

Page 1

Dino Dex
Page 2

ContentsContents
Contents
ContentsContents
YOUR DINO DEX KEYPAD 2
GOING TO MAIN MENU 4
1. ARCHIVE FILES 4
2. PERSONAL LOG 5
3. DATA BANK 7
4. SCHEDULE LIST 10
5. SECURITY SYSTEM 13
6. SYSTEM CORE 15
7. CALCULATOR 15
8. SORTER 16
9. SYSTEM BIO'S 18
GAME SIMULATOR 19
INSERTING OR REPLACING BATTERIES 25
CAUTION: 27
DEFECT OR DAMAGE 27
90-DAY LIMITED WARRANTY 28
1
Page 3
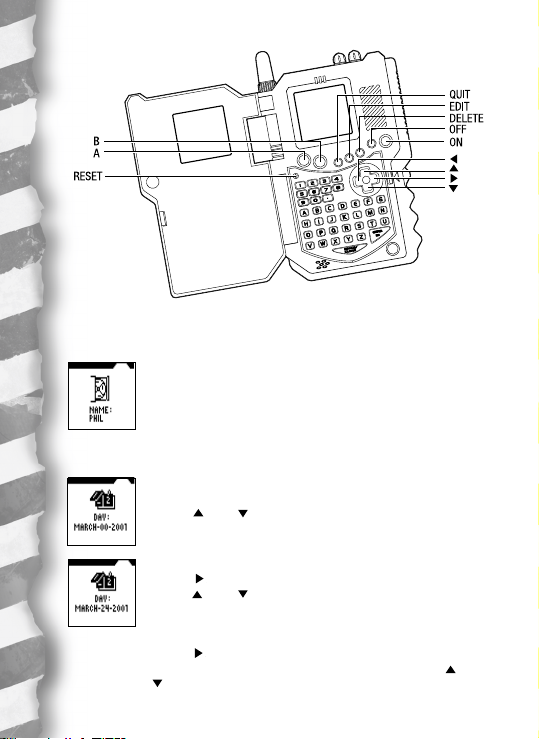
YOUR DINO DEX KEYPADYOUR DINO DEX KEYPAD
YOUR DINO DEX KEYPAD
YOUR DINO DEX KEYPADYOUR DINO DEX KEYPAD
Turn ON your Dino Dex. Welcome back (way way back!) to prehistoric times.
NAME
DATE
Enter in the date.
After the opening screens, you need to type in your name.
Use the keypad to do this.
Then press ENTER.
Month:
You will see the month of “JAN” flashing.
Use the “ ” and “ ” arrows to toggle to the correct month.
For example “March”.
Day:
Use the “ ” arrow to move to the day selection.
Use the “ ” and “ ” down arrows to type in the first digit of the
month (which would be a “0”, “1”, “2” or “3”. For example “2”.
Or you can use your keypad to type in the correct number. For
example, type in the “2” on your keypad.
Use the “ ” arrow to move to the second digit, which will be a
number from “0” to “9”. For example “4”. Then use the “ ” and
“ ” buttons to toggle to the correct number or type in the number
on your keypad.
2
Page 4
Year:
Once you enter the correct day, use the “ ” arrow to move to the
year selection. For example “2001”.
After you’ve toggled to the correct year, press ENTER.
TIME
Hour:
Use :
— the “ ” and “ ” buttons to enter the first digit or type in the first digit number
— the “ ” to move to the second digit.
— the “ ” and “ ” buttons to enter the second digit or type in the number using
For example “0”
Now do the same thing for the second digit.
For example “9”.
Minute:
Use the “ ” button to move to the minute spaces and enter in the correct minute
the same way with the “ ” and “ ” arrows or by typing the actual number on the
keypad.
For example, “23”.
AM or PM:
Use the “ ” button to move to the AM/PM space.
Use “ ” and “ ” to toggle to your choice. For example, “AM”.
Or you can type “A” on the keypad for AM or type “P” on your keypad for PM.
Now that you have learned how to set the date, setting the time is
easy!
using the keypad.
the keypad.
3
Page 5
ALARM
You’ll hear a “roaring dino” when the alarm sounds!
On screen, you will see the words, “WOULD YOU LIKE TO SET THE ALARM
FUNCTION? Y/N
Type in “Y” for yes or “N” for no. If yes, then use “ ” & “ ” to set alarm to be ON
or OFF.
SOUND EFFECTS
You can also set the unit to hear sound effects.
On screen, you will see the words, “WOULD YOU LIKE TO SET THE SOUND
EFFECTS? Y/N
Type in “Y” for yes or “N” for no. “If yes, then use “ ” & “ ” to set the sound effect
to be ON or OFF.
GOING TO MAIN MENUGOING TO MAIN MENU
GOING TO MAIN MENU
GOING TO MAIN MENUGOING TO MAIN MENU
After you're entered all your data of name, date, time, alarm and sound effects,
press the QUIT button to go to the main menu. From the main menu, you can
access 10 different really cool functions for playing! On the main menu, you will
see four icons on screen at a time.
Use the “ ” and “ ” buttons to move up and down along the main menu to see all
the ten main menu selection choices. Let’s spend a little time explaining how each
of these ten functions works! They’re each a lot of fun, so you’ll want to learn
about them all!
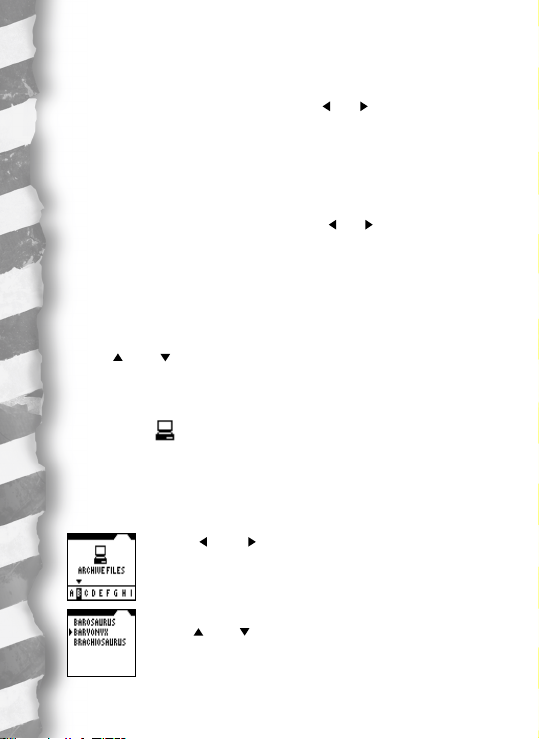
ARCHIVE FILES
In the archive files, you’ll find really interesting information about 72 different
dinosaurs. You can see their pictures and see their pictures come to life. Read all
about each of them!
Highlight ARCHIVE FILES and press ENTER.
The letters of the alphabet will appear.
Use your “ ” and “ ” arrow buttons to move to a letter of your
choice. For example, “B”.
Press ENTER.
See the list of all the dinosaurs that begin with the letter “B”.
Use the “ ” and “ ” arrows to highlight the dinosaur you want to
study, for example, BARYONYX.
Press ENTER.
4
Page 6
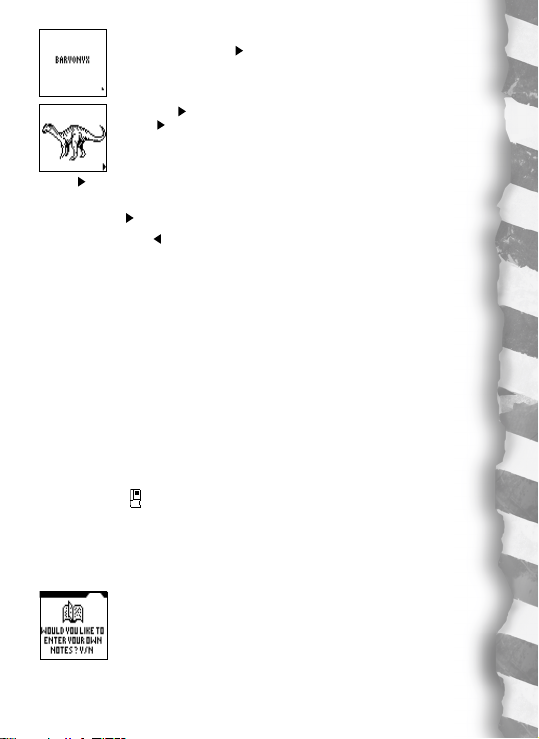
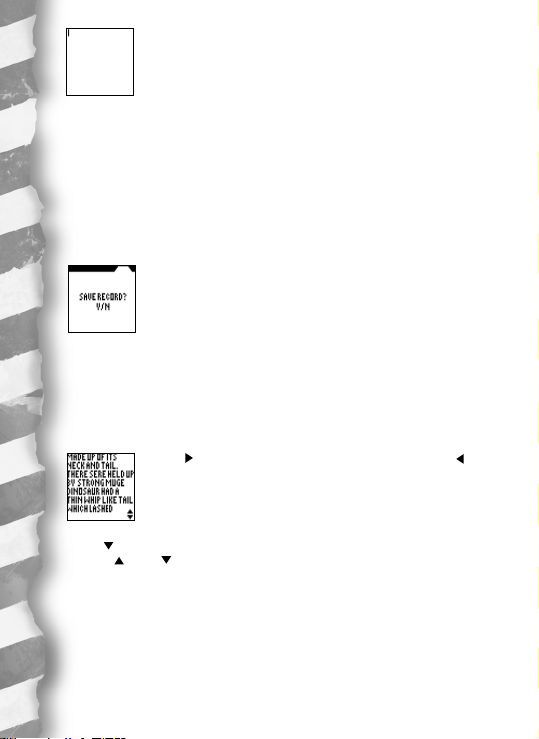
See the word “BARYONYX” on screen by itself and an arrow
pointing the left right ( ) on the bottom of the screen.
Press the “ ” to see an illustration of your dinosaur.
Press “ ” again to see your dinosaur moving!
Press “ ” again to see the correct pronounciation (BARE-EE-ON-IKS) and a full
biography about this dinosaur.
Keep using the “ ” button to scroll through the biography.
You can also use the “ ” button to not only move backwards through the
biography but also to move back to the other cool stuff - like the animated
dinosaur several screens back!
More dinosaurs of the same letter:
When you have finished your study on the Baryonyx, press the QUIT button to go
back to the “B” screen that listed all the dinosaurs that began with that letter of the
alphabet.
Select another letter of the alphabet for study:
Choose another dinosaur to study whose name begins with the letter “B” or you
can press QUIT again to go back to the ARCHIVES FILE and choose another letter
of the alphabet.
Go back to the main menu:
Press QUIT a third time to go back to the main menu and play with another
function of your Dino Dex!
PERSONAL LOG
Entering the first message:
From the main menu page, move the arrows to highlight PERSONAL LOG and then
press ENTER.
On screen you will see,
“WOULD YOU LIKE TO ENTER YOUR OWN NOTES? (Y/N)
Press Y for YES.
5
Page 7
A blank screen will appear.
Now use your keyboard to type your message!
HOWEVER YOU ARE LIMITED BY THE AMOUNT OF TEXT YOU ENTER IN THE
PERSONAL LOG. WHEN YOU REACH YOUR TEXT LIMIT A WARNING SCREEN WILL
APPEAR TELLING YOU TO DELETE SOME TEXT. YOU MUST DO SO IN ORDER TO
SAVE THE CURRENT MESSAGE YOU ARE ENTERING. FOR BEST PERFORMANCE IN
THE PERSONAL LOG ALWAYS TRY TO DELETE OLD MESSAGES BEFORE YOU ENTER
NEW ONES.
Saving your messages:
When you are done typing, press the ENTER button.
On screen you will see,
“SAVE RECORD? (Y/N)
Type “Y” for yes. You then go back to the main menu.
Entering more messages:
You want to enter in more messages to your personal log? No problem! Highlight
PERSONAL LOG again and press ENTER.
Then, enter in a new message and save it by pressing the EDIT button.
Now you have two messages in your personal log. You’ll see an arrow on the
bottom right hand corner of the screen.
Press “ ” to scroll forward through your messages. Press “ ” to
scroll backwards through your messages.
If you enter a long message, which takes up more room than one page, you will
see a “ ” arrow which will take you to another page to continue your message.
Use the “ ” and “ ” buttons to move up and down throughout longer messages,
moving back and forth to review these longer messages!
6
Page 8
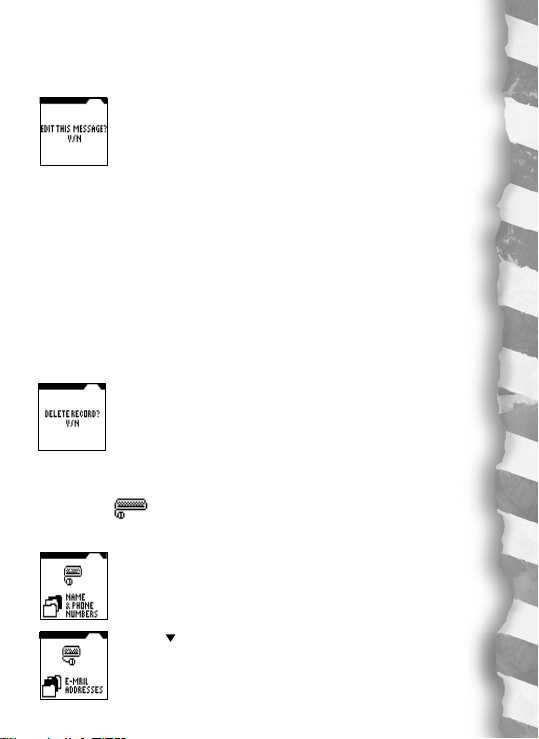
Editing messages:
If you want to edit (revise) a message you have written in your personal log, go to
the message and then press the DELETE button.
On screen you will see,
“EDIT THIS MESSAGE? Y/N
Press “Y” for yes to start editing (revising) your message. Use the directional
arrows to move the cursor to the part of the message you want to change. Then by
pressing the DELETE button, you will delete whatever letter is by the cursor. As you
delete letters, you can retype whatever revised message you wish to write.
When you’re done revising, resave your message by pressing the ENTER button.
Deleting messages:
Let’s say you want to delete (erase) a message. Go to the message and press the
DELETE button.
On screen, you will see EDIT THIS MESSAGE? Y/N
Press “N” for no.
On screen will appear,
DELETE RECORD? Y/N
Press “Y” for yes and you will delete (erase) this entire message!
When you’re done adding, editing or deleting messages, press the ENTER button to
complete this job and you will return to the main menu. Let’s move on!
DATA BANK
Store names and phone numbers, email addresses and web addresses here!
Highlight DATA BANK from the main menu and press ENTER.
You will see a screen that says NAMES & PHONE NUMBERS.
Use the “ ” button to scroll down to E-MAIL ADDRESS.
7
Page 9
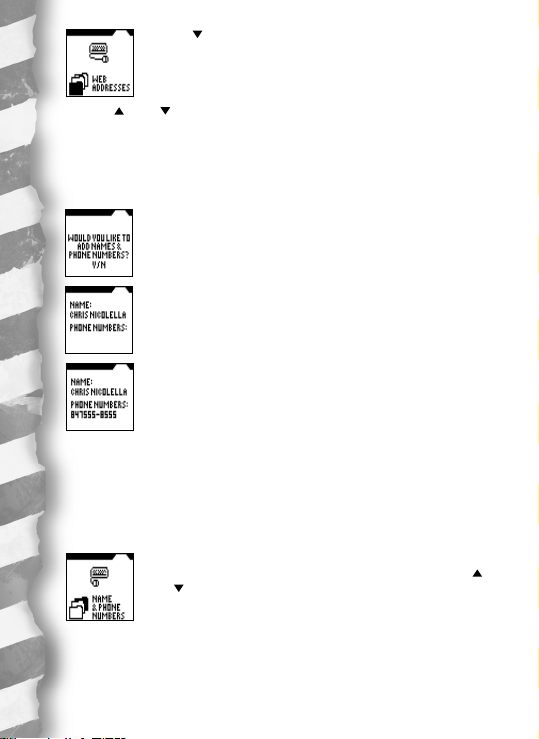
Use the “ ” button to scroll down to WEB ADDRESSES.
Use the “ ” and “ ” buttons to scroll to whichever of these three you want and
press ENTER to work in that file.
Names and Phone Numbers:
Let’s begin by highlighting NAMES AND PHONE NUMBERS and pressing ENTER.
On screen, you will see,
WOULD YOU LIKE TO ADD NAMES & PHONE NUMBERS? Y/N
Press Y for yes.
Name:
Type in the name (up to 17 letters) and press ENTER.
Phone Number:
Now type in the phone number.
Press ENTER.
On screen, see the message WOULD YOU LIKE TO ADD NAMES & PHONE
NUMBERS? Y/N again. This time, type “N” for no.
On screen:
WOULD YOU LIKE TO SAVE? Y/N
Press Y for yes.
Your name and phone number information is now saved.
Go back to the NAMES AND PHONE NUMBERS file.
You can then add more names and phone numbers or use the “ ”
and “ ” buttons to scroll to between this file and the files for e-mail
addresses and web addresses.
Adding More Names and Phone Numbers:
You can enter a total of 25 names and phone numbers. Press EDIT to add more
names. Follow the same procedure as before.
8
Page 10

Deleting Names and Phone Numbers:
Press DELETE instead of edit.
See an arrow on screen and use your directional buttons to move the arrow to
highlight the entry you want to change.
Once the entry is highlighted, you have two options:
Option 1: Press the DELETE button to delete the entire entry.
Option 2: If you press EDIT, you will pull up the highlighted entry again and can
edit any part of the entry by moving the cursor to the letters you want to change
and then retype the new letters or numbers. When you’re done revising, press
ENTER.
E-mail Address:
Let’s say instead of adding more names and phone numbers, you want to go to the
E-mail address folder.
Simply scroll down with the “ ” arrow from NAMES & PHONE NUMBERS to
E-MAIL ADDRESS and press ENTER.
On screen, see the message:
WOULD YOU LIKE TO ADD E-MAIL ADDRESS? Y/N
Press Y for yes and enter in an e-mail address.
Press the “A” button to get the “@” symbol.
Press the “B” button to get the “/” symbol.
Then press ENTER.
Just like with Names & Phone Numbers, you will see the message:
WOULD YOU LIKE TO SAVE? Y/N
Type in “Y” for yes.
This is the basic procedure as Names and Phone Numbers. EDIT and DELETE the
same way! You can save up to 25 E-Mail addresses!
Web Addresses:
If you want to record web addresses, It's just as easy! From the file menu, use the
“ ” and “ ” buttons to scroll up or down to WEB ADDRESSES and press ENTER.
On screen, you will see the message:
WOULD YOU LIKE TO ADD WEB ADDRESSES? Y/N
Press “Y” for yes. Use the same procedure to add, edit and delete web addresses
you used for “E-Mail” and for “Names and Phone Numbers”. You can save up to
25 web addresses!
9
Page 11

SCHEDULE LIST
From the main menu, press ENTER. On screen you will see,
SCHEDULE LIST followed by
WOULD YOU LIKE TO ENTER REMINDER TO YOURSELF? Y/N
Press “Y” for yes.
On screen you will see,
WOULD YOU LIKE TO SET THE ALARM FOR YOUR REMINDER? Y/N
Type in “Y” for yes.
On screen you will see,
DAY: 01-01-2001
TIME: 01:21PM
Use your “ “ and “ ” arrows to move through the DAY and TIME and then use the
keypad keys to type in the DAY and TIME for the alarm. Press ENTER.
Then the day and time of your alarm settings will appear on top of
the page and you can begin typing in your schedule.
If you press NO for the alarm instead of YES, you would go straight to the blank
screen and could begin entering your schedule immediately.
When you are done typing in your schedule, press ENTER.
On screen you will see,
SAVE RECORD? Y/N
Press “Y” for yes and you will return to the main menu.
From the main menu, highlight the SCHEDULE LIST again and press ENTER. Your
schedule will be on screen.
10
Page 12

Adding more schedules:
Press EDIT to add more scheduling. See the screen:
WOULD YOU LIKE TO ENTER REMINDER TO YOURSELF? Y/N
Press Y for yes and you will see the ALARM SETTING screen again, which is:
WOULD YOU LIKE TO SET THE ALARM FOR YOUR REMINDER? Y/N
Type in “Y” for yes or “N” for no.
If YES, enter in an alarm setting just as before for this new schedule. Then press
ENTER and type in the additional schedule.
If NO, you will go right to a blank screen for typing in the additional schedule.
When you’re finished with the added schedule, press ENTER.
THE SCHEDULE LIST CAN ONLY HOLD 15 REMINDERS AT ONE TIME. ALSO YOU ARE
LIMITED BY THE AMOUNT OF TEXT YOU ENTER FOR THE REMINDERS. WHEN YOU
REACH YOUR TEXT LIMIT OR TRY TO ADD MORE THAT 15 REMINDERS AT ONE
TIME, A WARNING SCREEN WILL APPEAR TELLING YOU TO DELETE SOME TEXT OR
DELETE SOME REMINDERS COMPLETELY. YOU MUST DO SO IN ORDER TO SAVE
THE CURRENT REMINDER YOU ARE ENTERING. FOR BEST PERFORMANCE IN THE
SCHEDULE LIST ALWAYS TRY TO DELETE OLD REMINDERS AND TRY TO LIMIT THE
AMOUNT OF TEXT FOR EACH ONE, BEFORE YOU ENTER NEW ONES.
On screen you will see,
SAVE THIS MESSAGE? Y/N
Press “Y” for yes and you will return to the main menu.
Deleting messages:
Go to SCHEDULE LIST again from the main menu and press
ENTER. This time, you will see your FIRST entered schedule plus a
flashing arrow on the bottom right hand corner of the screen.
Press the “ ” button to toggle through your added schedules.
11
Page 13

When you get to the message you want to delete, press the DELETE button.
On screen, you will see
EDIT THIS MESSAGE? Y/N
So you have two options.
Option 1:
If you type in Y for yes, you can go right into the schedule and delete/change parts
of the DAY and TIME, using the “ ” and “ ” arrows to move through the day and
time and then type over the letters or numbers you are highlighting to delete the old
letters and numbers and replace them with new text.
When you are done changing the day and time, press ENTER.
Now the revised day and time are on the top of the page and you can use your “ ”
and “ ” arrows to move through the text of your actual schedule. As you move
“ ” and “ ” with your arrows to highlight the letters you want to change, use the
letters on the keypad to revise your schedule.
When you have revised your schedule, press ENTER.
On screen you will see,
SAVE THIS MESSAGE? Y/N
Press Y for yes to save this edited schedule.
Option 2:
If you press N” for no,
On screen you will see,
DELETE RECORD? Y/N
Press Y for YES and delete the entire schedule.
12
Page 14

SECURITY SYSTEM
This is where you enter your own private password and lock out intruders from
entering your files! Neat! Highlight the SECURITY SYSTEM from the main menu
and press ENTER.
On screen you will see
SECURITY SYSTEM followed by
Your password can be up to 8 letters long. Type it in and press
ENTER.
On screen you will see,
RECONFIRM AND RETYPE YOUR PASSWORD
So type in your password again to confirm it and press ENTER.
On screen you will see,
PLEASE SELECT WHICH SECTORS YOU WISH TO LOCK OUT.
Press ENTER and you will return to the main menu. Highlight a file from the main
menu to “password protect”. For example, the ARCHIVE FILE.
Press ENTER. On screen you will see,
DO YOU WISH TO PASSWORD PROTECT ARCHIVE FILE? Y/N
Type in “Y” for YES and you will see a really cool animation of that
section of your Dino Dex being “locked up” to protect it from
intruders!
Now if anyone tries to enter the ARCHIVE FILE, they must enter the password.
Without the password, they can’t get in.
Then select any other functions of your Dino Dex you want to lock up. When you
are finishing “locking up”, press QUIT.
On screen you will see,
THE FOLLOWING FUNCTIONS ARE NOW LOCKED and then a list of whatever
functions you have “password protected”.
PLEASE ENTER YOUR PASSWORD
.
13
Page 15

If you’re entered in a bunch of functions as “password protected”, use the “ ”
arrow to see them all.
Press QUIT a second time. Now you’re back in the Main Menu.
Go to a section that you have password protected. Instead of the function opening,
on screen you will see
PLEASE ENTER YOUR PASSWORD.
If you type in the wrong password, you will see
INCORRECT PASSWORD.
Use the DELETE button to erase the incorrect password and try again!
When you type in the correct password, the function will open properly.
You can “password protect” any functions you want, even this
SECURITY SYSTEM function! When you go to “password protect”
the password (Security System), you will see a warning on screen.
This warning is important! The warning explains that if you happen to forget your
password, you are out of luck if you have “locked up” this section. In order to gain
password access, when you’ve locked up this security function, you will have to
reset your unit or take out the batteries and start all your programming for your
entire Dino Dex all over again.
So consider “password protecting” every section except the Security System
function. That way, if you forget your password and you haven’t locked up the
security system, you can go into this section and change your password!
Here’s how:
Go to SECURITY SYSTEM on the Main Menu and press ENTER.
On screen you will see
CHANGE PASSWORD? Y/N
Press Y for yes and go through the entire procedure of selecting a password again.
The sections of the Dino Dex you had previously locked up with your old password
(which you have forgotten), can now be opened with your new password.
14
Page 16

SYSTEM CORE
The SYSTEM CORE is all the basic information you entered when you first
programmed your Dino Dex. Highlight this function from the Main Menu and press
ENTER.
By either repeatedly pressing the “ ” button or by repeatedly pressing the ENTER
button you can toggle through all your basic information you have entered for
NAME, DAY, TIME, ALARM and SOUND EFFECTS.
To change any of this information, go to the screen you wish to change. For
example, go to the NAME screen and press EDIT.
Then press or hold down the DELETE button to delete the old name and then type
in the new name. Press ENTER.
When you change any of the core information, you will need to re-enter all the
information from that point, using the same procedure you used for the NAME
entry change.
To QUIT the core system, press the QUIT button.
CALCULATOR
Highlight the calculator from the main menu and press ENTER.
Here’s your own built-in calculator.
Use:
NUMBER
— the
— the button for DIVISON (/).
— the button for ADDITION (+).
— the button for MULTIPLICATION (x).
— the button for SUBTRACTION(-).
— the ENTER button for EQUALS (=).
— the SPACE button for CLEAR.
For example, if you wanted to add 7 + 4 = 11.
Here’s how you would do it:
Press the “7” key. (7)
Press the “ ” key. (+)
Press the “4” key. (4)
Press the ENTER key. (=)
Then the number “11” would appear in the bottom right hand corner.
A calculator is a “must have” for any scientist or paleontologist!
Press QUIT to return to the Main Menu.
keys for NUMBERS.
15
Page 17

SORTER
In the SORTER function, you can sort the 72 dinosaurs in many different ways including HEIGHT, LENGTH, WEIGHT, and TYPE.
Highlight SORTER from the main menu and press ENTER.
On screen you will see
SORT THE DINOSAURS BY THE FOLLOWING ATTRIBUTES
Press ENTER. You will see
HEIGHT, LENGTH, WEIGHT, TYPE
Use the “ ” and “ ” buttons to toggle through these four choices.
For instance, with HEIGHT highlighted, press ENTER.
On screen you will see,
WOULD YOU LIKE TO SORT ALL THE DINOSAURS BY ASCENDING
ORDER? Y/N
If you type in “Y” for yes, you will see all 72 dinosaurs listed from
the smallest to the tallest.
If you type in “N” for no, you will see
ENTER THE SPECIFIC HEIGHT
___ FEET TALL
If you type in a really big number like “87” to see all the dinosaurs
at least 87 feet tall, the unit will say,
NO MATCH, TRY AGAIN.
Then the screen will go back to your “87” entry. Use the DELETE button to erase
first the “7” and then the “8”. Then type in another number. For example, type in
“30” and press ENTER.to see all the dinosaurs at least 30 feet tall.
This list has just one dinosaur, DIPLODOCUS”.
16
Page 18

Now this is really cool - you can press the ENTER button here to enjoy all the
fantastic information and graphics from the archive folder inside the SORTER!
With DIPLODOCUS written on screen, press the ENTER button and
you will see the illustration of DIPLODOCUS.
As with the archives, you will notice an arrow in the bottom right hand corner. As
with the archives, use the “ ” button to toggle through the moving animation of
the dinosaur and the several pages of the dino’s biography!
If you had chosen a lesser height than 30 feet, there would have been more dinos
in the list. You could highlight ANY of the dinosaurs from the list and cycled
through their animations and biographies in the same way!
When you are done cycling through biographies, press the QUIT
button to go back to the sub-menu of height. Length, weight, and
type.:
HEIGHT , LENGTH, WEIGHT, TYPE
This time, instead of selecting height, select LENGTH.
You will once again see the display of,
WOULD YOU LIKE TO SORT ALL THE DINOSAURS BY ASCENDING ORDER? Y/N
You can sort information for HEIGHT, LENGTH, and WEIGHT all the same way.
However, if from the sub menu, you highlighted TYPE and pressed ENTER, you
would see a slightly different display. In TYPE, you will see,
WOULD YOU LIKE TO SORT ALL THE CARNIVOROUS DINOSAURS?
If you type in “Y”, you will see all the carnivorous dinosaurs dinosaurs who eat meat.
If you type in “N”, you will see,
WOULD YOU LIKE TO SORT ALL THE HERBIVOROUS DINOSAURS?
These are the plant eating dinosaurs!
17
Page 19

SYSTEM BIO’S
In SYSTEM BIO’S, you can list your 5 favorite dinosaurs - and have all their
biographic information available at an instant!
Press ENTER to enter the SYSTEM BIO’S.
On screen, you will see,
WOULD YOU LIKE TO LIST 5 FAVORITE DINOSAURS?
If you enter “N” for no, you will go back to the main menu.
But if you enter “Y” for yes, you will see
SELECT DINOSAURS and the alphabet chart from the archive folder.
Just as in the archives, you can use the “ ” and “ ” buttons to
highlight different letters in the alphabet. For example, if you want
to include TYRANNOSAURUS as one of your favorites, scroll along
the alphabet bar until you reach “T” and press ENTER.
On screen, you will see all the dinos beginning with the letter “T”,
Therizinosaurus, T orosaurus, Triceratops, Tyrannosaurus
Scroll down to TYRANNOSAURUS and press ENTER.
On screen you will see,
WOULD YOU LIKE TO ADD TYRANNOSAURUS TO YOUR FAVORITE
LIST? Y/N
Press “Y” for yes and on screen you will see
1. TYRANNOSAURUS
Then the screen automatically goes back to the
SELECT DINOSAURS screen with the alphabet bar.
You can add up to 5 dinosaurs in exactly this same way. When you’re done making
your “favorites” list, press QUIT.
Then you will see,
WOULD YOU LIKE TO SAVE YOUR LISTING? Y/N
Press “Y” for yes and your dinosaur favorites will be saved.
You will then be automatically returned to the Main Menu.
18
Page 20

Now whenever you go into the SYSTEMS BIO’s, you will see your list. The cursor
will be set for the first dinosaur on your list. Use the “ ” and “ ” buttons to toggle
to any of your favorite dinosaur listings.
Press ENTER. You will then have all the archive and bio information for that dino.
Just press the “ ” button to cycle through all the information. Remember, you can
always press the “ ” button to cycle backwards through this information as well.
Once you’ve entered in 5 dinos to your favorite’s list and you try to enter another
one, on screen you will see
THERE ARE ALREADY 5 DINOSAURS ON YOUR LIST.”
If you would like to change your list, highlight the dino on your list you want to
delete and press the DELETE button. That dinosaur will be deleted instantly from
your list! Each time you press DELETE, you will delete another dino from your list!
To add new dinosaurs to your list press the EDIT button when on your list.
GAME SIMULATORGAME SIMULATOR
GAME SIMULATOR
GAME SIMULATORGAME SIMULATOR
There are two games you can play! THE DNA LAB and BATTLE DOME.
Highlight the GAME SIMULATOR from the main menu and press ENTER.
Press ENTER again to enter the game simulator. You will see THE
DNA LAB highlighted Use the “ ” and “ ” arrows to highlight
either THE DNA LAB or BATTLE DOME.
Game 1: The DNA Lab Game
Let’s begin with THE DNA LAB game. With this game highlighted, press ENTER.
On screen you will see,
PLEASE SELECT THE DINA COMBINATION, followed by SELECT THE
HEAD.
Press ENTER and you will be given four choices, for example,
VELOCIRAPTOR, COMPSOGNA THUS, TYRANNOSAURUS,
TRICERATOPS
19
Page 21

Every 24 hours, a new dinosaur is available on the list! This will happen every day
until all 72 dinosaurs are available for you to select from!
Use your arrows to toggle through the selections. Highlight your choice for the
head, for example, TYRANNOSAURUS and press ENTER.
On screen you will see
SELECT THE HEAD TYRANNOSAURUS
Press ENTER and SELECT THE ARM appears on screen.
Press ENTER and the same list of four dinosaurs appears on screen.
Highlight your choice, for example, COMSOGNATHUS and press
ENTER.
Now SELECT THE TORSO appears on screen. Press ENTER.
Highlight your choice, for example, VELOCIRAPTOR and press
ENTER and on screen you will see, SELECT THE TORSO
VELOCIRAPTOR.
On screen, you will now see, SELECT THE FEET.
Highlight for example, TRICERATOPS and press ENTER.
On screen, you will see SELECT THE FEET TRICERATOPS.
20
Page 22

On screen, you will see SELECT THE TAIL.
Press ENTER.
Highlight your choice, for example, TRICERATOPS again, and press ENTER.
On screen, you will see
SELECT THE TAIL TRICERA TOPS.
Now on screen, you will see,
YOUR DINOSAUR IS ABOUT TO BE CREATED
WOULD YOU LIKE TO SAVE YOUR DINOSAUR? Y/N
Press “Y’ for yes.
A NAME screen will appear:
NAME:
Type in the name that you want for your newly created dinosaur.
Press ENTER and your newly created dino will come to life! You will see him
walking across screen. Whenever you enter this game mode, you can watch him
moving automatically - and he will AGE automatically from BABY to YOUNG to
ADULT! Now that’s interesting!
The life of a dinosaur can be a dangerous one. The hunter can easily become the
hunted in the dino world. So it is possible your newly created dino will be eaten by
other dinosaurs. When this happens you will have to create a new dino breed and
start over.
21
Page 23

Deleting Your Creation:
But let’s say you get tired of your creation. You can delete him!
Press the DELETE button. On screen you will see,
WOULD YOU LIKE TO CREATE A NEW BREED? Y/N
Type in Y for YES.
On screen you will see,
YOUR CURRENT DINOSAUR WILL BE DESTROYED!
DO YOU STILL WANT TO CREATE A NEW DINOSAUR? Y/N
Type in “Y” for YES and you will see your dinosaur get picked up by
a crank and then deposited down where he will be eaten alive by
other dinosaurs.
Then on screen, you will see again,
PLEASE SELECT THE DNA COMBINATION -SELECT THE HEAD.
Now it’s time to create all over again. What power you hold!
Game 2: Battle Dome
Once you’ve highlighted the BATTLE DOME game, press ENTER.
On screen you will see,
SELECT A BATTLE!
FIGHT MODE
WATCH MODE
Use your “ ” and “ ” buttons to highlight which mode. Highlight FIGHT MODE
and press ENTER.
Fight Mode:
Having selected the Fight Mode and pressing ENTER, you will see,
SELECT DINOSAUR, USER SELECT, RANDOM SELECT
22
Page 24

Use the “ ” and “ ” down arrows to select “user” or “random”. Highlight USER
and press ENTER.
You will see SELECT DINOSAUR and the alphabet bar.
Use the “ ” and “ ” buttons to toggle through the letters of the alphabet to select
your dinosaur. For example, if you want to fight with COELOPHYSIS, you need to
toggle to the letter “C” on the alphabet and press ENTER.
You will see the “C” choices of:
CARNOTAURUS, COELOPHYSIS, COMPSOGNATHUS,
CORYTHOSAURUS
CRYOLOPHOSAURUS
Use the “ ” and “ ” buttons to toggle to COELOPHYSIS and press ENTER.
The screen will now show
SELECT OPPONENT
USER SELECT
RANDOM SELECT
Let’s do user select again. Highlight this selection and press ENTER.
You will see SELECT OPPONENT and the alphabet bar again. Do the same
procedure to select an opponent.
Press ENTER and you will see both dinosaurs appear on screen as
well as their names plus the word FIGHT!
Use the following control buttons:
A — for a mouth attack
B — for a claw or tail attack
“ ” — to move your dino backwards.
“ ” — to move your dino forwards.
“ ” — to make your dino jump.
“ ” — no function with this button.
23
Page 25

As the fight continues, keep attacking! When the fight is over, you
will either see YOU LOSE or YOU WIN on screen.
The screen will then display,
WOULD YOU LIKE TO FIGHT AGAIN? Y/N
If you press “Y” for yes, you will fight again with the same dinos.
If you press “N” for no, you will go back to the main menu.
Play again - this time, choose FIGHT MODE again.
But this time, instead of using USER SELECT, try RANDOM SELECT.
Whenever you use, RANDOM SELECT, the unit will choose the dino for you! You can
RANDOM SELECT your own dino or your opponent’s dino - or use RANDOM SELECT
for both dinos!
Next time you play, instead of selecting FIGHT MODE, try selecting WATCH MODE.
In WATCH MODE, you also get the choices of USER SELECT and RANDOM select
for both your dinosaur and the opponent dinosaur.
But when the fight starts in WATCH MODE, you don’t do the actual fighting.
Instead, you sit back and watch the dinosaurs compete automatically!
That’s really cool, too!
24
Page 26

INSERTING OR REPLACING BATTERIESINSERTING OR REPLACING BATTERIES
INSERTING OR REPLACING BATTERIES
INSERTING OR REPLACING BATTERIESINSERTING OR REPLACING BATTERIES
Reset Operations:
By pressing the reset button, you can delete
all the data previously entered. A screen
will ask you, DATA FOUND! KEEP RECORD?
Y/N. By pressing Y (yes) all data will be
deleted. By pressing N (no), you will return
to the initial screen.
Be sure to press the reset button before you
use DINO DEX for the first time.
Replacing Batteries:
This DINO DEX is powered by two button-cell batteries
type LR44 and four AAA batteries. The four AAA batteries
are the main batteries and the two LR44 batteries are the
back-up batteries. The main batteries provide power for
normal operations. The back-up batteries protect data
stored in memory when changing the main batteries.
CAUTION : Batteries should be replaced by an adult.
Not suitable for children under 36 months, may contain small parts.
If the LCD display becomes dim, this means you should turn off the DINO DEX and
replace the main batteries. Your DINO DEX is protected by the back-up batteries
during main battery replacement.
Memory contents are lost when the back-up batteries are removed or need to be
replaced. Be sure to always leave the back-up batteries in place to protect
memory contents when you are changing the main batteries. However, when you
remove the main batteries at any time, memory retention will depend entirely on
the condition of the back-up batteries in place. If back-up batteries are not in
place, memory contents are likely to be damaged. If memory seems corrupted,
clear it using the reset.
Normally the back-up batteries can support over 180 days of operation, even
when no main batteries have been installed. However, in order to guarantee your
data is stored, never leave the unit without main batteries for a whole day.
Otherwise, you could lose your data. For regular maintenance, please exchange
the back-up batteries once a year.
25
Page 27

Important:
Incorrect use of batteries can cause them to burst or leak, possibly damaging the
interior of the DINO DEX. Note the following precautions:
Never leave dead batteries in the battery compartment.
To avoid damage to the unit from leaky batteries, replace both the main battery and
the back-up battery every three years. Batteries should be replaced no matter how
much you use the diary during that time.
Warning:
Never try to recharge the batteries supplied with DINO DEX.
Do not expose batteries to direct heat.
Keep batteries out of the reach of small children. If swallowed, consult a physician
immediately.
To Replace The Main Battery:
1. Switch power off, loose the screws that holds the battery compartment cover
in place, then remove the battery compartment cover.
2. Insert a thin, pointed, non-metallic object into small hole and remove the old
battery.
Warning:
DO NOT CLOSE THE BATTERY DOOR ONCE YOU REMOVE THE MAIN BATTERY. YOU
MUST REPLACE MAIN BATTERY BEFORE CLOSING BATTERY COMPARTMENT OR
ALL FILES WILL BE DELETED!
3. Wipe the surfaces of a new battery with a soft, dry cloth. Insert the new battery
into the DINO DEX, making sure to align "+" and "-" as shown.
4. Replace the battery compartment cover and the screws that secure it in place.
To Replace the Back-Up Battery:
1. Be sure always to leave main battery in place to protect memory contents before
you replace back-up battery.
2. Loose the screw that holds the back-up battery cover in place.
Remove the cover, then remove the old battery with a thin pointed, non-metallic
object.
3. Wipe the surfaces of a new battery with a soft, dry cloth. Insert the new battery
into the DINO DEX, making sure that its positive (+) side is facing up (so that you
can see it).
4. Replace the battery compartment cover and the screws that secure it in place.
26
Page 28

CAUTION:CAUTION:
CAUTION:
CAUTION:CAUTION:
To ensure proper function:
•Do not mix old and new batteries.
•Do not mix alkaline, standard or rechargeable batteries.
•Battery installation should be done by an adult.
•Non-rechargeable batteries are not to be recharged.
•Rechargeable batteries are to be removed from the toy before being charged
(If removable).
•Rechargeable batteries are only to be charged under adult supervision
(If removable).
•Only batteries of the same or equivalent type as recommended are to be used.
•Batteries are to be inserted with the correct polarity.
•Exhausted batteries are to be removed from the toy.
•The supply terminals are not to be short circuited.
•Replace with new batteries at the first sign of erratic operation.
DO NOT DISPOSE OF BATTERIES IN FIRE, BATTERIES MAY EXPLODE OR LEAK.
DEFECT OR DAMAGEDEFECT OR DAMAGE
DEFECT OR DAMAGE
DEFECT OR DAMAGEDEFECT OR DAMAGE
Replace batteries at the first sign of erratic operation.
If a part of your game is damaged or something has been left out, DO NOT RETURN THE
GAME TO THE STORE. The store doesn’t have replacement parts. Instead, write to us at:
Tiger Repair Department.
1000 N. Butterfield Road, Unit 1023, Vernon Hills, IL 60061, U.S.A.
In your note, mention the name of your game, your game’s model number , and tell us
briefly what the problem is. Also include sales slip, date, place of purchase and price paid.
We will do our best to help.
27
Page 29

90-DAY LIMITED WARRANTY90-DAY LIMITED WARRANTY
90-DAY LIMITED WARRANTY
90-DAY LIMITED WARRANTY90-DAY LIMITED WARRANTY
Tiger Electronics. (Tiger) warrants to the original consumer purchaser of this
product that the product will be free from defects in materials or workmanship for
90 days from the date of original purchase. This warranty does not cover damages
resulting from accident, negligence, improper service or use or other causes not
arising out of defects in materials or workmanship.
During this 90-day warranty period, the product will either be repaired or replaced
(at Tiger’s option) without charge to the purchaser, when returned with proof of the
date of purchase to either the dealer or to Tiger.
Product returned to Tiger without proof of the date of purchase or after the 90-day
warranty period has expired, but prior to one year from the original date of
purchase, will be repaired or replaced (at Tiger’s option) for a service fee of
U.S.$13.50. Payments must be by check or money order payable to Tiger
Electronics.
The foregoing states the purchaser’s sole and exclusive remedy for any
breach of warranty with respect to the product.
All product returned must be shipped prepaid and insured for loss or damage to:
Tiger Repair Department.
1000 N. Butterfield Road, Unit 1023, Vernon Hills, IL 60061, USA
The product should be carefully packed in the original box or other packing
materials sufficient to avoid damage during shipment. Include a complete written
description of the defect, a check if product is beyond the 90-day warranty period,
and your printed name, address and telephone number.
THIS WARRANTY IS IN LIEU OF ALL OTHER WARRANTIES AND NO OTHER
REPRESENTATIONS OR CLAIMS OF ANY NATURE SHALL BE BINDING ON OR
OBLIGATE TIGER IN ANY WAY. ANY IMPLIED WARRANTIES APPLICABLE TO
THIS PRODUCT, INCLUDING WARRANTIES OF MERCHANTABILITY AND FITNESS
FOR A PARTICULAR PURPOSE, ARE LIMITED TO THE NINETY (90) DAY PERIOD
DESCRIBED ABOVE. IN NO EVENT WILL TIGER BE LIABLE FOR ANY SPECIAL,
INCIDENTAL, OR CONSEQUENTIAL DAMAGES RESULTING FROM POSSESSION,
USE, OR MALFUNCTION OF THIS TIGER PRODUCT.
Some states do not allow limitations as to how long an implied warranty lasts and/
or exclusions or limitations of incidental or consequential damages, so the above
limitations and/or exclusions of liability may not apply to you. This warranty gives
you specific rights, and you may also have other rights which vary from state to
state.
28
Page 30

For more information about Tiger Electronics, our products and special promotions,
please visit our Web Site at: www.tigertoys.com
This device complies with Part 15 of the FCC Rules. Operation is subject to the
following two conditions : (1) this device may not cause harmful interference, and
(2) this device must accept any interference received, including interference that
may cause undesired operation.
Warning: Changes or modifications to this unit not expressly approved by the party
responsible for compliance could void the user’s authority to operate the
equipment.
NOTE: This equipment has been tested and found to comply with the limits for a
Class B digital device, pursuant to Part 15 of the FCC Rules. These limits are
designed to provide reasonable protection against harmful interference in a
residential installation. This equipment generates, uses, and can radiate radio
frequency energy and, if not installed and used in accordance with the instructions,
may cause harmful interference to radio communications. However, there is no
guarantee that interference will not occur in a particular installation. If this
equipment does cause harmful interference to radio or television reception, which
can be determined by turning the equipment off and on, the user is encouraged to
try to correct the interference by one or more of the following measures:
- Reorient or relocate the receiving antenna.
- Increase the separation between the equipment and receiver.
- Connect the equipment into an outlet on a circuit different from that to which the
receiver is connected.
- Consult the dealer or an experienced radio TV technician for help.
29
Page 31

A division of Hasbro, Inc.
, TM, & © 2001 Tiger Electronics.
®
All rights reserved.
980 Woodlands Parkway,
Vernon Hills, IL 60061, USA
www.tigertoys.com
®, TM, & © 2001 Tiger Electronics UK Ltd.
All rights reserved.
Belvedere House, Victoria Avenue, Harrogate,
North Yorkshire HG1 1EL, United Kingdom.
www.tigertoys.co.uk
Item No. 36412
200100550IWTI-01
Printed in China
Jurassic Park III is a trademark and
copyright of Universal Studios and
Amblin Entertainment, Inc. Licensed by
Universal Studios Licensing, Inc.
The Jurassic Park films are rated PG-13.
In Canada, please consult your local
Avis aux parents: Consultez votre journal
local pour connaître la cote du film
Nota para los padres: Consulte su periódico
local para conocer la clasificación de la
Universal Studios Consumer Products Group
is a proud sponsor of dinosaur research.
All rights reserved.
A Note to Parents in the USA:
Consult www.filmratings.com
for further information.
newspaper to find out the
Jurassic Park III rating.
Jurassic Park III.
película Jurassic Park III.
 Loading...