

Harvia HPC(S)7U1H, HPC(S)9U1H, HPC(S)11U1H, HPC(S)7U3H, HPC(S)9U3H Owner's/operator's Manual
...
20102016/ Y05-0120
Owner’s/Operator’s Manual
Manuel de l’utilisateur/opérateur
Sauna heater installation, wiring,
operating instructions, troubleshooting,
maintenance and guarantee.
IMPORTANT! This manual must
be left with owner, manager, or
operator of Sauna after it is used by
electrician!
MODEL
HPC(S)7U1H 6,8 kW
HPC(S)9U1H 9,0 kW
HPC(S)11U1H 10,5 kW
HPC(S)7U3H 6,8 kW
HPC(S)9U3H 9,0 kW
HPC(S)11U3H 10,5 kW
Instructions d’installation, de câblage
et d’utilisation, dépannage, entretien
et garantie du poêle de sauna.
IMPORTANT ! Ce manuel doit être
remis au propriétaire, au gérant ou à
l’opérateur du sauna après avoir été
utilisé par l’électricien !
Factory address: HC66, 465•A, Highway 219 N., Renick, WV 24966
Phone 888.355.3050
Email sales@almostheaven.com / service@almostheaven.com www.almostheaven.com
Almost Heaven Saunas LLC
Mailing Address: P.O. Box 190, Macatawa, MI 49434
Dealer logo:
Dealer contact info:

CONTENTS
WARNINGS .........................................................................3
1. INSTRUCTIONS FOR USE ...........................................4
1.1. Piling of the Sauna Stones ..........................................4
1.1.1. Maintenance ........................................................4
1.2. Heating of the Sauna ...................................................4
1.2.1. Using the Heater .................................................4
1.2.2. Throwing Water on Heated Stones ....................5
1.3. Instructions for Bathing ..............................................5
1.4. Troubleshooting ...........................................................5
2. THE SAUNA ROOM ...................................................6
2.1. Insulation and Wall Materials of the Sauna Room ....6
2.1.1. Room construction –
general information .....................................................6
2.1.2. Darkening of the Sauna Walls ...........................6
2.2. Sauna Room Floor.......................................................6
2.3. Heater Output ..............................................................6
2.4. Sauna Room Ventilation ..............................................6
2.5. Hygienic Conditions of the Sauna Room ..................7
3. INSTRUCTIONS FOR INSTALLATION ...........................8
3.1. Prior to Installation ......................................................8
3.2. Place and Safety Distances .........................................8
3.3. Heater fence .................................................................8
3.4. Installation of the Control Unit and Sensor ...............8
3.4.1. Suitable control units .........................................8
3.5. Electrical Connections .................................................8
3.6. Installing the Heater ..................................................10
3.7. Electric heater insulation resistance .........................10
3.8. Resetting the Overheat Protectors ........................... 11
4. SPARE PARTS ........................................................11
GUARANTEE ...........................................................................22
MAINTENANCE INSTRUCTIONS ...................................23
TABLE DES MATIÉRS
Avertissements .................................................................12
1. MODE D’EMPLOI .....................................................13
1.1. Mise en place des pierres du poêle ..........................13
1.1.1. Maintenance ......................................................13
1.2. Chauffage du sauna ...................................................13
1.2.1. Utilisation du poêle ..........................................13
1.2.2. Projection de l’eau sur les pierres ...................14
1.3. Conseils pour la séance de sauna ............................14
1.4. Dépannage .................................................................14
2. LE SAUNA ..............................................................15
2.1. Isolation du sauna et matériaux muraux ................15
2.1.1. Structure du sauna -
informations d’ordre général ....................................15
2.1.2. Noircissement des murs du sauna .................15
2.2. Revêtement de sol du sauna ...................................15
2.3. Puissance du poêle ..................................................15
2.4. Ventilation de la cabine de sauna .............................15
2.5. Hygiène du sauna .....................................................16
3. INSTRUCTIONS D’INSTALLATION .............................17
3.1. Avant l’installation ....................................................17
3.2. Emplacement et distances de sécurité ....................17
3.3. Ceinture de protection du poêle ..............................17
3.4. Installation du centre de contrôle et du capteur .....17
3.4.1. Centres de contrôle adaptés ............................17
3.5. Raccordement électrique ..........................................17
3.6. Installation du poêle ..................................................20
3.7. Résistance d’isolation du poêle électrique ..............20
3.8. Réinitialisation de la sécurité surchauffe .................20
4. PIÈCES DÉTACHÉES ................................................21
GARANTIE ...............................................................................22
INSTRUCTIONS D’ENTRETIEN ......................................23
EN
3
PLEASE READ THE INSTRUCTIONS FOR USE CAREFULLY BEFORE USING THE HEATER.
WARNINGS
• Keep away from the heater when it is hot. The stones and outer surface of the heater may burn
your skin.
• Do not throw too much water on the stones. The evaporating water is boiling hot.
• Do not let young, handicapped or ill people bathe in the sauna on their own.
• This appliance is not intended for use by persons (including children) with reduced physical, sensory or
mental capabilities, or lack of experience and knowledge, unless they have been given supervision or
instruction concerning use of the appliance by a person responsible for their safety. Children should be
supervised to ensure that they do not play with the appliance.
• Consult your doctor about any health-related limitations to bathing.
• Parents should keep children away from the hot heater.
• Consult your child welfare clinic about taking little babies to the sauna.
- age?
- temperature of the sauna?
- time spent in the warm sauna?
• Be very careful when moving in the sauna, as the platform and floors may be slippery.
• Do not smoke, use alcohol, or exercise in the sauna.
• Do not exceed 30 min. in the sauna at one time, as excessive exposure can be harmful to health. The
sauna should not be used as an endurance test.
• Persons with poor health should consult their physicians before using the sauna.
• Do not place any combustible material over the sauna heater (towels, bathing suits, wooden bucket or
ladle)!
• Hyperthermia occurs when the internal temperature of the body reaches a level several degrees above
the normal body temperature of 98,6 ºF. The symptoms of hyperthermia include an increase in the
internal temperature of the body, dizziness, lethargy, drowsiness, and fainting.
The effects of hyperthermia include:
A. Failure to perceive heat
B. Failure to recognize the need to exit the room
C. Unawareness of impending hazard
D. Fetal damage in pregnant women
E. Physical inability to exit the room
F. Unconsciousness
WARNING – the use of alcohol, drugs, or medication is capable of greatly increasing the risk of fatal
hyperthermia.
• Use only clean tap water on the stones – do
not use pool or spa water, as chlorine gas can
be produced and the heating elements can be
damaged!
• Sea air and a humid climate may corrode the
metal surfaces of the heater.
• No such objects or devices should be placed
inside the heater rock space or near the heater
that could change the amount or direction of
the air flowing through the heater, thus causing
the resistance temperature to rise too high,
which may set the wall surfaces on fire!
Purpose of the electric heater:
The HPC electric heater is intended for use in a well heat-insulated family sauna. It is forbidden to use the
heater for any other purposes.
The guarantee period of an HPC electric heater in family use is one year and in communal use, 3 months.
Please read the user’s instructions carefully before using the heater.
NOTE!
These instructions for installation and use are intended for the owner or the person in charge of the sauna,
as well as for the electrician in charge of the electrical installation of the heater.
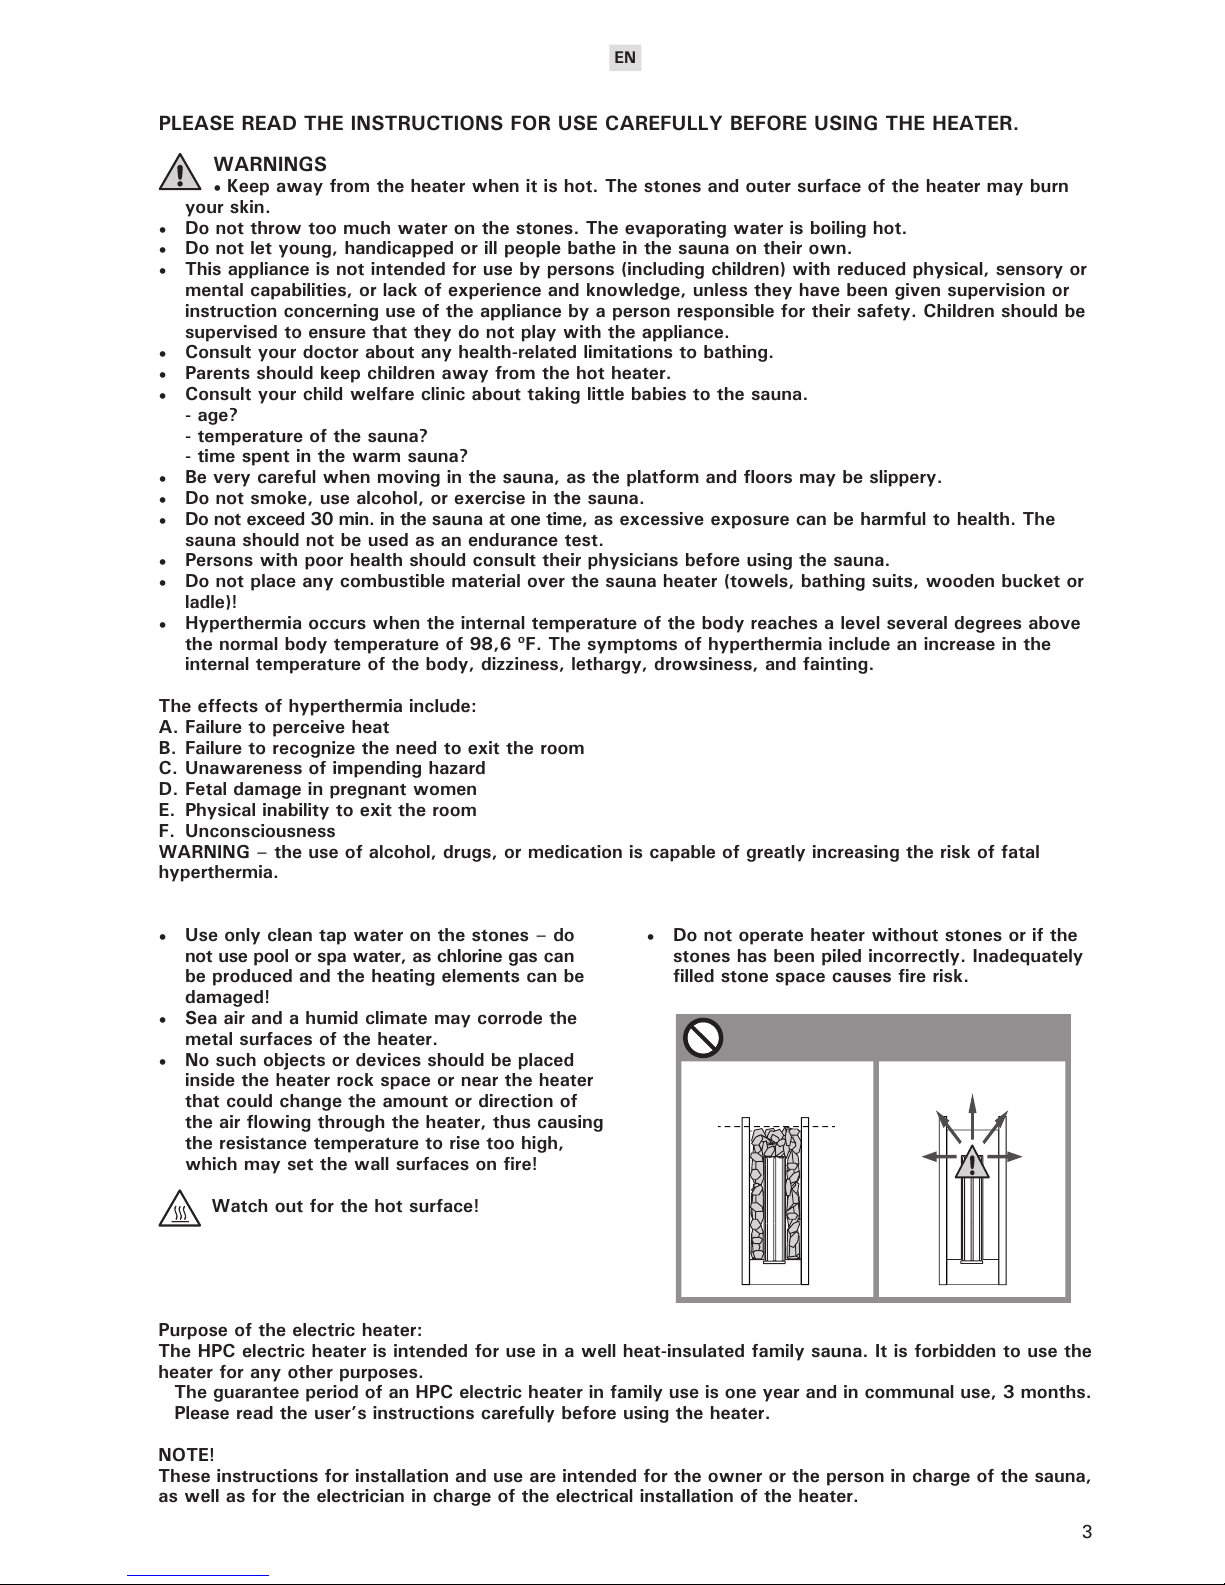
Watch out for the hot surface!
• Do not operate heater without stones or if the
stones has been piled incorrectly. Inadequately
filled stone space causes fire risk.
EN
4
1. INSTRUCTIONS FOR USE
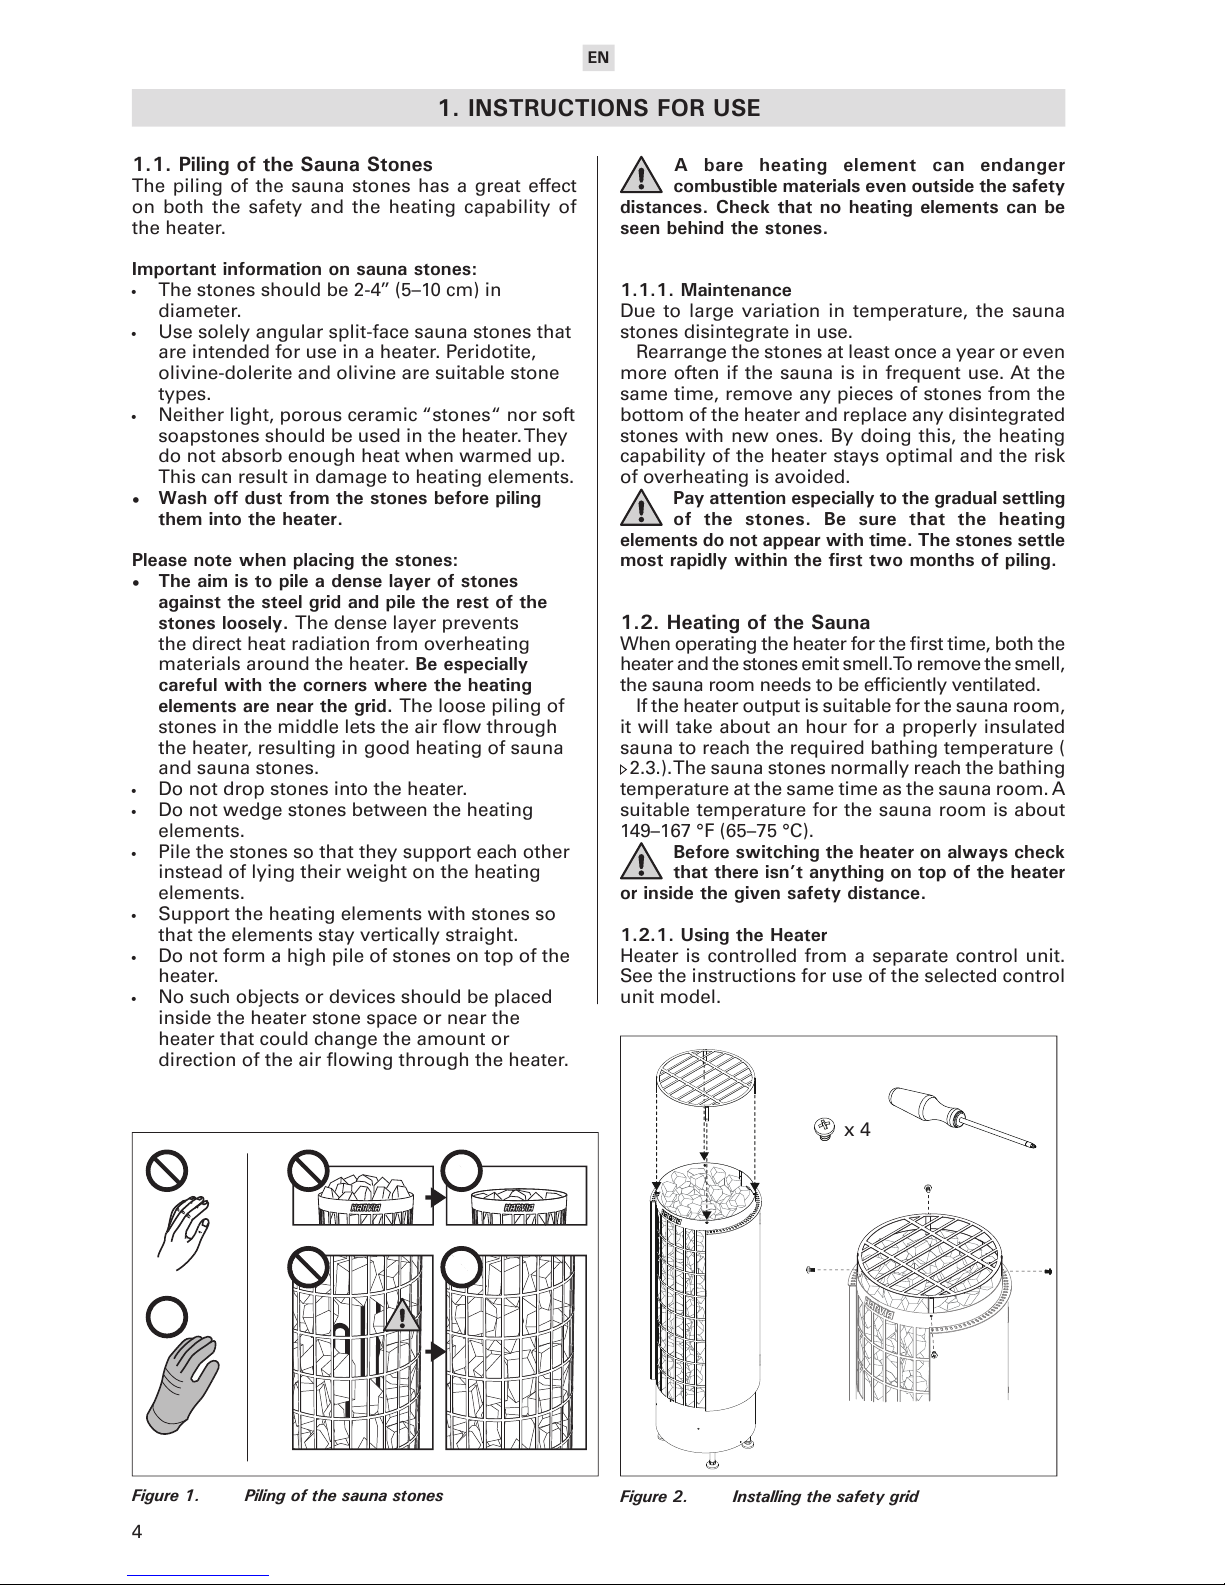
1.1. Piling of the Sauna Stones
The piling of the sauna stones has a great effect
on both the safety and the heating capability of
the heater.
Important information on sauna stones:
• The stones should be 2-4’’ (5–10 cm) in
diameter.
• Use solely angular split-face sauna stones that
are intended for use in a heater. Peridotite,
olivine-dolerite and olivine are suitable stone
types.
• Neither light, porous ceramic “stones“ nor soft
soapstones should be used in the heater. They
do not absorb enough heat when warmed up.
This can result in damage to heating elements.
• Wash off dust from the stones before piling
them into the heater.
Please note when placing the stones:
• The aim is to pile a dense layer of stones
against the steel grid and pile the rest of the
stones loosely. The dense layer prevents
the direct heat radiation from overheating
materials around the heater. Be especially
careful with the corners where the heating
elements are near the grid. The loose piling of
stones in the middle lets the air ow through
the heater, resulting in good heating of sauna
and sauna stones.
• Do not drop stones into the heater.
• Do not wedge stones between the heating
elements.
• Pile the stones so that they support each other
instead of lying their weight on the heating
elements.
• Support the heating elements with stones so
that the elements stay vertically straight.
• Do not form a high pile of stones on top of the
heater.
• No such objects or devices should be placed
inside the heater stone space or near the
heater that could change the amount or
direction of the air owing through the heater.
A bare heating element can endanger
combustible materials even outside the safety
distances. Check that no heating elements can be
seen behind the stones.
1.1.1. Maintenance
Due to large variation in temperature, the sauna
stones disintegrate in use.
Rearrange the stones at least once a year or even
more often if the sauna is in frequent use. At the
same time, remove any pieces of stones from the
bottom of the heater and replace any disintegrated
stones with new ones. By doing this, the heating
capability of the heater stays optimal and the risk
of overheating is avoided.
Pay attention especially to the gradual settling
of the stones. Be sure that the heating
elements do not appear with time. The stones settle
most rapidly within the first two months of piling.
1.2. Heating of the Sauna
When operating the heater for the rst time, both the
heater and the stones emit smell. To remove the smell,
the sauna room needs to be efciently ventilated.
If the heater output is suitable for the sauna room,
it will take about an hour for a properly insulated
sauna to reach the required bathing temperature (
2.3.). The sauna stones normally reach the bathing
temperature at the same time as the sauna room. A
suitable temperature for the sauna room is about
149–167 °F (65–75 °C).
Before switching the heater on always check
that there isn’t anything on top of the heater
or inside the given safety distance.
1.2.1. Using the Heater
Heater is controlled from a separate control unit.
See the instructions for use of the selected control
unit model.
Figure 1. Piling of the sauna stones
Figure 2. Installing the safety grid
x 4
EN
5
1.2.2. Throwing Water on Heated Stones
The air in the sauna room becomes dry when
warmed up. Therefore, it is necessary to throw
water on the heated stones to reach a suitable level
of humidity in the sauna. The effect of heat and
steam on people varies – by experimenting, you
can nd the levels of temperature and humidity
that suit you best.
You can adjust the nature of the heat from soft to
sharp by throwing water either to the front of the
heater or straight on top of the stones.
The maximum volume of the ladle is 0,05 gal
(0.2 litres). If an excessive amount of water is
poured on the stones, only part of it will evaporate and
the rest may splash as boiling hot water on the bathers.
Never throw water on the stones when there are
people near the heater, because hot steam may burn
their skin.
The water to be thrown on the heated stones
should meet the requirements of clean household
water (table 1). Only special aromas designed for
sauna water may be used. Follow the instructions
given on the package.
1.3. Instructions for Bathing
• Begin by washing yourself.
• Stay in the sauna for as long as you feel
comfortable.
• Forget all your troubles and relax.
• According to established sauna conventions,
you must not disturb other bathers by
speaking in a loud voice.
• Do not force other bathers from the sauna by
throwing excessive amounts of water on the
stones.
• Cool your skin down as necessary. If you
are in good health, you can have a swim if a
swimming place or pool is available.
• Wash yourself after bathing.
• Rest for a while and let your pulse go back to
normal. Have a drink of fresh water or a soft
drink to bring your uid balance back to normal.
1.4. Troubleshooting
All service operations must be done by
professional licensed maintenance personnel.
The heater does not heat.
• Check that the breakers to the heater are in
good condition.
• Check that the connection cable is connected.
• Check that the control panel shows a higher
gure than the temperature of the sauna.
• Check that the overheat protectors have not
gone off. See gure 9.
• Check that the breaker is switched on. Also,
breaker should be correct size.
The sauna room heats slowly. The water thrown
on the sauna stones cools down the stones
quickly.
• Check that the breakers to the heater are in
good condition.
• Check that all heating elements glow when the
heater is on.
• Turn the temperature to a higher setting.
• Check that the heater output is sufcient
( 2.3.).
• Check that the sauna room ventilation has
been arranged correctly ( 2.4.).
The sauna room heats quickly, but the
temperature of the stones remain insufficient.
Water thrown on the stones runs through.
• Turn the temperature to a lower setting.
• Check that the heater output is not too high
( 2.3.).
• Check that the sauna room ventilation has
been arranged correctly ( 2.4.).
Panel or other material near the heater darkens
quickly.
• Check that the requirements for safety
distances are fullled ( 3.2.).
• Check the sauna stones ( 1.1.). Too tightly
piled stones, the settling of stones with time
or wrong stone type can hinder the air ow
through the heater, which may result in
overheating of surrounding materials.
• Check that no heating elements can be seen
behind the stones. If heating elements can be
seen, rearrange the stones so that the heating
elements are covered completely ( 1.1.).
• Also see section 2.1.2.
The heater emits smell.
• See section 1.2.
• The hot heater may emphasize odours mixed
in the air that are not, however, caused by the
sauna or the heater. Examples: paint, glue, oil,
seasoning.
The heater makes noise.
• Occasional bangs are most likely caused by
stones cracking due to heat.
• The thermal expansion of heater parts can
cause noises when the heater warms up.
Water property Effect Recommendation
Humus concentration Colour, taste, precipitates <12 mg/l
Iron concentration Colour, odour, taste, precipitates
<0,2 mg/l
Hardness: most important substances are
manganese (Mn) and lime, i.e. calcium (Ca)
Precipitates
Mn: <0,05 mg/l
Ca: <100 mg/l
Chlorinated water Health risk Forbidden to use
Seawater Rapid corrosion Forbidden to use
Table 1. Water quality requirements
EN
6
2.1. Insulation and Wall Materials of the
Sauna Room
In an electrically heated sauna, all the massive wall
surfaces which store plenty of heat (such as bricks,
glass blocks, plaster etc.), must be sufficiently insulated in order to keep the heater output at a reasonably
low level.
A wall and ceiling construction can be considered
to have efcient thermal insulation if:
• the thickness of carefully tted insulating wool
inside the structure is 4” (100 mm) minimum
2” (50 mm).
• the moisture protection consists of e.g.
aluminium paper with tightly taped edges. The
paper must be tted so that the glossy side is
towards the inside of the sauna.
• there is a 1/4” (10 mm) vent gap between
the moisture protection and panel boards
(recommendation).
• the inside is covered by 1/2” – 5/8” (12–16
mm) thick panelling.
• there is a vent gap of a few millimetres at the
top of the wall covering at the edge of the ceiling
panelling.
When aiming at a reasonable heater output, it may be
advisable to lower the ceiling of the sauna, (minimum
height 75” (1900 mm)). As a result, the volume of the
sauna is decreased, and a smaller heater output may
be sufcient. The ceiling can be lowered so that the
ceiling joists are xed at a suitable height. The spaces
between the joists are insulated (minimum insulation
4” (100 mm)) and surfaced as described above.
Because heat goes up wards, a maximum distance
of 47” (1200 mm) is recom mended between the
bench and ceiling.
NOTE! The protection of the walls or ceiling with
heat protection, such as mineral board fitted directly
on the wall or ceiling, may cause the temperature of
the wall and ceiling materials to rise dangerously high.
2.1.1. Room construction – general information
FRAMING
2” x 4” (50 x 100 mm) any suitable wood material,
16” (406 mm) o.c.
CEILING HEIGHT
No higher than 7’ 6” (2300 mm).
INSULATION
R11 Fiberglas with foil back in walls and ceiling, foil
facing into room.
DRYWALL
See local codes. Is not required in most residences.
See local codes for commercial. If drywall is used
apply 1” x 2” (25 x 50 mm) nailers so that wall and
ceiling boards can be attached to solid wood.
PANELING
Use kiln-dried softwood (with moisture content not
exceeding 11 %).
BENCHES
Use matching softwood. Fasten from bottom to
prevent burning of bathers.
DOOR
Must open out and should not have a lock. Types
of door fastenings that may be used are magnetic
catches, friction catches, spring-loaded or gravity
loaded door closers, and the like.
ROOM LIGHT
Should be a vapor proof, wall mounted type, with
rough-in box mounted ush with inside paneling.
It should be mounted 6’’ (150 mm) from ceiling, not
directly over the sauna heater, and not over upper
benches. It could be installed under benches. Light
bulb should not exceed recommended watts of the
light manufacturer.
Note! Receptacles OR PLUGS are not allowed in
a Sauna room. If a speaker is installed in a Sauna
room, it should not be installed higher than 3’ (914
mm) from oor, away from the Sauna heater (consult manufacturer for ratings).
2.1.2. Darkening of the Sauna Walls
It is perfectly normal for the wooden surfaces of the
sauna room to darken in time. The darkening may
be accelerated by
• sunlight
• heat from the heater
• protective agents on the walls (protective
agents have a poor heat resistance level)
2.2. Sauna Room Floor
Due to a large variation in temperature, the sauna
stones disintegrate in use.
Small pieces of stone are washed down on the
sauna room oor along with the water thrown on
the rocks.
To prevent aesthetic damage only dark joint
grouts and oor coverings made of rock materials
should be used underneath and near the heater.
2.3. Heater Output
When the walls and ceiling are covered with panels,
and the insulation behind the panels is sufcient
to prevent thermal ow into the wall materials,
the heater output is dened according to the cubic
volume of the sauna. See table 2.
Because log walls are heated slowly, the cubic volume of a log sauna should be multiplied by 1.5, and the heater output should then
be selected on the basis of this information.
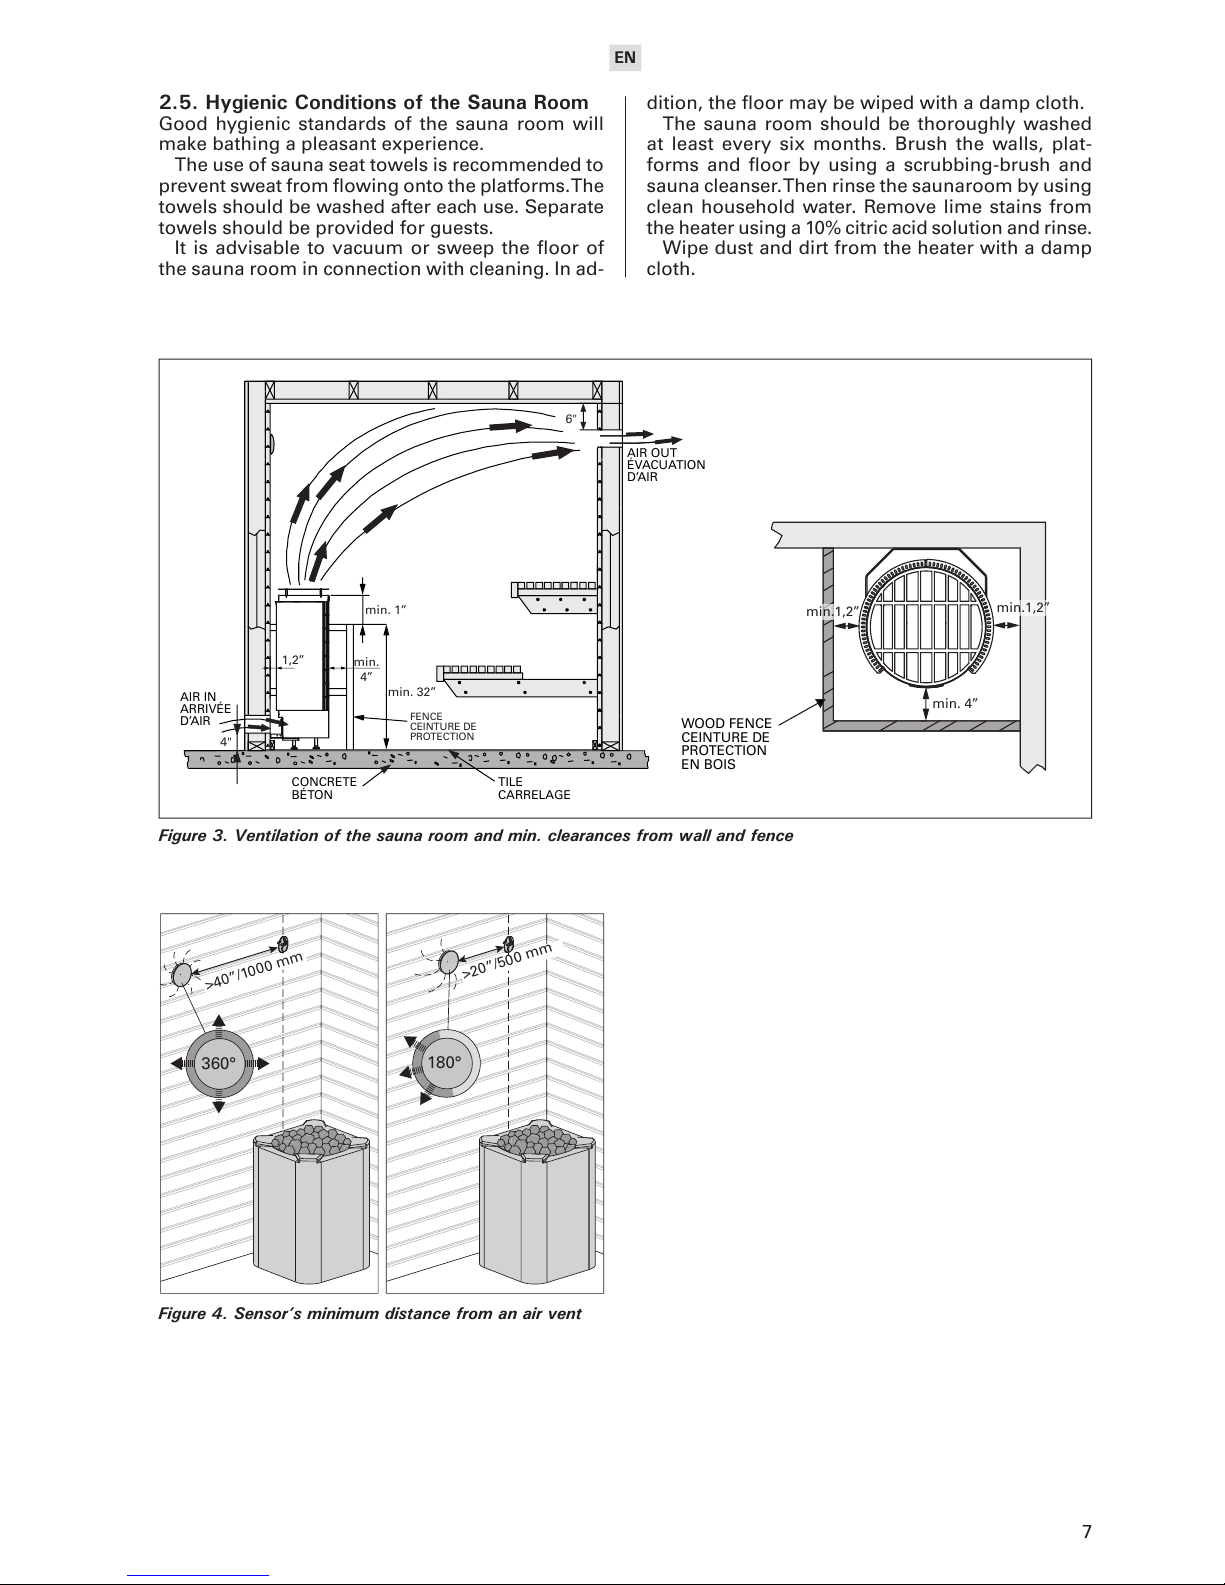
2.4. Sauna Room Ventilation
Should be provided by lower vent close to heater,
4” (100 mm) from oor, and upper vent on opposite
wall (if possible) 6” (150 mm) from ceiling or as
low as 24” (600 mm) from oor. Vents should be
adjustable and should allow air to change 5 times
per hour. Sauna shall be provieded with intended
ventilation as required per the local code authori-
ties. See gure 3.
2. THE SAUNA ROOM
EN
7
2.5. Hygienic Conditions of the Sauna Room
Good hygienic standards of the sauna room will
make bathing a pleasant experience.
The use of sauna seat towels is recommended to
prevent sweat from owing onto the platforms. The
towels should be washed after each use. Separate
towels should be provided for guests.
It is advisable to vacuum or sweep the oor of
the sauna room in connection with cleaning. In ad-
Figure 3. Ventilation of the sauna room and min. clearances from wall and fence
Figure 4. Sensor’s minimum distance from an air vent
360°
180°
>40”/1000 mm
>20”/500 mm
TILE
CARRELAGE
AIR IN
ARRIVÉE
D’AIR
CONCRETE
BÉTON
AIR OUT
ÉVACUATION
D’AIR
6"
4"
FENCE
CEINTURE DE
PROTECTION
min. 1’’
min.
4’’
1,2’’
min. 32’’
WOOD FENCE
CEINTURE DE
PROTECTION
EN BOIS
min.1,2’’
min.1,2’’
min. 4’’
dition, the oor may be wiped with a damp cloth.
The sauna room should be thoroughly washed
at least every six months. Brush the walls, plat-
forms and oor by using a scrubbing-brush and
sauna cleanser. Then rinse the saunaroom by using
clean household water. Remove lime stains from
the heater using a 10% citric acid solution and rinse.
Wipe dust and dirt from the heater with a damp
cloth.
EN
8
3. INSTRUCTIONS FOR INSTALLATION
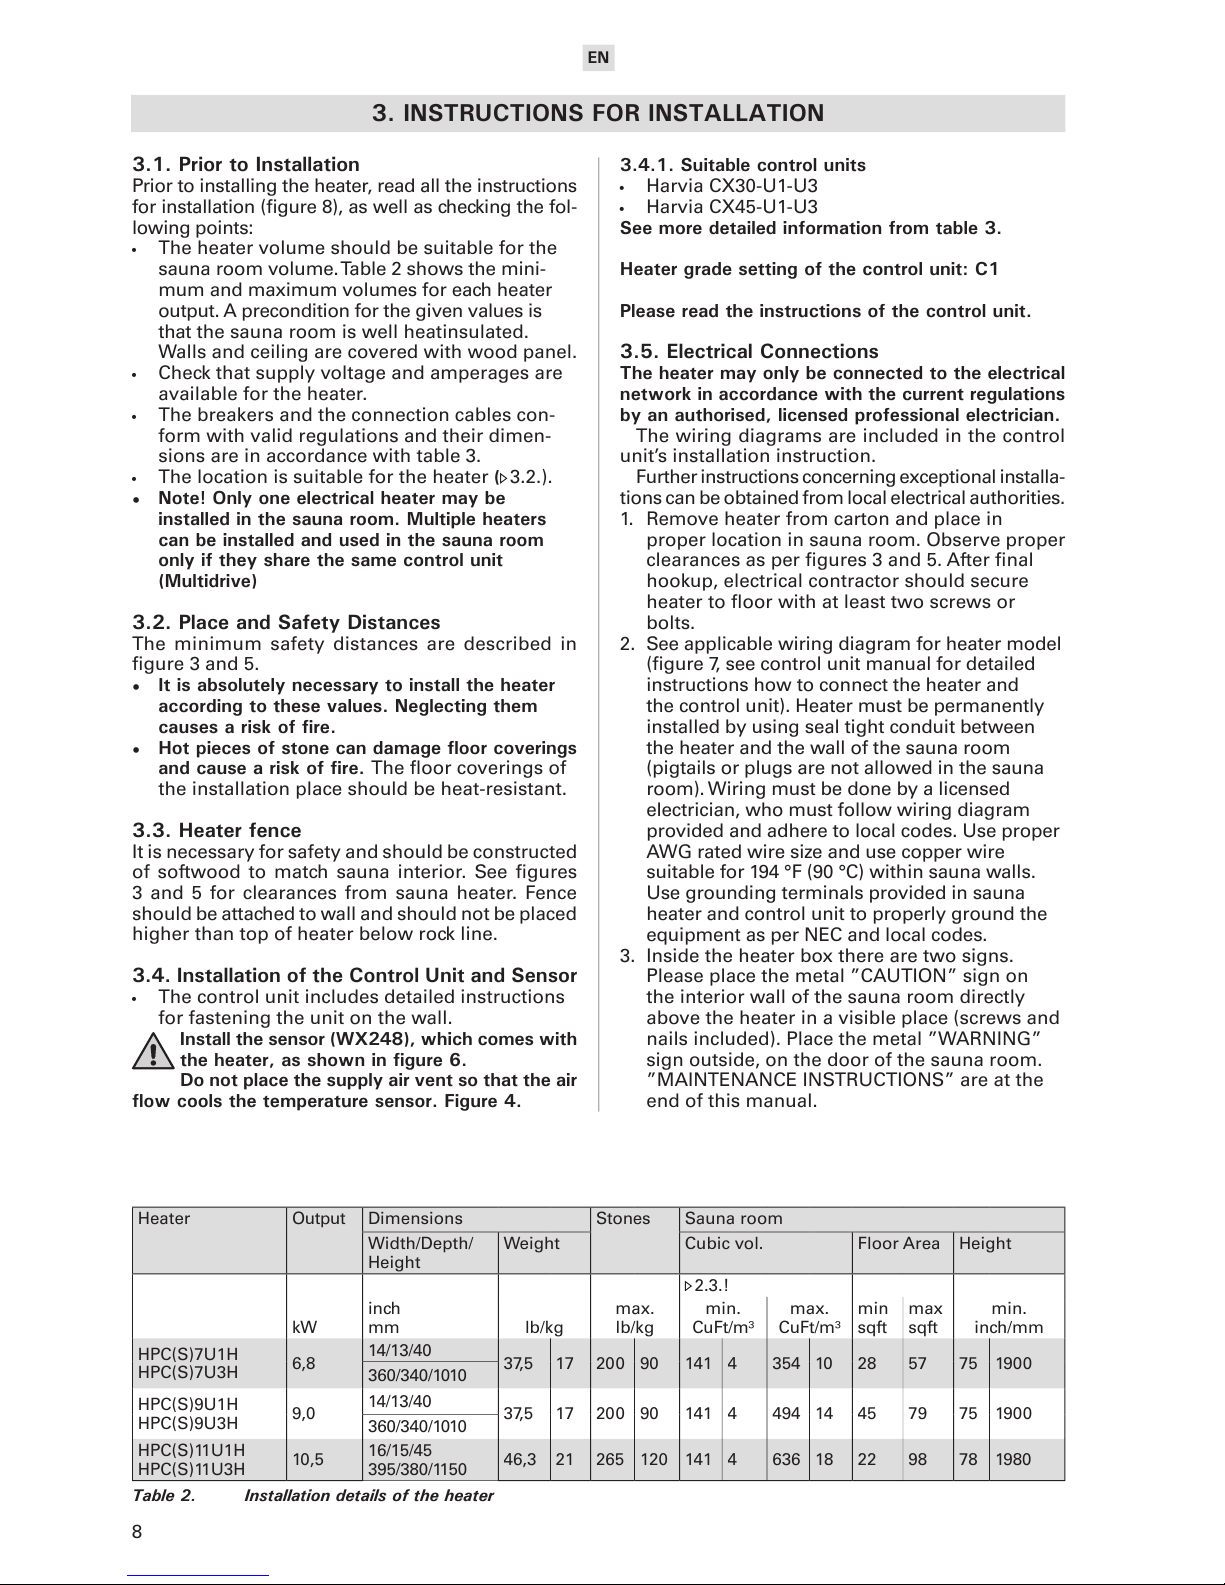
3.1. Prior to Installation
Prior to installing the heater, read all the instructions
for installation (gure 8), as well as checking the fol-
lowing points:
• The heater volume should be suitable for the
sauna room volume. Table 2 shows the mini-
mum and maximum volumes for each heater
output. A precondition for the given values is
that the sauna room is well heatinsulated.
Walls and ceiling are covered with wood panel.
• Check that supply voltage and amperages are
available for the heater.
• The breakers and the connection cables con-
form with valid regulations and their dimen-
sions are in accordance with table 3.
• The location is suitable for the heater ( 3.2.).
• Note! Only one electrical heater may be
installed in the sauna room. Multiple heaters
can be installed and used in the sauna room
only if they share the same control unit
(Multidrive)
3.2. Place and Safety Distances
The minimum safety distances are described in
gure 3 and 5.
• It is absolutely necessary to install the heater
according to these values. Neglecting them
causes a risk of fire.
• Hot pieces of stone can damage floor coverings
and cause a risk of fire. The oor coverings of
the installation place should be heat-resistant.
3.3. Heater fence
It is necessary for safety and should be constructed
of softwood to match sauna interior. See gures
3 and 5 for clearances from sauna heater. Fence
should be attached to wall and should not be placed
higher than top of heater below rock line.
3.4. Installation of the Control Unit and Sensor
• The control unit includes detailed instructions
for fastening the unit on the wall.
Install the sensor (WX248), which comes with
the heater, as shown in figure 6.
Do not place the supply air vent so that the air
flow cools the temperature sensor. Figure 4.
3.4.1. Suitable control units
• Harvia CX30-U1-U3
• Harvia CX45-U1-U3
See more detailed information from table 3.
Heater grade setting of the control unit: C1
Please read the instructions of the control unit.
3.5. Electrical Connections
The heater may only be connected to the electrical
network in accordance with the current regulations
by an authorised, licensed professional electrician.
The wiring diagrams are included in the control
unit’s installation instruction.
Further instructions concerning exceptional installa-
tions can be obtained from local electrical authorities.
1. Remove heater from carton and place in
proper location in sauna room. Observe proper
clearances as per gures 3 and 5. After nal
hookup, electrical contractor should secure
heater to oor with at least two screws or
bolts.
2. See applicable wiring diagram for heater model
(gure 7, see control unit manual for detailed
instructions how to connect the heater and
the control unit). Heater must be permanently
installed by using seal tight conduit between
the heater and the wall of the sauna room
(pigtails or plugs are not allowed in the sauna
room). Wiring must be done by a licensed
electrician, who must follow wiring diagram
provided and adhere to local codes. Use proper
AWG rated wire size and use copper wire
suitable for 194 °F (90 °C) within sauna walls.
Use grounding terminals provided in sauna
heater and control unit to properly ground the
equipment as per NEC and local codes.
3. Inside the heater box there are two signs.
Please place the metal ”CAUTION” sign on
the interior wall of the sauna room directly
above the heater in a visible place (screws and
nails included). Place the metal ”WARNING”
sign outside, on the door of the sauna room.
”MAINTENANCE INSTRUCTIONS” are at the
end of this manual.
Heater Output Dimensions Stones Sauna room
Width/Depth/
Height
Weight Cubic vol. Floor Area Height
kW
inch
mm lb/kg
max.
lb/kg
2.3.!
min.
CuFt/m³
max.
CuFt/m³
min
sqft
max
sqft
min.
inch/mm
HPC(S)7U1H
HPC(S)7U3H
6,8
14/13/40
37,5 17 200 90 141 4 354 10 28 57 75 1900
360/340/1010
HPC(S)9U1H
HPC(S)9U3H
9,0
14/13/40
37,5 17 200 90 141 4 494 14 45 79 75 1900
360/340/1010
HPC(S)11U1H
HPC(S)11U3H
10,5
16/15/45
395/380/1150
46,3 21 265 120 141 4 636 18 22 98 78 1980
Table 2. Installation details of the heater
 Loading...