

Page 1

APM6800+/APM6801+
Audio Processing Modules
Installation and Operation Manual
Edition C
175-000516-00
Page 2

Page 3

Preliminary—Contents are proprietary and confidential. Do not photocopy or distribute.
APM6800+/
APM6801+
Audio Processing Modules
Installation and Operation Manual
Edition C
June 2009
Page 4

Preliminary—Contents are proprietary and confidential. Do not photocopy or distribute.
Copyright Information
Copyright © 2008-2009 Harris Corporation, 1025 West NASA Boulevard,
Melbourne, Florida 32919-0001 U.S.A. All rights reserved. This publication
supersedes all previous releases. Printed in Canada.
This product and related documentation are protected by copyright and are
distributed under licenses restricting their use, copying, distribution, and
decompilation. No part of this product or related documentation may be
reproduced in any form by any means without prior written authorization of
Harris Corporation and its licensors, if any.
This publication could include technical inaccuracies or typographical errors.
Changes are periodically added to the information herein; these changes will be
incorporated into new editions of the publication. Harris Corporation may make
improvements and/or changes in the product(s) and/or the program(s) described
in this publication at any time.
Warranty Information
The limited warranty policy provides a complete description of your warranty
coverage, limitations, and exclusions, as well as procedures for obtaining
warranty service. To view the complete warranty, visit our website.
This publication is provided “as is” without warranty of any kind, either express
or implied, including, but not limited to, the implied warranties of
merchantability, fitness for a particular purpose, or non-infringement.
Page 5

Content s
Preface
Manual Information ...............................................................................................vii
Purpose ........................................................................................................... vii
Audience .........................................................................................................vii
Revision History ............................................................................................viii
Writing Conventions .....................................................................................viii
Obtaining Documents ....................................................................................viii
Unpacking/Shipping Information ........................................................................... ix
Unpacking a Product .......................................................................................ix
Product Servicing ............................................................................................ix
Returning a Product .........................................................................................ix
Restriction on Hazardous Substances (RoHS) Directive .................................x
Waste from Electrical and Electronic Equipment
(WEEE) Directive ...........................................................................................xi
Safety ..................................................................................................................... xii
Safety Terms and Symbols in this Manual ..................................................... xii
Chapter 1: Introduction
Product Description .................................................................................................1
Main Features ...................................................................................................1
Applications ..................................................................................................... 2
Module Description .................................................................................................2
Front Module ....................................................................................................2
Back Modules ...................................................................................................4
Breakout Cables ...............................................................................................5
RS-232/RS-422 Connector ...............................................................................7
Signal Flow ............................................................. .................................. .......9
Chapter 2: Installation
Preparing the Product for Installation ....................................................................13
Checking the Packing List ..............................................................................14
Selecting an External Balun ........................................................... ................14
Setting Jumpers .....................................................................................................15
Local and Remote Jumper Settings ................................................................15
Data I/O Termination Jumper Settings ...........................................................16
Maximum 6800+ Frame Power Ratings ............................................................... 17
Installing the Module .............................................................................................18
Upgrading Module Firmware ................................................................................18
APM6800+/APM6801+ Installation and Operation Manual iii
Copyright © 2008-2009, Harris Corporation
Page 6

Contents
Chapter 3: Configuration and Operation
Overview ............................................................................................................... 19
Operating Notes .....................................................................................................19
Changing Parameter Settings ................................................................................20
Changing Parameters Using CCS Navigator .................................................20
Changing Parameter Settings Using Card-Edge Controls ..............................21
Recalling Default Parameter Settings ............................................................22
Viewing Software and Hardware Versions ....................................................23
Selecting the Module Locking Source ...........................................................23
Audio Test Tones ...........................................................................................23
Audio Status Reporting ..................................................................................24
Clearing External Metadata ............................................................................24
Audio Synchronization ...................................................................................24
Audio Delay ...................................................................................................25
Audio Modes (APM6801+AAC Only) ................................................................25
Chapter 4: Parameters, LEDs, and Alarms
APM6800+/APM6801+ Control Parameters .......................................................27
Parameter Table Notes ...................................................................................28
APM6800+/APM6801+ Parameters .....................................................................29
Dolby Decoder Options (APM6800-D1+D/APM6801-D1+D) ........................... 34
APM6800-D2+D/APM6801-D2+D Parameters ..................................................38
APM6800-D3+D/APM6801-D3+D Parameters ..................................................45
APM6801+AAC+ Parameters ..............................................................................50
Neural Audio Parameters ......................................................................................56
Neural Common Parameters ..........................................................................56
Neural Audio UpMix Parameters ...................................................................58
Neural Audio DownMix Parameters ..............................................................59
Neural Audio MultiMerge Parameters ...........................................................60
Neural Loudness Control Parameters ............................................................. 62
LEDs and Alarms .............................................................. ....................................64
Monitoring LEDs ...........................................................................................64
Module Status LEDs ......................................................................................65
Alarms ............................................................................................................ 67
Chapter 5: Specifications
Overview ............................................................................................................... 71
Inputs ..................................................................................................................... 72
Reference Video .............................................................................................72
Balanced DARS ................................................ .............................................72
Unbalanced DARS ........................................................... ..............................73
Data I/O ..........................................................................................................73
Unbalanced AES ............................................................................................74
Balanced AES (with External Balun) .............................................................74
Outputs ..................................................................................................................75
Unbalanced AES ............................................................................................75
Balanced AES (with External Balun) .............................................................75
Performance ...........................................................................................................76
iv APM6800+/APM6801+ Installation and Operation Manual
Copyright © 2008-2009, Harris Corporation
Page 7

Contents
Power Consumption ......................................................... ..............................76
Audio Propagation Delay ...............................................................................76
Start-up Time ..................................... .............................................................76
Temperature ...................................................................................................77
Appendix A: Neural Audio Packages
Neural Audio .........................................................................................................79
Audio Delay with Neural Modules ........................................................................80
DTS Neural® Surround™ UpMix ........................................................................80
APM6801DM+D DTS Neural® Surround™ DownMix ......................................81
APM6801MM+D DTS Neural® Surround™ MultiMerge ..................................82
Parameters ...................................................................................................... 83
Neural Loudness Control ....................................................................................... 84
Neural Loudness Control Options on APM6801+ ........................................85
Appendix B: Communication and Control Troubleshooting
Tips
Software Communication Problems ......................................................................89
Hardware Communication Problems ............................................................... .....91
Appendix C: Audio Only & Audio/Video Module Combinations
Overview ............................................................................................................... 93
Optional Cables ..................................................................................................... 94
DB9 M to DB9 M Cable (Part No. 6800+OPT+AM) ....................................94
SFS to Dolby Bridge Cable (Part No. 6800+OPT+BRGAPM) ..................... 95
BNC Cable (Part No. 6800+OPT+BNCAPM) ..............................................96
Index
Keywords ...............................................................................................................97
APM6800+/APM6801+ Installation and Operation Manual v
Copyright © 2008-2009, Harris Corporation
Page 8

Contents
vi APM6800+/APM6801+ Installation and Operation Manual
Copyright © 2008-2009, Harris Corporation
Page 9

Manual Information
Purpose
This manual details the features, installation, operation, maintenance, and
specifications for the
• APM6800-D1+D/APM6801-D1+D Dolby® Decoder (E or AC-3) module
• APM6800-D2+D/APM6801-D2+D Dolby
• APM6800-D3+D/APM6801-D3+D Dolby
module
• APM6801+AAC+D AAC Encoder module
• APM6801UM+D DTS Neural Surround UpMix
• APM6801DM+D DTS Neural Surround DownMix
• APM6801MM+D DTS Neural Surround 5.1 and rendered stereo content
transition
• APM6801LC+D Neural Loudness Control for 2.0 or 5.1
Preface
®
E Encoder module
®
Digital (AC-3) Encoder
• APM6801LC+6+2+D Neural Loudness Control for 2.0 and 5.1
• APM6801LC+8+D Neural Loudness Control for four 2.0 program audio
streams
• APM6801LC+DM+D DTS Neural Loudness Control for 5.1 Program
Audio with DTS Neural Surround™ Downmix output
• APM6801UM+LC+D DTS Neural Surround™ UpMix DTV 5.1
Production Solution with DTS Neural Loudness Control
• APM6801DM+LC+D DTS Neural Surround™ DownMix DTV 5.1
Transport Solution with DTS Neural Loudness Control
• APM6801MM+LC+D DTS Neural Surround™ 5.1 and rendered stereo
content transitioning for DTV 5.1 Production with DTS Neural Loudness
Control
Audience
This manual is written for engineers, technicians, and operators responsible for
installation, setup, maintenance, and/or operation of 6800+ modules.
APM6800+/APM6801+ Installation and Operation Manual vii
Copyright © 2008-2009, Harris Corporation
Page 10

Preface
Note
Revision History
Table P-1. Revision History of Manual
Edition Date Comments
Edition A June 2008 Initial release
Edition B March 2009 Addition of
Edition C June 2009 Addit ion of more N eural options
Writing Conventions
To enhance your understanding, the authors of this manual have adhered to the
following text conventions:
Table P-2. Writing Conventions
Term or
Convention
Bold Indicates dialog boxes, property sheets, fields, buttons,
Italics Indicates E-mail addresses, the names of books or
CAPS Indicates a specific key on the keyboard, such as
Code Indicates variables or command-line entries, such as a
APM6801+AAC+ and
Neural options
Description
check boxes, list boxes, combo boxes, menus,
submenus, windows, lists, and selection names
publications, and the first instances of new terms and
specialized words that need emphasis
ENTER, TAB, CTRL, ALT, or DELETE
DOS entry or something you type into a field
> Indicates the direction of navigation through a
hierarchy of menus and windows
hyperlink Indicates a jump to another location within the
electronic document or elsewhere
Internet address
Indicates a jump to a website or URL
Indicates important information that helps to avoid and
troubleshoot problems
Obtaining Documents
Product support documents can be viewed or downloaded from our website.
Alternatively, contact your Customer Service representative to request a
document.
viii APM6800+/APM6801+ Installation and Operation Manual
Copyright © 2008-2009, Harris Corporation
Page 11

Unpacking/Shipping Information
Unpacking a Product
This product was carefully inspected, tested, and calibrated before shipment to
ensure years of stable and trouble-free service.
1. Check equipment for any visible damage that may have occurred during
transit.
2. Confirm that you have received all items listed on the packing list.
3. Contact your dealer if any item on the packing list is missing.
4. Contact the carrier if any item is damaged.
5. Remove all packaging material from the product and its associated
components before you install the unit.
Keep at least one set of original packaging, in the event that you need to return a
product for servicing.
Product Servicing
Except for firmware upgrades, the modules are not designed for field servicing.
All hardware upgrades, modifications, or repairs require you to return the
modules to the Customer Service center.
Preface
Returning a Product
In the unlikely event that your product fails to operate properly, contact
Customer Service to obtain a Return Authorization (RA) number, and then send
the unit back for servicing.
If the original package is not available, you can supply your own packaging as
long as it meets the following criteria:
• The packaging must be able to withstand the product’s weight.
• The product must be held rigid within the packaging.
• There must be at least 2 in. (5 cm) of space between the product and the
• The corners of the product must be protected.
Ship products back to us for servicing prepaid and, if possible, in the original
packaging material. If the product is still within the warranty period, we will
return the product prepaid after servicing.
container.
APM6800+/APM6801+ Installation and Operation Manual ix
Copyright © 2008-2009, Harris Corporation
Page 12

Preface
Restriction on Hazardous Substances (RoHS) Directive
Directive 2002 / 95 / EC—commonly known as the European Union (EU)
Restriction on Hazardous Substances (RoHS)—sets limits on the use of certain
substances found in electrical and electronic equipment. The intent of this
legislation is to reduce the amount of hazardous chemicals that may leach out of
landfill sites or otherwise contaminate the environment during end-of-life
recycling. The Directive, which took effect on July 1, 2006, refers to the
following hazardous substances:
• Lead (Pb)
• Mercury (Hg)
• Cadmium (Cd)
• Hexavalent Chromium (Cr-V1)
• Polybrominated Biphenyls (PBB)
• Polybrominated Diphenyl Ethers (PBDE)
In accordance with this EU Directive, products sold in the European Union will
be fully RoHS-compliant and “lead-free.” Spare parts supplied for the repair
and upgrade of equipment sold before July 1, 2006 are exempt from the
legislation. Equipment that complies with the EU directive will be marked with
a RoHS-compliant symbol, as shown in Figure P-1.
Figure P-1. RoHS Compliance Symbol
x APM6800+/APM6801+ Installation and Operation Manual
Copyright © 2008-2009, Harris Corporation
Page 13

Waste from Electrical and Electronic Equipment (WEEE) Directive
The Eur opean Unio n (EU) Directive 2002 / 96 / EC on Waste from Electrical and
Electronic Equipment (WEEE) deals with the collection, treatment, recovery,
and recycling of electrical and electronic waste products. The objective of the
WEEE Directive is to assign the responsibility for the disposal of associated
hazardous waste to either the producers or users of these products. As of August
13, 2005, producers or users are required to recycle electrical and electronic
equipment at end of its useful life, and must not dispose of the equipment in
landfills or by using other unapproved methods. (Some EU member states may
have different deadlines.)
In accordance with this EU Directive, companies selling electric or electronic
devices in the EU will affix labels indicating that such products must be
properly recycled. Contact your local Sales representative for information on
returning these products for recycling. Equipment that complies with the EU
directive will be marked with a WEEE-compliant symbol, as shown in Figure
P-2.
Preface
Figure P-2. WEEE Compliance Symbol
APM6800+/APM6801+ Installation and Operation Manual xi
Copyright © 2008-2009, Harris Corporation
Page 14

Preface
Safety
Carefully review all safety precautions to avoid injury and prevent damage to
this product or any products connected to it. If this product is rack-mountable, it
should be mounted in an appropriate rack using the rack-mounting positions and
rear support guides provided. To protect a frame from circuit overloading,
connect each frame to a separate electrical circuit. If this product relies on
forced air cooling, all obstructions to the air flow should be removed prior to
mounting the frame in the rack.
If this product has a provision for external earth grounding, ground the frame to
the earth using the protective earth ground on the rear panel.
IMPORTANT! Only qualified personnel should perform service procedures.
Safety Terms and Symbols in this Manual
WARNING
Statements identifying conditions or practices that may result in
personal injury or loss of life. High voltage is present.
CAUTION
Statements identifying conditions or practices that can result in
damage to the equipment or other property.
xii APM6800+/APM6801+ Installation and Operation Manual
Copyright © 2008-2009, Harris Corporation
Page 15

Product Description
The APM6800-D1+D/APM6801-D1+D provides Dolby E or Dolby Digital
(AC-3) decoding.
The APM6800-D2+D/APM6801-D2+D provides Dolby E encoding.
The APM6800-D3+D/APM6801-D3+D provides Dolby Digital (AC-3)
encoding.
The APM6801+AAC
Chapter 1
Introduction
+D provides AAC encoding.
Main Features
The APM6801UM
The APM6801DM
The APM6801MM
content transitioning.
The APM6801LC
The APM6801LC
The APM6801LC
program audio streams.
The APM6801LC
Program Audio with DTS Neural Surround™ Downmix output.
The APM6801UM
Production Solution with DTS Neural Loudness Control.
The APM6801DM
5.1 Transport Solution with DTS Neural Loudness Control.
The APM6801MM
stereo content transitioning for DTV 5.1 Production with DTS Neural Loudness
Control.
+D provides DTS Neural Surround UpMixing.
+D provides DTS Neural Surround DownMixing.
+D provides DTS Neural Surround 5.1 and rendered stereo
+D provides Neural Loudness Control for 2.0 or 5.1.
+6+2+D provides Neural Loudness Control for 2.0 and 5.1.
+8+D provides Neural Loudness Control for four 2.0
+DM+D provides DTS Neural Loudness Control for 5.1
+LC+D provides DTS Neural Surround™ UpMix DTV 5.1
+LC+D provides DTS Neural Surround™ DownMix DTV
+LC+D provides DTS Neural Surround™ 5.1 and rendered
• Reference analog video input (selec table frame genlock or external input on
breakout cable)
• Eight unbalanced AES input and output channels
APM6800+/APM6801+ Installation and Operation Manual 1
Copyright © 2008-2009, Harris Corporation
Page 16
Chapter 1: Introduction
Note
Module
status
LEDs
Mode select
rotary
switch
Navigation
toggle
switch
Monitoring
LEDs
Remote/local
control jumper
Extractor
handle
Control
LEDs
Applications
• Unbalanced AES connections can be converted to balanced by using
external baluns
• RS-232/RS-422 connector included that provides Audio Metadata input to
the encoders and output from the decoders
• Input and output routing
• DARS reference input (back module BNC or breakout cable)
• Input SRC (Sample Rate Conversion)
• Audio Test tone generator
AAC and Dolby-encoded signals must be decoded for any audio processing
tasks (such as voice-over or mixing) in any other audio elements.
Typically, Dolby E is used in contribution applications; AC-3 is used for
distribution applications (transmitting into the home). AAC is used in
contribution and distribution applications.
Due to high levels of heat dissipation, the modules should not be installed in
frames without fans.The modules cannot be installed in FR6802
6800/7000 series frames.
+DM and
Module Description
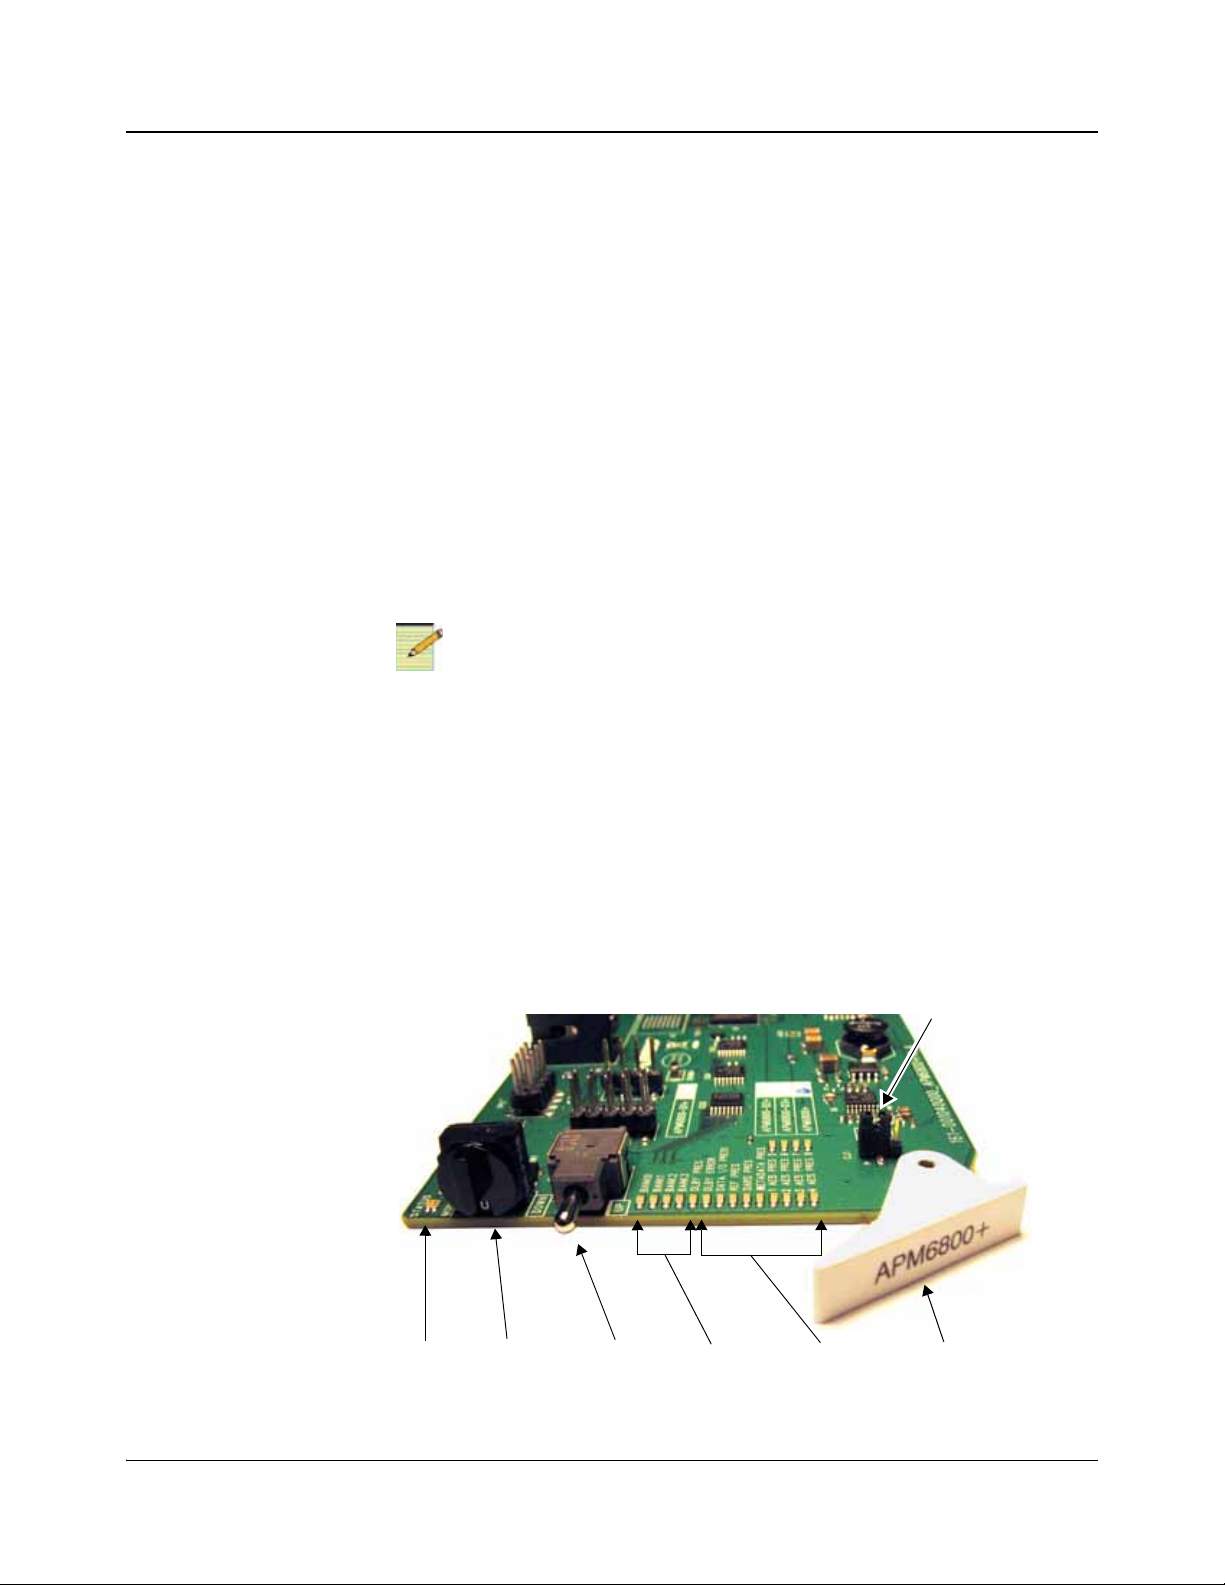
Front Module
Figure 1-1 shows the position of the LEDs and module controls on the front of
the modules.
Figure 1-1. APM6800+/APM6801+ Front Module
2 APM6800+/APM6801+ Installation and Operation Manual
Copyright © 2008-2009, Harris Corporation
Page 17

Chapter 1: Introduction
Table 1-1 on page 3 briefly describes the LEDs, switches, and jumpers.
Table 1-1. Generic Module Features
Feature Description
Module status LEDs Various color and lighting combinations of these LEDs
indicate the module state. See “LED Status Indicators” on
page 65 for more information.
Mode select rotary
switch
This switch selects between various control and feedback
parameters.
Navigation toggle switch This switch navigates up and down through the available
control parameters:
• Down: Moves down through the parameters
• Up: Moves up through the parameters
Control LEDs Various lighting combinations of these Control LEDs
(sometimes referred to as “Bank Select LEDs”) indicate
which bank is currently selected. See “Bank Select LEDs”
on page 21 for more information.
Monitoring LEDs Each 6800+ module has a number of LEDs assigned to
indicate varying states/functions. See “Module Status LED
Descriptions” on page 66 for a description of these LEDs.
Local/remote control
jumper
• Local: Locks out external control panels and allows
card-edge control only; limits the functionality of remote
software applications to only monitoring the
APM6800+/APM6801+.
• Remote: Allows remote or local (card-edge)
configuration, operation, and monitoring of the module.
See page 15 for more information on jumpers.
APM6800+/APM6801+ Installation and Operation Manual 3
Copyright © 2008-2009, Harris Corporation
Page 18
Chapter 1: Introduction
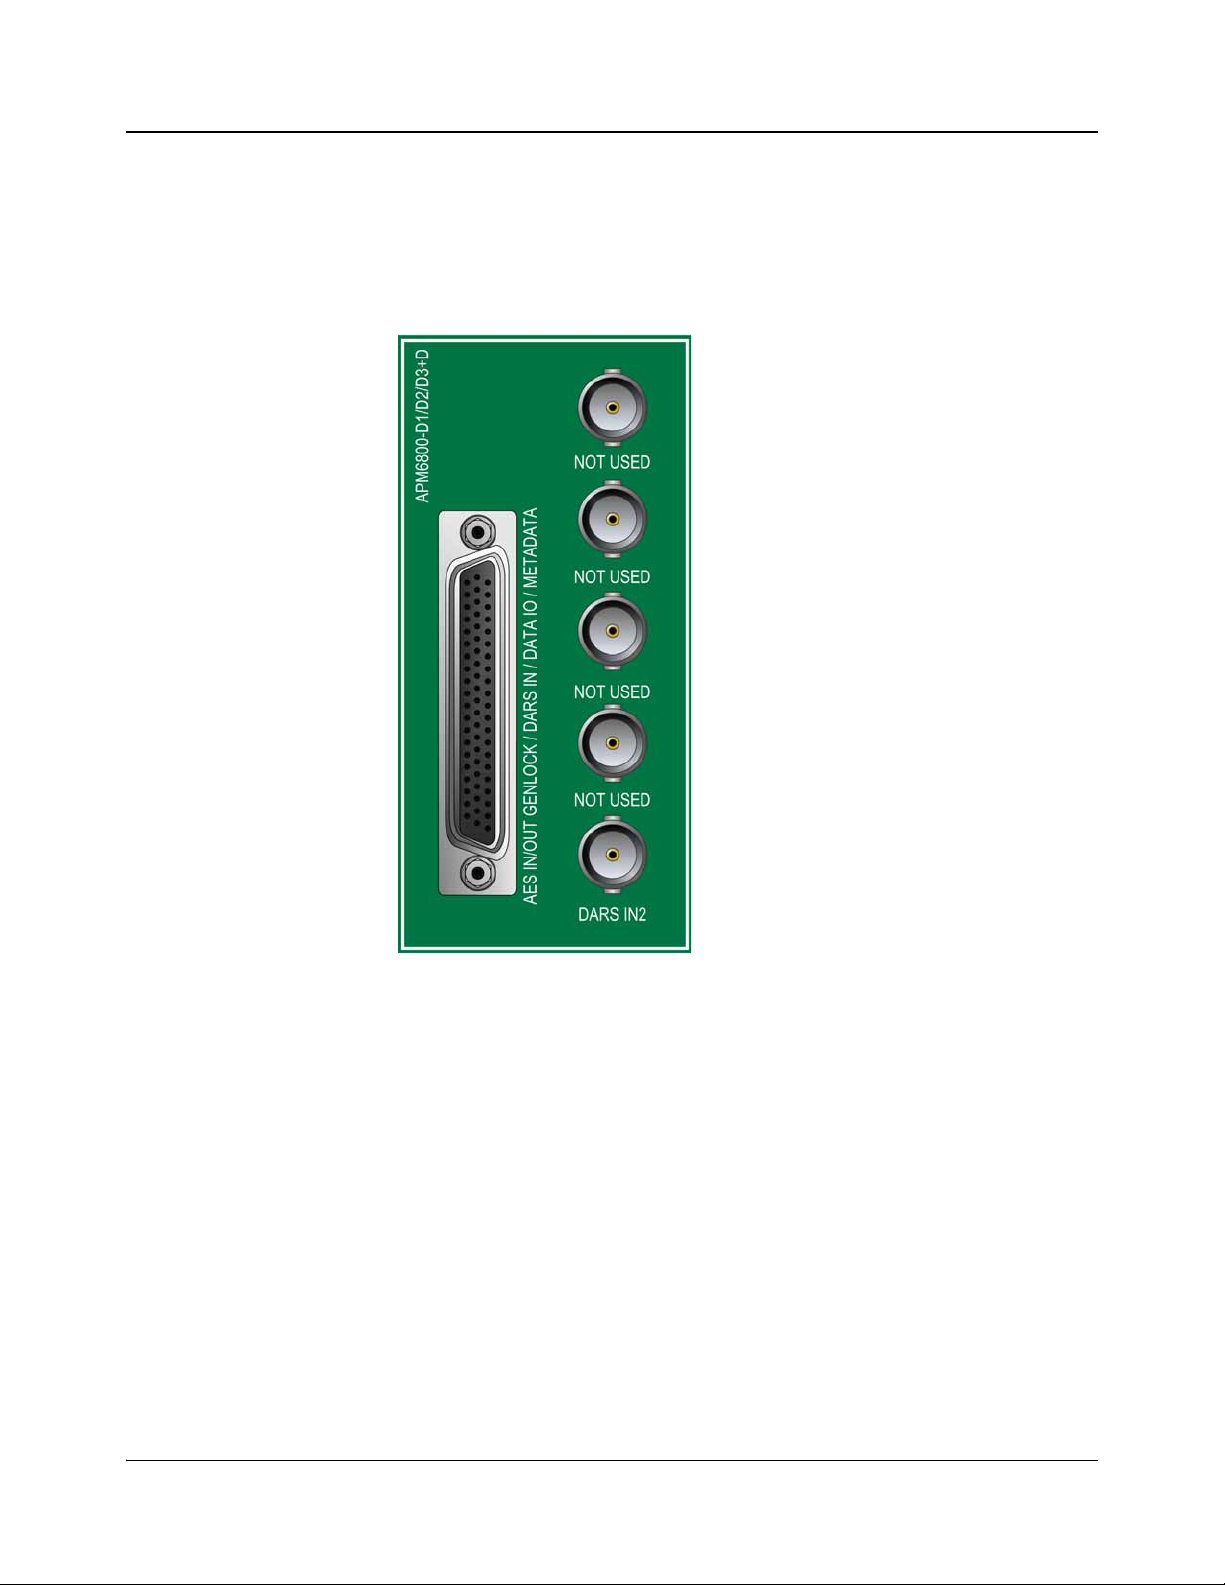
Back Modules
Figure 1-2 shows the double-slot back module used by the
APM6800+/APM6801+ modules. The back modules and the front modules
cannot be installed in frames without fans, or in FR6802+DM and 68 00/7000
series frames.
Figure 1-2. Back Connectors
4 APM6800+/APM6801+ Installation and Operation Manual
Copyright © 2008-2009, Harris Corporation
Page 19
Breakout Cables
AES 1 In
AES 2 In
AES 3 In
AES 4 In
AES 5 In
AES 6 In
AES 7 In
AES 8 In
AES 1 Ou t
AES 2 Ou t
AES 3 Ou t
AES 4 Ou t
AES 5 Ou t
AES 6 Ou t
AES 7 Ou t
AES 8 Ou t
DARS In
Data I/O
Genlock
Serial
AES1 IN
AES2 IN
AES3 IN
AES4 IN
AES5 IN
AES6 IN
AES7 IN
AES8 IN
AES1 OUT
DARS IN
DATA I/O
GENLOCK
SERIAL
AES2 OUT
AES3 OUT
AES4 OUT
AES5 OUT
AES6 OUT
AES7 OUT
AES8 OUT
Chapter 1: Introduction
The standard module ships with an unbalanced audio breakout cable (illustrated
in Figure 1-3).
Pinouts are listed in Table 1-2, and pin numbers for the 44-pin connector are
illustrated in Figure 1-4.
Figure 1-3. Unbalanced Audio Breakout Cable
APM6800+/APM6801+ Installation and Operation Manual 5
Copyright © 2008-2009, Harris Corporation
Page 20

Chapter 1: Introduction
Pin 31
Pin 16
Pin 1
Pin 44
Pin 30
Pin 15
Figure 1-4. Pin Numbers for 44-Pin Connector
Table 1-2. Pinouts for 44-Pin Connector
Pin No.
on
Connection Type Description
DB-44M
1 BNC GENLOCK GENLOCK Black Black
2 BNC GND GENLOCK GND GENLOCK Black Black
3 BNC GND AES OUT 7 GND AES OUT 7 Blue Blue
4 BNC AES IN 4 AES IN 4 White White
5 BNC GND AES IN 4 GND AES IN 4 White White
6 BNC AES IN 3 AES IN 3 White White
7 BNC GND AES IN 3 GND AES IN 3 White White
8 BNC DATA IO DATA IO Yellow Yellow
9 BNC GND DATA IO GND DATA IO Yellow Yellow
10 BNC AES OUT 2 AES OUT 2 Blue Blue
11 BNC GND AES OUT 2 GND AES OUT 2 Blue Blue
12 BNC AES OUT 1 AES OUT 1 Blue Blue
13 BNC GND AES OUT 1 GND AES OUT 1 Blue Blue
14 BNC GND AES IN 7 GND AES IN 7 White White
Wire
Label
External
Cable
Color
BNC
Color
15 BNC AES IN 7 AES IN 7 White White
16 Not Connected
17
18 BNC AES OUT 7 AES OUT 7 Blue Blue
19 BNC DARS IN 1 DARS IN 1 Yellow Black
20 BNC GND DARS IN 1 GND DARS IN 1 Yellow Black
21 BNC AES IN 2 AES IN 2 White White
22 BNC GND AES OUT 3 GND AES OUT 3 Blue Blue
23 BNC AES OUT 3 AES OUT 3 Blue Blue
24 BNC GND AES OUT 6 GND AES OUT 6 Blue Blue
25 162A10019X (DB9.5) RS232_GND (DB9) SERIAL Black N/A
25 BNC GND AES OUT 4 GND AES OUT 4 Blue Blue
6 APM6800+/APM6801+ Installation and Operation Manual
Copyright © 2008-2009, Harris Corporation
Page 21

Table 1-2. Pinouts for 44-Pin Connector (Continued)
Pin 9
Pin 5
Pin 6
Pin 1
Chapter 1: Introduction
Pin No.
on
Connection Type Description
DB-44M
26 BNC AES OUT 4 AES OUT 4 Blue Blue
27 BNC GND AES OUT 5 GND AES OUT 5 Blue Blue
28 BNC AES IN 8 AES IN 8 White White
29 BNC GND AES IN 8 GND AES IN 8 White White
30 BNC GND AES IN 5 GND AES IN 5 White White
31 162A10019X (DB9.3) BALANCED SERIAL IN- (DB9) SERIAL Red N/A
32 162A10019X (DB9.8) BALANCED SERIAL IN+ (DB9) SERIAL Yellow N/A
33 BNC GND AES OUT 8 GND AES OUT 8 Blue Blue
34 BNC AES OUT 8 AES OUT 8 Blue Blue
35 162A10019X (DB9.1) RS422_FR_GND (DB9) SERIAL Black N/A
35 BNC GND AES IN 2 GND AES IN 2 White White
36 BNC AES IN 1 AES IN 1 White White
37 162A10019X (DB9.9) RS422_FR_GND (DB9) SERIAL Black N/A
37 BNC GND AES IN 1 GND AES IN 1 White White
Wire
Label
External
Cable
Color
BNC
Color
38 BNC AES OUT 6 AES OUT 6 Blue Blue
39 162A10019X (DB9.7) BALANCED SERIAL OUT-
(DB9)
40 162A10019X (DB9.2) BALANCED SERIAL OUT+
(DB9)
41 BNC AES OUT 5 AES OUT 5 Blue Blue
42 BNC GND AES IN 6 GND AES IN 6 White White
43 BNC AES IN 6 AES IN 6 White White
44 BNC AES IN 5 AES IN 5 White White
SERIAL Blue N/A
SERIAL Green N/A
RS-232/RS-422 Connector
The RS-232/RS-422 connector on the breakout cable is used for serial metadata
transmission.
The DB-9 female connector is illustrated in Figure 1-5 and the pinouts are listed
in Table 1-3.
Figure 1-5. Pin Numbers for RS-232/RS-422 DB-9 Female Connector
APM6800+/APM6801+ Installation and Operation Manual 7
Copyright © 2008-2009, Harris Corporation
Page 22

Chapter 1: Introduction
Table 1-3. Pinouts for RS-232/RS-422 DB-9 Female Connector
Pin No.
on DB-9M
Signal Description
1 FG Frame Ground
9 FG Frame Ground
5 FG Frame Ground
2 TA (Tx-) Transmitted Data 7 TB (Tx+) Transmitted Data +
8 RA (Rx-) Received Data 3 RB (Rx+) Received Data +
4 Not Connected
6
8 APM6800+/APM6801+ Installation and Operation Manual
Copyright © 2008-2009, Harris Corporation
Page 23
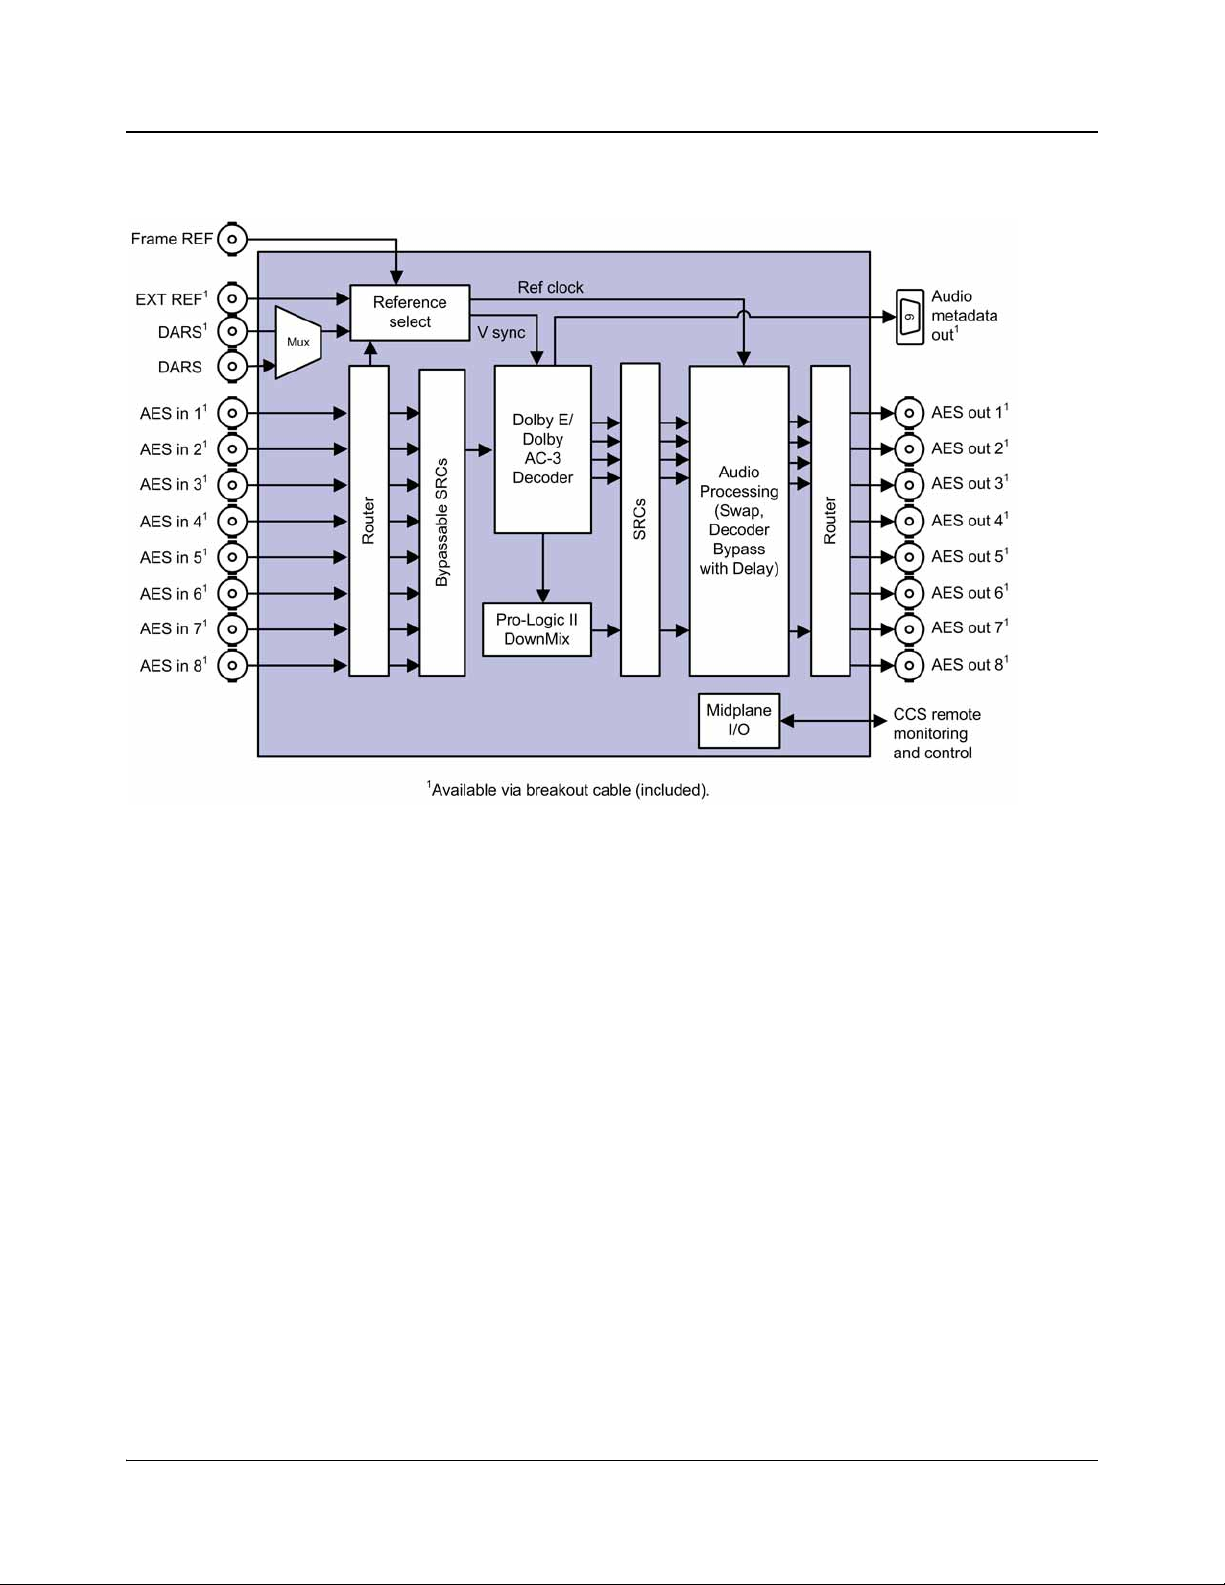
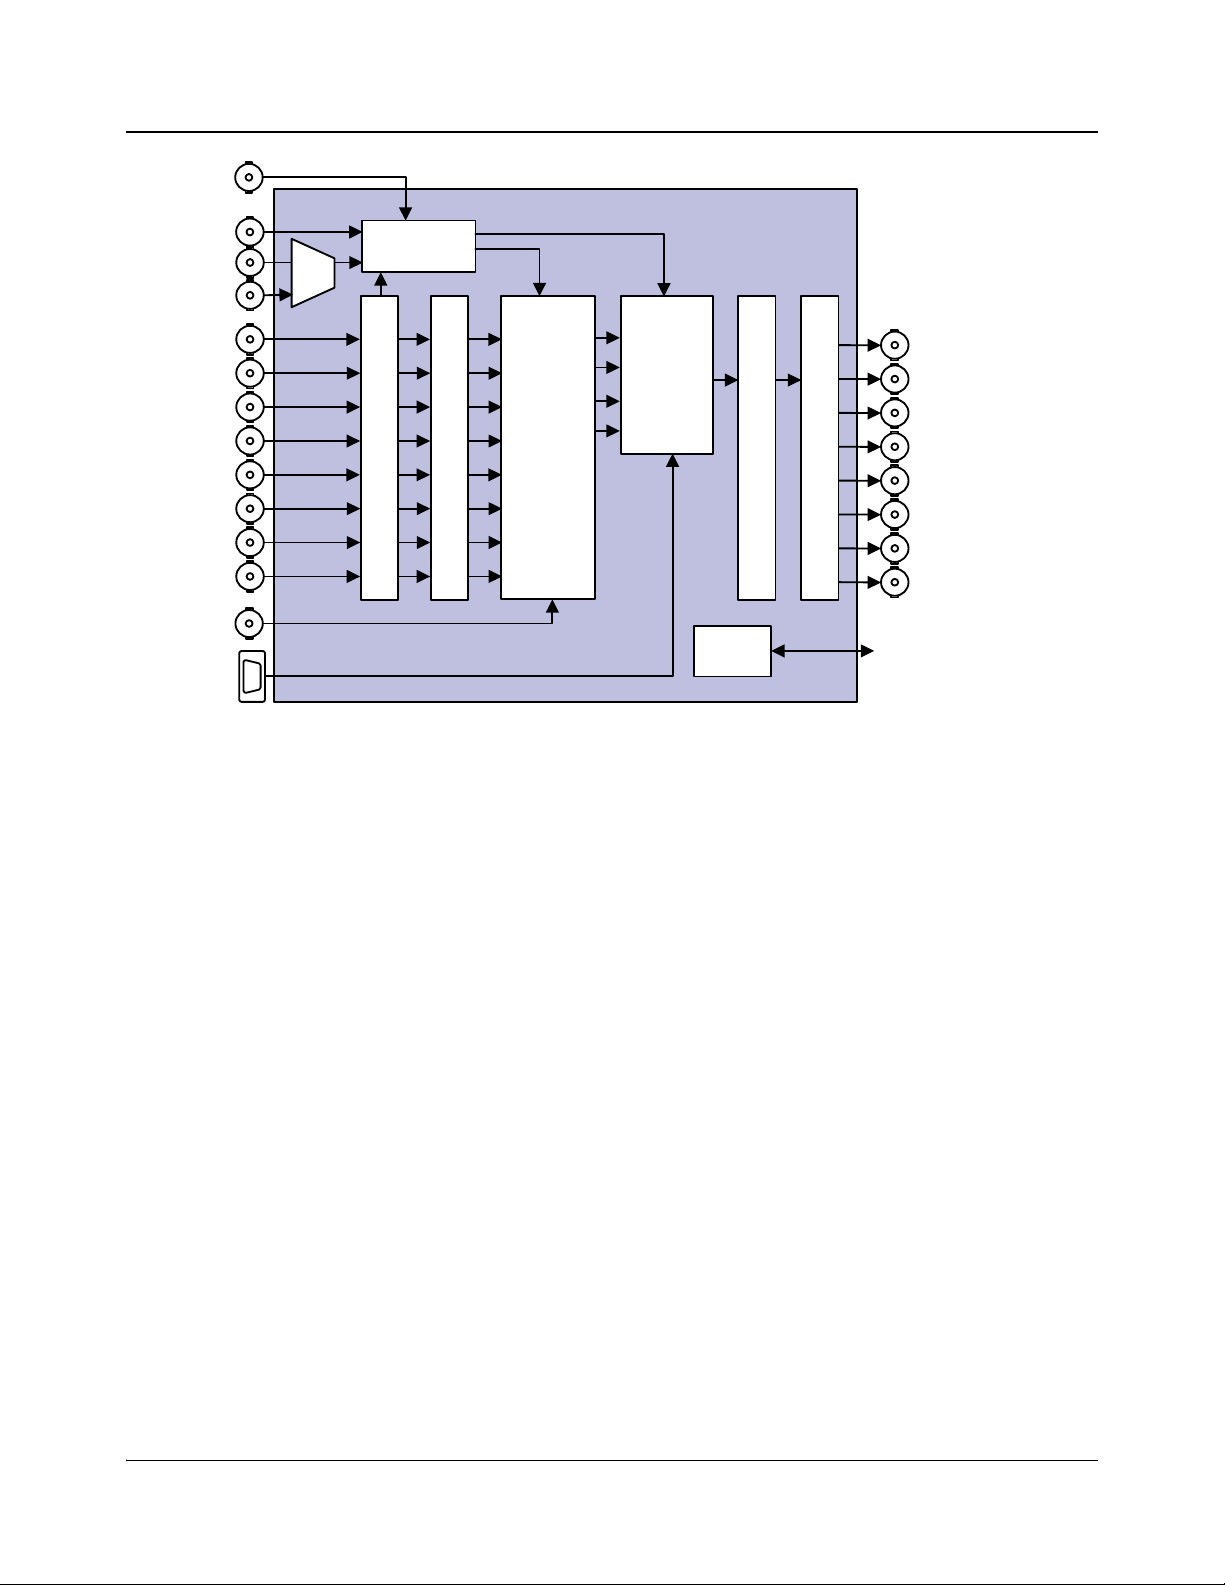
Signal Flow
Chapter 1: Introduction
Figure 1-6. APM6800-D1+D/APM6801-D1+D Signal Flow Diagram
APM6800+/APM6801+ Installation and Operation Manual 9
Copyright © 2008-2009, Harris Corporation
Page 24
Chapter 1: Introduction
Reference
select
Audio
metadata
in
V sync
Ref
clock
Frame REF
Audio
Processing
(Swap,
Encoder
Bypass
with Delay )
CCS remote
monitoring
and control
Midpla ne
I/O
Router
Optional delay
Dolby E/
Dolby
AC-3
Encoder
9
Bypassable SRCs
AES in 2
1
AES in 3
1
AES in 4
1
AES in 5
1
AES in 6
1
AES in 7
1
AES in 8
1
DARS
1
AES in 1
1
EXT REF
1
Mux
DARS
AES out 1
1
AES out 2
1
AES out 3
1
AES out 4
1
AES out 5
1
AES out 6
1
AES out 7
1
AES out 8
1
Router
1
Available via breakout cable (included).
Data I/O
1
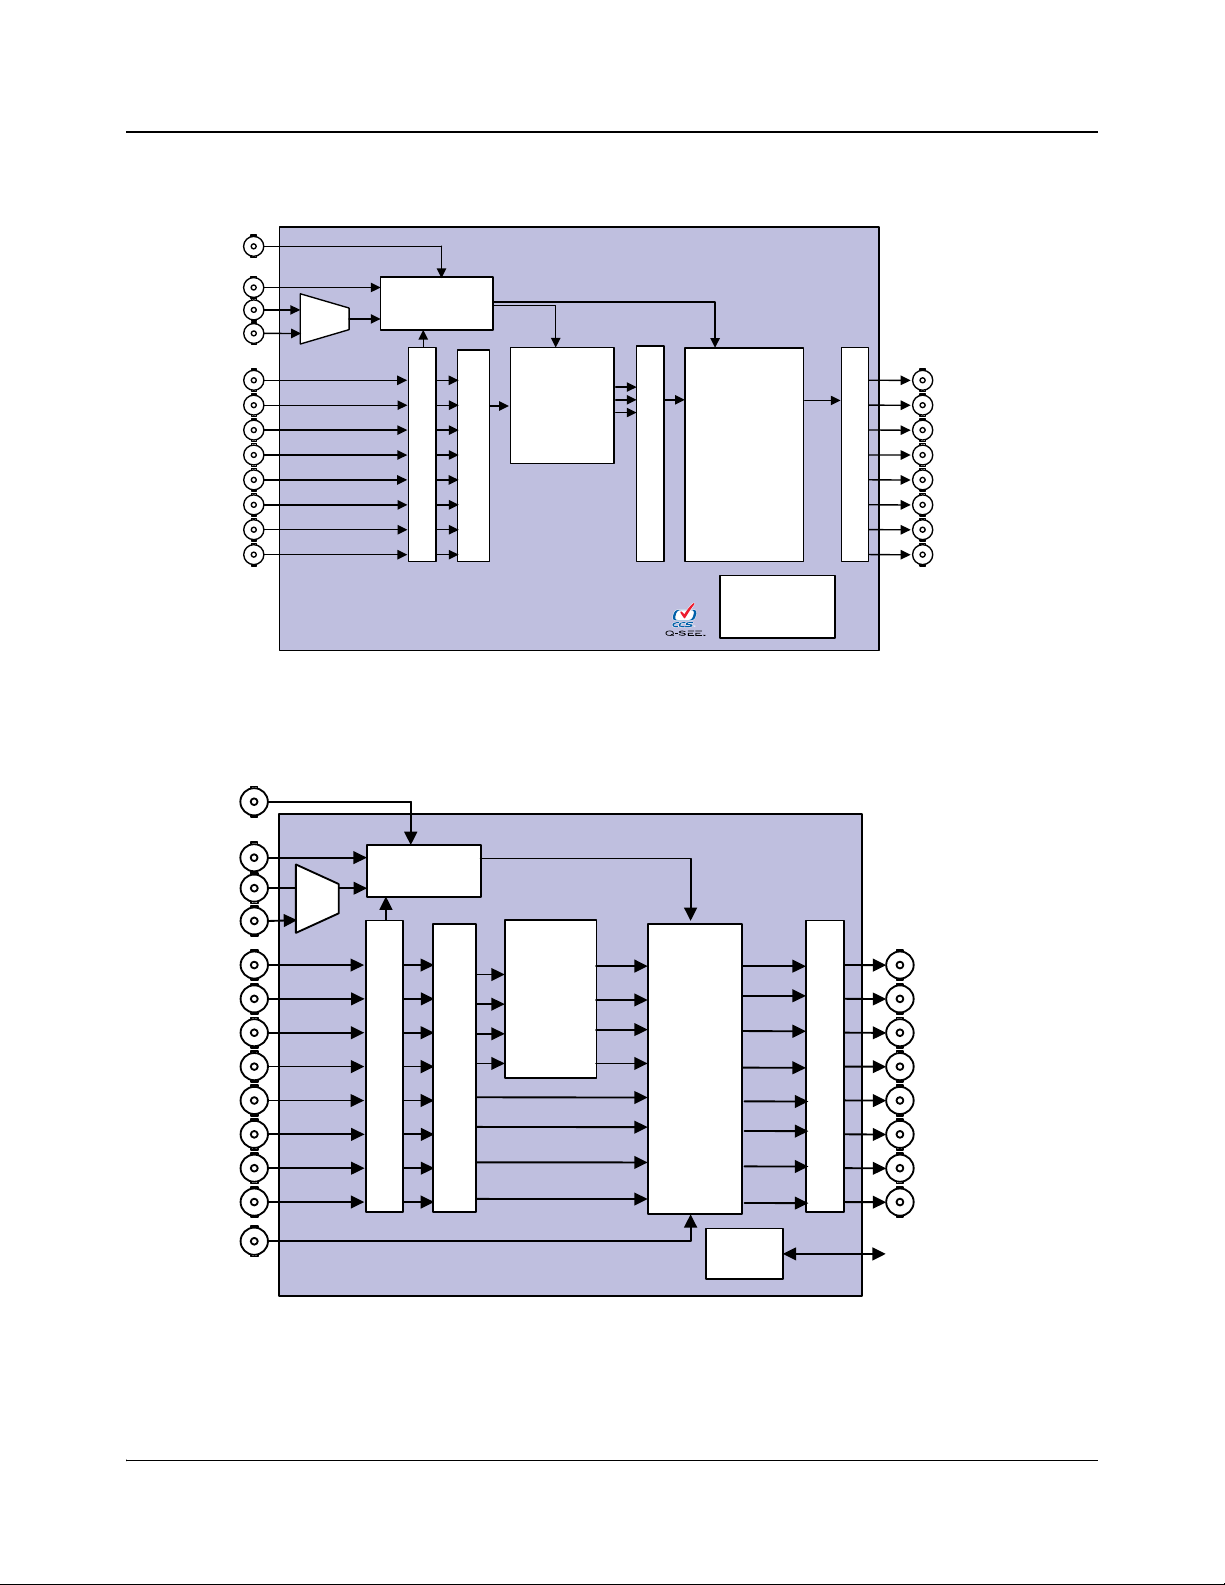
Figure 1-7. APM6800-D2+D/APM6801-D2+D and APM6800-D3+D/APM6801-D3+D Signal Flow
Diagram
10 APM6800+/APM6801+ Installation and Operation Manual
Copyright © 2008-2009, Harris Corporation
Page 25
Chapter 1: Introduction
CPU
Monitoring
and Control
Reference
select
AAC
Encoder
SRCs
AES in 2
1
AES in 3
1
AES in 4
1
AES in 5
1
AES in 6
1
AES in 7
1
AES in 8
1
Router
AES out 1
1
AES out 2
1
AES out 3
1
AES out 4
1
AES out 5
1
AES out 6
1
AES out 7
1
AES out 8
1
DARS
1
AES in 1
1
Ref c lo c k
V sync
EXT REF
1
Frame REF
Audio
Processing
(Swap,
Decoder
Bypass with
Delay)
Byp a ss ab le SR Cs
Mux
DARS
1
Available via breakout cable (included).
Router
Reference
select
Advanced
audio
processing
AES in 2
1
AES in 3
1
AES in 4
1
AES in 5
1
AES in 6
1
AES in 7
1
AES in 8
1
Router
AES out 1
1
AES out 2
1
AES out 3
1
AES out 4
1
AES out 5
1
AES out 6
1
AES out 7
1
AES out 8
1
DARS
1
AES in 1
1
Ref clock
EXT REF
1
Frame REF
CCS remote
monitoring
and control
Midplane
I/O
Mux
DARS
1
Available via break o ut cable (included).
Router
Bypassable SRCs
Audio
Processing
Data I/O
1
Figure 1-8. APM6801+AAC+ Signal Flow Diagram
Figure 1-9. APM6801+ Neural Modules (UM, DM, MM, LC, LC+6+2+, LC+8
+LC+, MM+LC+) Signal Flow Diagram
DM
APM6800+/APM6801+ Installation and Operation Manual 11
Copyright © 2008-2009, Harris Corporation
+, LC+DM+, UM+LC+,
Page 26

Chapter 1: Introduction
12 APM6800+/APM6801+ Installation and Operation Manual
Copyright © 2008-2009, Harris Corporation
Page 27

Preparing the Product for Installation
Before you install the APM6800+/APM6801+, perform the following:
• Check the equipment for any visible damage that may have occurred during
transit.
• Confirm receipt of all items on the packing list. See “Checking the Packing
List” on page 14 for more information.
Contact your Customer Service representative if parts are missing or
damaged.
• Remove the anti-static shipping pouch, if present, and all other packaging
material.
• Retain the original packaging materials for possible re-use.
See “Unpacking/Shipping Information” on page ix for information about
returning a product for servicing.
Chapter 2
Installation
APM6800+/APM6801+ Installation and Operation Manual 13
Copyright © 2008-2009, Harris Corporation
Page 28

Chapter 2: Installation
Checking the Packing List
Table 2-1. Available Product Packages
Ordered Product Content Description
APM6800-D1+D/APM6801-D1+D
APM6800-D2+D/APM6801-D2+D
APM6800-D3+D/APM6801-D3+D
APM6801+AAC+D
APM6801UM+D
APM6801DM+D
APM6801MM+D
APM6801LC+D
APM6801LC+6+2+D
APM6801LC+8+D
APM6801LC+DM+D
• One front module
• One back module
• One breakout cable
•One APM6800+/APM6801+ Installation
and Operation Manual
APM6801UM+LC+D
APM6801DM+LC+D
APM6801MM+LC+D
Selecting an External Balun
The following baluns from Neutrik or equivalent are recommended for the
unbalanced to balanced AES conversion:
NADITBNC-F : Female chassis XLR 110Ω input - female BNC 75Ω output.
http://www.neutrik.com/fl/en/audio/210_309314683/NADITBNC-F_detail.asp
x
NADITBNC-M: Female BNC 75Ω input - male chassis XLR 110Ω output.
http://www.neutrik.com/fl/en/audio/210_2044239418/NADITBNC-M_detail.as
px
NADITBNC-FX: Female cable end XLR 110Ω input - female BNC 75Ω
output.
http://www.neutrik.com/fl/en/audio/210_1576769505/NADITBNC-FX_detail.a
spx
NADITBNC-MX: Female BNC 75Ω input - male cable end XLR 110Ω output.
http://www.neutrik.com/fl/en/audio/210_1923043515/NADITBNC-MX_detail.
aspx
14 APM6800+/APM6801+ Installation and Operation Manual
Copyright © 2008-2009, Harris Corporation
Page 29
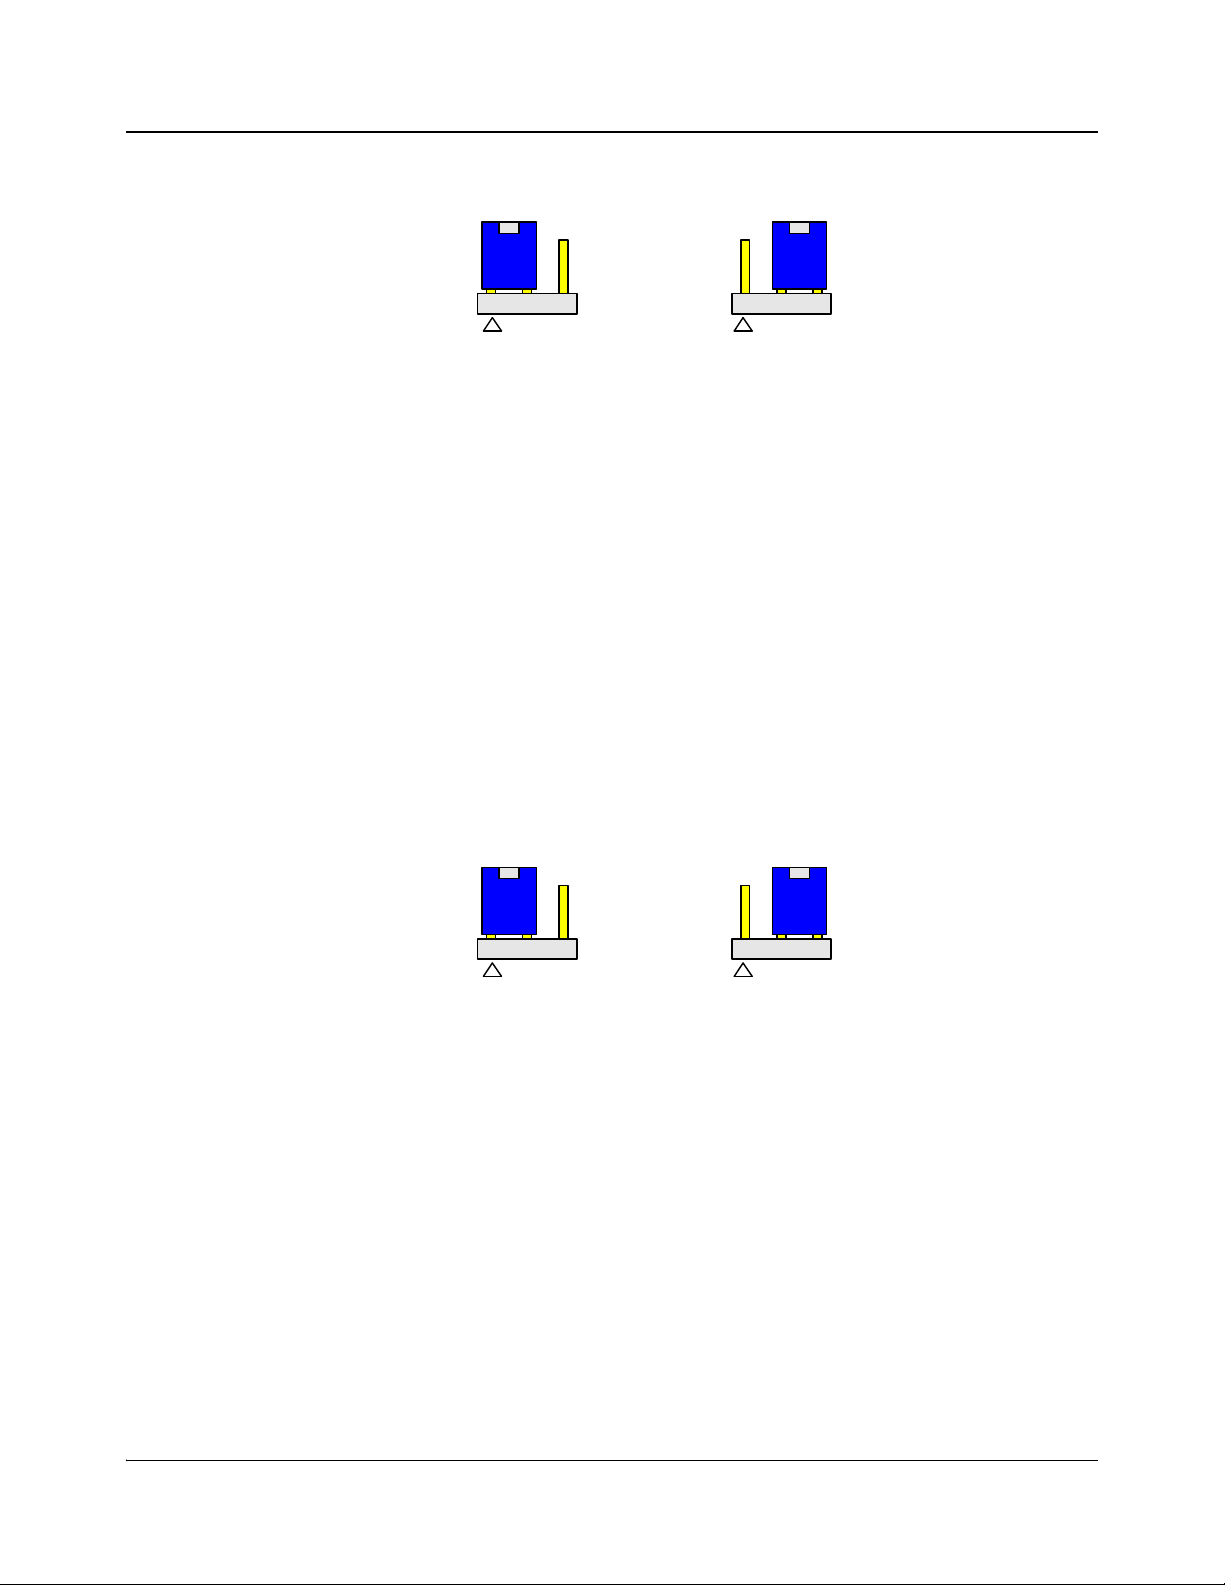
Setting Jumpers
Note
REM/LOC jumper Data I/O termination jumper (J5)
The APM6800+/APM6801+ modules have two jumpers:
• One standard jumper (REM/LOC) for remote or local control (page 15)
• One jumper (J5) for data I/O termination (page 16)
Figure 2-1 shows the location of the jumpers.
Chapter 2: Installation
Figure 2-1. Jumper Locations
Y ou must configu re modules for local or remote operation prior to power-up.
To change the configuration, first remove the module from the frame, reset
the jumper, and th en reinstall the module.
The white triangle near the jumper pins on the module indicates pin 1.
Local and Remote Jumper Settings
To set the REM/LOC jumper for either remote or local control:
1. Locate the REM/LOC control jumper on the module. Figure 2-1 shows the
location of the REM/LOC jumper.
2. Do either of the following:
• Place a jumper on pins 1 and 2 to set the module for Remote control.
• Place a jumper on pins 2 and 3 to set the module for Local control.
APM6800+/APM6801+ Installation and Operation Manual 15
Copyright © 2008-2009, Harris Corporation
Page 30
Chapter 2: Installation
1 2 3 1 2 3
Remote control
Local control
1 2 3 1 2 3
No Termination75Ω Termination
See Figure 2-2.
Figure 2-2. REM/LOC Settings for Remote and Local Control
See Table 1-1 on page 3 for more information on local/remote control jumper
functionality.
Data I/O Termination Jumper Settings
Follow this procedure to set the Data I/O Termination jumper J5:
1. Locate jumper J5 on the module, near the back of the module. (Figure 2-1
on page 15 shows the location of the jumper.)
2. Do either of the following:
• Place a jumper on pins 1 and 2 to set the module for 75Ω Onboard
Termination.
• Place a jumper on pins 2 and 3 to set the module for No Termination.
See Figure 2-3.
16 APM6800+/APM6801+ Installation and Operation Manual
Figure 2-3. Data I/O Termination Settings
Copyright © 2008-2009, Harris Corporation
Page 31

Maximum 6800+ Frame Power Ratings
Note
Caution
The power consumption for the APM6800+/APM6801+ modules is less than
12 W. Table 2-2 shows the maximum allowable power ratings for 6800+
frames. Note the given maximums before installing any 6800+ modules in your
frame.
Due to high levels of heat dissipation, the modules should not be installed in
frames without fans. The modules cannot be installed in FR6802+DM and
6800/7000 series frames.
To maintain pr oper temper atures, ensure that the fr ont p anel is closed at all
times, and that the fan module is fully operational.
Table 2-2. Maximum Power Ratings for 6800+ Frames
Chapter 2: Installation
6800+ Frame Type
FR6802+QXF
(frame with AC or DC power supply)
FR6802+XF
(frame with AC power supply)
FR6802+XF48
(frame with DC power supply)
FR6822+
(frame with AC or DC power supply)
* Each front module requires two slots.
Max. Frame
Power
Dissipation
120 W 10 12 W
120 W 10 12 W
105 W 10 10.5 W
120 W 10 12 W
Before installing this product, read the 6800+ Series Safety Instructions and
Standards Manual shipped with every frame installation and operation
manual. This information is also available on our website. The safety
manual contains important information about the safe installation and
operation of 6800+ series products.
Max. Number of
APM6800+/APM
6801+ Modules
Max Power
Dissipation
for Two
Slots*
APM6800+/APM6801+ Installation and Operation Manual 17
Copyright © 2008-2009, Harris Corporation
See your frame installation and operation manual for information about
installing and operating an FR6802+ or FR6822+ frame and its components.
Page 32

Chapter 2: Installation
Installing the Module
The APM6800+/APM6801+ modules have a double-width back module. Due
to high levels of heat dissipation, the modules should not be installed in frames
without fans. The modules cannot be installed in FR6802+DM and 6800/7000
series frames.
These modules require no specialized installation or removal procedures.
However, if you are installing both front and rear modules, ensure that the back
module is installed first before plugging in the front module. Likewise, ensure
that the front module is unplugged from the frame before removing the rear
module. See your Frame Installation and Operation Manual for information
about installing and operating an FR6802+ or FR6822+ frame and its
components.
An FR6802+RM (Rear Support Extension Rails for 6800+ series frames)
option is recommended for APM6800+/APM6801+ modules. See your Frame
Installation and Operation Manual for installation instructions.
Upgrading Module Firmware
This module’s firmware can be updated using CCS Pilot, CoPilot, or Navigator
version 3.1.1 or higher, or the HTTP software upgrade tool. In order to perform
these upgrades, your frame must be equipped with a 6800+ETH module. See
your frame manual for more information.
Firmware upgrades for the APM6800+/APM6801+ can also provide firmware
upgrades for the Neural audio processing submodule. In the event firmware for
the submodule is upgraded, the module will take approximately 2.5 minutes to
fully start up while new firmware is loaded. During this time the card-edge
LEDs will flash back and forth. Once this time has elapsed the module will
become controllable. Subsequent module start-ups will resume to the normal 8
seconds.
18 APM6800+/APM6801+ Installation and Operation Manual
Copyright © 2008-2009, Harris Corporation
Page 33

Overview
Chapter 3
Configuration and Operation
This chapter describes how to operate the APM6800+/APM6801+ modules
using card-edge controls or by using CCS Navigator.
The following topics are discussed in this chapter:
• “Operating Notes” on page 19
• “Changing Parameter Settings” on page 20
For detailed information on how to operate this product remotely, see the CCS
Pilot, CoPilot, Navigator, or NUCLEUS Network Control Panel,
LCP-3901-1U/RCP-CCS-1U manuals for Ethernet interface.
APM6800+/APM6801+ modules do not support + Pilot Lite software;
however, you can use HTTP monitoring and control (6800
use 6800+ETH
in the field), you must have the following:
• 6800+ETH firmware version 3.0 or higher
• A PC connected to a LAN with a JavaScript-enabled web browser such as
Microsoft Internet Explorer 6.0
• A FR6802
LAN
• A standard 100 Mbps 100Base-T RJ-45 Ethernet cable segment
(use a “crossover” RJ-45 cable to connect to a PC, or a normal
“straight-through” RJ-45 cable to connect to an Ethernet hub/switch)
For more information, see your Frame Installation and Operation Manual.
+HTTP (especially if you are upgrading to 6800+ETH+HTTP
+QXF or FR6822+QXFE frame installed and connected to the
+ETH+HTTP). To
Operating Notes
When setting the control parameters on the APM6800+/APM6801+, observe
the following:
• If you make changes to certain parameters, other related parameters may
also be affected.
APM6800+/APM6801+ Installation and Operation Manual 19
Copyright © 2008-2009, Harris Corporation
Page 34

Chapter 3: Configuration and Operation
• When you change a parameter, the effect is immediate. However, the
module requires up to 20 seconds to save the latest change. After 20
seconds, the new settings are saved and will be restored if the module loses
power and must be restarted.
• Terminate any unused coaxial output connectors with a 75Ω connector.
• If the required video reference is not present when you are operating
APM6800-D2+D/APM6801-D2+D, the free-running reference that is
specified in the Frame Rate parameter is generated to permit the encoding.
(For more information about Encoder parameters, see Table 4-4 on
page 38.)
• When Input 2 (Module) is selected for the DARS Input Select parameter,
the DARS input on the breakout cable (Input 1) becomes a DARS output.
This output is intended to be used in conjunction with the SFS6800
the 6800
DARS signal to the SFS6800
Audio Only & Audio/Video Module Combinations” on page 93.)
+OPT+BRGAPM cable combination, as a way to transfer the
Changing Parameter Settings
+ and
+. (For more information, see “Appendix C:
There are two ways to change the parameters that control your module’s
operation: CCS software applications and card-edge controls.
Using CCS Navigator, you can view, set, and confirm your module’s parameter
settings from your computer’s monitor. Using the card-edge controls, you can
set parameters using the module’s rotary hex and navigation switches.
You can use the information in this chapter to configure and operate your
module using a CCS software application or the module’s card-edge controls.
For more information about setting parameters using the software application or
by using the module’s card-edge control, see “Changing Parameters Using CCS
Navigator” on page 20 and “Changing Parameter Settings Using Card-Edge
Controls” on page 21.
A complete list of APM6800+/APM6801+ control parameters can be found in
“Chapter 4: Parameters, LEDs, and Alarms” on page 27.
Changing Parameters Using CCS Navigator
Before using CCS software applications to change your module’s parameter
settings, you must discover CCS Navigator the module. Discovery is the
processes by which your software finds, and then connects to your module.
Discovering a Module Using Navigator
To discover your module, your Navigator software must be in Build mode.
1. If the Discovery pane is not open, select Tools > Discovery in the main
menu.
A Discovery pane opens, most likely in the bottom left corner of the screen.
2. Click Options, and then click Add.
20 APM6800+/APM6801+ Installation and Operation Manual
Copyright © 2008-2009, Harris Corporation
Page 35

Chapter 3: Configuration and Operation
3. Enter the IP address of the frame that contains your module, the frame that
contains your ICE6800
+ module, or the frame that contains a 6800+ETH
module that provides access to your module.
4. Click OK, and then OK again to close the Discovery Options dialog box.
5. Click Start.
Navigator runs a discovery.
6. When your discovery is complete, Discovery Completed is displayed in
the Discovery pane. To continue, click Save to save the contents of your
discovery to the Discovery folder of the Navigation pane.
You can now switch to Control mode by selecting Operational Mode >
Control from the main menu. Double-click the module’s name in the
Navigation pane. The Control dialog box opens displaying the module’s
controls.
Changing Parameter Settings Using Card-Edge Controls
Use the module’s rotary and navigation switches to change your
APM6800+/APM6801+ parameter settings at the card edge.
1. Rotate the hex switch (mode select rotary switch) to “0.”
2. Once the hex switch is set to “0,” toggle the navigation switch up or down
to select a bank.
View the four control LEDs next to the navigation toggle switch to see
which bank is currently selected. (See
Table 3-1.)
See “Parameters, LEDs, and Alarms” on page 27 to view the various banks,
hex switch positions, and corresponding parameter options and values.
Table 3-1. Bank Select LEDs
Bank 3 Bank 2 Bank 1 Bank 0 Bank Number
Off Off Off Off 0
Off Off Off On 1
Off Off On Off 2
Off Off On On 3
Off On Off Off 4
Off On Off On 5
Off On On Off 6
Off On On On 7
On Off Off Off 8
On Off Off On 9
On Off On Off A (10)
On Off On On B (11)
On On Off Off C (12)
APM6800+/APM6801+ Installation and Operation Manual 21
Copyright © 2008-2009, Harris Corporation
Page 36

Chapter 3: Configuration and Operation
Note
3. Rotate the hex switch to the parameter number (1 to 9) or letter (A to F) of
4. Toggle the navigation switch to select and set the value of the chosen
5. Do either of the following:
Table 3-1. Bank Select LEDs (Continued)
Bank 3 Bank 2 Bank 1 Bank 0 Bank Number
On On Off On D (13)
On On On Off E (14)
On On On On F (15)
the option you want to set.
parameter.
• Rotate the hex switch to another parameter number/letter in the current
bank, and then repeat step 4.
• Rotate the hex switch to “0” again to select a different bank, and then
repeat steps 3 and 4.
For best results, use the available 6800+ software control options
(serial/local or Ethernet/remote) to help view, set, and confirm parameter
values.
Recalling Default Parameter Settings
You can use the module’s Factory Recall parameter to return all of the
module’s parameters to factory default settings. In the control parameter list
(see “Parameters, LEDs, and Alarms” on page 27), each factory default setting
appears in bold.
To return this module to its default settings, make the following selections:
Setting Description Parameter Navigation
Recall factory default settings General Factory Recall [0, F] Yes
22 APM6800+/APM6801+ Installation and Operation Manual
Copyright © 2008-2009, Harris Corporation
Page 37

Viewing Software and Hardware Versions
You can see the current software and hardware versions of the
APM6800+/APM6801+ module. In Navigator, right-click the name of the
module in the Navigator Window, and then select Configuration. A dialog box
appears with the version information.
In addition, you can view the software and hardware versions in CSS-enabled
control panels.
Selecting the Module Locking Source
By using the Lock Source Select parameter, the module can be locked to any of
the following lock sources:
•Genlock
• DARS
• Dolby Decoder Source (for APM6800-D1+D/APM6801-D1+D, this is
Input
AES 1–8)
• Dolby Encoder Ch 1 Source (for APM6800-D2+D/APM6801-D2+D and
APM6800-D3+D/APM6801-D3+D, this is Input AES 1–8)
The Lock Source status parameter reports the locking source of the module.
When the module locks to either Genlock or DARS, it attempts to use DARS
for AES 11 compliance first. If DARS is not present, the module then attempts
to use the reference video for AES 11 compliance if the reference video frame
rate is either 25 Hz or 50 Hz.
Chapter 3: Configuration and Operation
Audio Test Tones
When the module locks to AES 1–8, the module uses the same AES input signal
for AES 11 compliance at the output. In this case, the DARS signal is not used,
even if it is present. If DARS or reference video needs to be used for AES 11
compliance, use either Genlock or DARS as the locking source for the module.
Table 3-2 de scribes the frequency and levels of each audio output test tone
option that are available in the following parameters:
• Output AES 1A–8B
• Dolby Encoder In 1–8 (APM6800-D2+D/APM6801-D2+D and
APM6800-D3+D/APM6801-D3+D only)
• Neural Audio In 1-8 (APM6801UM
APM6801MM
APM6801LC
APM6801DM
+D, APM6801LC+D, APM6801LC+6+2+D,
+8+D, APM6801LC+DM+D, APM6801UM+LC+D,
+LC+D, and APM6801MM+LC+Donly)
+D, APM6801DM+D,
APM6800+/APM6801+ Installation and Operation Manual 23
Copyright © 2008-2009, Harris Corporation
Page 38

Chapter 3: Configuration and Operation
Note
Table 3-2. Audio Output Test Tones
Test Tone Frequency Default Level
Test Tone 400 Hz 400 Hz -18 dBFS
Test Tone 1 kHz 1 kHz -18 dBFS
Test Tone 2 kHz 2 kHz -18 dBFS
Test Tone 4 kHz 4 kHz -18 dBFS
EBU R68 1 kHz -18.06 dBFS
SMPTE RP155 1 kHz -20 dBFS
Audio Status Reporting
Table 3-3 de scribes the thresholds for audio status peak and silence reporting.
Table 3-3. Audio Status Peak and Silence Reporting Thresholds
Status Threshold
Peak 0 dBFS
Silence -100 dBFS
Clearing External Metadata
When you apply external metadata to the APM6800-D2+D/APM6801-D2+D
or the APM6800-D3+D/APM6801-D3+D, the metadata properties persist even
after you remove the external metadata from the module. Performing a Factory
Recall of the user settings does not clear the metadata properties that were
received when external metadata was present. After you remove the external
metadata, you must restart the module to clear the metadata properties.
Audio Synchronization
The APM6800+/APM6801+ modules provide the capability to synchronize
audio with a companion video frame synchronizer by using the Data I/O
connection. To enable the audio synchronizer, set the Audio Track Video
parameter to Yes. The Data I/O status of the upstream video frame synchronizer
will be reported in the Input > Data I/O menu.
Do not use the audio synchronization feature with the
APM6800-D1+D/APM6801-D1+D module. It can corrupt the incoming
Dolby E or AC3 signal.
24 APM6800+/APM6801+ Installation and Operation Manual
Copyright © 2008-2009, Harris Corporation
Page 39

Chapter 3: Configuration and Operation
Audio Delay
Use of the audio synchronization feature will effect the maximum available
audio delay to any of the incoming AES signals. When the audio synchronizer
(Audio Track Video parameter) is set to No, the total available audio delay to
any of these signals is 2.5 seconds. When the audio synchronizer is set to Yes,
the total available audio delay is the result of 2.64 seconds minus the Data I/O
Video Delay reported in the Input > Data I/O menu, up to a maximum of 2.5
seconds.
For example: if Audio Track V ideo is set to Yes and the Data I/O Video Delay
reports 1500 ms, the maximum available audio delay will be 1140 ms.
Audio Modes (APM6801+AAC Only)
Table 3-4. HE-AAC, AAC-LC Audio Standards and Modes
Possible
Audio
Standards
aac-he-24k Yes No No Yes No 24000 29375
aac-he-32k Yes
aac-he-40k Yes
aac-he-48k Yes
aac-he-56k Yes
aac-lc-56k Yes Yes Yes
aac-he-64k Yes No Yes Yes
aac-lc-64k Yes Yes Yes
aac-he-80k
aac-lc-80k Yes Yes Yes
aac-he-96k
aac-lc-96k Yes Yes Yes
aac-he-112k
aac-lc-112k Yes Yes Yes
Possible Audio Modes *
Nominal Bit
Mono Dual-Mono Stereo
No No Yes No 32000 35250
No No Yes No 40000 41125
No Yes Yes No 48000 52875
No Yes Yes No 56000 60160
No No Yes No No 80000 84224
No No Yes No No 96000 102272
No No Yes No No 112000 120320
Parametric
Stereo
No No 56000 60160
No No 64000 66176
No No 80000 84224
No No 96000 102272
No No 112000 120320
5.1
No 64000 66176
Rate (bps)
Transport Stream
Bit Rate (bps)
(Includes TS
Overhead)
aac-he-128k
aac-lc-128k Yes Yes Yes
APM6800+/APM6801+ Installation and Operation Manual 25
Copyright © 2008-2009, Harris Corporation
No No Yes No No 128000 132352
No No 128000 132352
Page 40

Chapter 3: Configuration and Operation
Table 3-4. HE-AAC, AAC-LC Audio Standards and Modes (Continued)
Possible
Audio
Standards
aac-he-160k No No No No Yes 160000 164500
aac-lc-160k Yes Yes Yes
aac-he-192k
aac-lc-192k
aac-he-224k
aac-lc-224k
aac-he-240k
aac-lc-256k
aac-lc-280k
aac-lc-320k
aac-lc-384k
aac-lc-448k
aac-lc-512k
aac-lc-576k
Possible Audio Modes *
Nominal Bit
Mono Dual-Mono Stereo
No No No No Yes 192000 199750
No Yes Yes No No 192000 198528
No No No No Yes 224000 23500
No Yes Yes No No 224000 234624
No No No No Yes 240000 246750
No Yes Yes No No 256000 264704
No No No No Yes 280000 287875
No Yes Yes No No 320000 330880
No No No No Yes 384000 393625
No No No No Yes 448000 458250
No No No No Yes 512000 528750
No No No No Yes 576000 593375
Parametric
Stereo
No No 160000 168448
5.1
Rate (bps)
Transport Stream
Bit Rate (bps)
(Includes TS
Overhead)
aac-lc-640k
aac-lc-800k
No No No No Yes 640000 658000
No No No No Yes 800000 822500
26 APM6800+/APM6801+ Installation and Operation Manual
Copyright © 2008-2009, Harris Corporation
Page 41

Parameters, LEDs, and Alarms
APM6800+/APM6801+ Control Parameters
Table 4-2 to Table 4-11 list all of the available parameters and options for the
modules. The parameters are listed in the order that they appear in Navigator.
lists all the modules, and the parameter lists that apply to that module.
Table 4-1. Parameter Lists Per Module
Module Applicable Parameter Lists
APM6800-D1+D/APM6801-D1+D
APM6800-D2+D/APM6801-D2+D
APM6800-D3+D/APM6801-D3+D
• Table 4-2: APM6800+/APM6801+ Parameters on 29
• Table 4-3: APM6800-D1+D/APM6801-D1+D-Specific Parameters on 34
• Table 4-2: APM6800+/APM6801+ Parameters on 29
• Table 4-4: APM6800-D2+D/APM6801-D2+D Parameters on 38
• Table 4-2: APM6800+/APM6801+ Parameters on 29
• Table 4-5: APM6800-D3+D/APM6801-D3+D Parameters on 45
Chapter 4
APM6801+AAC Table 4-6: APM6801+AAC+D Parameters on 50
APM6801UM+D
APM6801DM+D
APM6801MM+D
APM6801LC+D
APM6801LC+6+2+D
APM6800+/APM6801+ Installation and Operation Manual 27
Copyright © 2008-2009, Harris Corporation
• Table 4-2: APM6800+/APM6801+ Parameters on 29
• Table 4-7: APM6801+ Neural Audio Common Parameters on 56
• Table 4-8: Neural Audio UpMix Parameters on 59
• Table 4-2: APM6800+/APM6801+ Parameters on 29
• Table 4-7: APM6801+ Neural Audio Common Parameters on 56
• Table 4-9: Neural Audio DownMix Parameters on 60
• Table 4-2: APM6800+/APM6801+ Parameters on 29
• Table 4-7: APM6801+ Neural Audio Common Parameters on 56
• Table 4-10: Neural Audio MultiMerge Parameters on 61
• Table 4-2: APM6800+/APM6801+ Parameters on 29
• Table 4-7: APM6801+ Neural Audio Common Parameters on 56
• Table 4-11: Neural Audio Loudness Control Parameters on 62
• Table 4-2: APM6800+/APM6801+ Parameters on 29
• Table 4-7: APM6801+ Neural Audio Common Parameters on 56
• Table 4-11: Neural Audio Loudness Control Parameters on 62
Page 42

Chapter 4: Parameters, LEDs, and Alarms
Table 4-1. Parameter Lists Per Module (Continued)
Module Applicable Parameter Lists
APM6801LC+8+D
APM6801LC+DM+D
APM6801UM+LC+D
APM6801DM+LC+D
APM6801MM+LC+D
• Table 4-2: APM6800+/APM6801+ Parameters on 29
• Table 4-7: APM6801+ Neural Audio Common Parameters on 56
• Table 4-11: Neural Audio Loudness Control Parameters on 62
• Table 4-2: APM6800+/APM6801+ Parameters on 29
• Table 4-7: APM6801+ Neural Audio Common Parameters on 56
• Table 4-9: Neural Audio DownMix Parameters on 60
• Table 4-11: Neural Audio Loudness Control Parameters on 62
• Table 4-2: APM6800+/APM6801+ Parameters on 29
• Table 4-7: APM6801+ Neural Audio Common Parameters on 56
• Table 4-8: Neural Audio UpMix Parameters on 59
• Table 4-11: Neural Audio Loudness Control Parameters on 62
• Table 4-2: APM6800+/APM6801+ Parameters on 29
• Table 4-7: APM6801+ Neural Audio Common Parameters on 56
• Table 4-9: Neural Audio DownMix Parameters on 60
• Table 4-11: Neural Audio Loudness Control Parameters on 62
• Table 4-2: APM6800+/APM6801+ Parameters on 29
• Table 4-7: APM6801+ Neural Audio Common Parameters on 56
• Table 4-10: Neural Audio MultiMerge Parameters on 61
• Table 4-11: Neural Audio Loudness Control Parameters on 62
Parameter Table Notes
When viewing the control parameter tables, observe the following:
• Shaded table rows with
(feedback) parameters.
• Bolded parameter options indicate the default settings for the parameter.
• The bank selection and rotary switch combinations for each parameter and
parameter option are listed in the tables under the Bank, Switch heading.
For information about navigating through the parameter list using the
card-edge controls, see “Changing Parameter Settings Using Card-Edge
Controls” on page 21.
• Where a range is specified in a parameter name or option name as (1A–8B),
this will include options 1A, 1B, 2A, 2B, up to and including 8A and 8B.
[RO] after the parameter name indicate read-only
28 APM6800+/APM6801+ Installation and Operation Manual
Copyright © 2008-2009, Harris Corporation
Page 43

Chapter 4: Parameters, LEDs, and Alarms
APM6800+/APM6801+ Parameters
The parameters in Table 4-2 pertain to all APM6800+/APM6801+ modules.
Table 4-2. APM6800+/APM6801+ Parameters
.
Parameter Name
General
Bank,
Switch
Function Options
Serial Number [RO] Displays the serial number of the
module
Factory Recall 0, F Recalls the factory default settings
Input > AES
Input AES (1–8) Present
[RO]
Input > AES > Format
Input AES (1A–8B)
Format
5, F
•
•
Displays the presence of AES input
for the specified channel
Selects the AES format (Auto/
PCM/non-PCM) of the selected
input audio channel.
6, F
Input AES (1A–8B)
Format Feedback [RO]
Input > AES > Status
Input AES (1A–8B)
Status [RO]
Displays the detected format for the
specified channel
Displays the current status of the
audio input channel
<string>
• Off
•On
•No
•Yes
• Auto
•PCM
•Non-PCM
•PCM
•Non-PCM
• Unknown
•Normal
• Silence
• Peak
• Not Present
APM6800+/APM6801+ Installation and Operation Manual 29
Copyright © 2008-2009, Harris Corporation
Page 44

Chapter 4: Parameters, LEDs, and Alarms
Table 4-2. APM6800+/APM6801+ Parameters (Continued)
Parameter Name
Input > V-Bit
Bank,
Switch
Function Options
V-bit Mute Enable 7, 1 En ables automatic muting of
outputs when the V-bit is set
Note Muting on a detected V-Bit
applies to PCM audio channels only.
Non-PCM audio channels will not be
muted.
Input AES (1A–8B) V-Bit
Feedback
Input > Genlock/DARS
Reports the validity bit status of the
input audio channel
Lock Source Select 0, A Sets the locking source for the
module
Lock Source [RO] Displays the locking source for the
module
Genlock Input Source
Select
Genlock Video Present
[RO]
Genlock Video Locked
[RO]
Genlock Video Standard
Feedback [RO]
0, B Sets the reference video input
source
Displays the presence of the
reference video signal
Displays the locked status of the
reference video signal
Displays the detected reference
video standard
DARS Input Select 0, C Sets the source of the DARS input
signal
• No
•Yes
•Off
•On
• Genlock
•DARS
• Genlock
•DARS
•AES 1
•AES 2
•AES 3
• Frame Reference
• Card Reference
•No
•Yes
•No
•Yes
• Unknown
• 1080P 50
• 1080P 59.94
• 1080P 60
• 1080P 25
• 720P 59.94
•720P 60
• 1080P 23.98
• 1080P 24
• 1080P 29.97
• 1080P 30
• 1080I 25
• Input 1 (Cable)
• Input 2 (Module)
•AES 4
•AES 5
•AES 6
•AES 7
•AES 8
• 1080I 29.97
• 1080I 30
• SD 525
• SD 625
• 720P 50
• 1080PsF 23.98
• 1080PsF 24
• 720P 29.97
• 720P 30
• 720P 25
• 720P 23.98
• 720P 24
30 APM6800+/APM6801+ Installation and Operation Manual
Copyright © 2008-2009, Harris Corporation
Page 45

Table 4-2. APM6800+/APM6801+ Parameters (Continued)
Chapter 4: Parameters, LEDs, and Alarms
Parameter Name
Bank,
Switch
Function Options
DARS Input Present [RO] Displays the presence of the DARS
input signal
DARS Locked to
Reference [RO]
Input > Data I/O
Displays the locked status of the
DARS input signal
Data I/O Present Reports the presence of the Data
I/O signal
Data I/O Video Standard Reports the video standard
indicated in the Data I/O signal
Data I/O Video Hot
Switch
Reports if a video hot-switch is
indicated in the Data I/O signal
•No
•Yes
•No
•Yes
•No
•Yes
• Unknown
• 1080P 50
• 1080P 59.94
• 1080P 60
• 1080P 25
• 720P 59.94
•720P 60
• 1080P 23.98
• 1080P 24
• 1080P 29.97
• 1080P 30
• 1080I 25
• 1080I 29.97
•No
•Yes
• 1080I 30
• SD 525
• SD 625
• 720P 50
• 1080PsF 23.98
• 1080PsF 24
• 720P 29.97
• 720P 30
• 720P 25
• 720P 23.98
• 720P 24
Data I/O Video Delay Reports the amount of video delay
0.000 ms to 2640.000 ms
being tracked
Processing
Fade Rate 3, B Controls th e rate of fading (in
0.0 to 10.0 (0.1)
seconds) when channels are
swapped or muted
Audio Control Style 7, 5 Switches between Mono and Stereo
control styles
Processing > Sample Rate Conversion
Input AES (1–8) SRC
Control
0, 2
•
•
Controls the insertion of the audio
sample rate converter in the
processing path for the specified
channel
• Mono
•Stereo
• Auto
•On
•Off
0, 9
Input AES (1–8) SRC
Status
APM6800+/APM6801+ Installation and Operation Manual 31
Copyright © 2008-2009, Harris Corporation
Reports the state of the specified
SRC
• Enabled
• Bypassed
Page 46

Chapter 4: Parameters, LEDs, and Alarms
Table 4-2. APM6800+/APM6801+ Parameters (Continued)
Parameter Name
Processing > AES Delay
Bank,
Switch
Function Options
Delay Lock 7, 2 Couples fixed delay controls
Input AES (1A–8B) Delay 0 , D
0, E
Adjusts the delay (in ms) for input
audio AES of the specified channel
1, 1
•
•
1, E
Processing > Gain
Gain Lock 7, A Couples gain controls
Output AES (1A–8B)
Gain
7, B
•
Adjusts gain for specified output
audio AES channel
•
8, B
Processing > Invert
Output AES (1A–8B)
Invert
8, C
•
Inverts the selected audio channel
to correct for phase error
•
9, C
• No
•Yes
0.00 ms to 2500.00 ms
Note: See “Audio Delay” on page 25 for
information on delay range limitations.
• No
•Yes
-36.0 dB to 36.0 dB (0.0 dB)
• No
•Yes
Processing > Mute
Master Mute 9, D Enables muting for all output audio
channels
Output AES (1A–8B)
Mute
9, E
•
Enables muting for specified output
AES audio channel
• Off
•On
• No
•Yes
•
10, E
32 APM6800+/APM6801+ Installation and Operation Manual
Copyright © 2008-2009, Harris Corporation
Page 47

Table 4-2. APM6800+/APM6801+ Parameters (Continued)
Chapter 4: Parameters, LEDs, and Alarms
Parameter Name
Processing > Test Tones
Bank,
Switch
Function Options
Test Tone 400 Hz Level 7, 6 Sets the tone amplitude -36.0 dBFS to 0.0 dBFS (-18.0 dBFS)
Test Tone 1 kHz Level 7, 7
Test Tone 2 kHz Level 7, 8
Test Tone 4 kHz Level 7, 9
Processing > Synchronization
Audio Track video 7, 3 Enables audio synchronization with
the video frame synchronizer
Audio LOV Output Mode 7, 4 Selects the output audio mode when
the input video is disrupted
Output > AES > Interface
Output AES 1–8 Interface
Control
3, C Provides a master control for the
AES output interface
• No
•Yes
• Pass
•Mute
• Individual Control
• Set All Unbalanced
• Set All Balanced
Output AES (1–8)
Interface
3, D
•
Sets the type of output for the
specified AES channel
• Unbalanced
• Balanced
•
4, 5
Output > AES > Source Selection
Output AES
(1A–8B) Source Select
4, 6
•
•
5, 6
Sets the source for output for the
specified AES channel
•AES (1A–8B)
default Ch 1A-8B: the AES that
corresponds to the specified AES
channel (e.g., for Output 2A, the
default output is AES 2A)
• AES (1–8) Sum
• Test Tone 400Hz
•Test Tone 1kHz
•Test Tone 2kHz
•Test Tone 4kHz
• Mute
• EBU R68
• SMPTE RP155
APM6800+/APM6801+ Installation and Operation Manual 33
Copyright © 2008-2009, Harris Corporation
Page 48

Chapter 4: Parameters, LEDs, and Alarms
Table 4-2. APM6800+/APM6801+ Parameters (Continued)
Parameter Name
Output > AES > Word Length
Output AES (1–8) Word
Length
Output > AES audio
Output AES (1A–8B)
Format Feedback
Bank,
Switch
5, 7
•
•
5, E
Function Options
Adjusts the sample resolution for
output of the specified AES channel
Reports the AES format (PCM/
non-PCM) of specified AES output
audio channel
Dolby Decoder Options (APM6800-D1+D/APM6801-D1+D)
In addition to the APM6800+/APM6801+ parameters in Table 4-2,
APM6800-D1+D/APM6801-D1+D modules also have the parameters from
Table 4-3.
Table 4-3. APM6800-D1+D/APM6801-D1+D-Specific Parameters
• 24 bits
•20 bits
•16 bits
•PCM
• Non-PCM
Parameter Name
Bank,
Switch
General
Dolby Decoder Ver Firmware version of Dolby
Decoder
Serial Port Interface 0, 1 Selects the serial port interface
Input > Genlock/DARS
Lock Source Select 0, A Sets the locking source for the
module
Processing > Dolby
Guard Band Offset 2, B Adjusts the guard band location
Function Options
<string>
• RS-232
• RS-422
• Genlock
• DARS
• Dolby Dec Src
• 0 Ln to 524 Ln (525)
• 0 Ln to 624 Ln (625)
• 0 Ln to 749 Ln (720)
• 0 Ln to 1124 Ln (1080)
34 APM6800+/APM6801+ Installation and Operation Manual
Copyright © 2008-2009, Harris Corporation
Page 49

Table 4-3. APM6800-D1+D/APM6801-D1+D-Specific Parameters
Chapter 4: Parameters, LEDs, and Alarms
Parameter Name
Processing > Dolby > Decoder
Dolby Decoder Input
Select
Dolby Bitstream Format
[RO]
I/P Video Frame Rate
[RO]
3, 7 Sets the input audio source for the
Bank,
Switch
Dolby E/Dolby Digital Decoder
Displays the format of the input
audio bitstream
Displays the status of the video
vertical sync input
Function Options
Dolby E Frame Rate [RO] Displays the frame rate of the
associated Dolby E bitstream
Video Frame Sync Status
[RO]
Aux Channel Output
Mode
Non-Dolby Latency
Select
3, A Sets the downmix mode for the
3, 8 Specifies the main channel decoder
Displays the status of the video
vertical sync input
two-channel auxiliary output
latency for PCM bitstreams
• AES 1A/1B
• AES 2A/2B
• AES 3A/3B
• AES 4A/4B
• AES 5A/5B
• AES 6A/6B
• AES 7A/7B
• AES 8A/8B
• Dolby Digital 32-bit
• Dolby Digital 16-bit Ch 1
• Dolby Digital 16-bit Ch 2
• Dolby Digital 16-bit Ch 1 and Ch 2
• Dolby E 24-bit
• Dolby E 20-bit
• Dolby E 16-bit
• Non-Dolby
• Unknown
• 23.98 fps
• 24 fps
• 25 fps
• 30 fps
• 50 fps
• 59.94 fps
• 60 fps
• 29.97 fps
• Unknown
• 23.98 fps
• 24 fps
• 25 fps
• 30 fps
• 50 fps
• 59.94 fps
• 60 fps
• 29.97 fps
• Present at Dolby E Rate
• Valid - Not at Dolby E Rate
• Unknown
• Lt/Rt
•Lo/Ro
• Mono
• Mute
• Single Frame
• Minimum
Processing > Dolby > Channel Status
Dolby Dec (1–8) Status
[RO]
Dolby Dec Aux L Status
[RO]
APM6800+/APM6801+ Installation and Operation Manual 35
Copyright © 2008-2009, Harris Corporation
Displays the current status of
decoded Dolby audio
Displays the current status of
decoded Dolby audio
• Normal
• Silence
• Normal
• Silence
• Peak
• Peak
Page 50

Chapter 4: Parameters, LEDs, and Alarms
Table 4-3. APM6800-D1+D/APM6801-D1+D-Specific Parameters
Parameter Name
Dolby Dec Aux R Status
[RO]
Processing > Dolby > Delay
Dolby Decoder Ch (1–8)
Delay
Dolby Decoder Aux L
Delay
Dolby Decoder Aux R
Delay
Function Options
Bank,
Switch
Displays the current status of
decoded Dolby audio
1, F
•
•
2, 7
2, 8 Adjusts the delay (in ms) for the
2, 9 Adjusts the delay (in ms) for the
Adjusts the delay (in ms) for the
specified Dolby decoder channel
Dolby decoder channel aux L
Dolby decoder channel aux R
• Normal
• Silence
0.00 to 2500.00
0.00 to 2500.00
0.00 to 2500.00
• Peak
36 APM6800+/APM6801+ Installation and Operation Manual
Copyright © 2008-2009, Harris Corporation
Page 51

Table 4-3. APM6800-D1+D/APM6801-D1+D-Specific Parameters
Chapter 4: Parameters, LEDs, and Alarms
Parameter Name
Bank,
Output > AES > Source Selection
Output AES
(1A–8B) Source Select
4, 6
•
•
5, 6
Function Options
Switch
Sets the source for output for the
specified AES channel
•AES (1A–8B)
default Ch 5A-8B: the AES that
corresponds to the specified AES
channel (e.g., for Output 5A, the
default output is AES 5A)
• AES (1–8) Sum
• Dolby Decoder Ch (1–8)
default 1A is Dolby Ch 1
default 1B is Dolby Ch 2
default 2A is Dolby Ch 3
default 2B is Dolby Ch 4
default 3A is Dolby Ch 5
default 3B is Dolby Ch 6
default 4A is Dolby Ch 7
default 4B is Dolby Ch 8
• Dolby Decoder Aux L
• Dolby Decoder Aux R
• Dolby Decoder Ch 1/2 Sum
• Dolby Decoder Ch 3/4 Sum
• Dolby Decoder Ch 5/6 Sum
• Dolby Decoder Ch 7/8 Sum
• Dolby Decoder Aux L/R Sum
• Test Tone 400Hz
• Test Tone 1kHz
• Test Tone 2kHz
• Test Tone 4kHz
• Mute
• EBU R68
• SMPTE RP155
APM6800+/APM6801+ Installation and Operation Manual 37
Copyright © 2008-2009, Harris Corporation
Page 52

Chapter 4: Parameters, LEDs, and Alarms
APM6800-D2+D/APM6801-D2+D Parameters
In addition to the APM6800+/APM6801+ parameters in Table 4-2,
APM6800-D2+D/APM6801-D2+D modules also have the parameters from
Table 4-4.
Table 4-4. APM6800-D2+D/APM6801-D2+D Parameters
.
Parameter Name
Bank,
Switch
General
Dolby Encoder Ver Displays the version number of the
firmware
Serial Port Interface 0, 1 Sets the serial port int e rface
Input > Genlock/DARS
Lock Source Select 0, A Sets the locking source for the
module
Processing > Dolby
Guard Band Offset 2, B Adjusts the guard band location
Function Options
<string>
•RS-232
• RS-422
• Genlock
•DARS
• Dolby Enc Ch 1 Src
• 0 Ln to 524 Ln (525)
• 0 Ln to 624 Ln (625)
• 0 Ln to 749 Ln (720)
• 0 Ln to 1124 Ln (1080)
38 APM6800+/APM6801+ Installation and Operation Manual
Copyright © 2008-2009, Harris Corporation
Page 53

Chapter 4: Parameters, LEDs, and Alarms
Table 4-4. APM6800-D2+D/APM6801-D2+D Parameters (Continued)
Parameter Name
Processing > Dolby > Encoder
Dolby Encoder In (1–8) 2, C
•
Bank,
Switch
Sets audio source for the specified
Dolby encoder
Function Options
•
3, 4
Encoder Status [RO] Indicates the operational status of the
encoder
Video Frame Sync Status
[RO]
Reference Frame Rate
[RO]
Indicates the status of the external
video reference signal
Indicates the reference video frame
rate
•AES 1A
(default: 1)
•AES 1B
(default: 2)
•AES 2A
(default: 3)
•AES 2B
(default: 4)
•AES 3A
(default: 5)
•AES 3B
(default: 6)
•AES 4A
(default: 7)
•AES 4B
(default: 8)
•AES 5A
•AES 5B
•AES 6A
•AES 8A
•AES 8B
• AES 1 Sum
• AES 2 Sum
• AES 3 Sum
• AES 4 Sum
• AES 5 Sum
• AES 6 Sum
• AES 7 Sum
• AES 8 Sum
• Test Tone 400Hz
• Test Tone 1kHz
• Test Tone 2kHz
• Test Tone 4kHz
•Mute
• EBU R68
• SMPTE RP155
•AES 6B
•AES 7A
•AES 7B
• Encoding Active
• Encoding Stopped
• Pass-through Mode
• Present - Dolby E Rate
• Valid - Not Dolby E Rate
• Invalid
• Unknown
• 23.98 fps
•24 fps
•25 fps
• 29.97 fps
•30 fps
•50 fps
• 59.94 fps
•60 fps
APM6800+/APM6801+ Installation and Operation Manual 39
Copyright © 2008-2009, Harris Corporation
Page 54

Chapter 4: Parameters, LEDs, and Alarms
Table 4-4. APM6800-D2+D/APM6801-D2+D Parameters (Continued)
Parameter Name
Bank,
Switch
Function Options
Ext. Metadata Status [RO] Indicates external metadata status
Metadata Reversion Status Indicates if internal or external
Metadata is being used
Frame Rate 3, 5 Specifies the frame rate of the Dolby
bitstream
Dolby Bit Depth 3, 6 Specifies the number of bits per word
within the Dolby bitstream
Metadata Source 12, 3 Selects the source of metadata to be
included in the Dolby E metadata
segment
Processing > Dolby > Encoder > Metadata Generator
Program Configuration 12, 2 Specifies the program configuration
of the Dolby bitstream
• Not Present
• Invalid
• Valid
• Valid AC-3
• Valid AC-3 with BSI
• Internal
• External
• Auto
• 23.98 fps
•24 fps
• 20 bit
• 16 bit
• External
• Internal
• 2 + 2x1
• 2 + 4x1
• 2 + 6x1
• 2x2 + 2x1
• 2x2 + 4x1
•3x2
• 3x2 + 2x1
•4
•4x1
•4 + 2
• 4 + 2x1
•4 + 4
• 25 fps
• 29.97 fps
• 30 fps
• 4 + 2x2
• 4 + 2 + 2x1
• 4 + 4x1
•4x2
•5.1
• 5.1 + 2
• 5.1 + 2x1
•6x1
•7.1
• 7.1 Screen
• 8x1
Processing > Dolby > Encoder > Metadata Generator > Subprogram 1
Program ID Specifies the program ID
•Program 1
•Program 2
•Program 3
•Program 4
40 APM6800+/APM6801+ Installation and Operation Manual
Copyright © 2008-2009, Harris Corporation
• Program 5
• Program 6
• Program 7
• Program 8
Page 55

Chapter 4: Parameters, LEDs, and Alarms
Table 4-4. APM6800-D2+D/APM6801-D2+D Parameters (Continued)
Parameter Name
Bank,
Switch
Bitstream Mode 12, 5 Specifies the AC-3 bitstream mode
Coding Mode 12, 6 Specifi es the AC-3 coding mode
Surround Mode 12, 7 Specifies whether or not the program
is a Dolby Surround encoded stereo
mix
Low Freq Effect Ch 12, 8 Specifies the status of the AC-3 low
frequency effect channel
Function Options
• Complete Main
• Music and Effects
• Visually Impaired
• Hearing Impaired
• Dialogue
• Commentary
• Emergency
• Voice over
• Karaoke
•1/0 (C)
• 2/0 (L-R)
• 3/0 (L-C-R)
• 2/1 (L-R-S)
• 3/1 (L-C-R-S)
• 2/2 (L-R-SL-SR)
• 3/2 (L-C-R-SL-SR)
• Unknown
• No
•Yes
• On
•Off
Dialog Normalization 12, 9 Specifies the average dialogue level
relative to 100%
Aud. Production Info 12, A Indicates whether or not audio
production parameters exist
AC-3 Mix Level 12, B Specifies the acoustic sound pressure
level used during final audio mixing
Room Type 12, C Specifies the type/calibration of the
mixing room
Copyright Protected 12, D Indicates whether or not the program
is copyright protected
Original Bitstream 12, E Specifies the AC-3 original bitstream
flag
EXT BSI1 Present 12, F Indicates whether or not extended
BSI1 metadata is present
APM6800+/APM6801+ Installation and Operation Manual 41
Copyright © 2008-2009, Harris Corporation
-31 dBFS to -1 dBFS (-27 dBFS)
•Yes
• No
80 dB SPL to 111 dB SPL (105 dB SPL)
• Not specified
• Large Room- X Curve Mon
• Small Room- Flat Mon
• Yes
•No
• Yes
•No
• Yes
•No
Page 56

Chapter 4: Parameters, LEDs, and Alarms
Table 4-4. APM6800-D2+D/APM6801-D2+D Parameters (Continued)
Parameter Name
Bank,
Switch
Ext Stereo Downmix 13, 1 Indicates the preferred type of stereo
downmix
Ext LtRt Ctr Mix Lvl 13, 2 Indicates the nominal LtRt downmix
of the center channel
Ext LtRt Surr Mix Lvl 13, 3 Indicates the nominal LtRt dow nmix
of the surround channel(s)
Ext LoRo Ctr Mix Lvl 13, 4 Indicates the nominal LoRo downmix
of the center channel
Ext LoRo Surr Mix Lvl 13, 5 Indicates the nominal LoRo downmix
of the surround channel(s)
Ext BSI2 Present 13, 6 Indicates whether or not extended
BSI2 metadata is present
Ext Surr EX Mode 13, 7 Indicates if the program has been
encoded in Surround EX
Ext A/D Type 13, 9 Indicates the type of A/D used to
capture the program
DC Highpass Flt 13, A Indicates the AC-3 encoder DC
highpass filter status
B/W Lowpass Flt 13, B Indicates the AC-3 encoder
bandwidth lowpass filter status
LFE Ch Lowpass Flt 13, C Indicates the AC-3 encoder LFE
channel lowpass filter status
Srnd Phase Shift Flt 13, D Indicates the AC-3 encoder surround
90 degrees phase shift filter status
Srnd Ch Attenuator 13, E Indicates the AC-3 encoder 3 dB
surround channel attenuator status
Function Options
• Not specified
• LtRt Preferred
• LoRo Preferred
• +3.0 dB
• +1.5 dB
• 0.0 dB
• -1.5 dB
• -1.5 dB
• -3.0 dB
• -4.5 dB
• +3.0 dB
• +1.5 dB
• 0.0 dB
• -1.5 dB
• -1.5 dB
• -3.0 dB
• -4.5 dB
• Yes
•No
• Unknown
• No
•Yes
• Standard
•HDCD
• Enable
•Disable
• Enable
•Disable
• Enable
•Disable
• Enable
•Disable
• Enable
• Disable
• -3.0 dB
• -4.5 dB
• -6.0 dB
• -Inf dB
• -6.0 dB
• -Inf dB
• -3.0 dB
• -4.5 dB
• -6.0 dB
• -Inf dB
• -6.0 dB
• -Inf dB
42 APM6800+/APM6801+ Installation and Operation Manual
Copyright © 2008-2009, Harris Corporation
Page 57

Chapter 4: Parameters, LEDs, and Alarms
Table 4-4. APM6800-D2+D/APM6801-D2+D Parameters (Continued)
Parameter Name
Bank,
Switch
Function Options
RF Cmpr Profile 14, 1 Indicates the AC-3 encoder RF
compression profile
Line Mode Profile 14 , 3 Indicates the AC-3 encoder dynamic
range compression profile
Processing > Dolby > Channel Status
Dolby Enc L Status [RO] Displays the current status of encoded
Dolby audio
Dolby Enc R Status [RO] Displays the current status of encoded
Dolby audio
•None
• Film- Standard
• Film- Light
• Music- Standard
• Music- Light
• Speech
•None
• Film- Standard
• Film- Light
• Music- Standard
• Music- Light
• Speech
•Normal
• Silence
•Normal
• Silence
• Peak
• Peak
Processing > Dolby > Delay
Dolby Encoder Output
Delay
2, A Adjusts the delay (in ms) for Dolby
encoder output
0.00 to 2500.00 ms
APM6800+/APM6801+ Installation and Operation Manual 43
Copyright © 2008-2009, Harris Corporation
Page 58

Chapter 4: Parameters, LEDs, and Alarms
Table 4-4. APM6800-D2+D/APM6801-D2+D Parameters (Continued)
Parameter Name
Bank,
Output > AES > Source Selection
Output AES
(1A–8B) Source Select
4, 6
•
•
5, 6
Function Options
Switch
Sets the source for output for the
specified AES channel
• AES (1A–8B)
default Ch 2A-8B: the AES that
corresponds to the specified AES
channel (e.g., for Output 2A, the
default output is AES 2A)
• AES (1B–8B)
• AES (1–8) Sum
•Dolby Enc Out A (Left)
default Ch 1A
• Dolby Enc Out B (Right)
default Ch 1B
• Test Tone 400Hz
•Test Tone 1kHz
•Test Tone 2kHz
•Test Tone 4kHz
• Mute
• EBU R68
• SMPTE RP155
Output > Metadata
Meta Revert Md 14, 4 Specifies the metadata output if
incoming bitstream is lost or
corrupted
• Internal
• Last used
•Stop
44 APM6800+/APM6801+ Installation and Operation Manual
Copyright © 2008-2009, Harris Corporation
Page 59

Chapter 4: Parameters, LEDs, and Alarms
APM6800-D3+D/APM6801-D3+D Parameters
In addition to the APM6800+/APM6801+ parameters in Table 4-2,
APM6800-D3+D/APM6801-D3+D modules also have the parameters from
Table 4-5.
Table 4-5. APM6800-D3+D/APM6801-D3+D Parameters
.
Parameter Name
Bank,
Switch
General
Dolby EncoderVer [RO] Displays the version number of the
firmware
Serial Port Interface 0, 1 Sets the serial port interface
Input > Genlock/DARS
Lock Source Select 0, A Sets the locking so urce for the
module
Processing > Dolby
Guard Band Offset 2, B Adjusts the guard band location
Function Options
<string>
•RS-232
• RS-422
• Genlock
•DARS
• Dolby Enc Ch 1 Src
• 0 Ln to 524 Ln (525)
• 0 Ln to 624 Ln (625)
• 0 Ln to 749 Ln (720)
• 0 Ln to 1124 Ln (1080)
APM6800+/APM6801+ Installation and Operation Manual 45
Copyright © 2008-2009, Harris Corporation
Page 60

Chapter 4: Parameters, LEDs, and Alarms
Table 4-5. APM6800-D3+D/APM6801-D3+D Parameters (Continued)
Parameter Name
Processing > Dolby > Encoder
Dolby Encoder In (1–6) 2, C
•
Bank,
Switch
Sets audio source for the specified
Dolby encoder
Function Options
•
3, 2
Encoder Status [RO] Indicates the operational status of
the encoder
Ext. Metadata Status [RO] Indicates external metadata status
Metadata Reversion
Status [RO]
Indicates if internal or external
Metadata is being used
•AES 1A
(default: 1)
•AES 1B
(default: 2)
•AES 2A
(default: 3)
•AES 2B
(default: 4)
•AES 3A
(default: 5)
•AES 3B
(default: 6)
•AES 4A
•AES 4B
•AES 5A
•AES 5B
•AES 6A
•AES 6B
•AES 8B
•AES 1 Sum
•AES 2 Sum
•AES 3 Sum
•AES 4 Sum
•AES 5 Sum
•AES 6 Sum
•AES 7 Sum
•AES 8 Sum
• Test Tone 400Hz
• Test Tone 1kHz
• Test Tone 2kHz
• Test Tone 4kHz
•Mute
• EBU R68
• SMPTE RP155
•AES 7A
•AES 7B
•AES 8A
• Encoding Active
• Encoding Stopped
• Pass-through Mode
• Not Present
• Invalid
•Valid
•Valid AC-3
• Valid AC-3 with BSI
• Internal
• External
46 APM6800+/APM6801+ Installation and Operation Manual
Copyright © 2008-2009, Harris Corporation
Page 61

Chapter 4: Parameters, LEDs, and Alarms
Table 4-5. APM6800-D3+D/APM6801-D3+D Parameters (Continued)
Parameter Name
Bank,
Switch
Function Options
Data Rate 12, 1 Controls the data rate of the output
of the Dolby Digital encoder
Metadata Source 12, 4 Selects the source of the metadata
used by the encoder
Processing > Dolby > Encoder > Metadata Generator > Subprogram 1
Bitstream Mode 12, 5 Specifies the AC-3 bitstream mode
Coding Mode 12, 6 Specifies the AC-3 coding mode
Surround Mode 12, 7 Specifies whether or not the
program is a Dolby Surround
encoded stereo mix
• Auto 384 kbps
• Auto 448 kbps
• 56 kbps
• 64 kbps
• 80 kbps
• 96 kbps
• 112 kbps
• 128 kbps
• 160 kbps
• 192 kbps
• 224 kbps
• 256 kbps
• 320 kbps
• 384 kbps
• 448 kbps
• 512 kbps
• 576 kbps
• 640 kbps
• Ext - Prog 1
• Ext - Prog 2
• Ext - Prog 3
• Ext - Prog 4
• Ext - Prog 6
• Ext - Prog 7
• Ext - Prog 8
• Internal
• Ext - Prog 5
• Complete Main
• Music and Effects
• Visually Impaired
• Hearing Impaired
•Dialogue
• Commentary
•Emergency
• Voi ce ov er
• Karaoke
•1/0 (C)
• 2/0 (L-R)
• 3/0 (L-C-R)
• 2/1 (L-R-S)
• 3/1 (L-C-R-S)
• 2/2 (L-R-SL-SR)
• 3/2 (L-C-R-SL-SR)
• Unknown
• No
•Yes
APM6800+/APM6801+ Installation and Operation Manual 47
Copyright © 2008-2009, Harris Corporation
Page 62

Chapter 4: Parameters, LEDs, and Alarms
Table 4-5. APM6800-D3+D/APM6801-D3+D Parameters (Continued)
Parameter Name
Bank,
Switch
Low Freq Effect Ch 12, 8 Specifies the status of the AC-3
low frequency effect channel
Dialog Normalization 12, 9 Specifies the average dialogue
level relative to 100%
Aud. Production Info 12, A Indicates whether or not audio
production parameters exist
AC-3 Mix Level 12, B Specifies the acoustic sound
pressure level used during final
audio mixing
Room Type 12, C Specifi es th e type/calibration of
the mixing room
Copyright Protected 12, D Indicates whether or not the
program is copyright protected
Original Bitstream 12, E Specifies the AC-3 original
bitstream flag
EXT BSI1 Present 12, F Indicates whether or not extended
BSI1 metadata is present
Ext Stereo Downmix 13, 1 Indicates the preferred type of
stereo downmix
Ext LtRt Ctr Mix Lvl 13, 2 Ind icates the nominal LtRt
downmix of the center channel
Ext LtRt Surr Mix Lvl 13, 3 Indicates the nominal LtRt
downmix of the surround
channel(s)
Ext LoRo Ctr Mix Lvl 13, 4 Indicates the nominal LoRo
downmix of the center channel
Ext LoRo Surr Mix Lvl 13, 5 Indicates the nominal LoRo
downmix of the surround
channel(s)
Function Options
• On
•Off
-31 dBFS to -1 dBFS (-27 dBFS)
•Yes
• No
80 dB SPL to 111 dB SPL (105 dB SPL)
• Not specified
• Large Room- X Curve Mon
• Small Room- Flat Mon
• Yes
•No
• Yes
•No
• Yes
•No
• Not specified
• LtRt Preferred
• LoRo Preferred
• +3.0 dB
• +1.5 dB
• 0.0 dB
• -1.5 dB
• -1.5 dB
• -3.0 dB
• -4.5 dB
• +3.0 dB
• +1.5 dB
• 0.0 dB
• -1.5 dB
• -1.5 dB
• -3.0 dB
• -4.5 dB
• -3.0 dB
• -4.5 dB
• -6.0 dB
• -Inf dB
• -6.0 dB
• -Inf dB
• -3.0 dB
• -4.5 dB
• -6.0 dB
• -Inf dB
• -6.0 dB
• -Inf dB
48 APM6800+/APM6801+ Installation and Operation Manual
Copyright © 2008-2009, Harris Corporation
Page 63

Chapter 4: Parameters, LEDs, and Alarms
Table 4-5. APM6800-D3+D/APM6801-D3+D Parameters (Continued)
Parameter Name
Bank,
Switch
Ext BSI2 Present 13, 6 Indicates whether or not extended
BSI2 metadata is present
Ext Surr EX Mode 13, 7 Indicates if the program has been
encoded in Surround EX
Ext Dolby Headphone 13, 8 Indicates if a program has been
encoded in Dolby Headphone
Ext A/D Type 13, 9 Indicates the type of A/D used to
capture the program
DC Highpass Flt 13, A Indicates the AC-3 encoder DC
highpass filter status
B/W Lowpass Flt 13, B Indicates the AC-3 encoder
bandwidth lowpass filter status
LFE Ch Lowpass Flt 13, C Indicates the AC-3 encoder LFE
channel lowpass filter status
Srnd Phase Shift Flt 13, D Indicates the AC-3 encoder
surround 90 degrees phase shift
filter status
Srnd Ch Attenuator 13, E Indicates the AC-3 encoder 3 dB
surround channel attenuator status
Compression Profile
Present
RF Cmpr Profile 14, 1 Indicates the AC-3 encoder RF
Dyn Range Profile Pres 14, 2 Indicates whether the bitstream
13, F Indicates whether the bitstream
contains compression profile
settings
compression profile
contains dynamic range profile
settings
Function Options
• Yes
•No
• Unknown
• No
•Yes
• Unknown
• No
•Yes
• Standard
•HDCD
• Enable
•Disable
• Enable
•Disable
• Enable
•Disable
• Enable
•Disable
• Enable
• Disable
• No
•Yes
•None
• Film- Standard
• Film- Light
• Music- Standard
• Music- Light
• Speech
• No
•Yes
APM6800+/APM6801+ Installation and Operation Manual 49
Copyright © 2008-2009, Harris Corporation
Page 64

Chapter 4: Parameters, LEDs, and Alarms
Table 4-5. APM6800-D3+D/APM6801-D3+D Parameters (Continued)
Parameter Name
Bank,
Switch
Line Mode Profile 14, 3 Ind icates the AC-3 encod er
dynamic range compression
profile
Processing > Dolby > Channel Status
Dolby Enc L Status [RO] Displays the current status of
encoded Dolby audio
Dolby Enc R Status [RO] Displays the current status of
encoded Dolby audio
Processing > Dolby > Delay
Dolby Encoder Output
Delay
Output > Metadata
Meta Revert Md 14, 4 Specifies the metadata output if
2, A Adjusts the delay (in ms) for
Dolby encoder output
incoming bitstream is lost or
corrupted
Function Options
•None
• Film- Standard
• Film- Light
• Music- Standard
• Music- Light
• Speech
•Normal
• Silence
•Normal
• Silence
0.00 to 2500.00 ms
• Internal
• Last used
•Stop
• Peak
•Not Present
• Peak
•Not Present
APM6801+AAC+ Parameters
APM6801+AAC+D modules have only the parameters from Table 4-6.
Table 4-6. APM6801+AAC+D Parameters
Parameter Name
General
Serial Number [RO] Displays the serial number of the
AAC Encoder Ver[RO] Displays the version number of the
Factory Recall 0, F Recalls the factory default settings
50 APM6800+/APM6801+ Installation and Operation Manual
.
Bank,
Switch
module
firmware
Function Options
<string>
<string>
• Off
•On
Copyright © 2008-2009, Harris Corporation
Page 65

Table 4-6. APM6801+AAC+D Parameters (Continued)
Chapter 4: Parameters, LEDs, and Alarms
Parameter Name
Input > AES
Input AES (1–8) Present
[RO]
Input AES (1A–8B)
Format Feedback [RO]
Bank,
Switch
Displays the presence of AES
input for the specified channel
Displays the detected format
(PCM/Non-PCM) for the specified
Function Options
channel
Input > Status
Input AES (1A–8B)
Status [RO]
Input > Genlock/DARS
Displays the current status of the
audio input channel
Lock Source Select 0, A Sets the locking source for the
module
Lock Source [RO] Displays the locking source for the
module
Genlock Input Source
Select
Genlock Video Present
[RO]
Genlock Video Locked
[RO]
Genlock Video Standard
Feedback [RO]
0, B Sets the reference video input
source
Displays the presence of the
reference video signal
Displays the locked status of the
reference video signal
Displays the detected reference
video standard
•No
•Yes
•PCM
•Non-PCM
• Unknown
• Normal
• Silence
• Genlock
• DARS
• AAC Enc Ch 1 Src
• Genlock
• DARS
•AES 1
•AES 2
•AES 3
• Frame Reference
• Card Reference
•No
•Yes
•No
•Yes
• Unknown
• 1080P 25
• 720P 59.94
• 720P 60
• 1080P 23.98
• 1080P 24
• 1080P 29.97
• 1080P 30
• 1080I 25
• 1080I 29.97
• 1080I 30
• Peak
•Not Present
•AES 4
•AES 5
•AES 6
•AES 7
•AES 8
• SD 525
• SD 625
• 720P 50
• 1080PsF 23.98
• 1080PsF 24
• 720P 29.97
• 720P 30
• 720P 25
• 720P 23.98
• 720P 24
APM6800+/APM6801+ Installation and Operation Manual 51
Copyright © 2008-2009, Harris Corporation
Page 66

Chapter 4: Parameters, LEDs, and Alarms
Table 4-6. APM6801+AAC+D Parameters (Continued)
Parameter Name
Bank,
Switch
Function Options
DARS Input Select 0, C Sets the source of the DARS input
signal
DARS Input Present [RO] Displays the presence of the
DARS input signal
DARS Locked to
Reference [RO]
Processing
Displays the locked status of the
DARS input signal
Fade Rate 3, B Controls the rate of fading (in
seconds) when channels are
swapped or muted
Processing > Sample Rate Conversion
Input AES (1–8) SRC
Control
Controls the insertion of the audio
0, 2
sample rate converter in the
•
processing path for input AES of
•
the specified channel
0, 9
Processing > AES Delay
Input AES (1A–8B)
Delay
Adjusts the delay (in ms) for input
0, D
audio AES of the specified
•
channel
•
1, E
• Input 1 (Cable)
• Input 2 (Module)
•No
•Yes
•No
•Yes
0.0 to 10.0 (0.1)
• Auto
•On
•Off
0.00 to 2500.00
52 APM6800+/APM6801+ Installation and Operation Manual
Copyright © 2008-2009, Harris Corporation
Page 67

Table 4-6. APM6801+AAC+D Parameters (Continued)
Chapter 4: Parameters, LEDs, and Alarms
Parameter Name
Processing > AAC > Encoder
AAC Encoder In (1–6) 6, 1
•
Bank,
Switch
Sets audio source for the specified
AAC encoder
Function Options
•
6, 6
Standard Controls the AAC encoder
standard
Data Rate Controls the data rate of the output
of the AAC encoder
Note: Available data rates are
based on mode selection.
• AES 1A
(default: 1)
• AES 1B
(default: 2)
• AES 2A
(default: 3)
• AES 2B
(default: 4)
• AES 3A
(default: 5)
• AES 3B
(default: 6)
•AES 4A
•AES 4B
•AES 5A
•AES 5B
•AES 6A
•AES 6B
•AES 7A
•AES 7B
•AES 8A
• AAC-LC
• AAC-HE
• 24000
• 32000
• 40000
• 48000
• 56000
• 64000
• 80000
• 96000
• 112000
• 128000
• 160000
• 192000
•AES 8B
•AES 1 Sum
•AES 2 Sum
•AES 3 Sum
•AES 4 Sum
•AES 5 Sum
•AES 6 Sum
•AES 7 Sum
•AES 8 Sum
• Test Tone 400Hz
• Test Tone 1kHz
• Test Tone 2kHz
• Test Tone 4kHz
•Mute
• EBU R68
• SMPTE RP155
• 224000
• 240000
• 256000
• 280000
• 320000
• 384000
• 448000
• 512000
• 576000
• 640000
• 800000
APM6800+/APM6801+ Installation and Operation Manual 53
Copyright © 2008-2009, Harris Corporation
Page 68

Chapter 4: Parameters, LEDs, and Alarms
Table 4-6. APM6801+AAC+D Parameters (Continued)
Parameter Name
Bank,
Switch
Function Options
Mode Controls the AAC encoder mode
Transport Controls the AAC encoder
transport
Version Controls the AAC encoder
version.
SBR Controls the AAC encoder SBR
Output > AES > Interface
Output AES 1–8 Interface
Control
Output AES (1–8)
Interface
3, C Provides a master control for the
AES output interface
Sets the type of output for the
3, D
specified AES channel
•
•
4, 5
• Mono
•Dual-Mono
• Stereo
• Parametric-Stereo
• Surround
• Auto
• ADTS
•LOAS
• MPEG2
•MPEG4
• Implicit
• Implicit-Hierarchal
• Individual Control
• Set All Unbalanced
• Set All Balanced
• Unbalanced
• Balanced
54 APM6800+/APM6801+ Installation and Operation Manual
Copyright © 2008-2009, Harris Corporation
Page 69

Table 4-6. APM6801+AAC+D Parameters (Continued)
Chapter 4: Parameters, LEDs, and Alarms
Parameter Name
Bank,
Output > AES > Source Selection
Output AES
(1A–8B) Source Select
4, 6
•
•
5, 6
Function Options
Switch
Sets the source for output for the
specified AES channel
•AES (1A–8B)
default Ch 2A-8B: the AES that
corresponds to the specified AES channel
(e.g., for Output 2A, the default output is
AES 2A)
• AES (1B–8B)
• AES (1–8) Sum
• AAC Enc Out A (Left)
default Ch 1A
• AAC Enc Out B (Right)
default Ch 1B
• Test Tone 400Hz
• Test Tone 1kHz
• Test Tone 2kHz
• Test Tone 4kHz
• Mute
• EBU R68
• SMP TE RP155
Output > AES > Word Length
Output AES (1–8) Word
Length
5, 7
•
•
5, E
Adjusts the sample resolution for
output of the specified AES
channel
• 24 bits
• 20 bits
• 16 bits
APM6800+/APM6801+ Installation and Operation Manual 55
Copyright © 2008-2009, Harris Corporation
Page 70

Chapter 4: Parameters, LEDs, and Alarms
Neural Audio Parameters
In addition to the APM6800+/APM6801+ parameters in Table 4-2, all
APM6801UM+, APM6801DM+, APM6801MM+, APM6801LC+,
APM6801LC+6+2+, APM6801LC+8+, APM6801LC+DM+,
APM6801UM+LC+, APM6801DM+LC+, and APM6801MM+LC+ modules
also have the common parameters from Table 4-7.
In addition, each module has parameters specific to its audio processing and
output:
•
The APM6801UM+ and APM6801UM+LC+ have the UpMix parameters
listed in Table 4-8 on page 59.
• The APM6801DM+, APM6801DM+LC+, and APM6801LC+DM+ have
the DownMix parameters listed in Table 4-9 on page 60.
• The APM6801MM+ and APM6801MM+LC+ have the MultiMerge
parameters listed in Table 4-10 on page 61.
• The APM6801LC+6+2+, APM6801LC+8+, APM6801LC+DM+,
APM6801UM+LC+, APM6801DM+LC+, and APM6801MM+LC+ have
the NLC Loudness Control parameters listed in Table 4-11 on page 62.
For more information about Neural Audio options on APM6801+, see
“Appendix A: Neural Audio Packages” on page 79.
Neural Common Parameters
In addition to the APM6800+/APM6801+ parameters in Table 4-2, all
APM6801UM+, APM6801DM+, APM6801MM+, APM6801LC+,
APM6801LC+6+2+, APM6801LC+8+, APM6801LC+DM+,
APM6801UM+LC+, APM6801DM+LC+, and APM6801MM+LC+ modules
also have the common parameters from Table 4-7
Table 4-7. APM6801+ Neural Audio Common Parameters
Parameter Name
Bank,
Switch
General
Serial Port Interface 0, 1 Sets the serial port interface
Function Options
•RS-232
• RS-422
56 APM6800+/APM6801+ Installation and Operation Manual
Copyright © 2008-2009, Harris Corporation
Page 71

Table 4-7. APM6801+ Neural Audio Common Parameters
Chapter 4: Parameters, LEDs, and Alarms
Parameter Name
Bank,
Input > Neural
Neural Audio In (1–8) 10, F
•
•
11, 7
Function Options
Switch
Selects an audio source for the
specified Neural audio processor
• AES 1A (default for Neural in 1)
• AES 1B (default for Neural in 2)
• AES 2A (default for Neural in 3)
• AES 2B (default for Neural in 4)
• AES 3A (default for Neural in 5)
• AES 3B (default for Neural in 6)
• AES 4A (default for Neural in 7)
• AES 4B (default for Neural in 8)
•AES 5A
•AES 5B
•AES 6A
•AES 6B
•AES 7A
•AES 7B
•AES 8A
•AES 8B
•AES 1 Sum
•AES 2 Sum
•AES 3 Sum
•AES 4 Sum
•AES 5 Sum
•AES 6 Sum
•AES 7 Sum
•AES 8 Sum
• Test Tone 400Hz
• Test Tone 1kHz
• Test Tone 2kHz
• Test Tone 4kHz
•Mute
• EBU R68
• SMPTE RP155
APM6800+/APM6801+ Installation and Operation Manual 57
Copyright © 2008-2009, Harris Corporation
Page 72

Chapter 4: Parameters, LEDs, and Alarms
Table 4-7. APM6801+ Neural Audio Common Parameters
Parameter Name
Bank,
Processing > Neural > Delay
Neural Audio Out (1–8)
Delay
Output > AES > Source Selection
Output AES
(1A–8B) Source Select
11, 8
•
•
11, F
4, 6
•
•
5, 6
Function Options
Switch
Adjusts delay for specified Neural
audio output channel
Sets the source for output for the
specified AES channel
0.000 ms to 2500.000 ms
• AES (1A–8B)
default Ch 5A-8B: the AES that
corresponds to the specified AES channel
(e.g., for Output 5A, the default output is
AES 5A)
•AES (1–8) Sum
• Test Tone 400Hz
• Test Tone 1kHz
• Test Tone 2kHz
• Test Tone 4kHz
•Mute
• EBU R68
• SMPTE RP155
Neural Audio Ch (1-8)
default AES 1A-4B: the Neural audio
channel that corresponds to the specified
AES channel (e.g., for Output 2A, the
default output is Neural audio Ch 3)
• Neural Audio Ch 1/2 Sum
• Neural Audio Ch 3/4 Sum
• Neural Audio Ch 5/6 Sum
• Neural Audio Ch 7/8 Sum
Neural Audio UpMix Parameters
In addition to the APM6800+/APM6801+ parameters in Table 4-2, and the
common Neural parameters that appear in Table 4-7 on page 56,
APM6801DM+ and APM6801UM+LC+ modules also have the parameters
from Table 4-8 on page 59.
58 APM6800+/APM6801+ Installation and Operation Manual
Copyright © 2008-2009, Harris Corporation
Page 73

For more information on Neural Audio UpMix features and functionality, see
“DTS Neural® Surround™ UpMix” on page 80.
Table 4-8. Neural Audio UpMix Parameters
Processing > Neural > Upmix
Output Config 14, 7 Controls the output channel
configuration generated by the
Upmix.
Chapter 4: Parameters, LEDs, and Alarms
•2.1
•3.1
•4.1
• 5.1
Output Bias 14, 6 Controls the soundstage depth of
the upmix.
(Values near -1.0 indicate that the
soundstage image will be biased
toward the surround channels;
values near 1.0 indicate that the
soundstage image will be biased
toward the front channels)
Upmix LFE Mute 14, 8 Mutes the LFE channel output
from the upmix
LFE Up Cutoff 14, 9 Controls the cutoff frequency of
the low pass filter applied to the
LFE channel before output
Limiter Enable 14, A Enables a limiter on the surround
output from the upmix
Limiter Threshold 14, B Sets the upper threshold of the
limiter applied to the output
Neural Audio DownMix Parameters
-1.00 to 1.00 (0)
•Yes
• No
60 Hz to 140 Hz (80 Hz)
•No
• Yes
-20 dBFS to 0 dBFS
In addition to the APM6800+/APM6801+ parameters in Table 4-2, and the
common Neural parameters that appear in Table 4-7 on page 56,
APM6801DM+, APM6801LC+DM+, and APM6801DM+LC+ modules also
have the parameters from Table 4-9.
APM6800+/APM6801+ Installation and Operation Manual 59
Copyright © 2008-2009, Harris Corporation
Page 74

Chapter 4: Parameters, LEDs, and Alarms
For more information on Neural Audio DownMix features and functionality,
see “APM6801DM+D DTS Neural® Surround™ DownMix” on page 81.
Table 4-9. Neural Audio DownMix Parameters
Parameter Name
Bank,
Switch
Processing > Neural > Downmix
LFE Down Filter En 14, C Enables a low pass filter to the
LFE input to the downmix
LFE Down Cutoff 14, D Sets the cutoff frequency of the
low pass filter applied to the LFE
input
Limiter Enable 14, E Enables a limiter on the stereo
output of the downmix
Note:
naturally represent more total energy
than 2 (stereo) channels of audio.
Because of this, content downmixed
from 5.1 to stereo will often have
higher energy than any of the 5.1
channels individually. You can enable
the limiter to protect content from
digital 0 clipping and adjust the
desired threshold.
Limiter Threshold 14, F Sets the upper threshold of the
limiter applied to the output
Function Options
6 (5.1) channels of audio can
•No
• Yes
60 Hz to 140 Hz (80 Hz)
•No
• Yes
-20 dBFS to 0 dBFS
Neural Audio MultiMerge Parameters
In addition to the APM6800+/APM6801+ parameters in Table 4-2, and the
common Neural parameters that appear in Table 4-7 on page 56,
APM6801MM+ and APM6801MM+LC+ modules also have the parameters
from Table 4-10.
60 APM6800+/APM6801+ Installation and Operation Manual
Copyright © 2008-2009, Harris Corporation
Page 75

For more information on Neural Audio MultiMerge features and functionality,
see “APM6801MM+D DTS Neural® Surround™ MultiMerge” on page 82.
Table 4-10. Neural Audio MultiMerge Parameters
Chapter 4: Parameters, LEDs, and Alarms
Parameter Name
Bank,
Switch
Processing > Neural > Multimerge
Input Selection Mode 15, 1 Selects the input selection mode
Multimerge Mode 15, 2 Controls the mode of the
MultiMerge algorithm
Detect Threshold 15, 3 Controls the noise fl oor level for
the detection while in Auto mode.
Input Crossfade Time 15, 4 Determines the transitio n time
from one source to another
MM Crossfade Time 15, 5 Controls the length of the audio
crossfade used on the outputs
when switching between Upmix
and Passthrough modes
automatically
Upmix LFE Mute 15, 8 Mutes the LFE chann e l outp ut
from the upmix
Function Options
• Mix
• Multi
•Stereo
•Aux
• Multi Detect
• Stereo Detect
• Aux Detect
• Multi Aux Stereo
• Auto
• Pass Through
•Up Mix
80 dBFS to -50 dBFS (-60 dBFS)
50 ms to 750 ms (200 ms)
50 ms to 750 ms (200 ms)
•Yes
• No
LFE Up Cutoff 15, 9 Controls the cutoff frequency of
the low pass filter applied to the
LFE channel before output
LFE Down Filter En 15, 6 Enables a low pass filter to the
LFE input to the downmix
LFE Down Cutoff 15, 7 Sets the cutoff frequency of the
low pass filter applied to the LFE
input
Surround Limiter En 15, A Enables a limiter on the surround
output from the multimerge
APM6800+/APM6801+ Installation and Operation Manual 61
Copyright © 2008-2009, Harris Corporation
60 Hz to 140 Hz (80 Hz)
•No
• Yes
60 Hz to 140 Hz (80 Hz)
•No
• Yes
Page 76

Chapter 4: Parameters, LEDs, and Alarms
Table 4-10. Neural Audio MultiMerge Parameters
Parameter Name
Bank,
Switch
Surround Threshold 15, B Sets the upper threshold of the
limiter applied to the surround
output
Stereo Limiter en 15, C Enables a limiter on the stereo
output of the multimerge
Stereo Threshold 15, D Sets the upper threshold of the
limiter applied to the stereo output
Function Options
Neural Loudness Control Parameters
In addition to the APM6800+/APM6801+ parameters in Table 4-2 and the
common Neural parameters that appear in Table 4-7 on page 56,
APM6801LC+, APM6801LC+6+2+, APM6801LC+8+, APM6801LC+DM+,
APM6801DM+LC+, APM6801DM+LC+, and APM6801LC+DM+ modules
also have the parameters from Table 4-11.
For more information on Neural Loudness Control features and functionality,
see “Neural Loudness Control” on page 84.
For the APM6801LC+6+2+ modules, the Group 1 parameters are repeated
again for Group 2. For APM6801LC+8+ modules, these parameters appear for
Groups 1, 2, 3, and 4.
Table 4-11. Neural Audio Loudness Control Parameters
-20 dBFS to 0 dBFS
•No
• Yes
-20 dBFS to 0 dBFS
Parameter Name
Bank,
Switch
Processing > Neural > Loudness Control
Preset Select Selects a loudness control preset
Processing > Neural > Loudness Control > Group 1
Processing > Neural > Loudness Control > Group 2 (APM6801LC
Processing > Neural > Loudness Control > Group 3 (APM6801LC
Processing > Neural > Loudness Control > Group 4 (APM6801LC
Bypass Loudness Control bypass
Target Level Loudness Control Target Level -31 dBFS to -1 dBFS (-27 dBFS)
LC Ratio Loudness Control Ratio 0.00 to 1.00 (0.95)
Upper Threshold Loudness Control Upper
Threshold
62 APM6800+/APM6801+ Installation and Operation Manual
Function Options
• (select preset)
•Mild
•Medium
• Aggressive
+6+2+, and APM6801LC+8+ only)
+8+ only)
+8+ only)
• LC1 enable
• LC1 bypass
0 dB to 12 dB (0 dB)
Copyright © 2008-2009, Harris Corporation
Page 77

Table 4-11. Neural Audio Loudness Control Parameters
Chapter 4: Parameters, LEDs, and Alarms
Parameter Name
Bank,
Switch
Lower Threshold Loudness Control lower threshold -12 dB to 0 dB (0 dB)
Freeze Window Loudness Control freeze window 0.0 to 6.0 (1.0)
Noise Floor Lo udness Control Noise Floor -60 dBFS to -40 dBFS (-50 dBFS)
Attack Time Loudness Control Attack Time 0 ms to 120 ms (20 ms)
Release Time Loudness Control Release Time 40 ms to 200 ms (120 ms)
Freq Compensation Loudness Control Shape
Reference
Compressor Threshold Loudness Control Compressor
Threshold
Compressor Ratio Loudness Control Compressor
Ratio
Output Limiter En Loudness Control Output Limiter
Enable
Output Limiter Threshold Loudness Control Output Limiter
Threshold
Function Options
•Off
• Low
•Medium
• High
0 dB to 12 dB (5 dB
0.0 to 1.0 (0.4)
•No
• Yes
-20 dBFS to 0 dBFS
APM6800+/APM6801+ Installation and Operation Manual 63
Copyright © 2008-2009, Harris Corporation
Page 78

Chapter 4: Parameters, LEDs, and Alarms
Module
status LED
Monitoring LEDs
LEDs and Alarms
Monitoring LEDs
The modules have 13 monitoring LEDs that serve as a quick monitoring
reference. Figure 4-1 shows the location of the monitoring LEDs on a typical
6800+ module. Table 4-12 on page 65 describes the meaning of the card-edge
LEDs.
Figure 4-1. Location of Card-Edge LEDs
64 APM6800+/APM6801+ Installation and Operation Manual
Copyright © 2008-2009, Harris Corporation
Page 79

Chapter 4: Parameters, LEDs, and Alarms
Module Status LEDs
If the LED listed in Table 4-12 is off, then the co rresp on din g inpu t is either not
present or not in error.
Table 4-12. LED Status Indicators
LED Name Description Color Indication
1 DLBY PRES Dolby signal is present
(APM6800-D1+D/APM6801-D1+D only)
2 DLBY ERR Dolby submodule error Red
3 DATA I/O PRES DATA I/O signal is present Green
4 REF PRES Video reference is present Green
5 DARS PRES DARS reference signal is present Green
6 METADATA PRES External metadata is present
(APM6800-D2+D/APM6801-D2+D and
APM6800-D3+D/APM6801-D3+D only)
7 AES1 PRES AES1 signal is present Green
8 AES2 PRES AES2 signal is present Green
9 AES3 PRES AES3 signal is present Green
10 AES4 PRES AES4 signal is present Green
11 AES5 PRES AES5 signal is present Green
12 AES6 PRES AES6 signal is present Green
13 AES7 PRES AES7 signal is present Green
14 AES8 PRES AES8 signal is present Green
Green
Green
The modules do not have any card-edge alarms. Instead, module status LEDs on
the corner of the module light up if an error is detected. See Figure 4-1 on
page 64 for the location of these LEDs, and Table 4-13 for a definition of the
LED colors.
APM6800+/APM6801+ Installation and Operation Manual 65
Copyright © 2008-2009, Harris Corporation
Page 80

Chapter 4: Parameters, LEDs, and Alarms
Note
Alarms are usually logged and monitored within software control applications
such as CSS Navigator. See the appropriate software control user manual or
online help for more information.
Table 4-13. Module Status LED Descriptions
LED Color
Sequence
Off There is no power to the module; the module is not
Green There is power to the module; the module is operating
Red There is an alarm condition.
Flashing Red The module has detected a hardware/firmware fault.
Yellow The module is undergoing configuration.
If the LED is flashing red, please contact your Customer Service
representative.
Meaning
operational.
properly.
66 APM6800+/APM6801+ Installation and Operation Manual
Copyright © 2008-2009, Harris Corporation
Page 81

Alarms
Chapter 4: Parameters, LEDs, and Alarms
If a major or minor alarm is triggered within your module, the Status LED will
light red.
Alarms are usually logged and monitored within available software control
applications (for example, CSS Navigator). You can only differentiate between
major and minor alarms within a software control application. See the
appropriate software control user manual or online help for more information.
The following settings can be made for each alarm within the software.
Table 4-14. Alarm Options
Alarm Option Effect
Enable/Disable This option toggles between Enabled and Disabled. If the
alarm is Enabled, an alarm condition will generate an alarm;
but if it is Disabled, the alarm condition will be ignored.
The default setting for all alarms is Disabled.
Alarm priority This setting determines whether a triggered alarm will be
reported as major or minor. The range is 1–10. A priority of 6
or higher is a major alarm, and a priority of 5 or lower is a
minor alarm
Trigger (s) This opti on determines how long an alarm condition must
exist (in seconds) before the alarm is triggered. If the alarm
level is reached for less time than the Trigger duration, then
the alarm will not trigger. Choose any duration from 0 to 7200
(or two hours). If this option is set to 0, the alarm will trigger
as soon as the alarm condition exists.
Clear (s) Determines the amount of time the alarm condition must be in
abate in order for the alarm to be turned off.
Choose any duration from 0 to 7200 seconds (or two hours). If
this option is set to 0, the alarm will clear as soon as the alarm
condition ceases.
Ack When an alarm is active, click here to allow other users on the
network to see that you have acknowledged the alarm.
Table 4-15, Table 4-16, Table 4-17, and Table 4-18 on page 70 describe the
alarms for each of the modules. You can only identify specific alarms using a
software control application
APM6800+/APM6801+ Installation and Operation Manual 67
Copyright © 2008-2009, Harris Corporation
Page 82

Chapter 4: Parameters, LEDs, and Alarms
APM6800-D1+D/APM6801-D1+D Alarms
Table 4-15. APM6800-D1+D/APM6801-D1+D Alarms
Alarm Name
Alarm Option Default Settings
Priority Trigger Clear
Input AES (1–8) Missing 1 (Minor) 0 sec 2 sec
AES (1A–8B) Peak 6 (Major) 0 sec 0 sec
AES (1A–8B) Silence 1 (Minor) 30 sec 0 sec
Dolby Decoder Ch1/2 Missing 1 (Minor) 0 sec 0 sec
Dolby Decoder Ch3/4 Missing 1 (Minor) 0 sec 0 sec
Dolby Decoder Ch5/6 Missing 1 (Minor) 0 sec 0 sec
Dolby Decoder Ch7/8 Missing 1 (Minor) 0 sec 0 sec
Dolby Decoder Ch(1–8) Peak 6 (Major) 0 sec 0 sec
Dolby Decoder Ch(1–8) Silence 1 (Minor) 30 sec 0 sec
Dolby Decoder Aux Missing 1 (Minor) 0 sec 0 sec
Dolby Decoder AuxL Peak 6 (Major) 0 sec 0 sec
Dolby Decoder AuxL Silence 1 (Minor) 30 sec 0 sec
Dolby Decoder AuxR Peak 6 (Major) 0 sec 0 sec
Dolby Decoder AuxR Silence 1 (Minor) 30 sec 0 sec
Reference Video Missing 6 (Major) 0 sec 2 sec
Reference Video Not Locked 6 (Major) 0 sec 2 sec
DARS Input Missing 1 (Minor) 0 sec 2 sec
DARS Input not Locked 1 (Minor) 0 sec 2 sec
Reference / Dolby Frame Rate Mismatch 6 (Major) 0 sec 2 sec
Dolby Decoder Bitstream Error 6 (Major) 0 sec 2 sec
Dolby / Reference Rate Mismatch 6 (Major) 0 sec 2 sec
Master Mute On 5 (Minor) 0 sec 0 sec
V-Bit Mute On 4 (Minor) 0 sec 0 sec
68 APM6800+/APM6801+ Installation and Operation Manual
Copyright © 2008-2009, Harris Corporation
Page 83

APM6800-D2+D/APM6801-D2+D Alarms
Table 4-16. APM6800-D2+D/APM6801-D2+D Alarms
Chapter 4: Parameters, LEDs, and Alarms
Alarm Name
Alarm Option Default Settings
Priority Trigger Clear
Input AES (1–8) Missing 1 (Minor) 0 sec 2 sec
AES (1A–8B) Peak 6 (Major) 0 sec 0 sec
AES (1A–8B) Silence 1 (Minor) 30 sec 0 sec
Dolby Encoder Audio Missing 6 (Major) 0 sec 0 sec
Reference Video Missing 6 (Major) 0 sec 2 sec
Reference Video Not Locked 6 (Major) 0 sec 2 sec
DARS Input Missing 1 (Minor) 0 sec 2 sec
DARS Input not Locked 1 (Minor) 0 sec 2 sec
Ref / Dolby Frame Rate not Equal 6 (Major) 0 sec 2 sec
Reference / Dolby Frame Rate Mismatch 6 (Major) 0 sec 2 sec
Dolby Encoding Stopped 6 (Major) 0 sec 2 sec
Master Mute On 5 (Minor) 0 sec 0 sec
V-Bit Mute On 4 (Minor) 0 sec 0 sec
APM6800-D3+D/APM6801-D3+D Alarms
Table 4-17. APM6800-D3+D/APM6801-D3+D Alarms
Alarm Option Default Settings
Alarm Name
Priority Trigger Clear
Input AES (1–8) Missing 1 (Minor) 0 sec 2 sec
AES (1A–8B) Peak 6 (Major) 0 sec 0 sec
AES (1A–8B) Silence 1 (Minor) 30 sec 0 sec
Dolby Encoder Audio Missing 6 (Major) 0 sec 0 sec
Reference Video Missing 6 (Major) 0 sec 2 sec
Reference Video Not Locked 6 (Major) 0 sec 2 sec
DARS Input Missing 1 (Minor) 0 sec 2 sec
DARS Input not Locked 1 (Minor) 0 sec 2 sec
Ref / Dolby Frame Rate not Equal 6 (Major) 0 sec 2 sec
Dolby Encoding Stopped 6 (Major) 0 sec 2 sec
Master Mute On 5 (Minor) 0 sec 0 sec
V-Bit Mute On 4 (Minor) 0 sec 0 sec
APM6800+/APM6801+ Installation and Operation Manual 69
Copyright © 2008-2009, Harris Corporation
Page 84

Chapter 4: Parameters, LEDs, and Alarms
APM6801+AAC+D Alarms
Table 4-18. APM6801+AAC+D Alarms
Alarm Name
Alarm Option Default Settings
Priority Trigger Clear
Input AES (1–8) Missing 1 (Minor) 0 sec 2 sec
AES (1A–8B) Peak 6 (Major) 0 sec 0 sec
AES (1A–8B) Silence 1 (Minor) 30 sec 0 sec
Reference Video Missing 6 (Major) 0 sec 2 sec
Reference Video Not Locked 6 (Major) 0 sec 2 sec
DARS Input Missing 1 (Minor) 0 sec 2 sec
DARS Input not Locked 1 (Minor) 0 sec 2 sec
AAC Encoding Error 6 (Maj or) 0 sec 2 sec
AAC Error 6 (Major) 0 sec 2 sec
APM6801+D Neural (UM, DM, MM, LC, LC+6+2+, LC+8+, LC+DM+, UM+LC+, DM+LC+, and
MM
+LC+) Module Alarms.
Table 4-19. APM6801+D Neural Alarms
Alarm Option Default Settings
Alarm Name
Priority Trigger Clear
Input AES (1–8) Missing 1 (Minor) 0 sec 2 sec
AES (1A–8B) Peak 6 (Major) 0 sec 0 sec
AES (1A–8B) Silence 1 (Minor) 30 sec 0 sec
Reference Video Missing 6 (Major) 0 sec 2 sec
Reference Video Not Locked 6 (Major) 0 sec 2 sec
DARS Input Missing 1 (Minor) 0 sec 2 sec
DARS Input not Locked 1 (Minor) 0 sec 2 sec
Master Mute On 5 (Minor) 0 sec 0 sec
V-Bit Mute On 4 (Minor) 0 sec 0 sec
70 APM6800+/APM6801+ Installation and Operation Manual
Copyright © 2008-2009, Harris Corporation
Page 85

Overview
Chapter 5
Specifications
The following specification tables appear in this chapter:
Inputs:
• “Reference Video” on page 72
• “Balanced DARS” on page 72
• “Unbalanced DARS” on page 73
• “Data I/O” on page 73
• “Unbalanced AES” on page 74
• “Balanced AES (with External Balun)” on page 74
Outputs:
• “Unbalanced AES” on page 75
• “Balanced AES (with External Balun)” on page 75
Performance
• “Power Consumption” on page 76
• “Audio Propagation Delay” on page 76
• “Start-up Time” on page 76
• “Temperature” on page 77
Specifications and designs are subject to change without notice.
APM6800+/APM6801+ Installation and Operation Manual 71
Copyright © 2008-2009, Harris Corporation
Page 86

Chapter 5: Specifications
Inputs
Reference Video
Balanced DARS
Table 5-1. Reference Video Input Specifications
Item Specification
Number of inputs 2 (frame and card)
Connector BNC (IEC169-8)
Input level 1 Vpk-to-pk ± 3 dB (nominal)
Impedance 75Ω
Return Loss (card input) > 40 dB up to 6 MHz
Standard support Bi-level, tri-level
Table 5-2. Balanced DARS Input (with External Balun) Specifications
Item Specification
Number of inputs 1
Connector BNC + Adapter Balun
Sensitivity < 200 mV
Impedance 110Ω ± 20% (0.1 to 6 MHz)
Maximum input signal 10 Vpk-to-pk
Common mode rejection 0 to 7 V (0 to 20 kHz)
72 APM6800+/APM6801+ Installation and Operation Manual
Copyright © 2008-2009, Harris Corporation
Page 87

Unbalanced DARS
Data I/O
Chapter 5: Specifications
Table 5-3. Unbalanced DARS Input Specifications
Item Specification
Number of inputs 1
Connector BNC (IEC169-8)
Standards AES 3, SMPTE 276M
Type Unbalanced, AC coupled
Sensitivity ≥ 100 mV
Impedance 75Ω
Return loss > 25 dB, 0.1 to 6 MHz
Table 5-4. Data I/O Input Specifications
Item Specification
Number of inputs 1
Connector BNC (IEC169-8)
Impedance 75Ω (jumper selectable)
APM6800+/APM6801+ Installation and Operation Manual 73
Copyright © 2008-2009, Harris Corporation
Page 88

Chapter 5: Specifications
Unbalanced AES
Table 5-5. Unbalanced AES Input Specifications
Item Specification
Number of inputs 8
Connector BNC (IEC169-8)
Standards AES 3, SMPTE 276M
Type Unbalanced, AC coupled
Sensitivity ≥ 100 mV
Impedance 75Ω
Return loss > 25 dB, 0.1 to 6 MHz
Input audio rate PCM input: 32 to 108 kH z
Bits 16, 20, or 24
Balanced AES (with External Balun)
Table 5-6. Balanced AES Input Specifications
Item Specification
Number of inputs 8
Connector BNC + Adapter Balun
Sensitivity ≥ 200 mV
Impedance 110Ω ± 20% (0.1 to 6 MHz)
Maximum input
signal
Common mode
rejection
10 Vpk-to-pk
0 to 7 V (0 to 20 kHz)
74 APM6800+/APM6801+ Installation and Operation Manual
Copyright © 2008-2009, Harris Corporation
Page 89

Outputs
Unbalanced AES
Chapter 5: Specifications
Table 5-7. Unbalanced AES Output Specifications
Item Specification
Number of outputs 8
Connector BNC (IEC169-8)
Standards AES 3, SMPTE 276M
Type Unbalanced, AC Coupled
Signal level 1.0 Vpk-to-pk ± 10%
Impedance 75Ω
Return loss > 25 dB, 0.1 MHz to 6 MHz
Jitter < ± 20 ns, peak value
DC offset 0.0 ± 50 mV
Rise/fall time 30 ns to 44 ns (10% to 90%)
Balanced AES (with External Balun)
Table 5-8. Optional Balanced AES Output Specifications
Item Specification
Number of outputs 8
Connector BNC + Adapter Balun
Output level 2.0 to 7.0 Vpk-to-pk
Jitter ± 20 ns
Rise/fall time 5 to 30 ns (10% to 90%)
Impedance 110Ω ± 20% (0.1 to 6 MHz)
Common mode component > 30 dB below output signal (0 to 6 MHz)
APM6800+/APM6801+ Installation and Operation Manual 75
Copyright © 2008-2009, Harris Corporation
Page 90

Chapter 5: Specifications
Performance
Power Consumption
The power consumption is <12 W.
Audio Propagation Delay
Table 5-9. Audio Propagation Delay
Audio Path Delay
Dolby (Encoding + Decoding)
PCM audio D APM6800-D2+D/APM6801-D2+D D
APM6800-D1+D/APM6801-D1+D D PCM audio
PCM audio D APM6800-D3+D/APM6801-D3+D D
APM6800-D1+D/APM6801-D1+D D PCM audio
Non-Dolby (PCM Audio)
AES audio in D
APM6800-D1+D/APM6801-D1+D/APM6800-D2+
D/APM6801-D2+D/APM6800-D3+D/APM6801-D3
+D D AES audio out
AES audio in D
APM6800-D1+D/APM6801-D1+
D
AAC
APM6801UM+D 66.3 ms
APM6801DM+D 24.0 ms
APM6801MM+D 66.8 ms
APM6801LC+D 69.2 ms
D Dec_Ch1 Out
D Dec_Ch2 Out
AAC-LC 56.0 ms
HE-AAC 130.0 ms
Dolby E In-Out Delay 79.3 ms
Dolby Digital (AC-3) In-Out Delay 189.0 ms
AES IN-AES OUT; SRC ON 3.3 ms
AES IN-AES OUT; SRC OFF 0.02 ms
AES IN-Dec_Ch1 OUT
(Non-Dolby Latency “Minimum”)
AES IN-Dec_Ch1 OUT
(Non-Dolby Latency “Single Frame”)
9.8 ms
32.0 ms
APM6801LC+6+2+D 72.0 ms
APM6801LC
APM6801LC
APM6801UM
APM6801DM
APM6801MM
+8+D 72.0 ms
+DM+D 70.0 ms
+LC+D 120.0 ms
+LC+D 76.0 ms
+LC+D 120.0 ms
Start-up Time
The Power On/Reset/Hot-swap time is 8 seconds.
76 APM6800+/APM6801+ Installation and Operation Manual
Copyright © 2008-2009, Harris Corporation
Page 91

Temperature
Chapter 5: Specifications
The range of operating temperatures is 32° tο 113°F (0° to 45°C).
APM6800+/APM6801+ Installation and Operation Manual 77
Copyright © 2008-2009, Harris Corporation
Page 92

Chapter 5: Specifications
78 APM6800+/APM6801+ Installation and Operation Manual
Copyright © 2008-2009, Harris Corporation
Page 93

Neural Audio
Appendix A
Neural Audio Packages
The APM6801+ offers a wide variety of Neural audio processing
options—using DTS Neural
TM
Control
. These options make it possible to offer advanced audio processing
for high-definition and surround sound programming using 5.1 and stereo
sources.
Table 1. APM6801+ Neural Audio Modules
Part Number Capability
APM6801UM+D DTS Neural Surround UpMix DTV 5.1 Production
® Surround upmix, downmix and Neural Loudness
Solution
APM6801DM
APM6801MM
APM6801LC
APM6801LC+6+2+D Neural Loudness Control for 2.0 and 5.1
APM6801LC+8+D DTS Neural Loudness Control for 4 x 2.0 Program Audio
APM6801LC
APM6801UM
APM6801DM
APM6801MM
+D DTS Neural Surround DownMix DTV 5.1 Transport
Solution
+D DTS Neural Su rroun d 5.1 and rendered stereo content
transitioning for DTV 5.1 Production
+D Neural Loudness Control for 2.0 or 5.1
+DM+D DTS Neural Loudness Control for 5.1 Program Audio with
DTS Neural Surround™ Downmix output
+LC+D DTS Neural Surround™ UpMix DTV 5.1 Production
Solution with DTS Neural Loudness Control
+LC+D DTS Neural Surround™ DownMix DTV 5.1 Transport
Solution with DTS Neural Loudness Control
+LC+D DTS Neural Surround™ 5.1 and rendered stereo content
transitioning for DTV 5.1 Production with DTS Neural
Loudness Control
APM6800+/APM6801+ Installation and Operation Manual 79
Copyright © 2008-2009, Harris Corporation
Page 94

Appendix A: Neural Audio Packages
Note
Firmware upgrades for the APM6800+/APM6801+ can also provide firmware
upgrades for the Neural audio processing submodule. In the event firmware for
the submodule is upgraded, the module will take approximately 2.5 minutes to
fully start up while new firmware is loaded. During this time the card-edge
LEDs will flash back and forth. Once this time has elapsed the module will
become controllable. Subsequent module start-ups will resume to the normal 8
seconds.
The default settings for each module represent typical setups and
configurations for that type of Neural processing device.
Audio Delay with Neural Modules
In some cases, Neural audio processing adds propagation delays to a signal. For
a module-by-module list of the delays, see Table 5-9 on page 76.
You can adjust the Neural Audio Out Delay parameter for each audio output
channel. These parameters are located at Processing > Neural > Delay.
DTS Neural® Surround™ UpMix
The DTS Neural Surround UpMix renders any two channel audio source
(stereo, matrix encoded stereo, LtRt, or DTS Neural Surround LwRw) as
surround sound. The DTS Neural Surround UpMix can simultaneously position
individual elements within the surround field, creating high levels of image
stability and granularity.
The UpMix technology avoids taking “artistic license” with content by placing
audio exactly where it would be heard in a professional LEDE (Live End Dead
End) listening environment. For example, mono or pan-pot stereo will image in
front of the listener, whereas stereo containing depth information will surround
the listener .
You can use the DTS Neural Surround UpMix as a stand-alone unit to monitor
stereo production, or you can use it in tandem with the DTS Neural Surround
DownMix as a complete 5.1 transport solution.
Figure A-1 below shows an UpMix taking a two-channel audio source (stereo,
matrix encoded stereo, LtRt or DTS Neural Surround LwRw) and rendering a
5.1 multi-channel mix.
80 APM6800+/APM6801+ Installation and Operation Manual
Copyright © 2008-2009, Harris Corporation
Page 95

Appendix A: Neural Audio Packages
Up m ix
processing
2.0 input 5.1 output
Figure A-1. Neural Audio UpMix Block Diagram
All of the UpMix parameters are located in Table 4-8 on page 59. Neural
UpMix parameters appear in APM6801UM+D and APM6801UM+LC+D
modules.
APM6801DM+D DTS Neural® Surround™ DownMix
The DTS Neural Surround DownMix enables 5.1 surround sound to be
transported through any stereo infrastructure. The downmix process is based
upon the principle that both natural stereo and 5.1 content are t wo-dimensional ;
both contain width and depth spatial attributes.
The DTS Neural Surround DownMix can represent six channels of discreet
audio sources in a stereo downmix by transforming the sources into pure
intensity and coherence encoding. By correcting overlaps of the signal sources
in intensity, time, coherence, polarity, and phase before the six channels are
combined, the DTS Neural Surround DownMix accounts for the problems
suffered in traditional matrix encode systems—such as comb filtering, spatial
location distortion, etc.
The proprietary Neural Audio “watermark process” faithfully reproduces
surround information when it is rendered by the DTS Neural Surround UpMix
or any LtRt system. In brief, the DTS Neural Surround DownMix produces a
stereo downmix that accurately represents the original content whether
monitored in mono, stereo, matrix or DTS Neural 5.1 Surround Sound.
Figure A-2 shows a DownMix taking a multi-channel audio source. The
downmix creates two-channel audio source using the Neural Audio approach of
embedding a watermark signal within the stereo audio signal patch. The
watermark signal contains spatial and steering positioning information. The
resulting stereo audio signal is also known as LwRw.
APM6800+/APM6801+ Installation and Operation Manual 81
Copyright © 2008-2009, Harris Corporation
Page 96

Appendix A: Neural Audio Packages
5.1
input
Down m ix
processing
with
watermarking
2.0
output
Figure A-2. Neural Audio DownMix Block Diagram
All of the DownMix parameters are located in Table 4-9 on page 60. DownMix
parameters appear in the APM6801DM+D, APM6801DM+LC+D, and
APM6801LC+DM+D modules.
APM6801MM+D DTS Neural® Surround™ MultiMerge
The DTS Neural Surround MultiMerge enables broadcasters to transition from
stereo to 5.1 surround sound, providing viewers with a 24/7 surround sound
experience. With MultiMerge inline, 5.1 original content is passed unaf fected to
the viewer while original stereo content is upmixed to a 5.1 surround sound
image. This provides the viewer with a consistent surround experience.
The transition between 5.1 and stereo occurs seamlessly without the need of
operator intervention. By offering a 24/7 5.1 signal, AC3 metadata does not
transition between 2/0 and 3/2 mode. This prevents audio clicks, pops, and
dropouts. The process also avoids taking “artistic license” with content by
placing audio exactly where it would be heard in a professional LEDE (Live
End Dead End) listening environment. For example, mono or pan-pot stereo
will image in front of the listener, whereas stereo containing depth information,
or LtRt encoding, will surround the listener.
You can use the MultiMerge in combination with the DTS Neural Surround
DownMix device to pass 5.1 through stereo-only facilities and therefore
eliminate the need for costly master control upgrades.
Figure A-3 shows how the MultiMerge takes a two-channel audio source
(stereo, matrix encoded stereo, LtRt or DTS Neural Surround LwRw) and
render a 5.1 multi-channel mix; in combination with taking original
multi-channel content and creating a stereo downmixed signal, depending on
the input configuration and content source used.
82 APM6800+/APM6801+ Installation and Operation Manual
Copyright © 2008-2009, Harris Corporation
Page 97

Parameters
Down mix processing
with watermark ing or
pass-thru
5.1
output
2.0
output
Up mix
processing
or pass-
thru
2.0 input
(L, R )
2.0 input
(L, R )
5.1 input
(C, L F E,
Ls, Rs)
Appendix A: Neural Audio Packages
Figure A-3. MultiMerge Block Diagram
The MultiMerge Mode offers three options:
• Auto determines if the content is stereo (2.0 ) or surround (5.1), and adapts
to the correct UpMix/Passthrough mode for consistent 5.1 output).
When in Auto, the Detect Threshold parameter controls the noise floor
level for the detection. If any content is above this threshold on the surround
channel inputs 3-6 (C, LFE, Ls, Rs), the input will be considered surround
and MultiMerge will be in passthrough mode.
• Passthrough forces MultiMerge to always pass through 5.1 content to the
5.1 outputs untouched, while creating a downmix for the stereo output.
• UpMix forces MultiMerge to always upmix stereo content on both of the
Left/Right 5.1 inputs and the Aux 2.0 inputs (C, LFE, Ls, and Rs content is
still passed through).
Input Select Mode offers eight options:
• Mix mixes the auxiliary 2.0 inputs into the multichannel 5.1 inputs.
• Multi always uses the multichannel 5.1 inputs.
• Stereo always uses the stereo L/R pair from the multichannel inputs.
• Aux always uses the auxiliary 2.0 inputs.
• Multi Detect uses multichannel 5.1 inputs if they are active. If not, the
auxiliary 2.0 inputs are used.
• Stereo Detect uses the stereo L/R pair from the multichannel 5.1 inputs if
they are active. If not, the auxiliary 2.0 inputs are used.
• Aux Detect uses the auxiliary 2.0 inputs if they are active. If not, the
multichannel 5.1 inputs are used.
APM6800+/APM6801+ Installation and Operation Manual 83
Copyright © 2008-2009, Harris Corporation
Page 98

Appendix A: Neural Audio Packages
Note
• Multi Aux Stereo uses multichannel inputs if they are active, or uses the
auxiliary inputs if they are active. If neither of those is active, it uses the
stereo L/R pair from the multichannel inputs.
All of the Multimerge parameters are located in Table 4-10 on page 61.
MultiMerge parameters appear in the APM6801MM+D and
APM6801MM+LC+D products.
Neural Loudness Control
APM6801+ Neural Loudness Control options manage loudness levels within a
specific desired volume range. Advanced psychoacoustic and signal processing
techniques detect and regulate the perceived loudness of stereo and 5.1 sources,
for example to maintain audio perceived loudness between programming and
commercials.
Neural Audio’s perceptual loudness measurement tool treats each audio channel
(L, R, C, LFE, Ls, and/or Rs) as a separate mono channel. The tool accounts for
spectral and density differences and temporal overlaps in modelling how the
human ear perceives the loudness of the audio content. DTS Neural loudness
measurement accommodates both stereo and multi-channel audio equally well.
After measurement, DTS Neural Loudness Control applies gain or attenuation
to achieve the target loudness level (Dial Norm) while preserving the spectral
balance of the original signal. It adapts the frequency response of the low and
high frequencies to compensate for level differences within the original signal.
You can use DTS Neural Loudness Control in the following roles:
• Protection—only affecting content that falls aggressively outside the
desired target
• Management—tightly controlling loudness to guarantee intelligibility
without the distracting side effects of traditional volume management
solutions
Because of the single function nature of APM6801+ modules, default settings
provide an optimal configuration for the normal audio situation.
Neural Loudness Control parameters appear in the APM6801LC+D,
APM6801LC+6+2+D, APM6801LC+8+D, APM6801LC+DM+D,
APM6801UM+LC+D, APM6801DM+LC+D, and APM6801MM+LC+D.
The parameters are listed in Table 4-11 on page 62.
84 APM6800+/APM6801+ Installation and Operation Manual
Copyright © 2008-2009, Harris Corporation
Page 99

Appendix A: Neural Audio Packages
5.1
output
2.0 or
5.1
loudness
control
5.1 input
(C, LFE,
Ls, Rs)
2.0 input
(L, R)
2.0
input
2.0
output
5.1
input
5.1
output
5.1
loudness
control
2.0
loudness
control
Neural Loudness Control Options on APM6801+
Neural Loudness Control is available on its own, and in various combinatiosn
with other audio processing options. The following Neural Loudness Contro l
options are available on APM6801+:
• APM6801LC+D Neural Loudness Control for 2.0 or 5.1
This module receives 2.0 or 5.1 input, and outputs audio in the same format.
It can do one or the other, not both.
Figure A-4. Loudness Control Block Diagram
• APM6801LC+6+2+D Neural Loudness Control for 2.0 and 5.1
The Neural Loudness Control 6+2 configuration is used when a 5.1
multichannel or surround sound mix is accompanied by an independent
stereo mix. It uses the same advanced psychoacoustic and signal processing
techniques to accurately detect and regulate the perceived loudness of stereo
and 5.1 sources. Common uses are for network programming with SAP,
LtRt or Descriptive Video programming.
Figure A-5. Loudness Control Block Diagram
APM6800+/APM6801+ Installation and Operation Manual 85
Copyright © 2008-2009, Harris Corporation
Page 100

Appendix A: Neural Audio Packages
2.0
input
2.0
output
2.0
input
2.0
output
2.0
input
2.0
output
2.0
input
2.0
output
2.0
loudness
control
2.0
loudness
control
2.0
loudness
control
2.0
loudness
control
• APM6801LC+8+D Neural Loudness Control for 4 x 2.0
This module provides Neural Loudness Control for four separate channels
of 2.0 Program Audio, balancing each of the four inputs separately. Neural
Loudness Control supports any stereo format (2.0, LtRt, LoRo, LwRw).
86 APM6800+/APM6801+ Installation and Operation Manual
Figure A-6. Loudness Control for Two Channels Block Diagram
Copyright © 2008-2009, Harris Corporation
 Loading...