

Page 1
*X03-76009*
Page 2

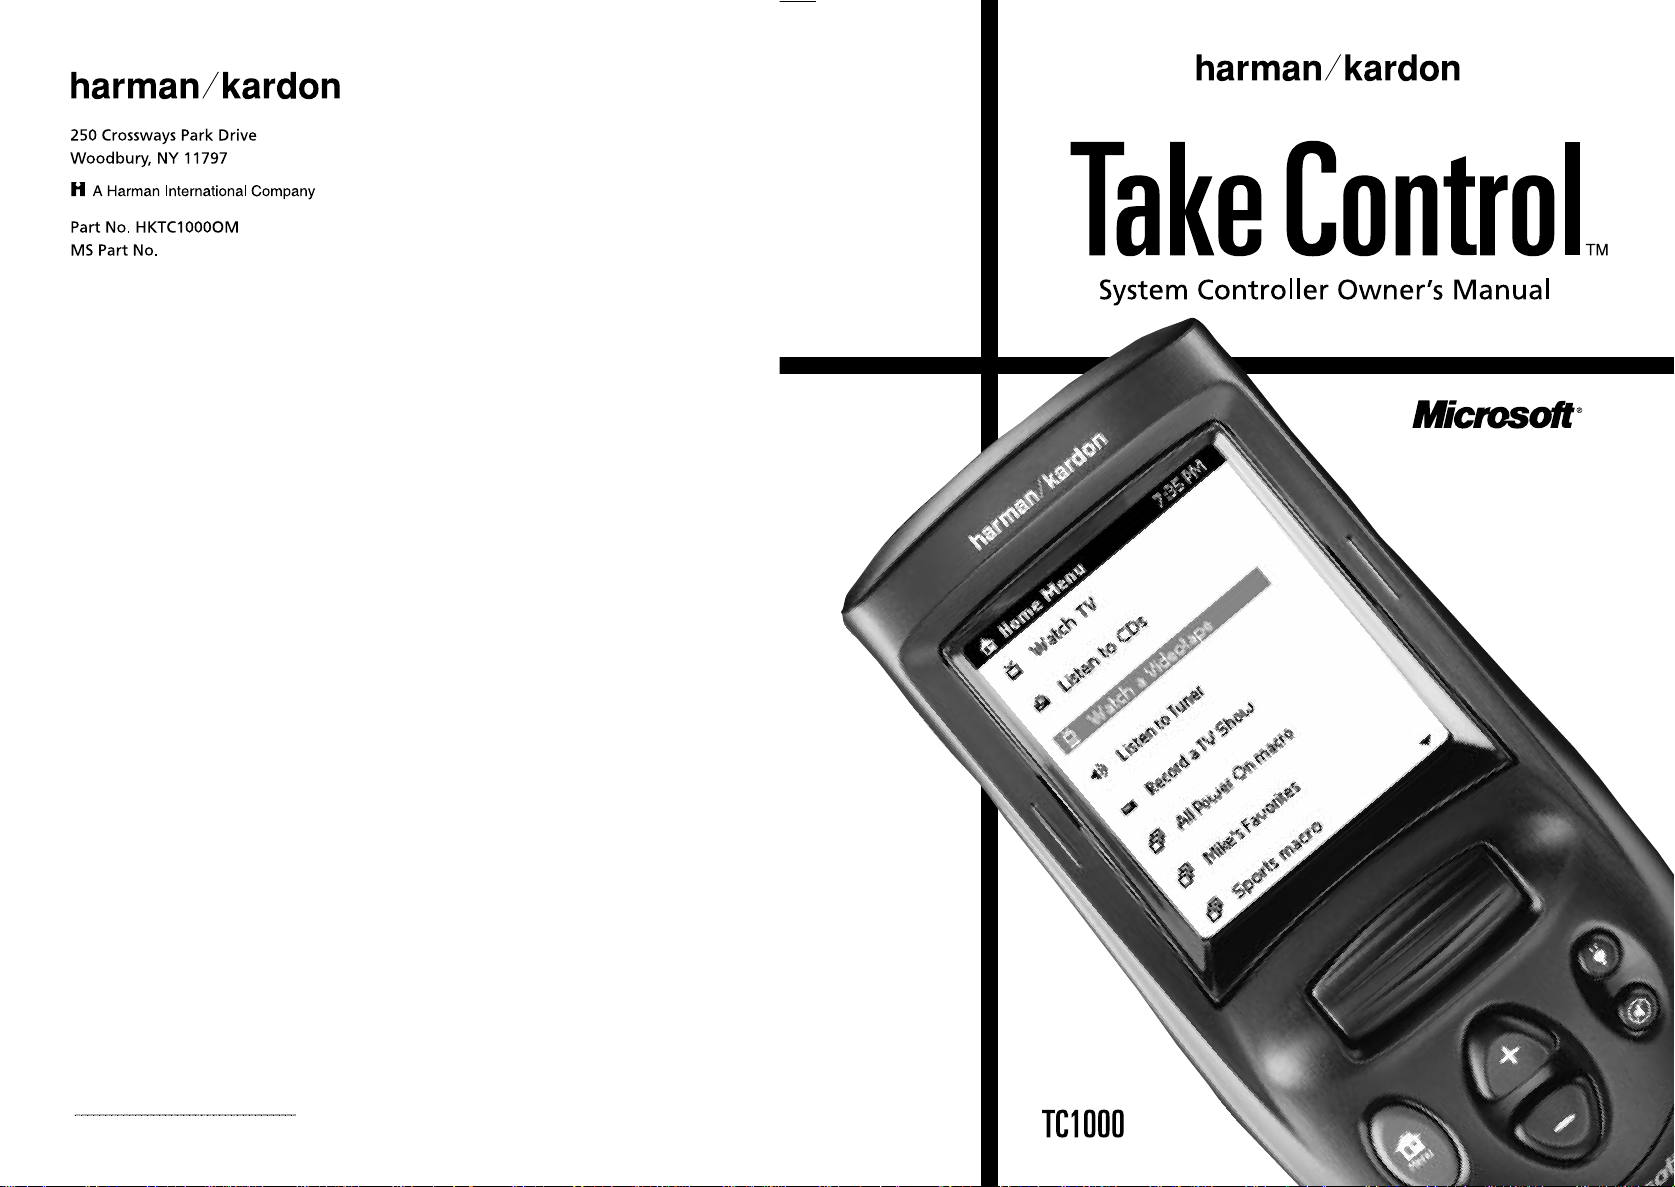
Take Control
Information in this document is subject to change without notice. The names of companies, products, people,
characters, and/or data mentioned herein are fictitious and are in no way intended to represent any real individual, company, product, or event, unless otherwise noted. Complying with all applicable copyright laws is the
responsibility of the user. No part of this document may be reproduced or transmitted in any form or by any
means, electronic or mechanical, for any purpose, without the express written permission of Microsoft Corporation. If, however, your only means of access is electronic, permission to print one copy is hereby granted.
Microsoft may have patents, patent applications, trademarks, copyrights, or other intellectual property rights
covering subject matter in this document. Except as expressly provided in any written license agreement from
Microsoft, the furnishing of this document does not give you any license to these patents, trademarks,
copyrights, or other intellectual property.
©1998 Microsoft Corporation. All rights reserved.
Microsoft, MS, Windows, and Windows NT are either registered trademarks or trademarks of Microsoft
Corporation in the U.S.A. and/or other countries.
Harman Kardon is a registered trademark of Harman Kardon, Inc. Take Control is a trademark of Harman
Kardon, Inc.
Other product and company names mentioned herein may be the trademarks of their respective owners.
Document No. X03-76009
Part number: 1111-HKTKCTRLO/M
Page 3

Harman Kardon
Contents
Welcome . . . . . . . . . . . . . . . . . . . . . . . . . . . . . . . . . . . . . . . . . . . . . . . . . . . . . . . . . . . 1
Take Control Overview . . . . . . . . . . . . . . . . . . . . . . . . . . . . . . . . . . . . . . . . . . . . . . . . . 2
Using the Controls . . . . . . . . . . . . . . . . . . . . . . . . . . . . . . . . . . . . . . . . . . . . . . . . 2
Using the Screens . . . . . . . . . . . . . . . . . . . . . . . . . . . . . . . . . . . . . . . . . . . . . . . . . 5
Starting Take Control for the First Time . . . . . . . . . . . . . . . . . . . . . . . . . . . . . . . . . . . . 6
Overview . . . . . . . . . . . . . . . . . . . . . . . . . . . . . . . . . . . . . . . . . . . . . . . . . . . . . . . 6
Installing the Batteries . . . . . . . . . . . . . . . . . . . . . . . . . . . . . . . . . . . . . . . . . . . . . 6
Completing the Setup Wizard . . . . . . . . . . . . . . . . . . . . . . . . . . . . . . . . . . . . . . . 7
Using Take Control . . . . . . . . . . . . . . . . . . . . . . . . . . . . . . . . . . . . . . . . . . . . . . . . . . . . 8
Selecting Activities and Operating Your Devices . . . . . . . . . . . . . . . . . . . . . . . . . . 8
Adding, Editing, and Removing Devices . . . . . . . . . . . . . . . . . . . . . . . . . . . . . . . . 9
Adding and Removing Activities . . . . . . . . . . . . . . . . . . . . . . . . . . . . . . . . . . . . . 10
Viewing the Buttons for a Device . . . . . . . . . . . . . . . . . . . . . . . . . . . . . . . . . . . . 10
Editing a Button for a Device . . . . . . . . . . . . . . . . . . . . . . . . . . . . . . . . . . . . . . . 10
Adjusting Your Settings . . . . . . . . . . . . . . . . . . . . . . . . . . . . . . . . . . . . . . . . . . . 10
Setting Up Take Control with a Computer . . . . . . . . . . . . . . . . . . . . . . . . . . . . . . . . . 14
Overview . . . . . . . . . . . . . . . . . . . . . . . . . . . . . . . . . . . . . . . . . . . . . . . . . . . . . . 14
Starting the Software . . . . . . . . . . . . . . . . . . . . . . . . . . . . . . . . . . . . . . . . . . . . . 14
Removing the TC1000 Files Copied onto Your Hard Disk . . . . . . . . . . . . . . . . . . 14
Connecting Take Control to Your Computer. . . . . . . . . . . . . . . . . . . . . . . . . . . . 15
Using Take Control with Your Computer . . . . . . . . . . . . . . . . . . . . . . . . . . . . . . . . . . 16
Introducing the Take Control Editor . . . . . . . . . . . . . . . . . . . . . . . . . . . . . . . . . . 17
Creating New Activities . . . . . . . . . . . . . . . . . . . . . . . . . . . . . . . . . . . . . . . . . . . 17
Customizing Activities . . . . . . . . . . . . . . . . . . . . . . . . . . . . . . . . . . . . . . . . . . . . 18
Deleting Activities . . . . . . . . . . . . . . . . . . . . . . . . . . . . . . . . . . . . . . . . . . . . . . . . 18
Customizing Take Control’s Buttons and Menu Commands . . . . . . . . . . . . . . . . 18
Changing the Tactile Control Buttons . . . . . . . . . . . . . . . . . . . . . . . . . . . . . . . . . 18
Adding or Deleting a Device . . . . . . . . . . . . . . . . . . . . . . . . . . . . . . . . . . . . . . . . 18
Working with Macros . . . . . . . . . . . . . . . . . . . . . . . . . . . . . . . . . . . . . . . . . . . . . 19
Getting Help . . . . . . . . . . . . . . . . . . . . . . . . . . . . . . . . . . . . . . . . . . . . . . . . . . . . 19
Feature Summary . . . . . . . . . . . . . . . . . . . . . . . . . . . . . . . . . . . . . . . . . . . . . . . . . . . . 20
Troubleshooting . . . . . . . . . . . . . . . . . . . . . . . . . . . . . . . . . . . . . . . . . . . . . . . . . . . . . 21
Setup . . . . . . . . . . . . . . . . . . . . . . . . . . . . . . . . . . . . . . . . . . . . . . . . . . . . . . . . . 21
Operation . . . . . . . . . . . . . . . . . . . . . . . . . . . . . . . . . . . . . . . . . . . . . . . . . . . . . . 23
Touchscreen . . . . . . . . . . . . . . . . . . . . . . . . . . . . . . . . . . . . . . . . . . . . . . . . . . . . 25
Computer . . . . . . . . . . . . . . . . . . . . . . . . . . . . . . . . . . . . . . . . . . . . . . . . . . . . . . 26
Take Control Version. . . . . . . . . . . . . . . . . . . . . . . . . . . . . . . . . . . . . . . . . . . . . . 26
Care of Your Take Control . . . . . . . . . . . . . . . . . . . . . . . . . . . . . . . . . . . . . . . . . . . . . 27
General Care . . . . . . . . . . . . . . . . . . . . . . . . . . . . . . . . . . . . . . . . . . . . . . . . . . . 27
Cleaning . . . . . . . . . . . . . . . . . . . . . . . . . . . . . . . . . . . . . . . . . . . . . . . . . . . . . . . 27
Replacing the Batteries . . . . . . . . . . . . . . . . . . . . . . . . . . . . . . . . . . . . . . . . . . . . 28
i
Page 4

Take Control
Technical Support . . . . . . . . . . . . . . . . . . . . . . . . . . . . . . . . . . . . . . . . . . . . . . . . . . . . 29
Regulatory Information . . . . . . . . . . . . . . . . . . . . . . . . . . . . . . . . . . . . . . . . . . . . . . . 29
End-User License Agreement and Warranty . . . . . . . . . . . . . . . . . . . . . . . . . . . . . . . . 30
A SOFTWARE PRODUCT LICENSE . . . . . . . . . . . . . . . . . . . . . . . . . . . . . . . . . . . 30
B GENERAL PROVISIONS . . . . . . . . . . . . . . . . . . . . . . . . . . . . . . . . . . . . . . . . . 31
C LIMITED WARRANTY . . . . . . . . . . . . . . . . . . . . . . . . . . . . . . . . . . . . . . . . . . 32
D EXCLUSION OF CERTAIN DAMAGES . . . . . . . . . . . . . . . . . . . . . . . . . . . . . . . 33
Technical Specifications . . . . . . . . . . . . . . . . . . . . . . . . . . . . . . . . . . . . . . . . . . . . . . . 34
General Specifications . . . . . . . . . . . . . . . . . . . . . . . . . . . . . . . . . . . . . . . . . . . . 34
Take Control TC1000 . . . . . . . . . . . . . . . . . . . . . . . . . . . . . . . . . . . . . . . . . . . . . 34
Computer System Requirements . . . . . . . . . . . . . . . . . . . . . . . . . . . . . . . . . . . . . 34
ii
Page 5

Welcome
Harman Kardon
Congratulations on your purchase of the
Take Control™ TC1000 system controller.
The TC1000—a high-performance touchscreen system controller—is the first userprogrammable system controller available
with software wizards and an enhanced
PC interface. It operates nearly all infrared-controlled electronic devices through
an easy-to-use touchscreen. For ease-ofuse and simplicity, the TC1000 touchscreen gives you common controls for all
of your devices.
Exciting Features
Take Control’s many features will
enhance your use of IR-controlled
devices:
l
The touchscreen interface puts all
device commands at your finger tips.
l
The Setup Wizard and built-in
database of popular remote codes
get you started quickly.
l
The Setup Wizard enables you to
easily add new and future devices to
your TC1000.
l
System-controller software adds
unlimited customization and configuration possibilities to make Take
Control work the way you want.
With Take Control, you eliminate the
clutter of multiple remote controls—a
large memory gives your Take Control the
capacity to replace them all.
Note Despite efforts to make Take Control work
with all devices, some IR-controlled products cannot work with the TC1000, due to incompatible
frequencies.
Introducing Activities
Take Control presents you with screenbased “activities,” instead of rows of
confusing buttons. Activities are events,
such as watching TV or listening to a CD.
When you set up an activity, you combine
the controls from all devices needed to
complete the activity. For example, you
might include controls from a TV, VCR,
and stereo receiver for the activity of
“Watch TV.”
A Home menu provides you with a list of
the activities that you can choose, like
Watch TV. When you select an activity on
the Home menu, the controls for your
electronic devices appear on the touchscreen as a button menu. You can then
press the buttons on the touch-screen
just as you would press the buttons on
the device remote control.
Once you set up Take Control, you may
also use the power of your computer to
create new activities and edit existing
activities.
Product Contents
Contents within the box include the following items:
l
Owner’s Manual
l
Take Control system controller
l
Four AA alkaline batteries
l
Serial cable
l
Compact disc with Take Control
software
1
Page 6
Take Control Overview
Take Control
Using the Controls
Take Control was created with you in
mind. Its form and size present an inviting design, free of complexity. The physical interface includes natural controls,
enabling you to use different electronic
devices smoothly, without awkward
transitions.
Take a moment to examine your Take
Control and observe the following
features:
Note Before using the touchscreen, remove the
protective plastic film by gently grabbing one corner and slowly peeling it away from the
touchscreen.
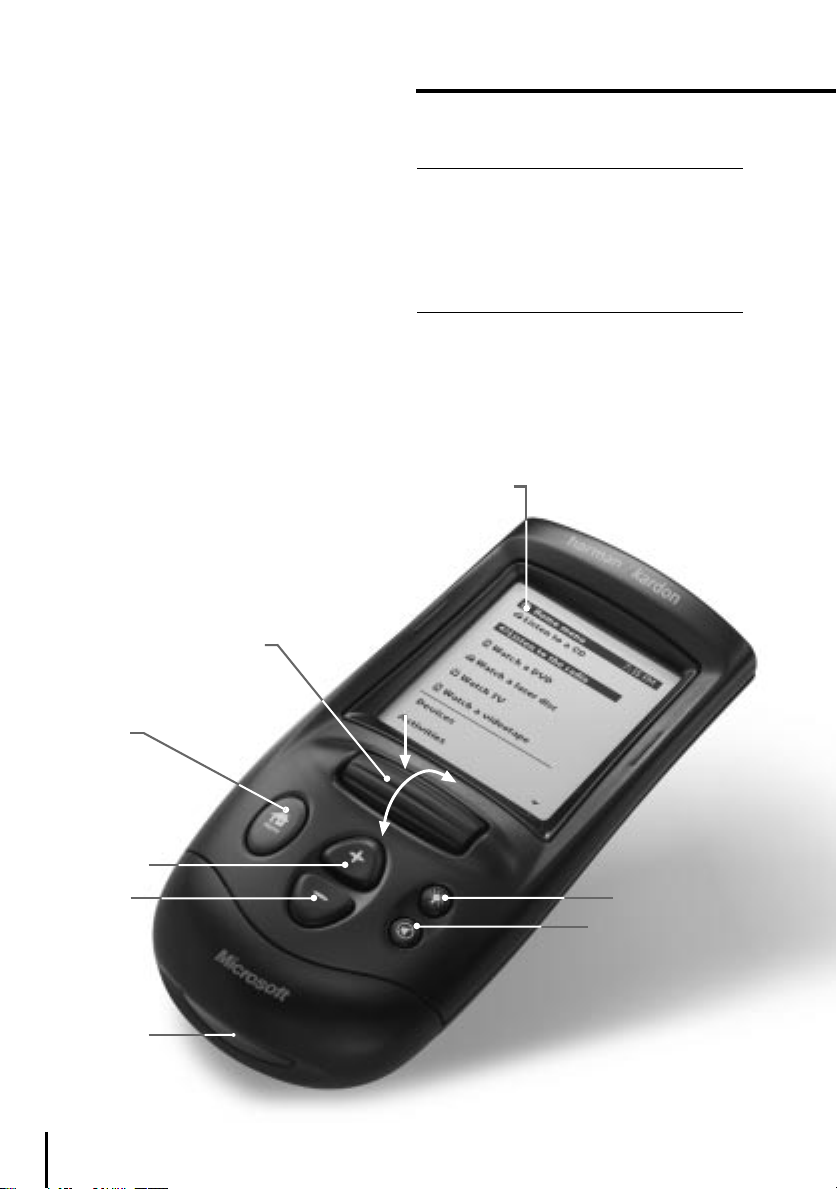
Selector wheel
(Roll and press to make
a selection)
Home menu
Caution Pressing the touchscreen with a
sharp object, such as a pen or stylus (like
those used with electronic organizers), may
result in damage to the touchscreen that is
not covered by the warranty. Only use your
finger or a soft, dull instrument to press directly on the touchscreen.
Touchscreen—The display gives you direct access to your activities, menu commands (text entries in a menu), and
buttons.
Touchscreen
Volume up
Volume down
IR receiver
2
Backlight
Mute
Page 7

You may select an activity or command
from a menu on the touchscreen by:
l
Pressing the name of the activity or
command on the touchscreen.
–or–
Rolling the selector wheel to highlight
the activity or command, and then
pressing the selector wheel.
Tips
l
Lightly press the touchscreen, roll or press the
selector wheel, press the Home menu button,
or press the backlight button to turn on the
display.
l
Periodic cleaning of the touchscreen can improve visibility of the display.
You may select a button—such as
—
from the touchscreen by pressing the
button you want. Pressing a button
either sends information to your device,
such as a channel selection, or takes you
to the next screen.
Tip When you press a button that sends information to your device, an icon (
) appears in the
title bar on the touchscreen, next to the time
display.
Note You cannot use the selector wheel to select a button on the touchscreen. You must press
the button.
Selector Wheel—Gives you an easy-touse means of:
l
Changing channels on your TV, cable
box, VCR, satellite system, or tuner. To
change channels, just roll the selector
wheel and the channels change
automatically with each click, or
notch, of the selector wheel.
l
Selecting menu commands (text
entries in a menu). To select a menu
command, roll the selector wheel to
highlight the command, and then
press the selector wheel.
Harman Kardon
l
Scrolling through text and long
menus. To scroll, simply roll the
selector wheel to reveal the touchscreen content beyond the top or
bottom of the touchscreen.
Tip Look for a triangle in the top or bottom
right-hand corner of the touchscreen that indicates
scrollable text.
Tactile Buttons—Each Take Control but-
ton has a tactile, durable rubber surface.
These buttons are used by simply pressing the one you need.
l
Home—Returns you to the Home
menu on the touchscreen or turns on
the display after it times out.
l
+ (Volume up)—Increases the volume
of the current device.
l
– (Volume down)—Decreases the
volume of the current device.
l
Backlight—Lights or dims the
touchscreen.
l
Mute—Turns off or restores the
sound on the current device.
IR Receiver—The IR receiver on your
Take Control is used to “learn” the IR
code for a device. Learning the IR code
for a device requires the remote control
for that device.
You only need to learn the IR code for a
product if the TC1000 does not list the
device category or specific brand name
when you use the Setup Wizard.
3
Page 8
Take Control
Take Control Overview—Cont.
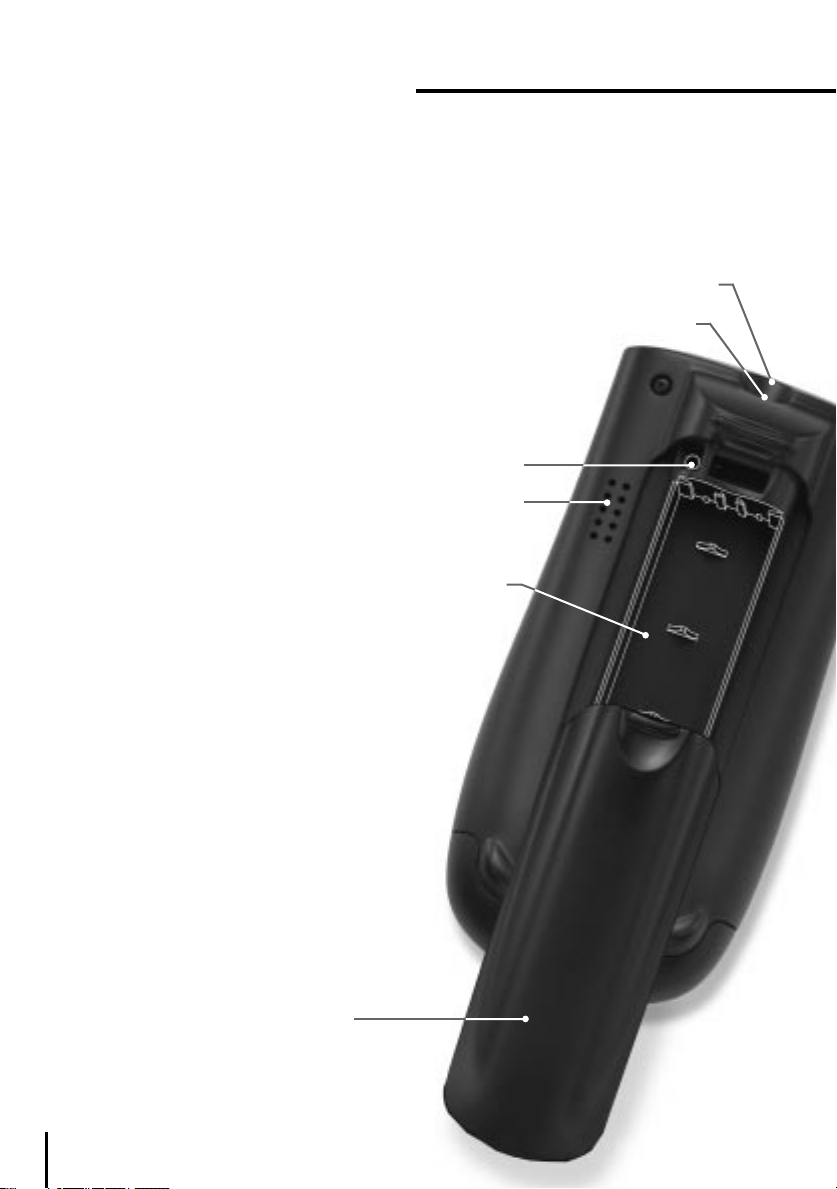
Computer-Connector Port—The com-
puter-connector port is used to establish
a serial connection between the TC1000
and a compatible computer. This connection enables your TC1000 to transfer data
to your computer, and vice versa. You can
use the computer-connector port by simply following the instructions in “Setting
Up Take Control with a Computer,”
page 14.
IR Transmitter—The infrared (IR) transmitter sends an IR signal to your devices,
directing them to perform an action,
such as changing channels or volume level. When using your TC1000, you need
to point the IR Transmitter toward the
applicable device, and be within 23 feet
(7.0 m) for it to receive the IR signal.
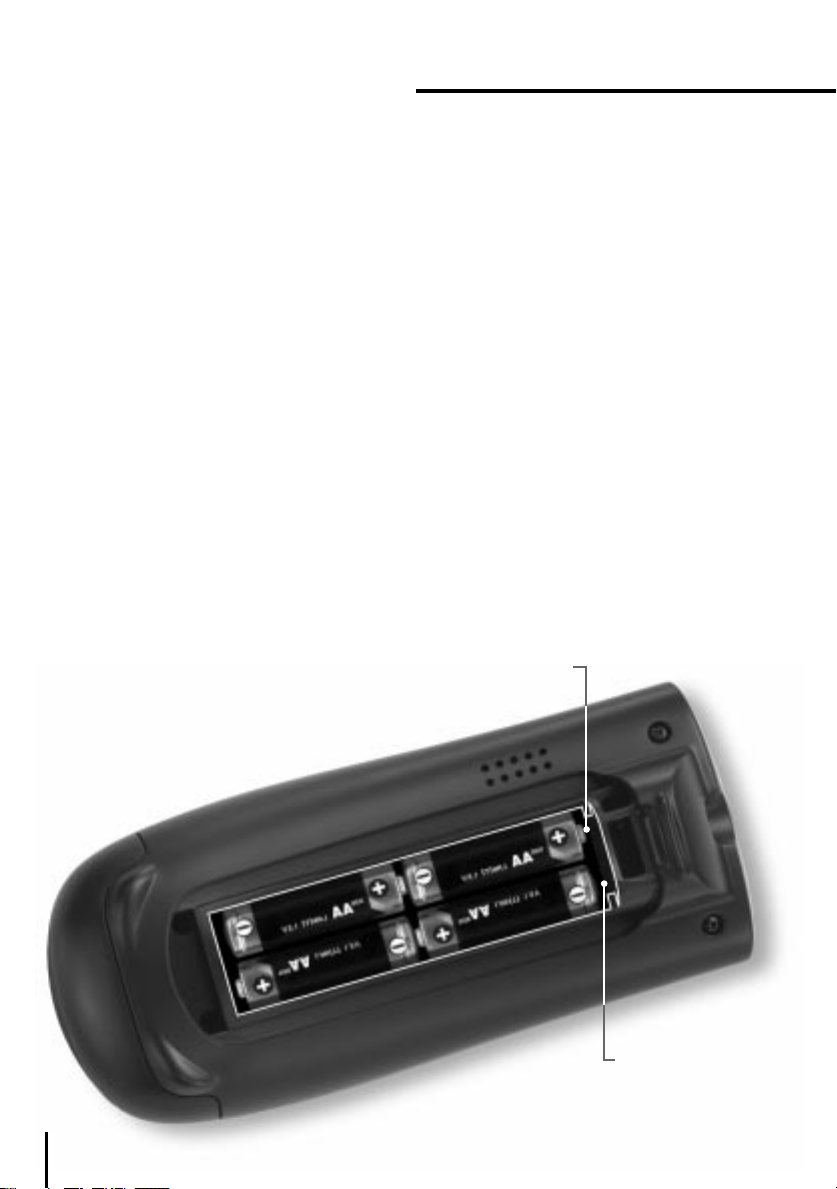
—
Battery Compartment
compartment houses four AA alkaline
batteries. For more information on
installing and replacing the batteries, see
the instructions in “Installing the Batteries,” page 6.
—
Reset Button
button, located inside the battery compartment, to return the contrast, speaker,
and time to their predefined default settings. Pressing the reset button will not
change or delete learned IR codes, activities, macros, or any customizing of buttons performed through the Take
Control Editor on your computer.
To use the reset button:
1 Remove the cover to the battery
compartment.
2 Using a paper clip, press the reset
button.
You can use the reset
The battery
IR transmitter
Computer-connector port
Reset button
Speaker
Battery
compartment
Battery-compartment cover
4
Page 9
Harman Kardon
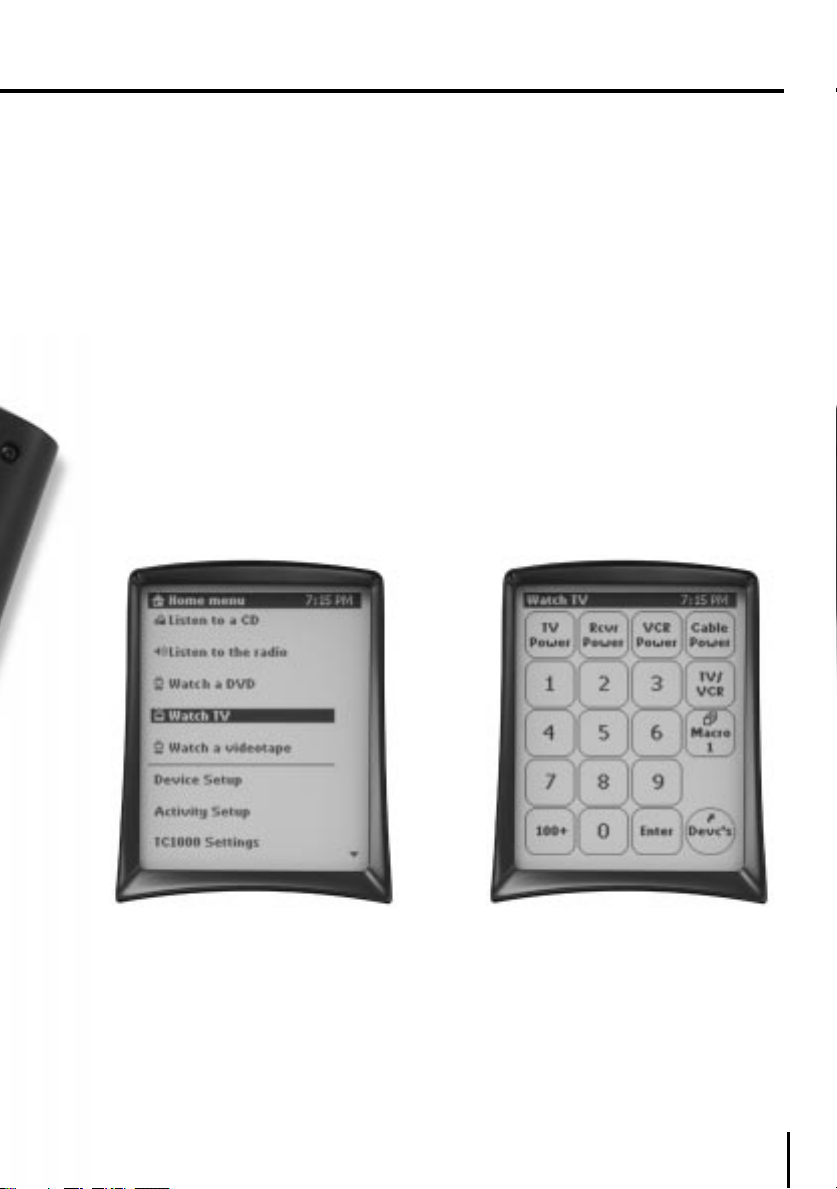
Using the Screens
Take Control has two different kinds of
screens to help you set up your system
controller and use your devices: menu
screens and button screens.
Using a Menu Screen
Menu screens include either menu commands, text, or both. One example of a
menu screen is the Home menu.
You may select a menu command by:
l
Pressing the command on the
touchscreen.
–or–
Rolling the selector wheel to highlight
the command, and then pressing the
selector wheel.
Using a Button Screen
Button screens may include four columns
and up to five rows of buttons. These
electronic buttons provide navigation on
Take Control, or send an IR signal to a
device. Pressing a button on the touchscreen performs the same function as
pressing a real button on a conventional
remote control.
You may select a button by pressing the
button on the touchscreen.
Note You must press buttons on the touchscreen directly. The selector wheel does not work
with buttons that appear on the touchscreen.
Menu Screen Button Screen
5
Page 10
Take Control
Starting Take Control for the First Time
Overview
Starting Take Control for the first time
requires two steps:
1 Installing the batteries.
2 Completing the Setup Wizard.
Installing the Batteries
Installing the batteries provides power
and enables you to begin using Take
Control. You must install four AA-size
batteries for Take Control to work. We
recommend alkaline batteries, and
include four in the box. You may use
either disposable or rechargeable alkaline
batteries. Other types of batteries will
work, but won’t last as long.
To insert the batteries:
1 Turn Take Control upside down (with
the touchscreen toward the floor),
and remove the door to the battery
compartment by pulling the tab located on the top of the cover.
2 Insert the batteries making sure that
you properly orient them for polarity,
pointing the positive (+) end towards
the “key,” and the negative (–) end
towards the spring.
3 Close the battery compartment cover.
Note When replacing batteries, it is recommended that all four be replaced at the same time. To
avoid damage, it is recommended that the batteries
be removed if the TC1000 will not be used for more
than a month.
After installing the batteries, you should
see a “Welcome” display on the
touchscreen.
If you do not see a display:
l
Ensure that you’ve installed fresh
batteries, correctly oriented in the
battery compartment.
Note See “Battery Safety Precautions,” page 28,
for additional information on proper handling and
disposal of batteries.
Key
Spring
6
Page 11
Harman Kardon
Completing the Setup Wizard
The Setup Wizard takes you step-by-
step through the process of adding electronic devices to Take Control, and
defines the specific IR code for each
device. These unique IR codes ensure
that Take Control communicates properly
with each specific product.
To add your devices for the first time
After you install the batteries, Take Control displays a Welcome menu on the
touchscreen. Using this menu, you can
add your devices with the help of the
Setup Wizard.
1 On the Welcome Menu, press Next
to begin. This will start the Setup
Wizard.
2 Follow the instructions on the Setup
Wizard screen.
Step 1 Install the batteries
You can also use Take Control to set up
an electronic device with:
l
A lost or broken remote control. Take
Control includes an extensive list of IR
codes for many popular electronic
devices, which you can access and
assign using the Setup Wizard.
l
Most IR-controlled products that are
not listed in the Setup Wizard. When
setting up an electronic device that is
not listed in the Setup Wizard, select
unlisted brand and Take Control can
learn the IR code for your electronic
device. To learn the IR code, you need
the remote control for your device and
the TC1000, either alone or with the
software on your computer.
Note Despite efforts to make Take Control work
with all devices, some IR-controlled products cannot work with Take Control, due to incompatible
frequencies.
Step 2 Select a device category
Step 3 Select a device brand
Step 4 Test your devices
Step 5 Set up your activities
Step 6 Enjoy using Take Control
7
Page 12

Using Take Control
Take Control
You can use Take Control for:
l
Selecting activities and operating your
IR-controlled devices
l
Viewing the buttons for a device
l
Adding, editing, and removing devices
l
Adjusting your unit’s settings
Selecting Activities and Operating
Your Devices
An activity is an event or action that you
perform using your devices. You may use
Take Control for different activities,
including:
l
Watch TV
l
Watch a videotape
l
Watch a DVD
l
Watch a laser disc
l
Listen to a CD
l
Listen to the radio
Take Control’s Home menu lists all of
your activities, enabling you to easily
select the activity that you prefer.
To select an activity:
1 Press the Home menu button.
2 Press the desired activity on the
touchscreen.
–or–
Roll the selector wheel up or down to
highlight the desired activity, and then
press the selector wheel.
After selecting an activity on the Home
menu, the touchscreen displays an activity screen that includes the buttons needed to operate each device.
For example, when you select the activity
Watch TV, the touchscreen displays an
activity screen with buttons to display
your TV channels, and to turn power on
and off for all devices assigned to the
activity.
Tip You can customize any activity screen, and
create new activities on the Home menu, with your
computer. See “Using Take Control with Your Computer,” page 16, for details.
8
Home Menu
Page 13

Harman Kardon
Adding, Editing, and Removing
Devices
When you buy a new device, replace a
device with a new one, or want to
remove a device, Take Control helps you
to easily maintain your configuration.
Adding a New Device
To add a new device:
1 On the Home menu, select Device
Setup.
2 Press Add, and then follow the
instructions in the Setup Wizard.
Notes
l
Some device categories are very similar. If your
device category isn’t listed, try a similar category before creating a new category with the Take
Control software. For example, try the categories of “Aux Audio” or “Receiver/Tuner” when
looking for pre-amps.
l
If your device category is not listed, such as TV,
VCR, etc., you can add the category by using
the Take Control software. See “Adding or
Deleting a Device,” page 18.
l
You can add up to 15 devices.
Device Categories
Adding a device without a working
remote control
To add a device for which you do not
have a working remote control, you must
identify the category and brand in the
Setup Wizard.
1 On the Home menu, select Device
Setup, and then press Add.
2 Under Select a device category to
add, select the category of device.
3 Under Select your <device> brand,
select the brand of device.
4 Follow the instructions on the Setup
Wizard screen.
Note Without a working remote control for your
device, Take Control works only with the brands of
products listed in the Setup Wizard.
Adding a device brand not listed in the
Setup Wizard
If the device you wish to program is not
listed in the Setup Wizard, or if Take
Control cannot match the IR code for
your device, then Take Control can learn
the applicable IR code for any IR-controlled device by using the device’s
remote control.
To learn the IR code for your device:
1 On the Home menu, select Device
Setup, and then press Add.
2 Under Select a device category to
add, select the category of device.
3 Under Select your <device> brand,
select Unlisted Brand.
4 Follow the instructions on the Setup
Wizard screen to learn the IR code for
your device.
Note You can learn the IR code for your device
with Take Control or with it connected to your computer. To use Take Control with your computer, see
“Setting up Take Control with a Computer,”
page 14.
9
Page 14

Using Take Control — Cont.
Take Control
Removing a Device
To remove a device:
1 On the Home menu, select Device
Setup.
2 Select the applicable device, and then
press Delete.
Adding and Removing Activities
You can add or remove the activities that
appear on your Home menu. Activities
enable you to enjoy different combinations of devices for different events.
Adding a New Activity
You may want to add new activities that
are customized to your needs.
To add a new activity:
1 On the Home menu, select
Activity Setup.
2 Select Add, and then follow the
instructions in the Setup Wizard.
Note You can add up to 32 activities.
Removing an Activity
If you find that you no longer need an
activity, you may want to remove it from
the Home menu.
To remove an activity:
1 On the Home menu, select
Activity Setup.
2 Select the applicable activity, and then
press Delete.
Viewing the Buttons for a Device
During operation, you may wish to check
the buttons for a device, such as the buttons assigned to your TV.
To view the buttons for a device:
l
On the Home menu, select Device
Setup, and then select the applicable
device.
Editing a Button for a Device
You may want to minimize the buttons
for a device by deleting the buttons you
don’t use.
To delete a button from a device:
1 On the Home menu, select Device
Setup, and then select the applicable
device.
2 Press Edit, select the button you want
to delete, press Delete, and then
press Yes.
If you find that a button doesn’t work
correctly, you can relearn the IR code
for it.
To relearn the IR code for a button:
1 On the Home menu, select Device
Setup, and then select the applicable
device.
2 Press Edit, select the applicable but-
ton, press Relearn, and then follow
the on-screen instructions.
Note You can relearn the IR code for a button
with Take Control or with it connected to your computer. To use Take Control with your computer, see
“Setting up Take Control with a Computer,”
page 14.
Adjusting Your Settings
You may need to adjust various settings
on the TC1000 to ensure optimum performance. Adjustable settings include:
l
Touchscreen sensitivity
l
Touchscreen contrast
l
Time adjustment
l
Speaker on/off
l
Touchscreen display time-out
10
Page 15
Harman Kardon
Calibrating the Touchscreen
You may see some variance in the
responsiveness and accuracy of the
touchscreen when using it in cold or hot
environments. For example, when pressing the touchscreen you might:
l
Not see a response
l
Need to press a menu command or
button hard to make it work
l
Touch an area beside a button—not
directly on it—to make it work.
If you can’t lightly touch a menu command or button to make it work, then
calibrating the touchscreen may help.
To calibrate the touchscreen:
1 On the Home menu, select TC1000
Settings.
2 Select Calibrate touchscreen, and
then press the button in each corner
of the touchscreen.
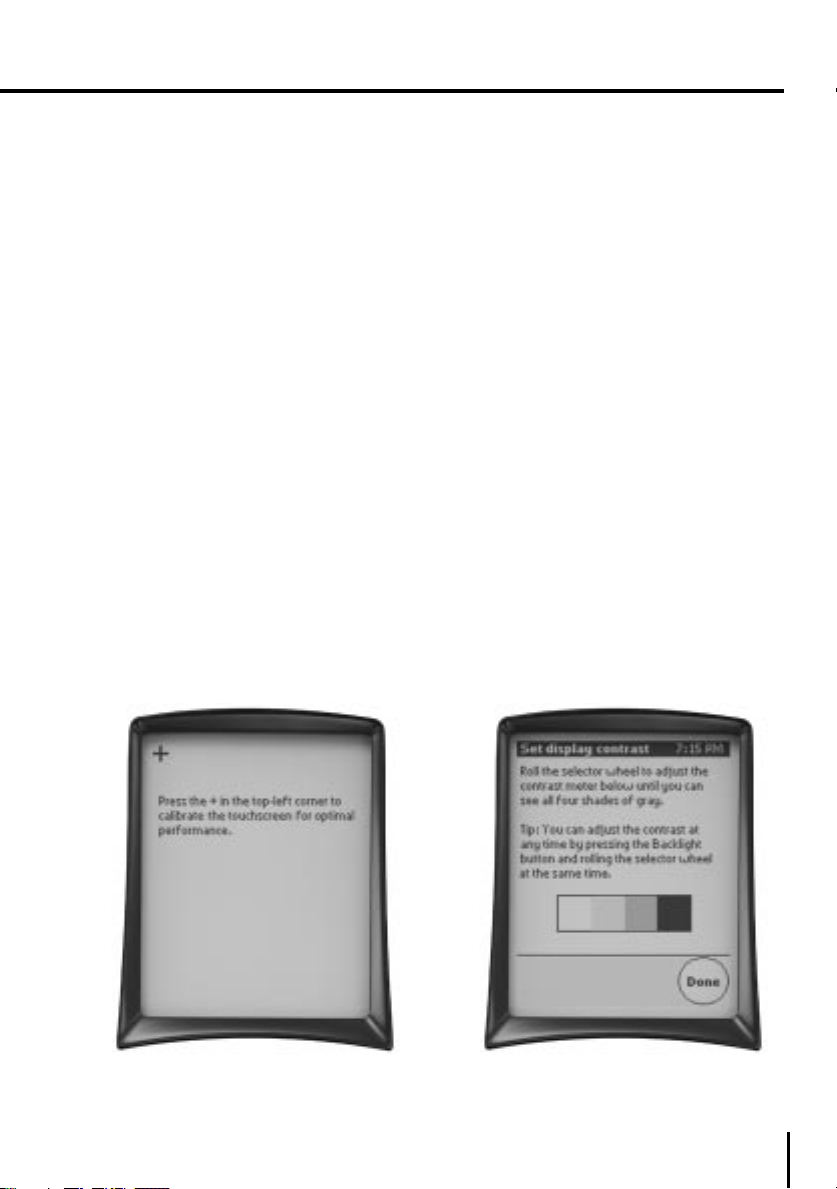
Adjusting the Touchscreen Contrast
You can adjust the contrast of the touchscreen to view the display more easily.
To adjust the touchscreen contrast:
1 On the Home menu, select TC1000
Settings.
2 Select Set display contrast, and then
follow the on-screen instructions.
Tips
l
To quickly adjust the contrast at any time, press
and hold down the backlight button as you roll
the selector wheel.
l
Turn on the backlight and check the contrast of
your display to ensure that the setting works in
a darkened room.
Calibrating the touchscreen Setting the display contrast
11
Page 16
Using Take Control — Cont.
Take Control
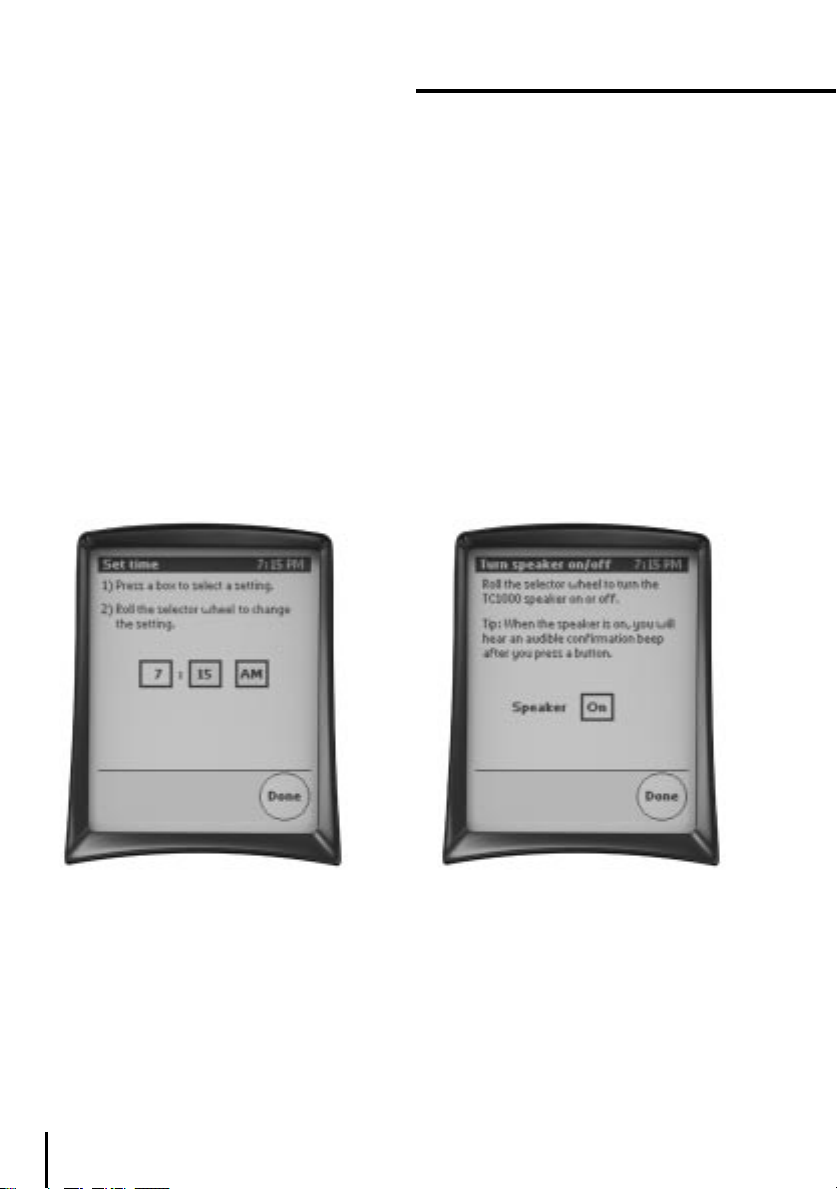
Setting the Time
The time display provides you with a
quick reference to the time of day.
To set the time:
1 On the Home menu, select TC1000
Settings.
2 Select Set time, and then follow the
on-screen instructions.
Tip When you connect Take Control to your computer, the time on Take Control is automatically set
to the time on your computer.
Turning the Speaker On or Off
When you select a command from a
menu by pressing the touchscreen or
selector wheel, or when you press a button on the touchscreen, an audible
“beep” confirms your entry. If you prefer,
you can turn off the speaker.
To turn off the speaker:
1 On the Home menu, select TC1000
Settings.
2 Select Turn speaker on/off, and then
follow the on-screen instructions.
Setting the time Turning the speaker on or off
12
Page 17

Adjusting the Display Time-Out
The touchscreen display time-out feature
turns off the display and the backlight after a period of inactivity. Turning off the
display and backlight eliminates distractions from the display in a darkened
room and extends battery life.
To adjust the display time-out:
1 On the Home menu, select TC1000
Settings.
2 Select Set display time-out, and
then follow the on-screen instructions.
Harman Kardon
Setting the display time-out
13
Page 18

Take Control
Setting Up Take Control with a Computer
Overview
The Take Control software employs the
power of your computer to help you
define and configure settings on your
system controller—beyond the capabilities of the TC1000 system controller
alone.
You can customize individual preferences
for each activity and redefine the way in
which buttons work.
To set up the Take Control software:
1 Start the Take Control software.
2 Connect the TC1000 to your
computer.
Starting the Software
You can start the Take Control software
in seconds. Take a moment to review the
minimum computer system requirements,
described within “Technical Specifications,” page 34, and ensure that your
computer system is compatible with the
software.
Note Starting the Take Control software automatically installs a minimum set of files onto your
hard disk. To remove them, see “Removing the
TC1000 Files Copied onto Your Hard Disk.”
Starting the software requires use of the
TC1000 compact disc.
To start the TC1000 software:
1 Insert the TC1000 compact disc into
your CD-ROM drive.
2 Answer the questions in the wizard
that appears on your screen. If the onscreen wizard does not start automatically, click the Start button, click Run,
and then type <drive>:\TC1000.exe.
For example, if the compact disc is in
drive E, type E:\TC1000.exe.
Removing the TC1000 Files Copied
onto Your Hard Disk
You may choose at some point to remove
the TC1000 files from your hard disk.
To remove the TC1000 files:
1 Click the Start button, click Settings,
and then click Control Panel.
2 Double-click Add/Remove Pro-
grams, select TC1000, and then click
Add/Remove.
14
Page 19

Harman Kardon
Connecting Take Control to Your
Computer
When you connect Take Control to your
computer, you can transfer data between
the TC1000 and your computer. Transferring data enables the TC1000 to use the
configuration changes that you set up
with software in your computer—an
extremely powerful capability.
To connect the TC1000 to your
computer:
1 Insert the TC1000 compact disc into
your CD-ROM drive.
2 Plug the computer-connector plug of
the serial cable into the computerconnector port on top of the system
controller.
3 Plug the 9-pin connector into a serial
port on your computer.
To serial port on
your computer
15
Page 20
Take Control
Using Take Control with Your Computer
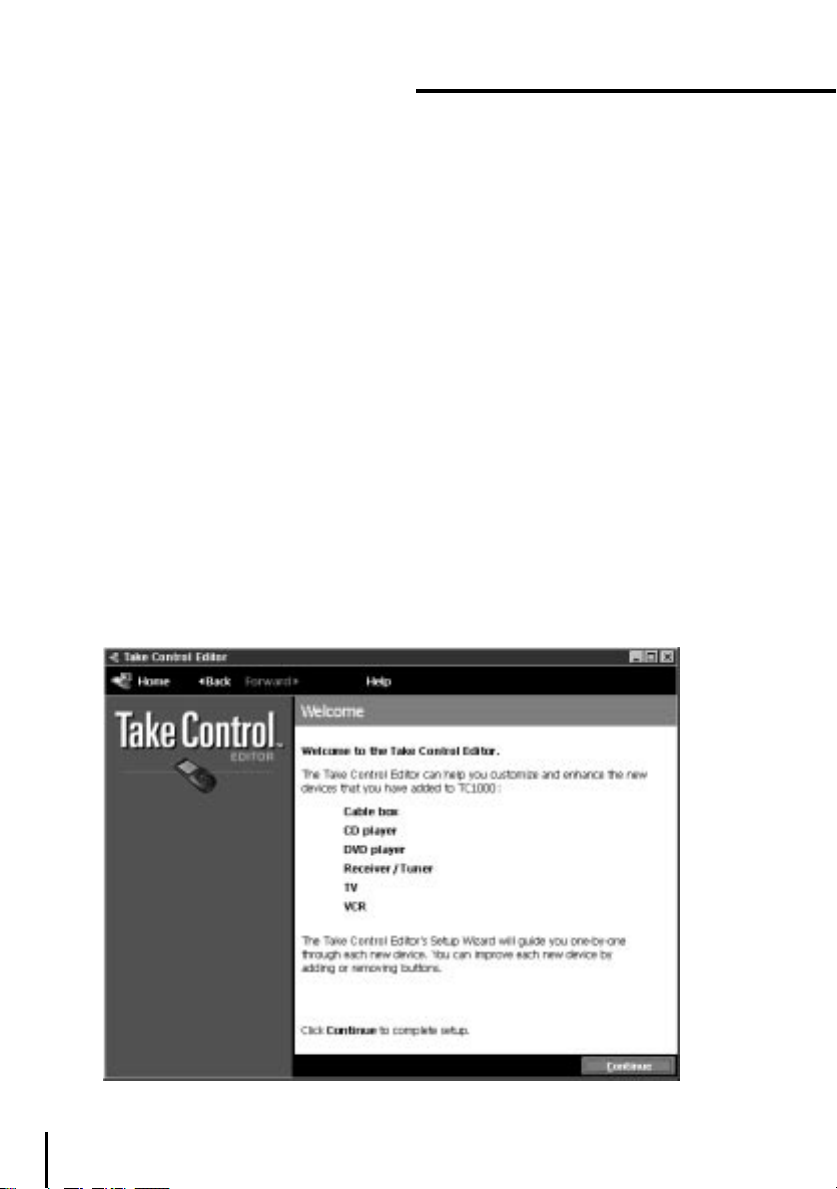
If you added a device using only Take
Control, the Setup Wizard automatically
appears on your computer screen the
first time you connect Take Control to
your computer, giving you an opportunity
to enhance the setup by adding or
removing buttons.
Once you complete the Setup Wizard,
you proceed to the Take Control Editor,
which enables you to customize the settings in the TC1000. Subsequently, whenever you insert the TC1000 compact disc
into your CD-ROM drive, the Take Con-
trol Editor starts automatically.
When you connect Take Control to your
computer, you are prompted to synchronize any changes that you made on the
unit itself or in the TC1000 software. If
you accept, the updated data is transferred between the computer and the
TC1000. For example, if you create a new
activity in the TC1000 software, it is
transferred to the TC1000.
If you would like additional information
at any time, you can refer to the Online
User’s Guide for detailed information,
which you can start by clicking Help.
16
Welcome Screen
Page 21

Harman Kardon
Introducing the Take Control Editor
The Take Control Editor enables you to
configure Take Control, and set up and
modify settings for electronic devices.
Starting the Take Control Editor
The Take Control Editor starts every
time you insert the TC1000 compact disc
into the CD-ROM drive, once you complete “Starting Take Control for the First
Time,” page 6. Using the Take Control
Editor simply requires that you follow
the instructions on the screen.
To start the Take Control Editor:
1 Insert the TC1000 compact disc—
included in the box—into your
CD-ROM drive.
2 Connect the Take Control to your
computer. The Take Control Editor
starts automatically, and begins with
the Take Control Editor home
screen.
Creating New Activities
The TC1000 includes many pre-defined
activities—such as Watch TV, Watch a
videotape, Watch a DVD-video, and so
forth—however, you may want to create
new activities of your own. Creating a
new activity requires connecting your
TC1000 to a computer.
To create a new activity:
1 On the Take Control Editor home
screen, click Add new activity.
2 Type a name, select an icon for the
activity, and then click OK.
3 Follow the on-screen instructions.
Tip You can also create and remove activities using Take Control alone. See “Adding and Removing
Activities,” page 10.
Note You can add up to 32 activities.
Take Control Editor Home Screen
17
Page 22

Take Control
Using Take Control with Your Computer—Cont.
Customizing Activities
Once you begin using your TC1000, you
may wish to customize the way an activity works. Customizing an activity is a
straightforward process using a Take
Control system controller with your
computer.
For example, you may rename an activity
or add additional buttons for a device in
the activity screen.
To customize an activity:
1 On the Take Control Editor home
screen, select the activity that you
wish to change.
2 Click Edit, and then follow the
on-screen instructions.
Deleting Activities
You may delete activities when your Take
Control is connected to a computer.
To delete an activity:
l
On the Take Control Editor home
screen, select the activity that you
wish to delete, and then click Delete.
Customizing Take Control’s Buttons
and Menu Commands
The Take Control software gives you the
ability to customize any button or menu
command that appears on the touchscreen. All customizing occurs through
the Take Control Editor.
For example, you may want to move a
button, add a button, delete a button, or
change the name of a button on the
touchscreen.
To customize a button:
1 On the Take Control Editor home
screen, select the activity that includes
the button you want to customize.
2 Click Edit, and then select Edit activ-
ity screen.
3 Select a device in the Select source
list. For example, select your VCR or
Amplifier.
4 In the Buttons list, click a button and
drag it to the activity screen on the
left, and then click Done.
Changing the Tactile Control
Buttons
Using the Take Control software, you can
customize any tactile control button on
the TC1000. For example, you could
change the mute button to mute your
receiver, instead of your TV. All customizing occurs through the Take Control
Editor.
To change a tactile control button:
1 On the Take Control Editor home
screen, select the activity within which
you would like to use a customized
control button.
2 Click Edit, click Edit settings, and
then follow the on-screen instructions.
Adding or Deleting a Device
You can easily add or delete a device
using the Take Control Editor.
To add or delete a device:
l
On the Take Control Editor home
screen, under Setup, click Devices,
and then follow the on-screen
instructions to add or delete a device.
Notes
l
We recommend that you add a listed device
using the TC1000 unit before you add or learn
an unlisted device category with the Take Control software. See “Adding, Editing, and Removing Devices,” page 9.
l
You can add up to 15 devices.
18
Page 23

Harman Kardon
Working with Macros
A macro is a powerful feature that sends
a series of IR commands to your devices.
You can create one macro button on your
activity screen that performs multiple
steps—then you simply press the macro
button on the activity screen to send the
series of commands to your devices.
For example, you may want to turn on
your TV, VCR, and A/V receiver at the
same time, set the TV to channel 3, and
set the VCR to select the channels.
To set up a macro:
1 On the Take Control Editor home
screen, select Macros.
2 Click Add new macro, type the
name of the new macro, and then
click OK.
3 Select a device in the Select source
list. For example, select your TV or
VCR.
4 In the Buttons list, select the appro-
priate button and drag it to the
Macro editor.
5 Repeat steps 3 and 4 to finish building
your macro, and then click Done.
Notes
l
When using macros, your devices may require a
moment to respond, requiring you to include a
short delay between steps. If your device does
not respond correctly when you first use a
macro, try adjusting the Delay setting, beginning with the lowest setting, and then increasing it, as needed. See the TC1000 Online User’s
Guide for more information.
l
You can add about 30 macros.
Getting Help
If you would like additional information
on using the Take Control software, refer
to the extensive TC1000 Online User's
Guide, which contains detailed information on all aspects of the TC1000
software.
To access the TC1000 Online User's
Guide, click Help in the Take Control
Editor.
19
Page 24

Take Control
Feature Summary
This summary identifies features that you can perform directly on your Take Control unit
and those that require use of a computer and the Take Control software.
Take Control Take Control
Feature Only with Software
Set up the TC1000 Page 6 Page 14
Learn IR code from a device's remote control Page 7 Page 18
Add a device Page 9 Page 18
Delete a device Page 10 Page 18
Calibrate the touchscreen Page 11 –
Set the contrast Page 11 –
Set the time Page 12 –
Turn the speaker on or off Page 12 –
Adjust the display time-out Page 13 –
Reset the TC1000 settings Page 4 –
Create a new activity Page 10 Page 17
Customize an activity – Page 18
Add a button to a device – Page 18
Delete a button from a device Page 10 Page 18
Customize a button – Page 18
Create and edit macros – Page 19
20
Page 25

Troubleshooting
Harman Kardon
If you have difficulty with your Take Control unit, consult the following problem
descriptions for a quick solution. If you
continue to have difficulties, see the
“Technical Support” section within this
manual for further direction.
Setup
I received a message “Code not
learned. TC1000 detected your button
press, but could not learn the IR code,”
and a beep from the speaker.
Cause The remote control for the
device was not aligned correctly
with the Take Control’s IR receiver.
Solutions
l
Try moving the IR transmitter end of
the remote control right, left, closer,
or further away from the TC1000
system controller. Moving the
remote control around may help to
align the remote control IR transmitter with Take Control’s IR receiver.
l
Align your remote control correctly
with your Take Control. See “Adding, Editing, and Removing Devices,” page 9, and “Adding or
Deleting a Device,” page 18.
Cause The button on the remote
control was not held down long
enough to learn the IR code.
Solution Hold down the button that
needs to be learned on the remote
control until you see the message,
“Code learned.”
Cause The Take Control software is
unable to learn the IR code for the
device or button.
Solution Use Take Control’s internal
list of categories and devices.
If the category and the device you
need are not listed, then you cannot
add this device or button.
Cause The batteries are low in either
the TC1000, the remote control you
are trying to learn, or both.
Solution Replace the batteries, as
needed. For the TC1000, see
“Replacing the Batteries,” page 28.
For the remote control, see the documentation for the remote control.
Cause The system controller is in
direct sunlight or under fluorescent
lighting.
Solution Direct sunlight or fluores-
cent lighting may cause interference
with the IR signal from the system
controller. Use it away from direct
sunlight or fluorescent lighting.
Cause The electronic device may
have IR frequencies that are incompatible with Take Control.
Solution Please contact us at the
number in “Technical Support,”
page 29.
Cause There may be other IR-con-
trolled devices in the room, creating
a conflict with the TC1000 IR signal.
Solution Turn off or refrain from
using other IR-controlled devices.
Cause The button on the remote
control being learned does not work
or is set to an alternate-device
mode, such as VCR when you are
trying to learn a TV button.
Solution Before learning the button
on the remote control, verify that it
works properly by pressing the
button and observing a correct
response on the device.
21
Page 26

Troubleshooting—Cont.
Take Control
The learning process times out, and I
receive the message “Code not
learned. TC1000 timed out waiting for
you to press the button.”
Cause You didn’t press the button to
be learned on your remote control
early enough.
Solution Press the button to be
learned on your remote control
earlier.
Cause The remote control being pro-
grammed and Take Control are not
aligned properly.
Solutions
l
Align the remote control with Take
Control.
l
Try moving the IR transmitter end of
the remote control closer, right or
left, or further away from the
TC1000. Moving the remote control
around may help to align the remote
control IR transmitter with TC1000’s
IR receiver.
Cause The remote control is not in
the correct mode.
Solution Verify that the remote con-
trol being learned is set to the correct mode, such as TV when learning
a TV button, by pressing a button
and observing a correct response on
the device. The remote control for
the device needs to be in the correct
mode to send the right IR code to
the TC1000.
Cause The batteries are low in either
the TC1000, the remote control
being learned, or both.
Solution Replace the batteries, as
needed. For the Take Control, see
“Replacing the Batteries,” page 28.
For the remote control, see the documentation for the remote control.
Cause The system controller may be
encountering difficulties learning.
Solution Try the solutions included in
“I received a message “Code not
learned. TC1000 detected your button press, but could not learn the IR
code,” and a beep from the speaker.,” page 21.
My receiver isn’t listed
Cause Some IR codes work with both
a receiver and amplifier.
Solution Check the IR codes for
amplifiers to see if your receiver is
included.
The Setup Wizard asks me to press a
button that my device does not have
Cause The Setup Wizard configures
some devices that may include additional buttons.
Solution Select Skip to skip this
step, and then proceed through the
Setup Wizard with the buttons that
the device includes.
My device has a button omitted from
the Setup Wizard
Cause The Setup Wizard includes the
default configurations for many, but
not all devices.
Solution Add the button for your
device by using the TC1000 software. See “Customizing Take Control’s Buttons and Menu
Commands,” page 18.
I have a combination device (for
example, TV and VCR), and don’t know
how to add them
Cause Take Control cannot add com-
bination devices together.
Solution Use the Take Control Edi-
tor on your computer to add both
22
Page 27

Harman Kardon
devices by creating an activity that
uses buttons for both “devices.” For
example, you can set up a TV device
and a VCR device, with buttons for
your TV in one and your VCR in the
other. You can then create a single
Watch TV activity using buttons
from the TV device and VCR device.
To add an activity, see “Creating
New Activities,” page 17.
Your Take Control fails to learn the IR
code from your device remote control
Cause The IR code for the device
remote control is incompatible with
the TC1000.
Solution Be sure that you follow the
instructions in this manual or the
Online User’s Guide to learn an IR
code. It is important that you align
the TC1000 properly with the device
remote control. If you have followed
all suggestions and instructions precisely and still experience a problem,
please contact us (see “Technical
Support,” page 29).
Operation
A button doesn’t work correctly or the
way I want it to work.
Cause The TC1000 IR transmitter is
covered or blocked from a direct
“line-of-sight” path to the device.
Solution Ensure that the TC1000 has
a clear, unobstructed path to the
device.
Cause The IR code assigned to the
button is incorrect.
Solutions
l
You need to relearn the IR code
using the device’s remote control.
See “Adding, Editing, and Removing
Devices,” page 9, and “Adding or
Deleting a Device,” page 18.
l
Verify that the remote control being
learned is set to the correct mode,
such as TV when learning a TV
button, by pressing a button and
observing a correct response on the
device.
Cause The touchscreen is calibrated
incorrectly.
Solution Calibrate the touchscreen.
See “Calibrating the Touchscreen,”
page 11.
Cause The system controller is set to
an activity screen that does not
apply to the desired device, preventing an appropriate IR signal to be
sent to the device.
For example, if you want to change
stations on your radio and have the
activity screen for Watch TV selected, the system controller cannot
send an IR signal to your radio.
Solution Select an applicable activity
screen.
For example, when you watch TV, an
activity screen such as Watch TV
needs to appear to enable the system controller to send IR codes to
the TV or appropriate device.
My electronic device does not work
with my system controller.
Cause The system controller is too
far away from the device.
Solution Move to within 23.0 ft
(7.0 m) of the device. Ensure that
you have a “line-of-sight” path
between the system controller and
the electronic device.
Cause The touchscreen is not cali-
brated properly.
Solution Calibrate the touchscreen.
See “Calibrating the Touchscreen,”
page 11.
23
Page 28

Troubleshooting—Cont.
Take Control
Cause The IR codes are incorrect or
lost.
Solution Delete and then add the IR
codes for your device again. See
“Adding or Deleting a Device,” page
18, or “Completing the Setup Wiz-
ard,” page 7.
Cause The TC1000 is not pointed at
the product you want to control.
Solution Point the system controller
directly toward the product’s IR
sensor.
Cause The system controller is in
direct sunlight or under fluorescent
lighting.
Solution Direct sunlight or fluores-
cent lighting may cause interference
with the IR signal from the system
controller. Use it away from direct
sunlight or fluorescent lighting.
Cause The electronic device may
have incompatible frequencies with
the TC1000.
Solution Please contact us at the
number in “Technical Support,”
page 29.
Cause The IR code for the device is
not a perfect match.
Solution Assign another IR code to
your device from either the same or
a similar category. You may want to
try all possible matches for your
device to determine which is most
effective.
The database match test does not
work correctly
Cause The device may not be turned
on.
Solution Turn on the device and
retry the database match test.
24
The touchscreen display goes blank or
times out.
Cause The display timed out due to
inactivity of the system controller.
Solution Lightly press the touch-
screen, roll or press the selector
wheel, press the Home menu button, or press the backlight button to
restore the display.
Cause The backlight duration is set
for too short of a period.
Solution Increase the backlight
duration period. See “Adjusting the
Display Time-Out,” page 13.
Cause The batteries are low or dead.
Solution Replace the batteries. See
“Replacing the Batteries,” page 28.
I cannot hear the internal speaker.
Cause The speaker is turned off.
Solution Turn on the speaker set-
ting. See “Turning the Speaker On
or Off,” page 12.
I cannot get my macro to play
Cause Not enabling the macro to
completely execute or play
Solution Hold Take Control in front
of the applicable device long enough
for the macro to complete playing.
I can’t create another macro
Cause You reached the maximum
limit for macros.
Solution Delete unused macros or
reduce the number of commands
within your macros. See “Working
with Macros,” page 19.
My computer doesn’t work with my
Take Control.
Cause Loose connections on your
serial cable.
Page 29

Harman Kardon
Solution Ensure that the serial cable
is connected properly to both the
computer-connector port and the
serial port. See “Connecting the
TC1000 to Your Computer,”
page 15.
Touchscreen
My backlight, contrast, and time
settings are lost.
Cause Replacing the batteries or
pressing the reset button restores all
settings to their default
configuration.
Solution Adjust the backlight, con-
trast, and time settings to your preference. See “Adjusting the Display
Time-Out,” page 13, “Adjusting the
Touchscreen Contrast,” page 11,
and “Setting the Time,” page 12, as
needed.
I cannot see the display.
Cause The display timed out, turning
off the display.
Solution Adjust the display setting to
your preference. See “Adjusting the
Display Time-Out,” page 13.
Cause Dead batteries.
Solution Replace the batteries. See
“Replacing the Batteries,” page 28.
Cause The contrast is set too low.
Solution Adjust the contrast setting.
See “Adjusting the Touchscreen
Contrast,” page 11.
The touchscreen remains blank
Causes
l
The batteries are low or dead.
l
The batteries were installed
incorrectly.
l
The batteries are old.
Solution Replace all batteries. See
“Replacing the Batteries,” page 28.
Cause The display timed out.
Solution Increase the period
assigned to the Display Time-out
feature. See “Adjusting the Display
Time-Out,” page 13.
Cause The contrast settings may be
set too low.
Solution Adjust the contrast setting
to your preference. See “Adjusting
the Touchscreen Contrast,”
page 11.
I received a Low Batteries icon in the
title bar on my touchscreen.
Cause The batteries are low.
Solution Have fresh batteries ready
to replace all batteries when you
receive the Low Batteries warning.
See “Replacing the Batteries,”
page 28.
The Low Batteries warning appears in
the center of the touchscreen and then
the display disappears.
Cause The batteries are too low to
provide proper operation.
Solution Replace all batteries. See
“Replacing the Batteries,” page 28.
My batteries don't last very long.
Cause Using the Backlight button
wears down the batteries when used
extensively.
Solution
l
Use the Backlight button less.
–or–
Reduce the period assigned to the
Display Time-out feature. See
“Adjusting the Display Time-Out,”
page 13.
25
Page 30

Troubleshooting—Cont.
Take Control
Computer
I don't have a serial port available to
connect the TC1000 to my computer.
Cause Each serial port already has a
device connected to it.
Solution Disconnect a computer
peripheral device from a serial port
that you don't use or need, and then
remove it from the list of devices in
the Windows Device Manager. Note
that after removing a device from
the Windows Device Manager, you
will need to reinstall it, if you choose
to again use it on that serial port.
To remove a computer peripheral
device, for example a mouse:
In Windows 95 or Windows 98
1 Click the Start button on the Win-
dows taskbar, point to Settings,
and then click Control Panel.
2 Double-click System, click the
Device Manager tab, select the
device in the list, and then click
Remove.
In Windows NT
1 Click the Start button, point to
Settings, and then click Control
Panel.
2 Double-click Add/Remove
Programs.
3 Select the program assigned to the
serial port, click Add/Remove, and
then click OK.
4 Close all applications and restart
your computer.
If your mouse is connected to a serial
port, check to see if you have a mouse
(PS/2) port. If so, you can install a PS/2
mouse. Or, if you have a Universal
Serial Bus (USB) port and are running
Windows 98, you can install a USB
mouse.
The computer-connector plug on the
serial cable does not work with my
computer
I use an extension serial cable,
connected to my serial port
Take Control Version
I need to determine the version of my
Take Control.
Cause The computer has a 25-pin
serial port.
Solution Use a 9-pin-to-25-pin serial
adapter to connect the serial port:
1 Insert the 25-pin side of the adapter
into the serial port and tighten the
screws.
2 Insert the computer-connector plug
into the 9-pin side of the adapter.
Cause Signal interference may occur
when the serial cable is not connected directly to the computer.
Solution Connect the computer con-
nector plug directly to the serial port
on the computer.
Cause You need to find out what
version of Take Control you have.
Solution
1 On the Home menu, select
Troubleshooting.
2 Scroll to the bottom of the menu,
and then select About to view the
version.
26
Page 31

Care of Your Take Control
Harman Kardon
We designed Take Control for minimal
maintenance. These instructions provide
you with steps that can keep it working
for many years to come.
General Care
Follow these steps for optimum performance and longevity of your Take
Control:
l
Keep your Take Control away from
small children and pets.
l
Do not drop your Take Control.
l
Keep your Take Control away from
heat sources, such as heating registers
or direct sunlight.
l
Keep your Take Control away from
liquids. Never immerse it in water. If
liquid should enter the unit, have it
examined by an authorized Harman
Kardon service center before using.
See “Technical Support” for more
information.
Cleaning
Occasional cleaning may be required,
depending upon use.
To clean your TC1000:
1 Disconnect the TC1000 from your
computer, if connected.
2 Dampen a lint-free cloth with water,
mild detergent, or rubbing alcohol
and wipe the touchscreen, selector
wheel, buttons, and outer surfaces
clean.
27
Page 32

Take Control
Care of Your Take Control—Cont.
Replacing the Batteries
Take Control provides you with two levels
of low-battery indication: Low Battery
and Low Battery Warning.
A Low Battery indication appears as
an icon in the title bar on the touchscreen, next to the time display. This icon
appears when batteries reach a level of
4.0 volts. You can continue to operate
the TC1000 when this icon appears.
A Low Battery Warning indication
appears as an icon in the center of the
touchscreen. You will see this icon for
four seconds, before the touchscreen
turns off. This icon appears when batteries reach a level of 3.8 volts. You cannot
operate the TC1000 with a Low Battery
Warning.
If you receive a low-battery indication,
replace all of your batteries with fresh AA
alkaline batteries. During replacement,
ensure that all the batteries are oriented
properly in the battery compartment,
observing the key—a vertical slot for the
battery tip—for the positive (+) end. If
the batteries are not inserted properly,
the TC1000 will not work.
Tip Keep the period short for the Display timeout feature to extend the life of your batteries.
Important Removing one or more batteries returns the contrast, speaker, and time
to their default configuration. It does not
change learned IR codes, activities, macros,
or any customizing of buttons performed
through the Take Control Editor.
Battery Safety Precautions
l
Keep batteries out of reach of
children.
l
Don’t mix old and new batteries, or
batteries of different types (for
example, carbon and alkaline
batteries).
l
Always remove old, weak, or wornout batteries promptly and dispose of
them in accordance with your local
ordinances.
l
If a battery leaks, remove all batteries
and dispose of them in accordance
with your local ordinances. Before
inserting new batteries, thoroughly
clean the battery compartment with a
damp paper towel, or follow the
battery manufacturer’s recommendations for cleanup. If fluid from the
battery comes into contact with skin
or clothes, flush skin with water
immediately.
l
Remove the batteries if your system
controller is to be stored for longer
than a month without being used.
Special Precautions
The precautions below are to prevent the
sudden release of electrolytes, which
these prohibited actions can cause:
l
Do not open, puncture, or mutilate
the batteries.
l
Do not heat batteries in an attempt to
recharge them.
l
Do not use a fire to dispose of
batteries.
Released battery electrolyte is corrosive,
can cause damage to the eyes and skin,
and may be toxic if swallowed.
28
Page 33

Harman Kardon
Technical Support
If you are living in the USA, please call
1-800-422-8027, and then follow the
prompts for “Customer Service.” If you
are living outside the USA, please call
your local distributor.
harman/kardon
250 Crossways Park West
Woodbury, NY 11797
www.harmankardon.com
Regulatory Information
This product was tested and complies
with the limits for a Class B digital device
under Part 15 of the Federal Communications Commission (FCC) rules, and is subject to these conditions: It may not cause
harmful interference and must accept any
interference received, including any that
causes undesired operation.
This Class B digital apparatus complies
with ICES-003.
Cet appareil numérique de la classe B est
conforme à la norme NMB-003 du
Canada.
For detailed information on U.S. and
Canadian radio interference regulations, press F1 from the Take Control
Editor and search for “regulations” in
the TC1000 Online User's Guide. This
information is also available in the
README.TXT file.
Tested to comply with FCC standards. For
home and office use. Model number
RMT1.
For FCC-compliance and non-technical
support issues, the responsible party is:
Microsoft Corporation
One Microsoft Way
Redmond, WA 98052-6399
(425) 635-7040
29
Page 34

Take Control
End-User License Agreement and Warranty
A SOFTWARE PRODUCT LICENSE
IMPORTANT—READ CAREFULLY: This End-User License Agreement (“EULA”) is a legal agreement between you (either an individual or a single entity) and Harman International Industries,
Inc. (“HARMAN”) for the software portion of this Remote Control Device, which includes the
accompanying computer software, and may include associated media, printed materials and
any “online“ or electronic documentation (“SOFTWARE”). By installing, copying or otherwise
using the SOFTWARE, you agree to be bound by the terms of this EULA. If you do not agree to
the terms of this EULA, Harman and Microsoft Corporation (“MICROSOFT”) are unwilling to license the SOFTWARE to you. In such event, you may not install or use or copy the SOFTWARE,
and you should promptly contact Harman for instructions on return of the SOFTWARE together
with the Remote Control Device for a refund.
The SOFTWARE is protected by copyright laws and international copyright treaties, as well as
other intellectual property laws and treaties. The SOFTWARE is licensed, not sold.
1 GRANT OF LICENSE. This EULA grants you the following rights:
l
Software Installation and Use. You may install and use one copy of the SOFTWARE on
a single computer for use with the accompanying Harman Remote Control Device
l
Storage/Network Use. You may also store or install a copy of the SOFTWARE on a storage device, such as a network server, used only to install or run the SOFTWARE on your other
computers over an internal network; however, you must acquire and dedicate a license for
each separate computer on which the SOFTWARE is installed or run from the storage device,
and each such computer must use the enclosed Harman Remote Control Device in conjunction with the SOFTWARE. A license for the SOFTWARE may not be shared or used concurrently on different computers.
2 DESCRIPTION OF OTHER RIGHTS AND LIMITATIONS.
l
Limitations on Reverse Engineering, Decompilation and Disassembly. You may not
reverse engineer, decompile, or disassemble the SOFTWARE, except and only to the extent
that such activity is expressly permitted by applicable law notwithstanding this limitation.
l
Separation of Components. The SOFTWARE is licensed as a single product. Its component parts may not be separated for use on more than one computer.
l
Rental. You may not rent or lease the SOFTWARE.
l
Software Transfer. You may permanently transfer all of your rights under this EULA, provided you retain no copies, you transfer all of the SOFTWARE (including all component parts,
the media and printed materials, any upgrades, this EULA and, if applicable, the Certificate of
Authenticity) along with the accompanying Remote Control Device, and the recipient agrees
to the terms of this EULA. If the SOFTWARE portion is an upgrade, any transfer must include
all prior versions of the SOFTWARE.
l
Not For Resale Software. If the SOFTWARE is labeled “Not for Resale” or “NFR”, then,
notwithstanding other sections of this EULA, you may not resell, or otherwise transfer for value, the SOFTWARE.
l
Termination. Without prejudice to any other rights, Microsoft and/or Harman International may terminate this EULA if you fail to comply with the terms and conditions of this
EULA. In such event, you must destroy all copies of the SOFTWARE and all of its component
parts.
30
Page 35

Harman Kardon
l
Support Services. Product support for the SOFTWARE and Remote Control Device is not
provided by Microsoft or its subsidiaries. For product support, please refer to Harman’s support number provided in the user documentation for the Remote Control Device. Should you
have any questions concerning this EULA, or if you desire to contact Harman for any other
reason, please refer to the address provided in the user documentation for the Remote Control Device.
3 COPYRIGHT. All title and copyrights in and to the SOFTWARE (including but not limited
to any images, photographs, animations, video, audio, music, text and “applets,” incorporated into the SOFTWARE), the accompanying printed materials, and any copies of the SOFTWARE, are owned by Microsoft or its suppliers. The SOFTWARE is protected by copyright
laws and international treaty provisions. Therefore, you must treat the SOFTWARE like any
other copyrighted material except that you may either (a) make one copy of the SOFTWARE
solely for backup or archival purposes, or (b) install the SOFTWARE on a single computer provided you keep the original solely for backup or archival purposes. You may not copy the
printed materials accompanying the Remote Control Device.
4 EXPORT RESTRICTIONS. You acknowledge that the SOFTWARE licensed hereunder is
subject to the export control laws and regulations of the U.S.A., and any amendments thereof. You confirm that with respect to the SOFTWARE, you will not export or re-export it,
directly or indirectly, to any countries that are subject to U.S.A. export restrictions. You further
acknowledge that the SOFTWARE may include technical data subject to export and re-export
restrictions imposed by U.S.A. law.
5 DISCLAIMER OF WARRANTIES. The Limited Warranty that appears below is the only
express warranty made to you and is provided in lieu of any other express warranties (if any)
created by any documentation or packaging. No other warranties are made with respect to
the SOFTWARE and Remote Control Device by any person, including but not limited to Harman, Microsoft, and its suppliers. Except for the Limited Warranty, and to the maxi-
mum extent permitted by applicable law, Harman, Microsoft and its suppliers
provide the SOFTWARE and Remote Control Device AS IS and with all faults, and
hereby disclaim all other warranties and conditions, either express, implied or statutory, including but not limited to any (if any) implied warranties or conditions of
merchantability, of fitness for a particular purpose, of lack of viruses, and of lack of
negligence or lack of workmanlike effort, all with regard to the SOFTWARE and
Remote Control Device. Also, there is no warranty or condition of title, authority, or nonin-
fringement in the SOFTWARE and Remote Control Device.
B GENERAL PROVISIONS
These provisions apply to the EULA and the below Limited Warranty and Limitation of
Liability.
6 EXCLUSION OF INCIDENTAL, CONSEQUENTIAL AND CERTAIN OTHER DAMAGES.
To the maximum extent permitted by applicable law, in no event shall Harman,
Microsoft or its suppliers be liable for any special, incidental or consequential damages whatsoever (including but not limited to damages for loss of profits, for business interruption, for personal injury, for loss of privacy, for failure to meet any duty
including of good faith or of reasonable care, for negligence, and for any other pecuniary or other loss whatsoever), arising out of or in any way related to the use of
or inability to use the SOFTWARE or Remote Control Device, even if Harman,
Microsoft or any supplier has been advised of the possibility of such damages.
31
Page 36

Take Control
7 GOVERNING LAW. If you acquired the SOFTWARE and Remote Control Device in the
United States of America, the laws of the State of Washington, U.S.A., will apply to this contract. If you acquired this SOFTWARE and Remote Control Device outside of the United States
of America, then local law may apply.
8 QUESTIONS. Should you have any questions, or if you desire to contact Harman for any
reason, write:
Harman Customer Service
250 Crossways Park West
Woodbury, NY 11797
C LIMITED WARRANTY
Warranty Period
Harman warrants that the on the day you receive and for the next 90 days for the SOFTWARE and on the day your receive and for the next one (1) year thereafter for the Remote
Control Device, and under normal use and service, (a) the SOFTWARE will perform substantially in accordance with the accompanying packaging and documentation, and (b) the
Remote Control Device accompanying the SOFTWARE will be substantially free from defects
in materials and workmanship.
Who Is Protected By This Warranty
Your Harman warranty protects you, the first licensed user of the SOFTWARE and
Remote Control Device, provided that the Harman Remote Control product and
accompanying SOFTWARE was purchased from an authorized dealer, and there are
no third-party beneficiaries of this Limited Warranty. A copy of the original dated
sales receipt must be provided whenever warranty service is required. Please attach
a copy of your sales receipt to this warranty and put it in a safe place.
What Is Covered
Your Harman warranty covers all defects in material and workmanship with the following
specified exceptions. These are: (1) damage caused by accident, unreasonable use or neglect
(including the lack of reasonable and necessary maintenance); (2) damage occurring during
shipment (claims must be presented to the carrier); (3) damage to or deterioration of any
accessory or decorative surface; (4) damage resulting from failure to follow instructions contained in your user’s manual; (5) damage resulting from the performance of repairs by someone other than an authorized Harman warranty station; (6) damage caused by the
installation of parts that do not conform to Harman specifications; (7) any Harman unit on
which the serial number has been effaced, modified, or removed; (8) units used for other
than home use. This warranty covers only actual defects within the Remote Control Device or
SOFTWARE itself; and does not cover the cost of installation or removal from a fixed
installation, normal set-up or adjustment, claims based on misrepresentation by the seller or
performance variations resulting from installation related circumstances such as source quality
or AC power.
32
Page 37

Harman Kardon
How To Obtain Warranty Service
If your Harman Remote Control Device product ever needs service, please call your authorized dealer at 1-800-422-8027 to receive instructions on how to obtain service or write to
Harman, 250 Crossways Park West, Woodbury, NY 11797 (Attention Customer Service).
You’ll need to present a copy of your original sales receipt to establish the date of purchase.
Do not return products to Harman without authorization.
Who Pays For What
Harman will pay all labor and material expenses for all repairs covered by this warranty. If
necessary repairs are not covered by this warranty, or if a unit is examined which is not in
need of repair, you will be charged for the repairs or examination.
You must pay any shipping charges incurred in getting your Harman Remote Control Device
product to a Harman Authorized Warranty Station. We will pay reasonable return shipping
charges to any location in the United States if the repairs are covered under the warranty.
Please be sure to save the original shipping cartons, because a nominal charge will be made
for additional cartons.
Information
If you have questions regarding the installation or operation of this unit, please call Customer
Service at 1-800-422-8027 or write to us at Harman Kardon, 250 Crossways Park West,
Woodbury, NY 11797.
Limitation On Implied Warranties
IMPLIED WARRANTIES OF MERCHANTABILITY AND FITNESS FOR PARTICULAR PURPOSE ARE
LIMITED IN DURATION TO THE LENGTH OF THIS WARRANTY, UNLESS OTHERWISE PROVIDED
BY STATE LAW. AS TO ANY DEFECTS DISCOVERED AFTER THE 90-DAY AND 1-YEAR PERIOD,
THERE IS NO WARRANTY OR CONDITION OF ANY KIND.
D EXCLUSION OF CERTAIN DAMAGES
HARMAN’S ENTIRE LIABILITY AND YOUR EXCLUSIVE REMEDY WITH RESPECT TO THE SOFTWARE AND REMOTE CONTROL DEVICE IS LIMITED TO, AT HARMAN’S OPTION, THE REPAIR
OR REPLACEMENT, OF ANY DEFECTIVE SOFTWARE OR REMOTE CONTROL DEVICE AND
SHALL IN NO EVENT INCLUDE INCIDENTAL OR CONSEQUENTIAL DAMAGES OF ANY KIND.
HARMAN RESERVES THE RIGHT TO REPLACE A DISCONTINUED MODEL WITH A COMPARABLE MODEL. ANY REPLACEMENT UNITS OR PARTS MAY BE NEW OR REBUILT. ANY REPLACEMENT SOFTWARE OR REMOTE CONTROL DEVICES WILL BE WARRANTED FOR THE
REMAINDER OF THE ORIGINAL WARRANTY PERIOD OR THIRTY DAYS, WHICHEVER IS LONGER. Section 6 above of the EULA General Provisions (Exclusion of Incidental, Consequential
and Certain Other Damages) also applied to this Limited Warranty and is incorporated herein.
SOME STATES DO NOT ALLOW LIMITATIONS ON HOW LONG AN IMPLIED WARRANTY
LASTS AND/OR DO NOT ALLOW THE EXCLUSION OF INCIDENTAL OR CONSEQUENTIAL
DAMAGES, SO THE ABOVE LIMITATIONS MAY NOT APPLY TO YOU.
This warranty gives you specific legal rights, and you may also have other rights which vary
from state to state.
We sincerely thank you for your expression of confidence in Harman products.
33
Page 38

Take Control
Technical Specifications
General Specifications
l
Model: TC1000
l
Size:
Length—7.5 in. (190.3 mm)
Height—2.1 in. (53.3 mm)
Width—3.4 in. (87.3 mm)
l
Weight—13.4 oz (380.0 g)—with
batteries installed
l
Operating temperature range—41° F
(5° C) to 95° F (35° C)
l
IR transmission range—23.0 ft (7.0 m)
l
IR transmission frequency—120 KHz
(maximum)
l
IR learning frequency—120 KHz
(maximum)
Take Control TC1000
Touchscreen
l
Viewing area—2.5 in. (64.0 mm)
(height) x 2.0 in. (51.4 mm) (width)
l
Resolution—200 x 160 pixels total
l
Backlight color—green
Batteries
l
Quantity—4
l
Type—Standard AA-size and weight,
alkaline
Computer System Requirements
For software installation and use, only.
l
Windows 95, Windows 98, Windows
NT Workstation version 4.0 or later,
Windows NT Server version 4.0 or
later operating system
l
PC with 486/25 MHz microprocessor,
or equivalent
l
8 MB RAM
l
2 MB free hard disk space
l
CD-ROM drive
l
Serial port
Serial Cable
l
Length—6.0 ft (1.8 m)
l
Computer serial-port connector—
9-pin, D-shell
l
Computer-connector plug—0.1 in.
(3.5 mm) mini-stereo plug
34
 Loading...