

Page 1
GPS-810NA
Portable Touchscreen Navigation System and A/V Media Player
Quick-Start Guide
Page 2
Contents
Contents
English Instructions ................................................ 3
!
The Harman Kardon® GPS-810 uses a lithium-polymer battery. Under normal operating conditions, the battery
will provide superior service with a lifespan that is superior to those of other battery types. Please observe the
following guidelines to protect the performance of your GPS-810 and its battery:
Do not operate the unit in ambient temperatures outside the following range: –10° C (14° F) to 55° C (131° F).
Do not store the unit even for short periods in ambient temperatures outside the following range: –20° C (–4° F)
to 60° C (140° F).
Do not store the unit for long periods in ambient temperatures outside the following range: 0° C (32° F) to 25° C
(77° F).
The GPS-810 will not charge the battery at temperatures above 50° C (122° F).
Le Harman Kardon® GPS-810 utilise une pile au lithium-polymère. Dans des conditions d’utilisation normales, la
pile o re une durée de vie et un rendement supérieurs à celui des autres types de piles. Veuillez observer les lignes
directrices ci-dessous pour optimiser le rendement de votre GPS-810 et de sa pile:
Ne pas faire fonctionner l’unité à une température inférieure à –10° C (14° F) ou supérieure à 55° C (131° F).
Ne pas ranger l’unité, même pour une courte période de temps, dans un endroit où la température ambiante est
inférieure à -20° C (–4° F) ou supérieure à 60° C (140° F).
Ne pas ranger l’unité pendant une longue période de temps dans un endroit où la température ambiante est
inférieure à 0° C (32° F) ou supérieure à 25° C (77° F).
La pile du GPS-810 ne se charge pas lorsque la température ambiante est supérieure à 50° C (122° F).
El GPS-810 de Harman Kardon® usa una batería de litio-polímero. Bajo condiciones normales de operación, la
batería le brindará un servicio superior y una vida útil mucho más prolongada que cualquiera de los otros tipos
de baterías. Siga las directrices siguientes para proteger el desempeño de su GPS-810 y de su batería:
No utilice la unidad en entornos cuya temperatura está fuera de la gama siguiente: –10° C (14° F) a 55° C (131° F).
No guarde la unidad en entornos cuya temperatura está fuera de la gama siguiente aún por periodos muy
cortos: –20° C (–4° F) a 60° C (140° F).
No almacene la unidad por periodos prolongados en entornos cuya temperatura está fuera de la gama
siguiente: 0° C (32° F) a 25° C (77° F).
El GPS-810 no cargará la batería en temperaturas arriba de 50° C (122° F).
www.guideandplay.com
Page 3
Quick-Start Guide
Before You Begin
What’s in the Box
What’s in the Box
GPS-810NA
Car Charger
Wall Charger
USB Cable
Quick-Start Guide
Carrying Case
Fold-Flat Mounting Bracket
Plastic Adhesive Disc for Dash-Mount
Wireless Remote Control w/Battery
Mounting Disc for Wireless Remote
Alcohol Cleaning Pads for Mounting Surfaces
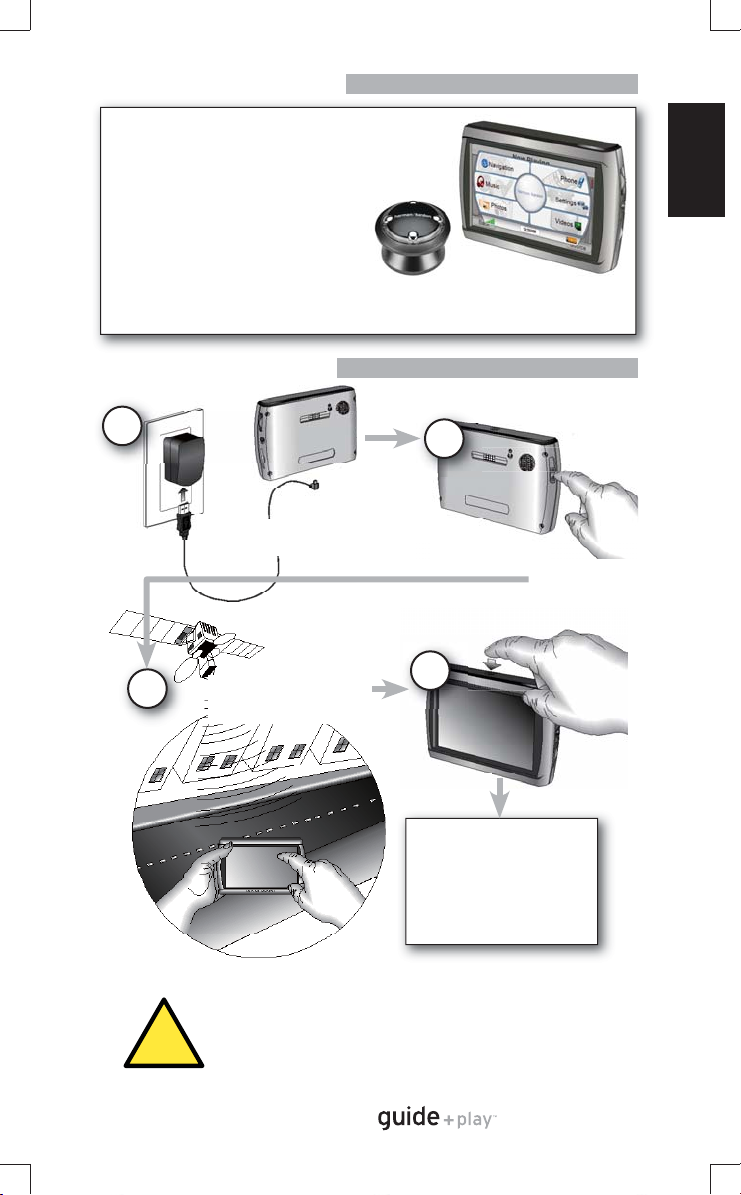
Before You Begin
ENGLISH
1
Charge Battery
at Least 6 Hours
3
Go Outdoors to Obtain
GPS Signal Reception
WARNING: Operation of any feature of this device while driving is dangerous. Do
not operate this device while driving. Do not view or operate audio or video modes
while driving.
!
For safety reasons, this device will cease navigation functions when the video mode
is enabled. Do not attempt to disable any safety function incorporated in this device.
Any alteration of this device may cause serious injury and shall void the warranty.
2
Unlock Switch
Power On
4
To put the unit in stand by
mode, PRESS the power
button momentarily.
To turn unit completely o ,
PRESS and HOLD the power
button for 2 seconds.
3
GPS-810NA
Quick-Start Guide
Page 4
Quick-Start Guide
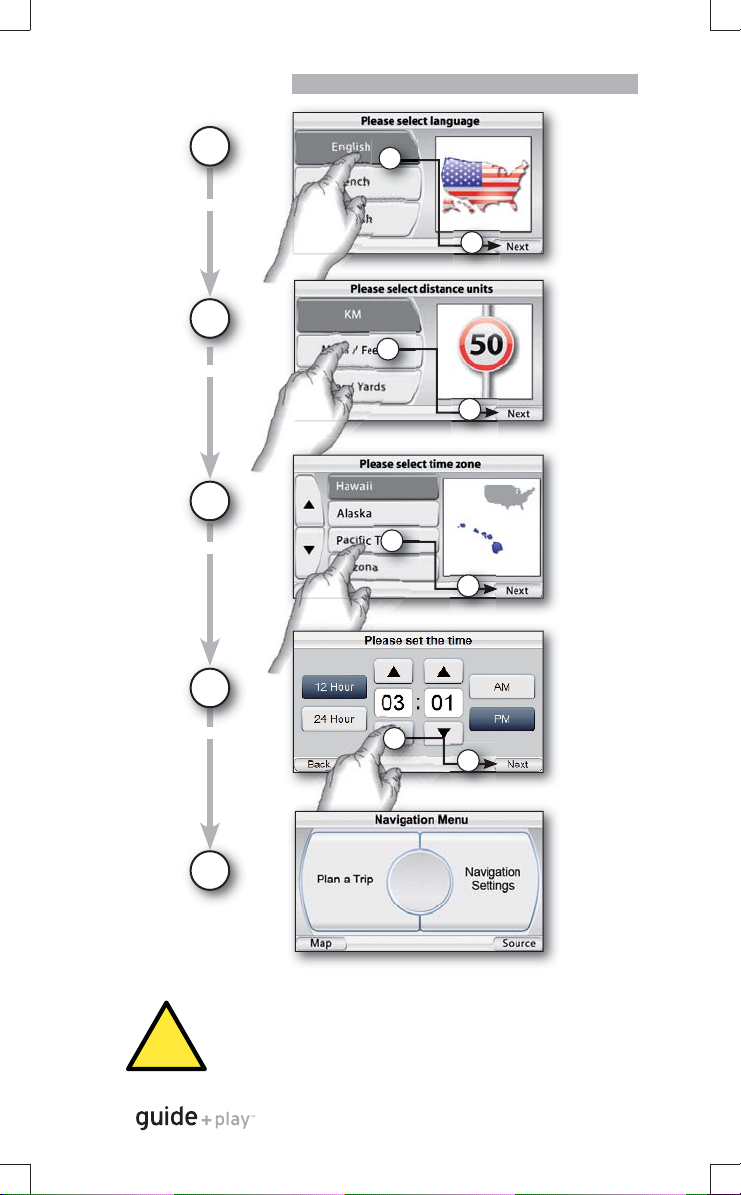
Setup Wizard
Setup Wizard
1
Select Language
2
Select Units
3
Select Time Zone
4
1
2
1
2
1
2
Set Time of Day
Quick-Start Guide4
5
Finished!
The geographic information provided by this device serves as a navigational aid only
and does not include information pertaining to construction, road closures, speed
restrictions, road or tra c conditions, or other circumstances relevant to public safety.
The driver must always be aware of the actual road conditions and surroundings, and
decide whether or not to follow the information provided by this device. Obey all tra c
!
laws and observe safe driving practices. The manufacturer does not accept responsibility
for any inaccurate or incomplete information provided by this device.
GPS-810NA
1
2
Page 5
Quick-Start Guide
Plan a Trip
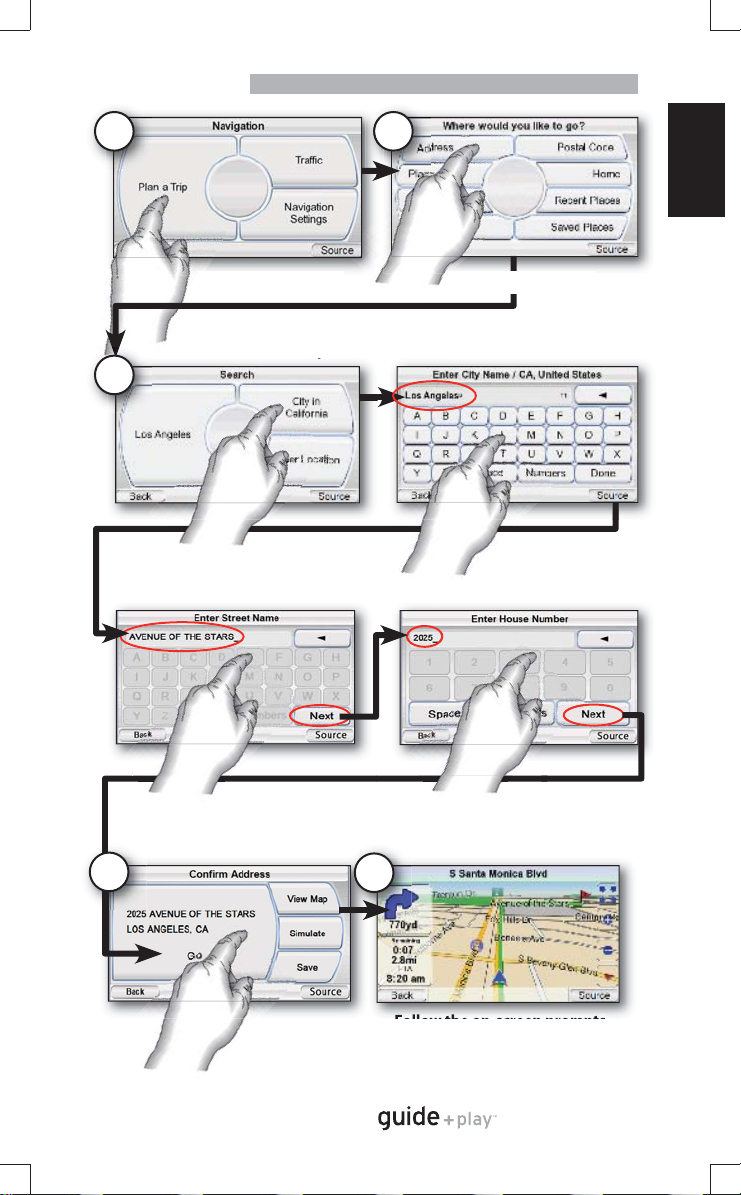
Plan a Trip
Choose “Plan a Trip” Choose “Address”
3
21
ENGLISH
Input the destination
4
Choose “Go”
5
Follow the on-screen prompts
GPS-810NA
5
Quick-Start Guide
Page 6

Quick-Start Guide
Connecting a Bluetooth Phone*
Connecting a Bluetooth Phone*
* A Bluetooth® enabled phone is required operation with GPS-810NA calling features. Please read the
instructions with your particular phone to determine how to place it into “pairing” or “discovery” mode to
set up the connection with GPS-810NA.
1
Place your Bluetooth®
enabled phone in
the “pairing” or
“discovery” mode.
3
4
Press “Search”
Select Phone
2
From GPS-810NA
Menu Select
“Phone”
The rst time you select “Phone” with no
previous devices in the memory, the “Cell
Phone Setup” screen automatically appears
GPS-810NA will search and retreive names on all
Bluetooth® devices in range
GPS-810NA will connect to the selected device
and then import the Phone Book and Call History
Quick-Start Guide6
5
Finished!
Now you are ready to
place and receive calls!
GPS-810NA
Page 7

Quick-Start Guide
Placing and Receiving Calls
Placing and Receiving Calls
You can place and receive calls directly from the screen of GPS-810NA once a
phone is paired and an external hands-free microphone has been connected
(microphone not included).
There are several ways in which to place calls
ENGLISH
Dial by Phone
Book
Dial by Call
History
Direct Dial
from Keypad
Select “Phone Book”
1
Example: Placing a call from the Phone Book
Select Name to Call
2
Scroll Up/Down
Dial by Voice
Redial Last
Number
Call is Placed
3
Hang up when call
is nished
Example: Receiving an incoming call
When a call is incoming, choose “Accept”
1
Call is answered. Begin speaking.
2
Hang up when call
is nished
GPS-810NA
7
Quick-Start Guide
Page 8

Quick-Start Guide
Loading Media Files
*
*
Loading Media Files
* An SD Memory Card is required for storage of audio and video les. This is not included with the unit
and must be purchased separately.
1
2
3
SD Card Drive
Name and Drive Letter
depend on your settings
4
Media Files
Drag and Drop Files
GPS-810 SD Card
Unplug From the
5
Computer, and You’re
Finished!
Quick-Start Guide8
GPS-810NA is compatible with the following A/V formats:
Audio
• MP3 VBR/CBR (8 - 448 k bps), 8 - 48 kHz, ID3 tags (v1 and v2.1 to v2.3) with album art supported.
• WMA 32 k bps up to 160 kbps (VBR) and 32 kbps up to 256 kbps (CBR), WMA Lossless, WMA Pro, playback up to 48 kHz,
DRM 10, ASF tag with album art supported.
• M4A VBR/CBR (8 ~ 320 kbps), 8 ~ 96 kHz sample rate, M4A, MP4 extensions only. M4A tag with album art supported.
Video
• MPEG-4 Max 640x480 with 20 fps with 1 Mbps data rate. ASP pro le compatible. AVI extension only. ‘DIV3’ not
supported.
• WMV WMV codecs 7, 8, and 9, and Advanced Pro le, DRM 10.
• H.264 Baseline pro le only, Max 640x480 with 15 fps with 1 Mbps data rate. M4V, MP4, 3GP extensions only.
GPS-810NA
Page 9

Quick-Start Guide
Using the Multimedia Player
Using the Multimedia Player
Source Menu Switcher
Audio Menu
(Red Icon)
Video Menu
(Green Icon)
Main Music Menu Example
Choosing “Music” from the source menu brings up the Main Music Menu
screen. You can select music by Artist, Album, Genre, Playlist or Song, using the
appropriate button. Then, navigate through the list to choose your song.
For safety reasons, this device will cease navigation functions when the video mode is
enabled. Do not attempt to disable any safety function incorporated in this device. Any
!
alteration of this device may cause serious injury and shall void the warranty.
ENGLISH
Video Menu Example
File Name
Scroll Up/Down
Choosing “Video” from the source menu brings up the “Video” screen.
You can view all the video les stored on the SD card and select one to view
by pressing that le name.
GPS-810NA
9
Quick-Start Guide
Page 10

Quick-Start Guide
In-Vehicle Installation
In-Vehicle Installation
Mounting the Unit
Do not install this device in any manner that impairs the safe operation of the vehicle. Do not
install this device on any airbag panels or in the deployment eld of any airbags. Do not place
the device on the vehicle’s dashboard unsecured. Failure to observe the installation or usage
!
instructions may result in tra c accidents or personal injury.
The installation of this device on the windshield, between the driver and the windshield, or
otherwise in any manner that obstructs the driver’s clear view of the road or tra c conditions is
dangerous and may be prohibited by law. State laws in California and Minnesota (and possibly
!
other states) prohibit the mounting of this device on the windshield, in which case other
mounting methods should be used. Check your state and local laws before mounting.
Mounting the Unit
1
Select Mounting Location
Dash-Mount
Windshield-Mount
2
Install
Mounting
Base
3
Install GPS-810NA
Quick-Start Guide10
in Mounting Base
Clean dash with supplied alcohol pad.
1
GPS-810NA
Lock
Unlock
Display
Angle
Adjustment
2
Page 11

Control Knob Button Operation
Mounting the Control Knob
Mounting the Control Knob
1
Select Mounting Location
2
CR2032/DL2032
Install Battery
Use a coin to remove
the bottom cover.
3
Mount Control Knob Base
4
Attach Control
Knob to Base
Toward front of car
UP
Control Knob Button Operation
Rotate outer ring to move the
highlight bar on the active screen
If Left or Right button is held for
2 seconds, outer ring becomes
Volume or Brightness adjustment
Orient the base so that the arrow is
facing the front of the car.
You can either screw the base to
the mounting location or use the
supplied adhesive pad.
If you use the adhesive pad, you
must FIRST CLEAN the surface with
the supplied alcohol cleaning pad.
Push the knob down onto the base,
and turn clockwise to lock it into place.
The knob can be removed by turning
the bottom counterclockwise.
Screen Dependent
Button Function
ENGLISH
UP
Press once for Back (Same as
Left button on Screen)
Press and hold for 2 seconds
to adjust Volume Up/Down
from outer ring
Press once for Center
menu bar item
Press and hold for 2
seconds to suspend
power or turn on
Press once for Source (Same
as Right button on Screen)
Press and hold for 2 seconds
to adjust Brightness from
outer ring
Press to select the
highlighted menu item
GPS-810NA
11
Quick-Start Guide
Page 12

Quick-Start Guide
Car Connections
Car Connections
Portable Audio
Connect to Audio System or
1
AUX IN
Use Built-In Speaker
2
Mount and
Connect
Hands-Free
Microphone
Portable Audio
12 VDC
1
Connect Headphones or
Ear Buds
2
Or Use the Built-In
Speaker
Hands-Free Microphone
Audio Output
Plug In for Charging
and for Tra c
DC Power
Volume
Headphone Jack
Do not use headphones
while driving!
3
Service
Quick-Start Guide12
Note: The headphone output may also be
connected to the line/aux input of an audio device
when the GPS-810NA is away from the car, but
when docked in the mount it’s recommended to
use the connection in the mount for easy removal
and redocking of the unit.
The installation and use suggestions provided by the manufacturer may be subject to
restrictions or limitations by federal, state or local laws. The user should determine whether the
installation and use of this device is governed by any law prior to installation or use. For more
!
information, please consult the user’s manual online at http://www.guideandplay.com.
GPS-810NA
Page 13

Activate Tra c Service
Activate Tra c Service
1
Choose “Tra c”
2
3
4
Visit activation
website. Follow on-
2
screen instuctions.
Enter GPS-810NA ID number
3
into the website
4
Press “Activate”
on GPS-810NA
2
On the internet, go to:
http://traffi c.guideandplay.com
Enter ID: (Example)
3
1F92F1CF48AB66609
Webpage returns an
activation code: (Example)
CADC941172CAEFEDAFFF
ENGLISH
Enter Activation Code
from Web Page, then
5
press “Done”
Finished!
GPS-810NA
13
Quick-Start Guide
Page 14

Quick-Start Guide
Text to Speech Feature
Text to Speech Feature
GPS-810NA has a feature called “Text to Speech” in which navigation prompts
that appear on the screen as text can be con gured to be spoken in one
of several voices (male or female). You can choose to have only directions
announced or both directions and street names. For example, the voice would
say: “In 500 feet, turn left on Lincoln Blvd.”
1
Choose
“Navigation
Settings”
2
Choose
“Voice
Settings”
Quick-Start Guide14
3
Choose
a voice
pro le
Finished!
GPS-810NA
Page 15

Quick-Start Guide
Troubleshooting
Troubleshooting
Problem/Symptom Possible Solution
Unit does not turn on at all Charge battery, check UNLOCK switch
Unit does not have a good GPS signal Make sure unit has a clear and
Unit does not have songs/movies Requires loading to SD card
Computer sees unit as “MTP Device” Change preference in “Settings” menu
Screen is too bright or too dim Adjust in “Settings” menu or press
Volume is too low for navigation
prompts
Output level is low or distorted when
listening to headphones or when
using the line output
Suction cup mount is loose Reposition with moderate force
Screen is loose on mount Make sure it is securely “clicked” into
Unit is unresponsive, won’t power o Using a paper clip, press the reset
Unit does not show tra c
information
Unit does not nd the Bluetooth®
phone or device
Remote control knob is unresponsive Try pressing the top, center and right
unobstructed view of the sky
rotary wheel on the right side
Adjust volume using rotary wheel
on the right side or adjust volume of
navigation prompts in Volume Mixer
(Settings Menu)
Increase media player volume in
Volume Mixer (Settings Menu)
place on both the bottom and back
button on the right side of the
bottom panel
Check antenna connection. Activate
service.
Ensure the device is enabled for
“discovery” or “pairing”.
buttons simultaneously for 2 seconds,
then turn the outer ring until the
highlight bar moves. If the control
knob is still unresponsive, try a fresh
CR2032 type battery.
ENGLISH
GPS-810NA
15
Quick-Start Guide
Page 16

This equipment has been tested and found to comply with the limits for a Class B digital device,
pursuant to part 15 of the FCC rules. These limits are designed to provide reasonable protection
against harmful interference in a residential installation. This equipment generates, uses and can
radiate radio frequency energy and, if not installed and used in accordance with the instructions,
may cause harmful interference to radio communications. However, there is no guarantee that
interference will not occur in a particular installation. If this equipment does cause harmful
interference to radio or television reception, which can be determined by turning the equipment
o and on, the user is encouraged to try to correct the interference by one or more of the
following measures:
-Reorient or relocate the receiving antenna.
-Increase the separation between the equipment and receiver.
-Connect the equipment into an outlet on a circuit di erent from that to which the receiver is
connected.
-Consult the dealer or an experienced radio/TV technician for help.
This transmitter must not be co-located or operated in conjunction with any other antenna or
transmitter.
You are cautioned that changes or modi cations not expressly approved by the party responsible
for compliance could void your authority to operate the
equipment.
This Class B digital apparatus complies with Canadian ICES-003.
Cet appareil numérique de la classe B est conforme à la norme NMB-003 du Canada.
For customer and technical support, call
516.255.4545 (USA only).
Download the complete GPS-810NA User’s Manual at
www.guideandplay.com.
250 Crossways Park Drive, Woodbury, New York 11797
www.harmankardon.com
©2007 Harman International Industries, Incorporated. All rights reserved.
Harman Kardon is a trademark of Harman International Industries, Incorporated, registered in the United States
and/or other countries. Guide + Play is a trademark of Harman International Industries, Incorporated.
Part No. 950-0223-001
Please Recycle
 Loading...