

Page 1
'STEREO
-
POWER
AMPLIFIER
-
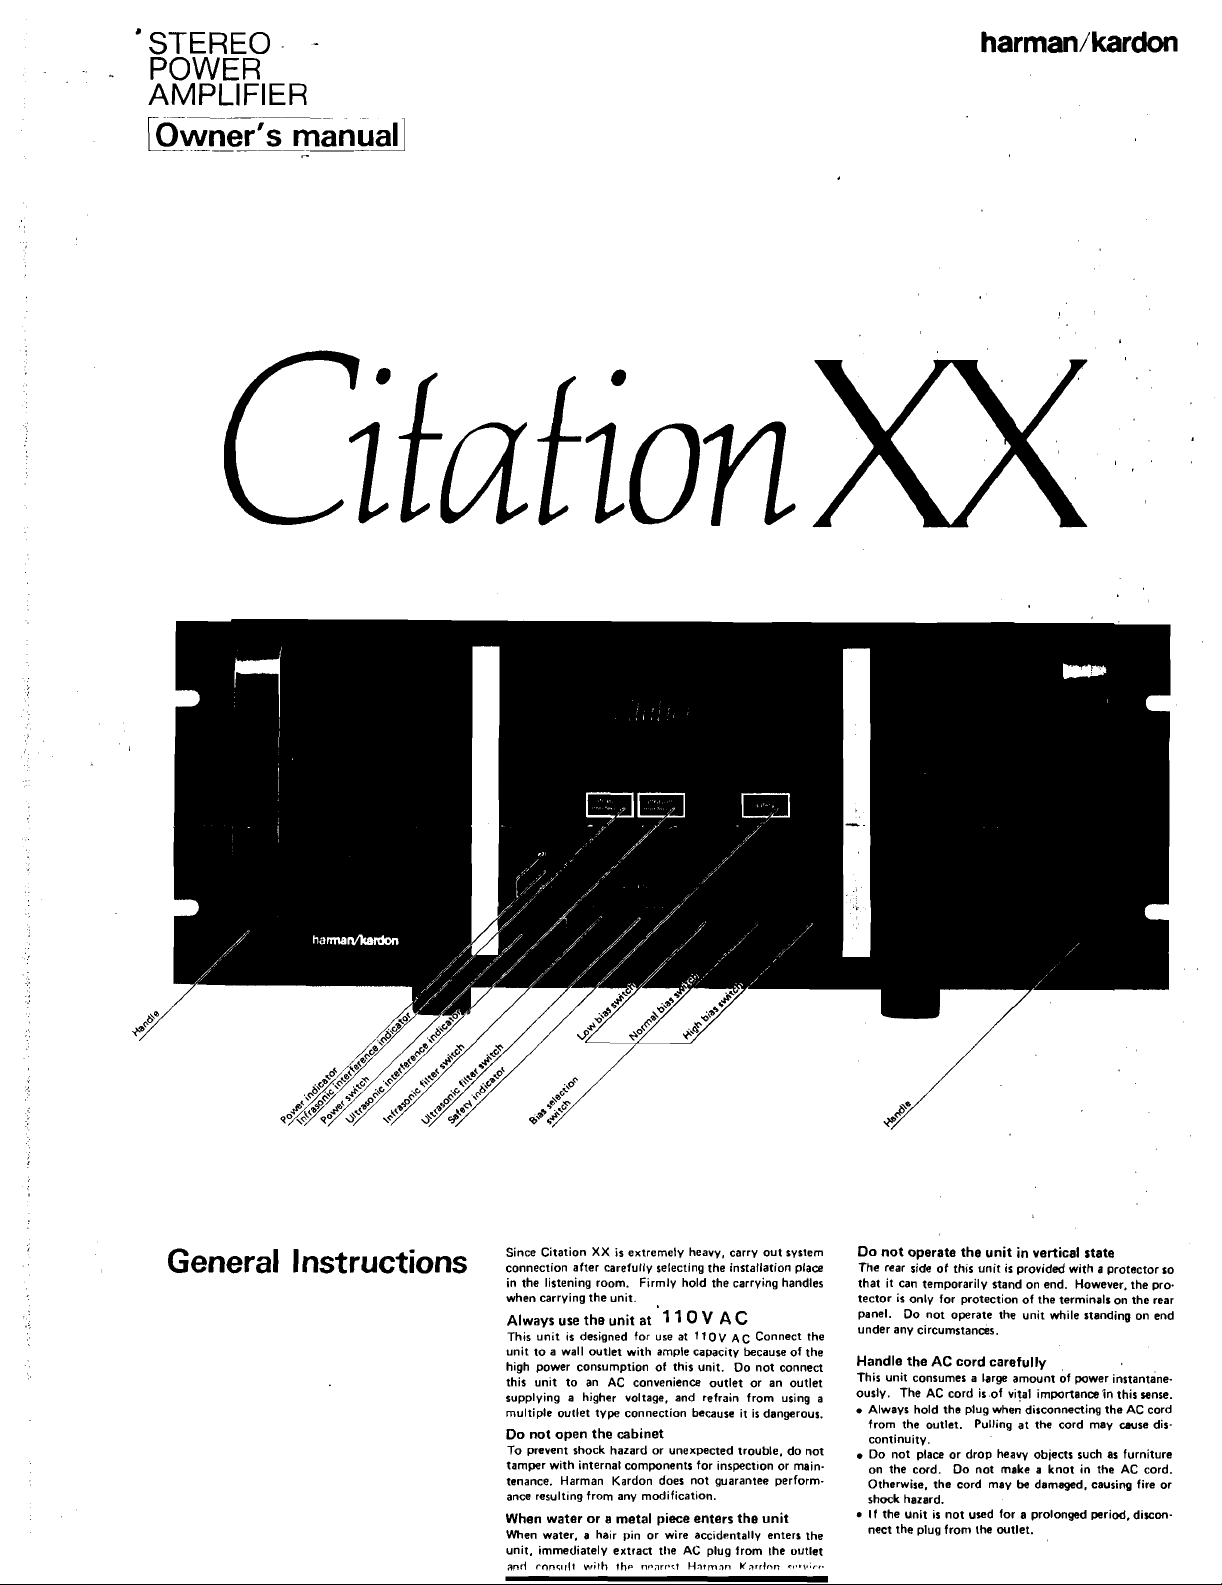
General I nstructions
Since Citation
connection after carefully select~ng the installation place
in the listening room. Firmly hold the carrying handles
when carrying the unit.
Always use the unit at
This unit
unit to a wall outlet with ample capacity because of the
high power consumption of this unit. Do not connect
this unit to an AC convenience outlet or an outlet
supplying a higher voltage, and refrain from using a
multiple outlet type connection because it is dangerous.
Do not open the cabinet
To prevent shock hazard or unexpected trouble, do not
tamper with internal components for inspection or main.
tenance.
ance
When water or a metal piece enters the unit
When water, a hair pin or wire acc~d~ntally enters the
unit, immediately extract
anrl rnn<n~lt
XX
is extremely heavy, carry out system
,
1 1
0
V
A
IS
designed for use at
Harman Kardon does not guarantee perform-
result~ng from any modification.
with
tlie AC plug from the outlet
fhp
n<-arr.%l
11
OV
Hwrnnn
C
A
c
Connect the
Karrlrm
r*.*wr..
Do not operate the unit in vertical state
The rear side of th~s unit is provided with a protector so
that it can temporarily stand on end. However. the pro
tector is only for protection of the terminals on the rear
panel. Do not operate the unit
under any circumstances.
Handle the
This unit consumes a large amount of power instantane-
ously. The AC cord
.
Always hold the plug when disconnecting the AC cord
from the outlet. Pulling at the cord may mse discontinuity.
.
Do not place or drop heavy objects such as furniture
on the
Otherwise, the cord may
shock hazard.
If the unit is not used for a prolonged period, disconnect the plug from
AC
cord carefully
is.of vital importance In this sense.
CM~.
DO not make a knot in the AC cord.
the outlet.
while
standing on end
be
damaged, causing fire
or
Page 2
Connections
Always d~sconnect the AC cord from the mains outlet
before making connections with other components.
Connection with preamplifier
For connection between the input terminals (INPUT) of this unit and the output
terminals of a stereo preamplifier, always use
nect the left channel and right channel output terminals of the preamplifier correctly to the LEFT (left channel) and RIGHT (right channel) INPUT terminals of
this unit, respectively.
terminals for cannon connectors.
hook to prevent accidental disconnection during operation, it is safe. Capability of
sure, firm connection by one-touch operation is very convenient for those who
frequently change connections. When using cannon connectors, make correct
connections by checking preamplifier polarities.
Cannectcan cwds ta the preamplifier should nal entangle woth the AC card
degrade the sound
LIZ
Insert plugs fully.
quallw.
Cannon connector handling method
high.quality connection cords. Con-
This unit is
Since a cannon connector is provided with a
also provided with input
because
it may
l
nf rasonic filter
Since this unit is a DC amplifier, any DC or subsonic component of the input signal
will be amplified. Since a DC
should be filtered out. When a
the red "infrasonic interference" indicator illuminates to warn the user. Press the
infrasonic filter switch. A 1 Hz filter is inserted into the circuit to cut off the
unwanted signal component.
red warning display will soon turn off.
If the
DC
operation, and the "safety" indicator
power off, check and eliminate the cause,
Possible causes of the DC or subsonic signal components are warped records and
leakage from the preamplifier, tuner or tape deck.
component increases abnormally, a protection circuit stops the amplifier
slgnal component adversely influences speakers, it
DC component orstrong tubsonic signal 1s present,
The green "infrasonic" indicator illuminates, and the
~lluminates. If this state occurs, turn the
and then turn the power on again.
DC
..f
Push
oh.
c~~la
r*(
8, 8.
."10"\111011"
1osl.d m Ih
in.
,msitoo
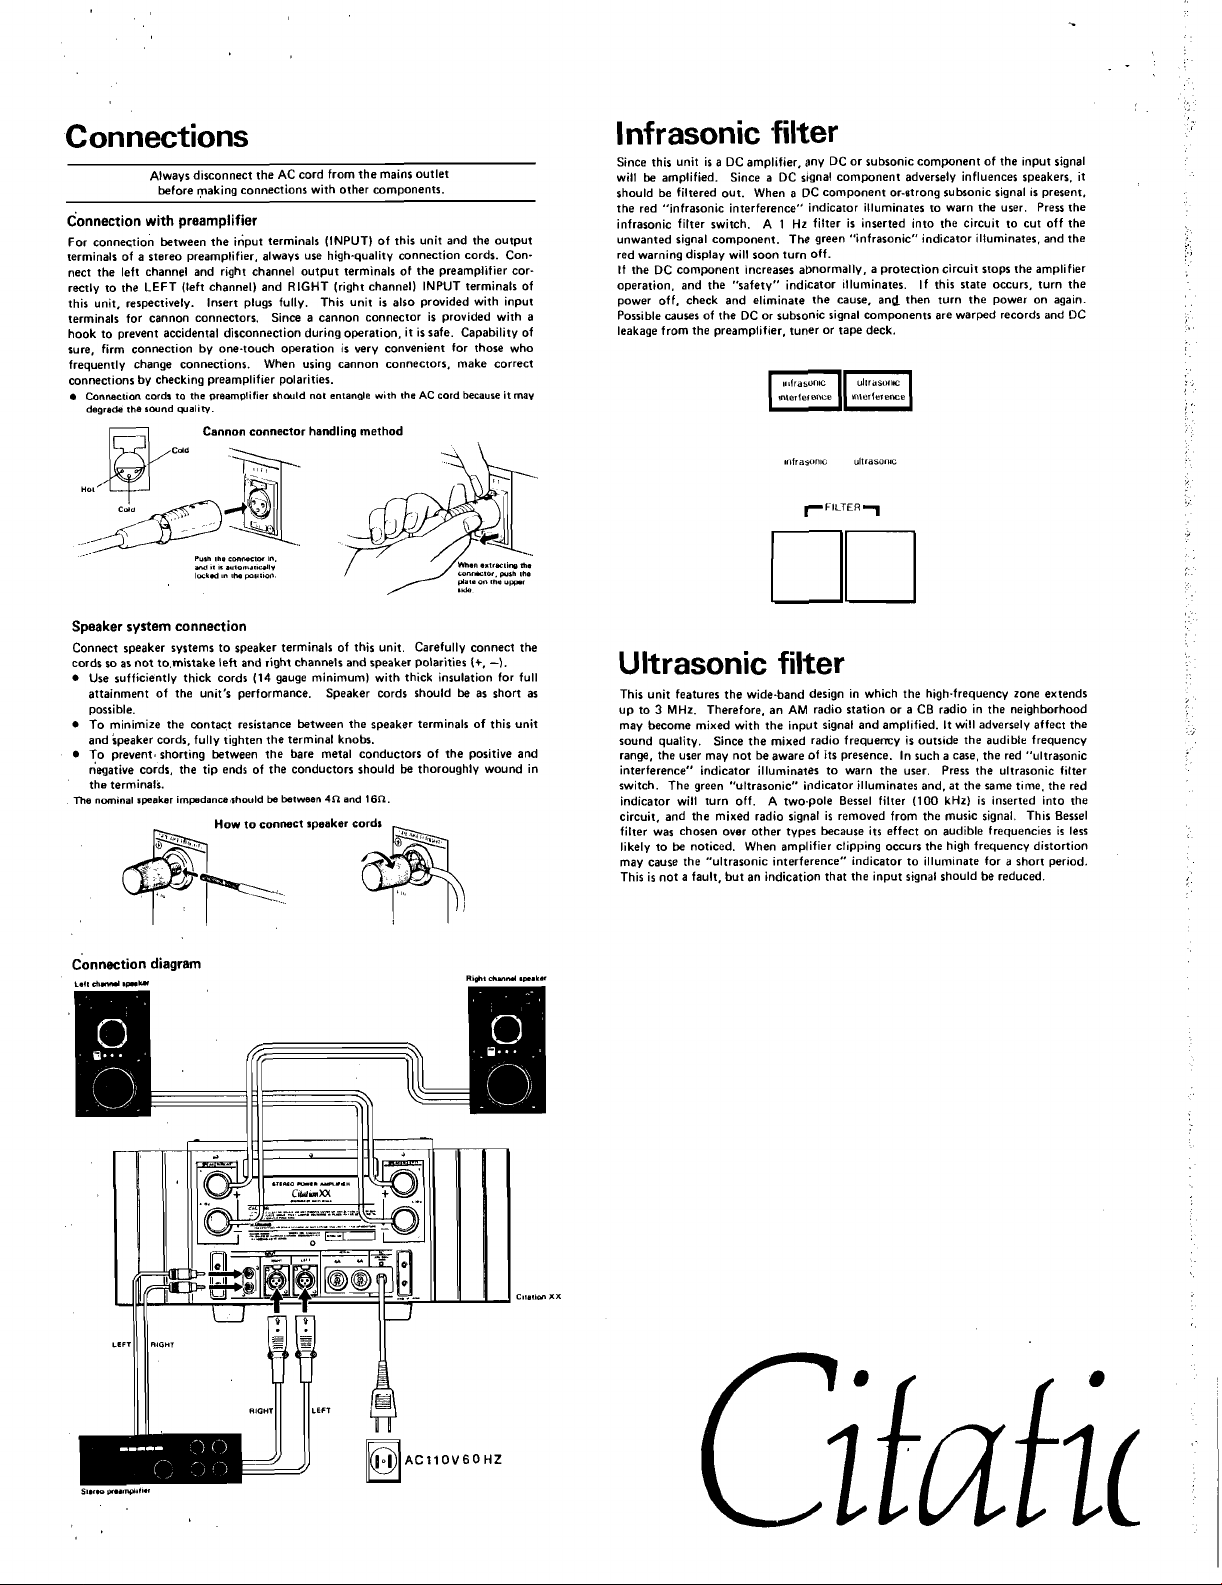
Speaker system connection
Connect speaker systems to speaker terminals of this unit. Carefully connect the
cords so as not
Use sufficiently thick cords (14 gauge minimum) with thick insulation for full
attainment of the unit's performance. Speaker cords should be as short as
possible.
To minimize the mntact resistance between the speaker terminals of this unit
and speaker cords, fully tighten the terminal knobs.
To prevent, shorting between the bare metal conductors of the positive and
negative cords, the tip ends of the conductors should
the terminals.
The nomsnal speaker impdanceshould be between
to.mistake left and right channels and speaker polarities
be
thoroughly wound in
4n
and
16n.
(+,
-).
Connection diagram
Ultrasonic filter
This unit features the wide-band design in which the high-frequency zone extends
up to
3
MHz. Therefore, an AM radio station or a CB radio in the neighborhood
may become mixed with the input signal and
sound quality. Since the mixed radio frequency is outside the audible frequency
range, the user may not be aware of its presence. In such a case, the red "ultrasonic
interference'' indicator illuminates to warn the user. Press the ultrasonic filter
switch. The green "ultrasonic" indicator illuminates and, at the same
indicator will turn off. A two-pole Bessel filter (100
circuit, and the mixed radio signal is removed from the music signal.
filter was chosen over other types because its effect on audible frequencies is less
likely to
be
may cause the "ultrasonic interference" indicator to illuminate for a short
This is not a fault, but an indication that the input signal should be reduced.
noticed. When amplifier clipping occurs the high frequency distortion
ampl~fied. It will adversely affect the
kHz)
tlme, the red
is
inserted into the
Th~s Bessel
per~od.
Page 3

Bias selection switches
This unit enables bias selection in 3 stages (low, normal and high). The bias settings
allow the effective use of the heat
current to the operating conditions. Generally select the normal bias position.
,
low position
The low bias position reduces the bias but is the optimunl setting for continuous
use at high, power levels. The low bias position is also optimal for use at a high
room temperature and/or a poor heat radiation environment.
normal position
The normal bias position is recommended for normal use irrespective of the music
genre, big band orchestra, popular or
that in the low bias position.
high position
The high bias position is suitable when delicate reproduction is required such as
when listening to baroque music. The heat generation is the highest and the heat
sink temperature rises up to about 50°C. Use at this position should be avoided
when the room temperature is high or heat radiation environment is poor. When it
is desired to expedite warmtng up after power on, the amplifier is warmed in a
short time by selectingthis position.
DO
not Operate continuously at high volume levels at rhe high bmr poritmn
A
high temperature pror~ctot may
65'C.
about
Thermal protector
When the heat sink tempereture exceeds 65OC. a thermal protector is operated to
pr~te~t'the power transistors. The red "safety" indicator illuminates and the ope.
ration stops. If this occurs, turn the power off temporarily. After cooling
awhile, place the bias selection switch in the low or normal bias position, turn on
the power and continue to use the unit.
stnk thermal capatity by adjusting the idle
jazz. The heat generated is a little more than
for
a
be
activated when the charrlr temperature reacher
long Inme.
the unit
Operating procedure
Before turning the power on, be sure to check that all connections are correct.
1. Turn the volume control knob of
2. Select the desired source.
3.
Turn on the preamplifier power.
4. Press the
5. Turn on the power switch. The red "wait" indicator illumtnates. In about 7
6. Start the source (tape deck, turntable,
7.
8. When turning off the system power at the end of operation, first turn off the
nornlal bias switch.
expedite warming up of the amplifier.
seconds, the "wait" indicator goes off, the green "on" and "Citation
cators illuminate and the amplifier is ready for operation.
(iradually increase the preamplifier volunle and sound will be heard from the
speakers.
If the "lnfrasonic interference" or "ultrasonic interference" indicators tlluminate during operation, press the corresponding filter switch. (See Inltasonic
and Ultrasonic filter explanations.)
power of this unit and then turn off the power of other system
Turning off the preamplifier power first may cause generation of a turn-off
transient which will be amplified by this unit and may damage the speakers.
Protection circuit
a
The "wait" indicator illuminates for about 7 seconds after the power is turned on,
and no sound will be heard from the speakers during this period. The protecriort
circuit mutes the unit until it stabilizes.
sients from damaging the speaker systems.
a
The protection circuit also mutes the speaker output when the speaker terminals
are shorted during operation. Although the protection
cally, turn off the power temporarily and remove the short circuit.
a
In case of abnormal heat generation, refer to the explanation of blas selectton
switches.
your preamplifier to the minimum level.
Press the high bias switch when it is desired to
XX"
indi-
etc.).
compone]its.
-
This prevents noise and turn-on tran-
circutt resets automati-
IUW
IBlAS
normal htgh
1
Specifications
Output
Input sensitivity
Filter
Infrasonic
Ultrasonic
Power source
Power consumption
Dimensions
Weiqht
The design and specifications are subject to change for improvement wtthout
notice.
8R load 250W x
4S2 load 440W x 2
IVIlSkR
1Hz (6dB/octl
lOOkHz (Secondary bessel filter)
ACllOV6OHZ
1050W
425mm(W) x 195mm(H) x 487mm(Dl
42kg
2
Page 4

Locations for installation
Avoid the following locations for safe operation of this To maximize the high current performance of this unit.
unit:
Place exposed to direct sunlight, near a heat source. or ration. If the fuse is blown. consult with your dealer or
a cold place such as near a cooling air outlet. Harman Kardon service shop. Do not try to replace the
Humid or dusty place, or a place exposed to direct fuse yourself.
vibration such as on a speaker.
Since this unit weights 42kg. avoid an unstable base or
a rack with insufficient strength. A sturdy base will
ensure better sound quality.
This unit generates much heat because of high current
conduction to obtain better sound quality. Do not place
the unit on another component or in a narrow rack that
will obstruct the vertical flow of air required for
,
,
.quate heat radiation.
Select an installation place ensuring sufficient ventilation.
Rack mounting according to the EIA specification
~05sihIr. hiat
,
"
Pay spec~al
,
t,
,it,,,
-,
---
-
. .
,-
-
attention
-
to heaGidiatr63
ade.
lv
$I#--
lo
al<t> pay st~ffici~~lt
4
,
..r.
at:rwl!,~n
Fuse
replacement
it uses a special fuse that will not melt in normal ope
is
10
Block diagram
I"
,
-
..
..
..
Ullrmnle
drCdt
-.
. .
ndocatm
.
--
 Loading...