

Page 1
4.
NOTE
BASIC FUNCTION
2
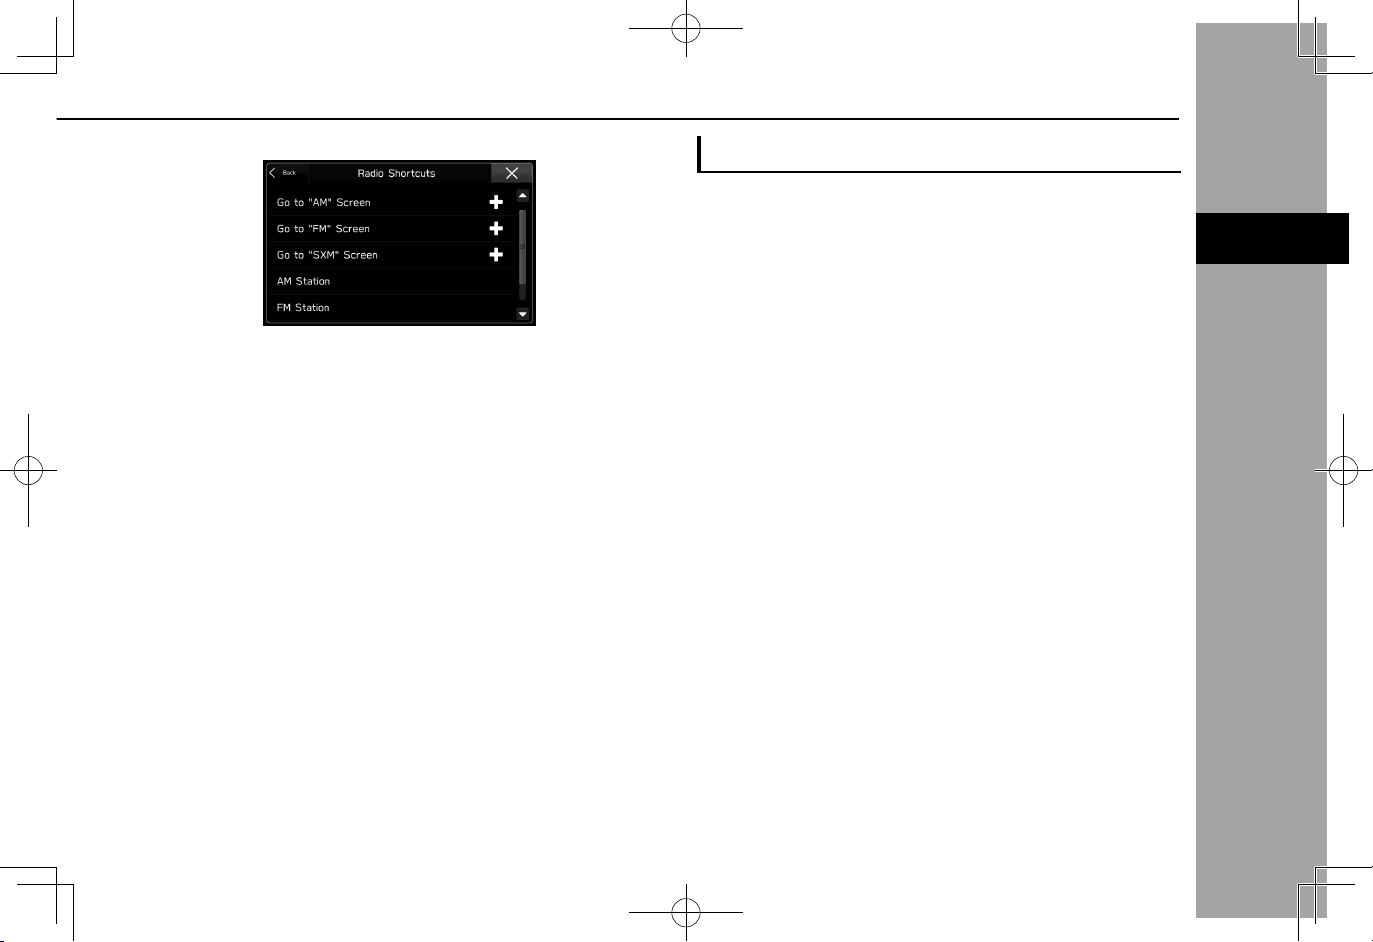
Select the desired shortcut function.
● Depending on the function, select other items and
enter necessary information.
5.
Check that the shortcut icon is displayed on the home
screen.
l The home screen has 3 pages, and shortcut icons can be added
to each page. The page can be changed by swiping.
BASIC INFORMATION BEFORE OPERATION
MOVING AND DELETING SHORTCUT ICONS
Users can rearrange the home screen buttons when the
home screen shortcut function is turned on. (→P.62)
1.
Select and hold the shortcut icon.
XWhen moving shortcut icons
2.
Drag the button to the desired position.
● User can move buttons to another page by dragging
them to the corresponding end of the screen if the
number of buttons allows for multiple pages.
XWhen deleting shortcut icons
2.
Drag the button to the bottom of the screen.
43
Page 2
Bluetooth® SETTINGS
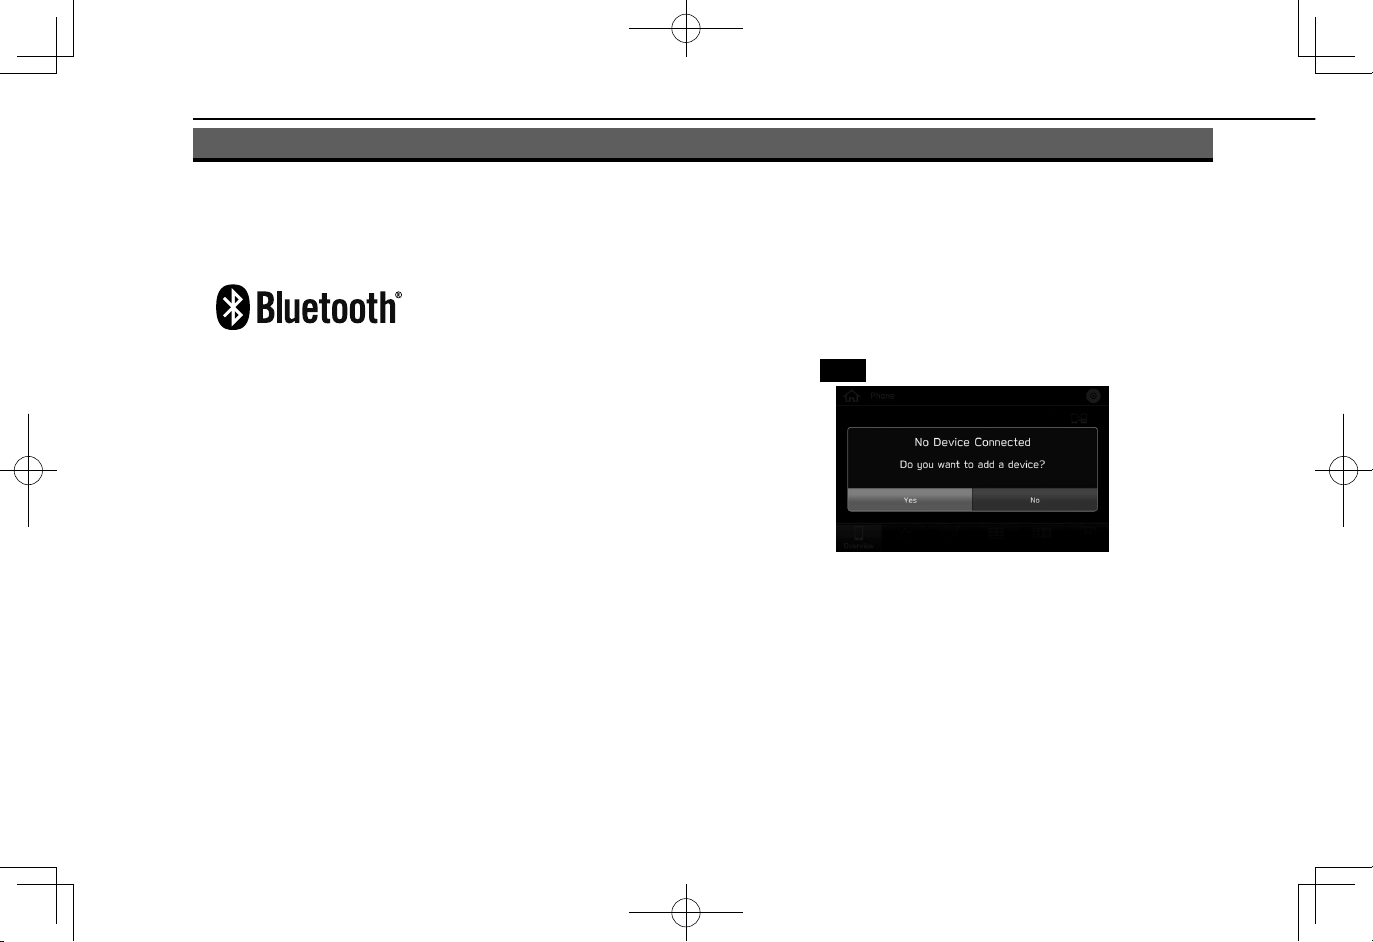
Yes
Bluetooth® SETTINGS
REGISTERING A Bluetooth PHONE/
DEVICE FOR THE FIRST TIME
The Bluetooth® word mark and logos are registered
trademarks owned by Bluetooth SIG, Inc.
To use the hands-free system or the Bluetooth audio
system, it is necessary to register a Bluetooth phone/device
with the system.
Once the Bluetooth phone/device has been registered, it is
possible to use the hands-free system and the Bluetooth
audio system.
This operation cannot be performed while driving.
For details on registering a Bluetooth phone/device:
→P.48
1.
Turn the Bluetooth connection setting of your Bluetooth
phone/device on.
● This function is not available when the Bluetooth
connection setting of your Bluetooth phone/device is
set to off.
2.
Display the phone screen (→P.78) or the Bluetooth
audio operation screen (→P.63).
3.
Select
4.
Follow the steps in “REGISTERING A Bluetooth
PHONE/DEVICE” from “STEP 3” to “STEP 7” .
(→P.48)
(Yes) to register a Bluetooth phone/device.
44
Page 3
PROFILES
3
Bluetooth® SETTINGS
SETTINGS
3
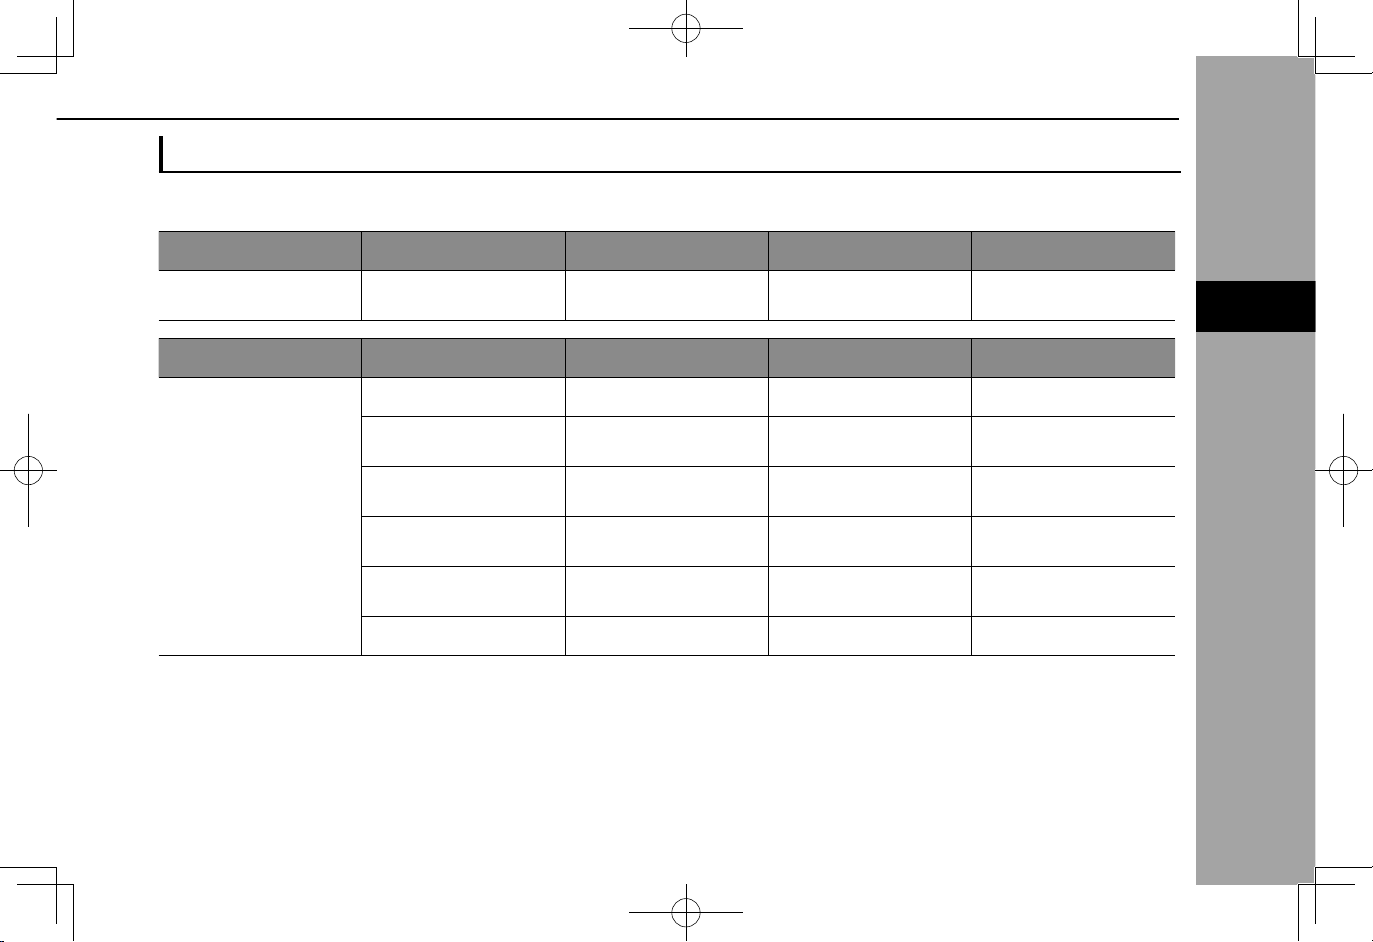
This system supports the following services.
Bluetooth Device Spec. Function Requirements Recommendations
Bluetooth Phone/Device Bluetooth Specication
Bluetooth Device Prole Function Requirements Recommendations
HFP (Hands-Free Prole) Hands-free system Ver. 1.0 Ver. 1.6
PBAP (Phone Book
Access Prole)
MAP (Message Access
Bluetooth Phone
Prole)
PAN (Personal Area
Networking Prole)
DUN (Dial-Up Network
Prole)
SPP (Serial Port Prole) APPS function - Ver. 1.1
Registering a Bluetooth
phone/device
Transferring the contacts Ver. 1.0 Ver. 1.1.1
Bluetooth phone message - Ver. 1.0
APPS function - PAN 1.0
APPS function - DUN 1.1
Ver. 1.1 Ver. 3.0 +EDR
45
Page 4
NOTE
Bluetooth® SETTINGS
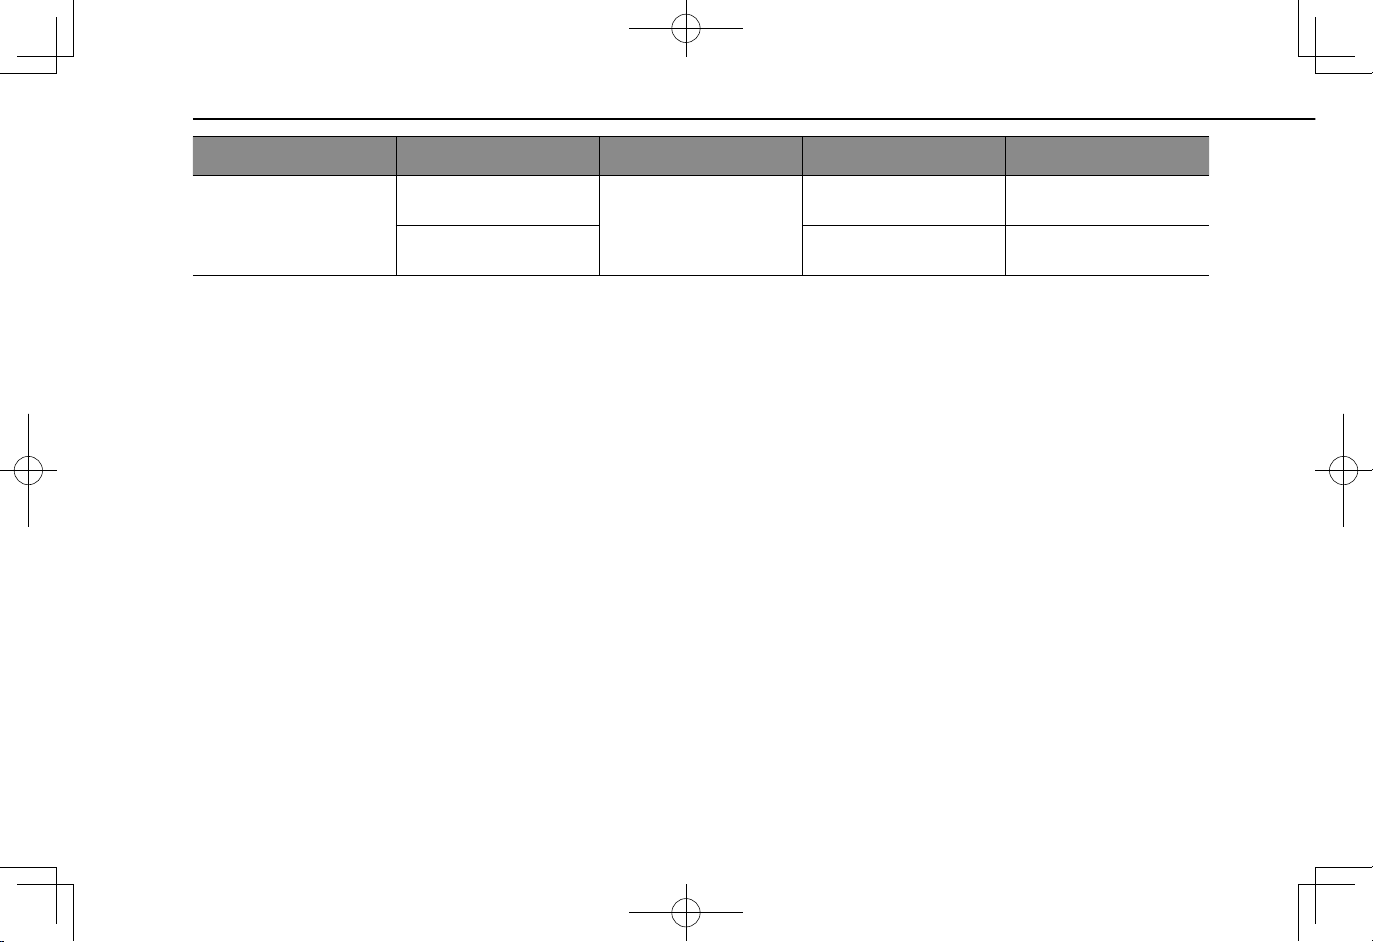
Bluetooth Device Prole Function Requirements Recommendations
Bluetooth Device
l If your cellular phone does not support HFP, registering the Bluetooth phone or using PBAP, MAP or SPP proles individually will not be
possible.
l If the connected Bluetooth phone/device version is older than recommended or incompatible, the Bluetooth phone/device function may not
work properly.
A2DP (Advanced Audio
Distribution Prole)
AVRCP (Audio/Video
Remote Control Prole)
Ver. 1.0 Ver. 1.2
Bluetooth audio system
Ver. 1.0 Ver. 1.4
46
Page 5
Bluetooth SETTINGS
Settings
Phone
NOTE
3
Bluetooth® SETTINGS
SETTINGS
3
1.
Press .
XWhen setting the Bluetooth phone/device
4.
Select the desired Bluetooth phone/device.
5.
Select the item to be set.
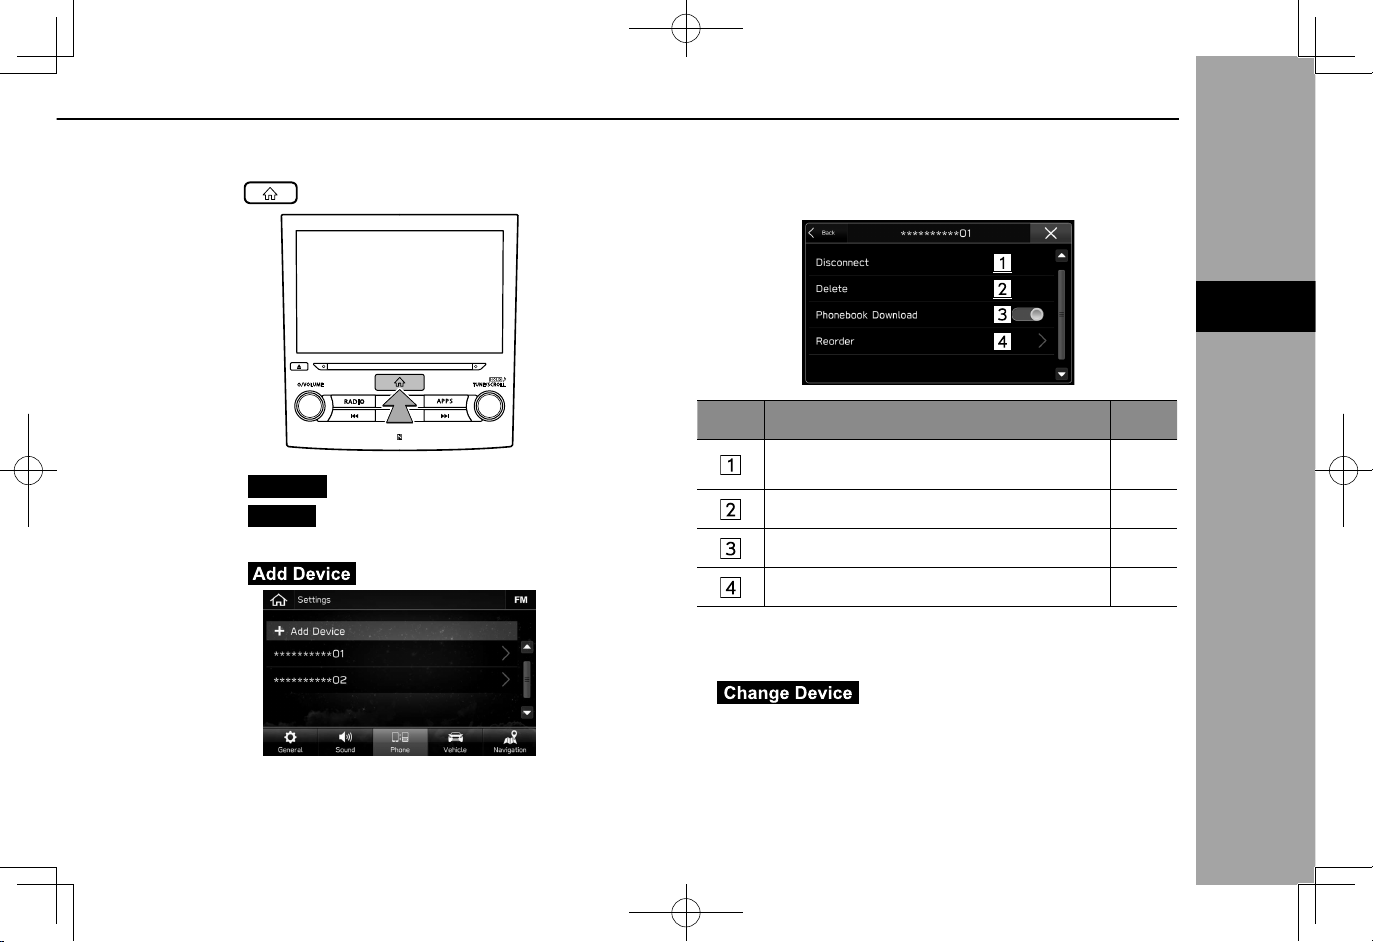
No. Function Page
2.
Select
3.
Select
XWhen registering a Bluetooth phone/device
4.
Select (Add Device).
● For details on registering a Bluetooth phone/device:
→P.48
(Settings).
(Phone).
Connecting or disconnecting Bluetooth
phones/devices
Deleting Bluetooth phones/devices 51
Setting phonebook download 52
Setting the automatic connection priority 52
l The phone settings screen can also be displayed by selecting
(Change Device) on the phone overview
screen (→P.78) or Bluetooth audio operation screen
(→P.63).
49
47
Page 6

Cancel
Bluetooth® SETTINGS
REGISTERING A Bluetooth PHONE/DEVICE
Up to 5 Bluetooth phones/devices can be registered.
Bluetooth compatible phones (HFP) and devices (AVP) can
be registered simultaneously.
This operation cannot be performed while driving.
1.
Display the phone settings screen. (→P.47)
2.
Select (Add Device).
● If a message appears, follow the guidance on the
screen.
3.
When this screen is displayed, search for the device
name displayed on this screen on the screen of your
Bluetooth phone/device.
●
● For details on operating the Bluetooth phone/device,
see the manual that comes with it.
4.
Register using your Bluetooth phone/device.
● A PIN-code is not required for SSP (Secure Simple
Pairing) compatible Bluetooth phones/devices.
Depending on the type of Bluetooth phone/device
being connected, a message conrming registration
may be displayed on the Bluetooth phone’s/device’s
screen. Respond and operate the Bluetooth phone/
device according to the conrmation message.
● 8-inch with Navi system/8-inch system only:
Registration of NFC compatible devices is completed
when they are held near the audio system.
(Cancel): Select to cancel the registration.
48
Page 7

5.
Cancel
Cancel
3
Bluetooth® SETTINGS
SETTINGS
3
Select (Conrm).
7.
Check that the following pop-up screen is displayed
when the connection is complete.
●
6.
Check that the following pop-up screen may be
displayed.
●
● If a conrmation message appears asking whether
to transfer the phone’s contact data to the system,
select the appropriate button.
(Cancel): Select to cancel the registration.
(Cancel): Select to cancel the registration.
● If an error message appears, follow the guidance on
the screen to try again.
CONNECTING OR DISCONNECTING
Bluetooth PHONE/DEVICE
Up to 5 Bluetooth phones/devices (Phones (HFP) and
devices (AVP)) can be registered.
If more than 1 Bluetooth phone/device has been registered,
select which Bluetooth phone/device to connect to.
1.
Display the phone settings screen. (→P.47)
49
Page 8

2.
NOTE
Bluetooth® SETTINGS
Select the Bluetooth phone/device to be connected or
disconnected.
● “Connected (Connected)” is displayed next to the
currently connected Bluetooth phone/device.
● If the desired Bluetooth phone/device is not on the
list, select
Bluetooth phone/device. (→P.48)
3.
Select (Connect) or
(Disconnect).
(Add Device) to register the
4.
Check that “Connected (Connected)” is displayed next
to the Bluetooth phone/device when the connection is
complete.
● If an error message appears, follow the guidance on
the screen to try again.
l It may take time if the Bluetooth phone/device connection is
carried out during Bluetooth audio playback.
l Depending on the type of Bluetooth phone/device being
connected, it may be necessary to perform additional steps on
the Bluetooth phone/device.
AUTO CONNECTION MODE
Leave the Bluetooth phone/device in a location where the
connection can be established.
● When the ignition switch is in the “ACC” or “ON”
position, the system searches for a nearby registered
Bluetooth phone/device.
● The system will connect with the registered Bluetooth
phone/device that was last connected, if it is nearby.
50
Page 9

CONNECTING MANUALLY
Settings
Phone
Delete
Delete
3
Bluetooth® SETTINGS
SETTINGS
3
When the auto connection has failed, it is necessary to
connect Bluetooth phones/devices manually.
1.
Press , and then select
2.
Select
3.
Follow the steps in “CONNECTING OR
DISCONNECTING Bluetooth PHONE/DEVICE” from
“STEP 2”. (→P.49)
(Phone).
(Settings).
RECONNECTING THE Bluetooth PHONE/DEVICE
If a Bluetooth phone/device is disconnected due to poor
reception from the Bluetooth network when the ignition
switch is turned to the “ACC” or “ON” position, the system
automatically reconnect the Bluetooth phone/device.
● If a Bluetooth phone/device is disconnected on
purpose, such as turning it off, this does not happen.
Reconnect the Bluetooth phone/device manually.
DELETING Bluetooth PHONES/DEVICES
1.
Display the phone settings screen. (→P.47)
2.
Select the desired Bluetooth phone/device.
3.
4.
Select
Select
appears.
(Delete).
(Delete) when the conrmation message
51
Page 10

SETTING PHONEBOOK DOWNLOAD
NOTE
Bluetooth® SETTINGS
When this function is activated, the phonebook data of the
connected phone will be downloaded automatically.
1.
Display the phone settings screen. (→P.47)
2.
Select the Bluetooth phone to be set.
3.
Select to turn “Phonebook Download (Phonebook
Download)” on/off.
SETTING THE AUTOMATIC CONNECTION
PRIORITY
The automatic connection priority of the registered Bluetooth
phones/devices can be changed.
1.
Display the phone settings screen. (→P.47)
2.
Select the Bluetooth phone/device to be set.
3.
Select (Reorder).
l The prole version of the connected Bluetooth phone may not be
compatible with transferring phonebook data. For details, contact
your SUBARU dealer.
52
Page 11

4.
3
Bluetooth® SETTINGS
SETTINGS
3
Select next to the desired Bluetooth phone/device,
and then drag it to the desired position.
53
Page 12

OTHER SETTINGS
SETTING Wi-Fi® CONNECTION (8-inch with
Navi system/8-inch system only)
CONNECTING OR DISCONNECTING A Wi-Fi®
NETWORK
1.
Display the general settings screen. (→P.62)
2.
Select (Wi-Fi Settings).
3.
Select the desired network.
4.
Select (Connect) or
(Disconnect).
● (Forget This Network): Select
to delete the item.
5.
Check that a conrmation message appears when the
connection is complete.
● If an error message appears, follow the guidance on
the screen to try again.
● (Add New Network): Select to
add a Wi-Fi
● When a network with
password entry screen is displayed, enter the
password, and then select
54
®
network (→P.55)
is selected and the
(Join).
Page 13

ADDING A Wi-Fi® NETWORK
WARNING
NOTE
SETTINGS
3
●Communication standards:
・802.11b
・802.11g
・802.11n (2.4GHz/5GHz*)
・802.11a*
・802.11ac*
*: Depending on the country, this specification may not be available.
●Security:
・WPA
・WPA2
●WPA and WPA2 are registered mark of the Wi-Fi Alliance®.
TM
TM
OTHER SETTINGS
Available networks which are not displayed by searching
can be added.
1.
Display the general settings screen. (→P.62)
2.
Select (Wi-Fi Settings).
3.
Select (Add New Network).
4.
Enter the network name, and then select (Join).
5.
Select the security type.
6.
Enter the password, and then select (Join).
7.
Check that a conrmation message appears when the
connection is complete.
l Use Wi-Fi® devices only when safe and legal to do so.
l This system is tted with Wi-Fi
implantable cardiac pacemakers, cardiac resynchronization
therapy-pacemakers or implantable cardioverter debrillators
should maintain a reasonable distance between themselves
and the Wi-Fi® antennas. The radio waves may affect the
operation of such devices.
l Before using Wi-Fi
device other than implantable cardiac pacemakers, cardiac
resynchronization therapy-pacemakers or implantable
cardioverter debrillators should consult the manufacturer
of the device for information about its operation under the
inuence of radio waves.
Radio waves could have unexpected effects on the operation
of such medical devices.
l Communication standards:
• 802.11b
• 802.11g
• 802.11n (2.4GHz)
l Security:
TM
• WPA
TM
• WPA2
l WPA and WPA2 are registered mark of the Wi-Fi Alliance®.
®
devices, users of any electrical medical
®
antennas. People with
55
Page 14

MEDIA OPERATION
MEDIA OPERATION
CD
OVERVIEW
The CD operation screen can be accessed with the
following methods:
● Insert a disc. (→P.35)
● Select
XControl panel
on the “Media (Media)” screen. (→P.79)
No. Function
Turn to adjust volume.
Press to mute the audio system.
Press and hold to turn the audio system on/off.
Press to eject a disc.
Disc slot
Turn to change a track.
Press and hold to display the sound settings screen.
(→P.72)
Press to change a track.
Press and hold to fast forward/rewind.
Press to switch between media sources.
56
Page 15

NOTE
MEDIA OPERATION
AUDIO
6
*: 8-inch with Navi system/8-inch system only
XControl screen
No. Function
Select to switch between other media sources.
Displays cover art.
Select to display the play mode selection screen.
• Select (Search OO) to narrow down the
search for tracks in each play mode.
Shows progress.
The playback location can be changed by dragging the
sliders.
No. Function
Select to enable/disable repeat playback of the track
currently playing.
Select to change a track.
Select and hold to fast forward/rewind.
Select to pause/play.
Select to enable/disable random playback for the tracks
currently playing on the CD.
l If a disc contains CD-DA les and MP3/WMA/AAC les, only the
CD-DA les can be played back.
l If a CD-TEXT disc is inserted, the title of the disc and track will
be displayed.
l Depending on the disc or music le being played, the cover art
may not be displayed.
57
Page 16

MEDIA OPERATION
USB MEMORY
Audio les on the USB memory device can be played back.
OVERVIEW
The USB Audio playback screen can be accessed with the
following methods:
● Connect a USB memory device. (→P.36)
● Select
on the “Media (Media)” screen. (→P.79)
XControl panel
No. Function
Turn to adjust volume.
Press to mute the audio system.
Press and hold to turn the audio system on/off.
Turn to change a track.
Press and hold to display the sound settings screen.
(→P.72)
Press to change a track.
Press and hold to fast forward/rewind.
Press to switch between media sources.
58
Page 17

WARNING
CAUTION
MEDIA OPERATION
AUDIO
6
*: 8-inch with Navi system/8-inch system only
XControl screen
No. Function
Select to switch between other media sources.
Displays cover art.
Select to display the play mode selection screen.
• Select (Search OO) to narrow down the
search for tracks in each play mode.
No. Function
Shows progress.
The playback location can be changed by dragging the
sliders.
Select to enable/disable repeat playback of the track
currently playing.
Select to change a track.
Select and hold to fast forward/rewind.
Select to pause/play.
Select to enable/disable random playback for the tracks
currently playing from the USB memory device.
l Do not operate the player’s controls or connect the USB
memory device while driving.
l Do not leave your portable player in the vehicle. In particular,
high temperatures inside the vehicle may damage the portable
player.
l Do not push down on or apply unnecessary pressure to the
portable player while it is connected as this may damage the
portable player or its terminal.
l Do not insert foreign objects into the port as this may damage
the portable player or its terminal.
59
Page 18

NOTE
MEDIA OPERATION
l Depending on the device or music le being played, the cover art
may not be displayed.
iPod
When an iPod is connected, you can play iPod music les.
On this unit, you can perform operations such as selecting
a le from a list or changing to the random playback mode.
At devices which support Apple CarPlay, turn Apple CarPlay
off in the device side Restrictions settings.
OVERVIEW
The iPod operation screen can be accessed with the
following methods:
● Connect an iPod. (→P.36)
● Select
on the “Media (Media)” screen. (→P.79)
60
Page 19

MEDIA OPERATION
AUDIO
6
*: 8-inch with Navi system/8-inch system only
XControl panel
No. Function
Turn to adjust volume.
Press to mute the audio system.
Press and hold to turn the audio system on/off.
Turn to change a track.
Press and hold to display the sound settings screen.
(→P.72)
Press to change a track.
Press and hold to fast forward/rewind.
Press to switch between media sources.
XControl screen
No. Function
Select to switch between other media sources.
Displays cover art.
Select to display the play mode selection screen.
• Select (Search OO) to narrow down the
search for tracks in each play mode.
Shows progress.
The playback location can be changed by dragging the
sliders.
61
Page 20

*
*
WARNING
CAUTION
NOTE
MEDIA OPERATION
No. Function
Select to enable/disable repeat playback of the track
currently playing.
Select to change a track.
Select and hold to fast forward/rewind.
Select to pause/play.
Select to enable/disable random playback for the tracks
currently playing on the iPod.
Select to fast forward the current content item in xed
intervals.
Select to rewind the current content item in xed
intervals.
*: Display when playing Audiobooks or Podcasts
l Do not operate the player’s controls or connect the iPod while
driving.
l Do not leave your portable player in the vehicle. In particular,
high temperatures inside the vehicle may damage the portable
player.
l Do not push down on or apply unnecessary pressure to the
portable player while it is connected as this may damage the
portable player or its terminal.
l Do not insert foreign objects into the port as this may damage
the portable player or its terminal.
l When an iPod is connected using a genuine iPod cable, the iPod
starts charging its battery.
l If playing iPod music, perform operation at the system. Certain
functions may not be available if played directly from the
iPod. Furthermore, depending on the connected iPod, certain
functions may not be available.
l Depending on the iPod or music le being played, the cover art
may not be displayed.
l When an iPod is connected and the audio source is changed to
iPod mode, the iPod will resume playing from the same point it
was last used.
l Tracks selected by operating a connected iPod may not be
recognized or displayed properly.
62
 Loading...