

Page 1

Cadillac CTS/CTS-V Owner Manual (GMNA-Local izi ng- U.S ./C anada2ndPrint-11254870) - 2017 - Final Review - 6/14/16
Contents
Introduction . . . . . . . . . . . . . . . . . . . . . . . . . . 2
In B rief . . . . . . . . . . . . . . . . . . . . . . . . . . . . . . . 5
Keys, Doors, and Windows . . . . . . . . . 31
Seats and Restraints . . . . . . . . . . . . . . . 57
Storage . . . . . . . . . . . . . . . . . . . . . . . . . . . . . 107
Instruments and Controls . . . . . . . . 111
Lighting . . . . . . . . . . . . . . . . . . . . . . . . . . . . 169
Infotainment System . . . . . . . . . . . . . 178
Climate Controls . . . . . . . . . . . . . . . . . . 190
Driving and Operating . . . . . . . . . . . . 199
Vehicle Care . . . . . . . . . . . . . . . . . . . . . . . 277
Service and Maintenance . . . . . . . . . 362
Technical Data . . . . . . . . . . . . . . . . . . . . 378
Customer Information . . . . . . . . . . . . 383
Reporting Safety Defects . . . . . . . . . 398
OnStar . . . . . . . . . . . . . . . . . . . . . . . . . . . . . . 401
Index . . . . . . . . . . . . . . . . . . . . . . . . 421
Page 2
Cadillac CTS/CTS-V Owner Manual (GMNA-Local izi ng- U.S ./C anada2ndPrint-11254870) - 2017 - Final Review - 6/14/16
2 INTRODUCTION
Introduction
Object-ID=43 68704 Owner =Smith, Ja mes
LMD=09-Jun-2 016 LMB=Clark, Lorien
4379273
The names, logos, emb lems, slogans,
vehicle mode l names, and vehicle
body designs appearing in this manual
including, b ut not limited to, GM, the
GM logo, CADILLAC, th e CADILLAC
Emblem, CTS and CTS-V are
trademarks and/or service marks of
General Motors LLC, its sub sidiaries,
affiliates, or licensors.
For vehicles first sold in Ca nada,
substitute the name “ General Motors
of C anada Company” for Cadillac
Motor Car Division wherever it
appears in this manual.
This manual describes features that
may or may not be on the vehicle
because of optional equipment that
was not purchased on the vehicle,
model variants, country specifications,
features/applic ations that may not be
available in your region, or changes
subsequent to the printing of this
owner manual.
Refer to the purchase documentation
relating to your specif ic vehicle to
confirm the features.
Keep this manual in the vehicle for
quick reference .
Canadian Vehicle Owners
(US/CAN)
Object-ID=21 70296 Owner =Smith, Ja mes
LMD=09-Jun-2 016 LMB=Clark, Lorien
A French language manual can be
obtained from your dealer, at
www.helminc.com, or from:
Propriétaires Canadiens
On p eut obtenir un exemplaire de ce
guide en français auprès du
concessionnaire ou à l 'adresse
suivante:
Helm, Incorporated
Attention: Customer Ser vice
47911 Halyard Drive
Plymouth, MI 48170
USA
Using this Manual
Object-ID=21 70298 Owner =Smith, Ja mes
LMD=09-Jun-2 016 LMB=Clark, Lorien
To quickly locate inf ormation about
the vehicle, use the Index in the back
of t he manual. It is an alphabetical
list of what is in the manual and the
page number where it can be found .
Danger, Warning, and
Caution
Object-ID=28 09732 Owner =Smith, Ja mes
LMD=09-Jun-2 016 LMB=Clark, Lorien
Warning mess ages found on vehicle
labels and in this manual describe
hazards and what to do to avoid or
reduce them.
Page 3

Cadillac CTS/CTS-V Owner Manual (GMNA-Local izi ng- U.S ./C anada2ndPrint-11254870) - 2017 - Final Review - 6/14/16
INTRODUCTION 3
{
Danger
Object-ID=28 09727 LMD=1 9-Feb-2014
Danger indicates a hazard with a
high level of risk which will result
in serious injury or death.
{
Warning
Object-ID=28 09715 LMD=1 9-Feb-2014
Warning indi cates a hazard that
could result in injury o r death.
Caution
Object-ID=28 09729 LMD=1 0-Feb-2014
Caution indic ates a hazard that
could result in property or ve hicle
damage.
1954876
A circle with a sl ash through it is a
safety symbol which means “ Do Not,”
“Do not do this,” or “Do not let this
happen.”
Symbols
Object-ID=29 00789 Owner =Smith, Ja mes
LMD=09-Jun-2 016 LMB=Clark, Lorien
The vehicle has compo nents and
labels that use symbols instead of
text. Symbols are show n along with
the text describing the operation or
information relating to a specific
component, control, messag e, gauge,
or indicator.
M : Shown when the owner manual
has additional instructions or
information.
* : Shown when the servic e ma nual
has additional instructions or
information.
0 : Shown when there is more
information on another page —
“see page.”
Vehicle Symbol Chart
Here are some additional symbols that
may be found on the vehicle and what
they mean. For more information on
the symbol, refer to the Index.
9 : Airbag Readiness Light
# : Air Conditioning
! : Antilock Brake System (ABS)
g : Audio Steering Wheel Controls or
OnStar
®
(if equipped)
$ : Brake System Warning Light
" : Charging Syste m
I : Cruise Control
` : Do Not Puncture
^ : Do Not Service
B : Engine Coolan t Temperature
O : Exterior Lamps
_ : Flame/Fire Prohibited
. : Fuel Gauge
+ : Fuses
Page 4

Cadillac CTS/CTS-V Owner Manual (GMNA-Local izi ng- U.S ./C anada2ndPrint-11254870) - 2017 - Final Review - 6/14/16
4 INTRODUCTION
3 : Headlamp High/Low-Beam
Changer
( : Heated Steering Wheel
j : LATCH System Child Restraints
* : Malfunction I ndicator Lamp
: : Oil Pressure
O : Power
/ : Remote Vehicle Start
> : Safety Belt Reminders
7 : Tire Pressure Monitor
d : Traction Contr ol/StabiliTrak
®
a : Under Pressure
M : Windshield Washer Fluid
Page 5

Cadillac CTS/CTS-V Owner Manual (GMNA-Local izi ng- U.S ./C anada2ndPrint-11254870) - 2017 - Final Review - 6/14/16
IN BRIEF 5
In Brief
Instrument Panel
Instrument Panel . . . . . . . . . . . . . . . . . . . 6
Initial Drive Information
Initial Drive Information . . . . . . . . . . . 8
Stop/Start System . . . . . . . . . . . . . . . . . . . 8
Remote Keyless Entry (RKE)
System . . . . . . . . . . . . . . . . . . . . . . . . . . . . . 8
Remote Vehicle Start . . . . . . . . . . . . . . . 8
Door Locks . . . . . . . . . . . . . . . . . . . . . . . . . . 9
Trunk . . . . . . . . . . . . . . . . . . . . . . . . . . . . . . . 10
Windows . . . . . . . . . . . . . . . . . . . . . . . . . . . 10
Seat Adjustment . . . . . . . . . . . . . . . . . . . 10
Memory Fea tures . . . . . . . . . . . . . . . . . . 14
Heated and Ventilated Seats . . . . . . 14
Head Restraint Adjustment . . . . . . . 15
Safety Belts . . . . . . . . . . . . . . . . . . . . . . . . . 15
Passenger Sensing System . . . . . . . . 16
Mirror Adjustment . . . . . . . . . . . . . . . . 16
Steering Wheel Adjustment . . . . . . . 17
Interior Lighting . . . . . . . . . . . . . . . . . . . 18
Exterior Lighting . . . . . . . . . . . . . . . . . . . 18
Windshield Wiper/Washer . . . . . . . . 19
Climate Controls . . . . . . . . . . . . . . . . . . . 20
Transmission . . . . . . . . . . . . . . . . . . . . . . . 21
Starting th e Engine . . . . . . . . . . . . . . . . 21
Vehicle Features
Infotainment System . . . . . . . . . . . . . . 21
Steering Wheel Controls . . . . . . . . . . 21
Cruise Contr ol . . . . . . . . . . . . . . . . . . . . . 22
Driver Information
Center (DIC) . . . . . . . . . . . . . . . . . . . . . . 22
Forward Collision Alert (FCA)
System . . . . . . . . . . . . . . . . . . . . . . . . . . . . 23
Forward Automatic
Braking (FAB) . . . . . . . . . . . . . . . . . . . . 23
Lane Keep Assist (LKA) . . . . . . . . . . . 23
Lane Change Alert (LCA) . . . . . . . . . . 23
Surround Vision (CTS O nly) . . . . . . 23
Curb View Camera
(CTS-V Only) . . . . . . . . . . . . . . . . . . . . . 24
Rear Vision Camera (RVC) . . . . . . . . 2 4
Rear Cross Traffic Alert (RCTA)
System . . . . . . . . . . . . . . . . . . . . . . . . . . . . 24
Parking Assist . . . . . . . . . . . . . . . . . . . . . . 24
Automatic Parking
Assist (APA) . . . . . . . . . . . . . . . . . . . . . . 24
Reverse Automatic
Braking (RAB) . . . . . . . . . . . . . . . . . . . . 25
Vehicle-to-Vehic le . . . . . . . . . . . . . . . . . 25
Power Outlets . . . . . . . . . . . . . . . . . . . . . . 25
Universal Remote System . . . . . . . . . 25
Sunroof . . . . . . . . . . . . . . . . . . . . . . . . . . . . . 26
Performance and Maintenance
Traction Control/Electronic
Stability Control . . . . . . . . . . . . . . . . . . 27
Tire Pressure Monitor . . . . . . . . . . . . . 27
Fuel (LGX 3.6L V6 Engine) . . . . . . . . 28
Fuel (LTG 2.0L L4 Engine) . . . . . . . . 28
Fuel (LF3 3.6L V6 Twin Turbo and
LT4 6.2L V8 Engines) . . . . . . . . . . . . 28
E85 or FlexFuel . . . . . . . . . . . . . . . . . . . . 29
Engine Oil Life System . . . . . . . . . . . . 29
Car Wash Guidelines . . . . . . . . . . . . . . 29
Driving for Better Fuel
Economy . . . . . . . . . . . . . . . . . . . . . . . . . . 29
Roadside Service (US/CAN) . . . . . . . 30
Roadside Service (MEXICO) . . . . . . . 30
Page 6
Cadillac CTS/CTS-V Owner Manual (GMNA-Local izi ng- U.S ./C anada2ndPrint-11254870) - 2017 - Final Review - 6/14/16
6 IN BRIEF
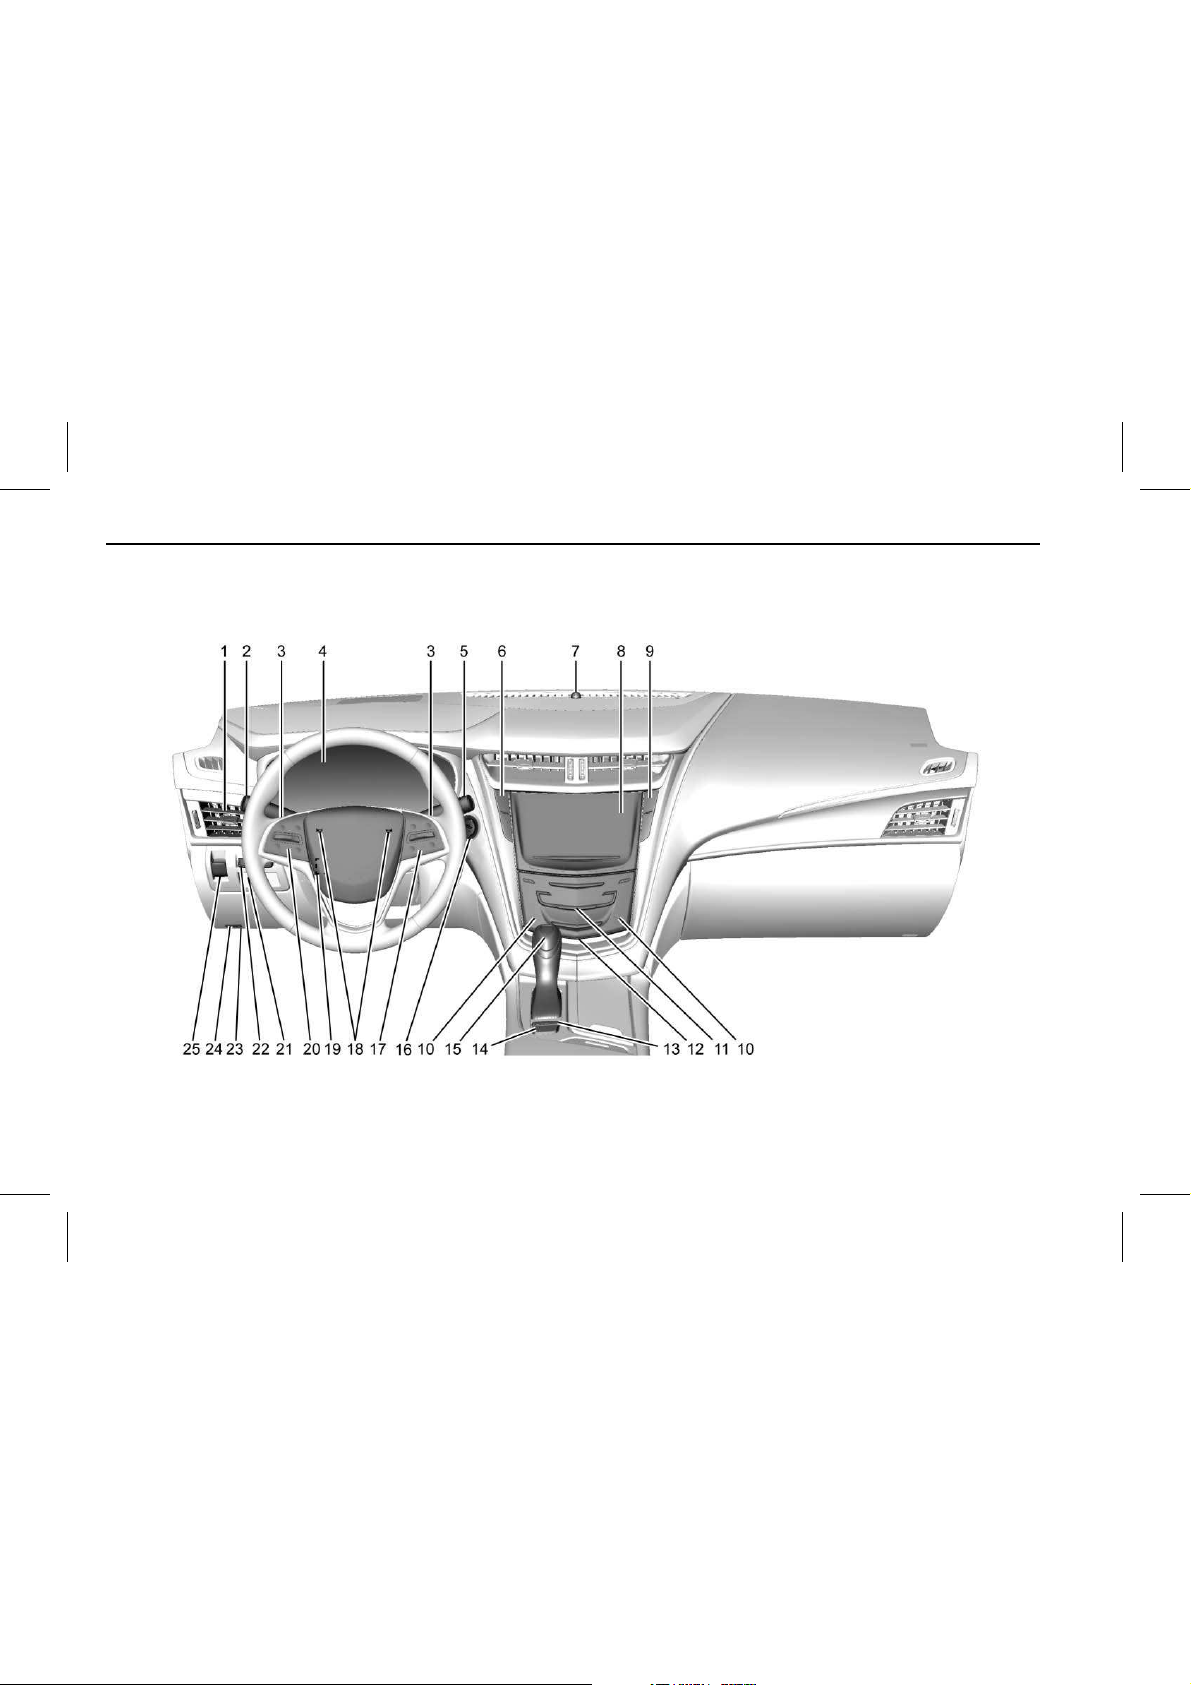
Instrument Panel
Object-ID=40 35268 Owner =Parker, Cynthia LMD=08-A pr-2016 LMB =Parker, Cynthi a
4025569
Page 7

Cadillac CTS/CTS-V Owner Manual (GMNA-Local izi ng- U.S ./C anada2ndPrint-11254870) - 2017 - Final Review - 6/14/16
IN BRIEF 7
1. Air Vents 0 197.
2. Turn Signal Lever. See
Turn and
Lane-Change Signals 0 173
.
3. Manual Mode 0 226 (If
Equipped).
4.
Instrument Cluster 0 120.
5. Windshield Wiper/Washer 0 113.
6.
Hazard Warning Flashers 0 173.
Lane Keep Assist (LKA) 0 263 (If
Equipped).
Start/Stop Disable Switch (If
Equipped). See
Starting the
Engine 0 217
.
7. Light Sensor (If Equipped). See
Automatic Headlamp
System 0 172
.
Solar Sensor. See Dual Automatic
Climate Control System 0 190
.
8.
Infotainment 0 178 .
9. Glove Box Button. See Gl ove
Box 0 108
.
Automatic Parking Assist Button
(If Equipped). See
Assistance
Systems for Parking or
Backing 0 250
.
Parking Assist Button. See
Assistance Systems for Parking or
Backing 0 250
.
10.
Heated and Ventilated Front Seats
0 65
(If Equipped).
11. Dual Automatic Climate Control
System 0 190
.
12.
Instrument Panel Storage 0 107.
Wireless Charging Pad ( If
Equipped) (Out of View). See
Wireless Charging 0 117.
13. Traction Control/E lectronic
Stability Control 0 230
.
14. MODE Switch. See
Driver Mode
Control 0 231
.
15. Shift Lever. See
Automatic
Transmissio n 0 224
.
Manual Mode Button. See
Automatic Transmission 0 224.
16. ENGINE START/STOP Button.
See
Ignition Pos itions 0 216.
17.
Steering Whe el Controls 0 113.
Driver Information Center (DIC)
Controls. See
Driver Information
Center (DIC) 0 140
.
18. Horn 0 113.
19.
Steering Whe el Adjustment 0 112.
20.
Cruise Control 0 238 (If
Equipped).
Adaptive Cruise Control 0 240 (If
Equipped).
Forward Collision Alert (FCA)
System 0 257
(If Equipped).
Heated Steering Wheel 0 113 (If
Equipped).
21.
Instrument Panel Illumina tion
Control 0 174
.
22. Head-Up Display (HUD) 0 143 (If
Equipped).
23. Data Link Connector (DLC) (Out
of V iew). See
Malfunction
Indicator Lamp (Check Engine
Light) 0 131
.
24. Hood Release. See Hood 0 280.
25. Electric Par king Brake (EPB)
Switch. See
Electric Parking
Brake 0 228
.
Page 8
Cadillac CTS/CTS-V Owner Manual (GMNA-Local izi ng- U.S ./C anada2ndPrint-11254870) - 2017 - Final Review - 6/14/16
8 IN BRIEF
Initial Drive Information
Object-ID=22 26588 Owner =Szydlowski, Corinna
LMD=08-Oct-2 015 LMB=Cla rk, Lorien
This section provides a br ief overview
about some of the important features
that may or may not be on your
specific vehicle.
For more detailed infor mation, refer to
each of the features which can be
found later in this owner manual.
Stop/Start System
Object-ID=41 00173 Owner =Byrne, Matthew
LMD=22-Feb-2 016 LMB=Byrne, Matthew
The vehicle is equipped with a fuel
saving stop/start system to shut off
the engine and help conserve fuel.
When the brakes are applied and the
vehicle is at a complete stop, the
engine may turn off. When the brake
pedal is released or the accelerator
pedal is pushed, the engine will
restart.
See
Starting the Engine 0 217.
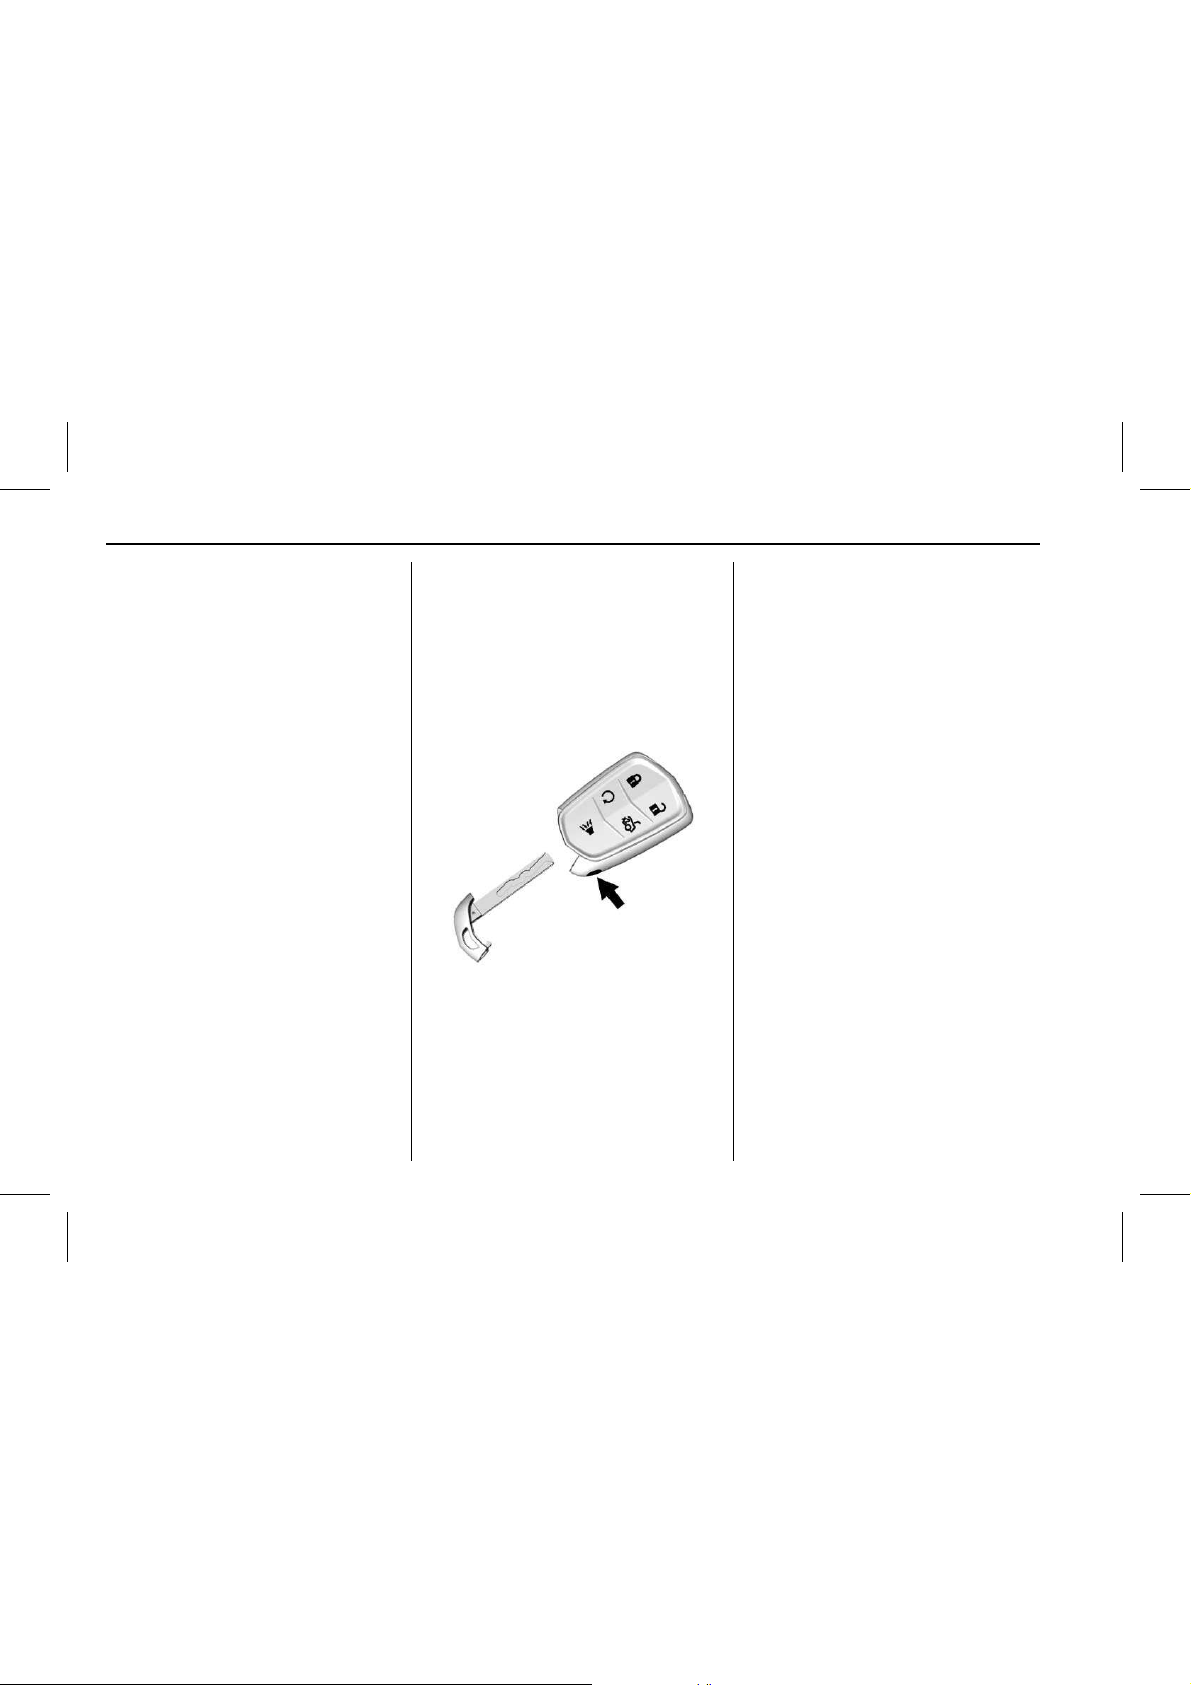
Remote Keyless Entry
(RKE) System
Object-ID=44 90847 Owner =Szydlowski, Corinna
LMD=26-Apr-2 016 LMB=Szy dlowski, C orinna
The Remote Keyless Entry (RKE)
transmitt er may work u p to 60 m
(197 ft) away.
2919924
Press the button to remove the key.
The key can be use d for the driver
door, rear folding seats a nd the rear
seat pass-through door.
Press
K to unlock the driver door or
all doors, depending on the vehicle
personali zation settings.
Press
Q to lock all doors, depending
on the vehicle person alization
settings.
Lock and unlock feedback can be
personali zed. See
Vehicle
Personaliz ation 0 158
.
Press X twice quickly to release the
trunk.
Press
7 and release to initiate vehicle
locator.
Press and hold 7 for m ore than
three seconds to sound the panic
alarm.
Press
7 again to cancel the panic
alarm.
See
Keys 0 3 1 and Remote Keyless
Entry (RKE) System Operation 0 32
.
Remote Vehicle Start
Object-ID=39 90733 Owner =Szydlowski, Corinna
LMD=16-Dec-2 015 LMB=Szy dlowski, C orinna
The engine can be started from
outside of the vehicl e.
Starting the Vehicle
Page 9

Cadillac CTS/CTS-V Owner Manual (GMNA-Local izi ng- U.S ./C anada2ndPrint-11254870) - 2017 - Final Review - 6/14/16
IN BRIEF 9
1. Press and release Q on the RKE
transmitt er.
2. Immediately press and hold
/
for at least four seconds or until
the turn signal lamps flash.
Start the vehicle normally after
entering.
When the vehicle starts, the parking
lamps will turn on.
Remote start can be extended.
Canceling a Remote Start
To cancel a remote start, do one of
the following:
.
Press and hold
/ until the
parking lamps turn off.
.
Turn on the hazard warning
flashers.
.
Turn the vehicle on and then off.
See
Remote Vehic le Start 0 38.
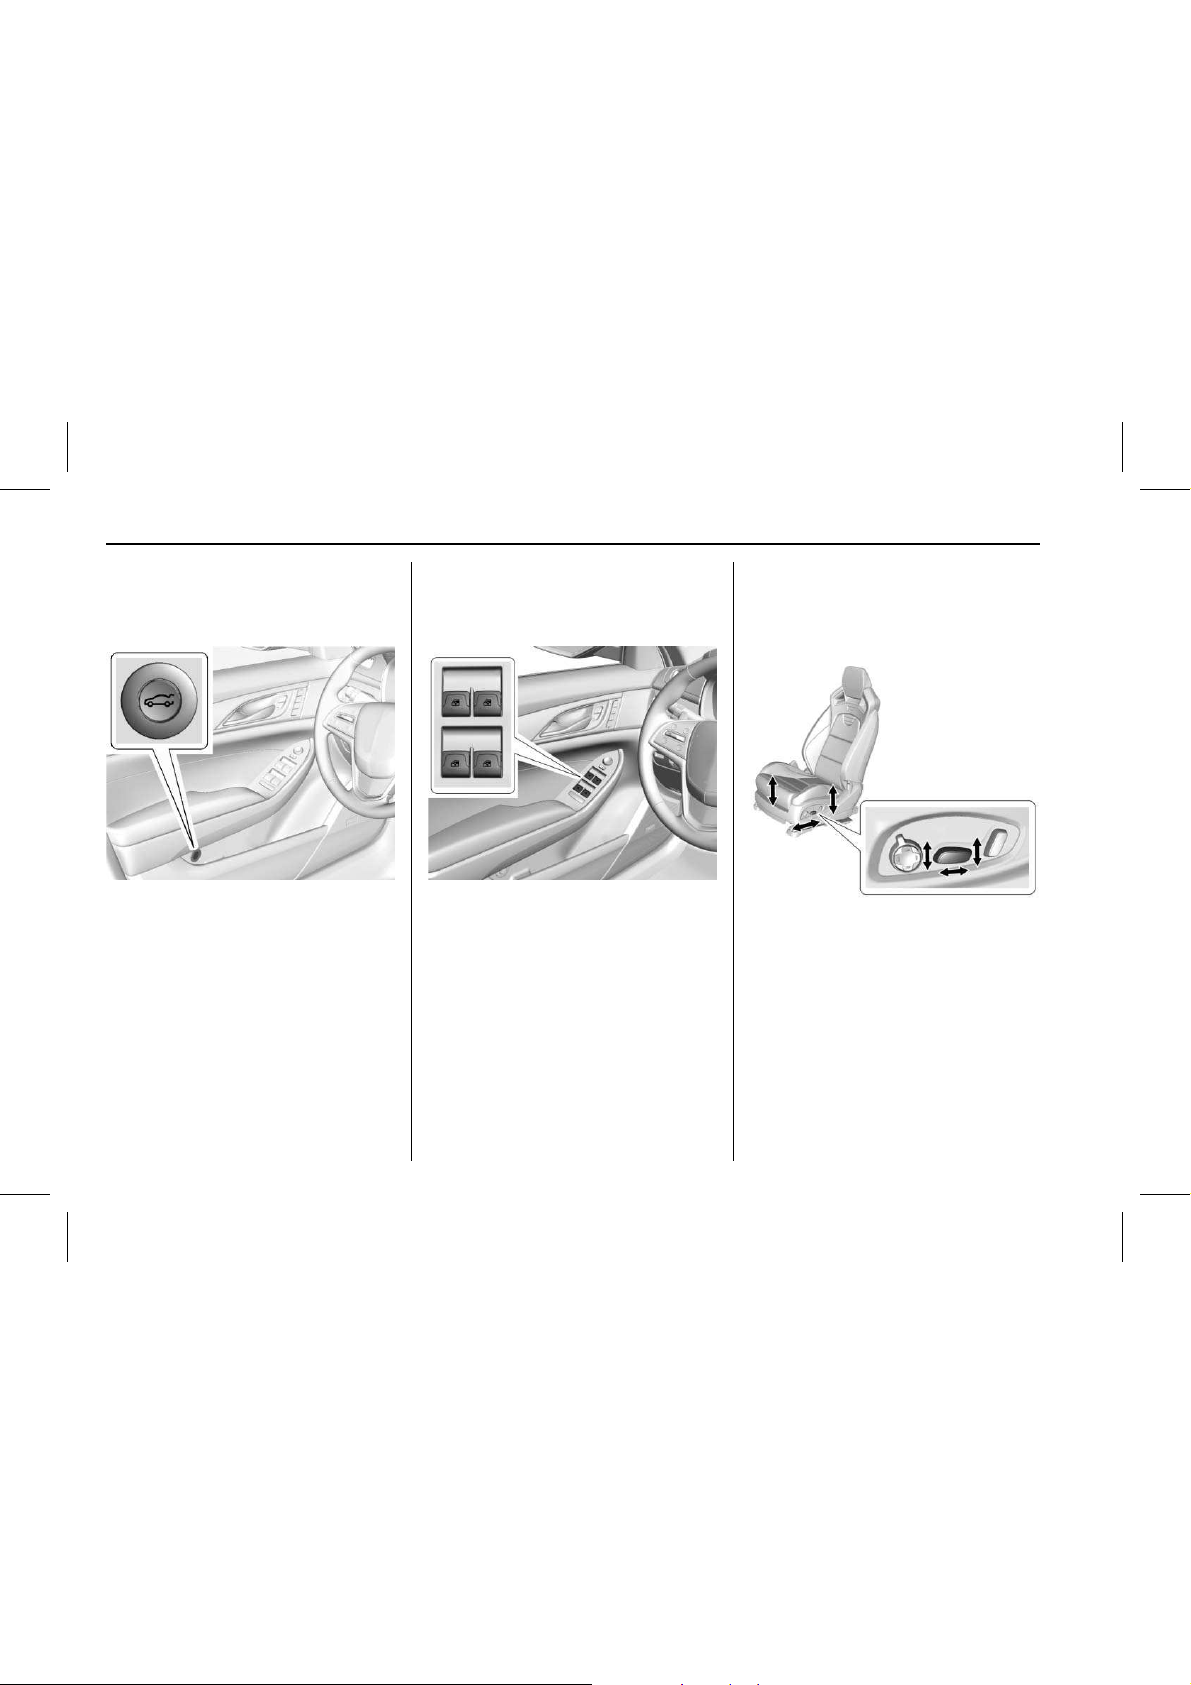
Door Locks
Object-ID=37 21903 Owner =Szydlowski, Corinna
LMD=08-Oct-2 015 LMB=Cla rk, Lorien
Keyless Access
Press the button on the door handle
and pull the handle when the Remote
Keyless Entry (RKE) transmitter is
within range. See
Remote Keyle ss Entry
(RKE) System Operation 0 32
.
Manual Operation
From outside, use the key in the
driver door. The key cylinder is
covered by a cap. S ee Door Locks 0 40.
From the inside rear doors, push down
on the door lock knob on top of the
door. To unlock a door, pull once on
the door handle to unlock it, and
again to open it.
Power Door Locks
From outside, press Q or K on the
RKE transmitter. See
Remote Keyless
Entry (RKE) System Operation 0 32
.
2916811
From inside, press Q or K. The
indicator light in the switch will
illuminate w hen locked. See
Power
Door Locks 0 42
.
Page 10
Cadillac CTS/CTS-V Owner Manual (GMNA-Local izi ng- U.S ./C anada2ndPrint-11254870) - 2017 - Final Review - 6/14/16
10 IN BRIEF
Trunk
Object-ID=44 87966 Owner =Szydlowski, Corinna
LMD=06-Apr-2 016 LMB=Szy dlowski, C orinna
3346209
To open the trunk, press | on the
driver door, press
X twice quickly on
the Remote Keyless Entry (RKE)
transmitt er, or press t he touch pad on
the rear of the vehicle after unlocking
all doors.
Press the touch pad on the rear of the
trunk above the license p late when
the RKE transmitter is in range. See
Remote Keyle ss Entry (RKE) System
Operation 0 32
and Trunk 0 44.
Windows
Object-ID=29 17424 Owner =Szydlowski, Corinna
LMD=08-Oct-2 015 LMB=Cla rk, Lorien
2916813
The driver power window switches
control all the windows. The
passenger switch only controls that
window.
Press the switch down to lower the
window. Pull the switch up to raise it.
See
Power Window s 0 52.
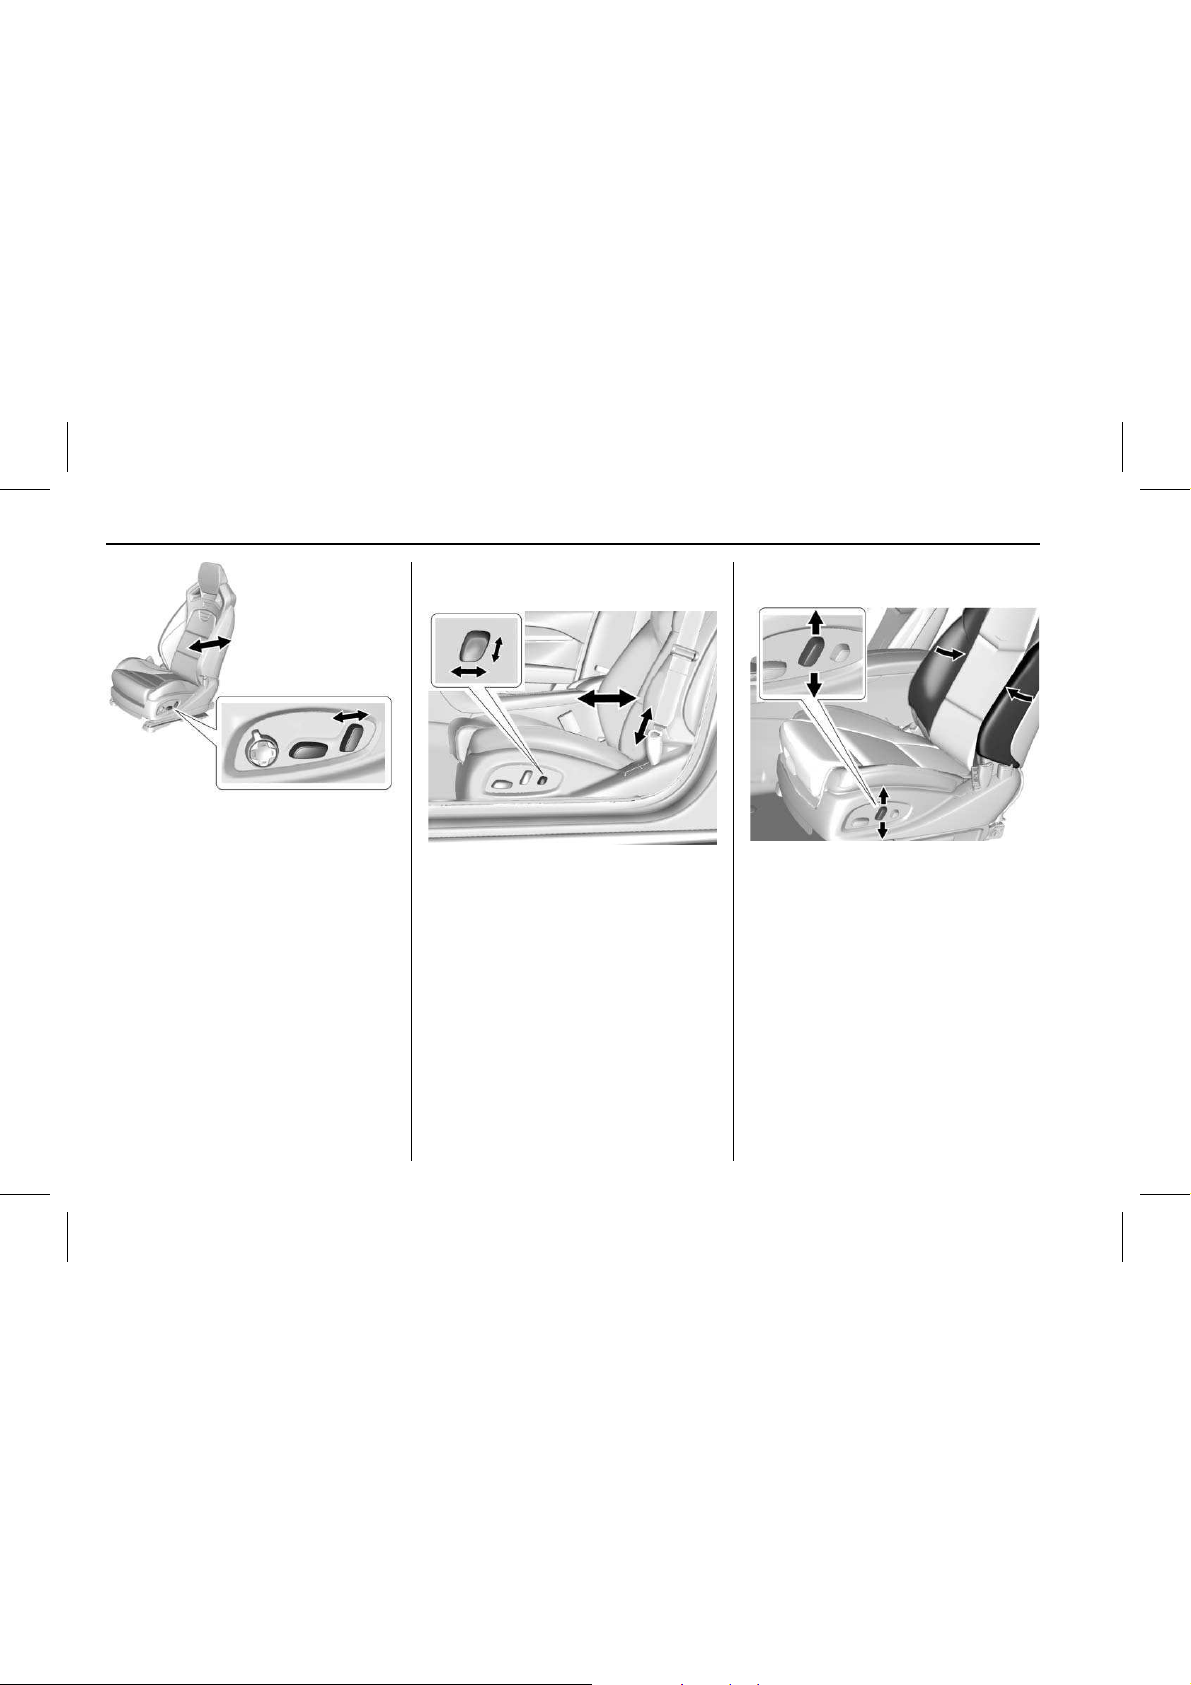
Seat Adjustment
Object-ID=40 56591 Owner =Landstrom, Michael
LMD=26-Apr-2 016 LMB=Lan dstrom, Mi c hael
Power Seats
High Performance Seat
4056626
To adjust the seat:
.
Move the seat forward or rearward
by s liding the control forward o r
rearward.
.
Raise or lower the seat by moving
the rear of the control up or down .
Page 11
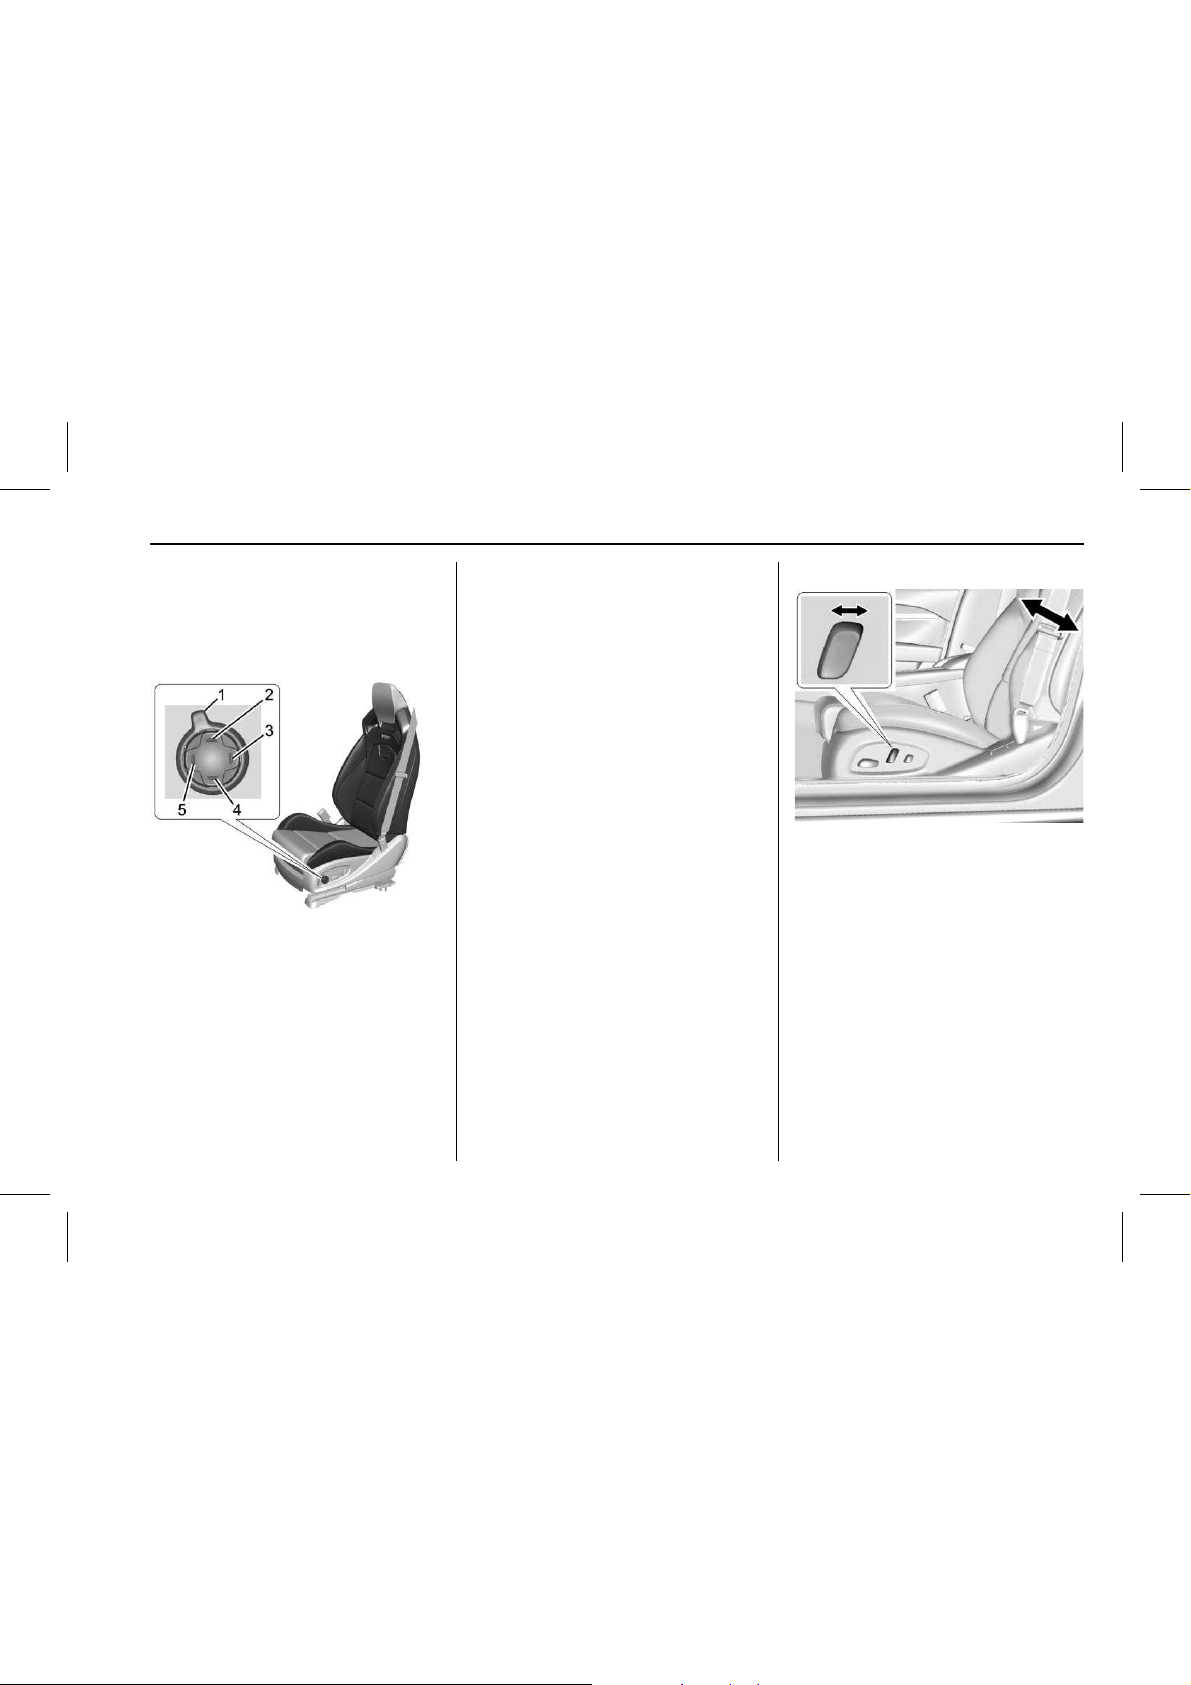
Cadillac CTS/CTS-V Owner Manual (GMNA-Local izi ng- U.S ./C anada2ndPrint-11254870) - 2017 - Final Review - 6/14/16
IN BRIEF 11
.
If eq uipped, raise or lower the
front part of the seat cushion by
moving the front of the control up
or down.
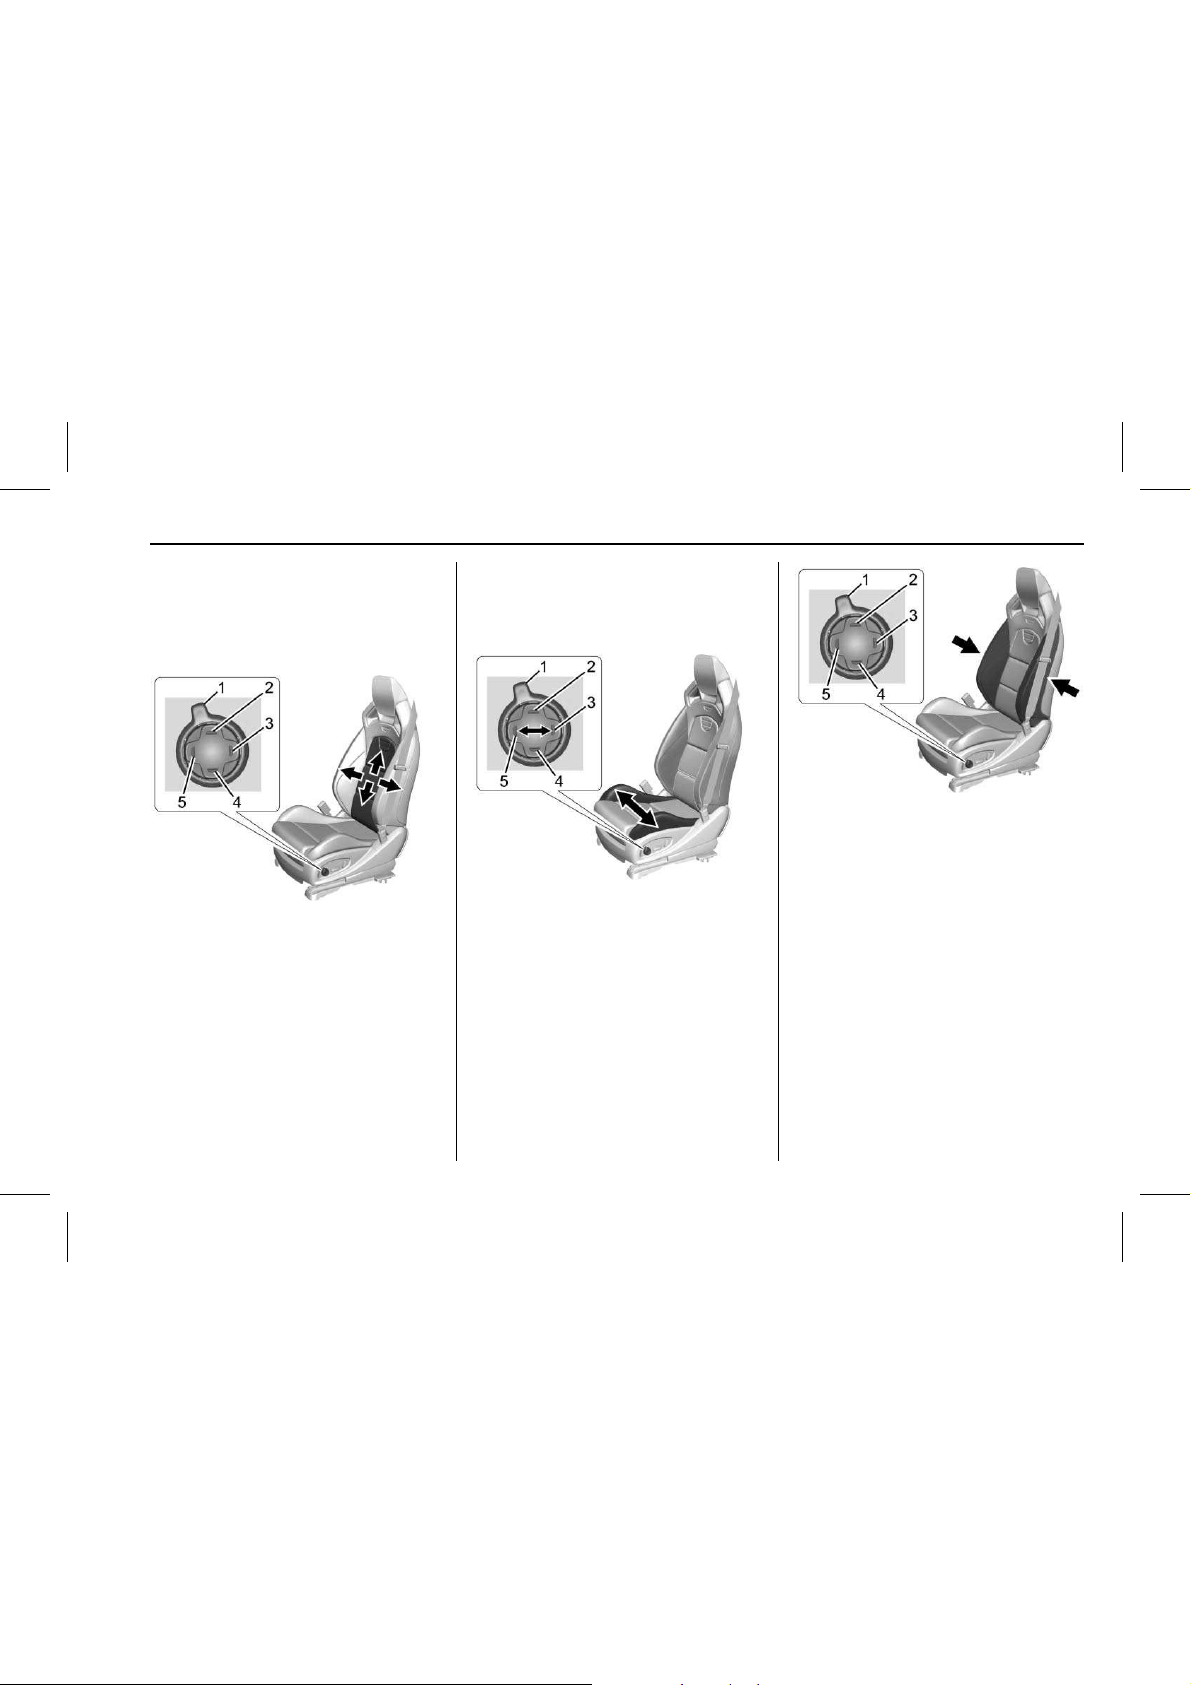
High Performance Seat Adjustment
High Performance Seat
4017583
1. Feature Select
2. Up
3. Rearward
4. Down
5. Forward
.
Move Feature Select (1) to disp lay
seat adjustments on t he center
stack. Press and release or hold to
scroll through features.
.
Press Up (2) to ma ke upward
adjustments of the selected
feature.
.
Press Rearward (3) to make
rearward adjustments of the
selected feature.
.
Press Down (4) to make downward
adjustments of the selected
feature.
.
Press Forward (5) to make forward
adjustments of the selected
feature.
See
Power Seat Adjustment 0 59.
Reclining Seatbacks
Base Seat
2675340
To adjust the seatback:
.
Tilt the top of the control
rearward to recline.
.
Tilt the top of the control forward
to r aise.
Page 12
Cadillac CTS/CTS-V Owner Manual (GMNA-Local izi ng- U.S ./C anada2ndPrint-11254870) - 2017 - Final Review - 6/14/16
12 IN BRIEF
High Performance Seat
4056523
To adjust the seatback:
.
Tilt the top of the control
rearward to recline.
.
Tilt the top of the control forward
to r aise.
See
Reclining Se atbacks 0 62.
Two-Way Lumbar and Bolster
Adjustment
Lumbar Adjustment
2675338
To adjust the two-way lumbar and
bolster support, if equipped:
.
Press and hold the lumbar
adjustment control forward or
rearward to adjust lumbar s upport
inward or outward.
.
Press and hold the recliner control
up or dow n to increase or decrease
seatback bolster support.
Four-Way Lumbar and Bolster
Adjustment
Bolster Adjustment
3319514
To adjust the four-way lumbar and
bolster support, if equipped:
.
Press and hold the lumbar
adjustment control forward or
rearward to adjust lumbar s upport
inward or outward and up or down
for vertical lumbar adjustment.
.
Press and hold the recliner control
up or dow n to increase or decrease
seatback bolster support.
See
Lumbar Adjus tment 0 61.
Page 13
Cadillac CTS/CTS-V Owner Manual (GMNA-Local izi ng- U.S ./C anada2ndPrint-11254870) - 2017 - Final Review - 6/14/16
IN BRIEF 13
High Performance Bolster
Support
Four-Way Lumbar Support
To adjust lumbar support, if equipped:
High Performance Seat
4017584
.
Press and release or hold Feature
Select (1) to scroll to lumbar
support on the center stack.
.
Press Forward (5) or Rearward (3)
to a djust lumbar forward or
rearward.
.
Press Up (2) or Down (4) to adjust
lumbar support up or down.
Cushion Bolster Support
To adjust cushion bolster support,
if equipped:
4021145
.
Press and release or hold Feature
Select (1) to scroll to bolster
support on the center stack.
.
Press Forward (5) or Rearward (3)
to a djust bolster support inward or
outward.
Back Bolster Support
To adjust back bolster support,
if equipped:
4021147
.
Press and release or hold Feature
Select (1) to scroll to back bolster
support on the center stack.
.
Press Forward (5) or Rearward (3)
to a djust back bolste r support
inward or outward.
Page 14
Cadillac CTS/CTS-V Owner Manual (GMNA-Local izi ng- U.S ./C anada2ndPrint-11254870) - 2017 - Final Review - 6/14/16
14 IN BRIEF
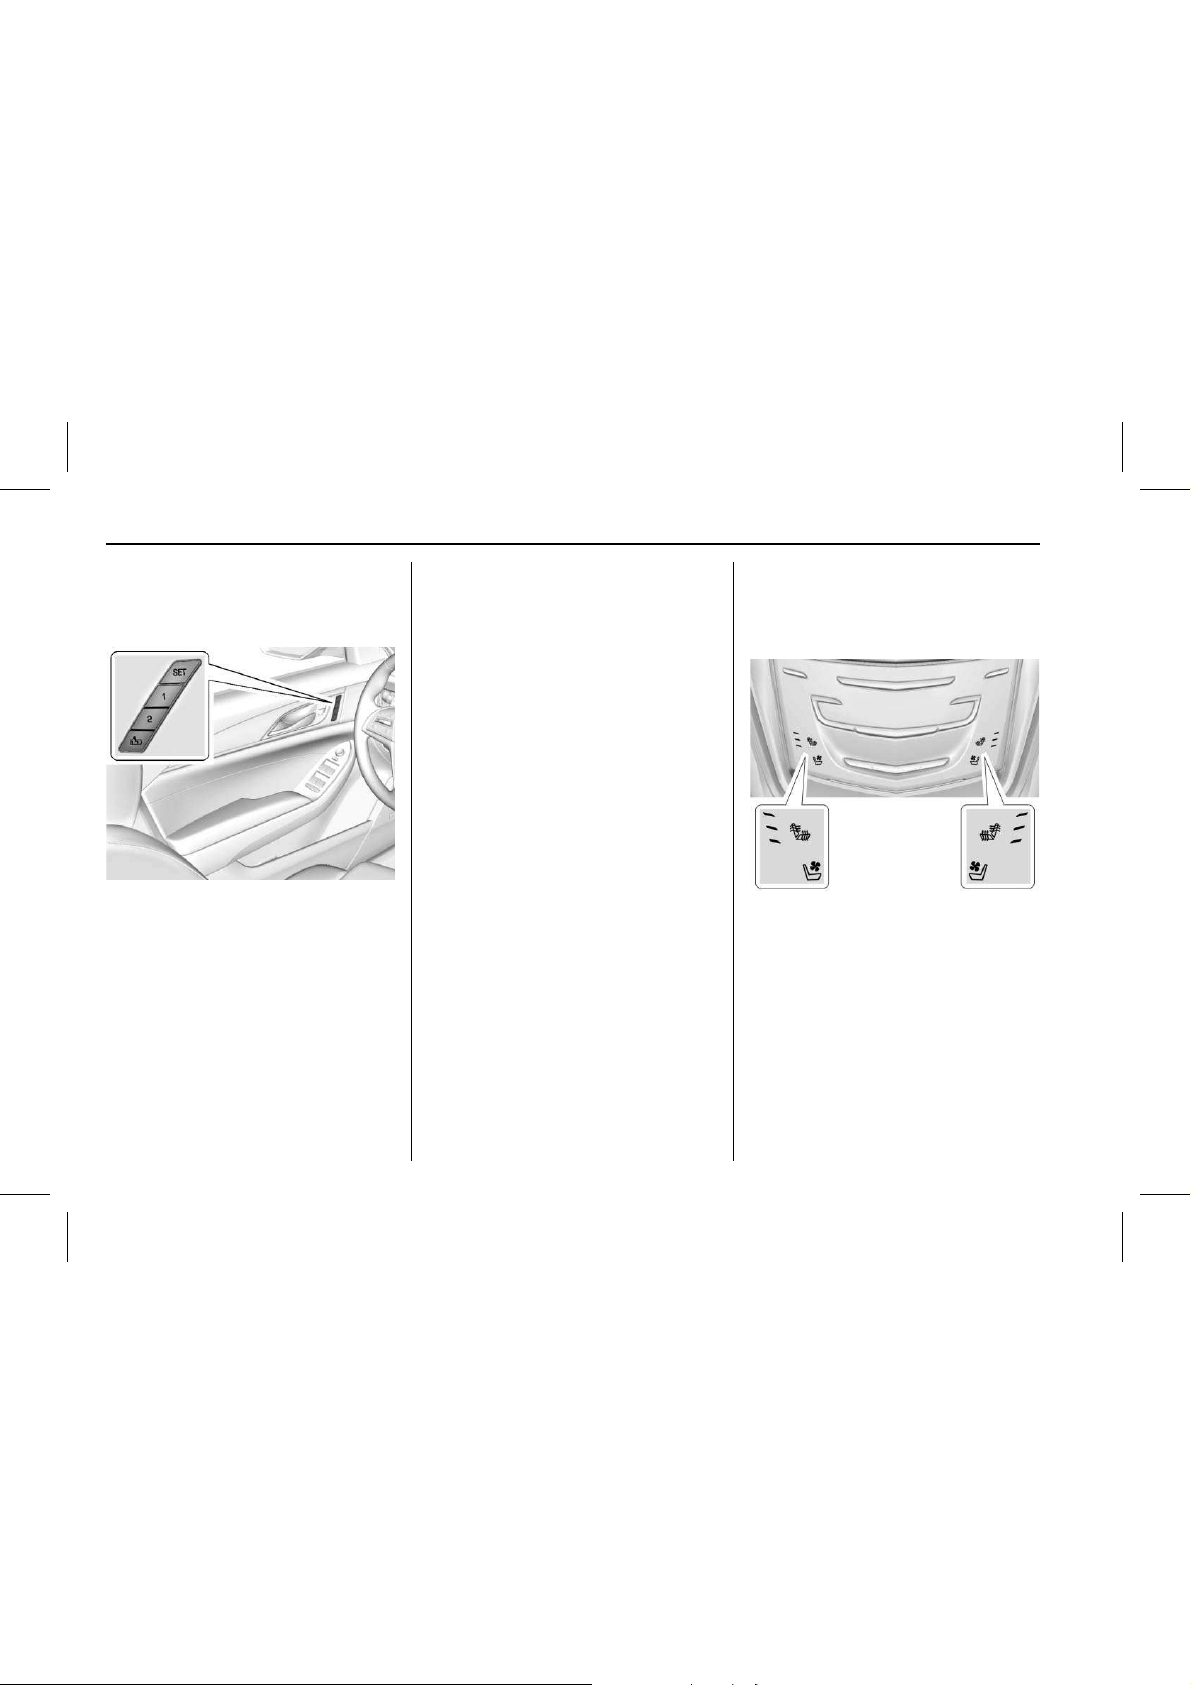
Memory Features
Object-ID=29 00769 Owner =Landstrom, Michael
LMD=08-Oct-2 015 LMB=Lan dstrom, Mi c hael
2901329
The SET, 1, 2, an d B (Exit) buttons
on the driver door are used to
manually sto re and recall memory
settings for the driver seat, outside
mirrors, and power tilt and
telescoping steering colu mn (if
equipped).
When Auto Memory Recall is enabled
in the personalization menu, positions
previously st ored to memory buttons
1 and 2 are recalle d when the ignition
is changed from OFF to ON/RUN/
START or ACC/ACCESSORY .
When Easy Exit Options is enabled in
the personalization menu, the feature
will recall the previously stored exit
positions when the ignition is changed
to O FF and dr iver door is o pened
within a short time.
See
Memory Seats 0 63 and Vehicle
Personaliz ation 0 158
.
Heated and Ventilated
Seats
Object-ID=43 26232 Owner =Landstrom, Michael
LMD=02-Dec-2 015 LMB=Lan dstrom, Mi chael
Uplevel Buttons Shown, Base Buttons
Similar
4326236
If eq uipped, the buttons are near the
climate cont rols on the center stack.
To operate, the ignition must be in
ON/RUN.
Press
J or z to heat the driver or
passenger seat cushion and seatback .
Press C or { to venti late the driver
or passenger seat.
Page 15
Cadillac CTS/CTS-V Owner Manual (GMNA-Local izi ng- U.S ./C anada2ndPrint-11254870) - 2017 - Final Review - 6/14/16
IN BRIEF 15
Press the button once for the highest
setting. With each pr ess of the button,
the seat will change to the next lower
setting, and then to the off setting.
The indicator lights above the buttons
indicate three for the highest setting
and one for the lowest. If the front
heated seats are on high, the level
may automatically be lowered after
approxima tely 30 min utes.
See
Heated and Ventilated Front
Seats 0 65
.
Auto Heated and Ventilated
Seats
When the vehicle is on, this feature
will automatically activate the heated
or ventila ted seats at the level
required by the vehicle’s i nterior
temperatu re.
The active high, medium, low, or of f
heated or ventilated seat level will be
indicated by the manual heated or
ventilated seat buttons on the center
stack. Use the manual heated or
ventilated seat buttons on the center
stack to turn auto heated or ventilated
seats off.
If the passenger seat is unoccupied,
the auto heated or ventilated seats
feature will not activate that seat. The
auto heated or ventilated seats feature
can be programmed to always be
enabled when the vehicle is on.
The heated or ventilated seats will not
turn on during a remote start unless
they are enabled in the vehicle
personali zation menu.
See
Vehicle Personalization 0 158.
Head Restraint Adjustment
Object-ID=40 80790 Owner =Landstrom, Michael
LMD=08-Oct-2 015 LMB=Lan dstrom, Mi c hael
If eq uipped with base seats, th e
vehicle’ s front seats have adjustable
head restraints in the outboard
seating positions.
If eq uipped with high performance
seats, the vehicle’s front seats have
head restraints in the outboard
seating positions that cannot be
adjusted.
Do n ot drive until the head restraints
for all occupants are installed and
adjusted properly.
To achieve a comforta ble seating
position, ch ange the seatback recline
angle as little as necessary while
keeping the seat and the head
restraint height in the proper position.
See
Head Restraints 0 58 and Power
Seat Adjustment 0 59
.
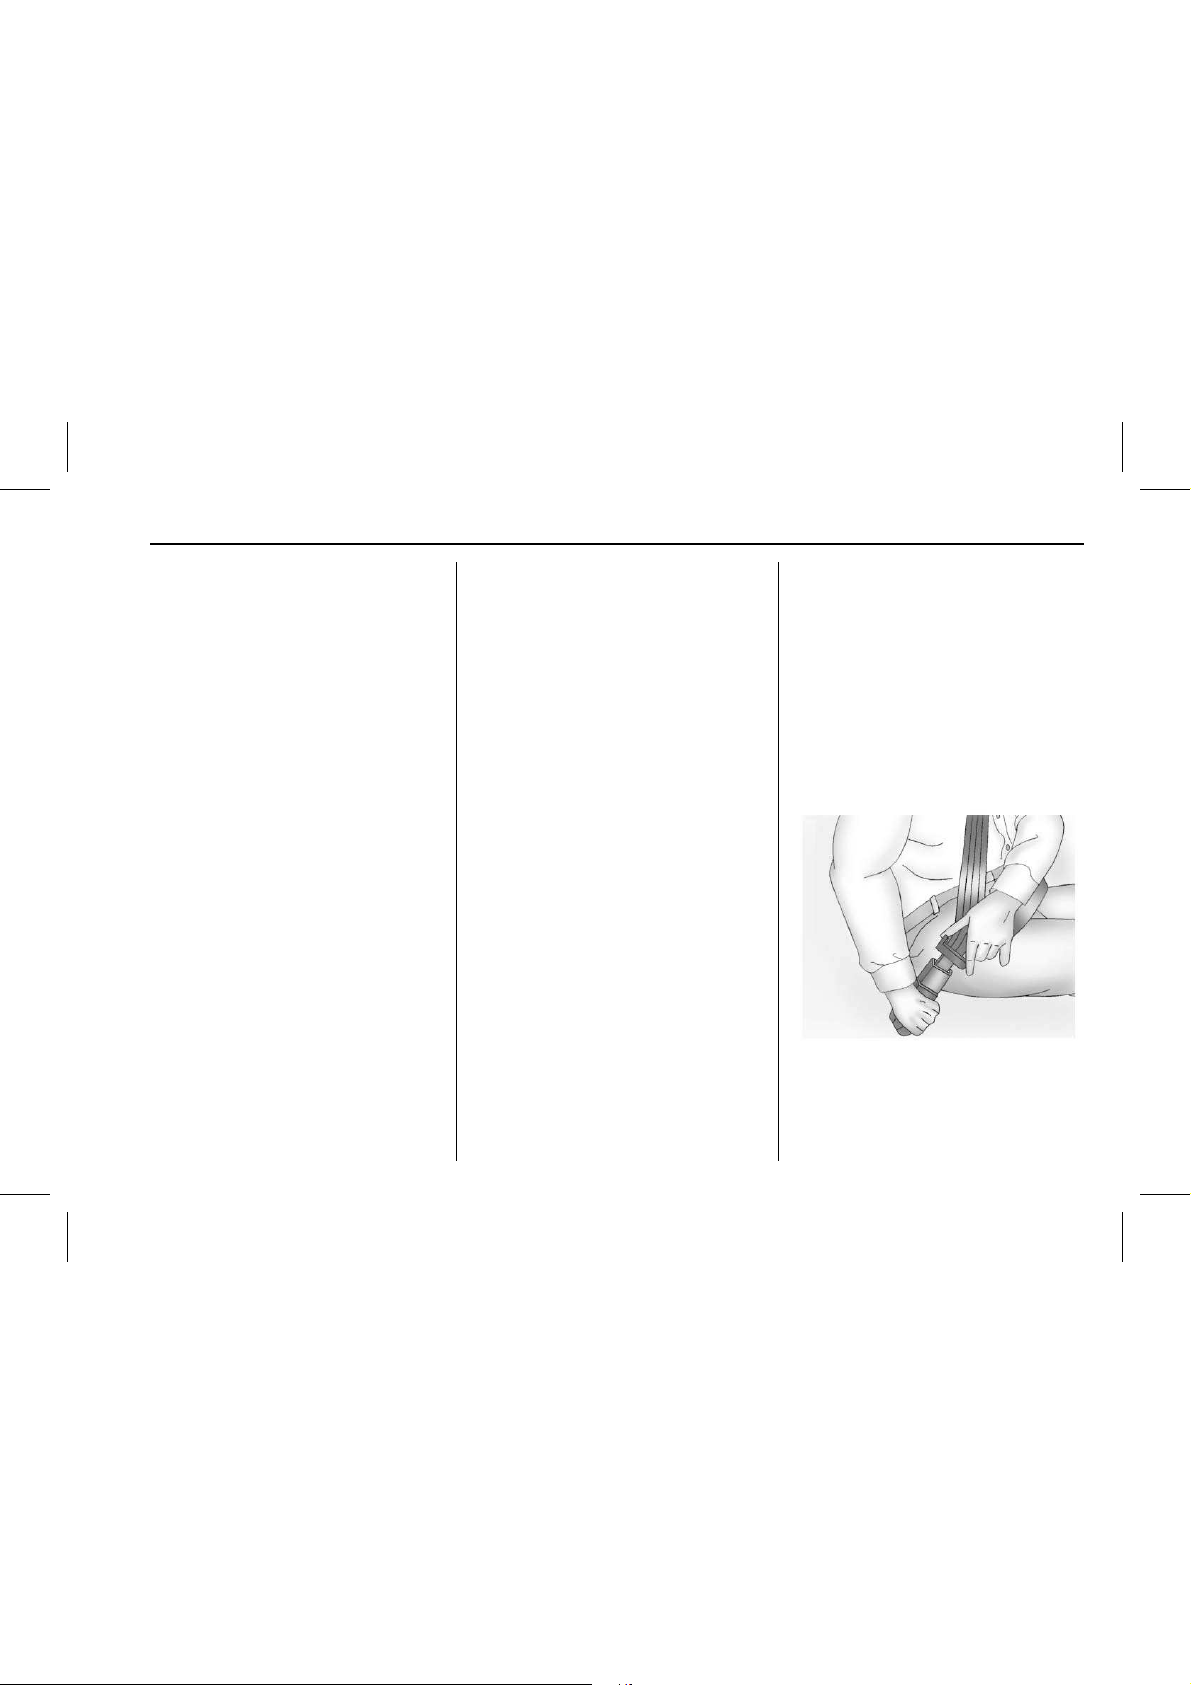
Safety Belts
Object-ID=22 39828 Owner =Foster, Cindi
LMD=26-Jan-2 016 LMB=Clark, Lorien
1966388
Refer to the following sections for
important information on how to use
safety belts properly:
.
Safety Belts 0 69.
Page 16
Cadillac CTS/CTS-V Owner Manual (GMNA-Local izi ng- U.S ./C anada2ndPrint-11254870) - 2017 - Final Review - 6/14/16
16 IN BRIEF
.
How to Wear Safety Belts
Properly 0 71
.
.
Lap-Shoulder Belt 0 71.
.
Lower Anchors and Tethers for
Children (LATCH System) 0 95
.
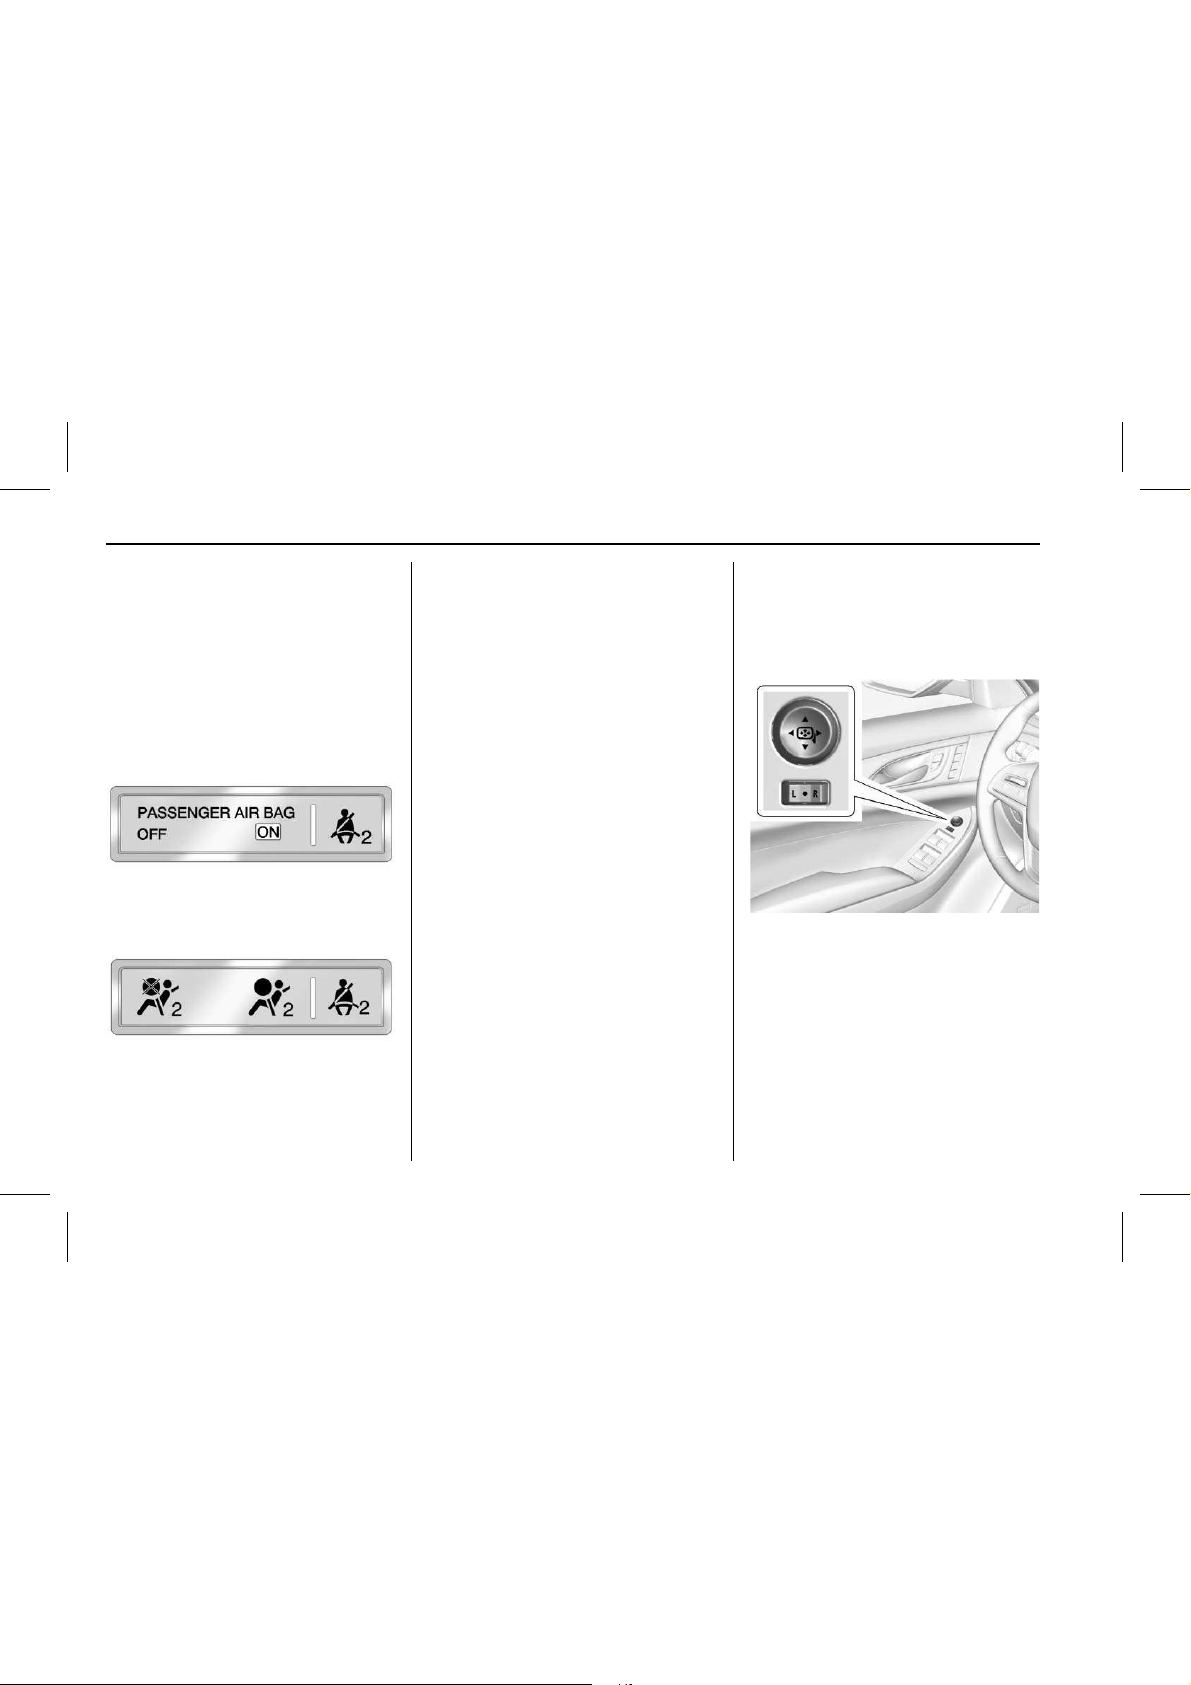
Passenger Sensing System
Object-ID=27 56966 Owner =Foster, Cindi
LMD=26-Jan-2 016 LMB=Clark, Lorien
United States
2920323
Canada and Mexico
2048776
The passenger sensing system will
turn off the front outboard passenger
frontal airbag and knee airbag under
certain conditions. No other airbag is
affected by the passenger sensing
system. See
Passenger Sensing
System 0 83
.
The passenger airbag status indicator
lights on the overhea d console are
visible when the vehicle is started. See
Passenger Airbag Status
Indicator 0 130
.
Mirror Adjustment
Object-ID=36 09633 Owner =Szydlowski, Corinna
LMD=08-Oct-2 015 LMB=Cla rk, Lorien
Exterior
2916815
Controls for the outsi de power mirrors
are on the driver d oor.
To adjust each mirror :
1. Press (L) or (R) to select the
driver or passenger side mirror.
2. Press the arrows on the control
pad to move the m irror up,
down, right, or left.
Page 17
Cadillac CTS/CTS-V Owner Manual (GMNA-Local izi ng- U.S ./C anada2ndPrint-11254870) - 2017 - Final Review - 6/14/16
IN BRIEF 17
3. Adjust each mirror so that a little
of t he vehicle and the area
behind it can be seen.
4. Return the selector switch to the
center posit ion.
See
Power Mirrors 0 49.
Interior
The vehicle has an automatic
dimming insi de rearview mirror.
Automatic dimming reduces the glare
of headlamps from behind. The
dimming feat ure comes o n when the
vehicle is started.
See
Automatic Dimming Rearview
Mirror 0 50
.
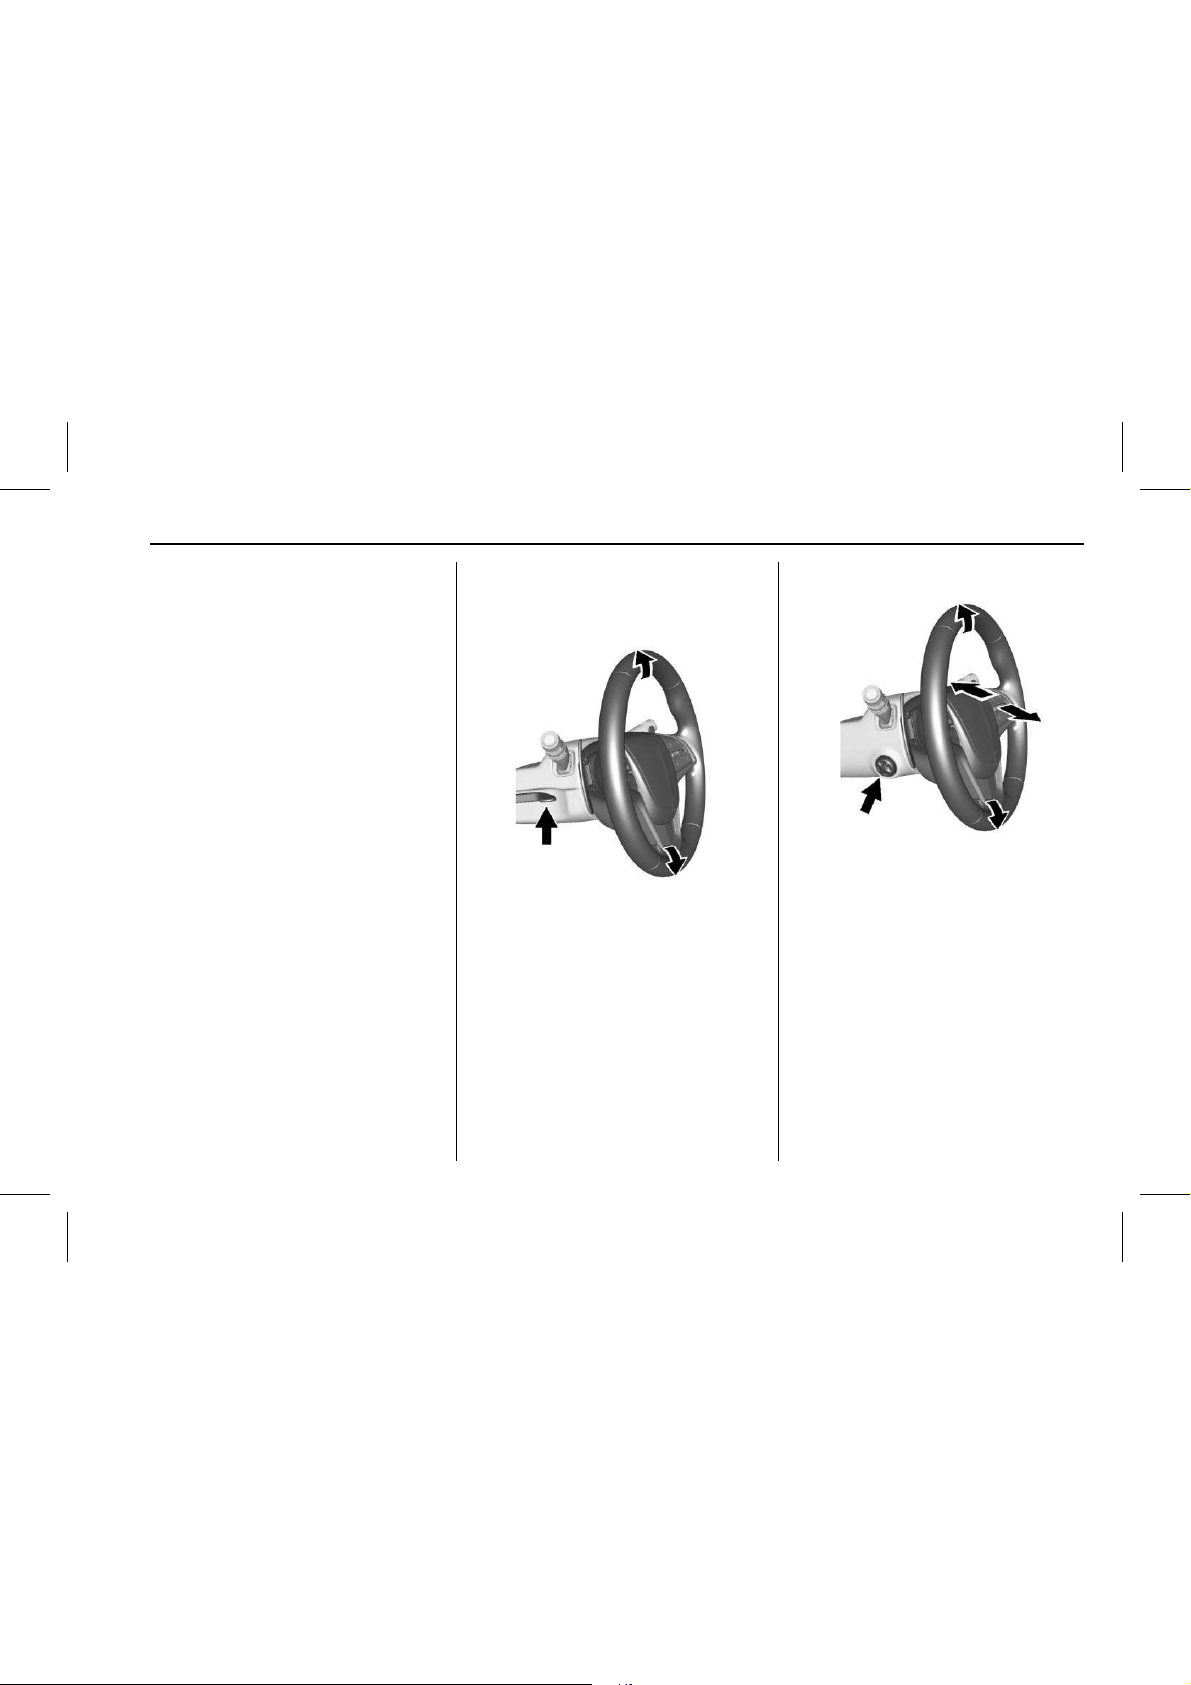
Steering Wheel Adjustment
Object-ID=32 72981 Owner =Parker, Cynthia
LMD=16-May-2 013 LMB=Par ker, Cynthia
3400926
To adjust the steering wheel:
1. Pull the lever down.
2. Move the steering whe el up
or down.
3. Pull or push the steering wheel
closer or away from you.
4. Pull the lever up to lock the
steering wheel in place.
Power Tilt and Telescoping Wheel
3400920
If eq uipped, the control is on the left
side of the steering column.
.
Push the control up or down to tilt
the steering wheel up or down.
.
Push the control forward or
rearward to move the steering
wheel toward the front or rear of
the vehicle.
Do n ot adjust the steering wheel while
driving.
To set the power tilt wheel memory
position, se e
Memory Seats 0 63.
Page 18
Cadillac CTS/CTS-V Owner Manual (GMNA-Local izi ng- U.S ./C anada2ndPrint-11254870) - 2017 - Final Review - 6/14/16
18 IN BRIEF
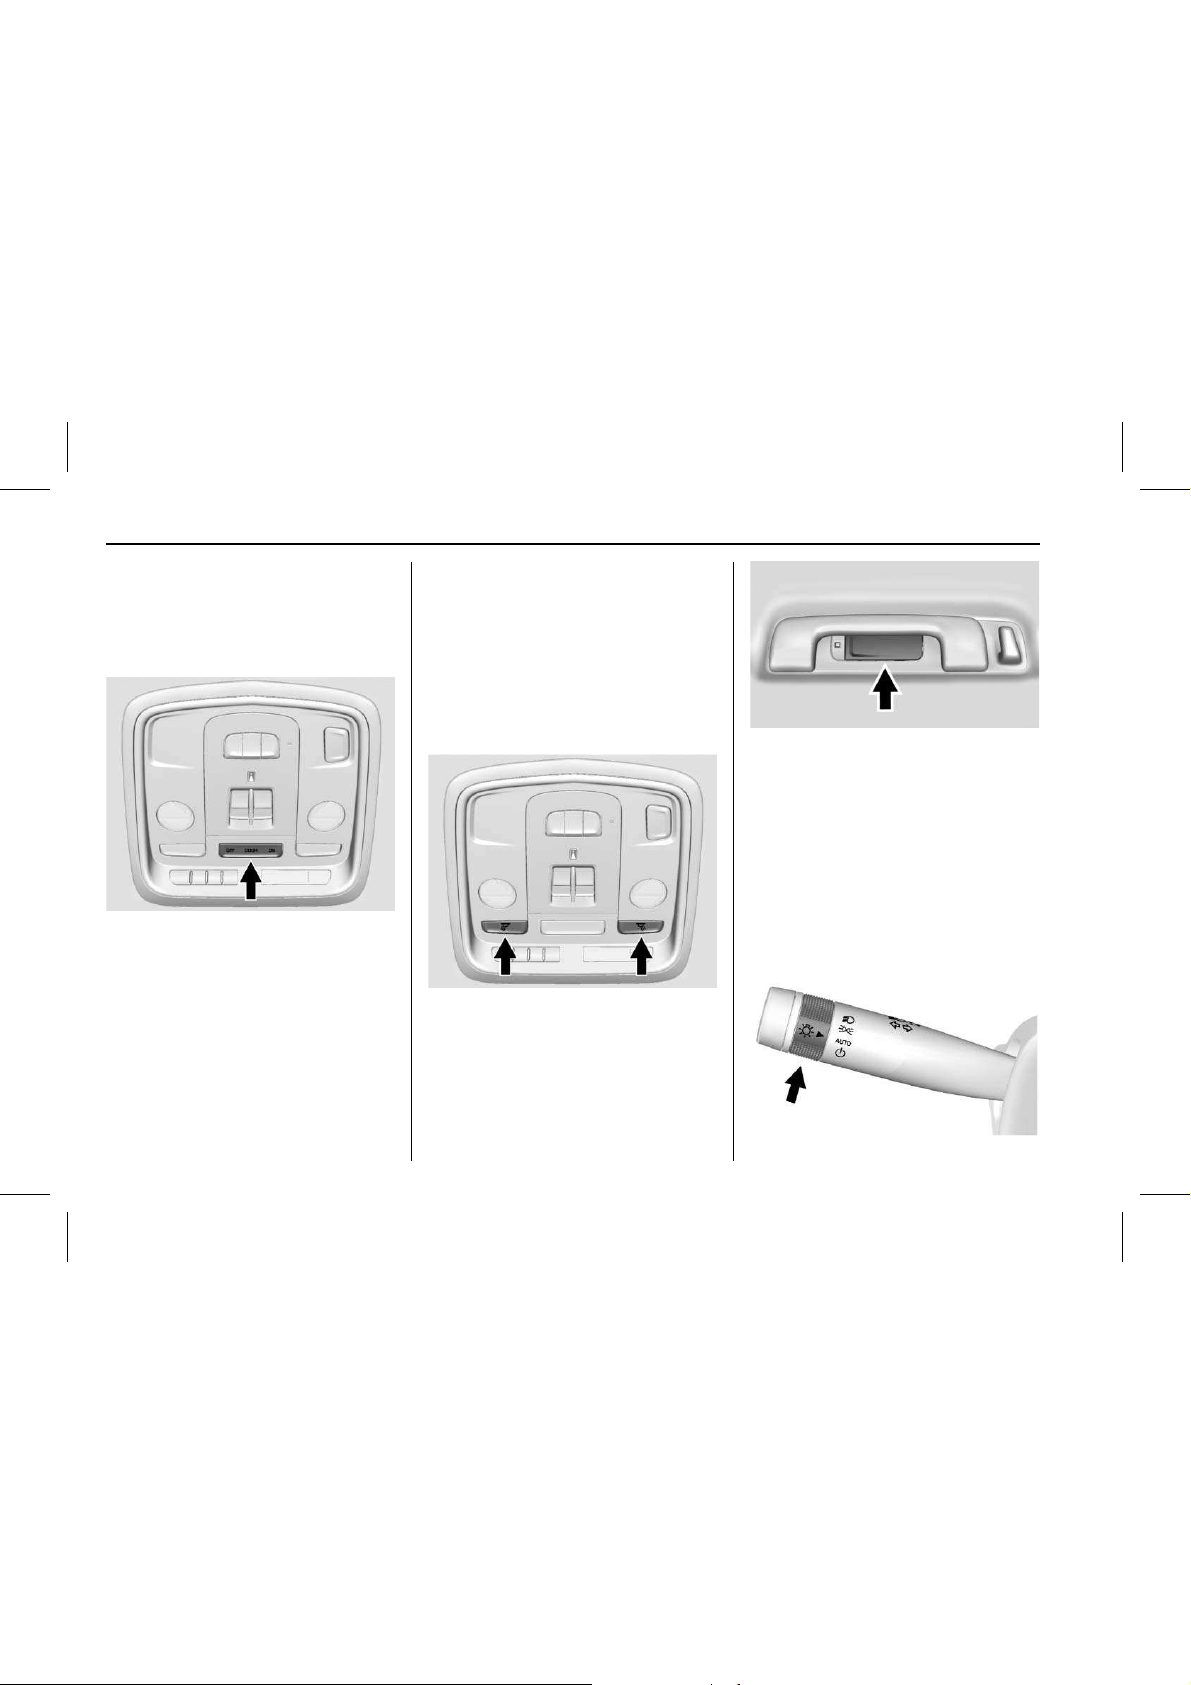
Interior Lighting
Object-ID=40 83972 Owner =Parker, Cynthia
LMD=11-Feb-2015 LMB=Parker, Cynth ia
Dome Lamp
3379338
To change the dome lamp settings,
press the following:
OFF : Turns the lamp off, even when a
door is open.
DOOR : The lamp comes on when a
door is opened.
ON : Turns the lamp on.
Reading Lamps
There are front and rear reading
lamps on the overhead console and
over the rear passenger doors. These
lamps come on when any door is
opened.
To manually turn the reading lamps
on or off:
3379339
Press m or n next to each overhead
console reading lamp.
4083265
Press the lamp lenses over the rear
passenger doors.
For more information on interior
lighting, see
Instrument Panel
Illumination Control 0 174
.
Exterior Lighting
Object-ID=32 72985 Owner =Parker, Cynthia
LMD=23-Apr-2 014 LMB=Par ker, Cynthia
2742865
Page 19
Cadillac CTS/CTS-V Owner Manual (GMNA-Local izi ng- U.S ./C anada2ndPrint-11254870) - 2017 - Final Review - 6/14/16
IN BRIEF 19
There are four positions:
O : Turns off the exterior lamps. The
knob returns to the AUTO position
after it is released. Turn to
O again to
reactivate the AUTO mode. In Canada,
the headlamps will automatically
reactivate when the vehicle is shifted
out of P (Park).
AUTO : Automatically turns the
exterior lamps on and off, depending
on outside lighting.
; : Turns on the parking lamps
including all lamps, except the
headlamps.
5 : Turns on the headlamps tog ether
with the parking lamps and
instrument panel lights.
See
Exterior Lamp Controls 0 169 and
Daytime Running Lamps (DRL) 0 172.
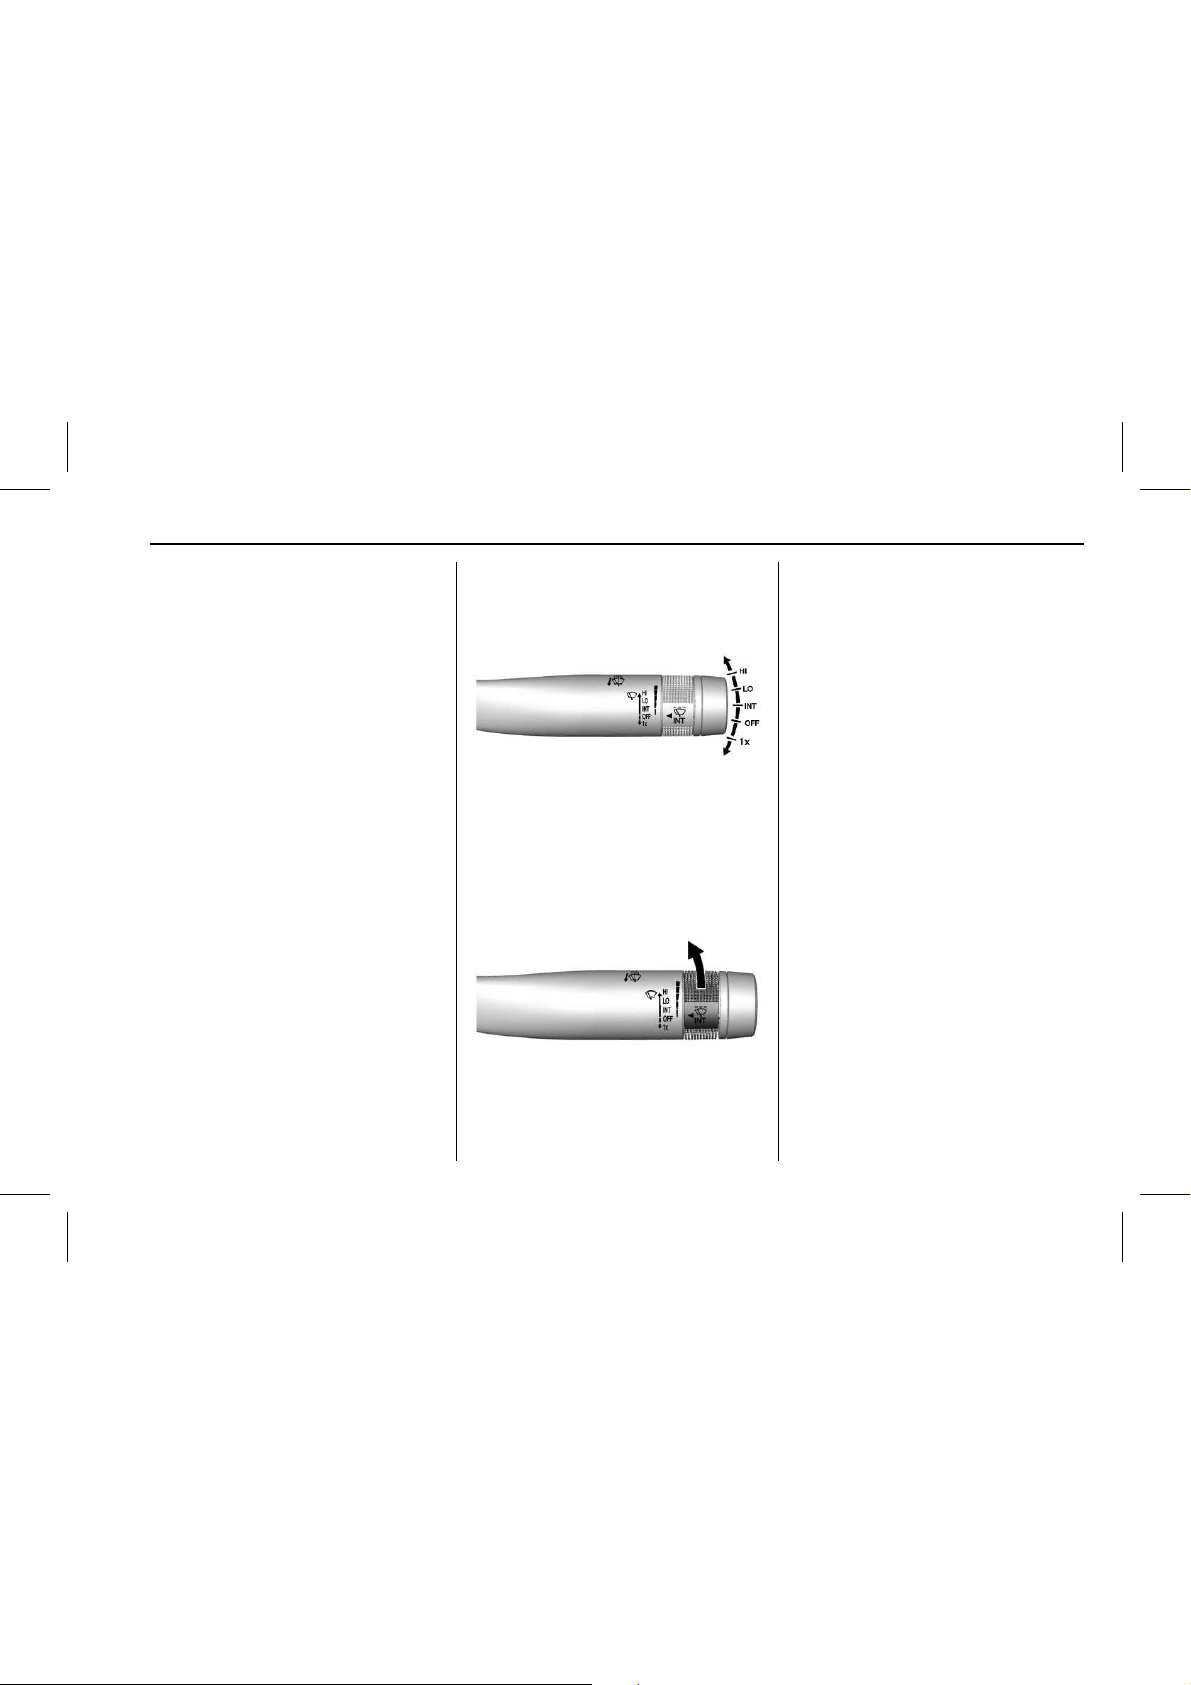
Windshield Wiper/Washer
Object-ID=32 73010 Owner =Parker, Cynthia
LMD=16-Jun-2 015 LMB=Parker, Cynthia
3272353
With the ignition in ACC/ACCESSORY
or ON/RUN/ST ART, move the lever to
select the wiper speed.
HI : Use for fast wipes.
LO : Use for slow wipes.
3272708
INT : Use this setting for intermittent
wipes or Rainsense™, if equipped. For
intermittent wipes, move the
windshield wiper lever to INT. Turn
the
x INT band up for more
frequent wipes or down for less
frequent wipes.
If eq uipped with Rainsense and the
feature is enabled in vehicle
personali zation, move the windshield
wiper lever to INT and turn the
x
INT band to adjust the sensitivity to
moisture.
.
Turn the band up for more
sensitivity to moisture.
.
Turn the band down for less
sensitivity to moisture.
.
Move the windshield w iper lever
out of the INT position to
deactivate Rainsense.
To turn the Rainsense feature on or
off, see “Rain Sense Wipers” under
Vehicle Personalization 0 158.
OFF : Use to turn the wipers off.
1X : For a single wipe, briefly move
the lever down. For several wipes, hold
the lever down.
n L : Pu ll the le ver toward you to
spray windshield washer fluid and
activate the wipers.
Page 20
Cadillac CTS/CTS-V Owner Manual (GMNA-Local izi ng- U.S ./C anada2ndPrint-11254870) - 2017 - Final Review - 6/14/16
20 IN BRIEF
See Windshield Wiper/Washer 0 113.
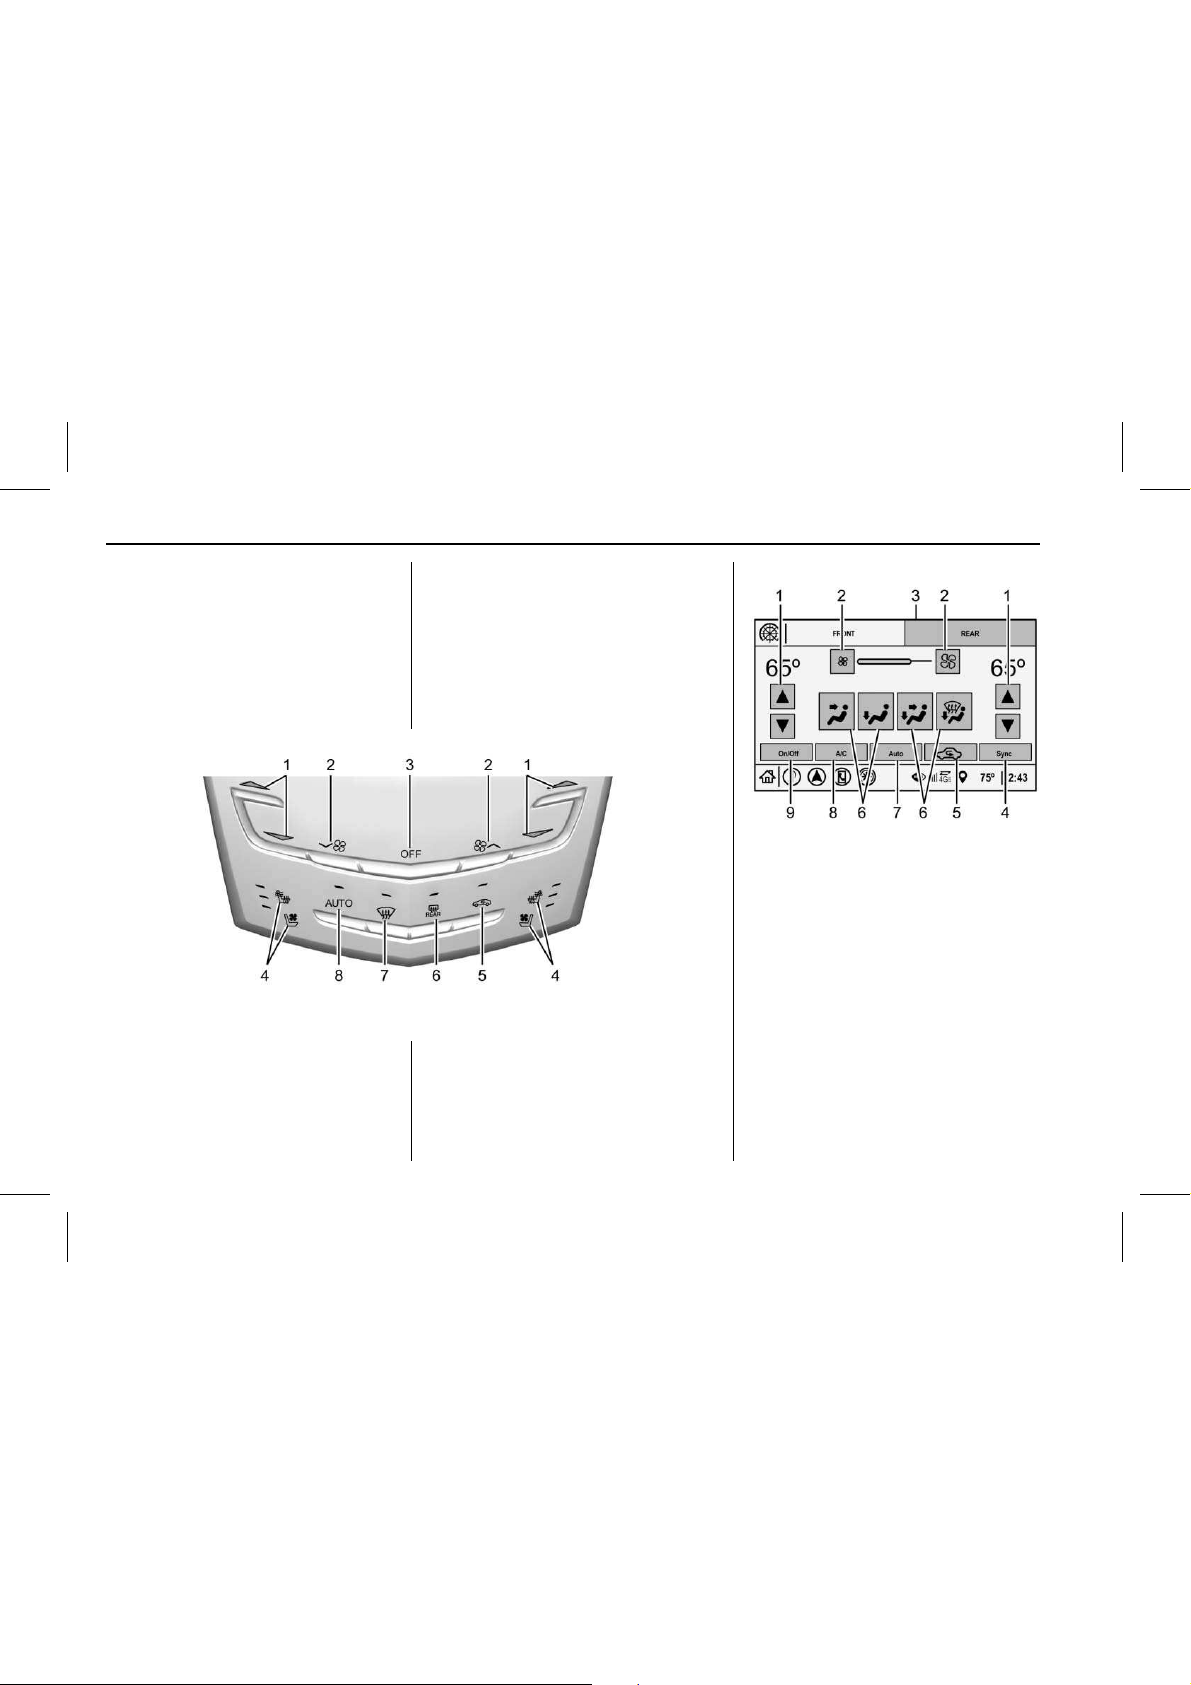
Climate Controls
Object-ID=45 35299 Owner =Parker, Cynthia
LMD=08-Jun-2 016 LMB=Parker, Cynthia
The climate control buttons and the
touch screen are used to adjust the
heating, cooling, and ventilation.
Climate Control Buttons
4003127
1. Driver and Passenger
Temperature Co ntrols
2. Fan Control
3. OFF (Fan)
4. Driver and Passenger Heated and
Ventilated Seats (If Equipped)
5. Recirculation
6. Rear Window Defogger
7. Defrost
8. AUTO (Automatic Operation)
Climate Touch Screen Controls
4535192
1. Driver and Passenger
Temperature Co ntrols
2. Fan Controls
3. Rear (Rear Climate Control
Touch Screen)
4. SYNC (Synchronized
Temperature)
5. Air Delivery Mode Control
6. Recirculation
7. Auto (Automatic Operation)
8. A/C (Air Conditioning)
Page 21

Cadillac CTS/CTS-V Owner Manual (GMNA-Local izi ng- U.S ./C anada2ndPrint-11254870) - 2017 - Final Review - 6/14/16
IN BRIEF 21
9. On/Off
See
Dual Automatic Climate Control
System 0 190
and Rear Climate Control
System 0 195
(if equipped).
Transmission
Object-ID=29 64508 Owner =Byrne, Matthew
LMD=20-Aug-2 015 LMB=Byr ne, Matthe w
Tap Shift
If eq uipped, permanent Tap Shift
Mode may be entered with the shift
lever in D (Dri ve), by pressing the
M (Manual Mode) button on the top
of t he shift lever.
Temporary Tap Shift Mode may be
entered while in D (Drive) using the
tap shift controls on the back of the
steering wheel.
See
Manual Mode 0 226.
Starting the Engine
Object-ID=23 81599 Owner =Byrne, Matthew
LMD=01-Sep-2 015 LMB=Pat chak, Roxanne
When first starting the vehicle, the
engine idle speed will be elevated to
allow the catalytic converter, an
emissions control device, to quickly
reach operating temperature. After
approxima tely 20 seconds, the engine
will begin to transition to its normal,
quieter idle speed, w hich can vary
depending on the temperature. This is
normal operation.
Vehicle Features
Infotainment System
Object-ID=45 33551 Owner =Mason, Sc ott
LMD=06-Jun-2 016 LMB=Mason, Scott
See the infotainment manual for
information on the rad io and avail able
features.
Steering Wheel Controls
Object-ID=45 33581 Owner =Mason, Sc ott
LMD=06-Jun-2 016 LMB=Mason, Scott
The infotainment system can be
operated by using the steering wheel
controls. See "Steering Wheel
Controls" in the infotainment manual.
Page 22
Cadillac CTS/CTS-V Owner Manual (GMNA-Local izi ng- U.S ./C anada2ndPrint-11254870) - 2017 - Final Review - 6/14/16
22 IN BRIEF
Cruise Control
Object-ID=36 86809 Owner =Parker, Cynthia
LMD=21-Jan-2 014 LMB=Parker, Cynthia
3287351
J : Press to turn the system on and
off. A white indicator appears in the
instrument cluster when cruise is
turned on.
+RES : If there is a se t speed in
memory, press the control up briefly
to r esume to that speed or press and
hold to accelerate. If the cruise control
is already active, use to increase
vehicle spee d. To increase speed by
1 km/h (1 mph), press +RES up to the
first detent. To increase speed to the
next 5 km/h (5 mph) mark on the
speedometer, press +RES up to the
second deten t.
SET− : Press the control down briefly
to s et the speed and activate cruise
control. If cruise cont rol is already
active, use to decrea se vehicle speed.
To decrease speed by 1 km/h (1 mph),
press SET− down to the first detent.
To decrease speed to the next 5 km/h
(5 mph ) mark on the speedometer,
press SET− down to the second detent.
* : Press to disengage cruise control
without erasing the set speed from
memory.
See
Cruise Control 0 238 or Adaptive
Cruise Control 0 240
(if equipped).
Driver Information
Center (DIC)
Object-ID=28 57585 Owner =Owens, Lynne tte
LMD=07-Oct-2 015 LMB=Cla rk, Lorien
The DIC display is in the instrument
cluster. It shows the status of many
vehicle syst ems.
2852090
y or z : Press to move up or down
in a list.
S or T : Press to move between the
interactive display zones in the
cluster. Press
S to go back to the
previous menu.
SEL : Press to open a menu or sel ect a
menu item. Press and hold to reset
values on certain scr eens.
See
Driver Information Center
(DIC) 0 140
.
Page 23

Cadillac CTS/CTS-V Owner Manual (GMNA-Local izi ng- U.S ./C anada2ndPrint-11254870) - 2017 - Final Review - 6/14/16
IN BRIEF 23
Forward Collision Alert
(FCA) System
Object-ID=27 18543 Owner =Owens, Lynne tte
LMD=07-Oct-2 015 LMB=Cla rk, Lorien
If eq uipped, FCA may help avoid or
reduce the harm caused by front-end
crashes. FCA provides a green
indicator,
V, when a veh icle is
detected ahe ad. This indicator
displays amber if you follow a vehicle
much too closely. When approaching a
vehicle ahea d too quickly, FCA
provides a flashing red alert on the
windshield and rapidly beeps or pulses
the driver seat.
See
Forwa rd Collision Alert (FCA)
System 0 257
.
Forward Automatic
Braking (FAB)
Object-ID=43 25518 Owner =Owens, Lynne tte
LMD=30-Nov-2 015 LMB=Owe ns, Lynnette
If the vehicle has Adaptive Cruise
Control (ACC), it also has FAB, which
includes Intelligent Brake Assist (IBA).
When the system detects a vehicle
ahead in your path that is traveling in
the same direction tha t you may be
about to crash into, it can provide a
boost to braking or automatically
brake the vehicle. This can help avoid
or lessen the severity of crashes when
driving in a forward gear.
See
Forwa rd Automatic Braking
(FAB) 0 259
.
Lane Keep Assist (LKA)
Object-ID=36 83613 Owner =Owens, Lynne tte
LMD=07-Oct-2 015 LMB=Cla rk, Lorien
If eq uipped, LKA may help avoid
crashes due to unintentional lane
departures. It may assist by gently
turning the steering wheel if the
vehicle approaches a detected lane
marking without using a turn signal in
that direction. It may also provide a
Lane Departure Warning (LDW) alert
as the lane marking is crossed. The
system will not assist or alert if it
detects that you are actively steering.
Override LKA by turning the steering
wheel. LKA uses a camera to detect
lane markings between 60 km/h (37
mph) and 180 km/h (112 mph).
See
Lane Departure Warning (LDW)
0 263
and Lane Keep Assist
(LKA) 0 263
.
Lane Change Alert (LCA)
Object-ID=40 16083 Owner =Owens, Lynne tte
LMD=07-Oct-2 015 LMB=Cla rk, Lorien
If eq uipped, the LCA system is a
lane-changing aid that assist s drivers
with avoiding lane change crashes
that occur with moving vehicles in the
side blind zone (or spot) areas or with
vehicles rapidly approaching these
areas from behind. The LCA warning
display will light up in the
corresponding outside side mirror and
will flash if the tur n signal is on. The
Side Blind Zone Alert (SBZA) system
is included as part of the LCA system.
See
Side Blind Zone Alert (SBZA) 0 261
and Lane Change Alert (LCA) 0 261.
Surround Vision (CTS Only)
Object-ID=45 02728 Owner =Owens, Lynne tte
LMD=26-Apr-2 016 LMB=Owe ns, Lynnette
If eq uipped, views around the vehicle
display on the center stack to aid with
parking and low-speed maneuvers.
See “Surround Vision (CTS Only)”
under
Assistance Systems for Parking
or Backing 0 250
.
Page 24

Cadillac CTS/CTS-V Owner Manual (GMNA-Local izi ng- U.S ./C anada2ndPrint-11254870) - 2017 - Final Review - 6/14/16
24 IN BRIEF
Front Vision Camera
If eq uipped, a view of the area in fron t
of t he vehicle displays on the center
stack to aid with parking and
low-speed ma neuvers.
See “Front Vision Camera” under
Assistance Systems for Parking or
Backing 0 250
.
Curb View Camera
(CTS-V Only)
Object-ID=40 87214 Owner =Owens, Lynne tte
LMD=07-Oct-2 015 LMB=Cla rk, Lorien
If eq uipped, a view of the area in fron t
of t he vehicle displays on the center
stack to aid with parking and
low-speed ma neuvers. The display
shows a front, top down view at the
top of t he screen and left and right
front camera images on the bottom.
See “Curb View Camera (CTS-V Series
Only)” under
Assistance Systems for
Parking or Backing 0 250
.
Rear Vision Camera (RVC)
Object-ID=27 18564 Owner =Owens, Lynne tte
LMD=11-Apr-2016 LM B=Owens, Lynnette
If eq uipped, RVC displays a view of
the area behind the vehicle on the
infotainment display when the vehicle
is shifted into R (Reverse) to aid with
parking and low-speed backing
maneuvers .
See
Assistance Systems for Parking or
Backing 0 250
.
Rear Cross Traffic Alert
(RCTA) System
Object-ID=37 50572 Owner =Owens, Lynne tte
LMD=08-Jun-2 016 LMB=Owens, Lynnette
If eq uipped, the RCTA system uses a
triangle with an arrow displayed on
the infotainment display to warn of
traffic behind your vehicle that may
cross your vehicle's path while in
R (Reverse). In addition, beeps w ill
sound, or the driver seat will pulse.
See
Assistance Systems for Parking or
Backing 0 250
.
Parking Assist
Object-ID=36 57650 Owner =Owens, Lynne tte
LMD=07-Oct-2 015 LMB=Cla rk, Lorien
If eq uipped, Rear Parking Assist (RPA)
uses sensors on the rear bumper to
assist with parking and avoiding
objects whil e in R (Reverse).
It operates at speeds less than 8 km/h
(5 mph ). RPA may display a warning
triangle on the Rear Vision Cam era
screen and a graphic on the
instrument cluster to provide the
object distance. In addition, multiple
beeps or seat pulses may occur if very
close to an object.
The vehicle may also have the Front
Parking Assist system.
See
Assistance Systems for Parking or
Backing 0 250
.
Automatic Parking
Assist (APA)
Object-ID=37 09582 Owner =Owens, Lynne tte
LMD=07-Oct-2 015 LMB=Cla rk, Lorien
If eq uipped, the APA system hel ps to
search for and maneuver the vehicle
into parallel or perpe ndicular parking
spots using automatic steering, DIC
Page 25
Cadillac CTS/CTS-V Owner Manual (GMNA-Local izi ng- U.S ./C anada2ndPrint-11254870) - 2017 - Final Review - 6/14/16
IN BRIEF 25
displays, and beeps. When the vehicle
speed is below 30 km/h (18 mph),
press
O to enable the system.
See “Automatic Parking Assist (APA)”
under
Assistance Systems for Parking
or Backing 0 250
.
Reverse Automatic
Braking (RAB)
Object-ID=37 50573 Owner =Owens, Lynne tte
LMD=07-Oct-2 015 LMB=Cla rk, Lorien
If the vehicle has Adaptive Cruise
Control (ACC) it also has the RAB
system, which is designed to help
avoid or reduce the harm caused by
backing crashes when the vehicle is
shifted into R (Reverse). If the system
detects the vehicle is backing too fast
to a void a crash with a detec ted object
behind your vehicle in your path, it
may automatically brake hard to
a stop.
See
Assistance Systems for Parking or
Backing 0 250
.
Vehicle-to-Vehicle
Object-ID=45 37691 Owner =Owens, Lynne tte
LMD=09-Jun-2 016 LMB=Owens, Lynnette
If eq uipped, this technology
communicates with other
Vehicle-to-Vehic le (V2V) — equipped
vehicles. It can help drivers a void
crashes and traffic congestion. V2V
technology alerts when other
V2V-equipped vehicles ahead are
braking hard, are disabl ed, or may be
on slippery roads. See
Vehicle-to-Vehic le 0 265.
Power Outlets
Object-ID=32 73157 Owner =Parker, Cynthia
LMD=08-Apr-2 016 LMB=Par ker, Cynthia
Power Outlets 12 Volt Direct Current
Accessory power outlets can be used
to p lug in electrical equipment, such
as a cell phone or MP3 player.
The vehicle has three 12-volt
accessory power outlets:
.
Inside the center console storage
in front of the armrest cover.
.
Inside the storage area und er the
armrest cover.
.
Inside the storage area on the rear
of t he center console, if equipped.
These outlets are powered while the
vehicle is in ON/RUN/START or ACC/
ACCESSORY mode, or until the driver
door is opened within 10 minutes of
turning off the vehicle.
Lift the cover to access the accessory
power outlet.
See
Power Outlet s 0 116.
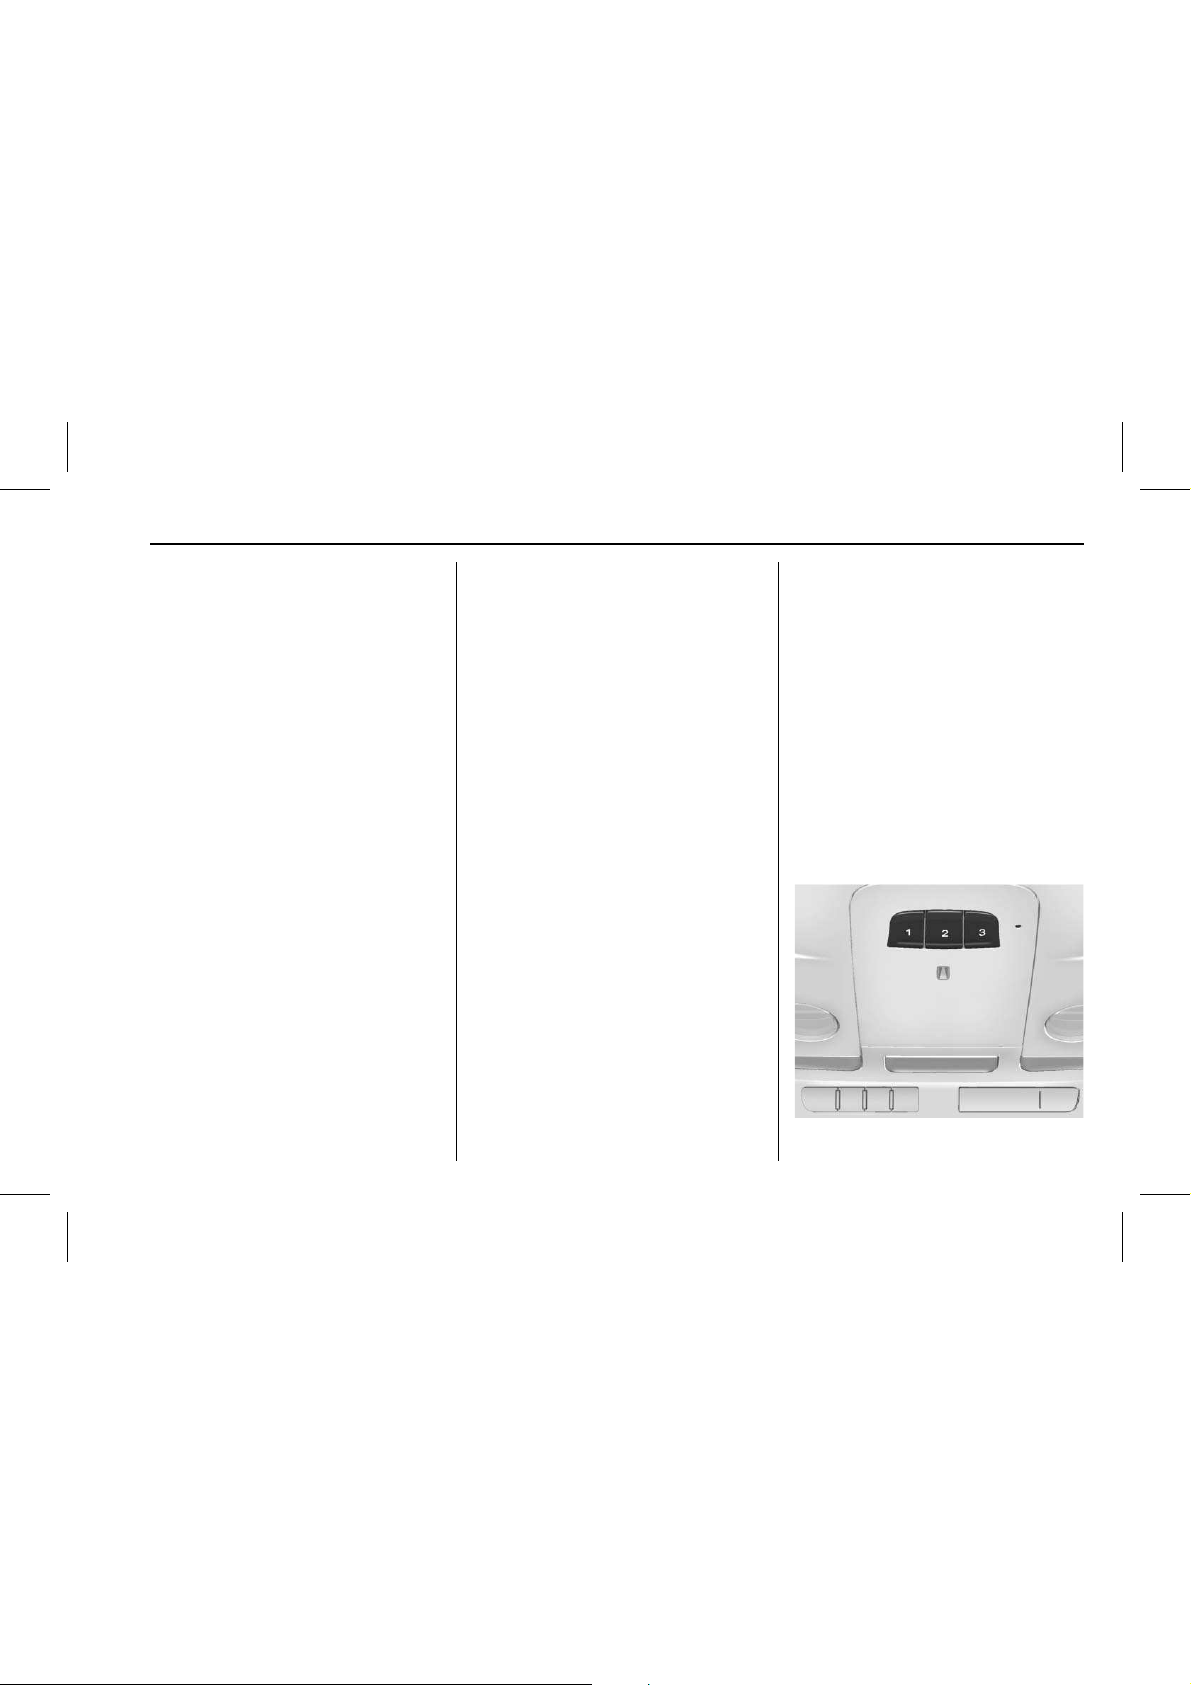
Universal Remote System
Object-ID=32 86996 Owner =Cusenza, Mark
LMD=08-Oct-2 015 LMB=Cla rk, Lorien
2718354
Page 26

Cadillac CTS/CTS-V Owner Manual (GMNA-Local izi ng- U.S ./C anada2ndPrint-11254870) - 2017 - Final Review - 6/14/16
26 IN BRIEF
If eq uipped, this system provides a
way to replace up to three remote
control transmitters used to activate
devices such as garage door openers,
security systems, and home
automation devices.
Read the instructions completely
before attempting to program the
Universal Remote system. Because of
the steps involved, it may be helpful
to h ave another person available to
assist you with programming the
Universal Remote system.
See
Universal Remo te System 0 163.
Sunroof
Object-ID=43 79257 Owner =Perkins, Frank
LMD=10-Feb-2 016 LMB=Perkins, Fran k
If eq uipped, the sunroof will only
operate when the ignition is in ON/
RUN or ACC/ACCESSORY, or when
Retained Accessory Power (RAP) is
active. See
Retained Accessory Power
(RAP) 0 219
.
2916816
The driver side switch (1) operates the
sunroof.
Vent : Press and release
~ (1) to
vent the sunroof. The sunshade will
automatically open approxi mately
38 cm (1 5 in). Pr ess and ho ld
g (1)
to c lose the sunroof vent.
Express-Open/Exp ress-Close : With
the sunroof in the vent position, press
~ (1) a second time to express-open
the sunroof. Press
g (1) to
express-c lose the sunroof. To stop the
sunroof partway, press the switch
again.
The passenger side switch
Q (2)
operates the sunshade. Press and
release
Q (2) to express-open or
express-c lose the sunshade. To stop
the sunshade partway, press the
switch again.
See
Sunroof 0 55.
Page 27
Cadillac CTS/CTS-V Owner Manual (GMNA-Local izi ng- U.S ./C anada2ndPrint-11254870) - 2017 - Final Review - 6/14/16
IN BRIEF 27
Performance and
Maintenance
Traction Control/Electronic
Stability Control
Object-ID=44 51466 Owner =Garcia, S i d
LMD=10-Mar-2 016 LMB=Ga rcia, Sid
The Traction Control System (TCS)
limits wheel spin. The sy stem turns
on automatically every time the
vehicle is started.
StabiliTrak assists with directional
control of the vehicle in difficult
driving conditions. The syste m turns
on automatically every time the
vehicle is started.
.
To turn off TCS, press and release
Y on the center console. i
illuminates in the instrument
cluster. The appropriate DIC
message is displayed. See
Ride
Control System Messages 0 154
.
.
Press
Y again to turn traction
control back on.
.
To turn off both TCS and
StabiliTrak, press and hold
Y on
the center console until
g a nd i
illuminate i n the ins trument
cluster. The appropriate DIC
message displays. See
Ride Control
System Messages 0 154
.
.
Press
Y again to turn on bo th
systems.
See
Traction Control/Electronic Stabil ity
Control 0 230
.
The vehicle has Drive r Mode Control
and may have Competitive Driving
Mode. See
Driver Mode Control 0 231
and Competitive Driving Mode 0 235.
Tire Pressure Monitor
Object-ID=22 33928 Owner =Rosekrans, Dee
LMD=02-Jul-2 012 LMB=Ro cha, Wendy
This vehicle may have a Tire Pressure
Monitor System (TPMS).
1970731
The low tire pressure warning light
alerts to a significant loss in pressure
of one of the vehicle's tires. If the
warning light comes on, stop as soon
as possible and inflate the tires to the
recommended pressure shown on the
Tire and Loading Information label.
See
Vehicle Load Limits 0 211. Th e
warning light will remain on until the
tire pressure is correcte d.
The low tire pressure warning light
may come on in coo l weather when
the vehicle is first started, and then
turn off as the vehicle is driven. This
may be an early indicator that the tire
pressures are getting low and the tires
need to be inflated t o the proper
pressure.
The TPMS does not replace normal
monthly tire maintenance. Maintain
the correct tire pressures.
Page 28
Cadillac CTS/CTS-V Owner Manual (GMNA-Local izi ng- U.S ./C anada2ndPrint-11254870) - 2017 - Final Review - 6/14/16
28 IN BRIEF
See Tire Pressure Monitor
System 0 327
.
Fuel (LGX 3.6L V6 Engine)
Object-ID=41 97283 Owner =Dobson, Bert
LMD=14-Sep-2 015 LMB=Dob son, Bert
4196741
Regular Fuel
Use only unleaded gas oline rated
87 octane or higher in your vehicle.
Do n ot use gasoline with an octane
rating lower as it may r esult in vehicle
damage and lower fue l ec onomy. See
Fuel 0 2 67.
Fuel (LTG 2.0L L4 Engine)
Object-ID=42 13320 Owner =Dobson, Bert
LMD=11-Jun-2015 LMB=Dobson, Bert
4196747
Premium Recommended Fuel
Use premium 93 octane unleaded
gasoline in your vehicle. Unleaded
gasoline with an octa ne rating as low
as 87 may be used, but it will reduce
performance and fuel economy. See
Fuel 0 2 67.
Fuel (LF3 3.6L V6 Twin
Turbo and LT4 6.2L
V8 Engines)
Object-ID=42 13323 Owner =Dobson, Bert
LMD=10-Jul-2 015 LMB=Do bson, Bert
4196752
Premium Required Fuel
Use premium 93 octane unleaded
gasoline in your vehicle. Unleaded
gasoline with a 91 octane rating may
be used, but it will reduce
performance and fuel economy. See
Fuel 0 2 67.
Page 29
Cadillac CTS/CTS-V Owner Manual (GMNA-Local izi ng- U.S ./C anada2ndPrint-11254870) - 2017 - Final Review - 6/14/16
IN BRIEF 29
E85 or FlexFuel
Object-ID=42 13327 Owner =Dobson, Bert
LMD=12-Jun-2 015 LMB=Dobson, Bert
4196777
No E85 or FlexFuel
Gasoline-ethanol fuel ble nds greater
than E15 (15% ethanol by volume),
such as E85, cannot be used in this
vehicle.
Engine Oil Life System
Object-ID=32 18140 Owner =Dobson, Bert
LMD=20-Jul-2 015 LMB=Do bson, Bert
The engine oil life system calculates
engine oil life based on vehicle use
and displays the CHANGE ENGINE
OIL SOON message when it is time to
change the engine oil and filter. The
oil life system should be reset to 100%
only following an oil change.
Resetting the Oil Life System
1. Using the DIC buttons, display
REMAINING OIL LIFE on the
DIC. See
Driver Information Center
(DIC) 0 140
and Engine Oil
Messages 0 149
.
2. Press and hold SEL to clear the
CHANGE ENGINE OIL SOON
message and reset the oil life
at 1 00%.
Be c areful not to reset the oil life
display accide ntally at any time
other than after the oil is
changed. It cannot be reset
accuratel y un til the next oil
change.
The oil life system can also be reset as
follows:
1. Turn the ignition on with the
engine off.
2. Fully press and release the
accelerat or pedal three times
within five seconds.
If the CHANGE ENGINE OIL
SOON message is not on, the
system is reset.
See
Engine Oil Life System 0 291.
Car Wash Guidelines
Object-ID=40 83692 Owner =Perkins, Frank
LMD=07-Oct-2 015 LMB=Per kins, Fra n k
Caution
Object-ID=42 15338 LMD=1 8-Jun-2015
Some automat ic car washes can
cause damage to the vehicle, wheels
and ground effects. Automatic car
washes are not recommended, due
to l ack of clearance for the
undercarr iage and/or wide rear tires
and wheels. See "Washing the
Vehicle" under Exterior Care 0 353.
Driving for Better Fuel
Economy
Object-ID=22 33932 Owner =Perkins, Frank
LMD=22-Sep-2 015 LMB=Per kins, Fran k
Driving habits can affect fuel mileage.
Here are some driving tips to get the
best fuel economy possible.
.
Avoid fast starts and accelerate
smoothly.
.
Brake gradually and avoid abrupt
stops.
Page 30

Cadillac CTS/CTS-V Owner Manual (GMNA-Local izi ng- U.S ./C anada2ndPrint-11254870) - 2017 - Final Review - 6/14/16
30 IN BRIEF
.
Avoid idling the engine for long
periods of time.
.
When road and weather
conditions are appropriate, use
cruise control.
.
Always follow posted speed l imits
or drive more slowly when
conditions require.
.
Keep vehicle tires properly
inflated.
.
Combine several trips into a
single trip.
.
Replace the vehicle's tires with the
same TPC Spec number molded
into the tire's sidewall near
the size.
.
Follow recommended scheduled
maintenance.
Roadside Service (US/CAN)
Object-ID=29 15198 Owner =Smith, Ja mes
LMD=09-Jun-2 016 LMB=Clark, Lorien
U.S.: 1-800-224-1400
Canada: 1-800-882-1112
TTY Users (U.S. Only): 1-888-889-2438
New Cadillac owners are automatically
enrolled in the Roadside Service
Program.
See
Roadside Service (US/CAN) 0 388
or Roadside Service (MEXICO) 0 390.
Roadside Service (MEXICO)
Object-ID=29 15199 Owner =Smith, Ja mes
LMD=09-Jun-2 016 LMB=Clark, Lorien
Call 01-800-466-0805.
New Cadillac owners are automatically
enrolled in the Roadside Service
Program.
See
Roadside Service (US/CAN) 0 388
or Roadside Service (MEXICO) 0 390.
Page 31

Cadillac CTS/CTS-V Owner Manual (GMNA-Local izi ng- U.S ./C anada2ndPrint-11254870) - 2017 - Final Review - 6/14/16
KEYS, DOORS, AND WINDOWS 31
Keys, Doors, and
Windows
Keys and Locks
Keys . . . . . . . . . . . . . . . . . . . . . . . . . . . . . . . . 31
Remote Keyless Entry (RKE)
System . . . . . . . . . . . . . . . . . . . . . . . . . . . . 32
Remote Keyless Entry (RKE)
System Operation . . . . . . . . . . . . . . . . 32
Remote Vehicle Start . . . . . . . . . . . . . . 38
Door Locks . . . . . . . . . . . . . . . . . . . . . . . . . 40
Power Door Locks . . . . . . . . . . . . . . . . . 42
Delayed Locking . . . . . . . . . . . . . . . . . . . 42
Automatic Door Locks . . . . . . . . . . . . 42
Lockout Protection . . . . . . . . . . . . . . . . 43
Safety Locks . . . . . . . . . . . . . . . . . . . . . . . . 43
Doors
Trunk . . . . . . . . . . . . . . . . . . . . . . . . . . . . . . . 44
Vehicle Security
Vehicle Security . . . . . . . . . . . . . . . . . . . . 46
Vehicle Alarm System . . . . . . . . . . . . . 46
Immobilizer . . . . . . . . . . . . . . . . . . . . . . . . 47
Immobilizer Operation . . . . . . . . . . . . 47
Exterior Mirrors
Convex Mirrors . . . . . . . . . . . . . . . . . . . . 48
Manual Mirrors . . . . . . . . . . . . . . . . . . . . 49
Power Mirrors . . . . . . . . . . . . . . . . . . . . . . 49
Folding Mirrors . . . . . . . . . . . . . . . . . . . . 49
Heated Mirro rs . . . . . . . . . . . . . . . . . . . . . 49
Automatic Dimming Mirror . . . . . . . 49
Reverse Tilt Mirrors . . . . . . . . . . . . . . . 50
Interior Mirrors
Interior Rearview Mirrors . . . . . . . . . 50
Automatic Dimming Rearview
Mirror . . . . . . . . . . . . . . . . . . . . . . . . . . . . . 50
Rear Camera Mirror . . . . . . . . . . . . . . . 50
Windows
Windows . . . . . . . . . . . . . . . . . . . . . . . . . . . 52
Power Windows . . . . . . . . . . . . . . . . . . . . 52
Sun Visors . . . . . . . . . . . . . . . . . . . . . . . . . . 54
Rear Window Sunshade . . . . . . . . . . . 55
Roof
Sunroof . . . . . . . . . . . . . . . . . . . . . . . . . . . . . 55
Keys and Locks
Keys
Object-ID=45 02522 Owner =Szydlowski, Corinna
LMD=26-Apr-2 016 LMB=Szy dlowski, C orinna
{
Warning
Object-ID=27 16351 LMD=2 2-Nov-2011
Leaving children in a vehicle with a
Remote Keyless Entry (RKE)
transmitter is dangerous and
children or others could be
seriously injured or killed. They
could operate the power windows
or other controls or make the
vehicle move . The windows will
function with the RKE transmitter
in the vehicle, and children or
others could be caught in the path
of a closing window. Do not leave
children in a v ehicle with an RKE
transmitter.
Page 32

Cadillac CTS/CTS-V Owner Manual (GMNA-Local izi ng- U.S ./C anada2ndPrint-11254870) - 2017 - Final Review - 6/14/16
32 KEYS, DOORS, AND WINDOWS
1968737
2919924
This key, inside the Remote Keyless
Entry (RKE) transmitter, is used for
the driver door, rear folding seats and
rear seat pass-throu gh door.
To remove the key, press the button
on the side of the tr ansmitter near the
bottom, and pull the key out. Never
pull the key out without pressing the
button.
See your dealer if a new key is needed.
Contact Roadside Service if locked out
of t he vehicle. See
Roadside Service
(US/CAN) 0 388
or Roadside Service
(MEXICO) 0 390
.
With an active OnStar subscription, an
OnStar Advisor may remotely unlock
the vehicle. See
OnStar Overview
(MEXICO) 0 402
or OnStar Overview
(US/CAN) 0 401
.
Remote Keyless Entry
(RKE) System
Object-ID=35 81119 Owner= Szydlowski, Corinna
LMD=02-Feb-2 016 LMB=Szydlowski, Corinna
See
Radio Frequency Statement (US/
CAN) 0 397
or Radio Frequency
Statement (M EXICO1) 0 397
or Radio
Frequency Statement (MEXICO) 0 397
.
If there is a decrease in the Remote
Keyless Entry (RKE) operating rang e:
.
Check the distance. T he
transmitt er may be too far from
the vehicle.
.
Check the location. O ther vehicles
or objects may be blocking the
signal.
.
Check the transmitter's battery.
See “Battery Replacement” later in
this section.
.
If the transmitter is still not
working correctly, see your dealer
or a qualified technician for
service.
Remote Keyless Entry
(RKE) System Operation
Object-ID=43 75484 Owner =Szydlowski, Corinna
LMD=27-Apr-2 016 LMB=Szy dlowski, C orinna
The Keyless Access sy stem allows for
vehicle entry when the transmitter is
within 1 m (3 ft). Se e “Keyless Access
Operation” later in this section.
The RKE transmitter may work up to
60 m (197 ft) away from the vehicle.
Page 33

Cadillac CTS/CTS-V Owner Manual (GMNA-Local izi ng- U.S ./C anada2ndPrint-11254870) - 2017 - Final Review - 6/14/16
KEYS, DOORS, AND WINDOWS 33
Keep in mind that other conditions,
such as those previou sly stated, can
impact the performance of the
transmitt er.
2918226
Q : Press to lock all doors. The turn
signal indicators may flash and/or the
horn may sound on the second press
to i ndicate locking. See
Vehicle
Personaliz ation 0 158
.
If the driver door is open when
Q is
pressed and enabled through vehicle
personali zation, all doors will lock and
then the driver door will immediately
unlock. See
Vehicle Personalization
0 158
. If the passenger door is open
when
Q is pressed, all doors lock.
Pressing
Q may also arm the alarm
system. See
Vehicle Alarm Sys tem 0 46.
Pressing
Q lock will also lock the
fuel door.
K : Press to unlock the driver door.
Press again within five seconds to
unlock all doors. The RKE transmitter
can be programmed to unlock all
doors on the first button press. See
Vehicle Personalization 0 158. When
remotely unlocking the vehicle at
night, the headlamps and back-up
lamps will come on for about
30 seconds to light your approac h to
the vehicle. The turn signal indicators
may flash to indicate unlocking.
Pressing K will disarm the alarm
system. See
Vehicle Alarm Sys tem 0 46.
Press and hold
K until the windows
fully open. Windows will not operate
unless remote window operation is
enabled. See
Vehicle
Personaliz ation 0 158
.
Pressing K lock will also unlock the
fuel door.
/ : Press and release Q and then
immediately press and hold
/ for at
least four seconds to start the engine
from outside the vehicle using the
RKE transmitter. See
Remote Vehicle
Start 0 38
.
7 : Press and release one time to
initiate vehicle locator. The exterior
lamps flash and the h orn c hirps three
times. Press and hold
7 for more
than three seconds to sound the panic
alarm. The horn sounds and the turn
signal lamps flash for 30 seconds,
or until
7 is pressed again or the
vehicle is started.
X : Press twice quickly to release the
trunk.
Keyless Access Operation
The Keyless Access sy stem lets you
lock and unlock the doors and access
the trunk without remo ving the RKE
transmitt er from your pocket, purse,
briefcase, etc. The RK E transmitter
must be within 1 m (3 ft) of the door
Page 34

Cadillac CTS/CTS-V Owner Manual (GMNA-Local izi ng- U.S ./C anada2ndPrint-11254870) - 2017 - Final Review - 6/14/16
34 KEYS, DOORS, AND WINDOWS
being opened. If equipped, there will
be a button on the outside door
handles.
The Keyless Access sy stem can be
programmed to unlock al l doors on
the first lock/unlock press from the
driver door. See
Vehicle
Personaliz ation 0 158
.
Keyless Unlocking/Locking from the
Driver Door
When the doors are locked and the
RKE transmitter is within 1 m (3 ft) of
the door handle, pressing the lock/
unlock button on the driver door
handle will unlock the driver door.
If the lock/unlock button is pressed
again within five seco nds, all
passenger doors wil l unlock.
Driver Door Shown, Passenger Similar
2578630
Pressing the lock/unlock button will
cause all doors to lock if a ny of the
following occur:
.
It has been more than five seconds
since the first lock/unlock button
press.
.
Two lock/unlock button presses
were used to unlock all doors.
.
Any vehicle door has open ed an d
all doors are now c losed.
Keyless Unlocking/Locking from the
Passenger Doors
When the doors are locked and the
RKE transmitter is within 1 m (3 ft) of
the door handle, pressing the lock/
unlock button on a passenger door
handle will unlock all doors. Pressing
the lock/unlock button will cause all
doors to lock if any of the following
occur:
.
The lock/unlock button was used
to u nlock all doors.
.
Any vehicle door has open ed an d
all doors are now c losed.
Passive Locking
The Keyless Access sy stem will lock
the vehicle several seconds after all
doors are closed if the vehicle is off
and at least one transmitter has bee n
removed or none remain in the
vehicle.
The fuel door will also lock at
this time.
If ot her electronic devices interfere
with the RKE transmitter signal, the
vehicle may not detect the RKE
transmitt er inside the vehicle.
Page 35

Cadillac CTS/CTS-V Owner Manual (GMNA-Local izi ng- U.S ./C anada2ndPrint-11254870) - 2017 - Final Review - 6/14/16
KEYS, DOORS, AND WINDOWS 35
If passive locking is enabled, the doors
may lock with the RKE transmitt er
inside the vehicle. Do not leave the
RKE transmitter in an unattended
vehicle.
To customize the doors to
automatically lock when exiting the
vehicle, see
Vehicle
Personaliz ation 0 158
.
Temporary Disable of Passive
Locking Feature
Temporarily disable the passive
locking by pressing an d holding
K on
the interior door switch with a door
open for at least f our seconds, or until
three chimes are heard. Pass ive
locking will then rem ain disabled until
Q on the int erior door is pressed,
or until the vehicle is turned on.
Remote Left In Vehicle Alert
When the vehicle is turned off and a
remote is left in the vehicle, the horn
will chirp three times aft er all doors
are closed. To turn on or of f see
Vehicle Personalization 0 158.
Remote No Longer In Vehicle Alert
If the vehicle is on, with a door open,
and then all doors are closed, the
vehicle will check for RKE
transmitt er(s) inside. If an RKE
transmitt er is not detected, the DIC
will display NO REMOTE DETECTED
and the horn w ill chirp three times.
This occurs only once each time the
vehicle is driven. See
Vehicle
Personaliz ation 0 158
.
Keyless Trunk Opening
Press the touch pad on the rear of the
trunk above the license p late if the
RKE transmitter is within 1 m (3 ft).
Key Access
To access a vehicle with a weak
transmitt er battery, see
Door
Locks 0 40
.
Programming Transmitters to
the Vehicle
Only RKE transmitters programmed to
the vehicle will work . If a transmitter
is lost or stolen, a replacement can be
purchased and programmed through
your dealer. The vehicle can be
reprogrammed so that lost or stolen
transmitt ers no longer work. Each
vehicle can have up to eight
transmitt ers matched to it.
Programming with Recognized
Transmitters
A new transmitter can be programmed
to t he vehicle when there are two
recognized transmitters.
To program, the vehicle must be off
and all transmitters, both currently
recognized and new, must be
with you.
1. Remove the vehicle key from the
recognized transmitter.
2. Place the two recognized
transmitt er(s) in the cupholder.
3. Remove the key lock cylinder cap
on the driver door handle. See
Door Locks 0 40. Insert the
vehicle key into the key lock
cylinder on the driver door
handle, then turn the key
counterclockwise to the unlock
position five times within
10 seconds.
Page 36

Cadillac CTS/CTS-V Owner Manual (GMNA-Local izi ng- U.S ./C anada2ndPrint-11254870) - 2017 - Final Review - 6/14/16
36 KEYS, DOORS, AND WINDOWS
The Driver Information Center
(DIC) displays READY FOR
REMOTE #2, 3, 4, ETC.
2918184
4. Open the center consol e, remove
the rubber mat, and place the
new transmitter in the
transmitt er pocket.
5. Press ENGINE START/STOP.
When the transmitter is learned,
the DIC display will show that it
is ready to program the next
transmitt er.
6. Remove the transmitter from the
transmitt er pocket and press
K
or Q on the transmitter.
To program additional
transmitt ers, repeat Steps 4–6.
When all additional transmitters
are programmed, press and hold
ENGINE START /STOP for
approxima tely 12 seconds to exit
programming mode.
7. Return the vehicle key back into
the transmitter.
Programming without Recognized
Transmitters
If two cu rrently recognized
transmitt ers are not available, follow
this procedure to program up to eight
transmitt ers. This feature is not
available in Canada. This procedure
will take approximately 30 minutes to
complete. The vehicle must be off and
all transmitters to be programmed
must be with you.
1. Remove the vehicle key from the
transmitt er.
2. Remove the key lock cylinder cap
on the driver door handle. See
Door Locks 0 40. Insert the
vehicle key into the key lock
cylinder on the driver door
handle, then turn the key
counterclockwise to the unlock
position five times within
10 seconds.
The Driver Information Center
(DIC) displays REMOTE LEARN
PENDING, PLEASE WAIT.
3. Wait for 10 minutes until the
DIC displays PRESS ENGINE
START BUTTON TO LEARN and
then press ENGINE
START/STOP.
The DIC display will again show
REMOTE LEARN PENDING,
PLEASE WAIT.
4. Repeat Step 3 two additional
times. After the thi rd time all
previously kn own transmitters
will no longer work with the
vehicle. Remaining transmi tters
can be relearned during the next
steps.
The DIC display should now
show READY FOR REMOTE # 1.
Page 37

Cadillac CTS/CTS-V Owner Manual (GMNA-Local izi ng- U.S ./C anada2ndPrint-11254870) - 2017 - Final Review - 6/14/16
KEYS, DOORS, AND WINDOWS 37
2918184
5. Open the center consol e, remove
the rubber mat, and place the
new transmitter in the
transmitt er pocket.
6. Press ENGINE START/STOP.
When the transmitter is learned,
the DIC display will show that it
is ready to program the next
transmitt er.
7. Remove the transmitter from the
transmitt er pocket and press
K
or Q on the tran smitter.
To program additional
transmitt ers, repeat Steps 5–7.
When all additional transmitters
are programmed, press and hold
ENGINE START /STOP for
approxima tely 12 seconds to exit
programming mode.
8. Return the vehicle key back into
the transmitter.
Starting the Vehicle with a Low
Transmitter Battery
If the transmitter battery is weak or if
there is interference with the signal,
the DIC may display NO REMOTE
DETECTED or NO REMOTE KEY WAS
DETECTED PLACE KEY IN
TRANSMITTER POCKET THEN
START YOUR VEHICLE wh en starting
the vehicle. See
Key and Lock
Messages 0 150
.
To start the vehicle :
2918184
1. Open the center consol e, remove
the rubber mat, and place the
new transmitter in the
transmitt er pocket.
2. With the vehicle in P (Park) or
N (Neutral) press the brake pedal
and ENGINE START/STOP.
Replace the transmitter battery
as soon as possible.
Page 38

Cadillac CTS/CTS-V Owner Manual (GMNA-Local izi ng- U.S ./C anada2ndPrint-11254870) - 2017 - Final Review - 6/14/16
38 KEYS, DOORS, AND WINDOWS
Battery Replacement
Caution
Object-ID=28 97615 LMD=2 0-Aug-2012
When replacing the battery, do not
touch any of the circuitry on the
transmitter. Static from your body
could damage the transmitter.
Replace the battery if the REPLACE
BATTERY IN REMOTE KEY message
displays in the DIC.
2919924
1. Press the button on the side of
the transmitter near the bottom
and pull the key out.
3712408
2. Separate the two halves of the
transmitt er using a flat tool
inserted into the bottom center
of t he transmitter. D o not use
the key slot.
3270865
3. Remove the old battery. Do not
use a metal object.
4. Insert the new battery on the
back housing, positive side facing
down. Replace with a CR2032 or
equivalent ba ttery.
5. Align the front and back housing,
then snap the transmi tter
together.
Remote Vehicle Start
Object-ID=38 26338 Owner =Szydlowski, Corinna
LMD=06-Apr-2 016 LMB=Szy dlowski, C orinna
This feature allows the engine to be
started from outside the vehicle.
Page 39

Cadillac CTS/CTS-V Owner Manual (GMNA-Local izi ng- U.S ./C anada2ndPrint-11254870) - 2017 - Final Review - 6/14/16
KEYS, DOORS, AND WINDOWS 39
/ : This button will be on the RKE
transmitt er if the veh icle has remote
start.
The climate control system will use
the previous settings during a remote
start. The rear window defogger may
come on during remote start based on
cold ambient conditions. The rear
defog indicat or light does not come on
during remote start.
If eq uipped, the heated and ventilated
front seats may also come on when
the vehicle personalization setting is
enabled. See
Heated and Ventilated
Front Seats 0 6 5
.
Laws in some local communities may
restrict the use of remote starters. For
example, some laws may require a
person using remote start to have the
vehicle in view. Check local
regulations for any require ments.
If your vehicle is low on fuel, do not
use the remote start feature. The
vehicle may run out of fuel.
The RKE transmitter range may be
shorter while the vehicle is running.
Other conditions can a ffect the
performance of the transmitter. Se e
Remote Keyle ss Entry (RKE)
System 0 32
.
Starting the Engine Using Remote
Start
1. Press and release
Q on the RKE
transmitt er.
2. Immediately press and hold
/
for at least four seconds or until
the turn signal lamps flash. This
confirms the request t o remote
start the vehicle has been
received.
During the remote star t, the
parking lamps will remain o n as
long as the engine is running.
The engine will shut off after
10 minutes unless a time
extension is done or the ignition
is put in ON/RUN.
3. Press the brake pedal and select
the ON/RUN ignition mode to
drive the vehicle.
Extending Engine Run Time
The engine run time can also be
extended by another 10 minutes,
if during the first 10 minutes Steps 1–
2 are repeated while the engine is still
running. An extension can be
requested, 30 seconds after starting.
This provides a total of 20 minutes.
The remote start can only be
extended once.
When the remote start is extended,
the second 10 minute period is added
on to the first 10 minutes for a total
of 2 0 minutes.
A maximum of two remote starts, or a
remote start with an extension, are
allowed between ignition cycles.
Then the ignition must be changed to
ON/RUN and then back to OFF before
the remote start procedure can be
used again.
Canceling a Remote Start
To cancel a remote start, do any of
the following:
.
Press and hold
/ until the
parking lamps turn off.
Page 40

Cadillac CTS/CTS-V Owner Manual (GMNA-Local izi ng- U.S ./C anada2ndPrint-11254870) - 2017 - Final Review - 6/14/16
40 KEYS, DOORS, AND WINDOWS
.
Turn on the hazard warning
flashers.
.
Turn the vehicle on and then
back off.
Conditions in Which Remote Start
Will Not Work
The remote start will not operate if
any of th e following occur:
.
The ignition is in any mode other
than off.
.
A transmitter is in the vehicle.
.
The hood is not closed.
.
The hazard warning flashers
are on.
.
There is an emission control
system malfunction.
.
The engine coolant temperature is
too high.
.
The oil pressure is low.
.
Two remote vehicle sta rts have
already been used.
.
The vehicle is not in P (Par k).
Door Locks
Object-ID=41 63331 Owner =Szydlowski, Corinna
LMD=27-Apr-2 016 LMB=Szy dlowski, C orinna
{
Warning
Object-ID=22 18092 LMD=0 6-Jan-2015
Unlocked doors can be dangerous.
.
Passengers, especially
children, can easily open the
doors and fall out of a moving
vehicle. The chance of being
thrown out of the vehicle in a
crash is increased if the doors
are not locked. So, all
passengers should wear safety
belts properly and the doors
should be locked whenever
the vehicle is driven .
.
Young children who get into
unlocked vehicles may be
unable to get out. A child can
be overcome by extreme heat
and can suffer permane nt
injuries or even death from
heat stroke. Always lock the
vehicle when ever leaving it.
(Continued)
Warning (Continued)
Object-ID=22 18092 LMD=0 6-Jan-2015
.
Outsiders can easily enter
through an unlocked door
when slowing or stopping the
vehicle. Lock the doors to
help prevent this from
happening.
Keyless Access
2578630
Use the Keyless Access system to lock
and unlock the door. When the doors
are locked and the Remote Keyless
Entry (RKE) transmitter is within 1 m
Page 41

Cadillac CTS/CTS-V Owner Manual (GMNA-Local izi ng- U.S ./C anada2ndPrint-11254870) - 2017 - Final Review - 6/14/16
KEYS, DOORS, AND WINDOWS 41
(3 ft) of the driver door handle, press
the lock/unlock button. When
unlocking from the driver door, the
first press unlocks that door; p ress
again within five seco nds to un lock all
passenger doors. See
Remote Keyle ss
Entry (RKE) System Operation 0 32
.
Driver Door Key Cylinder Access
4163324
To access the key cylinder:
1. Pull the door handle (1) to the
open position.
2. Insert the key into the slot (3) on
the bottom of the cap (2) and
pry outward.
3. Move the cap (2) rearward and
remove.
4. Use the key in the cylinder.
3251230
To replace the cap:
1. Pull the door handle to the open
position.
2. Insert the two tabs (7) at the
back of the cap (8) between the
seal (5) and the metal base (6).
2748681
2748682
3. Move the cap forward and press
to s nap the cap in place.
Page 42

Cadillac CTS/CTS-V Owner Manual (GMNA-Local izi ng- U.S ./C anada2ndPrint-11254870) - 2017 - Final Review - 6/14/16
42 KEYS, DOORS, AND WINDOWS
4. Release the door handle.
Inside the Vehicle
On t he rear doors, push down on the
door lock knob to lock the door
manually. Pull once on the doo r
handle to unlock the door and again
to o pen the door.
Press the power door lock switch to
lock or u nlock all doors automatically.
See
Power Door Locks 0 42.
Power Door Locks
Object-ID=29 17460 Owner =Szydlowski, Corinna
LMD=06-Apr-2 016 LMB=Szy dlowski, C orinna
2916811
Q : Press to lock the doors. The
indicator light in the switch will
illuminate w hen activated.
K : Press to unlock the doors.
Delayed Locking
Object-ID=45 04430 Owner =Szydlowski, Corinna
LMD=27-Apr-2 016 LMB=Szy dlowski, C orinna
This feature delays the actual locking
of t he doors until five seconds after all
doors are closed.
When
Q is pressed on the power door
lock switch with the door open, a
chime will sound three times
indicating that delayed locking is
active.
The doors will then lock automatically
five seconds after all doo rs are closed.
If a door is reopened before
five seconds have elapsed, the
five-second timer will reset once all
the doors are closed again.
Press
Q on the doo r lock swi tch again,
or press
Q on the RKE tra nsmitter, to
override thi s feature and lock the
doors immediately.
Delayed locking can only be turned on
when the Unlocked Door Anti-Lockout
feature has been turned off.
Delayed locking can be programmed.
See
Vehicle Personalization 0 158.
Automatic Door Locks
Object-ID=32 71872 Owner =Szydlowski, Corinna
LMD=05-Nov-2 015 LMB=Szy dlowski, C orinna
The doors will lock automatically
when all doors are closed, the ignition
is on, a nd the vehicle is shifted out of
P (Park).
To unlock the doors:
.
Press
K on the power door lock
switch.
.
Shift the transmission into
P (Park).
Automatic door locking cannot be
disabled. Automatic door unlocking
can be programmed. See
Vehicle
Personaliz ation 0 158
.
Page 43

Cadillac CTS/CTS-V Owner Manual (GMNA-Local izi ng- U.S ./C anada2ndPrint-11254870) - 2017 - Final Review - 6/14/16
KEYS, DOORS, AND WINDOWS 43
Lockout Protection
Object-ID=34 59694 Owner =Szydlowski, Corinna
LMD=12-Apr-2 016 LMB=Szy dlowski, C orinna
If the vehicle is in ACC/ACCESSORY or
ON/RUN/START and the power door
lock switch is presse d with the driver
door open, all the doors will lock and
only the driver door will unlock.
If the vehicle is off and locking is
requested while a door is open, when
all doors are closed the vehicle will
check for RKE transmitters inside.
If an RKE transmitter is detected and
the number of RKE transmitters inside
has not reduced, the driver door w ill
unlock and the horn will chirp three
times.
Lockout Protection can be manually
overridden with the driver door open
by p ressing and holding
Q on the
power door lock switch.
Unlocked Door Anti-Lockout
If Unlocked Door Anti-Lockout is
turned on and the vehicle is off, the
driver door is open, and locking is
requested, al l the doors will lo ck and
only the driver door will unlock. The
Unlocked Door Anti-Lockout feature
can be turned on or off usi ng the
vehicle pers onalization menus. See
Vehicle Personalization 0 158.
Safety Locks
Object-ID=29 17464 Owner =Szydlowski, Corinna
LMD=08-Oct-2 015 LMB=Cla rk, Lorien
2916818
The rear d oor sa fety locks prevent
passengers from opening the rear
doors from inside the vehicle.
Press Z { to activate the safety
locks on the rear doors. The indicator
light in the switch will illuminate
when activated.
The rear d oor power windows are also
disabled. See
Power Window s 0 52.
Press
Z { again to deactivate the
lockout switch.
If an inside rear door handle is being
pulled at the same time the safety
lock is deactivated, t hat door will
remain locked and the indicator light
may flash. Release the handle, then
press the safety lock twice to
deactivate the safety lo cks.
Page 44

Cadillac CTS/CTS-V Owner Manual (GMNA-Local izi ng- U.S ./C anada2ndPrint-11254870) - 2017 - Final Review - 6/14/16
44 KEYS, DOORS, AND WINDOWS
Doors
Trunk
Object-ID=45 02550 Owner =Szydlowski, Corinna
LMD=26-Apr-2 016 LMB=Szy dlowski, C orinna
{
Warning
Object-ID=22 10312 LMD=0 7-Nov-2011
Exhaust gases can enter the vehicle
if it is driven with the liftgate or
trunk/hatch open, or with any
objects that pass through the seal
between the body and the trunk/
hatch or liftgate. Engine exhaust
contains carbon monoxide (CO)
which cannot be seen or smelled.
It can cause unconsciousness and
even death.
If the vehicle must be driven with
the liftgate or trunk/hatch open:
.
Close all of the windows.
.
Fully open the air outlets on
or under the instrument
panel.
(Continued)
Warning (Continued)
Object-ID=22 10312 LMD=0 7-Nov-2011
.
Adjust the climate control
system to a s etting that
brings in only outside air and
set the fan speed to the
highest sett ing. See “Climat e
Control Systems” in the Index.
.
If the vehicle is equipped with
a power liftgate, disa ble the
power liftgate function.
See
Engine Exhaust 0 223 .
Trunk Release
3346209
To open the trunk, the vehicle must
be off or the shift lever must be in
P (Park).
.
Press | on the driver door.
.
Press
X twice quickly on the
Remote Keyless Entry (RKE)
transmitt er.
3967343
.
Press the touch pad on the rear of
the trunk above the license plate
when all doors are unlocked.
The trunk can be opened while the
vehicle is locked by pressing the touch
pad above the license plate while the
RKE transmitter is within 1 m (3 ft) of
Page 45
Cadillac CTS/CTS-V Owner Manual (GMNA-Local izi ng- U.S ./C anada2ndPrint-11254870) - 2017 - Final Review - 6/14/16
KEYS, DOORS, AND WINDOWS 45
the rear of the vehicle. See Remote
Keyless Entry (RKE) System
Operation 0 32.
Close the trunk by pullin g on the
handle. Do not use the handle as a
tie-down.
Rear Seat Pass-Through
Use the rear seat pass-through door
when transporting long items.
To open, pull down the rear seat
armrest. Pull the lever all the way
down to release the door.
To close, push it up and b ack into
place. Try to open the door wi thout
pulling up on the lever to make sure it
is locked into place.
Emergency Trunk Release
Handle
3346156
Caution
Object-ID=28 88425 LMD=1 0-Jul-2012
Do n ot use th e emergency trunk
release handl e as a tie-down or
anchor point when securing items
in the trunk as it could damage the
handle.
There is a glow-in-the-dark emergency
trunk release handle on the trunk lid.
This handle will glow following
exposure to light. Pull the release
handle to open the trunk from the
inside.
4454085
After pulling the emergency trunk
release handl e, push the handle back
into the bezel.
Page 46

Cadillac CTS/CTS-V Owner Manual (GMNA-Local izi ng- U.S ./C anada2ndPrint-11254870) - 2017 - Final Review - 6/14/16
46 KEYS, DOORS, AND WINDOWS
Vehicle Security
Object-ID=21 71094 Owner =Szydlowski, Corinna
LMD=07-Jul-2 015 LMB=La ndstrom, Mi chael
This vehicle has theft-deterrent
features; however, they do not m ake
the vehicle impossible to steal.
Vehicle Alarm System
Object-ID=33 57017 Owner =Szydlowski, Corinna
LMD=09-Jan-2 014 LMB=Szydlowski, C o rinna
This vehicle has an anti-theft alarm
system.
3270866
The indicator light, on the instrument
panel near the windshield, indicates
the status of the system.
Off : Alarm system is dis armed.
On Solid : Vehicle is secured during
the delay to arm the system.
Fast Flash : Vehicle is unsecured.
A door, the hood, or the trunk is open.
Slow Flash : Alarm sy stem is armed.
Arming the Alarm System
1. Turn off the vehicle.
2. Lock the vehicle in one of
three ways:
.
Use the RKE transmitter.
.
Use the Keyless Access
system.
.
With a d oor op en, press
Q
on the interior of the door.
3. After 30 seconds the alarm
system will arm, and the
indicator light will begin to
slowly flash indicating the alarm
system is operating. Pressing
Q
on the RKE transmitter a second
time will bypass the 30-s econd
delay and immediately arm the
alarm system .
The vehicle alarm system w ill not arm
if the doors are locked with the key.
If the driver door is opened without
first unlocking with the RKE
transmitt er, the horn will chirp and
the lights will flash to indicate
pre-alarm . If the vehicle is not started,
or the door is not unlocked by
pressing K on the RKE transmitter
during the 10-second pre-alarm, the
alarm will be activated.
The alarm will also be activated if a
passenger door, the trunk, or the hood
is opened without first disarming the
system. When the alarm is activated,
the turn signals flash and the horn
sounds for about 30 seconds. The
alarm system will then re-arm to
monitor the next unauthorized event.
Disarming the Alarm System
To disarm the alarm system or turn
off the alarm if it has been activated:
.
Press
K on the RKE transmitter.
Page 47

Cadillac CTS/CTS-V Owner Manual (GMNA-Local izi ng- U.S ./C anada2ndPrint-11254870) - 2017 - Final Review - 6/14/16
KEYS, DOORS, AND WINDOWS 47
.
Unlock the vehicle using the
Keyless Access system.
.
Start the vehicle.
To avoid setting off the alarm by
accident:
.
Lock the vehicle after all
occupants have left th e vehicle
and all doors are closed.
.
Always unlock a door with the
RKE transmitter or use the Keyless
Access system.
Unlocking the driver door with the key
will not disarm the system or turn of f
the alarm.
How to Detect a Tamper
Condition
If K is pressed on the transmitter and
the horn chirps and the lights flash
three times, a previous alarm occurred
while the system was armed.
If the alarm has been activated, a
message will appear on the DIC. See
Security Messages 0 156.
Power Sounder and Inclination
Sensor
In a ddition to the standard
theft-deterrent system features, this
system may also have a power
sounder and inclination sensor.
The power sounder provides an
audible alarm which is distinct from
the vehicle’s horn. I t has its own
power source, and can sound an alarm
if the vehicle’s battery is
compromis ed.
The inclination sensor can set off the
alarm if it senses movement of the
vehicle, such as a change in vehicle
orientation.
Immobilizer
Object-ID=35 81122 Owner=Szydlo wski, Cori nna
LMD=24-Jul-2 013 LMB=Sz ydlowski, Corinna
See
Radio Frequency Statement (US/
CAN) 0 397
or Radio Frequency
Statement (M EXICO1) 0 397
or Radio
Frequency Statement (MEXICO) 0 397
.
Immobilizer Operation
Object-ID=34 62656 Owner =Szydlowski, Corinna
LMD=17-Jul-2 015 LMB=Sz ydlowski, Corinna
This vehicle has a passive
theft-deterrent system.
The system does not have to be
manually armed or disar med.
The vehicle is automatically
immobilized when the vehicle is
turned off.
The immobilization system is
disarmed when the pushbutton start
is activated to enter the ACC/
ACCESSORY mode or the ON /RUN/
START mode and a valid transmitter
is present in the vehicle.
2326622
The security light, in the instrument
cluster, com es on if there is a problem
with arming or disarming the
theft-deterrent system.
Page 48

Cadillac CTS/CTS-V Owner Manual (GMNA-Local izi ng- U.S ./C anada2ndPrint-11254870) - 2017 - Final Review - 6/14/16
48 KEYS, DOORS, AND WINDOWS
The system has one or more RKE
transmitt ers matched to an
immobilizer control unit in the
vehicle. Only a correctly matched RKE
transmitt er will start the vehicle.
If the transmitter is ever damaged,
you may not be able to start your
vehicle.
When trying to start t he vehicle, the
security light may come on briefly
when the ignition is turned on.
If the engine does not start and the
security light stays on, there is a
problem with the system. Turn the
ignition off and try again.
If the vehicle will not change ignition
modes (ACC/ACCESSORY, ON/RUN/
START, OFF), and the RKE transmitter
appears to be undamaged, try another
transmitt er. Or, you may try placing
the transmitter in the transmitter
pocket locate d in the center con sole.
See
Key and Lock Messages 0 150.
If the ignition modes will not change
with the other transmitter, your
vehicle need s service. If the ignition
does change modes, the first
transmitt er may be faulty. See the
dealer.
It is possible for the immobilizer
system to learn new or replacement
RKE transmitters. Up to eight
transmitt ers can be programmed for
the vehicle. To program additional
transmitt ers, see “Programming
Transmitters to the Vehicle” under
Remote Keyle ss Entry (RKE) System
Operation 0 32
.
Do n ot leave the key or device that
disarms or deactivates the
theft-deterrent system in the vehicle.
Exterior Mirrors
Convex Mirrors
Object-ID=21 47968 Owner =Szydlowski, Corinna
LMD=22-Apr-2 016 LMB=Szy dlowski, C orinna
{
Warning
Object-ID=22 07534 LMD=0 6-Nov-2008
A convex mirror can make things,
like other vehicles, look farther
away than they really are. If y ou cut
too sharply into the right lane, you
could hit a vehicle on the right.
Check the inside mirror or glance
over your shoulder before changing
lanes.
The passenger side mirror is convex
shaped. A convex mirror's surface is
curved so more can be seen from the
driver seat.
Page 49

Cadillac CTS/CTS-V Owner Manual (GMNA-Local izi ng- U.S ./C anada2ndPrint-11254870) - 2017 - Final Review - 6/14/16
KEYS, DOORS, AND WINDOWS 49
Manual Mirrors
Object-ID=35 98754 Owner =Szydlowski, Corinna
LMD=08-Oct-2 015 LMB=Cla rk, Lorien
If eq uipped, push the tab forward for
daytime use and pull it rearward for
nighttime use to avoid gla re of the
headlamps fr om behind.
Power Mirrors
Object-ID=43 74969 Owner =Szydlowski, Corinna
LMD=27-Apr-2 016 LMB=Szy dlowski, C orinna
2916815
Controls for the outsi de power mirrors
are on the driver d oor.
To adjust each mirror :
1. Press (L) or (R) to select the
driver or passenger side mirror.
2. Press the arrows on the control
pad to move the m irror up,
down, right, or left.
3. Adjust each mirror so that a little
of t he vehicle and the area
behind it can be seen.
4. Return the selector switch to the
center posit ion.
Memory Mirrors
If eq uipped, the vehicle may have
memory mirrors. See
Memory
Seats 0 63
.
Side Blind Zone Alert (SBZA)
If eq uipped, the vehicle may have
SBZA. See
Side Blind Zone Alert
(SBZA) 0 261
.
Lane Change Alert (LCA)
If eq uipped, the vehicle may have
LCA.
Lane Change Alert (LCA) 0 261.
Folding Mirrors
Object-ID=32 22248 Owner =Szydlowski, Corinna
LMD=19-Oct-2 015 LMB=Szy dlowski, C orinna
Manual Folding Mirrors
The mirrors can be folded inward
toward the vehicle to prevent damage
when going through an automatic car
wash. Push the mirror outward to
return it to the original position.
Heated Mirrors
Object-ID=32 13968 Owner =Szydlowski, Corinna
LMD=08-Oct-2 015 LMB=Cla rk, Lorien
If eq uipped with heated mirrors:
= : The rear window defogger also
heats the outside mirrors.
See
Dual Automatic Climate Control
System 0 190
.
Automatic Dimming Mirror
Object-ID=21 42232 Owner =Szydlowski, Corinna
LMD=08-Oct-2 015 LMB=Cla rk, Lorien
If the vehicle has the automatic
dimming mirr or, the driver outside
mirror automatically adjusts for the
glare of headlamps behind you.
Page 50

Cadillac CTS/CTS-V Owner Manual (GMNA-Local izi ng- U.S ./C anada2ndPrint-11254870) - 2017 - Final Review - 6/14/16
50 KEYS, DOORS, AND WINDOWS
Reverse Tilt Mirrors
Object-ID=34 59805 Owner =Szydlowski, Corinna
LMD=08-Oct-2 015 LMB=Cla rk, Lorien
The passenger and/or driver mirror ti lt
to a preselected position when the
vehicle is in R (Reverse). This feature
allows the driver to view the curb
when parallel parking. The mirror
returns to the origina l position when
the vehicle is shifte d out of
R (Reverse), the ignition is turned off,
or if the vehicle is driven in reverse
above a predetermined speed.
Turn this feature on or off through
vehicle pers onalization. S ee
Vehicle
Personaliz ation 0 158
.
Interior Mirrors
Interior Rearview Mirrors
Object-ID=29 68584 Owner =Szydlowski, Corinna
LMD=08-Oct-2 015 LMB=Cla rk, Lorien
Adjust the rearview mirror for a clear
view of the area b ehind the vehicle.
Do n ot spray glass cleaner direct ly on
the mirror. Use a soft towel dampened
with water.
Automatic Dimming
Rearview Mirror
Object-ID=33 56448 Owner =Szydlowski, Corinna
LMD=08-Oct-2 015 LMB=Cla rk, Lorien
The rearview mirror au tomatically
dims to reduce the glare of the
headlamps fr om behind. This feature
comes on when the vehicle is started.
Rear Camera Mirror
Object-ID=43 74935 Owner =Szydlowski, Corinna
LMD=26-Apr-2 016 LMB=Szy dlowski, C orinna
If eq uipped, this automatic dimming
mirror provides a wide angle camera
view of the area b ehind the vehicle.
4068795
Pull the tab rearward to turn on the
display. Push the tab forward to turn
it off. When off, the mirror i s
automatic dimming. Adjust the mirror
for a clear view of the area be hind the
vehicle whil e the dis play is off.
Page 51

Cadillac CTS/CTS-V Owner Manual (GMNA-Local izi ng- U.S ./C anada2ndPrint-11254870) - 2017 - Final Review - 6/14/16
KEYS, DOORS, AND WINDOWS 51
4069016
To adjust the brightness, press the
button (1) on the back of the rearview
mirror with out covering the light
sensor (2).
4275330
Each button press cycles the
brightness between five settings.
4072259
{
Warning
Object-ID=40 74630 LMD=2 5-Sep-2015
The Rear Camera Mirror (RCM) has
a limited view. Portions of the road,
vehicles, and other objects may not
be seen. Do not drive or park the
vehicle usin g onl y this camera.
Objects may appear closer than
they are. Check the outside mirrors
or glance over your shoulder when
making lane changes or merging.
Failure to use proper care may
result in injury, death, or vehicle
damage.
4375474
The camera that provides th e Rear
Camera Mirror (RCM) image is above
the license plate, next to the Rea r
Vision Camera (RVC).
To clean the rear camera, see
Windshield Wiper/Washer 0 113.
Troubleshooting
If the tab is in the rearward position
and a blue screen and
d are displayed
in the mirror a nd the display shuts
off, see your dealer for service.
The RCM may not wor k properly or
display a clear image if:
Page 52

Cadillac CTS/CTS-V Owner Manual (GMNA-Local izi ng- U.S ./C anada2ndPrint-11254870) - 2017 - Final Review - 6/14/16
52 KEYS, DOORS, AND WINDOWS
.
There is glare from the sun or
headlamps. This may obstruct
objects from view.
.
Dirt, snow, or other debris blocks
the camera lens. Clean the lens
with a soft damp cloth.
.
The back of the vehicle has been
damaged and the position and
mounting angle of the camera has
changed.
Windows
Object-ID=27 15175 Owner =Szydlowski, Corinna
LMD=08-Oct-2 015 LMB=Cla rk, Lorien
{
Warning
Object-ID=27 15147 LMD=2 3-Sep-2011
Never leave a c hild, a helpless adult,
or a pet alone in a vehicle,
especially with the windows closed
in warm or hot weather. They can
be overcome by the extreme heat
and suffer permanent injuries or
even death from heat stroke.
1970744
The vehicle aerodynamics are
designed to improve fuel economy
performance. This may result in a
pulsing sound when either rear
window is down and the front
windows are up. To reduce the sound,
open either a front window or the
sunroof, if equipped.
Power Windows
Object-ID=43 75004 Owner =Szydlowski, Corinna
LMD=06-Apr-2 016 LMB=Szy dlowski, C orinna
{
Warning
Object-ID=27 15150 LMD=2 3-Sep-2011
Children coul d be seriously injured
or killed if caught in the path of a
closing wind ow. Never leave keys in
a vehicle with children. When there
are children in the rear seat, use the
window lockout button to prevent
operation of the windows. See
Keys 0 3 1.
Page 53

Cadillac CTS/CTS-V Owner Manual (GMNA-Local izi ng- U.S ./C anada2ndPrint-11254870) - 2017 - Final Review - 6/14/16
KEYS, DOORS, AND WINDOWS 53
2916813
The windows work when the vehicle is
in ON/RUN or ACC/ACCESSORY,
or when Retained Ac cessory Power
(RAP) is active. See
Retained Accessory
Power (RAP) 0 219
.
Press or pull the switch to open or
close the window.
The windows will be temporarily
disabled if the window switches are
used repeatedly within a short time.
Window Lockout
2916818
This feature stops the rear door
passenger window switches from
working.
Press
Z { to engage the rear window
lockout feature. The indicator light is
on when e ngaged.
This also disables the rear power door
locks. See
Safety Locks 0 43.
Press
Z { again to disengage.
A door may remain locked if that door
handle is pulled at the same time the
safety lock is disengaged. Release the
door handle then press
Z { twice.
Window Express Movement
Express-d own/up allows the windows
to b e opened or closed without
holding the window switch. Press the
window switch fully down or pull it
up, and quickly release it to engag e.
Briefly press or p ull the same switch
to s top window movement.
Express Window Obstacle
Detection
The express-up feature w ill reverse
window movement if it comes in
contact with an object . Extreme cold
or ice could cause the window to
auto-reverse. The window will operate
as normal after the object or condition
is removed.
Page 54

Cadillac CTS/CTS-V Owner Manual (GMNA-Local izi ng- U.S ./C anada2ndPrint-11254870) - 2017 - Final Review - 6/14/16
54 KEYS, DOORS, AND WINDOWS
Obstacle Detection Override
{
Warning
Object-ID=42 82606 LMD=2 4-Nov-2015
If ob stacle detection override is
activated, the window will not
reverse automatically. You or others
could be injured and the window
could be damaged. Before you use
obstacle detection override, make
sure that all people and
obstructions are clear of the
window path.
The window can be closed by holding
the window switch in the up position
if conditions prevent i t from express
closing.
Programming the Power
Windows
Programming may be necessary if the
vehicle's battery has been
disconnected or discharged. If the
window is unable to express-up, follow
these steps to program the window:
To program the window:
1. Close all doors.
2. Place the ignition in ACC/
ACCESSORY or ON/RUN.
3. Partially open the window to be
programmed, th en close it and
continue to pull the switch
briefly after the window has fully
closed.
4. Press the power window switch
until the window is fully open
and briefly hold.
Remote Window Operation
If eq uipped, this feature allows all the
windows to be opened remotely.
If enabled in v ehicle personalizatio n,
press and hold
K on the RKE
transmitt er. See
Vehicle
Personaliz ation 0 158
.
Sun Visors
Object-ID=23 87096 Owner =Szydlowski, Corinna
LMD=22-Sep-2 015 LMB=Szy dlowski, C orinna
2326151
Pull the sun visor down to block glare.
Detach the sun visor from the center
mount to pivot to the side window or,
if equipped, extend along the r od.
Page 55

Cadillac CTS/CTS-V Owner Manual (GMNA-Local izi ng- U.S ./C anada2ndPrint-11254870) - 2017 - Final Review - 6/14/16
KEYS, DOORS, AND WINDOWS 55
Rear Window Sunshade
Object-ID=37 03997 Owner =Szydlowski, Corinna
LMD=08-Oct-2 015 LMB=Cla rk, Lorien
3375052
If eq uipped with a rear window
sunshade, the switch is on the
overhead cons ole. The sunshade only
operates with the ignition in ON/RUN/
START.
To open the sunshade, press and
release the switch. The su nshade will
fully extend. To close the sunshade,
press and release the switch again.
The sunshade will fully close.
When shiftin g the vehicle into
R (Reverse), the sunshade will
automatically retract if it is extended.
It wi ll re-extend after a short delay
when shifting into D (Drive).
Rear Passenger Door Sunshades
3414247
If eq uipped, use the handle to pull the
sunshade up and attach to the holder
at t he top of the window. There is also
a small shade for the rear corner of
the window.
To close the sunshade, use the handle
to u nhook and hold it while it
retracts down.
Roof
Sunroof
Object-ID=43 79264 Owner =Perkins, Frank
LMD=10-Feb-2 016 LMB=Perkins, Fran k
If eq uipped, the sunroof will only
operate when the ignition is in ON/
RUN or ACC/ACCESSORY, or when
Retained Accessory Power (RAP) is
active. See
Retained Accessory Power
(RAP) 0 219
.
2916816
The driver side switch (1) operates the
sunroof.
Page 56

Cadillac CTS/CTS-V Owner Manual (GMNA-Local izi ng- U.S ./C anada2ndPrint-11254870) - 2017 - Final Review - 6/14/16
56 KEYS, DOORS, AND WINDOWS
Vent : Press and release ~ (1) to
vent the sunroof. The sunshade will
automatically open approxi mately
38 cm (1 5 in). Pr ess and ho ld
g (1)
to c lose the sunroof vent.
Express-Open/Exp ress-Close : With
the sunroof in the vent position, press
~ (1) a second time to express-open
the sunroof. Press
g (1) to
express-c lose the sunroof. To stop the
sunroof partway, press the switch
again.
The passenger side switch
Q (2)
operates the sunshade. Press and
release
Q (2) to express-open or
express-c lose the sunshade. To stop
the sunshade partway, press the
switch again.
Automatic Reversal System
The sunroof/sunshade is equipped
with an automatic reversal system
that is only active when the sunroof/
sunshade is being operated in express
mode. If an object is in the path of the
sunroof/sunshade while it is express
closing, the reversal s ystem will detect
the object and stop. In the event of
closing diff iculties like frost or other
conditions, it is possible to override
the reversal system. To override the
reversal system, close in manual
mode. To stop the movement, re lease
the switch.
3285327
Dirt and debris may collect on the
sunroof seal or in the track. This
could cause an issue with sunroof
operation or noise. It cou ld also plug
the water drainage system.
Periodically open the sunroof and
remove any obstacles or loose debris.
Wipe the sunroof seal and roof sealing
area using a clean cloth, mild soap,
and water. Do not remove grease from
the sunroof.
If water is seen dripping into the
water drainage system, this is no rmal.
Page 57

Cadillac CTS/CTS-V Owner Manual (GMNA-Local izi ng- U.S ./C anada2ndPrint-11254870) - 2017 - Final Review - 6/14/16
SEATS AND RESTRAINTS 57
Seats and Restraints
Head Restraints
Head Restraints . . . . . . . . . . . . . . . . . . . . 58
Front Seats
Power Seat Adjustment . . . . . . . . . . . 59
Lumbar Adjus tment . . . . . . . . . . . . . . . 61
Thigh Support Adjustment . . . . . . . . 62
Reclining Seatbacks . . . . . . . . . . . . . . . 62
Memory Sea ts . . . . . . . . . . . . . . . . . . . . . . 63
Heated and Ventilated Front
Seats . . . . . . . . . . . . . . . . . . . . . . . . . . . . . . 65
Rear Seats
Rear Seats . . . . . . . . . . . . . . . . . . . . . . . . . . 66
Heated Rear Seats . . . . . . . . . . . . . . . . . 68
Rear Seat Pass-Through Door . . . . . 69
Safety Belts
Safety Belts . . . . . . . . . . . . . . . . . . . . . . . . . 69
How to Wear Safety Belts
Properly . . . . . . . . . . . . . . . . . . . . . . . . . . . 7 1
Lap-Shoulder Belt . . . . . . . . . . . . . . . . . . 71
Safety Belt Use During
Pregnancy . . . . . . . . . . . . . . . . . . . . . . . . . 75
Safety Belt Extender . . . . . . . . . . . . . . . 75
Safety System Check . . . . . . . . . . . . . . 75
Safety Belt Care . . . . . . . . . . . . . . . . . . . . 76
Replacing Safety Belt System Parts
after a Crash . . . . . . . . . . . . . . . . . . . . . . 76
Airbag System
Airbag System . . . . . . . . . . . . . . . . . . . . . 77
Where Are the Airbags? . . . . . . . . . . . 78
When Should an Airbag
Inflate? . . . . . . . . . . . . . . . . . . . . . . . . . . . 80
What Makes an Airbag Inflate? . . . 81
How Does an Airbag Restrain? . . . 81
What Will You See after an Airbag
Inflates? . . . . . . . . . . . . . . . . . . . . . . . . . . 81
Passenger Sensing System . . . . . . . . 83
Servicing the Airbag-Equipped
Vehicle . . . . . . . . . . . . . . . . . . . . . . . . . . . . 87
Adding Equipment to t he
Airbag-Eq uipped Vehicle . . . . . . . . 87
Airbag System Check . . . . . . . . . . . . . . 88
Replacing Airbag System Parts
after a Crash . . . . . . . . . . . . . . . . . . . . . . 88
Child Restraints
Older Children . . . . . . . . . . . . . . . . . . . . . 89
Infants and Young Chil dren . . . . . . 90
Child Restraint Systems . . . . . . . . . . . 93
Where to Put the Restraint . . . . . . . 94
Lower Anchors and Tethers for
Children (LATCH System) . . . . . . . 95
Replacing LATCH System Parts
After a Crash . . . . . . . . . . . . . . . . . . . . 101
Securing Child Restraints (With
the Safety Belt in the
Rear Seat) . . . . . . . . . . . . . . . . . . . . . . . 101
Securing Child Restraints (With
the Safety Belt in the
Front Seat) . . . . . . . . . . . . . . . . . . . . . . 104
Page 58

Cadillac CTS/CTS-V Owner Manual (GMNA-Local izi ng- U.S ./C anada2ndPrint-11254870) - 2017 - Final Review - 6/14/16
58 SEATS AND RESTRAINTS
Head Restraints
Object-ID=44 47612 Owner =Landstrom, Michael
LMD=08-Mar-2 016 LMB=La ndstrom, Mi chael
If eq uipped with base seats, th e
vehicle’ s front seats have adjustable
head restraints in the outboard
seating positions.
If eq uipped with high performance
seats, the vehicle’s front seats have
head restraints in the outboard
seating positions that cannot be
adjusted.
{
Warning
Object-ID=22 09551 LMD=1 3-Nov-2008
With head restraints that are not
installed and adjusted properly,
there is a grea ter chance that
occupants will suffer a neck/spinal
injury in a crash. Do not drive until
the head restraints for all occupants
are installed and adjusted properly.
1968498
If eq uipped with base seats, ad just the
head restraint so that the top of the
restraint is at the same height as the
top of t he occupant's head. This
position reduces the chance of a neck
injury in a crash.
Front Seats
If eq uipped, the vehicle's front seats
have adjustable head restraints in the
outboard seating positions .
1881871
The height of the head restraint can
be adjusted.
To raise or lower the head restraint,
press the button located on the side of
the head restraint, and pull up or
push the head restraint down and
release the button. Pull a nd push on
the head restraint after the button is
released to make sure that it is locked
in place.
Page 59

Cadillac CTS/CTS-V Owner Manual (GMNA-Local izi ng- U.S ./C anada2ndPrint-11254870) - 2017 - Final Review - 6/14/16
SEATS AND RESTRAINTS 59
2768788
To adjust the head restraint forward
and rearward, press the button located
on the side facing of the h ead
restraint and move it forward or
rearward until the des ired locking
position is reached. Try to move the
head restraint after the button is
released to make sure that it is locked
in place.
The front seat outboard head
restraints are not removable.
Rear Seats
The vehicle's rear seats have
adjustable h ead restraints in the
outboard seating positions .
The height of the head restraint can
be adjusted. Pull the head restraint up
to r aise it. Try to move the head
restraint to make sure that it is locked
in place.
2403763
To lower the head restraint, press the
button, located on the top of the
seatback, and push the head restraint
down. Try to move the head restraint
after the button is released to ma ke
sure that it is locked in place.
Rear outboard head restraints are not
removable.
Front Seats
Power Seat Adjustment
Object-ID=40 23371 Owner =Landstrom, Michael
LMD=26-Apr-2 016 LMB=Lan dstrom, Mi c hael
High Performance Seat Shown,
Others Similar
4056626
To adjust the seat:
.
Move the seat forward or rearward
by s liding the control forward o r
rearward.
.
Raise or lower the seat by moving
the rear of the control up or down .
Page 60

Cadillac CTS/CTS-V Owner Manual (GMNA-Local izi ng- U.S ./C anada2ndPrint-11254870) - 2017 - Final Review - 6/14/16
60 SEATS AND RESTRAINTS
.
If eq uipped, raise or lower the
front part of the seat cushion by
moving the front of the control up
or down.
To adjust the seatback, see
Reclining
Seatbacks 0 62
.
To adjust the lumbar support, see
Lumbar Adjus tment 0 61.
Some vehicle s are equi pped with a
Safety Alert Seat. This feature
activates a vibrating pulse alert in the
driver seat to help the driver avoid
crashes.
High Performance Seat
Adjustment
{
Warning
Object-ID=22 08270 LMD=2 3-Nov-2011
You can lose control of the vehicle
if you try to adjust a driver seat
while the vehicle is moving. Adjust
the driver seat only whe n the
vehicle is not moving.
High Performance Seat
4017583
1. Feature Select
2. Up
3. Rearward
4. Down
5. Forward
.
Move Feature Select (1) to disp lay
seat adjustments on t he center
stack. Press and release or hold to
scroll through features.
.
Press Up (2) to ma ke upward
adjustments of the selected
feature.
.
Press Rearward (3) to make
rearward adjustments of the
selected feature.
.
Press Down (4) to make downward
adjustments of the selected
feature.
.
Press Forward (5) to make forward
adjustments of the selected
feature.
Four-Way Lumbar Support
To adjust lumbar support for a base
seat, see
Lumbar Adjus tment 0 61.
To adjust lumbar support for high
performance seats, if equipped:
High Performance Seat
4017584
Page 61

Cadillac CTS/CTS-V Owner Manual (GMNA-Local izi ng- U.S ./C anada2ndPrint-11254870) - 2017 - Final Review - 6/14/16
SEATS AND RESTRAINTS 61
.
Press and release or hold Feature
Select (1) to scroll to lumbar
support on the center stack.
.
Press Forward (5) or Rearward (3)
to a djust lumbar forward or
rearward.
.
Press Up (2) or Down (4) to adjust
lumbar support up or down.
Cushion Bolster
To adjust cushion bolster, if equipped:
4021145
.
Press and release or hold Feature
Select (1) to scroll to cushion
bolster on the center stack.
.
Press Forward (5) or Rearward (3)
to a djust cushion bolster inward
or outward.
Back Bolster
To adjust back bolster, if equipped:
4021147
.
Press and release or hold Feature
Select (1) to scroll to back bolster
on the center stack.
.
Press Forward (5) or Rearward (3)
to a djust back bolste r inward or
outward.
Lumbar Adjustment
Object-ID=33 19639 Owner =Landstrom, Michael
LMD=31-Mar-2 016 LMB=La ndstrom, Mi chael
Two-Way Lumbar and Bolster
Adjustment
Lumbar Adjustment
2675338
To adjust the two-way lumbar and
bolster support, if equipped:
.
Press and hold the lumbar
adjustment control forward or
rearward to adjust lumbar s upport
inward or outward.
Page 62

Cadillac CTS/CTS-V Owner Manual (GMNA-Local izi ng- U.S ./C anada2ndPrint-11254870) - 2017 - Final Review - 6/14/16
62 SEATS AND RESTRAINTS
.
Press and hold the recliner control
up or dow n to increase or decrease
seatback bolster support.
Four-Way Lumbar and Bolster
Adjustment
Bolster Adjustment
3319514
To adjust the four-way lumbar and
bolster support, if equipped:
.
Press and hold the lumbar
adjustment control forward or
rearward to adjust lumbar s upport
inward or outward and up or down
for vertical lumbar adjustment.
.
Press and hold the recliner control
up or dow n to increase or decrease
seatback bolster support.
Thigh Support Adjustment
Object-ID=26 80592 Owner =Landstrom, Michael
LMD=08-Oct-2 015 LMB=Lan dstrom, Mi c hael
Base Seat
2675333
If eq uipped, pull up on the lever. Then
pull or push on the support to
lengthen or shorten. Release the lever
to l ock in place.
Reclining Seatbacks
Object-ID=26 80593 Owner =Landstrom, Michael
LMD=31-Mar-2 016 LMB=La ndstrom, Mi chael
{
Warning
Object-ID=22 08274 LMD=0 8-Dec-2015
Sitting in a reclined position when
the vehicle is in motion can be
dangerous. Even when buckled up,
the safety belts cannot do their job .
The shoulder belt will not be
against your body. Inst ead, it will be
in front of you. In a crash, you
could go into it, receiving neck or
other injuries.
The lap belt could go up o ver your
abdomen. The belt forces would be
there, not at your pelvic bones. This
could cause serious internal
injuries.
For proper protection wh en the
vehicle is in motion, have the
seatback upright. Then sit well back
in the seat and wear the safety belt
properly.
Page 63

Cadillac CTS/CTS-V Owner Manual (GMNA-Local izi ng- U.S ./C anada2ndPrint-11254870) - 2017 - Final Review - 6/14/16
SEATS AND RESTRAINTS 63
1968936
Do n ot have a seatback reclined if the
vehicle is moving.
Base Seat
2675340
To adjust the seatback:
.
Tilt the top of the control
rearward to recline.
.
Tilt the top of the control forward
to r aise.
High Performance Seat
4056523
To adjust the seatback:
.
Tilt the top of the control
rearward to recline.
.
Tilt the top of the control forward
to r aise.
Memory Seats
Object-ID=4111131 O wner=Landstrom, Michael
LMD=31-Mar-2 016 LMB=La ndstrom, Mi chael
2901329
The SET, 1, 2, an d B (Exit) buttons
on the driver door are used to
manually sto re and recall memory
settings for the driver seat, outside
mirrors, power tilt and telescoping
steering column (if equipped).
Storing Memory Positions
To store positions to the 1 and 2
buttons:
1. The ignition must be in ON/
RUN/START or ACC/ACCESSORY.
Page 64

Cadillac CTS/CTS-V Owner Manual (GMNA-Local izi ng- U.S ./C anada2ndPrint-11254870) - 2017 - Final Review - 6/14/16
64 SEATS AND RESTRAINTS
2. Adjust the driver seat, outside
mirrors, and the power til t and
telescoping steering colu mn (if
equipped) to the desired
positions.
3. Press and release SET. A beep
will sound.
4. Immediately press and hold 1
until two beeps sound.
5. Repeat Steps 1 and 2 for a
second drive r using 2.
Repeat Steps 1–4 using
B to store
your positions for gett ing out of the
vehicle.
Manually Recalling Memory
Positions
Press and hold 1, 2, or
B to
manually recall the previously stored
memory positions. Releasing 1, 2,
or
B before the stored positions are
reached stops the recall.
Automatically Recalling Memory
Positions
If programmed in vehicle
personali zation, the Auto (Automatic)
Memory Rec all feature automatically
recalls the current driver’s previously
stored 1 or 2 position when the
ignition is changed from off to ON/
RUN/START or ACC/ACCESSORY.
The transmission must be in P (Park).
See
Vehicle Personalization 0 158.
To stop recall movement, press one of
the memory, driver seat, outside
mirror, or power tilt and telescoping
steering column controls.
RKE transmitters are not lab eled with
a number. If your memory seat
position is stored to 1 or 2 bu t this
position is not automatically recalling,
then store your positions to the other
button or switch RKE transmitters
with the other driver.
If the vehicle’s driver has changed, in
some vehicles the Driver ID may be
displayed for the first few ignition
cycles.
Easy Exit Recall
If programmed on in the vehicle
personali zation menu, the Easy Exit
feature recalls the previously stored
B (Exit) positions when leaving the
vehicle. See “Storing Memory
Positions” listed previously. See also
Vehicle Personalization 0 158.
Easy Exit Recall automatically
activates when one of the following
occurs:
.
The vehicle is turned off and the
driver door is opened within a
short time.
.
The vehicle is turned off with the
driver door open.
Obstructions
If something has blocked the dri ver
seat and/or the power tilt and
telescoping steering colu mn while
recalling a memory position, the recall
may stop. Remove the obstruction.
Then do one of th e following:
.
If au tomatically or manually
recalling the stored memory
position, pr ess and hold the
appropria te manual control for
two seconds. Try recalling again
by p ressing the appropr iate
memory button, then try recalling
again by opening the driver door
and pressing
K on the RKE
transmitt er.
Page 65

Cadillac CTS/CTS-V Owner Manual (GMNA-Local izi ng- U.S ./C anada2ndPrint-11254870) - 2017 - Final Review - 6/14/16
SEATS AND RESTRAINTS 65
.
If recalling the exit position, press
and hold the appropriate manual
control for the exit feature not
recalling for two seconds. Then try
recalling the exit position again.
If the memory position is still not
recalling, se e your dealer for se rvice.
Heated and Ventilated
Front Seats
Object-ID=43 27985 Owner =Landstrom, Michael
LMD=02-Dec-2 015 LMB=Lan dstrom, Mi chael
{
Warning
Object-ID=27 69687 LMD=0 8-Feb-2012
If you cannot feel temperature
change or pain to the skin, the seat
heater may cause burns. To reduc e
the risk of burns, pe ople with such
a condition should use care whe n
using the seat heater, especially for
long periods of time. Do not place
anything on the seat that insulates
against heat, such as a blanket,
cushion, cover, or similar item. This
may cause the seat heater to
(Continued)
Warning (Continued)
Object-ID=27 69687 LMD=0 8-Feb-2012
overheat. An overheated seat heater
may cause a bu rn or may damage
the seat.
4326236
If eq uipped, the buttons are near the
climate cont rols on the center stack.
To operate, the ignition must be on.
Press
J or z to heat the driver or
passenger seat cushion and seatback .
Press
C or { to ventilate the driver
or passenger seat.
Press the button once for the highest
setting. With each pr ess of the button,
the seat will change to the next lower
setting, and then to the off setting.
The indicator lights next to th e
buttons indi cate three for the highest
setting and one for the lowest. If the
front heated seats are on high, the
level may automatically be lowered
after approximately 30 minutes.
When this feature is off, the heated
and ventilated seat symbols on the
buttons are white. A ventilated seat
has a fan that pul ls or pushes air
through the seat. The air is not
cooled. When a heated seat is turned
on, the symbol turns red. When a
ventilated seat is turned on, the
symbol turns blue.
The passenger seat may take longer to
heat up.
Auto Heated and Ventilated Seats
When the vehicle is on, this feature
will automatically activate the heated
or ventila ted seats at the level
required by the vehicle’s i nterior
temperatu re.
Page 66

Cadillac CTS/CTS-V Owner Manual (GMNA-Local izi ng- U.S ./C anada2ndPrint-11254870) - 2017 - Final Review - 6/14/16
66 SEATS AND RESTRAINTS
The active high, medium, low, or of f
heated or ventilated seat level will be
indicated by the manual heated or
ventilated seat buttons on the center
stack. Use the manual heated or
ventilated seat buttons on the center
stack to turn auto heated or ventilated
seats off. If the pa ssenger seat is
unoccupied, the auto heated or
ventilated seats feature will not
activate that seat. The auto heated or
ventilated seats feature can be
programmed to always be enabled
when the vehicle is on.
See
Vehicle Personalization 0 158.
Remote Start Heated and Ventilated
Seats
During a remote start, the heated or
ventilated seats, if equipped, can be
turned on automatically. When it is
cold outside, the heated seats turn on,
and when it is hot outside the
ventilated seats turn on. The heated
or ventila ted seats are canceled when
the ignition is turned on. Press the
heated or ventilated seat button to
use the heated or ventilated seats
after the vehicle is sta rted.
The heated or ventilated seat
indicator lights do not turn on dur ing
a remote start.
The temperature performance of an
unoccupied seat may be reduced. This
is normal.
The heated or ventilated seats may be
enabled or disabled in the vehicle
personali zation menu. See
Remote
Vehicle Start 0 38
and Vehicle
Personaliz ation 0 158
.
Rear Seats
Object-ID=33 40510 Owner =Landstrom, Michael
LMD=31-Mar-2 016 LMB=La ndstrom, Mi chael
3340318
Split fold seats are equipped with a
locking latch.
Lock and unlock the seatback using
the vehicle key in the cylinder.
The latch will not open when the
seatback is locked.
Page 67

Cadillac CTS/CTS-V Owner Manual (GMNA-Local izi ng- U.S ./C anada2ndPrint-11254870) - 2017 - Final Review - 6/14/16
SEATS AND RESTRAINTS 67
Folding the Seatback
Caution
Object-ID=28 11111 LMD=26-M ar-2012
Folding a rear seat with the safety
belts still fastened may cause
damage to the seat or the safety
belts. Always unbuckle the safety
belts and return them to their
normal stowed position before
folding a rear seat.
If eq uipped, either side of the seatback
can be folded for more cargo space.
Fold a seatback only whe n the vehicle
is not moving.
To fold the seatback:
2717516
1. Disconnect the rear saf ety belt
mini-latch using a key in the slot
on the mini-buckle, and let the
belt retract.
2711532
2. Unlock the seatback using the
vehicle key in the cylinder.
Pull the lever on top of the
seatback toward you to release
the seatback.
A red tab near the seatback lever
raises when the seatback is
released.
3. Fold the seatback forward.
Repeat Steps 2 and 3 to fold th e
other seatback, if desired.
Page 68

Cadillac CTS/CTS-V Owner Manual (GMNA-Local izi ng- U.S ./C anada2ndPrint-11254870) - 2017 - Final Review - 6/14/16
68 SEATS AND RESTRAINTS
Raising the Seatback
{
Warning
Object-ID=22 08277 LMD=11-Nov-2008
If ei ther seatback is not locked , it
could move forward in a sudden
stop or crash. That could cause
injury to the person sit ting there.
Always push and pull on the
seatbacks to be sure they are
locked.
{
Warning
Object-ID=22 11711 LMD=20 -Nov-2008
A safety belt t hat is im properly
routed, not properly attached,
or twisted will not provide the
protectio n needed in a crash. Th e
person wearing the belt could be
seriously injured. After raising the
rear seatback, always check to be
sure that the safety belts are
properly routed and attached, and
are not twisted.
To raise a sea tback:
1. Lift the seatback up. Mak e sure
the center safety belt and latch
do not get trapped behind the
seat. Push the seatback rearward
to s ecure it in pl ace.
A red tab near the seatback lever
retracts when the seatback is in
place.
2. Push and pull the top of the
seatback to be sure it is in
position.
3. Lock the seatback using the
vehicle key in the cylinder.
4. Reconnect th e center safety b elt
mini-latch to the mini-buckle. Do
not let the belt twist.
5. Pull on the center safety belt to
make sure the mini-latc h is
secure.
6. Repeat the steps to raise the
other seatback, if necessary.
When the seat is not in use, it should
be kept i n the upr ight, locked position.
Heated Rear Seats
Object-ID=29 00627 Owner =Landstrom, Michael
LMD=08-Oct-2 015 LMB=Lan dstrom, Mi c hael
{
Warning
Object-ID=27 71866 LMD=1 4-Feb-2012
If you cannot feel temperature
change or pain to the skin, the seat
heater may cause burns. See the
Warning unde r
Heated and
Ventilated Front Seats 0 65
.
3255496
If eq uipped, the buttons are on the
rear of the center console.
Page 69

Cadillac CTS/CTS-V Owner Manual (GMNA-Local izi ng- U.S ./C anada2ndPrint-11254870) - 2017 - Final Review - 6/14/16
SEATS AND RESTRAINTS 69
With the ignition in ON/RUN/START,
press
M o r L to heat the left or right
outboard seat cushion and seatback.
An indicator on the climate control
display appears when this feature
is on.
Press the button once for the highest
setting. With each pr ess of the button,
the heated seat changes to the next
lower setting, and then the off setting.
Three lights indicate the highest
setting, and one light in dicates the
lowest. If the heated seats are on high,
the level may automatically be
lowered after approximately
30 minutes.
Rear Seat
Pass-Through Door
Object-ID=29 00814 Owner =Landstrom, Michael
LMD=11-Apr-2016 LM B=Landstrom, Michael
2717270
The vehicle has a rear seat
pass-through door in the center of the
rear seatback. Fold down the center
armrest and pull the lever all the way
down to release the door.
The pass-through door c an be locked
or unlocked using the knob on the
back of the door. Open the trunk to
access the lock. Turn the knob tow ard
Q to lock the door or away from Q to
unlock the door.
Safety Belts
Object-ID=25 07749 Owner =Foster, Cindi
LMD=26-Jan-2 016 LMB=Clark, Lorien
This section of the manual describes
how to use safety belts properly.
It also describes some things not to
do with safety belts.
{
Warning
Object-ID=25 07477 LMD=0 3-Sep-2013
Do n ot let an yone ride where a
safety belt cannot be worn proper ly.
In a crash, if yo u or your
passenger(s) are not wearing safety
belts, injuries can be much worse
than if you are w earing safety belts.
You can be seriously injured or
killed by hitting things inside the
vehicle harder or by being ejected
from the vehicle. In addition,
anyone who is not buckled up can
strike other passengers in the
vehicle.
It is extremely dangerous to ride in
a cargo area, inside or outside of a
vehicle. In a collision, passengers
(Continued)
Page 70

Cadillac CTS/CTS-V Owner Manual (GMNA-Local izi ng- U.S ./C anada2ndPrint-11254870) - 2017 - Final Review - 6/14/16
70 SEATS AND RESTRAINTS
Warning (Continued)
Object-ID=25 07477 LMD=0 3-Sep-2013
riding in these areas are more likely
to b e seriously injured or killed. Do
not allow passengers to ride in any
area of the vehicle that is not
equipped with seats and safety
belts.
Always wear a safety belt, and
check that all passenger(s) are
restrained properly too.
This vehicle has indicators as a
reminder to buckle the safety belts.
See
Safety Belt Reminders 0 129.
Why Safety Belts Work
1966609
When riding in a vehicle, you travel as
fast as the vehicle does. If the vehicle
stops suddenly, you ke ep going until
something stops you. It could be the
windshield, the instrumen t panel,
or the safety belts!
When you wear a safety belt, you and
the vehicle slow down together. There
is more time to stop because you stop
over a longer distance and, when worn
properly, your strongest bones take
the forces from the safety belts. That
is why wearing safety belt s make s
such good sense.
Questions and Answers About
Safety Belts
Q: Will I be trapped in the vehicle
after a crash if I am wearing a
safety belt?
A: You could be — whether you are
wearing a safety belt or not. Your
chance of being conscious during
and after a crash, so you can
unbuckle and get out, is much
greater if you are belted.
Q: If my vehicle has ai rbags, why
should I have to wear safety
belts?
A: Airbags are supplemental syste ms
only; so they work with safety
belts — not instead of them.
Whether or not an airbag is
provided, all occupants still have
to b uckle up to get the most
protection.
Also, in nearly all states and in all
Canadian provinces, the law
requires wearing safety belts.
Page 71

Cadillac CTS/CTS-V Owner Manual (GMNA-Local izi ng- U.S ./C anada2ndPrint-11254870) - 2017 - Final Review - 6/14/16
SEATS AND RESTRAINTS 71
How to Wear Safety Belts
Properly
Object-ID=25 10095 Owner =Foster, Cindi
LMD=26-Jan-2 016 LMB=Clark, Lorien
This section is only for people of
adult size.
There are special things to know
about safety belts and children, and
there are different rules for smaller
children and infants. I f a child will be
riding in the vehicle, see Older Children
0 89
or Infants and Young Children
0 90
. Follow those rules for everyone's
protection.
It is very important for all occupants
to b uckle up. Statistics show that
unbelted people are hurt more o ften
in crashes than those who are wearing
safety belts.
There are important things to know
about wearing a safety belt prope rly.
1966371
.
Sit up s traight and always keep
your feet on the floor in front
of you.
.
Always use the correct buckle for
your seating position.
.
Wear the lap part of the belt low
and snug on the hips, just
touching the thighs. In a crash ,
this applies force to the strong
pelvic bones and you woul d be
less likely to slide under the lap
belt. If you slid under it, the belt
would apply force on your
abdomen. This could cause serious
or even fatal injuries.
.
Wear the shoulder belt ov er the
shoulder and across the chest.
These parts of the body are best
able to take belt restraining forces.
The shoulder belt locks if there is
a sudden stop or c rash.
{
Warning
Object-ID=25 10048 LMD=0 3-Sep-2013
You can be seriously injured,
or even killed, by not wearing your
safety belt properly.
.
Never allow the lap or
shoulder belt to become loose
or twisted.
.
Never wear the sho ulder belt
under both arms or behind
your back.
.
Never route the lap or
shoulder belt over an armrest.
Lap-Shoulder Belt
Object-ID=39 56968 Owner =Foster, Cindi
LMD=26-Jan-2 016 LMB=Clark, Lorien
All seating positions in the vehicle
have a lap-shoulder belt.
Page 72

Cadillac CTS/CTS-V Owner Manual (GMNA-Local izi ng- U.S ./C anada2ndPrint-11254870) - 2017 - Final Review - 6/14/16
72 SEATS AND RESTRAINTS
If you are using a rear seating position
with a detachable saf ety belt and the
safety belt is not attached, see Rear
Seats 0 66
for instructions on
reconnecting the safety belt to the
mini-buckle.
The following instructions explain
how to wear a lap-shoulder belt
properly.
1. Adjust the seat, if the seat is
adjustable, so you can sit up
straight. To see how, see “Seats”
in the Index.
1877328
2. Pick up the latch plate and pull
the belt across you. Do not let it
get twisted.
The lap-shoulder belt may lock if
you pull the belt across you very
quickly. If this happens, let the
belt go back slightly to unlock it.
Then pull the belt across you
more slowly.
If the shoulder portion of a
passenger belt is pulled out all
the way, the child restraint
locking feature may be engaged.
If this happens, let the belt go
back all the way and start again.
1966395
If the webbing locks in the latch
plate before it reaches the
buckle, tilt the latch plate flat to
unlock.
1877330
3. Push the latch plate into the
buckle until it clicks.
Pull up on the latch plate to
make sure it is secure. If the belt
is not long enough, see
Safety
Belt Extende r 0 75
.
Position the release b utton on
the buckle so that the safety belt
could be quickly unbuckled if
necessary.
Page 73

Cadillac CTS/CTS-V Owner Manual (GMNA-Local izi ng- U.S ./C anada2ndPrint-11254870) - 2017 - Final Review - 6/14/16
SEATS AND RESTRAINTS 73
4. If eq uipped with a shoulder belt
height adjuster, move it to the
height that is right for you. See
“Shoulder Belt Height Adjuster”
later in this section for
instructions on use and
important safety information.
1966390
5. To m ake the la p part tight, pull
up on the shoulder belt.
1877333
To unlatch the belt, push the button
on the buckle. The belt should ret urn
to i ts stowed position.
Always stow the safety belt slowly.
If the safety belt webbing return s
quickly to the stowed position, the
retractor may lock and cannot be
pulled out. If this happens, pull the
safety belt straight out firmly to
unlock the webbing, and then release
it. If t he webbing is still locked in the
retractor, see your dealer.
Before a door i s closed, be sure the
safety belt is out of the way. If a door
is slammed against a safety belt,
damage can occur to both the safe ty
belt and the vehicle.
Shoulder Belt Height Adjuster
The vehicle has a shoulder belt hei ght
adjuster for the driver and right front
passenger seating position s.
Adjust the height so the shoulder
portion of the belt is on the shoulder
and not falling off of it. The b elt
should be close to, but not contacting,
the neck. Improper shoulder belt
height adjustment could reduce the
effective ness of the safety belt in a
crash. See
How to Wear Safety Belts
Properly 0 71
.
Page 74

Cadillac CTS/CTS-V Owner Manual (GMNA-Local izi ng- U.S ./C anada2ndPrint-11254870) - 2017 - Final Review - 6/14/16
74 SEATS AND RESTRAINTS
2920266
Press the release button and move the
height adjuster to the desired position.
The adjuster can be moved up by
pushing the slide/trim up. After the
adjuster is set to the desired position,
try to move it down without pushing
the release button to make sure it has
locked into position.
Automatic Safety Belt
Tightening System
The vehicle may have the Automatic
Safety Belt Tightening System.
Each time the vehicle is started with
the front safety belts buckled, the
system activates once to tighten the
safety belts when the forward vehicle
speed exceeds the thr eshold for
activation.
The system also activates during
emergency braking and/or sudden
driving maneuvers and releases when
driving conditions return to normal.
The system turns off whenever
Competitive Driving Mode is activated,
and will turn back on when
Competitive Driving Mode is
deactivated. See
Competitive Driving
Mode 0 235
.
The system will not activate if the
Traction Control/Electronic Stability
Control system is not functioning
properly. See
Traction Control/
Electronic Stability Control 0 230
.
If there is a problem with the
Automatic Safety Be lt Tightening
System, a message displays on the
Driver Information Center (DIC). See
Safety Belt Messages 0 156. Other
safety belt functions are not affected
by t he Automatic Safety Belt
Tightening System.
Safety Belt Pretensioners
This vehicle has safety belt
pretensio ners for front outboard
occupants. Although the safety belt
pretensio ners cannot be seen, they are
part of the safety belt assembly. They
can help tighten the safe ty belts
during the early stages of a moderate
to s evere frontal, near frontal, or rear
crash if the threshold cond itions for
pretensio ner activation are met. Safety
belt pretensioners can also help
tighten the safety belts in a side crash
or a rollover event.
Pretensio ners work only once. If the
pretensio ners activate in a crash, the
pretensio ners and probably other
parts of the vehicle's safety belt
system will need to be replaced. See
Replacing Safety Belt S ystem Parts after
a Crash 0 76
.
Do n ot sit on the outboard safety belt
while enteri ng or exiting the vehicle or
at a ny ti me while sitting in the seat.
Sitting on the safety belt can damage
the webbing and hardware.
Page 75

Cadillac CTS/CTS-V Owner Manual (GMNA-Local izi ng- U.S ./C anada2ndPrint-11254870) - 2017 - Final Review - 6/14/16
SEATS AND RESTRAINTS 75
Rear Safety Belt Comfort Guides
Rear safety belt comfort guides may
provide added safety belt comfort for
older children who have outgrown
booster seats and for some adults.
When install ed on a shoulder belt, the
comfort guide positions the belt away
from the neck and head.
Comfort guides are available through
your dealer for the rear outboard
seating positions. Instructions are
included with the guide.
Safety Belt Use During
Pregnancy
Object-ID=21 53268 Owner =Foster, Cindi
LMD=26-Jan-2 016 LMB=Clark, Lorien
Safety belts work for everyone,
including pregnant women. Like all
occupants, they are more likely to be
seriously injured if they do not wear
safety belts.
1966380
A pregnant woman should wear a
lap-shoulder belt, and the lap portion
should be worn as low as possible,
below the rounding, th roughout the
pregnancy.
The best way to protect the fetus is to
protect the mother. When a saf ety belt
is worn properly, it is more likely that
the fetus will not be hurt in a crash.
For pregnant women, as for anyone,
the key to making safety belts
effective is wearing them properly.
Safety Belt Extender
Object-ID=21 53288 Owner =Foster, Cindi
LMD=26-Jan-2 016 LMB=Clark, Lorien
If the vehicle's safe ty belt will fasten
around you, you should use it.
But if a safety belt is not long enough,
your dealer will orde r you an ex tender.
When you go in to order it, take the
heaviest coat you will wear, so the
extender will be long enough for you.
To help avoid personal injury, do not
let someone else use it, and use it
only for the seat it is made to fit. The
extender has been desi gned for ad ults.
Never use it for se curing child
restraints. To wear it, attach it to the
regular safety belt. For more
information, see the instruction sheet
that comes with the extender.
Safety System Check
Object-ID=43 63642 Owner =Foster, Cindi
LMD=26-Jan-2 016 LMB=Clark, Lorien
Check that the safety belt reminder,
safety belts, buckles, latch plates, and
retractors, are all working properly.
Look for any oth er loose or damaged
safety belt system parts that might
keep a sa fety belt system from
Page 76

Cadillac CTS/CTS-V Owner Manual (GMNA-Local izi ng- U.S ./C anada2ndPrint-11254870) - 2017 - Final Review - 6/14/16
76 SEATS AND RESTRAINTS
performing properly. See your dealer
to h ave it repa ired. Torn or frayed
safety belts may not protect you in a
crash. They can rip apart under
impact forces. If a belt is torn or
frayed, have it replaced immediately.
Make sure the safety belt reminder
light is working. See
Safety Belt
Reminders 0 129
.
Keep safety belts clean and dr y. See
Safety Belt Care 0 76.
Safety Belt Care
Object-ID=21 53293 Owner =Foster, Cindi
LMD=26-Jan-2 016 LMB=Clark, Lorien
Keep belts clean and dry.
{
Warning
Object-ID=22 08127 LMD=1 3-Oct-2015
Do n ot bleach or dye safety belt
webbing. It may severely weaken
the webbing. In a crash, they might
not be able to provide adequate
protectio n. Clean and rinse safety
belt webbing only with mild soap
and lukewarm water. Allo w the
webbing to dry.
Safety belts should be properly cared
for and maintained.
Safety belt hardware should be kept
dry and free of dust or debr is. As
necessary exterior hard surfaces a nd
safety belt webbing may be lightly
cleaned with mild soap and water.
Ensure there is not excessi ve du st or
debris in the mechanism. If dust or
debris exists in the syst em please see
the dealer. Parts may ne ed to be
replaced to ensure proper
functionality of the system.
Replacing Safety Belt
System Parts after a Crash
Object-ID=21 53294 Owner =Foster, Cindi
LMD=26-Jan-2 016 LMB=Clark, Lorien
{
Warning
Object-ID=22 09624 LMD=0 3-Sep-2013
A crash can da mage the safety belt
system in the vehicle. A damaged
safety belt system may not properl y
protect the person usin g it,
resulting in serious injury or even
death in a crash. To help make sure
(Continued)
Warning (Continued)
Object-ID=22 09624 LMD=0 3-Sep-2013
the safety belt systems are working
properly after a crash, have them
inspected and any necessary
replacements made as soon as
possible.
After a minor c rash, replacement of
safety belts may not be necessary. But
the safety belt assemblies that w ere
used during any crash may have been
stressed or damaged. See your dealer
to h ave the safety belt assemblies
inspected or replaced.
New parts and repairs may be
necessary even if the safety b elt
system was not being used at the time
of t he crash.
Have the safety belt pretensioners
checked if the vehicle has been in a
crash, or if the a irbag readiness lig ht
stays on after you start the vehicle or
while you are driving. See
Airbag
Readiness Light 0 129
.
Page 77

Cadillac CTS/CTS-V Owner Manual (GMNA-Local izi ng- U.S ./C anada2ndPrint-11254870) - 2017 - Final Review - 6/14/16
SEATS AND RESTRAINTS 77
Airbag System
Object-ID=29 11380 Owner=Foster, Cindi
LMD=26-Jan-2 016 LMB=Clark, Lorien
The vehicle has the following airbags:
.
A frontal airbag for the driver.
.
A frontal airbag for the front
outboard passenger.
.
A knee airbag for the driver.
.
A knee airbag for the front
outboard passenger.
.
A seat-mounted side i mpact airbag
for the driver.
.
A seat-mounted side i mpact airbag
for the front outboard passenger.
.
Seat-mounted side impact airbags
for the second row outboard
passengers.
.
A roof-rail airbag for the driver
and the passenger seated directly
behind the driver.
.
A roof-rail airbag for the front
outboard passenger and the
passenger seated directly behind
the front outboard passenger.
All vehicle airbags have the word
AIRBAG on the trim or on a label near
the deployment opening.
For frontal airbags, the word AIRBAG
is on the center of the steering wheel
for the driver and on the instrument
panel for the front outboard
passenger.
For knee airbags, the word AIRBAG is
on the lower part of the instrument
panel.
For s eat-mounted side impact airbags,
the word AIRBAG is on the side of the
seatback clos est to the door.
For roof-rail airbags, the word AIRBAG
is on the ceiling or trim.
Airbags are designed to supplement
the protection provided by safety
belts. Even though today's airbags are
also designed to help reduce the risk
of i njury from the force of an inflating
bag, all airbags must inflate very
quickly to do their job.
Here are the most important thi ngs to
know about the airbag system:
{
Warning
Object-ID=22 10167 LMD=1 0-Dec-2015
You can be severely injured or
killed in a crash if you are no t
wearing your safety belt, even with
airbags. Airbags are designed to
work with safety belts, not replace
them. Also, airbags are not designed
to i nfla te in every crash. In some
crashes safety belts are the only
restraint. See
When Should an
Airbag Inflate? 0 80
.
Wearing your safety belt during a
crash helps reduce your chance of
hitting things inside the vehicle or
being ejected from it. Airbags are
“supplemental restraints” t o the
safety belts. Everyone in the vehicle
should wear a safety belt properly,
whether or not there is an airbag
for that person.
Page 78

Cadillac CTS/CTS-V Owner Manual (GMNA-Local izi ng- U.S ./C anada2ndPrint-11254870) - 2017 - Final Review - 6/14/16
78 SEATS AND RESTRAINTS
{
Warning
Object-ID=22 10478 LMD=1 6-Jan-2015
Because airbags inf late with great
force and faster than the blink of an
eye, anyone who is up against,
or very close to any airbag when it
infl ates can be seriously injured or
killed. Do not sit unnecessarily
close to any ai rbag, as y ou would be
if sitting on the edge of the seat or
leaning forward. Safety belts help
keep you in po sition before and
during a crash. Always wear a safety
belt, even with airbags. The driver
should sit as far b ack as po ssible
while still maintaining control of
the vehicle. The safety belts and the
front outboard pass enger airbags
are most effective when you are
sitting well back and upright in the
seat with both feet on the floor.
Occupants should not lean on or
sleep against the door or side
windows in seating po sitions with
seat-mounted side impact airbags
and/or roof-rail airbags.
{
Warning
Object-ID=29 08148 LMD=2 9-Jul-2013
Children who are up against,
or very close to, any airbag when it
infl ates can be seriously injured or
killed. Always secure children
properly in the vehicle. To read
how, see
Older Children 0 89 or
Infants and Young Children 0 90.
1971498
There is an airbag readiness light on
the instrument cluster, which shows
the airbag symbol. The system checks
the airbag electrical system for
malfunctions. The light tells you if
there is an electrical problem. See
Airbag Readin ess Light 0 129 for mo re
information.
Where Are the Airbags?
Object-ID=32 13954 Owner =Foster, Cindi
LMD=26-Jan-2 016 LMB=Clark, Lorien
1877319
The driver frontal airbag is in the
center of the steering wheel.
The front outboard passenger frontal
airbag is in the passenger side
instrument panel.
Page 79

Cadillac CTS/CTS-V Owner Manual (GMNA-Local izi ng- U.S ./C anada2ndPrint-11254870) - 2017 - Final Review - 6/14/16
SEATS AND RESTRAINTS 79
2716161
The driver knee airbag is below the
steering column. The front outboard
passenger knee airbag is below the
glove box.
Driver Side Shown, Passenger Side
Similar
2592691
The seat-mounted side impact airbags
for the driver and front outboard
passenger are in the side of the
seatbacks closest to the door.
The roof-rail airbags for the driver,
front outboard passenger, and second
row o utboard passen gers are in the
ceiling above the side wi ndows.
Rear Seat Driver Side Shown,
Passenger Side Similar
2184700
The second row seat-mounted side
impact airbags are in the sides of the
rear seatback closest to the door.
{
Warning
Object-ID=22 10479 LMD=0 3-Sep-2013
If something is between an
occupant and an airbag, the airbag
might not inflate properly or it
might force the object into that
person causing severe injury or
even death. The path of an inflating
(Continued)
Page 80

Cadillac CTS/CTS-V Owner Manual (GMNA-Local izi ng- U.S ./C anada2ndPrint-11254870) - 2017 - Final Review - 6/14/16
80 SEATS AND RESTRAINTS
Warning (Continued)
Object-ID=22 10479 LMD=0 3-Sep-2013
airbag must be kept clear. Do not
put anything between an occupant
and an airbag, and do not attach or
put anything on the steering wheel
hub or on or near any other airbag
covering.
Do n ot use se at accessories that
block the inflation path of a
seat-mounted side impact airbag.
Never secure anything to the roof of
a vehicle with roof-rail airbags by
routing a rope or tie‐down through
any door or window opening. If you
do, the path of an inflating roof-rail
airbag will be blocked.
When Should an Airbag
Inflate?
Object-ID=33 18536 Owner =Foster, Cindi
LMD=26-Jan-2 016 LMB=Clark, Lorien
This vehicle is equipped with airbags.
See
Airbag System 0 77. Airbags are
designed to inflate if the impact
exceeds the specific airbag system's
deployment threshold. Deployment
threshold s are used to predict how
severe a crash is likely to be in time
for the airbags to inflate and help
restrain the occupants. The vehicle
has electronic sensors that help the
airbag system determine the severity
of t he impact. Deploy ment thresholds
can v ary with specific vehicle design.
Frontal airbags are designed to infla te
in moderate to severe frontal or near
frontal crashes to help reduce th e
potential for severe injuries, mainly to
the driver's or front outboard
passenger's head and chest.
Whether the frontal airbags will or
should inflate is not based primarily
on how fast the vehicle is traveling.
It depends on what is hit, the
direction of the impact, and how
quickly the vehicle s lows down.
Frontal airbags may inflate at
different crash speeds depending on
whether the vehicle hits an object
straight on or at an an gle, and
whether the object is fixed or moving,
rigid or deformable, narrow or wide.
Frontal airbags are not intended to
inflate during vehicle rollovers, in rear
impacts, or in many side impacts.
In a ddition, the vehicle has advanced
technology frontal airbags. Advanced
technology frontal airbags adjust the
restraint according to crash severity.
Knee airbags are designed to inflate in
moderate to severe frontal or near
frontal impacts. Knee airbags are not
designed to inflate during vehicle
rollovers, in rear impacts, or in many
side impacts.
The vehicle also has a seat position
sensor that enables the sensing
system to monitor the position of the
front outboard passenger seat. The
passenger seat position sensor and the
passenger safety bel t bu ckle provide
information that is used to det ermine
if the passenger knee airbag should
inflate.
Seat-mounted side impact airbags are
designed to inflate in moderate to
severe side crashes depending on the
location of the impact. Seat-mounted
side impact airbags are not designed
to i nfla te in frontal impacts, near
frontal impacts, rollovers, or rear
Page 81

Cadillac CTS/CTS-V Owner Manual (GMNA-Local izi ng- U.S ./C anada2ndPrint-11254870) - 2017 - Final Review - 6/14/16
SEATS AND RESTRAINTS 81
impacts. A seat-mounted side impact
airbag is designed to inflate on the
side of the vehicle that is struck .
Roof-rail airbags are designed to
inflate in moderate to severe side
crashes depending on the location of
the impact. In addition, these roof-rail
airbags are designed to inflate during
a rollover or i n a severe fro ntal
impact. Roof-rail airbags are not
designed to inflate in rear impacts.
Both roof-rail airbags will inflate w hen
either side of the vehicle is struck,
if the sensing system predicts that the
vehicle is about to roll over on its
side, or in a severe frontal impact.
In a ny particular crash, no one can
say whether an airbag should have
inflated simply because of the vehicle
damage or repair costs.
What Makes an Airbag
Inflate?
Object-ID=25 68322 Owner =Foster, Cindi
LMD=26-Jan-2 016 LMB=Clark, Lorien
In a deployment event, the sensing
system sends an electrical signal
triggering a release of gas from the
inflator. Gas from the inflator fills the
airbag causing the bag to break out of
the cover. The inflator, the airb ag, and
related hardware are all part of the
airbag module.
For airbag locations, see
Where Are the
Airbags? 0 78
.
How Does an Airbag
Restrain?
Object-ID=25 68323 Owner =Foster, Cindi
LMD=26-Jan-2 016 LMB=Clark, Lorien
In m oderate to severe frontal or near
frontal collisions, even belted
occupants can contact the steering
wheel or the instrument panel. In
moderate to severe side collisions,
even belted occupants can contact the
inside of the vehicle.
Airbags supplement the protection
provided by safety belts by
distributing the force of the impact
more evenly over the occupant's body.
Rollover capa ble roof-rail airbags are
designed to help contain the head and
chest of occupants in the outboard
seating positions in the first and
second rows. The rollover capable
roof-rail airbags are designed to help
reduce the risk of full or partial
ejection in rollover events, although
no system can prevent all such
ejections.
But airbags would not help in many
types of c ollisions, primarily becau se
the occupant's motion is not toward
those airbags. See
When Should an
Airbag Inflate? 0 80
.
Airbags should never be regarded as
anything more than a supplement to
safety belts.
What Will You See after an
Airbag Inflates?
Object-ID=37 65109 Owner =Foster, Cindi
LMD=26-Jan-2 016 LMB=Clark, Lorien
After the frontal, knee, and
seat-mounted side impact airbags
inflate, they quickly deflate, so quic kly
that some people may not even realize
an airbag inflated. Roof-rail airbags
may still be at least partially inf lat ed
for some time after they inflate. Some
components of the air bag module may
be hot for several m inutes. For
location of the airbags, s ee
Where Are
the Airbags? 0 78
.
Page 82

Cadillac CTS/CTS-V Owner Manual (GMNA-Local izi ng- U.S ./C anada2ndPrint-11254870) - 2017 - Final Review - 6/14/16
82 SEATS AND RESTRAINTS
The parts of the airbag that come into
contact with you may be warm, but
not too hot to touch. There may be
some smoke and dust coming from
the vents in the defl ated airbags.
Airbag inflation does not prevent the
driver from seeing out of the
windshield or being able to steer the
vehicle, nor does it prevent people
from leaving the vehicle.
{
Warning
Object-ID=22 08291 LMD=0 3-Sep-2013
When an airbag inflates, there may
be dust in the air. This dust could
cause breathing problems for
people with a history of asthma or
other breathing trouble. To avoid
this, everyone in the vehicle should
get out as soon as it is safe to do
so. If you have breathing problems
but cannot get out of the vehicle
after an airbag inf lates, then get
fresh air by opening a window or a
door. If you experience breathing
problems following an airbag
deployment, you s hould seek
medical attention.
The vehicle has a feature that may
automatically unlock the doors, turn
on the interior lamps and hazard
warning flashers, and shut off the fuel
system after the airbags inflate. The
feature may also activate, without
airbag inflation, after an event that
exceeds a predetermined threshold.
You can lock the doors, turn off the
interior lamp s, and turn off the hazard
warning flashers by using the controls
for those features.
{
Warning
Object-ID=22 21497 LMD=0 3-Sep-2013
A crash severe enough to inflate the
airbags may have also damaged
important functions in the vehicle,
such as the fuel system, brake and
steering systems, etc. Even if the
vehicle appe ars to be drivable after
a moderate crash, there may be
concealed damage that could make
it difficult to safely operate the
vehicle.
Use caution if you shoul d attempt
to r estart the engine after a crash
has occurred.
In m any crashes severe enough to
inflate the airbag, windsh ields are
broken by vehicle deformation.
Additional windshield breakage may
also occur from the front outboard
passenger airbag.
.
Airbags are designed to inflate
only once. After an airbag inflates,
you will need some new parts for
the airbag system. If you do not
get them, the airbag system will
not be there to help protect you in
another crash. A new system will
include airbag modules and
possibly other parts. The service
manual for the vehicle covers the
need to replace other parts.
.
The vehicle has a crash sensing
and diagnostic module which
records information after a crash.
See
Vehicle Data Recording and
Privacy 0 399
and Event Data
Recorders 0 399
.
.
Let only qualified technicians
work on the airb ag systems.
Improper service can mean that
an airbag system will not work
properly. See your dealer for
service.
Page 83

Cadillac CTS/CTS-V Owner Manual (GMNA-Local izi ng- U.S ./C anada2ndPrint-11254870) - 2017 - Final Review - 6/14/16
SEATS AND RESTRAINTS 83
Passenger Sensing System
Object-ID=29 11411 Owner= Foster, Cindi
LMD=08-Feb-2 016 LMB=Foster, Cindi
The vehicle has a passenger sen sing
system for the front outboard
passenger po sition. The passenger
airbag status indicator will light on
the overhead console when the vehicle
is started.
United States
2920323
Canada and Mexico
2048776
The words ON and OFF or the symbol
for on and off will be visible during
the system check. When th e system
check is complete, either the word ON
or OFF, or the symbol for o n and off
will be visible. See
Passenger Airbag
Status Indicator 0 130
.
The passenger sensing system turns
off the front outboard passenger
frontal airbag and knee airbag, under
certain conditions. No other airbag is
affected by the passenger sensing
system.
The passenger sensing system works
with sensors that are part of the front
outboard passenger seat. The sensors
are designed to detect the presence of
a properly seated occupant and
determine if the front outboard
passenger frontal airbag and knee
airbag should be allowed to inflate
or not.
According to accident statistics,
children are safer when properly
secured in a rear seat in a correct
child restraint for their weight
and size.
Whenever possible, children aged
12 and under should be secured in a
rear seating position.
Never put a rear-facin g child seat in
the front. This is because the risk to
the rear-facing child is so great, if the
airbag inflates.
{
Warning
Object-ID=25 55658 LMD=11-Aug-2015
A child in a rear-facing child
restraint can be seriously injured or
killed if the passenger frontal airbag
infl ates. This is because the back of
the rear-facing child restraint would
be very close to the inflating airbag.
A child in a forward-facing child
restraint can be seriously injured or
killed if the passenger frontal airbag
infl ates and the passenger seat is in
a forward position.
Even if the p assenger sensing
system has turned off the front
outboard passenger airbag(s), no
system is fail-safe. No one can
guarantee that an airbag will no t
deploy under some unusual
circumsta nce, even though the
airbag(s) are off.
(Continued)
Page 84

Cadillac CTS/CTS-V Owner Manual (GMNA-Local izi ng- U.S ./C anada2ndPrint-11254870) - 2017 - Final Review - 6/14/16
84 SEATS AND RESTRAINTS
Warning (Continued)
Object-ID=25 55658 LMD=11-Aug-2015
Never put a rear-facing child
restraint in the front seat, even if
the airbag is off. If securing a
forward- facing child restraint in the
front outboard pass enger seat,
always move the seat as far back as
it will go. It is better t o secure child
restraints in the rear seat. Consider
using anothe r vehicle to transport
the child when a rear seat is not
available.
The passenger sensing system is
designed to turn off the front
outboard passenger frontal airbag and
knee airbag if:
.
The front outboard passenger seat
is unoccupied.
.
The system determines that an
infant is present in a child
restraint.
.
A front outboard passenger takes
his/her weight off of the seat for a
period of time.
.
There is a critical problem with
the airbag system or the passenger
sensing system.
When the passenger sensing system
has turned off the front outboard
passenger frontal airbag and knee
airbag, the off indica tor will light and
stay lit to remind you that the airbags
are off. See
Passenger Airbag Status
Indicator 0 130
.
The passenger sensing system is
designed to turn on the front
outboard passenger frontal airbag and
knee airbag anytime the system
senses that a person of adult size is
sitting properly in the front outboard
passenger seat.
When the passenger sensing system
has allowed the airbags to be enabled,
the on indicator wi ll light and stay lit
as a reminder that the airbags are
active.
For s ome children, including children
in child restraints, and for very small
adults, the passenger sensing system
may or may not turn off the front
outboard passenger frontal airbag and
knee airbag, depending upon the
person’s seat ing posture and body
build. Everyone in the vehicle who has
outgrown child restraints should wear
a safety b elt properly — whether or
not there is an ai rbag for that person.
{
Warning
Object-ID=22 10164 LMD=0 3-Sep-2013
If the airbag readiness light ever
comes on and stays on, it means
that something may be wrong with
the airbag system. To help avoi d
injury to yourself or others, have
the vehicle serviced right away. See
Airbag Readiness Light 0 129 for
more information, i ncluding
important s afety information.
If the On Indicator Is Lit for a
Child Restraint
The passenger sensing system is
designed to turn off the front
outboard passenger frontal airbag and
knee airbag if the system determines
that an infant is present in a child
restraint. If a child restraint has bee n
installed and the on indicator is lit:
1. Turn the vehicle off.
Page 85

Cadillac CTS/CTS-V Owner Manual (GMNA-Local izi ng- U.S ./C anada2ndPrint-11254870) - 2017 - Final Review - 6/14/16
SEATS AND RESTRAINTS 85
2. Remove the child restraint from
the vehicle.
3. Remove any additional items
from the seat such as blankets,
cushions, seat covers, seat
heaters, or seat massagers.
4. Reinstall the child restraint
following the directions provided
by t he child restraint
manufacturer and refer to
Securing Child Restraints (With the
Safety Belt in the Rear Seat) 0 101
or Securing Child Restraints (With
the Safety Belt in the Front
Seat) 0 104
.
5. If, after reinstalling the child
restraint and restarting the
vehicle, the on indicator is still
lit, turn the vehicle off. Then
slightly recline the vehicle
seatback and adjust the seat
cushion, if adjustable, to make
sure that the vehicle seatback is
not pushing the child restraint
into the seat cushion.
Also make sure the child
restraint is not trapped under t he
vehicle head restraint. If this
happens, adj ust the head
restraint. See
Head
Restraints 0 58
.
6. Restart the vehicle.
The passenger sensing system
may or may not turn off the
airbags for a child in a child
restraint depending upon the
child’s size. It is better to secure
the child restraint in a rear seat.
Never put a rear-facin g child
restraint in the front seat, even if
the on indicator is not lit.
If the Off Indicator Is Lit for an
Adult-Sized Occupant
2048779
If a person of adult size is sitting in
the front outboard passenger seat, but
the off indicator is lit, it could be
because that person is not sitting
properly in the seat. Use the following
steps to allow the system to detect
that person and enable the front
outboard passenger frontal airbag and
knee airbag:
1. Turn the vehicle off.
2. Remove any additional material
from the seat, such as blankets,
cushions, seat covers, seat
heaters, or seat massagers. Also,
remove laptops, or other
electronic devices.
3. Place the seatback in the fully
upright position.
4. Have the person sit upright in
the seat, centered on the seat
cushion, with legs comfortably
extended.
5. Restart the vehicle and have the
person remain in this posit ion
for two to three minutes after
the on indicator is lit.
Page 86

Cadillac CTS/CTS-V Owner Manual (GMNA-Local izi ng- U.S ./C anada2ndPrint-11254870) - 2017 - Final Review - 6/14/16
86 SEATS AND RESTRAINTS
{
Warning
Object-ID=28 98635 LMD=0 3-Sep-2013
If the front outboard passenger
airbag is turned off for an
adult-sized occupant, the airbag will
not be able to inf late and help
protect that person in a crash,
resulting in an increased risk of
serious injury or even death. An
adult-sized occupant shou ld not
ride in the f ront outboard passe nger
seat, if the passenger airbag off
indicator is lit.
Additional Factors Affecting
System Operation
Safety belts help keep the passenger
in position on the seat during vehicle
maneuvers and braking, which helps
the passenger sensing system
maintain the passenger airbag status.
See “Safety Belts” and “Child
Restraints” in the Index for additional
information about the importance of
proper restraint use.
A thick layer of additional material,
such as a blanket or cushion,
or aftermarket equipment such as seat
covers, seat heaters, a nd seat
massagers can affect how well the
passenger sensing system operates.
We recommend that you not use seat
covers or other aftermar ket equipment
except when approved by GM for your
specific vehicle. See
Adding Equipment
to the Airbag-Equipped Vehicle 0 87
for
more information about modifications
that can affect how the system
operates.
A wet seat can af fect the p erformance
of t he passenger sensi ng system. Here
is how:
.
The passenger sensing system may
turn off the passenger frontal
airbag and passenger knee airbag
when liquid is soaked into the
seat. If this happens, the off
indicator will be lit, and the airbag
readiness light on the ins trument
panel will also be lit.
.
Liquid pooled on the seat that has
not soaked in may make it more
likely that the passenger sensing
system will turn on the passenger
frontal airbag and passenger knee
airbag while a child restraint or
child occupa nt is on the seat.
If the passenger frontal airbag and
passenger knee airbag are turned
on, the on indicator will be lit.
If the passenger seat gets wet, dry the
seat immediately. If the airbag
readiness light is lit, do not install a
child restraint or allow anyone to
occupy the seat. See
Airbag Readiness
Light 0 129
for importan t safety
information.
The on indicator may be lit if an
object, such as a briefcase, handbag,
grocery bag, laptop, or other electronic
device, is put on an unoccupied seat.
If this is not desired, remove the
object from the seat.
{
Warning
Object-ID=22 08814 LMD=0 3-Sep-2013
Stowing of articles under the
passenger seat or betwee n the
passenger seat cushion and
seatback may interfere with the
proper operation of the passenger
sensing system.
Page 87

Cadillac CTS/CTS-V Owner Manual (GMNA-Local izi ng- U.S ./C anada2ndPrint-11254870) - 2017 - Final Review - 6/14/16
SEATS AND RESTRAINTS 87
Servicing the
Airbag-Equipped Vehicle
Object-ID=21 65264 Owner =Foster, Cindi
LMD=26-Jan-2 016 LMB=Clark, Lorien
Airbags affect how the vehicle should
be serviced. There are parts of the
airbag system in several places around
the vehicle. Your dealer and the
service manual have information
about servicing the vehicle and the
airbag system. To purchase a service
manual, see
Service Publications
Ordering Information (US/CAN) 0 396
.
{
Warning
Object-ID=22 08295 LMD=0 3-Sep-2013
For up to 10 seconds after the
vehicle is turned off and the battery
is disconnected, an airbag can still
infl ate during improper service. You
can be injured if you are close to an
airbag when it inflates. Avoid
yellow connectors. They are
probably part of the airbag system.
Be s ure to follow proper service
(Continued)
Warning (Continued)
Object-ID=22 08295 LMD=0 3-Sep-2013
procedure s, and make sure the
person performing work for you is
qualified to do so.
Adding Equipment to the
Airbag-Equipped Vehicle
Object-ID=43 21286 Owner =Foster, Cindi
LMD=26-Jan-2 016 LMB=Clark, Lorien
Adding accessories that change the
vehicle's frame, bumper system,
height, front end, or side sheet metal,
may keep the airbag system from
working properly. The operation of the
airbag system can also be affected b y
changing any parts of the front sea ts,
safety belts, airbag sensing and
diagnostic m odule, steering wheel,
instrument panel, any of the airbag
modules, ceiling or pillar garnish trim,
overhead cons ole, front sensors, side
impact sensors, or airbag wiring.
Your dealer and the service manual
have information about the location of
the airbag sensors, sen sing and
diagnostic m odule, and airbag wiring.
In a ddition, the vehicle has a
passenger sensing system for the front
outboard passenger position, which
includes sensors that are part of the
passenger seat. The passenger sensing
system may not operate properly if
the original seat tri m is replaced with
non-GM covers, upholster y, or trim; or
with GM covers, upholstery, or trim
designed for a different vehicle. Any
object, such as an aftermarket seat
heater or a comfort-enhancing pad or
device, installed under or on top of
the seat fabric, could als o interfere
with the operation of the passenger
sensing system. This could either
prevent proper deployment of the
passenger airbag(s) or prevent the
passenger sensing system from
properly turning off the passenger
airbag(s) . See
Passenger Sensing
System 0 83
.
If the vehicle has rollover roo f-rail
airbags, see
Different Size Tires and
Wheels 0 335
for additional important
information.
If you have to mo dify your vehicle
because you have a disability and you
have questions about whether the
modifications will affect the vehicle's
Page 88

Cadillac CTS/CTS-V Owner Manual (GMNA-Local izi ng- U.S ./C anada2ndPrint-11254870) - 2017 - Final Review - 6/14/16
88 SEATS AND RESTRAINTS
airbag system, or if you have
questions ab out whether the airbag
system will be affected if the vehicle is
modified for any other reason, call
Customer Assistance. See
Customer
Assistance Offices (US/CAN) 0 386
or
Customer Ass istance Offices
(MEXICO) 0 386
.
Airbag System Check
Object-ID=28 67378 Owner =Foster, Cindi
LMD=26-Jan-2 016 LMB=Clark, Lorien
The airbag system does not need
regularly scheduled maintenance or
replacement. Make sure the airbag
readiness light is working. See
Airbag
Readiness Light 0 129
.
Caution
Object-ID=28 67375 LMD=2 9-Jul-2013
If an airbag covering is damaged,
opened, or broken, the airbag may
not work properly. Do not open or
break the airbag coverings. If there
are any opened or broken airbag
coverings, have the airbag c overing
and/or airbag module replaced. For
(Continued)
Caution (Continued)
Object-ID=28 67375 LMD=2 9-Jul-2013
the location of the airbags, see
Where Are the Airbag s? 0 78. See
your dealer for service.
Replacing Airbag System
Parts after a Crash
Object-ID=21 65195 Owner =Foster, Cindi
LMD=26-Jan-2 016 LMB=Clark, Lorien
{
Warning
Object-ID=22 09622 LMD=11-Dec-2015
A crash can da mage the airbag
systems in the vehicle. A dama ged
airbag system may not properly
protect you and your passenger(s)
in a crash, resulting in serious
injury or even death. To help make
sure the airbag systems are working
properly after a crash, have them
inspected and any necessary
replacements made as soon as
possible.
If an airbag inflates, you will need to
replace airbag system parts. See your
dealer for service.
If the airbag readiness light stays on
after the vehicle is sta rted or comes
on when you are driving, the airbag
system may not work properly. Have
the vehicle serviced right away. See
Airbag Readin ess Light 0 129.
Page 89

Cadillac CTS/CTS-V Owner Manual (GMNA-Local izi ng- U.S ./C anada2ndPrint-11254870) - 2017 - Final Review - 6/14/16
SEATS AND RESTRAINTS 89
Child Restraints
Older Children
Object-ID=28 99323 Owner =Foster, Cindi
LMD=26-Jan-2 016 LMB=Clark, Lorien
1974657
Older children who have outgrown
booster seats should wear the vehicle’s
safety belts.
The manufacturer instructions that
come with the booster seat state the
weight and height lim itations for that
booster. Use a booster seat with a
lap-shoulder belt until the child
passes the fit test below:
.
Sit all the way back on the seat.
Do t he knees bend at the seat
edge? If yes, continue. If no, return
to t he booster seat.
.
Buckle the lap-shoulder belt. Does
the shoulder belt rest on the
shoulder? If yes, continue. If no,
try using the rear safety belt
comfort guide, if available. See
“Rear Safety Belt Comfo rt Guides”
under
Lap-Shoulder Belt 0 71. If a
comfort guide is not availa ble, or if
the shoulder belt still does not rest
on the shoulder, then return to the
booster seat.
.
Does the lap belt fit low and snug
on the hips, touching the thighs?
If yes, continue. If no, return to
the booster seat.
.
Can proper safety belt fit be
maintained for the length of the
trip? If yes, continue. If no, return
to t he booster seat.
Q: What is the proper way to wear
safety belts?
A: An older child should wear a
lap-shoulder belt and get the
additional restraint a shoulder belt
can provide. The shoulder belt
should not cross the face or neck.
The lap belt should fit snugly
below the hips, just touc hing the
top of t he thighs. This applies belt
force to the child's pelvic bones in
a crash. It should never be worn
over the abdomen, which could
cause severe or even fatal internal
injuries in a crash.
Also see “Rear Safety Belt Comfort
Guides” under
Lap-Shoulder Belt 0 71.
According to accident statistics,
children are safer when properly
restrained in a rear seating position.
In a crash, children who are not
buckled up can strike other people
who are buckled up, or can be thrown
out of the vehicle. Older children need
to u se safety belts properly.
{
Warning
Object-ID=22 08724 LMD=0 3-Sep-2013
Never allow more than one child to
wear the same safety belt. The
safety belt cannot properly spread
(Continued)
Page 90

Cadillac CTS/CTS-V Owner Manual (GMNA-Local izi ng- U.S ./C anada2ndPrint-11254870) - 2017 - Final Review - 6/14/16
90 SEATS AND RESTRAINTS
Warning (Continued)
Object-ID=22 08724 LMD=0 3-Sep-2013
the impact forces. In a crash, they
can be crushed together and
seriously injured. A safety belt must
be used by only o ne person at
a time.
1974662
{
Warning
Object-ID=22 08303 LMD=0 3-Sep-2013
Never allow a child to wear the
safety belt with the shoulder belt
behind their back. A child can be
seriously injured by not wearing the
lap-shoulder belt properly. In a
crash, the child would not be
restrained by the shoulder belt. The
child could move too far forward
increasing the chance of head and
neck injury. The child might also
slide under the lap belt. The belt
force would then be applied right
on the abdomen. That could cause
serious or fatal injuries. The
shoulder belt should go over the
shoulder and across the chest.
1966378
Infants and Young Children
Object-ID=43 10488 Owner =Foster, Cindi
LMD=26-Jan-2 016 LMB=Clark, Lorien
Everyone in a vehicle ne eds
protection! This includes infants and
all other children. Neither the distance
traveled nor the age and size of the
traveler changes the need, for
everyone, to use safety restraints. In
fact, the law in every state in the
United States and in every Canadian
province says children up to some age
must be restrained while in a vehicle.
Page 91

Cadillac CTS/CTS-V Owner Manual (GMNA-Local izi ng- U.S ./C anada2ndPrint-11254870) - 2017 - Final Review - 6/14/16
SEATS AND RESTRAINTS 91
{
Warning
Object-ID=35 20726 LMD=2 8-Jun-2013
Children can be seriously injured or
strangled if a shoulder belt is
wrapped around their ne ck. The
shoulder belt can tighten but
cannot be loosened if it is locked.
The shoulder belt locks when it is
pulled all the way out of the
retractor. It unlocks when the
shoulder belt is allowed to go all
the way back in to the retractor, but
it cannot do this if it is wrapped
around a child’s neck. If the
shoulder belt is locked and
tightened around a child’s neck, the
only way to loosen the belt is to
cut it.
Never leave children unattended in
a vehicle and never allow childre n
to p lay with the safety belts.
Every time infants and young children
ride in v ehicles, they should have the
protection provided by a ppropriate
child restraints. Neither the vehicle's
safety belt system nor its airbag
system is designed for th em.
Children who are not restrained
properly can strike othe r people,
or can be thrown out of the vehicle.
{
Warning
Object-ID=22 08298 LMD=1 0-Dec-2015
Never hold an infant or a child
while riding in a vehicle. Due to
crash forces, an infant or a child
will become so heavy it is not
possible to hold it during a crash.
For e xample, in a crash at only
40 km/h (25 mph), a 5.5 kg (12 lb)
infant will suddenly be come a
110 kg (240 lb) force on a person's
arms. An infant or child should be
secured in an appropriate restraint.
1974669
{
Warning
Object-ID=22 08299 LMD=1 3-Sep-2013
Children who are up against,
or very close to, any airbag when it
infl ates can be seriously injured or
killed. Never put a rear-facing child
restraint in the front outboard seat.
Secure a rear-facing child restraint
in a rear seat. It is also bette r to
secure a forward-fa cing child
restraint in a rear seat. If you must
secure a forward-fa cing child
(Continued)
Page 92

Cadillac CTS/CTS-V Owner Manual (GMNA-Local izi ng- U.S ./C anada2ndPrint-11254870) - 2017 - Final Review - 6/14/16
92 SEATS AND RESTRAINTS
Warning (Continued)
Object-ID=22 08299 LMD=1 3-Sep-2013
restraint in the front outboard seat,
always move the front passenger
seat as far back as it will go.
1966383
Child restraints are devices used to
restrain, seat, or position children in
the vehicle and are someti mes called
child seats or car seats.
There are three basic types of child
restraints:
.
Forward -facing child restra ints
.
Rearwar d-facing child restraints
.
Belt-positioning booster s eats
The proper child restraint for your
child depend s on their size, weight,
and age, and also on whether the
child restraint is compatible with the
vehicle in which it will be used.
For e ach type of child restraint, there
are many different models available.
When purchasing a child restraint, be
sure it is designed to be used in a
motor vehicle. If it is, the res traint will
have a label saying that it meets
federal motor vehicle safety standards.
The restraint manufacturer's
instructions that come with the
restraint state the weight and height
limitations for a particular child
restraint. In addition, there are many
kinds of restraints available for
children with special n eeds.
{
Warning
Object-ID=39 92541 LMD=1 3-Oct-2014
To reduce the risk of neck and head
injury in a crash, infants and
toddlers should be secured in a
(Continued)
Warning (Continued)
Object-ID=39 92541 LMD=1 3-Oct-2014
rear-facing child restraint until age
two, or until they reach the
maximum height and we ight limits
of t heir child restraint .
{
Warning
Object-ID=22 08301 LMD=0 3-Sep-2013
A young child's hip bones are still
so small that the vehicle's regular
safety belt may not remain low on
the hip bones, as it should. Instead,
it may settle up around the child's
abdomen. In a crash, the belt would
apply force on a body area that is
unprotected by any bony structure.
This alone could caus e serious or
fatal injuries. To red uce the risk of
serious or fatal injuries during a
crash, young children should always
be secured in appropriate child
restraints.
Page 93
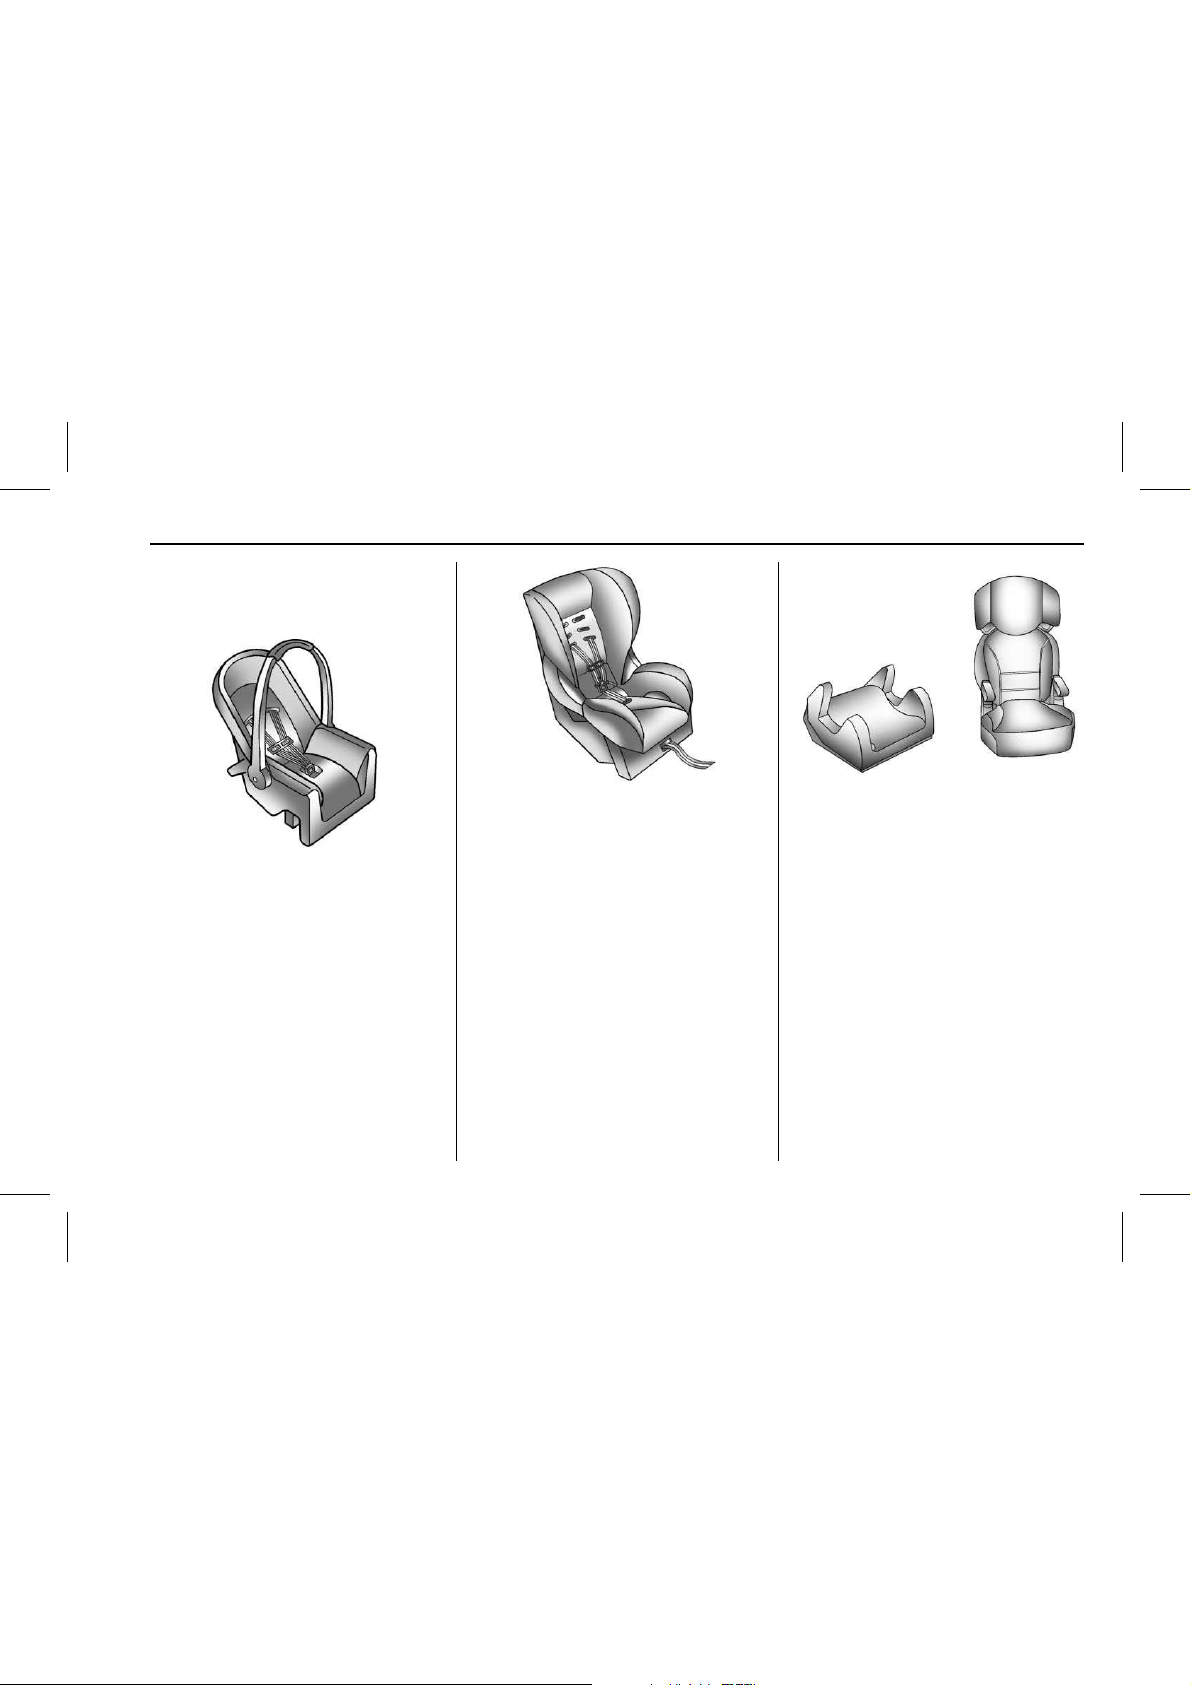
Cadillac CTS/CTS-V Owner Manual (GMNA-Local izi ng- U.S ./C anada2ndPrint-11254870) - 2017 - Final Review - 6/14/16
SEATS AND RESTRAINTS 93
Child Restraint Systems
Object-ID=43 11008 Owner=Foster, Cindi
LMD=27-Jan-2 016 LMB=Rosekrans, De e
Rear-Facing Infant Seat
1966385
A rear-facing child restraint provides
restraint with the seati ng surface
against the back of the infant.
The harness system ho lds the infant
in place and, in a crash, a cts to keep
the infant positioned in t he res traint.
Forward-Facing Child Seat
1966387
A forward-facing child restraint
provides restraint for the child's body
with the harness.
Booster Seats
1966384
A belt-positioning booste r seat is used
for children who have outgrown their
forward-facing child restraint.
Boosters are designed to improve the
fit of the vehicle's safety belt system
until the child is large enough for the
vehicle safety belts to fit prop erly
without a booster seat. See the safety
belt fit test in
Older Children 0 89.
Page 94

Cadillac CTS/CTS-V Owner Manual (GMNA-Local izi ng- U.S ./C anada2ndPrint-11254870) - 2017 - Final Review - 6/14/16
94 SEATS AND RESTRAINTS
Securing an Add-On Child
Restraint in the Vehicle
{
Warning
Object-ID=22 09257 LMD=1 0-Dec-2015
A child can b e seriously injured or
killed in a crash if the child
restraint is not properly secured i n
the vehicle. Secure the child
restraint properly in the vehicle
using the vehicle’s safety belt or
LATCH system, following the
instructions that came with that
child restraint and the instructions
in this manual.
To help reduce the chance of injury,
the child restraint must be secured in
the vehicle. Child restraint systems
must be secured in vehicle seats by
lap belts or the lap belt portion of a
lap-shoulder belt, or by the LAT CH
system. See
Lower Anchors and Tethers
for Ch ildren (LATCH System ) 0 95
for
more information. Children can be
endangered in a crash if the child
restraint is not properl y secured i n the
vehicle.
When securin g an add-on child
restraint, refer to the instructions that
come with the restraint which may be
on the restraint itself or in a booklet,
or both, and t o this manual. The child
restraint instructions are important,
so if they are not available, obtain a
replacement c opy from the
manufacturer.
Keep in mind that an unsecured child
restraint can move around in a
collision or sudden st op and injure
people in the vehicle. Be sure to
properly secure any child restraint in
the vehicle — even when no child is
in it.
In s ome areas of t he United States
and Canada, Certified Child Passenger
Safety Technicians (CPSTs) are
available to inspect and demonstrate
how to correctly use and install child
restraints. In the U.S., refer to the
National Highway Traf fic Safety
Administration (NHTSA) website to
locate the nearest child safety seat
inspection s tation. For CPST
availabili ty in Canad a, c heck with
Transport Canada or the Provincial
Ministry of Transportation office.
Securing the Child Within the
Child Restraint
{
Warning
Object-ID=22 10482 LMD=0 3-Sep-2013
A child can b e seriously injured or
killed in a crash if the child is not
properly secured in the child
restraint. Secure the child properly
following the instructions that
came with that child restraint.
Where to Put the Restraint
Object-ID=29 66996 Owner =Foster, Cindi
LMD=26-Jan-2 016 LMB=Clark, Lorien
According to accident statistics,
children and infants are safer when
properly restrained in an appropriate
child restraint secured in a rear
seating position.
Whenever possible, children aged
12 and under should be secured in a
rear seating position.
Never put a rear-facin g child restraint
in the front. This is because the risk
to t he rear-facing child is so great if
the airbag deploys.
Page 95

Cadillac CTS/CTS-V Owner Manual (GMNA-Local izi ng- U.S ./C anada2ndPrint-11254870) - 2017 - Final Review - 6/14/16
SEATS AND RESTRAINTS 95
{
Warning
Object-ID=24 86420 LMD=0 3-Sep-2013
A child in a rear-facing child
restraint can be seriously injured or
killed if the front passenger airbag
infl ates. This is because the back of
the rear-facing child restraint would
be very close to the inflating airbag.
A child in a forward-facing child
restraint can be seriously injured or
killed if the front passenger airbag
infl ates and the passenger seat is in
a forward position.
Even if the p assenger sensing
system has turned off the front
passenger frontal airbag, no system
is fail-safe. No one can guarantee
that an airbag will not deploy under
some unusual circumstance, even
though it is turned off.
Secure rear-facing child restraints
in a rear seat, even if the airbag is
off. If yo u secure a forward-facing
child restraint in the front seat,
always move the front passenger
(Continued)
Warning (Continued)
Object-ID=24 86420 LMD=0 3-Sep-2013
seat as far back as it will go. It is
better to secure the child restraint
in a rear seat.
See
Passenger Sensing System 0 83
for additional information.
When securin g a child restraint in a
rear seating position, study the
instructions that came with the child
restraint to make sure it is compatible
with this vehicle.
Child restraints and bo oster seats vary
considerably in size, and some may fit
in certain seating positions better
than others.
Depending on where you place the
child restraint and the size of the
child restraint, you may not be able to
access adjacent safety belts or LATCH
anchors for additional p assengers or
child restraints. Adjacent seating
positions should not be used i f the
child restraint prevents access to or
interferes with the routing of the
safety belt.
Wherever a child restraint is installed,
be sure to follow the instructions that
came with the child restraint system
and secure the child restraint system
properly.
Keep in mind that an unsecured child
restraint can move around in a
collision or sudden st op and injure
people in the vehicle. Be sure to
properly secure any child restraint in
the vehicle — even when no child is
in it.
Lower Anchors and
Tethers for Children
(LATCH System)
Object-ID=43 27988 Owner =Landstrom, Michael
LMD=02-Dec-2 015 LMB=Lan dstrom, Mi chael
The LATCH system secures a chil d
restraint during driving or in a crash.
LATCH attachments on the child
restraint are used to attach the child
restraint to the anchor s in the vehicle.
The LATCH system is designed to
make installation of a child restraint
easier.
Page 96

Cadillac CTS/CTS-V Owner Manual (GMNA-Local izi ng- U.S ./C anada2ndPrint-11254870) - 2017 - Final Review - 6/14/16
96 SEATS AND RESTRAINTS
In o rder to use the LATCH system in
your vehicle, you n eed a chi ld
restraint that has LATCH
attachments. LATCH-compatible
rear-facing an d forward-facing child
seats can be properly installed using
either the LATCH anchors or the
vehicle’ s safety belts. Do not use both
the safety belts and the LATCH
anchorage system to secure a
rear-facing or forward-facing
child seat.
Booster seats use the vehicle’s safety
belts to secure the child in the booster
seat. If the manufact urer recommends
that the booster seat be secured with
the LATCH system, thi s can be done
as long as the booster seat can be
positioned properly and there is no
interference with the proper
positioning of the lap-shoulder belt on
the child.
Make sure to fol low the instructions
that came with the child restraint, and
also the instructions in this manual.
When install ing a child restraint with
a top tether, you must also use either
the lower anchors or the safety belts
to p roperly secure the child rest raint.
A child restraint must never be
attached usi ng only the top tether.
The LATCH anchorage system can be
used until the combined weight of the
child plus the child restraint is
29.5 kg (65 lbs). Use the safety belt
alone instea d of the LATCH anchorage
system once the combined weight is
more than 29.5 kg (65 lbs).
See
Securing Child Restraints (With the
Safety Belt in the Rear Seat) 0 101
or
Securing Child Restraints (With the
Safety Belt in the Front Seat) 0 104
.
Child restraints built after March 2014
will be labeled with the specific child
weight up to which the LATCH system
can be used to install the restraint.
The following explains how to attach
a child restraint with these
attachments in the vehicle.
Not all vehicle seating positions or
child restraints have lower anchors
and attachments or top tether anchors
and attachments. In this case, the
safety belt must be used (with top
tether whe re available) to secure the
child restraint. See
Securing Child
Restraints (With the Safety Belt in the
Rear Seat) 0 104
or Securing Child
Restraints (With the Safety Belt in the
Front Seat) 0 1 04
.
Lower Anchors
2713462
Lower anchors (1) are metal bars built
into the vehicle. There are two lower
anchors for each LATCH seating
Page 97

Cadillac CTS/CTS-V Owner Manual (GMNA-Local izi ng- U.S ./C anada2ndPrint-11254870) - 2017 - Final Review - 6/14/16
SEATS AND RESTRAINTS 97
position that will accommodate a
child restraint with lower
attachments (2).
Top Tether Anchor
2750096
A top tether (3, 4) anch ors the top of
the child restraint to the vehicle.
A top tether anchor is built into the
vehicle. The top tether attachment (2)
on the child restraint connects to t he
top tether anchor in the vehicle in
order to reduce the forward movement
and rotation of the child restraint
during driving or in a crash.
The child restraint may have a single
tether (3) or a dual tether (4). Either
will have a single attachment (2) to
secure the top tether to the anchor.
Some child restraints with top t ethers
are designed for use with or witho ut
the top tether being attached. Others
require the top tether always to be
attached. In Canada, the law requires
that forward-facing child restraints
have a top tether, and that the tether
be attached. Be sure to read and
follow the instructions for your child
restraint.
Lower Anchor and Top Tether
Anchor Locations
Rear Seat
2384845
I : Seating positions with top tether
anchors.
H : Seating positions with two lower
anchors.
1913385
Page 98

Cadillac CTS/CTS-V Owner Manual (GMNA-Local izi ng- U.S ./C anada2ndPrint-11254870) - 2017 - Final Review - 6/14/16
98 SEATS AND RESTRAINTS
To assist in locating the lower
anchors, each seating position with
lower anchors has two labels, near the
crease between the seatback and the
seat cushion.
1968732
To assist in locating the top tether
anchors, the top tether anc hor sy mbol
is on the cover.
2726989
The outboard lower anchors are
behind the vertical openings in the
seat trim.
2564943
The top tether anchors are behind the
rear seat, on the f iller panel. Open the
covers to access the anchors. Be sur e
to u se an anchor on the sam e side of
the vehicle as the seating position
where the child restraint will be
placed.
Do n ot secure a ch ild restraint in a
position without a top tether an chor if
a national or local law requires that
the top tether be attached , or if the
instructions that come with the child
restraint say that the top tether must
be attached.
According to accident statistics,
children and infants are safer when
properly restrained in a child restraint
system or infant restraint system
secured in a rear seating position. See
Where to Put the Restraint 0 94 for
additional information.
Securing a Child Restraint
Designed for the LATCH System
{
Warning
Object-ID=22 09285 LMD=1 8-Aug-2015
If a LATCH-type child restraint is
not attached to anchors, the child
restraint will not be able to protect
the child correctly. In a crash, the
child could be seriously injured or
killed. Install a LATCH-type child
restraint properly using the
anchors, or use the vehicle's safety
belts to secure the restraint,
following the instructions that
came with the child restraint and
the instructions in this manual.
Page 99

Cadillac CTS/CTS-V Owner Manual (GMNA-Local izi ng- U.S ./C anada2ndPrint-11254870) - 2017 - Final Review - 6/14/16
SEATS AND RESTRAINTS 99
{
Warning
Object-ID=22 08990 LMD=1 8-Aug-2015
To reduce the risk of serious or
fatal injuries during a crash, do not
attach more than one child
restraint to a single anchor.
Attaching more tha n one child
restraint to a single anchor could
cause the anchor or attachment to
come loose or even break during a
crash. A child or others could be
injured.
{
Warning
Object-ID=35 20811 LMD=18-Aug-20 15
Children can be seriously injured or
strangled if a shoulder belt is
wrapped around their ne ck. The
shoulder belt can tighten but
cannot be loosened if it is locked.
The shoulder belt locks when it is
pulled all the way out of the
retractor. It unlocks when the
shoulder belt is allowed to go all
(Continued)
Warning (Continued)
Object-ID=35 20811 LMD=18-Aug-20 15
the way back in to the retractor, but
it cannot do this if it is wrapped
around a child’s neck. If the
shoulder belt is locked and
tightened around a child’s neck, the
only way to loosen the belt is to
cut it.
Buckle any unused safety belts
behind the child restraint so
children cannot rea ch them. Pull
the shoulder belt all the way out of
the retractor to set the lock, and
tighten the belt behind the child
restraint after the ch ild restraint
has been installed.
Caution
Object-ID=28 11114 LMD=25-Aug-2015
Do n ot let th e LATCH attachmen ts
rub against the vehic le’s safety
belts. This may damage these parts.
(Continued)
Caution (Continued)
Object-ID=28 11114 LMD=25-Aug-2015
If necessary, move buckled safety
belts to avoid rubbing the LATCH
attachments.
Do n ot fold the rear seatback when
the seat is occupied. Do not fold the
empty rear seat with a safety belt
buckled. This could damage the
safety belt or the seat. Unbuckle
and return the safety belt to its
stowed posit ion, before folding
the seat.
If you need to secure more than one
child restraint in the rear seat, see
Where to Put the Restraint 0 94.
This system is designed to make the
installation of child restraints easier.
When using lower ancho rs, do not use
the vehicle's safety belts. Instead, use
the vehicle's anchors and child
restraint attachments to secure the
restraints. Some restraints also use
another vehicle anchor to secure a top
tether.
Page 100

Cadillac CTS/CTS-V Owner Manual (GMNA-Local izi ng- U.S ./C anada2ndPrint-11254870) - 2017 - Final Review - 6/14/16
100 SEATS AND RESTRAINTS
1. Attach and tighten th e lower
attachments to the lower
anchors. If the child restraint
does not have lower attachments
or the desired seating position
does not have lower anchors,
secure the child restraint with
the top tether and the safety
belts. Refer to your child
restraint manufacturer
instructions and the instructions
in this manual.
1.1. Find the lower anchors for
the desired seating
position.
1.2. Put the child restraint on
the seat.
1.3. Attach and tighten th e
lower attachments on the
child restraint to the lower
anchors.
2. If the child restraint
manufacturer r ecommends that
the top tether be attached , attach
and tighten the top tether to the
top tether anchor, if equipped.
Refer to the child restraint
instructions and the following
steps:
2.1. Find the top tether anchor.
2.2. Open the top tether anchor
cover to expose the anchor.
2.3. Route, attach, and tighten
the top tether according to
your child restraint
instructions and the
following instructions:
1913405
If the position you are
using does not have a
headrest or head restrai nt
and you are us ing a single
tether, route the tether
over the seatback.
1913404
If the position you are
using does not have a
headrest or head restrai nt
and you are us ing a dual
tether, route the tether
over the seatback.
1913402
If the position you are
using has an adjustable
headrest or head restrai nt
 Loading...