

Page 1

Maserati Touch Control Plus
Page 2
The vehicle is equipped with the info-telematics Maserati Touch Control Plus (MTC+) System, an advanced user interface
which combines innovative and exclusive technical features combining entertainment, user settings, air conditioning,
navigation, communication and information functions within a single system.
The MTC+ system comes equipped with an audio system, acoustically optimized for this vehicle.
The vehicle is provided with this specific add to the Owner’s Manual, describing the MTC+ system fully and listing all
warnings and precautions for use, which are essential for safe use of the system. Maserati recommends you to read the
add carefully and thoroughly.
The information in this publication is provided by using examples.
Maserati may modify for technical or marketing purposes the specifications of the system described in this publication at
any time.
WARNING!
• ALWAYS drive safely with your hands on the steering wheel. You have full responsibility and assume all risks related
to the use of the MTC+ features and applications in this vehicle. Only use MTC+ when it is safe to do so. Failure to do
so may result in an accident involving serious injury or death.
• The Navigation System assists the driver while driving, providing advice and suggestions, by means of voice guidance
and graphic information, for the best route to take for reaching the set destination. The suggestions provided by the
Navigation System do not relieve the driver from full responsibility for the maneuvers made through traffic while
driving, or from compliance with road regulations and other provisions regarding road traffic. The person driving the
vehicle is always and in any case responsible for safe driving on the road.
2
Page 3

Safety Guidelines
1
Devices, Controls and Buttons
MTC+ Access
Radio Mode
Media Mode
Control and Climate Modes
Navigation Mode
MTC+ System Phone
MTC+ Settings
2
3
4
5
6
7
8
9
Index
10
3
Page 4

4
Page 5

1 – Safety Guidelines
Safety Guidelines . . . . . . . . . . . . . . . . . . . . . . . . . . . . . . 6
Safety References . . . . . . . . . . . . . . . . . . . . . . . . . . . . . . 6
Intended Use . . . . . . . . . . . . . . . . . . . . . . . . . . . . . . . . . 7
Navigation System (if equipped) — Safety Precaution and
Important Information . . . . . . . . . . . . . . . . . . . . . . . . 7
System Care . . . . . . . . . . . . . . . . . . . . . . . . . . . . . . . . . . 8
5
Page 6
Safety Guidelines
Safety Guidelines
1
Ensure that all persons read this
manual carefully before using the
MTC+ System. It contains instructions
on how to use the system in a safe and
effective manner.
WARNING!
Please read and follow these safety
precautions. Failure to do so may
result in injury or property damage.
• Glance at the screen only when
necessary and safe to do so. If
prolonged viewing of the screen is
necessary, pull over at a safe
location.
• Stop use immediately if a problem
occurs. Failure to do so may cause
injury or damage to the product.
Return it to your authorized dealer
to repair.
• Make certain that the volume level
of the system is set to a level that still
allows you to hear outside traffic and
emergency vehicles.
against operating procedures that
could result in an accident or bodily
injured. If you do not read the entire
manual, you may miss important
information. Observe all WARNINGS!
NOTE:
The information given in this manual is
subject to change.
Safety References
Before operating this system for the
first time, please read this manual
carefully. Note the safety precautions
described in this manual. If you have
any questions, please contact Maserati
or your authorized dealer.
WARNING!
This manual contains WARNINGS
6
Page 7

Safety Guidelines
Intended Use
Generally recognized rules of radio
technology were maintained during
the development and manufacture of
this system. When using this product,
be aware of state/province-specific
norms and guidelines.
Navigation System (if equipped) — Safety Precaution and Important Information
Read this information carefully before
starting to operate the Navigation
System and follow the instructions in
this manual. Maserati shall be liable
for problems or accidents resulting
from failure to observe the
instructions in this manual.
Failure to avoid the following
potentially hazardous situations could
result in an accident or collision
resulting in death or serious injury.
• Always use your best judgment, and
operate the vehicle in a safe manner.
Do not become distracted by the
Navigation System while driving, and
always be fully aware of all driving
conditions. Minimize the amount of
time spent viewing the Navigation
System screen while driving and use
voice prompts when possible.
• Do not input destinations, change
settings, or access any functions
requiring prolonged use of the
Navigation System controls while
driving. Pull over in a safe and legal
manner before attempting such
operations.
• When navigating, carefully compare
information displayed on the
Navigation System to all available
navigation sources, including road
signs, road closures, road conditions,
traffic congestion, weather
conditions, and other factors that
may affect safety while driving. For
safety, always resolve any
discrepancies before continuing
navigation, and defer to posted road
signs and road conditions.
• The Navigation System is designed to
provide route suggestions. It is not a
replacement for driver attentiveness
and good judgment. Do not follow
route suggestions if they suggest an
unsafe or illegal maneuver or would
place the vehicle in an unsafe
situation.
• Be careful of the ambient
temperature. Using the Navigation
System at extreme temperatures can
lead to malfunction or damage. Also
note that the unit can be damaged
by strong vibration, by metal objects,
or by water getting inside the unit.
1
7
Page 8
Safety Guidelines
1
WARNING!
The Navigation System is designed to
provide you with route suggestions. It
does not reflect road closures or road
conditions, weather conditions, or
other factors that may affect safety or
timing while driving.
Use the Navigation System only as a
navigational aid. Do not attempt to
use the Navigation System for any
purpose requiring precise
measurement of direction, distance,
location, or topography.
The Global Navigation Satellite System
is subject to changes that could affect
the accuracy and performance of all
GPS equipment, including the
Navigation System.
System Care
Safe usage of the MTC+ System
Read all instructions in this manual
carefully before using your system to
ensure proper usage! Your system is a
sophisticated electronic device. Do not
let young children use your system.
Permanent hearing loss may occur if
you play your music or the system at
loud volumes. Exercise caution when
setting the volume on your system.
Driving is a complex activity that
requires your full attention. If you’re
engaged in driving or any activity that
requires your full attention, we
recommend that you do not use your
system.
NOTE:
Many features of this system are speed
dependent. For your own safety, it is
not possible to use the touch screen
keyboard while the vehicle is in
motion. Keep drinks, rain, and other
sources of moisture away from your
system. Besides damage to your
system, moisture can cause electric
shocks as with any electronic device.
Connections
Never force any connector into the
ports of your system.
Make sure your connectors are the
correct shape and size before you
connect.
Any attached cable should be routed
so that it will not apply any pressure to
the connection and should not
obstruct the driver operation.
Touch screen
Do NOT attach any object to the touch
screen, doing so can result in damage
to the touch screen.
Do not touch the screen with any hard
or sharp objects (pen, USB stick,
jewelry, etc.) which could scratch the
touch screen surface!
8
Page 9

Safety Guidelines
NOTE:
It is possible to use a plastic stylus for
press screen enabled devices such as a
PDA and Pocket PCs. Do not spray any
liquid or caustic chemicals directly on
the screen! Use a clean and dry micro
fiber lens cleaning cloth in order to
clean the touch screen. If necessary,
use a lint-free cloth dampened with a
cleaning solution, such as isopropyl
alcohol, or an isopropyl alcohol and
water solution ratio of 50:50. Be sure
to follow the solvent manufacturer’s
precautions and directions.
GPS Navigation and Satellite Radio Antenna
The GPS navigation and satellite radio
antenna is integrated into the fin on
the roof of the vehicle. Do not place
items on the roof around the roof top
antenna location. Objects placed
within the line of sight of the antenna
will cause decreased performance.
Larger luggage items should be placed
as far from the antenna as possible.
Do not place items directly on or
above the antenna.
Some of these devices may cause
electromagnetic interference with the
GPS. If a degradation in the
Navigation System is observed, turn
the devices off, or keep them as far
away from the GPS antenna as
possible.
1
Other Electronic Devices
You may bring other electronic devices
into your vehicle (e.g., PDA, iPod, etc.).
9
Page 10

Safety Guidelines
10
Page 11

2 – Devices, Controls and Buttons
Overview . . . . . . . . . . . . . . . . . . . . . . . . . . . . . . . . . . . 12
Quick Description . . . . . . . . . . . . . . . . . . . . . . . . . . . . . 14
Personalized Menu Bar . . . . . . . . . . . . . . . . . . . . . . . . . 17
11
Page 12
Devices, Controls and Buttons
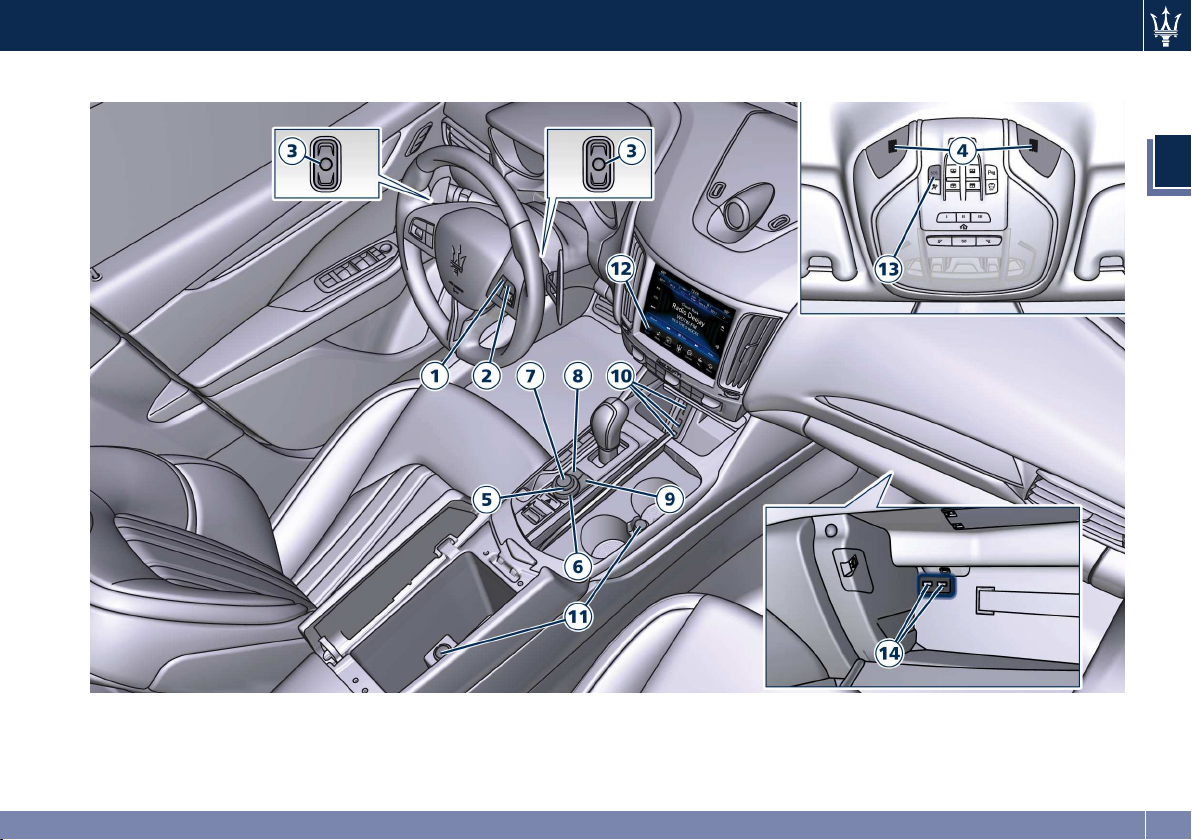
Overview
MTC+ System has a series of soft-keys,
controls and devices through which it
is possible set up different audio
2
options, perform setting/function
changes and use external multimedia
sources.
1.
Phone Button
2.
3. Steering Wheel Audio Controls
4. Microphones
5. Volume Control
6. Tune/Scroll Control
7. Enter Button
8. Browse Button
9. Back Button
10. Media Inputs (AUX, USB and SD
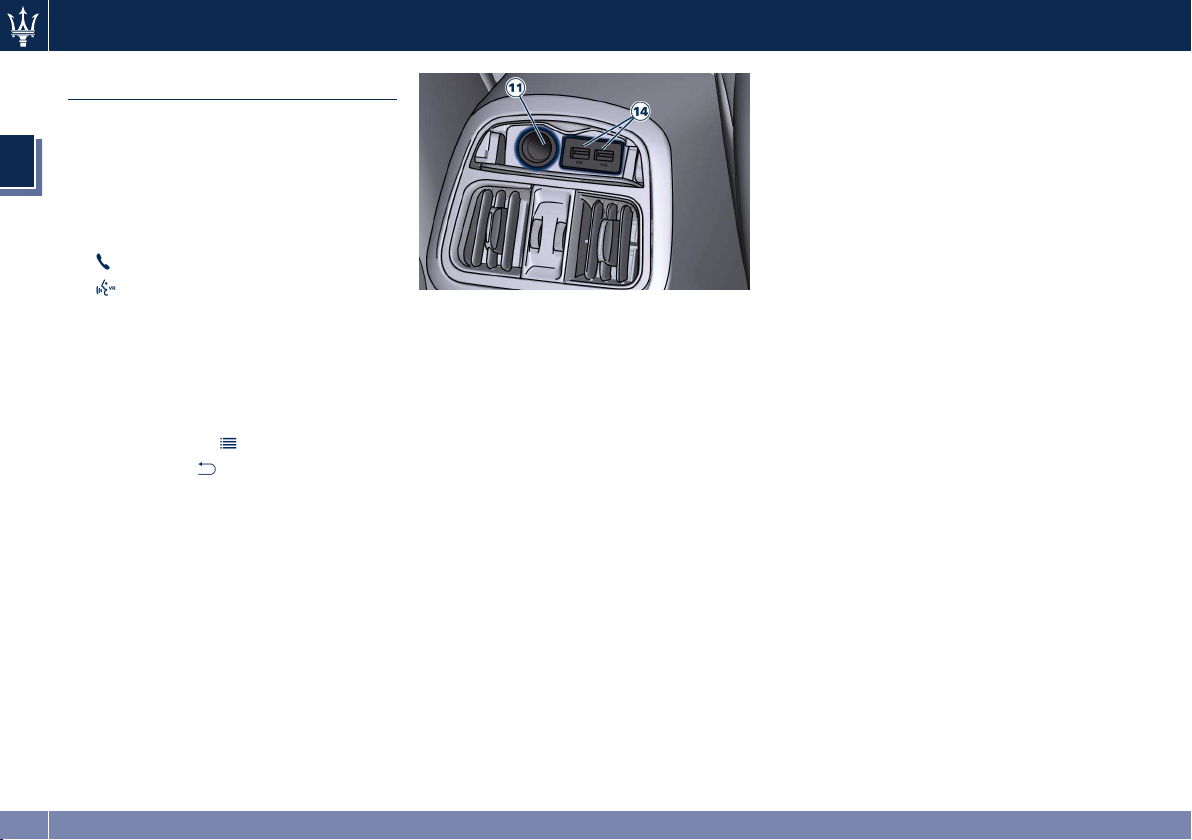
11. Power Outlets
12. Touch Screen Display
13. SOS-Emergency Call Button
14. USB Inputs for Charging the
Voice Command Button
memory card)
(optional only for Russian market)
Connected Devices.
Rear Controls
12
Page 13
Devices, Controls and Buttons
2
Front Controls
13
Page 14
Devices, Controls and Buttons
Quick Description
Phone Button
Pressing the Phone button it is
2
possible to: activate the phone mode,
start a call, show recent incoming and
outgoing calls, show contacts list, etc.
All these functions can also be reached
by using the touch screen commands
on the MTC+ display in “Phone” mode.
When pressing the button
audible sound will invite you to impart
a command.
Voice Command Button
By using voice commands, after
pressing the
to control the AM and FM radio, the
satellite radio and all devices
connected and managed by the
“Media” mode (i.e SD card, USB/iPod
player).
When pressing the button
acoustic signal will invite to give a
voice command.
Steering Wheel Audio Controls
These audio controls are rocker-type
switches with a button in the center
and are located on the rear side of the
steering wheel, right behind the front
switches.
button, it is possible
an
an
Press any button to display
information on the radio station or
track being listened to inside a pop-up
for 2 seconds on instrument cluster.
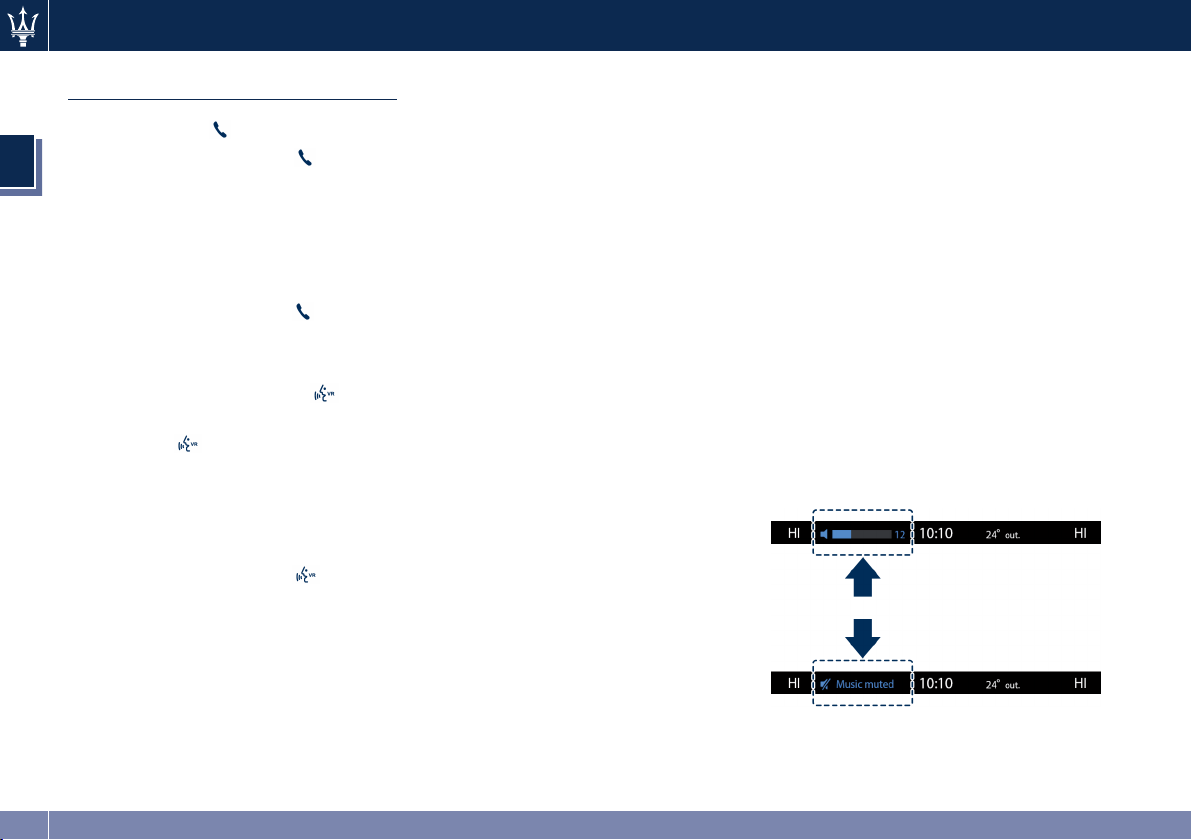
The right-hand control manages the
volume.
By pressing the top of the rocker
switch you can increase the volume
and by pressing the bottom of the
rocker switch you can lower it. Press
the center button to mute the volume.
The left-hand control functions
depend on the current source. To
change source, press the center
button.
When in “Radio” mode, pressing the
top of the switch will “Seek” up for
the next listenable station and
pressing the bottom of the switch will
“Seek” down for the previous
listenable station.
When an external source is connected
to MTC+, a light press on the top of
the switch will play the next track on
the device connected.
Pressing the bottom of the switch once
will go to the beginning of the current
track, or to the beginning of the
previous track if it is within one second
after the current track begins to play.
If you press the switch up or down
twice, it plays the second track; three
times, it will play the third, etc.
Microphones
The microphones placed behind the
grilles on either side of the front dome
console allows to give voice commands
with hands-free function. See “Voice
Recognition Quick Tips” in section 8
for more details.
Volume Control
Working this knob in “Radio” or
“Media” mode, user can adjust the
volume of the radio or audio files,
from minimum to maximum and vice
versa. Turn knob clockwise to increase
the volume, counterclockwise to
decrease it. The volume status will be
indicated in the top part of the MTC+
display.
Tune/Scroll Control
Working this knob in “Radio” or
“Media” mode, user can go through
14
Page 15
Devices, Controls and Buttons
the radio stations or scroll the tracks
inside connected external devices and
confirm the selection by pressing enter
button.
In any other mode of the MTC+, use
this knob to scroll the list of available
options or to manage the cursor
movement in the lower bar of the
main menu. Then press enter button
to confirm the function or setting
highlighted on MTC+ display.
Enter Button
Press this button to confirm the
function or setting highlighted on
MTC+ display.
Browse button
After selecting a function, using the
tune/scroll knob or soft-keys on MTC+
display, press this button to see the
detail of the items/options of the
selected function. This button is also
used as short cut to display the phone
book, when the “Telephone” menu is
selected, or the favorites when the
“Nav (Navigation)” menu is selected.
Back button
Press this button to go back to
previous menu or previous screen.
Press this button to shift the
navigation one level backwards on
MTC+ screen. If it is pressed and held
for at least 2 seconds, it brings the
cursor back in the lower bar of the
main menus.
Media Inputs
The inputs for front passengers are
located inside the glove box
compartment of the dashboard and in
the compartment at the front end of
the central console. To access the
central console inputs, push the lid to
open completely.
In the central console compartment
there are a AUX input, compatible
only with 3,5 mm jack connectors (not
included), a USB port
exchange (see section "Media Mode"
for further details) and an SD Memory
card slot.
To insert a memory card into the slot,
lift the tab with the "SD" indication
and push it inside the slot. To extract
it, press lightly on the card.
For rear seat passengers, there are two
USB inputs inside the compartment
located on the rear end of the central
console, above the air vents. To access
this USB inputs open the outside cover.
The USB inputs in the glove box and at
the rear end of the central console
allow charge (CHARGE ONLY label) of
the connected source.
for data
Power Outlets
To access the power outlet inside the
front cup holder, press the cover to
open completely. Remove the
cigarette lighter and use its socket as
power outlet.
To access the power outlet located
inside the glove box of the central
console you need to open the
half-lids.
There is another power outlet in the
compartment at the rear end of the
central console.
To access the power outlet, push the
lid to open completely.
Touch Screen Display
The soft keys located on the lower
part of the MTC+ display represent the
main menu modes/functions, which
are briefly indicated below.
2
15
Page 16
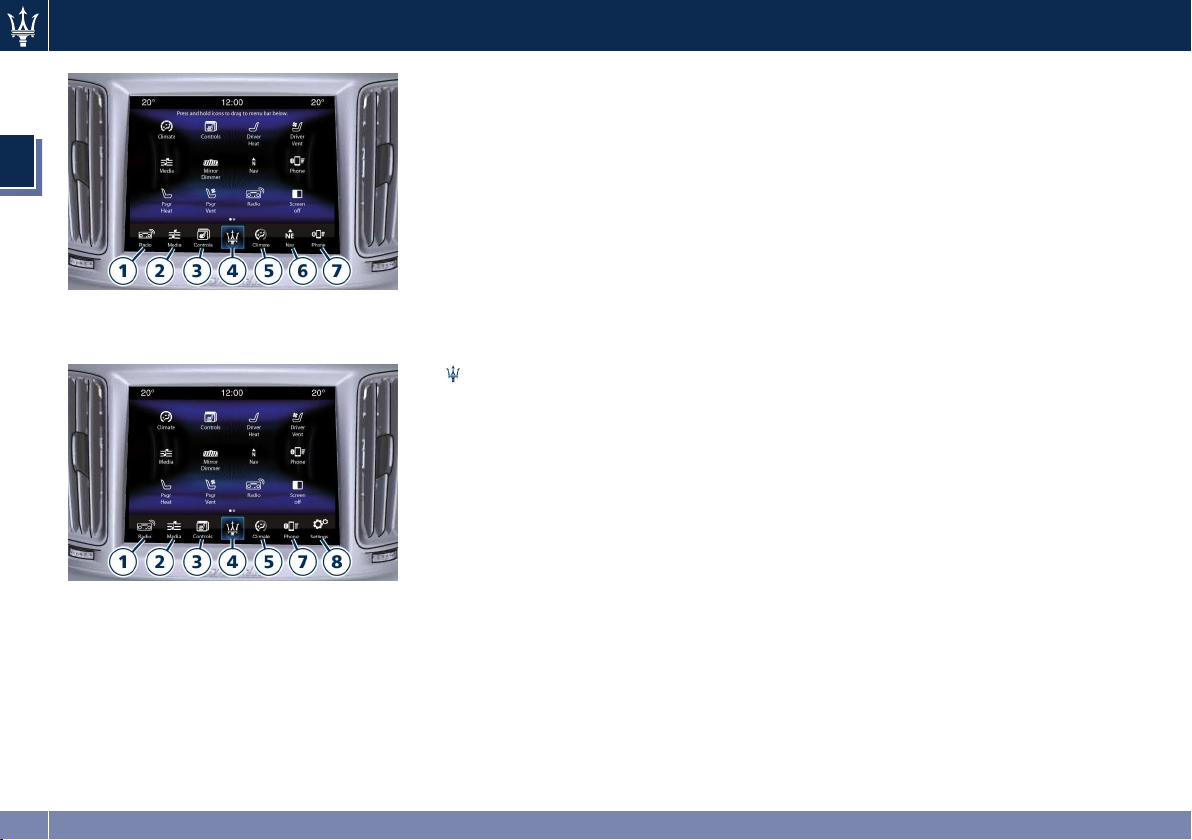
Devices, Controls and Buttons
2
1. “Radio” soft-key
Touch this soft-key to enter the
Radio mode. The different tuner
modes: FM, AM, MW, LW, SW, DAB,
DAB+ and DMB (if equipped) can
be selected by touching the related
soft-keys in the Radio mode.
2. “Media” soft-key
Touch this soft-key to access media
MTC+ with Navigator
MTC+ without Navigator
sources such as: USB Device, AUX,
Bluetooth (if equipped) and SD card
as long as the requested media is
present.
3. “Controls” soft-key
Touch this soft-key to access the
controls that can be set up. Controls
such as: Heated Seats, Heated
Steering Wheel, Ventilated Seats,
etc. can be selected or turned
on/off by touching the related
soft-key. For further details see the
Owner's Manual.
4. (Apps) soft-key
Touch this soft-key to access
connected phone connection
options and user functions settings
if MTC+ is equipped with navigator.
5. “Climate” soft-key
Touch this soft-key to access the air
conditioning settings.
6. “Nav” soft-key (if equipped)
Touch this soft-key to access the
Navigation feature. Refer to the
section “Navigation Mode” for
further details.
7. “Phone” soft-key
Touch this soft-key to access the
MTC+ Phone feature that can be set
or monitored via MTC+.
8. “Settings” soft-key (only for MTC+
without navigator)
Touch this soft-key to access the list
of functions that the user can set.
Main menu bar is set up by Maserati: it
can be personalized according to
personal requirements, as explained in
“Personalized Menu Bar” of this
section.
16
Page 17
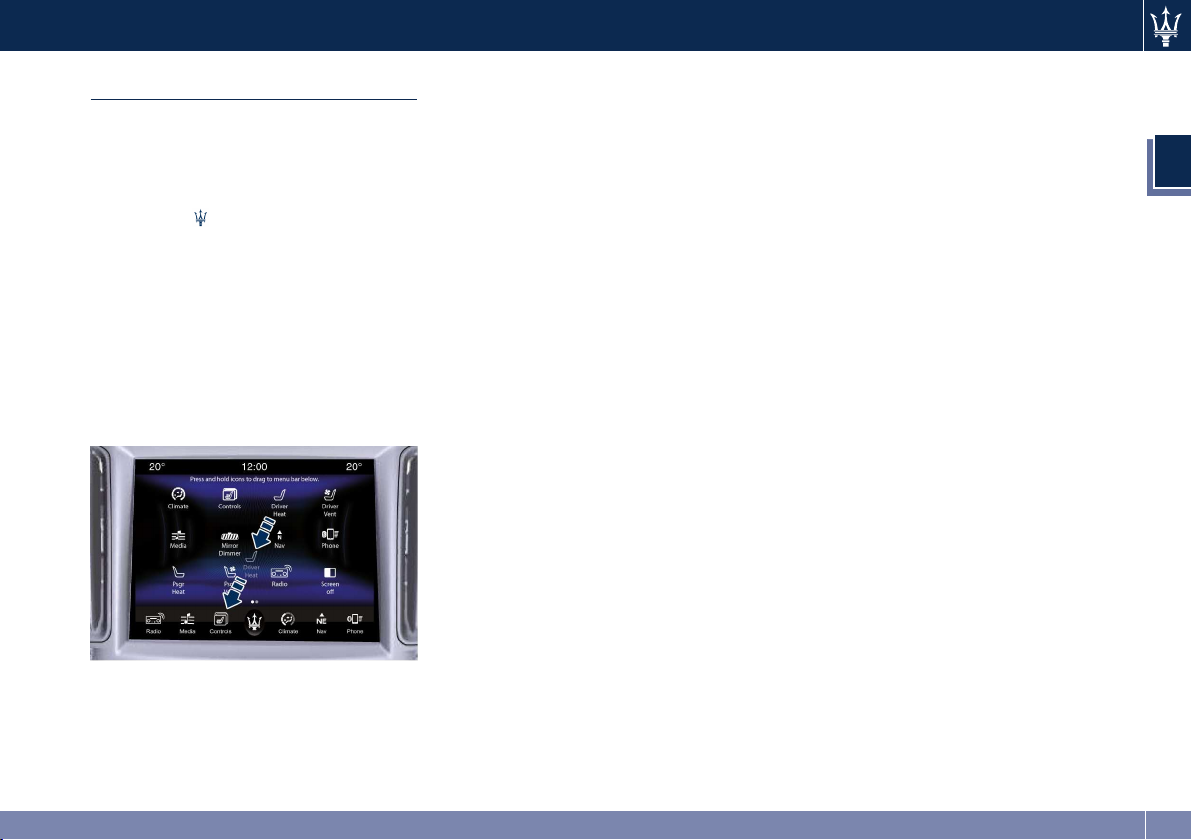
Personalized Menu Bar
The MTC+ features and services in the
main menu bar are easily changed for
your convenience. Simply follow these
steps:
• Touch the
the App screen.
• Touch and hold, then drag the
selected App icon to replace an
existing shortcut in the main menu
bar.
• The replaced shortcut will now be an
active App/shortcut on the main
menu bar.
Apps soft-key to open
Devices, Controls and Buttons
2
17
Page 18

Devices, Controls and Buttons
18
Page 19

3 – MTC+ Access
Introduction to MTC+ Access . . . . . . . . . . . . . . . . . . . . 20
Getting Started with MTC+ Access . . . . . . . . . . . . . . . . 21
Using MTC+ Access . . . . . . . . . . . . . . . . . . . . . . . . . . . . 22
SOS-Emergency Call (available only for Russian
market) . . . . . . . . . . . . . . . . . . . . . . . . . . . . . . . . . . . 37
Maintain My MTC+ Access Account. . . . . . . . . . . . . . . . 40
MTC+ FAQs . . . . . . . . . . . . . . . . . . . . . . . . . . . . . . . . . . 40
Device Connection and Audio Tips with MTC+ . . . . . . . 43
19
Page 20
MTC+ Access
Introduction to MTC+ Access
To unlock the full potential of MTC+
Access in your vehicle, you first need to
register with MTC+ Access.
3
WARNING!
• ALWAYS obey traffic laws and pay
attention to the road. Some MTC+
Access services including
SOS-Emergency Call (available only
for Russian market) will NOT work
without an operable 3G (data)
network connection.
• ALWAYS drive safely with your
hands on the steering wheel. You
have full responsibility and assume
all risks related to the use of the
MTC+ System features and
applications in this vehicle. Only use
MTC+ System when it is safe to do
so. Failure to do so may result in an
accident involving serious injury or
death.
NOTE:
Your vehicle may be transmitting data
as authorised by the subscriber. MTC+
Access services can only be used where
coverage is available.
What Is MTC+ Access?
MTC+ Access enhances your ownership
and driving experience by connecting
your vehicle with an operable 3G
(data) network.
For a complete list of MTC+ Access
services, please visit:
www.maserati.com.
MTC+ Access provides:
• The ability to remotely lock/unlock
your doors and start your vehicle (if
foreseen) from virtually anywhere,
with the MTC+ Access App, the
Maserati Owner Connect website
(www.maserati.com
• Security alarm notification via text or
e-mail.
• Yelp to help find great places,
businesses and other locations when
you need them.
• Voice texting so you can compose,
send and receive text messages with
your voice while keeping your hands
on the wheel.
).
Before you drive, familiarize yourself
with the easy-to-use MTC+ System.
• The SOS-Emergency call button on
dome console (available only for
Russian market). This button
connects you directly to emergency
services.
• The MTC+
main menu bar on the touch screen.
This is where you can begin
registration for MTC+ Access, find
the Apps.
• The MTC+
phone
The buttons let you use your voice to
give commands, make phone calls,
send and receive text messages
hands-free, enter navigation
destinations and control your radio
and media devices. For more details,
see “MTC+ System Phone” section.
Apps soft-key on the
Voice Recognition and
button on steering wheel.
Included Trial Period for New Vehicles
Your new vehicle may come with an
included trial period for use of the
MTC+ Access services starting at the
date of vehicle purchase. To activate
the trial, you must first register with
MTC+ Access. Once registered, MTC+
Access customers can purchase
20
Page 21
MTC+ Access
additional services and Apps over the
lifetime of their vehicle ownership.
Included Trial on New Vehicles ONLY
Radio Sales
Code
Trial Period 12 months of the
RA4
Advantage Package
Features And Packages
After the trial period, you can
subscribe to continue your service by
visiting the Maserati Owner Connect
website (www.maserati.com
).
Getting Started with MTC+ Access
Registration
To unlock the full potential of MTC+
Access in your vehicle, you first need
to register with MTC+ Access.
Signing up is easy! Touch the Apps
button on the touch screen to
“Register By Web” to complete the
process using your wireless device or
computer.
For further information please visit
www.maserati.com
Download The MTC+ Access App
You’re only a few steps away from
using remote commands and playing
your favourite music in your car.
To link your internet radio accounts:
• Download the MTC+ Access App to
your mobile device.
• Touch the “Via Mobile” icon on the
MTC+ touch screen.
• Touch the App you’d like to connect
to your vehicle.
• Enter your login information for the
selected App and touch “Link”.
• Next time you’re in your vehicle,
enable Bluetooth, pair your phone
.
and select the Via Mobile App you
want to play from the MTC+ touch
screen to stream your personalised
music.
NOTE:
• You can also complete this process
on the web. Simply visit
www.maserati.com
“Set Up Via Mobile Profile” (under
Quick Links).
• Once you download the App to your
compatible mobile device, you will
also be able to start your vehicle and
lock/unlock its doors from virtually
anywhere.
log in and click
Using Maserati Owner Connect
The Maserati Owner Connect website
(www.maserati.com
with all the information you need, all
in one place. You can track your
service history, find recommended
accessories for your vehicle, watch
videos about your vehicle's features,
and easily access your user guides and
manuals. It is also where you can
manage your MTC+ Access account.
This section will familiarize you with
the key elements of the website that
will help you get the most of your
MTC+ Access system.
) provides you
3
21
Page 22

MTC+ Access
• Your Vehicle(s):
Images are placed here to represent
the Maserati vehicles you own. If a
vehicle you own is not shown here,
click on the “Add New Vehicle”
button. Likewise, if a vehicle is
shown that you no longer own click
3
on the “Edit Profile” to manage
your account.
• Edit Profile:
To manage the details of your MTC+
Access account, such as your contact
information, password and PIN, click
on the “Edit Profile” button to
access the details of your account.
• Connected Vehicle:
This statement will indicate which
vehicle’s you own that are equipped
with the MTC+ Access system. Other
vehicles you own may not have
MTC+ Access and will indicate that it
is a non-MTC+ Access Vehicle.
• Remote Services:
For vehicles with an active MTC+
Access subscription, touch one of
these icons and enter your four-digit
MTC+ Security PIN to command your
vehicle to remotely start (if
equipped), lock/unlock doors or
sound the horn and lights.
• Subscription Status:
Refer to this section to quickly see if
you are currently subscribed to
remote services.
• MTC+ Access App:
This is where you can enter the
mobile phone number for your
compatible device to download the
MTC+ Access App. Device
compatibility can be verified at
www.maserati.com
details, see the paragraph
“Download the MTC+ Access App”
in this chapter.
• Learn & Use:
Click on the “Learn & Use” tab to
find user guides and other
information about your vehicle.
More specifically, there is a
dedicated MTC+ Access tab in this
section to learn all about your
connected vehicle capabilities.
Editing Your Notifications
Notifications are an important element
of your MTC+ Access Account. For
example, any time you use your
remote services (such as remote door
unlock), or if your security alarm is set
off, you can elect to receive a text
message and/or email to notify you of
the event. To set up the notifications,
please follow these instructions.
. For more
Using MTC+ Access
Getting Started With Apps
Applications (Apps for short) in your
MTC+ Access system are designed to
deliver the features and services that
you want. There are two basic
categories:
• Built-In Apps:
Uses the 3G (data) network on your
radio.
• MTC+ Access via Mobile (if
equipped):
Uses the MTC+ Access App and your
device's data plan to access your
personal accounts (such as “Aha”)
from the vehicle and control them
using the vehicle touch screen.
Customer's data plan charges will
apply.
Apps Main Menu
Touch the
touch screen to open the Apps main
menu, in this screen you will be able to
access all of your available Apps. To
access an App directly, touch the
corresponding soft-key on the touch
screen and you will be directed to that
App. To view the rest our your Apps,
Apps soft-key on the
22
Page 23

MTC+ Access
touch the page forward or page back
soft-key.
App Manager
Touch the “App Manager” soft-key to
access the following categories:
• Favourite Apps:
This is a good place to put the Apps
you use most frequently.
• All Apps:
All of your available Apps will reside
in the “All Apps” folder.
• Running Apps:
Touch this tab to see which Apps are
currently running.
NOTE:
Most MTC+ Access features do not
require that you have a compatible
device. The MTC+ Access features must
have an operable 3G (data) network
connection and you must be
registered with MTC+ Access with an
active subscription. Only voice
commands, the MTC+ Access App and
Via Mobile Apps require a compatible
device to work with your MTC+ Access
system.
Yelp Search
Use Yelp to search for places to eat,
shop, relax and play.
Description
Yelp is a familiar, widely used website
and mobile App that connects people
to great local businesses. Now with
MTC+ Access, Yelp has been adapted
for your vehicle, and on the go
capability. Yelp gives you the ability to
search for a Point of Interest (POI) or
desired destination using either
pre-defined search categories, or
custom searches, using keywords like
“tacos.” Searching can be done by
voice recognition or by using the
touch screen keypad.
Here is what Yelp can do for you while
you are on the road:
• Deliver a list of up to 20 results,
prioritizing by best match, by
distance or rating.
• Provide up-to-date search listings
(pulling the latest information from
the cloud).
• The live and local search engine will
scan 12 categories and millions of
POIs to provide drivers with a local
guide for real word-of-mouth
recommendations.
• With one touch, select from the list
to find location address, phone
number, user ratings, hours of
operation (if available) and price
ratings (if available).
• The ability to call the selected POI
directly (a device must be paired via
Bluetooth), or have the address
immediately sent to the navigation
system for routing (if equipped).
How It Works
• Using the touch screen: launch Yelp
by touching Apps Yelp.
• Or using voice recognition: press the
button on the steering wheel
and say “Launch Yelp.”
Give It a Try!
• Press the
wheel and say “Launch Yelp.”
button on the steering
3
23
Page 24
MTC+ Access
• Press the button on the steering
wheel and say “Yelp Search.”
• The MTC+ System will prompt you to
say something like, “car wash” After
the beep, say “restaurants”.
• The MTC+ System will link out to the
cloud to do your Yelp search, and
3
depending on your search request,
this may take up to 30 seconds.
• Using the touch screen, select a
restaurant from the list of search
results.
• Navigate to the location by pressing
“Go Now” (if equipped with
navigation).
NOTE:
Save your destination to “Favourites”.
To find it again go to “Nav” > “Where
to” > “Favourites”.
How to Add and Delete Search
Categories
Yelp provides the ability to
save custom search categories
by first initiating the search,
then pressing the star. To
delete a search category, select it, and
touch the star icon. A confirmation
prompt will appear to confirm. Create
up to 36 custom search categories!
Requirements
• Vehicle must be properly equipped
with the MTC+ Access System.
• Your vehicle must be in range of an
operable 3G (data) network
connection (indicated by the signal
strength bars on the
on the touch screen).
• Vehicle must be registered with
MTC+ Access and have an active
subscription that includes the
applicable feature or App.
• Vehicle must be powered with
ignition device in the RUN or ACC
position with a properly functioning
electrical system.
• Vehicle must have on board
navigation to use “Go Now”.
• Mobile device must be paired with
Bluetooth
POI directly.
Safety Information
ALWAYS drive safely with your hands
on the steering wheel. You have full
responsibility and assume all risks
related to the use of the MTC+
features and applications in this
vehicle. Only use MTC+ when it is safe
to do so. Failure to do so may result in
®
and connected to call a
WARNING!
Apps soft-key
an accident involving serious injury or
death.
Tips And Shortcuts
• To improve your search results, use
single search terms like “coffee”
rather than multiple words, which
may deliver mixed results, for
example, “home improvement and
gardening stores.”
• Press the
wheel to use voice commands.
• If you wish to cancel a search
request, touch “Cancel.”
• To learn more about a listing, touch
the line that appears on the display
details such as the address, phone
number and hours of operation (if
applicable).
• Sort results by “Best Match”,
“Rating” or “Distance” (default is
“Best Match”).
• The “Rating” tab will re-sort your
search based on ratings submitted by
everyday users to Yelp’s on-line
database.
• “Distance” will sort by the closest POI
near you.
• To bypass the voice prompts hit the
button a second time to barge in
and state your desired command.
button on the steering
24
Page 25

MTC+ Access
• To exit Yelp, touch the “X” (close)
soft-key in the upper right corner of
the touch screen.
Security Alarm Notification
Notifies you via email or text message
(SMS) when the vehicle’s
factory-installed theft alarm system
has been set-off.
Description
The Theft Alarm Notification feature
notifies you via email or text message
(SMS) when the vehicle’s
factory-installed theft alarm system
has been set-off. You’ve probably seen
this before, a vehicle’s alarm goes off
in a parking lot or out on the street,
and the owner is nowhere to be
found. With Theft Alarm Notification
your vehicle will alert you of the
situation.
Should you receive a notification that
your theft alarm has been set-off,
please react with caution. There are a
number of reasons why your alarm
may have been triggered, one of
which could be that your vehicle was
stolen. If so, please see the details of
the Stolen Vehicle Assistance service
below.
How It Works
Theft Alarm Notification can send you
an email or text message (SMS) should
the alarm go off. The following
instructions will help you manage your
notifications.
• Log on to the Maserati Owner
Connect website
(www.maserati.com
name and password you used when
registering your MTC+ Access system.
• If you forgot your user name or
password, links are provided on
the website to help you retrieve
them.
• Once logged in you will find yourself
on the dashboard. Click on the “Edit
Profile” soft-key in the upper-right
corner of the page.
• Click on the “Notifications” tab on
the left side of the page.
• If you have more than one vehicle
with MTC+ Access, please select
which vehicle you want to manage
notifications for using the drop
down menu.
• You can enter up to five mobile
phone and/or email addresses to
your notifications, and you can
customize which ones receive the
types of messages.
) using the user
• You will receive a confirmation text
message, asking to confirm and
receive vehicle notifications. If you
are OK with this, reply to the text
message saying “yes” (message and
data rates may apply, please see your
mobile device provider for details). If
you have questions, text “HELP” in
your reply.
• You’re all set. Should your theft
alarm go off, a notification(s) will be
sent to the number(s) and/or email(s)
you provided.
Requirements
• Vehicle must be properly equipped
with the MTC+ Access System and a
factory installed Theft Alarm system.
• Your vehicle must have an operable
3G (data) network connection.
• Vehicle must be registered with
MTC+ Access and have an active
subscription that includes the
applicable feature or App.
• Owner must properly set-up
notification to have the Theft Alarm
Notification sent to an appropriate
mobile device or email account.
CAUTION!
In the event your theft alarm is
(Continued)
3
25
Page 26
MTC+ Access
(Continued)
activated, use caution and evaluate
the situation from a safe distance. If
any unauthorised or suspicious person
is near or inside of your vehicle,
immediately contact the police. Do not
do anything that could jeopardize
your safety or the safety of those
3
around you.
FAQs
What do I do if my Theft Alarm goes
off?
In the event your theft alarm is
activated, use caution and evaluate
the situation from a safe distance. If
any unauthorised or suspicious person
is near or inside of your vehicle,
immediately contact the police. Do not
do anything that could jeopardize
your safety or the safety of those
around you.
How can I change where I receive
notifications?
You can manage your notifications by
going to the Maserati Owner Connect
website (www.maserati.com
in with your user name and password.
Once there, you can click on “Edit
Profile”, then the “Notifications” tab.
Can I receive a text message (SMS)
when my Theft Alarm goes off?
) and log
Yes. Text messages are a convenient
and quick way to receive notifications.
You can manage your notifications by
going to the Maserati Owner Connect
website (www.maserati.com
) and log
in with your user name and password.
Once there, you can click on “Edit
Profile”, then the “Notifications” tab
to add, remove and edit your
notification options.
Voice Texting
Description
This Voice Texting enhances the Voice
Text Reply feature built into your
MTC+ Access radio. While Voice Text
Reply provides 18 pre-defined
messages you can send, Voice Texting
lets you create and send nearly any
message you want. Just speak your
message as if you were talking to the
recipient, and the MTC+ Access
voice-texting technology will convert
your voice into a text message.
Voice Texting and Voice Text Reply
features are compatible with many
newer Android and Blackberry devices.
Before using, determine if your device
has been tested to support Bluetooth
“Message Access Profile (MAP)” at
www.maserati.com
other devices do not currently support
Bluetooth
®
MAP. Ensure MAP is ON
. iPhone and some
and incoming message notification is
enabled.
How It Works (Set Up Your Device to
Work with Voice Texting)
After pairing your device to the vehicle
using Bluetooth
(www.maserati.com
®
see
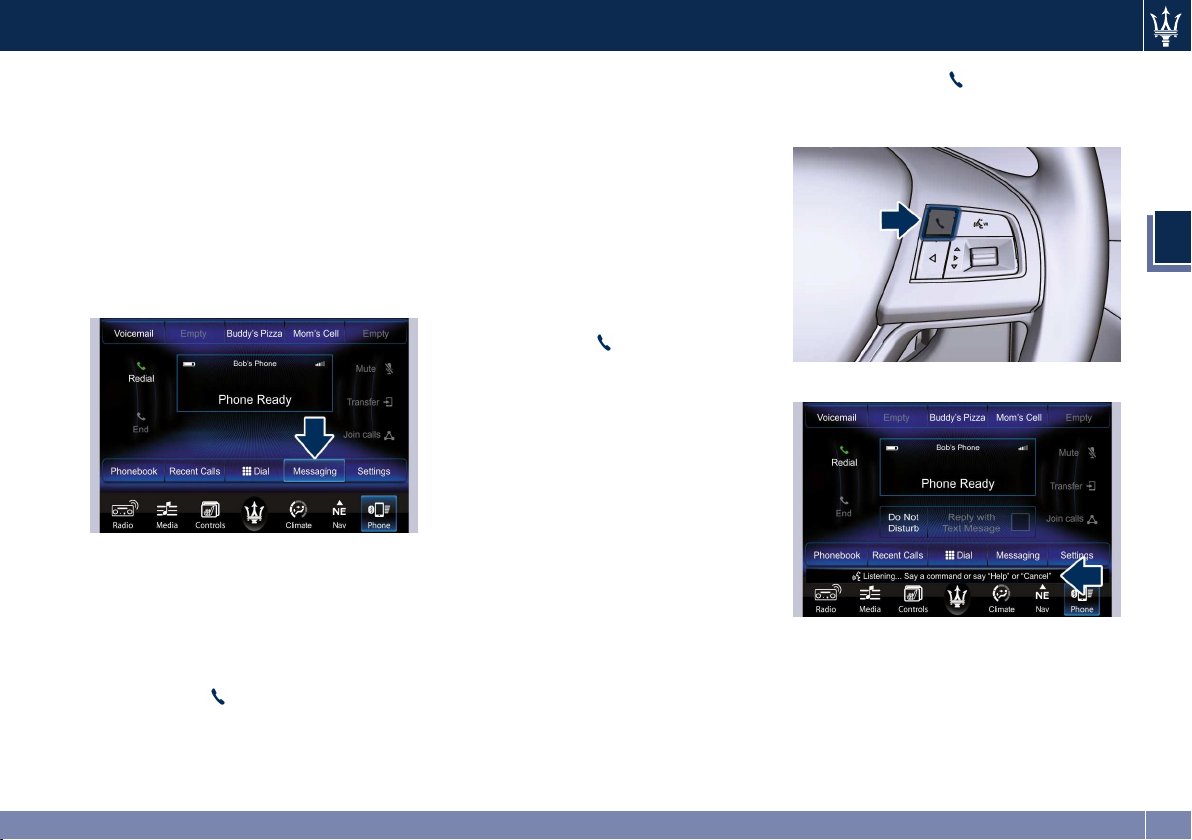
), touch the phone
soft-key on the menu bar of the
radio to see the main “Phone” screen.
A minute or so after a compatible MAP
enabled device has been Bluetooth
connected to the vehicle; the
“messaging” soft-key on the touch
screen will change from grey to white.
This is an indicator that Voice Texting
will work with your device. Outgoing
voice texts may not be possible. The
device may allow incoming texts only.
Determine if your device has been
tested to support Bluetooth “Message
Access Profile” (MAP) - at
www.maserati.com. (Your device may
support Voice Texting even if not
found on this website. Check with your
device manufacturer to see if it
supports MAP protocol).
®
®
26
Page 27
MTC+ Access
NOTE:
If your device supports MAP, then
ensure MAP is on and incoming
message notification is enabled, (see
www.maserati.com
instructions).
Follow the steps below to see if your
device can set up to work with Voice
Texting.
If a Bluetooth
appears showing your device
requesting permissions, check the box
for Always and touch “Accept”.
Sending A New Text Message From
Radio
• Push phone
steering wheel.
• Say “Send text message”.
for device specific
®
authorisation window
button on the
• The system will respond “Say the
phone number or the full name and
the phone type of the contact that
you want to send a message to”.
• Dictate message (“I will be home at
eight”).
• When finished dictating, wait for
prompt and say “Send”.
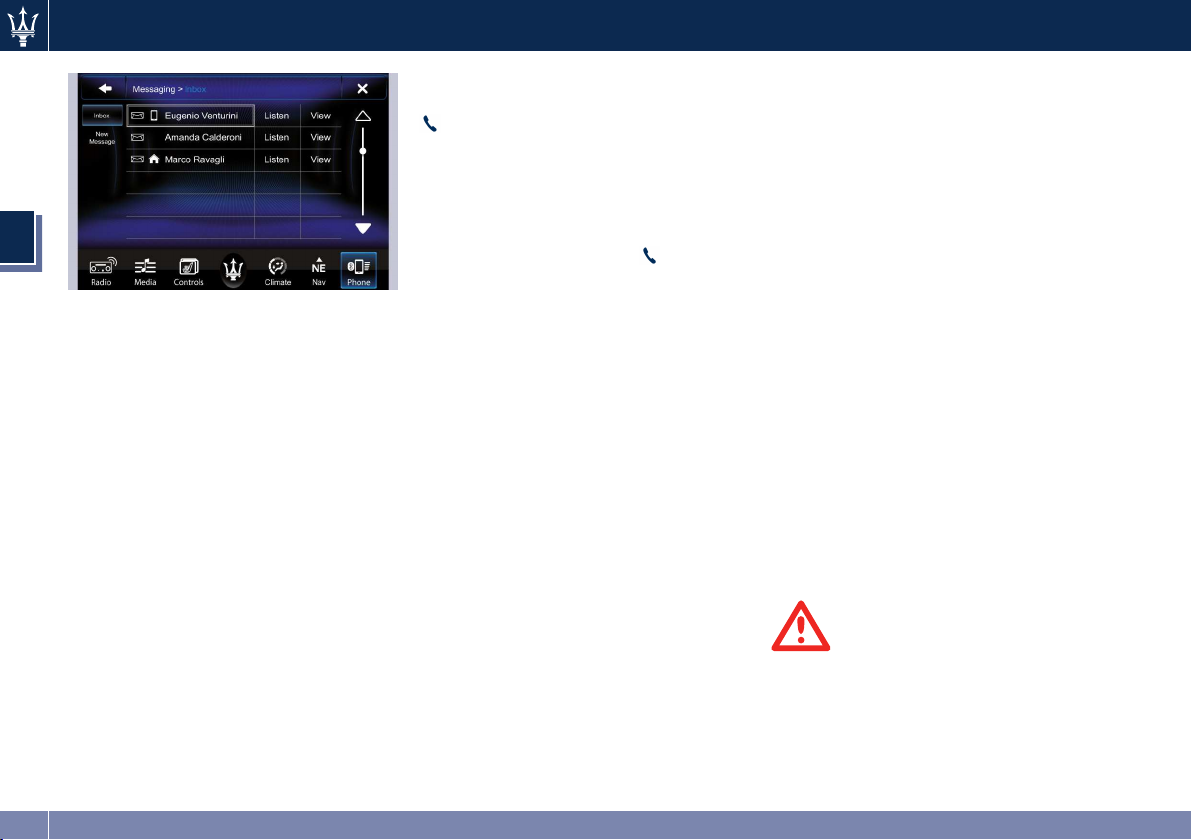
Viewing Or Listening To Incoming
Messages
To listen to a message from radio:
• Press the phone
steering wheel. Say "Listen to
message".
• Or touch the "Listen" soft-key on
the touch screen.
Viewing Your Messages
button on the
• Press the phone button on the
steering wheel.
3
• Say “View message”.
• Or touch “View” on the in-vehicle
touch screen.
27
Page 28
MTC+ Access
3
Contact names or phone numbers of
the message sender appears in a list
along with “View” and “Listen”
soft-keys on the touch screen.
Viewing A Specific Message
• Touch “View” next to the contact
name/phone number of the message
you want to be displayed.
• Or say “Show message <number of
the message>”.
Listening To A Message
Touch “Listen” on the touch screen or
push the “Phone” button on the
steering wheel and say “Listen,” the
MTC+ system will read the received
text message over the vehicle audio
system.
Barge-In
“Barge-in” is a feature that enables a
user to say a valid command without
waiting for the system to finish
28
speaking. When the system is
“speaking” you can press the phone
button on the steering wheel and
say a valid command.
For example, if the system is explaining
all of the options available after
dictating a text message, at any time
the user can touch "Listen" on touch
screen or press the phone
on the steering wheel and say
"Listen."
Requirements
• (MAP may not be compatible with
Apple iPhones (pre iOS 6). Apple iOS
6 supports receiving text messages,
but does not support sending text
messages).
• Available on vehicles equipped with
MTC+ Access.
• Vehicle must be registered with an
active MTC+ Access Advantage trial
or paid subscription for free form
text response to work.
• Vehicle and device must have an
operable 3G (data) network
connection.
• Customer must have a properly
paired and connected device with
Bluetooth
(MAP) enabled. Voice Texting is
compatible with many newer
BlackBerry and Android mobile
®
Message Access Profile
button
devices. Apple iOS 5 and earlier does
not support MAP so iPhones will not
send free form text messages. Apple
iOS 6 supports receiving, not sending
text messages. To check if your
device has been tested to be
compatible please visit:
www.maserati.com
Disclaimers
• Not all Voice Texting features may be
available on your device.
• Your MAP supported device must be
paired and connected to a
compatible MTC+ radio.
• Vehicle must have an operable 3G
(data) network connection to voice
text.
• Maserati and its affiliates are not
responsible for errant text messages.
• Vehicle must be registered with an
active MTC+ Access trial or paid
subscription.
WARNING!
ALWAYS drive safely with your hands
on the steering wheel. You have full
responsibility and assume all risks
related to the use of the MTC+
features and applications in this
vehicle. Only use MTC+ when it is safe
.
Page 29
MTC+ Access
to do so. Failure to do so may result in
an accident involving serious injury or
death.
FAQs
Can I still voice text if my device is not
listed?
We are constantly testing devices and
updating our compatibility database.
If your device is not listed, you may
still be able to pair and connect your
MAP supported device to a compatible
MTC+ radio to see if all or most voice
texting functions work. Check your
device manufacturer if MAP is
supported on your device.
Can I use voice texting while in my
other Maserati vehicle?
The Voice Texting free text response
feature is available only on MTC+
(sales code RA4) radio. Other Maserati
vehicles do support hands free texting,
but only with fixed responses.
My “Messaging” soft-key on the
touch screen is White, but I can only
use pre-formatted responses
The Voice Texting free-form voice
response requires a subscription to the
MTC+ Access Advantage package.
(some devices will support
pre-formatted responses, but not
free-form. Refer to www.maserati.com
for further details.)
Do I have to “train” my MTC+ Radio to
my voice?
Maserati uses the latest voice
recognition engine that provides good
recognition without required training.
This makes it easier for a passenger to
also use the system.
Can a passenger voice text?
Yes, however, voice recognition
microphones are optimised for the
driver, so the system may have
difficulty hearing the passenger; also,
the system will use the currently
connected device, so be sure your
passenger isn’t sending texts to the
wrong recipient.
Does Voice Texting work with
accents?
Speech isn’t perfect. Technology isn’t
perfect. While Maserati strives to use
the latest voice recognition engine,
the technology may have difficulty
with strong accents.
Can I voice text my car?
The “Voice Texting” feature allows
you to listen to, and reply to text
messages (SMS) sent to your device by
voice while in your vehicle.
How many pre-formatted replies are
there?
You can respond with a set of up to 18
preset outgoing messages such as "I’ll
call you later.” Refer to “Voice
Texting” paragraph in this chapter.
Can I use abbreviations and
emoticons?
Of course! Just say the name of the
most popular emoticon or
abbreviation, e.g. smiley, frown, wink,
& LOL.
Can I use text messaging if the
“messaging” button doesn’t turn
white?
Only MAP compatible devices will
work with text messaging. If your
device is compatible, the “messaging”
light will turn white, after the device
is Bluetooth®connected, and you will
then be able to do hands free text
messaging. The system will respond
with “Sorry, I didn’t understand you”
if you push the steering wheel phone
button and say a voice command
for text messaging, when the button
isn’t active (“white”).
Remote Door Lock/Unlock
Description
The remote door lock/unlock feature
provides you the ability to lock or
unlock the door on your vehicle,
without the keys and from virtually
any distance. You can send a request
to your vehicle in one of three ways:
3
29
Page 30

MTC+ Access
• Using the MTC+ Access App from a
compatible device
• From the Maserati Owner Connect
website (www.maserati.com
If you want, you can set up
notifications for your account to
receive an email or text (SMS) message
every time a command is sent to lock
3
or unlock your doors.
How It Works
MTC+ Access App:
• Download the MTC+ Access App to a
compatible device and login using
your user name and password.
• To lock the doors, touch the
button with the closed lock icon;
to unlock the driver’s door touch the
button with the open lock icon.
• A pop-up screen will appear asking
for your MTC+ Security PIN (this is
the same 4-digit code established
when your registered your MTC+
Access system). Enter the MTC+
Security PIN on the keypad and touch
“OK.”
• The MTC+ Access App will confirm if
your command was sent (or not).
Touch “OK” to close the pop-up
screen.
• It will take a little while for the
command to go through to your
vehicle. The time it takes depends on
a number of technical conditions.
• A message will appear on the screen
)
to let you know if the command was
received by your vehicle.
Maserati Owner Connect website:
• Log on to the Maserati Owner
Connect website
(www.maserati.com
name and password you used when
registering your MTC+ Access system.
NOTE:
If you forgot your user name or
password, links are provided on the
website to help you retrieve them.
• If you have more than one vehicle
registered into the Maserati Owner
Connect website
(www.maserati.com
vehicle you want to send the
command by touching on its image
along the top.
• Beneath the image of a vehicle like
yours, you will see a row of icons. To
lock the doors, touch the
lock icon; to unlock the driver’s door
touch the
• You will then be asked to enter your
MTC+ Security PIN (this is the same
4-digit code established when your
) using the user
), select the
closed
open lock icon.
registered your MTC+ Access system).
Please enter your MTC+ Security PIN.
• A message will appear on the screen
to let you know if the command was
received by your vehicle.
Requirements
• Vehicle must be properly equipped
with the MTC+ Access system.
• Vehicle must have an operable 3G
(data) network connection.
• Vehicle must be registered with
MTC+ Access and have an active
subscription that includes the
applicable feature or App.
• If using the MTC+ Access App to
command your vehicle, your device
must be compatible and be
connected to an operable 3G (data)
network connection.
• An ignition cycle is required for some
remote commands such as Remote
Vehicle Start and Remote Door
Lock/Unlock if following a Remote
Horn and Lights activation.
FAQs
How long does it take to unlock or
lock the door?
Depending on various conditions, it
can take 1–2 minutes or more for the
request to get through to your vehicle,
30
Page 31

MTC+ Access
although MTC+ is always striving to
improve performance.
Which is faster, my key fob or the
MTC+ Access App?
Your key fob will lock/unlock the door
quicker, however its range is limited
and it can sometimes get misplaced or
locked in the vehicle. Your MTC+
Access App comes in handy for these
and other situations.
Will my vehicle be safe if I lose my
device?
People sometimes lose their devices,
which is why security measures have
been engineered into the MTC+
Access App. Asking for your user
name, password and MTC+ Security
PIN help to ensure that nobody can
get into your vehicle if they happen to
find your device.
Why can’t all devices use the MTC+
Access App?
The MTC+ Access App has been
designed to work on most devices
with the Apple and Android operating
systems. The capabilities of these
devices allows us to remotely
command your vehicle. Other
operating systems may be supported
in the future.
Why is the MTC+ Access App running
slow?
The MTC+ Access App relies on a
mobile network connection from your
device to send commands to your
vehicle which must have an operable
3G (data) network connection. If
either your device or your vehicle are
in an area with below average
coverage, it may take longer to log in
and send commands.
Remote Vehicle Start (if equipped)
Description
The remote vehicle start feature
provides you with the ability to start
the engine on your vehicle, without
the keys and from virtually any
distance. Once started, the pre-set
climate controls in your vehicle can
warm-up or cool-down the interior
before you have to get in. You can
send a request to your vehicle in one
of two ways:
• Using the MTC+ Access App from a
compatible device.
• From the Maserati Owner Connect
website (www.maserati.com
You can also send a command to
turn-off an engine that has been
remote started. After 15 minutes if
you have not entered your vehicle
).
with the key fob, the engine will shut
off automatically.
This remote function requires your
vehicle to be equipped with a
factory-installed Remote Start system.
If you want, you can set-up
notifications for your account to
receive an email or text (SMS) message
every time a command is sent to
remote start or cancel a remote start.
How It Works
MTC+ Access App:
• Download the MTC+ Access App to a
compatible device and login using
your user name and password.
• To start the engine, touch the
circular arrow, to turn-off an
engine that has been remote started
touch the “cancel” soft-key.
• A pop-up screen will appear asking
for your MTC+ Security PIN (this is
the same 4-digit code established
when your registered your MTC+
Access system). Enter the MTC+
Security PIN on the keypad and
touch “OK.”
• The MTC+ Access App will confirm if
your command was sent (or not).
touch “OK” to close the pop-up
screen.
• It will take a little while for the
command to go through to your
3
31
Page 32

MTC+ Access
vehicle. The time it takes depends on
a number of technical conditions.
• A message will appear on the screen
to let you know if the command was
received by your vehicle.
Maserati Owner Connect website:
• Log on to the Maserati Owner
3
Connect website
(www.maserati.com
name and password you used when
registering your MTC+ Access system.
NOTE:
If you forgot your user name or
password, links are provided on the
website to help you retrieve them.
• If you have more than one vehicle
registered into the Maserati Owner
Connect website
(www.maserati.com
vehicle you want to send the
command by clicking on its image
along the top.
• Beneath the image of a vehicle like
yours, you will see a row of icons. To
start the engine, touch the
circular arrow, to turn-off an
engine that has been remote started
touch the “cancel” soft-key.
• You will then be asked to enter your
MTC+ Security PIN (this is the same
) using the user
), select the
4-digit code established when your
registered your MTC+ Access system).
Please enter your MTC+ Security PIN.
• A message will appear on the screen
to let you know if the command was
received by your vehicle.
Requirements
• Vehicle must be properly equipped
with the MTC+ Access System and
factory installed remote start
capabilities.
• Vehicle must have an operable 3G
(data) network connection.
• Vehicle must be registered with
MTC+ Access and have an active
subscription that includes the
applicable feature or App.
• To perform updates to this
application, if required, your vehicle
must be connected to an operable
3G (data) network.
• If using the MTC+ Access App to
command your vehicle, your device
must be compatible and be
connected to a mobile network.
• An ignition cycle is required for some
remote commands such as remote
vehicle start and remote door
lock/unlock if following a remote
horn and lights activation.
FAQs
How long does it take to remote start
my vehicle?
Depending on various conditions, it
can take three minutes or more for the
request to get through to your vehicle,
although MTC+ is always striving to
improve performance.
Which is faster, my key fob or the
MTC+ Access App?
Your key fob will remote start your
vehicle quicker, however its range is
limited. For example, when you are
leaving the stadium after the game,
you can remote start your vehicle to
have the inside comfortable before
you even get there.
Will my vehicle be safe if I lose my
wireless device?
People sometimes lose their wireless
devices, which is why security measures
have been engineered into the MTC+
Access App. Asking for your user
name, password and MTC+ Security
PIN help to ensure that nobody can
start your vehicle if they happen to
find your device.
Can someone drive off with my
vehicle using the App?
No. Driving your vehicle still requires
the key fob to be in the vehicle. The
remote start feature simply starts the
engine to warm-up or cool down the
32
Page 33

MTC+ Access
interior before you arrive, you cannot
drive away without the key fob.
Can I stop a vehicle that is being
driven by cancelling the engine start
command?
No. If a vehicle is driving down the
road the cancel remote start soft-key
will not stop it. It simply cancels or
ends a remote start of the engine.
Why can’t all devices use the MTC+
Access App?
The MTC+ Access App has been
designed to work on most devices
with the Apple and Android operating
systems. The capabilities of these
device allows us to remotely command
your vehicle. Other operating systems
may be supported in the future.
Remote Horn And Lights
Description
It is easy to locate a vehicle in a dark,
crowded or noisy parking area by
activating the horn and lights. It may
also help if you need to draw
attention to your vehicle for any
reason. You can send a request to your
vehicle in one of three ways:
• Using the MTC+ Access App from a
compatible device.
• From the Maserati Owner Connect
website (www.maserati.com
).
If you want, you can set-up
notifications for your account to
receive an email or text (SMS) message
every time a command is sent to turn
on the horn and lights.
How It Works
• Download the MTC+ Access App to a
compatible device and login using
your user name and password.
• To turn on the horn and lights, touch
the horn
horn and lights, touch the horn
icon again.
• A pop-up screen will appear asking
for your MTC+ Security PIN (this is
the same 4- digit code established
when your registered your MTC+
Access system). Enter the MTC+
Security PIN on the keypad and
touch “OK.”
• The MTC+ Access App will confirm if
your command was sent (or not).
touch “OK” to close the pop-up
screen.
• It will take a little while for the
command to go through to your
vehicle. The time it takes depends on
a number of technical conditions.
• A message will appear on the screen
to let you know if the command was
received by your vehicle.
icon. To turn-off the
Maserati Owner Connect website:
• Log on to the Maserati Owner
Connect website
(www.maserati.com
name and password you used when
registering your MTC+ Access system.
If you forgot your user name or
password, links are provided on the
website to help you retrieve them.
• If you have more than one vehicle
registered into the Maserati Owner
Connect website
(www.maserati.com
vehicle you want to send the
command by clicking on its image
along the top.
• Beneath the image of a vehicle like
yours, you will see a row of icons. To
turn on the horn and lights, touch
the horn
horn and lights, touch the horn
icon again.
• You will then be asked to enter your
MTC+ Security PIN (this is the same
4-digit code established when your
registered your MTC+ Access system).
Please enter your MTC+ Security PIN.
• A message will appear on the screen
to let you know if the command was
received by your vehicle.
Requirements
icon. To turn off the
) using the user
), select the
3
33
Page 34

MTC+ Access
• Vehicle must be properly equipped
with the MTC+ Access System.
• Vehicle must have an operable 3G
(data) network connection.
• Vehicle must be registered with
MTC+ Access and have an active
subscription that includes the
3
applicable feature or App.
• To perform updates to this
application, if required, your vehicle
must be connected to an operable
3G (data) network.
• If using the MTC+ Access App to
command your vehicle, your device
must be compatible and be
connected to a mobile network.
• An ignition cycle is required for some
remote commands such as Remote
Vehicle Start and Remote Door
Lock/Unlock if following a Remote
Horn and Lights activation.
NOTE:
The remote horn and lights feature is
designed to be loud and get noticed.
Please keep in mind the surroundings
when using this feature.
FAQs
How long does it take to sound my
horn and flash the lights?
Depending on various conditions, it
can take three minutes or more for the
request to get through to your vehicle,
although MTC+ is always striving to
improve performance.
Which is faster, my key fob or the
MTC+ Access App?
Your key fob will sound the horn and
flash the lights quicker; however its
range is limited.
Will my vehicle be safe if I lose my
wireless device?
People sometimes lose their device,
which is why security measures have
been engineered into the MTC+ Access
App. Asking for your user name,
password and MTC+ Security PIN help
to ensure that nobody can access your
vehicle if they happen to find your
device.
How do I turn off the horn and lights
after I turn them on?
By touching the horn
time on your MTC+ Access App, a
second command will be sent to
shut-off the horn and lights.
Why can’t all devices use the MTC+
Access App?
The MTC+ Access App has been
designed to work on most devices with
the Apple and Android operating
systems. The capabilities of these
device allows us to remotely command
icon a second
your vehicle. Other operating systems
may be supported in the future.
Vehicle Health Alert
Your vehicle will send you an email
alert if it senses a problem under the
bonnet with one of your vehicles key
systems. For further information go to
the Maserati Owner Connect website
(www.maserati.com
).
Via Mobile Apps
NOTE:
This paragraph contains the
description and the use of App “Aha”.
This information can be applied to
many of the Apps that you can
download from your mobile device or
from your PC and visualize on the
MTC+ screen.
Aha by Harman (if equipped)
Aha makes it easy to instantly access
your favourite Web content on the go.
Choose from over 40,000+ stations
spanning internet radio, personalised
music, news, entertainment, hotels,
weather, audiobooks, Facebook,
Twitter, and more.
Description
Aha lets you easily access and organize
your favourite web content on your
34
Page 35

MTC+ Access
device, then seamlessly integrates the
experience with your vehicle.
• Listen to audio updates from
Facebook or Twitter (vehicle must be
registered with MTC+ Access).
• Organize your favourite content
from the web into personalised
on-demand radio stations.
• Aha gives customers the flexibility to
create up to 30 pre-set stations from
within the vehicle, on the Aha
website (aharadio.com
the Aha mobile App.
• “Like” and “Dislike” soft-key on the
touch screen are available to refine
songs being played on the station.
• Ability to perform location-based
local searches (e.g. “Hungry” and
“Coffee”) and route to a point of
interest by sending the address to
the navigation system (if equipped).
• Real-time traffic reports and audio
books (read aloud).
• Access your favourite podcasts,
internet radio, on-demand music,
traffic reports and restaurant
recommendations.
• News, sports, talk, social, comedy
and special interest podcasts.
), or through
Ensure that “Via Mobile” data has
been turned on under “Settings” in
the MTC+ Access App.
Each time you want to use a “Via
Mobile” App in your vehicle, the
MTC+ Access App must be running on
your device and the device must be
paired via Bluetooth
A message will be displayed to remind
you that Via Mobile Apps utilize the
data plan on your connected device to
provide content. Touch “OK” soft-key
to continue or the “X” to exit.
NOTE:
Many devices have a limit to how
much data they can utilize before
incurring additional charges. The
amount of data being used varies by
device, service provider and specific
App. Check your device service plan
for more details.
You can associate your Aha account
with your personal Facebook and
Twitter accounts. If you have the Aha
App downloaded to your device visit
the Aha settings screen and look for
“Associate Accounts.” You can also
associate your Aha account from
aharadio.com
Requirements
®
.
.
• Vehicle must be properly equipped
with the MTC+ Access System.
• Your device must be compatible with
the MTC+ Access App and properly
connected to the vehicle.
• To perform updates to this
application, if required, your vehicle
must be connected to an operable
3G (data) network.
• Your device must be connected to a
mobile network.
• Vehicle must be registered with
MTC+ Access and have an active
subscription that includes the
applicable feature or App.
• Vehicle must be powered with the
ignition device in the RUN or ACC
position with a properly functioning
electrical system.
FAQs
Why can’t I get Aha Via Mobile to
work?
Here are some things to consider:
• Check to ensure you have linked
your Aha account credentials with
MTC+ Access. This is usually done
during registration and set-up. Then,
check to ensure you have properly
connected your compatible device to
the vehicle touch screen. The MTC+
Access App must be open and you
3
35
Page 36

MTC+ Access
must be logged in. A blue light
indicates that it’s providing data to
the vehicle.
• If you recently changed your
password for Aha, it may need to be
updated on Maserati Owner Connect
under the “Via Mobile” paragraph in
3
this chapter.
How does Aha help refine my music
options?
It organizes your favourite content
into personalised on-demand radio
stations. You can access podcasts,
internet radio, personalised traffic
reports and even restaurant
recommendations. It will assemble
content for you based on your use of
the “like” and “dislike” soft-key on
the touch screen.
Where does the search function search
from?
The search function will provide results
based on the location of your vehicle.
As you drive, the search results will
change to reflect your vehicle’s current
location.
How do I sync my Aha account with
Facebook and Twitter?
Associate your Aha account with
Facebook and Twitter services at
aharadio.com
App. From the Aha device App, visit
, or from the Aha device
the Aha settings screen and look for
“Associate Accounts.”
If I enter personalised preferences on
the web, will it also save my setting
when I am in the vehicle?
Yes, your personalised selections are
saved to a common area, so they will
be reflected wherever you access Aha
in the vehicle on the vehicle touch
screen, device or the Aha website
aharadio.com.
Why can’t I get Aha Via Mobile to
work?
Ensure you have registered for MTC+
Access and associated your Aha
account credentials with MTC+ Access.
This is done during registration and
set-up process. Then, ensure you have
properly connected your compatible
device to the vehicle touch screen. The
MTC+ Access App must be open. A
blue light indicates that it’s providing
data to the vehicle.
If I changed my password for Aha, do I
have to update it with MTC+ Access?
Yes. Visit Maserati Owner Connect
website (www.maserati.com
and click on Via Mobile.
How do I set up an Aha account?
You can create an account with Aha by
visiting aharadio.com
changes to an existing Aha account,
visit the Aha website.
), log in,
. To make
Can I create an Aha account during
MTC+ Access registration and set-up?
There is a link from the “Via Mobile”
profile page where the customer can
go to the Aha website to create a new
account.
How do I block explicit content?
By default Aha automatically filters
and blocks explicit content for you. If
you would like to enable the ability to
listen to explicit podcasts, as well as
comedy or user-generated shouts, you
must visit the “Settings” screen and
switch the “Allow Explicit Content”
setting to “ON”.
Should I have the Aha App
downloaded to my device to use Aha
Via Mobile?
You do not need to have the Aha App
on your device to use Aha Via Mobile.
The MTC+ Access App is required.
How do I know how much data is
being used?
MTC+ Access Via Mobile uses your
device’s existing data plan to stream
content. Data usage varies by
phone/device, content (e.g. videos),
high quality audio and several other
factors. Please refer to your device
carrier for specific details.
36
Page 37

MTC+ Access
SOS-Emergency Call (available only for Russian market)
WARNING!
Some MTC+ Access services, including
SOS-Emergency call, will NOT work
without an operable 3G (data)
network connection.
With MTC+ Access, your vehicle has
on-board assistance features that is
activated by the button located on the
dome console designed to enhance
your driving experience if you should
ever need assistance or support.
Description
SOS-Emergency Call is a feature that,
at the push of a button, can contact
emergency services providing that the
Telematic Box Module (TDM) is
working and the ignition device is in
RUN or ACC position. The manual
emergency Call is possible also when
the ignition device is in OFF position
until its backlight stays on. It’s a
convenient way to get in contact with
an operator in the event of an
emergency. When the connection
between the vehicle and an operator
is made, your vehicle will
automatically transmit location and
vehicle information to the emergency
service operator.
The SOS-Emergency Call is
automatically forwarded in the event
of an accident with airbag
intervention providing that the
ignition device is in RUN position and
airbags are working (malfunction
warning light
Ended the call, you can still call the
emergency service operator to
indicate additional information by
pressing the button again.
off).
How It Works
Press and hold for a few seconds the
SOS-Emergency Call button on the
dome console; the green LED on the
button will blink and then become a
fixed light indicating a call has been
placed.
NOTE:
In case the SOS-Emergency Call button
is accidentally pushed, there is a 10
second delay before the call is placed.
The system will verbally alert you that
a call is about to be made. To cancel
the call connection, push the
SOS-Emergency Call button on the
dome console.
Once a connection between the
vehicle and an emergency service
operator is made, the SOS-Emergency
Call system will transmit the following
important vehicle information to the
operator:
• Indication that the occupant placed
an SOS-Emergency Call.
• The Vehicle Identification Number
(VIN).
• The last known GPS coordinates of
the vehicle.
You should be able to speak with the
emergency service operator to
3
37
Page 38

MTC+ Access
determine if additional help is needed.
The SOS-Emergency Call has priority
over other audio sources, which will be
muted. If you have a phone connected
via Bluetooth
reconnected at the end of the
SOS-Emergency Call.
Voice prompts will guide you during
3
the SOS-Emergency Call.
If a connection is made between an
emergency service operator and your
vehicle, you understand and agree
that operators may, like any other
emergency call, record conversations
and sounds in and near your vehicle
upon connection.
®
, it is disconnected and
SOS-Emergency Call System Limitations
If the SOS-Emergency Call system
detects a malfunction, any of the
following may occur at the time the
malfunction is detected:
• The LED on the dome console button
will continuously be illuminated red.
• The instrument cluster will display a
message alerting you to contact the
Service Network together with the
failure warning light.
Even if the SOS-Emergency Call system
is fully functional, external or not
controlled factors may prevent or stop
SOS-Emergency Call operation. These
include, but are not limited to, the
following factors:
• The key fob has been removed from
the vehicle and the delayed
accessories mode is active.
• The ignition device is in OFF position.
• The vehicle’s electrical systems are
not intact.
• The SOS-Emergency Call system
software and/or hardware is
damaged during a vehicle crash.
• The vehicle battery loses power or
becomes disconnected during a
vehicle crash.
• 3G (data) network and/or GPS signals
are unavailable or obstructed.
• Equipment malfunction at the
emergency service operator facility.
• Operator error.
• 3G (data) network congestion.
• Weather.
• Buildings, structures, geographic
terrain, or tunnels.
NOTE:
The signal strength bars on the
soft-key on the touch screen will show
a single bar and a symbol to indicate
your vehicle is not connected to an
operable 3G (data) network.
If your vehicle loses battery power for
any reason (including during or after
an accident) the SOS-Emergency Call
system, among other vehicle systems,
will not operate.
Apps
Requirements
• This feature is available only on
vehicles sold in Russian market.
• Vehicle must have an operable 3G
(data) network connection.
• Vehicle must be powered with a
properly functioning electrical
system.
• The ignition device must be in the
RUN or ACC position and in OFF
position until its backlight stays on.
WARNING!
• Never place anything on or near the
vehicle’s 3G (data) and GPS aerials.
You could prevent 3G (data) and GPS
signal reception, which can prevent
your vehicle from placing an
38
Page 39

MTC+ Access
emergency call. An operable 3G
(data) network connection and a
GPS signal is required for the
SOS-Emergency Call system to
function properly.
• Do not add any aftermarket
electrical equipment to the vehicle’s
electrical system. This may prevent
your vehicle from sending a signal
to initiate an emergency call. To
avoid interference that can cause
the SOS-Emergency Call system to
fail, never add aftermarket
equipment (e.g., two-way mobile
radio, CB radio, data recorder, etc.)
to your vehicle’s electrical system or
modify the antennas on your
vehicle. IF YOUR VEHICLE LOSES
BATTERY POWER FOR ANY REASON
(INCLUDING DURING OR AFTER AN
ACCIDENT) THE MTC+ FEATURES,
APPS AND SERVICES AMONG
OTHERS WILL NOT OPERATE.
• The Occupant Restraint Controller
(ORC) turns on the airbag warning
light on the instrument cluster if a
malfunction in any part of the
airbag system is detected. If the
airbag warning light is illuminated,
the airbag system may not be
working properly and the
SOS-Emergency Call system may not
be able to send a signal to an
emergency service operator. If the
airbag warning light is illuminated,
have immediately the airbag system
checked ad the Service Network.
• Ignoring the LED on dome console
button could mean you will not
have emergency call services if
needed. If the LED on dome console
button is illuminated in red color,
have immediately the airbag system
checked ad the Service Network.
• If anyone in the vehicle could be in
danger (e.g., fire or smoke is visible,
dangerous road conditions or
location), do not wait for voice
contact from an emergency service
operator. All occupants should exit
the vehicle immediately and move
to a safe location.
• Failure to perform scheduled
maintenance and regularly inspect
your vehicle may result in vehicle
damage, accident or injury.
FAQs
What Happens if I Accidentally Push
the SOS-Emergency Call Button on the
Dome Console?
You have 10 seconds after pushing the
emergency button to cancel the call.
To cancel the call, either push the
button again.
What Type of Information Is Sent
when I Call Emergency Service
Operator from My Vehicle?
Certain vehicle information, such as
VIN of the model, is transmitted along
with last known GPS location. Also
note that emergency service operators
may record conversations and sounds
within your vehicle once a connection
is made, and that by using the service
you consent to having this
information shared.
When Could I Use the SOS-Emergency
Call Button?
You can use the emergency button to
make a call if you or someone else
needs emergency assistance.
3
39
Page 40

MTC+ Access
Maintain My MTC+ Access Account
How to Remove my MTC+ Access Account
To remove your MTC+ Access account
or cancel your MTC+ Access
3
subscription go to the Maserati Owner
Connect website (www.maserati.com
On Maserati Owner Connect, go to
“MTC+ Store”, and touch “Remove My
Vehicle.”
Adding Vehicles to my MTC+ Access Account
You can easily add vehicles to your
MTC+ Access account on-line by going
to the Maserati Owner Connect
website (www.maserati.com
Dashboard > “Add a Vehicle”.
Connected vehicles must follow the
secure registration process to be added
to an account.
) >
MTC+ FAQs
How Do I Register for my MTC+ Access
Account?
Touch the
in-vehicle touch screen, then select
MTC+ Registration.
Why Do I Need An Email Address?
Without an email address, customers
cannot register for MTC+ Access.
).
Customers need to register so they can
subscribe to receive additional services
and create a MTC+ Security PIN for
remote command requests.
How Do I Create A MTC+ Security PIN?
Set up your MTC+ Security PIN during
the registration process. The MTC+
Security PIN will be required to
authenticate you when performing
any remote services such as remote
door lock/unlock, remote horn &
lights, or remote vehicle start.
What If I Forgot my MTC+ Security
PIN?
If you’ve already registered and forgot
your MTC+ Security PIN, you can reset
the pin by selecting “Edit Profile” on
the Maserati Owner Connect website
(www.maserati.com
How Do I Create a MTC+ Payment PIN?
Log into the Maserati Owner Connect
website (www.maserati.com
user name and password. Select “Edit
Apps button on the
).
) with your
Profile” > “MTC+ Payment Account”
to create an account (and PIN) (if you
have a MTC+ Access equipped vehicle).
What Is a MTC+ Payment PIN?
A MTC+ Payment PIN is a unique
4-digit code that you create to gain
access to your payment information –
your credit cards, billing address,
payment history and more. It is
required in order to purchase MTC+
Access packages and Apps.
What If I Forgot my MTC+ Payment
PIN?
The next time you are asked for your
MTC+ Payment PIN, select “Forgot
PIN?” and follow the steps to reset it.
How Do I Update my MTC+ Payment
Account Address?
Your MTC+ Payment Account address
must be updated on-line only: login to
the Maserati Owner Connect website
(www.maserati.com
Profile” > “MTC+ Payment Account”.
How Do I Update my MTC+ Profile?
Your name, home address, phone
number, email address and MTC+
Security PIN can be updated on-line on
the Maserati Owner Connect website
(www.maserati.com
• Log in to the Maserati Owner
Connect website
(www.maserati.com
), and select “Edit
).
) then select
40
Page 41

MTC+ Access
“Edit Profile” to edit your personal
information.
• Make your edits and click “Save.”
Can I Access every App And Service
While Driving?
No, some applications and services are
not available while driving. For your
own safety, it is not possible to use
some of the touch screen features
while the vehicle is in motion (e.g.
keypad).
Can I Access the MTC+ Store while I
Am Driving?
No, some applications and services are
not available while driving. Only use
MTC+ applications and services when
the vehicle is parked in a safe location.
How Do I Know when a New App,
Feature or Package Is Offered?
Go to “MTC+ Store” to check for
updated features, packages and Apps.
Will I Be Notified when my
Subscription Is Expired or Will It
Automatically Renew?
There is no auto-renewal feature
currently offered. You can find the
expiration dates for all of your App
and package subscriptions from your
in-vehicle touch screen, select
soft-key > “MTC+ Store” > “My Apps”.
How Do I Manage My Notification
Preferences?
Apps
Go to “Edit Profile” > “MTC+
Notifications” on the Maserati Owner
Connect website (www.maserati.com
Do I Receive A Purchase Confirmation?
Yes. You will receive a purchase
confirmation email any time you
renew your MTC+ Access subscription.
How Do I Purchase A Subscription?
From your in-vehicle touch screen:
• Select
Store”.
• Choose a package or service.
• Follow the steps to enter your MTC+
Payment PIN and complete the
process.
You can also go to the “MTC+ Store”
on-line at Maserati Owner Connect
website (www.maserati.com), select
the “Shop” tab, then “MTC+ Store”.
How Do I Update my Credit Card
Information?
Login to the Maserati Owner Connect
website (www.maserati.com), and
select “Edit Profile”, then select
“MTC+ Payment Account”.
How Do I Find Out How Much Longer
I Have on my Subscription?
From your vehicle touch screen >
select
> “My Apps” and choose a
subscription to view its expiration
date. When your subscription is about
Apps soft-key > “MTC+
Apps soft-key > “MTC+ Store”
to expire you will receive an email
notification.
Which Apps Are Included With My
).
Vehicle?
Go to “MTC+ Store” > “My Apps” to
see Apps currently available on your
vehicle.
If I Delete/Remove a Package from my
Screen, Does It Cancel my
Subscription?
Yes, this removes the subscription of
the selected package.
Can I Get a Refund if I Have Not Used
the Entire Subscription?
No.
Can I Cancel a Subscription Before It
Expires?
Yes, but your subscription will still be
active until the expiration date. If you
subscribe to another package, the new
subscription will start immediately.
Do I Have To Keep my Vehicle on
During the App Download Process?
Yes.
How Do I Re-Initiate a Download App
if There Was an Error?
If you’re having issues with an App
you can reinstall it. This returns the
App to its original state which usually
fixes the problem. This does not affect
your MTC+ subscriptions or account
information. To reinstall an App from
the in-vehicle touch screen, touch
3
41
Page 42

MTC+ Access
Apps soft-key > “MTC+ Store” >
“My Apps” > “Settings” > “Reinstall
Apps” > continue...
What Should I Do if I Want To Sell my
Vehicle?
Before your vehicle is sold to a new
owner, you’ll want to remove your
account information. This process
3
removes all personal information and
returns the MTC+ system to its original
factory settings. To remove your
account information from the MTC+
system:
• On the touch screen, touch
soft-key > “MTC+ Store” > “My
Apps” > “Settings”.
• Choose “Remove MTC+ Account”
and follow the instructions.
I Am Trading my Vehicle In. Can I
Transfer Apps To my New Vehicle if I
Have an Active Subscription?
No.
What Will Happen if There Is Not an
Operable 3G (Data) Network
Connection?
The SOS - Emergency button (if
equipped) will NOT function if you are
not connected to an operable 3G
(data) network. Other MTC+ services
will only be operable if your MTC+
Access service is active and you are
Apps
connected to an operable 3G (data)
network.
How Will I Know if my Vehicle Is Not
Connected To an Operable 3G (Data)
Network?
The signal strength bars on the Apps
soft-key on the touch screen will show
a single bar and a prohibition symbol
to indicate your vehicle is not
connected to an operable 3G (data)
network.
Safety Guidelines
WARNING!
ALWAYS obey traffic laws and pay
attention to the road. Some MTC+
Access services, including SOS Emergency Call (if equipped), will NOT
work without an operable 3G (data)
network connection.
NOTE:
Your vehicle may be transmitting data
as authorised by the subscriber.
Ensure that all persons read this
manual carefully before using the
radio system. It contains instructions
on how to use the system in a safe and
effective manner.
• Glance at the screen only when safe
to do so. If prolonged viewing of the
screen is required, park in a safe
location and set the electric parking
brake.
• Stop use of the MTC+ System
immediately if a problem occurs.
Failure to do so may cause injury or
damage to the MTC+ System. Please
contact the Service Network solve
this malfunction.
• Ensure the volume level of the MTC+
System is set to a level that still
allows you to hear outside traffic and
emergency vehicles.
Safe Usage Of The MTC+ Access System
• Read all instructions in this manual
carefully before using your system to
ensure proper usage!
• Your system is a sophisticated
electronic device. Do not let young
children use your system.
• Permanent hearing loss or damage
may occur if you play your music or
otherwise operate the system at loud
volumes. Exercise caution when
setting the volume on your system.
42
Page 43

MTC+ Access
NOTE:
Many features of this system are speed
dependent. For your own safety, it is
not possible to use some of the touch
screen features while the vehicle is in
motion.
• Keep drinks, rain, and other sources
of moisture away from your system.
Besides damage to your system,
moisture can cause electric shocks as
with any electronic device.
Device Connection and Audio Tips with MTC+
• More than one device can be paired
to your vehicle. The connected
device with the highest priority will
be used. To transition between
devices, select “Phone” soft-key >
“Settings”, then touch the desired
device.
• Multiple devices may be connected
at one time. For example, a device
can be paired and connected for
hands-free calling and texting, while
a USB media source is connected for
audio. However, only one Bluetooth
connection can be used at a time.
• Device calls will always have the
highest priority regardless of which
connection is active (only the SOS Emergency Call (if equipped) will
have a higher priority than the
device). For example, if an App is
launched and the user receives a call,
the user will be exited out of the
App and returned to the App when
the call ends.
• After all devices are connected/
paired, when switching to a
different audio source, audio will
auto-play from the new source.
• Current audio (AM-MW-LW-SW/FM/
DAB-DAB+-DMB/AUX/SD) will
continue to play when switching to a
non-media type App.
• Current audio (AM-MW-LW-SW/FM/
DAB-DAB+-DMB/AUX/SD) is muted
during SOS-Emergency Call.
• Device calls will mute all audio
except for Navigator (Nav) prompts
if guidance is currently active (audio
will resume after device call is
ended).
• All secondary incoming device calls
will be treated similar to “call
waiting” (except SOS-Emergency
Call).
• Incoming calls received while
entering a Navigator (Nav)
destination (before pressing “Go”)
will cancel the Navigator (Nav) entry.
The user is required to start over
when the device call has ended.
3
43
Page 44

MTC+ Access
44
Page 45

4 – Radio Mode
Radio Controls . . . . . . . . . . . . . . . . . . . . . . . . . . . . . . . 46
Setting Presets . . . . . . . . . . . . . . . . . . . . . . . . . . . . . . . 47
Audio . . . . . . . . . . . . . . . . . . . . . . . . . . . . . . . . . . . . . . 48
45
Page 46

Radio Mode
Radio Controls
The radio is equipped with the
following modes:
• FM
• AM/MW/LW/SW (if equipped)
• DAB, DAB+ and DMB (if equipped)
Touch the “Radio” soft-key on the
touch screen, bottom left corner, to
enter the Radio mode. The different
tuner modes: FM, AM, MW, LW, SW,
4
DAB, DAB+ and DMB (if equipped),
can then be selected by pressing the
corresponding buttons in the Radio
mode.
Volume Control
The volume control knob on the
central console turns continuously (360
degrees) in either direction, without
stopping. Turn the volume control
knob clockwise to increase the volume
and anti-clockwise to decrease.
When the audio system is turned on,
the sound will be set at the same
volume level as last played.
Tune/Scroll Control
Turn the tune/scroll control knob
clockwise to increase or anti-clockwise
to decrease the radio station
frequency. Push the enter button to
confirm a selection.
Touching the green soft-key “GO” on
the touch screen confirms selection,
immediately tunes the radio to the
selected station or channel and closes
the “Direct Tune” page.
Screen Close
The “X” soft-key on the touch screen
at the top right, provides a means to
close the “Direct Tune” screen. The
“Direct Tune” screen also auto closes if
no activity occurs within 10 seconds.
Seek and Direct Tune Functions
The seek up and down functions are
activated by touching the double
arrow buttons ( , ) on the touch
screen to the right and left of the
radio station display, or by pressing the
left steering wheel audio control up or
down.
Seek Up
Touch and release the seek up
soft-key on the touch screen to
tune the radio to the next listenable
station or channel. During a seek up
function, if the radio reaches the
starting station after passing through
the entire band two times, the radio
will stop at the station where it began.
Fast Seek Up
Touch and hold the seek up soft-key
on the touch screen to advance the
radio through the available stations or
channels at a faster rate, the radio
stops at the next available station or
channel when the button on the touch
screen is released.
Seek Down
Touch and release the seek down
soft-key on the touch screen to
tune the radio to the next listenable
station or channel. During a seek
down function, if the radio reaches the
starting station after passing through
the entire band two times, the radio
will stop at the station where it began.
Fast Seek Down
Touch and hold the seek down
soft-key on the touch screen to
advance the radio through the
available stations or channel at a faster
rate, the radio stops at the next
available station or channel when the
button on the touch screen is released.
Direct Tune
Touch the “Tune” softkey on the touch
screen located at the bottom of the
radio screen. The “Tune” soft-key on
the touch screen is available in FM,
AM, MW, LW, SW, DAB, DAB+ and
DMB (if equipped) radio modes and
46
Page 47

Radio Mode
can be used to direct tune the radio to
a desired station or channel.
Touch the available number soft-key
on the touch screen to begin selecting
a desired station. Once a number has
been entered, any numbers that are
no longer possible (stations that
cannot be reached) will become
deactivated/greyed out.
Undo
You can backspace an entry by
touching the bottom left “Undo”
soft-key on the touch screen.
GO
Once the last digit of a station has
been entered, the “Direct Tune”
screen will close and the system will
automatically tune to that station.
The selected station or channel
number is displayed in the “Direct
Tune” text box.
Setting Presets
The presets are available for all radio
modes, and are activated by touching
any of the 6 “Preset” soft-keys on the
touch screen, located at the top of the
screen.
When you are receiving a station that
you wish to commit into memory,
press and hold the desired numbered
soft-key on the touch screen for more
that two seconds or until you hear a
confirmation beep.
The radio stores up to 12 presets in
each of the “Radio” modes. A set of 6
presets are visible at the top of the
radio screen.
You can switch between the two radio
presets by touching the arrow >
soft-key located in the upper right of
the radio touch screen.
Browse Function in Radio Modes
When in any Radio modes, the
“Browse” screen provides a means to
edit the “Presets List” and is entered
by pushing the enter button.
touching the and arrow keys,
located on the right of the screen.
Preset Selection from List
A preset can be selected by touching
any of the listed “Presets”, or by
pushing the enter button on the
central console to select the currently
highlighted preset.
When selected, the radio tunes to the
station stored in the preset and
returns to the main Radio screen.
Deleting Presets
A preset can be deleted in the “Presets
Browse” screen by touching the trash
can icon for the corresponding preset.
Return to Main Radio Screen
You can return to the main Radio
screen, by touching the “X” soft-key
on the touch screen when in the
“Browse Presets” screen.
4
Scrolling Preset List
Once in the “Browse Presets” screen,
you can scroll the preset list by
rotation of the tune/scroll knob, or by
47
Page 48

Radio Mode
Audio
Press of the “Audio” soft-key on the
touch screen to activate the Audio
settings screen to adjust “Balance/
Fade”, “Equalizer”, “Speed Adjusted
Volume”, “Surround Sound”, Clari-Fi”
and “Auto Play”.
NOTE:
The available audio modes depending
on the type of audio system supplied
4
on the car.
You can return to the Radio screen by
touching the “X” located at the top
right.
Balance/Fade
Touch the “Balance/Fade” soft-key on
the touch screen to balance audio
between the front speakers or fade
the audio between the rear and front
speakers.
Touching the “Front,” “Rear,” “Left,”
or “Right” soft-keys or touch and drag
the blue speaker icon to adjust the
“Balance/Fade”.
Equalizer
Touch the “Equalizer” soft-key on the
touch screen to activate the
“Equalizer” screen.
Touch the “+” or “–” soft-keys, or by
pressing and dragging over the level
bar for each of the equalizer bands.
The level value, which spans between
-9 to +9, is displayed at the bottom of
each of the bands.
Speed Adjusted Volume
Touch the “Speed Adjusted Volume”
soft-key on the touch screen to
activate the “Speed Adjusted Volume”
screen.
This function is adjusted by selecting
from “Off,” “1,” “2” or “3.” This alters
the automatic adjustment of the audio
volume with variation to vehicle
speed. Volume increases automatically
as speed increase to compensate for
normal road noise.
Surround Sound
Touch the “On” soft-key on the touch
screen to activate Surround Sound.
Touch “Off” to deactivate this feature.
When this feature is “On”, you can
hear audio coming from every
48
Page 49

Radio Mode
direction as in a cinema or home
theatre system.
Clari-Fi
Touch the “On” soft-key on the touch
screen to activate Clari-Fi function.
Press “Off” to deactivate this function.
When in “On”, this function improves
the audio quality by enhancing
digitally compressed source files such
as MP3 and AAC files and certain
music tracks played by radio stations.
In case of high-definition source files
like the ones on a CD, Clari-Fi shall
apply no enhancement. Clari-Fi
intervention is completely automatic.
When a portable device is connected
to MTC+ System, it plays automatically
the songs if this function in set “On”.
4
Auto Play
Touch the “On” soft-key on the touch
screen to activate Auto Play function.
Press “Off” to deactivate this function.
49
Page 50

Radio Mode
50
Page 51

5 – Media Mode
USB/iPod Mode . . . . . . . . . . . . . . . . . . . . . . . . . . . . . . . 52
AUX Mode . . . . . . . . . . . . . . . . . . . . . . . . . . . . . . . . . . 53
SD Card Mode. . . . . . . . . . . . . . . . . . . . . . . . . . . . . . . . 53
Bluetooth Mode . . . . . . . . . . . . . . . . . . . . . . . . . . . . . . 54
51
Page 52

Media Mode
USB/iPod Mode
Overview
USB/iPod mode is entered by either
inserting a USB device or iPod and
cable into the USB port of the central
console or press the “iPod” soft-key on
the left side of the screen.
Seek Up/Seek Down
Touch and release the seek up
soft-key on the touch screen for the
next selection on the USB device/iPod.
Touch and release the seek down
5
soft-key on the touch screen to
return to the beginning of the current
selection, or to return to the
beginning of the previous selection if
the USB device/iPod is within the first
three seconds of the current selection.
Browse
Touch the “Browse” soft-key on the
touch screen or the browse button
on the central console to display
the browse window. The left side of
the browse window displays a list of
ways you can browse through the
contents of the USB device/iPod. If
supported by the device, you can
browse by folders, artists, playlists,
albums, songs, etc. Press the desired
soft-key on the left side of the screen.
The centre of the browse window
shows items and it’s sub-functions,
which can be scrolled by pressing the
and soft-keys to the right. The
tune/scroll control knob can also be
used to scroll.
Media Mode
Touch the “Media” soft-key on the
touch screen to select the desired
audio source: USB.
Repeat
Touch the “Repeat” soft-key on the
touch screen to toggle the repeat
functionality. This soft-key is
highlighted when active. The radio will
continue to play the current track,
repeatedly, as long as the repeat is
active.
Shuffle
Touch the “Shuffle” soft-key on the
touch screen to play the selections on
the USB/iPod device in random order
to provide an interesting change of
pace. Touch this soft-key a second time
to turn this feature off.
Info
Touch the “Info” soft-key on the touch
screen to display the current track
information. Touch this soft-key a
second time to cancel this feature.
Tracks
Touch the “trks” soft-key on the touch
screen to display a pop up with the
song list. The currently playing song is
indicated by an arrow and lines above
and below the song title. When in the
tracks list screen you can rotate the
tune/scroll control knob to highlight a
track (indicated by the line above and
below the track name) and then push
the enter button to start playing that
track.
Touching the “trks” soft-key on the
touch screen while the pop up is
displayed will close the pop up.
Audio
Refer to “Radio” mode for adjusting
the audio settings.
52
Page 53

Media Mode
AUX Mode
Overview
Auxiliary mode is entered by inserting
an AUX device using a cable with a 3.5
mm audio jack into the AUX port or
by pressing the “AUX” soft-key on the
left side of the screen.
Inserting Auxiliary Device
Gently insert the auxiliary device cable
into the AUX port. If you insert an
auxiliary device with the ignition
device in RUN position and the radio
on, the unit will switch to AUX mode
and begin to play when you insert the
device cable.
Controlling the Auxiliary Device
The control of the auxiliary device
(e.g., selecting playlists, play, fast
forward, etc.) cannot be provided by
the radio; use the device controls
instead. Adjust the volume with the
volume control knob, or with the
volume of the attached device.
NOTE:
The vehicle radio unit is acting as the
amplifier for audio output from the
auxiliary device. Therefore if the
volume control on the auxiliary device
is set too low, there will be insufficient
audio signal for the radio unit to play
the music on the device.
Media Mode
Touch the “Media” soft-key on the
touch screen to select the desired
audio source: AUX (auxiliary device).
Audio
Refer to Radio Mode for adjusting the
audio settings.
SD Card Mode
Overview
SD Card mode is entered by either
inserting a SD Card into its slot or
touch the “SD Card” soft-key on the
left side of the screen.
Seek Up/Seek Down
Touch and release the seek up
soft-key on the touch screen for the
next selection on the SD Card. Touch
and release the seek down
on the touch screen to return to the
beginning of the current selection, or
to return to the beginning of the
previous selection if the SD Card is
within the first three seconds of the
current selection.
Browse
Touch the “Browse” soft-key on the
touch screen or the browse button
on the central console to display
the browse window. The left side of
the browse window displays a list of
ways you can browse through the
contents of the SD Card. If supported
by the device, you can browse by
folders, artists, playlists, albums, songs,
etc. Touch the desired soft-key on the
left side of the screen. The centre of
soft-key
5
53
Page 54

Media Mode
the browse window shows items and
it’s sub-functions, which can be
scrolled by touching the
soft-keys to the right of the screen.
The tune/scroll control knob can also
be used to scroll.
Media Mode
Touch the “Media” soft-key on the
touch screen to select the desired
audio source: SD Card.
Repeat
Touch the “Repeat” soft-key on the
touch screen to toggle the repeat
5
functionality. This soft-key is
highlighted when active. The radio will
continue to play the current track,
repeatedly, as long as the repeat is
active.
Shuffle
Touch the “Shuffle” soft-key on the
touch screen to play the selections on
the SD Card device in random order to
provide an interesting change of pace.
Touch this soft-key a second time to
turn this feature off.
and
information. Touch this soft-key a
second time to cancel this feature.
Tracks
Touch the “trks” soft-key on the touch
screen to display a pop up with the
song list. The currently playing song is
indicated by an arrow and lines above
and below the song title. When in the
tracks list screen you can rotate the
tune/scroll control knob to highlight a
track (indicated by the line above and
below the track name) and then push
the enter button to start playing that
track.
Touching the “trks” soft-key on the
touch screen while the pop up is
displayed will close the pop up.
Audio
Refer to Radio mode for adjusting the
audio settings.
Bluetooth®Mode
Overview
®
Bluetooth
Bluetooth
a Bluetooth
to the MTC+ System.
Before proceeding, the Bluetooth
device must be paired to the phone to
communicate with the MTC+ System.
NOTE:
See the pairing procedure in the
“MTC+ System Phone” section for
more details.
To access Bluetooth
“Bluetooth” soft-key on the left side
of the screen.
Streaming Audio (BTSA) or
®
mode is entered by pairing
®
device, containing music,
®
mode, press the
®
Info
Touch the “Info” soft-key on the touch
screen to display the current track
54
Page 55

Seek Up/Down
Touch and release the seek up
soft-key on the touch screen for the
next selection on the Bluetooth
device. Touch and release the seek
down
to return to the beginning of the
current selection, or return to the
beginning of the previous selection if
the Bluetooth
first second of the current selection.
soft-key on the touch screen
®
device is within the
®
Media Mode
Touch the “Media” soft-key on the
touch screen to select the desired
audio source: Bluetooth®.
Tracks
If the Bluetooth
feature, touch the “trks” soft-key on
the touch screen to display a pop up
with the song list. The currently
playing song is indicated by a blue
arrow and lines above and below the
song title.
Pressing the “trks” soft-key on the
touch screen while the pop up is
displayed will close the pop up.
®
device supports this
Media Mode
5
Audio
Refer to “Radio Mode” section for
adjusting the audio settings.
55
Page 56

Media Mode
56
Page 57

6 – Control and Climate Modes
Controls Screen. . . . . . . . . . . . . . . . . . . . . . . . . . . . . . . 58
Controls: Programmable Features . . . . . . . . . . . . . . . . . 58
Climate Screen . . . . . . . . . . . . . . . . . . . . . . . . . . . . . . . 63
Dual Zone Climate Commands . . . . . . . . . . . . . . . . . . . 63
Four Zone Climate Commands by the Driver . . . . . . . . . 65
57
Page 58

Control and Climate Modes
Controls Screen
Overview
Touch the “Controls” soft-key to access
the settings screen.
NOTE:
6
Screen content changes depending on
vehicle equipment.
Soft-keys on the sides of the screen
refer to driver comfort settings
(“DRIVER”) and front passenger
comfort settings (“PASSENGER”).
Soft-keys at the centre of the screen
refer to the glare adjustment function
on the internal rear-view mirror
(“Mirror Dimmer”), to glove box
locking function (“Glove Box”), to
Surround View cameras view function
(“Surround View”) and to turn off the
screen backlight (“Screen OFF”).
In this area you also find the
“Settings” soft-key that allows access
to user settings described in “MTC+
Settings” section.
Controls: Programmable Features
Front Comfort Seat (Driver & Passenger)
WARNING!
• Persons with low skin sensitivity
because of advanced age, chronic
illness, diabetes, spinal cord injury,
medication, alcohol use, exhaustion
or other physical conditions must be
careful when using the seat heater. It
may cause burns even at low
temperatures, especially if used for
long periods of time.
• Do not place anything on the seat
that insulates against heat, such as a
blanket or cushion. This may cause
the seat heater to overheat. Sitting
in a seat that has been overheated
could cause serious burns due to the
increased surface temperature of the
seat.
Front Seats Heat Function
NOTE:
The engine must be running for the
heated seats to operate.
58
Page 59

Control and Climate Modes
• Touch the “Controls” soft-key on the
lower part of the MTC display.
• Within 15 seconds, touch the
“Driver” or “Passenger” seat
soft-key once to select HI-level
heating.
• Within 15 seconds, touch the same
soft-key a second time to select
LO-level heating.
• Within 15 seconds, touch the same
soft-key a third time to shut the
heating elements OFF.
NOTE:
Once a heat setting is selected, heat
will be felt within 2 to 5 minutes.
When the HI-level setting is selected,
the heater will provide a boosted heat
level during the first 4 minutes of
operation.
Then, the heat output will drop to the
normal HI-level.
If the HI-level setting is selected, the
system will automatically switch to
LO-level after a maximum of 60
minutes of continuous operation.
At that time, the display will indicate
the change from HI to LO.
The LO-level setting will turn OFF
automatically after a maximum of
approximately 45 minutes.
Front Ventilated Seats Function
• Touch the “Controls” soft-key on the
lower part of the touch screen.
• Within 15 seconds, touch the
“Driver” or “Passenger” seat
soft-key once to select HI-level
ventilation.
6
• Within 15 seconds, touch the same
soft-key a second time to select
LO-level ventilation.
• Within 15 seconds, touch the same
soft-key a third time to shut off the
seat ventilation.
59
Page 60

Control and Climate Modes
Heated Steering Wheel
NOTE:
The engine must be running for the
heated steering wheel to operate.
The steering wheel contains a heating
element inside the rim that helps
warm driver’s hands by cold weather.
The heated steering wheel has only
one temperature setting. Once turned
on, this function will operate for
approximately 58 to 70 minutes before
automatically shutting off.
The heated steering wheel can shut off
early or may not turn on when the
steering wheel is already warm.
• Touch the “Controls” soft-key
6
60
located on the lower part of the
touch screen.
• Within 15 seconds, touch the
“Heated wheel” soft-key to turn on
the function.
• Within 15 seconds, touch the
“Heated wheel” soft-key a second
time to turn it off.
WARNING!
• Persons who are unable to feel pain
to the skin because of advanced age,
chronic illness, diabetes, spinal cord
injury, medication, alcohol use,
exhaustion, or other physical
conditions must exercise care when
using the steering wheel heater. It
may cause burns even at low
temperatures, especially if used for
long periods.
• Do not place anything on the
steering wheel that insulates against
heat, such as a blanket or steering
wheel covers of any type and
material. This may cause the steering
wheel heater to overheat.
Rearview Mirror Adjusting Glare
It is possible switch on/off the glare
function of the internal rearview
mirror touching “Mirror Dimmer”
soft-key in “Controls” screen of MTC+
display.
Glove Box Lock Feature
The glove box is equipped with an
opening/closing electric actuator that
can be locked and unlocked via a
feature of the MTC+, by entering a
4-digit PIN code.
It is important to memorize and take
note of the PIN since if it is lost, you
Page 61

Control and Climate Modes
must contact the Maserati Service
Network that will reset this feature.
This feature is only available when
vehicle is at a standstill.
Glove Box Lock
• Open “Controls” screen and touch
“Glove Box”.
• To open the screen required to enter
the PIN, answer “Yes” to the prompt.
• Using the keypad, enter the four
digits of the PIN and press “OK”. A
buzzer will sound three tones
indicating that proper PIN code was
entered.
NOTE:
• If you do not enter all PIN digits, a
prompt and a buzzer will indicate
that you should do so.
• In case of incoming call while
entering the PIN, the MTC+ system
will temporarily stop the release
function. As soon as the barge-in is
over, the keypad screen will be
displayed again so that you can
enter the PIN.
• Confirm entered code by touching
“OK” in the next page. Glove box is
now locked and the MTC+ will go
back to “Controls” page.
Glove Box Unlock
If the glove box is locked, when you
enter in the vehicle, the MTC+ screen
will display the page already shown
during the locking procedure, on
which a message will indicate that
system operation is reduced and that
only “Climate”, “Controls” and
“Settings” features are active.
Unlock glove box by entering the lock
code as previously specified.
Glove Box Manual Unlock
If battery is flat, it is necessary to
manually work the actuator on the LH
side of the glove box to unlock the
glove box that has been locked using
the PIN code.
• Proceed carefully and start with the
central part, indicated by the arrow
6
61
Page 62

Control and Climate Modes
in the figure, and remove the
dashboard molding beneath and on
the sides of the climate control
panel. This molding is fastened by
means of 10 pins (indicated in the
figure) press-fitted onto clips present
in dashboard structure.
6
• After removing the molding, take
the screwdriver from the tool kit
under boot mat (see vehicle Owner's
Manual).
• Insert screwdriver tip inside the hole
on LH side of glove box structure:
push until home against actuator
pin.
• Push down screwdriver tip to release
actuator pin and manually unlock
the glove box. The actuator will
remain in this condition until battery
feed is restored.
• Reinstall the molding ensuring that
Inner Section
pins match with the clips of
dashboard structure.
• Press on the molding, always starting
from the central part until all 10 pins
are engaged in their clips and “click”
in place.
After releasing the glove box by means
of this procedure, do not lock glove
box using the PIN code and contact the
Maserati Service Network to have
unlock feature via PIN code checked.
Surround View
Refer to “Surround View Camera
System (optional)” chapter of section 2
in your vehicle Owner's Manual for
function description and details.
Switch OFF Touch screen Backlight
If the screen backlight becomes
annoying when driving, it is possible to
switch it off.
Switch off the screen backlight by
touching “Screen OFF” soft-key in
“Controls” screen of MTC+ display.
62
Page 63

Control and Climate Modes
Climate Screen
To access the settings screen, touch the
“Climate” soft-key on main menu bar
of touch screen or press the buttons
on the climate control panel.
NOTE:
Screen content changes if the vehicle
is equipped with dual zone climate or
four zone climate (optional).
Dual Zone Climate Commands
Commands Function
1. Climate Control On/Off
Once you enter the screen “Climate”,
touch the “ON” soft-key to switch the
climate control on/off. The LED on the
button and the OFF key will illuminate
when the A/C is on.
NOTE:
For vehicle equipped with Remote
Start, the Air Conditioning System will
not function during Remote Start
operation if the climate control is left
in OFF.
2. A/C
Touch to change the current air
conditioning (A/C) setting; the
indicator illuminates when the A/C is
on. Operating this function will cause
the automatic feature to switch into
manual mode and the AUTO soft-key
will turn off.
3. Driver Temperature Control
Provides the driver with independent
temperature control. Touch the ▼
soft-key for cooler temperature. Touch
the ▲ soft-key for warmer
temperature. The driver's temperature
setting will be displayed on the MTC+
screen between the arrows.
NOTE:
In SYNC mode, this button will also
automatically and simultaneously
adjust the passenger temperature.
4. Passenger Temperature Control
Provides the passenger with
independent temperature control.
Touch the ▼ soft-key for cooler
temperature. Touch the ▲ soft-key for
warmer temperature. The passenger's
temperature setting will be displayed
on the MTC+ screen between the
arrows.
NOTE:
Touching the 4 soft-key while in SYNC
mode will automatically exit SYNC.
6
63
Page 64

Control and Climate Modes
5. Recirculation
Touch to change the current setting,
the LED indicators on the relevant
soft-key illuminates to indicate which
recirculation function is activated.
6. Blower Control
Blower control is used to regulate the
amount of air forced through the
climate system. There are seven blower
speeds available. Adjusting the blower
will cause automatic mode to switch to
manual.
Touch the small icon of the blower to
decrease the speed, or the big icon to
increase it. Between the two icons,
bars will appear to show the number
of the corresponding selected speed.
The blower can also be activated/
6
regulated by touching the bars
between the two blower icons.
7. AUTO
This function automatically controls
the interior temperature by adjusting
the air flow rate and the air
distribution. Touch the “AUTO” will
cause the ATC to switch between
manual and automatic mode. The
“AUTO” soft-key illuminates when the
“AUTO” function is activated.
8. FAST Defrosting/Demisting
Touch the
airflow setting to the windshield and
soft-key to switch the
the front side windows to get a quick
defrosting/defogging. The soft-key
illuminates when this feature is
activated. Operating this function will
cause the ATC to switch into manual
mode: so the AUTO soft-key will turn
off; the fifth blower speed will be
automatically selected, unless the
blower is not already set to a higher
speed. If this function is turned off the
climate system will return to the
previous setting.
9. REAR Defrosting/Demisting
Touch the
rear window defroster and the heated
outside mirrors. The soft-key will
illuminate when the rear window
defroster and the heated external
mirrors are on.
The rear window defroster and the
heated external mirrors automatically
turn off after 10 minutes.
Failure to observe the following
cautions may cause damage to the rear
windows defroster:
• Use care when washing the inside of
the rear window. Do not use
abrasive window cleaners on the
interior surface of the window. Use
a soft cloth and a mild washing
soft-key to turn on the
CAUTION!
solution, wiping parallel to the
heating elements. Labels can be
peeled off after soaking with warm
water.
• Do not use scrapers, sharp
instruments, or abrasive window
cleaners on the interior surface of
the window.
• Keep all objects inside the vehicle at
a safe distance from the window.
10. Airflow Distribution Modes
The airflow distribution mode can be
adjusted so air comes from the
dashboard vents, floor vents,
demist/defrost vents.
The display contains the relevant
soft-keys used to set these modes.
Available settings are as follows:
• “Dashboard” mode
Air flows in from the four adjustable
vents of the dashboard and the two
positioned at the rear of the central
console. Each of these vents can be
singly adjusted. The air vanes of the
vents can be moved up and down or
right and left to adjust air flow
direction. A setting wheel, placed
near each vent, allows to regulate or
close the air flow.
• “Bi-Level” mode
Air comes from the dashboard vents,
the central console adjustable vents
64
Page 65

Control and Climate Modes
and the fixed floor vents. A small
portion of the airflow is directed
through the defrost/demist vents.
NOTE:
Bi-Level mode is designed to let cooler
air from the dashboard and rear
central console vents and warmer air
from the floor vents.
• “Floor” mode
Air comes from the floor vents. A
small portion of the airflow is
directed through the defrost/demist
vents.
• “Mix” mode
Air comes from the floor and the
defrost/demist vents. This mode is
recommended for cold climates, to
improve comfort and prevent
fogging.
11. “SYNC” mode
Touch the SYNC soft-key on the MTC+
to switch the Sync feature on/off. The
SYNC indicator illuminates when this
feature is selected. This function is
used to synchronize the passenger
temperature setting with the driver
temperature setting.
Changing the passenger temperature
setting while in SYNC will
automatically exit this feature.
12. MAX A/C
Touching the MAX A/C soft-key, the
system automatically switches to get
the maximum cold air flow.
Adjust Driver and Passenger Temperature with Voice Commands
Using single voice commands, you can
adjust the temperature on the driver
and passenger side.
For all informations, see chapter
“Voice Recognition Quick Tips” in
section 8.
Four Zone Climate Commands by the Driver
By operating the MTC+ display
soft-keys the driver can adjust the
settings of the rear climate zones
controlled by rear passengers.
By touching the following MTC+
soft-key, the driver is able to:
1. View and change the settings of
the rear climate.
2. Block the settings of the rear
climate.
3. Synchronize the temperature of the
front passenger side and the one
set by the rear passengers with the
driver's side.
4. Return to the front climate control
display.
6
65
Page 66

Control and Climate Modes
NOTE:
Refer to “Air Conditioning Controls”
chapter of section 4 in your vehicle
Owner's Manual for more details.
6
66
Page 67

7 – Navigation Mode
Main Menu . . . . . . . . . . . . . . . . . . . . . . . . . . . . . . . . . . 68
Where To? . . . . . . . . . . . . . . . . . . . . . . . . . . . . . . . . . . 68
View Map . . . . . . . . . . . . . . . . . . . . . . . . . . . . . . . . . . . 80
Information . . . . . . . . . . . . . . . . . . . . . . . . . . . . . . . . . 85
Emergency . . . . . . . . . . . . . . . . . . . . . . . . . . . . . . . . . . 86
Map Updates . . . . . . . . . . . . . . . . . . . . . . . . . . . . . . . . 88
67
Page 68

Navigation Mode
Main Menu
Once the navigationsystem has ben
activated from the Maserati Service
Network, touch the "Nav" soft-key on
the bottom of the touch screen.
• Touch “Where To?” to find or route
to a destination.
• Touch “View Map” to view the map.
• Touch “Information” to view
“Traffic”, “Where Am I?” and “Trip
Computer” information.
• Touch “Emergency” to search for
Hospitals, Police and Fire Stations
near your current location. You can
also display your current location and
save any Emergency facility location
to your favourites.
• Touch “Stop” to stop a route.
• Touch “Detour” to detour a route.
7
Where To?
Where To? — Main Menu
From the “Nav” main menu, touch the
“Where To?” soft-key on the touch
screen and select one of the following
methods to program a route guidance.
NOTE:
Refer to the individual section of the
chosen option for further information.
• Address
Touch this soft-key on the touch
screen to search by a street address
or a street name with house
number.
• Recent
Touch this soft-key on the touch
screen to access previously routed
addresses or locations.
• Point of Interest
Touch this soft-key on the touch
screen when you want to route to a
point of interest. The Point of
Interest (POI) database allows you to
select a destination from a list of
locations and public places, or points
of interest.
• Favourites
Touch this soft-key on the touch
screen to access previously saved
addresses or locations.
• Crossroads
Touch this soft-key on the touch
screen to enter in two street names
as a destination.
• Go Home
Touch this soft-key on the touch
screen to program or confirm a
route to the saved home address.
• Trips
Touch this soft-key on the touch
screen to program a new trip or
recall a saved trip.
• GEO Coordinates
Touch this soft-key on the touch
screen to route to a “GEO
Coordinate”. A geo coordinate is a
coordinate used in geography. You
can determine a geo coordinate
with the help of a hand-held GPS
68
Page 69

Navigation Mode
receiver, a map, or the navigation
system.
• Point on Map
Touch this soft-key on the touch
screen to select a destination
directly from the “Map” screen. By
selecting a street segment or icon,
you can quickly enter a destination
without the need to input the city
name or street.
• City Centre
Touch this soft-key on the touch
screen to route to a particular city.
The navigation system will calculate
a route with the destination at the
centre of the city.
• Trails
Touch this soft-key on the touch
screen and select the option to start
trail recording to track the route
you are driving. Select the option to
"stop trail recording" to end
tracking. This gives you a point of
reference to for a particular route if
needed.
• Closest City
Touch this soft-key on the touch
screen to route to a nearby city. The
screen will display an alphabetical
listing of nearby cities. The
navigation system will calculate a
route with the destination at the
centre of the nearby city.
• Phone Number
Touch this soft-key on the touch
screen to route to a location or
point of interest by the phone
number.
NOTE:
You can touch the
soft-key on the touch screen to return
to the previous screen or the “X”
soft-key on the touch screen to exit.
back arrow
Where To? — Address
To enter a destination by “Address”,
follow these steps:
1. While in the “Nav” main menu,
touch the “Where To?” soft-key on
the touch screen, then press the
“Address” soft-key on the touch
screen.
2. Touch “Spell Out Town” or “Spell
Out Street” to begin entering the
address of your destination.
7
If you touch “Spell Out Town”, you
will have to enter and select/touch
the desired town name, followed by
the desired street name then the
house number.
69
Page 70

Navigation Mode
If you touch “Spell Out Street” you
will have to enter and select/touch
the desired street name in the
correct city and then you will have
to enter the house number.
To change the state and/or country,
touch the “state, country” soft-key
on the touch screen and follow the
prompts to change the state and/or
country.
3. Once the correct town, street and
7
number has been entered, you will
be asked to confirm your
destination by touching “OK”.
4. Touch the “Yes” soft-key on the
touch screen to confirm your
destination and begin your route.
If you are currently on a route
guidance and you select “Recent”, the
system will ask you to choose one of
the following:
• Cancel previous route
• Add as first destination
• Add as last destination
You can touch the
soft-key on the touch screen to return
to the previous screen or the “X”
soft-key on the touch screen to exit.
back arrow
Where To? — Recent
To route to a recent destination,
follow these steps:
1. While in the “Nav” main menu,
touch the “Where To?” soft-key on
the touch screen, then touch the
“Recent” soft-key on the touch
screen.
2. Touch the soft-key on the touch
screen with the name of the desired
destination.
3. Confirm the route with “Yes” to
start the route guidance.
To delete a destination from the list,
touch the trash can icon soft-key on
the touch screen.
To display the options for a
destination touch the “Options”
soft-key on the touch screen that
looks like a gear.
70
Page 71

Navigation Mode
The following options are available
for each destination:
• Edit name
• Add phone number
• Move up in the list
• Move down in the list
• Place pin on the location (saves the
spot on the list)
You can touch the
soft-key on the touch screen to return
to the previous screen or the “X”
soft-key on the touch screen to exit.
back arrow
Where To? — Point of Interest
To enter a destination by Point of
Interest (POI), touch the “Where To?”
soft-key from the “Nav” main menu,
then touch the “Point of Interest”
soft-key on the touch screen.
The Point of Interest database allows
you to select a destination from a list
of locations and public places, or
points of interest.
You have the following POIs to choose
from:
• Petrol Stations
• Restaurants
• Hotels/Motels
• ATM/Banking
• All POIs
• Spell out name
You can also change your POI search
area, by touching the “Change Search
Area” soft-key on the touch screen.
You will have the following options to
change your search area:
• Around Me
• In a Town
• Near Destination (only available
during route guidance)
• Along Route (only available during
route guidance)
You can touch the
soft-key on the touch screen to return
to the previous screen or the “X”
soft-key on the touch screen to exit.
POI — Petrol Stations, Restaurants, Hotels/Motels and ATM/Banking
1. To select a POI regarding Petrol
Station, Restaurants, Hotels/Motels
or ATM/Banking, touch the “Where
To?” soft-key on the touch screen,
then touch the “Point of Interest”
soft-key on the touch screen.
back arrow
7
71
Page 72

Navigation Mode
2. Touch the soft-key on the touch
screen regarding the desired POI to
search (Petrol Stations, Restaurants,
etc.).
7
You can search for a POI by the
following categories, which are
soft-key tabs at the top of the
screen.
• Name
• Distance
• Type
• ABC (search)
3. Touch the desired POI and touch
“Yes” to confirm the destination.
If you are currently on a route
guidance and you select a POI, the
system will ask you to choose one of
the following:
• Cancel previous route
• Add as first destination
• Add as last destination
You can touch the
soft-key on the touch screen to return
to the previous screen or the “X”
soft-key on the touch screen to exit.
back arrow
All POIs
1. To select a POI type, touch the
“Where To?” soft-key on the touch
screen, then touch the “Point of
Interest” soft-key on the touch
screen.
2. Touch “All POIs” soft-key on the
touch screen.
You can search through the
72
Page 73

Navigation Mode
available POI categories to find your
desired POI.
The available categories are:
• Airport
• ATM/Banking
• Automotive
• Coffee Shops
• Community
• Entertainment
• Petrol Stations
• Health and Beauty
• Highway Exit
• Hospital
• Hotels/Motels
• Other
• Parking
• Recreation
• Restaurants
• Shopping
• Travel
• Truck
3. Select a category and then select a
subcategory if necessary. Touch the
“ABC” soft-key on the touch screen
to activate a keyboard with
alphabetic characters to search
within the POI categories.
4. Touch the desired POI and touch
“Yes” to confirm the destination.
If you are currently on a route
guidance and you select a POI, the
system will ask you to choose one of
the following:
• Cancel previous route
• Add as first destination
• Add as last destination
You can touch the back arrow
soft-key on the touch screen to return
to the previous screen or the “X”
soft-key on the touch screen to exit.
POI — Spell Out Name
1. To select for a specific POI, touch
the “Where To?” soft-key on the
touch screen, then touch the “Point
of Interest” soft-key on the touch
screen.
2. Touch the “Spell out name”
soft-key on the touch screen.
3. A keyboard will appear on the
screen. Type in the POI that you
want to search and touch the “List”
soft-key on the touch screen to
display available items.
4. Touch the desired POI and touch
“Yes” to confirm the destination.
If you are currently on a route
guidance and you select a POI, the
system will ask you to choose one of
the following:
• Cancel previous route
• Add as first destination
• Add as last destination
You can touch the
soft-key on the touch screen to return
to the previous screen or the “X”
soft-key on the touch screen to exit.
back arrow
Where To? — Favourite Destinations
To route to a favourite destination,
follow these steps:
1. While in the “Nav” main menu,
touch the “Where To?” soft-key on
the touch screen, then touch the
“Favourites” soft-key on the touch
screen.
7
73
Page 74

Navigation Mode
2. Touch the soft-key on the touch
screen with the name of the desired
favourite destination and confirm
the route with “Yes” to start the
route guidance.
3. To delete a destination from the
list, touch the trash can icon
soft-key on the touch screen.
4. To save a favourite destination,
touch the “Add Favourite” soft-key
7
on the touch screen and follow the
steps to route a destination.
5. To display the options for a
favourite destination touch the
“Options” soft-key on the touch
screen that looks like a gear.
The following options are available
for each favourite destination:
• Edit Name
• Add Phone Number
If you are currently on a route
guidance and you select a Favourite,
the system will ask you to choose one
of the following:
• Cancel previous route
• Add as first destination
• Add as last destination
You can touch the back arrow
soft-key on the touch screen to return
to the previous screen or the “X”
soft-key on the touch screen to exit.
Where To? — Junction
To enter a destination by
junction/intersection, follow these
steps:
1. While in the “Nav” main menu,
touch the “Where To?” soft-key on
the touch screen, then touch the
“Junction” soft-key on the touch
screen.
2. Touch the “Spell Out Junction”
soft-key on the touch screen.
This menu shows the default
country and state setting.
NOTE:
To change the state and/or country,
touch the “state, country” soft-key on
the touch screen and follow the
prompts to change the state and/or
country.
74
Page 75

Navigation Mode
3. If you touch “Spell Out Town,”
enter and touch the desired city
name, followed by the desired
street name, then enter the
intersection street.
If you touch “Spell Out Street,”
enter and touch the desired street
name in the correct city, then enter
the intersecting street.
4. Once the correct city and
intersection have been entered,
you will be asked to confirm your
destination.
5. Touch the “Yes” soft-key on the
touch screen to confirm your
destination and begin your route.
If you are currently on a route
guidance and you select a intersection,
the system will ask you to choose one
of the following:
• Cancel previous route
• Add as first destination
• Add as last destination
You can touch the
soft-key on the touch screen to return
to the previous screen or the “X”
soft-key on the touch screen to exit.
back arrow
Where To? — Go Home
To enter your home address, follow
these steps:
1. While in the “Nav” main menu,
touch the “Where To?” soft-key on
the touch screen then touch the
“Home” soft-key on the touch
screen.
If there is no home address entered,
touch “Yes” to enter it now.
2. To set your set your home address
choose one of the following
options:
• Address
• Recent
• Point of Interest
• Favourites
• Junction
• GEO Coordinates
• Point on Map
• Town Centre
• Closest Towns
• Phone Number
Once you have generated your
home address, you will be asked to
save it.
NOTE:
Refer to the individual section of the
chosen option for further information.
3. Touch the “Save” soft-key on the
touch screen to confirm your
destination and begin the route to
your home address.
4. This address will be saved as your
home address and it can be
accessed by touching the “Home”
soft-key in the “Where To?” menu.
Change/Delete Your Home Address
To change or delete your current
home address perform the following:
7
75
Page 76

Navigation Mode
1. Touch the “Home” soft-key in the
“Where To?” menu.
2. Touch the “Options” soft-key at the
bottom of the displayed map.
3. Touch “Clear Home” and then
touch “Yes” to clear/delete your
home address.
4. To enter in a new home address,
follow the “Where To?” and “Go
Home” procedure.
You can touch the
soft-key on the touch screen to return
to the previous screen or the “X”
soft-key on the touch screen to exit.
back arrow
Where To? — Trips
To route to a saved trip, follow these
steps:
1. While in the “Nav” main menu,
touch the “Where To?” soft-key on
7
the touch screen then touch the
“Recent” soft-key on the touch
screen.
2. Touch the “Trip” soft-key on the
touch screen.
3. Touch the soft-key on the touch
screen with the name of the desired
trip and touch the first destination
in the list.
4. Confirm the route by touching
“Yes” to start the route guidance.
To add a trip, follow these steps:
1. Touch the “Create new Trip”
soft-key on the touch screen.
2. Type in the new trip name.
3. Touch “Add Destination” to add
destinations to your trip.
4. Choose from the following options
to add a destination
• Address
• Recent
• Point of Interest
• Favourites
• Junction
• GEO Coordinates
• Point on Map
• Town Centre
• Closest Towns
• Phone Number
NOTE:
Refer to the individual section of the
chosen option for further information.
5. Add more needed destinations to
your trip.
NOTE:
Each destination will be listed in order,
with the last destination being the
final destination.
6. Your new trip will appear on the
“Trips” list.
To delete a trip from the list, touch the
trash can icon soft-key on the touch
screen.
To display the options for a trip touch
the “Options” soft-key on the touch
screen that looks like a gear.
The following options are available for
each trip:
• Edit Name
• Move Up in the list
• Move Down in the list
You can touch the
soft-key on the touch screen to return
back arrow
76
Page 77

Navigation Mode
to the previous screen or the “X”
soft-key on the touch screen to exit.
Where To? — GEO Coordinate
To route to a saved trip, follow these
steps:
1. While in the “Nav” main menu,
touch the “Where To?” soft-key on
the touch screen then touch the
“GEO Coordinate” soft-key on the
touch screen.
2. Enter the latitude by typing in the
numbers. Use the left and right
arrows to select specific numbers in
the location shown.
3. Touch the “OK” soft-key on the
touch screen.
4. Enter the longitude by typing in
the numbers. Use the left and right
arrows to select specific numbers in
the location shown.
5. Touch “OK” to confirm the
destination.
NOTE:
Touch the “Format” soft-key on the
touch screen to change the format of
the Latitude/Longitude entry.
6. Touch the “Yes” soft-key on the
touch screen to confirm your
destination and begin your route.
If you are currently on a route
guidance and you select a “Geo
Coordinate”, the system will ask you
to choose one of the following:
• Cancel previous route
• Add as first destination
• Add as last destination
You can touch the
soft-key on the touch screen to return
to the previous screen or the “X”
soft-key on the touch screen to exit.
back arrow
Where To? — Point on Map
To enter a destination by “Point on
Map”, follow these steps:
1. While in the “Nav” main menu,
touch the “Where To?” soft-key on
the touch screen then touch the
“Point on Map” soft-key on the
touch screen.
2. Use the touch screen to drag the
centre of the cross over the desired
destination.
7
3. Either touch the address bar at the
top centre of the screen to confirm
your location, or touch the
“Details” soft-key in the upper
right corner to display the available
locations near that point on the
map.
4. Touch the “Yes” soft-key on the
77
Page 78

Navigation Mode
touch screen to confirm your
destination and begin your route.
If you are currently on a route
guidance and you select a “Point on
Map”, the system will ask you to
choose one of the following:
• Cancel previous route
• Add as first destination
• Add as last destination
You can touch the
soft-key on the touch screen to return
to the previous screen or the “X”
soft-key on the touch screen to exit.
Where To? — Town Centre
To enter a destination by “Town
Centre”, follow these steps:
1. While in the “Nav” main menu,
touch the “Where To?” soft-key on
the touch screen then touch the
7
“Town Centre” soft-key on the
touch screen.
back arrow
2. Enter the name of the town you
would like to route to.
3. Touch the desired town from the
list.
4. Touch the “Yes” soft-key on the
touch screen to confirm your
destination and begin your route.
If you are currently on a route
guidance and you select a “Town
Centre”, the system will ask you to
choose one of the following:
• Cancel previous route
• Add as first destination
• Add as last destination
You can touch the
soft-key on the touch screen to return
to the previous screen or the “X”
soft-key on the touch screen to exit.
back arrow
Where To? — Closest Towns
To enter a destination by “Closest
Towns”, follow these steps:
1. While in the “Nav” main menu,
touch the “Where To?” soft-key on
the touch screen then touch the
“Closest Towns” soft-key on the
touch screen.
2. Touch the desired town from the
list.
3. Touch the “Yes” soft-key on the
78
Page 79

touch screen to confirm your
destination and begin your route.
If you are currently on a route
guidance and you select a “Closest
Towns”, the system will ask you to
choose one of the following:
• Cancel previous route
• Add as first destination
• Add as last destination
You can touch the
soft-key on the touch screen to return
to the previous screen or the “X”
soft-key on the touch screen to exit.
back arrow
Where To? — Routes
When starting to drive a route you
want to record, follow these steps:
1. While in the “Nav” main menu,
touch the “Where To?” soft-key on
the touch screen then touch the
“Routes” soft-key on the touch
screen.
2. Touch “Start Route Recording”
soft-key on the touch screen.
3. When you want to end the
recording of a route, touch “Stop
Route Recording” soft-key on the
touch screen.
The trip you recorded will be added to
the “Recent Routes” list.
Where To? — Phone Number
To enter a destination by phone
number, follow these steps:
1. While in the “Nav” main menu,
touch the “Where To?” soft-key on
the touch screen then touch the
“Phone Number” soft-key on the
touch screen.
Navigation Mode
2. Enter the phone number of the
destination you would like to route
to.
3. Touch the desired destination from
the list.
4. Touch the “Yes” soft-key on the
touch screen to confirm your
destination and begin your route.
If you are currently on a route
guidance and you select a phone
number destination, the system will
ask you to choose one of the
following:
• Cancel previous route
• Add as first destination
• Add as last destination
You can touch the
soft-key on the touch screen to return
to the previous screen or the “X”
soft-key on the touch screen to exit.
back arrow
7
79
Page 80

Navigation Mode
Before Route Guidance
Before confirming the route with the
“Yes” soft-key on the touch screen, it
is possible to select options different
from the default route settings.
• Options – Touch the “Options”
soft-key on the touch screen to
display a list of options to alter your
route. To make a selection touch and
release the desired setting until a
check-mark appears.
7
• Avoid – Touch the “Avoid” soft-key
on the touch screen to choose road
types to avoid during your route. To
make a selection touch and release
the desired setting until a
check-mark appears.
NOTE:
Since toll roads, tunnels and ferries are
built for the purpose of shortening
travel distances, avoiding these road
types may increase distance and travel
time.
• Save – Touch the “Save” soft-key on
the touch screen to save the
destination as a favourite.
Touch the “Yes” soft-key on the touch
screen to confirm your destination and
to start your route guidance.
You can touch the
soft-key on the touch screen to return
to the previous screen or the “X”
soft-key on the touch screen to exit.
back arrow
View Map
View Map – Main Menu
Touch the “View Map” soft-key from
the “Nav” main menu to display a map
of your current position.
With the map displayed you have the
following features available:
Menu
Touch this soft-key on the touch screen
to return to the “Nav” main menu.
Zoom In +/Zoom Out –
Touch the zoom in “+” or zoom out
“–” soft-keys on the touch screen to
change the zoom level. Roads with
lower functional classification are not
shown in higher zoom levels. (e.g.
residential streets, lightly-travelled
county roads.)
80
Page 81

Navigation Mode
Time of Arrival/Time to Destination/
Distance (only during route guidance)
Touch the soft-key in the upper right
area of the screen to the display items
available. Touch the desired option
soft-key on the touch screen.
• Time of Arrival
• Time to Destination
• Distance
Turn List (only during route guidance)
Touch the area in the upper central
part of the screen that displays your
next turn to see a “Turn List” for your
current route.
Touch a turn in the displayed “Turn
List” for the following options:
• Show on Map
• Avoid Street
Options (only during route guidance)
Touch the “Options” soft-key on the
touch screen to display the following
options. Touch the desired soft-key on
the touch screen.
• 2D North Up/Map View 2D/Map
View 3D – Touch this soft-key on the
touch screen to scroll between the
three viewing options.
• Settings – Touch this soft-key on the
touch screen to view all the available
settings. See “View Map – Settings”
for more information.
• Repeat – Touch this soft-key on the
touch screen to repeat the current
voice prompt.
• Turn List – Touch this soft-key on the
touch screen to view the turn list for
the current route.
• Stop Guidance – Touch this soft-key
on the touch screen to stop route
guidance.
Where Am I?
Touch the area in the lower centre
part of the screen that displays your
current location to view the “Where
Am I?” view.
“Where Am I?” displays the address
and “GEO Coordinates” of your
current location.
• Touch the “GPS” soft-key on the
touch screen to view the Global
Navigation Satellite System
information.
• Touch the “Save” soft-key on the
touch screen to save the location in
your favourites.
You can touch the back arrow
soft-key on the touch screen to return
to the previous screen or the “X”
soft-key on the touch screen to exit.
View Map – Settings
7
With the map displayed, touch the
“Options” soft-key on the touch
screen then touch the “Settings”
soft-key on the touch screen. You can
also access this menu by touching the
81
Page 82

Navigation Mode
“Settings” soft-key in the lower right
of the “Nav” main menu.
The following map settings are
available:
• Map Set up – Touch this soft-key on
the touch screen to display items to
customize how your map is viewed.
See “Settings – Map Set up” for more
information.
• Speed Limit – Touch this soft-key on
the touch screen to turn on/off speed
limit warning announcements and to
enter a pre-defined speed limit for
your route.
• Guidance Options – Touch this
soft-key on the touch screen to
display items to customize your route
guidance. See “Settings – Guidance
Options” for more information.
• Units – Touch this soft-key on the
7
touch screen to change the units
display. Touch the desired soft-key on
the touch screen.
• Metric (meter)
• Imperial (mile/yard)
• GPS – Touch this soft-key on the
touch screen to change the Global
Navigation Satellite System display.
Touch the desired soft-key on the
touch screen.
• Decimal
• DMS
• DM
Copy device information to USB? (if
equipped) – Touch this soft-key on the
touch screen to copy your radio
information to a USB jump drive
through the available USB port.
Settings — Map Set up
With the map displayed, touch the
“Options” soft-key on the touch
screen, then touch the “Settings”
soft-key on the touch screen and then
the “Map Set up” soft-key on the
touch screen. You can also access this
menu by touching the “Settings”
soft-key lower right of the “Nav” main
menu.
The following “Map Set up” options
are available:
Map View
Touch this soft-key on the touch screen
to change how the map view is
displayed. Touch the desired soft-key
on the touch screen.
• 3D (must select “3D Town Models” or
“3D Landmark”s for 3D map view to
display.)
• 2D
Orientation
Touch this soft-key on the touch screen
to change how the “Map Orientation”
is displayed. Touch the desired soft-key
on the touch screen.
• North Up
• Heading Up
Current Street
Touch this soft-key on the touch screen
to turn on/off the current street
display on the lower centre of the map
view. Touch the soft-key on the touch
screen until a check-mark appears,
showing the setting has been selected.
Destination Information
Touch this soft-key on the touch screen
to change the “Destination
Information” that is displayed in the
upper right corner of the map view.
Touch the desired soft-key on the
touch screen.
• Time of Arrival
82
Page 83

Navigation Mode
• Time to Destination
• Distance
AutoZoom
Touch this soft-key on the touch
screen to change how the
“AutoZoom” feature adjust the zoom
level during guidance in map view.
Touch the desired soft-key on the
touch screen.
• Far
• Normal
• Near
• Off
Vehicle Icon
Touch this soft-key on the touch
screen to change the vehicle icon that
is displayed while in map view. Touch
“Previous” or “Next” to view the
available icons. Touch the back icon
soft-key on the touch screen when
you've made your selection.
Show POI Icons
Touch this soft-key on the touch
screen to show the selected POI icons
while in map view. Touch the soft-key
on the touch screen until a check-mark
appears, showing the setting has been
selected.
POI Icon List
Touch this soft-key on the touch
screen to display the available POI
icons you would like displayed while
in map view. Touch the desired
selection soft-key on the touch screen
until a check-mark appears, showing
the setting has been selected.
TMC Incidents – If equipped
Touch this soft-key on the touch
screen to show “Traffic Message
Channel (TMC) Incidents” while in
map view. Touch the soft-key on the
touch screen until a check-mark
appears, showing the setting has been
selected.
Speed and Flow
Touch this soft-key on the touch
screen to show the “Speed and Flow”
of traffic while in map view. Touch the
soft-key on the touch screen until a
check-mark appears, showing the
setting has been selected.
3D Town Models
Touch this soft-key on the touch
screen to display 3D Town Models
while in map view. Touch the soft-key
on the touch screen until a check-mark
appears, showing the setting has been
selected.
3D Landmarks
Touch this soft-key on the touch
screen to display “3D Landmarks”
while in map view. Touch the soft-key
on the touch screen until a check-mark
appears, showing the setting has been
selected. Next, change map view to 3D
by selecting: “Navigation Options” >
“Settings” > “Map Set up” > “Map
view”.
Digital Terrain Model
Touch this soft-key on the touch
screen to display the areas terrain
while in map view. Touch the soft-key
on the touch screen until a check-mark
appears, showing the setting has been
selected.
Park Areas
Touch this soft-key on the touch
screen to display park areas while in
map view. Touch the soft-key on the
touch screen until a check-mark
appears, showing the setting has been
selected.
Railways
Touch this soft-key on the touch
screen to display railway tracks while
in map view. Touch the soft-key on the
touch screen until a check-mark
appears, showing the setting has been
selected.
Town Areas
Touch this soft-key on the touch
screen to display town areas while in
map view. Touch the soft-key on the
touch screen until a check-mark
7
83
Page 84

Navigation Mode
appears, showing the setting has been
selected.
River Names
Touch this soft-key on the touch screen
to display river names while in map
view. Touch the soft-key on the touch
screen until a check-mark appears,
showing the setting has been selected.
You can touch the
soft-key on the touch screen to return
to the previous screen or the “X”
soft-key on the touch screen to exit.
Settings — Guidance
With the map displayed, touch the
“Options” soft-key on the touch
screen, then touch the “Settings”
soft-key on the touch screen and then
the “Guidance” soft-key on the touch
screen. You can also access this menu
by touching the “Settings” soft-key in
the lower right of the “Nav” main
7
menu.
The following Guidance options are
available.
• Play Voice Guidance Prompts – Touch
this soft-key on the touch screen to
enable voice guidance prompts
during route guidance. Touch the
soft-key on the touch screen until a
check-mark appears, showing the
setting has been selected.
back arrow
• Nav Volume Adjustment – Touch the
“+” or “–” soft-keys on the touch
screen to adjust the “Nav” voice
prompt volume.
• Lane Recommendation – Touch this
soft-key on the touch screen to
enable lane recommendation during
route guidance. Touch the soft-key
on the touch screen until a
check-mark appears, showing the
setting has been selected.
• Junction View – Touch this soft-key
on the touch screen to enable
junction view during route guidance.
Touch the soft-key on the touch
screen until a check-mark appears,
showing the setting has been
selected.
• Navigation Turn-by-Turn displayed in
cluster – Touch this soft-key on the
touch screen to enable navigation
turn-by-turn displayed in vehicles
cluster during route guidance. Touch
the soft-key on the touch screen until
a check-mark appears, showing the
setting has been selected.
• TMC Route Mode (if equipped) –
Touch this soft-key on the touch
screen to change how the “Traffic
Message Channel (TMC) Route
Mode” functions during route
guidance. Select from:
• Automatic
• By Delay Time
• Manual
• Off
• TMC avoidance types (if equipped) –
Touch this soft-key on the touch
screen to display the available Traffic
Message Channel (TMC) avoidance
types you would like displayed while
in route guidance. Touch the desired
selection soft-key on the touch
screen until a check-mark appears,
showing the setting has been
selected.
• Avoid – Touch the “Avoid” soft-key
on the touch screen to choose road
types to avoid during your route. To
make a selection touch the desired
setting until a check-mark appears.
You can touch the
soft-key on the touch screen to return
to the previous screen or the “X”
soft-key on the touch screen to exit.
back arrow
84
Page 85

Information
From the “Nav” main menu, touch the
“Information” soft-key on the touch
screen and select one of the following
options to view additional
information.
• Traffic
• Where Am I?
• Trip Computer
Information — Where Am I?
To select “Where Am I?” information,
follow these steps:
1. While in the “Nav” main menu,
touch the “Information” soft-key
on the touch screen.
2. Touch the “Where Am I?” soft-key
on the touch screen.
“Where Am I?” displays the address
and GEO coordinates of your
current location.
3. Touch the “GPS” soft-key on the
touch screen to view the Global
Navigation Satellite System
information.
4. Touch the “Save” soft-key on the
touch screen to save the location in
your favourites.
You can touch the
soft-key on the touch screen to return
to the previous screen or the “X”
soft-key on the touch screen to exit.
back arrow
Information — Trip Computer
To select “Trip Computer”
information, follow these steps:
1. While in the “Nav” main menu,
touch the “Information” soft-key
on the touch screen.
Navigation Mode
2. Touch the “Trip Computer” soft-key
on the touch screen.
7
Trip Computer displays the following
trip information from your last trip:
• Travel direction
• Distance to final destination
• Vehicle speed
• Distance travelled
• Overall average speed
• Moving average speed
85
Page 86

Navigation Mode
• Maximum speed reached
• Total time travelled
• Travel time spent moving
• Travel time spent stopped
You can touch the
soft-key on the touch screen to return
to the previous screen or the “X”
soft-key on the touch screen to exit.
7
back arrow
Emergency
Emergency — Main Menu
From the “Nav” main menu, touch the
“Emergency” soft-key on the touch
screen and touch one of the following
options to search and route to a
specific location.
• Hospital – Search and route to a
hospital close to your current
location
• Police – Search and route to a police
station close to your current location
Touch the “Location” soft-key on the
touch screen to display your exact
current location.
Touch the “Save” soft-key on the
touch screen to save your current
location in favourites.
You can touch the back arrow
soft-key on the touch screen to return
to the previous screen or the “X”
soft-key on the touch screen to exit.
Emergency — Hospital
To search for a hospital close to your
current location, follow these steps:
1. While in the “Nav” main menu,
touch the “Emergency” soft-key on
the touch screen.
2. Touch the “Hospital” soft-key on
the touch screen.
You can search for a hospital by the
following categories, which are
soft-key tabs at the top of the
screen.
• Name
• Distance
• ABC (Search)
86
Page 87

Navigation Mode
NOTE:
In case of emergency, please contact
the facility to verify their availability
before proceeding.
3. Touch the desired hospital and
touch “Yes” to confirm the
destination.
If you are currently on a route
guidance and you select a hospital the
system will ask you to choose one of
the following:
• Cancel previous route
• Add as first destination
• Add as last destination
You can touch the
soft-key on the touch screen to return
to the previous screen or the “X”
soft-key on the touch screen to exit.
back arrow
Emergency — Police
To search for a police station close to
your current location, follow these
steps:
1. While in the “Nav” main menu,
touch the “Emergency” soft-key on
the touch screen.
2. Touch the “Police” soft-key on the
touch screen.
You can search for a police station
by the following categories, which
are soft-key tabs at the top of the
screen.
• Name
• Distance
• ABC (Search)
NOTE:
In case of emergency, please contact
the facility to verify their availability
before proceeding.
1. Touch the desired police station
and touch “Yes” to confirm the
destination.
If you are currently on a route
guidance and you select a police
station the system will ask you to
choose one of the following:
• Cancel previous route
• Add as first destination
• Add as last destination
You can touch the
soft-key on the touch screen to return
to the previous screen or the “X”
soft-key on the touch screen to exit.
back arrow
7
87
Page 88

Navigation Mode
Map Updates
The map data available in your vehicle
is the most up-to-date information
that was available when your vehicle
was built. Map data is updated
periodically as map information
changes. To update the navigation
system software and the map data,
contact the Maserati Service Network.
7
88
Page 89

8 – MTC+ System Phone
Overview . . . . . . . . . . . . . . . . . . . . . . . . . . . . . . . . . . . 90
Operation . . . . . . . . . . . . . . . . . . . . . . . . . . . . . . . . . . . 91
Phone Call Features . . . . . . . . . . . . . . . . . . . . . . . . . . . 96
Assistance Call . . . . . . . . . . . . . . . . . . . . . . . . . . . . . . . 98
Advanced Phone Connectivity . . . . . . . . . . . . . . . . . . 100
Things You Should Know about MTC+ System Phone . 101
Voice Recognition Quick Tips . . . . . . . . . . . . . . . . . . . 103
89
Page 90

MTC+ System Phone
Overview
MTC+ System Phone is a voiceactivated, hands-free, in-vehicle
communications system. This system
allows you to dial a phone number
with your mobile phone.
MTC+ System Phone supports the
following features:
Voice Activated Features:
• Hands-free dialling via voice (“Call
John Smith Mobile” or, “Dial
248-555-1212”).
• Hands-free text to speech listening of
your incoming SMS messages.
• Hands-free text message reply
(forward one of 18 pre-defined SMS
messages to incoming calls/text
messages).
• Redialling last dialled numbers
(“Redial”).
• Calling back the last incoming call
number (“Call Back”).
• View call logs on screen (“Show
8
incoming calls,” “Show Outgoing
calls,” “Show missed Calls,” “Show
Recent Calls”).
• Searching contacts phone number
(“Search for John Smith Mobile”).
NOTE:
Examples of voice commands are
provided throughout this manual. For
quick use, go to the chapter “Voice
Recognition Quick Tips” in this section.
Screen Activated Features
• Dialling via keypad using touch
screen.
• Viewing and calling contacts from
phone books displayed on the touch
screen.
• Setting favourite contact phone
numbers so the are easily accessible
on the main phone screen.
• Viewing and calling contacts from
recent call logs.
• Reviewing your recent incoming
SMS.
• Listen to music on your Bluetooth
®
device via the touch screen.
• Pairing up to 10 phones/audio
devices for easy access to connect to
them quickly.
NOTE:
Your phone must be capable of SMS
messaging via Bluetooth
®
for
messaging features to work properly.
Your mobile phone’s audio is
transmitted through your vehicle’s
audio system; the system will
automatically mute your radio when
using the MTC+ System Phone
features.
For customer support visit your
Maserati local authorized dealership.
MTC+ System Connect Phone allows
you to transfer calls between the
system and your mobile phone as you
enter or exit your vehicle and enables
you to mute the system's microphone
for private conversation.
The MTC+ System Phone is driven
through your Bluetooth
Profile” mobile phone. MTC+ features
Bluetooth
®
technology - the global
®
“Hands-free
standard that enables different
electronic devices to connect to each
other without wires or a docking
station, so MTC+ System Phone works
no matter where you stow your mobile
phone (be it your purse, pocket, or
briefcase), as long as your phone is
turned on and has been paired to the
vehicle's MTC+ Connect Phone. The
MTC+ System Phone allows up to ten
mobile phones or audio devices to be
linked to the system. Only one linked
(or paired) mobile phone and one
audio device can be used with the
system at a time.
90
Page 91

MTC+ System Phone
Phone Button
The phone
steering wheel is used to get
into the phone mode and
make calls, show recent,
incoming, outgoing calls, view phone
book etc. When you press the button
you will hear a beep. The beep is your
signal to give a command.
Voice Command Button
The voice command
button on the steering
wheel is only used for “barge
in” and when you are already
in a call and you want to send tones or
make another call.
The button on the steering wheel
is also used to access the voice
commands for the MTC+ Voice
Command features if your vehicle is
equipped.
The MTC+ System Phone is fully
integrated with the vehicle's audio
system. The volume of the MTC+
System Phone can be adjusted either
from the radio volume control knob or
from the steering wheel radio control
(right switch).
button on the
Operation
Voice commands can be used to
operate the MTC+ System Phone and
to navigate through its menu
structure. Voice commands are
required after most MTC+ System
Phone prompts. There are two general
methods for how voice command
works:
1. Say compound commands like “Call
John Smith mobile.”
2. Say the individual commands and
allow the system to guide you to
complete the task.
You will be prompted for a specific
command and then guided through
the available options.
• Prior to giving a voice command,
one must wait for the beep, which
follows the “Listen” prompt or
another prompt.
• For certain operations, compound
commands can be used. For example,
instead of saying “Call” and then
“John Smith” and then “mobile”,
the following compound command
can be said: “Call John Smith
mobile.”
• For each feature explanation in this
section, only the compound
command form of the voice
command is given. You can also
break the commands into parts and
say each part of the command when
you are asked for it. For example,
you can use the compound
command form voice command
“Search for John Smith,” or you can
break the compound command form
into two voice commands: “Search
Contact” and when asked “John
Smith.” Please remember, the MTC+
System Phone works best when you
talk in a normal conversational tone,
as if speaking to someone sitting a
few feet/metres away from you.
Natural Speech
Your MTC+ System Phone voice system
uses a natural language Voice
Recognition (VR) engine.
Natural speech allows the user to
speak commands in phrases or
complete sentences. The system filters
out certain non-word utterances and
sounds such as “ah” and “eh.” The
system handles fill-in words such as “I
would like to.”
The system handles multiple inputs in
the same phrase or sentence such as
“make a phone call” and “to Kelly
Smith.” For multiple inputs in the
same phrase or sentence, the system
identifies the topic or context and
8
91
Page 92

MTC+ System Phone
provides the associated follow-up
prompt such as “Who do you want to
call?” in the case where a phone call
was requested but the specific name
was not recognised.
The system utilizes continuous
dialogue; when the system requires
more information from the user it will
ask a question to which the user can
respond without pushing the voice
command button on the steering
wheel.
Pair (Link) MTC+ System Phone to a Mobile Phone
To begin using your MTC+ System
Phone, you must pair your compatible
Bluetooth
Mobile phone pairing is the process of
establishing a wireless connection
between a cellular phone and the
MTC+ system.
To complete the pairing process, you
will need to reference your mobile
phone Owner's Manual. Please visit
8
www.maserati.com
mobile phone compatibility
information.
NOTE:
• You must have Bluetooth
on your phone to complete this
procedure.
92
®
enabled mobile phone.
for complete
®
enabled
• The vehicle must be in P (Park).
1. Place the ignition device in the ACC
or RUN position.
2. the “Phone” soft-key in the menu
bar on the touch screen. If there is
no phones currently connected with
the system, a pop-up will appear
asking if you would like to pair a
mobile phone.
3. Select “Yes” to begin the pairing
process.
4. Search for available devices on your
®
Bluetooth
enabled mobile phone.
• Press the Settings button on your
mobile phone.
• Select Bluetooth
®
and ensure it is
enabled. Once enabled, the mobile
phone will begin to search for
Bluetooth
®
connections.
5. If “No” is selected, and you still
would like to pair a mobile phone,
press the “Settings” soft-key from
the MTC+ System Phone main
screen.
• Select “Paired Phones” then touch
the “Add Device” soft-key on the
touch screen.
• Search for available devices on
your Bluetooth
®
enabled mobile
phone (see below). When
prompted on the phone, select
“MTC+” and accept the
connection request.
6. MTC+ Connect Phone will display
an in progress screen while the
system is connecting.
7. When your mobile phone finds the
MTC+ system, select “MTC+”
8. When prompted on the mobile
phone, accept the connection
request from MTC+ System Phone.
NOTE:
Some mobile phones will require you
to enter the PIN number.
9. When the pairing process has
Page 93

MTC+ System Phone
successfully completed, the system
will prompt you to choose whether
or not this is your favourite phone.
Selecting “Yes” will make this
phone the highest priority. This
phone will take precedence over
other paired phones within range
and will connect to the MTC+
system automatically when
entering the vehicle. Only one
mobile phone and/or one
Bluetooth
®
audio device can be
connected to the MTC+ system at a
time. If “No” is selected, simply
select “MTC+” from the mobile
phone/audio device Bluetooth
screen, and the MTC+ system will
reconnect to the Bluetooth
®
®
device.
Pair Additional Mobile Phones
1. Touch the “Settings” soft-key on
the touch screen from the Phone
main screen.
2. Next, touch the “Phone/Bluetooth”
soft-key on the touch screen.
3. Touch the “Add Device” soft-key on
the touch screen.
4. Search for available devices on your
Bluetooth
When prompted on the phone,
enter the name and PIN shown on
the MTC+ screen.
5. MTC+ System Phone will display an
in process screen while the system
is connecting.
6. When the pairing process has
successfully completed, the system
will prompt you to choose whether
or not this is your favourite phone.
®
enabled mobile phone.
Selecting “Yes” will make this
phone the highest priority. This
phone will take precedence over
other paired phones within range.
NOTE:
For phones which are not made a
favourite, the phone priority is
determined by the order in which it
was paired. The latest phone paired
will have the higher priority.
You can also use the following Voice
Recognition (VR) commands to bring
up the “Paired Phone” screen from
any screen on the radio:
• “Show Paired Phones” or
• “Connect My Phone”.
®
Pair a Bluetooth
Streaming
Audio Device
1. Touch the “Media” soft-key on the
touch screen to begin.
2. Change the Source to Bluetooth®.
3. Touch the “Bluetooth” soft-key on
the touch screen to display the
paired audio devices screen.
4. Touch the “Add Device” soft-key on
the touch screen.
8
93
Page 94

MTC+ System Phone
NOTE:
If there is no device currently
connected with the system, a pop-up
will appear.
5. Search for available devices on your
Bluetooth®enabled audio device.
When prompted on the device,
enter the PIN shown on the MTC+
screen.
6. MTC+ System Phone will display an
in process screen while the system is
connecting.
7. When the pairing process has
successfully completed, the system
will prompt you to choose whether
or not this is your favourite device.
Selecting “Yes” will make this
device the highest priority. This
device will take precedence over
other paired devices within range.
8. Touch the “Add Device” soft-key on
the touch screen.
NOTE:
8
For devices which are not made a
favourite, the device priority is
determined by the order in which it
was paired. The latest device paired
will have the higher priority.
You can also use the following Voice
Recognition (VR) command to bring up
a list of paired audio devices.
• “Show Paired Phones” or
• “Connect My Phone”.
Connecting to a Particular Mobile Phone or Audio Device after Pairing
MTC+ System Phone will automatically
connect to the highest priority paired
phone and/or audio device within
range. If you need to choose a
particular phone or audio device
follow these steps:
1. Touch the “Settings” soft-key on
the touch screen.
2. Touch the “Paired Phones” or
“Paired Audio Sources” soft-key on
the touch screen.
3. Touch to select the particular phone
or the particular audio device.
4. Touch the “X” to exit out of the
“Settings” screen.
Disconnecting a Phone or Audio Device
1. Touch the “Settings” soft-key on
the touch screen.
2. Touch the “Paired Phones” or
“Paired Audio Sources” soft-key on
the touch screen.
3. Touch the “Settings” soft-key
located to the right of the device
name.
4. The options pop-up will be
displayed.
5. Touch the “Disconnect Device”
soft-key on the touch screen.
6. Touch the “X” to exit out of the
“Settings” screen.
Deleting a Phone or Audio Device
1. Touch the “Settings” soft-key on
the touch screen.
2. Touch the “Pair Phones” or “Paired
Audio Sources” soft-key on the
touch screen.
3. Touch the settings icon soft-key
located to the right of the device
name for a different phone or
audio device than the currently
connected device.
4. The options pop-up will be
displayed.
5. Touch the “Delete Device” soft-key
on the touch screen.
6. Touch the “X” to exit out of the
“Settings” screen.
94
Page 95

MTC+ System Phone
Making a Phone or Audio Device a Favourite
1. Press the “Settings” soft-key on the
touch screen.
2. Press the “Paired Phones” or
“Paired Audio Sources” soft-key on
the touch screen.
3. Press the settings icon soft-key
located to the right of the device
name.
4. The options pop-up will be
displayed.
5. Press the “Make Favourite”
soft-key on the touch screen; you
will see the chosen device move to
the top of the list.
6. Press the “X” to exit out of the
“Settings” screen.
Phone Book Download (Automatic Phone Book Transfer from Mobile Phone) — If Equipped
If equipped and specifically supported
by your phone, MTC+ System Phone
automatically downloads names (text
names) and number entries from the
mobile phone’s phone book. Specific
Bluetooth
access profile may support this
®
phones with phone book
feature. See www.maserati.com
website, for supported phones.
• To call a name from a downloaded
mobile phone book, follow the
procedure in the chapter “Voice
Recognition Quick Tips” in this
section.
• Automatic download and update of
a phone book, if supported, begins
as soon as the Bluetooth
phone connection is made to the
MTC+ System Phone, for example,
after you start the vehicle.
• A maximum of 1,000 contact names
with four numbers per contact will
be downloaded and updated every
time a phone is connected to the
MTC+ System Phone.
• Depending on the maximum number
of entries downloaded, there may be
a short delay before the latest
downloaded names can be used.
Until then, if available, the
previously downloaded phone book
is available for use.
• Only the phone book of the
currently connected mobile phone is
accessible.
• This downloaded phone book
cannot be edited or deleted on the
MTC+ System Phone. These can only
be edited on the mobile phone. The
®
wireless
changes are transferred and updated
to MTC+ System Phone on the next
phone connection.
Managing Your Favourites
There are three ways you can add an
entry to your favourites.
1. During an active call of a number
to make a favourite, press and hold
the preset soft-key on the touch
screen on the top of the phone
main screen.
2. After loading the mobile phone
book, select phone book from the
“Phone” main screen, then select
the appropriate number. Touch the
"Settings" soft-key next to the
selected number to display the
options pop-up. In the pop-up
select “Add to Favourites.”
NOTE:
If the favourites list is full, you will be
asked to remove an existing favourite.
3. From the “Phone” main screen,
select phone book. From the phone
book screen, select the
“Favourites” soft-key on the touch
screen and then select the settings
icon soft-key on the touch screen
located to the right of the phone
book record.
8
95
Page 96

MTC+ System Phone
4. Select an empty entry and touch
the "Settings" soft-key on that
selected entry. When the “Options”
pop-up appears, press “Add from
Mobile.” You will then be asked
which contact and number to
choose from your mobile phone
book. When complete the new
favourite will be shown.
To Remove a Favourite
1. To remove a favourite, select
“phone book” from the “Phone”
main screen.
2. Next select “Favourites” on the left
side of the screen and then touch
the settings icon soft-key on the
touch screen.
3. Touch the settings icon soft-key
next to the favourite you would like
to remove.
4. The “Option”s pop-up will display,
touch “Remove from Favs”.
8
Phone Call Features
The following features can be accessed
through the MTC+ System Phone if the
feature(s) are available and supported
by Bluetooth
plan. For example, if your mobile
service plan provides three-way calling,
this feature can be accessed through
the MTC+ System Phone. Check with
your mobile service provider for the
features that you have.
Ways to Initiate a Phone Call
Listed below are all the ways you can
initiate a phone call with MTC+ System
Phone.
• Redial
• Dial by touching in the number
• Voice Commands (dial by saying a
name, call by saying a phone book
name, redial or call back)
• Favourites
• Mobile phone book
• Recent call log
• SMS message viewer
Dial by Saying a Number
1. Press the phone
steering wheel to begin.
2. After the “Listening” prompt and
®
on your mobile service
button on the
the following beep, say “Dial
151-123-4444.”
3. The MTC+ System Phone will dial
the number 151-123-4444.
Call by Saying a Phone Book Name
1. Press the phone
steering wheel to begin.
2. After the “Listening” prompt and
the following beep, say “Call John
Doe Mobile.”
3. The MTC+ System Phone will dial
the number associated with John
Doe, or if there are multiple
numbers it will ask which number
you want to call for John Doe.
button on the
Call Controls
The touch screen allows you to control
the following call features:
• Answer
• End
• Ignore
• Hold/unhold
• Mute/unmute
• Transfer the call to/from the phone
• Swap two active calls
• Join two active calls together
96
Page 97

MTC+ System Phone
Touch-Tone Number Entry
1. Touch the “Phone” soft-key on the
touch screen.
2. Touch the “Dial” soft-key on the
touch screen.
3. The “Touch-Tone” screen will be
displayed.
4. Use the numbered soft-keys on the
touch screen to enter the number
and touch “Call.”
Press the
wheel to send a touch-tone during a
call in progress and say “Send 1234#”
or you can say “Send voicemail
password” if voicemail password is
stored in your mobile phone book.
button on the steering
Recent Calls
You may browse up to 31 of the most
recent of each of the following call
types:
• All calls
• Incoming calls
• Outgoing calls
• Missed calls
These can be accessed by touching the
“recent calls” soft-key on the “Phone”
main screen.
You can also press the phone
soft-key on the steering wheel and
say “Show my incoming calls” from
any screen and the incoming calls will
be displayed.
NOTE:
Incoming can also be replaced with
“Outgoing,” “Recent” or “Missed.”
Answer or Ignore an Incoming Call — No Call Currently in Progress
When you receive a call on your
mobile phone, the MTC+ System
Phone will interrupt the vehicle audio
system. Press the phone
the steering wheel to accept the call.
You can also touch the “answer”
soft-key on the touch screen or touch
the caller ID box.
button on
Answer or Ignore an Incoming Call — Call Currently in Progress
If a call is currently in progress and
you have another incoming call, you
will hear the same network tones for
call waiting that you normally hear
when using your mobile phone. Press
the phone
wheel, answer button on the touch
screen or caller ID box to place the
current call on hold and answer the
incoming call.
button on the steering
NOTE:
The MTC+ System Phone compatible
phones in the market today do not
support rejecting an incoming call
when another call is in progress.
Therefore, the user can only answer
an incoming call or ignore it.
Place/Retrieve a Call from Hold
During an active call, touch the
“Hold” soft-key on the “Phone” main
screen.
Making a Second Call while Current Call is in Progress
You can place a call on hold by
pressing the “Hold” soft-key on the
“Phone” main screen, then dial a
number from the dial pad, recent calls,
SMS inbox or from the phone books.
To go back to the first call, refer to
“Toggling between Calls” in this
section. To combine two calls, refer to
“Join Calls” in this section.
8
Toggling between Calls
If two calls are in progress (one active
and one on hold), touch the “Swap”
soft-key on the “Phone” main screen.
Only one call can be placed on hold at
a time.
97
Page 98

MTC+ System Phone
You can also press the phone
button to toggle between the
active and held phone call.
Join Calls
When two calls are in progress (one
active and one on hold), touch the
“Join Calls” soft-key on the “Phone”
main screen to combine all calls into a
conference call.
Call Termination
To end a call in progress, momentarily
touch the phone end
touch screen or the phone
on the steering wheel. Only the active
call(s) will be terminated and if there is
a call on hold, it will become the new
active call.
Redial
Touch the “Redial” soft-key on the
touch screen, or press the phone
button and after the “Listening”
prompt and the following beep, say
8
“Redial.”
The MTC+ System Phone will call the
last number that was dialled from your
mobile phone.
Call Continuation
Call continuation is the progression of
a phone call on the MTC+ System
button on the
button
Phone after the vehicle ignition device
has been switched to OFF position.
NOTE:
The call will remain within the vehicle
audio system until the phone becomes
out of range for the Bluetooth
connection. It is recommended to press
the “transfer” soft-key on the touch
screen when leaving the vehicle.
®
Assistance Call
Roadside Assistance
If you need towing assistance:
• Press the phone
steering wheel to begin.
• After the “Listening” prompt and
the following beep, say “Roadside
Assistance”.
NOTE:
• The emergency roadside assistance
call can also be initiated using the
touch screen.
• The roadside assistance number
dialed is based on the country where
the vehicle is purchased. The number
dialed may not be applicable with
the available mobile service and
area.
• The MTC+ System Phone does slightly
lower your chances of successfully
making a phone call as to that for
the mobile phone directly.
Voice Mail Call
To learn how to access your voice mail,
refer to “Working with Automated
Systems”.
soft-key on the
98
Page 99

MTC+ System Phone
Working with Automated Systems
This method is used in instances where
one generally has to press numbers on
the mobile phone keypad while
navigating through an automated
telephone system.
You can use your MTC+ System Phone
to access a voice mail system or an
automated service, such as a paging
service or automated customer service
line. Some services require immediate
response selection. In some instances,
that may be too quick for use of the
MTC+ System Phone.
When calling a number with your
MTC+ System Phone that normally
requires you to enter in a touch-tone
sequence on your mobile phone
keypad, you can utilize the touch
screen or press the
the word “Send” then the sequence
you wish to enter. For example, if
required to enter your PIN followed
with a pound, (3 7 4 6 #), you can
press the button and say, “Send 3 7
4 6 #”. Saying “Send” followed by a
number, or sequence of numbers, is
also to be used for navigating through
an automated customer service center
menu structure, and to leave a
number on a pager.
button and say
You can also send stored mobile
phonebook entries as tones for fast
and easy access to voice mail and
pager entries. To use this feature, dial
the number you wish to call and then
press the button and say for
example, “Send voicemail password”.
The system will prompt you to enter
the name or number and say the
name of the phonebook entry you
wish to send. The MTC+ System Phone
will then send the corresponding
phone number associated with the
phonebook entry, as tones over the
phone.
NOTE:
• The first number encountered for
that contact will be sent. All other
numbers entered for that contact
will be ignored.
• You may not hear all of the tones
due to mobile phone network
configurations. This is normal.
• Some paging and voice mail systems
have system time out settings that
are too short and may not allow the
use of this feature.
• Pauses, wait or other characters that
are supported by some phones are
not supported over Bluetooth
These additional symbols will be
®
.
ignored in the dialing a numbered
sequence.
Barge in - Overriding Prompts
The
wish to skip part of a prompt and
issue your voice command
immediately. For example, if a prompt
is asking "There are 2 numbers with
the name John. Say the full name"
you could press the
say, "John Smith" to select that option
without having to listen to the rest of
the voice prompt.
button can be used when you
button and
Voice Response Length
It is possible for you to choose
between “Brief” and “Detailed” voice
response length.
• Touch the “Settings” soft-key.
• Touch the “Display” soft-key, then
scroll down to “Voice Response
Length”.
• Select either “Brief” or “Detailed”
by touching the box next to the
selection. A check-mark will appear
to show your selection.
Phone and Network Status Indicators
MTC+ System Phone will provide
notification to inform you of your
8
99
Page 100

MTC+ System Phone
phone and network status when you
are attempting to make a phone call
using MTC+ System Phone. The status
is given for roaming, network signal
strength and phone battery strength.
Dialing using the Mobile Phone Keypad
You can dial a phone number with
your mobile phone keypad and still
use the MTC+ System Phone (while
dialing via the mobile phone keypad,
the user must exercise caution and
take precautionary safety measures).
By dialing a number with your paired
Bluetooth
will be played through your vehicle's
audio system. The MTC+ System Phone
will work the same as if you dial the
number using voice command.
NOTE:
Certain brands of mobile phones do
not send the dial ring to the MTC+
System Phone to play it on the vehicle
8
audio system, so you will not hear it.
Under this situation, after successfully
dialing a number the user may feel
that the call did not go through even
though the call is in progress. Once
your call is answered, you will hear the
audio.
®
mobile phone, the audio
Mute/Un-Mute (Mute OFF)
When you mute the MTC+ System
Phone, you will still be able to hear the
conversation coming from the other
party, but the other party will not be
able to hear you. In order to mute the
MTC+ System Phone simply touch the
“Mute” soft-key on the “Phone” main
screen.
Advanced Phone Connectivity
Transfer Call to and from Mobile Phone
The MTC+ System Phone allows
ongoing calls to be transferred from
your mobile phone to the MTC+
System Phone without terminating the
call. To transfer an ongoing call from
your connected mobile phone to the
MTC+ System Phone or vice versa,
press the “Transfer” soft-key on the
“Phone” main screen.
Connect or Disconnect Link between the MTC+ Phone and Mobile Phone
If you would like to connect or
disconnect the Bluetooth®connection
between a MTC+ System Phone paired
mobile phone and the MTC+ System
Phone, follow the instructions
described in your mobile phone User's
Manual.
100
 Loading...