

Page 1
FISHING REEL
Model
95493
WITH FRONT DRAG
ADJUSTMENT
ASSEMBLY AND OPERATION INSTRUCTIONS
Diagrams within this manual may not be drawn proportionally.
Due to continuing improvements, actual product may differ slightly from the product described herein.
Distributed exclusively by Harbor Freight Tools®.
3491 Mission Oaks Blvd., Camarillo, CA 93011
Visit our website at: http://www.harborfreight.com
Read this material before using this product.
Failure to do so can result in serious injury.
SAVE THIS MANUAL.
Copyright© 2006 by Harbor Freight Tools®. All rights reserved. No portion of this
manual or any artwork contained herein may be reproduced in any shape or form
without the express written consent of Harbor Freight Tools.
For technical questions or replacement parts, please call 1-800-444-3353.
Page 2
SPECIFICATIONS
Material Bail assembly: carbon steel and cast aluminum
Spool: cast aluminum
Rotor: injection molded plastic
Handle assembly: cast aluminum with wood handle
Approximate Line Capacity
Gear Ratio
Overall Dimensions
Instant anti-reverse for optimum hook setting and smooth front drag, 7+1 ball bearing drive design with
one way clutch
230 yd. for 6 lb. test, 190 yd. for 8 lb. test, 155 yd. for 10 lb. test
5.2:1
5-3/8” L x 6-1/4” W x 5-3/8” H
Save This Manual
You will need this manual for the safety warnings and precautions, assembly, operating, inspection,
maintenance and cleaning procedures, parts list and assembly diagram. Keep your invoice with this manual.
Keep this manual and invoice in a safe and dry place for future reference.
GENERAL SAFETY RULES
WARNING!
READ AND UNDERSTAND ALL INSTRUCTIONS
Failure to follow all instructions listed below may result in
serious injury.
SAVE THESE INSTRUCTIONS
Know and understand the fishing laws and regulations for the area you where you will be 1.
fishing.
Make certain that the area that you are fishing in is clear of hazards, both above and below 2.
the surface of the water.
Stay alert. 3. Watch what you are doing and use common sense when using this product.
Dress properly while fishing. 4. Do not wear loose clothing or jewelry. Contain long hair. Wear
non-skid footwear.
Do not overreach. 5. Keep proper footing and balance at all times.
Use safety equipment during use. 6. Always wear eye protection to protect yourself while casting
a fishing line with a sharp hook.
Do not force the Fishing Reel. 7. Use the correct product for your application. Do not use the Fishing
Reel for a purpose for which it is not intended.
Store idle product and tackle out of reach of children and other untrained persons. 8. These
items can be dangerous in the hands of untrained users.
Always remove hooks and lures from your fishing line and store them in your tackle box when 9.
moving your equipment and when you have finished fishing.
For technical questions, please call 1-800-444-3353.
REV 09b
Page 2SKU 95493
Page 3

Maintain products with care. 10. The Fishing Reel is a precision instrument and can be broken or
damaged by dropping or by impact.
Maintain labels and nameplates on the product. 11. These carry important information. If unread-
able or missing, contact Harbor Freight Tools for a replacement.
Do not exceed the maximum line capacity of 6 lb.=230 yd, 8 lb.=190 yd., 10 lb.=155 yd.12.
Check for misalignment or binding of moving parts, breakage of parts, and any other condi-13.
tion that may affect the product’s operation. If damaged, have the product serviced before using.
Many accidents are caused by poorly maintained products.
Children must be closely supervised by a responsible adult when using this product.14.
UNPACKING
When unpacking, check to make sure that the item is intact and undamaged. If any parts are missing or broken, please call Harbor Freight Tools at the number shown on the cover of this manual as soon
as possible.
OPERATION
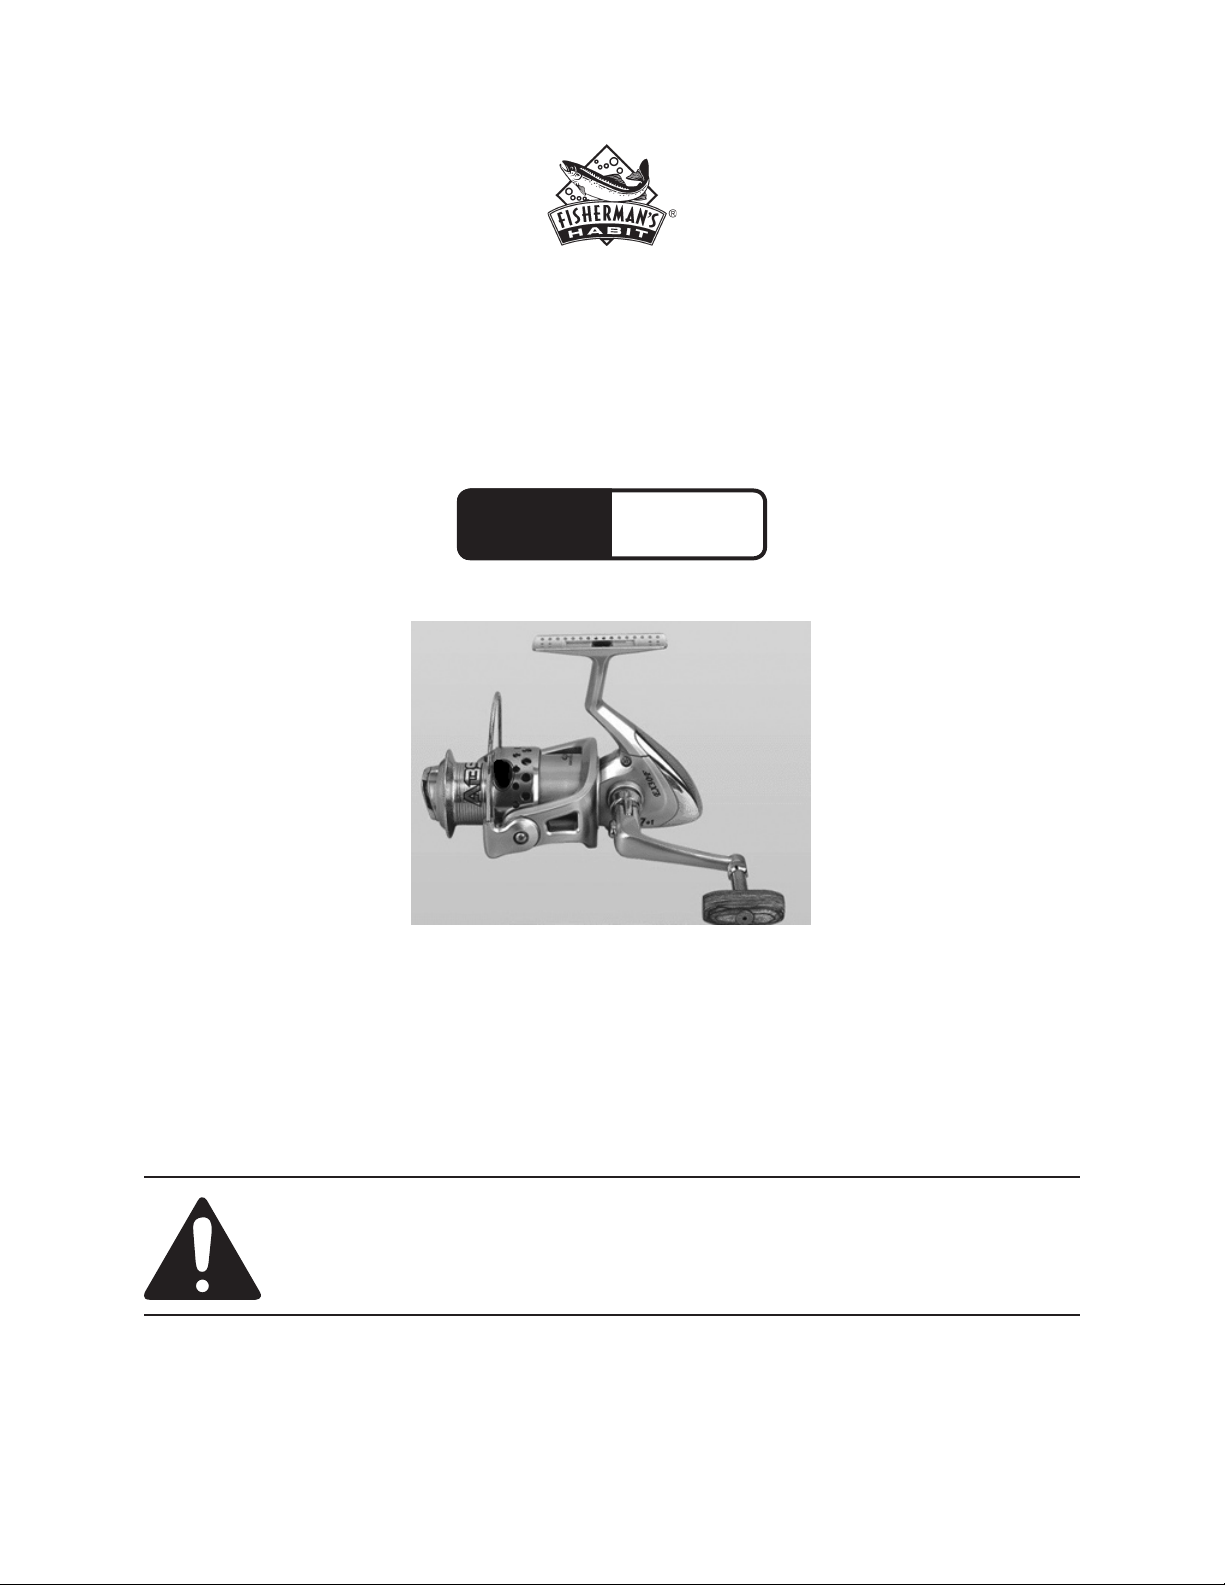
Handle
To change the location of the Handle Assembly (54), unscrew Handle Cap (46), remove Handle 1.
Assembly (54) and reassemble it to the other side of the Fishing Reel-see Figure 1.
The Handle Assembly (54) can be folded up next to of the Fishing Reel by pressing the Handle 2.
Release Button on the Handle and gently folding it upward and out of the way.
Bail Arm (24)
Handle Release
Button
Drag Knob
Assembly (2)
Handle
Assembly
(54)
Figure 1
For technical questions, please call 1-800-444-3353.
REV 07c; 07h
Page 3SKU 95493
Page 4

Open or Closed Bail
The Bail Arm (24) can be either set to an Open or Closed position-see Figure 1. 1.
When in the closed or down position, the Bail Arm (24) prevents line from being released and coming 2.
off of the Spool. When the Bail is opened, the line is ready to be released during a cast.
Crank the Handle to close the Bail Arm.3.
Loading the Spool
Open up the Bail Arm (24). Tie new line to the Spool Assembly (13). Close the Bail Arm (24) and 1.
begin winding the line on.
Make certain that the new line comes off the filler spool in the same direction it would come off the 2.
Spool Assembly (13). Keep tension on the line while winding. This can be done by feeding the line
through a cloth in-between thumb and forefinger.
Setting Drag
Setting drag is a procedure used to reduce line breakage when the line is under stress.
Set the drag by running the fishing line over the Bail and through the line guides. Tie the fishing 1.
line to a secure point.
With the rod at an angle of about 45 degrees, apply pressure to the line. 2.
Turn the Drag Knob Assembly (2) toward either the “Less” (counterclockwise-when facing knob) or 3.
“More” (clockwise) drag setting-see Figure 1. Adjust as necessary.
The Line Clip
The Line Clip (28) is located on top of the Spool Assembly (13). Use the Line Clip (28) to hold the line
firmly when the Bail is open. It will retain the end of the line when the Fishing Reel is not in use.
Casting
Grasp the rod with your rod hand. Capture the fishing line between your forefinger and the rod and 1.
open the bail.
With the bail open, swing the rod back behind your shoulder and then back out again in a smooth 2.
arc, releasing the line. When bait or lure hits the water, turn handle to reset Bail arm.
Effective casting takes practice. Become familiar with casting procedures by practicing in your yard 3.
or on location. When practicing in a yard, do not use sharp hooks.
Cast safely and efficiently; use eye protection to protect your eyes from sharp hooks during casting 4.
procedures.
For technical questions, please call 1-800-444-3353.
REV 07c; 07h
Page 4SKU 95493
Page 5

Anti-Reverse Cam
The Fishing Reel comes with an Anti-Reverse function which prevents the head of the Fishing Reel
from rotating backward when the line is being pulled out against the drag clutch. To activate or
deactivate this feature, toggle the Anti-Reverse Lever (44).
Anti-Reverse Lever
(44)
Oil all exterior moving parts on a regular basis including Bail, Handle Assembly and other moving 1.
parts.
On a yearly basis grease all internal mechanisms.2.
Store in a safe, dry place out of sunlight. Store out of the reach of children.3.
CLEANING AND MAINTENANCE
For technical questions, please call 1-800-444-3353.
REV 07c; 07h
Page 5SKU 95493
Page 6

PARTS LIST
Part Description
1 Drag Knob Cover
2 Drag Knob Assembly
3 Drag Screw
4 Spring
5 Click Gear
6 Screw
7 Click Leaf
8 Plate
9 Key Washer
10 Drag Washer Retainer
11 Washer
12 Eared Washer
13 Spool Assembly
14 Washer
15 Click Gear
16 Rotor Nut
17 Click Leaf
18 Rivet
19 Spring
20 Bail Holder
21 Screw
22 Rotor Assembly
23 Screw
24 Bail Arm
25 Washer
26 Line Roller
27 Ball Bearing
28 Line Clip
29 Bail Line
30 Bail Trip Shaft
31 Screw
32 Bail Trip Cover
33 Spring
34 Kick Slider
Part Description
35 Bail Trip Shaft
36 Main Shaft
37 Washer
38 Plate
39 Ball Bearing
40 One-Way Clutch Bearing Assembly
41 Pinion Gear
42 Anti-Reverse Cam
43 Anti-Reverse Spring
44 Anti-Reverse Lever
45 Screw
46 Handle Screw Cap
47 Washer
48 Screw
49 Drive Gear
50 Screw
51 Washer
52 Ball Bearing
53 Main Cover
Handle Assembly (Includes 2 Ball
54
Bearings)
55 Ball Bearing
56 Oscillating Gear
57 Ball Bearing
58 Washer
59 Brand Plate
60 Body Cover
61 Oscillating Slider
62 Screw
63 Body
64 Slider Switch
65 Screw
66 Body Assembly
PLEASE READ THE FOLLOWING CAREFULLY
THE MANUFACTURER AND/OR DISTRIBUTOR HAS PROVIDED THE PARTS LIST AND ASSEMBLY DIAGRAM IN THIS
MANUAL AS A REFERENCE TOOL ONLY. NEITHER THE MANUFACTURER OR DISTRIBUTOR MAKES ANY REPRESENTATION OR WARRANTY OF ANY KIND TO THE BUYER THAT HE OR SHE IS QUALIFIED TO MAKE ANY REPAIRS TO THE
PRODUCT, OR THAT HE OR SHE IS QUALIFIED TO REPLACE ANY PARTS OF THE PRODUCT. IN FACT, THE MANUFACTURER AND/OR DISTRIBUTOR EXPRESSLY STATES THAT ALL REPAIRS AND PARTS REPLACEMENTS SHOULD BE
UNDERTAKEN BY CERTIFIED AND LICENSED TECHNICIANS, AND NOT BY THE BUYER. THE BUYER ASSUMES ALL
RISK AND LIABILITY ARISING OUT OF HIS OR HER REPAIRS TO THE ORIGINAL PRODUCT OR REPLACEMENT PARTS
THERETO, OR ARISING OUT OF HIS OR HER INSTALLATION OF REPLACEMENT PARTS THERETO.
REV 07h
For technical questions, please call 1-800-444-3353.
Page 6SKU 95493
Page 7

PARTS AND ASSEMBLY DIAGRAM
For technical questions, please call 1-800-444-3353.
REV 07h
Page 7SKU 95493
 Loading...