

Page 1
WARHAWK RUBBERBAND AIRPLANE
®
Model 91132
ASSEMBLY AND OPERATING INSTRUCTIONS
3491 Mission Oaks Blvd., Camarillo, CA 93011
Visit our Web site at http://www.harborfreight.com
Copyright © 2004 by Harbor Freight Tools
herein may be reproduced in any shape or form without the express written consent of Harbor Freight Tools.
For technical questions and replacement parts, please call 1-800-444-3353
You will need the manual for the safety warnings and precautions, assembly instructions, operating and
maintenance procedures, parts list and diagram. Keep your invoice with this manual. Write the invoice number on
the inside of the front cover. Keep the manual and invoice in a safe and dry place for future reference.
Safety Warnings and Precautions
WARNING: When using product, basic safety precautions should always be followed to reduce the risk of personal injury and damage to equipment.
Read all instructions before using this tool!
1. Children supervision. Small children must be closely supervised when playing with this product, there is a
choking hazard of the small parts. Additionally, eyes and fingers need to be protected.
2. Store idle equipment. When not in use, product must be stored in a dry location. Always lock up product and
keep out of reach of small children.
3. Use eye protection. Always wear ANSI approved impact safety goggles when flying the Airplane.
4. Stay alert. Watch what you are doing, use common sense. Do not operate any product when you are tired.
5. Rubber band under pressure can break resulting in personal injury. Watch out for bystanders.
6. If using glue (not included) to repair the Airplane, be cautious of glue fumes. Many types of glue can cause
injury or death if inhaled. Keep glue away from children.
7. Replacement parts and accessories. When servicing, use only identical replacement parts. Use of any
other parts will void the warranty. Only use accessories intended for use with this tool. Approved accessories
are available from Harbor Freight Tools.
8. Do not operate product if under the influence of alcohol or drugs. Read warning labels on prescriptions to
determine if your judgment or reflexes are impaired while taking drugs. If there is any doubt, do not operate the
product.
Warning: The warnings, cautions, and instructions discussed in this instruction manual cannot cover all possible
conditions and situations that may occur. It must be understood by the operator that common sense and caution
are factors which cannot be built into this product, but must be supplied by the operator.
THE MANUFACTURER AND/OR DISTRIBUTOR HAS PROVIDED THE PARTS DIAGRAM IN THIS MANUAL AS A REFERENCE
TOOL ONLY. NEITHER THE MANUFACTURER NOR DISTRIBUTOR MAKES ANY REPRESENTATION OR WARRANTY OF ANY
KIND TO THE BUYER THAT HE OR SHE IS QUALIFIED TO MAKE ANY REPAIRS TO THE PRODUCT OR THAT HE OR SHE IS
QUALIFIED TO REPLACE ANY PARTS OF THE PRODUCT. IN FACT, THE MANUFACTURER AND/OR DISTRIBUTOR EXPRESSLY
STATES THat ALL REPAIRS AND PARTS REPLACEMENTS SHOULD BE UNDERTAKEN BY CERTIFIED AND LICENSED
TECHNICIANS AND NOT BY THE BUYER. THE BUYER ASSUMES ALL RISK AND LIABILITY ARISING OUT OF HIS OR HER
REPAIRS TO THE ORIGINAL PRODUCT OR REPLACEMENT PARTS THERETO, OR ARISING OUT OF HIS OR HER
INSTALLATION OF REPLACEMENT PARTS THERETO.
®
. All rights reserved. No portion of this manual or any artwork contained
Save This Manual
PLEASE READ THE FOLLOWING CAREFULLY
IMPORTANT:
If damage is caused due to a crash, your warranty is void.
REV 11/05
Page 2
Specification:
Wing span: 29.85 cm (11.75 inch)
Fuselage: 27.60 cm (10.875 inch)
Horizontal tail wing: span 11.43 cm (4.5 inch); width 4.76 cm (1.875 inch)
Vertical tail wing: height 5.715 cm (2.25 inch); width 5.08 cm (2 inch) Tapered
In air weight: 34 g (1.2 ounce)
Flying duration: 10-20 seconds
Power: rubber band
Propeller: 12 x 10 cm (diameter 4.75 inch by pitch 3.9 inch)
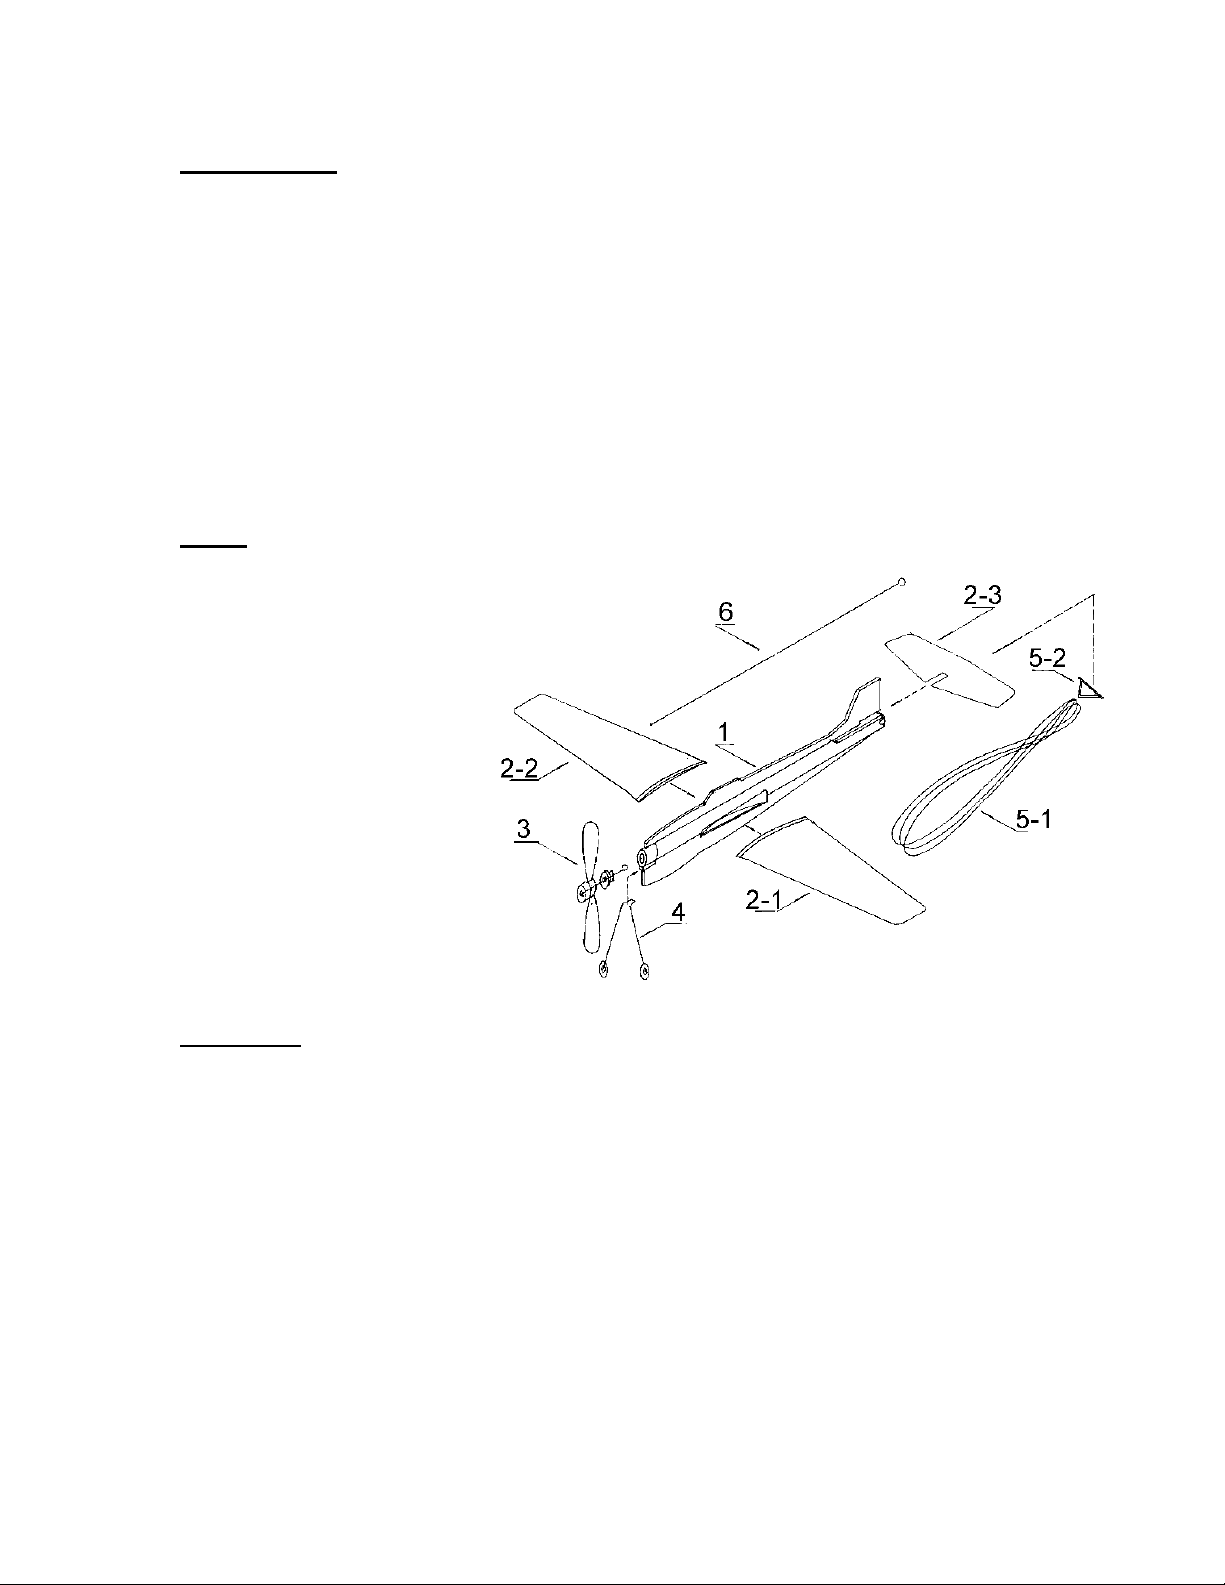
Parts:
1 Fuselage
2-1 Left wing
2-2 Right wing
2-3 Horizontal tail wing
3 Propeller
4 Landing gear
5-1 Rubber band
5-2 Tail hook
6 Wire hook
2-1 & 2-2 & 2-3 in one set
5-1 & 5-2 in one set
A
1
2. Press wing panels and horizontal tail wing to fuselage mounts. (FIG
3. Insert landing gear wire onto nose slot. (FIG 2).
4. Install the rubber band 3 loops inside the fuselag
5. Hook propeller to rubber band mounted in fuselage already. (FIG 3).
6. Check to make sure there is no binding of rubber band.
ssembly:
. Remove the taped covers from the wing and tail mounts. (FIG 1)
e with tail hooked first.
1)
Page 3

Flying the Model:
1. Fly your plane in a school yard, park or indoor in a gym. (Follow the warnings
in this manual.) Make sure all bystanders are kept well clear of the flying field.
2. For the first flight, wind the propeller 200 turns. (FIG 4)
3. Hold the plane under the wing with one hand and propeller with another hand.
4. Release the propeller, toss the plane forward & up at a shallow climb. (FIG 5)
5. Observe the flight pattern of your plane; it should turn in a left circle. To make
the circle smaller, pinch the back of the right wing tip down slightly. (FIG 6) To
make the circle larger, pinch the back of the left wing tip down slightly. (FIG 6)
6. The horizontal tail can also be pinched up or down to make flight smoother.
7. For long flights, you can wind your plane up to 300 turns by hand maximum.
8. If you have a professional winder, you can pull the rubber band out of the rear
of the plane to twice its length and wind to 400 turns maximum. (Warning:
never wind over 300 turns by hand, a breaking rubber band is dangerous!).
Repairing:
If the foam cracks, apply small amount of white
glue to the break and hold firm with scotch tape
or pin until dry. Remove the tape or pin when
you are ready to fly again (FIG 7).
HAPPY FLYING!
 Loading...