

Page 1
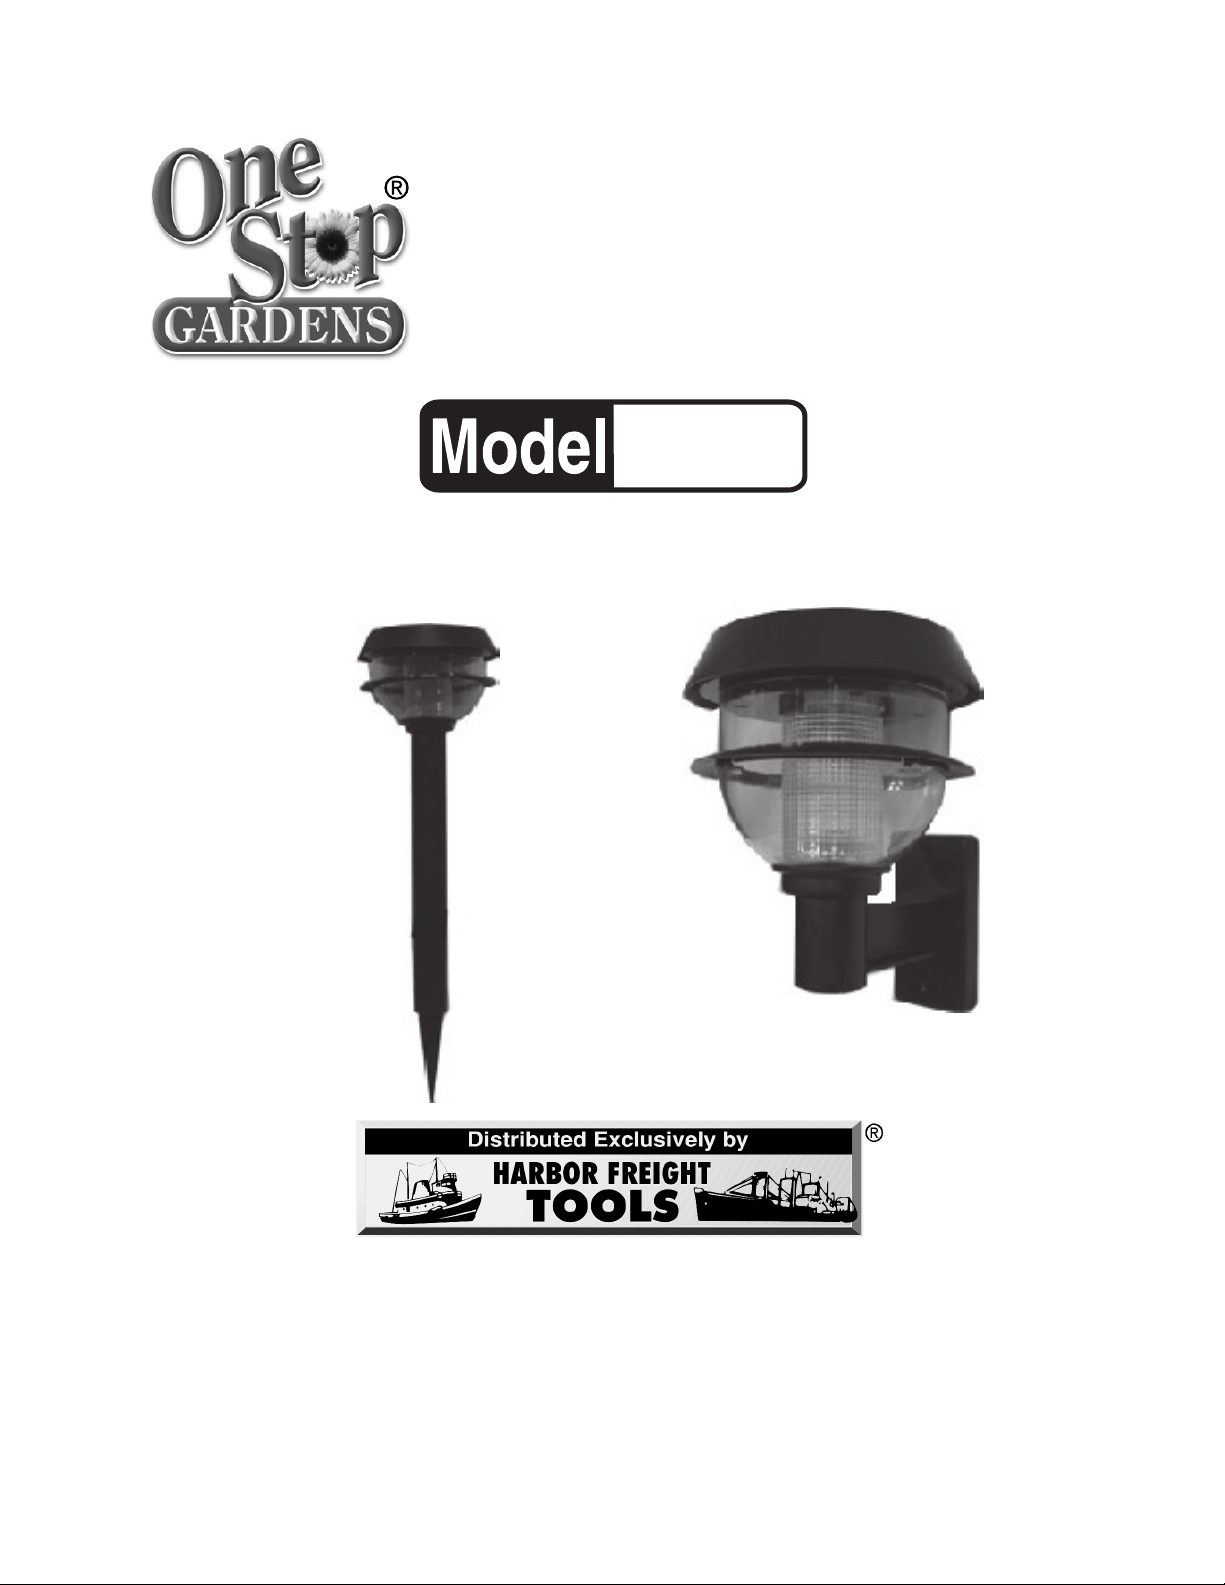
SOLAR LIGHT
WITH W ALL MOUNT
AND STAKE
90729
ASSEMBLY AND OPERATING INSTRUCTIONS
3491 Mission Oaks Blvd., Camarillo, CA 93011
Visit our Web site at http://www.harborfreight.com
Copyright© 2003 by Harbor F reight Tools®. All rights reserved. No portion of this
manual or any artwork contained herein may be reproduced in any shape or
form without the express written consent of Harbor Freight Tools.
For technical questions and replacement parts, please call 1-800-444-3353
Page 2

Specifications
Battery Rechargeable NI-CD 1.2 Volt DC “AA”
Light Dimensions 5-1/4” Dia. x 5-1/2” H
Lens Size 4” Dia. x 3-3/4” H
Stake Size 1-1/4” Dia. x 18” L
Solar Cell 2” x 2”
Photo Cell/Eye Auto On/ Off
Night Running Time Approximately 8 hours
Charges all day and lights up at night.
Save This Manual
You will need the manual for the safety warnings and precautions, assembly instructions,
operating and maintenance procedures, parts list and diagram. Keep your invoice with this
manual. Write the invoice number on the inside of the front cover. Keep the manual and
invoice in a safe and dry place for future reference.
Safety Warnings and Precautions
WARNING: When using pr oduct, basic safety precautions should alwa ys be followed to
reduce the risk of personal injury and damage to equipment.
Read all instructions before using this product!
1. Keep work area clean. Cluttered areas in vite injuries.
2. Observe work area conditions. Keep work area well lighted during setup.
3. Keep children away. Children must never be allowed in the w ork area during setup.
Do not let them handle or play with the Solar Light.
4. Store idle equipment. When not in use, products m ust be stored in a dry location to
inhibit rust. Always lock up products and keep out of reach of children.
5. Use the right product for the job. Do not attempt to force a small product to do the
work of a larger industrial product. There are certain applications for which this
product was designed. Do not modify this product and do not use this product for a
purpose for which it was not intended.
6. Dress properly. Protective, electrically nonconductive clothes and nonskid footwear
are recommended during setup. Wear restrictive hair covering to contain long hair.
7. Use eye protection. Always wear ANSI approved impact safety goggles during
setup.
8. Maintain products with care. Keep products clean for better and safer performance.
Follow instructions for changing accessories.
9. Stay alert. Watch what you are doing, use common sense. Do not assemble any
product when you are tired.
Page 2SKU 90729 For technical questions, please call 1-800-444-3353.
Page 3

10. Check for damaged parts. Before using any product, any part that appears
damaged should be carefully checked to determine that it will operate properly and
perform its intended function. Check for any broken parts or mounting fixtures; and
any other condition that may affect proper operation. Any part that is damaged should
be properly repaired or replaced by a qualified technician.
11. Replacement parts and accessories. When servicing, use only identical
replacement parts. Use of any other parts will void the warranty. Only use accessories
intended for use with this product. Approved accessories are available from Harbor
Freight Tools.
12. Do not setup the product if under the influence of alcohol or drugs. Read
warning labels if taking prescription medicine to determine if your judgment or reflexes
are impaired while taking drugs. If there is any doubt, do not setup the product.
13. Maintenance. For your safety, service and maintenance should be performed
regularly by a qualified technician.
Warning: The warnings, cautions, and instructions discussed in this instruction manual
cannot cover all possible conditions and situations that may occur. It must be understood by the operator that common sense and caution are factors which cannot be
built into this product, but must be supplied by the operator .
Specific Solar Light Warnings
1. The Solar light must be installed in a sunny location where it will receive at least 8
hours of sunlight daily. Do not allow anything to shade or cover the Solar Light, or it
will keep the solar panel from absorbing enough sunlight to operate at full capacity.
2. For best lighting results, it is recommended that you do not space Solar Lights more
than 12 feet apart. Do not place Solar Lights less than five feet from each other or
they may cause the lights to flicker from such a close adjacent light source.
3. Position the Solar Light away from any other night lighting sources as they may
interfere with the lights ability to turn on and off automatically.
Unpacking
When unpacking, check to make sure the parts listed on page 7 are included. If any parts
are missing or broken, please call Harbor Freight Tools at the number on the cover of this
manual as soon as possible.
REV 06/04
Page 3SKU 90729 For technical questions, please call 1-800-444-3353.
Page 4

Assembly
Ground Staked Installation
See the Assembly Drawing on page 7.
Note: Ground Stake parts assemble by simply slip-fitting them together.
1. Assemble the Ground Stake by fitting a Stake Connector (3) into the Pointed Ground
Stake (4), then add, a Ground Stake Tube (2) to the Stake Connector (3). Then, add
another Stake Connector (3) and another Ground Stake Tube (2). Lastly, insert the top
Ground Stake Tube (2) into the Light Fixture (1).
2. Choose a location away from other night time light sources and dig a hole
approximately 6 inches in the ground. If the ground is hard, soak it with water prior to
digging.
3. Work the Light stake into the ground without forcing it or hammering it. Forcing or
hammering will break the Light Stake and permanently damage the Solar Light. Fill in
the dirt around the Stake and make sure it is stable. See FIGURE 1.
FIGURE 1
Assembled
Ground Stake
FIGURE 2
Light Fixture (1)
Light Fixture (1)
Wall Bracket (5)
Wall Bracket Installation
1. At the desired location, use the holes in the Wall Bracket (5) for a template and draw
two screw hole circles on the mounting surface. Predrill, being careful not to drill into
hidden electrical wires or cables. Make sure the wall is solid or has a stud behind the
surface that will hold the weight of the Solar Light. Mount the Wall Bracket (5) with the
two screws provided.
2. Insert the Light Fixture (1) into the Wall Bracket (5) making sure the light sensor is
pointing away from any other night time light source. See FIGURE 2.
Page 4SKU 90729 For technical questions, please call 1-800-444-3353.
Page 5

Operation
1. Remove the Cap and turn the switch to “ON”. Replace the Cap. Now charge the
Solar Light in direct sunlight for at least 3 sunny days.
This period is called the “Charging Period” because, during the initial three days, the
lamp may not illuminate up to its full duration.
2. You will only need to turn on the unit once, and from then on it will switch on and off
automatically. See FIGURE 3.
FIGURE 3
Switch
Cap
Switch
LED
Note: W e recommend testing the light by waiting until after the 3 day initial charge period
and then taking the Solar Light indoors into a dark room to make sure it comes on
automatically.
Troubleshooting
Dim Light:
1. The on/off switch contacts may be poor. Turn the switch on and off several times to
alleviate the problem.
2. The battery may be low or under charged. Make sure the Solar Light is located in an
unobstructed location where it will receive 8 hours of sun. Allow the battery to
recharge for 5 full, sunny days. Overcast days will limit performance.
3. Dirty Solar Panel (on top of the Cap). A dirty Solar Panel will not allow the unit to
charge, shortening the life of the battery. Clean the Solar Panel regularly with a damp
cloth. Do not use detergents or solvents.
No Light:
1. An external light source (i.e. streetlight, porch light, flood light) may prevent the light
from turning on. Reposition the Solar Light.
2. Batteries may need recharging.
REV 05/05
Page 5SKU 90729 For technical questions, please call 1-800-444-3353.
Page 6

Maintenance
1. This Solar Light is designed for year-round outdoor usage. If you intend to store it
indoors for more than 2-3 days, follow the following protocols:
a. Store in a dry location at room temperature.
b. During storage, the battery still needs some light to keep it charging so it will not
become completely discharged. Store it where it can receive minimal sun or room
light.
c. During prolonged storage you should switch the power switch to the OFF position.
Note: We do not recommend storing the Solar Light for long periods of time.
2. Make sure the Solar Panel is clean and clear of any dirt or debris. Use a soft, damp
cloth to clean the Solar Panel. Do not use bleaches or detergents.
Note: The b ulb (LED type) cannot be replaced.
3. This light has delicate wiring inside. The Battery should only be replaced by a
qualified service technician. The battery should only be replaced by another “AA” (L6)
Ni-Cd, 600 mAh minimum battery.
REV 06/04
Page 6SKU 90729 For technical questions, please call 1-800-444-3353.
Page 7

Parts List
Part No. Description Qty.
1 Light Fixture 1
2 Ground Stake Tubes 2
3 Stake Connectors 2
4 Pointed Ground Stake 1
5 Wall Bracket 1
6 Mounting Screws 2
Assembly Drawing
3
2
1
5
Note: The Mounting Screws (6) are not shown.
PLEASE READ THE FOLLOWING CAREFULLY
THE MANUF ACTURER AND/OR DISTRIBUT OR HAS PRO VIDED THE PARTS DIAGRAM IN THIS
MANUAL AS A REFERENCE TOOL ONLY. NEITHER THE MANUFACTURER NOR DISTRIBUTOR MAKES ANY REPRESENTATION OR WARRANTY OF ANY KIND TO THE BUYER THAT
HE OR SHE IS QUALIFIED TO MAKE ANY REPAIRS T O THE PRODUCT OR THAT HE OR SHE
IS QUALIFIED TO REPLACE ANY PARTS OF THE PRODUCT. IN F A CT, THE MANUFACTURER
AND/OR DISTRIBUTOR EXPRESSLY STATES THAT ALL REPAIRS AND PARTS REPLACEMENTS SHOULD BE UNDERTAKEN BY CERTIFIED AND LICENSED TECHNICIANS AND NO T
BY THE BUYER. THE BUYER ASSUMES ALL RISK AND LIABILITY ARISING OUT OF HIS OR
HER REP AIRS TO THE ORIGINAL PRODUCT OR REPLA CEMENT P AR TS THERETO , OR ARISING OUT OF HIS OR HER INSTALLATION OF REPLACEMENT PARTS THERETO.
4
NOTE: Some parts are listed and shown for illustration purposes only and are not available
individually as replacement parts.
Page 7SKU 90729 For technical questions, please call 1-800-444-3353.
 Loading...