

Page 1
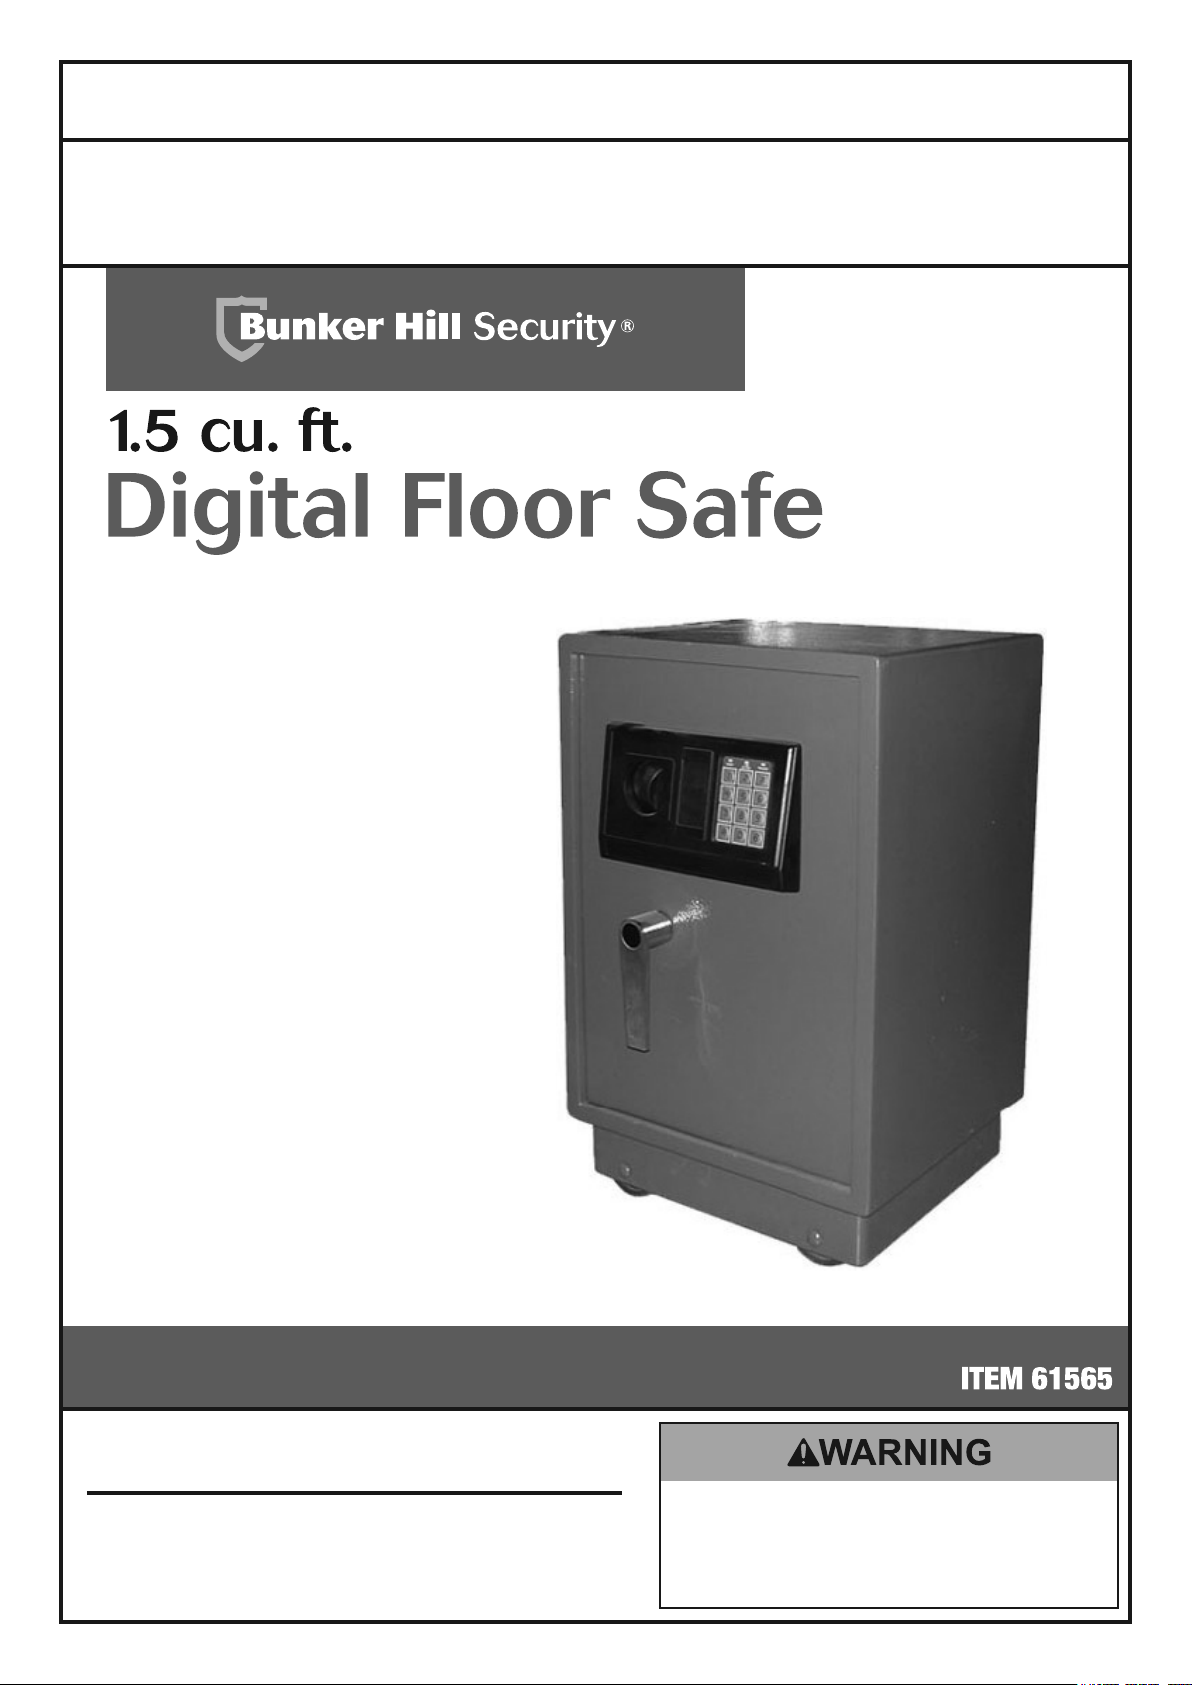
Owner’s Manual & Safety Instructions
Save This Manual Keep this manual for the safety warnings and precautions, assembly,
operating, inspection, maintenance and cleaning procedures. Write the product’s serial number in the
back of the manual near the assembly diagram (or month and year of purchase if product has no number).
Keep this manual and the receipt in a safe and dry place for future reference.
Batteries sold separately.
To ensure security of your safe, Bunker Hill Security
does NOT provide replacement keys.
Visit our website at: http://www.harborfreight.com
REV 14f
When unpacking, make sure that the product is intact
and undamaged. If any parts are missing or broken,
please call 1-888-866-5797 as soon as possible.
No portion of this manual or any artwork contained herein may be reproduced in
any shape or form without the express written consent of Harbor Freight Tools.
Diagrams within this manual may not be drawn proportionally. Due to continuing
improvements, actual product may differ slightly from the product described herein.
Email our technical support at: productsupport@harborfreight.com
Copyright© 2013 by Harbor Freight Tools®. All rights reserved.
Tools required for assembly and service may not be included.
Read this material before using this product.
Failure to do so can result in serious injury.
SAVE THIS MANUAL.
Page 2
Specifications
Overall Dimensions 22.82"H x 14.17"W x 13"D
Inside Dimensions 18.25"H x 12.75"W x 11.25"D
Capacity 1.5 cubic foot
9 ga. steel plate housing
Construction
Keypad Features
Emergency Keys 2 emergency override keys
Interior
Placement,
Mounting
Finish Dark gray powder coat
Weight 76.5 lbs.
6 ga. steel plate door frame
5 ga. steel door
0 - 9, A & B key code set
Green LED code “OPEN”
Red LED code “Battery Change”
Yellow LED code “Change Accepted”
Padded oor
Adjustable shelf
4 Removable wheels;
Can be wall mounted
IMPORTANT SAFETY INFORMATION
Installation Precautions
1. Verify that installation surface has no hidden
utility lines before drilling or driving screws.
2. Wear ANSI-approved safety
goggles during installation.
3. Mount securely before use.
4. Install only according to these instructions.
Improper installation can create hazards.
5. Keep installation area clean and well lit.
Use Precautions
1. Keep closed and locked whenever unattended.
RISK OF CHILD ENTRAPMENT AND
SUFFOCATION.
Check inside before closing.
Do not allow children to play with or near safe.
Keep keys and codes away from children.
2. Keep clear of door when closing.
3. Position batteries in proper polarity and
do not install batteries of different types,
charge levels, or capacities together.
6. Keep bystanders out of the area during installation.
7. Do not install when tired or when under the
influence of alcohol, drugs or medication.
8. At least two people are needed to move this product.
9. Place the Safe on correct surface.
Only use this Safe on a stable, level, clean and dry
surface that is capable of sustaining the load.
5. Inspect before every use; do not use
if parts are loose or damaged.
6. Maintain product labels and nameplates.
These carry important safety information.
If unreadable or missing, contact
Harbor Freight Tools for a replacement.
7. Do not store Keys inside of the Safe.
Place the emergency keys in a location
outside of the safe making sure they are
in a secure location that you can find.
4. Use as intended only.
Page 2 For technical questions, please call 1-888-866-5797. Item 61565
Page 3

8. WARNING: The brass components of this product
contain lead, a chemical known to the State
of California to cause cancer and birth defects
or other reproductive harm. (California Health
& Safety Code § 25249.5, et seq.)
9. The warnings, cautions, and instructions discussed
in this instruction manual cannot cover all possible
conditions and situations that may occur. It must
be understood by the operator that common sense
and caution are factors which cannot be built into
this product, but must be supplied by the operator.
10. The Safe is not fireproof.
NOTE: Harbor Freight Tools is not responsible
for the loss of any property stored within this safe
due to theft, fire, or any other circumstance.
Installation Instructions
Read the ENTIRE IMPORTANT SAFETY INFORMATION section at the beginning of this document
including all text under subheadings therein before set up or use of this product.
This safe may be used as a roll-about with the included casters, or may
be bolted to the wall for more permanent installation.
Wheel Assembly:
1. Place the Safe on its side for easy
access to the bottom of the Safe.
2. Assemble each wheel using the included wheel axles.
3. Secure each wheel in place using Cotter Pin.
5. Use Anchor Bolts, or seek a bonded professional
for installation of the Safe into cement.
Note: For floor or wall mounting, use bolts of a suitable
size (not included) to bolt into wall studs or floor joists.
6. Using the back of or bottom of the Safe as a
template, mark the location of the mounting holes on
the concrete surface using a pencil or other marker.
Wheel
Wheel
Axle
4. The Safe may be bolted to a wall or
a floor to deter theft and prevent tipping.
There are mounting holes in the back wall and
bottom of the safe. See Figure A below.
Mounting
Holes
Cotter
Pin
7. Move the Safe aside, and drill four suitable pilot
holes in the mounting surface. Make certain that
the drilling path is clear and free of obstacles such
as wires, cables and electrical lines. Drill holes
should be the diameter of the Anchor Bolt sleeves.
8. Insert the Anchor Bolts into each drilled hole and
tap Bolts into concrete. Remove washer and nut
from each bolt. The Safe now has to be lifted into
position to fit over the four anchor bolts. Because of
the heavy weight of the Safe, this task should only
be done by several capable workmen. With the
Safe in position, add washers and nuts to Anchor
Bolts. By tightening the nuts in place, the sleeve
around each bolt will expand, and secure each bolt
into the concrete to secure the Safe in place.
Figure A: Rear Mounting Hole Locations
Page 3For technical questions, please call 1-888-866-5797.Item 61565
Page 4

Operation
Read the ENTIRE IMPORTANT SAFETY INFORMATION section at the beginning of this document
including all text under subheadings therein before set up or use of this product.
Opening with Code
Note: The Safe comes preset with a code of
1. Press the numbers on the Key Pad,
then press either the or Key.
Note: The Yellow Light will illuminate each time a key
is pressed. If it does not, open the safe with the key,
see below, and replace the batteries, see page 7.
2. Once the Green light is on:
a. turn the Knob clockwise,
b. turn the Handle clockwise, and
c. pull the Door open.
Note: The Knob and Handle remain unlocked only
for several seconds after inputting numbers.
Note: Three wrong entries will
sound an alarm and disable the Key Pad
for 20 seconds.
Three additional wrong entries will
sound an alarm and disable the Key Pad
for 5 minutes.
To stop the alarm: Open the safe with the key
and temporarily remove a battery.
Knob
Manual
Lock Cover
Green Light
“Ready”
Figure B: Key Pad Controls
Red Light
“Low Battery”
Handle
Yellow Light
“Proceed”
Key
Pad
Opening with Key
Note: The Key is used to open the safe.
DO NOT STORE KEYS IN SAFE!
1. Gently remove the Manual Lock Cover.
2. Insert Key into the lock and turn clockwise. Then:
a. turn the Knob clockwise,
b. turn the Handle clockwise, and
c. pull the Door open.
Knob
Keys
Manual
Lock Cover
Handle
Figure C: Manual Lock
Page 4 For technical questions, please call 1-888-866-5797. Item 61565
Page 5

Changing the Code
Note: The Safe comes preset with a code of
1. Follow the instructions for opening
the Safe to open the door.
2. Make sure that the Key is available
before changing the code.
3. Keep door open during the entire procedure
of changing the code.
On the inside of the Door near the hinge, there is
the small, red, Code Reset Button. See Figure D.
Code
Reset
Button
Figure D: Code Reset Button
4. USER CODE:
a. Press the Code Reset Button until the Yellow Light
on the Front Control Panel lights up.
b. Input your new Code (3 to 8 digits) into the
Key Pad, followed by either the or Key.
c. The Safe will beep twice to confirm
that the Code has been changed.
Important: If the Safe beeps three times, the code
has not been accepted. Repeat the steps above.
d. Leave the door open until the code
has been tested, see below.
5. MASTER CODE:
a. Press on the Key Pad and press the
Code Reset Button until the Yellow Light
on the Front Control Panel lights up.
b. Input your new Code (3 to 8 digits) into the
Key Pad, followed by either the or Key.
c. The Safe will beep twice to confirm
that the Code has been changed.
Important: If the Safe beeps three times, the code
has not been accepted. Repeat the steps above.
d. Leave the door open until the code
has been tested, see below.
6. With the door still open, TEST the new code:
a. First extend the door lock latch to the locked
position by turning Handle counterclockwise
and then turning Knob clockwise.
b. Once the latch is in the locked position,
use the new code to open the latch
and ensure that it works.
Note: If desired, make a note of the
new Code and store it in a safe place.
Closing
Keep closed and locked whenever unattended.
RISK OF CHILD ENTRAPMENT AND SUFFOCATION.
Check inside before closing.
Do not allow children to play with or near safe.
Keep keys and codes away from children.
1. Close the door and turn the Handle counterclockwise.
2. Turn the Knob counterclockwise.
3. Pull on the door to make certain it is properly locked.
Knob
Handle
Figure E: Closing
Page 5For technical questions, please call 1-888-866-5797.Item 61565
Page 6

Maintenance
Procedures not specifically explained in this manual must
be performed only by a qualified technician.
1. Low battery power warning: The red LED light on the keypad will light when the batteries
wear down. When you observe the red LED light on, immediately replace the batteries.
2. Protect the safe from moist or wet conditions. This may cause electronic
fault in the keypad, or corrosion of the steel construction.
3. Occasionally wipe the safe and keypad with a soft dry cloth or brush to remove dust.
4. Occasionally apply a small amount of light oil or lock lubricant to the mechanical lock
mechanism. Be careful not to get any oil or other liquids on or near the electronic mechanism.
5. Occasionally apply a small amount of oil to the wheel axles.
6. Occasionally vacuum or brush dust from the carpet lining of the safe.
Page 6 For technical questions, please call 1-888-866-5797. Item 61565
Page 7

Replacing the Batteries
1. If the Red Light illuminates the
Batteries need to be changed.
2. Follow the instructions for opening the Safe.
3. The Battery Compartment is located on the
inside of the Door. Gently slide the Battery
Cover off the Battery Compartment.
4. Remove used batteries.
Dispose of them properly or recycle them.
5. Insert four new “AA” Batteries. Position batteries
in proper polarity and do not install batteries of
different types, charge levels, or capacities together.
6. Reinstall battery cover by placing it low against the
Battery Compartment and sliding it into place.
7. After changing the batteries, test the Code and
change it as needed before closing the Door.
Battery
Cover
Figure F: Battery Compartment
Record Serial Number Here:
Note: If product has no serial number, record
month and year of purchase instead.
Note: Replacement parts are not available for this item.
Page 7For technical questions, please call 1-888-866-5797.Item 61565
Page 8

Limited 90 Day Warranty
Harbor Freight Tools Co. makes every effort to assure that its products meet high quality and durability standards,
and warrants to the original purchaser that this product is free from defects in materials and workmanship for the
period of 90 days from the date of purchase. This warranty does not apply to damage due directly or indirectly,
to misuse, abuse, negligence or accidents, repairs or alterations outside our facilities, criminal activity, improper
installation, normal wear and tear, or to lack of maintenance. We shall in no event be liable for death, injuries
to persons or property, or for incidental, contingent, special or consequential damages arising from the use of
our product. Some states do not allow the exclusion or limitation of incidental or consequential damages, so the
above limitation of exclusion may not apply to you. THIS WARRANTY IS EXPRESSLY IN LIEU OF ALL OTHER
WARRANTIES, EXPRESS OR IMPLIED, INCLUDING THE WARRANTIES OF MERCHANTABILITY AND FITNESS.
To take advantage of this warranty, the product or part must be returned to us with transportation charges
prepaid. Proof of purchase date and an explanation of the complaint must accompany the merchandise.
If our inspection verifies the defect, we will either repair or replace the product at our election or we may
elect to refund the purchase price if we cannot readily and quickly provide you with a replacement. We will
return repaired products at our expense, but if we determine there is no defect, or that the defect resulted
from causes not within the scope of our warranty, then you must bear the cost of returning the product.
This warranty gives you specific legal rights and you may also have other rights which vary from state to state.
3491 Mission Oaks Blvd. • PO Box 6009 • Camarillo, CA 93011 • 1-888-866-5797
 Loading...