

Page 1
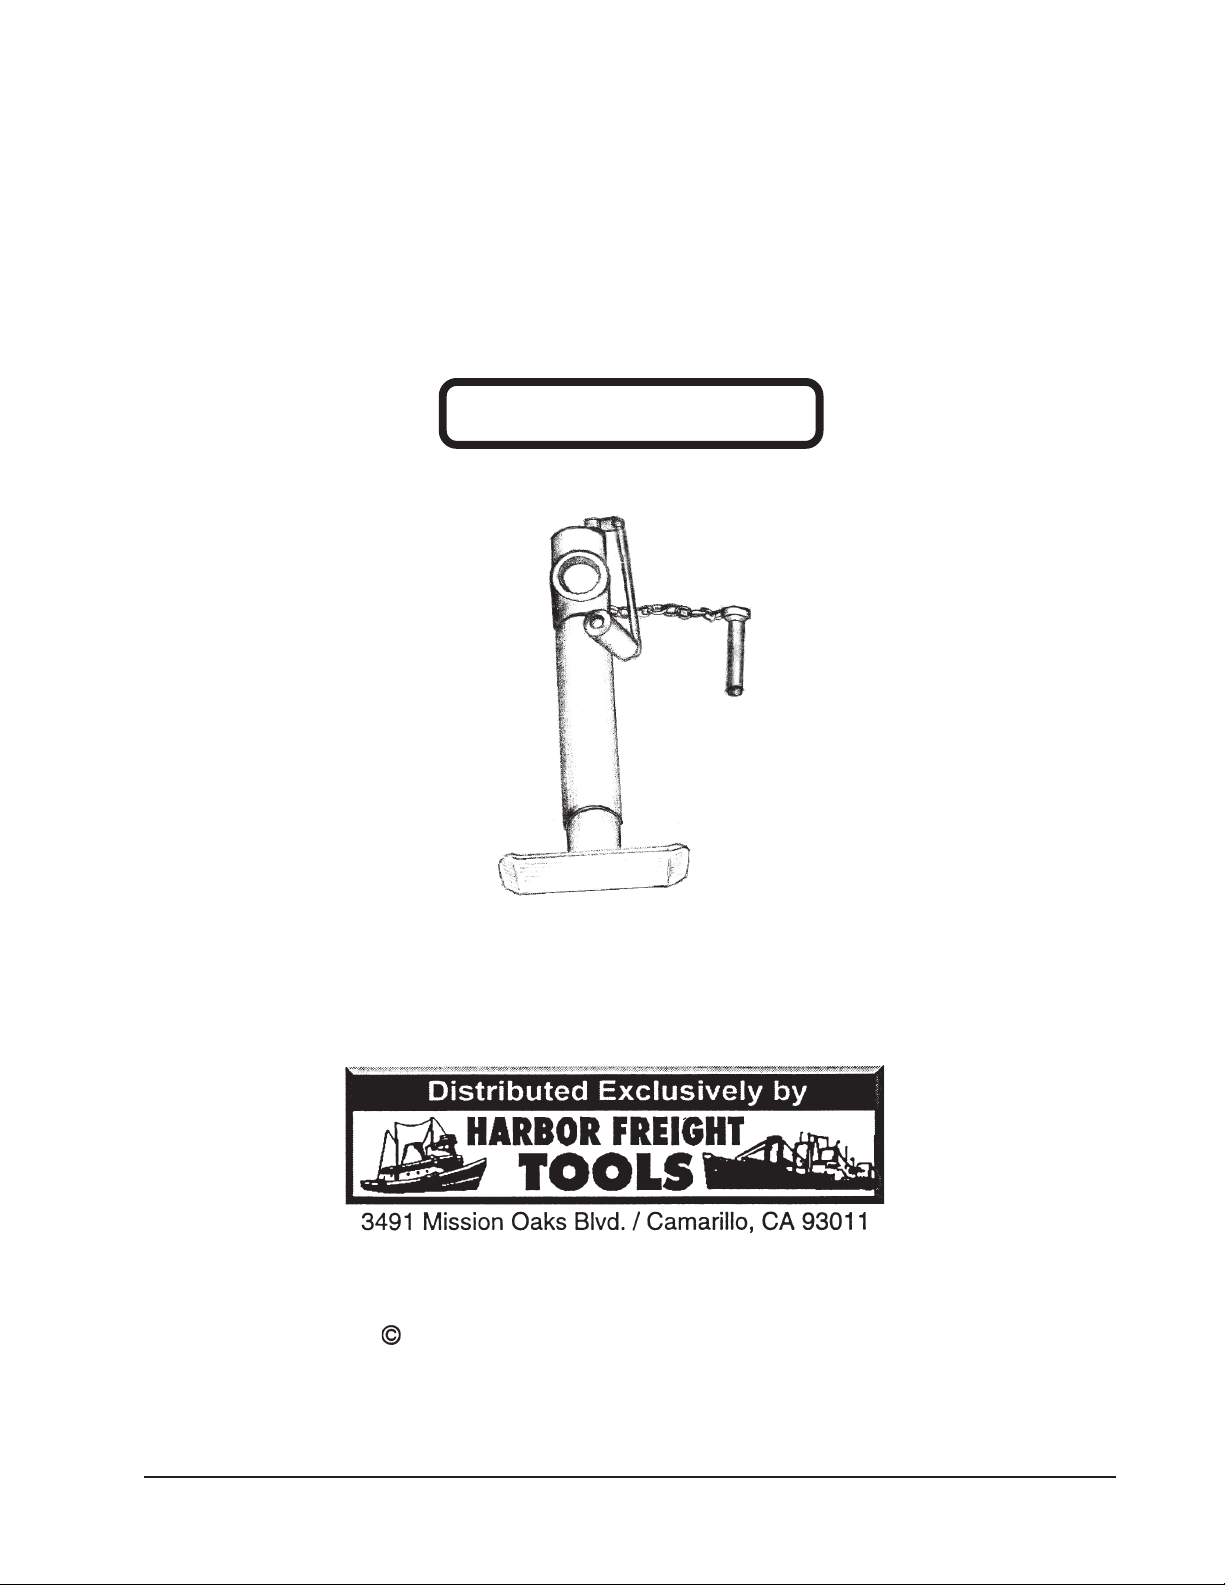
2000 Lb. Ring Mount
Trailer Jack
Model
41006 41006
41006
41006 41006
Assembly & Operating Instructions
www.HarborFreight.com
Copyright 1999 by Harbor Freight T ools®. All Rights Reserved.
No portion of this manual or any artwork contained herein may be reproduced in any
manner, shape or form without the express written consent of Harbor Freight Tools.
For technical questions and replacement parts, please call 1-800-444-3353.
Page 2
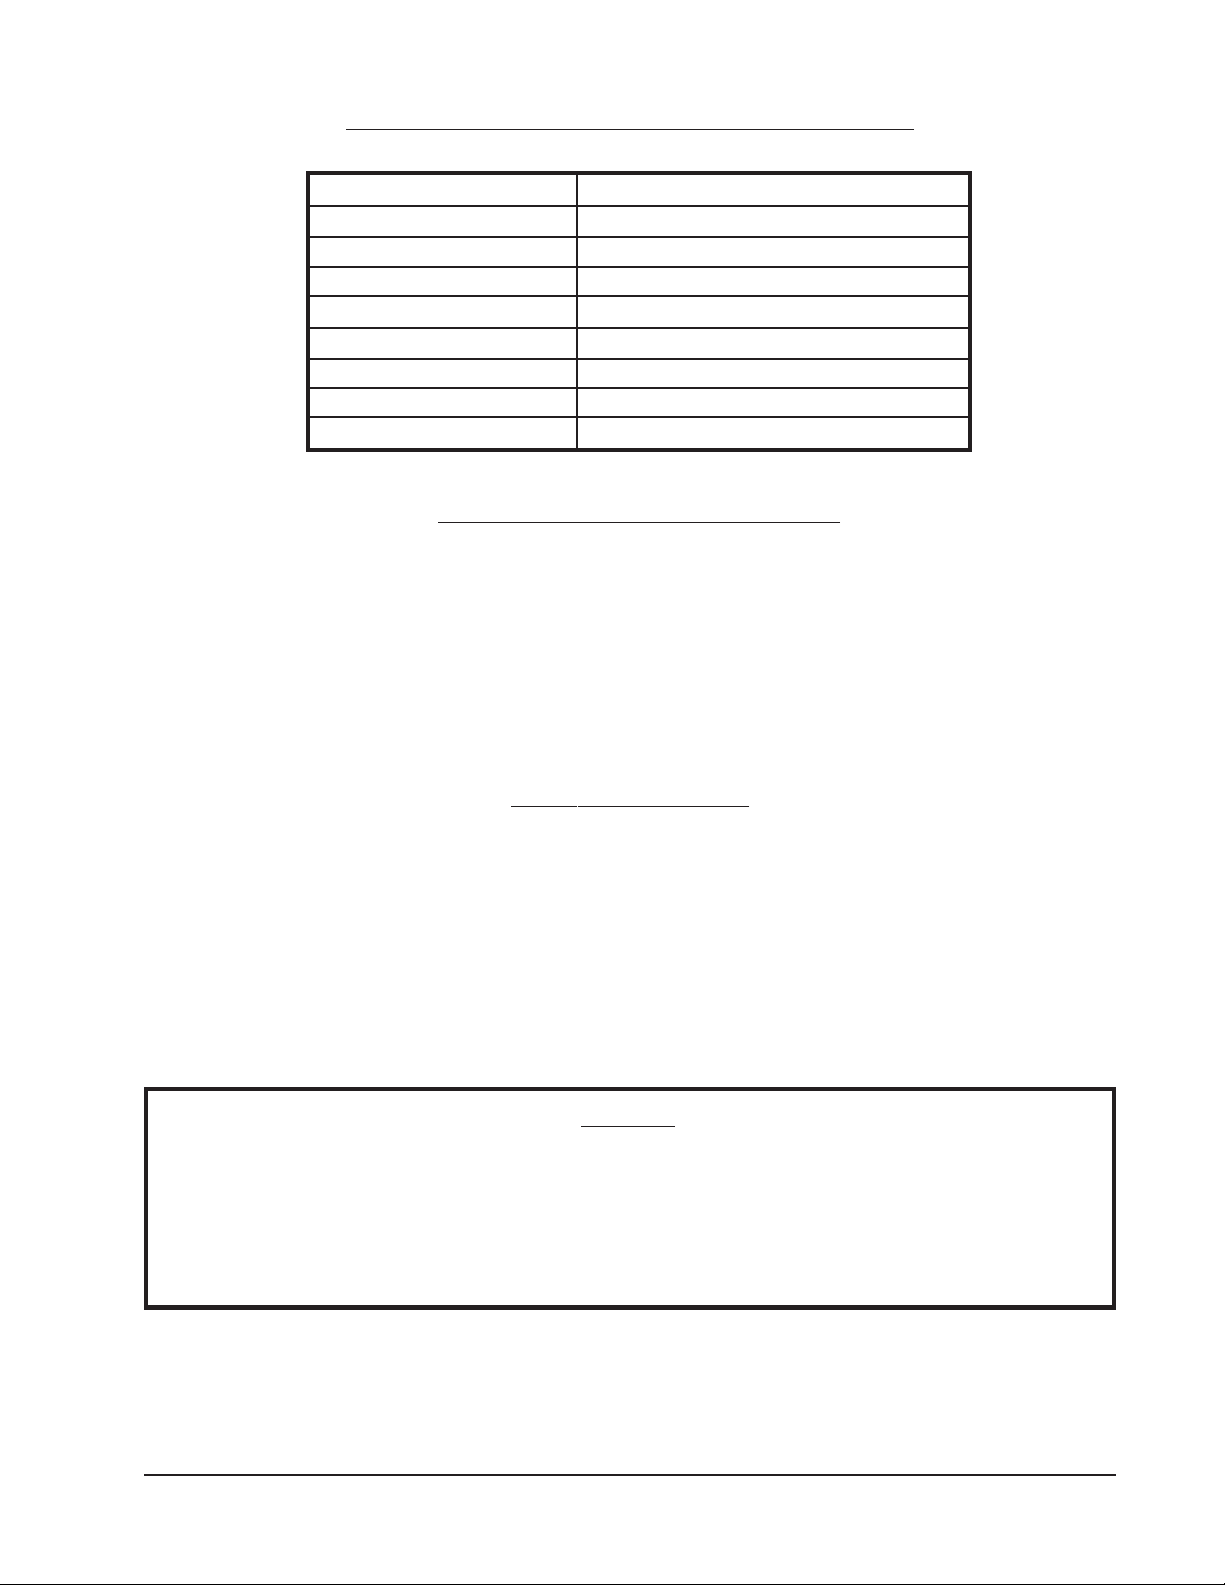
SPECIFICATIONS MODEL # 41006 TRAILER JACK
W eight Capacity: 2000 Lbs.
Minimum Height: 9-7/8”
Maximum Height: 20-3/4”
Lift Distance: 10-7/8”
Skid Dimensions: 7-5/8” x 4-1/16”
Swivel Capacity: 360
o
Material: Zinc-plated Steel
Overall Dimensions: 29-7/8”H x 7-5/8”L x 4-3/4”W
Net W eight: 13.38 Lbs
FEATURES OF THIS TRAILER JACK
1. Strong steel construction, with enclosed gear .
2. Lockable swivel base for convenient towing and jacking.
3. T op crank makes lifting trailer very easy.
4. Skid foot distributes trailer weight to resist surface damage.
5. Permanent weld-on mount enhances weight capacity .
SAVE THIS MANUAL
You will need this manual for the safety warnings and cautions, assembly instructions, operating
procedures, maintenance procedures, trouble shooting, parts list, and diagram. Keep your invoice
with this manual. Write the invoice number on the inside of the front cover. Keep both this manual
and your invoice in a safe, dry place for future reference.
NOTICE
The Warnings, Cautions, and Instructions discussed in this instruction manual cannot
cover all possible conditions and situations that may occur. It must be understood by
the operator that common sense and caution are factors which cannot be built into this
product, but must be supplied by the operator.
Page 2 SKU # 41006
Page 3

SPECIAL WARNINGS WHEN USING THIS TRAILER JACK
Using this Jack may create special hazards.
Take particular care to safeguar d yourself and those around you.
1. Roll Away. A void situations which allow the trailer to roll away on the skid and trailer wheels. If
using the trailer jack on an incline, be sure to chock the wheels. Never leave the trailer unattended while on
the jack if possibility of roll-away exists.
2. Overloading. Never attempt to lift or support loads in excess of the rated strength of this Trailer
Jack. Sudden failure of the Jack may result in serious personal or property injury .
3. Re-position the T railer Jack before driving. Always re-position the Trailer Jack into a
horizontal position (parallel to the trailer’s tongue) before moving the vehicle and trailer . Make sure the
Locking Pin is in place. Driving with the Trailer Jack in the vertical, down position can cause serious
damage to property .
4. Dollying on uneven surfaces. The Skid on this Jack makes moving your trailer without a vehicle
possible. However, moving the trailer on uneven surfaces can cause potential damage to the Jack or other
property .
5. Not to be used for aircraft purposes.
NOTICE: No list of warnings can be all inclusive. The operator must
supply common sense, and operate this tool in a safe manner.
MAINTENANCE
If you discover any damage, repair or replace any damaged parts before using your Trailer Jack.
1. Keep the Crank mechanism and inner tube lightly greased. Assure that this mechanism functions
smoothly .
2. Check the T ongue Adapter’ s mounting weld regularly to assure that it remains solid.
3. Inspect the entire unit for corrosion which may be caused by exposure to saltwater or weather.
Rinse thoroughly and re-lubricate if trailer jack has been immersed in salt water.
4. Keep all moving parts lightly lubricated to prevent corrosion. If corrosion develops, you may paint
exterior parts of the Jack to arrest and prevent further damage.
PLEASE READ THE FOLLOWING CAREFULLY
THE MANUFACTURER AND/OR DISTRIBUTOR HAS PROVIDED THE PARTS DIAGRAM IN
THIS MANUAL AS A REFERENCE TOOL ONLY: NEITHER THE MANUFACTURER NOR
DISTRIBUTOR MAKES ANY REPRESENT ATION OR WARRANTY OF ANY KIND TO THE BUYER
THAT HE OR SHE IS QUALIFIED TO MAKE ANY REPAIRS TO THE PRODUCT OR THAT HE
OR SHE IS QUALIFIED TO REPLACE ANY PARTS OF THE PRODUCT: IN FACT THE
MANUFACTURER A ND/OR DISTRIBUTOR EXPRESSLY STATES THATALL REPAIRS AND
PARTS REPLACEMENTS SHOULD BE UNDERTAKEN BY CERTIFIED AND LICENSED
TECHNICIANS AND NOT BY THE BUYER. THE BUYER ASSUMES ALL RISK AND LIABILITY
ARISING OUT OF HIS OR HER REPAIRS TO THE ORIGINAL PRODUCT OR REPLACEMENT
PARTS THERET O, OR ARISING OUT OF HIS OR HER INSTALLATION OF REPLACEMENT PARTS
THERETO.
Page 3 SKU # 41006 REV 03/04
Page 4

INST ALLATION
NOTE: Do not drill holes or otherwise damage the trailer tongue when installing this Jack. Failure
of the trailer tongue may result.
NOTE: Installing this Jack is most easily done with the Trailer mounted on the towing vehicle hitch.
1. Measure the trailer tongue for the best location to mount the Jack. Remember that the Jack must not
interfere with the V ehicle or trailer when turning or passing over speed bumps, boat ramps, etc.
2. Adjust the Coupling Tube so the Jack is in the lowered position.
3. Hold the Jack against the trailer tongue, and using the Crank Handle (#5), lower the Inner T ube
(#3) and Skid Plate (#7) to the ground.
4. Using a suitable welder, weld the Tongue Adapter (#8) to the trailer tongue.
WARNING: Only a qualified and certified welder should attempt this. A poor weld may cause the
trailer to fall suddenly, potentially causing serious personal or pr operty damage.
5. Attach the T railer Jack by fitting the Coupling Tube (#1) over the T ongue Adapter (#8). Slide the
Locking Pin (#6) through the appropriate hole in the Coupling Tube and the Tongue Adapter to
secure the Trailer Jack to the trailer tongue.
6. T est the operation of the Trailer Jack. Place the Locking Pin in each of the holes of the Coupling
Tube/T ongue Adapter to make sure it holds the T railer Jack in each of the posible positions. Make
adjustments if necessary . Tighten the mounting hardware firmly .
OPERATION
Dismounting the trailer from the towing vehicle.
WARNING: Before dismounting, make sur e the trailer wheels are properly chocked to pr event the
trailer from r olling.
1. With the trailer on the hitch, support the weight of the Jack with one hand and pull the Locking Pin
(#6) out of the Coupling Tube (#1)/T ongue Adapter (#8), allowing the Jack to rotate downwards.
WARNING: Keep your fingers away from the Coupling Tube area, and do not allow the Skid
Plate to strike your foot as the Jack rotates downward.
2. Replace the Locking Pin into the Coupling Tube/T ongue Adapter , locking the Jack into the lowered
position.
3. Rotate the Crank Handle (#5) counterclockwise to lower the Skid Plate (#7) to the
ground. Continue to crank just enough for the Trailer Jack to take the weight of the trailer . This will
make it easier to disengage the trailer hitch.
4. Disengage the trailer hitch. Remember to disengage any safety chains, electrical connections and
other connections between the vehicle and the trailer .
5. When the vehicle is completely clear, and it is safe to do so, drive the vehicle away from the trailer .
WARNING: Be sure to have a spotter watch this operation to be sure the trailer is clear of the
vehicle, and that the trailer does not roll away.
Using the Jack to mount the trailer to the towing vehicle.
WARNING: Do not attempt to move the trailer tongue if it is too heavy for you.
NOTE: You will need assistance for some parts of this operation.
1. Make sure the trailer’s wheels are properly blocked to prevent unwanted trailer movement.
2. Move the towing vehicle in place so that the vehicle’s hitch is in close proximity to the trailer’ s hitch.
3. Rotate the Crank Handle (#5) to raise or lower the trailer to the level of the towing vehicle’s hitch.
4. Have an assistant spot for you as you move the vehicle in close to the trailer’s hitch. Mount the trailer
onto the towing vehicle’ s hitch.
Page 4 SKU # 41006
Page 5

Using the Jack to mount the trailer to the towing vehicle (continued)
5. Turn the Crank Handle (#5) counterclockwise to lower the Jack slightly , transferring the trailer’s weight
onto the towing vehicle.
6. Pull out the Locking Pin (#6) and rotate the Jack into its upright position. Reinsert the Locking Pin into
the Coupling Tube/T ongue Adapter .
7. Check all connections and remove wheel blocks before driving the vehicle.
MODEL # 41006 TRAILER JACK
#10 Snap Ring (not shown)
#8 Tongue Adapter
MODEL # 41006 TRAILER JACK PARTS LIST
Part # Description
1 Coupling Tube
2 Outer Tube
3 Inner Tube
4 Screwed Shaft
5 Crank Handle
6 Locking Pin
7 Skid Plate
8 Tongue Adapter
9 Hitch Pin
10 Snap Ring
#9 Hitch Pin
Page 5 SKU # 41006
Rev 06/00
 Loading...