

Page 1
TRANSMISSION JACKTRANSMISSION JACK
®
TRANSMISSION JACK
TRANSMISSION JACKTRANSMISSION JACK
ONE TON ONE TON
ONE TON
ONE TON ONE TON
37481
ASSEMBLY and OPERATING
INSTRUCTIONS
3491 Mission Oaks Blvd., Camarillo, CA 93011
Copyright © 1997 by Harbor F reight Tools®. All rights reserved. No portion of
this manual or any artwork contained herein may be reproduced in any shape
or form without the express written consent of Harbor F reight Tools.
For technical questions and replacement parts, please call 1-800-444-3353
Page 2

Specifications
METINOITPIRCSED
yticapaCnotenO
noitcurtsnoCleetsllA
egnaRtfiL
tliTelddaSdrawkcab°42,drawrof°41
tnemevoMelddaS)syawedis(laretalsehcni61/3-1
eziSelddaSsehcni8/1-41x4/3-7
MARsehcni5:htgneL,sehcni20.1:retemaiD
niahCytefaS08edarG
rotsaCsehcni2/1-3:retemaiD
snoisnemiDllarevOsehcni)H(2/1-31x)W(2/1-91x)L(52
thgieW.sbl491
sehcni4/1-8:muminiM
sehcni2/1-03:mumixaM
Save This Manual
You will need the manual for the safety warnings and precautions, assembly instructions,
operating and maintenance procedures, parts list and diagram. Keep your invoice with this
manual. Write the invoice number on the inside of the front co v er. Keep the man ual and
invoice in a safe and dry place for future reference.
Safety Warnings and Precautions
WARNING: When using tool, basic safety precautions should always be followed to reduce
the risk of personal injury and damage to equipment.
Read all instructions before using this tool!
1. Do not use jack until properly trained. The transmission jack is intended for use by
properly trained and experienced personnel only. If you are not familiar with the proper
and safe operation of a transmission jack, do not use until trained.
2. Keep work area clean. Cluttered areas invite injuries.
3. Observe work area conditions. Do not use machines or power tools in damp or wet
locations. Don’t expose to rain. Keep work area well lighted. Do not use electrically
powered tools in the presence of flammable gases or liquids.
4. Secure vehicle. The vehicle must be properly supported and blocked before starting
repairs.
5. Do not overload. Use the proper size and capacity transmission jack to handle the
anticipated load or damage may occur to the jack and create a safety hazard.
Page 2SKU 37481
Page 3

6. Avoid moving parts on the jack. Keep fingers, hands, and arms awa y from moving
parts of the jack at all times.
7. Secure load. Secure the load with a safety chain before lowering or moving.
8. Use jack on hard surfaces onl y . The jack is designed for use only on hard, level
surfaces capable of sustaining the load. Using the jack on a soft surface can result in
jack instability and possible loss of load.
9. Keep children awa y. Children must never be allo w ed in the work area. Do not let
them handle machines, tools, or extension cords.
10. Store idle equipment. When not in use, tools must be stored in a dry location to inhibit
rust. Always lock up tools and keep out of reach of children.
11. Do not force tool. It will do the job better and more safely at the rate for which it was
intended. Do not use inappropriate attachments in an attempt to exceed the tool
capacity.
12. Use the right tool for the job. The use of this jack is limited to the removal,
installation, and transportation (in the lowered position), of transmissions and
differentials.
13. Dress properly. Do not wear loose clothing or jewelry as they can be caught in
moving parts. Protective, electrically nonconductive clothes and nonskid footwear are
recommended when working. Wear restrictive hair co v ering to contain long hair.
14. Use eye and ear protection. Always wear ANSI approved impact safety goggles.
Wear a full face shield if you are producing metal filings or wood chips. Wear an ANSI
approved dust mask or respirator when working around metal, wood, and chemical
dusts and mists.
15. Do not overreach. Keep proper footing and balance at all times. Do not reach over or
across running machines.
16. Maintain tools with care. K eep tools sharp and clean for better and safer
performance. Follow instructions for lubricating and changing accessories. Inspect tool
cords periodically and, if damaged, have them repaired by an authorized technician.
The handles must be kept clean, dry, and free from oil and grease at all times.
17. Remove adjusting keys and wrenches. Check that keys and adjusting wrenches
are removed from the tool or machine work surface before plugging it in.
18. Stay alert. Watch what you are doing, use common sense. Do not oper ate any tool
when you are tired.
19. Check for damaged parts. Before using any tool, any part that appears damaged
should be carefully checked to determine that it will operate properly and perform its
intended function. Check for alignment and binding of moving parts; an y broken parts
or mounting fixtures; and an y other condition that ma y aff ect proper operation. Any part
that is damaged should be properly repaired or replaced by a qualified technician. Do
not use the tool if any switch does not turn On and Off properly.
Page 3SKU 37481
Page 4

20. Replacement parts and accessories. When servicing, use only identical
replacement parts. Use of any other parts will void the warranty. Only use accessories
intended for use with this tool. Approved accessories are available from Harbor Freight
Tools.
21. Do not operate tool if under the influence of alcohol or drugs. Read warning
labels on prescriptions to determine if your judgment or reflexes are impaired while
taking drugs. If there is any doubt, do not operate the tool.
22. Comply with safety warnings. F ailure to comply with all of these warnings may
cause loss of load, damage or failure of the jack, or personal injury and property
damage.
Unpacking
When unpacking, check to make sure the following parts are included. If an y parts are
missing or broken, please call Harbor F reight Tools at the number on the cover of this
manual. If an y part of the machine is missing or broken, please call Harbor Freight Tools at
the number on the front cover as soon as possible.
WARNING:
ALWAYS EVALUATE YOUR TASK BEFORE USING THIS JACK. This jack is
designed to support a transmission or a differential as individual components.
Assemblies such as a differential with axle, or a transmission with bell housing, can be
bulky and difficult to balance on the jack’s platform or cradle.
LIFTING OR SUPPORTING SUCH ASSEMBLIES, EVEN WITHIN THE WEIGHT LIMIT,
CAN CREATE AN OFF-BALANCE SITUATION, CAUSING THE JACK TO TIP OVER
AND LEAD TO SERIOUS PERSONAL INJURY OR PROPERTY DAMAGE.
The load should be evenly distributed on the jack, and should not extend beyond the
area of the castor wheelbase. Always use safety straps or chains to secure the load.
If you are working and the load becomes off-balance and/or the jack begins to tip o ver,
DO NOT ATTEMPT TO CATCH OR LIFT WHEN FALLING. SERIOUS PERSONAL
INJURY CAN BE SUFFERED! In this event, clear the area as quickly and safely as
possible in order to avoid injury from the falling load, including getting hit with flying
fragments.
IF IN DOUBT ABOUT THE SAFETY OF YOUR PROJECT, WE ADVISE YOU TO HAVE
THE WORK DONE BY A PROFESSIONAL FAMILIAR WITH APPLICABLE SAFE
PRACTICES.
Assembly
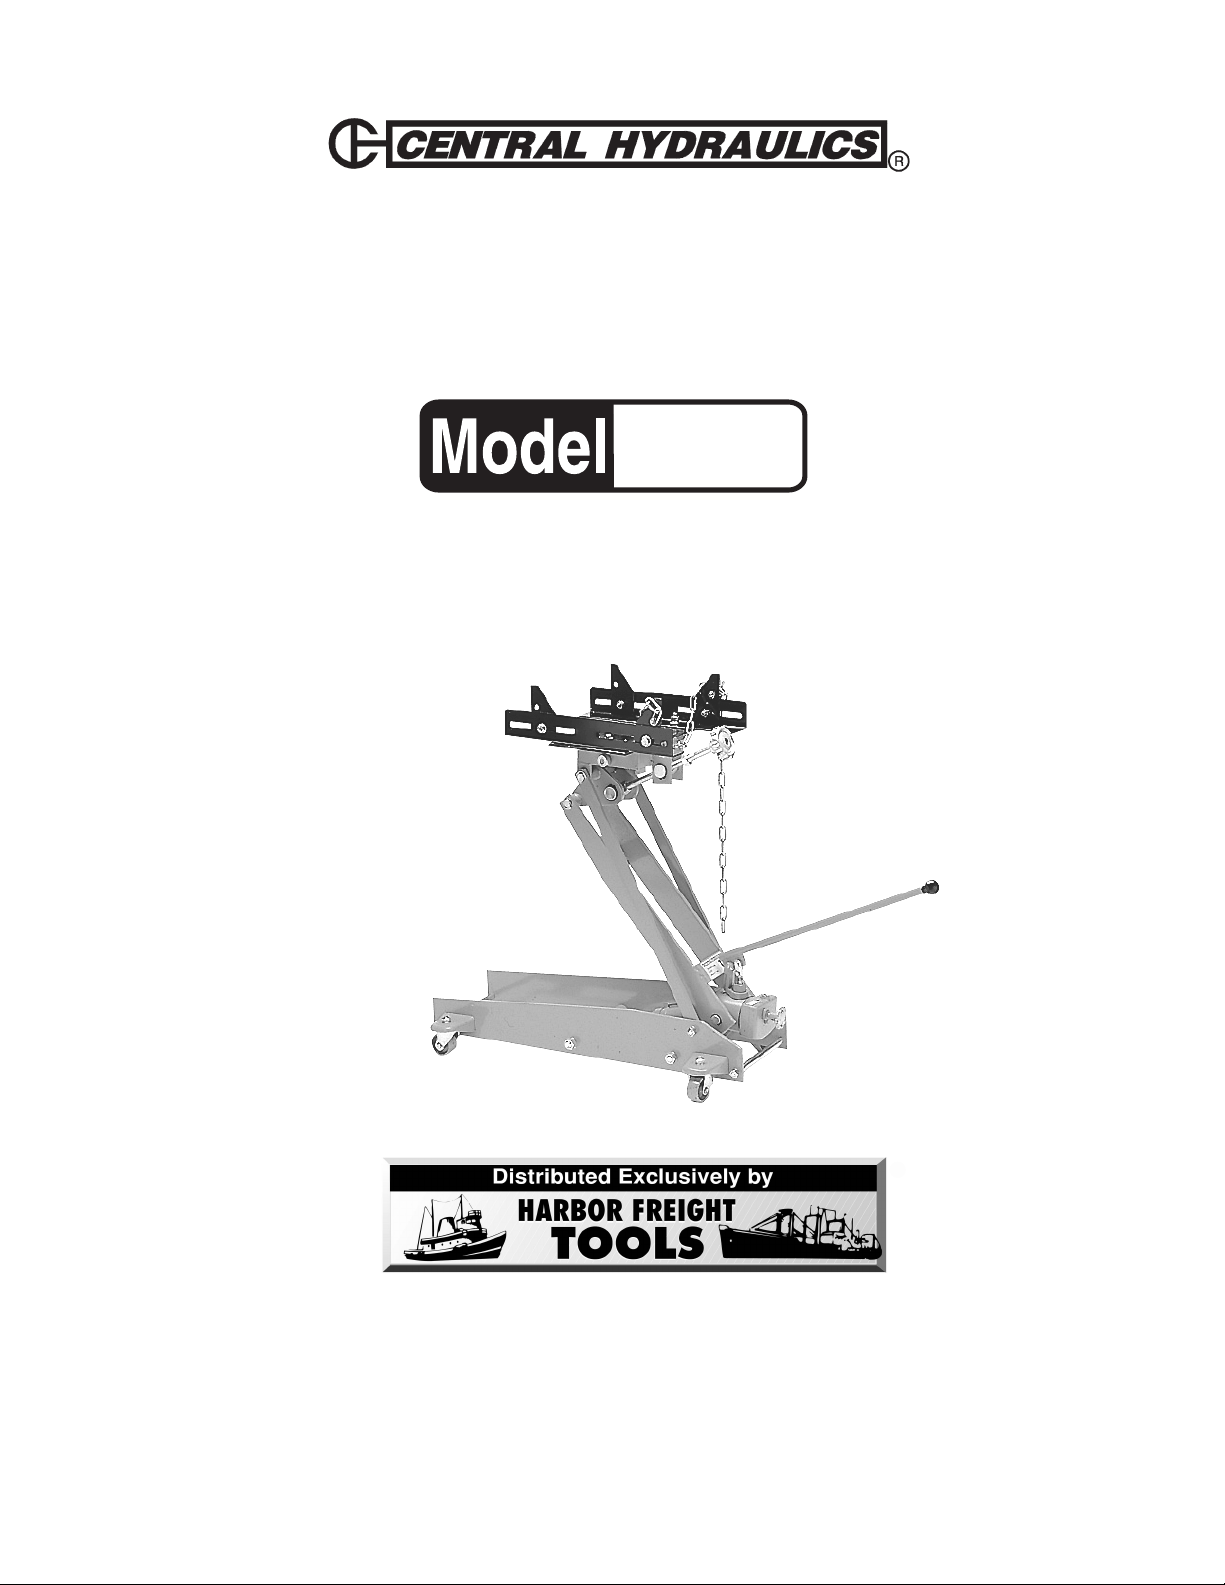
Before installing the angle brackets (#30), claws (#27), and chain (#26) to the base panel
(#24), refer to parts breakdown illustration on the last page. Verify all necessary parts for
assembly are in the parts bag.
1. Place the Transmission Jack on a clear area on the floor.
Page 4SKU 37481
REV 09/02
Page 5

2. Place the angle br ackets (#30) on each side of the base panel (#24) as shown below.
3. Insert the bolts (#30A) up through the bottom of the base panel (#24), and then the
washers and nuts onto the bolts as they protrude through the angle brackets (#30).
Adjust to desired width then tighten nuts thoroughly.
Claw (#27 - Typical of 4)
Nut (#48 - Typical of 4)
Chain (#26)
bolted to claw
Bolt (#49 Typical of 4)
Base Panel (#24)
Angle Bracket (#30)
Bolt, washer , nut (#30A)
Ke y , W asher, Nut (#28)
Angle Bracket (#30)
Angle Screw (#25)
4. Mount each claw (#27) on the inside of the angle brackets (#30) using bolts (#48), nuts
(#49), and washers, as shown in the illustrations. Nuts and washers should be on the
inside. Adjust distance to desired cradle width for the transmission, then tighten.
5. Insert the key ( #28 - where chain is temporarily attached) into the upper claw (#27)
hole from the outside.
6. Place the washer and nut on the other end of the key (inside claw) and tighten.
7. Bolt the chain (#26) to the outside of the diagonally opposite claw (top hole).
8. Remo ve the plastic cap on the Air Valve (#9) before operating the jac k. Failure to do so
may cause improper jack operation.
Operation
1. Turn the Pressure Valve Knob (#6) counterclockwise to open, lowering tranmission
saddle. Tur n Pressure Valve Knob clockwise to close.
2. With the vehicle properly secured and raised to the correct height to remove the
transmission, move the jack into position under the transmission.
3. Raise the saddle by moving the Pump Handle (#11) up and down until the claws (#27)
are just below the front and rear of the transmission.
Page 5SKU 37481
REV 09/02
Page 6

T ra vel Screw
(#29 opposite side)
Angle Screw (#25)
Pump Handle (#11)
Air Valv e (#9)
Pressure V alv e Knob (#6)
4. Adjust the saddle Travel Screw (#29) and the slant Angle Screw (#25) to align with the
shape of the transmission. Adjust the cla ws (#27) if necessary.
5. Continue moving the saddle up until the transmission is resting on the saddle.
6. Carefully move the jack to free the transmission from its location.
7. Slowly turn the Pressure Valve Knob (#6) counterclockwise to open, lowering the
transmission.
8. Pull the Chain tightly over the transmission and hook the nearest link onto the chain
Ke y (#28) to secure.
9. The transmission can now be safely moved.
10. Reverse this procedure when mounting a transmission.
Page 6SKU 37481
REV 09/02
Page 7

Maintenance
The hydraulic cylinder assembly contains hydraulic fluid that must be kept approximately
80% full at all times for proper operation. To check the lev el and refill, follow these steps.
Note: The hydraulic cylinder has a capacity of 8.4 ounces of hydraulic fluid.
Adding Hydraulic Fluid
1. Turn the Pressure Valve Knob (#6) counterclockwise to allow saddle to lower
completely.
2. Remove the Air Valve (#9) by unscrewing. (Keep screw in a safe place)
3. Visually inspect the inside of the air valve opening. The hydraulic fluid must be 80% of
the capacity of the hydraulic cylinder.
4. Fill with clean hydraulic fluid only.
5. Replace Air Valve.
Bleeding Air from the Hydraulic System
1. Place jack in a clear floor area.
2. Turn the Pressure Valve Knob (#6) counterclockwise to allow saddle to lower
completely and release pressure.
3. Unscrew Air Valve (#9) 1/2 turn counterclockwise.
4. Hold the saddle down while moving the Pump Handle (#11) up and down several
times.
5. Tighten the Air Valve.
Seal Replacement
0-rings and seals can be purchased if you need to have y our jac k serviced. Take the jack to
a qualified mechanic along with the 0-rings and seals. The Transmission Jack cannot be
user serviced.
Page 7SKU 37481
REV 09/02 REV 02/04
Page 8

#metInoitpircseDytQ
32ylbmessAesaBCF1
42lenaPesaB1
52ylbmessAwercSelgnA1
62niahC1
72walC4
82stuNdnasrehsaW/wyeK1
92niPdnatuN/wyssAwercS1
03elgnA2
13niPgnixiFrednilyC1
23niPdnaBmrA1
33ylbmessAretsaC1
B33gniraeBtsurhT1
C33)ylno(retsaC1
53)nwohston(eldnaHgarD1
A53PCylbmessAnotsiP1
A-B53teSgnikcaPnotsiP1
D53teStuNxeHCF1
KR53)tikriaper(teSgnikcaP1
73tloBgnixiFdoR1
64niPdnaBnotsiP1
A64niPtilpS1
74tuNpotSliO1
84tuN5
94tloB5
05doRgnitfiL1
15doRgnoL1
25llaBleetS1
35gnisuoHevlaV1
45gnirpS1
55tloB1
65rehsaWgnikcaP1
75tloB1
Parts List
#metInoitpircseDytQ
1ydoBrednilCretsaM1
2evlaVssarB1
3regnulP1
A3gnir-O1
4notsiPpmuP1
A4gnir-OpmuP1
5tekcarBpmuP1
A5niPtilpS1
6bonKevlaVerusserP1
A6niP1
7tloBknaTliO1
A7rehsaWgnikcaPesaeleR1
8knaTliO1
9evlaVriA1
A9gnir-O1
01ylbmessAdnaBpmuP1
11eldnaHpmuP1
21)epip(rednilyC1
31notsiPCF1
41doR1
A41niP1
C41niP1
D41gniRgnirpS1
51gnikcaPrednilyC1
61tuNxeHCF1
A61gnir-O1
71elzzoNreppoC1
81gnir-OevlaVerusserP1
B81epiPgnixiFdoR1
B91emarF1
02gniRpukcaBxeHCF1
12)S(gnikcaPrebbuR1
22)L(gnikcaPrebbuR1
B22tekcarBlatnoziroH1
Page 8SKU 37481
REV 09/02
Page 9

Parts Illustration
Page 9SKU 37481
REV 09/02
 Loading...