

Page 1

NETZWERKKAMERA
Benutzerhandbuch
SNV-L6013R/SNV-L6014RM
Page 2

Netzwerkkamera
Benutzerhandbuch
Copyright
©2016 Hanwha Techwin Co., Ltd. Alle Rechte vorbehalten.
Handelsmarke
Alle Marken in diesem Dokument sind registriert. Der Name dieses Produkts und andere Marken in diesem Handbuch gelten als eingetragenes
Warenzeichen der jeweiligen Unternehmen.
Richtlinien
Alle Rechte dieses Dokuments sind vorbehalten. Unter keinen Umständen darf dieses Dokument reproduziert, verteilt oder ganz oder teilweise ohne
ausdrückliche Genehmigung modifiziert werden.
Haftungsausschluss
Samsung ist bemüht, die Korrektheit Integrität des Inhaltes dieses Dokuments sicherzustellen, wird aber keine Garantie zur Verfügung gestellt. Die
Verwendung dieses Dokuments und der darauffolgenden Ergebnisse erfolgt auf alleinige Verantwortung des Benutzers. Samsung behält sich das Recht
vor, Änderungen der Dokumenteninhalte ohne vorherige Ankündigung vorzunehmen.
Design und technische Daten können ohne vorherige Ankündigung geändert werden.
Die initiale Administrator-ID ist “Administrator” und das Passwort sollte eingestellt werden, wenn Sie sich das erste Mal anmelden.
Bitte ändern Sie das Passwort alle drei Monate um die persönlichen Daten zu schützen und Schaden infolge Datendiebstahl zu vermeiden.
Beachten Sie bitte, der Benutzer ist für die Sicherheit und alle weiteren Probleme, die sich aus einem Missmanagment des Passworts
ergeben verantwortlich.
Page 3

übersicht
WICHTIGE SICHERHEITSHINWEISE
1. Lesen Sie diese Anweisungen.
2. Bewahren Sie sie auf.
3. Beachten Sie alle Warnungen.
4. Befolgen Sie alle Anweisungen.
5. Verwenden Sie dieses Gerät nicht in der Nähe von Wasser.
6. Reinigen Sie es nur mit einem trockenen Lappen.
7. Blockieren Sie keine Belüftungsöffnungen. Installieren Sie es gemäß den Herstelleranweisungen.
8. Installieren Sie das Gerät nicht in der Nähe von Wärmequellen wie beispielsweise von Radiatoren, Heizkörpern
oder anderen Geräten (einschließlich Verstärkern), die Wärme erzeugen.
9. Bitte achten Sie darauf, die Schutzvorrichtung des gepolten bzw. geerdeten Steckers nicht zu beschädigen.
Ein gepolter Stecker verfügt über zwei Stifte, von denen einer breiter als der andere ist. Ein geerdeter Stecker
hat zwei Stifte und einen Erdungsstift. Der breite Stift oder der dritte Stift ist für Ihre Sicherheit vorgesehen.
Wenn der vorgesehene Stecker nicht in Ihre Steckdose passt, wenden Sie sich an einen Elektriker, um die
veraltete Steckdose austauschen zu lassen.
10. Schützen Sie das Netzkabel so, dass nicht darauf getreten wird, und dass es insbesondere an den Steckern
oder passenden Steckdosen bzw. der Stelle, an der das Kabel das Gerät verlässt, nicht abgeklemmt wird.
11. Verwenden Sie nur die vom Hersteller angegebenen Zusatzgeräte/Zubehörteile.
12. Verwenden Sie für das Gerät nur Gestelle, Ständer, Stative, Konsolen und Tische, die
vom Hersteller empfohlen oder in Verbindung mit dem Gerät verkauft werden. Bei
Verwendung eines Transportwagens bewegen Sie das Gerät nur mit äußerster Vorsicht,
um Verletzungen durch Umkippen zu vermeiden.
13. Trennen Sie das Gerät bei Gewitter oder längerer Abwesenheit vom Stromnetz.
14. Überlassen Sie alle Wartungsarbeiten qualifiziertem Kundendienstpersonal.
Wartungsarbeiten sind erforderlich, wenn das Gerät in irgendeiner Weise beschädigt wurde, wie zum Beispiel
ein beschädigtes Netzkabel oder Stecker, verschüttete Flüssigkeiten oder Gegenstände, die in das Gerät
gefallen sind, das Gerät Regen oder Feuchtigkeit ausgesetzt wurde, nicht normal funktioniert oder fallen
gelassen wurde.
15. Die Versorgung dieses Produkts ist nur durch eine aufgelistete Stromversorgungseinheit, „Klasse 2“ oder
„LPS“, Leistung: 24 Vac(50 oder 60 Hz), min. 1.0 A oder 12 Vdc, min 1.0 A. bestimmt.
WARNUNG
SETZEN SIE DIESES GERÄT NICHT REGEN ODER FEUCHTIGKEIT AUS, UM DIE GEFAHR
EINES BRANDS ODER ELEKTROSCHOCKS ZU REDUZIEREN. STECKEN SIE KEINE
METALLGEGENSTÄNDE DURCH DIE BELÜFTUNGSSCHLITZE ODER ANDERE ÖFFNUNGEN
DER AUSRÜSTUNG.
Schützen Sie das Gerät vor Flüssigkeitsspritzern und Tropfen. Stellen Sie keine mit Flüssigkeiten
gefüllten Behälter auf dem Gerät ab (z. B. Vasen).
Zur Vermeidung von Verletzungen muss das Gerät gemäß der Montageanleitung sicher an der
Wand oder Decken befestigt werden.
VORSICHT
VORSICHT
GEFAHR EINES
ELEKTROSCHOCKSNICHT
ÖFFNEN
VORSICHT
: NICHT DIE RÜCKSEITIGE ABDECKUNG ÖFFNEN,
ABDECKUNG (ODER RÜCKSEITE) NICHT ABNEHMEN.
KEINE VOM BENUTZER ZU WARTENDE TEILE INNEN.
WENDEN SIE SICH AN QUALIFIZIERTESKUNDENDIENSTPERSONAL.
ERKLÄRUNG DER GRAPHISCHEN SYMBOLE
Das Blitzsymbol im gleichseitigen Dreieck warnt den Benutzer davor, dass
im Inneren des Produkts nicht isolierte, „gefährliche Spannungen“ anliegen.
Dies kann zu einem elektrischen Schlag führen und stellt eine ernsthafte
Verletzungsgefahr dar.
Das Ausrufezeichen im gleichseitigen Dreieck soll Benutzer darauf hinweisen,
dass die zum Lieferumfang des Produkts gehörende Dokumentation wichtige
Bedienungs- und Instandhaltungsanweisungen (Reparaturanweisungen) enthält.
●● ÜBERSICHT
Deutsch _3
Page 4

übersicht
Klasse nbauart
Ein Gerät der KLASSE sollte nur an einen NETZ-Anschluss mit Schutzerdung angeschlossen
werden.
Akku
Akkus (Akkusatz oder eingelegter Akku) dürfen keiner extremen Hitze, z. B. Sonneneinstrahlung,
Feuer oder Ähnlichem, ausgesetzt werden.
Trennung des Geräts
Trennen Sie den Hauptstecker vom Gerät, wenn dieser beschädigt ist. Und wenden Sie sich
bitte für die Reparatur an einen Fachmann in Ihrer Nähe.
Außerhalb der USA könnte ein HAR-Code verwendet werden. Eine Fachwerkstatt wird
mit Zubehör einer Fachwerkstatt beauftragt.
ACHTUNG
Wird die Batterie nicht mit der richtigen Batterie ausgetauscht, besteht Explosionsgefahr.
Entsorgen Sie gebrauchte Batterien vorschriftsgemäß.
Diese Hinweise zur Wartung und Reparatur gelten nur für qualifiziertes Kundendienstpersonal.
Um die Gefahr von Stromschlägen zu verringern, führen Sie nur die Reparaturen aus, die in der
Bedienungsanleitung enthalten sind. Überlassen Sie alle weiterführenden Reparaturarbeiten
qualifiziertem Personal.
Bitte verwenden Sie die Eingangsleistung für nur eine Kamera und schließen Sie keine
zusätzlichen Geräte an.
Der ITE darf nur mit PoE-Netzwerken und ohne Routing zur äußeren Anlage verbunden
werden.
Lesen Sie die folgenden empfohlenen Sicherheitsmaßnahmen sorgfältig durch.
yStellen sie das Gerät nicht auf eine unebene Fläche.
ySetzen Sie das Gerät keiner direkten Sonneneinstrahlung aus, stellen Sie es nicht in der
Nähe von Heizgeräten oder in sehr kalten Bereichen auf.
yDas Gerät nicht in der Nähe von leitendem Material aufstellen.
yVersuchen Sie auf keinen Fall, selbst Reparaturarbeiten auszuführen.
yStellen Sie kein Glas Wasser auf das Produkt.
yStellen Sie das Gerät nicht in der Nähe einer magnetischen Quelle auf.
yBlockieren Sie nicht die Belüftungsöffnungen.
yLegen Sie keine schweren Gegenstände auf das Produkt.
Das Benutzerhandbuch ist ein Anleitungsbuch zur Art der Verwendung von Produkten.
Die Verwendungshinweise im Handbuch bedeuten folgendes.
yReferenz : Im Falle einer weiterleitenden Information als Hilfe bei der Produktverwendung
yHinweis : Wenn die Möglichkeit besteht, dass Güter oder Menschen durch das
Nichtbefolgen der Anleitung zu Schaden kommen
Bitte lesen Sie das vorliegende Benutzerhandbuch zur eigenen Sicherheit vor der
Verwendung von Gütern sorgfältig durch, und heben Sie es an einem sicheren Ort auf.
4_ übersicht
Page 5

INHALTE
ÜBERSICHT
INSTALLATION & VERBINDUNG
NETZWERKVERBINDUNG UND
KONFIGURATION
3
9
14
3 Wichtige Sicherheitshinweise
6 Produkt-Funktionen
6 Empfohlene PC-Spezifikationen
7 Empfohlene Technische Daten Für MICRO
SD/SDHC/SDXC Speicherkarten
7 Empfohlene NAS-Spezifikationen
7 Lieferumfang
8 Auf einen Blick
9 Installation
11 Einlegen/Herausnehmen Einer Micro SD-
Speicherkarte
11 Speicherkarteninformation (Nicht Enthalten)
12 Anschluss an andere Geräte
14 Direktes Verbinden der Kamera an das LAN
14 Verbinden der Kamera Direkt mit Einem
DHCP Basierten DSL/Kabelmodem
15 Die Kamera Direkt mit Einem PPPoE-
Modem Verbinden
15 Verbinden der Kamera an Einen Breitband-
Router über das PPPoE/Kabelmodem
16 Schaltflächen des IP-
Installationsprogramms
16 Einstellung der Statischen IP
18 Einstellung der Dynamischen IP
18 Portbereichweiterleitung Konfigurieren (Port
Mapping)
19 Von Einem Gemeinsamen Lokalen PC Eine
Verbindung zu der Kamera Herstellen
19 Von Einem Entfernten PC eine Verbindung
zu der Kamera über das Internet Herstellen
WEB VIEWER
20
SETUP-BILDSCHIRM
27
ANHANG
45
20 Verbindung mit der Kamera
20 Passworteinstellung
21 Anmelden
21 Installation des STW WebViewer Plug-ins
22 Den Live-Bildschirm Benutzen
23 Wiedergabe des aufgenommenen Videos
27 Konfiguration
27 Standard-Einstellungen
31 Video-Setup Und Audio
34 Netzwerk-Setup
38 Ereigniss-Setup
40 NAS (Network-Attached Storage) Leitfaden
43 System-Setup
44 Profilinformation einsehen
45 Spezifikationen
47 Produktansicht
48 Fehlersuche
49 Open Source Announcement
●● ÜBERSICHT
Deutsch _5
Page 6

übersicht
PRODUKT-FUNKTIONEN
• M12 Standard (SNV-L6014RM)
Nutzen Sie M12-Anschlüsse für das Kamerakabel für eine vibrationssichere/wasserdichte (IP66) Funktion.
• Staub/Wasserdicht (IP66)
Durch die staub- und wasserdichte Auslegung kann diese Kamera problemlos außerhalb von Gebäuden auch
an Orten installiert werden, an denen Sie Regen ausgesetzt ist.
• IR-Modus
Wenn die IR-Anzeige anspricht, schaltet das Gerät in den IR-Modus, damit ein Objekt nicht zu hell dargestellt
wird, wodurch sich nahe am Objektiv befindende Objekt leichter identifiziert werden können.
• Sichtweite : 15m
Im S/W-Modus spricht die IR-Anzeige mit einer effektiven Sichtweite von 15m bei 0 Lux an.
• Full-HD-Videoauflösung
• Multi-Übertragung
Dieser Netzwerk Encoder kann Videos in verschiedenen Auflösungen und Qualitäten über verschieden CODECs
gleichzeitig anzeigen.
• Überwachung über Webbrowser
Der Webbrowser kann verwendet werden, um die Bildanzeige in einer lokalen Netzwerkumgebung
wiederzugeben.
• Alarm
Wenn ein Ereignis eintritt, wird das Video entweder an die registrierte Adresse des Nutzers übermittelt, auf dem
FTP-Server, einer SD-Karte oder NAS gespeichert
• Manipulation Erkennung
Erkennt Versuche, die Video Überwachung zu manipulieren.
• Bewegungserkennung
Erkennt Bewegungen auf den von der Kamera eingehenden Videobildern.
• ONVIF Compliance
Dieses Produkt unterstützt das ONVIF Profil-S&G.
Weitere Informationen finden Sie unter www.onvif.org.
EMPFOHLENE PC-SPEZIFIKATIONEN
• CPU : Intel Core 2 Duo 2.4 GHz oder höher (zur Verwendung von 1920x1080 30 fps)
Das Web-Plug-in wurde zum SSE 4.1 Befehlssatz optimiert.
`
• Auflösung : 1280X1024 Pixel oder höher (32 bit Farbe)
• RAM : 2GB oder höher
• Unterstützte Betriebssystem : Windows 7, 8, 10, MAC OS X 10.8, 10.9, 10.10, 10.11
• Unterstützte Browser : Microsoft Internet Explorer 11, Mozilla Firefox 43, Apple Safari 9 ※ Ausschlieslich Mac
OS X
Windows 8 wird nur im Desktopmodus unterstützt.
`
Im Gegensatz zu der auf der Webseite des Unternehmens veröffentlichten Version, wird weder die die Beta-Testversion noch die
`
Entwickler-Version unterstützt.
Für die IPv6 Verbindung wird Windows 7 oder höher empfohlen.
`
Für Mac OS X wird nur Safari unterstützt.
`
• Videospeicher : 256MB oder höher
Ist der Treiber oder der Video-Grafik-Adapter nicht ordnungsgemäß installiert oder wird nicht die neueste Version verwendet,
`
J
wird das Video möglicherweise nicht ordnungsgemäß wiedergegeben.
Bei Mehrfach-Überwachungssystemen, die wenigstens 2 Bildschirme umfassen, kann die Wiedergabeleistung je nach
`
System verschlechtert sein.
6_ übersicht
Page 7
EMPFOHLENE TECHNISCHE DATEN FÜR MICRO SD/SDHC/SDXC
RESET
RESET
SPEICHERKARTEN
• Empfohlene Kapazität : 4GB ~ 32GB
• Wir empfehlen Ihnen für Ihre Kamera die Verwendung einer Speicherkarte der folgenden Hersteller:
Micro SD/SDHC/SDXC Speicherkarte : Sandisk, Transcend
• Es wird eine Nutzung von Speicherkarten mit einer Spezifikation der Klasse 10 + UHS-1 oder höher empfohlen.
EMPFOHLENE NAS-SPEZIFIKATIONEN
• Empfohlene Kapazität : 200GB oder mehr wird empfohlen.
• Gleichzeitiger Zugriff : Eine NAS-Einheit kann maximal sechzehn Kamerazugriffe aufnehmen.
• Bei dieser Kamera raten wir zu NAS mit den folgenden Spezifikationen.
Empfohlene Produkte Verfügbare Größen
Netgear NAS Maximal 16 Kameras können gleichzeitig zugreifen.
Synologie NAS Maximal 16 Kameras können gleichzeitig zugreifen.
Netgears NAS-Ausüstung funktioniert nur mit ReadyNAS OS Version 6 oder höher (Geräteversion 6.x.x).
`
J
Bei Nutzung von NAS-Geräten von Netgear, dürfen Sie keine Nutzungskapazität zuweisen.
`
Falls Sie NAS-Geräte für sonstige Zwecke, als die Videospeicherung verwenden, wird möglicherweise die Anzahl von
`
zugänglichen Kameras reduziert.
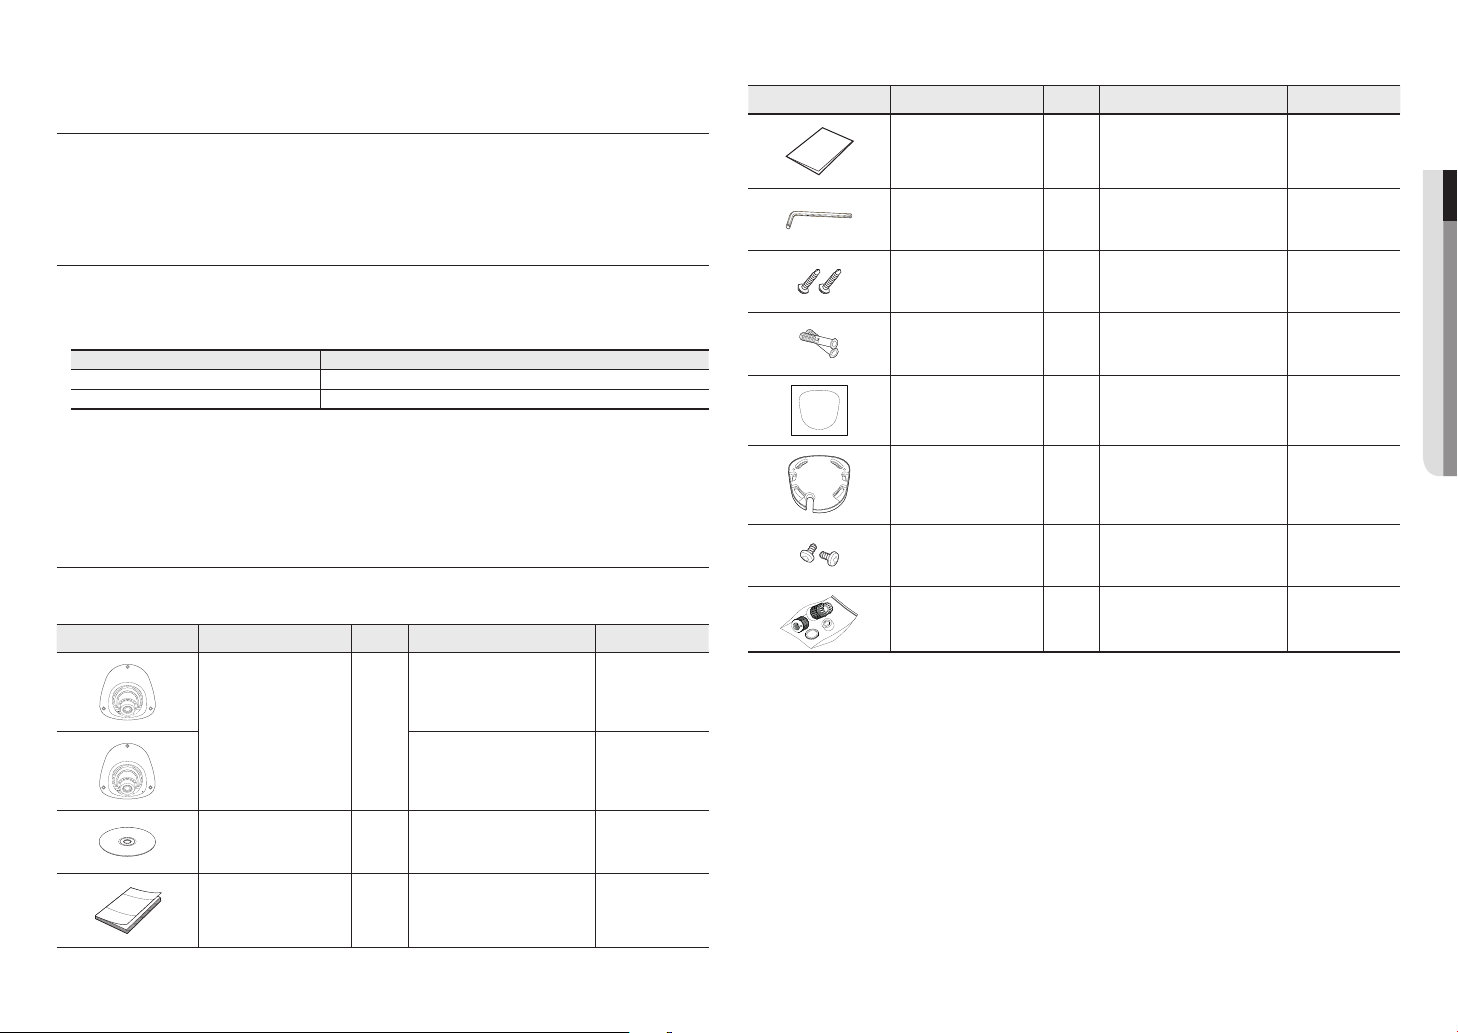
Produktdesign Bezeichnung Menge Beschreibung Modellbezeichnung
Garantiekarte
(Optional)
L-förmiger Schraubenschlüssel 1
M4-Blechschraube 2
Plastikdübel 2
Formbrett 1
Montagehalterung 1
1
Zum Entfernen/Befestigen der
Kuppelabdeckung
Wird zur Montage der Kamera an der
Wand oder Decke genutzt
Zum Befestigen einer in einer Bohrung
eingesetzten Schraube (verstärkende,
verankernde Wirkung)
Wird zur Installation der Kamera
genutzt
Wird zur Installation der Kamera an
der Wand oder einer Anschlussdose
(einfach) genutzt
SNV-L6013R/
SNV-L6014RM
SNV-L6013R/
SNV-L6014RM
SNV-L6013R/
SNV-L6014RM
SNV-L6013R/
SNV-L6014RM
SNV-L6013R/
SNV-L6014RM
SNV-L6013R/
SNV-L6014RM
●● ÜBERSICHT
LIEFERUMFANG
Überprüfen Sie bitte, ob in der Produktverpackung die Kamera und alle Zubehörteile enthalten sind.
(Da in jedem Vertriebsland die Zubehörteile nicht die gleichen sind.)
Produktdesign Bezeichnung Menge Beschreibung Modellbezeichnung
Kamera 1
Bedienungsanleitung,
Installations-CD
Kurzanleitung
(Optional)
1
1
SNV-L6013R
SNV-L6014RM
SNV-L6013R/
SNV-L6014RM
SNV-L6013R/
SNV-L6014RM
M4-Schraube für den
Montagewinkel
RJ45 wasserfestes Zubehör 1
Wird zur Fixierung der Kamera an der
2
Montagehalterung genutzt
Wird genutzt, um das RJ45-
Anschlusskabel wasserfest zu machen
SNV-L6013R/
SNV-L6014RM
SNV-L6013R
Deutsch _7
Page 8

übersicht
RESET
RESET
AUF EINEN BLICK
Aufbau
<SNV-L6013R> <SNV-L6014RM>
Bezeichnung Beschreibung
PoE-Anschluss
a
Audioeingangsbuchse
b
Kuppelabdeckung
c
M12
d
Buchsensteckverbinder
Audioausgangsbuchse
e
Falls die Oberfläche des Objektivs verschmutzt sein sollte, reinigen Sie sie sanft mit einem entsprechenden Tuch, auf dem
`
M
sich etwas Ethanol befindet.
a
b
d
e
b
c
Verbindet sich mit dem Netzwerk und wird über das Ethernet-Kabel mit Strom versorgt.
SNV-L6013R Wird zur Verbindung mit einem Mikrofon genutzt. (schwarz)
SNV-L6014RM Wird zur Verbindung mit einem Mikrofon genutzt. (rosa)
Gehäuseabdeckung zum Schutz des Objektivs und der Haupteinheit.
An M12 den Kabelsteckverbinder anschließen, dadurch ist die Stromversorgung und die
Netzwerkverbindung vorhanden.
Wird zur Verbindung mit Lautsprechern genutzt. (grün)
c
Innenansicht
g
f
RESET
e
Bezeichnung Beschreibung
Objektivschutz Zum fixieren oder schützen des Objektivs.
a
Schraubenöffnung Bohrung zur Absicherung der Kamera bei Deckenmontage.
b
Zum Zurücksetzen der Kameraeinstellungen auf die Standardeinstellungen. Drücken und 5
Sekunden gedrückt halten, um das System neu zu starten.
Reset-Taste
c
Mikrofoneingang
d
Micro SD
e
Speicherkartenfach
IR LED Diese infrarot LEDs werden über den Beleuchtungssensor gesteuert.
f
Beleuchtungssensor Erkennt das einfallende Licht, und steuert die Infrarot-LED.
g
J Wenn Sie die Kamera zurücksetzen, werden die Netzwerkeinstellungen so eingestellt,
dass DHCP aktiviert sein kann. Wenn kein DHCP-Server im Netzwerk verfügbar ist,
muss das IP-Installer-Programm gestartet werden und Netzwerkeinstellungen wie IPAdresse, Subnetzmaske, Gateway usw. konfiguriert werden, damit das System mit dem
Internet verbunden werden kann.
Mit integriertem Mikrofon.
Dies gilt nur für das Modell SNV-L6014RM.
`
Fach für die Micro SD-Speicherkarte.
a
b
c
d
8_ übersicht
Page 9

installation & verbindung
RESET
RESET
INSTALLATION
Bevor Sie mit der Installation beginnen
Bitte lesen Sie die folgenden Anweisungen, bevor Sie die Kamera installieren:
• Bei einer Deckenmonate muss der gewünschte Einbauort mindestens 5 Mal das Kameragewicht tragen
können.
• Verklemmte Kabel oder ein abgelöster Kabelschutz können zu Schäden an dem Produkt und Brandgefahr führen.
• Halten Sie aus Sicherheitsgründen andere Personen von dem Ort der Kamerainstallation fern. Achten Sie
darauf, dass sich in der Nähe der Kamerainstallation keine Gegenstände des Personals befinden.
• Diese Kamera (SNV-L6014RM) entspricht den IP66-Spezifikationen und ist zudem wasserfest. Für die Buchse
kann allerdings die Wasserfestigkeit nicht vorausgesetzt werden, wenn die Buchse und M12-Steckverbinder
und Kabel ausgestattet ist.
Bei der Installation des Produkts empfiehlt es sich ein, die M12-Vorgaben erfüllendes externes Kabel zu benutzen.
Demontage
Verwenden Sie den mitgelieferten L-förmigen Schraubenschlüssel, um die 3
Schrauben zu lösen. Drehen Sie diese gegen den Uhrzeigersinn und nehmen
Sie die Kuppelabdeckung ab.
Bitte notieren, dass es nicht notwendig ist, die Schraube völlig zu entfernen.
`
Zum Installieren der Kamera an der Decke
1. Den Aufstellungsort der Kamera auswählen.
2. Bereiten Sie ein Loch in der Wand vor, in der Sie das Gerät anbringen
wollen, und führen Sie dann den beiliegenden Trockenmauerdübel aus
Kunststoff ganz in die Wand ein.
3. Richten Sie das innere Loch mit dem Loch aus, in den der
Kunststoffdübel eingeführt wurde, und drehen Sie dann die
Schneidschraube im Uhrzeigersinn, um sie zu befestigen.
Nutzen Sie die beiliegende Montagehalterung, wenn Sie das Produkt an der Wand
`
M
montieren wollen.
4. Drehen Sie die Schrauben an beiden Seiten der Abdeckung des
Kameraobjektivs gegen den Uhrzeigersinn, um sie zu lockern.
Schraubenöffnung
Objektivschutz
6. Nach Anpassen des Blickwinkels drehen Sie die Schrauben im
Uhrzeigersinn, um den Objektivwinkel zu fixieren.
7. Schliessen Sie die Kameraabdeckung und drehen Sie sie in
Uhrzeigersinn mithilfe eines Winkelschraubenziehers.
Wenn die Abdeckung nicht fest fixiert wird, können Sie beim Wasserdicht
`
J
machen auf Schwierigkeiten stossen. (IP 66)
0~67°
●● INSTALLATION & VERBINDUNG
RESET
So verbinden Sie das wasserdichte RJ45-Kabel mit einem LAN-Kabel (SNV-L6013R)
1. Schieben Sie es in Pfeilrichtung durch.
2. Verbinden Sie den LAN-Stecker mit dem Kabel.
RESET
3. Verbinden Sie die RJ45-Modularbuchse mit dem RJ45-Stecker.
Halten Sie bitte jeden Teil getrennt von einander.
`
J
RJ45-
Modularbuchse
RJ45-Stecker
Entfernen Sie die Abdeckung des Objektivs (Schutzhaube) nicht gewaltsam, ohne
`
J
die Schrauben zu lockern, denn dies könnte zu einem defekten Produkt führen.
5.
Stellen Sie das Objektiv in eine gewünschte Richtung ein, indem Sie den
Abschnitt „Überwachungsrichtung der Kamera einstellen” nachsehen.
(Seite 10)
Deutsch _9
Page 10

installation & verbindung
4. Montieren durch Drehen der RJ45-Modularbuchse und der
Schutzklappe im Uhrzeigersinn (dem Pfeil folgen).
5. Montieren durch Drehen der RJ45-Schutzhaube und der hinteren
Abdeckung im Uhrzeigersinn (dem Pfeil folgen).
e hintere Abdeckung montiert, wird die wasserfeste Dichtung des
Kabels fest an dem Kabel angebracht, damit das Kabel wasserdicht
ist.
Sie müssen es vollständig montieren, um die hintere Abdeckung bis zum Ende des Gewindes des RJ45-Steckers zu drehen.
`
J
RJ45-SteckerSchutzhaube
Hintere Abdeckung
Wasserfeste
Kabeldichtung
Einbau im Außenbereich (SNV-L6013R)
Wird die Installation außerhalb des Gebäudes vorgenommen, ist sie mit einem Butylisolierband (im Handel
erhältlich) wasserundurchlässig zu machen, damit das Wasser nicht vom an die Außenseite angeschlossenen
Kabelspalt auslaufen kann.
1.
Schließen Sie den Strom, Audioeingang, LAN und andere Kabel an.
2. Die schwarze Kabelummantelung (Bereich A) und den
Kabelanschlussbereich mit dem wasserundurchlässigen
(Butylisolier-) Band so umwicklen, dass mehr als die Hälfte des
Butylisolierbandes überlappt wird.
Sollte die Kabelummantelung nicht richtig wasserundurchlässig sein, kann
`
J
das zu einer unmittelbaren Undichtigkeit führen. Stellen Sie sicher, dass das
Kabel dicht mit einem Klebeband geschützt ist.
Das wasserdichte Butylklebeband besteht aus Butylkautschuk und kann auf das Doppelte seiner normalen Länge ausgedehnt
`
werden.
Camera
Camera
Camera
System
System
AA
System
Überwachungsrichtung der Kamera einstellen
Schwenken
Objektivdrehung
`Anpassen der Überwachungsrichtung
Sie können die Richtung der Kamera nur einstellen, wenn die Kamera an der Decke befestigt ist.
Wobei das Drehen der Kamera nach links oder rechts Schwenken, die Einstellung der Neigung Neigen und
das Drehen des Objektivs um seine Achse Drehen genannt wird.
- Der maximale PAN-Bereich (drehen) liegt zwischen -5˚ und +5˚.
- Der ROTATE-Winkel (rotieren) ist entweder -90˚ oder +90˚.
- Der TILT-Gesamtbereich (schwenken) beträgt 67˚.
Eine Nutzung der Kamera außerhalb der in den Spezifikationen festgelegten Winkeln könnte zu einer Reflexion durch IR
`
J
oder einem unscharfen Bild führen.
`Anpassungsmethode
1. Nach der Installation der Kamera stellen Sie den Schwenkwinkel so ein, dass die Überwachungsrichtung
berücksichtigt wird.
2. Den horizontalen Winkel so festlegen, dass das Bild nicht umgedreht ist.
3. Stellen Sie danach den Neigungswinkel so ein, dass die Kamera die Überwachungsrichtung blickt.
Neigung
Einbau im Außenbereich (SNV-L6014RM)
Da bei einer Installation an der Gebäudeaußenseite aus dem Spalt vom extern angeschlossenen Kabel
Wasser auslaufen kann, wenn kein M12-Steckverbinder und M12-Kabel verwendet wird, muss im Hinblick
auf die Wasserfestigkeit und wie nachstehend gezeigt ein Butylkautschukband benutzt werden.
1. Schließen Sie den Strom, Audioein- und ausgang, LAN und andere
Kabel an.
2. Die schwarze Kabelummantelung (Bereich A) und den
Kabelanschlussbereich mit dem wasserundurchlässigen
(Butylisolier-) Band so umwicklen, dass mehr als die Hälfte des
Butylisolierbandes überlappt wird.
Sollte die Kabelummantelung nicht richtig wasserundurchlässig sein, kann
`
J
das zu einer unmittelbaren Undichtigkeit führen.
Stellen Sie sicher, dass das Kabel dicht mit einem Klebeband geschützt ist.
Das wasserdichte Butylklebeband besteht aus Butylkautschuk und kann auf das Doppelte seiner normalen Länge ausgedehnt
`
werden.
10_ installation & verbindung
Camera
Camera
Camera
System
System
AA
System
Page 11

RESET
EINLEGEN/HERAUSNEHMEN EINER MICRO SD-SPEICHERKARTE
RESET
Das Netzkabel von der Kamera abtrennen, bevor die Micro SD-Speicherkarte eingelegt wird.
`
J
Die Micro SD-Speicherkarte nicht mit Gewalt einlegen. Prüfen, ob die Karte richtig herum eingelegt wird.
`
Ansonsten kann die Micro SD-Speicherkarte beschädigt werden.
Bei Regen oder hoher Luftfeuchtigkeit empfiehlt es sich nicht, die Micro-SD-Karte einzulegen oder zu entfernen.
`
Der Ausbau des Produktdeckels sollte innerhalb von 5 Minuten abgeschlossen sein, sonst besteht die Gefahr der
`
Innenkondensation von Tau.
Einlegen einer Micro SD-Speicherkarte
Die Micro SD-Speicherkarte wie auf der Abbildung dargestellt in Pfeilrichtung drücken.
RESET
Wenn die Micro SD-Speicherkarte zu stark hineingedrückt wird, kann die Karte beim Loslassen unkontrolliert aus dem
`
J
Steckplatz herausschießen.
Bevor Sie Ihre microSD Speicherkarte entfernen, schalten Sie die Kamera aus oder gehen Sie zu <Speicherkapazität>,
`
schalten Sie das Gerät aus und drücken Sie das [Anwenden (
Wenn Sie die Kamera ausschalten oder die Micro SD-Speicherkarte mit Produktdaten entfernen, gehen Daten möglicherweise
`
verloren oder werden beschädigt.
)] Taste. (Seite 38)
SPEICHERKARTENINFORMATION (NICHT ENTHALTEN)
Was ist eine Speicherkarte?
Die Speicherkarte ist ein externes Datenspeichergerät, das entwickelt wurde, um einen völlig neuen Weg für
die Aufnahme und die Freigabe von Video-, Audio- und Textdaten mithilfe digitaler Geräte anzubieten.
Wählen Sie eine für Ihre Zwecke geeignete Speicherkarte
Die Kamera unterstützt Micro SD/SDHC/SDXC Speicherkarten. Sie können jedoch Kompabilitätsprobleme
abhängig vom Modell und der Marke der Speicherkarte erhalten.
Wir empfehlen Ihnen für Ihre Kamera die Verwendung einer Speicherkarte der folgenden Hersteller:
Micro SD/SDHC/SDXC Speicherkarte : Sandisk, Transcend
Für die Verwendung mit dieser Kamera werden Speicherkarten mit einer Speicherkapazität von 4 GB bis 32
GB empfohlen.
Die Wiedergabeleistung kann abhängig von der Geschwindigkeit der Speicherkarte beeinträchtigt werden,
verwenden Sie deshalb eine Hochgeschwindigkeits-Speicherkarte.
Es wird eine Nutzung von Speicherkarten mit einer Spezifikation der Klasse 10 + UHS-1 oder höher
empfohlen.
●● INSTALLATION & VERBINDUNG
Herausnehmen einer Micro SD-Speicherkarte
Drücken Sie leicht am ungeschützten Ende der Speicherkarte, wie im Schaubild zu sehen, um die
Speicherkarte aus dem Steckplatz auszuwerfen.
RESET
Komponenten der Speicherkarte
Kontakte
Micro SD/SDHC/SDXC
Deutsch _11
Page 12

installation & verbindung
RESETRESET
RESETRESET
RESETRESET
ANSCHLUSS AN ANDERE GERÄTE
PoE-Gerät
<SNV-L6013R>
<SNV-L6014RM>
Anschluss eines Kabelsteckers (SNV-L6014RM)
Schließen Sie den M12-Steckverbinder in der Bohrung des M12-Buchsensteckverbinders der Kamera an.
Diese Kamera nutzt D-kodierte Buchsenversionen.
`
M
PoE (Power over Ethernet) wird unterstützt.
`
Es wird empfohlen, einen abgeschirmten Netzwerkverbinder zu verwenden.
`
Diese Kamera an ein abgeschirmtes Netzwerkkabel (STP) anschließen.
`
J
Verwenden Sie dazu 4-polige D-kodierte externe Kabel-Steckerversionen, die den M12-
`
Vorgaben entsprechen.
Überprüfen, ob das PoE-Gerät richtig geerdet ist.
`
RX-
TX-
PoE-Gerät
Zur Herstellung einer Verbindung mithilfe des M12-RJ45-Konvertierungskabels
(SNV-L6014RM)
Den M12-Verbindungsstecker für das Konvertierungskabel mit dem Schlitz der M12-Steckbuchse Ihrer
Kamera verbinden.
Das M12-RJ45- Kabel wird gesondert verkauft.
`
M
TX+
RX+
Zur Energieversorgung und zur Vernetzung (SNV-L6013R)
Verbinden Sie eine Kamera mit der PoE-Ausrüstung.
Stellen Sie eine Verbindung mit einem PoE-Anschluss für einen PoE (Power over Ethernet) aktivierten Router her.
`
J
Nutzen Sie ein mit IEEE802.3af-Protokollen konformes PoE (Power over Ethernet).
`
Antrieb und Netzwerkbetrieb (SNV-L6014RM)
Verbinden Sie eine Kamera mit einer PoE-Ausrüstung oder verbinden Sie den M12-RJ45-Anschluss für das
Konvertierungskabel Ihrer Kamera mit einer PoE-Ausrüstung.
Die Verbindungsart wird entsprechend den Einbaubedingungen eines Benutzers variieren.
`
J
An einen PoE (Power over Ethernet) aktivierten PoE-Steckverbinder anschließen.
`
Der PoE (Power over Ethernet) muss mit dem IEEE802.3af-Protokoll harmonieren.
`
Es kann nur ein PoE-Gerät Tpe A, bei dem die Stromversorgung über das Datenstiftpaar 1, 2, 3, 6 erfolgt, verwendet werden.
Selbst bei Nutzung des M12-RJ45-Konvertierungskabels ist nur der Einsatz einer PoE-Ausrüstung Modus A möglich, die eine
`
Stromversorgung der Datenpaar-Pins 1, 2, 3, 6 sorgt.
12_ installation & verbindung
Page 13
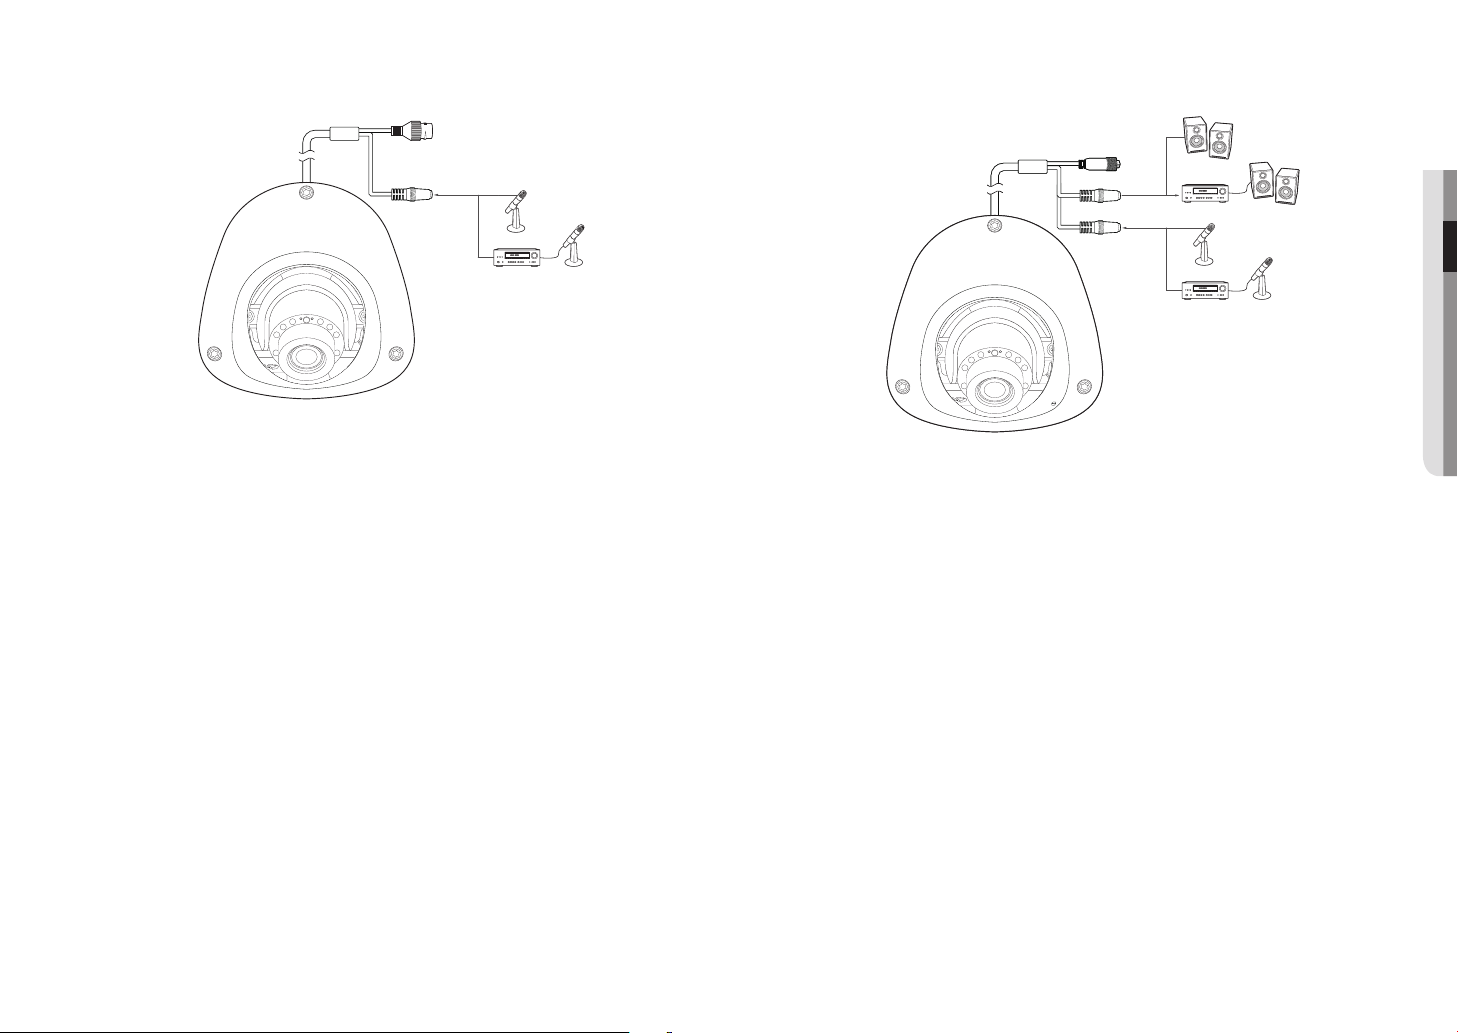
Audio E Blockdiagramm (SNV-L6013R)
RESET
RESETRESET
Mikrofon
MikrofonVerstärker
1. Verbinden Sie den AUDIO IN Anschluss der Kamera mit dem Mikrofon oder dem LINE OUT Anschluss des
Verstärkers, an den das Mikrofon angeschlossen ist.
2. Überprüfen Sie die Spezifikationen für den Audioeingang.
• Audio Codec
- Audioeingang : G.711 PCM (Bitrate: 64kbps / Abtastfrequenz: 8kHz), G.726 ADPCM (Bitrate: 16Kbps,
24Kbps, 32Kbps, 40Kbps / Abtastfrequenz: 8kHz)
• Vollduplex Audio
• Audio Ein : Eingang Mono Signalkabel (Max.2,4 Vpp)
Audio E/A Blockdiagramm (SNV-L6014RM)
Lautsprecher
Verstärker
1. Verbinden Sie den AUDIO IN Anschluss der Kamera mit dem Mikrofon oder dem LINE OUT Anschluss des
Verstärkers, an den das Mikrofon angeschlossen ist.
Aufgrund des integrierten Mikrofons können Sie das eingebaute Mikrofon statt eines externen Mikrofons nutzen.
`
M
2. Verbinden Sie den AUDIO OUT Anschluss der Kamera mit dem Lautsprecher oder dem LINE IN Anschluss
des Verstärkers, an den das Mikrofon angeschlossen ist.
3. Überprüfen Sie die Spezifikationen für den Audioeingang.
• Audio Codec
- Audioeingang : G.711 PCM (Bitrate: 64kbps / Abtastfrequenz: 8kHz), G.726 ADPCM (Bitrate: 16Kbps,
24Kbps, 32Kbps, 40Kbps / Abtastfrequenz: 8kHz)
- Audioausgang : G.711 PCM (Bitrate: 64kbps / Abtastfrequenz: 8kHz)
• Vollduplex Audio
• Audio Ein : Eingang Mono Signalkabel (Max.2,4 Vpp)
• Audio Aus : Ausgabe Mono Signalkabel (Max.2,4 Vpp)
• Line out Impedanz : 8Ω
Mikrofon
Verstärker
Lautsprecher
Mikrofon
●● INSTALLATION & VERBINDUNG
Deutsch _13
Page 14

netzwerkverbindung und konfiguration
RESET
RESET
RESET
netzwerkverbindung und konfiguration
Sie können die Netzwerkeinstellungen gemäß Ihrer Netzwerkkonfigurationen einrichten.
DIREKTES VERBINDEN DER KAMERA AN DAS LAN
Anschluss an die Kamera von einem lokalen PC im LAN
1. Starten sie einen Internetbrowser am lokalen PC.
2. Geben sie die IP-adresse der kamera in die adressenleiste des browsers ein.
Kamera
INTERNET
Kamera
Lokaler PC
<Lokales Netzwerk>
Ein Fern-PC in einem externen Internetausgang des LAN Netzwerks kann eventuell die im Intranet installierte Kamera nicht
`
M
ansteuern, wenn die Portweiterleitung nicht korrekt festgelegt oder eine Firewall eingestellt ist.
Wenden Sie sich in dem Fall zur Lösung des Problems an Ihren Netzwerkadministrator.
Bei dem IP-Installer können Sie das Anfangspasswort “4321” zum Einstellen der IP-Adresse, Subnet Mask, Gateway, HTTP
`
Port, VNP Port, IP-Typ verwenden. Nach Änderung der Nerzwerk- Schnittstelle greifen Sie zwecks besserer Sicherheit auf den
Webviewer zu und ändern Sie das Passwort.
Standardmäßig, wird die IP-Adresse vom DHCP-Server automatisch zugeteilt.
`
Wenn keinen DHCP-Server verfügbar ist, wird die IP-Adresse auf 192.168.1.100 gesetzt.
Verwenden Sie die IP-Adresse, um den IP-Installer zu ändern.
Weitere Informationen zur Verwendung des IP-Installers finden Sie unter „Einstellung der statischen IP“. (Seite 16)
Externer Fern-PC
DDNS-Server
(Datenzentrum, KOREA)
VERBINDEN DER KAMERA DIREKT MIT EINEM DHCP BASIERTEN DSL/
KABELMODEM
DSL/Kabel
Kamera
modem
1. Den Benutzer-PC direkt mit der Netzwerkkamera verbinden.
2. Führen Sie den IP-Installer aus und ändern Sie die IP-Adresse der Kamera, damit Sie den Webbrowser
Ihres Desktops mit dem Internet verbinden können.
Verwenden Sie den Webbrowser, um eine Verbindung mit dem Web Viewer herzustellen.
3.
4. Gehen Sie weiter zur [Setup] Seite.
5. Gehen Sie weiter zum [Network] – [DDNS] und konfigurieren Sie die DDNS-Einstellungen.
6. Zu [Basic] – [IP & Port] navigieren und den IP-Typ auf [DHCP] einstellen.
7. Verbinden Sie die Kamera, die von Ihrem PC entfernt wurde, direkt mit dem Modem.
8. Starten Sie die Kamera erneut.
Für die Konfiguration der DDNS-Einstellungen, siehe „DDNS”. (Seite 34)
`
M
Für das Registrieren der DDNS-Einstellungen, siehe „Registrierung unter DDNS vornehmen”. (Seite 35)
`
Siehe “IP & Port” für Information über das IP-Setup. (Seite 30)
`
INTERNET
DDNS-Server
(Datenzentrum, KOREA)
Externer Fern-PC
14_ netzwerkverbindung und konfiguration
Page 15

DIE KAMERA DIREKT MIT EINEM PPPoE-MODEM VERBINDEN
RESET
RESET
RESET
Kamera
PPPoE Modem
1. Den Benutzer-PC direkt mit der Netzwerkkamera verbinden.
2. Führen Sie den IP-Installer aus und ändern Sie die IP-Adresse der Kamera, damit Sie den Webbrowser
Ihres Desktops mit dem Internet verbinden können.
3. Verwenden Sie den Webbrowser, um eine Verbindung mit dem Web Viewer herzustellen.
4. Gehen Sie weiter zur [Setup] Seite.
5. Gehen Sie weiter zum [Network] – [DDNS] und konfigurieren Sie die DDNS-Einstellungen.
6. Zu [Basic] – [IP & Port]-Setup-Seite navigieren und den IP-Typ auf [PPPoE] sowie die ID und das
Passwort des Netzwerkdienstes eingeben.
7. Verbinden Sie die Kamera, die von Ihrem PC entfernt wurde, direkt mit dem Modem.
8. Starten Sie die Kamera erneut.
Für die Konfiguration der DDNS-Einstellungen, siehe „DDNS”. (Seite 34)
`
M
Für das Registrieren der DDNS-Einstellungen, siehe „Registrierung unter DDNS vornehmen”. (Seite 35)
`
Siehe “IP & Port” fur Information uber das IP-Setup. (Seite 30)
`
INTERNET
DDNS-Server
(Datenzentrum, KOREA)
Externer Fern-PC
VERBINDEN DER KAMERA AN EINEN BREITBAND-ROUTER ÜBER DAS
PPPoE/KABELMODEM
Das ist für eine kleine Netzwerkumgebung wie zum Beispiel Eigenheime, SOHO und gewöhnliche Geschäfte.
Kamera
PPPoE oder
Breitband-
Kabelmodem
Kamera
Lokaler PC
Router
Konfigurieren der Netzwerkeinstellungen des an einen Breitband-Router
Befolgen Sie die nachfolgenden Anweisungen zur Konfiguration der Netzwerkeinstellungen des an einen
Breitband-Router angeschlossenen lokalen PCs.
• Wählen Sie :
<Internet Protocol (TCP/IP)> <Properties> <Obtain an IP address automatically> oder <Use the
following IP address>.
• Befolgen Sie die nachfolgenden Anweisungen bei der Auswahl von <Use the following IP address>:
bsp1) Wenn die Adresse (LAN IP)des Breitband-Routers 192.168.1.1 ist
bsp2) Wenn die Adresse (LAN IP)des Breitband-Routers 192.168.0.1 ist
bsp3) Wenn die Adresse (LAN IP)des Breitband-Routers 192.168.xxx.1 ist
M
<Network> <Properties> <Local Area Connection> <General> <Properties>
IP-Adresse : 192.168.1.100
Subnetz Maske : 255.255.255.0
Standard Gateway : 192.168.1.1
IP-Adresse : 192.168.0.100
Subnetz Maske : 255.255.255.0
Standard Gateway : 192.168.0.1
IP-Adresse : 192.168.xxx.100
Subnetz Maske : 255.255.255.0
Standard Gateway : 192.168.xxx.1
Sehen Sie bezüglich der Adresse des Breitband-Routers in der Dokumentation des Gerätes nach.
`
Für weitere Informationen über due Portweiterleitung des Breitband Routers, bitte unter “Portbereichweiterleitung
`
Konfigurieren (Port Mapping)” nachschlagen. (Seite 18)
INTERNET
PPPoE oder
Kabelmodem
DDNS-Server
(Datenzentrum, KOREA)
Externer Fern-PC
●● NETZWERKVERBINDUNG UND KONFIGURATION
Deutsch _15
Page 16

netzwerkverbindung und konfiguration
SCHALTFLÄCHEN DES IP-INSTALLATIONSPROGRAMMS
a b c d e f g
h i
Bezeichnung Beschreibung
Modellname der verbundenen Kamera.
Device Name
a
Alias Diese Funktion steht zurzeit nicht zur Verfügung.
b
Mode
c
MAC(Ethernet) Address
d
IP Address
e
Protocol
f
URL
g
IPv4
h
Klicken Sie auf die Spalte, um die Liste nach Modellnamen zu sortieren.
Wenn Sie jedoch während einer Suche darauf klicken, wird die Suche gestoppt.
Für den aktuellen Verbindungsstatus des Netzwerkes wird entweder <Static>, <Dynamic>
oder <PPPoE> angezeigt.
Ethernetadresse der verbundenen Kamera.
Klicken Sie auf die Spalte, um die Liste nach Ethernetadressen zu sortieren.
Wenn Sie jedoch während einer Suche darauf klicken, wird die Suche gestoppt.
IP-Adresse.
Klicken Sie auf die Spalte, um die Liste nach IP-Adressen zu sortieren.
Wenn Sie jedoch während einer Suche darauf klicken, wird die Suche gestoppt.
Netzwerkeinstellungen der Kamera.
Standardmäßig ist „IPv4“ eingestellt.
Kameras mit der Einstellung „IPv6“ werden mit „IPv6“ angezeigt.
DDNS URL-Adresse für den externen Zugriff vom Internet aus.
Diese wird jedoch von der <IP Address> der Kamera ersetzt, wenn die DDNS-Registrierung
fehlschlug.
Sucht nach Kameras mit der Einstellung IPv4.
j k l m
Bezeichnung Beschreibung
IPv6
i
Search
j
Auto Set
k
Manual Set
l
Exit
m
Bei der Installation des IP-Installers nur das auf der Installations-CD gelieferte Installationsprogramm oder, falls vorhanden,
`
M
die neueste Version verwenden. Die neueste Softwareversion kann von der Samsung Electronics-Website heruntergeladen
werden.
Sucht nach Kameras mit der Einstellung IPv6.
Ist nur in einer IPv6 kompatiblen Umgebung aktiviert.
Sucht nach Kameras, die zurzeit mit dem Netzwerk verbunden sind.
Wenn weder IPv4 noch IPv6 aktiviert sind, wird diese Schaltfläche grau dargestellt.
Der IP-Installer konfiguriert die Netzwerkeinstellungen automatisch.
Sie müssen die Netzwerkeinstellungen manuell vornehmen.
Damit wird das IP-Installationsprogramm beendet.
EINSTELLUNG DER STATISCHEN IP
Manuelle Netzwerkeinstellung
Führen Sie die Datei <IP Installer_v2.XX.exe> aus, um die Kamerasuchliste anzuzeigen.
Anfangs werden sowohl [Auto Set] als auch [Manual Set] grau dargestellt.
Für gefundene Kameras mit der Einstellung IPv6 werden diese Schaltflächen grau dargestellt, da die Kameras diese Funktion
`
M
nicht unterstützen.
1. Wählen Sie eine Kamera aus der Suchliste.
Lesen Sie die MAC-Adresse der Kamera vom Etikett der
Kamera ab.
Die Schaltflächen [Auto Set] und [Manual Set] sind nun
aktiviert.
2. Klicken Sie auf [Manual Set].
Das Dialogfenster für die Manual Setting erscheint.
<IP Address>, <Subnet Mask>, <Gateway>, <HTTP Port>
und <VNP Port> der Kamera werden bei den voreingestellten Werten angezeigt.
3. Geben Sie die nötigen Informationen in dem Fenster
<Address> an.
• MAC (Ethernet) Address : Die auf dem Etikett der Kamera
abgedruckte MAC-Adresse wird automatisch angezeigt
und erfordert keine Einstellung durch den Benutzer.
Auf das IP bezogene Parameter lassen sich nur einstellen, wenn
`
M
DHCP nicht aktiviert ist.
16_ netzwerkverbindung und konfiguration
Page 17

Wenn Sie keinen Breitband-Router verwenden
Kontaktieren Sie ihren Netzwerkadministrator für die Einstellung der <IP Address>, <Subnet Mask> und für
das <Gateway>.
4. Geben Sie die nötigen Informationen in dem Fenster <Port>
an.
• HTTP Port : Zum Zugriff auf die Kamera über den
Internetbrowser. Standardmäßig ist der Wert 80 eingestellt.
• VNP Port : Wird verwendet, um die Videosignalübertragung
zu steuern. Der Standardwert lautet 4520.
5. Geben Sie das Kennwort ein.
Geben Sie das Passwort des „admin“ Kontos für den Zugriff
auf die Kamera ein.
Es wird empfohlen, dass Sie für Ihr Passwort aus Sicherheitsgründen eine Kombination aus Zahlen, alphabetischen Groß-
`
J
und Kleinbuchstaben und Sonderzeichen verwenden.
Wenn das Passwort geändert werde soll, bitte unter „Administrator-Kennwort Ändern“ im Benutzer Setup nachschlagen.
`
(Seite 29)
6. Klicken Sie auf [OK].
Die manuelle Netzwerkeinstellung ist beendet.
Bei Verwendung eines Breitband-Routers
• IP Address :
Bereich des Breitband-Routers befindet.
bsp) 192.168.1.2~254, 192.168.0.2~254,
• Subnet Mask : Die <Subnet Mask> des Breitband-Routers ist
ebenfalls die <Subnet Mask> der Kamera.
• Gateway : Die <Local IP Address> des Breitband-Routers ist
das <Gateway> der Kamera.
M
Geben Sie eine Adresse ein, die sich im IP-
192.168.XXX.2~254
Die Netzwerkeinstellungen können sich je nach verbundenem Breitband-
`
Router modell unterscheiden.
Für mehr Informationen, lesen Sie im Benutzerhandbuch des Routers nach.
Für weitere Informationen über due Portweiterleitung des Breitband Routers, bitte unter “Portbereichweiterleitung
`
Konfigurieren (Port Mapping)” nachschlagen.
(Seite 18)
Wenn mehrere Kameras mit dem Breitband-Router verbunden sind
Konfigurieren Sie die IP- und Port-Einstellungen für jede Kamera einzeln und in Übereinstimmung mit den
anderen.
bsp)
Kategorie Kamera #1 Kamera #2
IP-Einstellungen
Port-Einstellungen
Wenn der Wert des <HTTP port> nicht 80 ist, müssen Sie die <Port>-Nummer in die Internetadresszeile eingeben, bevor
`
M
Sie auf die Kamera zugreifen können.
bsp) http://IP-Adresse: HTTP-Port
http://192.168.1.100:8080
IP Address
Subnet Mask
Gateway
HTTP Port
VNP Port
192.168.1.100
255.255.255.0
192.168.1.1
8080
4520
192.168.1.101
255.255.255.0
192.168.1.1
8081
4521
Automatische Netzwerkeinstellung
Führen Sie die Datei <IP Installer_v2.XX.exe> aus, um die Kamerasuchliste anzuzeigen.
Anfangs werden sowohl [Auto Set] als auch [Manual Set] grau dargestellt.
Für gefundene Kameras mit der Einstellung IPv6 werden diese Schaltflächen grau dargestellt, da die Kameras diese Funktion
`
M
nicht unterstützen.
1.
Wählen Sie eine Kamera aus der Suchliste.
Lesen Sie die MAC-Adresse der Kamera vom Etikett der
Kamera ab.
Die Schaltflächen [Auto Set] und [Manual Set] sind nun
aktiviert.
2. Klicken Sie auf [Auto Set].
Das Dialogfenster für die Auto Setting erscheint.
Die <IP Address>, <Subnet Mask> und das <Gateway>
werden automatisch eingerichtet.
3.
Geben Sie das Kennwort ein.
Geben Sie das Passwort des “admin” Kontos für den Zugriff auf
die Kamera ein.
●● NETZWERKVERBINDUNG UND KONFIGURATION
Es wird empfohlen, dass Sie für Ihr Passwort aus Sicherheitsgründen
`
J
eine Kombination aus Zahlen, alphabetischen Groß- und
Kleinbuchstaben und Sonderzeichen verwenden.
Wenn das Passwort geändert werde soll, bitte unter “Administrator-
`
Kennwort Ändern” im Benutzer Setup nachschlagen. (Seite 29)
4. Klicken Sie auf [OK].
Die automatische Netzwerkeinstellung ist beendet.
Deutsch _17
Page 18
netzwerkverbindung und konfiguration
EINSTELLUNG DER DYNAMISCHEN IP
Einstellung der dynamischen IP-Umgebung
• Beispiel einer dynamischen IP-Umgebung
- Wenn einem Breitband-Router, mit dem Kameras verbunden sind, eine IP-Adresse von einem DHCP-
Server zugewiesen wird
- Wenn die Kamera direkt mit einem xDSL- oder Kabelmodem mithilfe eines DHCP-Protokolls verbunden
wird
- Wenn die IP-Adressen von dem internen DHCP-Server über eine LAN-Verbindung zugewiesen werden
Die dynamische IP überprüfen
1. Führen Sie den IP-Installer auf dem lokalen Computer des
Benutzers aus.
Kameras mit <Dynamic IP> werden in der Liste angezeigt.
2. Wählen Sie eine Kamera aus den Suchergebnissen aus.
3. Klicken Sie auf die Schaltfläche [Manual Set] und prüfen Sie
die <Dynamic IP> der Kamera.
Wenn die Markierung von <DHCP>, gelöscht wird, kann IP
auf <Static> eingestellt werden.
PORTBEREICHWEITERLEITUNG KONFIGURIEREN (PORT MAPPING)
Wenn Sie einen Breitband-Router mit verbundener Kamera installiert haben, müssen Sie die Weiterleitung des
Portbereichs für den Breitband-Router einstellen, damit auch ein entfernter Computer auf die verbundene Kamera
zugreifen kann.
Manuelle Portbereichweiterleitung
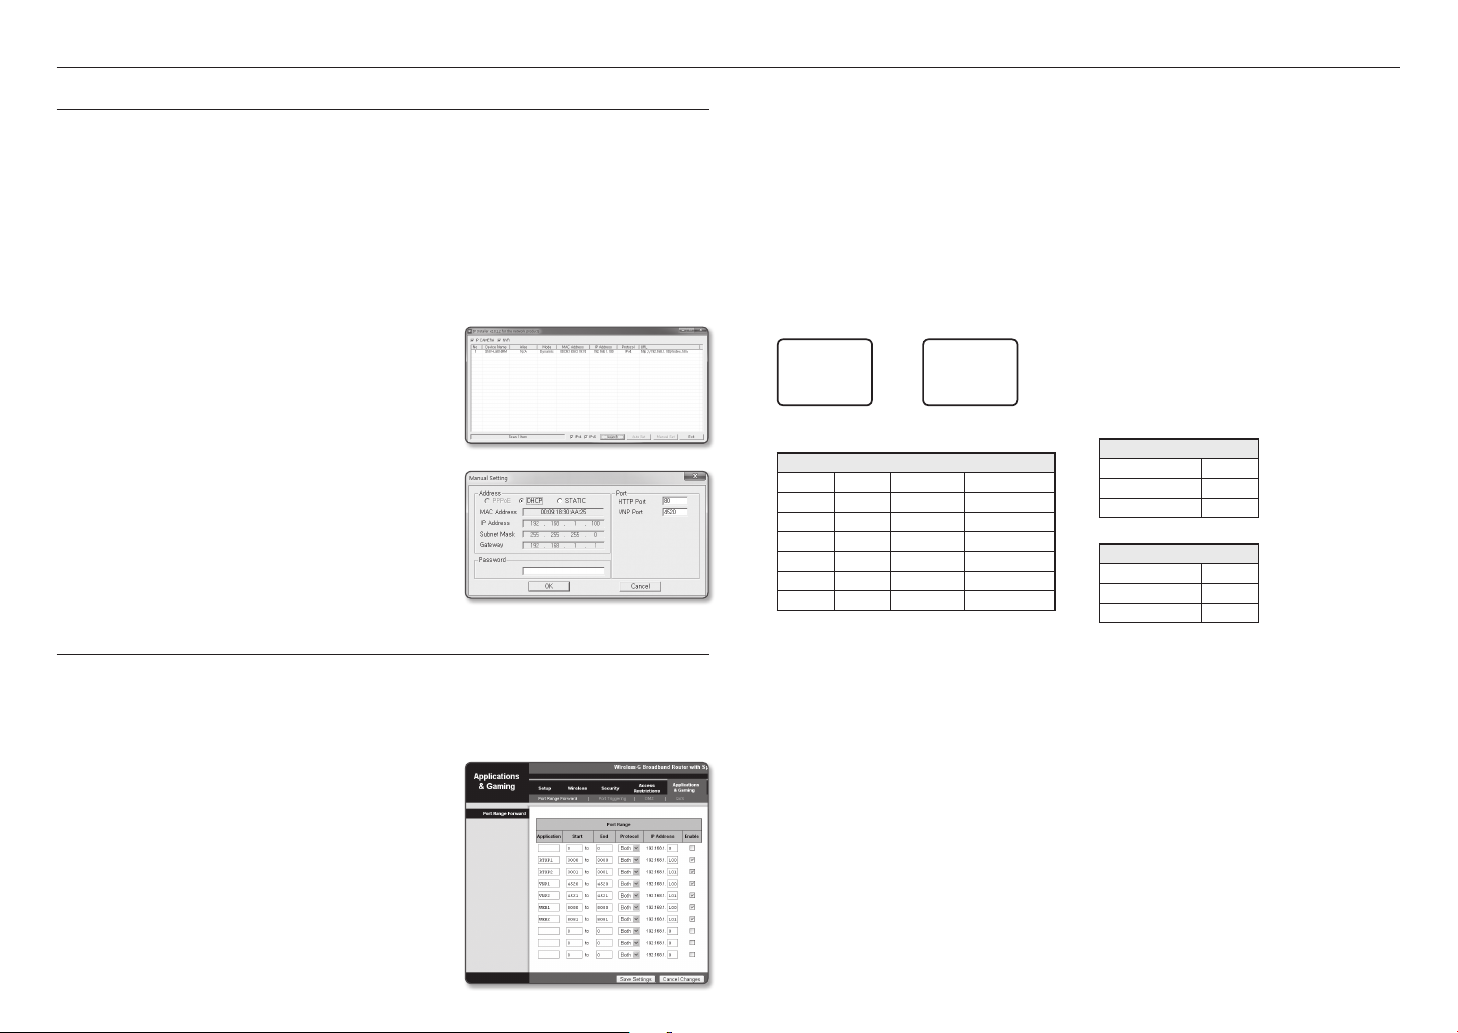
1. Wählen Sie aus dem Einstellungsmenü des Breitband-Routers
<Applications & Gaming> - <Port Range Forward>.
Für die Einstellung der Portbereichweiterleitung eines
Breitband-Routers von einem anderen Anbieter lesen Sie die
Bedienungsanleitung dieses Breitband-Routers.
2. Wählen Sie <TCP> und <UDP Port> für jede Kamera, die
mit dem Breitband-Router verbunden ist.
Jede im Router eingerichtete Portnummer muss der unter
<Setup> - <Basic> - <IP & Port> im Web Viewer Menü der
Kamera festgelegten Portnummer entsprechen.
3.
Wenn Sie fertig sind, klicken Sie auf [Save Settings].
Ihre Einstellungen werden gespeichert.
Die oben Beispielanweisungen basieren auf dem CISCO’s Breitband-Router.
`
M
Die Netzwerkeinstellungen können sich je nach Breitband-Routermodell unterscheiden.
`
Für mehr Informationen, lesen Sie im Benutzerhandbuch des Routers nach.
Einstellen des Portweiterleitungsbereichs für mehrere Netzwerkkameras
• Sie können auf dem Breitband-Router-Gerät durch seine Webseitekonfiguration Portweiterleitung-Richlinien
setzen.
• Ein Benutzer kann jeden Port durch Verwendung des Kamera-Einstellungsbildschirms ändern.
Wenn Kamera 1 und Kamera 2 an einen Router angeschlossen sind :
Benutzer Internet
Start Ende Protokoll IP-Adresse
3000 3000 TCP/UDP 192.168.1.100
3001 3001 TCP/UDP 192.168.1.101
4520 4520 TCP/UDP 192.168.1.100
4521 4521 TCP/UDP 192.168.1.101
8080 8080 TCP/UDP 192.168.1.100
8081 8081 TCP/UDP 192.168.1.101
`
M
Breitband-Router
Die Port-Weiterleitung lässt sich ohne zusätzliche Router-Einstellung vornehmen, wenn der Router die UPnP (Universal Plug
and Play) Funktion unterstützt.
Nach Anschließen der Netzwerkkamera, <Quick connect> von <Samsung DynDNS> zu <Ein> im “Setup Network
DDNS” Menü festlegen.
Kamera1 (192.168.1.100)
HTTP-port 8080
Geräteport 4520
RTSP-port 3000
Kamera2 (192.168.1.101)
HTTP-port 8081
Geräteport 4521
RTSP-port 3001
18_ netzwerkverbindung und konfiguration
Page 19

VON EINEM GEMEINSAMEN LOKALEN PC EINE VERBINDUNG ZU DER
KAMERA HERSTELLEN
1. Führen den IP-Installer aus.
Es wird nach verbundenen Kameras gesucht und eine
entsprechende Liste angezeigt.
2. Doppelklicken Sie auf eine Kamera, um auf sie zuzugreifen.
Der Internetbrowser wird gestartet und
zu der Kamera her.
Sie können ebenfalls auf die Kamera zugreifen, indem Sie die IP-Adresse der gefundenen Kamera in der Adresszeile des
`
M
Internetbrowsers eingeben.
stellt eine Verbindung
VON EINEM ENTFERNTEN PC EINE VERBINDUNG ZU DER KAMERA
ÜBER DAS INTERNET HERSTELLEN
Da die Verwendung des IP-Installers auf einem Remotecomputer der nicht im Netzwerk-Cluster des BreitbandRoutersverbunden ist, nicht zugelassen wird, können Benutzer auf die Kameras innerhalb des Breitband-RouterNetzwerks über die DDNS URL der Kamera zugreifen.
1. Bevor Sie auf eine Kamera im Breitband-Routernetzwerk zugreifen können, sollten Sie die
Portbereichweiterleitung für den Breitband-Router eingestellt haben.
2. Starten Sie den Internetbrowser auf dem entfernten Computer und geben Sie die DDNS-URL der Kamera
oder die IP-Adresse des Breitband-Routers in die Adresszeile ein.
bsp) http://www.samsungipolis.com/Produkt ID
Für das Registrieren der DDNS-Einstellungen, siehe „Registrierung unter DDNS vornehmen”. (Seite 35)
`
M
●● NETZWERKVERBINDUNG UND KONFIGURATION
Deutsch _19
Page 20

web viewer
VERBINDUNG MIT DER KAMERA
Sie würden, normalerweise
1. Starten Sie den Internetbrowser.
Die IP-Adresse der Kamera in die Adresszeile eingeben.
2.
bsp)
IP Addresse (IPv4) : 192.168.1.100
•
http://192.168.1.100
- Der Anmeldedialog sollte erscheinen.
IP Adresse (IPv6) : 2001:230:abcd: ffff:0000:0000:ffff:1111
•
http://[2001:230:abcd:ffff:0000:0000:ffff:1111]
Anmeldedialog sollte erscheinen.
Falls die Nummer des HTTP-Ports nicht 80 ist
1. Starten Sie den Internetbrowser.
2. Geben Sie in die Adressleiste des Browsers die IP-Adresse und die HTTP-Portnummer ein.
bsp)
IP Addresse: 192.168.1.100:HTTP-Portnummer(8080)
http://192.168.1.100:8080
- Der Anmeldedialog sollte erscheinen.
URL Benutzen
1. Starten Sie den Internetbrowser.
Geben Sie in die Adressleiste des Browsers die DDNS-URL-Adresse der Kamera ein.
2.
bsp
) URL-Addresse: http://www.samsungipolis.com/Produkt ID
- Der Anmeldedialog sollte erscheinen.
Die Netzwerkverbindung ist in der nur LAN-Umgebung deaktiviert.
`
J
Verbindung über UPnP
1. Das Kunden- oder Betriebssystem zur Unterstützung des UPnP-Protokolls ausführen.
2. Für die Suche den Kameranamen anklicken.
Den Kameranamen, der aus dem Netzwerkmenü gesucht wurde, im Windows Betriebssystem anklicken.
- Das Fenster Anmelden wird angezeigt.
- Der
Verbindung über Bonjour
1. Das Kunden- oder Betriebssystem zur Unterstützung des Bonjour- Protokolls ausführen.
2. Für die Suche den Kameranamen anklicken.
Beim Mac-Betriebssystem den Kameranamen anklicken, der von der Bonjour Registerkarte von Safari
gesucht wurde.
- Das Fenster Anmelden wird angezeigt.
So überprüfen Sie die DDNS-Adresse
Wenn die Kamera direkt mit dem DHCP-Kabelmodem, DSL-Modem oder PPPoE-Modem verbunden ist,
wird die IP-Adresse Ihres Netzwerks jedes Mal geändert, wenn Sie versuchen eine Verbindung mit dem ISP
(Internetserviceanbieter) -Server aufzunehmen.
In diesem Fall werden Sie nicht über die durch DDNS geänderte IP-Adresse informiert.
Sobald Sie ein auf dynamischer IP basierendes Gerät beim DDNS-Server registrieren, können Sie die
geänderte IP-Adresse einfach überprüfen, wenn Sie versuchen auf das Gerät zuzugreifen.
Um das Gerät auf dem <DDNS> Server zu registrieren, besuchen Sie bitte www.samsungipolis.com,
registrieren Sie zuerst Ihr Gerät stellen Sie anschließen im Net Viewer unter <Network> - <DDNS> auf
<Samsung DynDNS> und geben Sie ebenfalls die <Produkt-ID> ein, die Sie bei der DDNS-Registrierung
verwendet haben.
PASSWORTEINSTELLUNG
Beim ersten Zugriff auf das Produkt, müssen Sie das AnmeldePasswort registrieren.
Beim Erscheinen des Fensters “Passwort ändern”, ein neues
Passwort eingeben.
Für ein neues Passwort mit 8 bis 9 Ziffern müssen Sie mindestens
`
J
drei der Folgenden verwenden: Groß-/Kleinbuchstaben, Zahlen und
Sonderzeichen. Für ein Passwort mit 10 bis 15 Ziffern müssen Sie
mindestens zwei dieser Zeichentypen verwenden.
Zulässige Sonderzeichen sind. : ~`!@#$%^*()_-+=|{}[].?/
-
Zur erhöhten Sicherheit wird empfohlen, nicht die gleichen Zeichen
`
oder aufeinanderfolgende Eingaben der Tastatur zu wiederholen.
Falls Sie Ihr Passwort vergessen haben, können Sie die Schaltfläche [RESET] drücken und das Produkt initialisieren.
`
Verwenden Sie ein Memo-Pad oder merken Sie sich Ihr Passwort.
20_ web viewer
Page 21

ANMELDEN
Immer, wenn Sie auf die Kamera zugreifen, wird das Anmeldefenster angezeigt.
Geben Sie den Benutzernamen und das Passwort ein, um auf die Kamera zuzugreifen.
1. Geben Sie „admin“ in das <User name> Eingabefeld ein.
Die Administrator ID, „admin“, kann nicht verändert werden.
2. Geben Sie das Passwort in dem Eingabefeld <Password>
ein.
3. Klicken Sie auf [OK].
Wenn Sie sich erfolgreich angemeldet haben, werden Sie den
Live Viewer Bildschirm sehen.
Achten Sie beim Zugriff auf den Kamera-Webviewer besonders auf
`
J
die Sicherheit, indem Sie nachprüfen ob die Bilddaten verschlüsselt sind.
Wenn Sie die Option „Remember my credentials“ wählen, nachdem Ihre Eingabe beendet ist, werden Sie automatisch
`
M
angemeldet ohne zukünftig aufgefordert zu werden, Ihre Anmeldedaten einzugeben.
Die beste Bildqualität wird erreicht, wenn die Bildschirmgröße auf 100% eingestellt ist. Reduzierung des Bildseitenverhältnis
`
kann das Bild an den Rändern abschneiden.
INSTALLATION DES STW WebViewer PLUG-INS
Wenn zum ersten Mal eine Verbindung zu einer Kamera hergestellt wird, sehen Sie die Installationsmeldung.
Installieren Sie anschließend das erforderliche Web Viewer Plug-in, um auf die Kamera zugreifen und die
Videobilder der Kamera in Echtzeit zu steuern.
1. Wird zum ersten Mal auf die Seite Überwachen zugegriffen,
wird die Seite Installation angezeigt. [Click Here] anklicken,
um mit der Installation zu beginnen.
Wenn der Status des Herunterladens der Plugin-Datei zur Installation im Internetbrowser bei 99% abgebrochen wird, dann
`
J
versuchen Sie es erneut nachdem “SmartScreen Filter freigeben” in “Werkzeu SmartScreen Filter” gewählt wurde.
5. [OK] anklicken.
Die alte Version des Web Viewer-Plugins ist gelöscht.
6. [Install] anklicken, um mit der Installation des Web Viewer-
Plugins zu beginnen.
7. [Finish] anklicken.
Die STW Web Viewer-Plugin-Installation ist abgeschlossen.
Wenn Sie nach der Installation des STWWebviewer-Plug-Ins bei
`
J
Ihrem Internet-Explorer zu dem Installationsbildschirm gehen, prüfen
Sie, ob webviewer_activexplugin_lib.control in dem Menü “Werkzeug
Zusätzliches Funktionsmanagement” “Activated” ist.
Falls nicht, und wenn es ein bleibendes Problem gibt, dann wählen
Sie “Werkzeug Internet-Optionen Allgemein” und löschen Sie
alle Such-Aufzeichnungen.
●● WEB VIEWER
2. [Run] im Meldungsfenster anklicken.
3. [Yes] anklicken, wenn das Hinweisfenster angibt, dass alle
Browserfenster geschlossen werden.
Schritt 4 und 5 werden übersprungen, falls das Web Viewer-Plugin
`
M
installiert ist.
4. Wenn die alte Version des Web Viewer-Plugins installiert
ist, wird auf einem Hinweisfenster angezeigt, dass die alte
Version gelöscht werden wird.
[Yes] anklicken, wenn das Hinweisfenster angezeigt wird.
Deutsch _21
Page 22

web viewer
DEN LIVE-BILDSCHIRM BENUTZEN
a b c d e
f
g
h
i
j
k
l
m
Bezeichnung Beschreibung
Überwachen Gehen Sie zum Überwachungsbildschirm.
a
Wiedergabe
b
Setup Gehen Sie zum Setup-Bildschirm.
c
Profilzugriffinformation Sie können die Profilinformation lesen.
d
Viewer-Bildschirm
e
Profiltyp
f
Bildschirm Optimierung Die Größe der Videobilder der Kamera wird auf die Webbrowser Größe umgeschaltet.
g
Navigieren Sie zum Bildschirm, in dem Sie nach der auf Ihrer Micro SD Speicherkarte oder NAS
gespeicherten Videoaufnahme suchen können.
Gibt das Live-Video auf dem Bildschirm wieder.
Sie können das Mausrad verwenden, um den Digitalzoom auf dem Viewer Bildschirm zu
`
aktivieren.
Sie können einen Profiltyp in <Video Profil> im <Basic> Setupmenü auswählen.
Wenn eine Verbindung zum Web Viewer besteht, werden die Informationen des gerade
`
verwendeten Profils angezeigt.
Nachbilder lassen sich auf dem Bildschirm unter folgenden Bedingungen angezeigt werden,
J
wenn das Video in der Überwachungsseite abgespielt wird:
Die Auflösung wurde aufgrund einer Profiländerung geändert.
-
Eingehende Daten werden bei einer Profiländerung durch eine Netzwerkverzögerung
-
verlangsamt.
Die Fenstergröße und -Position vom Webbrowser wurden geändert.
-
Bezeichnung Beschreibung
Fixiert die Auflösung
h
Vollbild Schaltet das aktuelle Videobild auf die maximale Größe des Monitors um.
i
Aufnahme Speichert den Snapshot als .jpg-Bilddatei.
j
Manuelle Aufnahme Nutzer können Videos selbst auf einem PC speichern.
k
Audio/Mikrofon
l
Steuerelement
Kontextmenü verbergen Das Menüsymbol des Kontextmenüs der linken Ecke verschwindet.
m
Unabhängig von der in der Kamera eingestellten Auflösung, wird die Auflösung auf 640x480
eingestellt. Noch einmal drücken, um zur Standardauflösung zurückzukehren.
Das Aktivieren von Audio und Mikrofon regelt die Lautstärke.
Nur die Lautstärke lässt sich regeln.
`
Das Mikrofon gilt nur für SNV-L6014RM.
`
Den Schnappschuss aufnehmen
1. Klicken Sie [Aufnahme ( )] auf die Szene um aufzunehmen.
2. Wird ein aufgenommenes Video gespeichert, wird eine Meldung angezeigt.
Bei Verwendung des Internet Explorers wird das aufgenommene Video gespeichert in Arbeitsplatz/Eigene
Dokumente/Bilder.
Unter Mac OS wird die Datei gespeichert in “~/Bilder” oder “/Benutzer/{Benutzerkonto}/Bilder/”.
Wenn eine Videounterbrechung bei der Aufnahme eines Bildes mit dem IE8 auf einem Rechner mit Windows 7
`
M
Betriebssystem festgestellt wird, unter “Extras – Internetoptionen – Sicherheit” die Markierung bei “Geschützten Modus
aktivieren” entfernen.
Wird der Bildschirm nicht durch den IE Browser in Windows 7 oder 8 aufgezeichnet, dann führen Sie den IE Browser mit den
`
Administrationsrechten aus.
So nehmen Sie Videos manuell auf
1. Auf [Manuelle Aufnahme ( )].
2. Um das Aufnehmen zu beenden, erneut auf [Manuelle Aufnahme (
Kann manuell am PC in .avi-Dateiformat aufgenommene Videos speichern. Legen Sie einen Pfad fest und speichern Sie Ihre
`
M
Videos.
)] drücken.
22_ web viewer
Page 23

An den Vollbildschirm anpassen
1. Klicken Sie den [Vollbild ( )] Schalter.
2. Dadurch wird der Viewer in den Vollbildschirmmodus gebracht.
3. Um den Vollbildschirmmodus zu verlassen drücken Sie [Esc] auf der Tastatur.
Bei den Internet Explorer und Google Chrome Browsern kann auf den Vollbild Modus umgeschaltet werden.
`
M
Anwendung von Audio
1.
Klicken Sie auf das [Audio ( )] Symbol, um die Audio Kommunikation einzuschalten.
2. Verwenden Sie die [ ] Leiste, um die Lautstärke einzustellen.
Gibt es während der Betriebnahme beim Einstecken und Herausziehen der Audiobuchse keinen Ton, dann klicken Sie auf das
`
M
[Audio (
)] Symbol, um Audio erneut zu aktivieren.
Anwendung des Mikrofons (SNV-L6014RM)
Klicken Sie auf das [Mikrofon ( )] Symbol, um das Mikrofon einzuschalten.
WIEDERGABE DES AUFGENOMMENEN VIDEOS
Bevor Sie ein Video wiedergeben können, müssen Sie die Aufnahmeeinstellungen konfigurieren. Für ausführliche Anweisungen
`
M
schlagen Sie bitte unter „Speicherkapazität“ nach. (Seite 38)
Name des Ereignissuche-Bilds und seine Funktion
a
b
c
Bezeichnung Beschreibung
Einstellung des
a
Suchbereichs
Einstellung Ereignissuche Stellen Sie die Ereignistype so ein, dass innerhalb des Suchzeitraums gesucht wird.
b
Stellen Sie das Suchdatum und den Zeitbereich für alle auf Ihrer Micro SD Speicherkarte
oder NAS gespeicherten Daten ein.
●● WEB VIEWER
Ereignissuche Ereignissuche ausführen.
c
Deutsch _23
Page 24

web viewer
Inhaltswiedergabe nach „Suche nach Ereignis“
1. Klicken Sie auf die Taste [Playback ( )].
2. Legen Sie die Start- und Endzeit Ihrer Suche fest.
3. Einen Ereignistyp für die Suche innerhalb des angegebenen
Zeitraums auswählen.
Klicken Sie auf die Taste [Ereignissuche].
4.
Die Suchresultate werden in der Liste angezeigt.
Wenn während einem Suchzeitraum mehr als 800 Ereignisse
`
M
aufgezeichnet sind, wird Ihre Suche bis zu das Datum des 800.
aufgezeichnete Ereignis begrenzt.
Wenn beispielsweise ein Suchzeitraum zwischen 10. und 15. Tag des
Monats liegt, und zwischen 10. und 11.Tag mehr als 800 Ereignisse aufgezeichnet wurden, wird Ihre Suche bis zum 11. Tag mit
eine Summe von 800 Ereignisse begrenzt, und Ereignisse danach (von 12. Tag) werden nicht gefunden.
5. Wählen Sie einen Datenpunkt in der Suchliste zum Abspielen.
6. Klicken Sie auf die Taste [Wiedergabe (
7. Um die Wiedergabe anzuhalten, drücken Sie auf [Anhalten
)].
(
8.
Um zum Suchbildschirm zurückzukehren drücken Sie
[Beenden (
)].
)].
Name des Zeitsuch-Bilds und seine Funktion
b
c
d
e
f
g
h
i
a
Bezeichnung Beschreibung
Zeitleiste Die Wiedergabe des Abschnitts im vorgegebenen Zeitraum erfolgt mit der Zeitleiste.
a
Einstellung Suchdatum
b
Sprechanlage
c
Bildschirmoptimierung Das Kamerabild wird so umgewandelt, dass es in das Web-Browser-Fenster passt.
d
Fixiert die Auflösung
e
Aufnahme Das aktuelle Bild wird als .jpg-Bilddatei gespeichert.
f
Vollbild
g
Videoinformationen Die Zeitdaten des wiedergegebenen Videos werden am Bildschirm angezeigt.
h
Sicherung
i
Das Suchdatum wird mit dem Kalender eingestellt.
Falls es auch Daten gibt, die am selben Tag auf Ihrer Micro SD Speicherkarte oder NAS
`
gespeichert wurden, werden sie im Kalender als Kästchen markiert.
Um sich ein Tonsignal (wenn vorhanden) im aufgenommenen Video anzuhören, aktivieren
Sie das Signal-Icon, wenn Sie das Video vorspielen.
Unabhängig von der in der Kamera eingestellten Auflösung, wird die Auflösung auf
800x600 eingestellt. Noch einmal drücken, um zur Standardauflösung zurückzukehren.
Das aktuelle Bild wird so umgewandelt, dass die maximale Monitorgroße ausgeschopft
wird.
Stellen Sie das gewünschte Datum zur Erstellung einer Sicherungskopie für alle Videodaten
ein, die auf Ihrer Micro SD Speicherkarte oder NAS gespeichert sind.
Er lässt sich für Micro-SD-Speicherkarte auf bis zu 5 Minuten und für NAS auf bis zu 30
`
Minuten einstellen.
24_ web viewer
Page 25

Wiedergabe nach „Suche nach Zeit“
1. Auf [Time Search ( )] klicken.
2. Ein gewünschtes Datum im Kalender anklicken.
Das an diesem Tag aufgezeichnete Video wird
wiedergegeben.
3. Wenn die Video Wiedergabe angehalten ist, wählen Sie eine
Zeit aus und klicken Sie auf [Wiedergabe (
Das Video wird von der angegebenen Zeit an wiedergegeben.
4. Während das Video wiedergegeben wird, wird die
Aufnahmezeit für das aktuelle Video angezeigt.
5. Sucht nach dem Video vorwärts oder rückwärts und steuert die Wiedergabegeschwindigkeit.
- Das Abspielintervall steuernl
: Diese Schaltfläche wählen, um ein (1) Bild vorzurücken.
: Diese Schaltfläche wählen, um eine (1) Sekunde zurückzusetzen.
- Einstellen der Wiedergabegeschwindigkeit
Wenn ) ausgewählt wird, schaltet die Schaltfläche zwischen x1, x2, x4, x8, und die
Wiedergabegeschwindigkeit steigt entsprechend.
Bei Auswahl der Schaltfläche
wobei diese stufenweise verlangsamt wird. Danach kehrt die Schnell-Wiedergabe in den Normalbetrieb
zurück und die Rückwärts-Abspielgeschwindigkeit nimmt zu.
- Einstellen der Wiedergaberichtung
Wenn die Schaltfläche ) mit der Wiedergabegeschwindigkeit angezeigt, das Video wird vorwärts
wiedergegeben; wenn hingegen die Schaltfläche ( mit der Wiedergabegeschwindigkeit angezeigt wird,
wird das Video rückwärts wiedergegeben.
- Wie die Zeitleiste eingestellt werden kann
Wenn Sie die
Taste drücken, können Sie eine größere Auswahl an Zeiten und gewünschten Zeiten einfacher
auswählen.
6.
Geht [Zeitleiste
Die Zeit mit einer normalen Aufnahmedatei wird in blau markiert; die Zeit mit der Ereignisaufnahme wird rot
markiert.
Taste drücken, können die Details der Zeitleiste angezeigt werden.Wenn Sie die
( )
] zu dem gewünschten Zeitpunkt des Videos bevor die Wiedergabe startet.
(
wird die Abspielgeschwindigkeit um -1x, -2x, -4x, und -8x verringert,
)].
Zum Abspielen des Sicherungsvideos
Die gesicherten Bilder sind im AVI-Format gespeichert. Gom Player, VLC Player und Windows Media Player
werden zur Medienwiedergabe empfohlen, da sie mit diesem Format kompatibel sind.
Laden Sie bei Verwendung des Windows Media Players den neuesten Codec von www.windows7codecs.com herunter und
`
M
installieren Sie ihn vor der Anwendung.
Abspielen einer AVI-Datei
(1) Micro-Speicherkarte
1. Entfernen Sie die Micro SD-Karte von der Kamera.
Vor dem Entfernen der Micro SD-Karte das <Gerät> bei <Aus> in dem “Setup Event Speicherkapazität” Menü
`
J
festlegen.
2. Einfügen der Micro SD-Karte in den PC.
3. Abspielen der AVI-Datei in dem “\ch00\img\YYYY_mm_DD\
AVI” Verzeichnis, unter Verwendung einer Medienwiedergabe.
Ein Dateiname beginnt im Format “001_YYYYMMDD_HHMMSS.
`
M
avi” und die Dateinummer steigt jeweils um eins an.
YYYYMMDD_HHMMSS weist auf die Startzeit der Datenspeicherung
hin.
Bei “001_YYYYMMDD_HHMMSS.smi” handelt es sich um eine
`
Beschriftungsdatei und sie kann angesehen werden, wenn sie sich
im selben Verzeichnis, als die zugehörige AVI-Datei befindet.
Die max. Aufnahmezeit pro AVI-Datei beträgt 5 Minuten.
`
Falls beschädigt, können die Daten auf der Micro SD-Speicherkarte
`
nicht mehr auf Web-Ansicht [Playback] vorgespielt werden.
●● WEB VIEWER
Das herausgesuchte Video sichern.
1. Während der Wiedergabe in der zu sichernden Szene auf
[ ] klicken.
Das Planungsfenster zum Einstellen der Start- und Endzeit des
Backups erscheint.
2. Klicken Sie auf die Schaltfläche [ ].
Das Speichern unter Fenster erscheint.
3. Bestätigen Sie den Speicherpfad und klicken Sie auf die [Save]
Schaltfläche.
Der Bildschirmschnappschuss wird im festgelegten Pfad
gesichert.
Deutsch _25
Page 26

web viewer
(2) NAS (Network-Attached Storage)
1. Zugriff: mittels \\<ip address>\ im Windowsfenster.
ex)\\192.168.20.31\defaultfolder\ch01\img\2013_07_02\AVI
2. Zu <Computer> <Network drive connection> 1
eingeben.
3. Mit NAS verbunden.
Die Verzeichnisstruktur entspricht derjenigen einer Micro SDSpeicherkarte.
Ein Dateiname beginnt im Format “001_YYYYMMDD_HHMMSS.
`
M
avi” und die Dateinummer steigt jeweils um eins an.
YYYYMMDD_HHMMSS weist auf die Startzeit der Datenspeicherung
hin.
Bei “001_YYYYMMDD_HHMMSS.smi” handelt es sich um eine
`
Beschriftungsdatei und sie kann angesehen werden, wenn sie sich im selben Verzeichnis, als die zugehörige AVI-Datei
befindet.
Die max. Aufnahmezeit pro AVI-Datei beträgt 30 Minuten.
`
Wenn Sie selbst die gespeicherten Daten ändern oder beschädigen, erfolgt die Wiedergabe oder Speicherung nicht
`
ordnungsgemäß.
26_ web viewer
Page 27

setup-bildschirm
KONFIGURATION
Unter Netzwerk können Sie Grunddaten für Kamera, Video und Audio, Netzwerkereignisse und das System
festlegen.
1. Klicken Sie [Setup (
2. Der Setup-Bildschirm erscheint.
Zur Anzeige der Seite zum Einstellen des Vorschau-Videos muss das STW-Web-Viewer-Plug-In auf dem PC installiert sein.
`
J
Falls nicht richtig installiert, taucht die Installationsseite automatisch auf.
)] im Live-Bildschirm.
STANDARD-EINSTELLUNGEN
Video profil
1. Wählen Sie die Registerkarte <Basic ( )> aus dem Setup-
Menü.
2. Klicken Sie <Video profil>.
3. Stellen Sie die <Video Profil Verbindungsregel> ein.
• Verbindung aufrechterhalten, wenn Profileinstellung
geändert wird : Die Ausgabe verwendet die gleichen
Einstellungen, auch wenn sich die Einstellungen des
aktiven Profils ändern.
Falls nicht eingestellt, wird bei Änderung eines Profils,
das eine bestehende Verbindung benutzt, die Verbindung
unterbrochen.
4. Wählen Sie die Profileigenschaften aus.
Lesen Sie für weitere Einzelheiten “Hinzufügen/Ändern beim
Videoprofil”. (Seite 28)
5. Klicken Sie in das Eingabefeld jedes Punktes und geben Sie
ein oder wählen Sie einen gewünschten Wert aus.
Das Kontextmenü kann abhängig vom gewählten Codec-Typ verschieden
`
sein.
• Standard profil : Wenn bei der Verwendung des Web
Viewer kein Profil angegeben wird, wird das Standard
Videoprofil verwendet.
• E-mail/FTP profil : Video-Profil zur festgelegten E-Mail oder
FTP-Seite übertragen.
Nur der MJPEG Codec kann als das E-mail/FTP Profil festgelegt werden.
`
• Aufnahmeprofil : Dies ist das Profil, das bei der Videoaufzeichnung übernommen wird.
• Audioeingang : Stellt ein, ob bei Videoaufnahmen Audio verwendet werden soll.
6. Stellen Sie gemäß Ihrer Situation den ATC (Auto Transmit Control) ein.
• ATC Modus : Stellt die Videoeigenschaften entsprechend
den Veränderungen in der Bandbreite des Netzwerks ein,
indem die Bitrate geregelt wird. Die Einstellung der Bitrate
hängt vom ATC-Modus ab.
- Bildfrequenz regeln : Reduziert die Bildfrequenz, wenn die Bandbreite des Netzwerks absinkt.
- Kompression regeln : Regelt die Kompressionsrate, wenn die Bandbreite des Netzwerks absinkt.
Die Kompression kann zu einer Verschlechterung der Bildqualität führen.
- Ereignis (MD): Diese Funktion ist einsatzbereit, wenn das Ereignis Bewegungserkennung (MD Motion Detection) ausgewählt wurde.
Bei einem Ereignis steuert das System die Bildrate.
Wenn keine Bewegung ermittelt wird, werden die Signale des Systems mit der Mindestbildrate
ausgegeben. Damit wird auch die Bandbreitennutzung verringert.
Wenn <Bitrate-Kontr.> auf <CBR> eingestellt ist, wird die Priorität der Codierung gemäß dem ATC-Modus wie folgt fest
`
eingestellt:
Bitrate-Kontr. / ATC Modus Bildfrequenz regeln Kompression regeln Ereignis(MD)
CBR Bildfrequenz Kompression Bildfrequenz
• ATC empfindlichkeit : Beeinflusst die Übertragungsgeschwindigkeit je nach Veränderung der Bandbreite
des Netzwerks.
Die Übertragungsgeschwindigkeit wird auf das Maximum eingestellt, wenn die Bandbreite <Sehr hoch>
ist und auf das Minimum, wenn die Bandbreite <Sehr niedrig> ist.
• ATC limit : Wenn die Qualität oder Bildfrequenz eingestellt ist, wird die Eigenschaft auf den
eingegebenen Wert (%) in Bezug auf die vorherige Einstellung (100 %) eingestellt.
Beachten Sie, dass wenn der Wert dieser Eigenschaft zu stark reduziert wird, es zu einem Flimmern auf
dem Bildschirm kommen kann. Es wird empfohlen, den Wert innerhalb der Grenzwerte einzustellen.
Es wird empfohlen, die ATC-Steuerung nur für Kameras zu verwenden, die ATC unterstützen.
`
J
Stellen Sie die ATC-Empfindlichkeit in Netzwerkumgebungen mit hohen Schwankungen in der Bandbreite des Netzwerks auf
`
<Sehr niedrig>.
Wenn die Netzwerkverbindung instabil ist, kann es zu einem Flimmern auf dem Bildschirm kommen.
`
7. Klicken Sie auf [Anwenden ( )],
wenn Sie die Einstellungen vorgenommen haben.
●● SETUP-BILDSCHIRM
Deutsch _27
Page 28

setup-bildschirm
Hinzufügen/Ändern beim Videoprofil
Die Profileinstellungen können hinzugefügt oder geändert werden, um je nach den Aufnahmebedingungen
verschiedene Profile anzupassen.
1. Wählen Sie eine der <Video Profil> Optionen.
2. Geben Sie einen namen und wählen sie ein codec aus.
3. Legen Sie die umstände fest unter welchen der codec angewendet werden wird.
Legen Sie die details des gewählten codec fest, inklusive auflösung und bildwiederholrate.
4.
Klicken Sie auf <Fortgeschritten>, um das Kontextmenü anzuzeigen.
• Auflösung : Bestimmen Sie die Videogröße von H.264 und MJPEG Dateien.
• Bildrate : Die maximale Anzahl der Videobilder pro Sekunde einstellen.
Die maximal konfigurierbare Bildfrequenz wechselt zur <Sensor> Modus Einstellung der Kameraeinstellung.
`
M
Sensor 25 fps 30 fps
Bildfrequenz 1~25 fps 1~30 fps
• Maximale Bitrate : Die maximale Bitrate des Videos festlegen, wenn die Steuerung der Bitrate auf VBR
eingestellt ist.
Da die Bitrate entsprechend der Auflösung, der Bildfrequenz, und der Bildschirmkomplexität eingestellt werden kann,
`
J
kann die aktuelle Bitrate höher sein, als die maximale Bitrate. Beachten Sie also diese Bedingungen bei der Einstellung
dieses Werts.
• Ziel-Bitrate : Die Zielbitrate festlegen, wenn die Steuerung der Bitrate auf CBR eingestellt ist.
• Bitrate-Steuerung : Sie können eine der Konstante Bitrate und variable Bitrate für die Komprimierung
auswählen. Fixierte Bitfrequenz bedeutet, dass die Netzwerkübertragungsbitfrequenz fixiert ist, während
die Qualität des Videos oder Rahmenfrequenz variiert: variable Bitfrequenz bedeutet, das eine höhere
Priorität auf die Videoqualität gelegt wird, während die Bitfrequenz variiert.
Wenn Sie nach der Einstellung der fixen Bitrate-Steuerung den Video-Qualitätsprioritätsmodus wählen, kann die
`
J
tatsächlich übermittelte Bildrate, je nach der Komplexität des Bildschirms, von dem Setup der Bildrate differieren, damit
die optimale Videoqualität für die vorhandene Bitrate garantiert werden kann.
• Priorität Kodierung : Sie können die Priorität der Videoübertragung zu Bildfrequenz bzw. Kompression
einstellen.
• GOV Länge : Es gibt den Abstand (in Bezug auf die Anzahl der Bilder) zwischen zwei aufeinander
folgenden I-Frames in einer Videosequenz, wenn H.264-Codec ausgewählt wurde. (Eine I-Frame + 0 ~
Mehrere P-Frames)
• Profil : Sie können die H.264-Profilierungsmethode auswählen.
• Entropiekodierung : Reduziert den möglichen Kompressionsverlust durch das Codieren.
• Multicast (SVNP) : Legen Sie die Benutzung des SVNP-Protokolls fest.
- IP-Adresse : Geben Sie eine IPv4 Addresse ein, mit der Sie eine Verbindung zum IPv4 Netzwerk
herstellen können.
- Port : Legen Sie den Port für die Videokommunikation fest.
- TTL : Legen die TTL für das SVNP Packet fest.
• Multicast (RTP) : Legen Sie die Benutzung des RTP-Protokolls fest.
- IP-Adresse : Geben Sie eine IPv4 Addresse ein, mit der Sie eine Verbindung zum IPv4 Netzwerk
herstellen können.
- Port : Legen Sie den Port für die Videokommunikation fest.
- TTL : Sie können die TTL für das RTP-Packet festlegen.
Wenn Sie die Multicast-Adresse bei 224.0.0.0~224.0.0.255 festlegen, wird Multicast eventuell nicht in allen
`
J
Umgebungen richtig arbeiten. In diesem Falle empfehlen wir Ihnen, die Multicast-Adresse zu ändern.
Was ist die GOV-Länge?
GOV (Group of Video object planes) ist ein Satz an Videobildern für die H.264 Kompression, die eine
Sammlung an Einzelbildern vom ersten I-Frame (Schlüsselbild) bis zum nächsten I-Frame anzeigt.
GOV besteht aus zwei Arten an Einzelbildern I-Frame und P-Frame.
I-Frame ist das grundlegende Einzelbild für die Kompression, auch als Key Frame bekannt, welches die
kompletten Bilddaten enthält. P-Frame enthält nur die Daten, die sich seit dem vorhergehenden I-Frame
geändert haben.
Was den H.264 Codec betrifft, können Sie die GOV-Länge ermitteln.
Wenn Sie ein Aufnahmeprofil mit H.264 Codec einstellen, wird die GOV-Länge Framerate/2 betragen.
28_ setup-bildschirm
Page 29

Benutzer
1. Wählen Sie die Registerkarte <Basic ( )> aus dem Setup-
Menü.
2. Klicken Sie auf <Benutzer>.
3. Geben Sie die nötigen Benutzerinformationen an.
• Administrator-Kennwort Ändern : Ändern Sie das
Administrator-Kennwort.
Es wird empfohlen, dass Sie für Ihr Passwort aus
`
J
Sicherheitsgründen eine Kombination aus Zahlen, alphabetischen
Groß- und Kleinbuchstaben und Sonderzeichen verwenden.
Es wird empfohlen, dass Sie Ihr Passwort alle drei Monate
`
ändern.
Die Passwortlänge und Einschränkungen sind wie folgt.
`
Eine Kombination aus mindestens drei Typen von Groß- und
-
Kleinbuchstaben, numerischen und Sonderzeichen: 8 bis 9
Zeichen.
Eine Kombination aus mindesten zwei Arten von Groß- und Kleinbuchstaben, Zahlen und Sonderzeichen: 10-15
-
Zeichen.
Sollte anders als die ID sein.
-
Derselbe Buchstabe, die gleiche Nummer oder das gleiche Sonderzeichen dürfen nicht mehr als 4 Mal wiederholt
-
werden.
Nicht 4 oder mehr aufeinanderfolgende Zeichen verwenden. (Beispiele: 1234, abcd)
-
Nicht 4 oder mehr Zeichen wiederholt verwenden. (Beispiele: !!!!, 1111, aaaa)
-
Zulässige Sonderzeichen sind. : ~`!@#$%^*()_-+=|{}[].?/
-
Nach der Werkseinstellung werden der Administrator und das Benutzerpasswort initialisiert. Sie müssen das Passwort
-
zurückzusetzen.
Wenn Sie nach der Initialisierung erstmals Zugriff auf die Kamera-Webseite nehmen, werden Sie zum
-
Einstellungsmenü des Administratorpassworts geleitet.
In diesem Menü müssen Sie sich, ehe Sie die Menüs der Kamera-Webseite nutzen, erneut mit dem neuen Passwort
-
anmelden.
Wenn das vorhandene Passwort nicht übereinstimmt, können Sie durch Ändern des Administratorpassworts das
-
Passwort ändern.
Nachdem Sie Ihr Passwort geändert haben, müssen Sie sich, wenn eine Kamera mit einem CMS- oder NVR-Klienten
-
verbunden ist, mit dem neu geänderten Passwort erneut registrieren. Wird die Kamera weiter mit dem gleichen
Passwort verbunden, kann das Konto gesperrt werden, da ein Klient das vorherige Passwort verwendet.
Wenn Sie versuchen sich bei dem registrieren Konto anzumelden und die Passwort-Authentifizierung ist fünf mal oder
`
öfter hintereinander fehlgeschlagen, kann das Konto eventuell für dreißig Sekunden gesperrt werden.
Wenn das Passwort während mehrere Verbindungen von einem PC aus aktiv sind geändert wird, kann es zu einer
`
Fehlfunktion des Browsers kommen. Stellen Sie in diesem Falle eine neue Verbindung zum Server her.
• Einstellung :
Web Viewer zugegriffen werden, wobei jedoch nur der Live Viewer Bildschirm betrachtet werden kann.
`
• Authentifizierungseinstellungen : Wenn Sie <RTSP Verbinden ohne Authentifizierung ermöglichen>,
wählen, können Sie auf RTSP ohne Anmeldung zugreifen und Videobilder betrachten.
Wenn Sie <Gast Zugriff erlauben> ausgewählt haben, kann über das Gast Konto auf den
Die ID/das Passwort für das Gast Konto lautet <guest/guest> und kann nicht geändert werden.
• Aktueller Benutzer : Wenn Sie <Verwenden> wählen, können Sie die Benutzerberechtigungen einstellen
oder bearbeiten.
Profil : Wenn Sie <Stand.> wählen, können Sie nur Videobilder mit dem Voreinstellung Profil ansehen; wenn Sie <
`
können Sie Videobilder aller Profile ansehen.
Die für registrierte Benutzer verfügbaren ONVIF Funktionen sind auf die Benutzer beschränkt, die über die entsprechenden
`
J
Rechte verfügen.
Bildübertragung und Änderung der Bilddaten: Legen Sie das Profil auf <Alle> fest und aktivieren Sie die restlichen Berechtigungen.
`
4.
Klicken Sie auf [Anwenden ( )], wenn Sie die Einstellungen vorgenommen haben.
Alle
> wählen,
Datum und Zeit
1. Wählen Sie die Registerkarte <Basic ( )> aus dem Setup-
Menü.
2. Klicken Sie auf <Datum und Zeit>.
3. Legen Sie das Datum und die Uhrzeit fest, die für die Kamera
übernommen werden sollen.
• Aktuelle Systemzeit : Die aktuellen Zeiteinstellungen Ihres
Systems werden angezeigt.
• Timezone (Zeitzone) : Legen Sie die lokale Zeitzone
basierend auf der Greenwich-Zeit (GMT) fest.
• Daylight Saving Time (Sommerzeit) :
ausgewählt ist, wird die Zeit für den festgelegten Zeitraum
eine Stunde vor der lokalen Zeitzone eingestellt.
Diese Option wird nur in Gegenden angezeigt, in denen die
Sommerzeit angewendet wird.
• Einstellung der Systemzeit : Legen Sie das Datum und die Zeit fest, die für Ihr System angewendet
werden.
- Benutzerhandbuch : Legen Sie die Zeit manuell fest.
- Mit dem NTP-Server Synchronisieren : Die Zeit wird mit der Zeit der festgelegten Serveradresse
synchronisiert.
- Mit dem PC Viewer Synchronisieren : Stellt die Zeit auf die Zeit des angeschlossenen Computers ein.
4.
Klicken Sie auf [Anwenden ( )], wenn Sie die Einstellungen vorgenommen haben.
Wenn <Mit dem PC Viewer Synchronisieren> eingestellt wurde, muss die eingestellte Standard-Zeitzone dieselbe sein,
`
J
wie im PC.
Wenn diese Option
●● SETUP-BILDSCHIRM
Deutsch _29
Page 30

setup-bildschirm
IP & Port
1. Wählen Sie die Registerkarte <Basic ( )> aus dem Setup-
Menü.
2. Klicken Sie auf <IP & Port>.
3. Konfigurieren Sie das <IPv4 Setup>.
• IP-Typ : Wählen Sie einen IP-Verbindungs-Typ.
- Manuell :
- DHCP : Legen Sie DNS1 und DNS2 fest.
- PPPoE : Geben Sie DNS1, DNS2, ID und das Passwort
`
• MAC-Adresse : Zeigt die MAC Adresse an.
• IP-Adresse : Zeigt die gegenwärtige IP Adresse an.
• Subnetzmaske : Zeigt die <Subnetzmaske> für die gewählte IP.
• Gateway : Hier wird das <Gateway> für die gewählte IP-Adresse angezeigt.
• DNS1/DNS2 : Hier wird die Adresse des DNS (Domain Name Service)-Servers angezeigt.
4. Konfigurieren Sie das <IPv6 Setup>.
Stellen Sie diese Option auf <Verwendung> um IPv6 Adressen verwenden zu können.
`
• Stand. : Verwenden Sie die Standard IPv6 Adresse.
• DHCP : Die über den DHCP-Server bezogene IPv6-Adresse anzeigen und verwenden.
• Manuell : Geben Sie die zu verwendende IP-Adresse und das Gateway manuell ein.
`
J
`
Legen Sie IP Addresse, Subnetmaske, Gateway,
DNS1, und DNS2 fest.
an.
Wenn Sie auf <Manuell> stellen, sollten Sie IP, SubnetzMaske,
Gateway und DNS 1 & 2 manuell festlegen.
Die Zuweisung der IP-Adresse wird auf DHCP voreingestellt. Wenn kein DHCP-Server gefunden wird, werden die vorherigen
Einstellungen automatisch wieder hergestellt.
Wenn die Bearbeitung abgeschlossen ist, auf [Anwenden ( )] klicken, um die Änderungen zu übernehmen und den
Browser zu verlassen. Stellen Sie nach einer gewissen Zeit erneut eine Verbindung mit der geänderten IP her.
5.
Machen Sie nach Bedarf Ihre Eingaben im Port-Menü.
Der Port-Bereich kann sich nicht zwischen 0 und 1023 befinden und der Port 3702 steht nicht zur Verfügung.
`
• HTTP : Der HTTP-Port, mit dem über den Webbrowser auf die Kamera zugegriffen wird.
Die Standardeinstellung ist 80 (TCP).
Die Einstellung des HTTP-Ports auf 65535 ist aufgrund der Sicherheitsrichtlinie für Safari und Google Chrome nicht erlaubt.
`
• HTTPS : In dieser Version wird die Sicherheit des Web-Komunikationsprotokolls HTTP verstärkt. Lässt sich
verwenden, wenn der HTTPS-Modus auf SSL eingestellt ist.
Der Anfangswert ist auf 443(TCP) eingestellt.
Der verfügbare Einstellungsbereich liegt bei 1024~65535. (Möglicherweise können Sie aus Sicherheitsgründen bei Ihrem
`
Safari oder Google Chrome Browser 65535 nicht als Ihren HTTPS-Port verwenden.)
• RTSP : Wird verwendet, um Videos im RTSP-Modus zu übertragen; die Standardeinstellung ist 554.
• Timeout verwendung : Bei Verbindung mit RTSP wird durch diese Funktion die Verbindung
zurückgesetzt, wenn es eine bestimmte Zeitlang keine Reaktion gibt.
• Geräteport : Legen Sie einen Port fest, der zur Übertragung von Videosignalen mit Hilfe der Samsung-
Protokolle verwendet wird.
Wenn der HTTP-Port geändert wurde, wird der Browser verlassen.
`
M
Anschließend muss die Adresse den neu zugewiesenen HTTP-Port gefolgt von der IP-Adresse enthalten.
Beisp.: IP-Adresse 192.168.1.100, HTTP-Port : 8080 http://192.168.1.100:8080
(Wenn der HTTP-Port auf 80 eingestellt ist, muss keine Portnummer angegeben werden.)
Es wird empfohlen RTSP und HTTPS zu verwenden, damit verhindert wird, dass die Bildinformationen wiederhergestellt
`
werden.
6.
Klicken Sie auf [Anwenden
( )
], wenn Sie die Einstellungen vorgenommen haben.
Ereigniseinrichtung
Sie können auf einfache Weise die Kriterien zur Erkennung von Ereignissen festlegen und zu den detaillierten
Einstellungen gehen.
1. Wählen Sie die Registerkarte <Basic (
Menü.
2. Klicken Sie auf <Ereigniseinrichtung>.
3. In der Ereignisliste die gewünschten Punkte auswählen.
4.
Klicken Sie auf [Anwenden
Einstellungen vorgenommen haben.
Um detaillierte Ereignis-Einstellungen vorzunehmen, auf die
`
M
gewünschte Einstellung klicken. Zu detaillierten Einstellung von <Event> gehen.
( )
)> aus dem Setup-
], wenn Sie die
30_ setup-bildschirm
Page 31

VIDEO-SETUP UND AUDIO
Video Setup
1. Wählen Sie die Registerkarte <Video & Audio
dem Setup-Menü.
2. Klicken Sie <Video Setup>.
Wählen Sie einen <Videoquelle> Modus.
3.
• Modus Flip : Drehen Sie das von der Kamera
aufgenommene Bild herum.
• Spiegel Modus : Drehen Sie das von der Kamera
aufgenommene Bild horizontal.
• Hausfluransicht : Dreht ein Video, das von einer Kamera in
einem spezifischen Winkel aufgenommen wurde.
Drehen von 0, 90 und 270 Grad möglich.
Wird die Einstellung geändert, wird das Browser-Fenster geschlossen.
`
Versuchen Sie nach einer Weile die Verbindung erneut herzustellen.
Der Video-Ausgang für die Hausflur-Ansicht wird von SPD-100/400 nicht unterstützt.
`
J
4. Legen Sie die Privatsphärenzone fest.
Klicken Sie auf [Anwenden ( )], wenn Sie die Einstellungen vorgenommen haben.
5.
Privatezone einrichten
Sie können einen speziellen Bereich des Videos als geschützten Bereich für ihre Privatsphäre festlegen.
1. Stellen Sie es auf <Ein>.
2. Klicken Sie [Anwenden (
3. Klicken Sie und ziehen Sie die gewünschte Region auf dem
Video.
4. Den Namen eingeben und die Farbe wählen und dann [OK]
anklicken.
5. Wenn Sie einen Namen auf der Liste löschen möchten,
wählen Sie ihn und drücken Sie auf [Löschen (
)].
( )
> aus
)].
Audio setup (SNV-L6013R)
Sie können die Eingabewerte eines mit einer Kamera verbundenen Audios konfigurieren.
1. Wählen Sie die Registerkarte <Video & Audio
dem Setup-Menü.
2. Klicken Sie <Audio setup>.
3. Den Wert für den Audio Eingang festlegen.
• Quelle: Stellt die Audio Eingangsquelle ein.
- Line: Das Kabel mit dem Audiogerät verbinden.
- Externes Mikrofon:
• Stromversorgung für das Ext. Mikrofon einschaiten.:
Wenn das angeschlossene externe Mikrofon nicht über
eine getrennte Stromversorgung verfügt, diese Option markieren, damit das externe Mikrofon über die
Kamera mit Strom versorgt wird. Diese Option ist aktiv, wenn <Externes Mikrofon> ausgewählt ist.
• Codec: Den Audio-Codec angeben.
- G.711: Ein Audio Codec der eine 64 Kbps PCM (Pulse Code Modulation) Codierung verwendet.
Ein ITU-Standard Audio Codec, der sich für die digitale Tonübertragung in PSTN Netzwerken oder
über PBX eignet.
- G.726: ITU Standard Audio Codec gemäß ADPCM (Adaptive Differential Pulse Code Modulation) für
variable Bitraten von 40/32/24/16 Kbps bis 64 Kbps PCM Codierung.
• Bitrate: Stellt die Bitrate ein, um das Kompressionsverhältnis bei der Verwendung des G.726 Codecs
aufzuteilen.
• Verstärkung: Die Audioeingabe-Lautverstärkung angeben.
Eine Verschlechterung der Tonqualität oder Pfeifen kann auftreten, wenn die Lautstärke der Tonquelle oder der
`
J
Verstärkungswert unverhältnismäßig eingestellt wurden.
4. Klicken Sie auf [Anwenden (
3.5 pi(¢) Buchse, externes Mikrofon.
)], wenn Sie die Einstellungen vorgenommen haben.
( )
> aus
●● SETUP-BILDSCHIRM
Deutsch _31
Page 32

setup-bildschirm
Audio setup (SNV-L6014RM)
Sie können die Eingangs-/Ausgangseinstellungen der Audioquelle der Kamera einstellen.
1. Wählen Sie die Registerkarte <Video & Audio
dem Setup-Menü.
2. Klicken Sie <Audio setup>.
3. Den Wert für den Audio Eingang festlegen.
• Quelle: Stellt die Audio Eingangsquelle ein.
- Line: Das Kabel mit dem Audiogerät verbinden.
- Internes Mikrofon: In die Kamera eingebautes Mikrofon.
- Externes Mikrofon:
• Stromversorgung für das Ext. Mikrofon einschaiten.: Wenn
das angeschlossene externe Mikrofon nicht über eine getrennte Stromversorgung verfügt, diese Option
markieren, damit das externe Mikrofon über die Kamera mit Strom versorgt wird. Diese Option ist aktiv,
wenn <Externes Mikrofon> ausgewählt ist.
• Codec: Den Audio-Codec angeben.
- G.711: Ein Audio Codec der eine 64 Kbps PCM (Pulse Code Modulation) Codierung verwendet.
Ein ITU-Standard Audio Codec, der sich für die digitale Tonübertragung in PSTN Netzwerken oder
über PBX eignet.
- G.726: ITU Standard Audio Codec gemäß ADPCM (Adaptive Differential Pulse Code Modulation) für
variable Bitraten von 40/32/24/16 Kbps bis 64 Kbps PCM Codierung.
• Bitrate: Stellt die Bitrate ein, um das Kompressionsverhältnis bei der Verwendung des G.726 Codecs
aufzuteilen.
• Verstärkung: Die Audioeingabe-Lautverstärkung angeben.
Eine Verschlechterung der Tonqualität oder Pfeifen kann auftreten, wenn die Lautstärke der Tonquelle oder der
`
J
Verstärkungswert unverhältnismäßig eingestellt wurden.
4. Stellt den Audio Ausgangspegel ein.
• Aktivieren: Stellt die Audioausgabe auf Ein.
• Verstärkung: Die Audioausgabe-Lautverstärkung angeben.
5. Klicken Sie auf [Anwenden (
3.5 pi(¢) Buchse, externes Mikrofon.
)], wenn Sie die Einstellungen vorgenommen haben.
( )
> aus
Kamera Einstellungen
Sie können die Kameraeinstellungen je nach Kameraumgebung ändern.
1. Wählen Sie die Registerkarte <Video & Audio (
dem Setup-Menü.
2. Klicken Sie <Kamera Einstellungen>.
Konfigurieren Sie nach Bedarf die Einstellungen für: Sensor,
3.
SSDR, Weißabgleich, Hintergrundlicht, Belichtung, Tag/Nacht,
Besonderes, OSD, IR
4. Klicken Sie auf [Anwenden ( )], wenn Sie die
Einstellungen vorgenommen haben.
Wenn innerhalb einer bestimmten Zeit (240s) nach der Änderung von
`
Einstellungen die [
werden die Änderungen nicht übernommen.
Den Sensor festlegen
Gibt an, wie viele Bilder der CMOS-Sensor der Kamera pro Sekunde aufnehmen wird.
1. <Sensor> wählen.
2. <Modus> wählen.
`
M
Festlegen von SSDR (Samsung Super Dynamic Range)
In einer Szene mit starkem Unterschied zwischen hell und dunkel, können Sie die Helligkeit des dunklen
Bereichs separat erhöhen um die allgemeine Heiligkeit zu regulieren.
1. Wählen Sie <SSDR>.
2. Stellen Sie <Modus> auf <Ein> ein.
3. Konfigurieren Sie die <Stufe> und <D-Bereich>
Einstellungen so wie erforderlich.
• Stufe : Passt den Level des dynamischen Bereichs an.
• D-Bereich : Wählen Sie die Schwingungsweite des dynamischen Bereichs.
Anwenden ( )
Auf “Video Profil” für den Bildfrequenzeinstellungsbereich des <Video Profil>, entsprechend der Einstellung des Modus,
verweisen. (Seite 27)
] Taste nicht gedrückt wird,
)> aus
32_ setup-bildschirm
Page 33

Festlegen des Weißabgleichs
Sie können die auf Weiß basierenden Bildfarben unter allen Lichtverhältnissen korrigieren.
1. Wählen Sie <Weißabgleich>.
2. Wählen Sie <Modus>.
• ATW : Korrigiert die Farben des Kamera-Videos
automatisch.
• Manuell : Regelt die Rot- und Blauanteile des Kamera-Videos manuell.
• AWC : Regelt die Farben des Kamera-Videos um eine Optimierung entsprechend der Lichtverhältnisse und
des Bildschirmmodus zu erreichen.
Um die optimalen Einstellungen für die vorliegenden Lichtverhältnisse zu erhalten, richten Sie den Fokus der
Kamera auf ein weißes Blatt Papier und drücken Sie die Taste [Einstellen]. Wenn sich die Lichtverhältnisse
geändert haben, sollten die Einstellungen entsprechend angepasst werden.
• Außen : Die Videofarben der Kamera werden automatisch für die Aussenumgebung optimiert.
• Innen : Die Videofarben der Kamera werden automatisch für die Innenumgebung optimiert.
Im AWC Modus die [Einstellen] drücken, wenn der der Grad des Weißabgleichs des aktuellen Bildes beibehalten werden soll.
`
M
Der Weißabgleich könnte aus folgenden Gründen möglicherweise nicht einwandfrei funktionieren:
`
J
In solch einem Fall, schalten Sie den AWC Modus um.
Wenn die Umgebung rund um das Objekt außerhalb des Temperaturkorrekturbereichs ist.
-
bsp) Klarer Himmel, Sonnenuntergang
Wenn die Umgebung rund um das Motiv dunkel ist
-
Wenn der Fokus der Kamera direkt gegenüber fluoreszierendem Licht steht oder wenn die Kamera an einem Ort mit
-
mehreren Typen von Beleuchtungen installiert ist, kann die Leistung der Weißabgleich instabil sein.
BLC Setup
Sie können manuell einen gewünschten Bereich im Video festlegen und diesen mit höherer Klarheit darstellen.
1. Wählen Sie <Hintergrundlicht>.
2. Stellen Sie <Modus> auf <BLC> ein.
3. Stellen Sie <BLC-Stufe> ein.
Sie können den Pegel ändern um die Helligkeit des
Überwachungsbereichs anzupassen.
4.
Legen Sie die <Oben, Unten, Links, Rechts> Pegel fest um den Zielbereich zu definieren.
Wenn BLC festgelegt ist, wird auf dem Bildschirm 15 Sekunden lang das grüne Kästchen angezeigt.
`
J
Um während der Einst. BLC. technische Störungen zu vermeiden, sollte der vertikal verfügbare Raum des BLC-Bereichs über
`
40 und unter 60 betragen, während der horizontal verfügbare Raum über 30 und unter 60 liegen sollte.
Belichtung festlegen
Sie können den Belichtungspegel der Kamera anpassen.
1. Wählen Sie <Belichtung>.
2. Wählen Sie jeden Punkt aus und stellen Sie ihn angemessen
ein.
• Helligkeit : Stellen Sie die Bildschirmhelligkeit ein.
• Minimale Verschlusszeit : Die Grenze der längsten
Belichtungszeit.
Verschluss ist der Modus, der den Bereich der Sensor-Belichtungszeit festlegt, durch den die oberen und unteren Grenzen für
`
die elektronische Verschlussbewegung angegeben werden.
Die Bildfrequenz kann unter dunklen Bedingungen verringert werden, falls der Verschluss einen niedrigeren Wert hat, als dies
`
in dem Sensor-Modus angegeben ist.
• Maximale
• Anti-Flimmern : Es verhindert Bildschirmflimmern, das durch die Unstimmigkeit zwischen der
• SSNR : Für die Funktion Video-Rauschen-Beseitigung Aktivieren oder Deaktivieren wählen.
• SSNR
• AGC : Den AGC Steuerungsmodus auswählen.
J
Auf Tag/Nacht einstellen
1. Wählen Sie <Tag/Nacht>.
2. Wählen Sie jeden Punkt aus und stellen Sie ihn angemessen
ein.
• Modus: Modus wird verwendet, um die Farbe Schwarz
• Haltezeit: Gibt den Zeitraum an, in dem die ausgewählte Helligkeitsbedingung beibehalten werden
• Dauer: Gibt das Intervall der Umstellung des Lichtmodus an.
• Aktivierungszeit(Farbe): Ist er festgelegt, wird der Farbmodus vom Anfang bis zum Ende 59 Sekunden
J
Verschlusszeit
Umgebungsbeleuchtung und der Frequenz ausgelöst wird.
-Stufe : Stellen Sie den Pegel der Rauschunterdrückung ein.
Den Verstärkungsfaktor für das Video wählen (insbesondere für Aufnahmen die unter kontrastarmen
Bedingungen aufgenommen wurden und die einen niedrigeren Helligkeitsgrad aufweisen als normal), um die
Helligkeit des Videos zu regeln.
Die Belichtung des Bildes kann je nach Verschluss-Einstellungsbereich saturiert sein.
`
oder Weiß anzupassen.
- Farbe: Das Video wird immer in Farbe ausgegeben.
- S/W: Das Video wird immer in Schwarz und Weiß
ausgegeben.
- Auto: Normalerweise ist es auf Farbe eingestellt, S&W bei
schwacher Beleuchtung bei Nacht.
Wenn AGC des <Belichtung> Menüs auf <Aus> eingestellt ist, kann der Tag/Nacht Modus nicht auf <Auto> festgelegt
`
werden.
- Programm: Legt die Zeit fest, während der die Kamera im Farbmodus arbeitet.
muss, um den Lichtmodus von Tag auf Nacht oder umgekehrt zu schalten.
lang beibehalten.
Ist er festgelegt, wird der Farbmodus von Sekunde 00 der Startzeit bis Sekunde 59 am Ende beibehalten.
`
Wenn Sie zum Tag-/Nacht-Modus wechseln, kann das Ereignis Bewegungserkennung nicht ermittelt werden.
`
: Die Grenze der kürzesten Belichtungszeit.
Deutsch _33
●● SETUP-BILDSCHIRM
Page 34

setup-bildschirm
Besonderes festlegen
1. Wählen Sie <Besonderes> aus.
2. Wählen Sie jeden Punkt aus und stellen Sie ihn angemessen
ein.
• Schärfe: Verändert die allgemeine Bildschärfe.
Wenn Sie <Ein> auswählen, können Sie die Schärfe eines
Bildes anpassen.
• Schärfestufe: Je höher der Pegel, umso schärfer und klarer werden die Bildumrisse.
• Gamma-Wert: Verändert den Bildkontrast.
• Farbebene: Die Stärke der Videofarbe anpassen.
• LDC : Um festzustellen, ob die Bild-Verzeichnungskorrektur verwendet werden soll.
• LDC Level : Um das Level der Verzeichnungskorrektur anzupassen.
Besonderes festlegen
1. <OSD> auswählen.
2. Jeden Menüpunkt auswählen und richtig einstellen.
• Kameratitel : Gibt den Kameranamen an, der auf dem
Bildschirm angezeigt werden soll.
• Kameratitel X, Y : Gibt die Position des Kameranamen auf
dem Bildschirm an.
• Datum und Zeit : Stellen Sie das Zeit-Display und die Datumsformate auf dem Bildschirm ein.
• Datum und Zeit X, Y :
• Wochentag : Schaltet die Datumsanzeige auf dem Bildschirm ein oder aus.
Ein Positions-anpassbares Element (Kameratitel, Datum und Zeit) werden normalerweise nicht angezeigt, wenn es mit
`
J
anderen befestigten OSD-Elementen überlappt.
IR einstellen
1. <IR> auswählen.
2. Jeden Menüpunkt auswählen und richtig einstellen.
• Modus: Wenn sich die IR-Anzeige im B/W Modus
einschaltet, wird der Bildschirm vor Sättigung im zentralen Bereich geschützt, sodass ein sich nahe an
der Kamera befindendes Objekt identifiziert werden kann.
- Aus: Der IR-Modus wird abgeschaltet.
- Auto: Stellt die IR-Helligkeit gemäß der Helligkeit des Objekts in der Bildschirmmitte dar.
Die Position der Zeitanzeige auf dem Bildschirm festlegen.
NETZWERK-SETUP
DDNS
DDNS steht für „Dynamic Domain Name Service“. Dieser Service konvertiert die IP-Adresse einer Kamera in
einen allgemeinen Hostnamen, damit der Benutzer sich besser daran erinnern kann.
Sie können den DDNS-Service nur verwenden, wenn eine Internetverbindung besteht.
`
J
1. Wählen Sie die Registerkarte <Network (
Setup-Menü.
2. Klicken Sie auf <DDNS>.
3. Wählen Sie als Verbindungstyp <DDNS> aus.
Geben Sie entsprechend des ausgewählten Typs die DDNS-
4.
Angaben ein.
• Samsung DynDNS : Wählen Sie diese Option, wenn Sie
den von Samsung zur Verfügung gestellten DDNS-Server
benutzen.
- Produkt-ID : Geben Sie die im Samsung DDNS Dienst
registrierte Produkt-ID ein.
- Quick connect : Stellt die Portweiterleitung automatisch ein, wenn ein Router mit UPnP (Universal
Plug and Play) verwendet wird.
Wenn Sie DDNS-Dienstleistungen verwenden möchten, ohne den Hub zur Unterstützung von UPnP-Funktion zu
`
M
verwenden, drücken Sie auf schnelle Verbindung, dann gehen Sie zum Hub-Menü und aktivieren Sie den Anschluss für
die Weiterleitung an Ihren Hub.
Für mehr Informationen dazu, wie man ein Port für die Weiterleitung an Ihr Hub einstellt, wenden Sie sich auf
„Portbereichweiterleitung Konfigurieren (Port Mapping)“. (Seite 18)
• Öffentliche
Öffentlichen DDNS-Server benutzen.
5. Klicken Sie auf [Anwenden (
`
J
DynDNS
: Wählen Sie einer der verfügbaren Öffentlichen DDNS-Server aus, wenn Sie einen
- Service : Wählen Sie den gewünschten Server für den DDNS-Service aus.
- Hostname : Geben Sie den Hostnamen ein, der auf dem DDNS-Server registriert ist.
- Benutzername : Geben Sie einen Benutzernamen für den DDNS-Service ein.
- Kennwort : Geben Sie das Kennwort für den DDNS-Service ein.
Wenn <Quick connect>, eingestellt wurde, wählen Sie den Samsung DDNS Service aus.
)> aus dem
)], wenn Sie die Einstellungen vorgenommen haben.
34_ setup-bildschirm
Page 35

Registrierung unter DDNS vornehmen
Ihr Produkt unter Samsung DDNS registrieren
1. Besuchen Sie die Webseite von iPOLiS (www.samsungipolis.
com) und melden Sie sich mit einem gültigen Benutzerkonto
an.
Über das Kamera-Setup eine Verbindung zu Samsung DDNS herstellen
1. Stellen Sie im DDNS-Setup <DDNS> auf <Samsung
DynDNS>.
2. Den <Produkt-ID> eingeben, der bei der Registrierung des
Produkts auf der DDNS-Seite festgelegt wurde.
3. Klicken Sie auf [Anwenden (
Wenn die Verbindung erfolgreich hergestellt wurde, erscheint
die Nachricht <(Success)> auf dem Bildschirm.
)].
●● SETUP-BILDSCHIRM
2. Wählen Sie aus der oberen Menüleiste <DDNS SERVICE>-
<MY DDNS>.
3. Klicken Sie auf [PRODUCT REGISTRATION].
4. Die Produkt-ID eingeben.
Es muss geprüft werden, ob die von Ihnen eingegebene ID bereits
`
vorhanden ist.
5. Wählen Sie eine <CLASSIFICATION> und geben Sie die
<MODEL NUMBER> an.
6.
Wenn nötig, geben Sie den Standort des Produktes und eine
Beschreibung an.
7. Klicken Sie auf [REGISTRATION].
Das Produkt wird zu der Produktliste hinzugefügt, die Sie
überprüfen können.
Öffentliches DDNS in Kameraeinstellungen Konfigurieren
1. Öffnen Sie die Seite der DDNS-Einstellungen und wählen Sie <Öffentliche DynDNS> für <DDNS> aus.
2. Geben Sie der entsprechenden Hostname der Seite, das Benutzerkennwort und Passwort ein.
3. Klicken Sie auf die Taste [Anwenden (
Wenn die Verbindung ordnungsgemäß hergestellt wird, erscheint <(Success)>.
4. Klicken Sie auf [Anwenden (
Um den DDNS-Dienst richtig nutzen zu können, ist ein DDNS-Setup und die Einrichtung der Portweiterleitung des Routers
`
M
erforderlich.
Für die Portweiterleitung bitte unter “Portbereichweiterleitung Konfigurieren (Port Mapping)”. (Seite 18)
)].
)], wenn Sie die Einstellungen vorgenommen haben.
IP-Entstörung
Sie können eine Liste von IPs erstellen, denen der Zugang erlaubt oder verweigert wird.
1. Wählen Sie die Registerkarte <Network (
Setup-Menü.
2. Klicken Sie auf <IP-Filterung>.
3. Wählen Sie <Filterung-Typ>.
• Abgelehnt : Wenn Sie diese Option wählen, wird den IP-
Adressen, die dieser Filterliste hinzugefügt wurden, der
Zugang verweigert.
• Zulassen : Wenn Sie diese Option wählen, wird nur den
IP-Adressen, die dieser Filterliste hinzugefügt wurden, der
Zugang erlaubt.
4. Klicken Sie auf die [Hinzufügen (
Die IP-Liste wird erstellt.
5. Geben Sie die IP-Adresse ein, für die Sie den Zugriff gewähren oder verbieten wollen.
Wenn Sie eine IP-Adresse und einen Präfix eingeben, erscheint die Liste der verfügbaren IP-Adressen in
der rechten Filterbereichspalte.
)> aus dem
)] Schaltfläche.
Deutsch _35
Page 36

setup-bildschirm
Wenn für die IP-Filterung <Zulassen> und für <IPv6 Setup> unter <IP & Port>auf <Verwendung> gestellt wurde,
`
M
müssen die IPv4 und IPv& Adressen des gerade konfigurierten Computers zugewiesen werden.
Die IP-Adresse des für die Einrichtung verwendeten Computers darf nicht zu der <Abgelehnt> Liste hinzugefügt werden,
`
sondern muss zur <Zulassen> Liste hinzugefügt werden.
Nur die IP-Adressen, die auf <Verwendung> eingestellt sind, werden in der Filterspalte angezeigt.
`
6. Die zu löschende IP-Adresse aus der Liste auswählen.
Klicken Sie auf die [Löschen (
7. Klicken Sie auf [Anwenden (
SSL
Sie können ein sicheres Verbindungssystem oder ein öffentliches Zertifikat zu diesem Zweck auswählen.
1. Wählen Sie die Registerkarte <Network (
Setup-Menü.
2. Klicken Sie auf <SSL>.
3. Wählen Sie ein sicheres Verbindungssystem aus.
Um über den HTTPS-Modus auf eine Kamera zuzugreifen, müssen Sie die
`
IP-Adresse wie folgt eingeben: https://<Kamera_IP>.
Wenn im Internet Explorer die Konfiguration der Web Viewer Einstellungen
im HTTPS-Modus fehlgeschlagen ist, könne die Internetoptionen wie folgt
eingestellt werden: <Menü Extras Internetoptionen Erweitert
Sicherheit Markierung bei TLS 1.0 löschen und bei TLS 1.1, TLS 1.2
setzen>
4. Suchen Sie nach einem öffentlichen Zertifikat, das Sie auf Ihrer Kamera installieren möchten.
Sie müssen einen Zertifikatnamen (dieser kann beliebig vom Benutzer gewählt werden), eine
Zertifikatsdatei der Zertifikatsstelle und eine Schlüsseldatei angeben, um das Zertifikat auf der Kamera zu
installieren.
Die Option <HTTPS (Sicherer Verb.modus verw. öffentliches Zertifikat)> ist nur aktiv, wenn ein öffentliches Zertifikat
`
installiert wurde.
5. Klicken Sie auf [Anwenden (
Einlegen des Zertifikats
1. Zertifikatname eingeben.
Klicken Sie die Schaltfläche [
2.
Zertifikatsdatei und Schlüsseldatei und klicken Sie auf die Schaltfläche [
Das Zertifikat Löschen
1. Klicken Sie auf die Taste [Löschen ( )].
2. Um ein öffentliches Zertifikat zu löschen, muss auf den Netzwerk Video Decoder im <HTTP (Keine
sichere Verb. verwend.)> oder <HTTPS (Sicherer Verb.modus verw. besonderes Zertifikat)> Modus
zugegriffen werden.
Durchsuchen ( )
)] Schaltfläche.
)], wenn Sie die Einstellungen vorgenommen haben.
)> aus dem
)], wenn Sie die Einstellungen vorgenommen haben.
] an, wählen Sie zur Installation eine öffentliche
Installieren ( )
802.1x
Bei dem Verbindungsaufbau mit einem Netzwerk kann festgelegt werden, ob das 802.1x Protokoll verwendet
werden soll und anschließend das Zertifikat installiert werden.
1. Wählen Sie die Registerkarte <Network (
Setup-Menü.
2. Klicken Sie auf <802.1x>.
3. <IEEE 802.1x einstellung> einstellen.
• IEEE 802.1x : Die Verwendung des 802.1x Protokolls
einstellen.
• EAPOL version : EAP-TLS oder LEAP wählen.
• EAPOL version : Version 1 oder 2 auswählen.
• ID : Geben Sie die Client-Zertifikats-ID in EAP-TLS und die
Benutzer-ID in LEAP ein.
• Kennwort : Geben Sie das private Schlüssel-Passwort
vom Client in EAP-TLS und das Benutzerpasswort in LEAP ein. Das Passwort muss nicht in EAP-TLS
eingegeben werden, wenn eine nicht verschlüsselte Schlüsseldatei verwendet wird.
Wenn das angeschlossene Netzwerkgerät das 802. 1x Protokoll nicht unterstützt, funktioniert das Protokoll nicht einwandfrei,
`
J
selbst wenn sie es eingestellt haben.
LEAP ist eine Authentifizierungstechnik mit geringer Sicherheit. Verwenden Sie sie nur in einer Umgebung, in der EAP-TLS
`
nicht verfügbar ist.
4. Installieren/Entfernen von Zertifikaten.
Das Zertifikat wird nur für EAP-TLS benötigt.
• CA Zertifikate : Wählen Sie ein öffentliches Zertifikat, das einen öffentlichen Schlüssel enthält.
• Kundenzertifikat : Wählen Sie ein öffentliches Zertifikat, das einen Client Zertifikat Schlüssel enthält.
• Privater Kundenschlüssel : Wählen Sie ein öffentliches Zertifikat, das den Privaten Client Schlüssel
enthält.
5. Klicken Sie auf [Anwenden (
Installieren/Löschen der 802.1x Zertifikate
1. Die [Durchsucher ( )] Tasten für jede Position drücken und das zu installierende Zertifikat
auswählen.
2. Wenn kein Zertifikat installiert ist, erscheint die Meldung “Nicht verfügbar” neben der ausgewählten
Position.
(
].
3. Die [Installieren
4. Die [Löschen (
)] Taste neben der Information “Installiert” drücken.
)] Taste drücken, um das Zertifikat zu löschen.
)> aus dem
)], wenn Sie die Einstellungen vorgenommen haben.
36_ setup-bildschirm
Page 37

QoS
Es kann die Priorität festgelegt werden, um eine stabile Übertragungsgeschwindigkeit für eine bestimmte IP
zu sichern.
1. Wählen Sie die Registerkarte <Network (
Setup-Menü.
2. Klicken Sie auf <QoS>.
3. Klicken Sie auf die [Hinzufügen (
Die IP-Liste wird erstellt.
4. Geben Sie eine IP-Adresse ein, der QoS zugeordnet werden
soll.
Der voreingestellte Präfix für IPv4 lautet 32;
`
M
Für DSCP ist die Voreinstellung 63.
Nur die IP-Adressen, die auf <Verwendung> eingestellt sind, können
`
priorisiert werden.
5. Die zu löschende IP-Adresse aus der Liste auswählen.
Klicken Sie auf die [Löschen (
6. Klicken Sie auf [Anwenden (
)> aus dem
)] Schaltfläche.
)] Schaltfläche.
)], wenn Sie die Einstellungen vorgenommen haben.
SNMP
Mit Hilfe des SNMP Protokolls kann der System- oder Netzwerk Administrator die Netzwerkgeräte aus der
Ferne überwachen und die Umgebungseinstellungen konfigurieren.
1. Wählen Sie die Registerkarte <Network ( )> aus dem
Setup-Menü.
2. Klicken Sie auf <SNMP>.
3. Das <SNMP> festlegen.
• SNMP v1 aktivieren : SNMP Version 1 ist aktiviert.
• SNMP v2c aktivieren : SNMP Version 2 ist aktiviert.
- Lesen Gruppe : Den Namen der Read Community die
auf die SNMP Informationen zugreifen kann.
Der voreingestellte Name lautet <public>.
- Schreiben Gruppe : Den Namen der Write Community
die auf die SNMP Informationen zugreifen kann. Der
voreingestellte Name lautet <write>.
• SNMP Trap aktivieren: SNMP Trap wird verwendet, um wichtige Ereignisse und Bedingungen an den
Admin System zu senden.
- Gemeinschaft: Den Namen der Trap Community eingeben, um Nachrichten zu empfangen.
- IP-Adresse: Die IP-Adresse eingeben, an die die Nachrichten gesendet werden.
- Authentifizierungsfehler: Gibt an, ob ein Ereignis generiert werden soll, wenn die CommunityInformation ungültig ist.
- Netzwerkverbindung: Gibt an, ob ein Ereignis generiert werden soll, nachdem die
Netzwerkunterbrechung wieder hergestellt ist.
• SNMP v3 aktivieren: SNMP Version 3 ist aktiviert.
- Kennwort:
<admin4321>.
`
`
Klicken Sie auf [Anwenden
4.
`
J
`
Das Standard Passwort für SNMP Version 3 festlegen. Das voreingestellte Passwort lautet
Das voreingestellte Passwort kann einem Hacker angriff ausgesetzt sein. Es wird daher empfohlen, das Passwort nach der
Installation zu ändern.
Beachten Sie, dass für die Sicherheit und andere durch ein unverändertes Passwort verursachte Probleme der Benutzer die
Verantwortung trägt.
Das Passwort sollte wenigstens 8 und nicht mehr als 16 Zeichen haben.
( )
], wenn Sie die Einstellungen vorgenommen haben.
SNMP v3 kann nur dann eingestellt werden, wenn der sichere Datenübertragungsmodus HTTPS eingestellt ist.
Schlagen Sie unter „SSL“ nach. (Seite 36)
Falls Sie SNMP v3 nicht verwenden, kann es ein Sicherheitsproblem geben.
Autom. IP-Konfiguration
Sie können festlegen, dass die IP-Adresse für die Suche und den Zugriff auf die Kamera automatisch
festgelegt wird.
1. Wählen Sie die Registerkarte <Network (
Setup-Menü.
2. Klicken Sie auf <Autom. IP-Konfiguration>.
<Link- Lokale IPv4 Adresse> einstellen.
3.
Eine zusätzliche IP-Adresse kann zugewiesen werden, um
auf die Kamera über einen Link aus einem lokalen Netzwerk
zuzugreifen.
• Auto-Konfiguration : Gibt Befähigen oder Deaktivieren für
die Link-Lokale IPv4-Adresse an.
• IP-Adresse : Die zugeordnete IP-Adresse anzeigen.
• Subnetzmaske : Die Subnetzmaske des zugeordneten IP
anzeigen.
4. <UPnP entdeckung> einstellen.
Nach Kameras kann automatisch mit Unterstützung des UpnP-Protokolls sowohl im Client als auch im
Betriebssystem gesucht werden.
• UPnP entdeckung: Gibt Befähigen oder Deaktivieren für UPnP-Ermittlung an.
• Freundlicher name: Den Kameranamen anzeigen.
Der Anzeigename wird im Format von SAMSUNG-<Modellname>-<MAC-Adresse> angezeigt.
Beim Windows-Betriebssystem, das grundsätzlich UPnP unterstützt, werden die Kameras, die mit dem Netzwerk verbunden
`
M
sind, angezeigt.
5. <Bonjour> einstellen.
Nach Kameras kann automatisch mit Unterstützung des Bonjour-Protokolls sowohl im Client als auch im
Betriebssystem gesucht werden.
• Bonjour: Gibt Aktivieren oder Deaktivieren für Bonjour an.
• Freundlicher name: Den Kameranamen anzeigen.
Der Anzeigename wird im Format von SAMSUNG-<Modellname>-<MAC-Adresse> angezeigt.
Beim Mac-Betriebsystem, das Bonjour standardmäßig unterstützt, werden die verbundenen Kameras automatisch in dem
`
M
Bonjour-Lesezeichen des Safari Webbrowsers angezeigt.
Wird das Bonjour-Lesezeichen nicht angezeigt, dann prüfen Sie die Lesezeicheneinstellungen in dem “Präferenz” Menü.
6.
Klicken Sie auf [Anwenden ( )], wenn Sie die Einstellungen vorgenommen haben.
)> aus dem
Deutsch _37
●● SETUP-BILDSCHIRM
Page 38

setup-bildschirm
EREIGNISS-SETUP
FTP / E-mail
Es können die FTP / E-Mail Server Einstellungen konfiguriert werden, sodass die mit der Kamera
aufgenommenen Bilder an Ihren PC gesendet werden, wenn ein Ereignis eintritt.
1. Wählen Sie die Registerkarte <Event (
Menü.
2. Klicken Sie auf <FTP / E-mail>.
3. Wählen Sie <FTP-Konfiguration> oder <E-mailKonfiguration> und geben/löschen Sie einen gewünschten
Wert ein.
• FTP-Konfiguration
- Serveradresse : Geben Sie die IP-Adresse des FTPServers ein, an den die Bilder eines Alarms oder
Ereignisses gesendet werden sollen.
- ID : Geben Sie die Benutzer-ID ein, mit der Sie sich auf
dem FTP-Server anmelden werden.
- Kennwort : Geben Sie ein Benutzerkennwort ein, um
sich beim FTP-Server anzumelden.
- Verzeichnis Hochladen : Geben Sie den Pfad auf dem FTP-Server an, unter dem die Bilder eines
Alarms oder Ereignisses gespeichert werden.
- Port : Standardmäßig wird für den FTP-Server Port 21 verwendet; Sie können die Portnummer
jedoch den FTP-Servereinstellungen entsprechend ändern.
- Passivmodus : Wählen Sie <Ein>, wenn aufgrund der Firewall- oder FTP-Servereinstellungen eine
Verbindung mit Passivmodus erforderlich ist.
• E-mail-Konfiguration
- Serveradresse : Geben Sie die SMTP-Adresse des E-Mail-Servers ein, an den die Bilder eines Alarms
oder Ereignisses gesendet werden sollen.
- Verwendung Authentifizierung : Wählen ob die Berechtigung benutzt werden soll.
- SSL Verwendung : Legen Sie die Verwendung von SSL fest.
- ID : Geben Sie den Benutzernamen zur Anmeldung auf dem E-Mail-Server ein.
- Kennwort : Geben Sie das Benutzerkennwort ein, um sich beim E-Mail-Server anzumelden.
- Port : Standardmäßig wird für den E-Mail-Server Port 25 verwendet; Sie können die Portnummer
jedoch den E-Mail-Servereinstellungen entsprechend ändern.
- Empfänger : Geben Sie die E-Mail-Adresse des Empfängers ein.
- Absender : Geben Sie die E-Mail-Adresse des Absenders ein. Wenn Sie eine falsche
Absenderadresse eingeben, wird die E-Mail vom E-Mail-Server eventuell als SPAM eingestuft und
nicht verschickt.
- Betreff : Geben Sie einen Betreff für Ihre E-Mail ein.
- Textfeld : Geben Sie den Text Ihrer Nachricht ein. Fügen Sie die Bilder des Alarms oder Ereignisses
an die E-Mail an, die Sie gerade bearbeiten.
4.
Klicken Sie auf [Anwenden
( )
)> aus dem Setup-
], wenn Sie die Einstellungen vorgenommen haben.
Speicherkapazität
Sie können auf Ihrem Gerät die Aufnahmefunktion aktivieren, die Aufnahmebedingungen einstellen, die gespeicherte Datenkapazität prüfen und das Gerät selbst formatieren.
1. Wählen Sie die Registerkarte <Event ( )> aus dem Setup-
Menü.
2. Klicken Sie auf <Speicherkapazität>.
3. Gerät zum Speichern auswählen.
Wenn die Aufnahme von Daten in Ihrem Gerät ordnungsgemäß
`
M
erfolgt, wird “Aufnahme” angezeigt.
Falls Sie eine “Fehler”-Meldung sehen, überprüfen Sie folgende
`
Punkte :
Den Speicher daraufhin prüfen, ob er mit dem Gerät verbunden
-
ist.
Überprüfen Sie die Dateien im Speicher, um zu sehen, ob sie
-
beschädigt sind.
Überprüfen Sie den Speicher, um zu sehen, ob sie physisch
-
beschädigt sind.
Sollte die “Fehler” Benachrichtigung nach den folgenden
`
Anweisungen nicht verschwinden, formatieren Sie die Micro SD-Karte.
Sollte die Fehler-Benachrichtigung nach dem Formatieren noch immer vorhanden sein, dann ersetzen Sie die Micro SDKarte.
Wenn Sie die Micro SD-Karte entfernen, ohne eine Schaltfläche in den Einstellungen zur Position “Aus” ändern oder wenn Sie
`
eine Kamera zu einer instabilen Stromquelle anschließen, kann die Micro SD-Larte beschädigt werden.
Nach dem Betrieb im Aufnahme-Modus dürfen Sie gleichzeitig auf 2 Profile zugreifen sowie mit 3 Benutzern verbinden.
`
J
Vorhandene Benutzer werden jedoch aufrechterhalten.
Auf die Micro SD Speicherkarte aufnehmen
1. Legen Sie die SD-Karte-Einheit auf <Ein> fest.
2. Klicken Sie auf die Schaltfläche [Anwenden (
3. Prüfen Sie die <Freie Größe> und die <Gesamtgröße> Ihrer Speicherkarte.
Sie können die Micro SD -Karte formatieren, indem Sie auf die Schaltfläche <Format> klicken.
Einige Bilder können übersprungen werden, wenn die
`
empfohlen wird.
Lesen Sie für weitere Einzelheiten die “Micro SD/SDHC/SDXC Speicherkarte-Spezifikationsempfehlungen”. (Seite 7)
Bei Micro SD Speicherkarten mit hoher Speicherkapazität dauert die Formatierung entsprechend länger.
`
Der Datenverkehr nimmt zu, wenn die Kamera auf eine höhere Auflösung, eine höhere Bitrate und/oder eine höhere Bildfrequenz
`
eingestellt ist.
Wenn der Datenverkehr zu hoch ist, könnten einige Bilder übersprungen werden, auch wenn sie in einem vollständigen Frame
gespeichert sind.
Wird ein Einzelbild übersprungen, werden die Bilder in einer Frequenz einer Minute bzw. ein Bild pro Sekunde gespeichert.
`
4. Legen Sie die Speicheraktion fest.
• Aufnahmeprofil : Zeigt den Codec des Aufnahmeprofils an.
• Normal : Macht Aufnahmen bei einer bestimmten Bildfrequenz.
• Ereignis : Stellt den Aufnahmetyp für bestimmte eintretenden Ereignisse ein.
)].
Micro SD
Karte mit einer geringeren Geschwindigkeit arbeitet, als
38_ setup-bildschirm
Page 39

• Dauer vor dem Ereignis : Wählen Sie einen Zeitpunkt vor dem Alarmauftritt aus; alle Bilder, die von
diesem Zeitpunkt an aufgenommen wurden, werden übertragen. Sie können bis 5 Sekunden vor dem
Einsetzen des Alarms auswählen.
• Dauer nach dem Ereignis : Wählen Sie einen Zeitpunkt nach dem Alarmauftritt aus; alle Bilder, die bis zu
diesem Zeitpunkt aufgenommen wurden, werden übertragen. Sie können bis 120 Sekunden nach dem
Einsetzen des Alarms auswählen.
• Aufgezichnete Dateitype : Gibt das Dateiformat der aufgenommenen Bilder an.
- STW : Dies ist das spezifische Dateiformat von Samsung.
- AVI : Es ist das konventionelle AVI-Format.
Wird der Speicher-Dateityp geändert, werden die vorhandenen Daten formatiert.
`
J
• Überschreiben : Wenn die Micro SD Speicherkarte voll ist, werden die alten Daten gelöscht und durch
neue ersetzt.
• Autom. Löschen : Es werden Daten eines bestimmten Zeitraums gelöscht, während andere Daten nicht
gelöscht werden.
Das kann in einem Zeitraum von einem bis 180 Tagen erfolgen.
Wenn der Speicherzeitraum abgelaufen ist, werden die Daten automatisch gelöscht und neue Daten werden
`
J
aufgenommen. Nach dem Löschen ist eine Wiederherstellung unmöglich.
5. Einstellen <SD-Dateisystem>.
• Typ : Die Kamera unterstützt VFAT und EXT4 für das SD-Kartensystem, das von dem Benutzer
festgelegt werden kann.
(Eine getrennte Anwendung ist allerdings erforderlich, die es dem EXT4-Dateisystem erlaubt, mit dem
Windows-Betriebssystem zu interagieren.)
Wird die Einstellung geändert, werden die vorhandenen Daten formatiert.
`
J
Die Formatierung der SD-Karte im ext4-Dateisystem dauert bis zu 10 Minuten.
`
6. Legen Sie die <Normal Aufnahme Setup> fest.
• Immer : Speichert die aufgezeichneten Videos immer auf der Micro SD Speicherkarte.
Wenn Immer eingestellt ist, kann die Aktivierungszeit nicht geändert werden.
`
• Nur festgelegte Zeit : Führt die Aufnahme zur festgelegten Zeit am festgelegten Wochentag durch.
• [Entfernen (
7. Klicken Sie auf [Anwenden (
)] : Setzt alle Einstellungen zurück.
)], wenn Sie die Einstellungen vorgenommen haben.
Wenn Sie in Ihrem NAS aufnehmen möchten
1. Speicherbetrieb und Hauptaufnahme einstellen.
Die Auto-Löschfunktion wird nur unterstützt, wenn Ihr NAS den
`
J
empfohlenen Spezifikationen entspricht.
2. Geben Sie die in Ihrem NAS registrierten Informationen ein.
• IP-Adresse : Eindeutige dem NAS zugewiesene IP-
Adresse.
• ID : Eine im NAS registrierte ID.
• Kennwort : Das im NAS registrierte Passwort.
• Standard Ordner : Bezeichnen Sie den NAS-
Benutzerordner, um darin Daten zu speichern.
3. Die Schaltfläche [Test] anklicken und feststellen, ob Sie sich
erfolgreich mit NAS verbinden können.
Wird eine Erfolgsmeldung angezeigt, bedeutet dies, dass Sie Daten
`
J
erfolgreich in NAS speichern können.
Wird eine Fehlermeldung angezeigt, ist Folgendes zu prüfen.
`
Bestätigen Sie, dass die IP-Adresse des NAS gültig ist.
-
Bestätigen Sie, dass die ID/dass Passwort des NAS gültig ist.
-
Bestätigen Sie, dass Sie auf den als Basisordner bezeichneten Ordner mit der NAS-ID zugreifen können.
-
Bestätigen Sie, dass die NAS SMB/CIFS-Punkte nicht angekreuzt sind.
-
Bestätigen Sie, dass die NAS IP-Adresse und die Kamera-IP-Adresse dasselbe Format haben.
-
bsp) Der Erstwert des NAS & der Kamerasubnetzmaske ist 255.255.255.0.
Ist die IP-Adresse 192.168.20.32, sollte sich die NAS IP-Adresse im Bereich von 192.168.20.1~192.168.20.255.
befinden
Prüfen Sie, ob Sie als ein anderer Benutzer ohne Formatierung des gespeicherten oder benutzten Basisordners zugreifen
-
wollten.
Bestätigen Sie, dass Sie empfohlene NAS-Ausrüstung benutzten.
-
4. Nachdem die Einstellungen abgeschlossen worden sind, legen Sie das NAS-Gerät auf <Ein> fest.
5. Klicken Sie auf die Schaltfläche [Anwenden (
6. Melden Sie sich bei NAS an und prüfen Sie den <Freie Größe> und den <Gesamtgröße>.
Sie können den Standardordner, der in der NAS-Verbindung angegeben wurde formatieren, indem Sie auf
die Schaltfläche <Format> klicken.
Da Daten nach einer zeitweiligen Netzwerkunterbrechung bei der Verwendung von NAS eventuell nicht gespeichert werden,
`
empfiehlt es sich gleichzeitig SD zu verwenden, um den Verlust von aufgenommenen Bildern zu verhindern.
Der Datenverkehr nimmt zu, wenn die Kamera auf eine höhere Auflösung, eine höhere Bitrate und/oder eine höhere Bildfrequenz
`
eingestellt ist.
Wenn der Datenverkehr zu hoch ist, könnten einige Bilder übersprungen werden, auch wenn sie in einem vollständigen Frame
gespeichert sind.
Wird ein Einzelbild übersprungen, werden die Bilder in einer Frequenz einer Minute bzw. ein Bild pro Sekunde gespeichert.
`
)].
●● SETUP-BILDSCHIRM
Deutsch _39
Page 40

setup-bildschirm
NAS (Network-Attached Storage) Leitfaden
Da Daten nach einer zeitweiligen Netzwerkunterbrechung bei der Verwendung von NAS eventuell nicht gespeichert werden,
`
J
empfiehlt es sich gleichzeitig SD zu verwenden, um den Verlust von aufgenommenen Bildern zu verhindern.
Wenn es die Einstellungen zulassen, dass eine Micro SD Karte gleichzeitig mit dem NAS angeschlossen werden kann, liegt
`
die Aufnahmepriorität bei NAS.
Wenn Sie den NAS zum Überschreiben aktivieren indem Sie ihn auf <Aus> einstellen und die verfügbare Kapazität ist
`
weniger als 1%, wird in der Micro SD Karte gespeichert.
Werden Daten in NAS gespeichert, kann eine Speicherung unmöglich sein, wenn Sie eine von einer anderen Kamera
`
benutzte Micro SD Karte einsetzen.
Empfohlene NAS-Spezifikationen : Siehe “Empfohlene NAS-Spezifikationen” (Seite 7)
`
Wenn Sie die NAS-Speicherung ändern, während Sie Daten in NAS speichern, wirkt sich das nicht sofort im System aus.
`
Wenn Sie NAS-Geräte während einer Datenspeicherung entfernen oder wenn das Netzwerk getrennt ist, wird der NAS-
`
Speichervorgang als regelwidrig beendet.
Beim NAS-Speichern wird nur eine Kamera für jeden Ordner verwendet. Die Anmeldung mit einer anderen Kamera ist nicht
`
möglich und die Bilder werden nicht gespeichert.
Nachfolgend eine Darstellung zur Datenspeicherung mittels NAS laut dem Synologie-NAS-Verfahren, das zu
den empfohlenen Produkten gehört.
1. Auf Synologie-NAS als Admin zugreifen.
In diesem Beispiel wird die NAS-IP-Adresse auf
[192.168.20.253] eingestellt.
2. Wenn Sie darauf als Admin zugreifen, wird der folgende
Bildschirm angezeigt. Auf [Control Panel] klicken.
4. Auf die Schaltfläche [Create] klicken.
5. Nach Eingabe des Namens des gemeinsamen Ordners(ID),
auf die Schaltfläche [OK] klicken und einen gemeinsamen
Ordner erstellen.
In diesem Beispiel lautet die Bezeichnung des gemeinsamen
Ordners [testDirectory].
6. Unter Windows müssen, um auf NAS zugreifen zu können,
die Berechtigungen für den gemeinsamen Ordner wie folgt
sein.
Admins [Read/Write] prüfen.
7. Im Menü Berechtigungen und Dateinutzung auf <User>
klicken.
8. Nachdem auf die Schaltfläche [Create] geklickt wurde, Name
(ID) und Passwort eingeben.
In diesem Beispiel werden Name (ID) und Passwort auf
[testID] gesetzt.
Netgears NAS-Ausüstung funktioniert nur mit ReadyNAS OS Version
`
J
6 oder höher (Geräteversion 6.x.x).
Entsprechend den NAS-Empfehlungen und bei Nutzung von Netgears
`
NAS-Geräten, dürfen Sie keine Nutzungskapazität zuweisen.
9. In Windows ist die Berechtigung für den NAS-Zugriff
einzustellen.
Für den in Schritt 4 erstellten und als “testDirectory” benannten
Ordner ist der [Read/Write] zu prüfen.
3. Im Menü Berechtigungen und Dateinutzung auf <Shared
Folder> klicken.
40_ setup-bildschirm
Page 41

10. Die Grundeinstellung im NAS wurde abgeschlossen.
Verbinden Sie Ihre Kamera mit dem aktuellen NAS.
Geben Sie, wie unten gezeigt, die NAS
Verbindungeinstellungselemente ein.
11. Nach Eingabe von Element 10, <Ein> markieren.
12. Auf die Schaltfläche [
Speichervorgang mit NAS abschließen.
Anwenden ( )
] klicken.
Zeitplan
Es kann eingestellt werden, die Videodaten in bestimmten Intervallen zu speichern, unabhängig davon ob ein
Ereignis eingetreten ist.
1. Wählen Sie die Registerkarte <Event (
Menü.
2. Klicken Sie auf <Zeitplan>.
3. Entscheiden Sie, ob Sie die Option auf <Aktiviern> einstellen
möchten oder nicht
Legen Sie das <Übertragungsintervall> fest.
4.
5. Legen Sie die <Aktivierungszeit> fest.
• Immer : Wird immer im Betriebsmodus am eingestellten
Intervall aktiviert.
• Nur festgelegte Zeit : Wird regelmäßig im Betriebsmodus
am festgelegten Datum und Uhrzeit aktiviert.
Damit die Bildübertragung erfolgreich ist, muss der Einstellungswert
`
J
des Übertragungsintervalls kleiner als das voreingestellte
Aktivierungsintervall sein.
6. Legen Sie die Aktivierungsbedingungen fest.
• FTP : 타타 타타타 타타 타 FTP 타타 타타타 타타타타타.
Lesen Sie zu mehr auf “FTP / E-Mail”. (Seite 38)
`
7. Klicken Sie auf [Anwenden (
)> aus dem Setup-
)], wenn Sie die Einstellungen vorgenommen haben.
Manipulation erkennung
Es kann eingestellt werden Manipulationsversuche und auslösende Ereignisse zu erkennen, wie plötzliche Änderung
der Aufnahmerichtung der Kamera, blockiertes Objektiv und andere allgemeine Veränderungen am Videomotiv.
1. Wählen Sie die Registerkarte <Event ( )> aus dem Setup-
Menü.
2. Klicken Sie auf <Manipulation erkennung>.
3. Entscheiden Sie, ob Sie die Option auf <Aktiviern> einstellen
möchten oder nicht.
4. Stellen Sie die Empfindlichkeit der Manipulationserkennung
ein. Je höher die Empfindlichkeit, desto geringere
Manipulationsversuche werden erkannt.
5. Legen Sie die <Aktivierungszeit> fest.
• Immer : Um fortdauernd zu prüfen, ob ein Ereignis
stattgefunden hat oder nicht Wird ein Ereignis erkannt, wird
ein voreingestellter Vorgang ausgeführt.
Wenn <Immer> eingestellt ist, kann die Aktivierungszeit nicht
`
geändert werden.
• Nur festgelegte Zeit : Zum Prüfen, ob ein Ereignis zu einer bestimmten Zeit an einem bestimmten Datum
stattgefunden hat oder nicht. Wird ein Ereignis erkannt, wird ein voreingestellter Vorgang ausgeführt.
• [Entfernen (
• Stunde: Ihre Maus bei Aktivierungszeit ziehen und die Zeit
nach Stunden einstellen.
• Minuten: Einen Bereich in Aktivierungszeit anklicken und
die Zeit nach Minuten einstellen.
6. Konfigurieren der Vorgänge, die ausgeführt werden, wenn ein
Ereignis erkannt wird.
• FTP : Einstellen ob oder ob nicht an FTP zu senden, wenn
ein Ereignis erkannt wird.
Lesen Sie zu mehr auf “FTP / E-Mail”. (Seite 38)
`
• E-mail : Einstellen ob oder ob nicht eine Übertragung ausgeführt wird, wenn ein Ereignis erkannt wird.
Lesen Sie zu mehr auf “FTP / E-Mail”. (Seite 38)
`
• Aufnehmen : Einstellen ob oder ob nicht auf einem NAS oder einer MicroSD-Karte aufgezeichnet wird,
wenn ein Ereignis erkannt wird.
<Gerät> auf <An> im <Speicherkapazität> festlegen. (Seite 38)
`
7. Klicken Sie auf [Anwenden (
Die Manipulationserkennung kann in folgenden Fällen nicht störungsfrei funktionieren:
`
J
Bei eintönigen Hintergründen oder schwachen Lichtverhältnissen und während der Nacht kann die
-
Erkennungsempfindlichkeit niedriger sein.
Starke Erschütterungen der Kamera oder eine drastische Helligkeitsänderung können als Manipulationsversuch
-
interpretiert werden.
Das Erkennen eines Manipulationsversuchs kann eine gewisse Zeit in Anspruch nehmen (maximal 5 Sekunden).
-
Nachdem ein ein Manipulationsversuch erkannt wurde, fährt die Kamera für eine bestimmte Stabilisierungszeit mit dem
-
normalen Betrieb fort (ca. 5 Sekunden), während der keine weitere Erkennung vorgenommen wird.
)] : Setzen Sie die eingestellte Zeit zurück.
)], wenn Sie die Einstellungen vorgenommen haben.
●● SETUP-BILDSCHIRM
Deutsch _41
Page 42

setup-bildschirm
Bewegungserkennung
Sie können die Einstellungen konfigurieren, sodass bei Ermittlung einer Bewegung ein Ereignissignal generiert
wird.
1. Wählen Sie die Registerkarte <Event (
Menü.
2.
Klicken Sie auf <Bewegungserkennung>.
3. Entscheiden Sie, ob Sie die Option auf <Aktiviern> einstellen
möchten oder nicht.
4. Stellen Sie <Empfindlichkeit>, <Größe> und <Bereich> ein.
5. Legen Sie die Aktivierungszeit und Aktivierungsbedingung
fest.
Weitere Informationen über <Aktivierungszeit> und <Aktion> finden
`
Sie unter „Manipulation erkennung“. (Seite 41)
6.
Klicken Sie auf [Anwenden
vorgenommen haben.
Stellen Sie zuerst die minimale und maximale Bewegungsgröße ein,
`
J
um den zu erkennenden Bewegungsbereich anzupassen.
Die erkannte Größe eines Objekts kann aufgrund seiner Form von der
`
tatsächlichen Größe abweichen.
Bis zu 16 Objekte vom oberen Rand des Bildschirms können
`
angezeigt werden.
Wenn eine Kamera ein Objekt aus kurzer Distanz aufnimmt, könnte
`
die Funktion der Bewegungserkennung beeinträchtigt sein.
In diesen Fällen könnte die Funktion der Bewegungserkennung vermindert sein oder eine inkorrekte Bewegungserkennung
`
ergeben.
Die Farbe oder Helligkeit des Objekts ist ähnlich zum Hintergrund.
-
Geringe Aktivitäten in der Nähe des Randbereichs des Sichtfelds der Kamera.
-
Es treten laufend mehrere zufällige Bewegungen aufgrund eines Szenenwechsels, schnelle Änderungen der
-
Lichtverhältnisse oder andere Gründe auf.
Ein feststehendes Objekt bewegt sich laufend an der selben Stelle.
-
Bewegungen mit geringen Positionswechseln, wie das Annähern an die oder sich entfernen von der Kamera.
-
Das sich bewegende Objekt erscheint zu dicht an der Kamera.
-
Ein Objekt verbirgt andere Objekte hinter sich.
-
Zwei oder mehr Objekte überlappen oder ein Objekt teilt sich in mehrere Teile auf.
-
Das Objekt ist zu schnell (für eine korrekte Erkennung muss sich ein Objekt in den überlappenden Bereichen der
-
aneinander angrenzenden Rahmen befinden).
Reflexionen / Unschärfe / Schatten aufgrund starken Lichteinfalls, wie direkte Sonneneinstrahlung, Beleuchtung oder
-
Scheinwerfer.
Heftiger Regen, Schneefall, Wind oder bei Dämmerung / Halbdunkel.
-
( )
)> aus dem Setup-
], wenn Sie die Einstellungen
Bewegungserkennung verwenden
Es werden Bewegungen erkannt, die alle unter Empfindlichkeit, Größe und Bereich festgelegten Bedingungen
erfüllen.
1. Einen Bewegungserkennungsmodus auswählen.
2. Wählen Sie die Karteikarte <Empfindlichkeit>, um
eine Empfindlichkeitsstufe einzustellen. Sie können die
Empfindlichkeit des Sensors so einstellen, dass Bewegungen
im Hintergrund erkannt werden.
In Situationen, in den deutlich Objekte im Hintergrund erkannt werden,
`
J
eine niedrige Empfindlichkeitsstufe einstellen. Im entgegengesetzten
Fall, wenn Objekte schwer erkannt werden, wie bei schwachen
Lichtverhältnissen, eine hohe Empfindlichkeitsstufe einstellen.
3. Wählen Sie die Karteikarte <Größe>.
Sie können die minimale/maximale Größe der zu erkennenden
Bewegung festlegen.
• Minimale Größe (Pixel) : Um die minimale Größe der zu
erkennenden Bewegungen einzustellen, <Minimale Größe
(Pixel)> auswählen und mit der Maus auf dem Bildschirm
klicken und auf die gewünschte Größe ziehen.
• Maximale Größe (Pixel) : Um die maximale Größe der zu
erkennenden Bewegungen einzustellen, <Maximale Größe
(Pixel)> auswählen und mit der Maus auf dem Bildschirm
klicken und auf die gewünschte Größe ziehen.
Bewegungen, die kleiner oder größer als die Minimale oder Maximale Größe sind, werden nicht erkannt. Um eine falsche
`
J
Erkennung zu verhindern, die durch starkes oder schwaches Rauschen verursacht werden kann, die maximale/maximale
Größe der Bewegung entsprechend an Ihre Umgebung anpassen.
Beachten Sie bitte, dass die gleichen Bewegungen am gleichen Standort aufgrund der Erkennungsgröße unterschiedlich
erkannt werden können; es wird empfohlen, die akzeptablen Abweichungen bei der Einstellung der minimalen/maximalen
Erkennungsgrüße zu berücksichtigen.
4. Wählen Sie die Karteikarte <Bereich>.
Sie können einen Bereich auf dem Bildschirm auswählen,
der von der Erkennung eingeschlossen oder ausgeschlossen
werden soll.
Es können bis zu 4 Bereiche definiert werden.
• Erkennungsbereich: Schließt den gesamten Bildschirm von
der Erkennung aus und fügt einen festgelegten Bereich für die
Bewegungserkennung fest. Mit Ihrer Maus 4 Eckpunkte in dem
Bild wählen, um den Erkennungsbereich anzugeben.
• Erkennungsfreier Bereich: Der gesamte Bildschirm wird von
der Erkennung eingeschlossen und fügt einen Bereich hinzu,
der von der Erkennung ausgeschlossen werden soll.
Mit Ihrer Maus 4 Eckpunkte in dem Bild wählen, um den NichtErkennungsbereich anzugeben.
5. Um einen Bereich zu löschen, mit der rechten Maustaste
auf den Bildschirm klicken, um das Popup Kontextmenü zu
öffnen. Wählen Sie Löschen und klicken Sie auf [OK].
Klicken Sie auf [Anwenden
6.
vorgenommen haben.
( )
], wenn Sie die Einstellungen
42_ setup-bildschirm
Page 43

SYSTEM-SETUP
Produktinformation
1. Wählen Sie die Registerkarte <System ( )> aus dem
Setup- Menü.
Klicken Sie auf <Produktinformation>.
2.
3. Überprüfen Sie die Kamerainformationen oder geben Sie
Einzelheiten bezüglich Ihrer Netzwerkumgebung an.
• Modell : Modellname des Geräts.
• Seriennummer : Seriennummer des Geräts.
• Gerätename : Den Gerätenamen eingeben, der auf dem
Live Screnn angezeigt wird.
• Standort : Geben Sie den Ort an, an dem die Kamera
installiert ist.
• Beschreibung : Geben Sie detaillierte Informationen des Installationsortes der Kamera an.
• Memo (Notizen) : Geben Sie für ein besseres Verständnis eine Beschreibung der Kamera an.
• Sprache : Wählen Sie die gewünschte Sprache für das OSD des Web Viewers.
Die Standardsprache ist auf <English> eingestellt.
`
M
Klicken Sie auf [Anwenden ( )], wenn Sie die Einstellungen vorgenommen haben.
4.
Aktualisierung / Neustart
1. Wählen Sie die Registerkarte <System ( )> aus dem
Setup- Menü.
2. Klicken Sie auf <Aktualisierung / Neustart>.
3. Wählen Sie einen bestimmten Menüpunkt und stellen Sie ihn
entsprechend ein.
• Upgraden : Führt eine Systemaktualisierung durch.
• Standardwerte : Das System wird auf die
Werkseinstellungen zurückgesetzt.
- Außer Netzwerkparameter : Initialisieren aller
Einstellungen außer denen, die mit dem Netzwerk und
dem Objektiv in Beziehung stehen.
- Alle : Alle Einstellungen, einschließlich der Kameraeinstellungen, werden zurückgesetzt. (die
Protokollinformationen werden jedoch beibehalten)
Die Zuweisung der IP-Adresse wird auf DHCP voreingestellt, wenn die Kamera zurückgesetzt wird. Wenn kein DHCP-Server
`
gefunden wird, werden die vorherigen Einstellungen automatisch wieder hergestellt.
• Konfiguration Backup und Wiederherstellen : Zur Erzeugung einer Sicherungskopie der
Systemeinstellungen, bevor der Wiederherstellungsprozess durchgeführt wird. Das System startet
automatisch neu nach einem Backup oder einer.
• Neu starten : Das System wird neu gestartet.
Eine Aktualisierung durchführen
1. Klicken Sie auf [Upgraden].
2. Klicken Sie auf [Durchsucher] und legen Sie eine Datei für
die Aktualisierung fest.
3. Klicken Sie auf [Senden].
4. Der Dialog „Aktualisierung“ erscheint und der Fortschritt
wird im unteren Bereich angezeigt.
5. Nachdem die Aktualisierung abgeschlossen ist, wird der
Browser geschlossen und die Kamera neu gestartet.
Die Aktualisierung kann maximal 10 Minuten in Anspruch nehmen.
`
M
Wenn Sie den Aktualisierungsprozess abbrechen, so kann er nicht
fertiggestellt werden.
Während des System Neustarts findet der Zugriff über Web Viewer
`
nicht statt.
Die neueste Softwareversion kann von der Samsung Electronics-
`
Website heruntergeladen werden.
Sicherung der aktuellen Einstellungen
1. Klicken Sie auf [Backup].
Das „Speichern unter“-Dialogfeld erscheint.
2. Wählen Sie einen Backup-Pfad mit einem ordnungsgemäßen
Dateinamen und klicken Sie auf [Save].
Die Backup-Datei wird unter dem festgelegten Pfad und in
dem Format „.bin“ gespeichert.
●● SETUP-BILDSCHIRM
Deutsch _43
Page 44

setup-bildschirm
Wiederherstellen der gesicherten Einstellungen
1. Klicken Sie auf [Wiederhersteller] um die Backup-
Einstellungen.
2. Wählen Sie eine Backup-Datei und klicken Sie auf [Open].
Wenn Sie eine Sicherungskopie anlegen oder eine Wiederherstellung
`
M
der Daten vornehmen, wird der Browser geschlossen und die Kamera
startet neu.
Wenn Sie versuchen, die in einem anderen Modell gespeicherte,
`
konfigurierte Datei wieder herzustellen, werden einige Funktionen
nicht funktionieren und Sie müssen die Einstellung manuell ändern.
Protokoll
Sie können das System- oder das Ereignisprotokoll überprüfen.
1. Wählen Sie die Registerkarte <System (
Setup- Menü.
2. Klicken Sie auf <Protokoll>.
3. Wählen Sie einen Protokolltyp aus.
• System : Sie können anhand der Systemprotokolle
nachprüfen, an welcher Stelle Systemänderungen,
gemeinsam mit Zeitangaben, aufgezeichnet wurden.
• Ereigniss : Sie können die Ereignisprotokolle gemeinsam mit
Zeitangaben überprüfen.
4.
Wählen Sie aus der rechten Protokollliste ein Element, nach
dem gesucht werden soll.
• Wenn Sie <All> in dem Aufklappmenü oben links wählen, werden alle Protokolle des entsprechenden
Protokolltyps angezeigt.
5. Wenn alle verfügbaren Protokolle nicht auf einer Seite angezeigt werden können, verwenden Sie die
unteren Schaltflächen, um zum vorherigen, nächsten oder letzten Element zu wechseln.
6. Klicken Sie auf die Schaltfläche <Backup>, um alle Protokolldaten für den aktuell ausgewählten Modus
(System, Ereignis) in der Datei “Zeitstempel-Wert erstellt von der Kamera i Modellname-Modus-Kamera.txt
Datei” im für den Browser heruntergeladenen Ordner zu speichern.
)> aus dem
PROFILINFORMATION EINSEHEN
Profil Zugriff
Sie können die Angaben der Profil überprüfen.
1. Auf dem Live-Bildschirm auf [Status (
2. Der Bildschirm Profilinformation wird angezeigt.
• Profil Zugriff : Zeigt die Angaben des neu hinzugefügten
Profils an.
- Profil : Zeigt die Angaben des neu hinzugefügten
Codecs an.
- Bitrate(kbps) : Zeigt sowohl die aktuelle als auch die
eingestellte Bitrate an.
- Bildfrequenz(fps) : Zeigt sowohl die aktuelle als auch die
eingestellte Bildfrequenz an.
- ATC (%) : Zeigt den ATC-Status an.
- Anzahl der gleichzeitigen benutzer : Zeigt die Anzahl der Benutzer an, die zur gleichen Zeit auf das
Profil zugreifen.
• Aktuelle Benutzer : Zeigt Informationen über die Benutzer an, die auf den Web Viewer zugreifen und
Überwachungsvideo anzeigen.
- Profil : Zeigt den Namen des Profils an, auf das vom Benutzer zugegriffen wird.
- Bitrate(kbps) : Zeigt die aktuelle Bitrate an.
- Netzwerk Verbindungsstatus : Das zeigt, ob das Netzwerk ordnungsgemäß funktioniert.
- IP : Zeigt die IP-Adresse des aktuellen Benutzers an.
Um Informationen über das gerade verwendete Profil zu erhalten, erneut auf [Status ( )] drücken, um die Informationen
`
M
zu aktualisieren.
Damit Änderungen in Kraft treten, braucht es eine gewisse Zeit.
)] klicken.
Wenn Sie Details eines Protokolls betrachten möchten, klicken Sie in der rechten Spalte des Protokolls auf
`
M
Informationen zu dem Protokoll werden im unteren Bereich angezeigt.
Auf jeder Seite werden 15 Protokolle angezeigt, wobei das Aktuellste stets ganz oben angezeigt wird.
`
Die Ereignis-/Systemprotokoll-Liste kann bis zu 1000 Protokolle beinhalten; wird diese Anzahl überschritten, so wird jeweils
`
das älteste Protokoll überschrieben, wenn ein neues erstellt wird.
44_ setup-bildschirm
[Info. ( )]
; die
Page 45

anhang
SPEZIFIKATIONEN
Elemente
Bildaufnahmegerät 1/2.9” 2.19M CMOS
Gesamtpixelanzahl 2,000(H) x 1,121(V)
Video
Objektiv
Schwenken /
Neigen / Drehen
Effektive Pixel 1,984(H) x 1,105(V)
Abtastsystem Progressiv
Mindestbeleuchtung
Brennweite (Zoomrate) 3,6mm
Max. Blendenverhältnis
Sichtwinkelfeld H: 86,5˚, V: 47,8˚, D: 101,2˚
Mindestentfernung zum
Objekt
Objektivart Fixiert
Montagetyp Platinentyp
Schwenkbereich -5˚~+5˚
Neigebereich 0° ~ 67°
Drehbereich 90˚
Beschreibung
SNV-L6013R SNV-L6014RM
Farbe : 0,15 Lux (1/30 s, F1,8), 0,003 Lux (2 s, F1,8)
S/W : 0 Lux (IR-LED ein)
F1,8
0,5m
Funktionsweise
Elemente
Sichtweite 15m
Kameratitel Aus / Ein (bis zu 15 Zeichen werden angezeigt)
Tag und Nacht True Tag & Nacht
Gegenlichtkompensation
Kontraststeigerung (DWDR) SSDR (Samsung Super Dynamischer Bereich) (Aus / Ein)
Digitale Rauschunterdrückung
Bewegungserkennung
Privatsphärenausblendung
Verstärkungssteuerung
Weißabgleich ATW / AWC / Manuell / Innenbereich / Außenbereich
LDC (Lens distortion control bjektivverzeichnungskontrolle)
Elektronischer
Blendenverschluss
Umdrehen / Spiegel Flip/Spiegel/Hausflur
Intelligente Video-Analyse Bewegungserkennung mit Metadaten, Manipulation
Alarm Auslöser
Alarmereignisse
Aus / BLC
SSNR (Aus / Ein)
Aus / Ein (4EA rechteckige Erkennungsbereiche)
Aus / Ein (6EA rechteckige Erkennungsbereiche)
Aus / Gering / Mittel / Hoch
Ein/Aus (5 Niveaus mit Min/Max)
Minimum / Maximum / Anti-Flimmern
Bewegungserkennung, Manipulationsermittlung, SD-Kartenfehler, NAS-Fehler
SNV-L6013R SNV-L6014RM
yDatei Hochladen über FTP, E-Mail
yBenachrichtigung über E-Mail
yLokales Speichern der Aufnahme bei Ereignis
Beschreibung
●● ANHANG
Deutsch _45
Page 46

anhang
Netzwerk
Elemente
Ethernet RJ-45 (10/100BASE-T) M12 connector (10/100BASE-T)
Videokomprimierungsformat H.264, MJPEG
Auflösung
Max. Framerate
Video Qualität Anpassung
Bitrate Steuerungsmethode
Streaming Kapazität Mehrfach Streaming (Bis zu 3 Profile)
Audio E/A Eingang Eingang, Ausgang, eingebautes Mikro
Audiokomprimierungsformat
Audiokommunikation Unidirektional
IP
Protokoll
Sicherheit
Streaming-Methode
Max. Benutzerzugriff
1920x1280 /1280x960 / 1280x720 / 1024x768 / 800x600 / 720x576 / 640x480
/ 320x240
H.264 : Max. 30fps bei allen Auflösungen
MJPEG : Max. 1 FPS bei 1920x1080/1280x960/1280x720/1024x768,
Max. 15 FPS bei anderer Auflösung
H.264 : Zielbitrate Pegelsteuerung
MJPEG : Pegelsteuerungs-Qualität
H.264 : CBR oder VBR
MJPEG : VBR
G.711 μ-law /G.726 Wählbar
G.726 (ADPCM) 8KHz, G.711 8KHz
G.726 : 16Kbps, 24Kbps, 32Kbps, 40Kbps
IPv4, IPv6
TCP/IP, UDP/IP, RTP(UDP), RTP(TCP), RTCP, RTSP, NTP, HTTP, HTTPS, SSL, DHCP,
PPPoE, FTP, SMTP, ICMP, IGMP, SNMPv1/v2c/v3(MIB-2), ARP, DNS, DDNS, QoS,
PIM-SM, UPnP, Bonjour
HTTPS (SSL) Authentifizierungsprotokoll
Anmelde-Übersicht Authentifizierung
IP-Adressfilter
Benutzerzugriff Protokoll
802.1X Authentifizierungsmethode
Unicast / Multicast
6 Benutzer im Unicast-Modus
SNV-L6013R SNV-L6014RM
Beschreibung
Netzwerk
Betriebsbedingungen
Elektrisch
Mechanisch
Elemente
Micro-SD/SDHC Max 32G, NAS
Randspeicher
Anwendungsprogrammierschnittstelle
Sprache der Webseite
Web Viewer
Software zur zentralen
Verwaltung
Betriebstemperatur /
Feuchtigkeit
Lagerungstemperatur /
Feuchtigkeit
Schutz vor Eindringling
Vibrationsbeständig
Vandalismusschutz
Eingangsspannung/Strom
Energieverbrauch Max. 5.8W
Farbe / Materiell Elfenbein / Metall
Abmessungen (WxHxD) W99 x H100 x D52mm
Gewicht 300g
- Das auf der SD-Speicherkarte aufgezeichnete Bewegungsbild kann
heruntergeladen werden
- Manuell auf lokalem PC aufgezeichnet
ONVIF Profile S, G
SUNAPI(HTTP API)
Englisch, Französisch, Deutsch, Spanisch, Italienisch, Chinesisch, Koreanisch, Russisch,
Japanisch, Schwedisch, Dänisch, Portugiesisch, Tschechisch, Polnisch, Türkisch,
Rumänisch, Niederländisch, Kroatisch, Hungarisch, Griechisch, Finnland, Norwegen
Unterstützte Betriebssystem : Windows 7, 8, 10, Mac OS X 10.8, 10.9, 10.10, 10.11
Unterstützte Browser : Microsoft Internet Explorer 11, Mozilla Firefox 43, Apple Safari 9
※ Ausschließlich Mac OS X
SmartViewer
-30°C ~ +55°C (-22°F ~ +131°F) /Weniger als 90% rel.Luftfeuchtigkeit * Es sollte
bei -20°C oder höher eingeschaltet werden.
-30°C ~ +60°C (-22°F ~ +140°F) / Weniger als 90% rel. Luftfeuchtigkeit
IP66
EN50155 Klasse T3 (Vibration, Erschütterung, Unebenheit, Temperatur)
EN50121, ISO 16750-3 (Vibration)
NEMA 250 Typ 4x
IK10
PoE (IEEE802.3af, Klasse 2)
SNV-L6013R SNV-L6014RM
Beschreibung
46_ anhang
Page 47

PRODUKTANSICHT
SNV-L6013R
SNV-L6014RM
Einheit: mm (inch)
Einheit: mm (inch)
●● ANHANG
Deutsch _47
Page 48

anhang
FEHLERSUCHE
PROBLEM LÖSUNG
Ich kann von einem Webbrowser nicht
auf die Kamera zugreifen.
Der Viewer wurde während der
Überwachung getrennt.
Ich kann mit einem Registerbrowser
von Internet Explorer 7.0 nicht an das
System verbinden.
Die an das Netzwerk verbundene
Kamera wird im IPnicht erkannt.
Die Bilder überlappen.
Es wird kein Bild eingeblendet.
Dateien können nicht via E-Mail
übermittelt werden, selbst wenn
eine Bewegungserkennung der
Kamera verzeichnet wird, wenn
die <Bewegungserkennung> bei
<Ereignis> auf <EIN> eingestellt ist.
Installationsprogramm
yÜberprüfen Sie, ob die Netzwerkeinstellungen der Kamera entsprechend sind.
yKontrollieren Sie, oballe Netzwerkkabel korrekt angechlossen wurden.
yPrüfen Sie bei einer Verbindung über DHCP, ob die Kamera dynamische IP-Adressen
problemlos erhalten kann.
yPrüfen Sie, wenn die Kamera mit einem Breitband-Router verbunden ist, ob die
Portweiterleitung korrekt konfiguriert ist.
y Verbundene Viewer werden nach etwaigen Änderungen an der Kamera oder den
Netzwerkkonfigurationen getrennt.
yPrüfen Sie alle Netzwerkverbindungen.
y Wenn die Kamera über ein PPPoE-Netzwerk verbunden ist, kann der Viewer bei schlechten
Netzwerkbedingungen getrennt werden.
yDa die Cookie-Daten gemeinsam genutzt werden, kann bei der Verbindung zu einem neuen
Fenster oder einer Registerkarte eine Fehlermeldung ausgegeben werden. Verwenden
Sie kein neues Fenster bzw. keine neue Registerkarte sondern wählen Sie „Datei
Sitzung“.
ySchalten Sie die Firewall-Einstellungen an Ihrem PC aus und suchen Sie dann die Kamera
erneut.
yPrüfen Sie, ob zwei oder mehr Kameras auf einer einzigen Multicast-Adresse anstelle
verschiedener Adressen festgelegt sind. Wenn eine einzige Adresse für mehrere Kameras
verwendet wird, können die Bilder überlappen.
yWenn die Übertragungsmethode auf Multicast festgelegt ist, müssen Sie überprüfen, ob ein
Router vorhanden ist der Multicast im LAN, an das die Kamera verbunden ist, unterstützt.
yÜberprüfen Sie die Einstellungen in der folgenden Reihenfolge:
A. Prüfen Sie die Einstellungen unter <Datum & Uhrzeit>.
B. Die <Bewegungserkennung> muss auf <Aktivieren> gestellt sein.
C. Prüfen Sie, ob die Option <E-mail> im <Ereigniseinrichtung> Menü markiert ist.
Neue
PROBLEM LÖSUNG
Auf die Micro SD Speicherkarte kann
nicht aufgenommen werden.
Die Micro SD Speicherkarte
ist eingelegt, aber die Kamera
funktioniert nicht richtig.
Kann nicht in NAS aufnehmen.
Meldet, dass die NAS-Einstellung
fehlgeschlagen ist.
yAuf die SD-Speicherkarte kann nicht aufgenommen werden.
yÜberprüfen Sie, ob die Speicherkarte richtig herum eingelegt wurde. Für diese Kamera
kann nicht garantiert werden, dass eine Speicherkarte, die mit einem anderen Gerät
formatiert wurde, reibungslos funktioniert.
yFormatieren Sie die Speicherkarte über das Menü
<Speicherkapazität>
yBestätigen Sie, dass die in NAS registrierten Informationen richtig sind.
yBestätigen Sie, dass die IP-Adresse des NAS gültig ist.
yBestätigen Sie, dass die ID/dass Passwort des NAS gültig ist.
yBestätigen Sie, dass Sie auf den als Basisordner bezeichneten Ordner mit der NAS-ID
zugreifen können.
yBestätigen Sie, dass die NAS SMB/CIFS-Punkte nicht angekreuzt sind.
yBestätigen Sie, dass die NAS IP-Adresse und die Kamera-IP-Adresse dasselbe Format
haben.
Ex) Der Erstwert des NAS & der Kamerasubnetzmaske ist 255.255.255.0.
Ist die IP-Adresse 192.168.20.32, sollte sich die NAS IP-Adresse im Bereich von
192.168.20.1~192.168.20.255. befinden
yPrüfen Sie, ob Sie als ein anderer Benutzer ohne Formatierung des gespeicherten oder
benutzten Basisordners zugreifen wollten.
yBestätigen Sie, dass Sie empfohlene NAS-Ausrüstung benutzten.
.
<Setup> <Event>
48_ anhang
Page 49

OPEN SOURCE ANNOUNCEMENT
GPL/LGPL software license
The software included in this product contains copyrighted software that is licensed under the GPL/LGPL. You may obtain the complete Corresponding
Source code from us for a period of three years after our last shipment of this product by sending email to help.cctv@hanwha.com
If you want to obtain the complete Corresponding Source code in the physical medium such as CD-ROM, the cost of physically performing source
distribution might be charged.
GPL SW
Component Name License URL
Base Kernel
Busybox
iproute2-3.1.0
alsa-utils-1.0.24.2
alsa-lib-1.0.24.1
iptables-1.4.12.2
ethtool-3.2
mtd-1.4.1
mii-diag-2.11
rp-pppoe-3.10
wpa_supplicant-0.7.3
bash-4.2
zeroconf
LGPL SW
Component Name License URL
gLibc
Inetutils
neon-0.29.6
GPL 3.0
GPL 2.0
GPL 2.0
GPL 2.0
GPL 2.0
GPL 2.0
GPL 2.0
GPL 2.0
GPL 2.0
GPL 2.0
GPL 2.0
GPL 3.0
GPL 2.0
LGPL 2.0
LGPL 3.0
LGPL 2.0
(The Manual and
test suite are GPL)
http://www.busybox.net/downloads/snapshots
http://ftp.netfilter.org/pub/iptables
ftp://ftp.infradead.org/pub/mtd-utils
http://www.roaringpenguin.com/pppoe/
http://www.webdav.org/neon/
GNU GENERAL PUBLIC LICENSE
Version 2, June 1991
Copyright (C)1989, 1991 Free Software Foundation, Inc. 51 Franklin Street,Fifth Floor, Boston, MA 02110-1301, USA
Everyone is permitted to copy and distribute verbatim copies of this license document, but changing it is not allowed.
Preamble
The licenses for most software are designed to take away your freedom to share and change it. By contrast, the GNU General Public License is intended to
guarantee your freedom to share and change free software-- to make sure the software is free for all its users. This General Public License applies to most of the
Free Software Foundation’s software and to any other program whose authors commit to using it. (Some other Free Software Foundation software is covered
by the GNU Lesser General Public License instead.) You can apply it to your programs, too. When we speak of free software, we are referring to freedom, not
price. Our General Public Licenses are designed to make sure that you have the freedom to distribute copies of free software (and charge for this service if you
wish), that you receive source code or can get it if you want it, that you can change the software or use pieces of it in new free programs ; and that you know
you can do these things.
To protect your rights, we need to make restrictions that forbid anyone to deny you these rights or to ask you to surrender the rights. These restrictions translate
to certain responsibilities for you if you distribute copies of the software, or if you modify it.
For example, if you distribute copies of such a program, whether gratis or for a fee, you must give the recipients all the rights that you have.
You must make sure that they, too, receive or can get the source code. And you must show them these terms so they know their rights. We protect your rights
with two steps :
(1)copyright the software, and (2)offer you this license which gives you legal permission to copy, distribute and/or modify the software. Also, for each author’s
protection and ours, we want to make certain that everyone understands that there is no warranty for this free software. If the software is modified by someone
else and passed on, we want its recipients to know that what they have is not the original, so that any problems introduced by others will not reflect on the
original authors’ reputations.
Finally, any free program is threatened constantly by software patents. We wish to avoid the danger that redistributors of a free program will individually obtain
patent licenses, in effect making the program proprietary. To prevent this, we have made it clear that any patent must be licensed for everyone’s free use or not
licensed at all. The precise terms and conditions for copying, distribution and modification follow.
TERMS AND CONDITIONS FOR COPYING, DISTRIBUTION AND MODIFICATION
Version 2, June 1991 Copyright (C) 1989, 1991 Free Software Foundation, Inc. 51 Franklin S
0. This License applies to any program or other work which contains a notice placed by the copyright holder saying it may be distributed under the terms of this
General Public License.
The “Program”, below, refers to any such program or work, and a “work based on the Program” means either the Program or any derivative work under
copyright law : that is to say, a work containing the Program or a portion of it, either verbatim or with modifications and/or translated into another language.
(Hereinafter, translation is included without limitation in the term “modification”.) Each licensee is addressed as “you”.
Activities other than copying, distribution and modification are not covered by this License ; they are outside its scope. The act of running the Program is not
restricted, and the output from the Program is covered only if its contents constitute a work based on the Program (independent of having been made by
running the Program). Whether that is true depends on what the Program does.
1. You may copy and distribute verbatim copies of the Program’s source code as you receive it, in any medium, provided that you conspicuously and
appropriately publish on each copy an appropriate copyright notice and disclaimer of warranty; keep intact all the notices that refer to this License and to the
absence of any warranty ; and give any other recipients of the Program a copy of this License along with the Program.
You may charge a fee for the physical act of transferring a copy, and you may at your option offer warranty protection in exchange for a fee.
2. You may modify your copy or copies of the Program or any portion of it, thus forming a work based on the Program, and copy and distribute such
modifications or work under the terms of Section 1 above, provided that you also meet all of these conditions :
a) You must cause the modified files to carry prominent notices stating that you changed the files and the date of any change.
b) You must cause any work that you distribute or publish, that in whole or in part contains or is derived from the Program or any part thereof, to be licensed
as a whole at no charge to all third parties under the terms of this License.
c) If the modified program normally reads commands interactively when run,you must cause it, when started running for such interactive use in the most
ordinary way, to print or display an announcement including an appropriate copyright notice and a notice that there is no warranty (or else, saying that
you provide a warranty) and that users may redistribute the program under these conditions, and telling the user how to view a copy of this License.
(Exception:if the Program itself is interactive but does not normally print such an announcement, your work based on the Program is not required to print
an announcement.)
These requirements apply to the modified work as a whole. If identifiable sections of that work are not derived from the Program, and can be reasonably
considered independent and separate works in themselves, then this License, and its terms, do not apply to those sections when you distribute them as separate
works. But when you distribute the same sections as part of a whole which is a work based on the Program, the distribution of the whole must be on the terms of
this License, whose permissions for other licensees extend to the entire whole, and thus to each and every part regardless of who wrote it.
Thus, it is not the intent of this section to claim rights or contest your rights to work written entirely by you ; rather, the intent is to exercise the right to control the
distribution of derivative or collective works based on the Program. In addition, mere aggregation of another work not based on the Program with the Program
(or with a work based on the Program)on a volume of a storage or distribution medium does not bring the other work under the scope of this License.
3. You may copy and distribute the Program (or a work based on it, under Section 2)in object code or executable form under the terms of Sections 1 and 2
above provided that you also do one of the following :
a) Accompany it with the complete corresponding machine-readable source code, which must be distributed under the terms of Sections 1 and 2 above on
a medium customarily used for software interchange ; or,
b) Accompany it with a written offer, valid for at least three years, to give any third party, for a charge no more than your cost of physically performing source
distribution, a complete machinereadable copy of the corresponding source code, to be distributed under the terms of Sections 1 and 2 above on a medium
customarily used for software interchange ; or,
c) Accompany it with the information you received as to the offer to distribute corresponding source code. (This alternative is allowed only for noncommercial
distribution and only if you received the program in object code or executable form with such an offer, in accord with Subsection b above.) The source code
for a work means the preferred form of the work for making modifications to it. For an executable work, complete source code means all the source code for
all modules it contains, plus any associated interface definition files, plus the scripts used to control compilation and installation of the executable. However,
as a special exception, the source code distributed need not include anything that is normally distributed (in either source or binary form) with the major
Page 50

components (compiler, kernel, and so on) of the operating system on which the executable runs, unless that component itself accompanies the executable.
If distribution of executable or object code is made by offering access to copy from a designated place, then offering equivalent access to copy the source
code from the same place counts as distribution of the source code, even though third parties are not compelled to copy the source along with the object
code.
4. You may not copy, modify, sublicense, or distribute the Program except as expressly provided under this License. Any attempt otherwise to copy, modify,
sublicense or distribute the Program is void, and will automatically terminate your rights under this License.
However, parties who have received copies, or rights, from you under this License will not have their licenses terminatedso long as such parties remain in full
compliance.
5. You are not required to accept this License, since you have not signed it. However, nothing else grants you permission to modify or distribute the Program or
its derivative works.
These actions are prohibited by law if you do not accept this License.Therefore, by modifying or distributing the Program (or any work based on the Program), you
indicate your acceptance of this License to do so, and all its terms and conditions for copying, distributing or modifying the Program or works based on it.
6. Each time you redistribute the Program (or any work based on the Program), the recipient automatically receives a license from the original licensor to copy,
distribute or modify the Program subject to these terms and conditions. You may not impose any further restrictions on the recipients’ exercise of the rights
granted herein. You are not responsible for enforcing compliance by third parties to this License.
7. If, as a consequence of a court judgment or allegation of patent infringement or for any other reason (not limited to patent issues), conditions are imposed on
you (whether by court order, agreement or otherwise)that contradict the conditions of this License, they do not excuse you from the conditions of this License.
If you cannot distribute so as to satisfy simultaneously your obligations under this License and any other pertinent obligations, then as a consequence you
may not distribute the Program at all.
For example, if a patent license would not permit royaltyfree redistribution of the Program by all those who receive copies directly or indirectly through you, then
the only way you could satisfy both it and this License would be to refrain entirely from distribution of the Program.
If any portion of this section is held invalid or unenforceable under any particular circumstance, the balance of the section is intended to apply and the section as
a whole is intended to apply in other circumstances. It is not the purpose of this section to induce you to infringe any patents or other property right claims or to
contest validity of any such claims; this section has the sole purpose of protecting the integrity of the free software distribution system, which is implemented by
public license practices. Many people have made generous contributions to the wide range of software distributed through that system in reliance on consistent
application of that system ; it is up to the author/donor to decide if he or she is willing to distribute software through any other system and a licensee cannot
impose that choice. This section is intended to make thoroughly clear what is believed to be a consequence of the rest of this License.
8. If the distribution and/or use of the Program is restricted in certain countries either by patents or by copyrighted interfaces, the original copyright holder who
places the Program under this License may add an explicit geographical distribution limitation excluding those countries,so that distribution is permitted only
in or among countries not thus excluded. In such case, this License incorporates the limitation as if written in the body of this License.
9. The Free Software Foundation may publish revised and/or new versions of the General Public License from time to time. Such new versions will be similar
in spirit to the present version, but may differ in detail to address new problems or concerns. Each version is given a distinguishing version number. If the
Program specifies a version number of this License which applies to it and “any later version”, you have the option of following the terms and conditions either
of that version or of any later version published by the Free Software Foundation. If the Program does not specify a version number of this License, you may
choose any version ever published by the Free Software Foundation.
10. If you wish to incorporate parts of the Program into other free programs whose distribution conditions are different, write to the author to ask for permission.
For software which is copyrighted by the Free Software Foundation,write to the Free Software Foundation ; we sometimes make exceptions for this. Our
decision will be guided by the two goals of preserving the free status of all derivatives of our free software and of promoting the sharing and reuse of software
generally.
NO WARRANTY
11. BECAUSE THE PROGRAM IS LICENSED FREE OF CHARGE, THERE IS NO WARRANTY FOR THE PROGRAM, TO THE EXTENT PERMITTED BY
APPLICABLE LAW. EXCEPT WHEN OTHERWISE STATED IN WRITING THE COPYRIGHT HOLDERS AND/OR OTHER PARTIES PROVIDE THE PROGRAM
“ASIS” WITHOUT WARRANTY OF ANY KIND, EITHER EXPRESSED OR IMPLIED, INCLUDING, BUT NOT LIMITED TO, THE IMPLIED WARRANTIES OF
MERCHANTABILITY AND FITNESS FOR A PARTICULAR PURPOSE. THE ENTIRE RISK AS TO THE QUALITY AND PERFORMANCE OF THE PROGRAM IS
WITH YOU. SHOULD THE PROGRAMPROVE DEFECTIVE, YOU ASSUME THE COST OF ALL NECESSARY SERVICING, REPAIR OR CORRECTION.
12. IN NO EVENT UNLESS REQUIRED BY APPLICABLE LAW OR AGREED TO IN WRITING WILL ANY COPYRIGHT HOLDER, OR ANY OTHER PARTY
WHO MAY MODIFY AND/OR REDISTRIBUTE DAMAGES, INCLUDING ANY GENERAL, SPECIAL, INCIDENTAL OR CONSEQUENTIAL DAMAGES ARISING
OUT OF THE USE OR INABILITY TO USE THE PROGRAM (INCLUDING BUT NOT LIMITED TO LOSS OF DATA OR DATA BEING RENDERED INACCURATE
OR LOSSES SUSTAINED BY YOU OR THIRD PARTIES OR A FAILURE OF THE PROGRAM TO OPERATE WITH ANY OTHER PROGRAMS), EVEN IF SUCH
HOLDER OR OTHER PARTY HAS BEEN ADVISED OF THE POSSIBILITY OF SUCH DAMAGES.
END OF TERMS AND CONDITIONS
How to Apply These Terms to Your New Programs If you develop a new program, and you want it to be of the greatest possible use to the public, the best way
to achieve this is to make it free software which everyone can redistribute and change under these terms. To do so, attach the following notices to the program.
It is safest to attach them to the start of each source file to most effectively convey the exclusion of warranty ; and each file should have at least the “copyright”
line and a pointer to where the full notice is found.one line to give the program’s name and an idea of what it does.
Copyright (C)yyyy name of author
This program is free software ; you can redistribute it and/or modify it under the terms of the GNU General Public License as published by the Free Software
Foundation ; either version 2 of the License, or (at your option)any later version.
This program is distributed in the hope that it will be useful, but WITHOUT ANY WARRANTY ; without even the implied warranty of MERCHANTABILITY or
FITNESS FOR A PARTICULAR PURPOSE. See the GNU General Public License for more details.
You should have received a copy of the GNU General Public License along with this program ; if not, write to the Free Software Foundation, Inc.,51 Franklin
Street, Fifth Floor, Boston, MA 02110-1301, USA.
Also add information on how to contact you by electronic and paper mail. If the program is interactive, make it output a short notice like this when it starts in an
interactive mode :
Gnomovision version 69, Copyright (C) year name of author Gnomovision comes with ABSOLUTELY NO WARRANTY ; for details type ‘show w’. This is free software,
and you are welcome to redistribute it under certain conditions ; type ‘show c’ for details.
The hypothetical commands ‘show w’ and ‘show c’ should show the appropriate parts of the General Public License. Of course, the commands you use may
be called something other than ‘show w’ and ‘show c’ ; they could even be mouse-clicks or menu items-- whatever suits your program.
You should also get your employer (if you work as a programmer)or your school, if any, to sign a “copyright disclaimer” for the program,if necessary. Here is a
sample ; alter the names:
Yoyodyne, Inc.,hereby disclaims all copyright interest in the program ‘Gnomovision’ (which makes passes at compilers) written by James Hacker. signature of
Ty Coon, 1 April 1989 Ty Coon, President of Vice This General Public License does not permit incorporating your program into proprietary programs. If your
program is a subroutine library, you may consider it more useful to permit linking proprietary applications with the library. If this is Lwihcaetn ysoeu want to do,
use the GNU Lesser General Public instead of this License.
GNU GENERAL PUBLIC LICENSE
Version 3, 29 June 2007
Copyright (C) 2007 Free Software Foundation, Inc. <http://fsf.org/>
Everyone is permitted to copy and distribute verbatim copies of this license document, but changing it is not allowed.
Preamble
The GNU General Public License is a free, copyleft license for software and other kinds of works. The licenses for most software and other practical works are
designed to take away your freedom to share and change the works. By contrast, the GNU General Public License is intended to guarantee your freedom to
share and change all versions of a program-- to make sure it remains free software for all its users.
We, the Free Software Foundation, use the GNU General Public License for most of our software; it applies also to any other work released this way by its
authors.
You can apply it to your programs, too. When we speak of free software, we are referring to freedom, not price. Our General Public Licenses are designed to
make sure that you have the freedom to distribute copies of free software (and charge for them if you wish), that you receive source code or can get it if you
want it, that you can change the software or use pieces of it in new free programs, and that you know you can do these things.
To protect your rights, we need to prevent others from denying you these rights or asking you to surrender the rights. Therefore, you have certain responsibilities
if you distribute copies of the software, or if you modify it: responsibilities to respect the freedom of others. For example, if you distribute copies of such a
program, whether gratis or for a fee, you must pass on to the recipients the same freedoms that you received. You must make sure that they, too, receive
or can get the source code. And you must show them these terms so they know their rights. Developers that use the GNU GPL protect your rights with two
steps: (1) assert copyright on the software, and (2) offer you this License giving you legal permission to copy, distribute and/or modify it. For the developers’ and
authors’ protection, the GPL clearly explains that there is no arranty for this free software. For both users’ and authors’ sake, the GPL requires that modified
versions be marked as changed, so that their problems will not be attributed erroneously to authors of previous versions. Some devices are designed to deny
users access to install or run modified versions of the software inside them, although the manufacturer can do so. This is fundamentally incompatible with the
aim of protecting users’ freedom to change the software. The systematic pattern of such abuse occurs in the area of products for individuals to use, which is
precisely where it is most unacceptable. Therefore, we have designed this version of the GPL to prohibit the practice for those products. If such problems arise
substantially in other domains, we stand ready to extend this provision to those domains in future versions of the GPL, as needed to protect the freedom of
users.
Finally, every program is threatened constantly by software patents. States should not allow patents to restrict development and use of software on generalpurpose omputers, but in those that do, we wish to avoid the special anger that patents applied to a free program could make it ffectively proprietary. To prevent
this, the GPL assures that atents cannot be used to render the program non-free. he precise terms and conditions for copying, distribution and modification
follow.
TERMS AND CONDITIONS
0. Definitions.
“This License” refers to version 3 of the GNU General Public License.
Copyright” also means copyright-like laws that apply to other kinds of works, such as semiconductor masks. “The Program” refers to any copyrightable work
licensed under this License. Each licensee is addressed as “you”. “Licensees” and “recipients” may be individuals or organizations.
To “modify” a work means to copy from or adapt all or part of the work in a fashion requiring copyright permission, other than the making of an exact copy. The
resulting work is called a “modified version” of the earlier work or a work “based on” the earlier work.
A “covered work” means either the unmodified Program or a work based on the Program.
To “propagate” a work means to do anything with it that, without permission, would make you directly or secondarily liable for infringement under applicable
copyright law, except executing it on a computer or modifying a private copy.
Propagation includes copying, distribution (with or without modification), making available to the public, and in some countries other activities as well.
To “convey” a work means any kind of propagation that enables other parties to make or receive copies. Mere interaction with a user through a computer
network, with no transfer of a copy, is not conveying. An interactive user interface displays “Appropriate Legal Notices” to the extent that it includes a convenient
and prominently visible feature that (1) displays an appropriate copyright notice, and (2) tells the user that there is no warranty for the work (except to the extent
that warranties are provided), that licensees may convey the work under this License, and how to view a copy of this License. If the interface presents a list of
user commands or options, such as a menu, a prominent item in the list meets this criterion.
1. Source Code.
The “source code” for a work means the preferred form of the work for making modifications to it. “Object code” means any non-source form of a work.
A “Standard Interface” means an interface that either is an official standard defined by a recognized standards body, or, in the case of interfaces specified for a
particular programming language, one that is widely used among developers working in that language.
The “System Libraries” of an executable work include anything, other than the work as a whole, that (a) is included in the normal form of packaging a Major
Component, but which is not part of that Major Component, and (b) serves only to enable use of the work with that Major Component, or to implement a
Standard Interface for which an implementation is available to the public in source code form. A “Major Component”, in this context, means a major essential
component (kernel, window system, and so on) of the specific operating system (if any) on which the executable work runs, or a compiler used to produce the
work, or an object code interpreter used to run it.
The “Corresponding Source” for a work in object code form means all the source code needed to generate, install, and (for an executable work) run the object
code and to modify the work, including scripts to control those activities.
However, it does not include the work’s System Libraries, or generalpurpose tools or generally available free programs which are used unmodified in performing
those activities but which are not part of the work. For example, Corresponding Source includes interface definition files associated with source files for the
work, and the source code for shared libraries and dynamically linked subprograms that the work is specifically designed to require, such as by intimate data
communication or control flow between those subprograms and other parts of the work.
The Corresponding Source need not include anything that users can regenerate automatically from other parts of the Corresponding Source. The Corresponding
Source for a work in source code form is that same work.
Page 51

2. Basic Permissions.
All rights granted under this License are granted for the term of copyright on the Program, and are irrevocable provided the stated conditions are met. This
License explicitly affirms your unlimited permission to run the unmodified Program. The output from running a covered work is covered by this License only if the
output, given its content, constitutes a covered work. This License acknowledges your rights of fair use or other equivalent, as provided by copyright law.
You may make, run and propagate covered works that you do not convey, without conditions so long as your license otherwise remains in force. You may convey
covered works to others for the sole purpose of having them make modifications exclusively for you, or provide you with facilities for running those works, provided
that you comply with the terms of this License in conveying all material for which you do not control copyright. Those thus making or running the covered works for
you must do so exclusively on your behalf, under your direction and control, on terms that prohibit them from making any copies of your copyrighted material outside
their relationship with you. Conveying under any other circumstances is permitted solely under the conditions stated below. Sublicensing is not allowed; section 10
makes it unnecessary.
3. Protecting Users’ Legal Rights From anti-Circumvention Law.
No covered work shall be deemed part of an effective technological measure under any applicable law fulfilling obligations under article 11 of the WIPO copyright
treaty adopted on 20 December 1996, or similar laws prohibiting or restricting circumvention of such measures.
When you convey a covered work, you waive any legal power to forbid circumvention of technological measures to the extent such circumvention is effected by
exercising rights under this License with respect to the covered work, and you disclaim any intention to limit operation or modification of the work as a means of
enforcing, against the work’s users, your or third parties’ legal rights to forbid circumvention of technological measures.
4. Conveying Verbatim Copies.
You may convey verbatim copies of the Program’s source code as you receive it, in any medium, provided that you conspicuously and appropriately publish on
each copy an appropriate copyright notice; keep intact all notices stating that this License and any non-permissive terms added in accord with section 7 apply
to the code; keep intact all notices of the absence of any warranty; and give all recipients a copy of this License along with the Program. You may charge any
price or no price for each copy that you convey, and you may offer support or warranty protection for a fee.
5. Conveying Modified Source Versions.
You may convey a work based on the Program, or the modifications to produce it from the Program, in the form of source code under the terms of section 4,
provided that you also meet all of these conditions:
a) The work must carry prominent notices stating that you modified it, and giving a relevant date.
b) The work must carry prominent notices stating that it is released under this License and any conditions added under section 7. This requirement modifies
the requirement in section 4 to “keep intact all notices”.
c) You must license the entire work, as a whole, under this License to anyone who comes into possession of a copy. This License will therefore apply, along
with any applicable section 7 additional terms, to the whole of the work, and all its parts, regardless of how they are packaged. This License gives no
permission to license the work in any other way, but it does not invalidate such permission if you have separately received it.
d) If the work has interactive user interfaces, each must display Appropriate Legal Notices; however, if the Program has interactive interfaces that do not
display Appropriate Legal Notices, your work need not make them do so. A compilation of a covered work with other separate and independent works,
which are not by their nature extensions of the covered work, and which are not combined with it such as to form a larger program, in or on a volume of
a storage or distribution medium, is called an “aggregate” if the compilation and its resulting copyright are not used to limit the access or legal rights of
the compilation’s users beyond what the individual works permit. Inclusion of a covered work in an aggregate does not cause this License to apply to the
other parts of the aggregate.
6. Conveying Non-Source Forms.
You may convey a covered work in object code form under the terms of sections 4 and 5, provided that you also convey the machine-readable Corresponding
Source under the terms of this License, in one of these ways:
a) Convey the object code in, or embodied in, a physical product (including a physical distribution medium), accompanied by the Corresponding Source
fixed on a durable physical medium customarily used for software interchange.
b) Convey the object code in, or embodied in, a physical product (including a physical distribution medium), accompanied by a written offer, valid for at least
three years and valid for as long as you offer spare parts or customer support for that product model, to give anyone who possesses the object code
either (1) a copy of the Corresponding Source for all the software in the product that is covered by this License, on a durable physical medium customarily
used for software interchange, for a price no more than your reasonable cost of physically performing this conveying of source, or (2) access to copy the
Corresponding Source from a network server at no charge.
c) Convey individual copies of the object code with a copy of the written offer to provide the corresponding Source. This alternative is allowed only
occasionally and noncommercially, and only if you received the object code with such an offer, in accord with subsection 6b.
d) Convey the object code by offering access from a designated place (gratis or for a charge), and offer equivalent access to the Corresponding Source
in the same way through the same place at no further charge. You need not require recipients to copy the Corresponding Source along with the object
code. If the place to copy the object code is a network server, the Corresponding Source may be on a different server (operated by you or a third party)
that supports equivalent copying facilities, provided you maintain clear directions next to the object code saying where to find the Corresponding Source.
Regardless of what server hosts the Corresponding Source, you remain obligated to ensure that it is available for as long as needed to satisfy these
requirements.
e) Convey the object code using peer-to-peer transmission, provided you inform other peers where the object code and Corresponding Source of the
work are being offered to the general public at no charge under subsection 6d. A separable portion of the object code, whose source code is excluded
from the Corresponding Source as a System Library, need not be included in conveying the object code work. A “User Product” is either (1) a “consumer
product”, which means any tangible personal property which is normally used for personal, family, or household purposes, or (2) anything designed or
sold for incorporation into a dwelling. In determining whether a product is a consumer product, doubtful cases shall be resolved in favor of coverage. For
a particular product received by a particular user, “normally used” refers to a typical or common use of that class of product, regardless of the status of
the particular user or of the way in which the particular user actually uses, or expects or is expected to use, the product. A product is a consumer product
regardless of whether the product has substantial commercial, industrial or non-consumer uses, unless such uses represent the only significant mode of
use of the product.
“Installation Information” for a User Product means any methods, procedures, authorization keys, or other information required to install and execute modified
versions of a covered work in that User Product from a modified version of its Corresponding Source. The information must suffice to ensure that the continued
functioning of the modified object code is in no case prevented or interfered with solely because modification has been made. If you convey an object code
work under this section in, or with, or specifically for use in, a User Product, and the conveying occurs as part of a transaction in which the right of possession
and use of the User Product is transferred to the recipient in perpetuity or for a fixed term (regardless of how the transaction is characterized), the Corresponding
Source conveyed under this section must be accompanied by the Installation Information. But this requirement does not apply if neither you nor any third party
retains the ability to install modified object code on the User Product (for example, the work has been installed in ROM).
The requirement to provide Installation Information does not include a requirement to continue to provide support service, warranty, or updates for a work that
has been modified or installed by the recipient, or for the User Product in which it has been modified or installed. Access to a network may be denied when
the modification itself materially and adversely affects the operation of the network or violates the rules and protocols for communication across the network.
Corresponding Source conveyed, and Installation Information provided, in accord with this section must be in a format that is publicly documented (and with an
implementation available to the public in source code form), and must require no special password or key for unpacking, reading or copying.
7. Additional Terms.
“Additional permissions” are terms that supplement the terms of this License by making exceptions from one or more of its conditions. Additional permissions
that are applicable to the entire Program shall be treated as though they were included in this License, to the extent that they are valid under applicable law. If
additional permissions apply only to part of the Program, that part may be used separately under those permissions, but the entire Program remains governed
by this License without regard to the additional permissions. When you convey a copy of a covered work, you may at your option remove any additional
permissions from that copy, or from any part of it. (Additional permissions may be written to require their own removal in certain cases when you modify the
work.) You may place additional permissions on material, added by you to a covered work, for which you have or can give appropriate copyright permission.
Notwithstanding any other provision of this License, for material you add to a covered work, you may (if authorized by the copyright holders of that material)
supplement the terms of this License with terms:
a) Disclaiming warranty or limiting liability differently from the terms of sections 15 and 16 of this License; or
b) Requiring preservation of specified reasonable legal notices or author attributions in that material or in the Appropriate Legal Notices displayed by works
containing it; or
c) Prohibiting misrepresentation of the origin of that material, or requiring that modified versions of such material be marked in reasonable ways as different
from the original version; or
d) Limiting the use for publicity purposes of names of licensors or authors of the material; or
e) Declining to grant rights under trademark law for use of some trade names, trademarks, or service marks; or
f) Requiring indemnification of licensors and authors of that material by anyone who conveys the material (or modified versions of it) with contractual
assumptions of liability to the recipient, for any liability that these contractual assumptions directly impose on those licensors and authors. All other
non-permissive additional terms are considered “further restrictions” within the meaning of section 10. If the Program as you received it, or any part of it,
contains a notice stating that it is governed by this License along with a term that is a further restriction, you may remove that term. If a license document
contains a further restriction but permits relicensing or conveying under this License, you may add to a covered work material governed by the terms
of that license document, provided that the further restriction does not survive such relicensing or conveying. If you add terms to a covered work in
accord with this section, you must place, in the relevant source files, a statement of the additional terms that apply to those files, or a notice indicating
where to find the applicable terms. Additional terms, permissive or non-permissive, may be stated in the form of a separately written license, or stated as
exceptions; the above requirements apply either way.
8. Termination.
You may not propagate or modify a covered work except as expressly provided under this License. Any attempt otherwise to propagate or modify it is void, and
will automatically terminate your rights under this License (including any patent licenses granted under the third paragraph of section 11).
However, if you cease all violation of this License, then your license from a particular copyright holder is reinstated (a) provisionally, unless and until the copyright
holder explicitly and finally terminates your license, and (b) permanently, if the copyright holder fails to notify you of the violation by some reasonable means prior
to 60 days after the cessation. Moreover, your license from a particular copyright holder is reinstated permanently if the copyright holder notifies you ofthe violation
by some reasonable means, this is the first time you have received notice of violation of this License (for any work) from that copyright holder, and you cure the
violation prior to 30 days after your receipt of the notice. Termination of your rights under this section does not terminate the licenses of parties who have received
copies or rights from you under this License. If your rights have been terminated and not permanently reinstated, you do not qualify to receive new licenses for the
same material under section 10.
9. Acceptance Not Required for Having Copies.
You are not required to accept this License in order to receive or run a copy of the Program. Ancillary propagation of a covered work occurring solely as a
consequence of using peer-to-peer transmission to receive a copy likewise does not require acceptance. However, nothing other than this License grants you
permission to propagate or modify any covered work. These actions infringe copyright if you do not accept this License. Therefore, by modifying or propagating
a covered work, you indicate your acceptance of this License to do so.
10. Automatic Licensing of Downstream Recipients.
Each time you convey a covered work, the recipient automatically receives a license from the original licensors, to run, modify and propagate that work, subject
to this License. You are not responsible for enforcing compliance by third parties with this License. An “entity transaction” is a transaction transferring control
of an organization, or substantially all assets of one, or subdividing an organization, or merging organizations. If propagation of a covered work results from
an entity transaction, each party to that transaction who receives a copy of the work also receives whatever licenses to the work the party’s predecessor in
interest had or could give under the previous paragraph, plus a right to possession of the Corresponding Source of the work from the predecessor in interest, if
the predecessor has it or can get it with reasonable efforts. You may not impose any further restrictions on the exercise of the rights granted or affirmed under
this License. For example, you may not impose a license fee, royalty, or other charge for exercise of rights granted under this License, and you may not initiate
litigation (including a cross-claim or counterclaim in a lawsuit) alleging that any patent claim is infringed by making, using, selling, offering for sale, or importing
the Program or any portion of it.
11. Patents.
A “contributor” is a copyright holder who authorizes use under this License of the Program or a work on which the Program is based. The work thus licensed
is called the contributor’s “contributor version”. A contributor’s “essential patent claims” are all patent claims owned or controlled by the contributor, whether
already acquired or hereafter acquired, that would be infringed by some manner, permitted by this License, of making, using, or selling its contributor version,
but do not include claims that would be infringed only as a consequence of further modification of the contributor version. For purposes of this definition, “control”
includes the right to grant patent sublicenses in a manner consistent with the requirements of this License. Each contributor grants you a non-exclusive,
worldwide, royaltyfree patent license under the contributor’s essential patent claims, to make, use, sell, offer for sale, import and otherwise run, modify and
propagate the contents of its contributor version.
In the following three paragraphs, a “patent license” is any express agreement or commitment, however denominated, not to enforce a patent (such as an
express permission to practice a patent or covenant not to sue for patent infringement). To “grant” such a patent license to a party means to make such an
agreement or commitment not to enforce a patent against the party. If you convey a covered work, knowingly relying on a patent license, and the Corresponding
Source of the work is not available for anyone to copy, free of charge and under the terms of this License, through a publicly available network server or other
readily accessible means, then you must either (1) cause the Corresponding Source to be so available, or (2) arrange to deprive yourself of the benefit of the
patent license for this particular work, or (3) arrange, in a manner consistent with the requirements of this License, to extend the patent license to downstream
recipients. “Knowingly relying” means you have actual knowledge that, but for the patent license, your conveying the covered work in a country, or your
recipient’s use of the covered work in a country, would infringe one or more identifiable patents in that country that you have reason to believe are valid. If,
pursuant to or in connection with a single transaction or arrangement, you convey, or propagate by procuring conveyance of, a covered work, and grant a
Page 52

patent license to some of the parties receiving the covered work authorizing them to use, propagate, modify or convey a specific copy of the covered work,
then the patent license you grant is automatically extended to all recipients of the covered work and works based on it. A patent license is “discriminatory” if it
does not include within the scope of its coverage, prohibits the exercise of, or is conditioned on the non-exercise of one or more of the rights that are specifically
granted under this License. You may not convey a covered work if you are a party to an arrangement with a third party that is in the business of distributing
software, under which you make payment to the third party based on the extent of your activity of conveying the work, and under which the third party grants,
to any of the parties who would receive the covered work from you, a discriminatory patent license
in connection with copies of the covered work conveyedby you (or copies made from those copies), or
(a)
(b) primarily for and in connection with specific products or compilations that contain the covered work, unless you entered into that arrangement, or that patent
license was granted, prior to 28 March 2007. Nothing in this License shall be construed as excluding or limiting any implied license or other defenses to
infringement that may otherwise be available to you under applicable patent law.
12. No Surrender of Others’ Freedom.
If conditions are imposed on you (whether by court order, agreement or otherwise) that contradict the conditions of this License, they do not excuse you from
the conditions of thisLicense. If you cannot convey a covered work so as to satisfy simultaneously your obligations under this License and any other pertinent
obligations, then as a consequence you may not convey it at all. For example, if you agree to terms that obligate you to collect a royalty for further conveying
from those to whom you convey the Program, the only way you could satisfy both those terms and this License would be to refrain entirely from conveying the
Program.
13. Use with the GNU Affero General Public License.
Notwithstanding any other provision of this License, you have permission to link or combine any covered work with a work licensed under version 3 of the GNU
Affero General Public License into a single combined work, and to convey the resulting work. The terms of this License will continue to apply to the part which is
the covered work, but the special requirements of the GNU Affero General Public License, section 13, concerning interaction through a network will apply to the
combination as such.
14. Revised Versions of this License.
The Free Software Foundation may publish revised and/ or new versions of the GNU General Public License from time to time. Such new versions will be similar
in spirit to the present version, but may differ in detail to address new problems or concerns.
Each version is given a distinguishing version number. If the Program specifies that a certain numbered version of the GNU General Public License “or any later
version” applies to it, you have the option of following the terms and conditions either of that numbered version or of any later version published by the Free
Software Foundation. If the Program does not specify a version number of the GNU General Public License, you may choose any version ever published by the
Free Software Foundation. If the Program specifies that a proxy can decide which future versions of the GNU General Public License can be used, that proxy’s
public statement of acceptance of a version permanently authorizes you to choose that version for the Program. Later license versions may give you additional
or different permissions. However, no additional obligations are imposed on any author or copyright holder as a result of your choosing to follow a later version.
15. Disclaimer of Warranty.
THERE IS NO WARRANTY FOR THE PROGRAM, TO THE EXTENT PERMITTED BY APPLICABLE LAW. EXCEPT WHEN OTHERWISE STATED IN WRITING
THE COPYRIGHT HOLDERS AND/OR OTHER PARTIES PROVIDE THE PROGRAM “AS IS” WITHOUT WARRANTY OF ANY KIND, EITHER EXPRESSED OR
IMPLIED, INCLUDING, BUT NOT LIMITED TO, THE IMPLIED WARRANTIES OF MERCHANTABILITY AND FITNESS FOR A PARTICULAR PURPOSE. THE
ENTIRE RISK AS TO THE QUALITY AND PERFORMANCE OF THE PROGRAM IS WITH YOU. SHOULD THE PROGRAM PROVE DEFECTIVE, YOU ASSUME
THE COST OF ALL NECESSARY SERVICING, REPAIR OR CORRECTION.
16. Limitation of Liability.
IN NO EVENT UNLESS REQUIRED BY APPLICABLE LAW OR AGREED TO IN WRITING WILL ANY COPYRIGHT HOLDER, OR ANY OTHER PARTY WHO
MODIFIES AND/OR CONVEYS THE PROGRAM AS PERMITTED ABOVE, BE LIABLE TO YOU FOR DAMAGES, INCLUDING ANY GENERAL, SPECIAL,
INCIDENTAL OR CONSEQUENTIAL DAMAGES ARISING OUT OF THE USE OR INABILITY TO USE THE PROGRAM (INCLUDING BUT NOT LIMITED TO
LOSS OF DATA OR DATA BEING RENDERED INACCURATE OR LOSSES SUSTAINED BY YOU OR THIRD PARTIES OR A FAILURE OF THE PROGRAM TO
OPERATE WITH ANY OTHER PROGRAMS), EVEN IF SUCH HOLDER OR OTHER PARTY HAS BEEN ADVISED OF THE POSSIBILITY OF SUCH DAMAGES.
17. Interpretation of Sections 15 and 16.
If the disclaimer of warranty and limitation of liability provided above cannot be given local legal effect according to their terms, reviewing courts shall apply
local law that most closely approximates an absolute waiver of all civil liability in connection with the Program, unless a warranty or assumption of liability
accompanies a copy of the Program in return for a fee.
OpenSSL Combined License
The OpenSSL toolkit stays under a dual license, i.e. both the conditions of the OpenSSL License and the original SSLeay license apply to the toolkit.
See below for the actual license texts. Actually both licenses are BSD-style Open Source licenses. In case of any license issues related to OpenSSL please
contact openssl-core@openssl.org.
Component Name License URL
openssl-1.0.1g OpenSSL Combined License http://www.openssl.org/source
Copyright (c) 1998-2011 The OpenSSL Project. All rights reserved.
Redistribution and use in source and binary forms, with or without modification, are permitted provided that the following conditions are met:
1. Redistributions of source code must retain the above copyright notice, this list of conditions and the following disclaimer.
2. Redistributions in binary form must reproduce the above copyright notice, this list of conditions and the following disclaimer in the documentation and/or
other materials provided with the distribution.
3. All advertising materials mentioning features or use of this software must display the following acknowledgment: "This product includes software developed
by the OpenSSL Projectfor use in the OpenSSL Toolkit. (http://www.openssl.org/)"
4. The names "OpenSSL Toolkit" and "OpenSSL Project" must not be used to endorse or promote products derived from this software without prior written
permission. For written permission, please contact openssl-core@openssl.org.
5. Products derived from this software may not be called "OpenSSL" nor may "OpenSSL" appear in their names without prior written permission of the
OpenSSL Project.
6. Redistributions of any form whatsoever must retain the following acknowledgment: "This product includes software developed by the OpenSSL Project for
use in the OpenSSL Toolkit (http://www.openssl.org/)"
THIS SOFTWARE IS PROVIDED BY THE OpenSSL PROJECT ``AS IS'' AND ANY EXPRESSED OR IMPLIED WARRANTIES, INCLUDING, BUT NOT LIMITED
TO, THE IMPLIED WARRANTIES OF MERCHANTABILITY AND FITNESS FOR A PARTICULAR PURPOSE ARE DISCLAIMED. IN NO EVENT SHALL THE
OpenSSL PROJECT OR ITS CONTRIBUTORS BE LIABLE FOR ANY DIRECT, INDIRECT, INCIDENTAL, SPECIAL, EXEMPLARY, OR CONSEQUENTIAL
DAMAGES (INCLUDING, BUT NOT LIMITED TO, PROCUREMENT OF SUBSTITUTE GOODS OR SERVICES; LOSS OF USE, DATA, OR PROFITS; OR
BUSINESS INTERRUPTION) HOWEVER CAUSED AND ON ANY THEORY OF LIABILITY, WHETHER IN CONTRACT, STRICT LIABILITY, OR TORT (INCLUDING
NEGLIGENCE OR OTHERWISE) ARISING IN ANY WAY OUT OF THE USE OF THIS SOFTWARE, EVEN IF ADVISED OF THE POSSIBILITY OF SUCH DAMAGE.
This product includes cryptographic software written by Eric Young(eay@cryptsoft.com). This product includes software written by Tim Hudson (tjh@cryptsoft.com).
Original SSLeay License
Copyright (C) 1995-1998 Eric Young (eay@cryptsoft.com) All rights reserved.
This package is an SSL implementation written by Eric Young (eay@cryptsoft.com).
The implementation was written so as to conform with Netscapes SSL.
This library is free for commercial and non-commercial use as long as the following conditions are aheared to. The following conditions apply to all code found
in this distribution, be it the RC4, RSA, lhash, DES, etc., code; not just the SSL code. The SSL documentation included with this distribution is covered by the
same copyright terms except that the holder is Tim Hudson (tjh@cryptsoft.com).
Copyright remains Eric Young's, and as such any Copyright notices in the code are not to be removed. If this package is used in a product, Eric Young should
be given attribution as the author of the parts of the library used. This can be in the form of a textual message at program startup or in documentation (online
or textual) provided with the package. Redistribution and use in source and binary forms, with or without modification, are permitted provided that the following
conditions are met:
1. Redistributions of source code must retain the copyright notice, this list of conditions and the following disclaimer.
2. Redistributions in binary form must reproduce the above copyright notice, this list of conditions and the following disclaimer in the documentation and/or
other materials provided with the distribution.
3. All advertising materials mentioning features or use of this software must display the following acknowledgement: "This product includes cryptographic
software written by Eric Young (eay@cryptsoft.com)" The word 'cryptographic' can be left out if the rouines from the library being used are not cryptographic
related :-).
4. If you include any Windows specific code (or a derivative thereof) from the apps directory (application code) you must include an acknowledgement: "This
product includes software written by Tim Hudson (tjh@cryptsoft. com)"
THIS SOFTWARE IS PROVIDED BY ERIC YOUNG ``AS IS'' AND ANY EXPRESS OR IMPLIED WARRANTIES, INCLUDING, BUT NOT LIMITED TO, THE
IMPLIED WARRANTIES OF MERCHANTABILITY AND FITNESS FOR A PARTICULAR PURPOSE ARE DISCLAIMED. IN NO EVENT SHALL THE AUTHOR OR
CONTRIBUTORS BE LIABLE FOR ANY DIRECT, INDIRECT, INCIDENTAL, SPECIAL, EXEMPLARY, OR CONSEQUENTIAL DAMAGES (INCLUDING, BUT NOT
LIMITED TO, PROCUREMENT OF SUBSTITUTE GOODS OR SERVICES; LOSS OF USE, DATA, OR PROFITS; OR BUSINESS INTERRUPTION) HOWEVER
CAUSED AND ON ANY THEORY OF LIABILITY, WHETHER IN CONTRACT, STRICT LIABILITY, OR TORT (INCLUDING NEGLIGENCE OR OTHERWISE)
ARISING IN ANY WAY OUT OF THE USE OF THIS SOFTWARE, EVEN IF ADVISED OF THE POSSIBILITY OF SUCH DAMAGE.
The licence and distribution terms for any publically available version or derivative of this code cannot be changed. i.e. this code cannot simply be copied and
put under another distribution licence [including the GNU Public Licence.]
BSD License
Some software components of this product incorporate source code covered under the BSD license as follows.
Component Name License URL
net-snmp-5.7.1
pcre-8.20
openssh-5.9p1
libcap-1.2.1
lighttpd-1.4.35
Game-ws
MiniUPnP Project Client
pppd-2.4.5
lighttpd is a secure, fast, compliant, and very flexible webserver that has been optimized for high-performance environments. It has a very low memory footprint
compared to other webservers and takes care of cpuload. Its advanced feature-set (FastCGI, CGI, Auth, Output-Compression, URL-Rewriting and many more)
make lighttpd the perfect webserver-software for every server that suffers load problems. Simple Network Management Protocol (SNMP) is an Internetstandard
protocol for managing devices on IP networks. It is used mostly in network management systems to monitor the devices attached to the network for conditions
that need administrative attention. Net-SNMP is a suite of applications used to implement SNMP v1, SNMP v2c and SNMP v3 using both IPv4 and IPv6. For
more additional information, send email to help.cctv@hanwha.com.
Copyright (C) 2004, Kneschke, incremental
All rights reserved.
Redistribution and use in source and binary forms, with or without modification, are permitted provided that the following conditions are met :
- Redistributions of source code must retain the above copyright notice, this list of conditions and the following disclaimer.
- Redistributions in binary form must reproduce the above copyright notice, this list of conditions and the following disclaimer in the documentation and/or
other materials provided with the distribution.
- Neither the name of the ‘incremental’ nor the names of its contributors may be used to endorse or promote products derived from this software without
specific prior written permission.
BSD
BSD
BSD
BSD 2.0
BSD 2.0
BSD 2.0
BSD 2.0
BSD 2.0
http://www.net-snmp.org/about/license.html
http://www.kernel.org/pub/linux/libs/security/linux-privs/libcap2
http://www.opensource.org/licenses/bsd-license.html
http://opensource.org/licenses/BSD-3-Clause
Page 53

THIS SOFTWARE IS PROVIDED BY THE COPYRIGHT HOLDERS AND CONTRIBUTORS “AS IS” AND ANY EXPRESS OR IMPLIED WARRANTIES,
INCLUDING, BUT NOT LIMITED TO, THE IMPLIED WARRANTIES OF MERCHANTABILITY AND FITNESS FOR A PARTICULAR PURPOSE ARE DISCLAIMED.
IN NO EVENT SHALL THE COPYRIGHT OWNER OR CONTRIBUTORS BE LIABLE FOR ANY DIRECT, INDIRECT, INCIDENTAL, SPECIAL, EXEMPLARY, OR
CONSEQUENTIAL DAMAGES (INCLUDING, BUT NOT LIMITED TO, PROCUREMENT OF SUBSTITUTE GOODS OR SERVICES; LOSS OF USE, DATA, OR
PROFITS; OR BUSINESS INTERRUPTION) HOWEVER CAUSED AND ON ANY THEORY OF LIABILITY, WHETHER IN CONTRACT, STRICT LIABILITY, OR
TORT (INCLUDING NEGLIGENCE OR OTHERWISE) ARISING IN ANY WAY OUT OF THE USE OF THIS SOFTWARE, EVEN IF ADVISED OF THE POSSIBILITY
OF SUCH DAMAGE.
Copyright (c) 1998-2001 University College London
All rights reserved.
Redistribution and use in source and binary forms, with or without modification, is permitted provided that the following conditions are met :
1. Redistributions of source code must retain the above copyright notice, this list of conditions and the following disclaimer.
2. Redistributions in binary form must reproduce the above copyright notice, this list of conditions and the following disclaimer in the documentation and/or
other materials provided with the distribution.
3. All advertising materials mentioning features or use of this software must display the following acknowledgement: This product includes software developed
by the Computer Science Department at University College London.
4. Neither the name of the University nor of the Department may be used to endorse or promote products derived from this software without specific prior
written permission.
THIS SOFTWARE IS PROVIDED BY THE AUTHORS AND CONTRIBUTORS ``AS IS’’ AND ANY EXPRESSED OR IMPLIED WARRANTIES, INCLUDING, BUT
NOT LIMITED TO, THE IMPLIED WARRANTIES OF MERCHANTABILITY AND FITNESS FOR A PARTICULAR PURPOSEARE DISCLAIMED. IN NO EVENT
SHALL THE AUTHORS OR CONTRIBUTORS BE LIABLE FOR ANY DIRECT, INDIRECT, INCIDENTAL, SPECIAL, EXEMPLARY, OR CONSEQUENTIAL
DAMAGES (INCLUDING, BUT NOT LIMITED TO, PROCUREMENT OF SUBSTITUTE GOODS OR SERVICES; LOSS OF USE, DATA, OR PROFITS; OR
BUSINESS INTERRUPTION) HOWEVER CAUSED AND ON ANY THEORY OF LIABILITY, WHETHER IN CONTRACT, STRICT LIABILITY, OR TORT (INCLUDING
NEGLIGENCE OR OTHERWISE) ARISING IN ANY WAY OUT OF THE USE OF THIS SOFTWARE, EVEN IF ADVISED OF THE POSSIBILITY OF SUCH DAMAGE.
Copyright (c) 1988, 1989, 1990, 1991, 1993, 1994, 1995, 1996 The Regents of the University of California.
All rights reserved.
Redistribution and use in source and binary forms, with or without modification, are permitted provided that the following conditions are met:
1. Redistributions of source code must retain the above copyright notice, this list of conditions and the following disclaimer.
2. Redistributions in binary form must reproduce the above copyright notice, this list of conditions and the following disclaimer in the documentation and/or
other materials provided with the distribution.
3. Neither the name of the Regents of the University of California nor the names of its contributors may be used to endorse or promote products derived from
this software without specific prior written permission.
THIS SOFTWARE IS PROVIDED BY THE COPYRIGHT HOLDERS AND CONTRIBUTORS "AS IS" AND ANY EXPRESS OR IMPLIED WARRANTIES,
INCLUDING, BUT NOT LIMITED TO, THE IMPLIED WARRANTIES OF MERCHANTABILITY AND FITNESS FOR A PARTICULAR PURPOSE ARE DISCLAIMED.
IN NO EVENT SHALL THE COPYRIGHT OWNER OR CONTRIBUTORS BE LIABLE FOR ANY DIRECT, INDIRECT, INCIDENTAL, SPECIAL, EXEMPLARY, OR
CONSEQUENTIAL DAMAGES (INCLUDING, BUT NOT LIMITED TO, PROCUREMENT OF SUBSTITUTE GOODS OR SERVICES; LOSS OF USE, DATA, OR
PROFITS; OR BUSINESS INTERRUPTION) HOWEVER CAUSED AND ON ANY THEORY OF LIABILITY, WHETHER IN CONTRACT, STRICT LIABILITY, OR
TORT (INCLUDING NEGLIGENCE OR OTHERWISE) ARISING IN ANY WAY OUT OF THE USE OF THIS SOFTWARE, EVEN IF ADVISED OF THE POSSIBILITY
OF SUCH DAMAGE.
Copyright (c) 2006, Creative Labs Inc
All rights reserved.
Redistribution and use in source and binary forms, with or without modification, are permitted provided that the following conditions are met:
1. Redistributions of source code must retain the above copyright notice, this list of conditions and the following disclaimer.
2. Redistributions in binary form must reproduce the above copyright notice, this list of conditions and the following disclaimer in the documentation and/or
other materials provided with the distribution.
3. Neither the name of the Creative Labs nor the names of its contributors may be used to endorse or promote products derived from this software without
specific prior written permission.
THIS SOFTWARE IS PROVIDED BY THE COPYRIGHT HOLDERS AND CONTRIBUTORS "AS IS" AND ANY EXPRESS OR IMPLIED WARRANTIES,
INCLUDING, BUT NOT LIMITED TO, THE IMPLIED WARRANTIES OF MERCHANTABILITY AND FITNESS FOR A PARTICULAR PURPOSE ARE DISCLAIMED.
IN NO EVENT SHALL THE COPYRIGHT OWNER OR CONTRIBUTORS BE LIABLE FOR ANY DIRECT, INDIRECT, INCIDENTAL, SPECIAL, EXEMPLARY, OR
CONSEQUENTIAL DAMAGES (INCLUDING, BUT NOT LIMITED TO, PROCUREMENT OF SUBSTITUTE GOODS OR SERVICES; LOSS OF USE, DATA, OR
PROFITS; OR BUSINESS INTERRUPTION) HOWEVER CAUSED AND ON ANY THEORY OF LIABILITY, WHETHER IN CONTRACT, STRICT LIABILITY, OR
TORT (INCLUDING NEGLIGENCE OR OTHERWISE) ARISING IN ANY WAY OUT OF THE USE OF THIS SOFTWARE, EVEN IF ADVISED OF THE POSSIBILITY
OF SUCH DAMAGE.
Copyright (c) 2005-2012, Thomas BERNARD
All rights reserved.
Redistribution and use in source and binary forms, with or without modification, are permitted provided that the following conditions are met:
1. Redistributions of source code must retain the above copyright notice, this list of conditions and the following disclaimer.
2. Redistributions in binary form must reproduce the above copyright notice, this list of conditions and the following disclaimer in the documentation and/or
other materials provided with the distribution.
3. Neither the name of Thomas BERNARD nor the names of its contributors may be used to endorse or promote products derived from this software without
specific prior written permission.
THIS SOFTWARE IS PROVIDED BY THE COPYRIGHT HOLDERS AND CONTRIBUTORS "AS IS" AND ANY EXPRESS OR IMPLIED WARRANTIES,
INCLUDING, BUT NOT LIMITED TO, THE IMPLIED WARRANTIES OF MERCHANTABILITY AND FITNESS FOR A PARTICULAR PURPOSE ARE DISCLAIMED.
IN NO EVENT SHALL THE COPYRIGHT OWNER OR CONTRIBUTORS BE LIABLE FOR ANY DIRECT, INDIRECT, INCIDENTAL, SPECIAL, EXEMPLARY, OR
CONSEQUENTIAL DAMAGES (INCLUDING, BUT NOT LIMITED TO, PROCUREMENT OF SUBSTITUTE GOODS OR SERVICES; LOSS OF USE, DATA, OR
PROFITS; OR BUSINESS INTERRUPTION) HOWEVER CAUSED AND ON ANY THEORY OF LIABILITY, WHETHER IN CONTRACT, STRICT LIABILITY, OR
TORT (INCLUDING NEGLIGENCE OR OTHERWISE) ARISING IN ANY WAY OUT OF THE USE OF THIS SOFTWARE, EVEN IF ADVISED OF THE POSSIBILITY
OF SUCH DAMAGE.
Various copyrights apply to this package, listed in various separate parts below. Please make sure that you read all the parts.
Part 1: CMU/UCD copyright notice: (BSD like)
Copyright 1989, 1991, 1992 by Carnegie Mellon University Derivative Work - 1996, 1998-2000
Copyright 1996, 1998-2000 The Regents of the University of California
All Rights Reserved
Permission to use, copy, modify and distribute this software and its documentation for any purpose and without fee is hereby granted, provided that the above
copyright notice appears in all copies and that both that copyright notice and this permission notice appear in supporting documentation, and that the name
of CMU and The Regents of the University of California not be used in advertising or publicity pertaining to distribution of the software without specific written
permission.
CMU AND THE REGENTS OF THE UNIVERSITY OF CALIFORNIA DISCLAIM ALL WARRANTIES WITH REGARD TO THIS SOFTWARE, INCLUDING ALL
IMPLIED WARRANTIES OF MERCHANTABILITY AND FITNESS. IN NO EVENT SHALL CMU OR THE REGENTS OF THE UNIVERSITY OF CALIFORNIA BE
LIABLE FOR ANY SPECIAL, INDIRECT OR CONSEQUENTIAL DAMAGES OR ANY DAMAGES WHATSOEVER RESULTING FROM THE LOSS OF USE, DATA
OR PROFITS, WHETHER IN AN ACTION OF CONTRACT, NEGLIGENCE OR OTHER TORTIOUS ACTION, ARISING OUT OF OR IN CONNECTION WITH THE
USE OR PERFORMANCE OF THIS SOFTWARE.
Part 2 : Networks Associates Technology, Inc copyright notice (BSD)
Copyright (c) 2001-2003, Networks Associates Technology, Inc
All rights reserved.
Redistribution and use in source and binary forms, with or without modification, are permitted provided that the following conditions are met: yy Redistributions
of source code must retain the above copyright notice, this list of conditions and the following disclaimer. yy Redistributions in binary form must reproduce the
above copyright notice, this list of conditions and the following disclaimer in the documentation and/or other materials provided with the distribution. yy Neither
the name of the Networks Associates Technology, Inc nor the names of its contributors may be used to endorse or promote products derived from this software
without specific prior written permission.
THIS SOFTWARE IS PROVIDED BY THE COPYRIGHT HOLDERS AND CONTRIBUTORS “AS IS” AND ANY EXPRESS OR IMPLIED WARRANTIES,
INCLUDING, BUT NOT LIMITED TO, THE IMPLIED WARRANTIES OF MERCHANTABILITY AND FITNESS FOR A PARTICULAR PURPOSE ARE DISCLAIMED.
IN NO EVENT SHALL THE COPYRIGHT HOLDERS OR CONTRIBUTORS BE LIABLE FOR ANY DIRECT, INDIRECT, INCIDENTAL, SPECIAL, EXEMPLARY,
OR CONSEQUENTIAL DAMAGES (INCLUDING, BUT NOT LIMITED TO, PROCUREMENT OF SUBSTITUTE GOODS OR SERVICES; LOSS OF USE, DATA,
OR PROFITS; OR BUSINESS INTERRUPTION) HOWEVER CAUSED AND ON ANY THEORY OF LIABILITY, WHETHER IN CONTRACT, STRICT LIABILITY, OR
TORT (INCLUDING NEGLIGENCE OR OTHERWISE) ARISING IN ANY WAY OUT OF THE USE OF THIS SOFTWARE, EVEN IF ADVISED OF THE POSSIBILITY
OF SUCH DAMAGE.
Part 3: Cambridge Broadband Ltd. copyrightnotice (BSD)
Portions of this code are copyright (c) 2001-2003, Cambridge Broadband Ltd.
All rights reserved.
Redistribution and use in source and binary forms, with or without modification, are permitted provided that the following conditions are met: yy Redistributions
of source code must retain the above copyright notice, this list of conditions and the following disclaimer. yy Redistributions in binary form must reproduce the
above copyright notice, this list of conditions and the following disclaimer in the documentation and/or other materials provided with the distribution. yy The
name of Cambridge Broadband Ltd. may not be used to endorse or promote products derived from this software without specific prior written permission.
THIS SOFTWARE IS PROVIDED BY THE COPYRIGHT HOLDER “AS IS” AND ANY EXPRESS OR IMPLIED WARRANTIES, INCLUDING, BUT NOT LIMITED TO,
THE IMPLIED WARRANTIES OF MERCHANTABILITY AND FITNESS FOR A PARTICULAR PURPOSE ARE DISCLAIMED. IN NO EVENT SHALL THE COPYRIGHT
HOLDER BE LIABLE FOR ANY DIRECT, INDIRECT, INCIDENTAL, SPECIAL, EXEMPLARY, OR CONSEQUENTIAL DAMAGES (INCLUDING, BUT NOT LIMITED TO,
PROCUREMENT OF SUBSTITUTE GOODS OR SERVICES; LOSS OF USE, DATA, OR PROFITS; OR BUSINESS INTERRUPTION) HOWEVER CAUSED AND ON ANY
THEORY OF LIABILITY, WHETHER IN CONTRACT, STRICT LIABILITY, OR TORT (INCLUDING NEGLIGENCE OR OTHERWISE) ARISING IN ANY WAY OUT OF THE
USE OF THIS SOFTWARE, EVEN IF ADVISED OF THE POSSIBILITY OF SUCH DAMAGE.
Part 4: Sun Microsystems, Inc. copyright notice
(BSD)
Copyright (c) 2003 Sun Microsystems, Inc., 4150 Network
Circle, Santa Clara, California 95054, U.S.A.
All rights reserved.
Use is subject to license terms below. This distribution may include materials developed by third parties. Sun, Sun Microsystems, the Sun logo and Solaris
are trademarks or registered trademarks of Sun Microsystems, Inc. in the U.S. and other countries. Redistribution and use in source and binary forms, with or
without modification, are permitted provided that the following conditions are met: yy Redistributions of source code must retain the above copyright notice,
this list of conditions and the following disclaimer. yy Redistributions in binary form must reproduce the above copyright notice, this list of conditions and the
following disclaimer in the documentation and/or other materials provided with the distribution. yy Neither the name of the Sun Microsystems, Inc. nor the
names of its contributors may be used to endorse or promote products derived from this software without specific prior written permission.
THIS SOFTWARE IS PROVIDED BY THE COPYRIGHT HOLDERS AND CONTRIBUTORS “AS IS” AND ANY EXPRESS OR IMPLIED WARRANTIES,
INCLUDING, BUT NOT LIMITED TO, THE IMPLIED WARRANTIES OF MERCHANTABILITY AND FITNESS FOR A PARTICULAR PURPOSE ARE DISCLAIMED.
IN NO EVENT SHALL THE COPYRIGHT HOLDERS OR CONTRIBUTORS BE LIABLE FOR ANY DIRECT, INDIRECT, INCIDENTAL, SPECIAL, EXEMPLARY,
OR CONSEQUENTIAL DAMAGES (INCLUDING, BUT NOT LIMITED TO, PROCUREMENT OF SUBSTITUTE GOODS OR SERVICES; LOSS OF USE, DATA,
OR PROFITS; OR BUSINESS INTERRUPTION) HOWEVER CAUSED AND ON ANY THEORY OF LIABILITY, WHETHER IN CONTRACT, STRICT LIABILITY, OR
TORT (INCLUDING NEGLIGENCE OR OTHERWISE) ARISING IN ANY WAY OUT OF THE USE OF THIS SOFTWARE, EVEN IF ADVISED OF THE POSSIBILITY
OF SUCH DAMAGE.
Part 5: Sparta, Inc copyright notice (BSD)
Copyright (c) 2003-2009, Sparta, Inc
All rights reserved.
Redistribution and use in source and binary forms, with or without modification, are permitted provided that the following conditions are met: yy Redistributions
of source code must retain the above copyright notice, this list of conditions and the following disclaimer. yy Redistributions in binary form must reproduce the
Page 54

above copyright notice, this list of conditions and the following disclaimer in the documentation and/or other materials provided with the distribution. yy Neither
the name of Sparta, Inc nor the names of its contributors may be used to endorse or promote products derived from this software without specific prior written
permission.
THIS SOFTWARE IS PROVIDED BY THE COPYRIGHT HOLDERS AND CONTRIBUTORS “AS IS” AND ANY EXPRESS OR IMPLIED WARRANTIES,
INCLUDING, BUT NOT LIMITED TO, THE IMPLIED WARRANTIES OF MERCHANTABILITY AND FITNESS FOR A PARTICULAR PURPOSE ARE DISCLAIMED.
IN NO EVENT SHALL THE COPYRIGHT HOLDERS OR CONTRIBUTORS BE LIABLE FOR ANY DIRECT, INDIRECT, INCIDENTAL, SPECIAL, EXEMPLARY,
OR CONSEQUENTIAL DAMAGES (INCLUDING, BUT NOT LIMITED TO, PROCUREMENT OF SUBSTITUTE GOODS OR SERVICES; LOSS OF USE, DATA,
OR PROFITS; OR BUSINESS INTERRUPTION) HOWEVER CAUSED AND ON ANY THEORY OF LIABILITY, WHETHER IN CONTRACT, STRICT LIABILITY, OR
TORT (INCLUDING NEGLIGENCE OR OTHERWISE) ARISING IN ANY WAY OUT OF THE USE OF THIS SOFTWARE, EVEN IF ADVISED OF THE POSSIBILITY
OF SUCH DAMAGE.
Part 6: Cisco/BUPTNIC copyright notice (BSD)
Copyright (c) 2004, Cisco, Inc and Information Network
Center of Beijing University of Posts and Telecommunications.
All rights reserved.
Redistribution and use in source and binary forms, with or without modification, are permitted provided that the following conditions are met: yy Redistributions
of source code must retain the above copyright notice, this list of conditions and the following disclaimer. yy Redistributions in binary form must reproduce the
above copyright notice, this list of conditions and the following disclaimer in the documentation and/or other materials provided with the distribution. yy Neither
the name of Cisco, Inc, Beijing University of Posts and Telecommunications, nor the names of their contributors may be used to endorse or promote products
derived from this software without specific prior written permission.
THIS SOFTWARE IS PROVIDED BY THE COPYRIGHT HOLDERS AND CONTRIBUTORS “AS IS” AND ANY EXPRESS OR IMPLIED WARRANTIES,
INCLUDING, BUT NOT LIMITED TO, THE IMPLIED WARRANTIES OF MERCHANTABILITY AND FITNESS FOR A PARTICULAR PURPOSE ARE DISCLAIMED.
IN NO EVENT SHALL THE COPYRIGHT HOLDERS OR CONTRIBUTORS BE LIABLE FOR ANY DIRECT, INDIRECT, INCIDENTAL, SPECIAL, EXEMPLARY,
OR CONSEQUENTIAL DAMAGES (INCLUDING, BUT NOT LIMITED TO, PROCUREMENT OF SUBSTITUTE GOODS OR SERVICES; LOSS OF USE, DATA,
OR PROFITS; OR BUSINESS INTERRUPTION) HOWEVER CAUSED AND ON ANY THEORY OF LIABILITY, WHETHER IN CONTRACT, STRICT LIABILITY, OR
TORT (INCLUDING NEGLIGENCE OR OTHERWISE) ARISING IN ANY WAY OUT OF THE USE OF THIS SOFTWARE, EVEN IF ADVISED OF THE POSSIBILITY
OF SUCH DAMAGE.
Part 7: Fabasoft R&D Software Software GmbH & Co KG copyright Notice (BSD)
Copyright (c) Fabasoft R&D Software GmbH & Co KG, 2003oss@fabasoft.com
Author: Bernhard Penz
Redistribution and use in source and binary forms, with or without modification, are permitted provided that the following conditions are met: yy Redistributions
of source code must retain the above copyright notice, this list of conditions and the following disclaimer. yy Redistributions in binary form must reproduce the
above copyright notice, this list of conditions and the following disclaimer in the documentation and/or other materials provided with the distribution. yy The
name of Fabasoft R&D Software GmbH & Co KG or any of its subsidiaries, brand or product names may not be used to endorse or promote products derived
from this software without specific prior written permission.
THIS SOFTWARE IS PROVIDED BY THE COPYRIGHT HOLDER “AS IS” AND ANY EXPRESS OR IMPLIED WARRANTIES, INCLUDING, BUT NOT LIMITED
TO, THE IMPLIED WARRANTIES OF MERCHANTABILITY AND FITNESS FOR A PARTICULAR PURPOSE ARE DISCLAIMED. IN NO EVENT SHALL THE
COPYRIGHT HOLDER BE LIABLE FOR ANY DIRECT, INDIRECT, INCIDENTAL, SPECIAL, EXEMPLARY, OR CONSEQUENTIAL DAMAGES (INCLUDING,
BUT NOT LIMITED TO, PROCUREMENT OF SUBSTITUTE GOODS OR SERVICES; LOSS OF USE, DATA, OR PROFITS; OR BUSINESS INTERRUPTION)
HOWEVER CAUSED AND ON ANY THEORY OF LIABILITY, WHETHER IN CONTRACT, STRICT LIABILITY, OR TORT (INCLUDING NEGLIGENCE OR
OTHERWISE) ARISING IN ANY WAY OUT OF THE USE OF THIS SOFTWARE, EVEN IF ADVISED OF THE POSSIBILITY OF SUCH DAMAGE.
Part 8: Apple Inc. copyright notice (BSD)
Copyright (c) 2007 Apple Inc.
All rights reserved.
Redistribution and use in source and binary forms, with or without modification, are permitted provided that the following conditions are met:
1. Redistributions of source code must retain the above copyright notice, this list of conditions and the following disclaimer.
2. Redistributions in binary form must reproduce the above copyright notice, this list of conditions and the following disclaimer in the documentation and/or
other materials provided with the distribution. 3. Neither the name of Apple Inc. (“Apple”) nor the names of its contributors may be used to endorse or promote
products derived from this software without specific prior written permission.
THIS SOFTWARE IS PROVIDED BY APPLE AND ITS CONTRIBUTORS “AS IS” AND ANY EXPRESS OR IMPLIED WARRANTIES, INCLUDING, BUT NOT
LIMITED TO, THE IMPLIED WARRANTIES OF MERCHANTABILITY AND FITNESS FOR A PARTICULAR PURPOSE ARE DISCLAIMED. IN NO EVENT
SHALL APPLE OR ITSCONTRIBUTORS BE LIABLE FOR ANY DIRECT, INDIRECT, INCIDENTAL, SPECIAL, EXEMPLARY, OR CONSEQUENTIAL DAMAGES
(INCLUDING, BUT NOT LIMITED TO, PROCUREMENT OF SUBSTITUTE GOODS OR SERVICES; LOSS OF USE, DATA, OR PROFITS; OR BUSINESS
INTERRUPTION) HOWEVER CAUSED AND ON ANY THEORY OF LIABILITY, WHETHER IN CONTRACT, STRICT LIABILITY, OR TORT (INCLUDING
NEGLIGENCE OR OTHERWISE) ARISING IN ANY WAY OUT OF THE USE OF THIS SOFTWARE, EVEN IF ADVISED OF THE POSSIBILITY OF SUCH DAMAGE.
Part 9: ScienceLogic, LLC copyright notice(BSD)
Copyright (c) 2009, ScienceLogic, LLC
All rights reserved.
Redistribution and use in source and binary forms, with or without modification, are permitted provided that the following conditions aremet: yy Redistributions
of source code must retain the above copyright notice, this list of conditions and the following disclaimer. yy Redistributions in binary form must reproduce the
above copyright notice, this list of conditions and the following disclaimer in the documentation and/or other materials provided with the distribution. yy Neither
the name of ScienceLogic, LLC nor the names of its contributors may be used to endorse or promote products derived from this software without specific prior
written permission.
THIS SOFTWARE IS PROVIDED BY THE COPYRIGHT HOLDERS AND CONTRIBUTORS “AS IS” AND ANY EXPRESS OR IMPLIED WARRANTIES,
INCLUDING, BUT NOT LIMITED TO, THE IMPLIED WARRANTIES OF MERCHANTABILITY AND FITNESS FOR A PARTICULAR PURPOSE ARE DISCLAIMED.
IN NO EVENT SHALL THE COPYRIGHT HOLDERS OR CONTRIBUTORS BE LIABLE FOR ANY DIRECT, INDIRECT, INCIDENTAL, SPECIAL, EXEMPLARY,
OR CONSEQUENTIAL DAMAGES (INCLUDING, BUT NOT LIMITED TO, PROCUREMENT OF SUBSTITUTE GOODS OR SERVICES; LOSS OF USE, DATA,
OR PROFITS; OR BUSINESS INTERRUPTION) HOWEVER CAUSED AND ON ANY THEORY OF LIABILITY, WHETHER IN CONTRACT, STRICT LIABILITY, OR
TORT (INCLUDING NEGLIGENCE OR OTHERWISE) ARISING IN ANY WAY OUT OF THE USE OF THIS SOFTWARE, EVEN IF ADVISED OF THE POSSIBILITY
OF SUCH DAMAGE
The MIT License
Some software components of this product incorporate source code covered under the MIT license as follows
MIT License 2.0
- Acewidget, bettermeans, jquery-ui, libxml, libxml2, Mesa3D-MesaLib,mwEmbed,OpenGL Samples Pack, Wide Studio, xorg-server, dropbear-2012.55,
ncurses-5.7
Copyright (c) 2011, The Dojo Foundation
Copyright 2010, AUTHORS.txt (http://jqueryui.com/about)
Dual licensed under the MIT or GPL Version 2 licenses.
- http://jquery.org/license
- http://docs.jquery.com/UI/Widget
Copyright Daniel Veillard
Copyright Igor Zlatovic <igor@zlatkovic.com>
Copyright Aleksey Sanin
Copyright Gary Pennington <Gary.Pennington@uk.sun.com>
Copyright Alfred Mickautsch <alfred@mickautsch.de>
Copyright Bjorn Reese <bjorn.reese@systematic.dk>
Copyright Joel W. Reed
Copyright William Brack <wbrack@mmm.com.hk>
Copyright (c) 2007-2010 The Khronos Group Inc.
Copyright Atish Kumar Patra
Copyright (c) 2006 Free Software Foundation, Inc.
Permission is hereby granted, free of charge, to any person obtaining a copy of this software and associated documentation files (the "Software"), to deal in the
Software without restriction, including without limitation the rights to use, copy, modify, merge, publish, distribute, sublicense, and/or sell copies of the Software,
and to permit persons to whom the Software is furnished to do so, subject to the following conditions:
The above copyright notice and this permission notice shall be included in all copies or substantial portions of the Software.
THE SOFTWARE IS PROVIDED "AS IS", WITHOUT WARRANTY OF ANY KIND, EXPRESS OR IMPLIED, INCLUDING BUT NOT LIMITED TO THE WARRANTIES
OF MERCHANTABILITY, FITNESS FOR A PARTICULAR PURPOSE AND NONINFRINGEMENT. IN NO EVENT SHALL THE AUTHORS OR COPYRIGHT
HOLDERS BE LIABLE FOR ANY CLAIM, DAMAGES OR OTHER LIABILITY, WHETHER IN AN ACTION OF CONTRACT, TORT OR OTHERWISE, ARISING
FROM, OUT OF OR IN CONNECTION WITH THE SOFTWARE OR THE USE OR OTHER DEALINGS IN THE SOFTWARE.
Mozilla Public License
Since we, at Hanwha Techwin, used the Mozilla Firefox component without modifying the source code according to the MOZILLA Public license 1.1, we
are not obliged to provide the source code of the corresponding component.
• Version 1.1
1. Definitions.
1.0.1. "Commercial Use" means distribution or otherwise making the Covered Code available to a third party.
1.1. "Contributor" means each entity that creates or contributes to the creation of Modifications.
"Contributor Version" means the combination of the Original Code, prior Modifications used by a Contributor, and the Modifications made by that particular Contributor.
1.2.
1.3. "Covered Code" means the Original Code or Modifications or the combination of the Original Code and Modifications, in each case including portions thereof.
1.4. "Electronic Distribution Mechanism" means a mechanism generally accepted in the software development community for the electronic transfer of data.
1.5. "Executable" means Covered Code in any form other than Source Code.
1.6. "Initial Developer" means the individual or entity identified as the Initial Developer in the Source Code notice required by Exhibit A.
1.7. "Larger Work" means a work which combines Covered Code or portions thereof with code not governed by the terms of this License.
1.8. "License" means this document.
1.8.1. "Licensable" means having the right to grant, to the maximum extent possible, whether at the time of the initial grant or subsequently acquired, any and all of the
rights conveyed herein.
1.9. "Modifications" means any addition to or deletion from the substance or structure of either the Original Code or any previous Modifications. When Covered Code is
released as a series of files, a Modification is:
A. Any addition to or deletion from the contents of a file containing Original Code or previous Modifications.
B. Any new file that contains any part of the Original Code or previous Modifications.
1.10. "Original Code" means Source Code of computer software code which is described in the Source Code notice required by Exhibit A as Original Code, and which,
at the time of its release under this License is not already Covered Code governed by this License.
1.10.1. "Patent Claims" means any patent claim(s), now owned or hereafter acquired, including without limitation, method, process, and apparatus claims, in any patent
Licensable by grantor.
Page 55

1.11. "Source Code" means the preferred form of the Covered Code for making modifications to it, including all modules it contains, plus any associated interface
definition files, scripts used to control compilation and installation of an Executable, or source code differential comparisons against either the Original Code or another
well known, available Covered Code of the Contributor’s choice. The Source Code can be in a compressed or archival form, provided the appropriate decompression or
de-archiving software is widely available for no charge.
1.12. "You’’ (or "Your") means an individual or a legal entity exercising rights under, and complying with all of the terms of, this License or a future version of this License
issued under Section 6.1. For legal entities, "You’’ includes any entity which controls, is controlled by, or is under common control with You. For purposes of this
definition, "control’’ means (a) the power, direct or indirect, to cause the direction or management of such entity, whether by contract or otherwise, or (b) ownership of
more than fifty percent (50%) of the outstanding shares or beneficial ownership of such entity.
2. Source Code License.
2.1. The Initial Developer Grant. The Initial Developer hereby grants You a world-wide, royalty-free, non-exclusive license, subject to third party intellectual property
claims:
(a) under intellectual property rights (other than patent or trademark) Licensable by Initial Developer to use, reproduce, modify, display, perform, sublicense and
distribute the Original Code (or portions thereof) with or without Modifications, and/or as part of a Larger Work; and
(b) under Patents Claims infringed by the making, using or selling of Original Code, to make, have made, use, practice, sell, and offer for sale, and/or otherwise
dispose of the Original Code (or portions thereof).
(c) the licenses granted in this Section 2.1(a) and (b) are effective on the date Initial Developer first distributes Original Code under the terms of this License.
(d) Notwithstanding Section 2.1(b) above, no patent license is granted: 1) for code that You delete from the Original Code; 2) separate from the Original Code; or
3) for infringements caused by: i) the modification of the Original Code or ii) the combination of the Original Code with other software or devices.
2.2. Contributor Grant. Subject to third party intellectual property claims, each Contributor hereby grants You a world-wide, royalty-free, non-exclusive license
(a) under intellectual property rights (other than patent or trademark) Licensable by Contributor, to use, reproduce, modify, display, perform, sublicense and
distribute the Modifications created by such Contributor (or portions thereof) either on an unmodified basis, with other Modifications, as Covered Code and/
or as part of a Larger Work; and
(b) under Patent Claims infringed by the making, using, or selling of Modifications made by that Contributor either alone and/or in combination with its
Contributor Version (or portions of such combination), to make, use, sell, offer for sale, have made, and/or otherwise dispose of: 1) Modifications made by
that Contributor (or portions thereof); and 2) the combination of Modifications made by that Contributor with its Contributor Version (or portions of such
combination).
(c) the licenses granted in Sections 2.2(a) and 2.2(b) are effective on the date Contributor first makes Commercial Use of the Covered Code.
(d) Notwithstanding Section 2.2(b) above, no patent license is granted: 1) for any code that Contributor has deleted from the Contributor Version; 2) separate from the
Contributor Version; 3) for infringements caused by: i) third party modifications of Contributor Version or ii) the combination of Modifications made by that Contributor
with other software (except as part of the Contributor Version) or other devices; or 4) under Patent Claims infringed by Covered Code in the absence of Modifications
made by that Contributor.
3. Distribution Obligations.
3.1. Application of License. The Modifications which You create or to which You contribute are governed by the terms of this License, including without limitation Section
2.2. The Source Code version of Covered Code may be distributed only under the terms of this License or a future version of this License released under Section 6.1,
and You must include a copy of this License with every copy of the Source Code You distribute. You may not offer or impose any terms on any Source Code version that
alters or restricts the applicable version of this License or the recipients’ rights hereunder. However, You may include an additional document offering the additional rights
described in Section 3.5.
3.2. Availability of Source Code. Any Modification which You create or to which You contribute must be made available in Source Code form under the terms of this
License either on the same media as an Executable version or via an accepted Electronic Distribution Mechanism to anyone to whom you made an Executable version
available; and if made available via Electronic Distribution Mechanism, must remain available for at least twelve (12) months after the date it initially became available, or
at least six (6) months after a subsequent version of that particular Modification has been made available to such recipients. You are responsible for ensuring that the
Source Code version remains available even if the Electronic Distribution Mechanism is maintained by a third party.
3.3. Description of Modifications. You must cause all Covered Code to which You contribute to contain a file documenting the changes You made to create that Covered
Code and the date of any change. You must include a prominent statement that the Modification is derived, directly or indirectly, from Original Code provided by the Initial
Developer and including the name of the Initial Developer in (a) the Source Code, and (b) in any notice in an Executable version or related documentation in which You
describe the origin or ownership of the Covered Code.
3.4. Intellectual Property Matters
(a) Third Party Claims. If Contributor has knowledge that a license under a third party’s intellectual property rights is required to exercise the rights granted by such
Contributor under Sections 2.1 or 2.2, Contributor must include a text file with the Source Code distribution titled "LEGAL’’ which describes the claim and the party
making the claim in sufficient detail that a recipient will know whom to contact. If Contributor obtains such knowledge after the Modification is made available as
described in Section 3.2, Contributor shall promptly modify the LEGAL file in all copies Contributor makes available thereafter and shall take other steps (such as
notifying appropriate mailing lists or newsgroups) reasonably calculated to inform those who received the Covered Code that new knowledge has been obtained.
(b) Contributor APIs. If Contributor’s Modifications include an application programming interface and Contributor has knowledge of patent licenses which are reasonably
necessary to implement that API, Contributor must also include this information in the LEGAL file.
(c) Representations.
Contributor represents that, except as disclosed pursuant to Section 3.4(a) above, Contributor believes that Contributor’s Modifications are Contributor’s original
creation(s) and/or Contributor has sufficient rights to grant the rights conveyed by this License.
3.5. Required Notices. You must duplicate the notice in Exhibit A in each file of the Source Code. If it is not possible to put such notice in a particular Source Code file
due to its structure, then You must include such notice in a location (such as a relevant directory) where a user would be likely to look for such a notice. If You created
one or more Modification(s) You may add your name as a Contributor to the notice described in Exhibit A. You must also duplicate this License in any documentation for
the Source Code where You describe recipients’ rights or ownership rights relating to Covered Code. You may choose to offer, and to charge a fee for, warranty, support,
indemnity or liability obligations to one or more recipients of Covered Code. However, You may do so only on Your own behalf, and not on behalf of the Initial Developer
or any Contributor. You must make it absolutely clear than any such warranty, support, indemnity or liability obligation is offered by You alone, and You hereby agree to
indemnify the Initial Developer and every Contributor for any liability incurred by the Initial Developer or such Contributor as a result of warranty, support, indemnity or
liability terms You offer.
3.6. Distribution of Executable Versions. You may distribute Covered Code in Executable form only if the requirements of Section 3.1-3.5 have been met for that Covered
Code, and if You include a notice stating that the Source Code version of the Covered Code is available under the terms of this License, including a description of how
and where You have fulfilled the obligations of Section 3.2. The notice must be conspicuously included in any notice in an Executable version, related documentation or
collateral in which You describe recipients’ rights relating to the Covered Code. You may distribute the Executable version of Covered Code or ownership rights under
a license of Your choice, which may contain terms different from this License, provided that You are in compliance with the terms of this License and that the license
for the Executable version does not attempt to limit or alter the recipient’s rights in the Source Code version from the rights set forth in this License. If You distribute
the Executable version under a different license You must make it absolutely clear that any terms which differ from this License are offered by You alone, not by the
Initial Developer or any Contributor. You hereby agree to indemnify the Initial Developer and every Contributor for any liability incurred by the Initial Developer or such
Contributor as a result of any such terms You offer.
3.7. Larger Works. You may create a Larger Work by combining Covered Code with other code not governed by the terms of this License and distribute the Larger Work
as a single product. In such a case, You must make sure the requirements of this License are fulfilled for the Covered Code.
4. Inability to Comply Due to Statute or Regulation.
If it is impossible for You to comply with any of the terms of this License with respect to some or all of the Covered Code due to statute, judicial order, or regulation then
You must: (a) comply with the terms of this License to the maximum extent possible; and (b) describe the limitations and the code they affect. Such description must
be included in the LEGAL file described in Section 3.4 and must be included with all distributions of the Source Code. Except to the extent prohibited by statute or
regulation, such description must be sufficiently detailed for a recipient of ordinary skill to be able to understand it.
5. Application of this License.
This License applies to code to which the Initial Developer has attached the notice in Exhibit A and to related Covered Code.
6. Versions of the License.
6.1. New Versions. Netscape Communications Corporation (‘’Netscape’’) may publish revised and/or new versions of the License from time to time. Each version will be
given a distinguishing version number.
6.2. Effect of New Versions. Once Covered Code has been published under a particular version of the License, You may always continue to use it under the terms of that
version. You may also choose to use such Covered Code under the terms of any subsequent version of the License published by Netscape. No one other than Netscape
has the right to modify the terms applicable to Covered Code created under this License.
6.3. Derivative Works. If You create or use a modified version of this License (which you may only do in order to apply it to code which is not already Covered Code
governed by this License), You must (a) rename Your license so that the phrases "Mozilla", "MOZILLAPL", "MOZPL", "Netscape", "MPL", "NPL" or any confusingly similar
phrase do not appear in your license (except to note that your license differs from this License) and (b) otherwise make it clear that Your version of the license contains
terms which differ from the Mozilla Public License and Netscape Public License. (Filling in the name of the Initial Developer, Original Code or Contributor in the notice
described in Exhibit A shall not of themselves be deemed to be modifications of this License.)
7. DISCLAIMER OF WARRANTY.
COVERED CODE IS PROVIDED UNDER THIS LICENSE ON AN "AS IS’’ BASIS, WITHOUT WARRANTY OF ANY KIND, EITHER EXPRESSED OR IMPLIED, INCLUDING,
WITHOUT LIMITATION, WARRANTIES THAT THE COVERED CODE IS FREE OF DEFECTS, MERCHANTABLE, FIT FOR A PARTICULAR PURPOSE OR NONINFRINGING. THE ENTIRE RISK AS TO THE QUALITY AND PERFORMANCE OF THE COVERED CODE IS WITH YOU. SHOULD ANY COVERED CODE PROVE
DEFECTIVE IN ANY RESPECT, YOU (NOT THE INITIAL DEVELOPER OR ANY OTHER CONTRIBUTOR) ASSUME THE COST OF ANY NECESSARY SERVICING,
REPAIR OR CORRECTION. THIS DISCLAIMER OF WARRANTY CONSTITUTES AN ESSENTIAL PART OF THIS LICENSE. NO USE OF ANY COVERED CODE IS
AUTHORIZED HEREUNDER EXCEPT UNDER THIS DISCLAIMER.
8. TERMINATION.
8.1. This License and the rights granted hereunder will terminate automatically if You fail to comply with terms herein and fail to cure such breach within 30 days of
becoming aware of the breach. All sublicenses to the Covered Code which are properly granted shall survive any termination of this License. Provisions which, by their
nature, must remain in effect beyond the termination of this License shall survive.
8.2. If You initiate litigation by asserting a patent infringement claim (excluding declatory judgment actions) against Initial Developer or a Contributor (the Initial Developer
or Contributor against whom You file such action is referred to as "Participant") alleging that:
(a) such Participant’s Contributor Version directly or indirectly infringes any patent, then any and all rights granted by such Participant to You under Sections 2.1 and/
or 2.2 of this License shall, upon 60 days notice from Participant terminate prospectively, unless if within 60 days after receipt of notice You either: (i) agree in writing
to pay Participant a mutually agreeable reasonable royalty for Your past and future use of Modifications made by such Participant, or (ii) withdraw Your litigation claim
with respect to the Contributor Version against such Participant. If within 60 days of notice, a reasonable royalty and payment arrangement are not mutually agreed
upon in writing by the parties or the litigation claim is not withdrawn, the rights granted by Participant to You under Sections 2.1 and/or 2.2 automatically terminate at
the expiration of the 60 day notice period specified above.
(b) any software, hardware, or device, other than such Participant’s Contributor Version, directly or indirectly infringes any patent, then any rights granted to You by such
Participant under Sections 2.1(b) and 2.2(b) are revoked effective as of the date You first made, used, sold, distributed, or had made, Modifications made by that
Participant.
8.3. If You assert a patent infringement claim against Participant alleging that such Participant’s Contributor Version directly or indirectly infringes any patent where
such claim is resolved (such as by license or settlement) prior to the initiation of patent infringement litigation, then the reasonable value of the licenses granted by such
Participant under Sections 2.1 or 2.2 shall be taken into account in determining the amount or value of any payment or license.
8.4. In the event of termination under Sections 8.1 or 8.2 above, all end user license agreements (excluding distributors and resellers) which have been validly granted by
You or any distributor hereunder prior to termination shall survive termination.
9. LIMITATION OF LIABILITY.
UNDER NO CIRCUMSTANCES AND UNDER NO LEGAL THEORY, WHETHER TORT (INCLUDING NEGLIGENCE), CONTRACT, OR OTHERWISE, SHALL YOU, THE
INITIAL DEVELOPER, ANY OTHER CONTRIBUTOR, OR ANY DISTRIBUTOR OF COVERED CODE, OR ANY SUPPLIER OF ANY OF SUCH PARTIES, BE LIABLE TO
ANY PERSON FOR ANY INDIRECT, SPECIAL, INCIDENTAL, OR CONSEQUENTIAL DAMAGES OF ANY CHARACTER INCLUDING, WITHOUT LIMITATION, DAMAGES
FOR LOSS OF GOODWILL, WORK STOPPAGE, COMPUTER FAILURE OR MALFUNCTION, OR ANY AND ALL OTHER COMMERCIAL DAMAGES OR LOSSES, EVEN
IF SUCH PARTY SHALL HAVE BEEN INFORMED OF THE POSSIBILITY OF SUCH DAMAGES. THIS LIMITATION OF LIABILITY SHALL NOT APPLY TO LIABILITY
FOR DEATH OR PERSONAL INJURY RESULTING FROM SUCH PARTY’S NEGLIGENCE TO THE EXTENT APPLICABLE LAW PROHIBITS SUCH LIMITATION. SOME
JURISDICTIONS DO NOT ALLOW THE EXCLUSION OR LIMITATION OF INCIDENTAL OR CONSEQUENTIAL DAMAGES, SO THIS EXCLUSION AND LIMITATION MAY
NOT APPLY TO YOU. 10. U.S. GOVERNMENT END USERS.
The Covered Code is a "commercial item," as that term is defined in 48 C.F.R. 2.101 (Oct. 1995), consisting of "commercial computer software" and "commercial
computer software documentation," as such terms are used in 48 C.F.R. 12.212 (Sept. 1995). Consistent with 48 C.F.R. 12.212 and 48 C.F.R. 227.7202-1 through
227.7202-4 (June 1995), all U.S. Government End Users acquire Covered Code with only those rights set forth herein.
11. MISCELLANEOUS.
This License represents the complete agreement concerning subject matter hereof. If any provision of this License is held to be unenforceable, such provision shall
be reformed only to the extent necessary to make it enforceable. This License shall be governed by California law provisions (except to the extent applicable law, if
any, provides otherwise), excluding its conflictof-law provisions. With respect to disputes in which at least one party is a citizen of, or an entity chartered or registered
to do business in the United States of America, any litigation relating to this License shall be subject to the jurisdiction of the Federal Courts of the Northern District of
California, with venue lying in Santa Clara County, California, with the losing party responsible for costs, including without limitation, court costs and reasonable attorneys’
fees and expenses. The application of the United Nations Convention on Contracts for the International Sale of Goods is expressly excluded. Any law or regulation which
Page 56

provides that the language of a contract shall be construed against the drafter shall not apply to this License.
12. RESPONSIBILITY FOR CLAIMS.
As between Initial Developer and the Contributors, each party is responsible for claims and damages arising, directly or indirectly, out of its utilization of rights under
this License and You agree to work with Initial Developer and Contributors to distribute such responsibility on an equitable basis. Nothing herein is intended or shall be
deemed to constitute any admission of liability.
13. MULTIPLE-LICENSED CODE.
Initial Developer may designate portions of the Covered Code as Multiple-Licensed. Multiple-Licensedmeans that the Initial Developer permits you to utilize portions of
the Covered Code under Your choice of the MPL or the alternative licenses, if any, specified by the Initial Developer in the file described in Exhibit A.
EXHIBIT A -Mozilla Public License.
The contents of this file are subject to the Mozilla Public License Version 1.1 (the "License"); you may not use this file except in compliance with the License. You may
obtain a copy of the License at http://www.mozilla.org/MPL/Software distributed under the License is distributed on an "AS IS" basis, WITHOUT WARRANTY OF ANY
KIND, either express or implied. See the License for the specific language governing rights and limitations under the License.
The Original Code is ___________________________________.
The Initial Developer of the Original Code is ________________________. Portions created by ______________________ are Copyright (C) ______
_______________________. All Rights Reserved.
Contributor(s): ______________________________________.
Alternatively, the contents of this file may be used under the terms of the _____ license (the [___] License), in which case the provisions of [______] License are applicable
instead of those above. If you wish to allow use of your version of this file only under the terms of the [____] License and not to allow others to use your version of this file
under the MPL, indicate your decision by deleting the provisions above and replace them with the notice and other provisions required by the [___] License. If you do not
delete the provisions above, a recipient may use your version of this file under either the MPL or the [___] License."
[NOTE: The text of this Exhibit A may differ slightly from the text of the notices in the Source Code files of the Original Code. You should use the text of this Exhibit A
rather than the text found in the Original Code Source Code for Your Modifications
The Independent JPEG Group’s JPEG Software
The software included in this product contains copyrighted software that is licensed under the JPEG license.
• JPEG license
- Code project . Generating Outline OpenGL, Libjpeg
This distribution contains the sixth public release of the Independent JPEG Group’s free JPEG software. You are welcome to redistribute this software and to use it for
any purpose, subject to the conditions under LEGAL ISSUES, below.
Serious users of this software (particularly those incorporating it into larger programs) should contact IJG at jpeg-info@uunet.uu.net to be added to our electronic mailing
list. Mailing list members are notified of updates and have a chance to participate in technical discussions, etc.
This software is the work of Tom Lane, Philip Gladstone, Jim Boucher, Lee Crocker, Julian Minguillon, Luis Ortiz, George Phillips, Davide Rossi, Guido Vollbeding, Ge’
Weijers, and other members of the Independent JPEG Group.
IJG is not affiliated with the official ISO JPEG standards committee.
LEGAL ISSUES
============
In plain English:
We don’t promise that this software works. (But if you find any bugs, please let us know!)
1.
2. You can use this software for whatever you want. You don’t have to pay us.
3. You may not pretend that you wrote this software. If you use it in a program, you must acknowledge somewhere in your documentation that you’ve used the
IJG code.
In legalese:
The authors make NO WARRANTY or representation, either express or implied, with respect to this software, its quality, accuracy, merchantability, or fitness for
a particular purpose. This software is provided "AS IS", and you, its user, assume the entire risk as to its quality and accuracy.
This software is copyright (C) 1991-1998, Thomas G. Lane. All Rights Reserved except as specified below.
Permission is hereby granted to use, copy, modify, and distribute this software (or portions thereof) for any purpose, without fee, subject to these conditions:
(1) If any part of the source code for this software is distributed, then this README file must be included, with this copyright and no-warranty notice unaltered;
and any additions, deletions, or changes to the original files must be clearly indicated in accompanying documentation.
(2) If only executable code is distributed, then the accompanying documentation must state that "this software is based in part on the work of the Independent
JPEG Group".
(3) Permission for use of this software is granted only if the user accepts full responsibility for any undesirable consequences; the authors accept NO LIABILITY
for damages of any kind.
These conditions apply to any software derived from or based on the IJG code, not just to the unmodified library. If you use our work, you ought to acknowledge
us.
Permission is NOT granted for the use of any IJG author’s name or company name in advertising or publicity relating to this software or products derived from it.
This software may be referred to only as "the Independent JPEG Group’s software".
We specifically permit and encourage the use of this software as the basis of commercial products, provided that all warranty or liability claims are assumed by
the product vendor.
ansi2knr.c is included in this distribution by permission of L. Peter Deutsch, sole proprietor of its copyright holder, Aladdin Enterprises of Menlo Park, CA.
ansi2knr.c is NOT covered by the above copyright and conditions, but instead by the usual distribution terms of the Free Software Foundation; principally, that
you must include source code if you redistribute it. (See the file ansi2knr.c for full details.) However, since ansi2knr. c is not needed as part of any program
generated from the IJG code, this does not limit you more than the foregoing paragraphs do.
The Unix configuration script "configure" was produced with GNU Autoconf. It is copyright by the Free Software Foundation but is freely distributable. The same
holds for its supporting scripts (config.guess, config.sub, ltconfig, ltmain. sh). Another support script, install-sh, is copyright by M.I.T. but is also freely distributable.
It appears that the arithmetic coding option of the JPEG spec is covered by patents owned by IBM, AT&T, and Mitsubishi. Hence arithmetic coding cannot legally
be used without obtaining one or more licenses. For this reason, support for arithmetic coding has been removed from the free JPEG software. (Since arithmetic
coding provides only a marginal gain over the unpatented Huffman mode, it is unlikely that very many implementations will support it.) So far as we are aware,
there are no patent restrictions on the remaining code.
The IJG distribution formerly included code to read and write GIF files. To avoid entanglement with the Unisys LZW patent, GIF reading support has been removed
altogether, and the GIF writer has been simplified to produce "uncompressed GIFs". This technique does not use the LZW algorithm; the resulting GIF files are
larger than usual, but are readable by all standard GIF decoders.
We are required to state that
"The Graphics Interchange Format(c) is the Copyright property of CompuServe Incorporated. GIF(sm) is a Service Mark property of CompuServe Incorporated."
T-Kernel License
- This Product uses the Source Code of T-Kernel under T-License granted by the T-Engine Forum(www.t-engine.org)
T-License [License Agreement for Source Code of T-Kernel]
established by T-Engine Forum
on January 23, 2004
revised on June 17, 2004
revised on December 21, 2006
revised on March 24, 2009
Article 1. Scope of License Agreement
1. This License Agreement sets forth copyrights and the terms and conditions of use applicable to the source code of T-Kernel distributed by T-Engine Forum
and any derivative work created therefrom.
Article 2. Definition
1. "T-Kernel" means a real-time operating system controlled and distributed by T-Engine Forum on behalf of the copyright holder thereof.
2. "Source Code" means a source program, including related comments and documentations, for the T-Kernel and the Ported Source Code defined in Article 2.8
which is registered with T-Engine Forum.
3. "Hardware-dependent Part" means the part of the Source Code which depends on hardware and needs to be changed when the Source Code is ported and
operated on the target hardware, and is designated and separated as such part.
4. "Compiler-dependent Part" means the part of the Source Code which depends on compiler and needs to be changed when the Source Code is ported and
operated on the target hardware, and is designated and separated as such part.
5. "Header File" means the part of the Source Code which contains definitions necessary to develop application programs.
6. "T-Engine Hardware" means the hardware which is manufactured in accordance with the T-Engine Hardware specifications or the μT-Engine Hardware
specifications issued by T-Engine Forum, and registered with T-Engine Forum.
7. "Similar Hardware to T-Engine Hardware" means any hardware (including software which emulates hardware) other than that defined in Article 2.6 above, on
which the T-Kernel can be operated.
8. "Ported Source Code" means a source program produced from the Source Code by modifying only its Hardwaredependent Part and/or Compiler-dependent
Part to enable it to be operated on the T-Engine Hardware or the Similar Hardware to T-Engine Hardware. The Ported Source Code which is registered with
T-Engine Forum shall be included in the Source Code.
9. "Modified Source Code" means a source program modified from the Source Code for the purpose of improving its performance, increasing or decreasing its
function, and the like. The Ported Source Code shall not be included in the Modified Source Code.
10. "Binary Code" means an executable code form which is created by compiling programs, which include all or part of the Source Code or the Modified Source
Code.
11. "Derivative Work" means the Modified Source Code or the Binary Code.
12. "Embedded Product" means any product which operates with executable code form of the Source Code, the Modified Source Code or the Binary Code
loaded on its hardware.
13. "End User" means a consumer who uses the Embedded Product.
14. "System Developer" means any person who develops the Embedded Product by itself or has a third party develop the same, and provides, whether with or
without payment, the End User with the Embedded Product.
15. "Distributor of Modification" means any person who produces the Modified Source Code and, whether with or without payment, distributes the same to any
third party.
Page 57

16. "Patch for Modification" means a difference, program, system, or the like in order to create the Modified Source Code from the Source Code or the Binary
Code thereof.
17. "Vicarious Execution of Patch Processing" means vicarious execution service to create the Modified Source Code applying the Patch for Modification to the
Source Code or the Binary Code thereof.
18. "Source Code User" means a person who uses the Source Code.
19. "Distribution" means any of the following acts:
1. to transmit a work to a large number of specific persons through the Internet communication, broadcasting, and the like;
2. to transmit a work to the general public through the Internet communication, broadcasting, and the like automatically in response to a request from the
public; and
3. to distribute a copy of a work to the general public or a large number of specific persons.
Article 3. Copyright
1. The copyrights of the Source Code shall be owned by Ken Sakamura.
Article 4. License of Source Code
1. As provided for in this Article, T-Engine Forum shall provide, and grant a license to use, the Source Code free of charge to any person who has taken the
necessary procedure for registration as prescribed by T-Engine Forum and agreed to the T-License.
2. The Source Code shall be distributed exclusively by T-Engine Forum. Any person who obtains the Source Code under Article 4.1 above shall not make any
re-Distribution of the Source Code.
3. In accordance with the license granted under Article 4.1 above, the Source Code User may perform the following acts:
1. to copy and/or modify the Source Code provided by T-Engine Forum hereunder for its own research, development and the like.
2. to run the Source Code provided by T-Engine Forum hereunder for its own research, development and the like.
3. to run the Source Code modified in accordance with the provision of Article 4.3 (1) above for its own research, development and the like.
4. to distribute the Binary Code created from the Source Code provided by T-Engine Forum hereunder or from the Source Code modified in accordance with
the provision of Article 4.3 (1) above.
4. In accordance with the license granted under Article 4.1 above, the System Developer may perform the following acts:
1. to perform any and all acts set forth in the Article 4.3 above.
2. to develop and manufacture the Embedded Product containing the Binary Code, and, whether with or without payment, provide the End User with the same
and make the Binary Code available to the End User on the Embedded Product.
5. The Source Code User and the System Developer shall be obligated to give a notice that the Source Code is used, in such a way as separately specified by
T-Engine Forum, when they use the Source Code or the Binary Code, or make the Binary Code available for the End User on the Embedded Product.
Article 5. Distribution of Modified Source Code
1. Any of A- members of T-Engine Forum may become the Distributor of Modification by obtaining the approval of T-Engine Forum through the registration
procedure as prescribed by the Forum provided that only the department of the A- member which has taken the registration procedure may distribute the
Modified Source Code in such a way as provided for in this Article as long as it holds the Amembership.
2. The Distributor of Modification may create the Modified Source Code based on the Source Code provided by T-Engine Forum and the Patch for Modification
to be applied to create such Modified Source Code from the Source Code.
3. The Distributor of Modification shall, prior to the distribution, inform T-Engine Forum of and register a name and description of the Modified Source Code in
such a way as specified by T-Engine Forum.
4. The Distributor of Modification shall determine the name of the Modified Source Code subject to the rules separately established by T-Engine Forum and
publish an appropriate notice as required by the rules on the Patch for Modification and the Modified Source Code.
5. The Distributor of Modification may distribute the Modified Source Code to a third party, whether with or without payment, provided that the Distributor of
Modification shall take the necessary measures to prohibit the third party from making the re-Distribution of the Modified Source Code.
6. Developer with the Patch for Modification. Provided, however, that the Distributor of Modification shall be obligated to confirm that the System Developer is
the Source Code User duly licensed under Article 4.1.
7. The Distributor of Modification may perform the Vicarious Execution of Patch Processing for the System Developer.
8. The System Developer shall not distribute the Modified Source Code in further modified form to any third party as a stand-alone software product.
9. The System Developer may, under the same obligation as imposed in Article 4.5, make the Embedded Product available for the End User through use of the
Patch for Modification distributed by the Distributor of Modification or the Derivative Works obtained through the Vicarious Execution of Patch Processing.
Article 6. Distribution and Registration of the Ported Source Code
1. The Source Code User and the System Developer may, whether with or without charge, distribute to any third party only the following parts of the Ported
Source Code on the T-Engine Hardware or the Similar Hardware to T-Engine Hardware:
1. The Hardware-dependent Part and/or Compiler-dependent Part; provided that the Source Code User and the System Developer shall inform T-Engine Forum
of, and T-Engine Forum may publish, a method for distributing said Part(s) to third parties.
2. The Header File; provided that the Header File shall be distributed together with the Binary Code of the Ported Source Code.
2. Any member of T-Engine Forum may request T-Engine Forum to register and distribute, as an original source code for T-Kernel, the Ported Source Code on
the T-Engine Hardware or the Similar Hardware to T-Engine Hardware.
3. Any member of T-Engine Forum who requests the distribution mentioned in the preceding paragraph shall accede to the following conditions:
1. The member shall confirm that the object hardware is the T-Engine Hardware or the Similar Hardware to T-Engine Hardware.
2. The member shall provide T-Engine Forum with a complete set of operational environment for the object hardware and T-Ker nel free of charge when
requesting the distribution.
3. The member shall submit test results of the Ported Source Code to T-Engine Forum when requesting the distribution.
4. In the event that T-Engine Forum accepts the request mentioned in Article 6.2, T-Engine Forum shall register and distribute the Ported Source Code as the
Source Code for T-Kernel. Provided, however, that the Ported Source Code may be treated in the same way as the Modified Source Code until the time of
registration hereunder.
5. The provision set forth in Article 3 shall apply to the Ported Source Code registered in accordance with this Article.
Article 7. Use for Other Purpose
1. Any use of the Source Code, the Modified Source Code or the Ported Source Code other than those stipulated in Articles 4, 5 and 6 shall be subject to the
prior approval of T-Engine Forum.
Article 8. Limited Warranty
1. T-Engine Forum and the copyright holder of the Source Code warrant that the Source Code does not infringe third party’s copyrights. Provided, however, that
T-Engine Forum and the copyright holder of the Source Code make no warranty as to the Hardware-dependent Part and/or Compiler- dependent Part set forth
in Article 6.2 in the Ported Source Code by any third party.
2. Neither T-Engine Forum nor the copyright holder of the Source Code warrants that the Source Code will fit for any particular purpose of the Source Code
User.
3. Neither T-Engine Forum nor the copyright holder of the Source Code warrants that the Source Code does not infringe any third party’s industrial property
rights. In no event shall T-Engine Forum and the copyright holder of the Source Code be liable for any dispute which may arise between the Source Code User
and a third party in connection with the third party’s industrial property rights.
Article 9. Indemnity
1. Neither T-Engine Forum nor the copyright holder of the Source Code shall be liable for any damages (including, but not limited to, damages resulting from
loss of profit, business interruption, loss of business information or any other pecuniary damage) arising out of use or impossibility of use of the Source Code,
even if T-Engine Forum and the copyright holder have been informed of the possibility of such damages.
Article 10. Breach of Agreement
1. In case that T-Engine Forum considers that this License Agreement is breached or that the popularization of T-Kernel is obstructed, T-Engine Forum shall take
measures to correct such breach or such obstruction, take measures on the ground of copyright infringement, or take any other necessary measures against
the breaching person or the obstructing person, regardless of whether or not the said person is a member of T-Engine Forum.
2. In case of breach of this License Agreement by a member of T-Engine Forum, T-Engine Forum may take appropriate measures against the member; for
example, the member is disqualified from membership, depending on what kind of breach has been committed by it.
3. Any legal dispute which may arise in relation to any breach of this License Agreement shall be subject to the exclusive jurisdiction of the Tokyo District Court.
Article 11. Governing Law and Language
1. This License Agreement shall be governed by and interpreted under the laws of Japan.
2. This License Agreement is executed in both Japanese text and English text provided that the Japanese text shall govern the interpretation and performance
of this License Agreement.
Apache License 2.0
Component Name License URL
mDNSResponder_bonjour Apache License 2.0 http://www.apache.org/licenses/LICENSE-2.0
TERMS AND CONDITIONS FOR USE, REPRODUCTION, AND DISTRIBUTION
1. Definitions.
"License" shall mean the terms and conditions for use, reproduction, and distribution as defined by Sections 1 through 9 of this document.
"Licensor" shall mean the copyright owner or entity authorized by the copyright owner that is granting the License.
Page 58

"Legal Entity" shall mean the union of the acting entity and all other entities that control, are controlled by, or are under common control with that entity. For the
purposes of this definition, "control" means (i) the power, direct or indirect, to cause the direction or management of such entity, whether by contract or otherwise, or (ii)
ownership of fifty percent (50%) or more of the outstanding shares, or (iii) beneficial ownership of such entity.
"You" (or "Your") shall mean an individual or Legal Entity exercising permissions granted by this License. "Source" form shall mean the preferred form for making
modifications, including but not limited to software source code, documentation source, and configuration files.
"Object" form shall mean any form resulting from mechanical transformation or translation of a Source form, including but not limited to compiled object code,
generated documentation, and conversions to other media types.
"Work" shall mean the work of authorship, whether in Source or Object form, made available under the License, as indicated by a copyright notice that is included in
or attached to the work (an example is provided in the Appendix below).
"Derivative Works" shall mean any work, whether in Source or Object form, that is based on (or derived from) the Work and for which the editorial revisions,
annotations, elaborations, or other modifications represent, as a whole, an original work of authorship. For the purposes of this License, Derivative Works shall not
include works that remain separable from, or merely link (or bind by name) to the interfaces of, the Work and Derivative Works thereof.
"Contribution" shall mean any work of authorship, including the original version of the Work and any modifications or additions to that Work or Derivative Works
thereof, that is intentionally submitted to Licensor for inclusion in the Work by the copyright owner or by an individual or Legal Entity authorized to submit on behalf
of the copyright owner. For the purposes of this definition, "submitted" means any form of electronic, verbal, or written communication sent to the Licensor or its
representatives, including but not limited to communication on electronic mailing lists, source code control systems, and issue tracking systems that are managed
by, or on behalf of, the Licensor for the purpose of discussing and improving the Work, but excluding communication that is conspicuously marked or otherwise
designated in writing by the copyright owner as "Not a Contribution." "Contributor" shall mean Licensor and any individual or Legal Entity on behalf of whom a
Contribution has been received by Licensor and subsequently incorporated within the Work.
2. Grant of Copyright License. Subject to the terms and conditions of this License, each Contributor hereby grants to You a perpetual, worldwide, non-exclusive, no-
charge, royalty-free, irrevocable copyright license to reproduce, prepare Derivative Works of, publicly display, publicly perform, sublicense, and distribute the Work and
such Derivative Works in Source or Object form.
3. Grant of Patent License. Subject to the terms and conditions of this License, each Contributor hereby grants to You a perpetual, worldwide, non-exclusive, no-charge,
royaltyfree, irrevocable (except as stated in this section) patent license to make, have made, use, offer to sell, sell, import, and otherwise transfer the Work, where
such license applies only to those patent claims licensable by such Contributor that are necessarily infringed by their Contribution(s) alone or by combination of their
Contribution(s) with the Work to which such Contribution(s) was submitted. If You institute patent litigation against any entity (including a crossclaim or counterclaim in
a lawsuit) alleging that the Work or a Contribution incorporated within the Work constitutes direct or contributory patent infringement, then any patent licenses granted
to You under this License for that Work shall terminate as of the date such litigation is filed.
4. Redistribution. You may reproduce and distribute copies of the Work or Derivative Works thereof in any medium, with or without modifications, and in Source or Object
form, provided that You meet the following conditions:
(a) You must give any other recipients of the Work or Derivative Works a copy of this License; and
(b) You must cause any modified files to carry prominent notices stating that You changed the files; and
(c) You must retain, in the Source form of any Derivative Works that You distribute, all copyright, patent, trademark, and attribution notices from the Source form of the
Work, excluding those notices that do not pertain to any part of the Derivative Works; and
(d) If the Work includes a "NOTICE" text file as part of its distribution, then any Derivative Works that You distribute must include a readable copy of the attribution
notices contained within such NOTICE file, excluding those notices that do not pertain to any part of the Derivative Works, in at least one of the following places:
within a NOTICE text file distributed as part of the Derivative Works; within the Source form or documentation, if provided along with the Derivative Works; or,
within a display generated by the Derivative Works, if and wherever such third-party notices normally appear. The contents of the NOTICE file are for informational
purposes only and do not modify the License. You may add Your own attribution notices within Derivative Works that You distribute, alongside or as an addendum
to the NOTICE text from the Work, provided that such additional attribution notices cannot be construed as modifying the License.
You may add Your own copyright statement to Your modifications and may provide additional or different license terms and conditions for use, reproduction, or
distribution of Your modifications, or for any such Derivative Works as a whole, provided Your use, reproduction, and distribution of the Work otherwise complies with the
conditions stated in this License.
5. Submission of Contributions. Unless You explicitly state otherwise, any Contribution intentionally submitted for inclusion in the Work by You to the Licensor shall be
under the terms and conditions of this License, without any additional terms or conditions. Notwithstanding the above, nothing herein shall supersede or modify the
terms of any separate license agreement you may have executed with Licensor regarding such Contributions.
6. Trademarks. This License does not grant permission to use the trade names, trademarks, service marks, or product names of the Licensor, except as required for
reasonable and customary use in describing the origin of the Work and reproducing the content of the NOTICE file.
7. Disclaimer of Warranty. Unless required by applicable law or agreed to in writing, Licensor provides the Work (and eachContributor provides its Contributions) on an
"AS IS" BASIS, WITHOUT WARRANTIES OR CONDITIONS OF ANY KIND, either express or implied, including, without limitation, any warranties or conditions of
TITLE, NONINFRINGEMENT, MERCHANTABILITY, or FITNESS FOR A PARTICULAR PURPOSE. You are solely responsible for determining the appropriateness of
using or redistributing the Work and assume any risks associated with Your exercise of permissions under this License.
8. Limitation of Liability. In no event and under no legal theory, whether in tort (including negligence), contract, or otherwise, unless required by applicable law (such as
deliberate and grossly negligent acts) or agreed to in writing, shall any Contributor be liable to You for damages, including any direct, indirect, special, incidental, or
consequential damages of any character arising as a result of this License or out of the use or inability to use the Work (including but not limited to damages for loss
of goodwill, work stoppage, computer failure or malfunction, or any and all other commercial damages or losses), even if such Contributor has been advised of the
possibility of such damages.
9. Accepting Warranty or Additional Liability. While redistributing the Work or Derivative Works thereof, You may choose to offer, and charge a fee for, acceptance of
support, warranty, indemnity, or other liability obligations and/or rights consistent with this License. However, in accepting such obligations, You may act only on Your
own behalf and on Your sole responsibility, not on behalf of any other Contributor, and only if You agree to indemnify, defend, and hold each Contributor harmless for
any liability incurred by, or claims asserted against, such Contributor by reason of your accepting any such warranty or additional liability.
END OF TERMS AND CONDITIONS
APPENDIX: How to apply the Apache License to your work.
To apply the Apache License to your work, attach the following boilerplate notice, with the fields enclosed by brackets "[]" replaced with your own identifying information.
(Don't include the brackets!) The text should be enclosed in the appropriate comment syntax for the file format. We also recommend that a file or class name and
description of purpose be included on the same "printed page" as the copyright notice for easier identification within third-party archives.
Copyright [yyyy] [name of copyright owner]
Licensed under the Apache License, Version 2.0 (the "License"); you may not use this file except in compliance with the License. You may obtain a copy of the License
at http://www.apache.org/licenses/LICENSE-2.0
Unless required by applicable law or agreed to in writing, software distributed under the License is distributed on an "AS IS" BASIS, WITHOUT WARRANTIES OR
CONDITIONS OF ANY KIND, either express or implied. See the License for the specific language governing permissions and limitations under the License.
BZip2 License
This program, "bzip2", the associated library "libbzip2", and all documentation, are copyright (C) 1996-2007 Julian R Seward. All rights reserved.
Component Name License URL
bzip2-1.0.5 Bzip2 http://www.bzip.org/
Redistribution and use in source and binary forms, with or without modification, are permitted provided that the following conditions are met:
1. Redistributions of source code must retain the above copyright notice, this list of conditions and the following disclaimer.
2. The origin of this software must not be misrepresented; you must not claim that you wrote the original software. If you use this software in a product, an
acknowledgment in the product documentation would be appreciated but is not required.
3. Altered source versions must be plainly marked as such, and must not be misrepresented as being the original software.
4. The name of the author may not be used to endorse or promote products derived from this software without specific prior written permission.
THIS SOFTWARE IS PROVIDED BY THE AUTHOR ``AS IS'' AND ANY EXPRESS OR IMPLIED WARRANTIES, INCLUDING, BUT NOT LIMITED TO, THE
IMPLIED WARRANTIES OF MERCHANTABILITY AND FITNESS FOR A PARTICULAR PURPOSE ARE DISCLAIMED. IN NO EVENT SHALL THE AUTHOR
BE LIABLE FOR ANY DIRECT, INDIRECT, INCIDENTAL, SPECIAL, EXEMPLARY, OR CONSEQUENTIAL DAMAGES (INCLUDING, BUT NOT LIMITED TO,
PROCUREMENT OF SUBSTITUTE GOODS OR SERVICES; LOSS OF USE, DATA, OR PROFITS; OR BUSINESS INTERRUPTION) HOWEVER CAUSED AND
ON ANY THEORY OF LIABILITY, WHETHER IN CONTRACT, STRICT LIABILITY, OR TORT (INCLUDING NEGLIGENCE OR OTHERWISE) ARISING IN ANY WAY
OUT OF THE USE OF THIS SOFTWARE, EVEN IF ADVISED OF THE POSSIBILITY OF SUCH DAMAGE.
Julian Seward, jseward@bzip.org
bzip2/libbzip2 version 1.0.5 of 10 December 2007
University of Illinois / NCSA Open Source License
Copyright (c) 1999-2007, The Board of Trustees of the University of Illinois All Rights Reserved.
Component Name License
iperf-2.0.5 University of Illinois / NCSA Open Source
Iperf performance test
Mark Gates
Ajay Tirumala
Jim Ferguson
Jon Dugan
Feng Qin
Kevin Gibbs
John Estabrook
National Laboratory for Applied Network Research
National Center for Supercomputing Applications
University of Illinois at Urbana-Champaign
http://www.ncsa.uiuc.edu
Permission is hereby granted, free of charge, to any person obtaining a copy of this software (Iperf) and associated documentation files (the "Software"), to deal
in the Software without restriction, including without limitation the rights to use, copy, modify, merge, publish, distribute, sublicense, and/or sell copies of the
Software, and to permit persons to whom the Software is furnished to do so, subject to the following conditions:
Redistributions of source code must retain the above copyright notice, this list of conditions and the following disclaimers.
Redistributions in binary form must reproduce the above copyright notice, this list of conditions and the following disclaimers in the documentation and/or other
materials provided with the distribution.
Neither the names of the University of Illinois, NCSA, nor the names of its contributors may be used to endorse or promote products derived from this Software
without specific prior written permission. THE SOFTWARE IS PROVIDED "AS IS", WITHOUT WARRANTY OF ANY KIND, EXPRESS OR IMPLIED, INCLUDING
BUT NOT LIMITED TO THE WARRANTIES OF MERCHANTABILITY, FITNESS FOR A PARTICULAR PURPOSE AND NONINFRINGEMENT. IN NO EVENT SHALL
THE CONTIBUTORS OR COPYRIGHT HOLDERS BE LIABLE FOR ANY CLAIM, DAMAGES OR OTHER LIABILITY, WHETHER IN AN ACTION OF CONTRACT,
TORT OR OTHERWISE, ARISING FROM, OUT OF OR IN CONNECTION WITH THE SOFTWARE OR THE USE OR OTHER DEALINGS IN THE SOFTWARE.
Page 59

PHP 3.01 License
The PHP License, version 3.01 Copyright (c) 1999 - 2010 The PHP Group. All rights reserved.
Component Name License URL
php-5.2.17 PHP 3.01 http://www.php.net/distributions
Redistribution and use in source and binary forms, with or without modification, is permitted provided that the following conditions are met:
1. Redistributions of source code must retain the above copyright notice, this list of conditions and the following disclaimer.
2. Redistributions in binary form must reproduce the above copyright notice, this list of conditions and the following disclaimer in the documentation and/or
other materials provided with the distribution.
3. The name "PHP" must not be used to endorse or promote products derived from this software without prior written permission. For written permission,
please contact group@php.net.
4. Products derived from this software may not be called "PHP", nor may "PHP" appear in their name, without prior written permission from group@php.net.
You may indicate that your software works in conjunction with PHP by saying "Foo for PHP" instead of calling it "PHP Foo" or "phpfoo"
5. The PHP Group may publish revised and/or new versions of the license from time to time. Each version will be given a distinguishing version number. Once
covered code has been published under a particular version of the license, you may always continue to use it under the terms of that version. You may also
choose to use such covered code under the terms of any subsequent version of the license published by the PHP Group. No one other than the PHP Group
has the right to modify the terms applicable to covered code created under this License.
6. Redistributions of any form whatsoever must retain the following acknowledgment: "This product includes PHP software, freely available from <http://www.
php.net/software/>".
THIS SOFTWARE IS PROVIDED BY THE PHP DEVELOPMENT TEAM ``AS IS'' AND ANY EXPRESSED OR IMPLIED WARRANTIES, INCLUDING, BUT
NOT LIMITED TO, THE IMPLIED WARRANTIES OF MERCHANTABILITY AND FITNESS FOR A PARTICULAR PURPOSE ARE DISCLAIMED. IN NO EVENT
SHALL THE PHP DEVELOPMENT TEAM OR ITS CONTRIBUTORS BE LIABLE FOR ANY DIRECT, INDIRECT, INCIDENTAL, SPECIAL, EXEMPLARY, OR
CONSEQUENTIAL DAMAGES (INCLUDING, BUT NOT LIMITED TO, PROCUREMENT OF SUBSTITUTE GOODS OR SERVICES; LOSS OF USE, DATA, OR
PROFITS; OR BUSINESS INTERRUPTION) HOWEVER CAUSED AND ON ANY THEORY OF LIABILITY, WHETHER IN CONTRACT, STRICT LIABILITY, OR
TORT (INCLUDING NEGLIGENCE OR OTHERWISE) ARISING IN ANY WAY OUT OF THE USE OF THIS SOFTWARE, EVEN IF ADVISED OF THE POSSIBILITY
OF SUCH DAMAGE.
This software consists of voluntary contributions made by many individuals on behalf of the PHP Group. The PHP Group can be contacted via Email at group@
php.net.
For more information on the PHP Group and the PHP project, please see <http://www.php.net>. PHP includes the Zend Engine, freely available at <http://www.
zend.com>.
zlib / libpng License
This software is provided 'as-is', without any express or implied warranty. In no event will the authors be held liable for any damages arising from the use of
this software.
Component Name License URL
zlib-1.2.5 zlib / libpng http://zlib.net/
Copyright (C) 1995-2010 Jean-loup Gailly and Mark Adler
Permission is granted to anyone to use this software for any purpose, including commercial applications, and to alter it and redistribute it freely, subject to the
following restrictions:
1. The origin of this software must not be misrepresented; you must not claim that you wrote the original software. If you use this software in a product, an
acknowledgment in the product documentation would be appreciated but is not required.
2. Altered source versions must be plainly marked as such, and must not be misrepresented as being the original software.
3. This notice may not be removed or altered from any source distribution.
Jean-loup Gailly Mark Adler
jloup@gzip.org madler@alumni.caltech.edu
The data format used by the zlib library is described by RFCs (Request for Comments) 1950 to 1952 in the files http://www.ietf.org/rfc/rfc1950.txt (zlib format),
rfc1951.txt (deflate format) and rfc1952.txt (gzip format).
Samsung hat sich dem Schutz der Umwelt verpflichtet und wendet in allen Phasen des Produktherstellungsprozesses
umweltfreundliche Verfahren an, um seinen Kunden umweltgerechtere Produkte zu
liefern.
Das Eco-Gütesiegel ist ein Zeichen für die Absicht von Samsung, Produkte zu liefern, und zeigt an, dass die
Produkte die RoHS-Richtlinie der EU erfüllen.
Korrekte Entsorgung von Altgeräten (Elektroschrott)
(In den Ländern der Europäischen Union und anderen europäischen Ländern mit einem separaten Sammelsystem)
Die Kennzeichnung auf dem Produkt, Zubehörteilen bzw. auf der dazugehörigen Dokumentation gibt an, dass
das Produkt und Zubehörteile (z. B. Ladegerät, Kopfhörer, USB-Kabel) nach ihrer Lebensdauer nicht zusammen
mit dem normalen Haushaltsmüll entsorgt werden dürfen. Entsorgen Sie dieses Gerät und Zubehörteile bitte
getrennt von anderen Abfällen, um der Umwelt bzw. der menschlichen Gesundheit nicht durch unkontrollierte
Müllbeseitigung zu schaden. Helfen Sie mit, das Altgerät und Zubehörteile fachgerecht zu entsorgen, um die
nachhaltige Wiederverwertung von stoffl ichen Ressourcen zu fördern.
Private Nutzer wenden sich an den Händler, bei dem das Produkt gekauft wurde, oder kontaktieren die zuständigen
Behörden, um in Erfahrung zu bringen, wo Sie das Altgerät bzw. Zubehörteile für eine umweltfreundliche
Entsorgung abgeben können.
Gewerbliche Nutzer wenden sich an ihren Lieferanten und gehen nach den Bedingungen des Verkaufsvertrags
vor. Dieses Produkt und elektronische Zubehörteile dürfen nicht zusammen mit anderem Gewerbemüll entsorgt
werden.
Korrekte Entsorgung der Batterien dieses Produkts
(In den Ländern der Europäischen Union und anderen europäischen Ländern mit einem separaten AltbatterieRücknahmesystem)
Die Kennzeichnung auf der Batterie bzw. auf der dazugehörigen Dokumentation oder Verpackung gibt an, dass die Batterie zu diesem
Produkt nach seiner Lebensdauer nicht zusammen mit dem normalen Haushaltsmüll entsorgt werden darf. Wenn die Batterie mit den
chemischen Symbolen Hg, Cd oder Pb gekennzeichnet ist, liegt der Quecksilber-, Cadmium- oder Blei-Gehalt der Batterie über den
in der EG-Richtlinie 2006/66 festgelegten Referenzwerten. Wenn Batterien nicht ordnungsgemäß entsorgt werden, können sie der
menschlichen Gesundheit bzw. der Umwelt schaden.
Bitte helfen Sie, die natürlichen Ressourcen zu schützen und die nachhaltige Wiederverwertung von stofflichen Ressourcen zu fördern,
indem Sie die Batterien von anderen Abfällen getrennt über Ihr örtliches kostenloses Altbatterie-Rücknahmesystem entsorgen.
Page 60

VERKAUFSNETZWERK
HEAD OFFICE
6, Pangyo-ro 319beon-gil, Bundang-gu, Seongnam-si, Gyeonggi-do, 463-400 Rep. of KOREA
Tel : +82-70-7147-8753, 8764 Fax : +82-31-8018-3740
www.samsungsecurity.com
SAMSUNG TECHWIN AMERICA Inc.
100 Challenger Rd. Suite 700 Ridgefield Park, NJ 07660
Toll Free : +1-877-213-1222 Direct : +1-201-325-6920 Fax : +1-201-373-0124
www.samsung-security.com
www.samsungsecurity.com
www.samsungipolis.com
SAMSUNG TECHWIN EUROPE LTD.
2nd Floor, No. 5 The Heights, Brooklands, Weybridge, Surrey, KT13 0NY, UK
Tel : +44-1932-82-6700 Fax : +44-1932-82-6701
www.samsungsecurity.co.uk
 Loading...