

Page 1

http://www.emc2000.co.kr
FCC TEST REPORT
Report No.: EMC-FCC-R0176
EMC
compliance Ltd.
65, Sinwon-ro, Yeongtong-gu, Suwon-si, Gyeonggi-do, 443-390, Korea
82-31-336-9919 (Main) 82-505-299-8311 (Fax)
This test report shall not be reproduced, except in full, Without the written approval.
User Manual
Page 2
SAMSUNG SMARTCAM
User Manual
!
0678
SNH-E6440BN
Page 3

Samsung SmartCam
User Manual
Copyright
©2014 Samsung Techwin Co., Ltd. All rights reserved.
Trademark
is the registered logo of Samsung Techwin Co., Ltd.
The name of this product is the registered trademark of Samsung Techwin Co., Ltd.
Other trademarks mentioned in this manual are the registered trademark of their
respective company.
Restriction
Samsung Techwin Co., Ltd shall reserve the copyright of this document. Under no
circumstances, this document shall be reproduced, distributed or changed, partially or
wholly, without formal authorization of Samsung Techwin.
Disclaimer
Samsung Techwin makes the best to verify the integrity and correctness of the contents
in this document, but no formal guarantee shall be provided. Use of this document
and the subsequent results shall be entirely on the user’s own responsibility. Samsung
Techwin reserves the right to change the contents of this document without prior notice.
SPECIFY SERVICE INSTRUCTIONS AND WARRANTY TERMS
This device complies with Part 15 of the FCC Rules.
Operation is subject to the following two conditions: (1) this device may not cause
harmful interference, and (2) this device must accept any interference received, including
interference that may cause undesired operation.
FCC NOTE:
THE MANUFACTURER IS NOT RESPONSIBLE FOR ANY RADIO OR TV INTERFERENCE
CAUSED BY UNAUTHORIZED MODIFICATIONS TO THIS EQUIPMENT.
SUCH MODIFICATIONS COULD VOID THE USER'S AUTHORITY TO OPERATE THE
EQUIPMENT.
Operational Description
The operational description shall fulfil the requirements of Rule Part 2.1033(b)(4). The rule
part requires, "A brief description of the circuit functions of the device along with a
statement describing how the device operates. This statement should contain a
description of the ground system and antenna, if any, used with the device".
The above requirement has been further interpreted by the FCC to mean that the
description shall:
a. be an operational or technical description of how the device operates, is modulated
and meets requirements;
b. describe the EUT completely. What is it (in plain English as well as technical terms)?
Give a clear, concise functional description of device operation.
c. always describe the signal, such as modulation type, pulse repetition rate, signal type
and information being sent. Describe all modulation types and all data rates.
Instructions & Warranty
The manufacturer is not responsible for any loss or radio/TV interference caused by
unauthorized modification of the product.
Such modification will void the warranty of the product as well as the user’s right of use.
WARNING
• The product must be assembled and installed by an adult.
• Before using, read all instructions on this manual thoroughly and follow operational
instructions, warnings on this manual and printed on the product.
• To avoid entangled power cord, do not place it around the baby bed or other infant
furniture. Keep this product and its power cord out of children’s reach.
Page 4

• Especially, the power cord should be installed carefully while keeping it out of
children’s reach.
• Never use the product near bath tub, sink, washing machine and in wet basement to
avoid moisture.
• The product is designed for outdoor use.
• The product is not designed for medical monitoring, and requires a grown-up’s
protective supervision on its use.
• To avoid overheating of the product, do not expose the product to direct sunlight; do
not install or use near a heat source such as heater, radiator, cooking devices (ex:
electric stove or oven) and other warming devices (ex: audio amplifier, TV, etc.).
• Make sure to keep ventilated while using the product.
Avoid pillar or furniture that may block ventilation, when installing the product.
• Make sure to use the power adaptor provided. If used with unidentified adaptor, it
may damage the product. The power adaptor must be used with regular household
electric supply.
• Avoid sharp, pointed objects around the adaptor’s cable, not to damage the cable.
• Be warned and never hold the cable’s stripped part when connecting / disconnecting
the adaptor to/from the wall outlet.
• To avoid entangled cable lines, avoid using cable extension for adaptor’s power cord.
• The product’s servicing is allowed only to authorized Samsung Techwin’s service
personnel.
• When using the product for children’s care, be careful to keep the product out of
children’s reach.
• The product partially contains component which might cause respiration difficulty.
Accessories and small parts of the product should be stored keeping out of children’s
reach.
• The product is not designed to replace responsibility of human supervision on
children.
• The product is not equipped with device of immediate notification to adult with
accidental/sudden children‘s move; it requires periodic checks and human
supervision.
• This appliance and its antenna must not be collocated or operation in conjunction
with any other antenna or transmitter. A minimum separation distance of 20 cm must
be maintained between the antenna and the person for this appliance to satisfy the
RF exposure requirements.
Contents
GETTING STARTED
Features ……………………………………………………… 4
What’s Included ……………………………………………… 5
Part names and functions …………………………………… 6
INSTALLATION & NETWORK CONNECTION
Installation …………………………………………………… 8
Network Connection and Settings …………………………… 10
MONITORING
Registration …………………………………………………… 12
Live Video …………………………………………………… 17
Setup ………………………………………………………… 20
Event Alarm ………………………………………………… 27
Playback ……………………………………………………… 27
Information …………………………………………………… 28
APPENDIX
Specifications ………………………………………………… 30
Troubleshooting ……………………………………………… 33
Page 5

GETTING STARTED
Features 4
What’s Included 5
Part names and functions 6
Power Supply 7
Network connection 7
01
Features
• Easy to install
- Simply visit the home page (www.samsungsmartcam.com) and download and
install the program without a separate installer program.
• Remote monitoring
- Whenever and wherever if you are in the Internet enabled environment, remote
monitoring is ready for you.
- PC, laptop or smart phone can be used for monitoring.
• Real-time alarm
- When a motion and sound are detected, your smartphone will generate real time
alarms.
• Saving in SD card
- When an event occurs, the user can save the video in their SD card.
• Two-way Audio
- With the built-in speakers and microphone, you can make Two-way
communications.
However, it is available only with the smart phone. (Not applicable to the PC or
laptop computer.)
• IR LED
- At low illumination levels, you can use an IR LED for monitoring purposes.
4
· English
Page 6

What’s Included
Check for components when opening the product package.
9
9
Body & Bracket Camera Power Adaptor
Network Cable Quick Start Guide Warranty Card
01
Getting Started
GPL Lisence Tapping screw
` Please save the packaging. You will need the serial number later to register the camera.
n
5
Page 7
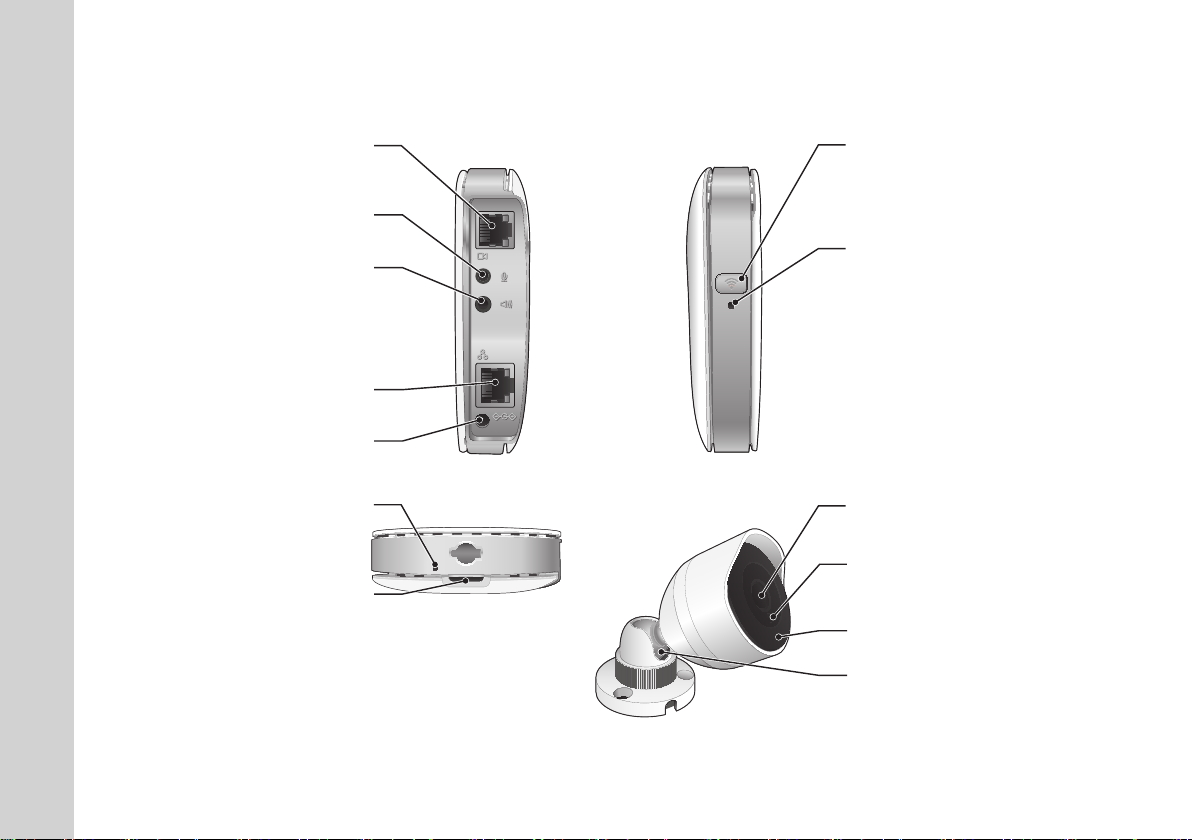
Part names and functions
Camera connector
Connect the camera via the RJ-12 cable.
Audio Input
Connect to the Mic.
Audio Output
Connect to the speaker.
Wi-Fi Direct button
Create a Wi-Fi connection for your camera and
smart phone.
Power / Network status LED
Used for wireless connection.
Power connection terminal
Network port
Connect to the power adaptor.
Reset button
Resets the camera settings to the default. Press and
hold for about 10 seconds to reboot the system.
Micro card insertion hole
6
· English
9
9
Camera lens
5(6(7
5(6(7
Luminance Sensor
Detects light levels where the camera is placed. Night
vision mode changes according to detection result.
Built-in IR LEDs for night vision
Adjustment angle hinge
Page 8
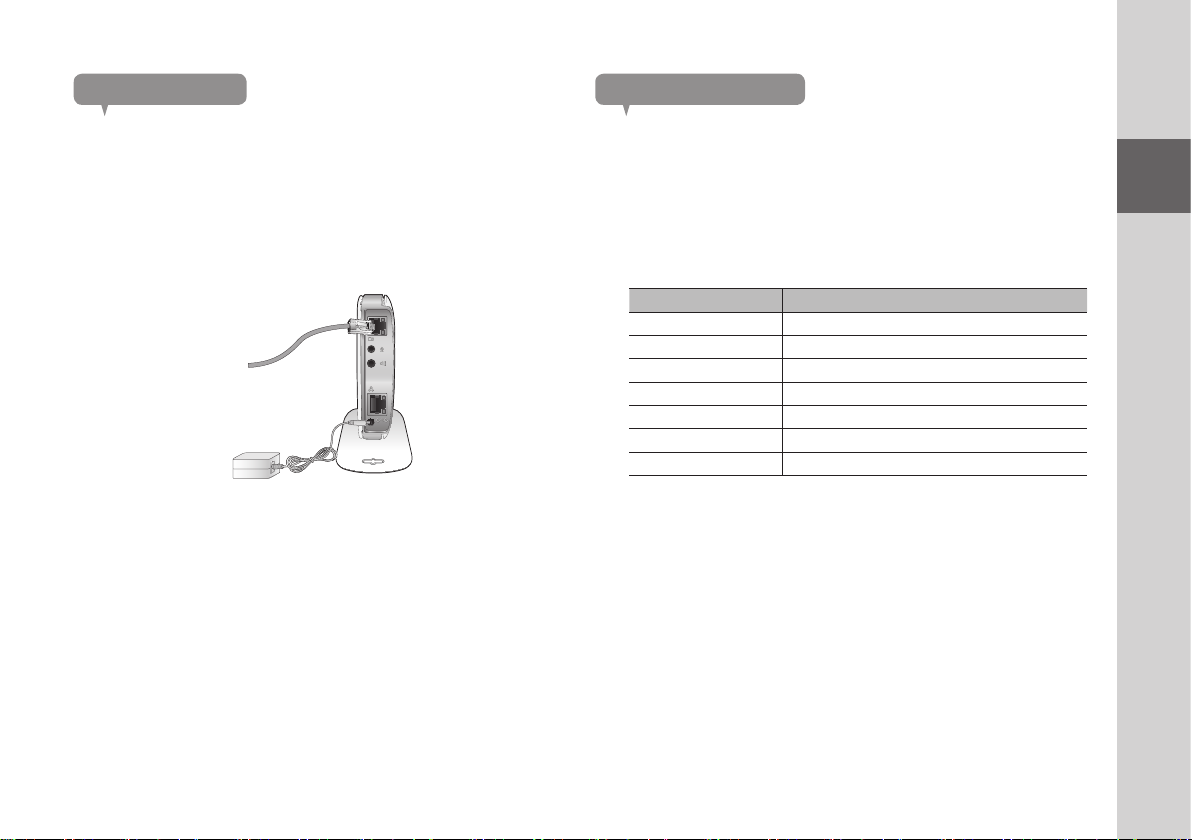
Power Supply
Network connection
Plug-in the camera power adapter to the wall outlet and connect the camera as
shown.
` Make sure to use the provided power adaptor. If you use an adaptor other than the
n
power supply adaptor provided in our package, the product may not operate properly.
` It will take about 1min for the camera to boot-up completely.
` When the camera has finished turning on, the LED lamp turns red and starts blinking.
9
9
Connect the provided network cable to the camera’s network terminal.
For further details on network configuration, refer to “Network Connection and
Settings”. (Page 10)
LED status
LED indicator shows operational status with colors.
Refer to table below for detailed meaning of the LED indicator.
Color Status
Red Booting up
Red Blinking Booting completed / Establishing network connection
Blue Blinking Connecting to the network.
Blue Local connection established
Green Connection to server completed / Normal operation
Yellow WiFi Direct is operating.
Magenta Updating firmware
01
Getting Started
7
Page 9
INSTALLATION &
NETWORK CONNECTION
Installation 8
Precautions 8
Wall Mounting with Screws 9
Adjusting the Angle 10
Network Connection and Settings 10
Precautions 10
Connecting via network cable 11
Wi-Fi connection setting 11
02
Installation
Precautions
1. Install the camera in a place where the Wi-Fi signal can be reached and
without interference.
2. Keep it away from humidity such as around the humidifier.
3. Keep it away from direct sunlight, strong light or dust; install it in a place with
clear view.
4. Do not install it in a place where there are a lot of obstacles.
5. Keep the lens clean at all times.
Wipe off the dust with a soft cloth.
8
· English
Page 10
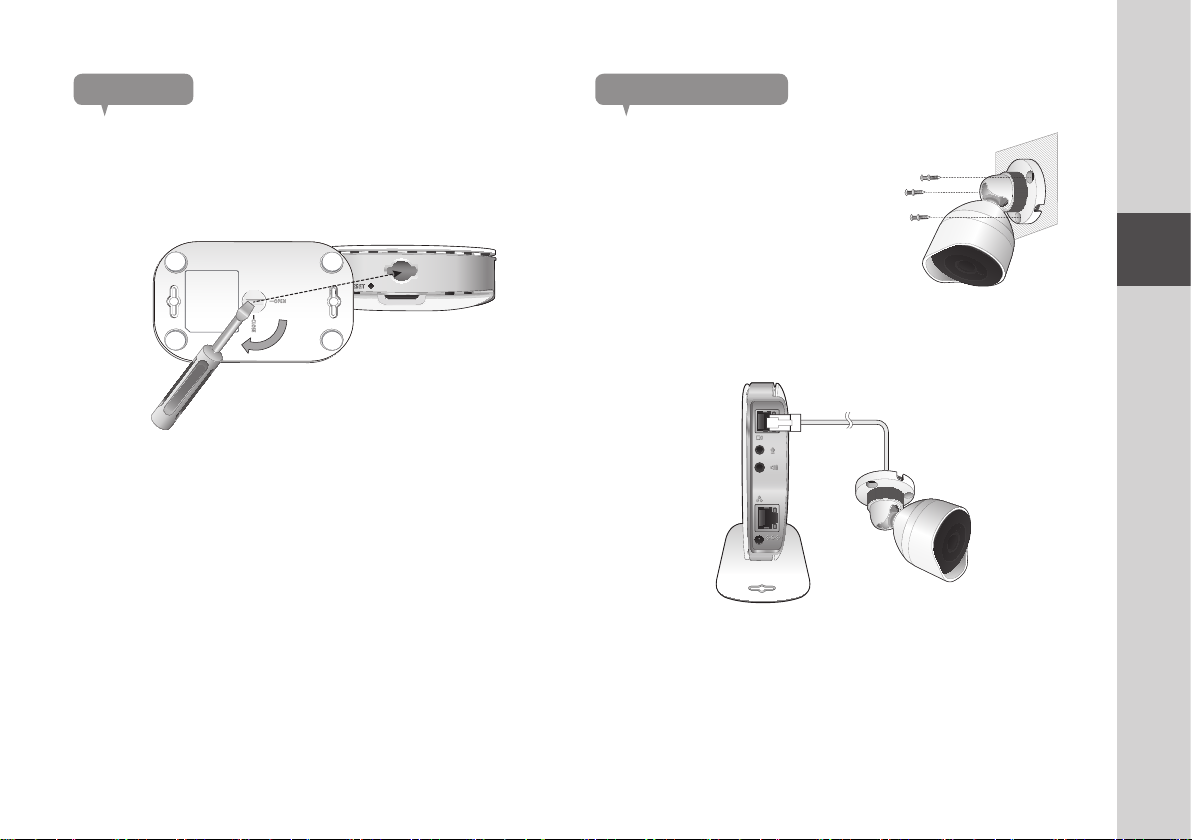
Assembling
Installing the camera
1. Match the home of the main unit and the bracket.
2. Please engage the bracket body and return to the [CLOSE] direction using a
flathead screwdriver 2.
` Turn to [OPEN] direction to remove the body and bracket.
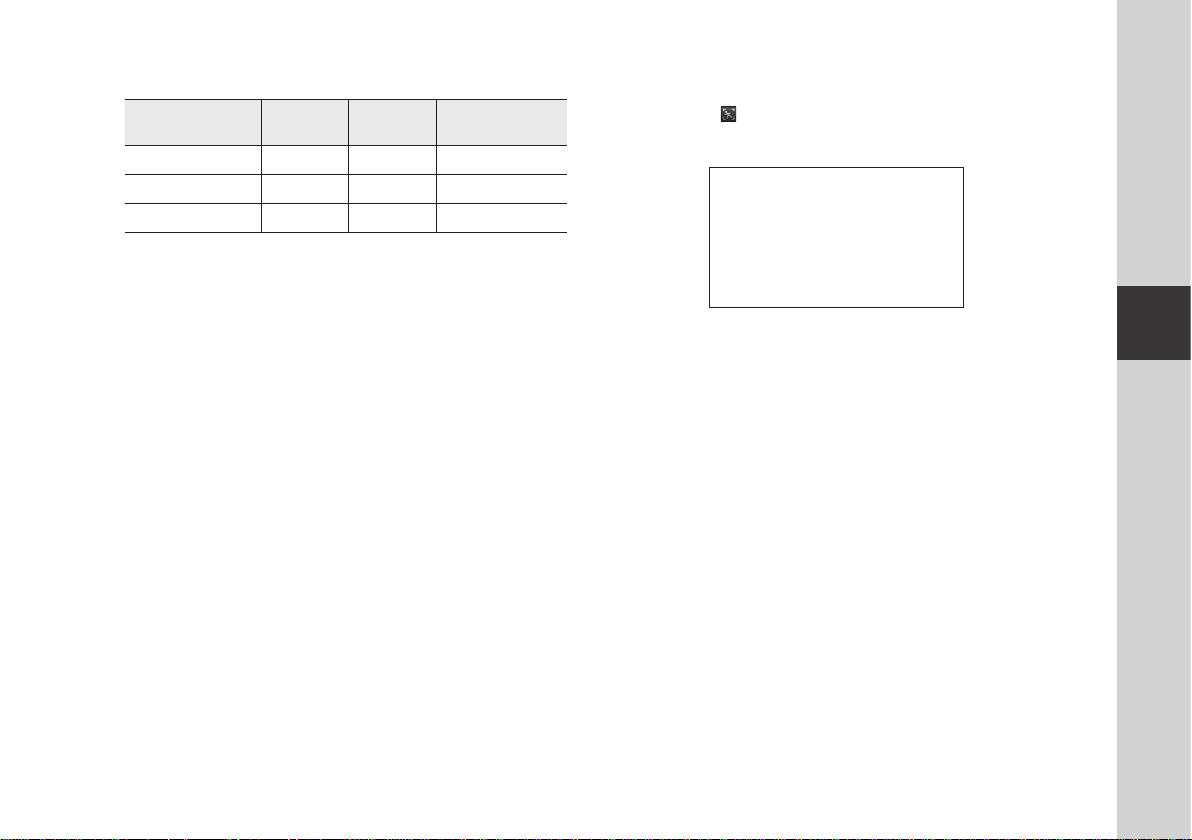
3. Choose the location where you want to
install the camera.
4. Use the provided mounting screws to
attach the camera to a wall or ceiling.
Connecting the camera to the body
Connect the [CAM] on the side of the main terminal and the camera cable.
9
9
To adjust the camera angle
Adjust the camera’s shooting angle as appropriate.
02
Installation & Network Connection
9
Page 11

Network Connection and Settings
Connecting via network cable
Precautions
• The wireless network access may fail, depending on the communications
environment.
• For details about the network settings and password, contact your network
administrator or service provider.
• For a specific Internet service requiring user authentication, you may not access
the service. If this is the case, contact the service provider.
• Do not access the unauthorized network.
• The farther the distance from the Wireless Access Point, the longer time the
network connection may take.
• If you fail to access the selected wireless network, try a different Wireless
Access Point to make access.
• For more information about the router or the wireless connection, refer to the
documentation of the router or contact the router manufacturer.
• If the camera is connected to a multiple-Wireless Access Point network
environment, some video packets may be lost, depending on the network traffic
load.
• According to the network policy (blocking UDP) of the service provider, the video
transmission can be limited to 7 minutes.
For more details, refer to the descriptions on page 19, <Relay Mode>.
•
In addition to the above two situations, you may encounter a network delay or
interruption due to the network conditions.
• Some hubs can have compatibility issues.
If you do not have a Wireless Access Point, you must connect the camera using
LAN cable directly to your home router.
1. When you apply the power, the power status LED is lit red, and it will change
to red blinking when the booting is completed.
2. Connect the network cable to the camera and to the home router as shown
below.
<Hub>
<Modem>
Internet Service
OR
3. The status LED will become steady blue once the camera is connected to
the router. (may take up to 30sec).
If the status LED (blue) is not lit, repeat steps 2 through the end and check it
again.
4. The status LED will became steady green once the camera is connected to
server.
` It is recommended to set the router to DHCP(Dynamic Host Configuration Protocol)
n
server.
If you want to use static IP address, please refer to <Wired Network> on page 21.
` If the router’s UPnP is not set, then you might be connected in relay mode.
The settings may differ depending on the connected Broadband Router model.
For more information, refer to the user manual of the applicable router.
10
· English
Page 12

Wi-Fi connection setting
If you want to connect a camera to Wi-Fi, first connect the network cable and try
to make a connection to the Wi-Fi network.
1. When you apply the power, the power status LED is lit red, and it will change
to red blinking when the booting is completed.
2. Use the network cable (LAN cable) to connect the LAN port of the unit to the
LAN port of the Wireless Access Point.
02
<Wireless Access Point>
Internet Service
<Modem>
3. Register and select the camera according to guide of 03. Monitoring.
4. Set your wireless network environment using the guideline <Wireless
Network> on page 22.
` If you want to connect your camera to Wi-Fi, you need a hub that supports wireless
n
networking.
` Using the camera's Wi-Fi Direct function, you can easily make a Wi-Fi connection from
your mobile phone.
` When the wireless network settings are completed, remove the LAN cable.
` If you fail to connect to the Internet service, contact the service provider for details.
Installation & Network Connection
11
Page 13

MONITORING
Registration 12
Web browser requirements 12
Starting SmartCam 12
Live Video 17
Monitoring options 18
Setup 20
Basic Info 20
Network 21
Time 23
Alarm & Notification 24
Alarm Schedule 25
SD card 26
03
Event Alarm 27
Playback 27
Information 28
My Account 28
Support 29
Registration
Once you register the product with the site, you can monitor the camera video on
the PC or laptop computer.
Web browser requirements
Windows Mac
Windows XP, 7 supported
- Internet Explorer 9 or higher
(The 64-bit is not supported.)
- Firefox
- Chrome
Starting SmartCam
1. From your PC, launch your web browser.
2. Go to http://www.samsungsmartcam.com.
3. Select preferred language.
4. Click <Sign up> or <Starting SmartCam>.
Mac OSX 10.7 Lion or higher is
supported
- Safari
- Firefox
- Chrome
12
· English
Page 14

❖Plug in installation
You need to install your plug in to automatically search for cameras connected to
the network and view the video in your camera.
` If you login or click <Starting SmartCam> in a PC where the plug in is not installed,
n
the installation message window will pop up.
` When you install the plug in, the web browser will be terminated and you need to
launch it again.
1) Click <Download Plug-in>, run the setup file.
3) Click <Install> to begin the installation.
For Windows
2) Click <Next>.
4) Installation has completed.
03
Monitoring
13
Page 15

For Mac
2) Click <Continue>.
4) Enter MAC PC password and click <Install Software>.
3) Click <Install>.
14
· English
5) Installation has completed.
Page 16

5. Enter the requested information, and click <Sign Up>.
6. According to the network connection and setting, click <Next> when the
camera LED turns into green.
• ID : Using alphabetical characters and numbers, make a combination
using 8 to 14 letters.
• Password : To strengthen security, create a password with a combination
of special characters, numerals and English letters.
` Length and other restrictions of password.
J
- A combination of English letters/numerals/special characters: 8 digits or more
- A combination of English letters/numerals: 10 digits or more
- The password must not be identical to your ID.
- No simple repetitive pattern must be used.
e.g., 1212abab,azxsazxs
- You cannot use 3 or more consecutive letters.
e.g.,
1234, abcd
- You cannot use 4 or more consecutive qwerty keyboard letters.
e.g., asdf, 7890
- You cannot use any letter 3 consecutive times.
e.g.,
!!!!, 1111, aaaa
• Confirm Password : Please enter the password again for confirmation.
• Name : Enter the user name.
• E-mail : Please make sure you enter correct email address as you will have
to use the email address to receive temporary ID/password when you lost
your user ID or password.
7. Select the serial number of the camera to be added from the camera search
list.
If the camera is not found, enter the serial number manually.
8. Click <Next>.
` Serial number can be found the label on the side of the packaging or on the rear of the
n
product.
` The computer and the camera has to be on the same network router to auto detect
the cameras.
03
Monitoring
15
Page 17

Create <Camera Name> and <Camera password>.
9.
10. Click <Next>.
` The camera password is used to block the unauthorized access to your camera.
n
` Create camera password using alphanumeric characters between 1 to 8 without any
space.
11. After adding the camera, click <Ye s> in the wireless network setup pop-up
window.
12. Select your Wireless Network from the list.
13. Enter the password of your Wireless Network and click <Next>.
` If your Wireless Network is hidden, select <Other Wi-Fi Networks (not listed)>.
n
` Select <Display password> to display the password.
14. Click <OK>.
16
· English
Page 18

15. Unplug the network cable from the camera and the router.
16. Click <Finish> if the <Finish> button is activated.
Live Video
1.
Select a camera from the camera list at the upper left hand of the screen.
17. Once the camera is successfully registered, you can check the camera in the
camera list.
` The gray icon indicates the camera is inactive so you cannot monitor it right now.
n
2. Enter the camera password and click <OK>.
` Check on <Remember> to access your camera without entering the password next
n
time.
`
If you want to change the Camera password, please refer to <Basic Info> on page 20.
3. Live video will be displayed on the screen.
03
Monitoring
17
Page 19

Monitoring options
b c
n
m
Item Description
Default Camera Set the default camera to monitor in the camera list.
Delete Camera Delete the registered camera.
b
c
18
· English
Cancel remembering
camera password
Night Vision
Cancel remembering the camera password.
If Night Vision is set <ON>, it will automatically switch to black
and white mode in the dark condition and then the IR lamp will
automatically operate.
If Night Vision is set <OFF>, it does not switch to night vision mode
and it will operate in color mode.
Item Description
Motion zone setting It detects motion within the range set by a user.
Flip You can flip over the video image.
A user can directly save videos in their SD card.
` If there is an ongoing event now or overwrite to SD card is not
checked, and there is storage space of 10% remaining, you
Manual recording
cannot perform manual recording.
` If you move the page or turn off the browser without turning off
the manual recording button, it will be saved for a max of 30
seconds and manual recording will be finished.
Set the network speed (low/mid/high).
`
Network Speed
Capture Image Live video is saved as one image.
Sound
Full screen
If the bandwidth provided by your internet service provider is smaller
than the recommended value, then the video might get fuzzy or
temporary disconnections or delays in the live video may be caused.
When enabled, you can hear what’s happening around the camera.
` Some internet service providers do not support audio outputs in
relay mode.
The video is displayed on the full screen.
` The system supports Internet Explorer only.
` If you double-click the screen, the full screen mode is terminated.
Brightness You can adjust the brightness of the screen image.
Hide/unhide detailed
m
menu
Audio
n
Click on the [
Adjust the volume of the built-in microphone and speaker of the
camera as appropriate.
If you set the mic to zero, you will hear no live sounds or audio events.
NO recording will be done in the SD card.
Note that the Two-way audio transfer function is available only with the
smart phone application.
] icon to unhide or hide detailed setting menu.
Page 20
❖Network Speed
Profile Name Resolution Frame rate
Low Speed Network VGA 20 fps 0.7Mbps
Mid Speed Network HD(720P) 15 fps 1Mbps
High Speed Network Full HD(1080P) 20 fps 2.8Mbps
` What is relay mode?
n
If the network condition is unstable, the camera cannot make a normal connection
(P2P), so it will set up a connection in relay mode. In this case, you will see the video
for the first seven minutes only.
Recommended
` Relay mode is added feature where the video from the camera is transmitted to
Samsung server then retransmitted to the user's computer.
` If you have trouble connection to the camera, visit "http://www.samsungsmartcam.
com", go to support page, and refer to “Troubleshooting” on it.
` It is recommended to use one browser at one time.
` If simultaneous accesses are made to the high speed network, video quality may be
low.
` The Night Vision video produces a different visibility according to the distance between
camera and subject.
bandwidth
❖Motion detection area setting
1) Click the < > icon.
2) Drag it to the screen to set the detection area.
3) Click on <OK>.
If you want to delete the set area, click on <Delete All>.
` The <Motion Detection> function needs to be activated in order to use the motion
n
zone function.
03
Monitoring
19
Page 21

Setup
Basic Info
b
c
Item Description
Serial number You can confirm the serial number.
Camera password
b
Camera Name Click the <Modify>, you can change the camera name.
c
Firmware Version
Status LED You can turn on/off the LED in your camera.
Flickerless
` If you change the camera password, you will be logged out and return to the camera
n
password input page.
Click the <Modify>, you can change the Camera password.
Enter the current camera password, and type a new Camera password.
You can check the current version and the latest version of your
camera S/W.
You can reduce the occurrence of screen shaking due to the frequency
mismatches with the neighboring lighting.
` Keep the camera password in a safe place as it is used for viewing the live screen of
the camera or for changing the display settings.
20
· English
Page 22

❖Firmware update
If the currently used S/W is not of the latest version, update it.
If you are using the latest version, then the firmware will not be activated.
1) Click <Firmware>.
Network
<Wired Network>
2) Click the <
3) When the firmware update is finished, the camera will reboot.
n
> icon to update the firmware.
` If you want to update the firmware, it is recommended to use a wired network
connection.
` If the power goes off during updates, it may not operate properly.
` The duration of the firmware update depends on the size of the firmware file and the
network connection speed.
Item Description
Dynamic IP Address
Static IP Address
b
If you select <Dynamic IP Address>, the IP address will be obtained
automatically.
You must manually provide the information of: IP address, subnet
mask, gateway, DNS server address.
b
03
Monitoring
21
Page 23

` If any of the manual settings is wrong, the network settings will not be applied.
n
` If you have both cable and wireless network connections simultaneously, the cable
network connection is prioritized.
` If you switch from the current wireless connection to the cable connection, the network
will switch to cable connection accordingly.
` For more information about the router or the wireless connection, refer to the
documentation of the router or contact the router manufacturer.
<Wireless Network>
b
c
Item Description
Wireless On/
Wireless Off
AP (Access Point) list
b
AP (Access Point)
c
password
Hidden SSID
n
` If you select a non-secured AP (Access Point), you just can access the network without
providing a specific password.
You can select to activate or deactivate the wireless network
connection.
You will see a list of APs (Access Point) available. Select a desired one
from the list of APs (Access Point).
If you select a secured AP (Access Point), you must enter the
password before you can access the network.
For the password, contact your network administrator.
If your SSID is hidden, select the type of security you have. Enter the
name of the SSID and the password.
` If you entered a wrong password, you cannot access the network whatsoever.
` When the wireless network settings are completed, remove the LAN cable. If you do
not remove the LAN cable, the wireless network will not be available.
22
· English
Page 24

Time
Item Description
Time Confirm the camera's time.
Time Zone Select your region.
b
Display Time Select the time format displayed in time setting.
c
Automatic Time It sets camera's time automatically.
Daylight Saving Time
Time to show Live screen displays the time.
Check this option if you live in a country or region where DST(Daylight
Saving Time) is applied.
b
c
` The time will synchronize with the NTP(Network Time Protocol) server automatically.
n
` For this, Internet connection is required.
` You need to set the timezone correctly to obtain the exact time setting.
` The time displayed without Internet connection may not be accurate.
03
Monitoring
23
Page 25

Alarm & Notification
Camera has ability to send event notifications when motion or audio is detected.
Item Description
You can set motion or audio alerts. Sensitivity level can also be set.
The higher the sensitivity, the more accurate motion and audio events
Alarm notification
can be detected.
` When an event occurs, if you want to send alerts to Gmail, first log
into your google account.
` In the following case, it may fail to derive the proper results for basic events and
n
motion detection.
- The object color or brightness is similar to the background.
-
Multiple movements continue occurring at random due to a scene change or other reasons.
- A fixed object continues moving in the same position.
- An object hides other objects behind.
- Two or more objects overlap or one object divides in multiple portions.
- A moving object comes close to the camera.
<Gmail> Notification
The event alarm is sent through Gmail.
1. Select the Google.
2. Enter your Gmail address and password.
3. Click <Save>.
4. Select <Use> of “Send alarms”.
5. Enter your email address to receive the notification e-mail and click <Add>.
Now, the receiver full email address will be shown in the List Box. If you want
to register more than one email address, you can just repeat the same
procedure.
<Receiver
email address>
`
If your Google email ID/password are saved, only check “Send alarms”.
n
`
If the email address for the recipient entered is incorrect, event alerts will not be sent.
`
Even if you entered a correct google account ID, if the ID/password confirmation pop up
window appears, click on <Go to the google page.> and check the google account.
24
· English
Page 26

Push alarm Notification
The push alarm is provided through the web viewer and mobile app in which the
camera is registered.
Push alert list shows the list of IDs of users who registered cameras.
•
When an alarm occurs, the web site will send push alerts to each smart phone.
Alarm Schedule
Alarms will only operate for the times selected by the user.
b
Item Description
Only Scheduled Time
Always Alarm function always operates.
b
Alarm function will only operate for the time/day designated by the
user.
03
Monitoring
25
Page 27

SD card
When an event occurs, it is saved in an SD card.
Item Description
Use the SD card
Continuous Recording
b
Overwrite
c
SD Card Status Check the remaining capacity of your SD card and delete all the data.
If you set motion/audio, video will be automatically saved in your SD
card.
Saves the video without being interrupted by events that may occur.
If the SD card capacity is insufficient, it will start overwriting the oldest
data.
` When there is storage capacity of 10% remaining, the top
notification window will show an alarm.
b
c
` Set to <Off> before removing the SD card. Otherwise, the SD card may be damaged.
n
` For this camera, you are recommended to use the following memory cards provided
from the following makers.
Micro SD memory card : SanDisk, Transcend
Recommended Capacity : 4GB ~ 32GB
` SD card of max 32GB is supported and a FAT32 file system is supported.
` You are recommended to use the SD card after formatting.
26
· English
Page 28

Event Alarm
Playback
You can check the event alarm that occurred.
Item Description
Delete by dates Delete all the event alarms on the date.
Delete All Delete all the event alarms for thirty days.
b
Display Events Displays the number of events occurred in the 30 day list.
c
Arrange by types Arrange the event list by event types.
b
c
You can play the video recorded in your SD card.
b
c
Item Description
Type Set the event type to search for during the search period.
Date Set the search date for the data saved in your SD card.
b
Play/pause Play and pause video.
c
Search Perform event searches.
Refresh Renew the events displayed in timeline.
Timeline Use the timeline to play the video in the desired time.
03
Monitoring
27
Page 29

Information
My Account
`
If you want to change the member information, click on <Account>. Select the item
n
(password, or email address) and enter your information.
28
· English
Page 30

Support
You can download the Samsung SmartCam mobile app and user guide.
03
Monitoring
29
Page 31

APPENDIX
Specifications 30
Specifications 30
Product Appearance 32
Troubleshooting 33
04
Specifi cations
Specifications
Item Description
OS Linux
Resolution 1920x1080, 1280x720, 640x480
Framerate 1080p@20fps
Max.
Video Compression Format H.264, MJPEG
Streaming Capability Multiple Streaming (Up to 5 Profiles)
Angular Field of View (D/V/H) 128°/ 62°/ 111°
Low Light Performance 0.3Lux(Color), 0Lux(Black/White)
WDR N/A
Day & Night True D/N Filter
Night vision IR-LED, 15M
Digital Zoom 4X
Flip / Mirror Support
Motion Detection Support
30
· English
Page 32

Item Description
Audio Detection Support
Audio I/O N/A
Audio Compression Format G.711, G726
Audio Communication 2-W
Memory Slot microSD (FAT32), Up to 32GB
Recording & Playback
Ethernet RJ-45 (10/100BASE-T)
Wireless Wi-Fi 802.11 b/g/n (2.4G Single-band)
WiFi Direct Support (Push button)
Security SSL (AES 256bit)
Max. User Access 5 users at Unicast Mode
Operating Temperature / Humidity Camera : -10°C ~ 50°C, Body : 0°C ~ 40°C / Less than 90% RH
Ingress Protection IP66 (Camera part), Indoor (Body)
Input Voltage / Current 9V DC / 1A
Power Consumption Max. 9W
Indication 1 LED (Power, Status, Link)
ay Audio (Optional Microphone & Speaker), Half Duplex
Event recording, Manual recording, Continuous recording, Remote
playback
Item Description
Color White
Dimension (WxHxD)
Weight 568g
Camera (Included bracket) : Φ54 x H102mm, Body (Except Mounts)
W83.2 × H111 × D27.3mm
04
Appendix
31
Page 33

Product Appearance
83.2
111
116.6
90.2 59.4
27.3 Φ54
102
32
· English
Page 34

Troubleshooting
If you encounter a problem with your system, see the table below to solve the problem
as quickly and easily as possible. Please follow the instruction below:
Problem Action
- Move to “Log-in page Forgot your ID/Password?”, and enter the
I forgot my user ID/
password.
Camera is not
connected to the
wireless hub.
After logged in,
I failed to register the
camera.
registered e-mail address to which we will send you the user ID and/or a
new password.
It can be spammed out depending on the policy of the email server.
After logged in, it is advisable to change the temporary password provided.
- If the camera's wireless internet indication LED goes off too often, then it
means that the camera installation location is not optimal for the wireless
internet environment, so in this case, locate the camera close to the wireless
hub and try to connect again.
- Check the password for the wireless hub and try again.
- Check that the serial number entered matches the label on the back of the
camera.
- Enter the correct password for the camera registered again and try to
register the camera again.
- Check the camera LED to see if it is green. If not, then check the network
connection.
- If you are still unable to register the camera after this, then reset the camera
to factory settings and begin again.
(If you want to reset to factory settings, press and hold the initialize button
on the back for 10 sec. Once initialized to factory settings, the camera will
be restarted.)
Problem Action
The video from the
camera is temporarily
lost.
No sound is output
from the video.
I forgot my Camera
password.
I want to change my
password and/or
email address.
Camera will be
connected in a relay
mode.
- The video from the camera can be delayed according to a network delay.
Please check if the camera is installed in a place of proper wireless Internet
communications.
- Click the Voice icon in the video playback page, or check if the voice is
turned On in your smart phone app.
- Some internet service providers do not support audio outputs in relay mode.
- You must create a new camera password.
- Press the initialization button on the back of the product for more than 10
seconds to reset to factory settings.
- After factory initialization, when you access the camera, you can reset the
password for the camera.
- After logging in, click on the <Account>. Select the item (password, or
email address) and enter your information.
- Check the UPnP setting of the router.
- Using a network upload speed of 500Kbps or higher is recommended.
- Depending on the policy of your service provider, you can access in relay
mode.
04
Appendix
33
Page 35

Samsung Techwin cares for the environment at all product manufacturing stages, and
is taking measures to provide customers with more environmentally friendly products.
The Eco mark represents Samsung Techwin’s devotion to creating environmentally
friendly products, and indicates that the product satisfies the EU RoHS Directive.
Correct Disposal of This Product
(Waste Electrical & Electronic Equipment)
(Applicable in the European Union and other European countries with separate
collection systems)
This marking on the product, accessories or literature indicates that the product and
its electronic accessories (e.g. charger, headset, USB cable) should not be disposed
of with other household waste at the end of their working life. To prevent possible
harm to the environment or human health from uncontrolled waste disposal, please
separate these items from other types of waste and recycle them responsibly to
promote the sustainable reuse of material resources.
Household users should contact either the retailer where they purchased this
product, or their local government office, for details of where and how they can take
these items for environmentally safe recycling.
Business users should contact their supplier and check the terms and conditions
of the purchase contract. This product and its electronic accessories should not be
mixed with other commercial wastes for disposal.
Page 36

SALES NETWORK
SAMSUNG TECHWIN CO., LTD.
Samsung Techwin R&D Center, 6, Pangyo-ro 319beon-gil, Bundang-gu, Songnam-si, Gyeonggi-do 463-400, Korea
TEL : +82-70-7147-8740~60 FAX : +82-31-8018-3745
SAMSUNG TECHWIN AMERICA Inc.
100 Challenger Rd. Suite 700 Ridgefield Park, NJ 07660
Toll Free : 1-877-349-3149
www.samsungsv.com
SAMSUNG TECHWIN EUROPE LTD.
Samsung House, 1000 Hillswood Drive, Hillswood Business Park Chertsey,
Surrey, UNITED KINGDOM KT16 OPS
TEL : +44-1932-45-5300 FAX : +44-1932-45-5325
 Loading...