

Page 1

Digital Color Camera
User Manual
SNC-79440BWN
CAUTION : Changes or modications not expressly approved by the party
responsible for compliance could void the user's authority to operate the
equipment.
NOTE : This equipment has been tested and found to comply with the limits for a Class A
digital device, pursuant to part 15 of the FCC Rules. These limits are designed to provide
reasonable protection against harmful interference when the equipment is operated in a
commercial environment. This equipment generates, uses and can radiate radio frequency
energy and, if not installed and used in accordance with the instruction manual, may cause
harmful interference to radio communications. Operation of this equipment in a residential
area is likely to cause harmful interference in which case the user will be required to correct
the interference at their own expense.
Page 2

User Manual
Copyright
Hanwha Techwin
©2017
Trademark
Each of trad emarks herein is registered. The name of this product and other trademarks mentioned in this manual are the regis tered trademark of
their respective company.
Restriction
Copyright of this d ocument is reserved. Under no circumstances, this document shall be repro duced, distributed or changed, par tially or wholly,
without formal authorization.
Disclaimer
Hanwha Techwin
provided. Use of this document and the subsequent results shall be entirely on th e user’s own responsibilit y.
to change the contents of this document without prior notice.
Design and specications are subject to change without prior notice.
Co., Ltd. All r ights reser ved.
makes the bes t to verify the integrit y and correctness of the contents in this document, but no fo rmal guarantee shall be
Hanwha Techwin
reserves the right
Page 3
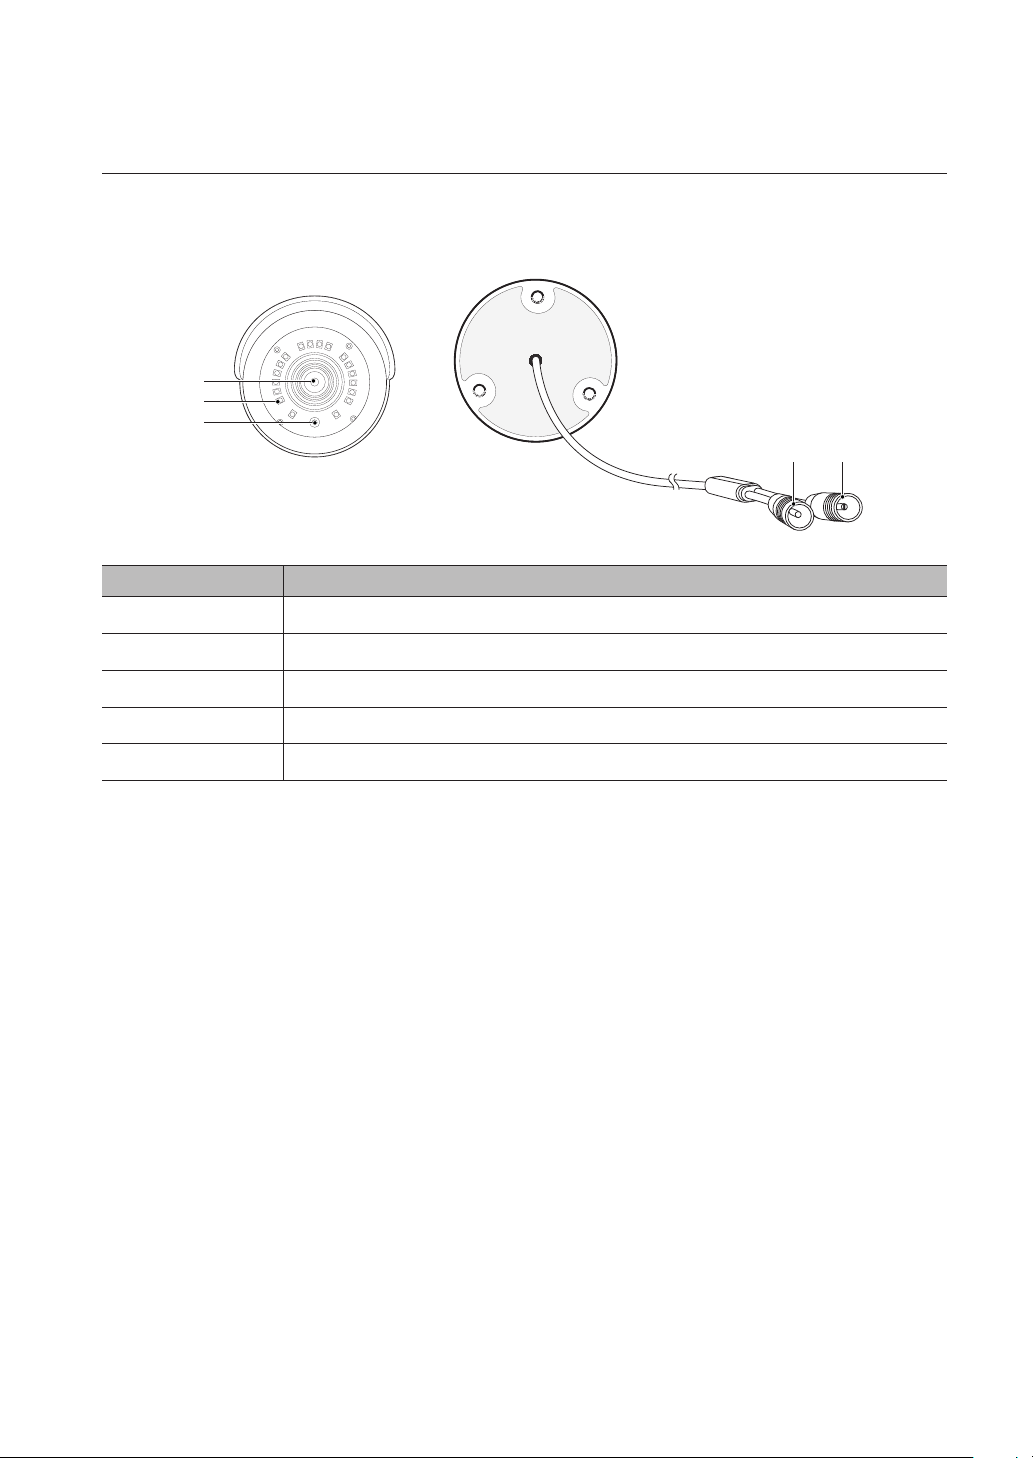
part names and functions
Equipped with the IR LED lights and the illumination sensor, the camera enables you to monitor at all times, day and night. The
camera is suitable for both indoor and ourtdoor use.
Do not fully expose the camera to rain. The camera must be installed under a shelter to avoid exposure to excessive rain or moisture.
a
b
c
d e
Name Description
Lens 3.6mm focal length enables you to monitor at a wider field of view
a
IR LED Infrared LED lights are controlled by the illumination sensor.
b
Illumination Sensor Detects incoming light to control the IR LED.
c
Pairing Button Click to do pairing manually.
d
Power Cable Use to power the camera.
e
English _3
Page 4
precautions
Ensure you read out the following instructions before installing the camera:
•
Select an area (ceiling or wall) that can withstand 5 times the camera weight
•
Stuck-in or peeled-off cables can cause damage to the product or a fire.
•
For safety purposes, keep anyone else away from the installation site.
And put aside personal belongings from the site, just in case.
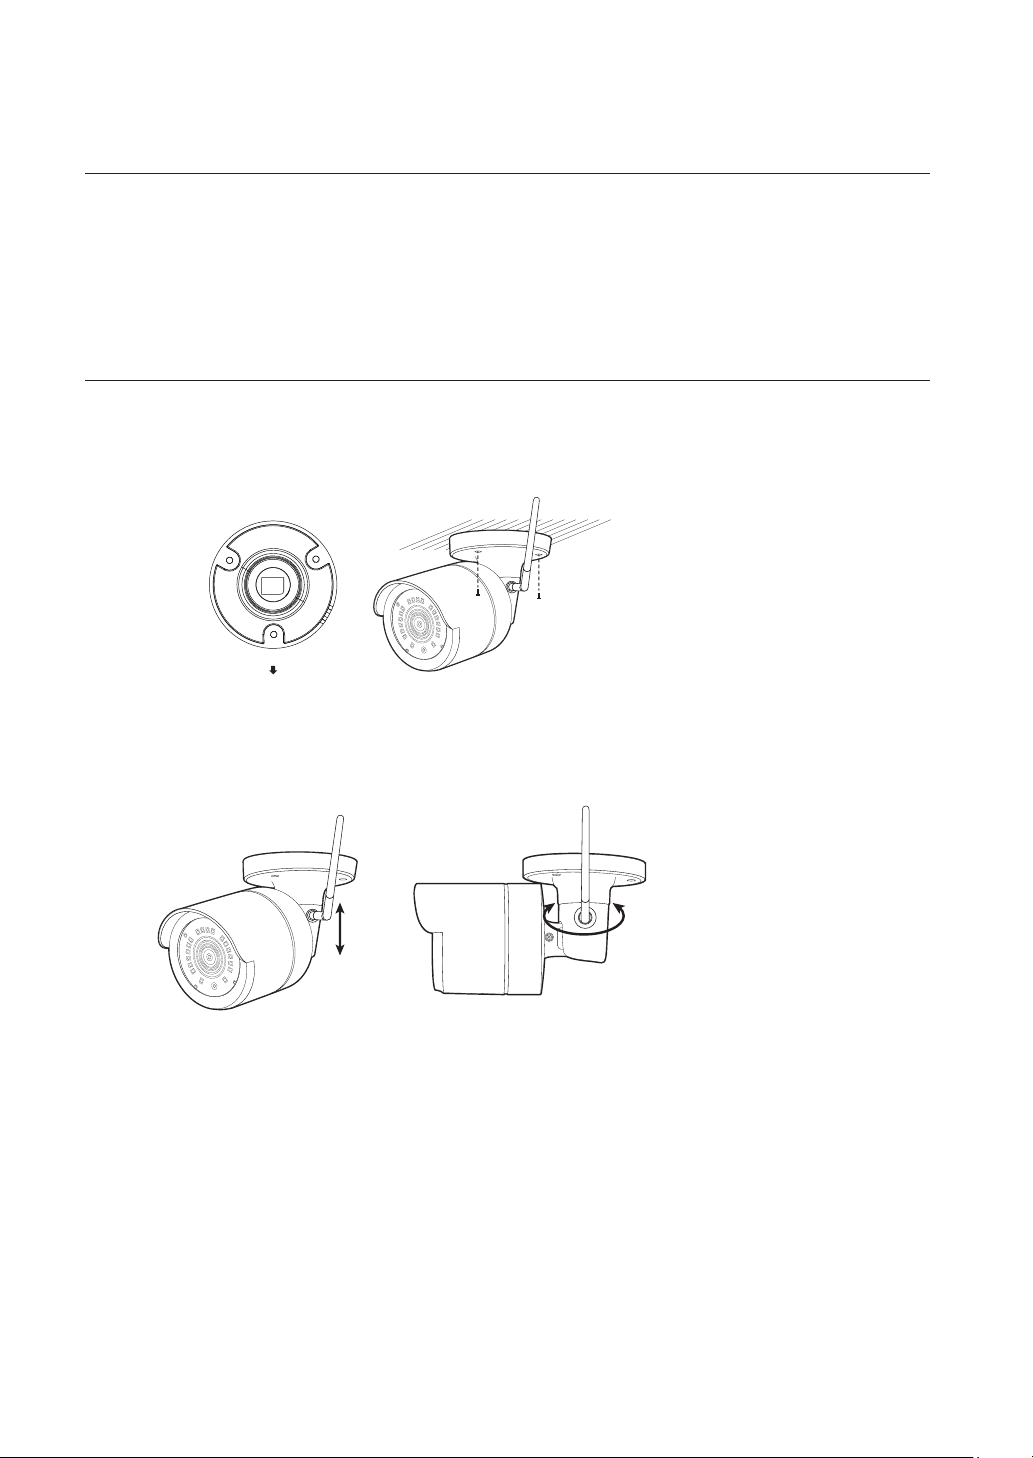
installing the camera
The camera can be installed on the wall, ceiling, shelf or a desired position using the provided mounting bracket.
1. Choose an installation site that can sufficiently support the weight of the camera to be installed.
2. Adhere the installation template onto the ceiling and use it as installation locating tool. "Please refer to Page15 (Quick Guide)"
Screw holes for
the Camera
installation
CAMERA FRONT
3. Attach the camera mount to the wall using the supplied screws.
4. Adjust the direction of the camera to the desired direction, and tighten the bracket.
5. Adjust camera angle as needed.
6. Connect the camera cable to the camera.
Take caution when installing the camera outdoors because the cable connectors may be wet with moisture or pile up with
impurities.
Although the camera is IP66 rated, direct exposure to water or moisture may cause problem such as condensation.
English _4
Page 5

protection of cable from Water
If this product is mounted outdoor, water leakage may occur at gap between cables. As shown below, butyl rubber (available on the
market) shall be used to protect from water.
1. Connect power supply and BNC power source.
2. Cover black sheath of the cable (Zone A), and ensure half of butyl rubber can cover the cable joint.
Poor water protection at the cable sheath may cause water leakage. Make sure to wrap tightly.
`
J
The water-proof butyl rubber is made of rubber that expands to twice the original length.
`
If you do not use cable joint, it must be covered with water-proof tape.
`
connecting the nVr
Use a 12V 0.5A power adpator to power each wireless camera. There is no need to connect cameras to NVR as it is wireless AIO.
12V
HDMI
VGA
WAN
HOCK
S
I
CAUTION
N
T OPE
VICEABLE
RISK OF ELECTR
DO NO
QUALIFIED
OF ELECTRICAL SHOCK
E RISK
S. NO USER SER
CING TO
NOT
SERVI
COVER
T OPEN
IDE. REFER
NNEL.
K HAZARD. DO
INS
DO NO
CAUTION : TO REDUCE TH
PERSO
VICE
PECIFICALLY DESIGNED
IN OR MOISTURE.
PARTS
NT FIRE OR SHOC
SER
NOT S
VE
G : TO PRE
WARNIN
EXPOSE UNITS
FOR OUTDOOR USE TO RA
English _5
Page 6

specifications
camera model: snc-79440bWn
Item Details
Video
Imaging Device 2M CMOS (1/2.9")
Effective Pixels 1,920(H)x1,080(v)
Scanning System Progressive
Synchronization Internal
Horizontal Resolution 1080P
Min. Illumination 0 Lux (IR LED ON)
Camera Output RJ45
Lens
Focal Length 3.6mm
Max. Aperture Ratio F2.1
Angular Field of View Diagonal : 105°
Operational
Shutter Mode Auto
Gain Control Auto
White Balance Auto
Wide Dynamic Range D-WDR
Contrast Enhancement Auto
Digital Noise Reduction 3DNR
Flickerless Manual(50Hz/60Hz optional)
Day & Night TRUE D/N, Auto
IR Distance 82ft(Total Darkness)/130ft(Ambient Lighting)
Environmental
Operating Temperature / Humidity -30°C ~ +50°C (-22°F ~ +122°F) / Less than 90% RH ※ Startup : -10°C ~ +50°C
Ingress Protection IP66
English _6
Page 7

Item Details
Electrical
Input Voltage 12V/500mA DC Adaptor
Power Consumption 5.4W(IR LEDS ON)
Mechanical / Package information
Color / Material White / Metal
Dimension (Ø x D) Ø69.3 x D147.2mm (2.73" x 5.79")
Weight 0.34kg prox.
Printed material Quick guide
Bracket one body (assembled)
Screw 3 EA (per camera)
Accessory
Anchor 3 EA (per camera)
Hex key 1 EA (per camera)
Power Adaptor 12V 0.5A 1 EA (per camera)
Cable (65ft ) 4EA 65ft power Cable
English _7
Page 8

dimension
camera
Ø6 (0.24")
Unit: mm (inch)
134.5 (5.30")
87.47 (3.44")
117.3 (4.62")
Ø54.2 (2.13")
3-Ø3.60 (0.12"-0.14")
Ø69.30
(2.73")
77.6 (3.06")
117.3 (4.62")
Ø69.30 (2.73")
147.2 (5.80")
English _8
Page 9

FCC Compliance Statement
This device complies with part 15 of the FCC rules. Operation is subject to the following two
conditions: (1) This device may not cause harmful interference, and (2) this device must accept any
interference received, including interference that may cause undesired operation.
FCC Interference Statement
This equipment has been tested and found to comply with the limits for a Class B digital device,
pursuant to part 15 of the FCC Rules. These limits are designed to provide reasonable protection
against harmful interference in a residential installation. This equipment generates, uses and can
radiate radio frequency energy and, if not installed and used in accordance with the instructions,
may cause harmful interference to radio communications. However, there is no guarantee that
interference will not occur in a particular installation. If this equipment does cause harmful
interference to radio or television reception, which can be determined by turning the equipment
off and on, the user is encouraged to correct the interference by one of the following measures:
• Reorient or relocate the receiving antenna.
• Increase the separation between the equipment and receiver.
• Connect the equipment into an outlet on a circuit different from which the receiver is connected.
• Consult the dealer or an experienced radio/TV technician for help.
FCC Caution
Any changes or modifications not expressly approved by the party responsible for compliance could
void the user's authority to operate this equipment. This transmitter must not be co-located or
operating in conjunction with any other antenna or transmitter.
FCC Radiation Exposure Statement
This equipment complies with FCC radiation exposure limits set forth for an uncontrolled
environment. This equipment should be installed and operated with minimum distance 20 cm
between the radiator and your body. This transmitter must not be co-located or operating in
conjunction with any other antenna or transmitter.
IEEE 802.11b or 802.11g operation of this product in the USA is firmware-limited to channels 1
through 11.
Page 10

Industry Canada Statement
This device complies with RSS-247 of the Industry Canada Rules. Operation is subject to the
following two conditions: (1) This device may not cause harmful interference, and (2) this device
must accept any interference received, including interference that may cause undesired operation.
Ce dispositif est conforme à la norme CNR-247 d’Industrie Canada applicable aux appareils radio
exempts de licence. Son fonctionnement est sujet aux deux conditions suivantes: (1) le dispositif ne
doit pas produire de brouillage préjudiciable, et (2) ce dispositif doit accepter tout brouillage reçu,
y compris un brouillage susceptible de provoquer un fonctionnement indésirable.
Industry Canada Radiation Exposure Statement
This equipment complies with IC radiation exposure limits set forth for an uncontrolled environment.
This equipment should be installed and operated with minimum distance 20 cm between the
radiator & your body.
Déclaration d’exposition aux radiations
Cet équipement est conforme aux limites d’exposition aux rayonnements IC établies pour un
environnement non con trôlé. Cet équipement doit être installé et utilisé avec un minimum de 20
cm de distance entre la source de rayonnement et votre corps.
Antennas Statement
This radio transmitter (identify the device by certification number or model number if Category II)
has been approved by Industry Canada to operate with the antenna types listed below with the
maximum permissible gain indicated. Antenna types not included in this list, having a gain greater
than the maximum gain indicated for that type, are strictly prohibited for use with this device.
Le present emetteur radio (identifier le dispositif par son numero de certification ou son numero
de modele s'il fait partie du materiel de categorie II) a ete approuve par Industrie Canada pour
fonctionner avec les types d'antenne enumeres ci-dessous et ayant un gain admissible maximal. Les
types d'antenne non inclus dans cette liste, et dont le gain est superieur au gain maximal indique,
sont strictement interdits pour l'exploitation de l'emetteur.
Antenna List
No. Model Type Gain[dBi] Impedance
Dipole antenna
1 YH2400-SMAJ-108
1.87 50
(Reversed SMA Jack type)
Page 11

Hanwha Techwin cares for the environment at all product manufacturing stages, and is taking measures to provide
customers with more environmentally friendly products.
The Eco mark represents Hanwha Techwin's devotion to creating environmentally friendly products, and indicates
that the product satisfies the EU RoHS Directive.
Correct Disposal of This Product (Waste Electrical & Electronic Equipment)
(Applicable in the European Union and other European countries with separate collection systems)
This marking on the product, accessories or literature indicates that the product and its electronic accessories (e.g.
charger, headset, USB cable) should not be disposed of with other household waste at the end of their working life.
To prevent possible harm to the environment or human health from uncontrolled waste disposal, please separate
these items from other types of waste and recycle them responsibly to promote the sustainable reuse of material
resources.
Household users should contact either the retailer where they purchased this product, or their local government
office, for details of where and how they can take these items for environmentally safe recycling.
Business users should contact their supplier and check the terms and conditions of the purchase contract. This
product and its electronic accessories should not be mixed with other commercial wastes for disposal.
Correct disposal of batteries in this product
(Applicable in the European Union and other European countries with separate battery return systems.)
This marking on the battery, manual or packaging indicates that the batteries in this product should not be disposed of with other
household waste at the end of their working life. Where marked, the chemical symbols Hg, Cd or Pb indicate that the battery contains
mercury, cadmium or lead above the reference levels in EC Directive 2006/66. If batteries are not properly disposed of, these
substances can cause harm to human health or the environment.
To protect natural resources and to promote material reuse, please separate batteries from other types of waste and recycle them
through your local, free battery return system.
English _9
Page 12

Head Oce
6, Pangyo-ro 319 beon-gil, Bundang-gu, Seongnam-si,
Gyeonggi-do, 463-400 Rep. of KOREA
Tel : +82.70.7147.8753 Fax : +82.31.8018.3740
www.hanwha-security.com
Hanwha Techwin America
500 Frank W. Burr Blvd. Suite 43 Teaneck, NJ 07666
Toll Free +1.877.213.1222 Direct +1.201.325.6920
Fax +1.201.373.0124
www.hanwha-security.com
Hanwha Techwin Europe
Heriot House, Heriot Road, Chertsey, Surrey, KT16 9DT, United Kingdom
Tel +44.1932.57.8100 Fax +44.1932.57.8101
www.hanwha-security.eu
 Loading...