

Page 1

FCC RF TEST REPORT
http://www.emc2000.co.kr
Appendix 6.
Report No.: EMC-FCC-R0061
User manual
EMC compliance Ltd.
480-5 Shin-dong, Yeongtong-gu, Suwon-city, Gyeonggi-do, 443-390,Korea
82 31 336 9919 (Main) 82 31 336 4767 (Fax)
This test report shall not be reproduced except in full, Without the written approval.
Page 2
WIRELESS CAMERA
l
ON OFF
PAIR
DC IN 12V AV OUT DVR CAMERA
P
A
I
R
S
E
B
-
1
0
0
4
R
W
PAIR
DC IN 12V
AV OUT
DVR CAMERA
ON
OFF
User Manual
English
IMPORTANT SAFETY INSTRUCTIONS
1. Read these instructions.
2. Keep these instructions.
3. Heed all warnings.
4. Follow all instructions.
5. Do not use this apparatus near water.
6. Clean only with dry cloth.
7. Do not block any ventilation openings, Install in accordance with the
manufacturer’s instructions.
8. Do not install near any heat sources such as radiators, heat registers, stoves,
or other apparatus (including amplifiers) that produce heat.
9. Do not defeat the safety purpose of the polarized or grounding-type plug. A
polarized plug has two blades with one wider than the other. A grounding
type plug has two blades and a third grounding prong. The wide blade or the
third prong are provided for your safety. If the provided plug does not fit into
your outlet, consult an electrician for replacement of the obsolete outlet.
10. Protect the power cord from being walked on or pinched particularly at plugs,
convenience receptacles, and the point where they exit from the apparatus.
11. Only use attachments/ accessories specified by the manufacturer.
12. Use only with the cart, stand, tripod, bracket, or table
specified by the manufacturer, or sold with the apparatus.
When a cart is used, use caution when moving the cart/
apparatus combination to avoid injury from tip-over.
13. Unplug this apparatus during lighting storms or when
unused for long periods of time.
14. Refer all servicing to qualified service personnel. Servicing is required when
the apparatus has been damaged in any way, such as power-supply cord or
plug is damaged, liquid has been spilled or objects have fallen into the
apparatus, the apparatus has been exposed to rain or
operate normally, or has been dropped.
SPECIFY SERVICE INSTRUCTIONS AND WARRANTY TERMS
This device complies with Part 15 of the FCC Rules.
Operation is subject to the following two conditions: (1) this device may not
cause harmful interference, and (2) this device must accept any interference
received, including interference that may cause undesired operation.
FCC NOTE:
THE MANUFACTURER IS NOT RESPONSIBLE FOR ANY RADIO OR TV
INTERFERENCE CAUSED BY UNAUTHORIZED MODIFICATIONS TO THIS
EQUIPMENT.
SUCH MODIFICATIONS COULD VOID THE USER'S AUTHORITY TO
OPERATE THE EQUIPMENT.
SEB-1004RW
moisture, does not
PT01-000907A
WARNING
• STRANGULATION HAZARD - Keep cord out of child's reach. NEVER place
camera or cords within 3 feet of crib or playpen. Never use extension cords
with adaptors. Only use the adaptors provided.
• Some adult assembly or installation required.
• This product contains small parts that may cause choking. Keep small
parts away from children.
• This product is NOT intended to replace proper supervision of children.
You MUST check your child’s activity regularly, as this product will not alert
parents to silent activities of a child.
• Before using this product, read and follow all instructions contained in this
booklet, and read and follow all instructions and warnings on the product.
• To prevent entanglement with adaptor cords, NEVER PLACE THE CORD
IN OR NEAR A CRIB OR PLAYPEN. DO NOT place the product or its
adaptor cords within reach of children.
• ALWAYS KEEP THE TRANSMITTER, RECEIVER AND ADAPTORS OUT OF
REACH OF CHILDREN.
• NEVER use the transmitter or receiver near water, including near a bathtub,
sink, laundry tub, wet basement, etc.
• This product is not intended for use as a medical monitor and its use
should not replace adult supervision.
• Check reception regularly. Test monitor before use and after changing
camera
location.
• Always unplug adaptors from wall outlets and power sources during
periods of non-use.
The wireless signal transfer range may be shortened if there exists an
obstacle such as a concrete wall between.
• To prevent overheating, keep the product and DC power adaptors away
from any direct sunlight and heat sources such as radiators, heat registers,
cooking devices (e.g., stoves and ovens) and other appliances that produce
heat (e.g., amplifiers, televisions and stereos).
• Ensure that the product is well ventilated during use. Avoid contact with
pillows and furniture that may block ventilation.
• Use only the adaptors provided with the product, as other adaptors may
damage the product. Plug the adaptors only into standard household
current (100~240 volts AC).
Place the adaptors avoiding pinch points otherwise you can damage the
adapters.
• When an adaptor is plugged into a power source, DO NOT touch the
exposed end of the adaptor’s cord.
• Do not use extension cords with the DC power adaptors to avoid
entanglement.
• This product should only be serviced by qualified and authorized Samsung
service centers.
• Images and sounds are transmitted by the product over public airwaves
and transmissions may be picked up by other units.
• Caution if you use the system to watch a young child, do not place the
camera where the child can reach.
• This appliance and its antenna must not be collocated or operation in
conjunction with any other antenna or transmitter. A minimum separation
distance of 20 cm must be maintained between the antenna and the
person for this appliance to satisfy the RF exposure requirements.
Samsung Techwin cares for the environment at all product manufacturing stages,
and is taking measures to provide customers with more environmentally friendly
products.
The Eco mark represents Samsung Techwin’s devotion to creating environmentally
friendly products, and indicates that the product satisfies the EU RoHS Directive.
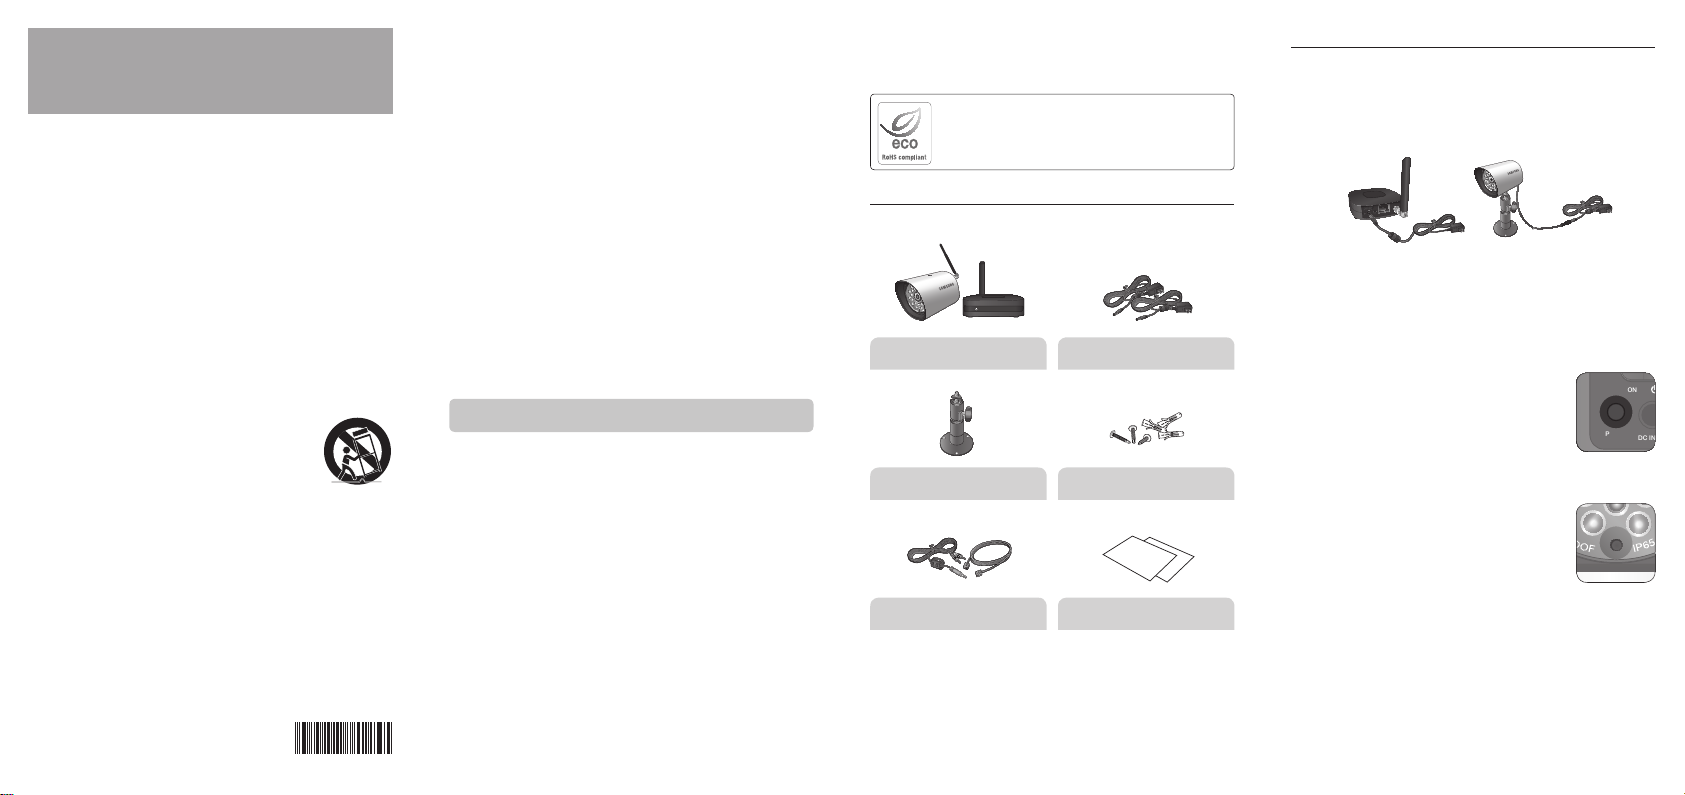
WHAT’S INCLUDED
The system comes with the following components:
Camera 1EA & Receiver 1EA adaptor (2EA)
Camera bracket
Screw 3EA & Plastic anchor 3EA
User Manual & Warranty CardA/V cable 1EA & UTP cable 1EA
GETTING STARTED
+ Powering camera and receiver
Wireless Receiver / Wireless Camera
Plug the adaptor power output cable into the 12V DC input of the
receiver/camera, and plug the power plug into a wall outlet or surge
protector.
l
+ Pairing camera and receiver
This camera will communicate with the receiver once powered on.
`It is highly recommended to pair the camera to the receiver before permanently
mounting the camera.
Wireless Receiver
Press PAIR button on receiver for 1 second, then a
message will be displayed on the screen. The receiver
will count down from 30~0 – you must press the
PAIR button on the camera during this time to
successfully pair the camera.
If the button on the camera is not pressed, the
receiver will return to the view screen, and no pairing will take place.
Wireless Camera
Press the PAIR button on the front of the camera.
Once the camera has been paired, it will be
immediately viewable on the TV or monitor.
+ Installing your camera and receiver
Wireless Receiver
This receiver can only be desktop or table stand.
Page 3

Wireless Camera
PAIR
DC IN 12V
AV OUT
DVR CAMERA
ON
OFF
PAIR
DC IN 12V
AV OUT
DVR CAMERA
ON
OFF
1. Mount the camera to the wall
`Mark the position of the screw holes on the wall, drill
holes and insert the supplied plastic anchors, then
firmly fix the camera bracket to the plastic anchors with
supplied screws.
2. Adjust the viewing angle of the camera
`You can adjust the viewing angle to monitor desired area
by rotating the camera bracket.
`Aim the camera to best optimize the viewing area:
J
Select a location for the camera that provides a
clear view of the area you want to receiver, which is
free from dust, and is not in line-of-sight to a strong
light source or direct sunlight.
`Avoid installing the camera where there are thick walls, or obstructions
between the camera and the receiver.
+ Connecting other device
Wireless Receiver
Connect one end of the included AV cable to the AV output of receiver,
and connect the other end to the Video IN (Yellow) and Audio IN (White)
ports on the DVR.
`When connecting the receiver to DVR using A/V cable, connect power adapter
to the Receiver.
Or connect one end of the UTP cable to the RJ-45-Jack, and connect
the other end to the DVR. Receiver may be turned on while connecting
UTP cable.
GETTING TO KNOW YOUR MONITORING SYSTEM
Wireless Receiver
l
b
c
ON OFF
PAIR
DC IN 12V AV OUT DVR CAMERA
def
l
Item Description
Antenna
a
Power switch
b
Pairing Button
c
12V Power Input
d
A/V Out Port
e
RJ-45 Jack
f
Power Indicator
g
LED
Wireless Camera
a
Item Description
Antenna
a
DC Adaptor Jack
b
Microphone
c
a
g
Receives signals from the camera. Adjust the antenna to
vertical position for better signal reception.
Slide the switch to left side to power on the receiver, and
to right side to power off the receiver.
It is used to pair the camera with receiver.
Connect the included DC 12V power adaptor to power the
receiver.
Connect the included A/V cable to view video on a TV or
monitor, or record to a VCR/DVR.
Connect the UTP cable to DVR system to view video from
the receiver.
Red LED is on when power on, blinking red LED is when is
pairing.
b
0
0
1
-
4
B
R
E
W
S
R
I
A
P
Sends signals to the receiver.
Plug the DC adaptor to the jack for camera’s power supply.
Receives sounds from the area near the camera, and
transmits sound from the camera to the receiver.
c
d
e
f
g
APPENDIX
Item Description
d
e
f
g
IR LEDs
Lens
CDS Sensor
Pairing Button
Infrared LEDs provide viewing in no/low light conditions
Catches the video in front of the lens and transmits video
from camera to receiver.
Detects illumination condition around camera and emits
signal to power on the IR LED when it is in no/low light
conditions.
It is used to pair the camera with receiver.
Specifications
Item Details
System General
Receiving Frequency Range
Transmitting Power/ERP
Data Rate
Receiving Sensitivity
Type of Spread Spectrum TX
Demodulation Type
Transmitting Distance
Wireless Camera
Image Sensor Type
Effective Pixels
Image Resolution/Frame
White Balance
Lens
Viewing Angle (Diagonal)
Minimum Illumination
IR LED Type/Night Vision
Power Consumption
Power Requirement
Operating Temperature
Operating Humidity
Environment Ra ting
Dimension
Weight
Regulation Compliance
RoHS Compliance
2.400GHz~2.480GHz
18dBm Max
2 Mbps
-81dBm
FHSS 39 Channels
GFSK
TBD
1/4” Color CMOS Image Sensor
H: 640 V: 480
VGA 640x480@20FPS
Auto
3.6mm F=2.0
46 degree
5 Lux without IR LED Illumination
20 LEDs / 850mm 15m (with IR LED)
140mA Max without IR ON
260mA Max with IR ON
12V DC ±5%
-10°C ~ 40°C (14°F ~ 104°F)
0% ~ 85% RH
IP65
117.5(L)X64.5(W)x115.5(H) mm
355g
FCC
Yes
Camera Housing Material
Mounting Stand Material
Other Special Feature
Resolution
Video Output
Audio Output
Power Requirement
Power Consumption
Operating Temperature
Operating Humidity
Environment Rating
Dimension
Weight
Regulation Compliance
RoHS Compliance
Receiver Housing Material
Troubleshooting
Problem Solution
No picture from a camera
The picture is dropping
The picture is or has
become choppy
SALES NETWORK
SAMSUNG TECHWIN CO., LTD.
Samsungtechwin R&D Center, 701, Sampyeong-dong, Bundang-gu, Seongnam-si, Gyeonggi-do, Korea, 463-400
TEL : +82-70-7147-8740~60 FAX : +82-31-8018-3745
SAMSUNG TECHWIN AMERICA Inc.
100 Challenger Rd. Suite 700 Ridgefield Park, NJ 07660
Toll Free : +1-877-213-1222 Direct : +1-201-325-6920
Fax : +1-201-373-0124
www.samsungsv.com
Wireless Receiver
Aluminum/ABS
Aluminum alloy
Built-in Microphone/Night Vision
VGA(410 TV line)
1.0Vp-p @75Ωload
1.0Vp-p @600Ωload
12V DC ±5%
140mA
-10°C ~ 40°C (14°F ~ 104°F)
0% ~ 85% RH
Indoor use only
83(L)x80(W)x25(H) mm
82.5g
FCC
Yes
ABS
1. Check all connections to the camera. Make sure the
adaptor is plugged in.
2. Make sure that the receiver is ON.
3. Make sure that the camera is in range of the receiver.
4. Make sure the receiver is well connected with TV or
monitor.
1. Move the camera closer to the receiver.
2. Try repositioning the camera, receiver or both to improve
the reception.
The picture may become choppy when experiencing a lower
frame rate (i.e. 10 frames per second vs. a higher 20 frames
per second).
1. Try moving the camera closer to the receiver.
2. Remove obstructions between the receiver and camera.
SAMSUNG TECHWIN EUROPE LTD.
Samsung House, 1000 Hillswood Drive, Hillswood
Business Park Chertsey,
Surrey, UNITED KINGDOM KT16 OPS
TEL : +44-1932-45-5300 FAX : +44-1932-45-5325
 Loading...