

user’s manual
®
Do Not Open! Risk of Electrical Shock. Voltages in this equipment are hazardous to life. No user-serviceable parts inside.
Refer all servicing to qualified service personnel. To prevent fire
or shock hazard, do not expose this module to rain or moisture.
The lightning bolt flash with arrowhead
symbol within an equilateral triangle,
is intended to alert the user to the presence of potentially “dangerous voltage” within the
product’s enclosure that may be of sufficient magnitude to constitute a risk of electric shock to persons.
The exclamation point within an equi-
lateral triangle is intended to alert the
user to the presence of important operating and maintenance (servicing) instructions in the
literature accompanying the appliance.
IMPORTANT SAFETY INSTRUCTIONS!
1 Read these instructions.
2 Keep these instructions.
3 Heed all warnings.
4 Follow all instructions.
5 Do not use this apparatus near water.
6 Clean only with dry cloth.
7 Do not block any ventilation openings. Install in accordance with the manu-
facturer’s instructions.
8 Do not install near any heat sources such as radiators, heat registers, stoves,
or other apparatus (including amplifiers) that produce heat.
9 Do not defeat the safety purpose of the polarized or grounding-type plug. A
polarized plug has two blades with one wider than the other. A grounding
type plug has two blades and a third grounding prong. The wide blade or
the third prong are provided for your safety. If the provided plug does not fit
into your outlet, consult an electrician for replacement of the obsolete outlet.
10 Protect the power cord from being walked on or pinched, particularly at
plugs, convenience receptacles, and the point where they exit from the
apparatus.
11 Only use attachments/accessories specified by the manufacturer.
12 Use only with the cart, stand, tripod, bracket, or
table specified by the manufacturer, or sold with
the apparatus. When a cart is used, use caution
when moving the cart/apparatus combination to
avoid injury from tip-over.
13. Unplug this apparatus during lightning storms or
when unused for long periods of time.
14. Refer all servicing to qualified service personnel. Servicing is required when
the apparatus has been damaged in any way, such as power-supply cord
or plug is damaged, liquid has been spilled or objects have fallen into the
apparatus, the apparatus has been exposed to rain or moisture, does not
operate normally, or has been dropped.
15. To completely disconnect this equipment from the AC mains, disconnect the
power supply cord plug from the AC receptacle.
16. The mains plug of the power supply cord shall remain readily operable.
17 CAUTION: Danger of explosion if battery is incorrectly replaced. Replace only
with the same or equivalent type (AAA). Dispose of dead batteries in accordance with local regulation.
18. To prevent overheating, do not cover the apparatus. Install in accordance
with the manufacturer’s instructions.
19. No naked flame sources, such as candles, should be placed on the product.
20. Do not expose this apparatus to dripping or splashing and ensure that no
objects filled with liquids, such as vases, are placed on the apparatus.
21. Batteries (battery pack or batteries installed) shall not be exposed to excessive heat such as sunshine, fire, or the like.
22. For apparatus mounted to wall, the apparatus shall be installed on solid
wood, bricks, concrete or solid wood columns and battens.
23. DO NOT overload wall outlets or extension cords beyond their rated capacity
as this can cause electric shock or fire.
24. Minimum distances around the apparatus for sufficient ventilation.
25. The ventilation should not be impeded by covering the ventilation openings
with items, such as newspapers, tablecloths,curtains, etc.
26. Do not ingest the battery, Chemical Burn Hazard.
27. Keep new and used batteries away from children.
28. If the battery compartment does not close securely, stop using the product
and keep it away from children.
29. If you think batteries might have been swallowed or placed inside any part of
the body, seek immediate medical attention.
30. The battery (battery or batteries or battery pack) shall not be exposed to
excessive heat such as sunshine, fire or the like.
31. Risk of leakage. Only use the specified type of Batteries. Never mix new and
used batteries. Observe correct polarity. Remove batteries from products that
are not in use for extended periods of time. Store batteries in a dry place.
32. Do not recharge non-rechargeable batteries.
33. Avoid exposure to extreme heat or cold.
34. This equipment is a Class II or double insulated electrical appliance. It has been designed in such a way that it does not require
a safety connection to electrical earth.
35. Danger of explosion if battery is incorrectly replaced. Replace only with the
same or equivalent type.
36. (The remote control supplied with) This product contains a AAA battery. If the
AAA battery is swallowed, it can cause severe internal burns in just 2 hours
and can lead to death.
37. Do not handle leaking or damaged AAA batteries.
2

38. THIS PRODUCT CONTAINS A AAA BATTERY. IF MISUSED OR ABUSED THIS
CAN RESULT IN:
- Smoke or gas hazard
- Heat hazard
- Fire hazard
- Explosion hazard
39. If an appliance coupler is used as the disconnect device, the disconnect
device shall remain readily operable.
sons and must not be co-located or operating in conjunction with any other antenna
or transmitter. End-users and installers must be provide with antenna installation
instructions and transmitter operating conditions for satisfying RF exposure compliance.
5GHz RF DEVICE STATEMENT: This device operates in the 5.15–5.25GHz
frequency range and is restricted to indoor use only. Outdoor operations in the 5150–
5250MHz frequency range is prohibited.
The rating for the USB output is 5V
WARNING: This product is intended to be operated ONLY from the AC Voltages
listed on the back panel or included power supply of the product. Operation from other
voltages other than those indicated may cause irreversible damage to the product
and void the product warranty. The use of AC Plug Adapters is cautioned because
it can allow the product to be plugged into voltages in which the product was not
designed to operate. If the product is equipped with a detachable power cord, use
only the type provided with your product or by your local distributor and/or retailer. If
you are unsure of the correct operational voltage, please contact your local distributor
and/or retailer.
This device complies with Part 15 of the FCC Rules. Operation is subject to the following two conditions: (1) This device may not cause harmful interference, and (2) this
device must accept any interference received, including interference that may cause
undesired operation.
FEDERAL COMMUNICATIONS COMMISSION INTERFERENCE
STATEMENT: This equipment has been tested and found to comply with the limits
for a Class B digital device, pursuant to part 15 of the FCC Rules. These limits are
designed to provide reasonable protection against harmful interference in a residential
installation. This equipment generates, uses and can radiate radio frequency energy
and, if not installed and used in accordance with the instructions, may cause harmful
interference to radio communications. However, there is no guarantee that interference will not occur in a particular installation. If this equipment does cause harmful
interference to radio or television reception, which can be determined by turning the
equipment off and on, the user is encouraged to try to correct the interference by one
or more of the following measures:
• Reorient or relocate the receiving antenna.
• Increase the separation between the equipment and receiver.
• Connect the equipment into an outlet on a circuit different from that to which
the receiver is connected.
• Consult the dealer or an experienced radio/TV technician for help.
Approved under the verification provision of FCC Part 15 as a Class B Digital Device.
Any changes or modifications not expressly approved by the grantee of this device
could void the user’s authority to operate the equipment.
2.1A.
CANADA, INDUSTRY CANADA (IC) NOTICES: This device complies with
Industry Canada licence-exempt RSS standard(s). Operation is subject to the following
two conditions: (1) this device may not cause interference, and (2) this device must
accept any interference, including interference that may cause undesired operation
of the device.
Under Industry Canada regulations, this radio transmitter may only operate using
an antenna of a type and maximum (or lesser) gain approved for the transmitter by
Industry Canada. To reduce potential radio interference to other users, the antenna
type and its gain should be so chosen that the equivalent isotropically radiated power
(e.i.r.p.) is not more than that necessary for successful communication.
This radio transmitter (certification number: 7756A-CRESCENDOX) has been approved
by Industry Canada to operate with the antenna types listed below with the maximum
permissible gain and required antenna impedance for each antenna type indicated.
Antenna types not included in this list, having a gain greater than the maximum gain
indicated for that type, are strictly prohibited for use with this device.
Gain of antenna: 4.2dBi max.
Type of antenna: 50ohm, PIFA
RADIO FREQUENCY (RF) EXPOSURE INFORMATION: The radiated output
power of the Wireless product is below the Industry Canada (IC) radio frequency
exposure limits. The Wireless product should be used in such a manner such that the
potential for human contact during normal operation is minimized. This device has
also been evaluated and shown compliant with the IC RF Exposure limits under mobile
exposure conditions. (antennas are greater than 20cm from a person’s body).
Caution: (i) The device operating in the band 5150–5250 MHz is only for indoor use
to reduce the potential for harmful interference to co-channel mobile satellite systems;
(ii) The maximum antenna gain permitted for devices in the bands 5250–5350 MHz
and 5470–5725 MHz shall comply with the e.i.r.p. limit; and (iii) The maximum
antenna gain permitted for devices in the band 5725–5825 MHz shall comply with
the e.i.r.p. limits specified for point-to-point and non point-to-point operation as
appropriate. (iv) Users should also be advised that high-power radars are allocated
as primary users (i.e. priority users) of the bands 5250–5350 MHz and 5650–5850
MHz and that these radars could cause interference and/or damage to LE-LAN devices.
(iv) the worst-case tilt angle(s) is compliant with the e.i.r.p. elevation mask requirement set forth in Section 6.2.2(3).
RF EXPOSURE WARNING: This equipment must be installed and operated in
accordance with provided instructions and the antenna(s) used for this transmitter
must be installed to provide a separation distance of at least 20 cm from all per-
3

WEEE NOTICE
Note: This mark applies only to countries within the European
Union (EU) and Norway.
In accordance with the European Union WEEE (Waste Electrical and Electronic
Equipment) directive 2002/96/EC effective August 13, 2005, we would like to
notify you that this product may contain regulated materials which upon disposal,
according to the WEEE directive, require special reuse and recycling processing.
For this reason Martin Logan has arranged with our distributors in European
Union member nations to collect and recycle this product at no cost to you.
find your local distributor please contact the dealer from whom you purchased
this product, email info@martinlogan.com or visit the distributor locator at
www.martinlogan.com.
Please note, only this product itself falls under the WEEE directive. When disposing of packaging and other related shipping materials we encourage you to
recycle these items through the normal channels.
WARNING/CAUTION!
• Hazardous voltages exist inside—do not remove cover.
• Refer servicing to a qualified technician.
• To prevent fire or shock hazard, do not expose this module to moisture.
• Unplug speaker should any abnormal conditions occur.
• Turn speaker off before making or breaking any signal connections!
• The power cord should not be installed, removed, or left detached from the
speaker while the other end is connected to an AC power source.
• No candles or other sources of open flame should be placed on the speaker.
• No liquids either in glasses or vases should be placed on speaker.
To
• Speaker should not be exposed to dripping or splashing liquids.
• The terminals marked with the lightning bolt symbol should be connected by
an instructed person or by way of ready made terminals.
• The power cord should remain readily operable should any abnormal
conditions occur.
• Any changes or modifications not expressly approved by the grantee of this
device could void the user’s authority to operate the equipment.
For DTS patents, see http://patents.dts.com. Manufactured under license
from DTS, Inc. DTS, Play-Fi, the Symbol, and Play-Fi together in combination with the Symbol are trademarks of DTS, Inc. DTS and Play-Fi are
registered trademarks of DTS, Inc. © DTS, Inc. All Rights Reserved.
Apple and the Apple logo are trademarks of Apple Inc., registered in the U.S.
and other countries. App Store is a service mark of Apple Inc.
The Spotify software is subject to third party licenses found here:
www.spotify.com/connect/third-party-licenses
AirPlay, iPad, iPhone, iPod, iPod classic, iPod nano, and iPod touch are
trademarks of Apple Inc., registered in the U.S. and other countries.
AirPlay works with iPhone, iPad, and iPod touch with iOS 4.3.3 or later,
Mac with OS X Mountain Lion, and Mac and PC with iTunes 10.2.2 or later.
iPad mini, iPod touch (3rd through 5th generation), and iPod nano (5th
through 7th generation). “Made for iPod,” “Made for iPhone,” and “Made
for iPad” mean that an electronic accessory has been designed to connect
specifically to iPod, iPhone, or iPad, respectively, and has been certified by
the developer to meet Apple performance standards. Apple is not respon-
The Bluetooth word mark and logos are registered trademarks owned by
Bluetooth SIG, Inc. and any use of such marks by MartinLogan, Ltd. is under
license.
Windows is a registered trademark of Microsoft Corporation in the United
States and other countries.
Other trademarks and trade names are those of their respective owners.
sible for the operation of this device or its compliance with safety and
regulatory standards. Please note that the use of this accessory with iPod,
iPhone, or iPad may affect wireless performance.
Made for:
• iPhone 6 Plus
• iPhone 6
• iPhone 5s
• iPhone 5c
• iPad Air 2
• iPad mini 3
4

Introduction and Overview ...............7
Placement ...........................7
Connection ..........................7
Power Connection ...................7
Signal Connection ...................7
Network Connection .................8
Subwoofer Connection ................8
An Overview of Connections .............9
Volume Behavior by Input ...............9
Controls ...........................11
Front Panel Controls .................11
Remote Control ....................12
Changing the Remote’s Batteries .........12
Control Functions by Input ..............13
Playing Audio Using Play-Fi® ............13
Automatic Input Selection ..............13
Playback – From the DTS Play-Fi App ......13
Controlling Multiple Speakers ...........14
Additional Play-Fi Features .............14
Playing Audio Using AirPlay® ............14
Automatic Input Selection ..............14
Playback – From an Apple® iOS Device ....14
Playback – From iTunes® on a Mac or PC ..14
Controlling Playback Using iTunes ........15
How to use Connect ...................15
DTS Play-Fi and Apple AirPlay Setup ......15
Network Requirements ...............15
DTS Play-Fi App Requirements ...........15
Apple AirPlay Requirements ............16
Wi-Fi Status Light ...................16
Downloading the DTS Play-Fi App ........16
Connecting to a Wireless Network:
Access Point Setup .................16
Audio Streaming Usage Guide ..........16
Connecting to a Wireless Network:
Wi-Fi Protected Setup (WPS) ..........18
Connecting to a Wired Network ........18
Apple AirPlay Setup (Without DTS App) ....18
Bluetooth® Connection .................19
Updates and Rebooting ................20
DTS Play-Fi App Update ..............20
DTS Play-Fi Module Update ............20
MartinLogan Firmware Update ..........20
Rebooting ........................20
Factory Reset ......................20
Removing the Front Grille ...............20
Contacting Customer Service ............20
General Information ..................20
Warranty Information ................20
Serial Number .....................21
Service .........................21
Frequently Asked Questions .............21
Troubleshooting ......................22
Specifications .......................24
Dimensional Drawings .................25
Serial Number:_____________________________
Record your serial number here for easy reference.
You will need this information when filling out your
warranty registration. The serial number is located on
the back of the speaker and on the product carton.
5

6
IntroductIon and overvIew
Thank you—the MartinLogan owner, for loving what we
do, and making it possible for us to do what we love.
MartinLogan’s dedicated in-house engineering and
design team developed the Crescendo X speaker to
deliver exceptional audio performance from a single
system, easily integrated and installed in a diverse
variety of environments. The Crescendo X produces an
enveloping field of richly detailed audio incorporating
two tweeters (featuring MartinLogan’s award-winning
Folded Motion technology), a high-performance woofer,
and three channels of dedicated class-D amplification
representing 100 watts of total system power.
An advanced 24-bit 48kHz DSP (digital signal pro-
Placement
We recommend locating the speaker on a surface
that provides a wide, level, and stable platform
such as a table or audio/video rack. Please note,
this speaker is not magnetically shielded and there-
cessing) based pre-amplifier allows MartinLogan to
replace dedicated stereo speakers with a one piece
solution, capable of reproducing sound with unflinching accuracy, resolution, and detail—the inspiration
behind every MartinLogan design. Additionally, for
a fully authentic audio experience, the Crescendo X
makes connecting a dedicated subwoofer as simple
as the push of a button.
The Crescendo X’s remote control quickly adjusts
volume, selects inputs, and controls your media. The
remote also allows you to easily switch between
two discrete acoustic modes—‘Bass +’ mode (for
those moments requiring a little extra thunder) and a
‘Normal’ mode that restores normal levels.
fore should not be placed directly beneath or on
top of a CRT (cathode ray tube) television. The
magnetic field of the speaker will not affect plasma
and LCD style televisions.
connectIon
WARNING! Turn your speaker off
before making or breaking any signal connections! WARNING! The
power cord should not be installed,
removed, or left detached from the speaker while
the other end is connected to an AC power source.
POWER CONNECTION
The power cord should be firmly inserted into the
AC power receptacle on the rear of the speaker,
and then to any convenient AC wall outlet.
If you remove your speaker from the country of
original sale, be certain that the AC power sup-
plied in any subsequent location is suitable
before connecting and operating the speaker.
Substantially impaired performance or severe
damage may occur to the speaker if operation is
attempted from an incorrect AC power source.
When the Power button on the back panel is set
to ‘Off’ the speaker is completely powered down,
including all network connections (Wi-Fi and
Ethernet are deactivated).
SIGNAL CONNECTION
Connections are made at the signal input section
7
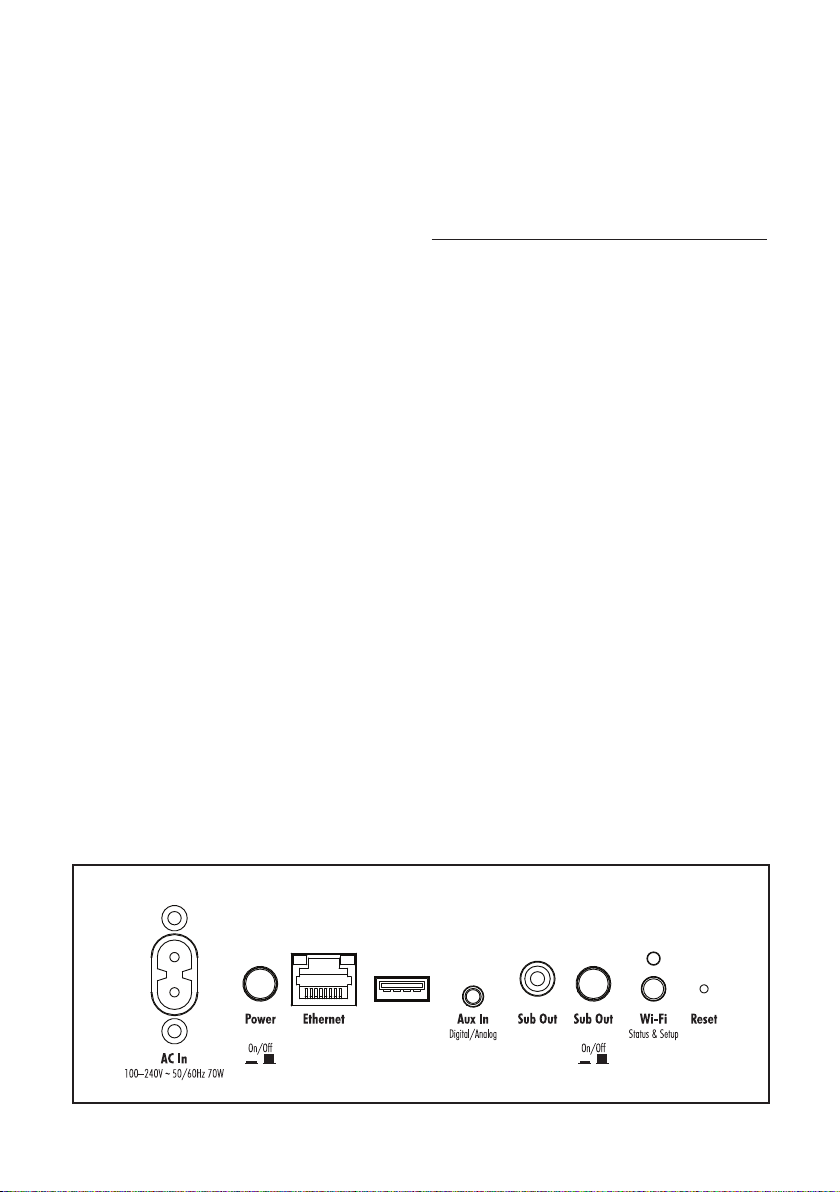
on the rear electronics panel of the speaker. Your
speaker features the following audio inputs:
• Ethernet: used for streaming audio from Apple
AirPlay or DTS Play-Fi®.
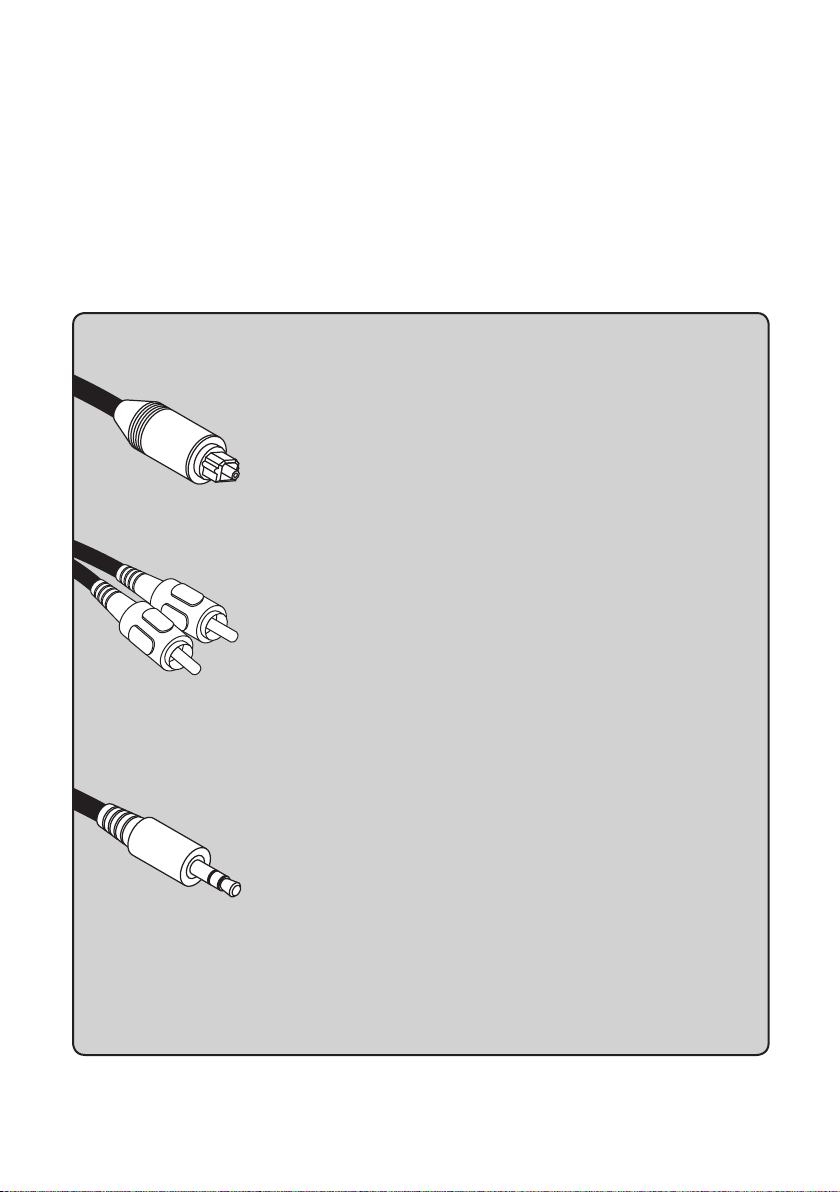
• Aux [Auxiliary]: used for either digital optical
(Toslink) or analog input. This input will accept
either a standard 3.5mm stereo headphone
style or mini-Toslink plug. A special mini-Toslink to Toslink cable or mini-Toslink adaptor is
required for digital optical connection.
In addition, the speaker features two inputs that do
not require a physical connection:
NETWORK CONNECTION
To stream audio to your speaker, a LAN (local
area network) connection is required. This connection can be established using Wi-Fi or Ethernet.
Refer to the wireless setup section of this manual for
setup and usage details.
SUBWOOFER CONNECTION
You may choose to employ a separate subwoofer
to enhance bass performance. Subwoofers can
be connected via the speaker’s “Sub Out” RCA
connection. We recommend using a superb
MartinLogan subwoofer.
• Wireless: used for streaming audio from Apple
AirPlay or Play-Fi®.
• Bluetooth: used for streaming from compatible
Bluetooth equipped devices, including aptX®
Bluetooth devices.
Please note, when utilizing this speaker to reproduce
audio from a television via the speaker’s Auxiliary
(digital or analog) connection, the television’s audio
output should be defeated. Some televisions will
allow you to turn off the internal speaker via the
television’s menu system. Other televisions may
require you to turn the television’s volume to “zero”
or “mute.” Additionally, your television may require
you to turn on the digital optical output or and/or
configure the output for 2-channel (stereo) sound.
Please refer to your television’s manual.
Fig. 1 Connection Panel
Using a high-quality RCA style cable designed for
subwoofer connection, connect “Sub Out” from the
speaker to the “LFE In/Sub In” on the subwoofer.
On the back panel of the speaker, set the Sub
Out button to “On” (in its “on” state the button will
be depressed—in its “off” state the button will be
extended). When the Sub Out is turned on, the
deep bass output of the speaker will be reduced
(to optimize performance) and bass information will
be sent directly to your external subwoofer for a
deeper, extended, overall bass response.
Reference your subwoofer’s manual to learn how
to properly adjust the sub’s level and phase controls to achieve proper blending with the speaker.
When Sub Out is set to “On,” the speaker will
handle the crossover setting to the subwoofer,
8
achieving ideal blending with the speaker.
Because of this, the subwoofer’s crossover should
be set to “bypass” or “LFE.” For subwoofers that
do not have a “bypass” or “LFE” crossover setting,
we recommend adjusting the crossover to its highest setting—remember, the speaker will handle the
crossover before sending out the sub signal.
Using a MartinLogan Dynamo Subwoofer:
If using a MartinLogan Dynamo family subwoofer,
we recommend beginning with the following subwoofer settings:
• Low-pass: Bypass
• Phase: 0
• Volume: Knob set to vertical (12-o’clock to
1-o’clock position)
an overvIew of connectIons
Digital Optical: Also referred to as Toslink, this cable utilizes one cable to pass digital
audio information (no video). A digital optical cable offers a high-quality digital
connection and passes multi-channel encoded audio between a source compo-
nent and an audio output device. The Auxiliary input on this speaker accepts
digital optical connection with the use of a mini-Toslink adaptor (included with
this speaker). Toslink to mini-Toslink cables may also be available from your dealer.
Left/Right Analog RCA: These cables are used to pass audio information (no
video). An analog RCA cable can only pass a single channel of audio infor-
mation between a source component and audio output device. To achieve
two-channels of audio (left/right), you will find that analog RCA cables come
bundled as a stereo pair (two connectors on each end). The Auxiliary input
on this speaker can accept an analog stereo signal through a cable using a
3.5mm stereo “headphone style” jack. If you are connecting this speaker to a device (such as a dock
or CD player) with left/right RCA analog outputs, you will need a special cable with a 3.5mm ‘headphone style’ jack on one end and left/right RCA jacks on the other end.
Left/Right Analog 3.5mm Stereo “Headphone Style” Jack: This cable is used to pass
audio information (no video). Users may find source components such as digital
media players and docks utilize a 3.5mm ‘headphone style’ connector. The
Auxiliary input on this speaker can accept an analog stereo signal through a
cable using a 3.5mm “headphone style” connector. These devices also have a
“volume control” that increases or decreases the level of the output signal.
which allows volume adjustment (like a digital media player or cell phone), we recommend the volume on
the device not be set to maximum. When the volume is set to its maximum setting, the amplifier in the external
device is likely to introduce elevated distortion into the audio signal which, in turn, will be passed on to this
speaker and further amplified, creating even more distortion.
If you are connecting a device
9
an overvIew of connectIons [contInued]
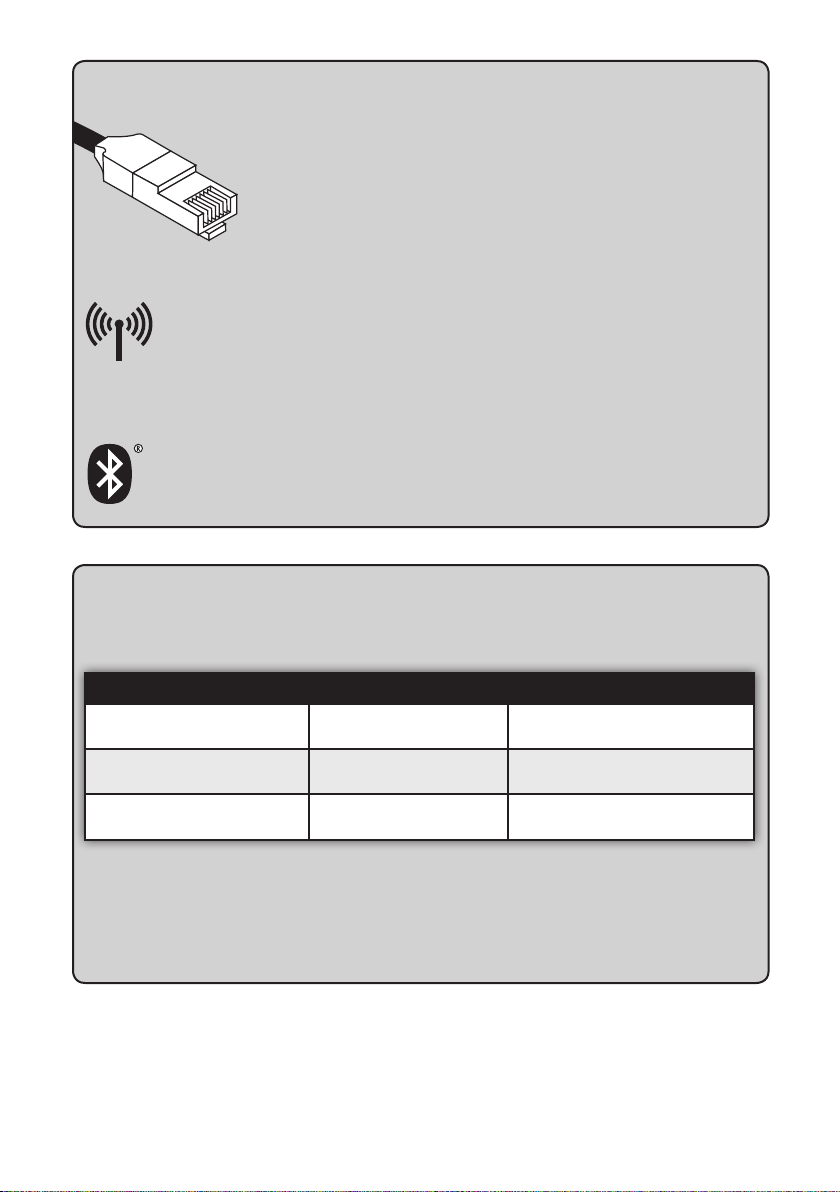
Ethernet: This cable allows you to physically connect a device to a LAN (local area
network). When connected to a LAN, audio information can be sent to this
speaker using various protocols (such as Play-Fi® or AirPlay). If a wireless (Wi-
Fi) connection is used to connect to a LAN, there is no need to use an
Ethernet connection. However, in some installations, a ‘hard-wired’ Ethernet
connection may prove more desirable than a wireless connection.
Wi-Fi: This connection technology wirelessly connects a device to a LAN (local area
network). When connected to a LAN, audio information can be sent to this speaker using
various protocols (such as Play-Fi or AirPlay). If an Ethernet connection is used to connect
to a LAN, there is no need to use a Wi-Fi connection. In some installations a ‘hard-wired’ Ethernet
connection may prove more desirable than a wireless connection.
Bluetooth: This wireless connection technology allows a wide variety of devices to connect
to an audio output device and stream audio. Bluetooth establishes a connection directly
with an audio output device and does not require either device to be connected to a LAN.
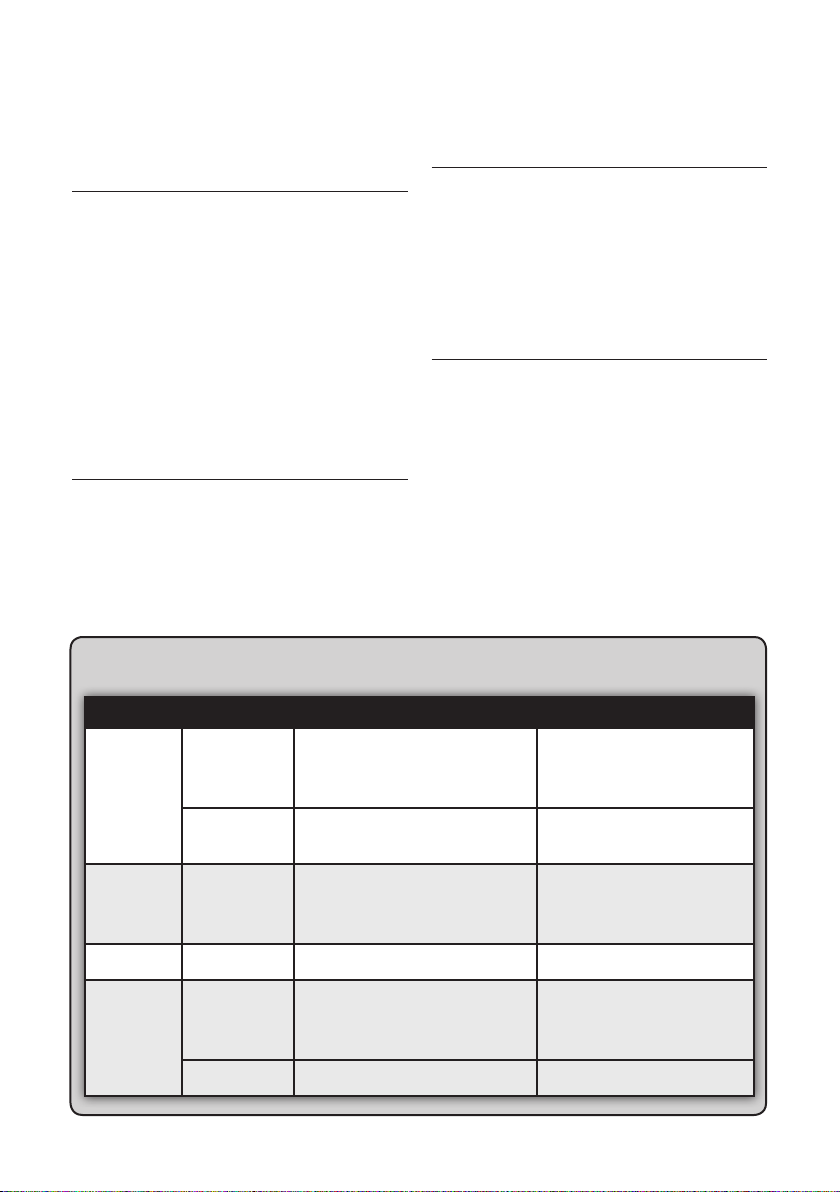
volume BehavIor By InPut
Depending on the input selected on your speaker, the volume will exhibit different behaviors.
SPEAKER INPUT FRONT LED COLOR VOLUME BEHAVIOR
Wireless or Ethernet
(using AirPlay or Play-Fi)
Aux [Auxiliary]
Bluetooth
* Devices connected via auxiliary and Bluetooth will often have
their own volume control which functions separately from the
speaker’s volume. If you are connecting a device which allows
you to adjust its volume separately, we recommend that the
volume on the device not be set to maximum. When set to its
Purple (flashing purple indicates
no network is available)
Green
Blue
maximum setting, the amplifier in the external device is likely to in
troduce elevated levels of distortion into the audio signal which,
in turn, will be further amplified by the speaker. Find a volume be
tween 50–75% of the device’s maximum volume and use your
speaker’s volume control to adjust the final playback volume.
Volume on device/remote and speaker
are synced and control each other.
Volume on device/remote and volume
on speaker are controlled separately.*
Volume on device/remote and volume
on speaker are controlled separately.*
10
-
-
controls
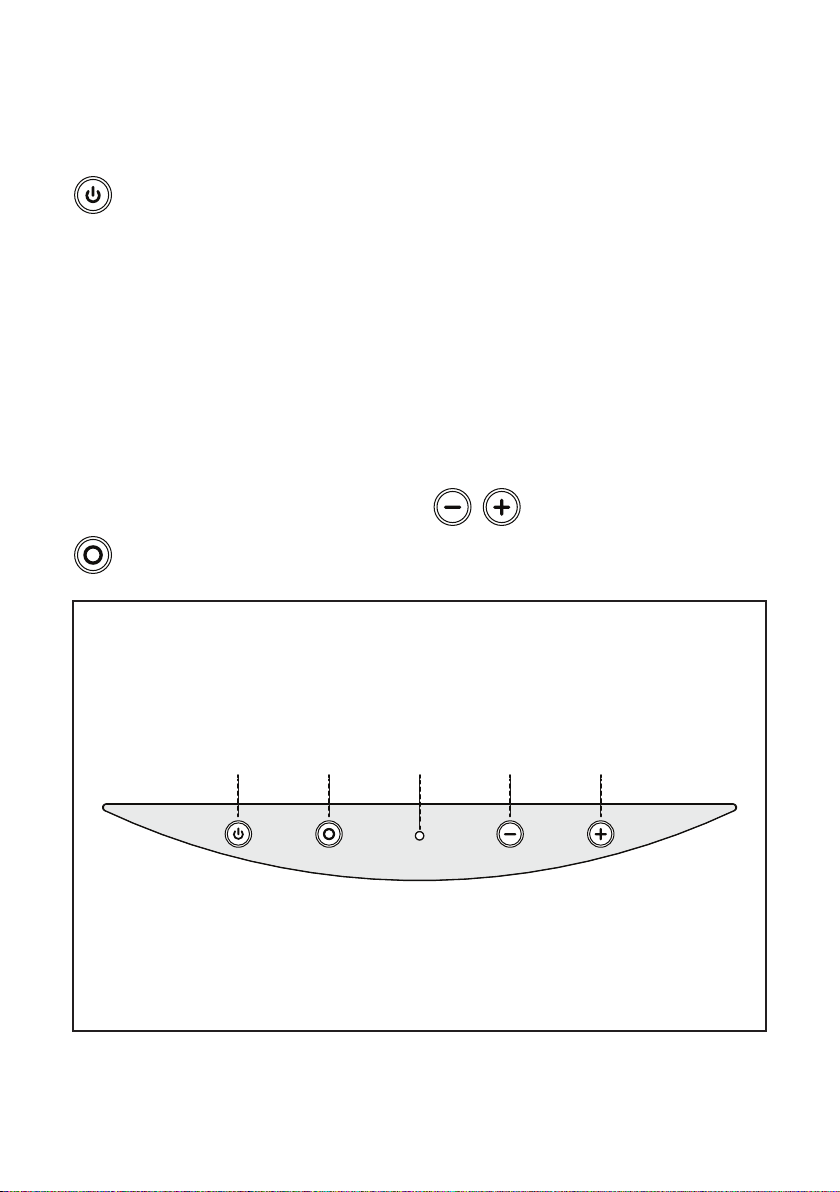
FRONT PANEL CONTROLS
STANDBY/MUTE: This button mutes the speak-
er and toggles between on and standby. To
mute press the button once (front LED will flash red). To
enter standby press the button for two seconds (front LED
will turn red). If no audio signal is detected for ten minutes, the speaker will automatically go into networked
standby mode (Wi-Fi and Ethernet remain active).
When the speaker is in standby mode, press the button
once to exit. A new audio signal will also automatically
wake the speaker. Please note, if the Auxiliary Input
has a cable plugged into the connection (with or without active audio content), the speaker will not go into
standby mode automatically and will not stay in standby
mode, even if manually activated (fig. 2).
INPUT: Cycles through the audio inputs.
The order of the inputs is:
Fig. 2 Front Panel Controls
Wireless/Ethernet (purple) > Auxiliary (green) >
Bluetooth (blue) (fig. 2).
FRONT LED: The LED on front of the speaker indicates the following (fig. 2):
• No Color: Speaker does not have power (or
updating firmware).
• Red: Speaker is in standby.
• Flashing Red: Speaker is muted.
• Purple: Wireless/Ethernet input active.
• Flashing Purple: Wireless/Ethernet input active
(no network connected).
• Green: Auxiliary input active.
• Blue: Bluetooth input active.
VOL –/VOL +: Adjusts the volume
level (fig. 2). For more details see
the section titled “VOLUME BEHAVIOR BY INPUT.”
STANDBY/MUTE INPUT VOL– VOL+FRONT LED
11
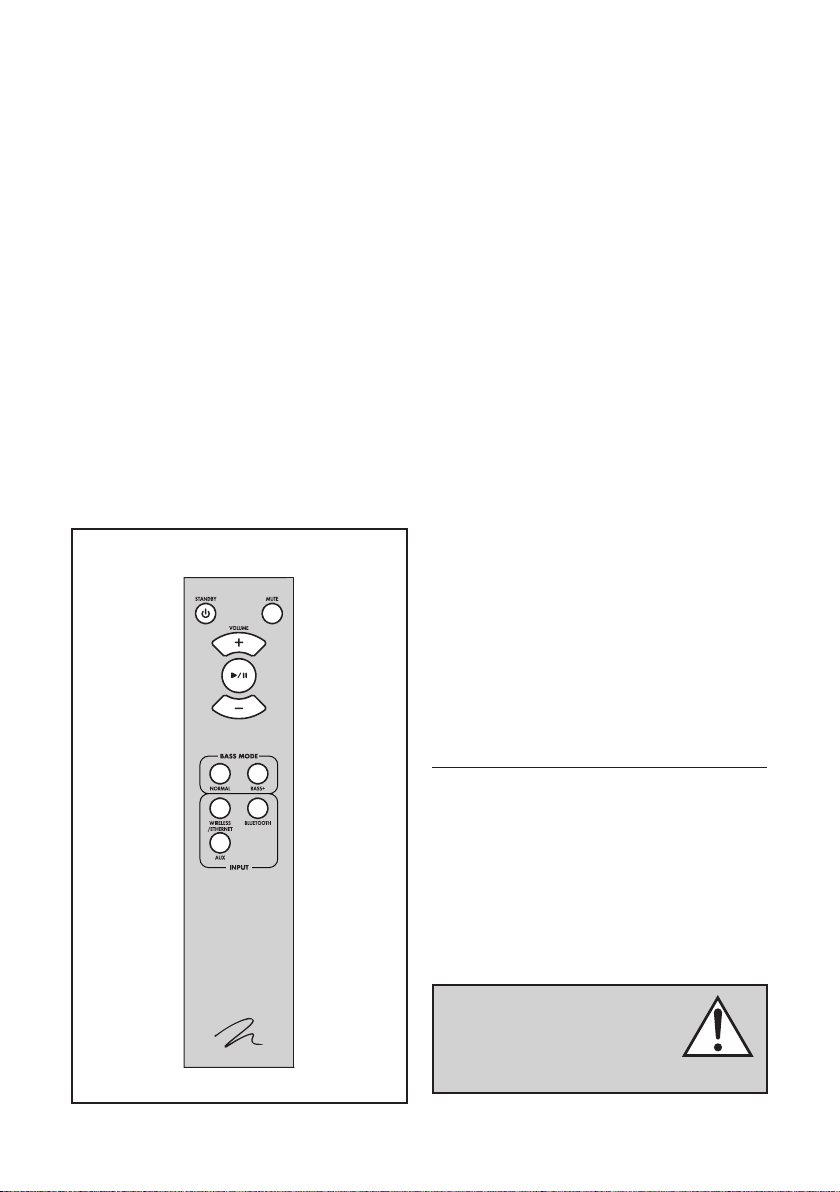
REMOTE CONTROL
STANDBY: This button toggles between on and standby. If no audio signal is detected for ten minutes, the
speaker will automatically go into networked standby
mode (Wi-Fi and Ethernet remain active). When the
speaker is in standby mode, press the button once
to exit. A new audio signal will also automatically
wake the speaker. Please note, if the Auxiliary Input
has a cable plugged into the connection (with or
without active audio content), the speaker will not go
into standby mode automatically and will not stay in
standby mode, even if manually activated.
MUTE: Mutes the volume. A second press will restore
the previous volume setting. Additionally, you can
turn mute off by pressing either of the volume buttons.
When mute is active, the front LED will blink red.
Fig. 3 Remote Control
VOL+/VOL–: Adjusts volume level. See the section
titled “VOLUME CONTROL (BY INPUT)”
PLAY/PAUSE: Toggles between play or pause.
This button works when a source is connected via
AirPlay or Play-Fi.
BASS MODE – NORMAL: Normal bass levels.
BASS MODE – BASS+: Increases bass output.
INPUT – WIRELESS/ETHERNET: Sets the current
input to receive an audio signal from the local
area network via the Wi-Fi or Ethernet connection
(using AirPlay or Play-Fi®).
INPUT – AUXILIARY: Sets the current input to
receive an audio signal from the auxiliary input via
a digital optical mini Toslink or analog 3.5mm stereo “headphone” style jack connection.
INPUT – BLUETOOTH: Sets the current input to
receive an audio signal from a Bluetooth capable
device that is connected wirelessly to the speaker.
12
Turn turn Bluetooth on, press the input button to
switch the source to Bluetooth. To turn Bluetooth
off, select an input other than Bluetooth.
CHANGING THE REMOTE’S BATTERIES
The remote control for your speaker uses two AAA
type batteries. Access the battery compartment by
using a Phillips screwdriver to remove the screw
located on the bottom of the remote.
Caution! Danger of explosion
if battery is incorrectly replaced.
Replace only with the same or
equivalent type.

control functIons By InPut
Depending on the input selected on your speaker, the remote will control functions differently.
®
Speaker Input
Front LED Color
Play-Fi
Wireless/
Ethernet
Purple Purple Purple Green Blue
AirPlay iTunes Digital or Analog Bluetooth
Wireless/
Ethernet
Wireless/
Ethernet
Auxiliary Bluetooth
Standby
Mute
Volume –/+
Play/Pause
Bass Mode:
Normal
Bass Mode:
Bass +
Input: Wireless/
Ethernet
Input: Auxiliary
Input: Bluetooth
*Devices connected via auxiliary and Bluetooth will
often have their own volume control which is separate
from the speaker’s volume. If you are connecting a
device which allows you to adjust its volume separately,
we recommend that the volume on the device not be
set to maximum. When set to its maximum setting, the
√ √ √ √ √
√ √ √ √ √
√ √ √ √* √*
√ √ √
√ √ √ √ √
√ √ √ √ √
√ √ √ √ √
√ √ √ √ √
√ √ √ √ √
PlayIng audIo usIng Play‑fI
AUTOMATIC INPUT SELECTION
Your speaker will automatically switch to the
streaming input if it detects that a new Play-Fi connection has been established with the speaker.
PLAYBACK – FROM THE DTS PLAY-FI APP
Note: Future updates to the DTS Play-Fi application
may change functionality.
amplifier in the external device is likely to introduce
elevated levels of distortion into the audio signal which,
in turn, will be further amplified by the speaker. Find
a volume between 50-–75% of the device’s maximum
volume and use your speaker’s volume control to adjust
the final playback volume.
1. Launch the DTS Play-Fi app on your mobile
device or PC (located in the system tray).
2. Android™ and iOS Device Users: Within the
Play-Fi app, select your music source. You can
choose from your personal music library, Internet
Radio, or from select internet music services. PC
Users: Any audio content from your computer
can be streamed using Play-Fi.
13

3.
If you have more than one DTS Play-Fi® speaker
connected to your network, you will be prompted
to select the speaker to which you want to stream.
CONTROLLING MULTIPLE SPEAKERS
If you have more than one Play-Fi speaker connected to your network, you can simultaneously stream
the same audio to multiple speakers.
1. Android and iOS Device Users: Within the
app, press the Play-Fi logo in the lower corner
of the app. PC Users: open the Play-Fi program
using the icon in your system tray.
2.
Select additional devices to play audio from. PC
Users: The free version of the Windows® app
may not allow streaming to multiple speakers. An
upgraded version of the DTS Play-Fi app, with this
capability, can be purchased from the DTS website.
Note: 8 Play-Fi speakers can be synced to
play the same audio content at the same time.
We recommend up to 32 Play-Fi speakers on
a network for the best experience, but the only
limit to connected devices is how many your
router can support.
TIP! Primary and Secondary Speakers
When streaming audio content to multiple devices,
you will be asked to assign them to two categories:
primary and secondary devices. The DTS Play-Fi
module requires a primary device be selected.
This maximizes synchronization between multiple
devices simultaneously streaming the same content.
Select the DTS Play-Fi device with the strongest signal
as your primary device. Secondary devices connect
to your primary device, so if you disable your primary
device, you will need to select a new primary device
before audio resumes on your secondary devices.
ADDITIONAL PLAY-FI FEATURES
New versions of the Play-Fi app will add features
not mentioned in this manual. Please refer to the
app and related documentation for details on new
and enhanced features such as streaming different
audio content to multiple zones and grouping of two
discrete speakers for stereo (left/right) playback.
PlayIng audIo usIng aIrPlay
AUTOMATIC INPUT SELECTION
Your speaker will automatically switch to the
streaming input if it detects that a new AirPlay connection has been established with the speaker.
PLAYBACK – FROM AN APPLE iOS DEVICE
1. Open your music application.
2. Press the AirPlay icon and choose your speaker
from the list.
3. Play music.
14
PLAYBACK – FROM iTUNES ON A MAC
OR PC (PERSONAL COMPUTER)
1. Launch iTunes (version 10 or later).
2. Click the AirPlay icon (usually located in the
upper left of the iTunes window) and choose
your speaker from the list. You can choose
multiple speakers if you have more than one
speaker on your network.
3. Play music.

CONTROLLING PLAYBACK USING iTUNES
To control playback (play/pause/volume) from
your speaker or remote control, follow these steps:
1. On your computer, launch iTunes (version
10.2.2 or later).
how to use connect
2. Open “Preferences” and choose “Devices.”
3. Check the box for “Allow iTunes audio control
from remote speakers” and click okay.
You’ll need Spotify Premium to use Connect, see
details overleaf.
1. Add your new device to the same wifi network
as your phone, tablet or PC (see product user
instructions for details).
2. Open the Spotify app on your phone, tablet or
PC, and play any song.
3. If you’re using the app on a phone - tap the
song image in the bottom left of the screen. For
tablet and PC move to step 4.
dts Play‑fI
NETWORK REQUIREMENTS
You must have the following to connect your wireless
product to your network:
• A wireless router.
• A high-speed internet connection for reliable
playback of internet based music services.
• Have your network password ready before
connecting the wireless product to your network.
TIP! If wireless connectivity is weak or not available,
connect to your router with an Ethernet cable. TIP! Your
wireless product communicates with wireless networks
that support 802.11g/n. For best performance, a
network that supports 802.11n wireless technology is
recommended. A network supporting 802.11b may be
used, but it will effectively stream to only one device
®
and aPPle aIrPlay setuP
4. Tap the Connect icon
5. Pick your device from the list. If you can’t see
it, just check it’s connected to the same wifi
network as your phone, tablet or PC.
All done! Happy listening.
Licenses
The Spotify Software is subject to third party
licenses found here:
www.spotify.com/connect/third-party-licenses.
equipped with DTS Play-Fi. Your wireless product
communicates over a 2.4 GHz wireless band, however,
it can become slow in locations, such as apartments,
where many routers are in operation. Consequently,
your wireless product is capable of jumping onto a 5
GHz band on dual band wireless routers.
DTS PLAY-FI APP REQUIREMENTS
• An Android device running Android 2.2 or later.
• An iOS device running iOS 6.0 or later.
• A Windows PC running Windows 7, 8 (32 and
64 bit), or later.
15
APPLE AIRPLAY REQUIREMENTS
• An iOS device running iOS 4.3.3 or later.
• Mac with OS X Mountain Lion, or later.
• Mac or PC with iTunes 10.2.2, or later.
WI-FI STATUS LIGHT
The Wi-Fi Status light tells you what your wireless
product is doing (fig. 1 & 2).
• Rapid Blinking: booting up.
• Blinking: connecting to a wireless router.
• Slow Pulse: Access Point Setup Mode.
• Two Blinks & Pause: WPS (Wi-Fi Protected
Setup) Mode.
• Solid: Connected to a wireless router.
• Off: Connected to a router via Ethernet.
DOWNLOADING THE DTS PLAY-FI® APP
•
Android Device Users: Download DTS’s free Play-Fi
app from the Google Play® or Amazon App Store®.
• iOS Device Users: Download DTS’s free Play-Fi
audIo streamIng usage guIde
app from the Apple App Store.
• PC Users: Download DTS’s free Play-Fi program
from https://play-fi.com/apps/windows
TURNING WI-FI ON AND OFF
After powering on the speaker, the default status of
Wi-Fi is on. Press and hold the Standby/Mute and
Vol+ buttons for 3 seconds to turn Wi-Fi off. Press
and hold the Standby/Mute and Vol+ buttons for 3
seconds to turn Wi-Fi back on.
CONNECTING TO A WIRELESS NETWORK:
ACCESS POINT SETUP
Access Point Setup causes your MartinLogan
wireless product to behave as if it were a wireless
router. Using your mobile device or Wi-Fi capable
PC, you connect directly to your wireless product
using Wi-Fi, select your home wireless network,
and enter the network password.
DEVICE APP CONTENT MULTI-ROOM SUPPORT
• Up to eight
• Multiple simultaneous users
• Speakers can be zoned
• One to one
• Up to eight
• Multiple simultaneous users
• Speakers can be zoned
Apple iOS
Android
Mac PC
DTS Play-Fi
Apple AirPlay
DTS Play-Fi
Apple AirPlay
• Select music services
• iTunes music stored on device
• iTunes audio content
• All iOS music apps
• Select music services
• iTunes music stored on device
• All audio content • Up to six
• Up to eight
Windows PC
DTS Play-Fi
Apple AirPlay
• All audio content
• Multiple simultaneous users
• Speakers can be zoned
• iTunes audio content • Up to six
16

1.
For optimal setup conditions place your wireless
product next to your wireless router. The device
can be moved to its final location after wi-fi setup.
2. Plug in your wireless product and press the
Power button. The Wi-Fi Status light will start
rapidly blinking for about 20 seconds while your
wireless product is booting up. If your wireless
product is not configured to connect to your
network, it will continue to blink. If this is the first
time your new wireless product is plugged in,
the Wi-Fi Status light will start pulsing slowly.
If the wireless product is already configured to
connect to a wi-fi network, the button will turn
solid (connected) or blink rapidly (not connected).
3.
Once the Wi-Fi Status light starts pulsing slowly,
your wireless product is in Access Point Mode and
ready to connect to your wireless network. Note:
If the Wi-Fi Status light does not pulse slowly, press
and hold the Wi-Fi Setup button for 8 seconds.
You will hear two tones—one at 3 seconds and
another at 8 seconds. After 20 seconds, the WiFi Status light will begin pulsing slowly to indicate
Access Point mode is ready. At anytime you can
press the button again to cancel the setup mode.
Android Device Users:
a) Launch the DTS Play-Fi® app.
b) The app will automatically find your device
and provide prompts for setup.
c) Touch the “Setup” button on the screen.
d) Enter the password for your wireless network;
the app will connect your device to your
network. You will notice the Wi-Fi Status light
will have changed from blinking to solid. This
may take up to a minute. If, after a minute,
the button continues to blink rapidly, setup
failed and you should try again.
e) Your wireless product is now connected to
your wireless network. Reconnect your mobile
device to your wireless network. You may re-
name your device using the app.
iOS Device Users:
Please note: When using an iOS device your
wireless product can stream audio using either
Apple AirPlay or DTS Play-Fi.
a) Make sure your iOS device’s Wi-Fi is turned
on and connected to your Wi-Fi network.
b) Open your iOS device’s ‘Settings’ app
and go to the ‘Wi-Fi’ menu. Your wireless
product will show up under the heading ‘set
up new Air plAy speAker...’
c) Select your wireless product from the list. It
will have “Play-Fi ” in the name.
d) Once in the ‘AirPlay Setup’ menu you will
be prompted to select your Wi-Fi network
and name your speaker (you will not need
to enter your network password.)
e) Once your device is connected, you will
notice that the Wi-Fi Status light on your
wireless product will change from blinking to
solid. This may take up to a minute. If, after a
minute, the button continues to blink rapidly,
setup failed and you should try again.
f)
Your wireless product is now connected to
your wireless network. Reconnect your iOS
device to your wireless network.
PC Users:
a) Launch the DTS Play-Fi app.
b) The app will automatically find your device
and provide prompts for set up. If the app
does not prompt you to set up a new device,
within the app go to the settings screen and
click ‘Setup Play-Fi Device’. Follow the on-
screen instructions.
c) Click the “Set-up” button on the screen.
d) Select the speaker(s) you want to set up.
e) Enter the password for your wireless network;
the app will connect your device to your
network. You will notice the Wi-Fi Status light
will have changed from blinking to solid. This
may take up to a minute. If, after a minute,
the button continues to blink rapidly, setup
failed and you should try again.
17

f)
Your wireless product is now connected to
your wireless network. Reconnect your PC to
your wireless network. You may re-name your
device using the app.
4. Once the Wi-Fi Status light turns solid (not
blinking), this indicates your wireless product
is connected to your wireless network. If, after
a minute, the button continues to blink rapidly,
setup failed and you should try again.
CONNECTING TO A WIRELESS NETWORK:
WI-FI PROTECTED SETUP (WPS)
Wi-Fi Protected Setup (WPS) is a feature found
on most wireless routers that allows your wireless
product to securely and automatically connect
without needing to enter a password. WPS is not
a standard feature on all routers, and only one
wireless product can be set up at a time.
Check your router’s owner’s manual to see if WPS is
an available feature, or look for a button on your router
marked with the WPS logo ( ). If your router does
not have WPS, then use Access Point Wireless Setup.
1. For optimal setup conditions place your wireless
product next to your wireless router. The device
can be moved to its final location after wi-fi setup.
2.
Plug in your wireless product and press the Power
button. The Wi-Fi Status light will start rapidly blinking
for about 20 seconds while your wireless product is
booting up. If your wireless product is not configured
to connect to your network, it will continue to blink.
If this is the first time your new wireless product is
plugged in, the Wi-Fi Status light will start pulsing
slowly. If the wireless product is already configured
to connect to a wi-fi network, the Status Light will turn
solid (connected) or blink rapidly (not connected).
3. To initiate Wi-Fi Protected Setup (WPS), for 3
seconds, press and hold the Wireless Setup
button on the back of your wireless product until
you hear a tone. The Wi-Fi Status light will blink
twice in continuous intervals to indicate WPS
mode. Now push the WPS button ( ) on your
router. If you cannot find a WPS button on your
router, refer to the router’s owner’s manual.
5. Connect your mobile device or PC to the same
network as your wireless product.
Play-Fi® app. Upon launching, it will automatically
detect your wireless product and should prompt
you to name your wireless product.
CONNECTING TO A WIRED NETWORK
1. Using an Ethernet cable, connect your wireless
product to your router.
2. Plug in your wireless product and press the
Power button. The Wi-Fi Status light will start
rapidly blinking for about 20 seconds while
your wireless product is booting up.
3.
The Wi-Fi Status light turns off when the wireless
product is connected via Ethernet.
4. Connect your mobile device or PC to the same
network as your wireless product.
Play-Fi app. Upon launching, it will automatically
detect your wireless product and should prompt
you to name your wireless product.
APPLE AIRPLAY SETUP (WITHOUT DTS® APP)
If you do not want to install and use the DTS Play-Fi
app you can still setup the wireless product to work
with iTunes and AirPlay on your Mac or Windows
PC using the following procedure.
Alternate Connection for Mac and Windows PC:
1.
To avoid a delayed wireless set up, place your
wireless product in close proximity to your router
during wireless set up.
Launch the DTS
Launch the DTS
18

2. Plug in your wireless product and press the
Power button. The Wi-Fi Status light will start
rapidly blinking for about 20 seconds while your
wireless product is booting up. If your wireless
product is not configured to connect to your
network, it will continue to blink. If this is the first
time your new wireless product is plugged in,
the Wi-Fi Status light will start pulsing slowly.
If the wireless product is already configured to
connect to a wi-fi network, the button will turn
solid (connected) or blink rapidly (not connected).
3.
Once the Wi-Fi Status light starts pulsing slowly,
your wireless product is in Access Point Mode and
ready to connect to your wireless network. Note:
If the Wi-Fi Status light does not pulse slowly, press
and hold the Wi-Fi Setup button for 8 seconds.
You will hear two tones—one at 3 seconds and
another at 8 seconds. After 20 seconds, the WiFi Status light will begin pulsing slowly to indicate
Access Point mode is ready. At anytime you can
press the button again to cancel the setup mode.
5. Once your wireless product is selected as the
Wi-Fi network, open your web browser and type
http://192.168.0.1/index.html in the address bar.
You will see a web page from your wireless product.
6.
Click on ‘Set Up’. A list of wireless networks will
be displayed. Click on the wireless network you
wish to connect to.
7. Enter the password for your wireless network
then click ‘Next’.
8.
Enter a name for your wireless product and then
click ‘Next’ to connect your wireless product to
your network.
9.
Your wireless product will attempt to connect to
your network. Once the Wi-Fi Status light turns
solid (not blinking), this indicates your wireless
product is connected to your wireless network.
If the Wi button rapidly blinks, setup failed and
should be tried again.
4. Ensure that Wi-fi is enabled on your computer.
Go to your computer’s Wi-Fi set up. Select the
Wi-Fi network with “Play-Fi ” in the name.
Bluetooth connectIon
1 Set your speaker to Bluetooth mode. Use the
speaker’s remote control to select Bluetooth,
or repeatedly press the input button on front of
the speaker until the front LED turns blue.
2 Sync the speaker with your digital media
device or computer. Follow the directions that
came with your device/computer.
10. Connect your Mac or PC to the same network
as your wireless product. Open your music
application, press the AirPlay icon, and choose
your speaker from the list.
3 Within your music application, you may need
to select the speaker as the output device for
playback.
4 You are now ready to stream music to your
speaker
19

uPdates and reBootIng
DTS PLAY-FI® APP UPDATE
If the DTS Play-Fi app on your mobile device or PC
requires an update, you will be notified that an update
is available and guided through the update process.
DTS PLAY-FI MODULE UPDATE
The DTS Play-Fi module within your speaker will
occasionally require an update. If an update is
needed, the DTS Play-Fi app will notify you and
guide you through the update process.
MARTINLOGAN FIRMWARE UPDATE
Your wireless product may occasionally require
firmware updates. Check www.martinlogan.com
for the latest updates.
REBOOTING
For less than 3 seconds, insert a pin or other small
object into the small hole above the “Reset” label
on back of the speaker. A single tone will sound.
This will reboot your wireless product. Network settings will not be cleared.
FACTORY RESET
For 3 seconds or longer, insert a pin or other small
object into the small hole above the “Reset” label
on back of the speaker. Two tones will sound. This
will reset your wireless product to factory settings
and clear the network configuration.
removIng the front grIlle
To remove the front grille from the speaker use a
finger to firmly apply pressure to either corner of
the grille.
contactIng customer servIce
MartinLogan customer service is available
Monday–Friday between the hours of 8am–5pm
general InformatIon
WARRANTY INFORMATION
Your wireless product is provided with an automatic Limited 90 Day Warranty coverage. You
have the option, at no additional charge, to
receive a Limited 2 Year Warranty coverage. To
obtain the Limited 2 Year Warranty coverage,
please complete registration 30 days of pur-
20
Fig. 4
(central time) by calling (785) 749-0133 or by
emailing service@martinlogan.com.
chase. For your convenience, MartinLogan offers
online warranty registration at www.martinlogan.
com. MartinLogan may not honor warranty service
claims unless we have a completed Warranty
Registration on file! Please save your original
purchase receipt. A copy of your reciept may be
required if service is necessary.

SERIAL NUMBER
The serial number is located on back of the speaker,
near the connection panel. The serial number may
also be found on the product carton.
SERVICE
Should you use your MartinLogan product in a
country other than the one in which it was originally
purchased, we ask that you note the following:
1 The appointed MartinLogan distributor for any
given country is responsible for warranty servicing
only on units distributed by or through it in that country in accordance with its applicable warranty.
frequently asked questIons
2 Should a MartinLogan product require servicing in a country other than the one in which
it was originally purchased, the end user may
seek to have repairs performed by the nearest
MartinLogan distributor, subject to that distributor’s local servicing policies, but all cost of repairs
(parts, labor, and transportation) must be borne by
the owner of the MartinLogan product.
If, after owning your speaker for six months, you
relocate to a country other than the one in which
you purchased your speaker, your warranty may
be transferable. Contact MartinLogan for details.
How do I connect the wireless product to
my television, Blu-Ray/DVD/CD player?
If your television has analog outputs these can be
used instead.
How do I clean my speaker?
Use a dust free cloth (such as a micro fiber cloth)
or a soft brush to remove dust from your speakers.
Do not spray any kind of cleaning agent on or in
close proximity to the drivers.
Could you suggest a list of suitable electronics and cables ideal for this speakers?
We have no favorites and use electronics and
cables quite interchangeably. We would suggest
listening to a number of brands—and above all
else—trust your ears. Dealers are always the best
source for information when purchasing additional
audio equipment.
Can I use other cables other than those
provided with the speaker?
The cables included with the speaker are intended
to get you started. You may find it necessary to augment your system with additional cables or replace
the included cables with cables of different length.
Is there likely to be interaction between
my speaker and the TV in my A/V system?
Yes, but only with CRT televisions. This speaker is
not magnetically shielded and should be kept at
least two feet away from a CRT television. LCD
and plasma televisions will not be affected.
How can I remove the grille cloth from
the speaker?
Use a finger to firmly apply pressure to either corner
of the grille.
21

trouBleshootIng
I’m having trouble using the Play-Fi® app.
• For information on the DTS Play-Fi app, please
visit: https://play-fi.com/faq
Speaker does not turn on.
• Check that the wireless product’s AC power
cord is firmly attached to the AC Power In input
and plugged into a working AC outlet.
•
Speaker is not behaving as expected.
• Turn the wireless product off and on using the
Power button.
• Unplug the wireless product, wait 30 seconds,
and plug it back in.
The Wi-Fi Status light does not light up.
• When connected to a network with an Ethernet
cable, this light will turn off.
I can not connect my speaker to my network.
• Verify that your wireless network is functioning.
• Your router’s wireless signal may be weak or
your wireless product may be out of the range
of your Wi-Fi network. Move the wireless
product closer to the router or use an Ethernet
connection instead.
•
Before connecting to your network, verify that
your wireless product’s Input button is illuminated
in purple. This indicates network streaming mode.
Press the Input button to enter network streaming
mode (purple).
• Reboot your wireless product. Turn the wireless
product off and on using the Power button on
the rear of the speaker. This reboot will cycle
the power off and on and force the wireless
product to reconnect to your network.
• Reset your wireless product to factory settings.
Perform a factory reset by inserting a pin or
other small object into the small hole above
the “Reset” label on back of the speaker.
Once complete, your wireless product will be
reset to factory default settings and will clear
the network configuration. After a reset has
been performed, there is no way to recover the
previous user configured settings.
The Play-Fi app cannot find my speaker.
• If you are trying to setup your wireless product,
verify the wireless product is fully powered on
and in Access Point Mode (Wi-Fi Status light is
pulsing slowly). If the Wi-Fi Status light does not
pulse slowly, press and hold the Wi-Fi Setup
button for 8 seconds. You will hear two tones—
one at 3 seconds and another at 8 seconds.
• Verify you are within the recommended range
of your wireless router.
•
Verify your mobile device or PC has its Wi-Fi
enabled or is otherwise connected to your network.
• Verify there are no other apps running on your
device that might impede wireless connectivity
to your network.
• Restart your phone, tablet, or PC.
• If you still can’t find the wireless product on your
network and are in an office environment, verify
with your network administrator that no special
permissions are enabled that would prevent
external wireless products from communicating
with the network.
• If the wireless product is still not found, uninstall,
re-download, and re-install the DTS Play-Fi® app
on your mobile device or PC.
• Reboot your wireless product. Turn the wireless
product off and on using the Power button on
the rear of the speaker. This reboot will cycle
the power off and on and force the wireless
product to reconnect to your network.
• Reset your wireless product to factory settings.
Perform a factory reset by inserting a pin or
other small object into the small hole above
the “Reset” label on back of the speaker.
Once complete, your wireless product will be
reset to factory default settings and will clear
22

the network configuration. After a reset has
been performed, there is no way to recover the
previous user configured settings.
The Play-Fi app reports “Play-Fi Devices Lost.”
• Check that your device is powered on.
• Verify you have a strong network signal.
• Verify the network connection has not been lost.
• Check for other devices that might be causing
heavy network traffic.
• Verify that your mobile device or PC has not left
the range of your router.
•
Verify that your mobile device or PC and your
wireless product are connected to the same network.
•
Verify that your wireless product’s wireless
streaming has not been taken over by another app.
• Exit and then restart the DTS Play-Fi app.
• Uninstall, re-download, and re-install the DTS
Play-Fi app on your mobile device or PC.
• Reboot your wireless product. Turn the wireless
product off and on using the Power button on
the rear of the speaker. This reboot will cycle
the power off and on and force the wireless
product to reconnect to your network.
• Reset your wireless product to factory settings.
Perform a factory reset by inserting a pin or
other small object into the small hole above
the “Reset” label on back of the speaker.
Once complete, your wireless product will be
reset to factory default settings and will clear
the network configuration. After a reset has
been performed, there is no way to recover the
previous user configured settings.
No output from the speaker.
• Check that the wireless product is turned on.
• Check that the wireless product is not muted.
• Check that the wireless product’s volume is not
turned all the way down.
• Check that the wireless product is set to the
proper input.
• Check that all system components are turned
on and source material is playing.
• Turn the speaker off and on using the Power button.
• Unplug the speaker, wait 30 seconds, and plug
it back in.
• Check that all interconnecting cables are connected at both ends.
• If necessary, try connecting an alternate source
component to make sure the original source
component isn’t the problem.
When using the Analog Input, sound is
coming from both my speaker
connected television.
• When utilizing the wireless product to reproduce audio, the television’s audio output should
be defeated. Some televisions will allow you to
turn off the internal speaker via the television’s
menu system. Other televisions may require you
to turn the television’s volume to “zero” or to
“mute” the television.
When using the Analog Input, the speaker
is too quiet even turned up.
• Check that the output on your television or
other source components are not connected via
a variable level output. Sometimes this option
may be configured in your source components
menu. Please refer the manual for the source
component in question.
No sound coming from external sub
• Check that the external sub is turned on.
• Check that the subwoofer cables are attached to
the Sub Out connection on the wireless product
and to the appropriate input on the subwoofer.
• Check that the Sub Out button on the wireless
product is depressed.
External sub is too quiet.
• Turn up the volume on the subwoofer.
• Try moving the subwoofer to a different location in the listening room.
and my
23

sPecIfIcatIons*
Frequency Response .....................
Crossover Frequency.....................
Amplifier Power ........................
High Frequency Drivers...................
Low Frequency Drivers ...................
Cabinet ..............................
Components...........................
Inputs................................
Wireless Inputs.........................
23,000 Hz ± 3 dB
3,600 Hz
1 x 50 Watts (woofer). 2 x 25 Watts (tweeters)
100 Watts (140 Watts peak) combined total output.
Two 0.94” x 1” (2.4cm x 2.5cm) Folded Motion
Transducers with 2.8” x 1.25” (7.1cm x 3.2cm)
diaphragm.
5” x 7” (12.7cm x 17.8cm) fiber cone with
extended throw drive assembly. Non-resonant
asymmetrical chamber format.
Ported
24-bit 48kHz
Class-D amplifier
Auxiliary analog/optical digital (3.5mm mini jack)
RJ45 Ethernet
Apple
DSP based preamplifier
AirPlay, DTS Play-Fi® , Bluetooth
Wireless Connectivity ....................
USB Charging Power ....................
Output ...............................
Power Draw...........................
Remote Battery.........................
Weight...............................
Dimensions (H x W x D) ..................
24
802.11b/g (2.4GHz)
Bluetooth v3.0 (supports AAC, aptX, MP3, SBC)
2.4 Amp (capable of rapidly charging some devices)
Subwoofer Out via analog RCA
Max: 70 Watts, Idle: 6.5 Watts,
Standby consumption: <0.5 Watts
Network standby consumption: < 6 Watts
2x AAA
15 lbs. (6.8 kg)
8.1” x 25.7” x 6.9” (20.5cm x 65.3cm x 17.5cm)
* Specifications are subject to change without notice.

dImensIonal drawIngs
25.7” (65.3cm) / 25,7 po (65,3cm)
8.1” (20.5cm)
8,1 po (20,5cm)
6.5” (16.5cm)
6,5 po (16,5cm)
6.9” (17.5cm)
6,9 po (17,5cm)
25

®
Lawrence, Kansas, USA tel 785.749.0133 fax 785.749.5320 www.martinlogan.com
Rev. 005©2016 MartinLogan Ltd. All rights reserved.

manuel de l’utilisateur
®

Ne pas ouvrir! Risque de choc électrique. Les tensions de cet équipement sont
potentiellement mortelles. Aucune pièce réparable par l’utilisateur à l’intérieur.
L’entretien doit être fait par un technicien compétent. Pour éviter les risques
d’incendie ou de choc, ne pas exposer ce module à l’humidité.
Le symbole de l’éclair avec une pointe
en forme de flèche, dans un triangle
équilatéral, avertit l’utilisateur de la
présence d’une « tension dangereuse » potentielle
près du produit qui peut être suffisante pour constituer
un risque de décharge électrique.
Le point d’exclamation dans un triangle équilatéral avertit l’utilisateur de
la présence de directives importantes
en matière de fonctionnement et d’entretien (service)
dans les documents qui accompagnent l’appareil.
CONSIGNES DE SÉCURITÉ IMPORTANTES
1 Lisez les consignes.
2 Conservez les consignes.
3 Tenez compte de toutes les mises en garde.
4 Suivez les consignes.
5 N’utilisez pas cet appareil près de l’eau.
6 Nettoyez uniquement avec un linge sec.
Ne bloquez pas les ouvertures de ventilation. Installez conformément aux
7
instructions du fabricant.
8 N’installez pas le produit près des sources de chaleur, telles que les
radiateurs, les registres de chaleur, les poêles ou les autres appareils qui
produisent de la chaleur (y compris les amplificateurs).
9 N’outrepassez pas la caractéristique de sécurité de la fiche polarisée ou de type
polarisé. Une fiche polarisée a deux lames dont une est plus large que l’autre.
Une fiche de type polarisé a deux lames et une troisième qui agit à titre de
broche de masse (grounding prong). La lame large ou la broche de masse sont
fournies pour votre sécurité. Si la fiche fournie n’entre pas dans la prise murale,
consultez un électricien pour qu’il remplace la prise obsolète.
10 Protégez le cordon d’alimentation pour qu’il ne soit pas piétiné ou écrasé
par des articles placés ou appuyés sur ceux-ci, en prêtant particulièrement
attention à la fiche des cordons, aux réceptacles d’utilité et à l’endroit où ils
sortent de l’appareil.
11 Utilisez uniquement les pièces ou les accessoires recommandés par le fabri-
cant.
12 Utilisez uniquement avec le chariot, le pied, le
trépied, le support ou la table recommandé par
le fabricant ou vendu avec l’appareil. Lorsque
vous utilisez un chariot, faites attention lorsque
vous déplacez le chariot/appareil pour éviter
de vous blesser s’il bascule.
13 Débranchez l’appareil lors des orages électriques ou lorsque vous ne l’utilisez
pas pendant une longue période.
14 Faites effectuer toutes les réparations par un technicien compétent. Des
réparations sont nécessaires lorsque l’appareil a été endommagé de
quelque façon que ce soit, par exemple, lorsque le cordon d’alimentation est
endommagé, que du liquide ou des objets sont tombés dans l’appareil, que
l’appareil a été exposé à la pluie ou à l’humidité, qu’il ne fonctionne pas
normalement ou qu’il est tombé sur le sol.
15. Pour débrancher complètement cet appareil des sources principales, débranchez le cordon d’alimentation du réceptacle.
16. La prise principale du cordon d’alimentation doit être facilement accessible.
17 MISE EN GARDE : risque d’explosion si la pile n’est pas placée correctement.
Remplacez la pile uniquement avec le même type de pile ou un type équivalent (AAA). Jetez les piles épuisées conformément aux lois locales.
18. Pour éviter les surchauffes, ne couvrez pas l’appareil. Installez l’appareil
conformément aux instructions du fabricant.
19. Aucune flamme nue, comme une chandelle, ne doit être placée sur
l’appareil.
20. N’exposez pas cet appareil aux gouttes et aux éclaboussures et assurezvous qu’aucun objet contenant des liquides, tel qu’un vase, n’est placé sur
l’appareil.
21. Les piles (bloc-piles ou piles installés) ne doivent pas être exposées à une
chaleur excessive comme les rayons du soleil, un feu ou quelque chose de
semblable.
22. Pour les appareils montés sur un mur, l’appareil doit être installé sur du bois
solide, des briques, du béton ou des colonnes et des lattes en bois solides.
23. NE surchargez PAS les prises murales ou les rallonges électriques au-delà
de leur capacité nominale, car cela peut causer un choc électrique ou un
incendie.
Respectez les distances minimales autour de l’appareil pour assurer une ventila-
24.
tion suffisante.
25. La ventilation ne doit pas être bloquée en couvrant les ouvertures de ventilation avec des articles comme des journaux, des linges de table, des rideaux,
etc.
26. N’ingérez pas la pile, risque de brûlure chimique.
27. Gardez les piles nouvelles et usagées hors de la portée des enfants.
28. Si le compartiment à piles ne se ferme pas bien, cessez d’utiliser le produit
et gardez-le hors de la portée des enfants.
29. Si vous pensez que les piles ont été avalées ou placées à l’intérieur d’une
partie du corps, consultez immédiatement un médecin.
30. Les piles (pile, piles ou bloc-pile) ne doivent pas être exposées à une chaleur
excessive comme les rayons du soleil, un feu ou quelque chose de semblable.
31. Risque de fuite. Utilisez uniquement les piles du type indiqué. Ne mélangez
jamais de nouvelles piles avec des piles usagées. Respectez la bonne polarité.
Enlevez les piles des produits qui ne sont pas utilisés pendant une longue période. Rangez les piles dans un endroit sec.
32. Ne rechargez pas les piles non rechargeables.
33. Évitez l’exposition à la chaleur ou au froid extrême.
34. Cet équipement est un appareil électrique de Classe II ou à
double isolation. Il a été conçu de façon à ne pas nécessiter de
branchement électrique de sécurité (mise à la terre).
35. Risque d’explosion si la pile n’est pas bien remplacée. Remplacez-la
uniquement avec le même type de pile ou un type équivalent.
36. (La télécommande fournie avec) ce produit contient une pile AAA . Si la pile
AAA est avalée, elle peut causer des brûlures internes graves en seulement 2
heures et peut causer le décès de la personne.
28

37. Ne manipulez pas des piles AAA qui fuient ou qui sont endommagées.
CE PRODUIT CONTIENT UNE PILE AAA. S’IL EST MAL UTILISÉ OU MAL MANIPULÉ,
38.
ILPEUT CAUSER :
- Un risque de fumée ou de gaz
- Un risque de chaleur
- Un risque d’incendie
- Un risque d’explosion
39. Si un coupleur d’appareil est utilisé comme dispositif de déconnexion, le
dispositif de déconnexion doit rester prêt à fonctionner.
La puissance nominale pour la sortie USB est de 5V
MISE EN GARDE : cet appareil est conçu pour fonctionner UNIQUEMENT avec les
tensions CA indiquées sur le panneau arrière ou avec l’alimentation électrique incluse
avec l’appareil. Le fonctionnement à partir de tensions autres que celles indiquées sur
l’appareil pourrait causer des dommages irréversibles au produit et annuler la garantie. L’utilisation d’adaptateur de prise CA doit faire l’objet d’une attention particulière,
car elle peut faire en sorte que l’appareil soit branché à des tensions pour lesquelles
il n’a pas été conçu. Si l’appareil est doté d’un cordon d’alimentation détachable,
utilisez uniquement le type de cordon fourni avec l’appareil ou par votre distributeur
ou revendeur local. Si vous n’êtes pas certain de la tension d’utilisation appropriée,
veuillez communiquer avec votre distributeur ou revendeur local.
2.1A.
utilisateurs finaux et les installateurs doivent recevoir les instructions d’installation de
l’antenne et les conditions d’utilisation du transmetteur pour se conformer aux normes
d’exposition RF.
ÉNONCÉ RELATIF AUX APPAREILS 5GHz RF : Cet appareil fonctionne dans
la plage de fréquences 5.15– 5.25GHz et est limité à un usage intérieur uniquement.
L’utilisation à l’extérieur dans la plage de fréquences 5150–5250MHz est interdite.
CANADA, AVIS D’INDUSTRIE CANADA (IC) : Le présent appareil est conforme aux CNR d’Industrie Canada applicables aux appareils radioexempts de licence.
L’exploitation est autorisée aux deux conditions suivantes : (1) l’appareil ne doit pas
produire de brouillage, et (2) l’utilisateur de l’appareil doit accepter tout brouillage
radioélectrique subi, même si le brouillage est susceptible d’en compromettre le fonctionnement.
Conformément à la réglementation d’Industrie Canada, le présent émetteur radio peut
fonctionner avec une antenne d’un type et d’un gain maximal (ou inférieur) approuvé
pour l’émetteur par Industrie Canada. Dans le but de réduire les risques de brouillage
radioélectrique à l’intention des autres utilisateurs, il faut choisir le type d’antenne et
son gain de sorte que la puissance isotrope rayonnée équivalente (p.i.r.e.) ne dépasse
pas l’intensité nécessaire à l’établissement d’une communication satisfaisante.
Cet appareil est conforme à la Partie 15 du règlement FCC. Son utilisation est
assujettie aux deux conditions suivantes : (1) cet appareil ne doit pas provoquer
d’interférences nuisibles, et (2) cet appareil doit supporter les interférences reçues, y
compris celles susceptibles de nuire à son bon fonctionnement.
DÉCLARATION DE LA FEDERAL COMMUNICATIONS COMMISSION SUR
L’INTERFÉRENCE : Cet équipement a été testé et jugé conforme aux limites d’un
appareil numérique de Classe B, en vertu de la Section 15 du règlement de la FCC.
Ces limites sont conçues pour offrir une protection jugée raisonnable contre l’interférence
nuisible dans une installation résidentielle. Cet équipement génère, utilise et peut
émettre une énergie radiofréquence et, s’il n’est pas installé et utilisé conformément aux
instructions, peut causer une interférence nuisible aux radiocommunications. Cependant,
il n’y a aucune garantie de non-apparition d’interférence dans une installation particu
lière. Si cet équipement cause une interférence nuisible à la réception radiophonique ou
télévisuelle, qu’on peut déterminer en ouvrant et en fermant l’équipement, l’utilisateur
est invité à essayer de corriger l’interférence à l’aide de l’une ou de plusieurs des
mesures suivantes :
• Réorienter l’antenne de réception ou la changer de place.
• Augmenter la distance entre l’équipement et le récepteur.
• Raccorder l’équipement à une prise située sur un autre circuit que celui sur
lequel le récepteur est raccordé.
• Consulter le revendeur ou un technicien radio/TV compétent pour obtenir de l’aide.
Approuvé en vertu de la disposition de vérification de la Section 15 de la FCC à titre
d’appareil numérique de classe B.
Les changements ou modifications non expressément approuvés par le concessionnaire
de cet appareil peuvent priver l’utilisateur du droit d’utiliser l’équipement en question.
MISE EN GARDE SUR L’EXPOSITION RF : Cet équipement doit être installé et
utilisé conformément aux instructions fournies et la ou les antennes utilisées pour ce
transmetteur doivent être installées de façon à offrir une distance de séparation d’au
moins 20 cm de toutes les personnes et ne doivent pas être situées au même endroit
ou utilisées conjointement avec toute autre antenne ou tout autre transmetteur. Les
-
Le présent émetteur radio (numéro de certification : 7756A-CRESCENDOX) a été
approuvé par Industrie Canada pour fonctionner avec les types d’antenne énumérés
ci-dessous et ayant un gain admissible maximal et l’impédance requise pour chaque
type d’antenne. Les types d’antenne non inclus dans cette liste, ou dont le gain est
supérieur au gain maximal indiqué, sont strictement interdits pour l’exploitation de
l’émetteur.
Gain d’antenne: 4.2dBi maximal
Type d’antenne: 50 ohm, PIFA
INFORMATION SUR L’EXPOSITION À LA RADIOFRÉQUENCE (RF) :
La puissance d’émission radio du produit sans fil ci-dessous est inférieure aux limites
d’exposition aux radiofréquences d’Industrie Canada (IC). Ce produit sans fil doit être
utilisé de telle façon que le potentie de contact humain pendant le fonctionnement soit
minimisé. Cet appareil a également été évalué et il a été démontré conforme aux limites
d’exposition RF d’IC dans des conditions d’exposition mobiles. (Les antennes sont à plus
de 20 cm du corps d’une personne.)
Mise en garde : (i) les dispositifs fonctionnant dans la bande 5150-5250 MHz sont
réservés uniquement pour une utilisation à l’intérieur afin de réduire les risques
d’interférence préjudiciable aux systèmes de satellites mobiles utilisant les mêmes
canaux; (ii) le gain maximal d’antenne permis pour les dispositifs utilisant les bandes
5250-5350 MHz et 5470-5725 MHz doit se conformer à la limite de p.i.r.e.; (iii) le
gain maximal d’antenne permis pour les dispositifs utilisant la bande 5725-5825
MHz) doit se conformer à la limite de p.i.r.e. spécifiée pour l’exploitation point à point
et non point à point, selon le cas. (iv) De plus, les utilisateurs devraient aussi être
avisés que les utilisateurs de radars de haute puissance sont désignés utilisateurs
principaux (c.-à-d., qu’ils ont la priorité) pour les bandes 5250-5350 MHz et 56505850 MHz et que ces radars pourraient causer de l’interférence et/ou des dommages
aux dispositifs LAN-EL. (iv) les pires angles d’inclinaison sont conformes à l’exigence
de p.i.r.e. applicable au masque d’élévation énoncée à la section 6.2.2 (3).
29

AVIS WEEE
Remarque : cette marque s’applique uniquement aux pays de
l’Union européenne (UE) et à la Norvège.
En vertu de la directive WEEE de l’Union européenne (directive sur les déchets
électriques et électroniques) entrée en vigueur le 13 août 2005, nous vous avisons
que ce produit pourrait contenir des matériaux réglementés dont l’élimination doit
faire l’objet de procédures de réutilisation et de recyclage particulières.
À cette fin, Martin Logan a demandé à ses distributeurs dans les pays
membres de l’Union européenne de reprendre et de recycler ce produit
gratuitement. Pour trouver le distributeur le plus près, communiquez avec
le revendeur du produit, envoyez un courriel à info@martinlogan.com ou
consultez le site Web martinlogan.com. Notez que seul le produit est régi
par la directive WEEE. Nous vous encourageons à recycler les matériaux
d’emballage et autres matériaux d’expédition selon les procédures normales.
AVERTISSEMENT/MISE EN GARDE!
• Tensions dangereuses à l’intérieur – ne pas retirer le couvercle.
• Les réparations doivent être effectuées par un technicien compétent.
•
Pour éviter les risques d’incendie ou de choc, ne pas exposer ce module à l’humidité.
• Débrancher l’enceinte en cas de situations anormales.
• Éteindre l’enceinte avant de faire ou de défaire des raccords de signal!
Le cordon d’alimentation ne doit pas être installé, enlevé ou laissé détaché de
•
l’enceinte lorsque l’autre extrémité est raccordée à une source d’alimentation CA.
•
Aucune chandelle ou autre source de flamme nue ne doit être placée sur l’enceinte.
• Aucun liquide, dans un verre ou un vase, ne doit être placé sur l’enceinte.
• L’enceinte ne doit pas être exposée à des écoulements ou à des éclabous-
sures de liquide.
• Les bornes marquées d’un symbole d’éclair doivent être raccordées par une
personne compétente ou par des bornes déjà raccordées.
• Le cordon d’alimentation doit rester facilement accessible en cas de condi-
tions anormales.
• Les changements ou modifications non expressément approuvés par le
concessionnaire de cet appareil peuvent priver l’utilisateur du droit d’utiliser
l’équipement en question.
Pour les brevets DTS, voir http://patents.dts.com. Fabriqué sous licence de DTS, Inc.
DTS, Play-Fi, le symbole, et DTS et le symbole réunis sont des marques de commerce
de DTS, Inc. DTS et Play-Fi sont des marques de commerce déposées de DTS, Inc. ©
DTS, Inc. Tous droits réservés.
Apple et le logo Apple sont des marques de commerce d’Apple Inc., enregistrées aux
É.-U. et dans les autres pays. App Store est une marque de service d’Apple Inc.
Le logiciel Spotify est l’object de licences de tiers trouvés ici:
www.spotify.com/connect/third-party-licenses.
AirPlay, iPad, iPhone, iPod, iPod classic, iPod nano et iPod touch sont des marques de
commerce d’Apple Inc., enregistrées aux É.-U. et dans d’autres pays.
AirPlay fonctionne avec les iPhone, iPad et iPod touch dotés d’iOS 4.3.3 ou d’une
version ultérieure, Mac dotés d’OS X Mountain Lion, et Mac et PC avec iTunes 10.2.2
ou une version ultérieure.
iPad mini, iPod touch (de la 3e à la 5e génération), et iPod nano (de la 5e à la 7e
génération). Les termes « Made for iPod », « Made for iPhone », et « Made for iPad »
signifient qu’un accessoire électronique a été conçu pour se brancher spécifiquement
aux appareils iPod, iPhone ou iPad, respectivement, et qu’il a été certifié par le développeur pour répondre aux normes de rendement d’Apple. Apple n’est pas responsable
Le mot servant de marque Bluetooth et les logos sont des marques de commerce
déposées possédées par Bluetooth SIG, Inc. et toute utilisation de ces marques par
MartinLogan, Ltd. est autorisée par licence.
Windows est une marque de commerce déposée de Microsoft Corporation aux ÉtatsUnis et dans d’autres pays.
Les autres marques de commerce et noms commerciaux sont la propriété de leur propriétaire respectif.
du fonctionnement de cet appareil ou de sa conformité aux normes de sécurité ou
réglementaires. Veuillez noter que l’utilisation de cet accessoire avec un iPod, iPhone
ou iPad peut avoir des répercussions sur le rendement de la fonction sans fil.
Fait pour :
• iPhone 6 Plus
• iPhone 6
• iPhone 5s
• iPhone 5c
• iPad Air 2
• iPad mini 3
30

Introduction et aperçu ...................... 33
Positionnement ........................... 33
Branchement ............................. 33
Branchement de l’alimentation ...............33
Raccord de signal .......................34
Connexion réseau .......................34
Connexion du caisson de sous-graves ..........34
Un aperçu des connexions ................... 35
Réaction du volume selon l’entrée .............36
Commandes ............................. 37
Commandes du panneau avant ..............37
Télécommande .........................38
Changer la pile de la télécommande ..........38
Fonctions de commande selon l’entrée .......... 39
Lecture de l’audio à l’aide du Play-Fi
MD
...........39
Choix de l’entrée automatique ...............39
Lecture – à partir de l’application DTS ..........39
Commande d’enceintes multiples .............40
Caractéristiques Play-Fi supplémentaires .........40
Lecture de l’audio à l’aide du AirPlay ............40
Choix de l’entrée automatique ...............40
Lecture – à partir d’iTunes sur un Mac ou un
PC (ordinateur personnel) ................40
Commander la lecture avec iTunes
MD
...........41
Functionnement de Spotify Connect ............41
Configuratioun de DTS Play-Fi et Apple
Exigences du r
é
seau .....................41
MD
AirPlayMD . 41
Application DTS Play-Fi - Exigences ............41
Apple AirPlay - Exigences ..................42
Lumière de statut Wi-Fi ....................42
T
élé
chargement de l’application DTS Play-Fi ......42
Connexion à un réseau san fil : configuration du point d’accès
.42
Guide d’utilisation de la lecture en continu .......42
Connexion à un réseau san fil : Wi-Fi Protected Setup (WPS)
.44
Connexion à un réseau câblé ...............44
Configuration Apple AirPlay (sans application DTS) .45
Connexion Bluetooth
MD
......................45
Mises à jour et redémarrage ...................46
Mises à jour du DTS Play-Fi .................46
Mises à jour du module DTS Play-Fi ............46
Mise a jour du micrologiciel MartinLogan ........46
Redémarrage ..........................46
Réinitialisation selon les paramètres d’usine .......46
Retirer la grille avant ....................... 46
Communiquer avec le service à la clientèle ....... 46
Renseignements généraux ...................46
Renseignements sur la garantie ...............46
Numéro de série ........................47
Service ..............................47
Foire aux questions ........................47
Dépannage .............................. 48
Spécifications ............................50
Dessins dimensionnels ......................51
Numéro de série : __________________________
Veuillez noter votre numéro de série ici pour le
retrouver facilement. Vous aurez besoin de ce
numéro lorsque vous remplirez l’inscription à la
garantie. Le numéro de série se trouve sur la partie
arrière de l’enceinte et sur le carton d’emballage.
31

32

IntroductIon et aPerçu
Merci à vous, propriétaire d’un produit MartinLogan,
d’aimer ce que nous faisons, et de faire en sorte que nous
puissions faire ce que nous aimons.
L’équipe interne d’ingénierie et de conception dévouée de
MartinLogan a développé l’enceinte Crescendo X pour offrir
un rendement audio exceptionnel à partir d’un seul système,
qui s’intègre et s’installe facilement dans différents environne
ments. Le Crescendo X produit un champ enveloppant de
son richement détaillé qui comprend deux haut-parleurs
d’aigus (notamment la technologie Folded Motion primée
de MartinLogan), un haut-parleur de graves haute perfor
mance et trois canaux dédiés d’amplification de classe D,
pour une puissance totale du système de 100 watts.
Un préamplificateur avancé de 24 bits 48 kHz DSP (digi-
PosItIonnement
Nous recommandons de placer cette enceinte sur une surface qui offre une plateforme large, au niveau et stable,
comme une table ou un support audio/vidéo. Veuillez
noter que cette enceinte n’est pas dotée d’une protection
tal signal processing) permet à MartinLogan de remplacer
les enceintes stéréo dédiées par une solution en une seule
pièce, capable de reproduire le son avec une précision,
une résolution et des détails exceptionnels, l’inspiration
derrière chaque design MartinLogan. De plus, afin de
fournir une expérience sonore totalement authentique,
le Crescendo X permet de brancher un caisson de sousgraves dédié en appuyant simplement sur un bouton.
-
La télécommande du Crescendo X permet de régler
rapidement le volume, de choisir les entrées et de commander l’appareil. La télécommande permet également
de basculer rapidement entre deux modes acoustiques
discrets : mode « Bass + » (pour les passages qui exigent un peu plus de tonnerre) et un mode « Normal » qui
restaure les niveaux normaux.
magnétique; par conséquent, elle ne doit pas être placée
directement en-dessous ou au-dessus d’une télévision à écran
cathodique (CRT). Le champ magnétique de l’enceinte n’aura
aucun effet sur les télévisions de style plasma ou LCD.
Branchement
MISE EN GARDE! Éteignez l’enceinte
avant de faire ou de défaire des raccords
de signal! MISE EN GARDE! Le cordon
d’alimentation ne doit pas être installé, enlevé
ou laissé détaché de l’enceinte lorsque l’autre extrémité est
raccordée à une source d’alimentation CA.
BRANCHEMENT DE L’ALIMENTATION
Le cordon d’alimentation doit être fermement inséré dans
la prise d’alimentation CA située à l’arrière de l’enceinte,
puis dans toute prise CA murale appropriée.
Si vous retirez l’enceinte du pays de vente d’origine,
assurez-vous que l’alimentation CA fournie dans tout
emplacement suivant est appropriée avant de brancher
et d’utiliser l’enceinte. Si l’enceinte est utilisée avec une
source d’alimentation CA inappropriée, son rendement
peut être grandement diminué et des dommages graves
peuvent survenir.
Lorsque le bouton d’alimentation (Power) sur le panneau
arrière est réglé à « Off » (Fermé), l’alimentation de
l’enceinte est complètement coupée, y compris toutes les
connexions réseau (le Wi-Fi et Ethernet sont désactivés).
33

RACCORD DE SIGNAL
Les raccords sont effectués dans la section entrée des
signaux située sur le panneau électronique arrière de
l’enceinte. Votre enceinte est dotée des entrées audio suivantes :
• Ethernet : utilisée pour lire un contenu audio en continu
à partir d’Apple AirPlay ou, DTS Play-Fi
MD
.
• Aux [Auxiliaire] : utilisée pour optique numérique
(Toslink) ou entrée analogique. Cette entrée accepte
une prise de type casque d’écoute stéréo standard
de 3,5 mm ou mini Toslink. Une prise mini Toslink à
câble Toslink spéciale ou un adaptateur mini Toslink est
nécessaire pour une connexion optique numérique.
De plus, l’enceinte comporte deux entrées qui ne nécessitent pas de connexion physique :
• Sans fil : utilisée pour lire un contenu audio en continu
à partir d’appareils Apple AirPlay or Play-Fi.
• Bluetooth : utilisée pour lire un contenu audio en con-
tinu à partir d’appareils compatibles dotés de la fonction
Bluetooth, y compris les appareils aptX
MD
Bluetooth.
Veuillez noter que lorsque vous utilisez cette enceinte pour
reproduire le son d’une télévision par l’entremise de la con
nexion Auxiliaire (numérique ou analogique) de l’enceinte,
la sortie audio de la télévision doit être désactivée.
Certaines télévisions vous permettent d’éteindre l’enceinte
interne en passant par le système de menu de la télévision.
Pour d’autres télévisions, il peut être nécessaire de mettre le
volume à zéro ou en « sourdine ». De plus, il est possible
que votre télévision exige que vous allumiez la sortie optique
numérique ou que vous configuriez le son à deux canaux
(stéréo). Veuillez consulter le manuel de la télévision.
CONNEXION RÉSEAU
Pour envoyer l’audio en continu enceinte, une connexion
LAN (local area network – réseau local) est nécessaire.
Cette connexion peut être établie par Wi-Fi ou Ethernet.
Consultez la section Configuration sans fil de ce manuel
pour obtenir des détails sur la configuration et l’utilisation.
CONNEXION DU CAISSON DE SOUS-GRAVES
Vous pouvez utiliser un caisson de sous-graves distinct
pour améliorer le rendement des graves. Les caissons
de sous-graves peuvent être raccordés par l’entremise
de la connexion RCA « Sub Out » de l’enceinte. Nous
vous recommandons d’utiliser un superbe caisson de sousgraves MartinLogan.
À l’aide d’un câble de style RCA de haute qualité conçu
pour le raccordement du caisson de sous-graves, raccordez la sortie « Sub Out » de l’enceinte à l’entrée « LFE
In/Sub In » du caisson de sous-graves. Sur le panneau
arrière de l’enceinte, réglez le bouton Sub Out à « On
» (lorsqu‘il est à « on », le bouton sera enfoncé; lorsqu’il
est à « off », le bouton sera sorti). Lorsque Sub Out est
allumé (on), la sortie des graves profondes de l’enceinte
sera réduite (pour optimiser le rendement) et l’information
des graves sera envoyée directement au caisson de sousgraves externe pour obtenir une réponse générale des
graves plus profonde et prolongée.
Consultez le manuel du caisson de sous-graves pour savoir
comment régler les commandes de niveau et de phase du
caisson de sous-graves afin d’obtenir un mélange appro
prié avec l’enceinte. Lorsque Sub Out est réglé à « On »,
l’enceinte gèrera la fonction de répartition (crossover) du
-
Fig. 1 Panneau
de connexion
34

caisson de sous-graves, afin d’obtenir le meilleur mélange
avec l’enceinte. Pour cette raison, le répartiteur du caisson
de sous-graves doit être réglé à « bypass » (contournement)
ou « LFE ». Pour les caissons de sous-graves qui n’ont pas
de fonction de répartiteur « bypass » ou « LFE », nous vous
recommandons de régler le répartiteur à son paramètre le
plus élevé; n’oubliez pas que l’enceinte gèrera le répartit
eur avant d’envoyer le signal des sous-graves.
Utilisation d’un caisson de sous-graves Dynamo de
MartinLogan :
Si vous utilisez un caisson de sous-graves de la gamme
MartinLogan Dynamo, nous vous recommandons de com
mencer avec les réglages de caisson de sous-graves suivants :
• Passe basse : Bypass (contournement)
• Phase : 0°
-
• Volume : Bouton réglé à la verticale (position 12 heu-
res à 1 heure)
un aPerçu des connexIons
Optique numérique : également appelé Toslink, ce câble utilise un câble pour acheminer
l’information audio numérique (pas de vidéo). Un câble optique numérique offre une con-
nexion numérique de haute qualité et achemine le son encodé à canaux multiples entre
une composante source et un appareil à sortie audio. L’entrée auxiliaire de cette enceinte
accepte une connexion optique numérique avec l’aide d’un adaptateur mini Toslink (com-
pris avec cet appareil). Les câbles Toslink à mini Toslink peuvent également être disponibles auprès de votre revendeur.
RCA analogique (gauche/droite) : ces câbles sont utilisés pour acheminer l’information audio (pas de vidéo).
Un câble RCA analogique peut uniquement acheminer un seul canal d’information entre une com-
posante source et un appareil à sortie audio. Pour obtenir un son à deux canaux (gauche/
droite), vous verrez que les câbles RCA analogiques viennent sous forme de paire stéréo
(deux connecteurs à chaque extrémité). L’entrée auxiliaire sur cette enceinte peut accepter
un signal stéréo analogique grâce à un câble utilisant une prise stéréo de 3,5 mm de style
casque d’écoute. Si vous branchez cette enceinte à un appareil (station d’accueil ou lecteur CD)
doté de sorties RCA analogiques gauche/droite, vous aurez besoin d’un câble spécial avec une prise de 3,5 mm de
style casque d’écoute à une extrémité et de prises RCA gauche/droite à l’autre extrémité.
-
Prise analogique gauche/droite stéréo de 3,5 mm de style casque d’écoute : ce câble est utilisé pour
acheminer l’information audio (pas de vidéo). Les utilisateurs noteront que certaines composantes
sources comme les lecteurs numériques et les stations d’accueil utilisent un connecteur de
3,5 mm de style casque d’écoute. L’entrée auxiliaire sur cette enceinte peut accepter un
signal stéréo analogique grâce à un câble utilisant un connecteur de 3,5 mm de style
casque d’écoute. Ces appareils sont également dotés d’une « commande de volume »
qui augmente ou diminue le niveau du signal de sortie.
Si vous branchez un appareil qui permet un réglage du volume (comme un lecteur numérique ou un téléphone cellulaire), nous vous recommandons de ne pas régler le volume de l’appareil au maximum. Lorsque le volume est réglé
au maximum, l’amplificateur dans l’appareil externe est susceptible d’introduire une distorsion élevée dans le signal
audio qui, à son tour, sera transmise à son enceinte et amplifiée davantage, ce qui crée encore plus de distorsion.
35

un aPerçu des connexIons [suIte]
Ethernet : ce câble vous permet de brancher physiquement un appareil à un LAN (réseau local).
Lors d’une connexion à un LAN, l’information audio peut être envoyée à cette enceinte à
l’aide de différents protocoles (comme Play-Fi
(Wi-Fi) est utilisée pour se connecter à un LAN, il n’est pas nécessaire d’utiliser une connexion Ethernet. Toutefois, dans certaines installations, une connexion Ethernet câblée
peut être plus indiquée qu’une connexion sans fil.
Wi-Fi : cette technologie de connexion permet le branchement sans fil d’un appareil à un LAN
(réseau local). Lors d’une connexion à un LAN, l’information audio peut être envoyée à cette enceinte
à l’aide de différents protocoles (comme Play-Fi ou AirPlay). Si une connexion Ethernet est utilisée pour
se connecter à un LAN, il n’est pas nécessaire d’utiliser une connexion Wi-Fi. Dans certaines installations, une connexion Ethernet câblée peut être plus indiquée qu’une connexion sans fil.
Bluetooth: cette technologie de connexion sans fil permet de brancher une vaste gamme d’appareils
à un appareil doté d’une sortie audio et à la lecture audio en continu. Bluetooth établit une connexion
directement avec un appareil doté d’une sortie audio et n’a pas besoin que l’un ou l’autre des appar-
eils soit connecté à un LAN.
MD
ou AirPlay). Si une connexion sans fil
réactIon du volume selon l’entrée
En fonction de l’entrée choisie sur votre enceinte, le volume réagira de différentes façons.
ENTRÉE DE L’ENCEINTE
Sans fil ou Ethernet
(avec AirPlay ou Play-Fi)
Aux [auxiliaire]
Bluetooth
* Les appareils connectés par auxiliaire et Bluetooth auront
souvent leur propre commande du volume qui fonctionne
séparément du volume de l’enceinte. Si vous branchez un
appareil qui vous permet de régler le volume séparément,
nous vous recommandons de ne pas régler au maximum
le volume sur cet appareil. Lorsque le volume est réglé au
COULEUR DE LA DEL AVANT
Mauve (mauve clignotant indique
qu’aucun réseau n’est disponible)
36
RÉACTION DU VOLUME
Le volume sur l’appareil/télécommande
et le volume de l’enceinte sont synchro-
nisés et se commandent l’un l’autre.
Verte
Bleue
maximum, l’amplificateur dans l’appareil externe est suscep
tible d’introduire une distorsion élevée dans le signal audio
qui, à son tour, sera amplifiée davantage par l’enceinte.
Trouvez un volume qui se situe entre 50 et 75 % du volume
maximal de l’appareil et utilisez la commande de volume
de votre enceinte pour régler le volume final de lecture.
Le volume sur l’appareil/télécommande
et le volume de l’enceinte sont com-
mandés séparément.*
-

commandes
COMMANDES DU PANNEAU AVANT
STANDBY/MUTE (VEILLE/SOURDINE) : ce bouton
met l’enceinte en sourdine et bascule entre le mode
allumé (On) et veille. Pour mettre en sourdine, appuyez une
fois sur le bouton (la DEL avant clignotera en rouge). Pour
passer en mode veille, appuyez sur le bouton pendant deux
secondes (la DEL passera au rouge). Si aucun signal audio
n’est détecté pendant dix minutes, l’enceinte passera automa
tiquement en mode veille de réseau (le Wi-Fi et Ethernet
restent actifs).Lorsque l’enceinte est en mode veille, appuyez
une fois sur le bouton pour en sortir. Un nouveau signal audio
réveillera automatiquement l’enceinte. Veuillez noter que si un
câble est branché dans la connexion de l’entrée auxiliaire
(avec ou sans contenu audio actif), l’enceinte ne passera pas
automatiquement en mode veille et ne restera pas en mode
veille, même si ce mode est activé manuellement (fig. 2).
INPUT (ENTRÉE) : navigue dans les entrées
audio. L’ordre des entrées est : Wireless/Ethernet
Fig. 2 Commandes du panneau avant
-
(Sans fil/Ethernet) (mauve) > Auxiliary (Auxiliaire) (verte) >
Bluetooth (bleue) (fig. 2).
DEL AVANT : la DEL située sur la partie avant de
l’enceinte indique les renseignements suivants (fig. 2) :
• Aucune couleur : l’enceinte n’est pas sous tension (ou
met à jour le micrologiciel).
• Rouge : l’enceinte est en mode veille.
• Rouge clignotante : l’enceinte est en mode sourdine.
• Mauve : l’entrée sans fil/Ethernet est active.
• Mauve clignotante : l’entrée sans fil/Ethernet est
active (aucun réseau connecté).
• Verte : l’entrée auxiliaire est active.
• Bleue : l’entrée Bluetooth est active.
VOL –/VOL +: règle le volume (fig. 2).
Pour obtenir de plus amples renseignements, consultez la section « RÉACTION DU VOLUME
SELON L’ENTRÉE ».
VEILLE/SOURDINE ENTRÉE VOL– VOL+DEL AVANT
37

TÉLÉCOMMANDE
STANDBY (VEILLE) : ce bouton permet de basculer entre
le mode allumé (On) et veille. Si aucun signal audio n’est
détecté pendant dix minutes, l’enceinte passera automatique
ment en mode veille de réseau (le Wi-Fi et Ethernet restent
actifs). Lorsque l’enceinte est en mode veille, appuyez une
fois sur le bouton pour en sortir. Un nouveau signal audio
réveillera automatiquement l’enceinte. Veuillez noter que si un
câble est branché dans la connexion de l’entrée auxiliaire
(avec ou sans contenu audio actif), l’enceinte ne passera pas
automatiquement en mode veille et ne restera pas en mode
veille, même si ce mode est activé manuellement.
MUTE (SOURDINE) : met le volume en sourdine. Appuyez
sur ce bouton pendant une seconde pour restaurer le
réglage du volume précédent. De plus, vous pouvez désactiver la sourdine en appuyant sur l’un des boutons du
volume. Lorsque la fonction sourdine est activée, la DEL
avant clignotera en rouge.
PLAY/PAUSE (LECTURE/PAUSE) : Bascule entre les
modes lecture ou pause. Ce bouton fonctionne lorsqu’une
source est connectée par l’entremise d’AirPlay ou Play-Fi.
BASS MODE – NORMAL (MODE GRAVES – NORMAL) :
niveaux de graves normaux.
BASS MODE – BASS+: (MODE GRAVES – GRAVES+:) :
augmente la sortie des graves.
INPUT – WIRELESS/ETHERNET (ENTRÉE – SANS FIL/
ETHERNET) : règle l’entrée actuelle pour recevoir un sig-
nal audio du réseau local par l’entremise d’une connexion
Wi-Fi ou Ethernet (avec AirPlay ou Play-Fi
MD
).
INPUT – AUXILIARY (ENTRÉE – AUXILIAIRE) : règle
l’entrée actuelle pour recevoir un signal audio de l’entrée
auxiliaire par l’entremise de la connexion mini Toslink
optique numérique ou d’une prise stéréo analogique de
3,5 mm de style casque d’écoute.
VOL+/VOL– : règle le niveau du volume. Voir la section «
COMMANDE DU VOLUME (PAR ENTRÉE) ».
Fig. 3
Télécommande
38
INPUT – BLUETOOTH (ENTRÉE – BLUETOOTH) : règle
l’entrée actuelle pour recevoir un signal audio d’un appa-
reil avec capacité Bluetooth branché sans fil à l’enceinte.
Pour activer le Bluetooth, appuyez sur le bouton d’entrée
pour faire passer la source au Bluetooth. Pour éteindre le
Bluetooth, choisissez une autre entrée que Bluetooth.
CHANGER LA PILE DE LA TÉLÉCOMMANDE
La télécommande de votre enceinte fonctionne avec deux
piles de type AAA. Vous pouvez accéder au compartiment à piles en utilisant un tournevis Phillips pour enlever
la vis située au bas de la télécommande.
Mise en garde! Risque d’explosion
si la pile n’est pas bien remplacée.
Remplacez-la uniquement avec le
même type de pile ou un type équivalent.

fonctIons de commande selon l’entrée
Selon l’entrée choisie sur votre enceinte, la télécommande commandera les fonctions différemment.
MD
Play-Fi
Entrée de
l’enceinte
Couleur DEL avant
Standby (veille)
Sourdine
Volume –/+
Lecture/pause
Mode graves :
Mode graves :
Graves+
Entrée : sans fil/
Entrée : auxiliaire
Entrée : Bluetooth
*Les appareils connectés par auxiliaire et Bluetooth auront
souvent leur propre commande du volume qui fonctionne
séparément du volume de l’enceinte. Si vous branchez un
appareil qui vous permet de régler le volume séparément,
nous vous recommandons de ne pas régler au maximum
le volume sur cet appareil. Lorsque le volume est réglé au
Sans fil/Ethernet Sans fil/Ethernet Sans fil/Ethernet Auxiliaire Bluetooth
Mauve Mauve Mauve Verte Bleue
√ √ √ √ √
√ √ √ √ √
√ √ √ √* √*
√ √ √
normal
Ethernet
√ √ √ √ √
√ √ √ √ √
√ √ √ √ √
√ √ √ √ √
√ √ √ √ √
AirPlay iTunes
Numérique ou
analogique Bluetooth
maximum, l’amplificateur dans l’appareil externe est suscep
tible d’introduire une distorsion élevée dans le signal audio
qui, à son tour, sera amplifiée davantage par l’enceinte.
Trouvez un volume qui se situe entre 50 et 75 % du volume
maximal de l’appareil et utilisez la commande de volume
de votre enceinte pour régler le volume final de lecture.
-
lecture de l’audIo à l’aIde du Play‑fI
CHOIX DE L’ENTRÉE AUTOMATIQUE
Votre enceinte peut passer automatiquement à l’entrée lecture en continu si elle détecte qu’une nouvelle connexion
AirPlay a été établie avec l’enceinte.
LECTURE – À PARTIR DE L’APPLICATION DTS
REMARQUE : Les prochaines mises à jour de l’application
DTS Play-Fi pourraient changer les fonctions.
1.
Lancez l’application DTS Play-Fi sur votre appareil mobile
ou votre PC (située dans la barre d’état système).
2. Utilisateurs d’un appareil AndroidTM et iOS : Dans
l’application Play-Fi, choisissez votre source de
musique. Vous pouvez choisir dans votre bibliothèque
de musique personnelle, dans la radio Internet ou dans
certains services de musique en ligne. Utilisateurs PC :
Tout contenu audio de votre ordinateur peut être lu en
continu avec Play-Fi.
39

3.
Si plus d’une enceinte Play-FiMD est connectée à votre
réseau, on vous invitera à choisir l’enceinte Play-Fi vers
laquelle vous souhaitez envoyer la musique en continu.
COMMANDE D’ENCEINTES MULTIPLES
Si plus d’une enceinte Play-Fi est connectée à votre réseau,
vous pouvez envoyer le même audio en continu à plusieurs
enceintes simultanément.
1.
Utilisateurs d’un appareil Android et iOS : Dans
l’application, appuyez sur le logo Play-Fi dans le coin inférieur
de l’application. Utilisateurs PC : ouvrez le programme
Play-Fi à l’aide de l’icône dans votre barre d’état système.
2. Choisissez des appareils additionnels pour lire l’audio.
Utilisateurs PC : Une version gratuite de l’application
Windows pourrait ne pas vous permettre de lire en
continu avec plusieurs enceintes. Une version à niveau
de l’application DTS Play-Fi, avec cette capacité, peut
être achetée sur le site Web de DTS.
REMARQUE : Il est posible de synchroniser huit enceintes
Play-Fi pour lire le même contenu audio en même temps.
Nous recommandons jusqu’à 32 enceintes Play-Fi sur un
même réseau pour le meilleur résultat, mais la seule limite
au nombre d’appareils connectés est e nombre que votre
routeur peut prendre en charge.
CONSEIL! Enceintes principales et secondaires
Lorsque vous envoyez du contenu audio en continu vers
plusieurs appareils, on vous demande de les attribuer à deux
catégories : appareil principal et secondaire. Le module
DTS Play-Fi nécessite de choisir un appareil principal. Cela
maximise la synchronisation entre les appareils multiples qui
lisent le même contenu en continu de façon simultanée.
Choisissez l’appareil DTS Play-Fi avec le signal le plus fort comme
appareil principal. Les appareils secondaires se connectent à
votre appareil principal, alors si vous désactivez votre appareil
principal, vous devrez choisir un nouvel appareil principal avant
que l’audio ne recommence sur vos appareils secondaires.
CARACTÉRISTIQUES PLAY-FI SUPPLÉMENTAIRES
De nouvelles versions de l’application Play-Fi ajouteront
des caractéristiques qui ne sont pas mentionnées dans
le présent manuel. Veuillez consulter l’application et la
documentation connexe pour obtenir les détails des nouvelles
caractéristiques améliorées comme l’envoi de contenu audio
différent à plusieurs zones et le groupage de deux enceintes
discrètes pour la lecture en stéréo (gauche/droite).
lecture de l’audIo à l’aIde du aIrPlay
CHOIX DE L’ENTRÉE AUTOMATIQUE
Votre enceinte peut passer automatiquement à l’entrée lecture en continu si elle détecte qu’une nouvelle connexion
AirPlay a été établie avec l’enceinte.
LECTURE – À PARTIR D’UN APPAREIL APPLE IOS
1. Ouvrez votre application de musique.
2. Appuyez sur l’icône AirPlay et choisissez votre
enceinte dans la liste.
3. Lire la musique
40
LECTURE – À PARTIR D’ITUNES SUR UN MAC
OU UN PC (ORDINATEUR PERSONNEL)
1. Lancez iTunes (version 10 ou ultérieure).
2. Appuyez sur l’icône AirPlay (habituellement située
dans le coin supérieur gauche de la fenêtre iTunes)
et choisissez votre enceinte dans la liste. Vous pouvez choisir plusieurs enceintes si vous avez plus d’une
enceinte dans votre réseau.
3. Lire la musique

COMMANDER LA LECTURE AVEC ITUNES
Pour commander la lecture (lecture/pause/volume) à partir de votre enceinte ou de la télécommande, suivez les
étapes suivantes :
1. Sur votre ordinateur, lancez iTunes (version 10.2.2 ou
ultérieure).
2. Ouvrez « Préférences » et choisissez « Appareils ».
3. Cochez la case « Autoriser la commande audio
d’iTunes à partir de haut-parleurs distants » et cliquez
sur OK.
functIonnement de sPotIfy connect
Spotify Connect ne fonctionne qu’avec Spotify Premium
(voir détails au verso).
1. Ajoutez votre nouvel appareil au même réseau wifi que votre téléphone, tablette ou PC (pour plis
d’informations, consultez les instructions d’utilisation du
produit).
2. Ouvrez l’appli Spotify sur votre téléphone, tablette ou
PC, puis écoutez le tire de votre choix.
3. Si vous utilisez l’appli sur un téléphone, appuyez
sur l’image du titre dans le coin inférieur gauche de
l’écran. Sur tablette et PC, passez à l’étape 4.
4. Appuyez sur l’icône Connect
5. Choisissez votre appareil dans la liste. S’il n’y figure
pas, il vous suffit de vérifier qu’il est bien connecté
au même réseau wi-fi que celui de votre téléphone,
tablette ou PC.
Terminé ! Bonne écoute !
Licences
Le logiciel Spotify est l’object de licences de tiers trouvés
ici:
www.spotify.com/connect/third-party-licenses.
confIguratIon de dts Play‑fImd et aPPle aIrPlay
EXIGENCES DU RÉSEAU
Vous devez avoir ce qui suit pour connecter votre produit
sans fil à votre réseau :
• Un routeur sans fil.
• Une connexion Internet haute vitesse pour une lecture
fiable des services de musique en ligne.
• Ayez votre mot de passe de réseau prêt avant de
connecter le produit sans fil à votre réseau.
CONSEIL! Si la connexion sans fil est faible ou indisponible,
effectuez une connexion à votre routeur avec un câble
Ethernet. CONSEIL! Votre produit sans fil communique avec
les réseaux sans fil qui prennent en charge le 802.11g/n.
Pour obtenir un meilleur rendement, un réseau qui prend en
charge la technologie sans fil 802.11n est recommandé.
Un réseau qui supporte la technologie 802.11b peut être
utilisé, mais il enverra le son en continu effectivement à un
seul appareil doté du DTS Play-FiMD. Votre produit sans fil
communique par une bande sans fil 2.4 GHz; toutefois, elle
peut être lente dans des endroits comme un appartement où
de nombreux autres routeurs sont en fonction à proximité.
Ainsi, produit sans fil est capable de sauter sur une bande 5
GHz sur des routeurs sans fil à double bande.
APPLICATION DTS PLAY-FIMD - EXIGENCES
• Un appareil Android qui utilise Android 2.2 ou une
version ultérieure.
41

• Un appareil iOS qui utilise iOS 6.0 ou une version
ultérieure.
• Un PC Windows qui utilise Windows 7, 8 (32 et 64
bits), ou une version ultérieure.
• Deux clignotements et pause : Mode WPS (Wi-Fi
Protected Setup).
• Unie : connecté à un routeur sans fil.
• Éteinte : connecté à un routeur par Ethernet.
APPLE AIRPLAY – EXIGENCES
• Un appareil iOS qui utilise iOS 4.3.3 ou une version
ultérieure.
• Mac avec OS X Mountain Lion, ou une version
ultérieure.
• Mac ou PC avec iTunes 10.2.2, ou une version
ultérieure.
TÉLÉCHARGEMENT DE L’APPLICATION DTS PLAY-FI
• Utilisateurs d’un appareil Android : Téléchargez
l’application DTS Play-fi gratuite sur Google Play
ou Amazon App Store
MD
.
• Utilisateurs d’un appareil iOS : Téléc harg ez
l’application DTS Play-Fi gratuite sur Apple App
Store.
• Utilisateurs PC : Téléchargez le programme DTS
Play-Fi gratuit sur https://play-fi.com/apps/windows
LUMIÈRE DE STATUT Wi-Fi
La lumière de statut Wi-Fi vous indique ce que le produit
Wi-Fi fait (fig. 1 & 2).
• Clignotement rapide : chargement.
• Clignotement : connexion à un routeur sans fil.
• Pulsation lente : mode de configuration du point
d’accès.
ALLUMER ET FERMER LE WI-FI
Après avoir allumé l’enceinte, le statut par défaut du Wi-Fi
est allumé. Appuyez et maintenez enfoncés les boutons
Standby/Mute (veille/sourdine) et volume pendant 3
secondes pour éteindre le Wi-Fi. Appuyez et maintenez
guIde d’utIlIsatIon de la lecture en contInu
APPAREIL APP CONTENU SOUTIEN MULTI-PIÈCES
• Jusqu’à 8
• Plusieurs utilisateurs simultanés
• Les enceintes peuvent être zonées
• Un à un
• Jusqu’à 8
• Plusieurs utilisateurs simultanés
• Les enceintes peuvent être zonées
• Jusqu’à 8
• Plusieurs utilisateurs simultanés
• Les enceintes peuvent être zonées
Apple iOS
Android
Mac PC
Windows PC
DTS Play-Fi
Apple AirPlay
DTS Play-Fi
• Services de musique choisis
•
Musique iTunes stockée sur l’appareil
• Contenu audio iTunes
•
Toutes les applications de musique iOS
• Services de musique choisis
•
Musique iTunes stockée sur l’appareil
Apple AirPlay • Tout le contenu audio • Jusqu’à 6
DTS Play-Fi • Tout le contenu audio
Apple AirPlay • Contenu audio iTunes • Jusqu’à 6
MD
MD
42

enfoncés les boutons Standby/Mute (veille/sourdine) et
volume pendant 3 secondes pour rallumer le Wi-Fi.
CONNEXION À UN RÉSEAU SANS FIL : CONFIGURATION DU POINT D’ACCÈS
La configuration du point d’accès fait en sorte que le
produit sans fil MartinLogan se comporte comme un
routeur sans fil. À l’aide de votre appareil mobile ou d’un
PC doté de la fonction Wi-Fi, connectez directement votre
produit sans fil par Wi-Fi; choisissez votre réseau sans fil
local, puis entrez le mot de passe du réseau.
c)
Touchez le bouton « Setup » (configuration) à l’écran.
d)
Entrez le mot de passe de votre réseau sans fil;
l’application connectera votre appareil au réseau.
Vous remarquerez que la lumière de statut Wi-Fi
passera du clignotement à une couleur unie. Cela
peut prendre jusqu’à une minute. Si après une minute
le bouton continue de clignoter rapidement, la
configuration a échoué et vous devez recommencer.
e) Votre produit sans fil est maintenant connecté à
votre réseau sans fil. Reconnectez votre appareil
mobile à votre réseau sans fil. Vous pouvez
renommer votre appareil à l’aide de l’application.
1.
Pour obtenir des conditions de configuration optimales,
placez le produit sans fil à côté de votre routeur sans
fil. L’appareil peut être déplacé à son emplacement
final après la configuration Wi-Fi.
2.
Branchez le produit sans fil et appuyez sur le bouton
de mise sous tension (POWER). La lumière de statut
Wi-Fi commencera à clignoter rapidement pendant 20
secondes pendant que le produit sans fil démarre. Si votre
produit sans fil n’est pas configuré pour se connecter à
votre réseau, le bouton continuera à clignoter. Si c’est la
première fois que vous branchez votre nouveau produit
sans fil, la lumière de statut Wi-Fi commencera à pulser
lentement. Si le produit sans fil est déjà configuré pour se
connecter à un réseau Wi-Fi, le bouton sera de couleur
unie (connecté) ou clignotera rapidement (pas connecté).
3.
Une fois que la lumière de statut Wi-Fi commence à pulser
lentement, votre produit sans fil est en mode point d’accès et prêt
à se connecter à votre réseau sans fil. REMARQUE : Si la lumière
de statut Wi-Fi ne pulse pas lentement, appuyez et maintenez
enfoncé le bouton de configuration Wi-Fi pendant 8 secondes.
Vous entendez deux tonalités, une à 3 secondes et l’autre à
8 secondes. Après 20 secondes, la lumière de statut Wi-Fi
commencera à pulser lentement pour indiquer que le mode point
d’accès est prêt. En tout temps, vous pouvez appuyer à nouveau
sur le bouton pour annuler le mode de configuration.
Utilisateurs d’un appareil Android :
a) Lancez l’application DTS Play-Fi
MD
.
b) L’application trouvera automatiquement votre
appareil et vous invitera à faire la configuration.
Utilisateurs d’un appareil iOS :
Veuillez noter : lorsque vous utilisez un appareil iOS,
votre produit sans fil peut lire l’audio en continu à
l’aide d’Apple AirPlay ou de DTS Play-Fi.
a) Assurez-vous que le Wi-Fi de l’appareil iOS est
allumé et connecté à votre réseau Wi-Fi.
b) Ouvrez l’application « Paramètres » (Settings) de
votre appareil iOS et allez dans le menu « Wi-Fi
». Votre produit sans fil apparaîtra sous l’en-tête «
configurer une nouvelle enceinte AirPlay » (set up
new AirPlay speaker...).
c) Choisissez le produit sans fil dans la liste. Son
nom contiendra « Play-Fi ».
d) Une fois que vous serez dans le menu «
Configuration AirPlay », on vous demandera de
choisir votre réseau Wi-Fi et de nommer votre
enceinte (vous n’aurez pas besoin d’entrer le mot
de passe de votre réseau).
e)
Une fois votre appareil connecté, vous remarquerez
que la lumière de statut Wi-Fi sur votre produit sans
fil passera du clignotement à une couleur unie. Cela
peut prendre jusqu’à une minute. Si après une minute
le bouton continue de clignoter rapidement, la
configuration a échoué et vous devez recommencer.
f) Votre produit sans fil est maintenant connecté à
votre réseau sans fil. Reconnectez votre appareil
iOS à votre réseau sans fil.
Utilisateurs PC :
a) Lancez l’application DTS Play-Fi.
43

b)
L’application trouvera automatiquement votre appareil
et vous invitera à faire la configuration. Si l’application
ne vous invite pas à configurer un nouvel appareil,
dans l’application, aller à l’écran des réglages et
cliquez sur ‘Setup Play-Fi Device’ (Configurer un
appareil Play-Fi). Suivez les instructions à l’écran.
c)
Cliquez sur le bouton « Setup » (configuration) à l’écran.
d)
Choisissez la ou les enceintes que vous souhaitez configurer.
e)
Entrez le mot de passe de votre réseau sans fil;
l’application connectera votre appareil au réseau.
Vous remarquerez que la lumière de statut Wi-Fi
passera du clignotement à une couleur unie. Cela
peut prendre jusqu’à une minute. Si après une minute
le bouton continue de clignoter rapidement, la
configuration a échoué et vous devez recommencer.
f) Votre produit sans fil est maintenant connecté
à votre réseau sans fil. Reconnectez votre PC à
votre réseau sans fil. Vous pouvez renommer votre
appareil à l’aide de l’application.
CONNEXION À UN RÉSEAU SANS FIL : WI-FI
PROTECTED SETUP (WPS)
Le Wi-Fi Protected Setup (WPS) est une caractéristique qui
se retrouve sur la plupart des routeurs sans fil et qui permet à
votre produit sans fil de se connecter de façon sécuritaire et
automatique sans entrer de mot de passe. La fonction WPS
n’est pas une caractéristique standard sur tous les routeurs,
et un seul appareil sans fil peut être configuré à la fois.
Consultez le manuel de l’utilisateur de votre routeur pour
voir s’il est doté du WPS, ou cherchez un bouton sur votre
routeur sur lequel le logo WPS (
) est apposé. Si votre
routeur ne comporte pas la fonction WPS, alors utilisez la
configuration du point d’accès sans fil.
1. Pour obtenir des conditions de configuration
optimales, placez le produit sans fil à côté de votre
routeur sans fil. L’appareil peut être déplacé à son
emplacement final après la configuration Wi-Fi.
2. Branchez le produit sans fil et appuyez sur le bouton
de mise sous tension (POWER). La lumière de statut
Wi-Fi commencera à clignoter rapidement pendant
20 secondes pendant que le produit sans fil démarre.
Si votre produit sans fil n’est pas configuré pour se
connecter à votre réseau, le bouton continuera à
clignoter. Si c’est la première fois que vous branchez
votre nouveau produit sans fil, la lumière de statut WiFi commencera à pulser lentement. Si le produit sans
fil est déjà configuré pour se connecter à un réseau
Wi-Fi, le bouton sera de couleur unie (connecté) ou
clignotera rapidement (pas connecté).
3. Pour lancer la fonction Wi-Fi Protected Setup
(WPS), appuyez et maintenez enfoncé le bouton de
configuration Wi-Fi situé sur la partie arrière de votre
produit sans fil pendant 3 secondes ou jusqu’à ce
que vous entendiez une tonalité. La lumière de statut
Wi-Fi clignotera deux fois en intervalles continus pour
indiquer le mode WPS. Maintenant, appuyez sur le
bouton WPS (
) sur votre routeur. Si vous ne trouvez
pas de bouton WPS sur votre routeur, consultez le
manuel de l’utilisateur de votre routeur.
4. Une fois que la lumière de statut Wi-Fi passe en
mode uni (sans clignotement), cela indique que votre
produit sans fil est connecté à votre réseau sans fil.
Si après une minute le bouton continue de clignoter
rapidement, la configuration a échoué et vous devez
recommencer.
5. Connectez votre appareil mobile ou votre PC au même
réseau que votre produit sans fil. Lancez l’application
DTS Play-Fi
MD
. Lors du lancement, l’application
détectera automatiquement votre produit sans fil et
vous invitera à le nommer.
CONNEXION À UN RÉSEAU CÂBLÉ :
1. À l’aide d’un câble Ethernet, branchez votre produit
sans fil au routeur.
2. Branchez le produit sans fil et appuyez sur le bouton
de mise sous tension (POWER). La lumière de statut
Wi-Fi commencera à clignoter rapidement pendant
20 secondes pendant que le produit sans fil démarre.
3. La lumière de statut Wi-Fi s’éteindra lorsque le produit
sans fil sera connecté par Ethernet.
4. Connectez votre appareil mobile ou vot re PC au même
réseau que votre produit sans fil. Lancez l’application
44

DTS Play-Fi. Lors du lancement, l’application détectera
automatiquement votre produit sans fil et vous invitera
à le nommer.
CONFIGURATION APPLE AIRPLAY (SANS
APPLICATION DTS
Si vous ne souhaitez pas installer et utiliser l’application DTS
®
Play-Fi
, vous pouvez quand même configurer le produit sans
fil pour qu’il fonctionne avec iTunes et AirPlay sur votre Mac
ou votre PC Windows à l’aide de la procédure suivante.
Connexion alternative pour Mac et PC Windows :
1. Pour éviter une configuration sans fil avec délai,
placez votre produit sans fil à proximité de votre
routeur pendant la configuration sans fil.
2. Branchez le produit sans fil et appuyez sur le bouton
de mise sous tension (POWER). La lumière de statut
Wi-Fi commencera à clignoter rapidement pendant
20 secondes pendant que le produit sans fil démarre.
Si votre produit sans fil n’est pas configuré pour se
connecter à votre réseau, le bouton continuera à
clignoter. Si c’est la première fois que vous branchez
votre nouveau produit sans fil, la lumière de statut WiFi commencera à pulser lentement. Si le produit sans
fil est déjà configuré pour se connecter à un réseau
Wi-Fi, le bouton sera de couleur unie (connecté) ou
clignotera rapidement (pas connecté).
3. Une fois que la lumière de statut Wi-Fi commence à
pulser lentement, votre produit sans fil est en mode
point d’accès et prêt à se connecter à votre réseau
sans fil. REMARQUE : Si la lumière de statut Wi-Fi ne
pulse pas lentement, appuyez et maintenez enfoncé le
®
)
bouton de configuration Wi-Fi pendant 8 secondes.
Vous entendez deux tonalités, une à 3 secondes et
l’autre à 8 secondes. Après 20 secondes, la lumière
de statut Wi-Fi commencera à pulser lentement pour
indiquer que le mode point d’accès est prêt. En tout
temps, vous pouvez appuyer à nouveau sur le bouton
pour annuler le mode de configuration.
4. Assurez-vous que le Wi-Fi est activé sur votre
ordinateur. Allez dans la configuration Wi-Fi de votre
ordinateur. Choisissez le réseau Wi-Fi dont le nom
contient « Play-Fi ».
5. Une fois le produit sans fil choisi comme réseau Wi-Fi,
ouvrez votre naviga teur et entrez http://192.168.0.1/
index.html dans la barre d’adresse. Vous verrez une
page Web de votre produit sans fil.
6. Cliquez sur « Set Up » (configuration). Une liste des
réseaux sans fil s’affichera. Cliquez sur le réseau sans
fil auquel vous souhaitez vous connecter.
7. Entrez le mot de passe de votre réseau sans fil et
cliquez sur « Suivant ».
8. Entrez un nom pour votre produit sans fil, puis cliquez
sur « Next » (suivant) pour connecter votre produit
sans fil à votre réseau.
9. Votre produit sans fil tentera de se connecter à votre
réseau. Une fois que la lumière de statut Wi-Fi passe
en mode uni (sans clignotement), cela indique que
votre produit sans fil est connecté à votre réseau
sans fil. Si le bouton sans fil clignote rapidement, la
configuration a échoué et vous devez recommencer.
10. Connectez votre Mac ou votre PC au même réseau
que votre produit sans fil. Ouvrez l’application de
musique, appuyez sur l’icône AirPlay et choisissez
votre enceinte dans la liste.
connexIon Bluetooth
1
Réglez l’enceinte en mode Bluetooth. Utilisez la télécommande de l’enceinte pour sélectionner Bluetooth ou
appuyez plusieurs fois sur le bouton Input (Entrée) sur le
devant de l’enceinte jusqu’à ce que la DEL passe au bleu.
2 Synchronisez l’enceinte avec votre appareil numéri-
que ou votre ordinateur. Suivez les instructions
fournies avec votre appareil/ordinateur.
Dans votre application de musique, vous pourriez devoir
3
sélectionner l’enceinte en tant qu’appareil de lecture.
4 Vous êtes maintenant prêt à lire de la musique en con-
tinu avec votre enceinte.
45

mIses à jour et redémarrage
MISE À JOUR DU DTS PLAY-FI
Si l’application DTS Play-Fi sur votre appareil mobile ou
votre PC nécessite une mise à jour, vous serez informé
qu’une mise à jour est disponible et guidé pendant le
processus de mise à jour.
MISE À JOUR DU MODULE DTS PLAY-FI
Le module DTS Play-Fi dans votre enceinte aura parfois
besoin d’une mise à jour. Si une mise à jour est nécessaire,
l’application DTS Play-Fi vous informera et vous guidera
pendant le processus de mise à jour.
MISE À JOUR DU MICROLOGICIEL MARTINLOGAN
Le produit sans fil aura parfois besoin de mises à jour
du micrologiciel. Consultez www.martinlogan.com pour
obtenir les dernières mises à jour.
MD
retIrer la grIlle avant
Pour enlever la grille avant de l’enceinte, utilisez un doigt
pour appliquer une pression ferme sur l’un des coins de
la grille.
REDÉMARRAGE
Pendant moins de 3 secondes, insérez une tige ou un
autre petit objet dans le petit trou qui se trouve au-dessus de l’étiquette « Reset » (réinitialisation) à l’arrière de
l’enceinte. Une seule tonalité retentira. Cela fera redémarrer votre produit sans fil. Les paramètres du réseau ne
seront pas effacés.
RÉINITIALISATION SELON LES PARAMÈTRES D’USINE
Pendant 3 secondes ou plus, insérez une tige ou un
autre petit objet dans le petit trou qui se trouve au-dessus de l’étiquette « Reset » (réinitialisation) à l’arrière de
l’enceinte. Deux tonalités retentiront. Cela réinitialisera
votre produit sans fil aux paramètres de l’usine et effacera
la configuration réseau.
Fig. 4
communIquer avec le servIce à la clIentèle
Le service à la clientèle de MartinLogan est disponible
du lundi au vendredi, de 8 h à 17 h (heure normale du
Centre) en composant le 785-749-0133 ou en envoyant
un courriel à l’adresse service@martinlogan.com.
renseIgnements généraux
RENSEIGNEMENTS SUR LA GARANTIE
Votre produit sans fil est vendu avec une garantie limitée automatique de 90 jours. Vous avez la possibilité
d’obtenir, sans frais supplémentaires, une garantie limitée de deux (2) ans. Pour obtenir la garantie limitée de
46
deux ans, vous devez remplir le certificat d’enregistrement
dans les 30 jours qui suivent la date d’achat. Pour
plus de commodité, MartinLogan permet également
l’enregistrement en ligne à la garantie à l’adresse www.
martinlogan.com. MartinLogan pourrait ne pas honorer les

réclamations de service au titre de la garantie à moins
d’avoir une carte d’enregistrement à la garantie dûment
remplie dans ses dossiers! Veuillez conserver votre reçu
d’achat d’origine. Une copie de votre reçu pourrait être
exigée si le service est nécessaire.
NUMÉRO DE SÉRIE
Le numéro de série est situé derrière l’enceinte, près du
panneau de connexion. Le numéro de série est également
indiqué sur la boîte de l’appareil.
SERVICE
Si vous utilisez votre produit MartinLogan dans un pays
autre que celui où il a été acheté à l’origine, nous vous
demandons de noter ce qui suit :
foIre aux questIons
1 Le distributeur MartinLogan désigné pour tout pays donné
est responsable du service au titre de la garantie uniquement
pour les appareils distribués par ce pays ou par l’entremise
de celui-ci conformément à sa garantie applicable.
2
Si un produit MartinLogan doit faire l’objet de réparations (service) dans un pays autre que celui où il a été acheté
à l’origine, l’utilisateur final peut faire réparer le produit chez
le distributeur MartinLogan le plus proche, sous réserve des
politiques de service locales de ce distributeur, mais tous
les coûts des réparations (pièces, main-d’œuvre et transport)
seront assumés par le propriétaire du produit MartinLogan.
Si, après avoir possédé l’enceinte pendant six mois, vous
déménagez dans un pays autre que celui où vous avez
acheté l’enceinte, votre garantie peut être transférable.
Communiquez avec MartinLogan pour obtenir tous les détails.
Comment puis-je connecter le produit sans fil
à ma télévision, ou à mon lecteur Blu-Ray/
DVD/CD?
Si votre télévision a des sorties analogiques, elles peuvent
être utilisées à la place.
Comment puis-je nettoyer mon enceinte?
Utilisez un linge propre (comme un linge à microfibres) ou
une brosse molle pour enlever la poussière des enceintes.
Ne vaporisez pas d’agent nettoyant sur ou à proximité
des haut-parleurs.
Puis-je utiliser d’autres câbles que ceux fournis avec l’enceinte?
Les câbles inclus avec l’enceinte sont fournis pour vous
permettre de commencer. Vous pourriez juger utile
d’augmenter le rendement du système avec des câbles
supplémentaires ou de remplacer les câbles inclus par des
câbles d’une longueur différente.
Pouvez-vous me proposer une liste d’appareils
électroniques et de câbles qui conviennent
parfaitement à cette enceinte?
Nous n’avons pas de produits préférés; nous utilisons les
appareils électroniques et les câbles de façon assez inter
changeable. Nous vous proposons d’écouter plusieurs
marques et surtout, de faire confiance à votre ouïe. Les rev
endeurs sont toujours la meilleure source de renseignements
lorsque vous achetez de l’équipement audio supplémentaire.
Peut-il y avoir une interaction entre mes enceintes et la télévision dans mon système A/V?
Oui, mais seulement avec les télévisions CRT. Cette enceinte n’a pas de protection magnétique et doit être gardée à au moins deux pieds d’une télévision CRT. Les télévisions ACL et plasma ne sont pas touchées.
Comment puis-je enlever le tissu de grille de l’enceinte?
Utilisez un doigt pour appliquer une pression ferme sur l’un
des coins de la grille.
-
-
47

déPannage
J’ai de la difficulté à utiliser l’application Play-FiMD.
• Pour obtenir de plus amples renseignements sur
l’application DTS Play-Fi, veuillez consulter : https://
play-fi.com/faq
Le produit sans fil ne s’allume pas.
• Vérifiez que le cordon d’alimentation CA du produit
sans fil est bien fixé dans l’entrée AC Power In et bien
branché dans une prise CA qui fonctionne.
La lumière de statut Wi-Fi ne s’allume pas.
• Lors d’une connexion à un réseau avec un câble
Ethernet, cette lumière s’éteint.
Je suis incapable de connecter mon produit
sans fil à mon réseau.
• Vérifiez que votre réseau sans fil fonctionne.
• Le signal sans fil de votre routeur peut être faible ou
votre produit sans fil peut être hors de portée de votre
réseau Wi-Fi. Rapprochez le produit sans fil du routeur ou utilisez une connexion Ethernet.
• Avant la connexion à votre réseau, vérifiez que
le bouton Input (entrée) de votre produit sans fil est
allumé en mauve. Cela indique le mode lecture en
continu réseau. Appuyez sur le bouton Input pour
passer en mode lecture en continu réseau (mauve).
•
Redémarrez votre produit sans fil. Éteignez le produit sans
fil et rallumez-le à l’aide du bouton de mise sous tension
(Power) situé à l’arrière de l’enceinte. Ce redémarrage
éteindra et allumera l’alimentation électrique, et forcera le
produit sans fil à se reconnecter à votre réseau.
• Réinitialisez le produit sans fil aux paramètres de
l’usine. Effectuez une réinitialisation aux paramètres
de l’usine en insérant une tige ou un autre petit objet
dans le petit trou qui se trouve au-dessus de l’étiquette
« Reset » (réinitialisation) à l’arrière de l’enceinte. Une
fois terminé, votre produit sans fil sera réinitialisé aux
paramètres de l’usine et effacera la configuration
réseau. Après une réinitialisation, il est impossible de
récupérer les paramètres configurés par l’utilisateur.
L’application Play-Fi ne trouve pas mon produit sans fil.
•
Si vous essayez de configurer votre produit sans fil, vérifiez que le produit sans fil est allumé et en mode point
d’accès (la lumière de statut Wi-Fi pulse lentement).
Si la lumière de statut Wi-Fi ne pulse pas lentement,
appuyez et maintenez enfoncé le bouton de configura
tion Wi-Fi pendant 8 secondes. Vous entendez deux
tonalités, une à 3 secondes et l’autre à 8 secondes.
• Vérifiez que vous êtes dans l’intervalle de distance
recommandé pour votre routeur sans fil.
•
Vérifiez que le Wi-Fi est activé sur votre appareil mobile
ou PC ou qu’il est connecté autrement au réseau.
• Vérifiez qu’aucune autre application pouvant nuire à
la connectivité sans fil de à votre réseau ne fonctionne
sur votre appareil.
• Redémarrez votre téléphone, tablette ou PC.
•
Si vous ne trouvez toujours pas le produit sans fil sur
votre réseau et que vous êtes dans un bureau, vérifiez
auprès de l’administrateur du réseau si des autorisa
tions spéciales sont activées et empêchent les appareils
sans fil externes de communiquer avec le réseau.
•
Si le produit sans fil n’est toujours pas trouvé, désinstallez, téléchargez à nouveau et réinstallez l’application
DTS Play-Fi sur votre appareil mobile ou votre PC.
•
Redémarrez votre produit sans fil. Éteignez le produit
sans fil et rallumez-le à l’aide du bouton de mise sous
tension (Power) situé à l’arrière de l’enceinte. Ce redé
marrage éteindra et allumera l’alimentation électrique, et
forcera le produit sans fil à se reconnecter à votre réseau.
• Réinitialisez le produit sans fil aux paramètres de
l’usine. Effectuez une réinitialisation aux paramètres
de l’usine en insérant une tige ou un autre petit objet
dans le petit trou qui se trouve au-dessus de l’étiquette
« Reset » (réinitialisation) à l’arrière de l’enceinte. Une
fois terminé, votre produit sans fil sera réinitialisé aux
paramètres de l’usine et effacera la configuration
réseau. Après une réinitialisation, il est impossible de
récupérer les paramètres configurés par l’utilisateur.
L’application DTS Play-Fi indique « Play-Fi Devices
Lost (appareils Play-Fi perdus) »
• Vérifiez que votre appareil est allumé.
• Vérifiez que vous avez un signal de réseau fort.
-
-
-
48

• Vérifiez si la connexion réseau est perdue.
• Vérifiez si d’autres appareils causent un trafic lourd sur
le réseau.
• Vérifiez si l’appareil mobile ou le PC est hors de portée du routeur.
• Vérifiez que votre appareil mobile ou PC et votre
produit sans fil sont connectés au même réseau.
• Vérifiez que la lecture en continu sans fil du produit
n’est pas prise par une autre application.
• Sortez de l’application DTS Play-Fi et redémarrez-la.
•
Désinstallez, téléchargez à nouveau et réinstallez l’application
DTS Play-Fi sur votre appareil mobile ou votre PC.
•
Redémarrez votre produit sans fil. Éteignez le produit
sans fil et rallumez-le à l’aide du bouton de mise sous
tension (Power) situé à l’arrière de l’enceinte. Ce redé
marrage éteindra et allumera l’alimentation électrique, et
forcera le produit sans fil à se reconnecter à votre réseau.
• Réinitialisez le produit sans fil aux paramètres de
l’usine. Effectuez une réinitialisation aux paramètres
de l’usine en insérant une tige ou un autre petit objet
dans le petit trou qui se trouve au-dessus de l’étiquette
« Reset » (réinitialisation) à l’arrière de l’enceinte. Une
fois terminé, votre produit sans fil sera réinitialisé aux
paramètres de l’usine et effacera la configuration
réseau. Après une réinitialisation, il est impossible de
récupérer les paramètres configurés par l’utilisateur.
Aucun son du produit sans fil.
• Vérifirez que le produit sans fil est allumé.
•
Vérifirez que le produit sans fil n’est pas en mode sourdine
• Vérifiez si le volume du produit sans fil est à zéro.
•
Vérifiez si le produit sans fil est réglé à la bonne entrée.
• Vérifiez que tous les composants du système sont allumés et que le matériel source est en mode lecture.
• Fermez et allumez le produit sans fil à l’aide du bouton de mise sous tension (Power).
• Débranchez le produit sans fil, attendez 30 secondes
et rebranchez-le.
• Vérifiez si tous les câbles d’interconnexion sont raccordés aux deux extrémités.
• Si nécessaire, essayez de raccorder un autre composant source pour vous assurer que le composant
source d’origine n’est pas le problème.
Lorsque j’utilise l’entrée analogique, le son sort de
mon produit sans fil et de ma télévision connectée.
• Lorsque vous utilisez le produit sans pour reproduire
l’audio, la sortie audio de la télévision doit être
désactivée. Certaines télévisions vous permettent
d’éteindre l’enceinte interne en passant par le système
de menu de la télévision. Pour d’autres modèles de
télévision, vous devez régler le volume de la télévision
à zéro ou à « sourdine ».
Lorsque j’utilise l’entrée analogique, le produit
sans fil est trop silencieux, même si le produit
sans fil est allumé.
•
Vérifiez si la sortie de votre télévision ou des autres
composants sources est raccordée par l’entremise d’une
sortie à niveau variable. Parfois, cette option peut être
configurée dans le menu du composant source. Veuillez
consulter le manuel du composant source en question.
Aucun son provenant du caisson de sousgraves externe
•
Vérifiez si le caisson de sous-graves externe est allumé.
• Vérifiez si les câbles du caisson de sous-graves sont
raccordés à la connexion Sub Out du produit sans fil
et à l’entrée appropriée du caisson de sous-graves.
• Vérifiez que le bouton Sub Out sur le produit sans fil
est enfoncé.
• Fermez et allumez le produit sans fil à l’aide du bouton de mise sous tension (Power).
• Débranchez le produit sans fil, attendez 30 secondes
et rebranchez-le.
Le caisson de sous-graves externe est trop silencieux.
• Montez le volume du caisson de sous-graves.
• Essayez de déplacer le caisson de sous-graves dans
la salle d’écoute.
Mon produit sans fil ne se comporte pas comme prévu.
• Fermez et allumez le produit sans fil à l’aide du bouton de mise sous tension (Power).
• Débranchez le produit sans fil, attendez 30 secondes
et rebranchez-le.
49

sPécIfIcatIons*
Réponse de fréquence.........................
Fréquence du répartiteur.......................
Puissance de l’amplificateur ....................
Haut-parleurs de haute fréquence ................
Haut-parleurs de basse fréquence ................
Boîtier ....................................
Composantes ...............................
Entrées....................................
Entrées sans fil .........................
50–23 000 Hz ± 3 dB
3 600 Hz
1 x 50 watts (haut-parleur de graves). 2 x 25 watts (hautparleur d’aigus). 100 watts (pointe de 140 watts) de
sortie totale combinée.
Deux transducteurs Folded Motion de 0,94 po x 1 po
(2,4 cm x 2,5 cm) avec diaphragme de 2,8 po x 1,25
po (7,1 cm x 3,2 cm).
Cônes en fibre de 5 X 7 po (12,7 x 17,8 cm) avec
haut-parleur à poussée étendue. Format de chambre asymétrique non résonant.
À ouverture
Préamplificateur fondé sur DSP de 24 bits 48 kHz
Amplificateur de classe-D
Auxiliaire analogique/optique numérique (mini prise de 3,5 mm)
RJ45 Ethernet
AirPlay, DTS Play-Fi
Apple
MD
, Bluetooth
Connectivité sans fil .....................
Puissance de chargement USB...................
Sortie.....................................
Consommation d’énergie ......................
Pile de la télécommande .......................
Poids .....................................
Dimensions (H x l x P).........................
50
802.11b/g (2.4GHz)
Bluetooth v3.0 (supporte
2,4 Amp (capable de charger rapidement certains appareils)
Subwoofer Out par analogique RCA
Max : 70 Watts, point mort : 6,5 watts,
Consommation en mode veille : <0,5 watt
Consommation du réseau en mode veille : < 6 watts
2x AAA
15 lb (6,8 kg)
8,1 po x 25,7 po x 6,9 po (20,5 cm x 65,3 cm x 17,5 cm)
* Les spécifications peuvent changer sans préavis.
AAC, aptX, MP3, SBC)

dessIns dImensIonnels
25.7” (65.3cm) / 25,7 po (65,3cm)
8.1” (20.5cm)
8,1 po (20,5cm)
6.5” (16.5cm)
6,5 po (16,5cm)
6.9” (17.5cm)
6,9 po (17,5cm)
51

®
Lawrence, Kansas, USA tél. 785.749.0133 téléc. 785.749.5320 www.martinlogan.com
Rev. 005©2016 MartinLogan Ltd. Tous droits réservés.
 Loading...