

Page 1

HEKS 12254 A1
Anleitung/Version:
93115_DE_20180823
Bestell-Nr.: 325 548
Nachdruck, auch aus zugs wei se, nicht ge stat tet!
Gebrauchsanleitung
Einbau-Kühlschrank
Page 2

InhaltsverzeichnisSeite DE-2
Inhaltsverzeichnis
Lieferung . . . . . . . . . . . . . . . . . . . . . . . . . . . DE-3
Lieferumfang . . . . . . . . . . . . . . . . . . . . . . DE-3
Lieferung kontrollieren . . . . . . . . . . . . . . . DE-3
Verpackungstipps . . . . . . . . . . . . . . . . . . DE-3
Geräteteile . . . . . . . . . . . . . . . . . . . . . . . . . . DE-4
Sicherheit . . . . . . . . . . . . . . . . . . . . . . . . . . DE-5
Bestimmungsgemäßer Gebrauch . . . . . . DE-5
Begriffserklärung . . . . . . . . . . . . . . . . . . . DE-5
Symbolerklärung . . . . . . . . . . . . . . . . . . . DE-5
Sicherheitshinweise . . . . . . . . . . . . . . . . . DE-5
Bedienung . . . . . . . . . . . . . . . . . . . . . . . . . . DE-9
Voraussetzungen . . . . . . . . . . . . . . . . . . . DE-9
Ein- und ausschalten . . . . . . . . . . . . . . . . DE-9
Temperatur regeln . . . . . . . . . . . . . . . . . . DE-9
Kühlen . . . . . . . . . . . . . . . . . . . . . . . . . . . . DE-10
Lebensmittel richtig lagern . . . . . . . . . . . DE-10
Qualität erhalten . . . . . . . . . . . . . . . . . . . DE-10
Energie sparen . . . . . . . . . . . . . . . . . . . . DE-10
Glasablagen und Türfächer umsetzen . DE-10
Pflege und Wartung . . . . . . . . . . . . . . . . . DE-11
Türdichtungen kontrollieren und
reinigen . . . . . . . . . . . . . . . . . . . . . . . . . DE-11
Außenwände reinigen . . . . . . . . . . . . . . DE-11
Kühlbereich abtauen . . . . . . . . . . . . . . . DE-11
Kühlbereich reinigen . . . . . . . . . . . . . . . DE-11
Glühlampe wechseln . . . . . . . . . . . . . . . DE-12
Inbetriebnahme . . . . . . . . . . . . . . . . . . . . . DE-13
Transportieren und Auspacken . . . . . . . DE-13
Der geeignete Standort . . . . . . . . . . . . . DE-13
Das geeignete Möbel . . . . . . . . . . . . . . . DE-14
Grundreinigung . . . . . . . . . . . . . . . . . . . DE-15
Türanschlag wechseln . . . . . . . . . . . . . . DE-15
Gerät einbauen . . . . . . . . . . . . . . . . . . . DE-16
Fehlersuchtabelle . . . . . . . . . . . . . . . . . . . DE-18
Stromversorgung . . . . . . . . . . . . . . . . . . DE-18
Service . . . . . . . . . . . . . . . . . . . . . . . . . . . DE-20
Beratung, Bestellung und Reklamation . DE-20
Reparaturen und Ersatzteile . . . . . . . . . DE-20
Umweltschutz . . . . . . . . . . . . . . . . . . . . . . DE-21
Elektro-Altgeräte
umweltgerecht entsorgen . . . . . . . . . . . DE-21
Unser Beitrag zum Schutz der
Ozonschicht . . . . . . . . . . . . . . . . . . . . . . DE-21
Produktdatenblatt für elektrische Haushaltskühlund Gefriergeräte sowie entsprechende Kombinationsgeräte nach VO (EU) Nr. 1060/2010 und
VO (EU) 643/2009 . . . . . . . . . . . . . . . . . . DE-22
Technische Daten . . . . . . . . . . . . . . . . . . . DE-22
Informationen zur Installation
und Inbetriebnahme fi nden Sie
ab Seite DE-13.
Bevor Sie das Gerät benutzen, le sen Sie bit te zu erst
die Si cher heits hin wei se und
die Ge brauchs an lei tung aufmerksam
durch. Nur so können Sie alle Funk tio nen si cher und zu ver läs sig nut zen.
Beachten Sie unbedingt auch die nationalen Vorschriften in Ihrem Land, die
zusätzlich zu den in dieser Anleitung genannten Vorschriften gültig sind.
Bewahren Sie alle Sicherheitshinweise
und Anweisungen für die Zukunft auf.
Geben Sie alle Sicherheitshinweise und
Anweisungen an den nachfolgenden Verwender des Produkts weiter.
Page 3

Lieferung
Lieferung
Seite DE-3
Lieferumfang
– Kühlschrank mit Gemüseschublade
– Reinigungstäbchen
– Eierablage, 6-fach (ohne Abbildung)
– Beutel mit Einbaumaterialien
(Abbildung siehe Seite DE-16)
–Gebrauchsanleitung
Lieferung kontrollieren
1. Transportieren Sie das Gerät an einen geeigneten Standort und packen Sie es aus
(siehe „Inbetriebnahme“ auf Seite DE-13).
2. Prüfen Sie, ob die Lieferung vollständig ist.
3. Kontrollieren Sie, ob das Gerät Transportschäden aufweist.
4. Sollte die Lieferung unvollständig sein
oder das Gerät einen Transportschaden
aufweisen, nehmen Sie bitte Kontakt mit
unserem Service auf (siehe Seite DE-20).
WARNUNG!
Gerät nicht in Betrieb nehmen, wenn es
einen sichtbaren Schaden aufweist.
Verpackungstipps
Sollten es Ihre räumlichen Verhältnisse zulassen, empfehlen wir Ihnen,
die Verpackung zumindest während
der Garantiezeit aufzubewahren. Sollte das
Gerät zur Reparatur eingeschickt werden
müssen, ist es nur in der Originalverpackung
ausreichend geschützt.
Wenn Sie sich von der Verpackung trennen
möchten, entsorgen Sie diese bitte umweltfreundlich.
Page 4

Geräteteile
GeräteteileSeite DE-4
(11)
(10)
(1) bis (6)
(7)
(9)
(8)
(13)
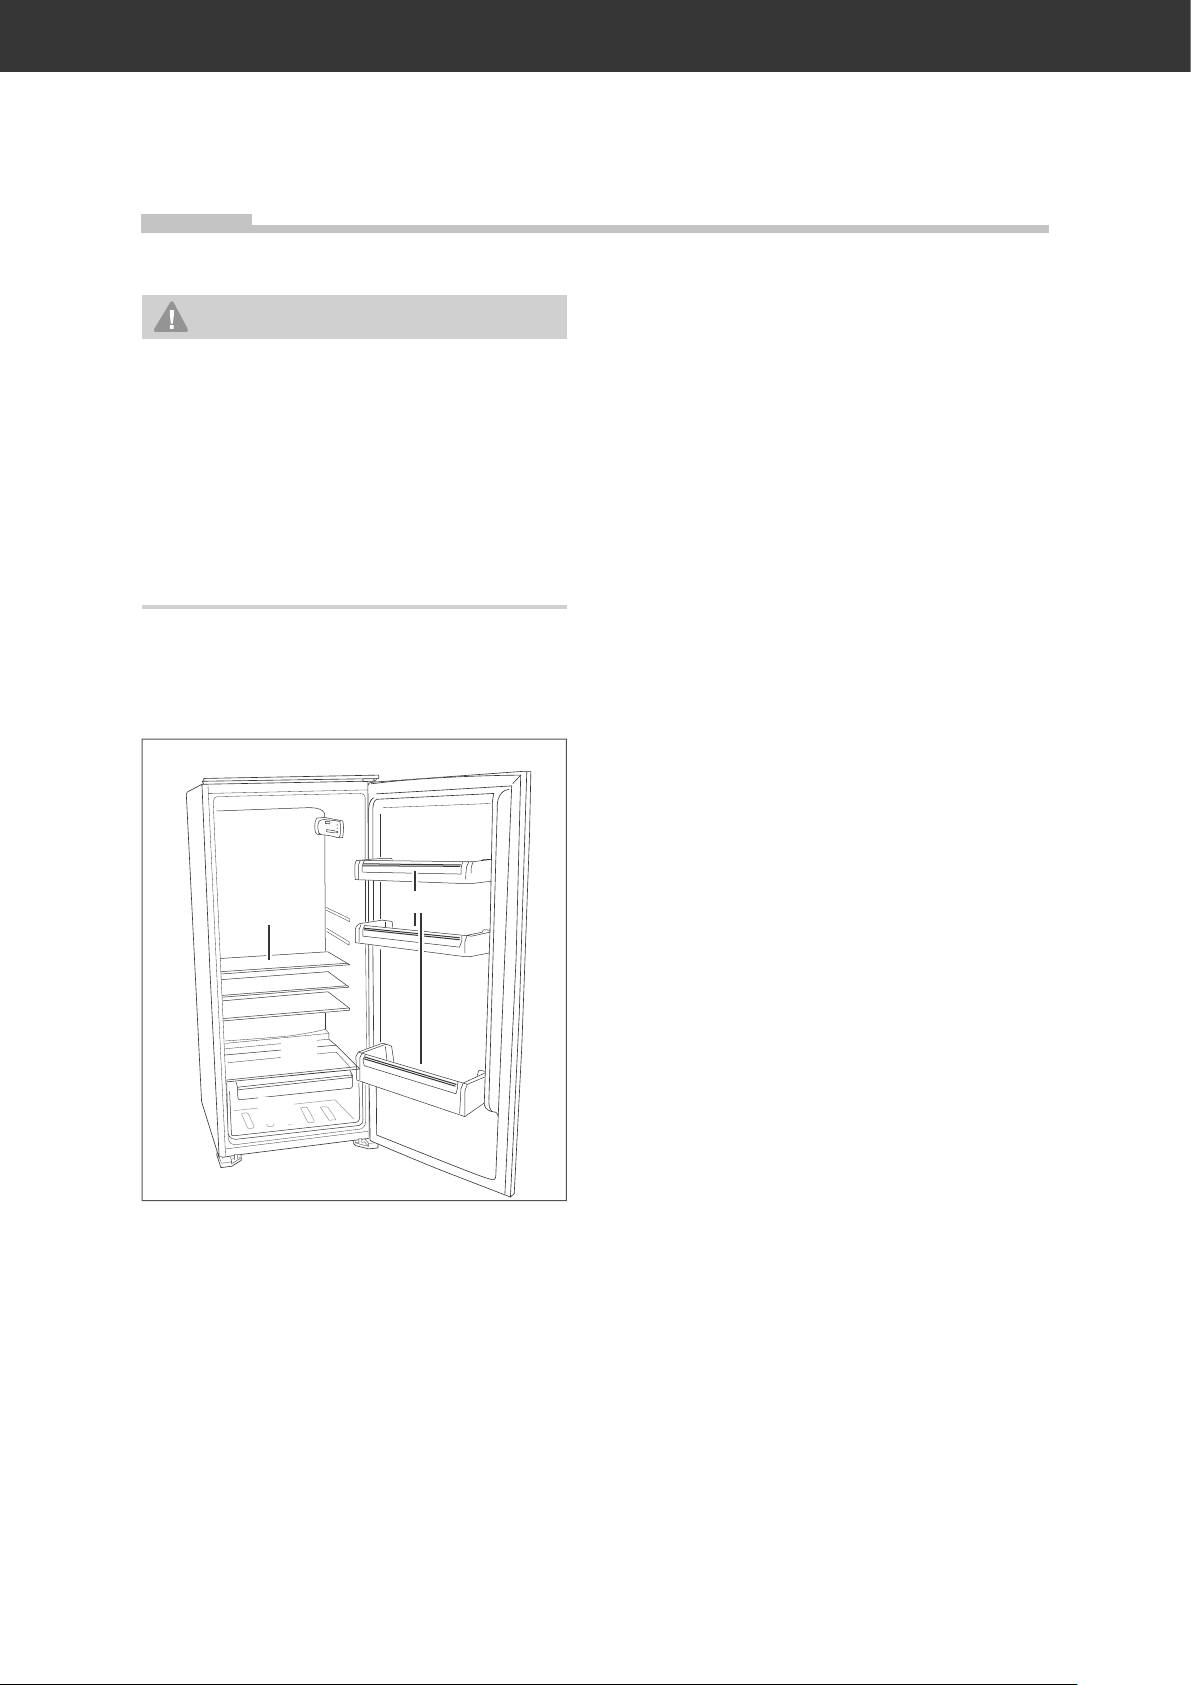
(1) Innenbeleuchtung
(2)–(6) Bedienelemente
(Näheres siehe Seite DE-9)
(7) 3 offene Türfächer
(8) Schublade für Obst und Gemüse
(9) 1 Glasablage als Abdeckung für die
Gemüseschublade
(12)
(10) 3 Glasablagen, verstellbar
(11) Kühlbereich
(12) Reinigungsstäbchen
(13) Beutel mit Einbaumaterialien,
(Näheres ab Seite DE-13)
Page 5

Sicherheit
Sicherheit
Seite DE-5
Bestimmungsgemäßer
Gebrauch
Das Gerät ist geeignet, um frische Lebensmittel zu kühlen.
Das Gerät ist nur zur Verwendung im privaten
Haushalt bestimmt.
Verwenden Sie das Gerät ausschließlich wie
in dieser Gebrauchsanleitung beschrieben.
Jede andere Verwendung gilt als nicht bestimmungsgemäß und kann zu Sachschäden
oder sogar zu Personenschäden führen. Der
Hersteller übernimmt keine Haftung für Schäden, die durch nicht bestimmungsgemäßen
Gebrauch entstanden sind.
Begriffserklärung
Folgende Si gnal begriffe fi nden Sie in dieser Gebrauchsanleitung.
WARNUNG
Dieser Signalbegriff bezeichnet eine Gefährdung mit einem mittleren Risikograd,
die, wenn sie nicht vermieden wird, den
Tod oder eine schwere Verletzung zur Folge
haben kann.
VORSICHT
Dieser Signalbegriff bezeichnet eine Gefährdung mit einem niedrigen Risikograd,
die, wenn sie nicht vermieden wird, eine
geringfügige oder mäßige Verletzung zur
Folge haben kann.
HINWEIS
Dieser Signalbegriff warnt vor möglichen
Sachschäden.
Dieses Symbol verweist auf nützliche
Zusatzinformationen.
Symbolerklärung
Vorsicht: Brandgefahr!
Sicherheitshinweise
In diesem Kapitel fi nden Sie allgemeine
Sicherheitshinweise, die Sie zu Ihrem eigenen Schutz und zum Schutz Dritter stets
beachten müssen. Beachten Sie zusätzlich
die Warnhinweise in den einzelnen Kapiteln zu Bedienung, Reinigung etc.
Risiken im Umgang mit elektrischen
Haushaltsgeräten
Stromschlaggefahr!
Das Gerät arbeitet mit 220–240
Netzspannung. Das Berühren von spannungsführenden Teilen kann zu schweren
Verletzungen oder zum Tod führen.
■ Gerät nur in Innenräumen verwenden.
Nicht in Feuchträumen oder im Regen
betreiben.
■ Gerät nicht in Betrieb nehmen oder wei-
ter betreiben,
■ wenn es sichtbare Schäden aufweist,
z.B. die Anschlussleitung defekt ist.
■ wenn es Rauch entwickelt oder ver-
brannt riecht.
■ ungewohnte Geräusche von sich gibt.
In diesen Fällen Netzstecker ziehen und
Gerät reparieren lassen (siehe „Service“
auf Seite DE-20).
■ Gerät nur an eine gut zugängliche Steck-
dose anschließen, damit Sie es im Störfall schnell vom Stromnetz trennen können.
■ Netzkabel so verlegen, dass es nicht zur
Stolperfalle wird.
■ Gerät, Netzstecker und -kabel von of-
fenem Feuer und heißen Flächen fernhalten.
V~/50 Hz
Page 6

SicherheitSeite DE-6
■ Netzkabel nicht knicken oder klemmen
und nicht über scharfe Kanten legen. Die
Folge kann ein Kabelbruch sein.
■ Wenn das Netzkabel des Geräts beschä-
digt ist, muss es durch den Hersteller,
dessen Kundendienst oder eine qualifi zierte Fachkraft ausgetauscht werden.
■ Gerät nicht mit einer externen Zeit-
schaltuhr oder einem separaten Fernwirksystem betreiben.
■ Keine Gegenstände in oder durch die Ge-
häuseöffnungen stecken und sicherstellen, dass auch Kinder keine Gegenstände
einstecken können.
■ Netzstecker immer am Kabel selbst,
nicht am Netzkabel anfassen.
■ Netzstecker niemals mit feuchten Hän-
den anfassen.
■ Netzkabel und -stecker nie in Wasser
oder andere Flüssigkeiten tauchen.
■ Im Fehlerfall sowie vor Reinigung und
Wartung den Netzstecker ziehen.
■ Eingriffe und Reparaturen am Gerät dür-
fen ausschließlich autorisierte Fachkräfte vornehmen sowie unser Service (siehe
Seite DE-20).
Eigenständige Reparaturen an dem Gerät können Sach- und Personenschäden
verursachen, und die Haftungs- und Garantieansprüche verfallen. Versuchen Sie
niemals, das defekte – oder vermeintlich
defekte – Gerät selbst zu reparieren.
■ Bei Reparaturen dürfen ausschließlich
Teile verwendet werden, die den ursprünglichen Gerätedaten entsprechen.
In diesem Gerät befi nden sich elektrische und mechanische Teile, die zum
Schutz gegen Gefahrenquellen unerlässlich sind.
■ Gerät nur an eine ordnungsgemäß instal-
lierte Schutzkontakt-Steckdose anschließen. Der Anschluss an eine Steckdosenleiste oder eine Mehrfachsteckdose ist
unzulässig.
■ Um ausreichende Luftzirkulation zu ge-
währleisten, Belüftungsöffnungen im
Gerätegehäuse oder im Einbaugehäuse
nicht verschließen.
■ Gerät nicht direkt an die Wand stellen.
Mindestabstände einhalten
(siehe „Der
geeignete Standort“ auf Seite DE-13).
Verletzungsgefahr!
■ Das Gerät ist schwer und unhandlich.
Beim Transport, bei der Aufstellung, Ausrichtung oder beim Ab- und Anmontieren der Türen die Hilfe einer weiteren
Person in Anspruch nehmen.
■ Schub fach, Ablagen etc. nicht als Tritt-
brett oder zum Ab stüt zen ver wen den.
Risiken für bestimmte
Personengruppen
Gefahren für Kinder und Personen mit eingeschränkten physischen, sensorischen oder
geistigen Fähigkeiten!
■ Dieses Gerät kann von Kindern ab 8 Jah-
ren sowie von Personen mit reduzierten
physischen, sensorischen oder mentalen
Fähigkeiten oder Mangel an Erfahrung
und/oder Wissen benutzt werden, wenn
sie beaufsichtigt oder bezüglich des sicheren Gebrauchs unterwiesen wurden
und die daraus resultierenden Gefahren
verstanden haben.
■ Reinigung und Wartung dürfen nicht
durch Kinder durchgeführt werden, es sei
denn, sie werden beaufsichtigt.
Brandgefahr!
Ein unsachgemäßer Umgang mit dem Gerät kann zu einem Brand und zu Sachschäden führen.
Für Kinder jeden Alters gelten weitere Vorsichtsmaßnahmen.
■ Kinder nicht mit der Verpackungsfolie
spielen lassen. Diese können sich darin
verfangen oder ersticken.
Page 7

Sicherheit
Seite DE-7
■ Kinder dürfen nicht mit dem Gerät spielen.
■ Verhindern, dass Kinder Kleinteile vom
Gerät abziehen oder aus dem Zubehörbeutel nehmen und in den Mund stecken. Sie könnten daran ersticken.
Risiken im Umgang mit Kühl- und
Gefriergeräten
Gefahren durch Kältemittel!
Im Kältemittel-Kreis lauf Ihres Geräts be fi n det sich das um welt freund li che, aber
brenn ba re Käl te mit tel R600a (Isobutan).
■ Me cha ni sche Ein grif fe in das Käl te-
system sind nur autorisierten Fachkräften er laubt.
■ Den Kältekreislauf nicht be schä di gen,
z. B. durch Auf ste chen der Käl te mit tel ka nä le des Ver damp fers mit schar fen
Ge gen stän den, Ab knic ken von Rohr lei tun gen usw.
■ Herausspritzendes Käl te mit tel ist brenn-
bar und kann zu Au gen schä den füh ren. In
die sem Fall die Au gen un ter kla rem Was ser spülen und sofort einen Arzt ru fen.
■ Damit im Fall einer Leckage des Kälte-
mittelkreislaufs kein zündfähiges GasLuft-Gemisch entstehen kann, muss der
Aufstellraum laut Norm EN 378 eine
Mindestgröße von 1m
3
je 8g Kältemittel haben. Die Mengeangabe des Kältemittels befi ndet sich auf dem Datenblatt
(siehe Seite DE-22).
Explosionsgefahr!
Ein unsachgemäßer Umgang mit dem Gerät kann zu Explosionen führen.
■ Keine explosiven Stoffe oder Sprühdo-
sen mit brennbaren Treibmitteln im Gerät lagern, da sie zündfähige Gas-LuftGemische zur Explosion bringen können.
■ Auf keinen Fall Abtausprays verwenden.
Sie können ex plo si ve Gase bilden. Auch
keine elek tri schen Heiz ge rä te, offene
Flammen oder Eis krat zer ver wen den. Die
Iso lie rung könnte schmelzen oder zer kratzt wer den.
■ Hochprozentigen Alkohol nur fest ver-
schlossen und stehend lagern.
Gesundheitsgefahren!
Durch falsche Handhabung, unzureichende
Kühlung oder Überlagerung können die
eingelagerten Lebensmittel verderben. Bei
Verzehr besteht die Gefahr einer Lebensmittelvergiftung!
■ Insbesondere rohes Fleisch und Fisch
ausreichend verpacken, damit danebenliegende Lebensmittel nicht durch Salmonellen o. Ä. kontaminiert werden.
■ Nach einem eventuellen Stromausfall
überprüfen, ob die Lebensmittel noch genießbar sind.
Das Gerät arbeitet eventuell nicht einwandfrei, wenn es über längere Zeit zu geringer Umgebungstemperatur ausgesetzt
wird. Es kann dann zu einem Temperaturanstieg im Inneren kommen.
■ Vorgesehene Umgebungs temperatur
ein halten (siehe Zeile „Klimaklasse“ auf
Seite DE-22).
Beschädigungsgefahr!
Unsachgemäßer Umgang mit dem Gerät
kann zu Sachschäden führen.
■ Gerät nicht an der Tür ziehen oder he-
ben.
■ Gerät nur auf einem ebenen und festen
Untergrund abstellen. Der Untergrund
muss das Gewicht des gefüllten Gerätes
tragen können.
■ Beim Auspacken keine scharfen oder
spitzen Gegenstände verwenden.
■ Beim Auspacken auf keinen Fall das Iso-
liermaterial an der Geräterück seite beschädigen.
Page 8

SicherheitSeite DE-8
■ Keine elektrischen Geräte innerhalb des
Geräts betreiben, die nicht der vom Hersteller empfohlenen Bauart entsprechen.
■ Keine anderen mechanischen Einrich-
tungen oder sonstigen Mittel als die vom
Hersteller empfohlenen benutzen.
■ Innenbeleuchtung ausschließlich zur Be-
leuchtung des Geräte-Inneren verwenden. Sie ist nicht zur Beleuchtungeines
Raumes geeignet.
■ Keine Glas- oder Metallgefäße mit Was-
ser, Limonade, Bier etc. einlagern. Wasser dehnt sich im gefrorenen Zustand
aus und kann den Behälter sprengen.
■ Gerät rechtzeitig abtauen, bevor sich
eine Eis- und Reifschicht von mehr als
4 mm bildet. Bei zu starker Eisbildung
steigt der Stromverbrauch und die Gefrierfachtür schließt eventuell nicht mehr
dicht ab.
■ Zum Beschleunigen des Abtauvorgangs
keine anderen Mittel verwenden als die
vom Hersteller empfohlenen. Z. B. keine
elek tri schen Heiz ge rä te, Messer oder Geräte mit of fe ner Flamme wie z. B. Kerzen
ver wen den. Die Wär medämmung und
der In nen be häl ter sind kratz- und hit ze emp fi nd lich oder können schmelzen.
■ Beim Reinigen beachten:
– Auf keinen Fall aggressive, körnige,
soda-, säure-, lösemittelhaltige oder
schmirgelnde Reinigungsmittel verwenden. Diese greifen die Kunststoffflächen an. Empfehlenswert sind Allzweckreiniger mit einem neutralen
pH-Wert.
– Türdichtungen und Geräteteile aus
Kunststoff sind empfindlich gegen Öl
und Fett. Verunreinigungen möglichst
schnell entfernen.
– Nur weiche Tü cher verwenden.
■ Nach dem Ausschalten 5Minuten war-
ten. Erst danach das Gerät erneut einschalten.
■ Nur Original-Zubehörteile verwenden.
Page 9
Bedienung
Voraussetzungen
Sie können das Gerät nutzen, wenn
– Sie das Kapitel „Sicherheit“ gelesen und
die Sicherheitshinweise verstanden haben
(Seite DE-5).
– es aufgestellt und angeschlossen ist, wie
im Kapitel „Inbetriebnahme“ beschrieben
(siehe Seite DE-13).
Bedienung
Seite DE-9
(2)
(3)
(4)(5)(6)
Ein- und ausschalten
Einschalten
Sobald das Gerät ans Stromnetz angeschlossen wird, hören Sie einen kurzen Signalton.
Das Gerät ist eingeschaltet, die Innenbeleuchtung leuchtet, der Mo tor beginnt zu arbeiten,
das Käl te mit tel strömt durch die Rohre und
Sie hören ein leich tes Rauschen.
• Macht das Gerät störende Geräusche,
überprüfen Sie den festen Stand und entfernen Sie Gegenstände auf dem Ge rät.
Ausschalten / Außerbetriebnahme
1. Räumen Sie das Gerät aus und reinigen
Sie es (siehe Kapitel „Pflege und Wartung“ auf Seite DE-11).
2. Lassen Sie die Tür leicht geöffnet, damit
sich kein Schimmel bildet.
3. Ziehen Sie den Netzstecker.
Temperatur regeln
WARNUNG
Gesundheitsgefahr!
Das Gerät arbeitet eventuell nicht einwandfrei, wenn es über längere Zeit zu geringer Umgebungstemperatur ausgesetzt
wird. Es kann dann zu einem Temperauranstieg im Inneren kommen.
■ Halten Sie die vorgesehene Umgebungs-
temperatur ein (siehe „Klimaklasse“ auf
Seite DE-22).
Die Bedienblende bietet Ihnen verschiedene
Möglichkeiten, um die Innentemperatur zu
steuern.
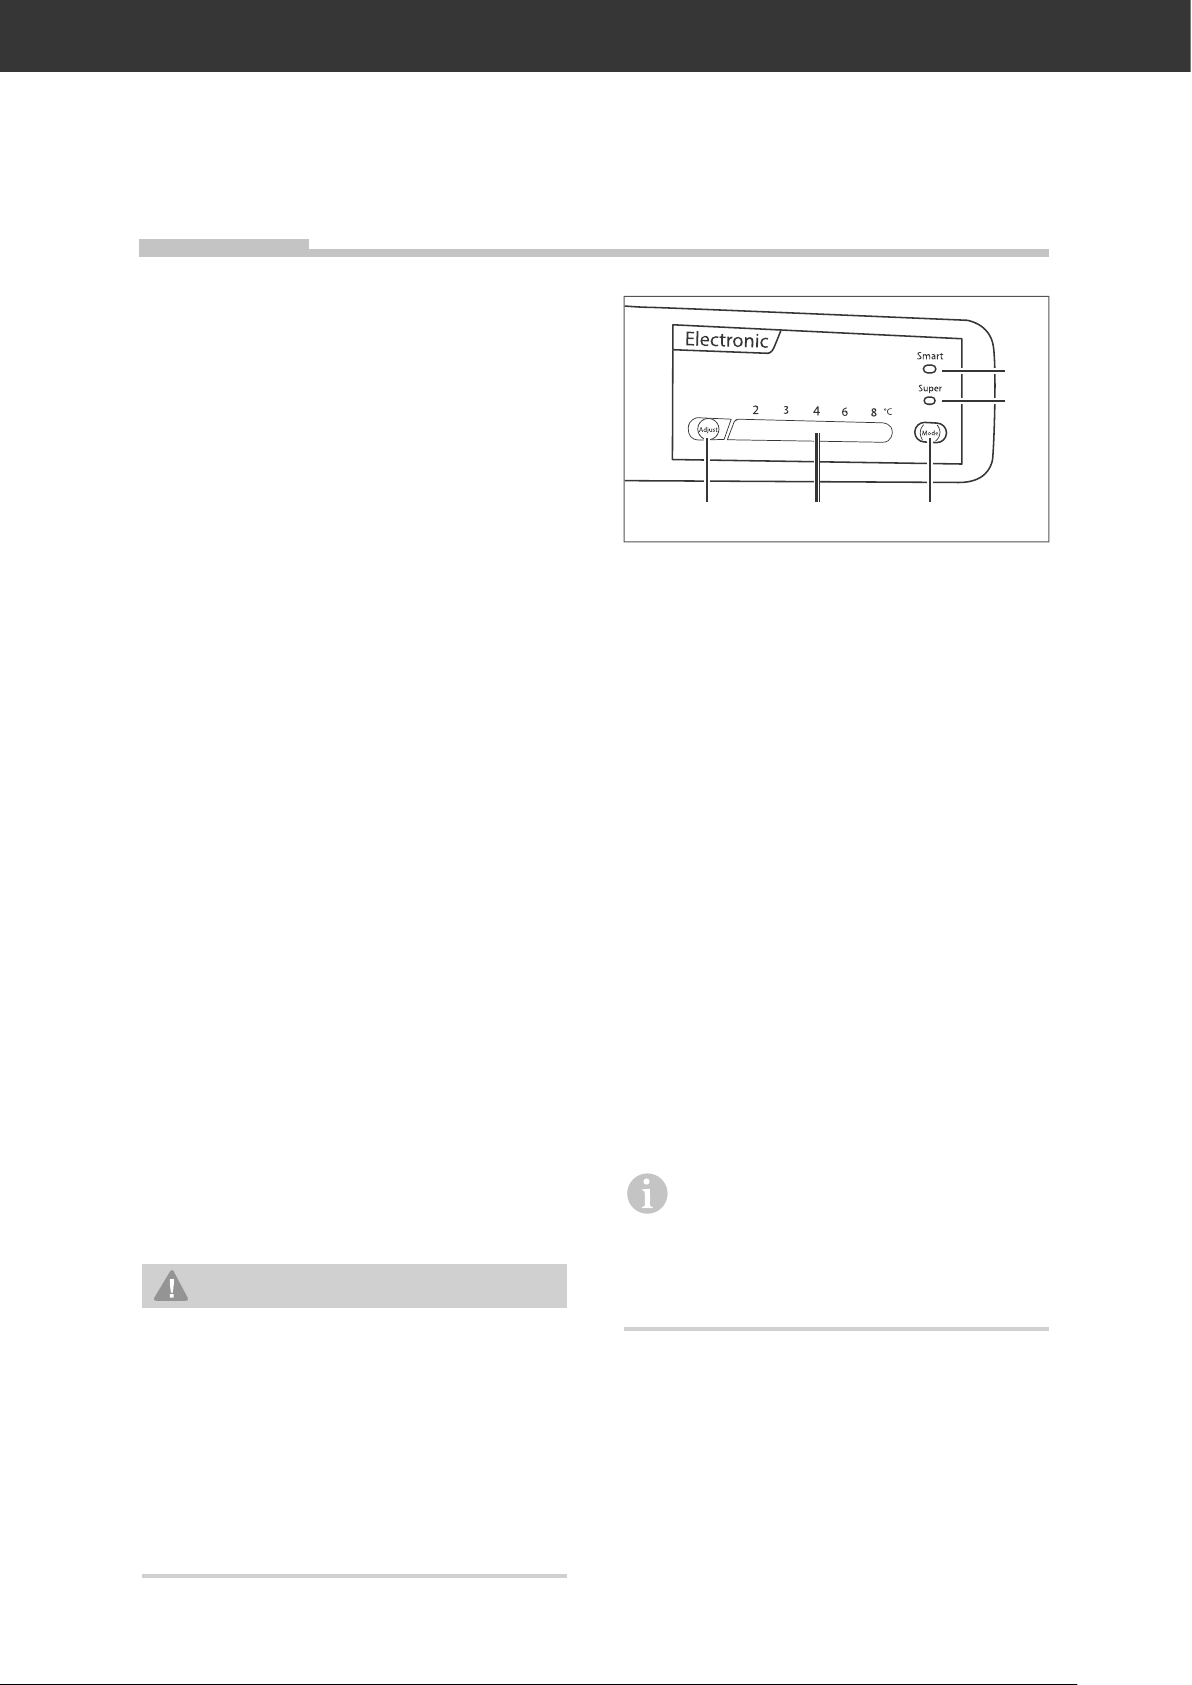
• Mit der Taste „Adjust“ (6) stellen Sie die
Innentemperatur ein, von +2 °C bis +8 °C.
Die Skala (5) zeigt die aktuelle Einstellung.
Mit jedem Tastendruck ändern Sie die
Gradzahl.
• Mit der Taste „Mode“ (4) schalten Sie den
„Smart“- oder den „Super“-Modus ein
oder aus. Die entsprechende LED (2) oder
(3) leuchtet.
– Im „Smart“-Modus passt sich die Kühl-
leistung den Umgebungsbedingungen
an. Wir empfehlen, diesen Modus zu
verwenden.
– Im „Super“-Modus kühlt das Gerät so
weit wie möglich herunter. Nach 54 Stunden kehrt es zur eingestellten Temperatur zurück.
Um die Kühlleistung kontrollieren zu
können, empfehlen wir die Nutzung
eines Kühl-/Gefrier-Thermometers. Platzieren Sie dieses auf der Glasablage oberhalb
der Gemüseschublade. Die richtige Temperatur beträgt hier +6 °C.
Page 10
Kühlen
KühlenSeite DE-10
WARNUNG
Explosionsgefahr!
Ein unsachgemäßer Umgang mit dem Gerät kann zu Explosionen führen.
■ Keine explosiven Stoffe oder Sprühdo-
sen mit brennbaren Treibmitteln im Gerät lagern, da sie zündfähige Gas-LuftGemische zur Explosion bringen können.
■ Alkohol nur fest verschlossen und ste-
hend lagern.
Lebensmittel richtig lagern
Glasablage (9) über der Gemüseschublade (8). Dort ist die Temperatur am niedrigsten.
• Legen Sie frisches Obst und Gemüse in
die Gemüseschublade (8).
Qualität erhalten
• Damit Aroma und Frische der Nahrungs-
mittel im Kühl be reich (11) erhalten bleiben,
legen oder stellen Sie alle zu küh len den
Le bens mit tel nur verpackt in den Kühlbereich. Ver wen den Sie spe zi el le Kunststoffbehälter für Lebensmittel oder han dels üb li che Folien.
• Legen Sie die Lebensmittel
– so in den Kühlbereich, dass die Luft frei
zir ku lie ren kann. Decken Sie die Glasablagen nicht mit Papier o. Ä. ab.
– nicht direkt an die Rückwand. Sie kön nen
sonst an der Rück wand fest frie ren.
(10)
(9)
(8)
Bestücken Sie den Kühlbereich (11) so, dass
er die Temperaturverhältnisse im Inneren optimal ausnutzt:
• Legen Sie streichfähige Butter und Käse
in die oberen Türfächer (7). Dort ist es am
wärmsten.
• Stellen Sie Flaschen und Ge trän ke kartons
in das untere Türfach (7). Stellen Sie vol le
Be häl ter dich ter zum Scharnier, um die
Belastung der Tür zu vermindern.
• Legen Sie Gekochtes und Gebackenes
auf die Glasablagen (10).
• Legen Sie Frischfleisch, Wild, Geflügel,
Speck, Wurst und rohen Fisch auf die
(7)
Energie sparen
• Lassen Sie warme Lebensmittel abkühlen,
ehe Sie sie in den Kühlbereich (11) stellen.
• Die Temperaturen im Gerät und damit der
Energieverbrauch können ansteigen,
– wenn die Tü ren häufig oder lange geöff-
net werden.
– wenn die Raumtemperatur ü ber- oder
unterschritten wird.
• Der Energieverbrauch ist auch abhängig
vom gewählten Standort (nähere Informationen siehe Seite DE-13).
Glasablagen und Türfächer
umsetzen
Die Glasablagen (10) oberhalb der Gemüseschubladen-Abdeckung lassen sich umsetzen.
1. Glasablage/Türfach anheben und entnehmen.
2. Glasablage/Türfach an neuer Position
von oben über die seitlichen Halterungen
führen.
Page 11

Pflege und Wartung
Pflege und Wartung
Seite DE-11
WARNUNG
Gesundheitsgefahr!
■ Reinigung und Benutzerwartung dürfen
nicht durch Kinder durchgeführt werden,
es sei denn, sie werden beaufsichtigt.
Stromschlaggefahr!
■ Vor dem Reinigen den Netzstecker zie-
hen. Dabei am Stecker selbst, nicht am
Netzkabel ziehen.
■ Darauf achten, dass kein Reinigungswas-
ser in die Lüftungsschlitze, in die elektrischen Teile und in die Ablauföffnung
dringt.
HINWEIS
Die Oberfl ächen und Türdichtungen werden durch ungeeignete Behandlung beschädigt.
■ Niemals scharfe, soda-, säure-, löse-
mittelhaltige oder schmirgelnde Reinigungsmittel verwenden. Diese greifen
die Kunststofffl ächen an. Empfehlenswert sind Allzweckreiniger mit einem
neutralen pH-Wert.
■ Pfl egemittel nur für die Außenfl ächen
verwenden.
■ Die Türdichtungen sind empfi ndlich ge-
gen Öl und Fett – das Gummi wird dadurch porös und spröde.
■ Nur weiche Tücher verwenden.
Türdichtungen kontrollieren
und reinigen
Die Türdichtungen müssen regelmäßig kontrolliert werden, damit keine war me Luf t in das
Gerät eindringt.
1. Klemmen Sie zur Prüfung ein dünnes
Stück Pa pier an verschiedenen Stel len
ein . Das Pa pier muss sich an allen Stellen
gleich schwer durch zie hen las sen.
2. Falls die Dich tung nicht überall gleichmäßig an liegt: Erwärmen Sie die Dich tung an
den entsprechenden Stellen vor sich tig mit
ei nem Haar trock ner und ziehen Sie sie
mit den Fin gern etwas her aus .
3. Reinigen Sie verschmutzte Dichtungen
nur mit klarem Wasser.
Außenwände reinigen
• Lackierte Oberflächen:
Verwenden Sie nur eine leichte pH-neutrale Seifenlauge.
Kühlbereich abtauen
Dies ist nicht notwendig. Denn der Kühlbereich Ihres Geräts be sitzt eine Abtau-Automatik. Reif und Eis werden au to ma tisch ab ge taut
und das Tauwasser auf der Rückseite des
Ge rä ts in einer Tauwasserschale gesammelt.
Durch die Wärme des Mo tors verdunstet das
Tauwas se r.
Kühlbereich reinigen
1. Ziehen Sie den Netzstecker.
2. Nehmen Sie das Kühlgut heraus und stellen Sie es in ei nen kühlen Raum.
3. Nehmen Sie die Gemüseschublade (8),
die Türfächer (7) und die Glasablagen (9)
und (10) heraus und reinigen Sie sie in
lauwarmem Wasser mit etwas Spülmittel.
Trocknen Sie alle Teile gründlich.
4. Wischen Sie den In nen raum mit war mem
Was ser und Spül mit tel aus .
Geben Sie beim Nach wi schen ei ni ge
Trop fen Es sig ins Was ser, um Schim mel bil dung vor zu beu gen.
Wischen Sie den Innenraum trocken und
lassen Sie die Tür zum Lüften noch einige
Zeit offen.
Page 12
Pflege und WartungSeite DE-12
5. Säubern Sie die Öffnung des Tauwasserablaufs oberhalb der Gemüseschublade (8) mit dem Reinigungsstäbchen (12).
6. Reinigen Sie die Türdichtung nur mit
klarem Wasser, sie ist empfindlich gegen
Öl und Fett.
7. Setzen Sie Glasablagen, Türfächer und
Schubladen wieder ein und legen Sie das
Kühlgut wieder ein.
8. Stecken Sie den Netzstecker wie der ein.
Glühlampe wechseln
WARNUNG
Stromschlaggefahr!
Weil das Gerät mit gefährlicher Netzspannung arbeitet, kann das Berühren von
spannungsführenden Teilen zu schweren
Verletzungen oder zum Tod führen.
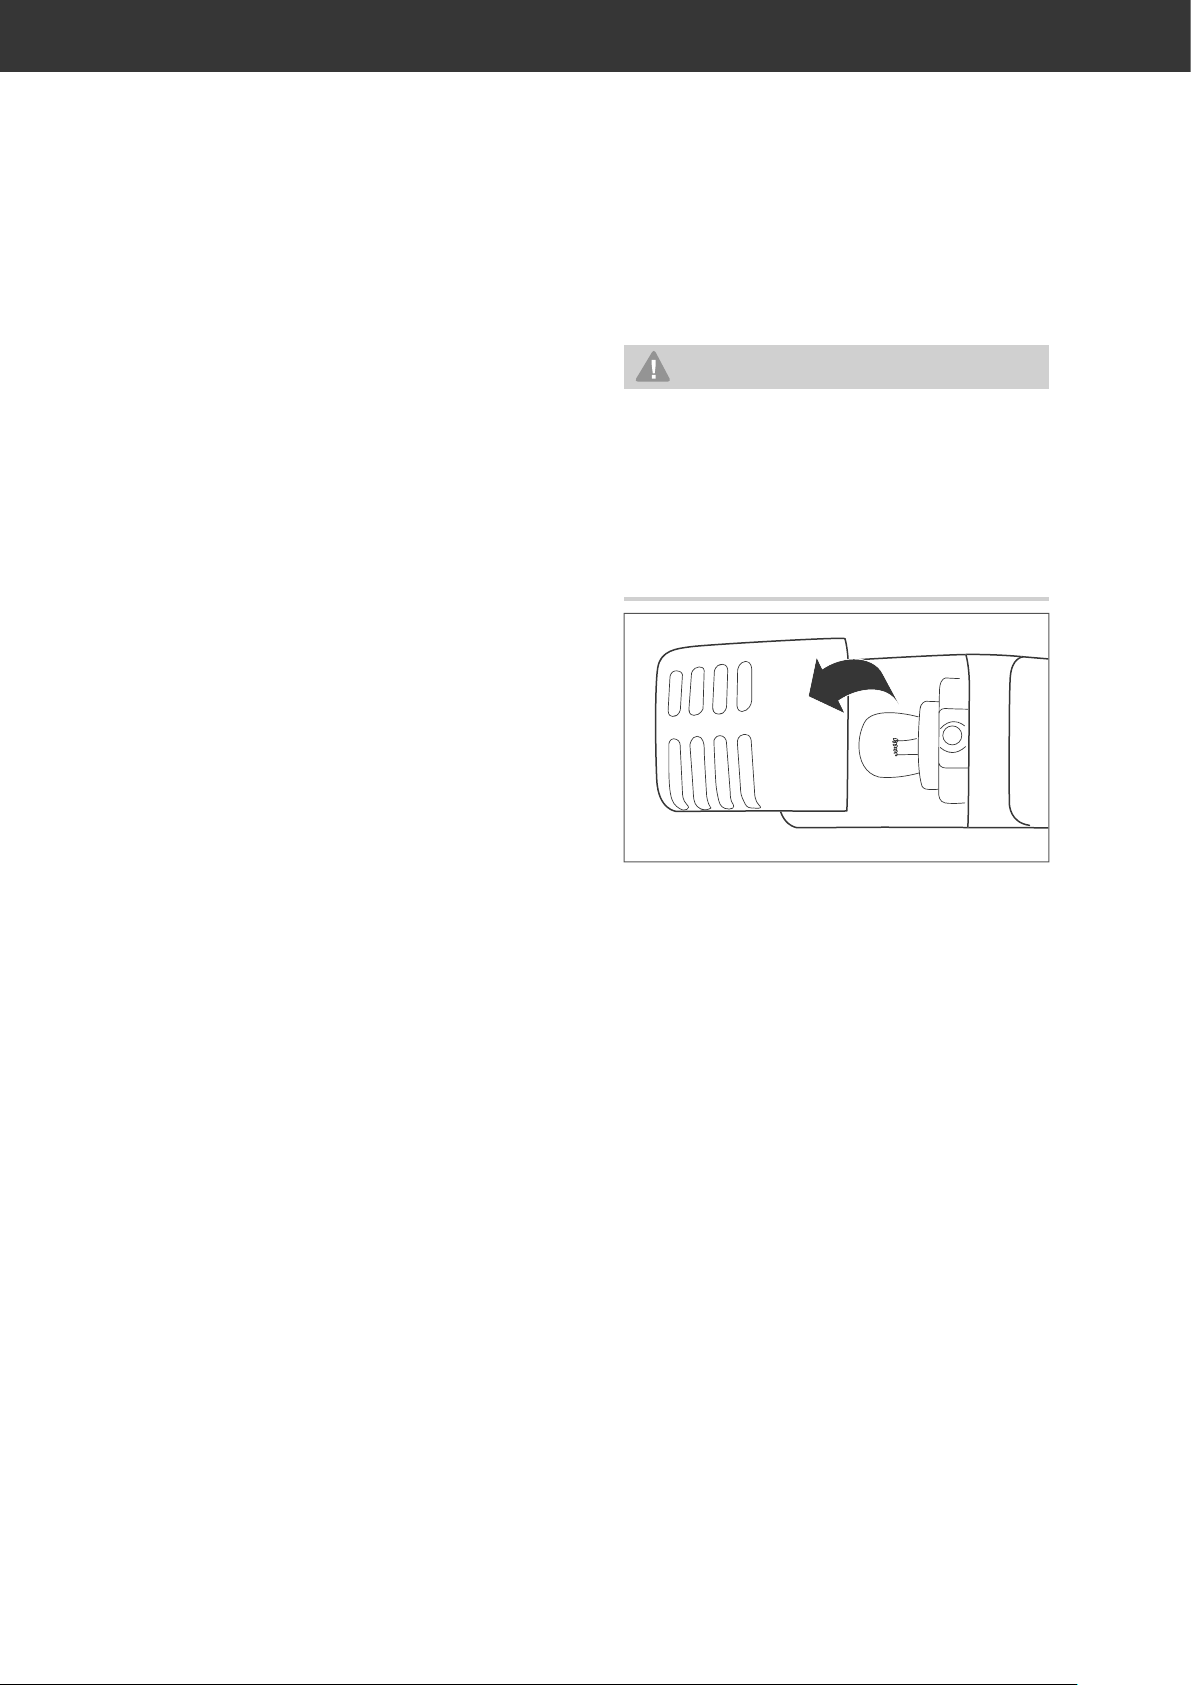
■ Vor dem Wechsel der Glühlampe den
Netzstecker ziehen.
Ausschließlich Glühlampen mit einer Leistung
von max. 15 Watt, 230 Volt, Sockel E 14 und
gleicher Form verwenden.
1. Ziehen Sie den Netzstecker aus der
Steckdose.
2. Lösen Sie mit einem Kreuzschlitz-Schraubendreher die Schraube der Abdeckung
und ziehen Sie die Abdeckung ab.
3. Drehen Sie die Glühlampe aus der Fassung und ersetzen Sie sie durch die neue.
4. Stecken Sie die Abdeckung wieder auf
und drücken Sie ein wenig am hinteren
Ende, damit die Nut einrastet.
5. Schrauben Sie die Abdeckung wieder fest.
6. Stecken Sie den Netzstecker wieder in die
Steckdose.
Page 13

Inbetriebnahme
Inbetriebnahme
Seite DE-13
WARNUNG
Verletzungsgefahr!
■ Das Gerät ist schwer und unhandlich.
Beim Transport, bei der Aufstellung, Ausrichtung oder beim Ab- und Anmontieren der Türen die Hilfe einer weiteren
Person in Anspruch nehmen.
■ Schub fä cher, Tü ren etc. nicht als Tritt-
brett oder zum Ab stüt zen ver wen den.
Gefahren durch Kältemittel
■ Den Kältekreislauf nicht be schä di gen,
z. B. durch Auf ste chen der Käl te mit tel ka nä le des Ver damp fers mit schar fen
Ge gen stän den, Ab knic ken von Rohr lei tun gen usw.
■ Herausspritzendes Käl te mit tel ist brenn-
bar und kann zu Au gen schä den füh ren.
Spü len Sie in die sem Fall die Au gen un ter
kla rem Was ser und ru fen Sie sofort ei nen
Arzt.
■ Damit im Fall einer Leckage des Kälte-
mittelkreislaufs kein zündfähiges GasLuft-Gemisch entstehen kann, muss der
Aufstellraum laut Norm EN 378 eine
Mindestgröße von 1m
3
je 8g Kältemittel haben. Die Menge des Kältemittels
in Ihrem Gerät fi nden Sie im Datenblatt
(auf Seite DE-22).
VORSICHT
Unsachgemäßer Umgang mit dem Gerät
kann zu Beschädigungen führen.
■ Das Gerät möglichst nicht in die Hori-
zontale kippen, sondern nur in leichter
Schräglage transportieren.
■ Gerät nur gegen die Wand lehnen, um
den Türanschlag zu wechseln.
■ Beim Auspacken keine spitzen Gegen-
stände verwenden.
Transportieren und Auspacken
• Transportieren Sie das Gerät mit Hilfe
einer Transportkarre oder einer zweiten
Person.
• Packen Sie das Gerät aus, entfernen Sie
vorsichtig alle Verpackungsteile, Kunststoffprofile, Klebestreifen und Schaumpolster, die sich außen befinden.
• Belassen Sie vorerst alle Verpackungsund Transportmaterialien im Inneren an
ihrem Platz.
Der geeignete Standort
Um die größtmögliche Kühlleistung bei geringstem Energieverbrauch zu erzielen, wählen Sie einen Standort, der:
– nicht zu warm, trocken und gut be lüf te t ist,
–nicht di rekt von der Son ne beschienen wird,
– mindestens 3 m3 groß ist.
Beschädigungsgefahr!
Das Gerät arbeitet eventuell nicht einwandfrei, wenn es über längere Zeit zu geringer Umgebungstemperatur ausgesetzt
wird. Es kann dann zu einem Temperauranstieg im Inneren kommen.
■ Halten Sie die vorgesehene Umgebungs-
temperatur ein (siehe „Klimaklasse“ auf
Seite 13).
Ungünstig ist ein Platz un mit tel bar neben
einem Ofen, Herd oder Heiz kör per. Die Min dest ab stän de zu sol chen Ge rä ten betragen:
– zu Elektroherden 3 cm
– zu Öl- und Kohleherden 30 cm
– zu Kühlgeräten 2 cm
– zu Wasch-/Geschirrspülmaschinen 2 cm
Können diese Abstände nicht eingehalten
wer den, muss eine Isolierplatte da zwi schen ge stellt werden. Ist im Auf stel lungs raum eine
Fußbodenheizung installiert, eine Isolierplatte
aus festem Material un ter das Gerät legen.
Page 14
InbetriebnahmeSeite DE-14
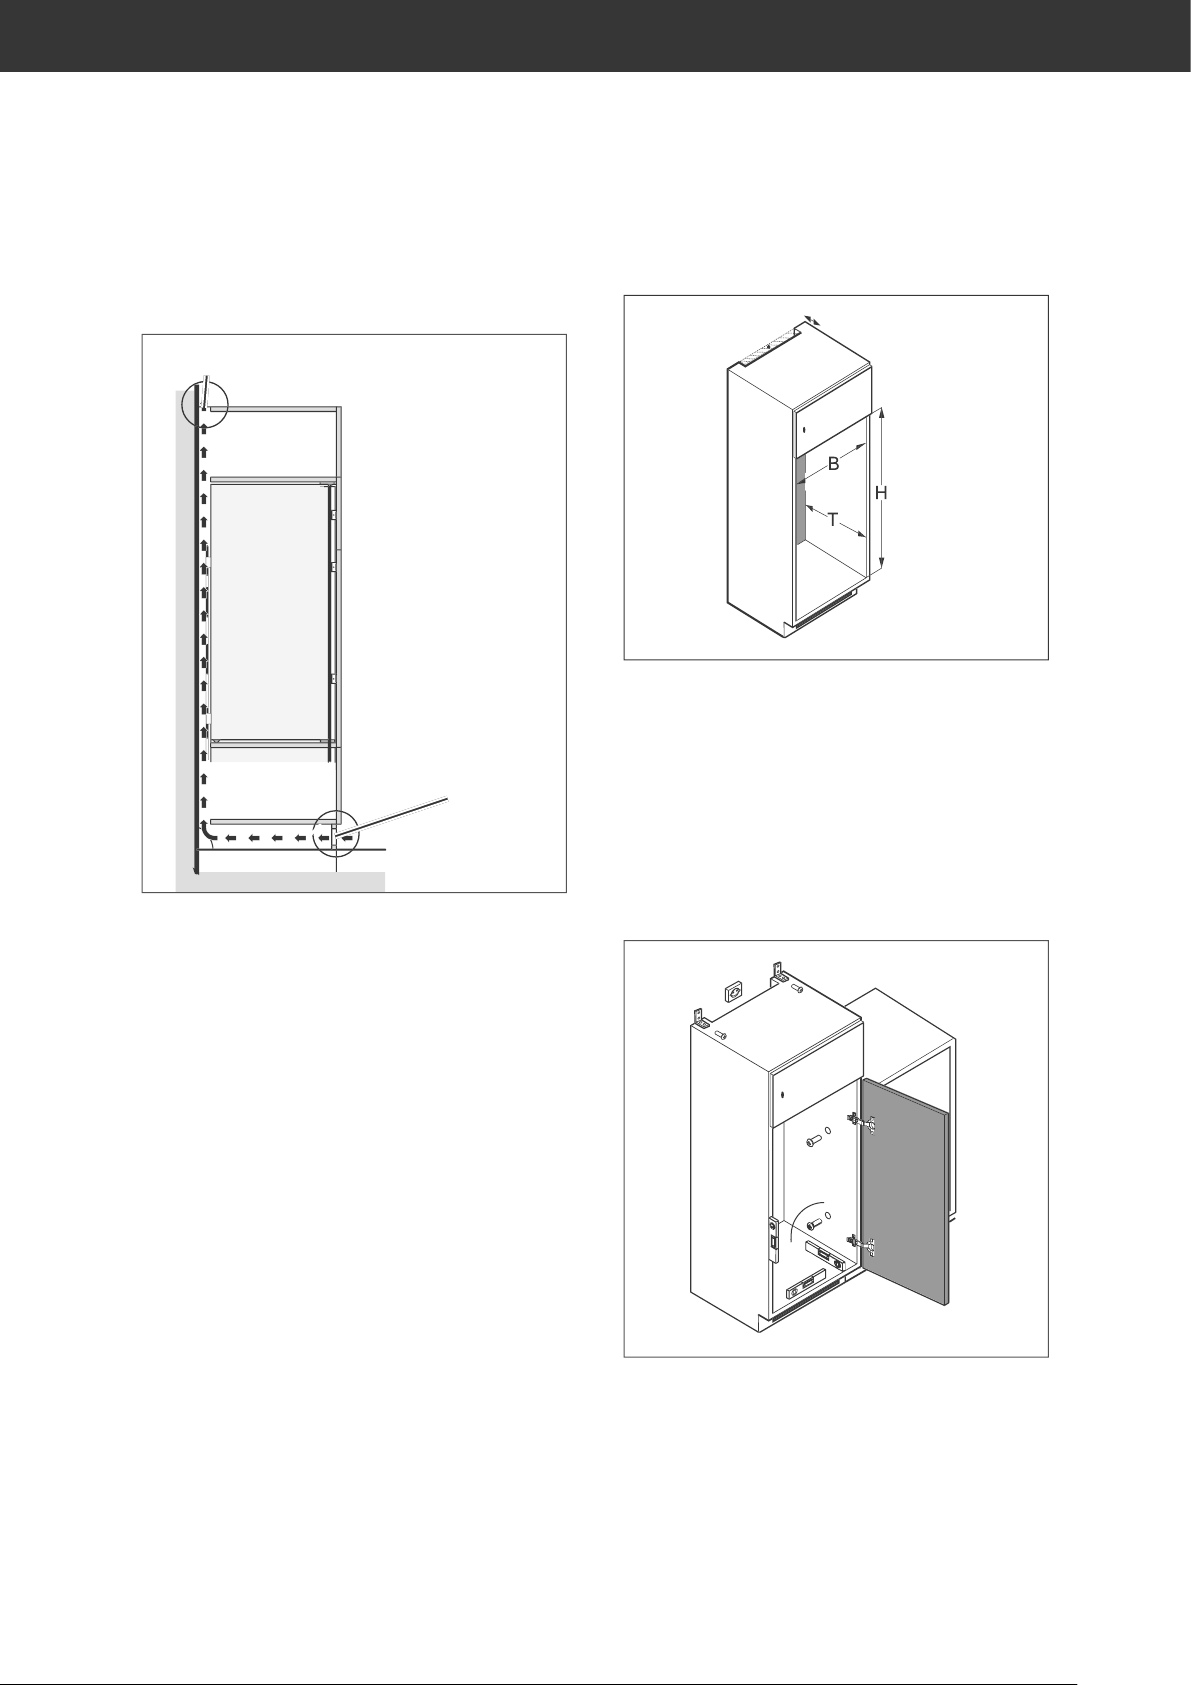
Das geeignete Möbel
200 cm
2
200 cm
2
Um aus Sicherheitsgründen eine ausreichende Belüftung des Kühlschranks zu erzielen, müssen die Angaben des erforderlichen
Lüftungsquerschnittes eingehalten werden.
Die Einbaunische muss folgende Bedingungen erfüllen:
Höhe (H): 1220 bis 1230 mm
Breite (B): 560 mm
Tiefe (T): ≥ 550 mm
Abstand zur Wand: ≥ 38 mm
Netzkabellänge: ca. 1520 mm
Lüftungskamin am
hinteren Teil des
Einbauschranks: mindestens 200 cm
2
Die Belüftung des Kompressors und des Verflüssigers erfolgt durch eine Öffnung, die an
der unteren Seite des Küchenmöbels vorhanden sein muss (Größe der Öffnung: minde-
2
stens 200 cm
).
Oben am Küchenmöbel muss ebenfalls eine
Öffnung vorhanden sein, damit die Luft austreten kann (Größe der Öffnung: mindestens
2
200 cm
).
90°
Die Einbaunische muss an den Nebenschränken oder an der Wand angeschraubt und
sorgfälltig ausgerichtet werden. Die Möbeltüren müssen ausgerichtet und die Scharniere festgezogen sein.
Page 15

Inbetriebnahme
Seite DE-15
Grundreinigung
Um den Geruch zu ent fer nen, der allen neuen Ge rä ten anhaf tet, reinigen Sie das Gerät,
bevor Sie es benutzen (siehe die „Kühlbereich
reinigen“ auf Seite DE-11.
Türanschlag wechseln
Sie können die Sei te, an der die geöffnete Tür
an schlägt, wechseln. Bei Auslieferung befindet sich der Anschlag rechts.
Da die ser Um bau et was hand werk li ches Geschick erfordert, lesen Sie die Ar beits schrit te
vor dem Umbau bitte vollständig durch.
Neben dem Lieferumfang benötigen Sie
– einen mittelgroßen Kreuzschlitz-Schrau-
bendreher,
–eine Flachzange,
– möglichst eine zwei te Per son.
1. Stellen Sie sicher, dass das Gerät nicht
ans Stromnetz an ge schlos sen ist.
2. Entnehmen Sie die Türfächer (7), die Gemüseschublade (8) und die Glasablagen
(9) und (10).
A
5. Lösen Sie die drei Schrauben des oberen
Scharniers (C), nehmen Sie sie heraus
und bewahren Sie sie gut auf.
6. Nehmen Sie die Tür heraus und stellen
Sie sie beiseite.
7. Schrauben Sie die Schraube (B) auf der
bisherigen Anschlagseite hinein.
8. Kippen Sie das Gerät etwas und lehnen
Sie es an die Wand.
D
9. Schrauben Sie die beiden Füße ab.
10. Entnehmen Sie den Stift (D) aus dem
einen Fuß und setzen Sie ihn in dem
anderen ein; die kürzere Seite gehört in
den Fuß.
11. Setzen sie den Fuß mit dem Stift (D) von
unten in die vorgesehene Aussparung
und schrauben Sie den Fuß wieder fest.
12. Schrauben Sie auch den anderen Fuß fest.
13. Stellen Sie das Gerät wieder senkrecht hin.
14. Setzen Sie die Tür von oben über den
Stift (D) und schließen Sie sie.
15. Lösen Sie nun den Stift im oberen Schar-
nier (C) mit einer Flachzange.
16. Setzen Sie den Stift von der anderen
Seite wieder ein.
B
3. Schrauben Sie die Leiste (A) auf der
Oberseite ab und legen Sie sie zur Seite.
4. Schrauben Sie die Schraube (B) auf der
neuen Anschlagseite ebenfalls heraus und
bewahren Sie sie gut auf.
C
C
17. Schrauben Sie das Scharnier (C) auf der
neuen Anschlagseite fest.
18. Kontrollieren Sie abschließend den korrekten Sitz der Tür (siehe „Türdichtungen
kontrollieren und reinigen“ auf Seite DE-11).
Page 16

InbetriebnahmeSeite DE-16
)14)16)17)18)19)
2
Gerät einbauen
Montagematerial
Anzahl
15
1
Neben dem Lieferumfang benötigen Sie
– einen mittelgroßen Kreuzschlitz-Schrau-
bendreher,
–eine Flachzange,
– möglichst eine zwei te Per son.
HINWEIS
Beschädigungsgefahr!
Unsachgemäßer Umgang mit dem Kühlschrank kann zu Beschädigungen führen.
■ Der Einbau des Kühlschranks sollte von
einem Fachmann durchgeführt wer-
den, andernfalls erlischt der Garantiean-
spruch.
(17)
(19)
3. Schrauben Sie die Winkelstücke (17) mit
den Schrauben (19) an die Gerätetür. Löcher mit Nagel Ø 2,5 mm vorstechen.
40 mm
Lesen Sie die Arbeitsschritte bitte erst einmal
durch, bevor Sie mit dem Einbau des Kühlschranks beginnen.
1. Schalten Sie vor Einbau und Anschluss
des Geräts den betreffenden Strom kreis
aus bzw. drehen Sie die betroffenen Sicherungen her aus .
2. Entnehmen Sie bitte die Türfächer (7), die
Gemüseschublade (8) und die Glasablagen (9) und (10).
4. Setzen Sie das Gerät in den Einbauschrank.
Der Abstand zwischen dem Gerät und der
unteren Kante des Einbauschranks muss
ca. 40 mm betragen.
Damit das Fugenprofil eingeklemmt
werden kann, muss auf der gegenüberliegenden Seite der Türscharniere ein
Abstand von 4 mm in der gesamten Höhe
zwischen Gerät und Einbauschrank eingehalten werden.
Page 17

Inbetriebnahme
Seite DE-17
(19)
5. Schrauben Sie den Kühlschrank mit den
Schrauben (19) am Einbauschrank fest.
6. Stecken Sie den Netzstecker in eine ordnungsgemäß installierte Steckdose.
18 mm
6 mm
6 mm
10. Zwischen Einbauschrank und Einbauschranktür muss ein mind. 6 mm breiter
Spalt verbleiben, damit die Kühlschranktür einwandfrei schließen kann.
Um die Spaltbreite einzustellen, lösen
Sie die Schrauben (19) etwas und stellen
manuell den gewünschten Abstand ein.
Ziehen Sie anschließend die Schrauben (19) wieder fest.
(15)
7. Öffnen Sie die Kühlschranktür so weit
wie möglich. Schieben Sie die Türmitnehmer (15) in die Führungsschienen der
Winkelstücke (17).
8. Schrauben Sie die Türmitnehmer (15) mit
den Schrauben (19) in einem Abstand
von ca. 18 mm zur Türkante des Einbauschranks fest.
9. Schließen Sie die Tür des Einbauschranks
und prüfen Sie dabei die Gleitführung
zwischen Winkelstück (17) und Türmitnehmer (15) auf einwandfreie Funktion.
(16)
(18)
11. Öffnen Sie die Kühlschranktür so weit
wie möglich und schieben Sie die langen
Abdeckstreifen (16) in die Führungsschienen der Türmitnehmer (15).
12. Setzen Sie die kurzen Abdeckstreifen (18) als Abdeckung auf die
Winkel stücke (17).
Page 18

InbetriebnahmeSeite DE-18
Stromversorgung
VORSICHT
Gefahr von Sachschäden!
Vor dem Anschließen muss die Kühlfl üssigkeit zur Ruhe kommen.
■ Gerät nach dem Transport 2 Stun den ru-
hig ste hen lassen.
(14)
13. Schneiden Sie das Fugenprofil (14) auf
die passende Länge. Drücken Sie es auf
der gegenüberliegenden Seite der Türscharniere zwischen Gerät und Einbauschrankwand ein.
14. Setzen Sie die Glasablagen (9) und (10),
die Gemüseschublade (8) sowie die Türfächer (7) ein.
1. Schalten Sie den während des Geräteeinbaus ausgeschalteten Strom kreis wieder ein bzw. drehen Sie die betroffenen
Sicherungen hinein.
Sie hören einen kurzen Signalton.
Das Gerät ist eingeschaltet, die Innenbeleuchtung (1) leuchtet, der Mo tor beginnt
zu arbeiten, das Käl te mit tel strömt durch
die Rohre und Sie hören ein leich tes Rauschen.
2. Wie Sie das Gerät bedienen und optimal
nutzen, erfahren Sie im Kapitel „Bedienung“ auf Seite DE-9.
Fehlersuchtabelle
Bei allen elektrischen Geräten können Störungen auf tre ten. Da bei muss es sich nicht um ei nen
Defekt am Gerät handeln. Prüfen Sie des halb bitte an hand der Ta bel le, ob Sie die Störung be sei ti gen können.
WARNUNG
Stromschlaggefahr bei unsachgemäßer Reparatur!
Nie mals versuchen, das de fek te – oder ver meint lich defekte – Ge rät selbst zu re pa rie ren.
Sie kön nen sich und spä te re Be nut zer in Gefahr brin gen. Nur au to ri sier te Fach kräf te dürfen
die se Re pa ra tu ren ausführen.
Page 19

Fehlersuchtabelle
Fehlersuchtabelle
Problem Mögliche Ursache Lösungen, Tipps
Seite DE-19
Kompressor aus,
Innenbeleuchtung
aus.
Kompressor aus,
Innenbeleuchtung
an.
Gerät kühlt zu
stark.
Gerät kühlt nicht
ausreichend.
Steckdose ohne Strom. Durch Anschluss eines anderen Geräts
prü fen.
Netzstecker sitzt lose. Festen Sitz des Netz stec kers kontrollieren.
Gewünschte Temperatur ist
erreicht.
Neuaufstellung. Das Gerät benötigt 2 Stun den, um das Käl-
Temperaturskala steht auf
einer zu hohen Kühlstufe.
Falsche Temperatur gewählt. Temperatur niedriger einstellen
Tür nicht fest verschlossen
oder Türdichtung liegt nicht
voll auf.
Gerät steht in der Nähe einer
Wärmequelle.
Weiteres Kühlen nicht erforderlich. Wenn
die Innentemperatur steigt, schaltet sich der
Kompressor selbsttätig ein.
te mit tel zur Ruhe kommen zu lassen.
Temperatur herunterregeln
(siehe „Bedienung“ auf Seite DE-9).
(siehe Seite DE-9).
Siehe „Türdichtungen kontrollieren und reinigen“ auf Seite DE-11.
Isolierplatte dazwischen stellen oder Standort wech seln.
Gerät erzeugt Geräusche.
Speisen warm eingelegt. Nur abgekühlte Speisen einlegen.
Umgebungstemperatur zu
niedrig oder zu hoch.
Kompressor scheint defekt. Temperatur auf „+2“ einstellen. Schaltet der
Funktionsbedingte
Betriebsgeräusche. Diese
zeigen keine Störung an.
Störende Geräusche, die
Sie beseitigen können.
Umgebungstemperatur an Klimaklasse anpassen (siehe „Produktdatenblatt und Technische Daten“ auf Seite 22).
Kom pres sor nicht binnen einer Stunde ein,
ver stän di gen Sie unseren Service (siehe
Seite DE-20).
Rauschen: Kälteaggregat läuft.
Fließgeräusche: Kältemittel fließt durch die
Rohre.
Klicken: Motor schaltet ein oder aus.
Festen Stand prüfen.
Gegenstände vom Gerät entfernen.
Fremdkörper von der Geräterückseite
entfernen.
Page 20

ServiceSeite DE-20
Service
Damit wir Ihnen schnell helfen können, nennen Sie uns bitte:
Gerätebezeichnung Farbe Modell Bestellnummer
Hanseatic Einbau-Kühlschrank weiß HEKS 12254 A1 325 548
Beratung, Bestellung und
Reklamation
Wenden Sie sich bitte an die Produktberatung
Ihres Versandhauses, wenn
– die Lieferung unvollständig ist,
– das Gerät Transportschäden aufweist,
– Sie Fragen zu Ihrem Gerät haben,
– sich eine Störung nicht mithilfe der Fehler-
suchtabelle beheben lässt,
– Sie weiteres Zubehör bestellen möchten.
Bitte beachten Sie: Sie sind für den einwandfreien Zustand des Gerätes und die fach ge-
rech te Benutzung im Haushalt verantwortlich. Wenn Sie wegen eines Bedienfehlers den
Kundendienst rufen, so ist der Besuch auch während der Gewährleistungs-/Ga ran tie zeit für Sie
mit Kos ten ver bun den. Durch Nichtbeachtung dieser Anleitung ver ur sach te Schäden können
leider nicht anerkannt werden.
Reparaturen und Ersatzteile
Kunden in Deutschland
– Wenden Sie sich bitte an unseren
Tech nik- Se rvic e:
Telefon 0 18 06 18 05 00
(Festnetz 20 Cent/Anruf, Mobilfunk max.
60 Cent/Anruf)
Kunden in Österreich
– Wenden Sie sich bitte an das Kundencen-
ter oder die Produktberatung Ihres Versandhauses.
Page 21

Umweltschutz
Umweltschutz
Seite DE-21
Elektro-Altgeräte
umweltgerecht entsorgen
Elektrogeräte enthalten Schadstoffe und wertvolle Ressourcen.
Jeder Verbraucher ist deshalb ge-
setzlich verpflichtet, Elektro-Altgeräte an einer zugelassenen Sammel- oder
Rücknahmestelle abzugeben. Dadurch werden sie einer umwelt- und ressourcenschonenden Verwertung zugeführt.
Sie können Elektro-Altgeräte kostenlos beim
lokalen Wertstoff-/Recyc linghof abgeben.
Für weitere Informationen zu diesem Thema
wenden Sie sich direkt an Ihren Händler.
VORSICHT
Brandgefahr!
Kühlgeräte enthalten in den Kühlsystemen und Isolierungen, Kältemittel
und Gase, welche fachgerecht entsorgt
werden müssen. Bei Austritt von Kältemittel besteht Brandgefahr.
■ Achten Sie darauf, dass an einem Kühl-
gerät bis zur fachgerechten Entsorgung
keine Kühlrippen oder Rohre beschädigt
werden.
Unser Beitrag zum Schutz der
Ozonschicht
In diesem Gerät wurden 100 %
FCKW- und FKW-freie Kälte- und
Aufschäummittel verwendet. Dadurch wird die Ozonschicht geschützt und der
Treibhaus effekt reduziert.
Unsere Verpackungen wer den aus um welt freund li chen, wie der ver wert ba ren Materialien
hergestellt:
– Außenverpackung aus Pappe
–Formteile aus ge schäum tem, FCKW-freiem
Po ly sty rol (PS)
– Folien und Beutel aus Polyäthylen (PE)
– Spannbänder aus Po ly pro py len (PP)
– Auch Energie sparen schützt vor zu starker
Erwärmung unserer Erde. Ihr neues Gerät
verbraucht mit seiner umweltverträglichen
Isolierung und seiner Technik wenig Energie.
Wenn Sie sich von der Verpackung trennen
möchten, entsorgen Sie diese bitte umweltfreundlich.
Page 22

Seite DE-22 Produktdatenblatt und Technische Daten
Produktdatenblatt für elektrische Haushaltskühl- und
Gefriergeräte sowie entsprechende Kombinationsgeräte
nach VO (EU) Nr. 1060/2010 und VO (EU) 643/2009
Warenzeichen
Modellkennung HEKS 12254 A1
Kategorie des Haushaltskühlgerätemodells 1, Kühlschrank
Energieeffizienzklasse auf einer Skala A+++
(höchste Effizienz) bis G (geringste Effizienz)
Energieverbrauch 128 kWh/Jahr, auf der Grundlage von Ergebnissen der Normprüfung über 24
Stunden. Der tatsächliche Verbrauch hängt von der Nutzung und vom Standort des Geräts ab.
Gefrierbereich / Stern-
Summe der
Nutzinhalte
Einstufung
Kühlbereich (frostfrei) 2) 201 L
A+
– L / –
Lagerzeit bei Störung – h
Gefriervermögen - kg – kg /24 h
Klimaklasse: SN-ST. Dieses Gerät ist für den Betrieb bei einer Umgebungstemperatur
zwischen 10 °C und 38 °C bestimmt.“
Luftschallemission 41 dB(A) re 1 pW
Einbaugerät ja
Die oben angegebenen Werte sind unter genormten Laborbedingungen nach EN 62552 gemessen worden.
Technische Daten
Bestellnummer 325 548
Gerätebezeichnung Einbaukühlschrank
Modell HEKS 12254 A1
Versorgungsspannung / Frequenz 220 - 240 V, 50 Hz
Stromverbrauch 0,5 A
Leistungsaufnahme 80 W
Gerätemaße (Höhe × Breite × Tiefe mit Anschlüssen) 121 cm × 54 cm × 55 cm
Leergewicht 34 kg
Kältemittel R600a (Isobutan)
Kältemittel-Füllmenge 23 g
Schaummittel Zyklopentan
Page 23

HEKS 12254 A1
Manual/version:
93115_GB_20180823
Article no.: 325 548
Reproduction, even of excerpts,
is not permitted!
User manual
Built-in refrigerator
Page 24

Table of contentsPage GB-2
Table of contents
Delivery . . . . . . . . . . . . . . . . . . . . . . . . . . . . GB-3
Package contents . . . . . . . . . . . . . . . . . . GB-3
Check the delivery . . . . . . . . . . . . . . . . . . GB-3
Packaging tips . . . . . . . . . . . . . . . . . . . . . GB-3
Appliance parts . . . . . . . . . . . . . . . . . . . . . . GB-4
Safety . . . . . . . . . . . . . . . . . . . . . . . . . . . . . GB-5
Intended use . . . . . . . . . . . . . . . . . . . . . . GB-5
Explanation of terms . . . . . . . . . . . . . . . . GB-5
Explanation of symbols . . . . . . . . . . . . . . GB-5
Safety notices . . . . . . . . . . . . . . . . . . . . . GB-5
Operation . . . . . . . . . . . . . . . . . . . . . . . . . . GB-9
Requirements . . . . . . . . . . . . . . . . . . . . . . GB-9
Switching on and off . . . . . . . . . . . . . . . . . GB-9
Thermostat control . . . . . . . . . . . . . . . . . . GB-9
Refrigeration . . . . . . . . . . . . . . . . . . . . . . . GB-10
Store food correctly . . . . . . . . . . . . . . . . GB-10
Maintaining quality . . . . . . . . . . . . . . . . . GB-10
Saving energy . . . . . . . . . . . . . . . . . . . . GB-10
Moving glass shelves and
door compartments . . . . . . . . . . . . . . . . GB-10
Service . . . . . . . . . . . . . . . . . . . . . . . . . . .GB-20
Advice, order and complaint . . . . . . . . . GB-20
Repairs and spare parts . . . . . . . . . . . . GB-20
Environmental protection . . . . . . . . . . . . . GB-21
Disposing of old electrical devices
in an environmentally-friendly manner . GB-21
Our contribution to the protection
of the ozone layer . . . . . . . . . . . . . . . . .GB-21
Product data sheet for electric household refrigerators and freezers as well as corresponding
combination appliances according to Regulation
(EU) No. 1060/2010 and Regulation (EU) No.
643/2009 . . . . . . . . . . . . . . . . . . . . . . . . . . GB-22
Technical specifications . . . . . . . . . . . . . . GB-22
Care and maintenance . . . . . . . . . . . . . . . GB-11
Checking and cleaning door seals. . . . . GB-11
Clean exterior . . . . . . . . . . . . . . . . . . . . . GB-11
Defrosting the fridge compartment . . . . GB-11
Cleaning the fridge compartment . . . . . GB-11
Changing bulb . . . . . . . . . . . . . . . . . . . . GB-12
Start-up . . . . . . . . . . . . . . . . . . . . . . . . . . . GB-13
Moving and unpacking . . . . . . . . . . . . . . GB-13
The suitable location . . . . . . . . . . . . . . . GB-13
The suitable furniture . . . . . . . . . . . . . . . GB-14
Cleaning before use . . . . . . . . . . . . . . . . GB-15
Changing the door hinges . . . . . . . . . . . GB-15
Switching on appliance . . . . . . . . . . . . . GB-16
Troubleshooting table . . . . . . . . . . . . . . . . GB-18
Power supply . . . . . . . . . . . . . . . . . . . . . GB-18
Information on installation and
start-up available from page
GB-13.
Please read through the safety
instructions and user manual
carefully before using the appliance. Only this way can all of the functions be used safely and reliably.
Be absolutely sure to also observe the
national regulations in your country, which
are also valid in addition to the regulations
specified in this user manual.
Keep all safety notices and instructions
for future reference. Pass all safety notices and instructions on to the subsequent
user of the product.
Page 25

Delivery
Delivery
Page GB-3
Package contents
– Refrigerator with vegetable drawer
– Cleaning rod
– Egg tray, 6 compartments (not illustrated)
– Pouch with fittings (see figure on page
GB-16)
– User manual
Check the delivery
1. Move the appliance to a suitable place
and unpack it (see „Start-up“ on page
GB-13).
2. Check that the delivery is complete.
3. Check whether the appliance was damaged during transit.
4. If the delivery is incomplete or the appliance has been damaged during transport,
please contact our Service Centre (see
page GB-20).
WARNING!
Do not operate the appliance if it has visible damage.
Packaging tips
If you have sufficient space, we recommend keeping the packaging, at
least during the warranty period. If the
appliance needs to be sent out for repairs,
only the original packaging will provide sufficient protection.
If you would like to dispose of the packaging, please dispose of it in an environmentally
friendly way.
Page 26

Appliance partsPage GB-4
Appliance parts
(11)
(10)
(1) to (6)
(7)
(9)
(8)
(13)
(1) Interior light
(2)–(6) Control elements
(For more information see
page GB-9)
(7) 3 open door compartments
(8) Drawer for fruit and vegetables
(12)
(9) 1 glass shelf as a cover for the
vegetable drawer
(10) 3 glass shelves, adjustable
(11) Fridge compartment
(12) Cleaning rod
(13) Pouch with fittings,
(more information from page GB-13)
Page 27

Safety
Safety
Page GB-5
Intended use
The appliance is intended to chill fresh foods.
The appliance is intended solely for use in
private households.
Use the appliance exclusively as described
in this user manual. Any other use is deemed
improper and may result in damage to property or even personal injury. The manufacturer accepts no liability for damage caused by
improper use.
Explanation of terms
The following symbols can be found in this
user manual.
WARNING
This symbol indicates a hazard with a medium level of risk which, if not avoided,
could result in death or serious injury.
CAUTION
This symbol indicates a hazard with a low
level of risk which, if not avoided, could result in minor or moderate injury.
NOTICE
This symbol warns against possible damage to property.
This symbol refers to useful supplementary information.
Explanation of symbols
Caution: Fire hazard!
Safety notices
In this chapter you will fi nd general safety
notices which you must always observe for
your own protection and that of third parties. Please also observe the warning notices in the individual chapters on operation,
cleaning, etc.
Risks in handling household
electrical appliances
Risk of electric shock!
The appliance operates with 220–
240 V~/50 Hz mains voltage. Touching live
parts may result in severe injury or death.
■ Only use the appliance indoors. Do not
use in wet rooms or in the rain.
■ Do not operate or continue to operate
the appliance,
■ if it has visible damage, e.g. the power
cord is defective.
■ if it starts smoking or there is a smell
of burning.
■ it makes unfamiliar noises.
In this case, you should pull out the mains
plug and have the appliance repaired (see
„Service“ on page GB-20).
■ Only connect the appliance to an easily
accessible socket so that you can quickly
disconnect it from the mains in the event
of a fault.
■ Take care to prevent the risk of tripping
when laying the mains cord.
■ The device, mains plug and cable should
be kept away from naked fl ame and hot
surfaces.
■ Do not kink or pinch the mains cord or
lay it over sharp edges. This can result in
a break in the cable.
■ If the mains cord of the appliance is
damaged, it must be replaced by the
manufacturer, through customer service
or by a qualifi ed specialist.
Page 28

SafetyPage GB-6
■ Do not operate the appliance with an ex-
ternal timer or a separate remote control
system.
■ Do not put any objects in or through the
housing openings, and also make sure
that children cannot insert any objects
in them.
■ Always take hold of the mains plug at
the cable itself, not the mains cord.
■ Never touch the mains plug with wet
hands.
■ Never immerse the mains cord or plug in
water or any other liquids.
■ In the event of any defect, or when
cleaning and servicing, please unplug
from the mains.
■ Inspections and repairs to the appliance
may only be carried out by authorised
specialists and our service personnel (see
page GB-20). Unauthorised repairs to
the appliance can cause property damage and personal injury, and invalidate
liability and warranty claims. Never try
to repair a defective or suspected defective appliance yourself.
■ Only parts corresponding to the original
appliance specifi cations may be used for
repairs. This appliance contains electrical and mechanical parts which are essential for protection against potential
sources of danger.
Fire hazard!
The inappropriate use of the device can
cause a fi re and damage to property.
■ Only connect the appliance to a properly
installed and earthed electric socket. Do
not connect to a multi-socket extension
cable or a multi-socket plug.
■ To ensure adequate air circulation, the
ventilation slots and the entire space
above the unit must remain clear of obstructions.
■ Do not place the appliance directly
against the wall. Adhere to minimum
distances (see „The suitable location“ on
page GB-13).
Risk of injury!
■ The appliance is heavy and bulky. Seek
the help of another person during transport, setting up, positioning or while
mounting or dismantling the doors.
■ Drawers, shelves, etc. must not be used
as steps or supports.
Risks for certain groups of people
Dangers for children and people with limited physical, sensory or mental capacity!
■ This appliance may be used by children
aged eight years and above, as well as
persons with reduced physical, sensory or mental capacities or those lacking
experience and/or knowledge, if they
are supervised or have been instructed
in how to safely use the appliance and
have understood the dangers associated
with operating it.
■ Cleaning and maintenance must not be
carried out by children unless they are
supervised.
Additional precautionary measures apply
to children of all ages.
■ Do not allow children to play with the
packaging fi lm. They may get caught up
in this or suffocate.
■ Children must not be allowed to play
with the appliance.
■ Stop children from pulling small parts
from the appliance or taking them out
of the accessory bag and putting them
in their mouths. Children can choke on
small parts.
Page 29

Safety
Page GB-7
Risks when dealing with fridge and
freezer appliances
Dangers from the refrigerant!
The refrigerant circuit of your appliance
contains the sustainable but fl ammable refrigerant R600a (isobutane).
■ Mechanical intervention in the refrigera-
tion system must only be carried out by
authorised specialists.
■ Do not damage the refrigeration circuit,
e.g. by piercing the refrigerant channels
of the evaporator with sharp objects, by
bending pipes, etc.
■ Leaking refrigerant is fl ammable, and
can lead to eye damage. If this happens,
rinse eyes with clean water and call a
doctor immediately.
■ To prevent the formation of a fl ammable
gas-air mixture in the event of a leakage
in the refrigeration circuit, the installation space must have a minimum size of
1 m³ per 8 g of refrigerant in compliance
with the EN 378 standard. The volume
of refrigerant is specifi ed on the data
sheet (see page GB-22).
Danger of explosion!
Improper handling of the appliance can
lead to explosions.
■ Do not store explosive substances or
spray cans with fl ammable propellants
inside the appliance, as they may cause
ignitable gas-air mixtures to explode.
■ Never use defrosting sprays. They can
generate explosive gases. Also refrain
from using electric heating appliances,
naked fl ames or ice scrapers. The insulation could melt or become scratched.
■ Only store high-proof alcohol upright
and tightly sealed.
Health hazards!
Incorrect handling, insuffi cient cooling
or overlapping items can spoil the stored
food. This could lead to a risk of food poisoning when consumed!
■ In particular, pack raw meat and fi sh
carefully to ensure that adjacent food
cannot be contaminated by salmonella
or similar bacteria.
■ After a power failure, check whether
food is still edible.
The appliance may not operate properly if
exposed to low ambient temperatures for
extended periods of time. This can then
lead to an increase in temperature inside
the appliance.
■ Observe the specifi ed ambient tempera-
ture (see “climate category” line on page
GB-22).
Risk of damage!
Improper handling of the appliance can
lead to property damage.
■ Do not use the door to pull or lift the ap-
pliance.
■ The appliance must only be placed on a
level and fi rm surface. The surface must
be strong enough to support the appliance’s weight when fully laden.
■ Do not use sharp or pointed objects to
unpack it.
■ When unpacking the appliance, never
damage the insulation material on the
back of the appliance.
■ Do not use any electrical parts inside the
appliance that do not conform to the
manufacturer’s recommended design.
■ Do not use any mechanical devices or
means other than those recommended
by the manufacturer.
Page 30

SafetyPage GB-8
■ The interior light must only be used to il-
luminate the interior of the appliance. It
is not suitable for lighting a room.
■ Do not store glass or metal containers
containing water, lemonade, beer etc.
Water expands when frozen and can
burst the container.
■ Defrost the appliance in a timely man-
ner, before it forms a layer of ice and
frost of more than 4mm. Excessive ice
formation increases power consumption
and the freezer compartment door may
no longer close tightly.
■ Do not use any means other than those
recommended by the manufacturer
to speed up defrosting. For example,
do not use any electric heating equipment, knives or devices with an open
fl ame such as a candle. The thermal insulation and the interior are scratch and
heat-sensitive and can melt.
■ When cleaning, please note:
– Never use harsh, granular, soda, acid,
solvent-based or abrasive cleaners.
These attack the plastic surfaces.
All-purpose cleaners with a neutral pH
are recommended.
– Door seals and plastic parts are sen-
sitive to oil and grease. Remove contaminants as quickly as possible.
– Only use soft cloths.
■ Wait 5 minutes after switching off. Only
then switch the appliance on again.
■ Only use original accessories.
Page 31

Operation
Operation
Page GB-9
Requirements
You can use the appliance if
– You have read the “Safety” chapter and
understood the safety instructions (page
GB-5).
– It has been set up and connected as de-
scribed in the “Start-up” chapter (see page
GB-13).
Switching on and off
Switching on
You will hear a brief signal tone as soon as
the appliance is connected to the mains. The
appliance is switched on, the interior light illuminates, the motor starts to work, the refrigerant flows through the pipes and you hear a
slight noise.
• If the appliance makes worrying noises
check the solid base and remove any objects on the appliance.
Switch off / shutdown
1. Empty the appliance and clean it (see
Chapter „Care and maintenance“ on page
GB-11).
2. Leave the door open slightly to avoid
mould formation.
3. Pull out the mains plug.
Thermostat control
WARNING
Health hazard!
The appliance may not operate properly if
exposed to low ambient temperatures for
extended periods of time. This can then
lead to an increase in temperature inside
the appliance.
■ Observe the specifi ed ambient temper-
ature (see “Climate category” on page
GB-22).
(2)
(3)
(4)(5)(6)
The control panel offers you various options
to control the inside temperature.
• Set the inside temperature with the ”Adjust“ (6) button from +2 °C to +8 °C. The
scale (5) shows the current setting. Each
time you press the button, the setting
changes in degree increments.
• Activate or deactivate the “Smart” or “Super” mode with the “Mode” (4) button. The
corresponding LED (2) or (3) illuminates.
– In “Smart” mode the cooling power ad-
justs to the ambient conditions. We recommend using this mode.
– In “Super” mode the appliance cools
down as far as possible. After 54 hours
it reverts to the configured temperature.
In order to monitor the cooling power,
we recommend using a fridge/freezer
thermometer. Place this on the glass shelf
above the vegetable drawer. Here the right
temperature is +6 °C.
Page 32

RefrigerationPage GB-10
)
Refrigeration
WARNING
Danger of explosion!
Improper handling of the appliance can
lead to explosions.
■ Do not store explosive substances or
spray cans with fl ammable propellants
inside the appliance, as they may cause
ignitable gas-air mixtures to explode.
■ Only store alcohol upright and tightly
sealed.
Store food correctly
(9) above the vegetable drawer (8). This
is where the temperature is lowest.
• Place fresh fruit and vegetables in the
vegetable drawer (8).
Maintaining quality
• To maintain the flavour and freshness of
food in the fridge compartment (11), only
place packaged food in the fridge compartment. Use special plastic containers
for good or standard food wrap.
• Place the food
– in the fridge in a way that allows the air
to circulate freely. Do not cover the glass
shelves with paper or anything similar.
– somewhere that is not directly against
the rear wall. Otherwise it may freeze
onto the rear wall.
(10)
(9)
(8)
Fill the fridge compartment (11) in such a way
that the temperature conditions inside are
used to their full potential:
• Place spreadable butter and cheese in
the top door compartment (7). This is
where it is warmest.
• Store bottles and drinks cartons in the
bottom door compartment (7). Position full
containers closer to the hinge in order to
reduce the strain on the door.
• Place cooked and baked foods on the
glass shelves (10).
• Place fresh meat, game, poultry, bacon,
sausage and raw fish on the glass shelf
(7)
Saving energy
• Allow hot food to cool before placing it in
the fridge compartment (11).
• The temperatures in the appliance and
thus the energy consumption can increase
– if the doors are opened frequently or for
a prolonged period.
– if the room temperature fluctuates up
and/or down.
• Energy consumption is also dependent
on the selected location (for more detailed
information, see page GB-13).
Moving glass shelves and
door compartments
The glass shelves (10) above the vegetable
drawer cover can be moved around.
1. Inserting and removing glass shelf/door
compartment.
2. Guide glass shelf/door compartment over
the side brackets from above.
Page 33

Care and maintenance
Care and maintenance
Page GB-11
WARNING
Health hazard!
■ Cleaning and user maintenance must
not be carried out by children unless they
are supervised.
Risk of electric shock!
■ Unplug the mains cable before cleaning.
Always take hold of the plug itself, do
not pull on the mains cord.
■ Make sure that no cleaning water gets
into the ventilation slots, the electrical
parts and the drain opening.
NOTICE
The surfaces and door seals can get damaged by improper handling.
■ Never use harsh, soda, acid, solvent or
abrasive cleaners. These attack the plastic surfaces. All-purpose cleaners with a
neutral pH are recommended.
■ Use care products only on the outer sur-
faces.
■ The door seals are sensitive to oil and
grease – making the rubber porous and
brittle.
■ Only use soft cloths.
Checking and cleaning door
seals
Clean exterior
• Painted surfaces:
Use only light pH-neutral soapy water.
Defrosting the fridge
compartment
This is not necessary. Since the fridge compartment of your appliance has an auto-defrost feature. Frost and ice are automatically
defrosted and the thaw water is collected in
a thaw water container on the reverse side of
the appliance. The thaw water evaporates as
a result of the heat generated by the motor.
Cleaning the fridge
compartment
1. Pull out the mains plug.
2. Remove the chilled goods and place them
in a cool room.
3. Remove the vegetable drawer (8), the
door compartments (7) and the glass
drawers (9) and (10) and clean them in
tepid water with a little washing-up liquid.
Dry all parts thoroughly.
4. Wipe down the inside with warm water
and washing-up liquid.
Add a few drops of vinegar to the water
when wiping for a second time to prevent
the formation of mould. Wipe the interior
dry and leave the door open a while to air.
The door seals must be checked regularly so
that no air can enter the appliance.
1. To test them, clamp a thin piece of paper
in various places. The paper should be
difficult to pull through at all points.
2. If the seal is not uniform everywhere:
Carefully warm the seal in the affected
places with a hair dryer and pull it out
slightly with your fingers.
3. Only clean dirty seals with clean water.
5. Clean the opening of the condensate
drain above the vegetable drawer (8) with
the cleaning rod (12).
6. Only clean the door seals with clean water; they are sensitive to oil and fat.
7. Reinsert the glass shelves, door compartments and drawers and replace the
chilled goods.
8. Insert the mains plug again.
Page 34

RefrigerationPage GB-12
Changing bulb
WARNING
Risk of electric shock!
As the appliance works with mains voltage, which can be dangerous, touching live
parts may lead to serious injury or death.
■ Unplug the mains cable before changing
the light bulb.
Only use light bulbs of the same shape with
an output of max. 15 watt, 230 volt and Holder
E 14.
1. Disconnect the mains plug from the socket.
2. Loosen the cover screw with a
cross-headed screwdriver and remove
the cover.
3. Unscrew the light bulb from the holder
and replace with a new one.
4. Replace the cover and apply slight pressure at the rear to snap it into the groove.
5. Screw the cover back on.
6. Re-insert the mains plug into the socket.
Page 35

Start-up
Start-up
Page GB-13
WARNING
Risk of injury!
■ The appliance is heavy and bulky. Seek
the help of another person during transport, setting up, positioning or while
mounting or dismantling the doors.
■ Drawers, doors, etc. must not be used as
steps or for support.
Hazards of refrigerant
■ Do not damage the refrigeration circuit,
e.g. by piercing the refrigerant channels
of the evaporator with sharp objects, by
bending pipes, etc.
■ Leaking refrigerant is fl ammable, and
can lead to eye damage. If this happens,
rinse eyes with clear water and call a
doctor immediately.
■ To prevent the formation of a fl ammable
gas-air mixture in the event of a leakage
in the refrigeration circuit, the installation space must have a minimum size of
3
1 m
per 8 g of refrigerant in compliance
with the EN 378 standard. The amount
of refrigerant in your appliance can be
found in the data sheet (see page GB-
13).
Improper handling of the appliance may
result in damage.
■ If possible, do not tip the appliance hori-
zontally, but transport it at a slight angle.
■ Only rest the appliance against the wall
to change the door stop.
■ Do not use sharp objects to unpack it.
Moving and unpacking
• Move the appliance using a trolley or with
the help of a second person.
• Unpack the device and carefully remove
all packaging, plastic profiles, adhesive
strips and foam padding from the outside.
• Leave all packaging and transport materials inside for the moment.
The suitable location
To achieve the highest possible cooling performance with the least energy consumption,
choose a location that:
– is not too warm, is dry and well ventilated,
– is not in direct sunlight,
– is at least 3 m3.
CAUTION
Risk of damage!
The appliance may not operate properly if
exposed to low ambient temperatures for
extended periods of time. This can then
lead to an increase in temperature inside
the appliance.
■ Observe the specifi ed ambient temper-
ature (see “Climate category” on page
GB-22).
We do not advise placing it directly next to
an oven, stove or radiator. The minimum distances to such appliances are:
– from electric stoves 3 cm
– from oil and coal burning stoves 30 cm
– from cooling units 2 cm
– from washing machines/dishwashers
If these distances cannot be maintained, an
insulating panel must be placed in-between.
If underfloor heating is installed in the room
where the appliance is to be installed, place
a solid insulating plate under the refrigerator.
2 cm
Page 36

Start-upPage GB-14
The suitable furniture
200 cm
2
200 cm
2
To achieve sufficient ventilation around the
refrigerator for safety reasons, the specifications of the necessary ventilation cross-section must be adhered to.
The installation recess must meet the following requirements:
Height (H): 1220 to 1230 mm
Width (B): 560 mm
Depth (T): ≥ 550 mm
Distance to the wall: ≥ 38 mm
Mains cord length: ca. 1520 mm
Ventilation chamber at the rear of the built-in
cabinet: at least 200 cm
2
Ventilation of the compressor and condenser
occurs through an opening that must be available underneath the kitchen cabinet (size of
2
the opening: minimum 200 cm
).
There must also be an opening on top of the
kitchen cabinet to make sure that air can es-
2
cape (size of the opening: minimum 200 cm
).
90°
The installation recess must be screwed to
the neighbouring cabinets or to the wall and
carefully aligned. The cabinet doors must be
aligned and the hinges tightened.
Page 37

Start-up
Page GB-15
Cleaning before use
To remove the odour that comes with all new
appliances, clean the appliance before use
(see „Cleaning the fridge compartment“ on
page GB-11.
Changing the door hinges
You can change the side on which the door
opens. The stop is on the right on delivery.
As this alteration requires some manual skills,
please read through the work instructions before altering.
In addition to the package contents, you will
require
– a medium sized cross-slotted screwdriver,
– a pair of flat-nosed pliers,
– the assistance of another person, where
possible.
1. Ensure that the appliance is not connected to the power supply.
2. Remove the door compartments (7),
the vegetable drawer (8) and the glass
shelves (9) and (10).
A
5. Loosen the three screws of the top hinge
(C), remove them and keep them in a
safe place.
6. Remove the door and set it aside.
7. Screw in the screw (B) on the previous
stop side.
8. Tilt the device slightly and rest it against
the wall.
D
9. Unscrew both feet.
10. Remove the pin (D) from one foot and
insert it into the other; the shorter side
goes in the foot.
11. Insert the foot with the pin (D) into the
designated recess from underneath and
screw the foot tight again.
12. Also screw the other foot tight.
13. Reposition the appliance upright.
14. Place the door over the pin (D) from
above and close it.
15. Now loosen the pin in the top hinge (C)
using flat-nosed pliers.
16. Re-insert the pin from the other side.
B
3. Screw the strip (A) onto the top and put it
to one side.
4. Also unscrew the screw (B) on the new
stop side and keep it in a safe place.
C
C
17. Screw the hinge (C) onto the new stop
side.
18. Then check the door sits correctly (see
„Checking and cleaning door seals“ on
page GB-11).
Page 38

Start-upPage GB-16
)
)
)
)
)19)
y
2
Switching on appliance
Installation materials
14
15
16
17
18
In addition to the package contents, you will
require
– a medium sized cross-slotted screwdriver,
– a pair of flat-nosed pliers,
– the assistance of another person, where
possible.
uantit
1
NOTICE
Risk of damage!
Improper handling of the refrigerator may
result in damage.
■ The refrigerator should be installed by a
specialist, otherwise any warranty claims
will be void.
(17)
(19)
3. Screw the elbows (17) onto the appliance
door with the screws (19). Pre-mark the
screw holes with a Ø 2.5 mm nail.
40 mm
Please read through the work steps first before you start installing the refrigerator.
1. Before installing and connecting the appliance, switch off the relevant power circuit
and/or turn off the relevant fuses.
2. Please remove the door compartments (7),
the vegetable drawer (8) and the glass
shelves (9) and (10).
4. Insert the appliance into the built-in cabinet.
The distance between the appliance and the
lower edge of the built-in cabinet must be approx. 40 mm.
To make sure the joint profile can be clamped,
a gap of 4 mm in the entire height between appliance and built-in cabinet must be retained
on the opposite side of the door hinges.
Page 39

Start-up
Page GB-17
(19)
5. Screw the refrigerator to the built-in cabinet using the screws (19).
6. Insert the mains plug into a properly installed socket.
18 mm
6 mm
6 mm
10. A gap of at least 6 mm must be maintained between the built-in refrigerator
and the built-in cabinet door so that the
refrigerator door can close without any
problems.
To set the gap width, loosen the screws (19)
slightly and manually set the desired distance. Then tighten the screws (19) again.
(15)
7. Open the refrigerator door out as far as
possible. Push the door couplers (15) into
the guide rails of the elbows (17).
8. Screw the door couplers (15) on tight using the screws (19), while maintaining a
gap of approx. 18 mm to the edge of the
door of the built-in cabinet.
9. Close the door of the built-in cabinet and
check that the sliding guide between the
elbow (17) and the door coupler (15)
function smoothly.
(16)
(18)
11. Open the refrigerator door out as far
as possible and push the long cover
strips (16) into the guide rails of the
door couplers (15).
12. Place the short cover strips (18) on the
elbows (17) as a cover.
Page 40

Start-upPage GB-18
Power supply
CAUTION
Risk of damage to property!
The coolant must be allowed to settle before connecting.
■ Leave the appliance to stand for 2 hours
after transportation.
(14)
13. Cut the joint profile (14) to the appropriate length. Push it into the opposite side
of the door hinges between the appliance and wall of the built-in cabinet.
14. Replace the glass shelves (9) and (10),
the vegetable drawer (8) and the door
compartments (7).
1. Switch the power circuit that was disabled
for installation of the appliance back on
again and/or replace the relevant fuses.
You will hear an brief signal tone.
The appliance is switched on, the interior light illuminates (1), the motor starts
to work, the refrigerant flows through the
pipes and you hear a slight noise.
2. Please see Chapter „Operation“ on page
GB-9 for operating instructions and tips
for optimal use.
Troubleshooting table
Malfunctions can occur in all electrical appliances. This does not necessarily mean that there is
a defect in the appliance. Therefore, please check whether or not you can correct the fault using
the table.
WARNING
Risk of electric shock in case of improper repair!
Never attempt to repair the faulty – or supposedly faulty – appliance yourself. You can endanger yourself and subsequent users. Only authorised specialists may carry out repairs.
Page 41

Troubleshooting table
Troubleshooting table
Problem Possible cause Solutions, tips
Page GB-19
Compressor off,
interior light off.
Compressor off,
interior light on.
Appliance cools
too quickly.
The appliance
doesn’t cool sufficiently.
No electricity to socket. Check by connecting another appliance.
Mains plug is loose. Check the tightness of the mains plug.
Desired temperature has
been reached.
Repositioning. The appliance requires 2 hours to allow the
Temperature scale is set too
cold.
Incorrect temperature selected.
Door not tightly closed or
door seal is not completely
tight.
The appliance is near a heat
source.
Food has been put in warm. Only put in cooled foods.
Further cooling not required. When the
inside temperature rises, the compressor
automatically switches on.
refrigerant to settle.
Turn down the temperature (see „Thermostat control“ on page GB-9).
Set lower temperature (see page GB-9).
See „Checking and cleaning door seals“ on
page GB-11.
Place insulation plate in-between or
change location.
Appliance is making a noise.
Ambient temperature too low
or too high.
Compressor seems defective.
Functional operating noise.
These are not malfunctions.
Distracting noises that you
can disregard.
Adjust the ambient temperature to the climate category (see „Product data sheet
and technical specifications“ on page
GB-22).
Set temperature to “+2”. If the compressor
does not switch on within an hour, please
contact our service centre (see page GB-20).
Humming: Refrigeration unit is running.
Flowing noise: Refrigerant is flowing through
the pipes.
Clicking: Motor switching on or off.
Check that it is stable.
Remove any objects from the appliance.
Remove any foreign matter from the back
of the appliance.
Page 42

ServicePage GB-20
Service
In order for us to help you quickly, please tell us:
Name of appliance Colour Model Article number
Built-in refrigerator
white HEKS 12254 A1 325 548
Advice, order and complaint
Please contact your mail order company’s
customer service centre if
– the delivery is incomplete,
– the appliance is damaged during transport,
– you have questions about your appliance,
– a malfunction cannot be rectified using the
troubleshooting table,
– you would like to order further accessories.
Repairs and spare parts
Customers in Germany
– Please contact our technical service:
Telephone 0 18 06 18 05 00 (landline 20
cents/call, mobile max 60 cents/call)
Customers in Austria
– Please contact your mail order company’s
customer service centre or product advice
centre.
Please note: You are responsible for the condition of the appliance and its proper use
in the household. If you call customer service because of an operating error, you will be
charged for the visit, even during the guarantee/warranty period. We regret that any damage
resulting from non-compliance with this manual will not be recognised.
Page 43

Environmental protection
Environmental protection
Page GB-21
Disposing of old
electrical devices in an
environmentally-friendly
manner
Electrical appliances contain harmful substances and valuable resources.
Every consumer is therefore required by law to dispose of old electrical appliances at an authorised collection or return
point. They will thus be made available for
environmentally-sound, resource-saving recycling.
You can dispose of old electrical appliances
free of charge at your local recycling centre.
Please contact your dealer directly for more
information about this topic.
CAUTION
Fire hazard!
Cooling appliances, which contain refrigerants and gases in the cooling systems and
insulation, have to be properly disposed of.
Refrigerant leakage may cause a fi re hazard.
■ Until the point of proper disposal, ensure
that none of the cooling fi ns or tubes on
a cooling appliance are damaged.
Our contribution to the
protection of the ozone layer
100% CFC and HFC-free refrigerants and foaming agents were used
in this appliance. This protects the
ozone layer and reduces the greenhouse effect.
Our packaging is made from environmentally
friendly, recyclable materials:
– Outer packaging made of cardboard
– Moulded parts made of foamed, CFC-free
polystyrene (PS)
– Films and bags made of polyethylene (PE)
– Tension bands made of polypropylene (PP)
– Saving energy also protects against exces-
sive global warming. Your new appliance
uses little energy due to its environmentally
friendly insulation and technology.
If you would like to dispose of the packaging, please dispose of it in an environmentally
friendly way.
Page 44

Page GB-22 Product data sheet and technical specifications
Product data sheet for electric household refrigerators and freezers
as well as corresponding combination appliances according to
Regulation (EU) No. 1060/2010 and Regulation (EU) No. 643/2009
Brand name
Model code HEKS 12254 A1
Household refrigerator model category 1, built-in refrigerator
Energy efficiency class on a scale of A+++
(highest efficiency) to G (lowest efficiency)
Energy consumption 128 kWh/year, based on the results of a 24 hour standard test. The actu-
al consumption depends on the type of usage and the position of the appliance.
Freezer compartment / star
Total volume
Storage time in case of malfunction - h
Freezing capacity - kg – kg /24 h
Climate class: SN-ST. This appliance is intended for operation at an ambient temperature be-
tween 10° C and 38 °C.“
Airborne noise emissions 41 dB(A) re 1 pW
Built-in appliance yes
classification
Fridge compartment (frost-free)
2)
A+
– L / –
201 L
The values indicated above have been measured under standardised laboratory conditions pursuant to EN 62552.
Technical specifications
Order number 325 548
Name of appliance Built-in refrigerator
Model HEKS 12254 A1
Supply voltage / frequency 220 - 240 V, 50 Hz
Power consumption 0.5 A
Power consumption 80 W
Device measurements (Height × Width × Depth with con-
nections)
Unloaded weight 34 kg
Refrigerant R600a (isobutane)
Refrigerant filling quantity 23 g
Foaming agent Cyclopentane
121 cm × 54 cm × 55 cm
 Loading...