

Page 1

12
10
8
6
4
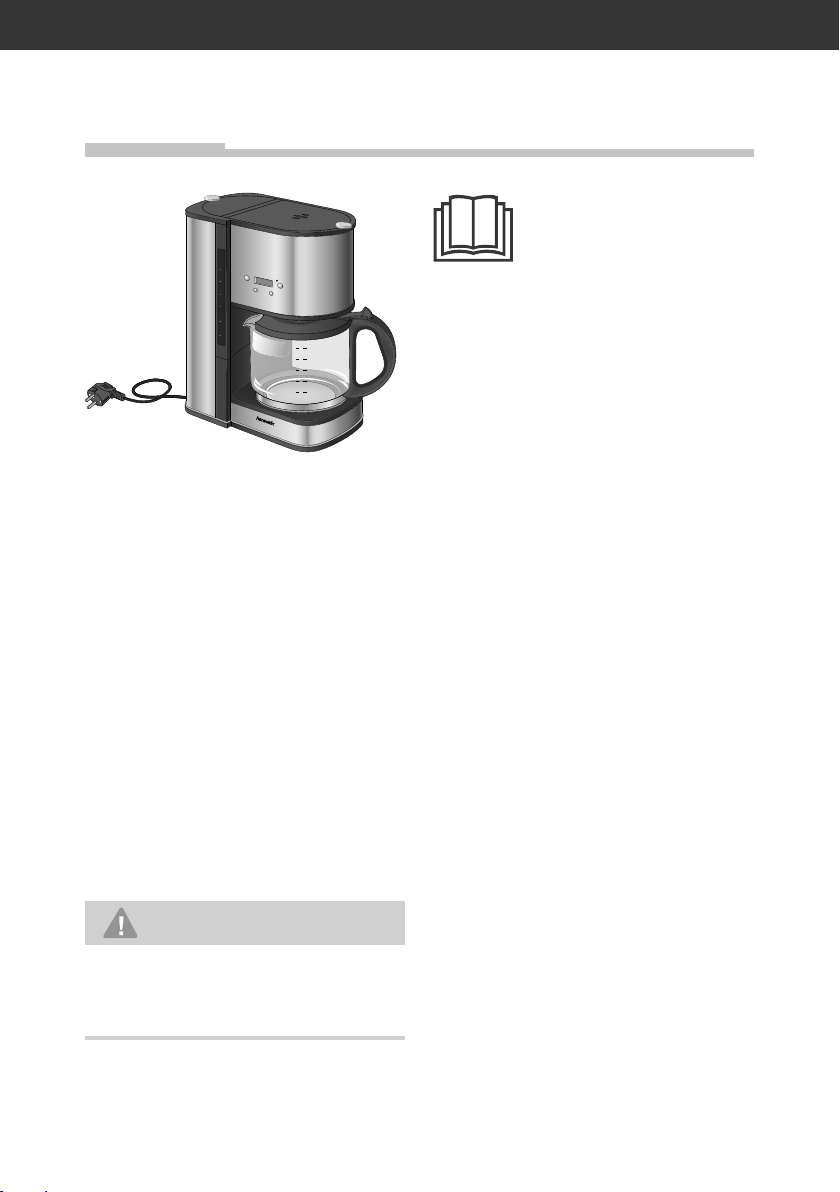
CM2065S
Max
12
10
PROG
AN/AUS
STD
8
6
4
2
MIN
Anleitung/Version:
196274_DE_20180328
Bestell-Nr.: 77870106
Nachdruck, auch
aus zugs wei se, nicht
ge stat tet!
Gebrauchsanleitung
Kaffeemaschine
Page 2

InhaltsverzeichnisSeite DE-2
Inhaltsverzeichnis
Lieferung . . . . . . . . . . . . . . DE-3
Lieferumfang . . . . . . . . . . DE-3
Lieferung kontrollieren. . . DE-3
Geräteteile und
Bedienelemente . . . . . . . . . DE-4
Sicherheit . . . . . . . . . . . . . . DE-5
Bestimmungsgemäßer
Gebrauch. . . . . . . . . . . . . DE-5
Begriffserklärung . . . . . . . DE-5
Sicherheitshinweise . . . . DE-6
Inbetriebnahme . . . . . . . . DE-12
Gerät auspacken. . . . . . DE-12
Geeigneten Standort
wählen . . . . . . . . . . . . . . DE-12
Gerät zusammenbauen DE-13
Leerdurchlauf . . . . . . . . DE-13
Uhrzeit einstellen. . . . . . DE-14
Bedienung . . . . . . . . . . . . DE-16
Kaffee brühen . . . . . . . . DE-17
Startzeitverzögerung. . . DE-18
Abschaltautomatik . . . . DE-19
Tropfschutz . . . . . . . . . . DE-19
Reinigung und Wartung . . DE-20
Kaffeemaschine reinigen DE-20
Kaffeemaschine
entkalken. . . . . . . . . . . . DE-21
Fehlersuchtabelle. . . . . . . DE-22
Service . . . . . . . . . . . . . . . DE-23
Beratung, Bestellung und
Reklamation . . . . . . . . . DE-23
Ersatzteile . . . . . . . . . . . DE-23
Umweltschutz. . . . . . . . . . DE-24
Elektro-Altgeräte umwelt-
gerecht entsorgen . . . . . DE-24
Verpackung . . . . . . . . . . DE-24
Technische Daten . . . . . . DE-25
Page 3
Lieferung
12
10
8
6
4
Max
12
10
PROG
AN/AUS
STD
8
MIN
6
4
2
Lieferumfang
–Kaffeemaschine
–Gebrauchsanleitung
Lieferung kontrollieren
1. Packen Sie das Gerät aus.
2. Prüfen Sie die Lieferung.
3. Sollte etwas fehlen oder das
Gerät einen Transportschaden
aufweisen, nehmen Sie bitte
Kontakt mit unserem Service
auf (siehe Seite DE-23).
Lieferung
Seite DE-3
Bevor Sie das Gerät benutzen, le sen Sie bit te
zu erst die Si cher heits hin wei se und die Ge brauchs an lei tung aufmerksam durch. Nur
so können Sie alle Funk tio nen
si cher und zu ver läs sig nut zen.
Beachten Sie unbedingt auch die
nationalen Vorschriften in Ihrem
Land, die zusätzlich zu den in dieser Gebrauchsanleitung genannten Vorschriften gültig sind.
Bewahren Sie alle Sicherheitshinweise und Anweisungen für
die Zukunft auf. Geben Sie alle
Sicherheitshinweise und Anweisungen an den nachfolgenden
Verwender des Geräts weiter.
WARNUNG!
Stromschlaggefahr!
■ Nie ein beschädigtes Gerät
in Betrieb nehmen.
Page 4
Geräteteile und BedienelementeSeite DE-4
12
10
8
6
4
Max
12
10
8
6
4
2
AN/AUS
MIN
STD
PROG
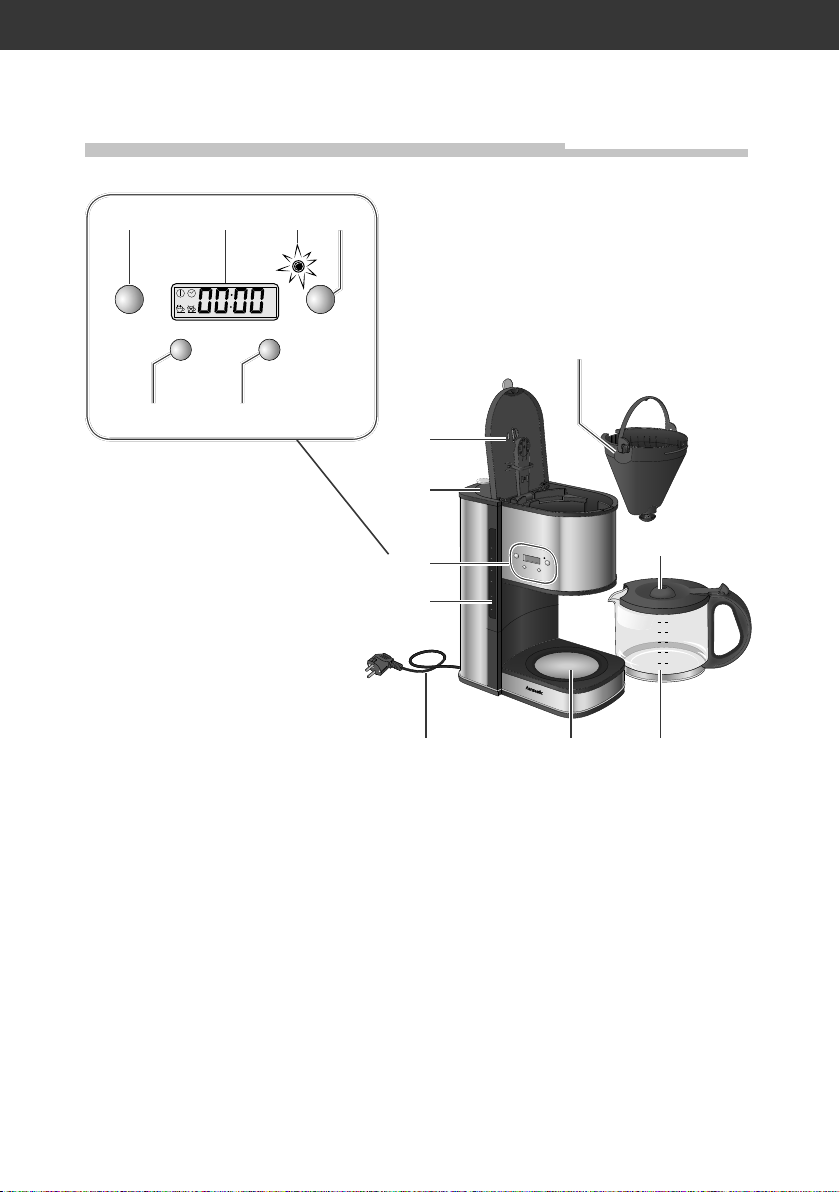
Geräteteile und Bedienelemente
(2) (3) (4)(1)
AM
PM
PROG
STD
(5)(6)
AN/AUS
MIN
(15)
(14)
(13)
(12)
(7)
(8)
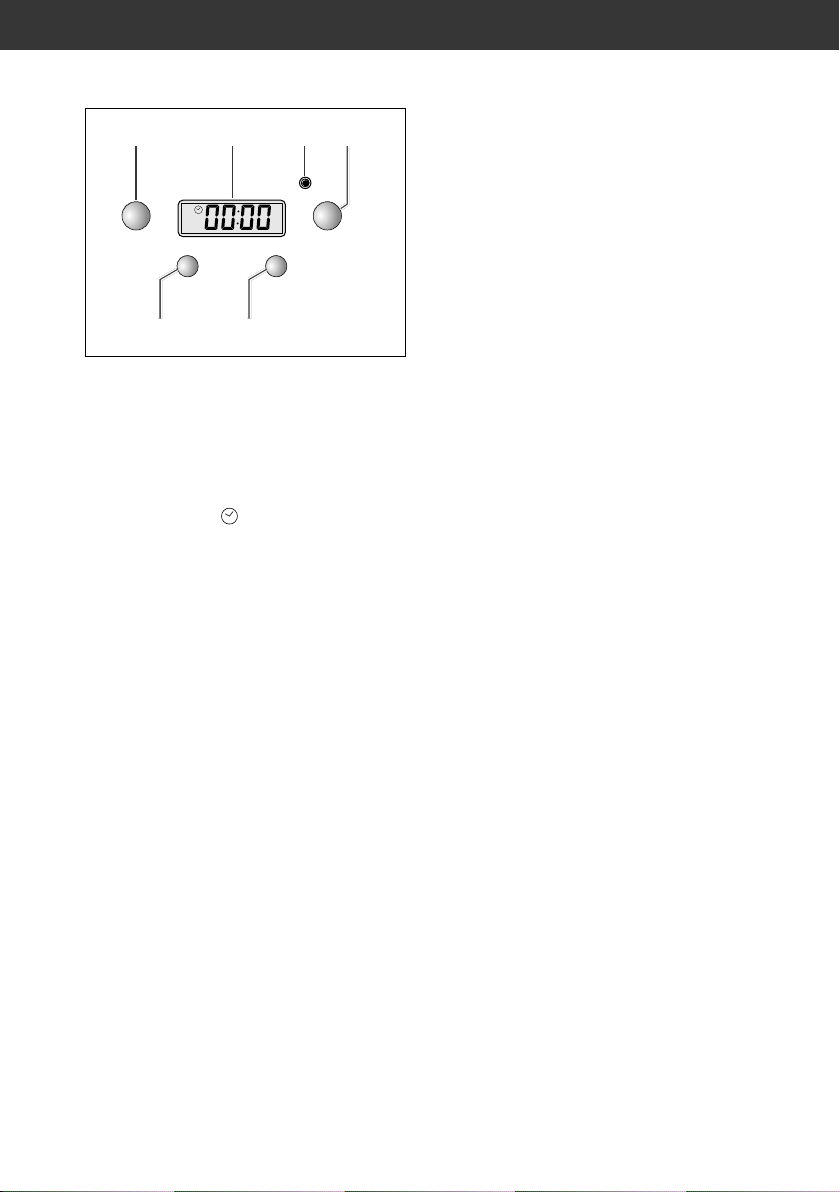
(1) PROG Einstellung der
Stunden, Programmieren
der Startzeitverzögerung
und der Abschaltautomatik
(2) Display
(3) Kontrolllampe
(4) AN/AUS Ein-/Ausschalttaste
(5) MIN Einstellung der Minuten
(6) STD Einstellung der
Stunden
(9)(10)(11)
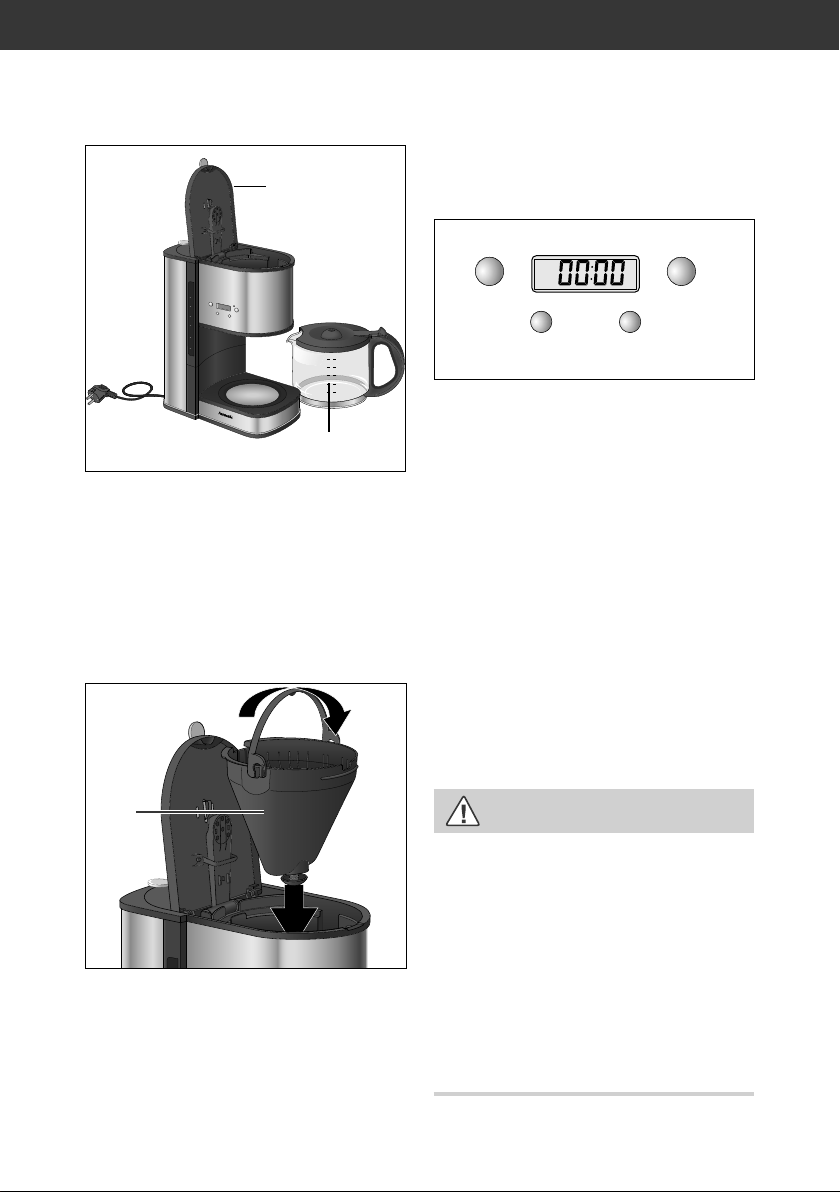
(7) Filteraufnahme mit
Tropfschutz
(8) Aromaschutz-Deckel
(9) Kaffeekanne
(10 ) W a r m h a l t e p l a t t e
(11) Netzkabel und -stecker
(12) Wasserstandsanzeige
(13) Bedienfeld
(14) Wasserbehälterdeckel
(15 ) F i l t e r f a c h d e c k e l
Page 5
Sicherheit
Sicherheit
Seite DE-5
Bestimmungsgemäßer
Gebrauch
Mit der Kaffeemaschine können Sie Kaffee in haushaltsüblichen Mengen zubereiten.
Benutzen Sie dazu handelsübliche Filtertüten, Größe 4.
Die Kaffeemaschine ist für
den Gebrauch im privaten
Haushalt konzipiert und nicht
für eine gewerbliche Nutzung oder Mehrfachnutzung
ausgelegt (z. B.: Verwendung
durch mehrere Parteien in
einem Mehr familienhaus).
Verwenden Sie die Kaffeemaschine ausschließlich wie
in dieser Gebrauchsanleitung
beschrieben. Jede andere
Verwendung gilt als nicht bestimmungsgemäß und kann
zu Sachschäden oder sogar
zu Personenschäden führen.
Der Hersteller übernimmt keine Haftung für Schäden, die
durch nicht bestimmungsgemäßen Gebrauch entstanden
sind.
Begriffserklärung
Folgende Si gnal begriffe fi nden Sie in dieser Gebrauchsanleitung.
WARNUNG
Dieser Signalbegriff bezeichnet eine Gefährdung mit
einem mittleren Risikograd,
die, wenn sie nicht vermieden wird, den Tod oder eine
schwere Verletzung zur Folge
haben kann.
VORSICHT
Dieser Signalbegriff bezeichnet eine Gefährdung mit
einem niedrigen Risikograd,
die, wenn sie nicht vermieden
wird, eine geringfügige oder
mäßige Verletzung zur Folge
haben kann.
HINWEIS
Dieser Signalbegriff warnt
vor möglichen Sachschäden.
Dieses Symbol verweist
auf nützliche Zusatzinfor-
mationen.
Page 6

Geräteteile und BedienelementeSeite DE-6
Sicherheitshinweise
In diesem Kapitel fi nden
Sie allgemeine Sicherheitshinweise, die Sie zu Ihrem
eigenen Schutz und zum
Schutz Dritter stets beachten
müssen. Beachten Sie zusätzlich die Warnhinweise in den
einzelnen Kapiteln zu Bedienung, Reinigung etc.
WARNUNG
Risiken im Umgang
mit elektrischen
Haushaltsgeräten
Stromschlaggefahr!
Das Berühren von spannungsführenden Teilen kann
zu schweren Verletzungen
oder zum Tod führen.
■ Vor jedem Gebrauch prü-
fen, ob der Artikel oder
die Netzanschlussleitung
Schäden aufweisen. Sollte
dies der Fall sein, das Gerät nicht einschalten, sondern unseren Service benachrichtigen (siehe Seite
DE-23).
■ Gerät nur anschließen,
wenn die Netzspannung
der Steckdose mit der Angabe auf dem Typschild
übereinstimmt.
■ Das Gerät entspricht der
Schutz klasse I und darf nur
an eine Steck dose mit ordnungsgemäß installiertem
Schutzleiter angeschlossen werden. Der Anschluss
an eine Steckdosenleiste,
eine Mehrfachsteckdose,
eine Zeitschaltuhr oder ein
separates Fernwirksystem
zur Fernüberwachung und
-steuerung ist unzulässig.
■ Der Ein-/Ausschalter trennt
das Gerät nicht vom Netz.
Gerät nur an eine gut zugängliche Steckdose anschließen, damit es bei
einem Störfall schnell von
Stromnetz getrennt werden
kann.
■ Gerät nicht in Betrieb neh-
men oder weiterbetreiben,
– wenn es sichtbare Schä-
den aufweist, z.B. das
Netzkabel defekt ist.
– wenn es Rauch entwickelt
oder verbrannt riecht.
– ungewohnte Geräusche
von sich gibt.
In diesen Fällen Netzstecker aus der Steckdose
ziehen und unseren Service
benachrichtigen (siehe
Seite DE-23).
■ Wenn das Netzkabel des
Geräts beschädigt ist, muss
Page 7

Geräteteile und Bedienelemente
Seite DE-7
es durch den Hersteller oder
seinen Kundendienst oder
eine ähnlich qualifi zierte
Person ersetzt werden.
■ Eingriffe und Repara-
turen am Gerät dürfen
ausschließlich autorisierte Fachkräfte vornehmen,
so wie unser Service (siehe
Seite DE-23). Eigenständige
Reparaturen an dem Gerät
können Sach- und Personenschäden verursachen,
und die Haftungs- und
Garantieansprüche verfallen.
■ Niemals das Gehäuse öff-
nen.
■ Nicht versuchen, das de-
fekte – oder vermeintlich
defekte – Gerät selbst zu
reparieren.
■ Bei Reparaturen dürfen
ausschließlich Teile verwendet werden, die den ursprünglichen Gerätedaten
entsprechen.
In diesem Gerät befi nden
sich elektrische und mechanische Teile, die zum Schutz
gegen Gefahrenquellen unerlässlich sind.
■ Bei Nichtverwendung, im
Fehlerfall sowie vor Reinigung und Wartung den
Netzstecker immer aus der
Steckdose ziehen.
■ Darauf achten, dass Kinder
keine Gegenstände in das
Gerät hineinstecken.
■ Gerät, Netzstecker und
Netzkabel von offenem
Feuer und heißen Flächen
fernhalten.
■ Netzkabel nicht knicken,
einklemmen und nicht über
scharfe Kanten legen.
■ Netzstecker nie am Netz-
kabel aus der Steckdose
ziehen, immer den Netzstecker selbst anfassen.
■ Netzkabel nie als Tragegriff
verwenden.
■ Netzstecker niemals mit
feuchten Händen anfassen.
■ Netzkabel so verlegen, dass
es nicht zur Stolperfalle
wird.
■ Gerät niemals in Wasser
tauchen.
■ Gerät nur in Innenräu-
men verwenden. Nicht in
Feucht räumen oder im Regen betreiben.
■ Gerät niemals so lagern,
dass es in eine Wanne oder
in ein Waschbecken fallen
kann.
■ Niemals nach einem Elek-
trogerät greifen, wenn es
ins Wasser gefallen ist. In
Page 8

Geräteteile und BedienelementeSeite DE-8
einem solchen Fall sofort
den Netzstecker aus der
Steckdose ziehen.
■ Weder das Gerät selbst
noch Netzkabel oder
Netzste cker in Wasser oder
andere Flüssigkeiten tauchen.
■ Alle Teile nach dem Reini-
gen gründlich abtrocknen.
Risiken im Umgang mit sich
erhitzenden Hausgeräten
Brandgefahr!
Das Gerät wird während des
Betriebs heiß. Brennbare Gegenstände in unmittelbarer
Nähe des Geräts können sich
entzünden.
■ Gerät nicht in der Nähe
von brennbaren Gegenständen, wie z. B. Vorhängen, aufstellen.
■ Gerät nie auf oder in der
Nähe von heißen Oberfl ächen abstellen, wie z.B.
Herdplatten, Öfen, etc.
■ Keine Gegenstände auf der
Warmhalteplatte oder dem
Gerät ablegen, während
das Gerät in Betrieb ist.
■ Gerät nicht abdecken, z.B.
mit Tüchern o.Ä.
Risiken durch heiße
Flüssigkeiten und Dämpfe
Verbrühungs gefahr!
Während des Gebrauchs der
Kaffeemaschine tritt heißer
Dampf aus, der auf ungeschützter Haut zu Verbrühungen führen kann.
Heißer Kaffee kann in der
Mundhöhle oder Speiseröhre sowie auf ungeschützter
Haut zu Verbrühungen führen.
■ Frisch gebrühten Kaffee
vorsichtig trinken.
■ Jeden Kontakt mit dem hei-
ßen Dampf während des
Brühvorgangs, beim Wiederauffüllen des Wassertanks und bei geöffnetem
Deckel vermeiden.
■ Wasserbehälter höchstens
bis zur Füllstandsanzeige
MAX befüllen.
■ Darauf achten, dass wäh-
rend des Betriebs der Deckel verschlossen ist.
Beim Einfüllen von Frischwasser kurz nach dem Brühvorgang kann heißer Dampf aus
dem Wasserauslauf austreten.
■ Sind mehrere Brühvorgän-
ge hintereinander erforderlich, die Kaffeemaschine
Page 9

Geräteteile und Bedienelemente
Seite DE-9
nach jedem Brühvorgang
ausschalten und ca. 5 Minuten lang abkühlen lassen.
Bei Herunterfallen des Geräts
kann Kontakt mit heißem
Kaffee zu Verbrühungen
führen.
■ Gerät nicht unmittelbar an
den Rand der Arbeitsplatte
stellen.
■ Netzkabel nicht über den
Rand der Arbeitsplatte
hängen lassen.
Risiken für die Gesundheit
Gesundheitsgefahr!
Unsachgemäßer Umgang
mit dem Gerät kann zu Gesundheitsschäden führen.
■ Vor dem ersten Gebrauch,
nach dem Entkalken und
nach längerem Nichtgebrauch eine komplette
Wasserfüllung durchlaufen
lassen und wegschütten.
Risiken für Kinder
Erstickungsgefahr!
Kinder können sich in der
Verpackungsfolie verfangen
und ersticken.
■ Kinder nicht mit der Verpa-
ckungsfolie spielen lassen.
VORSICHT
Risiken für bestimmte
Personengruppen
Gefahren für Kinder und
Personen mit eingeschränkten physischen, sensorischen
oder geistigen Fähigkeiten!
Kinder erkennen Gefahren
häufi g nicht oder unterschätzen sie.
■ Dieses Gerät kann von Kin-
dern ab 8 Jahren und darüber sowie von Personen
mit reduzierten physischen,
sensorischen oder mentalen Fähigkeiten oder
Mangel an Erfahrung und/
oder Wissen benutzt werden, wenn sie beaufsichtigt
oder bezüglich des sicheren
Gebrauchs des Gerätes unterwiesen wurden und die
daraus resultierenden Gefahren verstehen.
■ Kinder dürfen nicht mit
dem Gerät spielen.
■ Das Gerät und seine An-
schlussleitung sind von
Kindern jünger als 8 Jahre
fernzuhalten.
■ Gerät während des Be-
triebs nicht unbeaufsichtigt lassen.
■ Reinigung und Wartung
durch den Benutzer dürfen
Page 10

Geräteteile und BedienelementeSeite DE-10
nicht durch Kinder durchgeführt werden, es sei
denn, sie sind 8 Jahre oder
älter und werden beaufsichtigt.
Risiken im Umgang mit
Kaffeemaschinen
Verbrennungsgefahr!
Die Glaskanne und die
Warmhalteplatte werden
während des Betriebs heiß
und können bei Berührung zu
Verbrennungen führen!
Die Warmhalteplatte bleibt
auch nach dem Ausschalten
noch einige Zeit heiß!
■ Glas kanne nur am Griff an-
fassen.
■ Die heiße Warmhalteplat-
te nicht anfassen und nicht
unter den Filter fassen.
■ Das Gerät vor der Reini-
gung vollständig abkühlen
lassen.
HINWEIS
Beschädigungsgefahr!
Unsachgemäßer Umgang
mit dem Gerät kann zu Beschädigungen an dem Gerät
führen.
■ Ausschließlich reines Kaf-
feepulver verwenden. Wasserlösliche oder gefrierge-
trocknete Instantprodukte
und andere Getränkepulver
sind nicht geeignet.
■ Gerät niemals hoher Tem-
peratur (Heizung etc.) oder
Witterungseinfl üssen (Regen etc.) aussetzen.
■ Gerät nicht über einen
längeren Zeitraum Temperaturen von unter 0 °C
aussetzen. Evtl. gefrorenes
Restwasser kann das Gerät
beschädigen.
■ Gerät nur benutzen, wenn
es auf einer ebenen, stabilen und unempfi ndlichen
Oberfl äche steht.
■ Gerät nicht unbefüllt in Be-
trieb nehmen.
■ Nur frisches, kaltes Wasser
und keine anderen Flüssigkeiten in den Wasserbehälter füllen.
■ Beachten, dass die Oberfl ä-
chen-Beschichtungen von
Möbeln manchmal chemische Zusätze enthalten,
die die Gummifüße des Geräts angreifen können. Auf
diese Weise können Rückstände auf der Möbeloberfl äche entstehen. Daher
unter das Gerät eine hitzeund wasserunempfi ndliche
Unterlage legen.
Page 11

Geräteteile und Bedienelemente
■ Gerät nicht unter Küchen-
oberschränken o. Ä. aufstellen. Durch den austretenden Dampf können
diese beschädigt werden.
■ Beim Auspacken keine
spitzen Gegenstände verwenden.
■ Gerät zum Reinigen nie-
mals in Wasser tauchen.
■ Gerät oder einzelne Gerä-
teteile nie in eine Spülmaschine stellen.
■ Zur Reinigung keinen
Dampfreiniger verwenden.
Damit kann ein Kurzschluss
verursacht und das Gerät
beschädigt werden.
■ Keine lösemittelhaltigen,
ätzenden oder scheuernden Reinigungsmittel
(z.B. Backofen- oder GrillSpray) oder Reinigungsutensilien wie z.B. Topfschwämme oder Ähnliches
verwenden. Diese können
die Oberfl ächen beschädigen.
Seite DE-11
Page 12
InbetriebnahmeSeite DE-12
Inbetriebnahme
Gerät auspacken
HINWEIS
Beschädigungsgefahr!
Unsachgemäßer Umgang
mit dem Gerät kann zu Beschädigungen an dem Gerät
führen.
■ Beim Auspacken keine
spitzen Gegenstände verwenden.
1. Packen Sie die Kaffeemaschine aus.
2. Entfernen Sie vorsichtig alle
Verpackungsteile, Kunststoffprofile, Klebestreifen und
Schaumpolster.
Geeigneten Standort
wählen
Stellen Sie die Kaffeemaschine
tigen Flächen ein Freiraum von
mindestens 3 cm bleibt;
– nicht auf oder neben einen
Herd, eine andere Wärmequelle
oder in die Nähe einer Spüle;
– so auf, dass sie für Kinder uner-
reichbar ist.
WARNUNG
Stromschlaggefahr!
Das Berühren von spannungsführenden Teilen kann
zu schweren Verletzungen
oder zum Tod führen.
■ Achten Sie beim Verlegen
des Netzkabels darauf,
dass es nicht durch scharfe
Kanten oder durch den
Kontakt mit heißen Oberfl ächen (z. B. elektrische
Kochplatten) beschädigt
werden kann.
– auf eine feste, ebene und un-
empfindliche Stell fläche;
– nicht unter einem Hänge-
schrank auf;
– so auf, dass nach oben genü-
gend Platz ist, um den Filterfachdeckel (15) zu öffnen;
– so auf, dass zwischen der Kaf-
feemaschine und den angrenzenden seitlichen und rückwär-
Page 13
Inbetriebnahme
Seite DE-13
Gerät zusammenbauen
(15)
Max
12
10
PROG
AN/AUS
STD
8
MIN
6
4
2
1. Reinigen Sie das Gehäuse
nach dem Auspacken mit
einem leicht feuchten Tuch und
waschen Sie die Kaffeekanne
(9) mit Spülwasser ab.
2. Öffnen Sie den Filterfachdeckel (15).
(9)
12
10
8
6
4
4. Setzen Sie einen Kaffeefilter
ein. Wir empfehlen handelsübliche Papierkaffeefilter der
Größe Nr. 4.
PROG
STD
AN/AUS
MIN
5. Stecken Sie den Netzstecker in
eine leicht zugängliche Schutzkontakt-Steckdose.
Im Display blinkt 00: 00. Das
Gerät befindet sich im Standby-Betrieb.
Leerdurchlauf
Lassen Sie vor dem ersten Gebrauch, nach dem Entkalken und
nach längerem Nichtgebrauch
eine komplette Wasserfüllung
(ohne Kaffee) durchlaufen.
(7)
3. Setzen Sie die Filteraufnahme
(7) ein. Darauf achten, dass
der Henkel nach vorne umgeklappt wird, damit er richtig
verriegelt.
VORSICHT
Verbrühungs gefahr!
Während des Gebrauchs der
Kaffeemaschine tritt heißer
Dampf aus, der auf ungeschützter Haut zu Verbrühungen führen kann.
■ Öffnen Sie den Deckel
nicht während des Betriebs.
Page 14
InbetriebnahmeSeite DE-14
12
(12)
10
8
6
4
Max
12
10
PROG
STD
8
6
4
2
(14)
AN/AUS
MIN
(10)
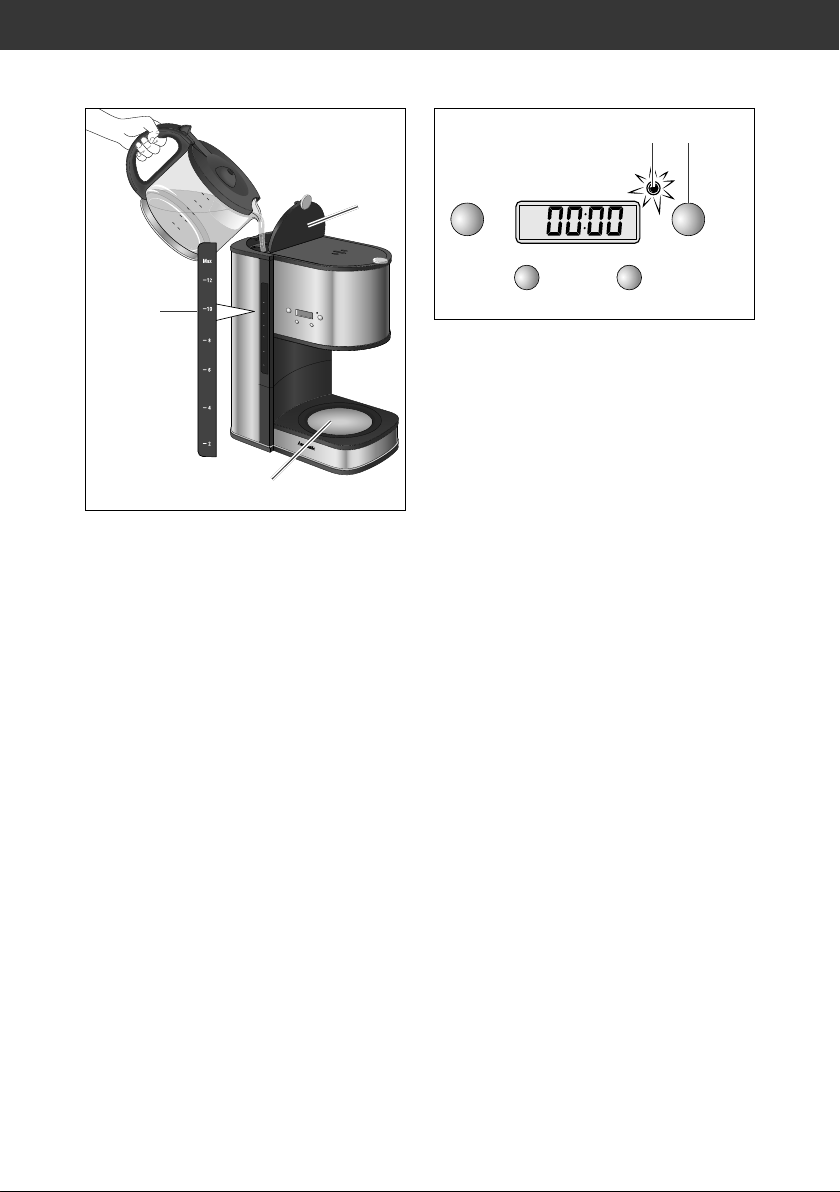
1. Füllen Sie die Kaffeekanne mit
frischem, kaltem Leitungswasser.
2. Öffnen Sie den Wasserbehälterdeckel (14) und gießen Sie
das Wasser aus der Kaffeekanne in den Wasserbehälter
bis zur Markierung MAX auf
der Wasserstandsanzeige (12).
Trocknen Sie die Kaffeekanne
von außen ab und stellen Sie
sie wieder auf die Warmhalteplatte (10).
(3) (4)
PROG
STD
AN/AUS
MIN
3. Drücken Sie 2-mal die Taste (4)
AN/AUS.
Die Kontrolllampe (3) leuchtet
rot, der Wasserdurchlauf beginnt.
4. Wenn das Wasser durchgelaufen ist, drücken Sie die Taste (4)
erneut, um das Gerät auszuschalten.
Die Kontrolllampe erlischt.
Ihre Kaffeemaschine ist jetzt
einsatzbereit.
Uhrzeit einstellen
Wenn Sie das Gerät als Uhr oder
die Funktion „Startzeitverzögerung“ nutzen möchten, müssen
Sie die Uhrzeit einstellen.
Wenn Sie das Gerät zum ersten
Mal an die Stromversorgung
anschließen oder das Gerät vom
Netz getrennt war, blinkt im Dis-
00: 00.
play
Page 15
Inbetriebnahme
Seite DE-15
(2) (3) (4)(1)
PROG
STD
AN/AUS
MIN
(5)(6)
1. Drücken Sie die Taste (4) AN/
AUS so oft, bis die Kontrolllampe (3) nicht mehr leuchtet.
2. Drücken Sie 1-mal die Taste
(1) PROG. Im Display blinkt ein
Uhrsymbol
.
3. Stellen Sie die aktuelle Uhrzeit
mit den Tasten (6) STD (Stunden) und (5) MIN (Minuten) ein.
Wenn Sie die Taste gedrückt
halten, läuft die Anzeige
schneller durch.
4. Ca. 5 Sekunden nach dem
letzten Tastendruck ist die Einstellung gespeichert.
Page 16

BedienungSeite DE-16
Bedienung
VORSICHT
Verbrühungs gefahr!
Während des Gebrauchs der
Kaffeemaschine entsteht
heißer Dampf, der auf ungeschützter Haut zu Verbrühungen führen kann.
■ Den Kontakt mit dem hei-
ßen Dampf vermeiden.
Besondere Vorsicht ist geboten während des Brühvorgangs, beim Wiederauffüllen des Wassertanks und
wenn der Deckel geöffnet
ist.
■ Den Deckel nicht während
des Betriebs öffnen.
Beim Einfüllen von Frischwasser kurz nach dem Brühvorgang kann heißer Dampf aus
dem Wasserauslauf austreten.
■ Sind mehrere Brühvorgän-
ge hintereinander erforderlich, die Kaffeemaschine
nach jedem Brühvorgang
ausschalten und eine Abkühlpause von ca. 5 Min.
einhalten.
Verbrennungs gefahr!
Die Glaskanne und die
Warmhalteplatte werden
während des Betriebs heiß
und können bei Berührung zu
Verbrennungen führen.
Die Warmhalteplatte bleibt
auch nach dem Ausschalten
noch einige Zeit heiß.
■ Die Glas kanne nur am Griff
anfassen.
■ Die heiße Warmhalteplatte
nicht berühren und nicht
unter den Filter fassen.
Heißer Kaffee kann in der
Mundhöhle oder Speiseröhre
sowie auf ungeschützter Haut
zu Verbrühungen führen.
■ Frisch gebrühten Kaffee
vorsichtig trinken.
HINWEIS
Unsachgemäßer Umgang mit
dem Gerät kann zu Beschädigung an dem Gerät führen.
■ Nur frisches, kaltes Wasser
und keine anderen Flüssigkeiten in den Wasserbehälter füllen.
■ Die maximale Füllmenge
nicht überschreiten.
Page 17
Bedienung
12
10
8
6
4
Seite DE-17
Kaffee brühen
(15)
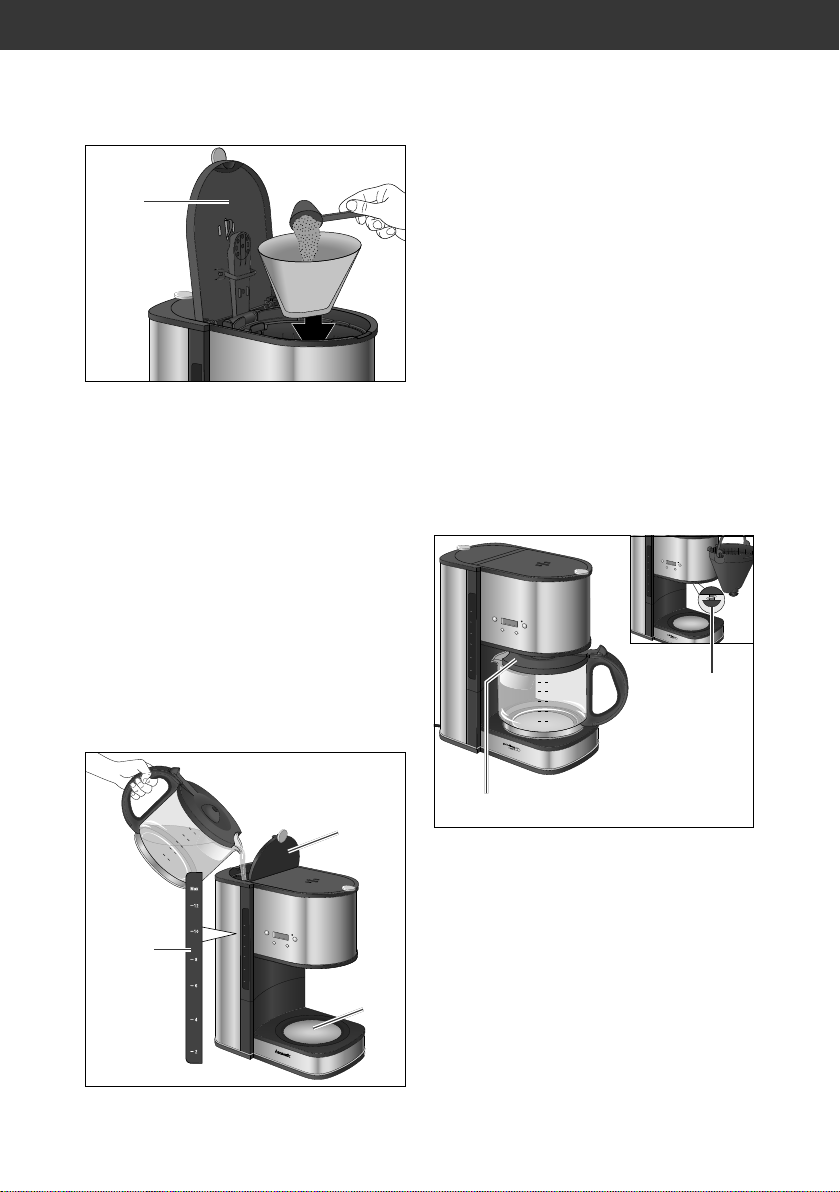
1. Öffnen Sie den Filterfachdeckel (15).
2. Setzen Sie einen Papierfilter
der Größe 4 ein und füllen Sie
die gewünschte Menge Kaffeepulver in den Filter.
Wir empfehlen, für jede normalgroße Tasse (ca. 125 ml)
einen Teelöffel mittelfein bis
fein gemahlenes Kaffeepulver
zu verwenden. Bei größeren
Tassen nehmen Sie bitte einen
gehäuften Teelöffel.
3. Öffnen Sie Wasserbehälterdeckel (14) öffnen.
4. Füllen Sie eine entsprechende
Menge frisches, kaltes Leitungswasser in den Wasserbehälter.
Am Wasserbehälter und an der
Kanne befindet sich eine Skala
zum Abmessen der Frischwassermenge. Sie gilt für normalgroße Tassen mit einem Inhalt
von ca. 125 ml.
Füllen Sie nie mehr Wasser ein
als bis zur oberen Marke MAX.
5. Schließen Sie den Wasserbehälterdeckel.
Max
12
10
PROG
AN/AUS
STD
8
MIN
6
4
Max
12
10
PROG
AN/AUS
STD
8
MIN
6
4
2
2
(16)
12
10
8
6
4
(14)
(8)
6. Stellen Sie die Kaffeekanne auf
die Warmhalteplatte. Achten
Max
12
10
PROG
AN/AUS
STD
8
MIN
(12)
6
4
2
(10)
Sie darauf, dass die Kanne
richtig positioniert ist, sodass
der Aromaschutz-Deckel (8)
den Tropfschutz (16) in der Filteraufnahme nach oben drückt.
Page 18

BedienungSeite DE-18
(3) (4)
PROG
STD
AN/AUS
MIN
7. Drücken Sie die Taste (4) AN/
AUS.
Die Kontrolllampe (3) leuchtet
rot, der Brühvorgang beginnt.
8. Wenn kein Kaffee mehr nachläuft, ist der Brühvorgang
beendet. Sie können nun die
Kaffeekanne herausnehmen
und den Kaffee ausschenken.
9. Wenn Sie den restlichen Kaffee warm halten möchten,
stellen Sie die Kaffeekanne
auf die Warmhalteplatte zurück, ohne die Kaffeemaschine auszuschalten.
10. Um das Gerät auszuschalten,
drücken Sie die Taste (4) AN/
AUS.
Die Kontrolllampe (3) erlischt.
Wenn Sie Ihre Kaffeema-
schine nicht selbst ausschalten, geschieht dies aus
Energiespargründen nach 40 Minuten automatisch.
Startzeitverzögerung
Wenn Sie möchten, dass der
Brühvorgang zu einer bestimmten
Uhrzeit beginnt, nutzen Sie die
Startzeitverzögerung.
Voraussetzungen:
– Die aktuelle Uhrzeit ist einge-
stellt (siehe „Uhrzeit einstellen“
auf Seite DE-14).
– Das Gerät befindet sich im
Standby-Betrieb (das Display
leuchtet, die Kontrolllampe (3)
leuchtet nicht).
Startzeit eingeben
(1)
PROG
(6) (5)
STD
1. Drücken Sie 2-mal die Taste (1)
PROG.
Im Display blinkt das Tassensymbol
.
2. Stellen Sie die gewünschte
Startzeit mit den Tasten (6)
STD (Stunden) und (5) MIN
(Minuten) ein.
Ca. 5 Sekunden nach dem
letzten Tastendruck ist die Einstellung gespeichert.
Die Kontrolllampe (3) leuchtet
blau, die Startzeitverzögerung
ist nun aktiviert.
MIN
Page 19

Bedienung
Seite DE-19
Wenn Sie die Kaffeema-
schine vom Netz trennen,
wird die Aktivierung und Einstellung der Startzeitverzögerung
gelöscht.
Abschaltautomatik
Das Gerät und die Warmhalteplatte schalten sich normalerweise
nach 40 Minuten selbsttätig aus.
Um Energie zu sparen, können Sie
jedoch einen früheren Abschaltzeitpunkt für die Warmhalteplatte
festlegen (einstellbar von 1 bis 40
Minuten). Diese Einstellung wird
nicht gespeichert, sondern muss
nach jedem Einschalten der Kaffeemaschine wiederholt werden.
(1)
3. Stellen Sie die gewünschte
Warmhaltezeit mit der Taste (5)
MIN ein.
Ca. 5 Sekunden nach dem
letzten Tastendruck ist die Eingabe gespeichert.
Das Tassensymbol
blinkt
nicht mehr.
4. Nach Ablauf der Warmhaltezeit
erlischt die Kontrolllampe (3).
Das Gerät befindet sich damit
wieder in Standby.
Tropfschutz
Max
12
10
PROG
AN/AUS
STD
8
MIN
6
4
2
(16)
PROG
(6) (5)
STD
MIN
1. Schalten Sie die Kaffeemaschine mit der Taste (4) AN/AUS
ein.
Die Kontrolllampe (3) leuchtet
rot.
2. Drücken Sie 2-mal die Taste (1)
PROG.
Im Display blinkt das Tassensymbol .
Ihre Kaffeemaschine ist mit einem
Tropfschutz (16) ausgestattet, der
den Filterauslauf abdichtet, sobald
Sie die Kaffeekanne wegnehmen.
Es läuft also kein Kaffee auf die
Warmhalteplatte.
Nehmen Sie die Kaffeekan-
ne nur kurz weg, denn es
läuft nach wie vor heißes Wasser in den Filter und kann diesen
zum Überlaufen bringen.
Page 20

Reinigung und WartungSeite DE-20
Reinigung und Wartung
Kaffeemaschine
reinigen
WARNUNG
Stromschlaggefahr!
Unsachgemäßer Umgang
mit dem Gerät kann zu
schweren Verletzungen oder
zum Tod führen.
■ Vor Reinigung und War-
tung den Netzstecker aus
der Steckdose ziehen.
■ Gerät zum Reinigen nie-
mals in Wasser tauchen.
■ Zur Reinigung keinen
Dampfreiniger verwenden.
VORSICHT
Verbrennungsgefahr!
Das Gerät wird während des
Betriebs heiß. Das Berühren
des heißen Geräts kann zu
Verbrennungen führen.
■ Gerät vor der Reinigung
vollständig abkühlen lassen.
HINWEIS
Beschädigungsgefahr!
Unsachgemäßes Reinigen
kann einen Kurzschluss verursachen und das Gerät beschädigen.
■ Gerät nie in eine Spülma-
schine geben.
Unsachgemäße Verwendung
von Reinigern oder Reinigungsutensilien kann die
Oberfl äche zerkratzen oder
chemisch angreifen.
■ Keine lösemittelhaltigen,
ätzenden und scheuernden
Reinigungsmittel (z.B.
Backofen- oder Grill-Spray)
oder Reinigungsutensilien
wie z.B. Topfschwämme
oder Ähnliches verwenden.
■ Zum Reinigen keine schar-
fen Reiniger (Scheuermittel, Verdünnung) verwenden.
1. Ziehen Sie den Netzstecker
aus der Steckdose.
2. Lassen Sie das Gerät vollstän-
dig abkühlen.
3. Wischen Sie die Geräte-
oberfläche mit einem leicht
angefeuchteten Tuch ab. Ver-
Page 21

Reinigung und Wartung
Seite DE-21
wenden Sie bei hartnäckigen
Verschmutzungen etwas Spülmittel. Achten Sie darauf, dass
das Bedienfeld nicht nass wird.
4. Waschen Sie die Kaffeekanne in normalem Spülwasser
ab, oder geben Sie sie in die
Spülmaschine. Häufiger Spülmaschinengebrauch kann
allerdings den Kunststoff ausbleichen.
5. Trocknen Sie alle Teile nach
dem Reinigen gründlich ab.
Kaffeemaschine
entkalken
Je nach Härtegrad des Wassers
bilden sich Kalkrückstände im Inneren der Kaffeemaschine. Ein
Entkalken ist notwendig, wenn der
Brühvorgang länger dauert oder
die Geräusche während des Brühens lauter als gewohnt sind.
Maximalmenge klares Wasser
durchlaufen.
6. Wiederholen Sie den Entkalkungsvorgang bei Bedarf.
1. Mischen Sie 2-3 Esslöffel
Essigessenz mit der Maximalmenge kalten Wassers.
2. Gießen Sie das Gemisch in
den Wasserbehälter.
3. Schalten Sie das Gerät ein.
Das Wasser-Essig-Gemisch
läuft nun durch und entkalkt
das Brühsystem.
4. Schütten Sie das Gemisch
nach dem Durchlauf weg.
5. Lassen Sie anschließend zum
Spülen mindestens 1-mal die
Page 22

FehlersuchtabelleSeite DE-22
Fehlersuchtabelle
Bei allen elektrischen Geräten können Störungen auf tre ten. Da bei muss
es sich nicht um ei nen Defekt am Gerät handeln. Prüfen Sie des halb
bitte an hand der Ta bel le, ob Sie die Störung be sei ti gen können.
WARNUNG
Stromschlaggefahr bei unsachgemäßer Reparatur!
Nie mals versuchen, das de fek te – oder ver meint lich defekte –
Ge rät selbst zu re pa rie ren. Sie kön nen sich und spä te re Be nut zer in Gefahr brin gen. Nur au to ri sier te Fach kräf te dürfen
die se Re pa ra tu ren ausführen.
Problem Mögliche Ursache Lösungen, Tipps
Die Kaffeemaschine funktioniert nicht.
Der Brühvorgang startet
nicht wie
geplant.
Ein-/Ausschalter
nicht betätigt.
Netzstecker sitzt
lose.
Steckdose defekt.
Die Startverzögerung ist aktiviert,
aber die Uhrzeit ist
falsch eingestellt.
Gerät einschalten.
Festen Sitz des Netz stec kers in
der Steckdose kontrollieren.
Gerät an einer anderen Steckdose
ausprobieren.
Sicherungen prüfen.
Uhrzeit einstellen (siehe „Uhrzeit
einstellen“ auf Seite DE-14).
Page 23

Service
Seite DE-23
Service
Damit wir Ihnen schnell helfen können, nennen Sie uns bitte:
Gerätebezeichnung Modell Bestellnummer
Kaffeemaschine CM2065S 77870106
Beratung, Bestellung und Reklamation
Wenden Sie sich bitte an die Produktberatung Ihres Versandhauses,
wenn
– die Lieferung unvollständig ist,
– das Gerät Transportschäden aufweist,
– Sie Fragen zu Ihrem Gerät haben,
– sich eine Störung nicht mithilfe der Fehlersuchtabelle
beheben lässt,
– Sie weiteres Zubehör bestellen möchten.
Ersatzteile
Kunden in Deutschland
– Wenden Sie sich bitte an die Firma Hermes Fulfilment GmbH:
– Tel. (0 57 32) 99 66 00
Montag–Donnerstag 8–15 Uhr, Freitag 8–14 Uhr
– E-Mail: ersatzteilservice-elektrokleingeraete@hermes-ws.com
Kunden in Österreich
– Wenden Sie sich bitte an das Kundencenter oder die Produktberatung
Ihres Versandhauses.
Bitte beachten Sie:
Sie sind für den einwandfreien Zustand des Geräts und die fach ge rech te
Benutzung im Haushalt verantwortlich. Durch Nichtbeachtung dieser Anleitung ver ur sach te Schäden können leider nicht anerkannt werden.
Page 24

UmweltschutzSeite DE-24
Umweltschutz
Elektro-Altgeräte
umweltgerecht
entsorgen
Elektrogeräte enthalten
Schadstoffe und wertvolle Ressourcen.
Jeder Verbraucher ist
deshalb gesetzlich verpflichtet,
Elektro-Altgeräte an einer zugelassenen Sammel- oder Rücknahmestelle abzugeben. Dadurch
werden sie einer umwelt- und ressourcenschonenden Verwertung
zugeführt.
Sie können Elektro-Altgeräte kostenlos beim lokalen Wertstoff-/
Recyclinghof abgeben.
Für weitere Informationen zu diesem Thema wenden Sie sich direkt an Ihren Händler.
Verpackung
Unsere Verpackungen
wer den aus um welt freund li chen, wie der ver-
wert ba ren Materialien hergestellt:
– Außenverpackung aus Pappe
–Formteile aus ge schäum tem,
FCKW- freiem Po ly sty rol (PS)
– Folien und Beutel aus Polyäthy-
len (PE)
– Spannbänder aus Po ly pro py len
(PP).
Wenn Sie sich von der Verpackung
trennen möchten, entsorgen Sie
diese bitte umweltfreundlich.
Page 25

Technisc he Daten
Seite DE-25
Technische Daten
Marke
Gerätebezeichnung Kaffeemaschine
Modell CM2065S
Leistungsaufnahme 915–1080 W
Versorgungsspannung 220– 240 V~ / 50 Hz
Schutzklasse I
Fassungsvermögen 1,5 l
Kabellänge 87 cm
Gewicht (ohne Wasser) 2,25 kg
Bestellnummer 77870106
Page 26

Page 27

Page 28

Page 29

12
10
8
6
4
CM2065S
Max
12
10
PROG
AN/AUS
STD
8
6
4
2
MIN
Manual/version:
196274_GB_20180328
Order no.: 77870106
Reproduction, even
of excerpts, is not
permitted!
User manual
Coffee machine
Page 30

Table of contentsPage GB-2
Table of contents
Table of contents . . . . . . . GB-2
Delivery. . . . . . . . . . . . . . . GB-3
Package contents . . . . . GB-3
Check the delivery . . . . . GB-3
Appliance parts and
control elements . . . . . . . . GB-4
Safety . . . . . . . . . . . . . . . . GB-5
Intended use . . . . . . . . . GB-5
Explanation of terms . . . GB-5
Safety notices . . . . . . . . GB-6
Start-up. . . . . . . . . . . . . . GB-12
Unpack the appliance . GB-12
Choose a suitable
location . . . . . . . . . . . . GB-12
Assembling the device. GB-13
Empty cycle . . . . . . . . . GB-13
Setting the time . . . . . . GB-14
Cleaning and
maintenance. . . . . . . . . . GB-20
Cleaning the coffee
machine . . . . . . . . . . . . GB-20
Decalcifying the coffee
machine . . . . . . . . . . . . GB-21
Troubleshooting table. . . GB-22
Service . . . . . . . . . . . . . . GB-23
Advice, order and
complaint . . . . . . . . . . . GB-23
Spare parts . . . . . . . . . GB-23
Environmental protection GB-24
Disposing of old electrical
devices in an environmentally-
friendly manner . . . . . . GB-24
Packaging . . . . . . . . . . GB-24
Technical specifications . GB-25
Operation . . . . . . . . . . . . GB-16
Brew the coffee . . . . . . GB-17
Start time delay . . . . . . GB-18
Automatic switch-off
function . . . . . . . . . . . . GB-19
Drip protection . . . . . . . GB-19
Page 31

Delivery
12
10
8
6
4
Delivery
Page GB-3
Before using the appliance, please first read
Max
12
10
PROG
AN/AUS
STD
8
MIN
6
4
2
structions and user manual carefully. This is the only way you can
use all the functions reliably and
through the safety in-
safely. Be absolutely sure to also
observe the national regulations in
your country, which are also valid
in addition to the regulations specified in this user manual.
Package contents
– Coffee machine
– User manual
Check the delivery
1. Unpack the appliance.
2. Check the package contents.
3. If the delivery is incomplete or
the appliance has been damaged during transit, please
contact our service department
(see page GB-23).
WARNING!
Risk of electric shock!
■ Never use a damaged ap-
pliance.
Keep all safety notices and instructions for future reference.
Pass all safety notices and instructions on to the subsequent
user of the appliance.
Page 32

Appliance parts and control elementsPage GB-4
12
10
8
6
4
Max
12
10
8
6
4
2
AN/AUS
MIN
STD
PROG
Appliance parts and control elements
(2) (3) (4)(1)
AM
PM
PROG
STD
(5)(6)
AN/AUS
(7)
MIN
(15)
(14)
(13)
(12)
(8)
(1) The PROG setting controls
the hours, programming the
start time delay and the au-
tomatic shut-off feature
(2) Display
(3) Control light
(4) AN/AUS (ON/OFF) button
tection
(5) MIN Setting in minutes
(6) STD Setting in hours
(7) Filter holder with drip pro-
(9)(10)(11)
(8) Flavour protection lid
(9) Coffee pot
(10) Hotplate
(11) Mains cable including
mains plug
(12) Water level indicator
(13) Control panel
(14) Water tank lid
(15) Filter compartment lid
Page 33

Safety
Safety
Page GB-5
Intended use
You can prepare coffee in
ordinary domestic quantities
using this coffee machine.
Use the size 4 fi lters which
are available from shops.
The coffee machine is designed for use in private
households and is not designed for commercial use
or multiple use (e.g.: use by
several parties in a block of
fl ats).
Only use the coffee machine
as described in this user manual. Any other use is deemed
improper and may result in
damage to property or even
personal injury. The manufacturer accepts no liability
for damage caused by improper use.
Explanation of terms
The following symbols can be
found in this user manual.
WARNING
This symbol indicates a
hazard with a medium level
of risk which, if not avoided,
could result in death or serious injury.
CAUTION
This symbol indicates a
hazard with a low level of risk
which, if not avoided, could
result in minor or moderate
injury.
NOTICE
This symbol warns against
possible damage to property.
This symbol refers to useful
additional information.
Page 34

SafetyPage GB-6
Safety notices
In this chapter you will fi nd
general safety instructions
which you must always
observe for your own protection and that of third parties.
Please also observe the warning notices in the individual
chapters on operation, cleaning, etc.
WARNING
Risks in handling
household electrical
appliances
Risk of electric shock!
Touching live parts may result in severe injury or death.
■ Prior to each use, check
whether the articles or the
mains connection show
signs of damage. If this is
the case, do not switch the
appliance on, instead you
should inform our customer service department (see
page GB-23).
■ Only connect the appli-
ance if the socket voltage
matches the requirements
indicated on the type
plate.
■ The appliance corresponds
to protection class I and
may only be connected
to a plug with a protective conductor that has
been properly installed. Do
not connect to a multiple
socket outlet, power strip,
timer or to a separate remote-controlled system for
distance monitoring and
control.
■ The AN/AUS switch does
not disconnect the appliance from the mains. The
appliance must therefore
be connected to an easily
accessible socket so that it
can be quickly disconnected from the power supply
in the event of breakdown.
■ Do not operate or continue
to operate the appliance,
– if it shows signs of visible
damage, e.g. the mains
cable is defective.
– if it starts smoking or
there is a smell of burning.
– it makes unfamiliar nois-
es.
In this case pull the mains
plug out of the socket and inform our service department
(see page GB-23).
■ If the mains cable of the
appliance is damaged, the
manufacturer, its custom-
Page 35

Safety
Page GB-7
er service team or a person
with similar qualifi cations
must replace it.
■ Investigations and repairs
to the appliance may only
be carried out by authorised specialists, such as our
service department (see
page GB-23). Unauthorised
repairs to the appliance
can cause property damage and personal injury,
and invalidate liability and
warranty claims.
■ Never open the housing.
■ Do not attempt to repair
an appliance which is defective or supposed to be
defective.
■ Only parts corresponding
to the original appliance
specifi cations may be used
for repairs.
This appliance contains
electrical and mechanical
parts which are essential
for protection against potential sources of danger.
■ Always pull the mains plug
out of the socket if the appliance is faulty and when
cleaning or maintaining
the socket.
■ Make sure that children do
not insert any objects into
the appliance.
■ Keep the appliance, the
mains plug and the mains
cord away from open
fl ames and hot surfaces.
■ Do not kink or pinch the
mains cable or lay it over
sharp edges.
■ Never pull the mains plug
out of the socket by the
mains cord, always hold
the mains plug itself.
■ Never use the mains cable
as a carrying handle.
■ Never touch the mains
plug with wet hands.
■ Take care to prevent the
risk of tripping when laying
the mains cord.
■ Never immerse the appli-
ance in water.
■ Only use the appliance in-
doors. Do not use in wet
rooms or in the rain.
■ Never store the appliance
in such a way that it can
fall into a bathtub or sink.
■ Never touch an electrical
appliance if it has fallen
into water. In such a case,
immediately unplug the
mains plug from the socket.
■ Do not immerse the appli-
ance or the mains cable or
mains plug in water or other liquids.
Page 36

SafetyPage GB-8
■ Thoroughly dry all parts af-
ter cleaning.
Risks in handling
household appliances
which heat up
Fire hazard!
The appliance will become
hot during operation. Flammable objects placed close
to the appliance may ignite
easily.
■ Do not place objects near
to fl ammable objects such
as curtains.
■ Never place the appliance
near to hot surfaces, such
as hotplates, ovens etc.
■ Do not store objects on the
hotplates or the appliance
whilst the device is in operation.
■ Do not cover the appliance,
e.g. with cloths or other
items.
Risks caused by hot liquid
and steam
Risk of scalding!
When the coffee machine is
in use, hot steam will come
out of it which will lead to
scalding if it comes into contact with unprotected skin.
Hot coffee can cause scalding in the mouth or the
oesophagus and on unprotected skin.
■ Drink freshly brewed coffee
with care.
■ Avoid any contact with the
hot steam while the coffee
is brewing, when refi lling
the water tank and when
the lid is open.
■ Do not fi ll the water tank
past the MAX fi ll level
mark.
■ Ensure that the lid is closed
during operation.
When fi lling the appliance
with fresh water, hot steam
may come out of the water
outlet shortly after the brewing process.
■ If several consecutive brew-
ing processes are required,
switch the coffee machine
off after every brewing process and allow it to cool for
approx. 5 minutes.
If the appliance falls down,
contact with hot coffee can
lead to scalding.
■ Do not position the appli-
ance on the edge of the
worktop.
■ Do not allow the network
cable to hang over the
edge of the worktop.
Page 37

Safety
Page GB-9
Health hazard
Improper use of the appliance may lead to damage to
health.
■ During fi rst use, after de-
calcifi cation and after having not used the device for
a prolonged period of time,
allow a full tank of water to
percolate through the appliance and throw it away.
Risks to children
Risk of suffocation!
Children can become entangled in the packaging fi lm
and suffocate.
■ Do not allow children to
play with the packaging
fi lm.
CAUTION
Risks for certain groups of
people
Danger to children and people with impaired physical,
sensory or mental abilities!
Such persons often fail to recognise risks or underestimate
them.
■ This appliance may be
used by children aged
eight years and above, as
well as persons with reduced physical, sensory or
mental capacities or those
lacking experience and/
or knowledge, if they are
supervised or have been
instructed in how to safely
use the appliance and have
understood the dangers associated with operating it.
■ Children must not be al-
lowed to play with the appliance.
■ The appliance and its con-
nector cable must be kept
away from children under 8
years of age.
■ Do not leave the appliance
unsupervised while in operation.
■ Cleaning and user main-
tenance may not be per-
Page 38

SafetyPage GB -10
formed by children unless
they are at least eight
years old and under supervision.
Risks in handling coffee
machines
Risk of burns!
The glass jug and the hotplate become hot during
operation and may cause
burns if contact with the skin
occurs.
The hotplate will remain hot
for some time after switching
off.
■ Only touch the glass jug by
the handle.
■ Do not touch the hotplate
when hot and do not touch
underneath the fi lter.
■ Allow the appliance to cool
completely prior to cleaning it.
NOTICE
Risk of damage!
Improper handling of the
appliance may cause it to
become damaged.
■ Only use pure ground
coffee. Water-soluble or
freeze-dried instant products and other drink powders are unsuitable.
■ Never expose the appli-
ance to high temperatures
(heaters etc.) or to the effects of the weather (rain
etc.).
■ Do not expose the ap-
pliance to temperatures
below 0°C for prolonged
periods. Residual water
that may have frozen could
damage the appliance.
■ Only use the appliance if
it is on a level, stable and
non-sensitive surface.
■ Do not operate the appli-
ance when empty.
■ Only fi ll it with fresh, cold
drinking water; do not add
other liquids to the water
tank.
■ Please keep in mind that
the surface coatings of
furniture sometimes contain chemical additives
that may corrode the rub-
Page 39

ber feet of the appliances.
This may cause residue to
accumulate on the surface
of the furniture. You should
therefore place a heat- and
water-resistant layer underneath the appliance.
■ Do not set up the appli-
ance under kitchen cupboards or similar. They
could be damaged by the
steam that is emitted.
■ Do not use sharp objects to
unpack the appliance.
■ Never immerse the appli-
ance in water in order to
clean it.
■ Never place the appliance
or individual parts in a
dishwasher.
■ Do not use a steam cleaner
to clean it. This can cause
short-circuiting and damage the appliance.
■ Do not use any sol-
vent-based, abrasive or
scouring cleaners (e.g. oven
cleaners or grill sprays)
or cleaning utensils (e.g.
scouring pads or similar).
They could damage the
surfaces.
Safety
Page GB -11
Page 40

Start-up
Start-upPage GB -12
Unpack the appliance
NOTICE
Risk of damage!
Improper handling of the
appliance may cause it to
become damaged.
■ Do not use sharp objects to
unpack the appliance.
1. Unpack the coffee machine.
2. Carefully remove all parts of
the packaging, plastic profiles,
tape and foam padding.
Choose a suitable
location
Place the coffee machine
– on a solid, level, water-resistant
and non-sensitive surface;
– not underneath an overhanging
cupboard;
– in such a way that there is
space above to open the filter
compartment lid (15);
– in such a way that there is free
space of at least 3 cm between
the coffee machine and the adjacent areas to the side and the
rear;
– not upon or next to an oven,
another heat source or near to
a sink;
– in such a way that it is out of the
reach of children.
WARNING
Risk of electric shock!
Touching live parts may result in severe injury or death.
■ When laying out the mains
cable, ensure that it cannot
become damaged by sharp
edges or through contact
with hot surfaces (e.g. electrical hobs).
Page 41

Start-up
Page GB -13
Assembling the device
(15)
Max
12
10
PROG
AN/AUS
STD
8
MIN
6
4
2
1. Clean the housing after unpacking with a slightly damp
cloth and wash the coffee pot
(9) with soapy water.
2. Open the filter compartment lid
(15).
(9)
12
10
8
6
4
paper coffee filters which are
available in shops.
PROG
STD
AN/AUS
MIN
5. Insert the mains plug in an
easily accessible protective-contact socket.
00:00 will flash on the display.
The appliance is in standby
mode.
Empty cycle
During first use, after decalcification and if you have not used the
appliance for a prolonged period
of time, fill the water tank (without
coffee) and run the machine for a
full empty cycle.
(7)
3. Replace the filter holder (7).
Ensure that the handle is
tipped forward so that it locks
correctly.
4. Insert a coffee filter. We recommend that you use size 4
CAUTION
Risk of scalding!
When the coffee machine is
in use, hot steam will come
out of it which will lead to
scalding if it comes into contact with unprotected skin.
■ Do not open the lid during
operation.
Page 42

Start-upPage GB -14
12
(12)
10
8
6
4
Max
12
10
PROG
STD
8
6
4
2
(14)
AN/AUS
MIN
(10)
1. Fill the coffee pot with fresh,
cold tap water.
2. Open the water tank lid (14)
and pour the water out of the
coffee pot into the water tank
up to the MAX mark on the
water level indicator (12).
Dry the coffee pot from the
outside and reposition it on the
hotplate (10).
The control light (3) is illuminated in red and the water will
begin to percolate through.
4. Once the water has percolated
through, press the button (4)
once again to switch off the
appliance.
The control light will go out.
Your coffee machine is now
ready for use.
Setting the time
If you wish to use the appliance
as a clock or use the “start time
delay” function, you must set the
time.
If you are connecting the device to
the power supply for the first time
or if the appliance was disconnected from the network,
will flash in the display.
(2) (3) (4)(1)
00:00
(3) (4)
PROG
STD
AN/AUS
MIN
3. Press the AN/AUS button (4)
twice.
PROG
STD
AN/AUS
MIN
(5)(6)
1. Push the AN/AUS button (4)
as often as required until the
control light (3) is no longer
flashing.
Page 43

2. Press the PROG button (1)
once. A clock symbol will
flash in the display.
3. Set the current time with the
buttons STD (hours) (6) and
MIN (minutes) (5). If you hold
the button pressed in, the display will change more quickly.
4. Around 5 seconds after you
last press the button, the setting will be saved.
Start-up
Page GB -15
Page 44

OperationPage GB -16
Operation
CAUTION
Risk of scalding!
When the coffee machine is
in use, hot steam will be created which can scald the skin
if unprotected.
■ Avoid contact with the hot
steam. Avoid any contact
with the hot steam while
cooking, when refi lling the
water tank and when the
lid is open.
■ Do not touch the lid during
operation.
When fi lling the appliance
with fresh water, hot steam
may come out of the water
outlet shortly after the brewing process.
■ If several consecutive brew-
ing processes are required,
switch the coffee machine
off after every brewing process and allow it to cool for
approx. 5 minutes.
The hotplate will still remain
hot for some time after
switching it off.
■ Only hold the glass pot by
the handle.
■ Do not touch the hotplate
when it is hot and do not
reach underneath the fi lter.
Hot coffee can cause scalding in the mouth or the
oesophagus and on unprotected skin.
■ Drink freshly brewed coffee
with care.
NOTICE
Improper use of the appliance can lead to damage to
the appliance.
■ Only fi ll it with fresh, cold
drinking water; do not add
other liquids to the water
tank.
■ Do not exceed the maxi-
mum fi ll level.
Risk of burns!
The glass pot and the hotplate become hot during operation and may cause burns
if touched.
Page 45

Operation
12
10
8
6
4
Page GB -17
Brew the coffee
(15)
1. Open the filter compartment lid
(15).
2. Insert a size 4 paper filter and
add the required quantity of
ground coffee to the filter.
We recommend one teaspoon
of medium- to fine-ground coffee for each normal sized cup
(approx. 125 ml). For larger
cups, please use a heaped
teaspoon.
4. Add the correct quantity of
fresh, cold tap water to the water tank.
There is a scale on the water
tank and on the pot to measure the quantity of fresh water.
This applies for normal-sized
cups of approx. 125 ml.
Never add more water than up
to the upper MAX mark.
5. Close the water tank lid.
Max
12
10
PROG
AN/AUS
STD
8
MIN
6
4
Max
12
10
PROG
AN/AUS
STD
8
MIN
6
4
2
2
(16)
(8)
12
10
8
6
4
Max
12
10
PROG
AN/AUS
STD
8
MIN
(12)
3. Open the water tank lid (14).
6
4
2
(14)
(10)
6. Place the coffee pot on the
hotplate. Ensure that the pot is
correctly positioned so that the
flavour protection lid (8) pushes the drip protector (16) up
into the filter holder.
(3) (4)
PROG
STD
AN/AUS
MIN
Page 46

OperationPage GB -18
7. Press the AN/AUS button (4).
The control light (3) will be
illuminated in red and the
brewing process will begin.
8. If no more coffee drips out,
the brewing process has finished. You can now take out
the coffee pot and pour the
coffee.
9. If you want to keep the rest
of the coffee warm, place the
coffee pot back on the hotplate without switching off the
coffee machine.
10. To switch the appliance off,
press the AN/AUS button (4).
The control light (3) will go off.
If you do not switch off your
coffee machine, it will automatically switch off after 40 minutes.
Enter the start time
(1)
PROG
(6) (5)
STD
1. Press the PROG button (1)
twice.
In the display, the cup symbol
will flash.
2. Set the desired start time with
the buttons STD (hours) (6)
and MIN (minutes) (5).
Around 5 seconds after you
last press the button, the setting will be saved.
The control light (3) will be illuminated in blue; the start time
delay has now been activated.
MIN
Start time delay
If you want the brewing process
to begin at a certain time, use the
start time delay.
Requirements:
– The current time has been set
(see „Setting the time“ on page
GB-14).
– The appliance is in standby
mode (the display lights up, the
control light (3) does not).
If you disconnect the coffee
machine from the network,
the activation and setting of the
start time delay will be deleted.
Page 47

Operation
Page GB -19
Automatic switch-off
function
The appliance and the hotplate
will normally switch off after 40
minutes automatically. To save
energy, you can set an earlier
switch-off time for the hotplate
(can be set from 1 to 40 minutes). This setting is not saved,
but the process must be repeated
every time the coffee machine is
switched on.
(1)
PROG
(6) (5)
STD
1. Switch the coffee machine on
or off using the AN/AUS button
(4).
The control light (3) is illuminated in red.
2. Press the PROG button (1)
twice.
On the display the cup symbol
is flashing.
3. Set the desired keep-warm
time with the MIN button (5).
Around 5 seconds after you
last press the button, the
standard display will once
again appear.
The cup symbol will no
longer flash.
MIN
4. Once the keep-warm time has
elapsed the control light will go
out (3). The appliance will go
back into standby mode.
Drip protection
Max
12
10
PROG
AN/AUS
STD
8
MIN
6
4
2
Your coffee machine is equipped
with a drip protector (16) which
seals the filter outlet as soon as
you take away the coffee pot. This
means that no coffee will run out
onto the hotplate.
Only remove the coffee pot
for a short time, as hot water will continue to run into the fi l-
ter and can cause it to overfl ow.
(16)
Page 48

Cleaning and maintenancePage GB -20
Cleaning and maintenance
Cleaning the coffee
machine
WARNING
Risk of electric shock!
Improper handling of the
appliance can lead to serious
injuries or to death.
■ Before cleaning and main-
tenance, pull the mains
plug out of the socket.
■ Never immerse the appli-
ance in water in order to
clean it.
■ Do not use a steam cleaner
to clean it.
CAUTION
Risk of burns!
The appliance will become
hot during operation. Touching the hot appliance can
lead to burns.
■ Allow the appliance to cool
completely prior to cleaning it.
NOTICE
Risk of damage!
Improper cleaning can cause
short-circuiting and damage
the device.
■ Never place the appliance
in a dishwasher.
Improper use of cleaning
products or cleaning utensils
can scratch or chemically
damage the surface.
■ Do not use any sol-
vent-based, abrasive or
scouring cleaners or cleaning utensils (e.g. oven spray
or grill spray) or cleaning
utensils such as scouring
pads or similar.
■ Do not use any abrasive
cleaners (scouring or thinning agents) to clean the
appliance.
1. Disconnect the mains plug
from the socket.
2. Allow the appliance to cool off
completely.
3. Wipe the appliance surface
with a slightly moistened towel.
Use a small amount of washing-up liquid to remove stub-
Page 49

Cleaning and maintenance
Page GB -21
born dirt. Make sure that the
control panel does not become
wet.
4. Wash the coffee pot in normal
soapy water or put it in the
dishwasher. Frequent washing
in the dishwasher can bleach
the plastic.
5. Thoroughly dry all parts after
cleaning.
Decalcifying the coffee
machine
Depending on the degree of hardness of the water, calcium deposits can build up inside the coffee
machine. It is necessary to decalcify the machine if the brewing
process takes longer or if sounds
are heard during the brewing process.
5. To rinse the appliance through,
allow at least the maximum
quantity of clean water to run
through the machine.
6. Repeat the decalcification process if required.
1. Mix 2-3 tablespoons of vinegar
essence with the maximum
quantity of cold water.
2. Pour the mixture into the water
tank.
3. Switch the appliance on.
The water-vinegar mixture will
run through and decalcify the
brewing system.
4. Tip the mixture away after it
has percolated through the
coffee machine.
Page 50

Troubleshooting tablePage GB -22
Troubleshooting table
Malfunctions can occur in all electrical appliances. This does not necessarily mean there is a defect in the appliance. For this reason, please
check the tables to see if you can correct the malfunction.
WARNING
Risk of electric shock in case of improper repair!
Never try to repair a defective or suspected defective appliance yourself. You can put your own and future users’ lives in
danger. Only authorised specialists are allowed to carry out
this repair work.
Problem Possible cause Solutions, tips
The coffee machine does not
work.
The brewing
process does
not start as
planned.
The AN/AUS switch
has not been activated.
Mains plug is
loose.
The socket is defective.
The start time delay has been activated but the time
has been incorrectly set.
Switch the appliance on.
Check that the mains plug is firmly
inserted into the socket.
Test the appliance with another
socket.
Checking the fuses.
Set the time (see „Setting the time“
on page GB-14).
Page 51

Service
Page GB-23
Service
In order for us to help you quickly, please tell us:
Name of appliance Model Order number
Coffee machine CM2065S 77870106
Advice, order and complaint
Please contact your mail order company’s customer service centre if
– the delivery is incomplete,
– the appliance is damaged during transport,
– you have questions about your appliance,
– a fault cannot be rectified using the troubleshooting table,
– you would like to order further accessories.
Spare parts
Customers in Germany
– Please contact the company Hermes Fulfilment GmbH:
– Tel. 00 49 (0) 57 32 99 66 00
Mon-Thurs 8 am to 3 pm, Friday 8 am to 2 pm
– E-Mail: ersatzteilservice-elektrokleingeraete@hermes-ws.com
Customers in Austria
– Please contact your mail order company’s customer service centre
or product advice centre.
Please note:
You are responsible for the condition of the appliance and its proper
use in the household. Damage resulting from non-compliance with this
manual unfortunately cannot be recognised.
Page 52

Environmental protectionPage GB -24
Environmental protection
Disposing of old
electrical devices in an
environmentally-friendly
manner
Electrical appliances
contain harmful substances as well as valuable resources.
Every consumer is therefore required by law to dispose of old
electrical appliances at an authorised collection or return point.
They will thus be made available
for environmentally-sound, resource-saving recycling.
You can dispose of old electrical
appliances free of charge at your
local recycling centre.
Please contact your dealer directly for more information about this
topic.
Packaging
Our packaging is made of
environmentally-friendly,
recyclable materials:
– Outer packaging made of card-
board
– Moulded parts made of foamed,
CFC-free polystyrene (PS)
– Films and bags made of poly-
ethylene (PE)
– Tension bands made of poly-
propylene (PP).
If you would like to dispose of the
packaging, please dispose of it in
an environmentally friendly way.
Page 53

Technical specifications
Page GB-25
Technical specifications
Brand
Name of appliance Coffee machine
Model
Power consumption 915-1080 W
Supply voltage 220–240 V~ / 50 Hz
Protection class I
Capacity 1.5 l
Cable length 87 cm
Weight (without water) 2.25 kg
Order number
CM2065S
77870106
Page 54

Page 55

Page 56

 Loading...