

Hanover Luxury, HIM60701-6SS, 9760701 Instruction Manual
1
INSTRUCTION MANUAL
Model Number: 9760701
ICE MAKER
BEFORE USE, PLEASE READ AND FOLLOW ALL SAFETY RULES AND OPERATING
INSTRUCTIONS.

2
WARNING!
The appliance must be positioned so that the plug is accessible. Release the
If the supply cord is damaged, it must be replaced by manufacturer or a similarly
harm.
electric cord, move your wine cooler/beverage cooler to the desired location.
Do not move your ice maker when filled, as this might distort the body.
Do not touch the compressor on the ice maker.
The plug should be accessible at all times.
The assembly of this appliance should be done with caution as there are hazards
involved. Children should not play with the appliance.
This item should be plugged into a power outlet directly. Do not plug into an
extension cord or power strip.
qualified person, in order to avoid a hazard.
Ensure that your water supply line connections comply with all local and state
plumbing codes. All connections must be made by a licensed plumbing
contractor. Failure to follow these instructions may result in damage and/or

3
WARNING
Follow these basic steps to reduce the risk of fire,
electrical shock, or injury.
Save these instructions for future use.
Never allow children to play or crawl inside the appliance.
Make sure the appliance has an open ventilation system and is clear of obstruction.
Before you throwing away your old ice maker: Take off the door off so that children are not able to
climb inside.
Never clean appliance parts with flammable fluids. The fumes can create a fire hazard or explosion.
Do not store or use gasoline or any other flammable vapors and liquids in the vicinity of this
appliance. The fumes can create a fire hazard or explosion. Do not store explosive substances such as
aerosol cans with a flammable propellant in this appliance.
Do not use mechanical devices or other means to accelerate the defrosting process, other than those
recommended by the manufacturer.
Appliance should be on a stable surface to avoid any hazard.
The only refrigerant that should be used is R134.
IMPORTANT SAFETY INSTRUCTIONS

4
INSTALLATION INSTRUCTIONS
Class
Symbol
Ambient Temperatures range(°F)
Extended Temperate
SN
﹢50 to ﹢90
Temperate
N
﹢60 to ﹢90
Subtropical
ST
﹢60 to ﹢100
Tropical
T
﹢60 to ﹢109
Before Using your Ice Maker
Remove the exterior and interior packing.
Before connecting the ice maker to the power source, let it stand upright for approximately 2 hours. This
will reduce the possibility of a malfunction in the cooling system from handling during transportation.
Clean the interior surface using a soft cloth and a lukewarm mixture of 2 tablespoons of baking soda for
each quart of lukewarm water..
This appliance is intended to be used for residential applications.
When disposing your appliance, please choose an authorized disposal site.
Installation of your ice maker
This appliance is designed to be for free standing or built-in installation .
Place your ice maker on a level surface that is strong enough to support the weight when fully loaded.
This appliance is using flammable refrigerant. Be careful not to damage the cooling pipe during the
transportation.
Place the ice maker away from direct sunlight and sources of heat (stove, heater, radiator, etc.).
Direct sunlight may affect the acrylic coating and heat sources may increase electrical consumption.
Extreme cold ambient temperatures may also cause the unit not to perform properly.
Avoid locating the unit in humid areas.
Plug the ice maker into a properly installed-grounded wall outlet. Do not under any circumstances cut or
remove the third (ground) prong from the power cord. Any questions concerning power and/or grounding
please contact a certified electrician or an authorized product service center.
CAUTION
To store the ice maker cooler for an extended period of time; the unit should have a thorough cleaning and
the door should be left ajar to allow air to circulate. This will avoid possible formations of condensation,
mold or odors.
Ambient Room Temperature Limits
This appliance is designed to operate in ambient temperatures specified by its temperature class marked on the
rating plate.
5
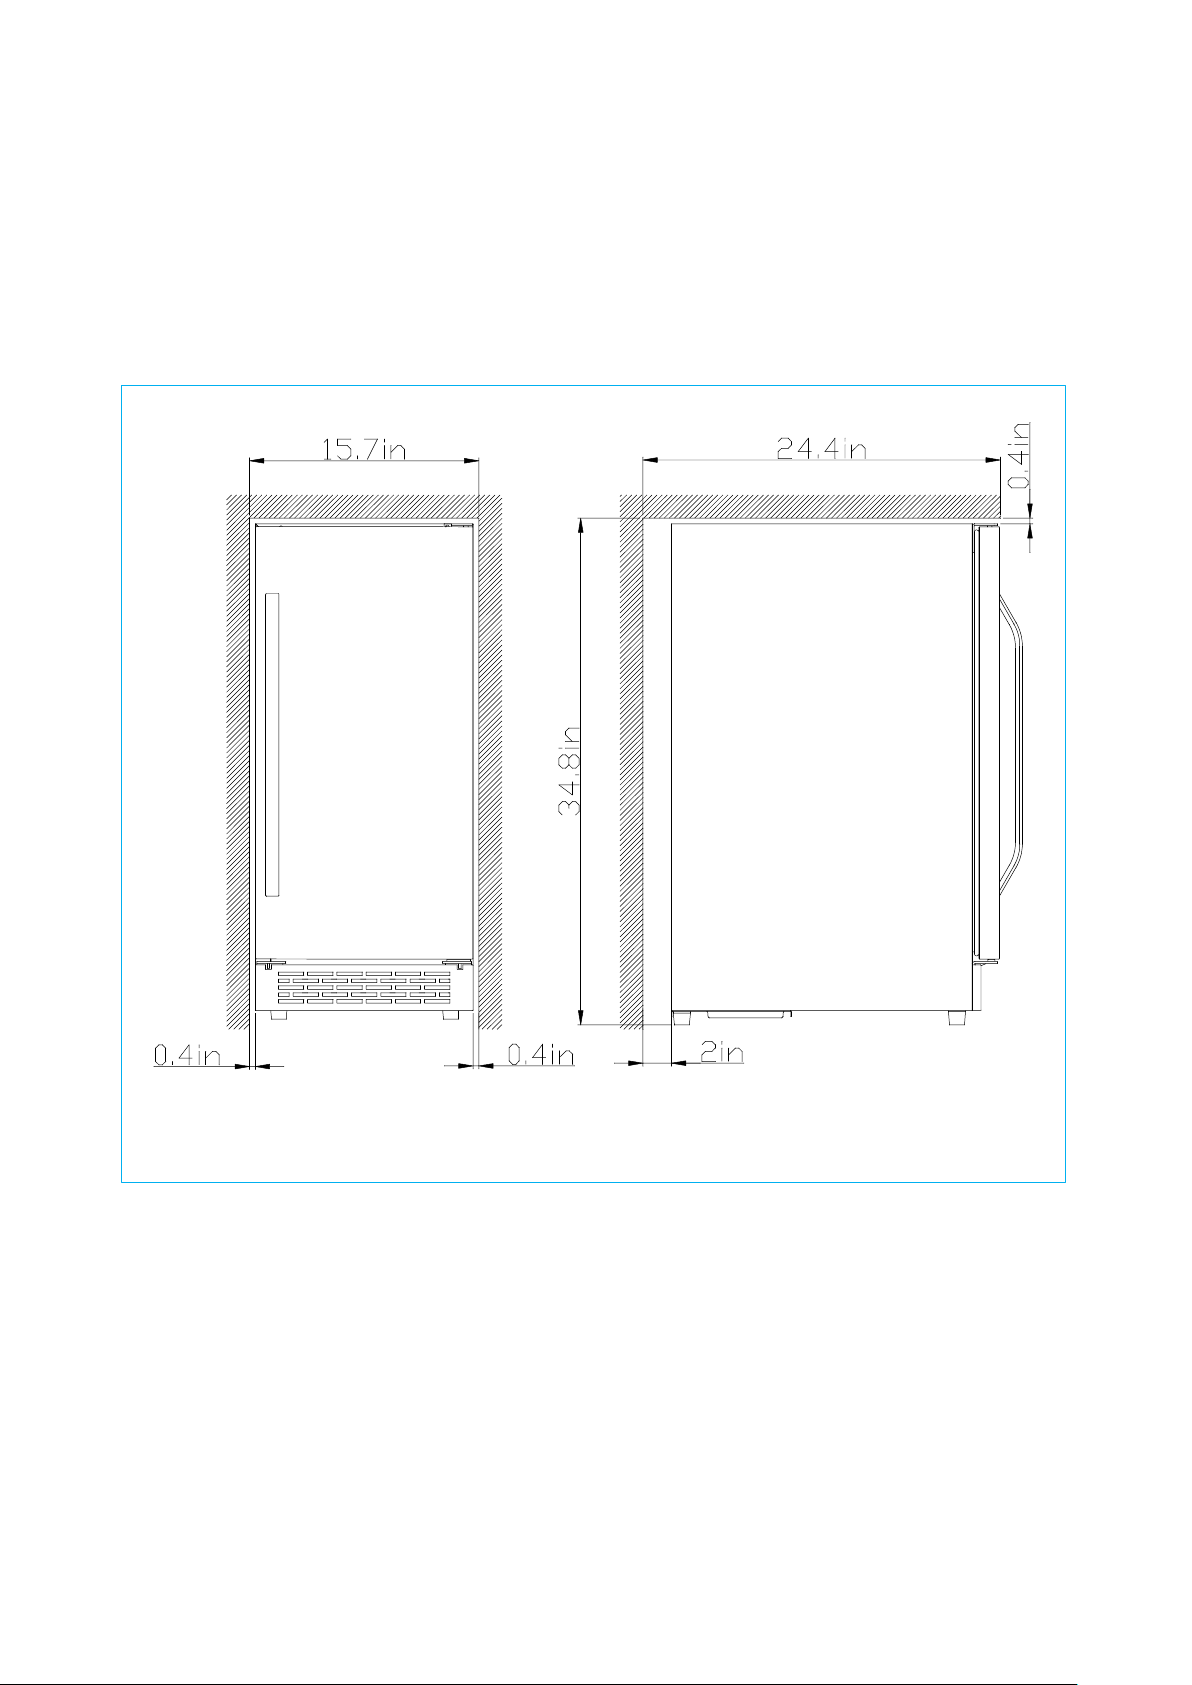
BUILT-IN INSTALLATION
INSTRUCTIONS
To build in the ice maker, we suggest keeping the distance of at least 1 inch from every left, right and
topside of the wall and at least 4 inches to the back side of the wall in order to properly vent out the hot
air. Please see below detailed drawing.

6
CAUTION
-Copper tubing is recommended for the water supply line. Water supply tubing made of 1/4 inch plastic
is not recommended since these increases the potential for water leaks. Manufacturer will not be
Connecting ice maker to water supply
WARNING: When connecting water supply line to the ice maker, make sure to disconnect the ice maker
from electrical power. This will avoid electric shock, which can cause death or severe personal injury.
To avoid property damage:
responsible for any damage if plastic tubing is used for supply line.
- Do not install water supply tubing in areas where temperatures fall below freezing.
-Connect the ice maker to potable water source that is not tied into a water softening system. Chemicals
from the softener may damage the ice maker, causing it to malfunction.
WARNING!
Ensure that your water supply line connections comply with all local and state plumbing codes. All
connections must be made by a licensed plumbing contractor. Failure to follow these instructions
may result in damage and/or harm.
Before installing the water supply line, you will need:
Adjustable wrench and a standard flat blade screwdriver.
Access to a household cold water line with water pressure between 20 and 120 psi (138 and 827 kPa).
A water supply line made of 1/4 inch OD copper tubing. To determine the length of copper tubing needed, you
will need to measure the distance from the ice maker inlet valve at the back of the ice maker to your cold water
pipe. Then add approximately 7 feet, so the ice maker can be moved out for cleaning.
A shutoff valve to connect the water supply line to your household water system. Do not use a self-piercing
type shutoff valve.
A compression nut and ferrule (sleeve) for connecting the water supply line to the ice maker inlet valve.
NOTE: The following accessories are needed but not provided.
25 feet of 1/4 inch OD copper tubing
Saddle type shutoff valve (non-piercing)
(2) 1/4 inch brass compression nuts
(2) ferrules /sleeves
7
CAUTION
Do not use any plastic water supply line. Plastic may crack and could cause damage to your home.
Do not reuse an old hose set. Use a new hose set.
To connect water supply line to ice maker inlet valve:
1. Disconnect ice maker from electric power supply.
2. Place the end of water supply line into sink or bucket.
3. Turn ON water supply and flush supply line until water is clear. Turn OFF water supply at shutoff valve.
Unscrew plastic cap from water valve inlet and save it for use later.
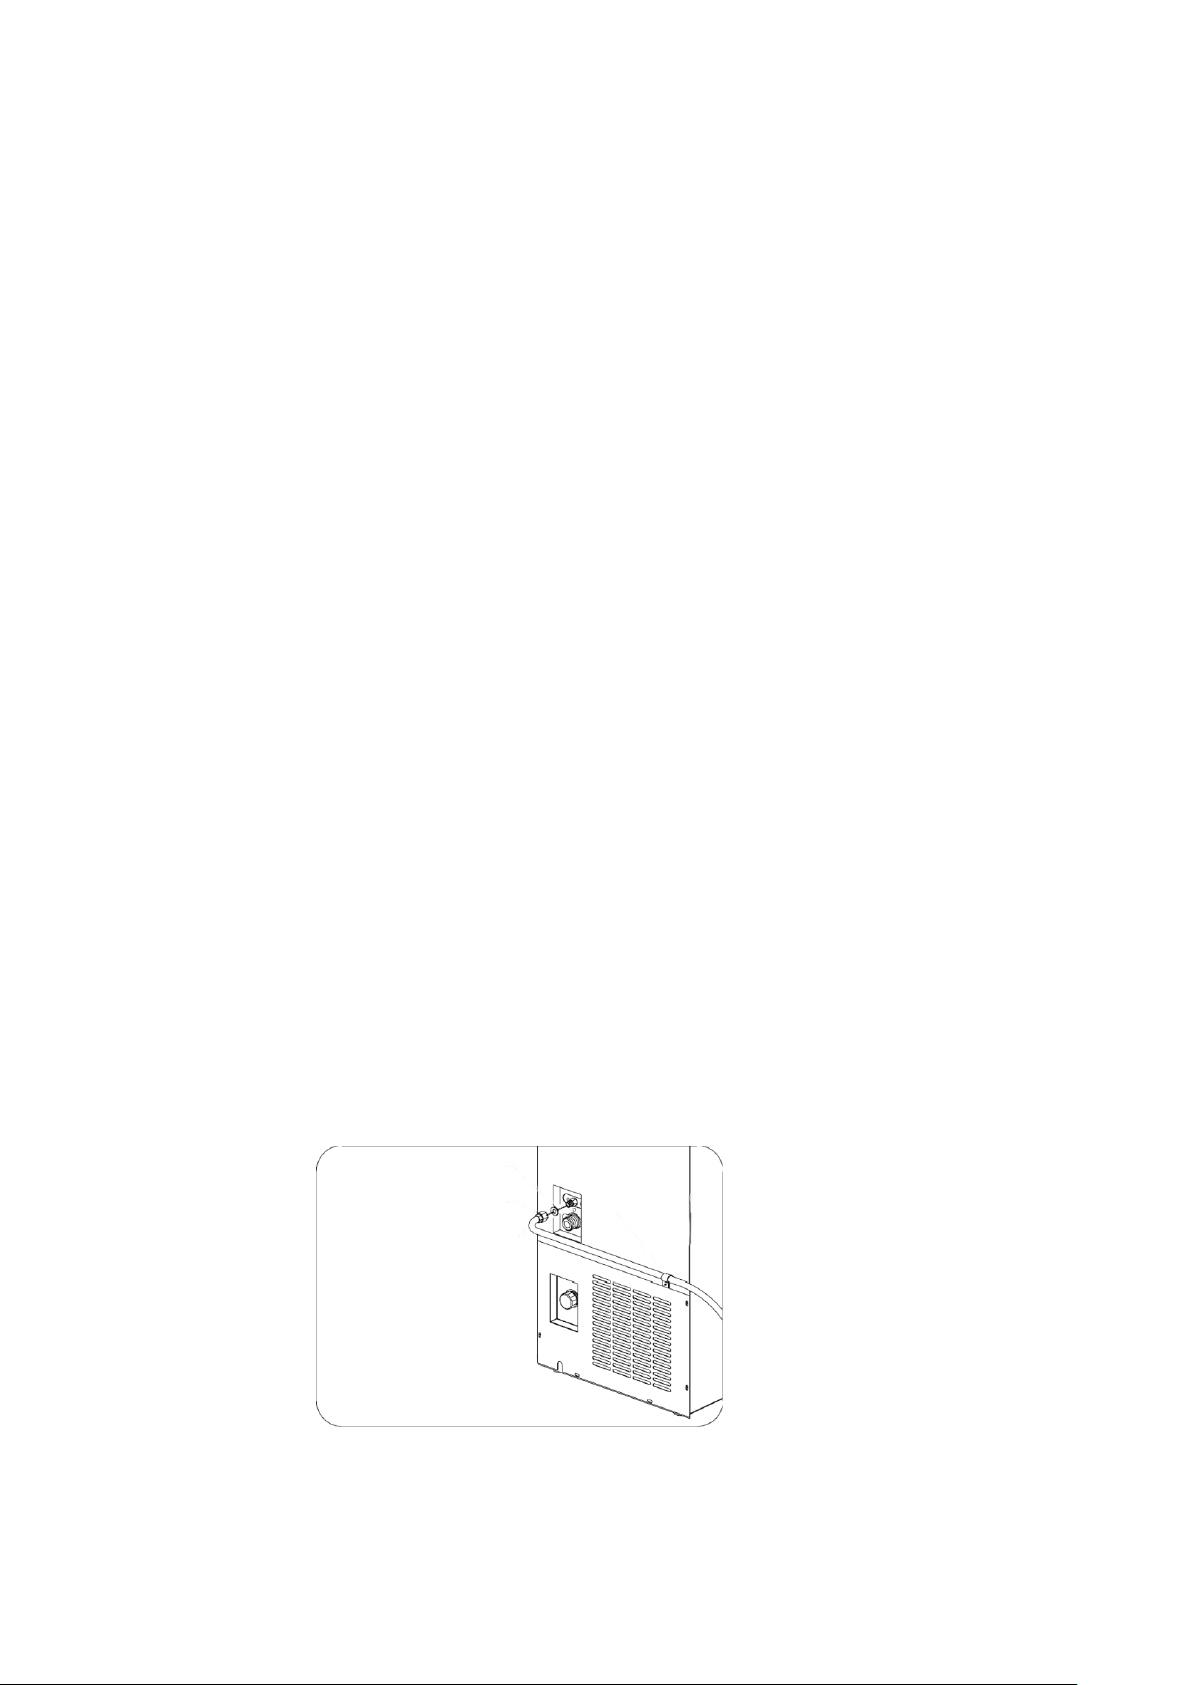
4. Slide brass compression nut, then ferrule (sleeve) onto the water supply line, as shown in Fig. A.
5. Push water supply line into water valve inlet as far as it will go (approximately 1/4 inch).
6. Slide ferrule (sleeve) into valve inlet and finger tighten compression nut onto valve. Tighten another half turn
with a wrench; do not over tighten.
7. With steel clamp and screw, secure water supply line to rear panel of ice maker at location as shown in Fig.A.
8. Coil excess water supply line (about 2 ½ turns) behind ice maker as shown in Fig.A and arrange coils so they
do not vibrate or rub against any other surface.
9. Turn ON water supply at shutoff valve and tighten any connections that leak.
10. Reconnect ice maker to electric power supply.
Although the unit has been tested and cleaned, due to transit and storage, the first batch of ice cubes should be
discarded.
It takes approximately 24 hours for the ice maker to begin producing ice. Air in new plumbing lines may cause the ice
maker to cycle two or three times before making a full tray of ice. New plumbing may cause ice to be discolored or have
poor flavor. Discard ice made during the first 24 hours.
IMPORTANT: Never turn the water supply tap off when the ice maker is working. Never touch the evaporator
when the unit is running. Except to take ice from the unit, keep the door closed to reduce melting and insure
proper ice formation.
Fig.A
 Loading...