

Page 1
Instruction Manual
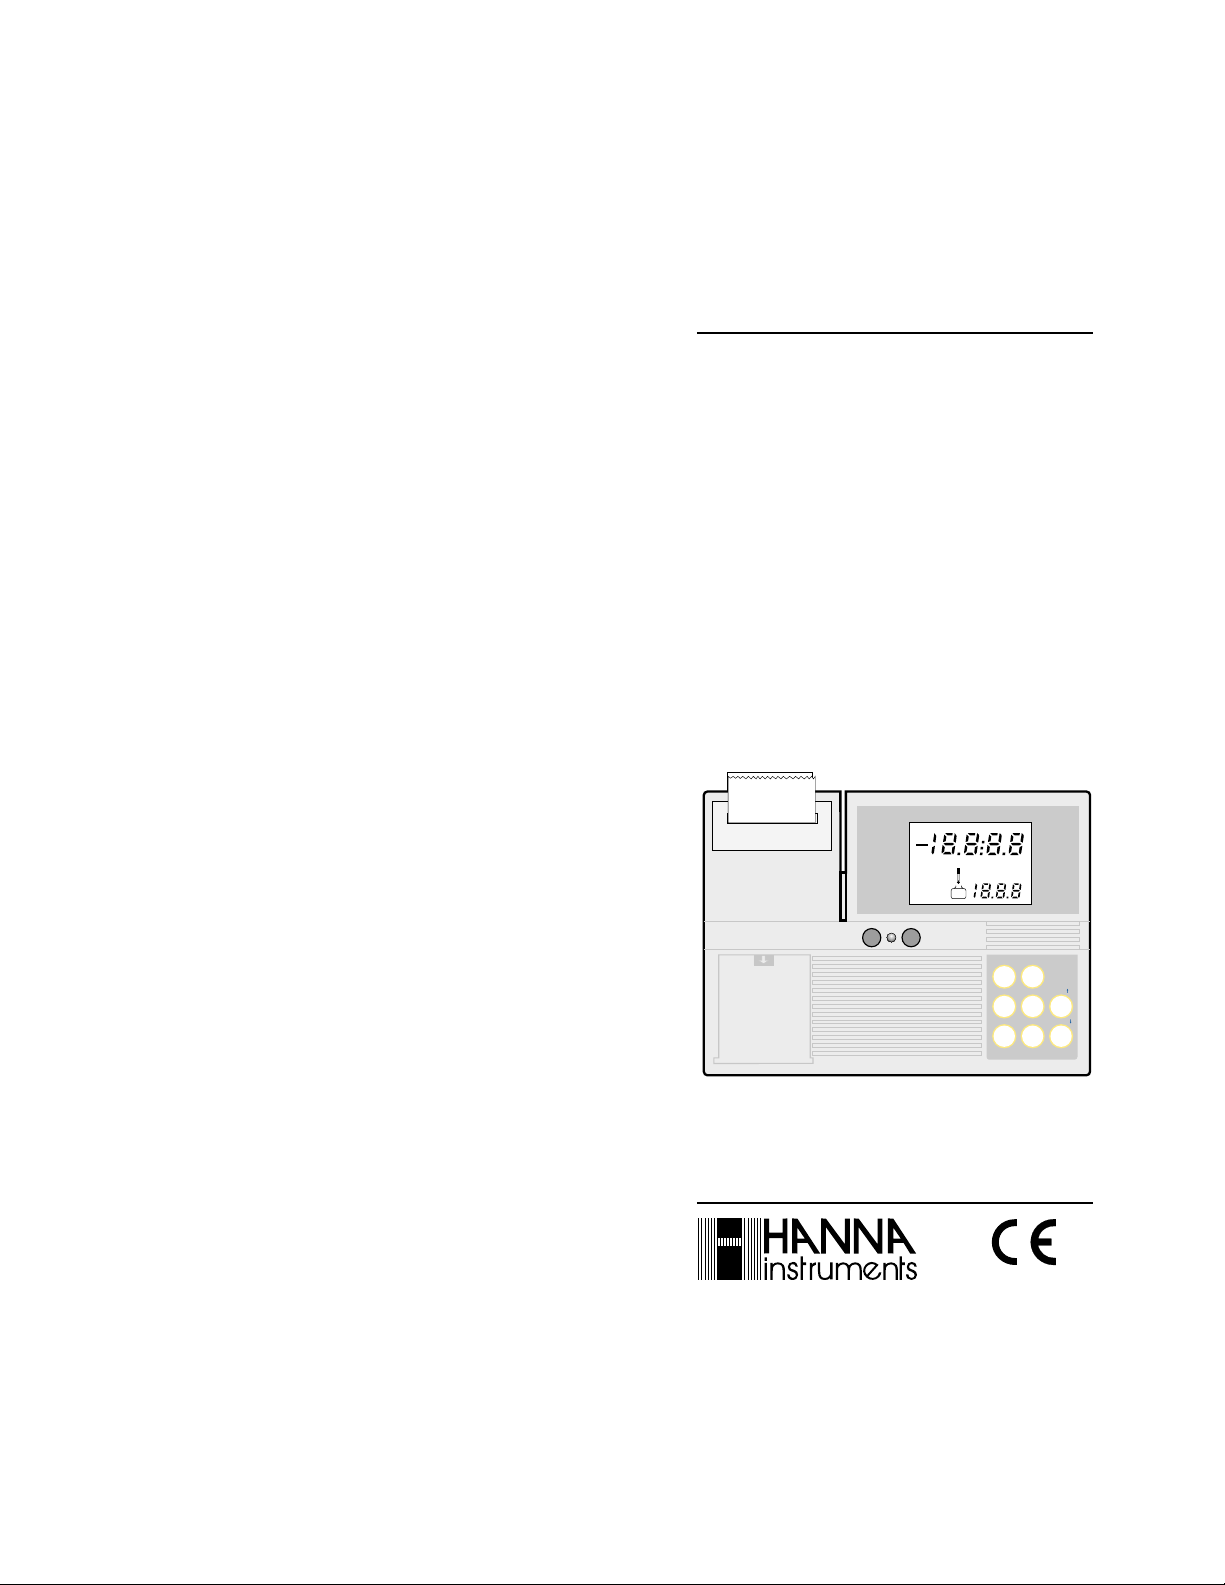
pH300
pH301
pH302
Microprocessor
GLP Bench-top
pH/mV/ISE/°C Meters
ppm
DATE TIME
Rel mV
MEM
ON OFF
CFM
WRONG
CAL
LOG
ppmpHpH
INTV
mV°C
m
1
2
BUF
s
3
http://www.hannainst.com
1
PAPER PRINT
pH302
pH METER
RANGE CAL
CFM /
PGM
TIME
ENTER /
These Instruments are in
Compliance with the CE Directives
Page 2
Dear Customer,
Thank you for choosing a Hanna Instruments
Product.
Please read this instruction manual carefully before using the instrument.
This manual will provide you with all the necessary information for the correct use of the instrument, as well as a precise idea of its versatility
in a wide range of applications.
These instruments are in compliance with CSA,
UL and
directives.
(EN 50081-1 and EN 50082-1)
TABLE OF CONTENTS
Preliminary Examination................................... 1
General Description .......................................... 1
Functional Description pH300 .......................... 2
Specifications pH300 ........................................ 4
Functional Description pH301 .......................... 5
Specifications pH301 ........................................ 7
Functional Description pH302 .......................... 8
Specifications pH302 ...................................... 10
The Rear Panel ................................................ 11
LCD Functional Description ............................. 11
Operational Guide ........................................... 12
pH Calibration ................................................. 29
pH Values at Various Temperature ................. 39
ION Calibration (for pH301 only) ..................... 4 0
mv Calibration ................................................. 44
Temperature Calibration ................................. 50
Logging with pH301 ........................................ 55
Programming Functions with pH302 .............. 58
Interface with PC ............................................. 82
Troubleshooting Guide ................................... 83
Electrode Conditioning and Maintenance ...... 84
Temperature-Resistance Correlation
for HANNA pH Sensitive Glass ....................... 8 8
Additional Information about
Interface with PC ............................................. 90
Accessories..................................................... 99
Electrode Application Reference Guide ........ 10 7
Warranty......................................................... 108
CE Declaration of Conformity ...................... 109
ISO 9000 Certified
Company since 1992
PRELIMINARY EXAMINATION
Remove the instrument from the packing material and examine it to make sure that no
damage has occurred during shipping. If there
is any damage, notify your Dealer.
Each pH meter comes supplied complete with:
• HI 1131B glass-body combination pH electrode
• HI 7669/2W temperature probe
• HI 3131B glass-body platinum ORP electrode
• pH 4.01 & 7.01 buffer solutions (20 mL each)
• 12VDC adapter (HI710005 or HI710006)
• 5 paper rolls (pH 302 only)
The KIT version includes also:
• HI76405 electrode holder
• HI 92000 Windows® compatible applica-
tion software
• HI 920010 PC connection cable
• Storage, cleaning and electolyte solutions
Note: Save all packing material until you are
sure that the instrument functions correctly. All
defective items must be returned in the original
packing with the supplied accessories.
GENERAL DESCRIPTION
Hanna Instruments pH300, pH301 and pH302
are professional bench-top pH meters for pH,
ORP (Oxidation Reduction Potential), ISE and
temperature measurements. Their built-in microprocessor ensures accurate and userfriendly operation.
pH measurements are automatically compensated for the temperature effect (ATC).
These meters come equipped with a large,
easy-to-read LCD which shows the pH or
mV or ION (for pH301 only) with temperature simultaneously. The display has graphic
symbols to make the calibration procedure
easy to follow. Calibration is not allowed until
the electrode has stabilized to ensure accurate measurements.
Through the RS 232 serial port you can
transfer sample measurements to a PC.
32
Page 3
FUNCTIONAL DESCRIPTION pH 300
THE FRONT PANEL
ppm
DATE TIME
Rel mV
MEM
CFM
WRONG
CAL
LOG
OFF
COMM
CFM
WRONG
CAL
LOG
ONONOFF
COMM
ppmpHpH
INTV
mV°C
m
1
2
BUF
ppm
Rel mV
MEM
BUF
3
1
2
3
mV°C
RANGE CAL DATA
CAL MS°C
CFM
DATE TIME
ppmpHpH
RANGE
CAL MS°C
CFM
s
pH METER
°C
INTV
m
s
CAL DATA
pH METER
°C
pH300
MR
pH300
MR
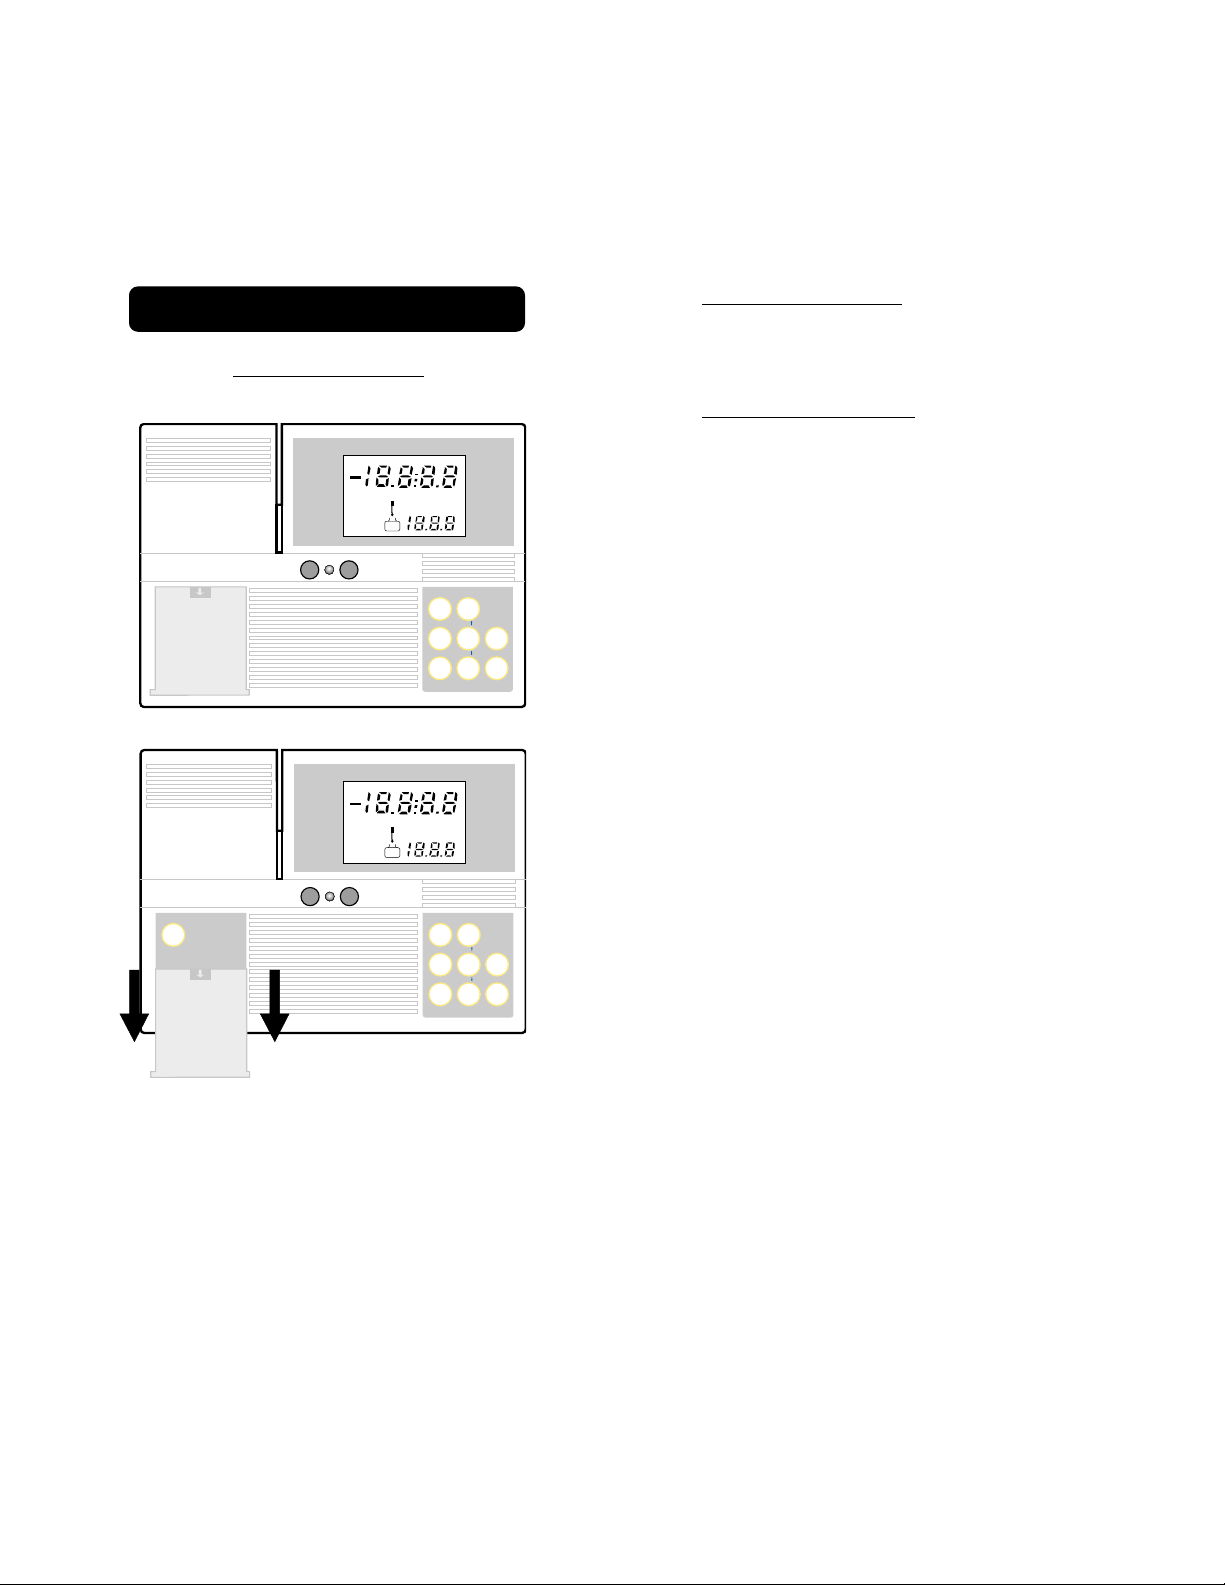
Keyboard on the Left
• COMM to display the current baud rate
for RS232.
Keyboard on the Right
!!
•
!°C and
!!
""
"°C to manually set tempera-
""
ture (when the temperature probe is not
connected) and to select the calibration
buffer, the baud rate, the command prefix.
• CAL to enter and exit the calibration mode.
After the pH calibration, to enter the calibration date, use this key to toggle between month, day and year.
• CAL DATA to display the date of last pH
calibration. This also displays the offset
and the slope values expressed in mV.
• CFM to confirm calibration values and to
confirm baud rate and command prefix
during communication setting mode.
• MR to recall the stored value.
• MS to hold and memorize the measured
value. The last reading will be frozen on
the display until the key is released. At
the same time this reading is stored in the
memory.
• RANGE to select the measurement range
(pH or mV).
• ON to turn the meter on
• OFF to turn the meter off
• Power LED to confirm the meter is on
54
Page 4
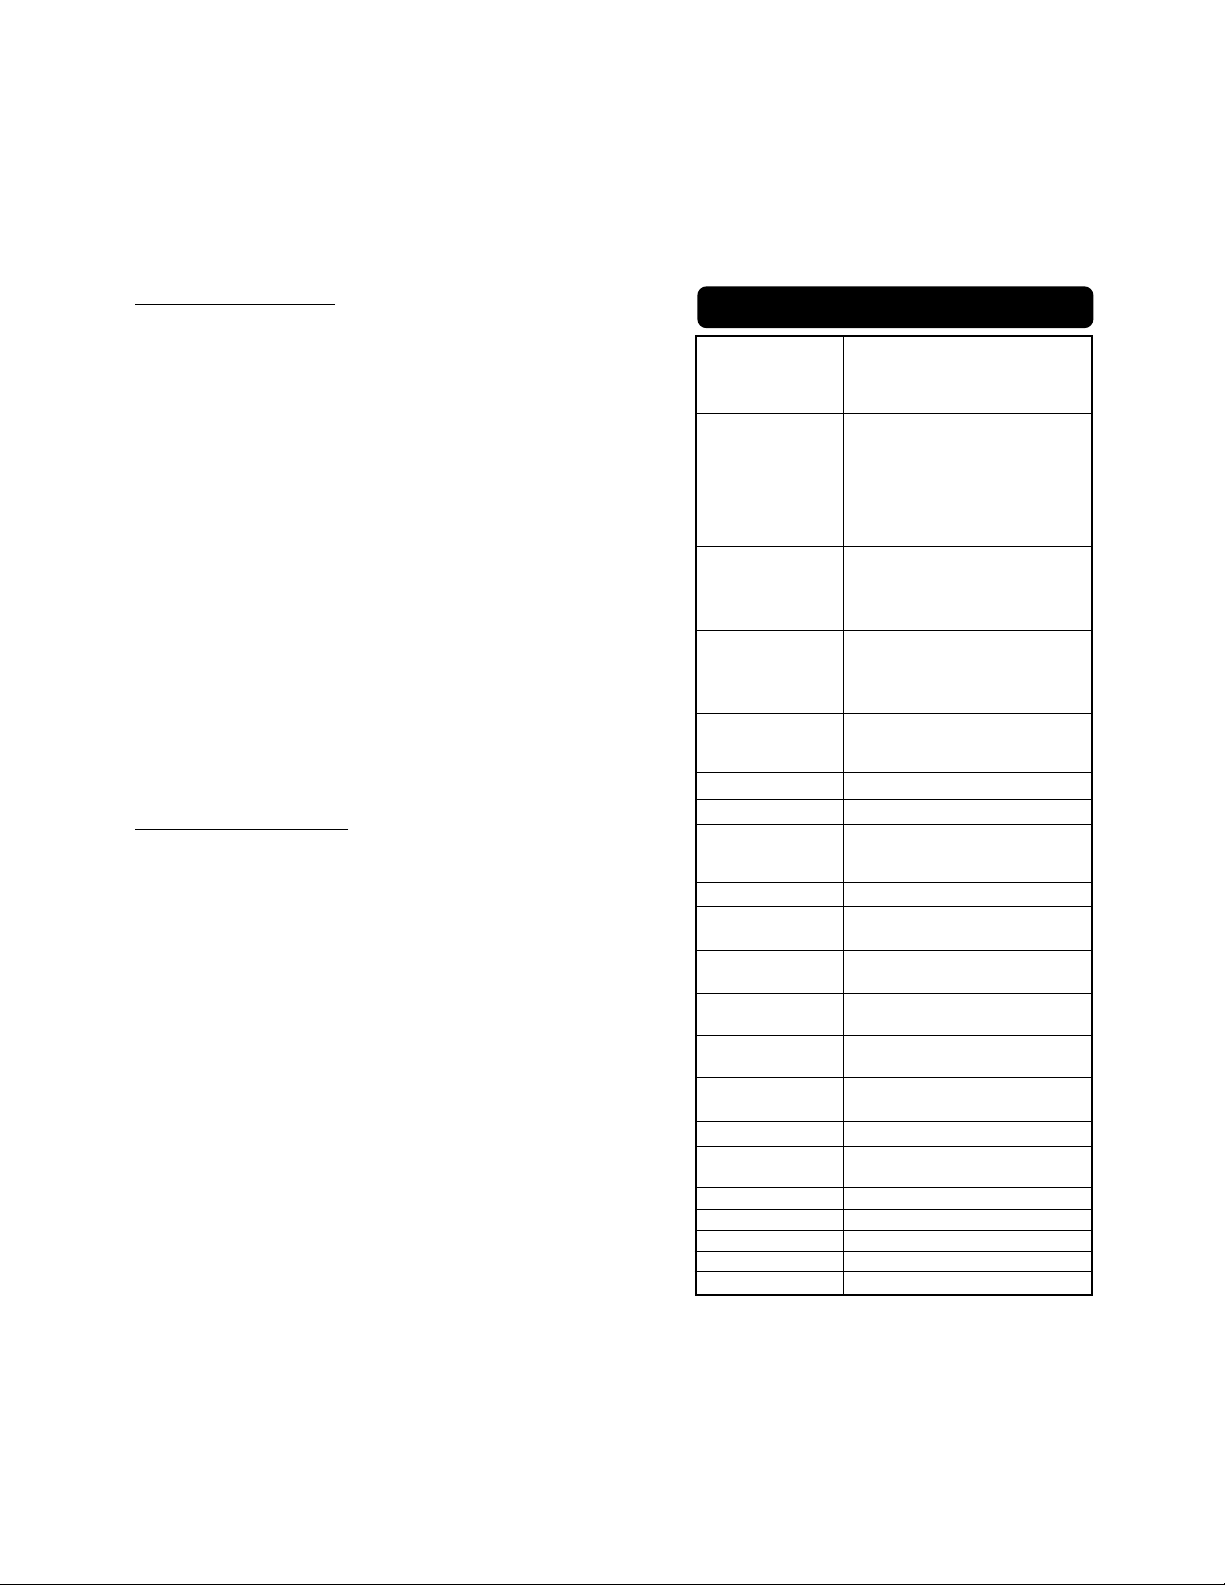
SPECIFICATIONS pH 300
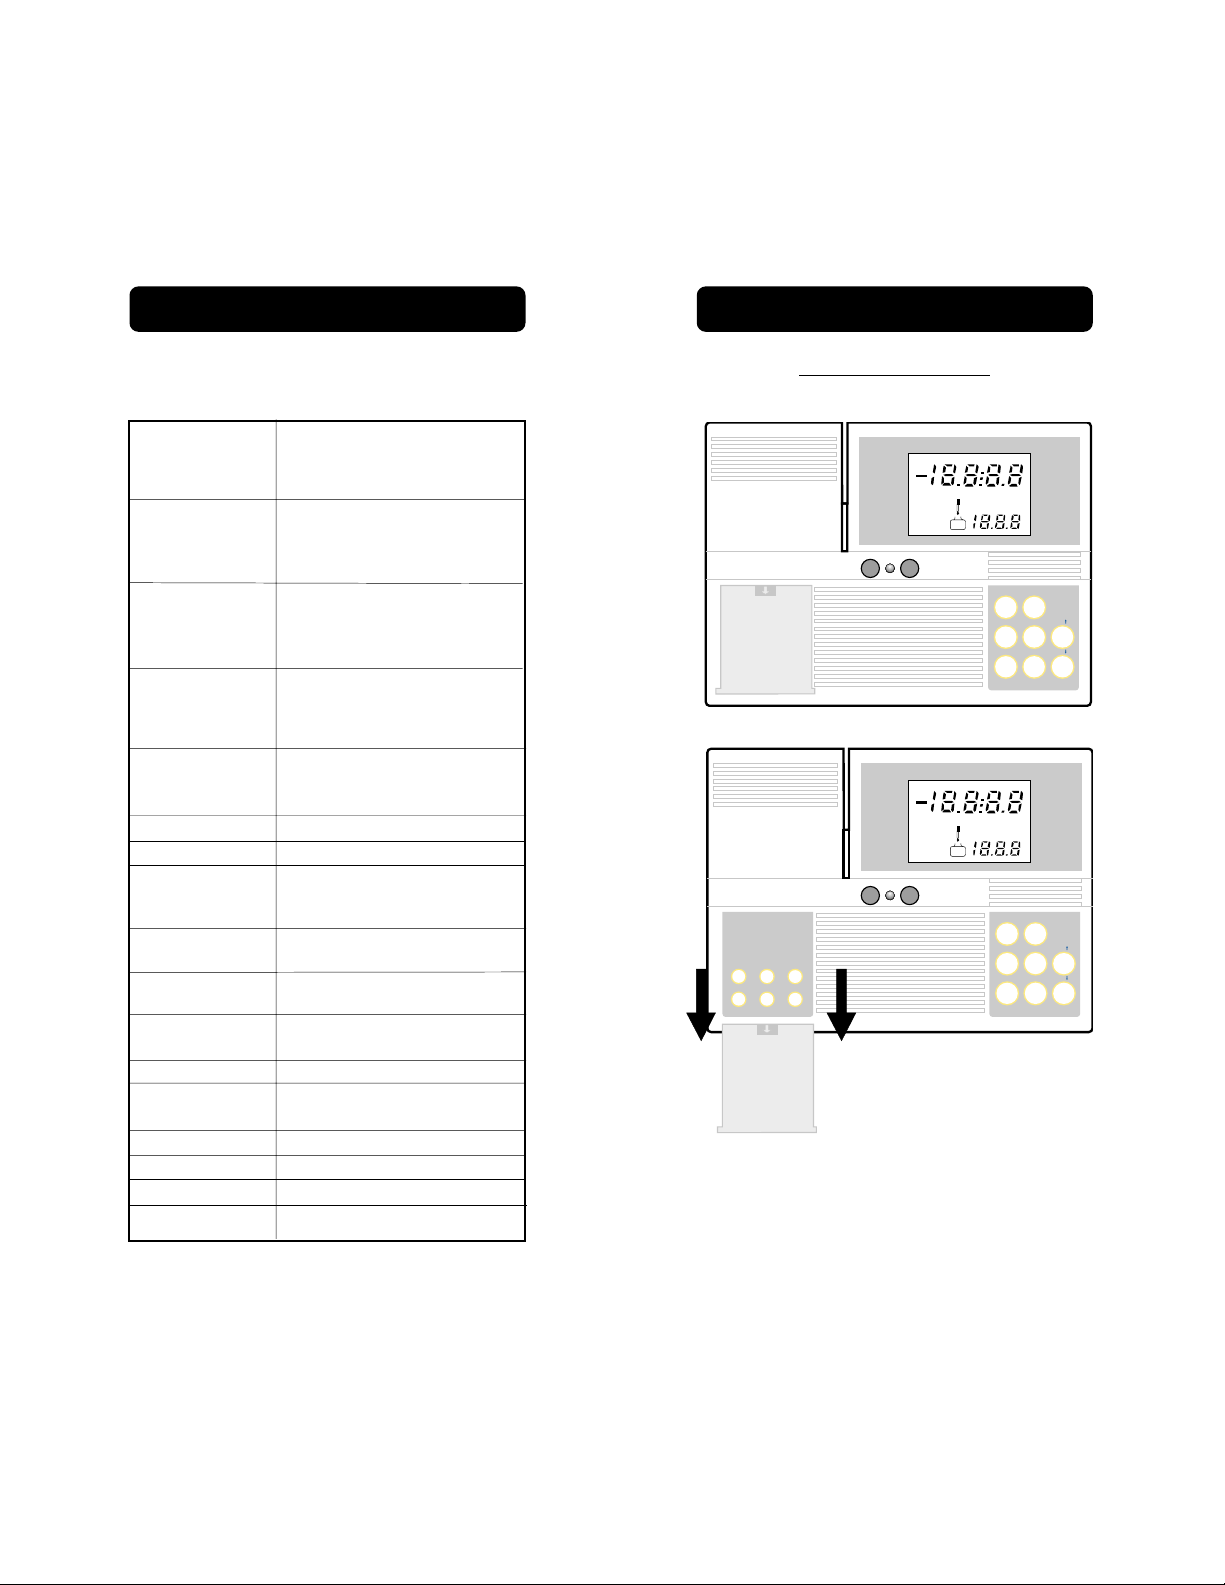
FUNCTIONAL DESCRIPTION pH 301
THE FRONT PANEL
Range pH 0.00 to 14.00
ISE ±399.9 mV
ORP ±1999 mV
°C -9.9 to 120.0
Resolution pH 0.01
ISE 0.1 mV
ORP 1 mV
°C 0.1
Accuracy pH ±0.01
(@20°C/68°F) ISE ±0.2 mV
ORP ±1mV
°C ±0.5
Typical EMC pH ±0.01
Deviation ISE ±0.6 mV
ORP ±1 mV
°C ±0.5
pH Calibration Automatic 1 or 2 points with
3 memorized buffers
(4.01, 7.01, 10.01)
pH Offset Max ±60mV or ±1pH
pH Slope 70-108%
Temperature Automatic 1 or 2 points with
Calibration 2 memorized values
(0 and 50°C)
Temperature Automatic or manual
Compensation from -9.9 to 120°C (14 to 248°F)
Electrode HI1131B glass body combination
refillable pH electrode (included)
Temperature HI 76 6 9/ 2 W with 1 m
probe (3.3') cable (included)
Input impedance 1012 Ω
Computer RS 232 (optoisolated)
Interface
Power supply 12 VDC (CSA, UL & CE approved)
Environment 0 to 50°C (32 to 122°F); 95% RH
Dimensions 280x200x75mm (11x7.9x3")
Shipping Weight 1.3 kg (2.9 lb.)
ppm
pH
DATE
Rel mV
MEM
CFM
WRONG
CAL
LOG
ONONOFF
Rel mV
CFM
MEM
WRONG
CAL
LOG
OFF
CAL
DATE COMM
RANGE
CFM
TIME
TIME
ppm
pH
INTV
mVmV°C
m
1
2
BUF
BUF
s
3
LOG
CAL DATA
pH
ION
0.00/0.000
mV
ppm
pH
DATE
TIME
ppm
pH
INTV
°C
1
m
2
s
3
LOG
CAL DATA
pH
ION
0.00/0.000
mV
• ON to turn the meter on
• OFF to turn the meter off
• Power LED to confirm the meter is on
pH301
pH / ION
METER
°C
°C
pH301
pH / ION
METER
°C
°C
76
Page 5
Keyboard on the Left
• CAL to start the calibration mode for pH,
mV and ION. To set or quit the date or
time setting mode. Used also during logging (to start logging press pH, mV or ION
plus LOG plus CAL key; to stop logging
press LOG plus CAL key).
• CFM to confirm calibration values.
• COMM to display the current baud rate
and command prefix for RS232.
• DATE to display the date.
• RANGE to display the calibration buffer
or the temperature on the secondary LCD
during calibration. During setting of the
date, to toggle between month, day and
year. During setting of the time, to toggle
between minutes, seconds and logging interval.
• TIME to display the time.
Keyboard on the Right
!!
•
!°C and
!!
""
"°C to manually set tempera-
""
ture (when the temperature probe is not
connected) and to select the calibration
buffer, the date and time, the baud rate,
the command prefix.
• CAL DATA to display the date of last pH
calibration. This also displays the offset
and the slope 1 or slope 2 values expressed in mV.
• ION to select the ION measurement range.
• mV to select the mV measurement range.
• pH to select the pH measurement range.
• .00/.000 to select two or three decimal
points for pH measurements.
SPECIFICATIONS pH 301
Range pH -1.999 to 19.999
mV ±1999.9
ppm 0.001 to 19999
°C -9.9 to 120.0
Resolution pH 0.01 or 0.001
mV 0.1
ppm 0.001 (from 0.001 to 9.999)
0.01 (from 10.00 to 99.99)
0.1 (from 100.0 to 999.9)
1 (from 1000 to 19999)
°C 0.1
Accuracy pH ±0.002
(@20°C/68°F)m V ±0.1 (±799.9) / ±0.2 (±1999.9)
ppm ±0.5%
°C ±0.5
Typical EMC pH ±0.01
Deviation mV ±0.3
ppm ±1%
°C ±0.5
pH Calibration Automatic 1, 2 or 3 points with
6 memorized buffers
(1.68, 4.01, 6.86, 7.01, 9.18, 10.01)
pH Offset Max ±60mV or ±1pH
pH Slope 70-108%
ppm Calibration Automatic 1 or 2 points with
5 memorized buffers
(0.1, 1, 10, 100, 1000)
ppm Offset Max ±1999.9mV
ppm Slope From ±20mV to ±100 mV
[mV/log(0.001xppm)]
Temperature Automatic 1 or 2 points with
Calibration 2 memorized values (0 and 50°C)
Temperature Automatic or manual (for pH only)
Compensation from -9.9 to 120°C (14 to 248°F)
Electrode HI1131B glass body combination
refillable pH electrode (included)
Temperature HI 7669/2W with 1 m
probe (3.3') cable (included)
Input impedance 1012 Ω
Logging Interval 1, 15, 30 seconds or
1, 5, 30, 60, 120, 180 minutes
PC Interface RS 232 (optoisolated)
Power supply 12 VDC (CSA, UL & CE approved)
Environment 0 to 50°C (32 to 122°F); 95% RH
Dimensions 280x200x75mm (11x7.9x3")
Shipping Weight 1.3 kg (2.9 lb.)
98
Page 6
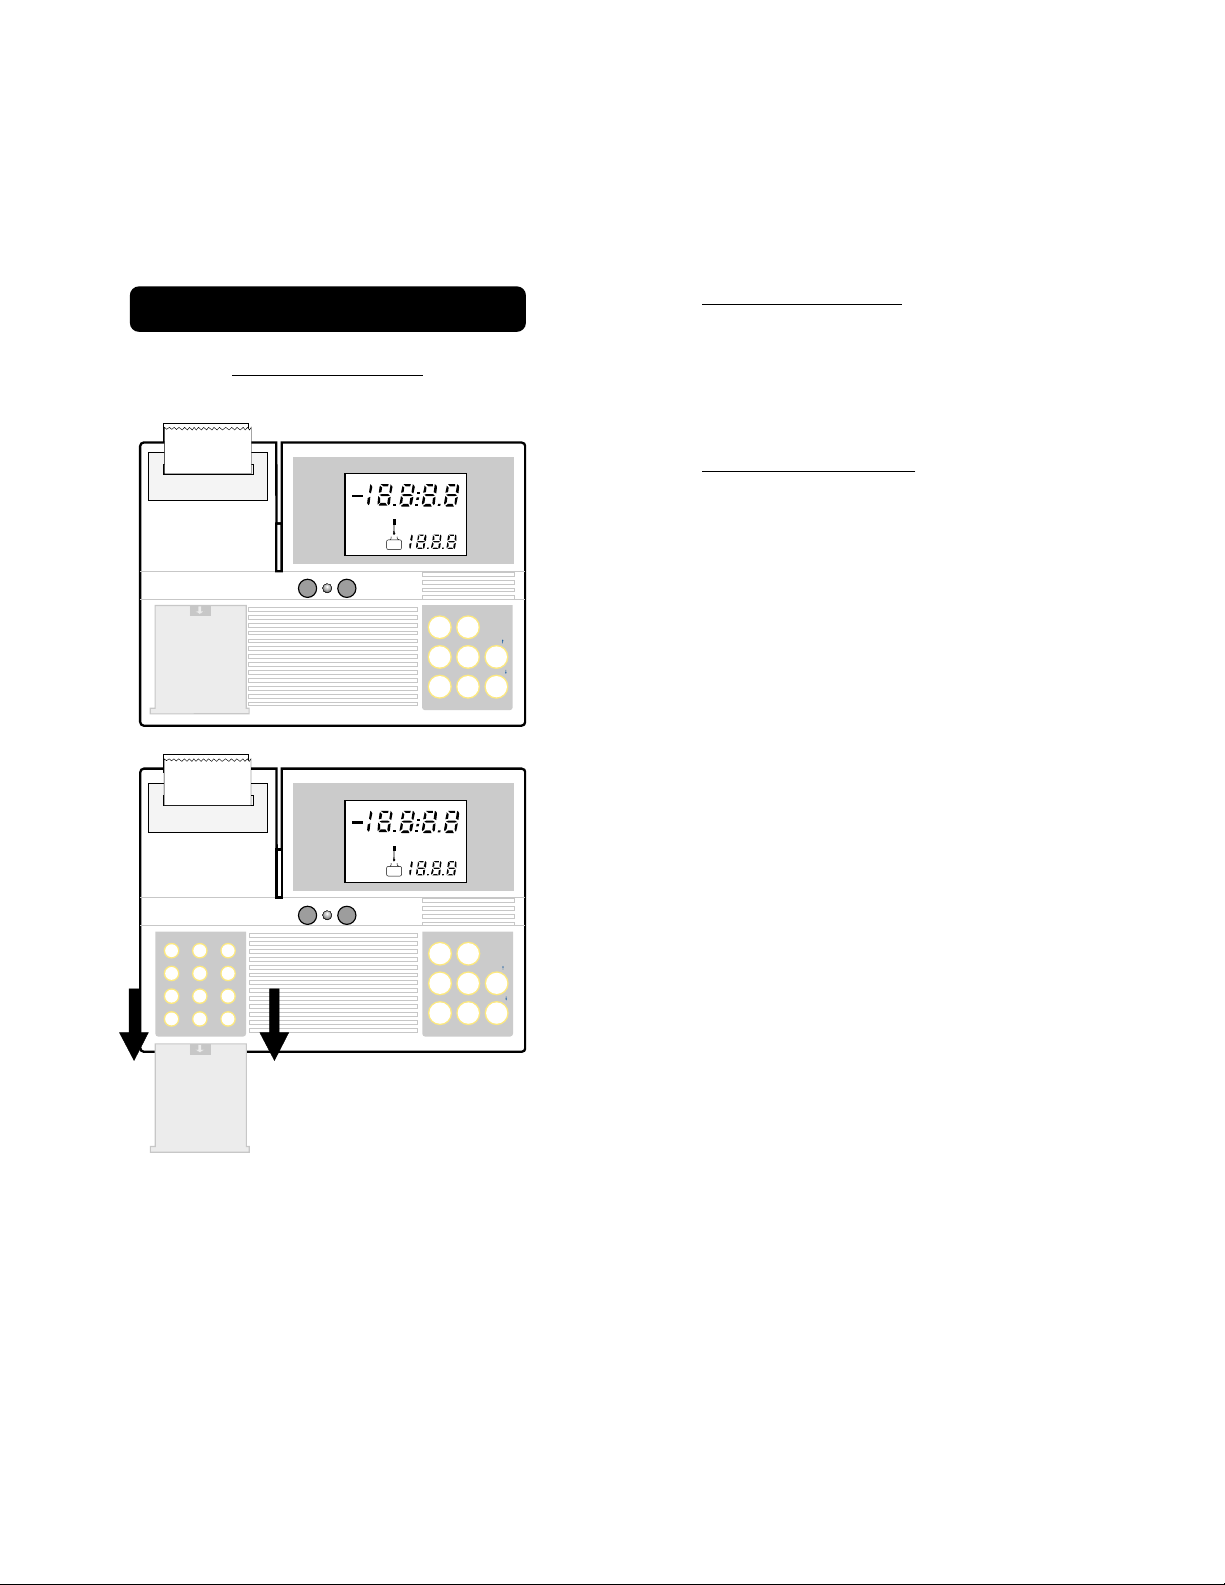
FUNCTIONAL DESCRIPTION pH 302
THE FRONT PANEL
Keyboard on the Left
• 0 to 9 for numeric and decimal data in-
put.
• CLEAR to cancel wrong data entry during
programming.
Rel mV
ppm
DATE TIME
Keyboard on the Right
• CAL to perform the pH, mV or tempera-
MEM
CFM
WRONG
CAL
LOG
OFF
ppmpHpH
INTV
mV°C
m
1
2
BUF
s
3
PAPER
PRINT
pH302
pH METER
RANGE
CFM /
CAL
PGM
TIME
ENTER /
ture calibration.
• CFM/
!!
! to confirm pH/mV/temperature
!!
calibration values or to manually set temperature (when the temperature probe is
not connected).
• ENTER/
""
"°C to terminate the numeric data
""
entry or to manually set temperature (when
the temperature probe is not connected)
or to select the buffer value during pH
calibration.
• PAPER to pull the paper.
ppm
DATE TIME
Rel mV
MEM
CFM
WRONG
CAL
LOG
ONONOFF
8
9
7
6
5
4
1
3
2
0
CLEAR
.
ppmpHpH
INTV
mV°C
m
1
2
BUF
s
3
PAPER
PRINT
pH302
pH METER
RANGE
CFM /
CAL
PGM
TIME
ENTER /
• PGM to select a program.
• PRINT to obtain a printout (prints time,
date, sample number and pH or mV values).
• RANGE to select the measurement range
(pH or mV) or to display the calibration
buffer or the temperature on the secondary LCD during calibration.
• TIME to display the time and the date.
• ON to turn the meter on
• OFF to turn the meter off
• Power LED to confirm the meter is on
1110
Page 7
SPECIFICATIONS pH 302
Range pH 0.00 to 14.00
ISE ±399.9 mV
ORP ±1999 mV
°C -9.9 to 120.0
Resolution pH 0.01
ISE 0.1 mV
ORP 1 mV
°C 0.1
Accuracy pH ±0.01
(@20°C/68°F) ISE ±0.2 mV
ORP ±1mV
°C ±0.5
Typical EMC p H ±0.01
Deviation ISE ±0.3 mV
ORP ±1 mV
°C ±0.5
pH Calibration Automatic 1, or 2 points with
3 memorized buffers
(4.01,7.01,10.01)
Temperature Automatic 1 or 2 points with
Calibration 2 memorized values
(0 and 50°C)
Temperature Automatic or manual
Compensation from -9.9 to 120°C (14 to 248°F)
(for pH only)
Electrode HI1131B glass body combination
refillable pH electrode (included)
Temperature HI 76 6 9/ 2 W with 1 m
probe (3.3') cable (included)
Input impedance 1012 Ω
Printer Dot matrix, 44mm wide paper
Languages English, German, French,
Spanish, Italian & Swedish
PC Interface RS 232 (optoisolated)
Power supply 12 VDC (CSA, UL & CE approved)
Environment 0 to 50°C (32 to 122°F); 95% RH
Dimensions 280x200x75mm (11x7.9x3")
Shipping Weight 1.3 kg (2.9 lb.)
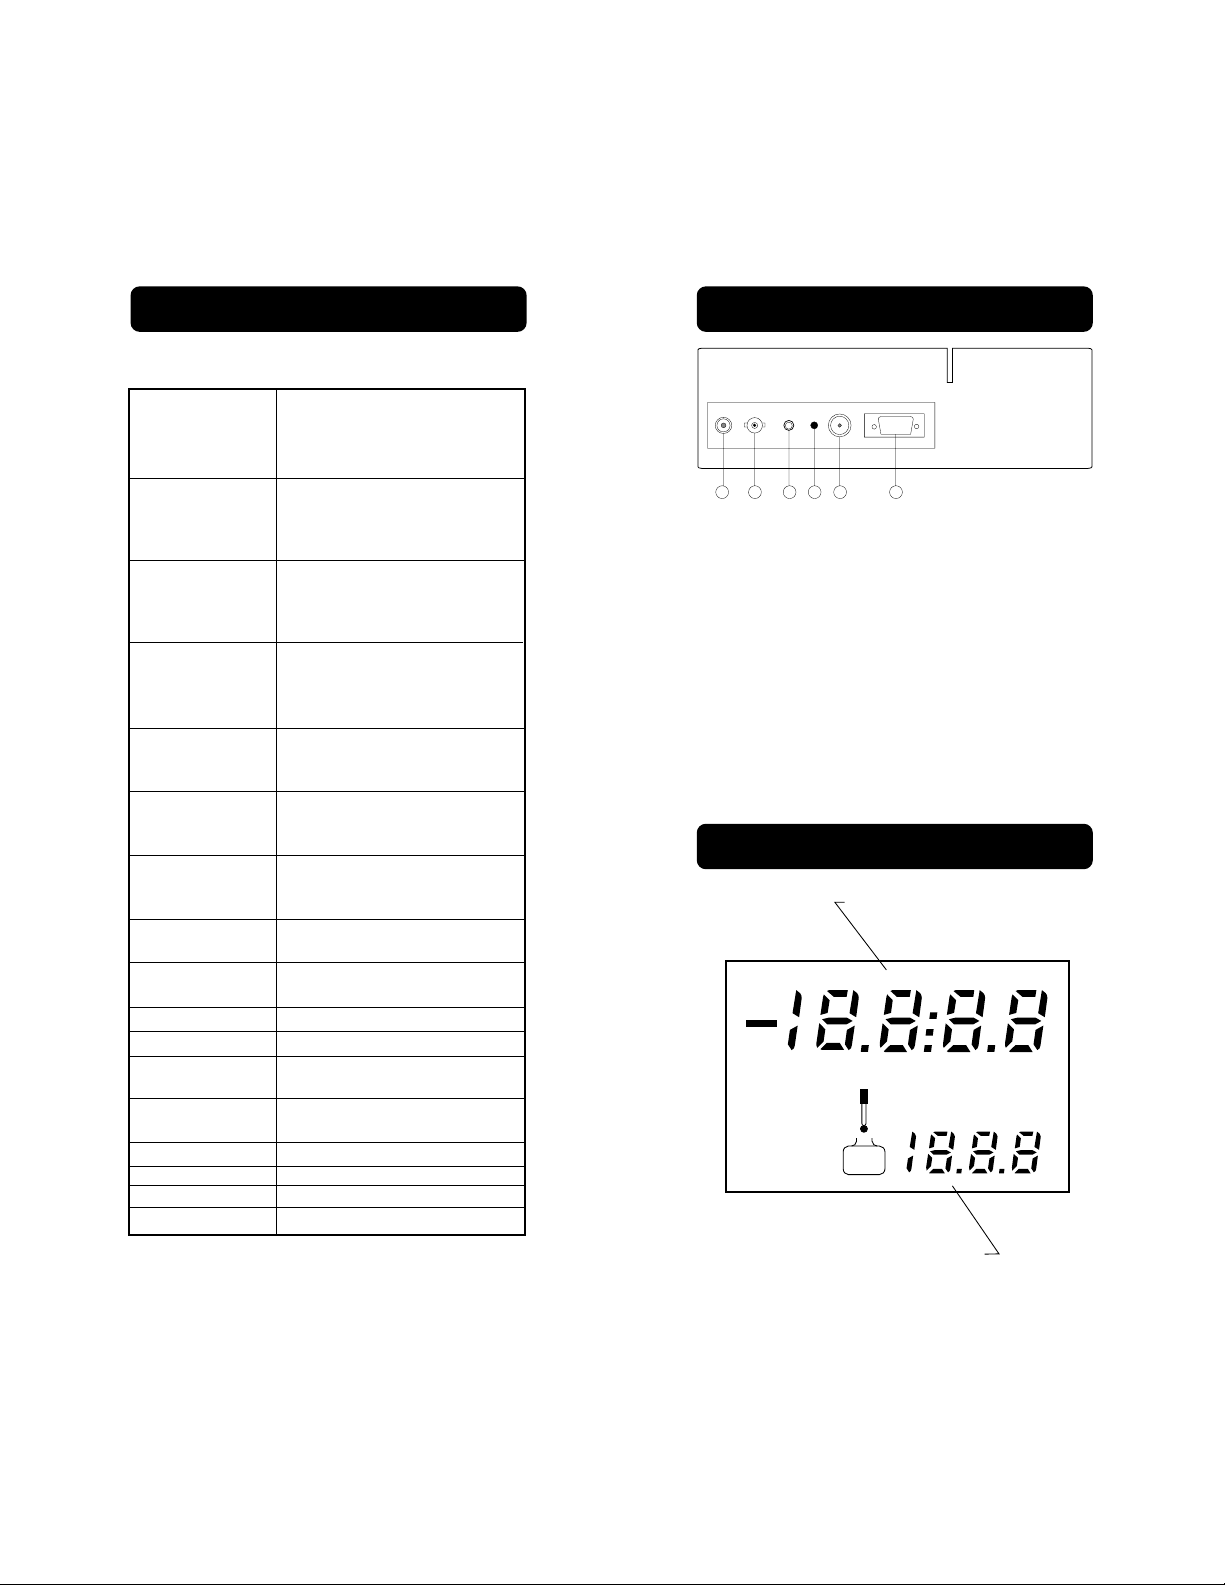
THE REAR PANEL
MEASUREMENT
REFERENCE
ELECTRODE
TEMPERATURE
ELECTRODE
12345 6
RESET 12VDC RS 232
PROBE
ooooo
oooo
1. Reference Electrode Connector (Ø 4 mm)
2. BNC socket for measurement electrode
3. Socket for Temperature Probe
4. Reset Button
5. DC Power Socket (for HI710005 or
HI710006)
6. RS 232 Connector
LCD FUNCTIONAL DESCRIPTION
Primary Display
CFM
CAL
LOG
Rel mV
MEM
WRONG
BUF
ppm
1
2
3
mV°C
ppmpHpH
DATE TIME
INTV
m
s
Secondary Display
1312
Page 8
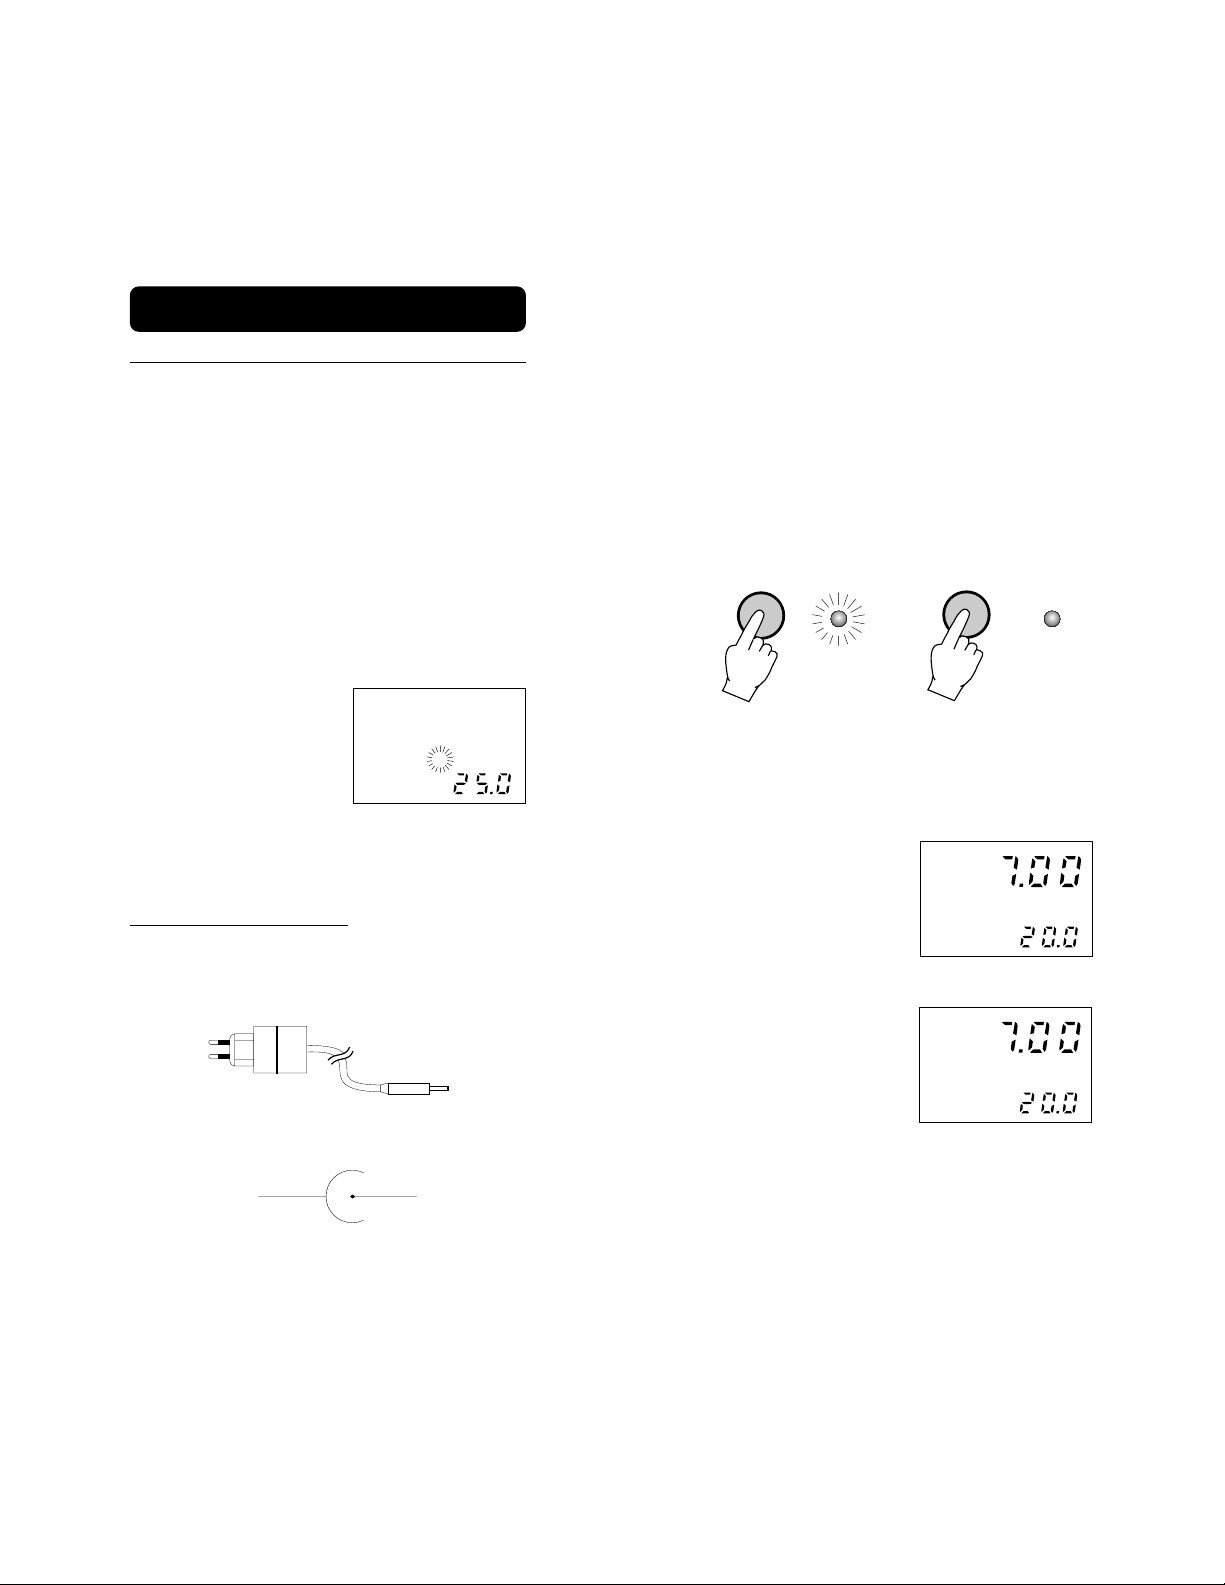
OPERATIONAL GUIDE
ELECTRODE AND PROBE CONNECTIONS
For combination pH or ISE or ORP electrodes (with internal reference) plug the
electrode's BNC to the socket provided (see
page 11).
For electrode with separate reference, connect the measuring electrode's BNC to the
BNC socket and the reference electrode's
plug to the socket provided (see page 11).
For temperature measurements and automatic temperature compensation connect the
temperature probe to the °C socket (see
page 11).
If the temperature probe
is not connected, when
turned on, the meter will
display a default tem-
°C
perature of 25°C or the
last recorded temperature (if the temperature probe is disconnected
when the meter is on) on the secondary
LCD. The "°C" indicator will be flashing.
POWER CONNECTION
Plug the 12VDC adapter (HI710005 or
HI710006) into the DC socket (see page11).
Plug the adapter to the mains.
Note: The instrument uses the following con-
figuration.
+
-
It is recommendable to use the Hanna
HI710005 or HI710006 voltage adapters (sup-
plied with the meters) that use the proper
polarity configuration.
The meters can also be used with other adapters. In this case, remember to check the
correct polarity of your adapter before connecting it to the meter.
Note: Make sure the main line is protected
by a fuse.
Press ON to turn the meter on. The power
LED will remain lit until OFF is pressed to
turn the meter off.
ON
OFF
When the meters are turned on, the microprocessor checks if any calibration data is in
memory (i.e. if the offset is within ±60mV
and the slope between 70-108%).
If the calibration data is
valid, the meter will op-
pH
erate in the normal measurement mode and default to pH measurement
°C
mode with the temperature on the secondary LCD.
If the calibration data is
not valid or the calibra-
pH
tion data is lost, the
"CAL" indicator will be
displayed to prompt the
CAL
°C
user to perform the pH
calibration. If the user chooses not to perform the calibration and presses CAL to quit
from the calibration mode, the offset and the
slope of the instrument would be set to 0 mV
and 100% respectively.
1514
Page 9
pH300, pH301 and pH302 use an EEPROM
to retain the pH calibration, mV calibration,
temperature calibration as well as the serial
communication setting. The instrument will
store the respective data after a calibration
or serial communication setting, even when it
is not plugged-in.
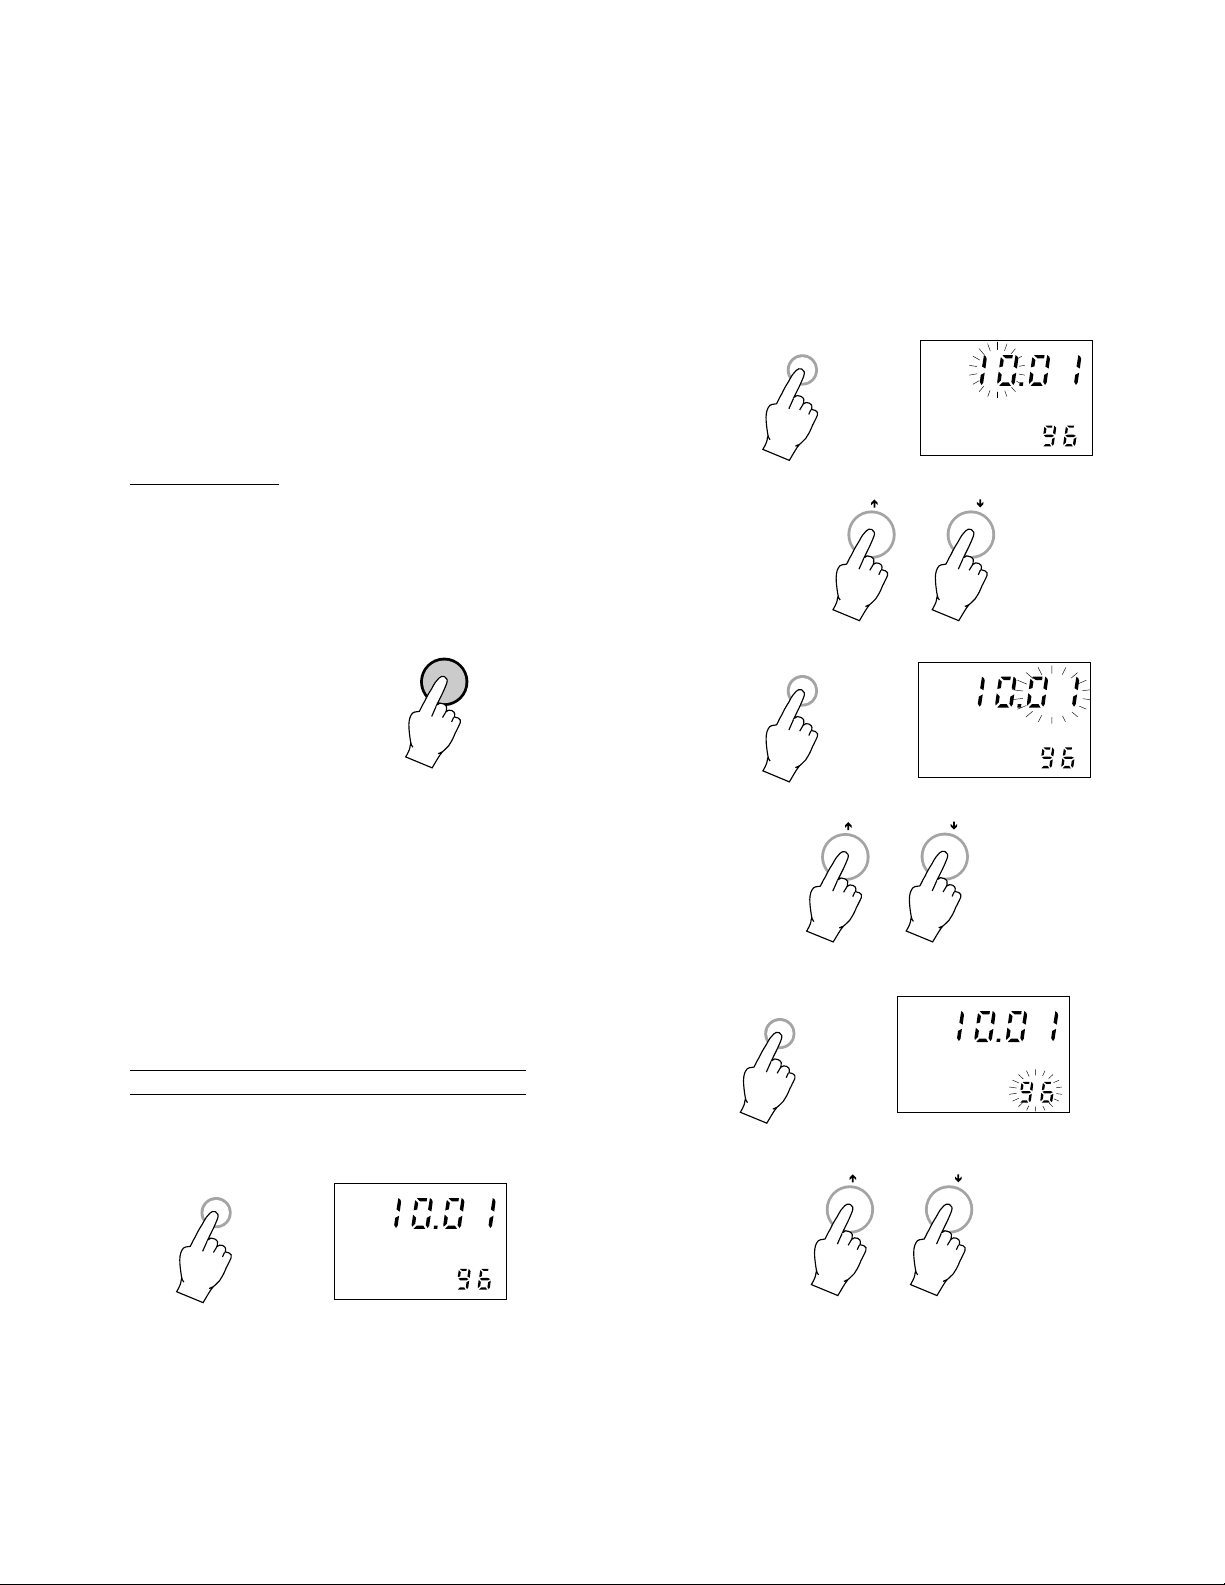
Press CAL to enter the setting mode and the
month will be flashing.
CAL
DATE
For pH 302 only
pH302 uses a rechargeable battery to retain
the pH calibration data. It lasts approximately
one month when fully charged. The battery is
automatically charged any time the meter is
plugged-in (either turned on or off).
If you need to unplug the
instrument, press OFF before
OFF
disconnecting the meter from
the mains. Only in this case
will the instrument retain the
memorized data. Otherwise,
the instrument needs to be
re-calibrated. In the case of a power failure
while the instrument is operational, re-calibration is required.
When the instrument is initially switched on,
the microprocessor checks if any calibration
data is in memory (i.e. if the offset is within
±1 pH and the slope between 70 - 108%).
If the calibration data are not memorized, the
offset and slope of the instrument will be set
to 0 mV and 100% respectively.
Use UP or DOWN to select the month.
°C
°C
Press RANGE and the day will start to flash.
RANGE
DATE
Use UP or DOWN to select the day.
°C
°C
Press RANGE and the year on the secondary LCD will flash.
RANGE
DATE
SETTING THE DATE AND THE TIME AND
THE LOGGING INTERVAL (for pH 301 only)
Press DATE to display the date. The month
and the day will be displayed on the primary
LCD, the year on the secondary one.
DATE
DATE
Use UP or DOWN to select the year.
°C °C
1716
Page 10
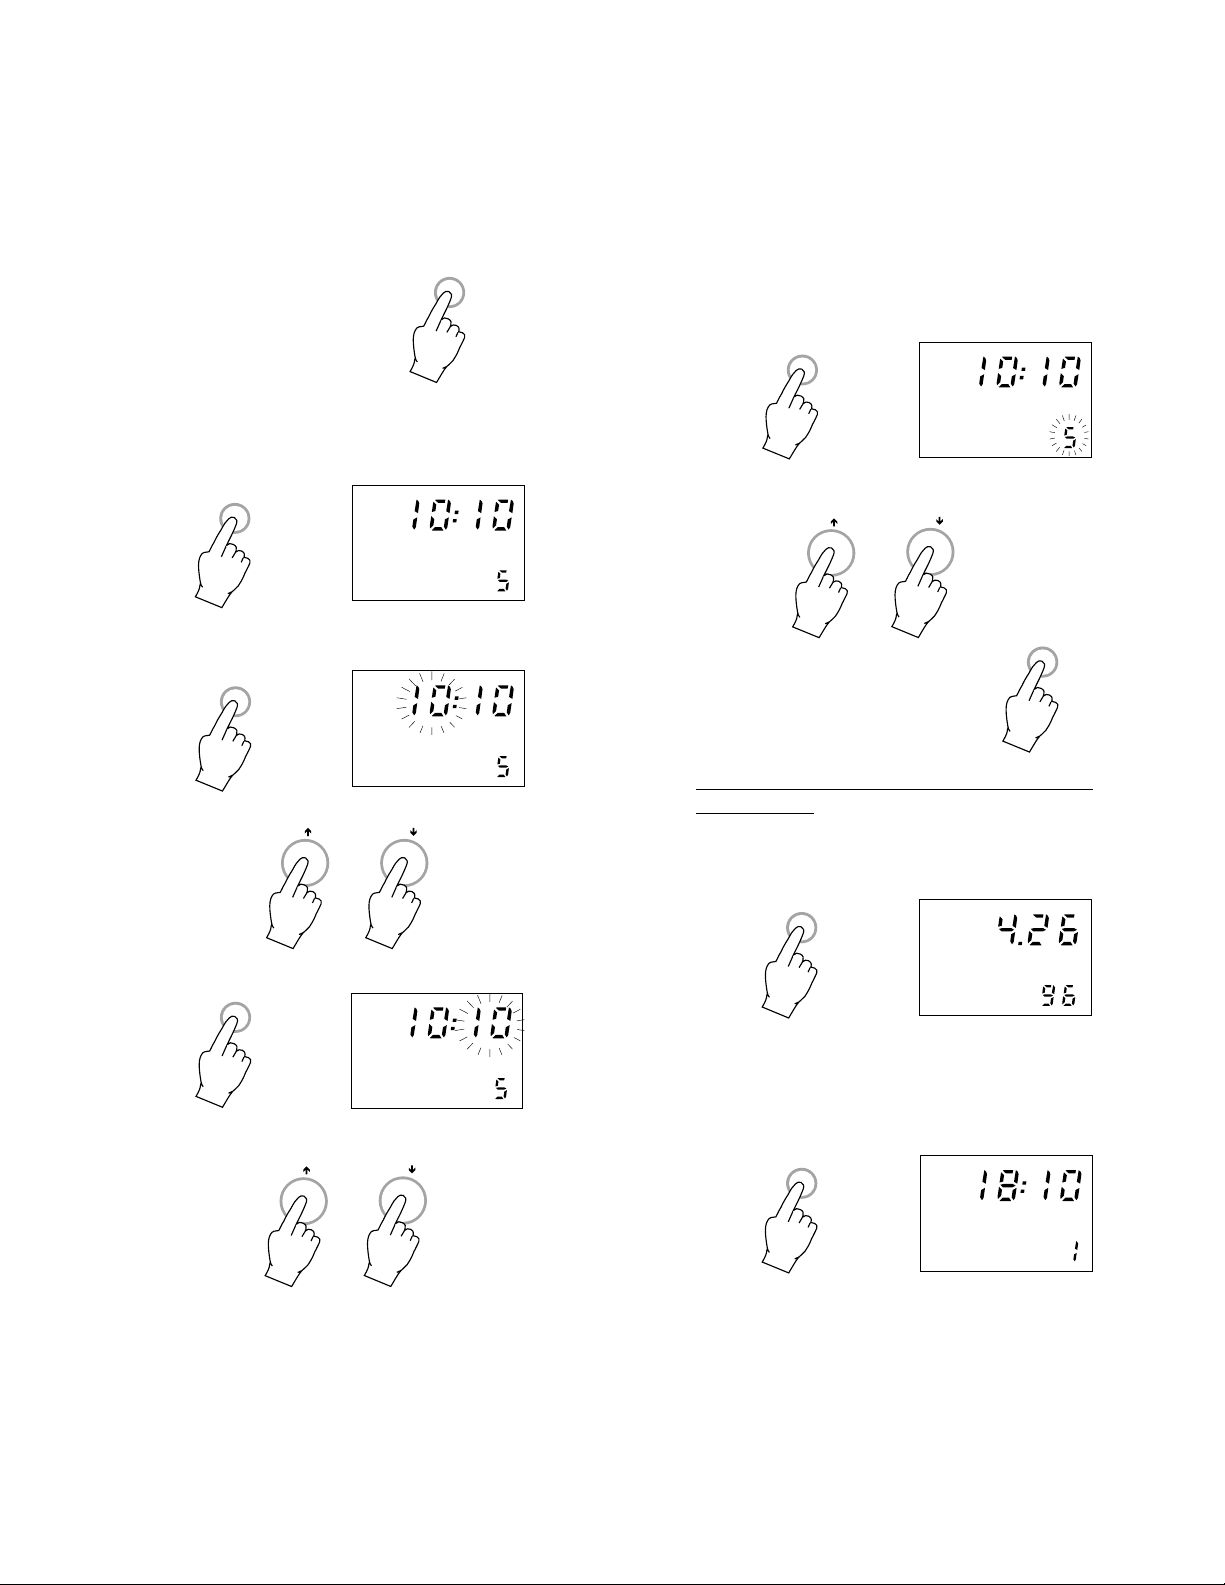
Press CAL to exit the date
setting mode.
CAL
Press RANGE and the logging interval on the
secondary LCD will come up.
RANGE
TIME
Press TIME to display the time. The hour and
the minutes will be displayed on the primary
LCD, the logging interval on the secondary
one.
TIME
TIME
INTV
Press CAL to enter the setting mode and the
hour will flash.
CAL
TIME
INTV
Use UP or DOWN to select the hour.
°C °C
Press RANGE and the minutes will flash.
RANGE
TIME
INTV
Use UP or DOWN to select the logging interval.
°C
°C
CAL
Press CAL to exit the time setting mode.
VIEWING THE DATE AND THE TIME (for
pH 301 only)
Press DATE to display the date. The month
and the day will be displayed on the primary
LCD, the year on the secondary one.
DATE
DATE
Use UP or DOWN to select the minutes.
°C
°C
INTV
Press TIME to display the time. The hour and
the minutes will be displayed on the primary
LCD, the logging interval on the secondary
one.
TIME
1918
TIME
INTV
s
Page 11
SETTING THE DATE AND THE TIME AND
THE LOGGING INTERVAL (for pH 302 only)
See program No. 1 (page 60).
VIEWING THE DATE AND THE TIME (for
pH 302 only)
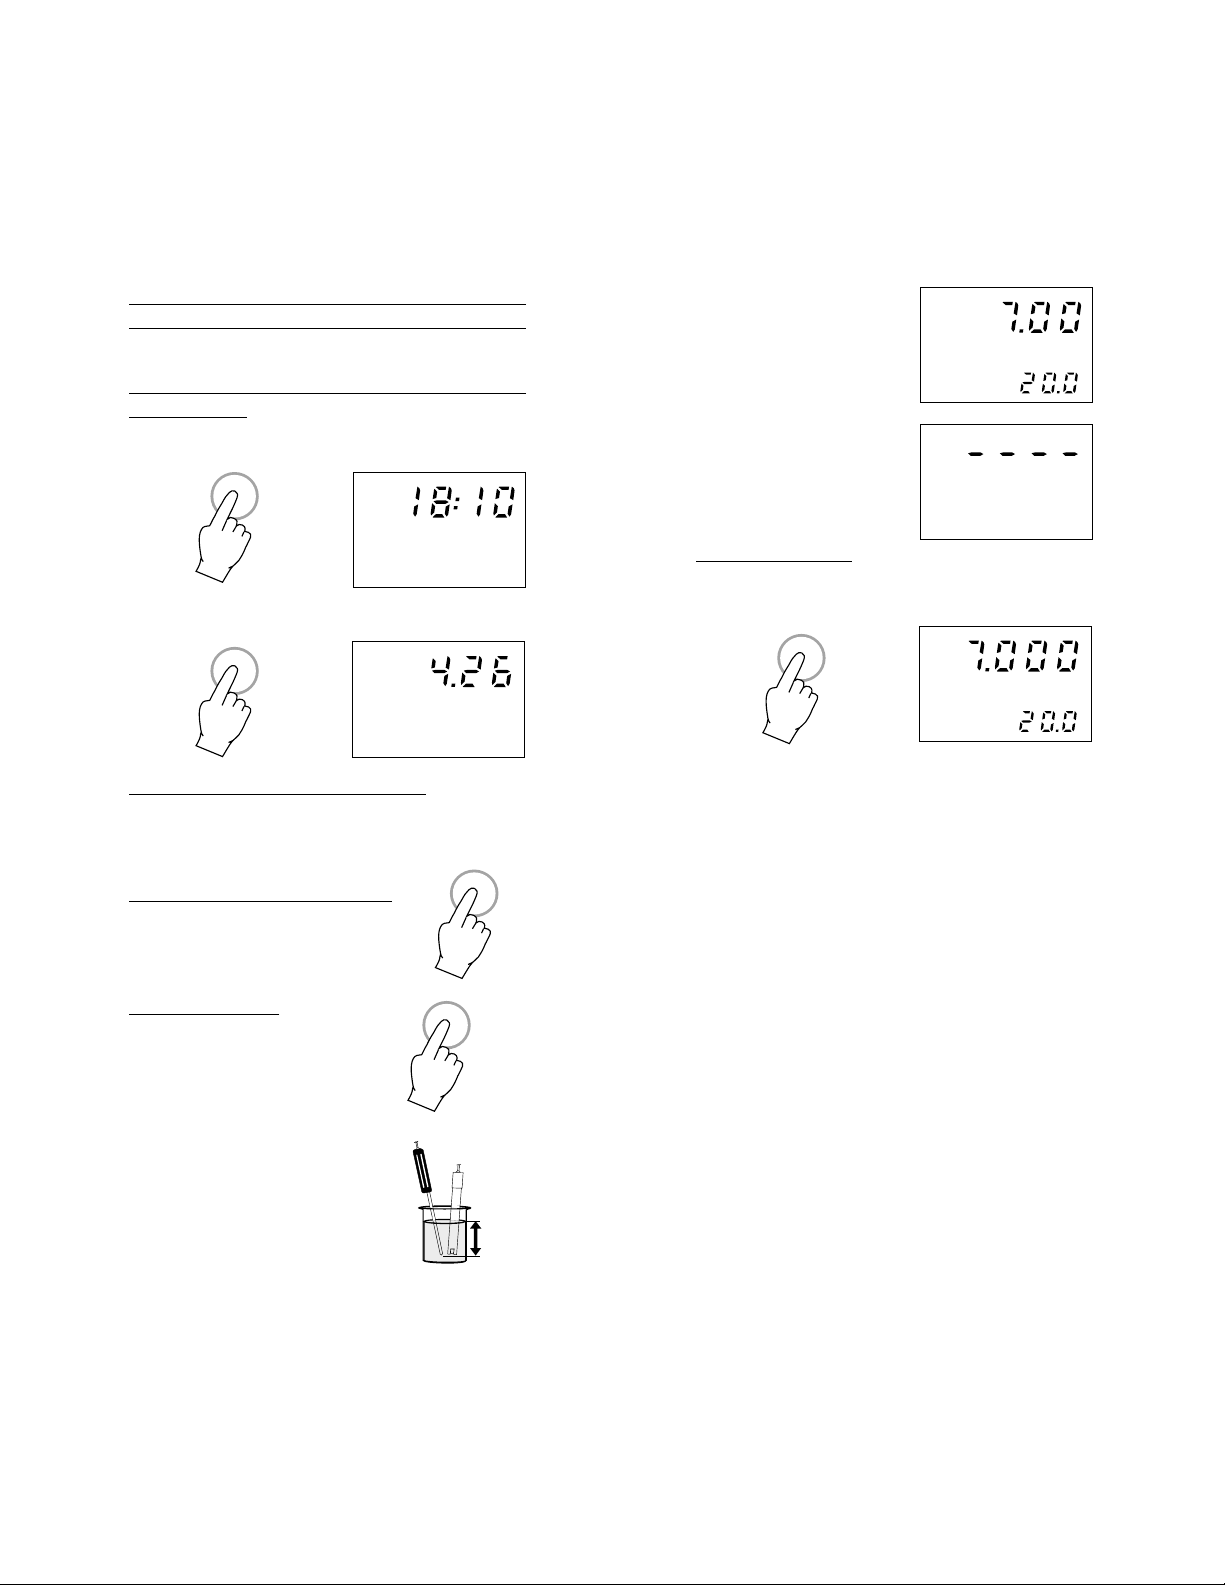
Press TIME to display the time (HH/MM).
TIME
Press TIME again to display the date (MM/
DD).
TIME
DATE
Allow 1 or 2 minutes for
pH
the electrode to stabilize.
°C
pH is displayed on the
primary display and temperature on the second-
pH
ary one.
If readings are out of
range "---" will appear
on the LCD display.
For pH 301 only:
Press the .00/.000 key to change the resolution from two to three decimal points.
0.00/0.000
pH
°C
TAKING pH MEASUREMENTS
Make sure that the instrument has been calibrated for pH before taking pH measurements (see page 29).
For pH 300 and pH 302 only
:
RANGE
Select the pH measurement mode
by pressing RANGE.
For pH 301 only
:
pH
Select the pH measurement
mode by pressing pH.
To take a pH measurement
simply submerge the tip (4cm/
1½") of the pH electrode and
the temperature probe into the
sample to be tested.
4 cm
(1½")
It is recommended that the electrode is rinsed
thoroughly for better conditioning. For this
rinsing process, it is recommended to use a
liberal amount of the sample to be measured.
If measurements are taken in different samples
successively, it is recommended that the electrode and the temperature probe are rinsed
thoroughly with deionized water or distilled
water (if not available, tap water may also be
used) and then blot dry between each measurement.
The pH reading is directly effected by temperature. In order for the meter to measure
the pH accurately, temperature must be taken
into consideration.
A perfect equilibrium between the pH electrode and the sample is reached in approximately 15 minutes.
To use the meter's Automatic Temperature
Compensation feature, submerge the
HI7669/2W temperature probe into the sample
2120
Page 12
as close to the electrode as possible and wait
for 1-2 minutes.
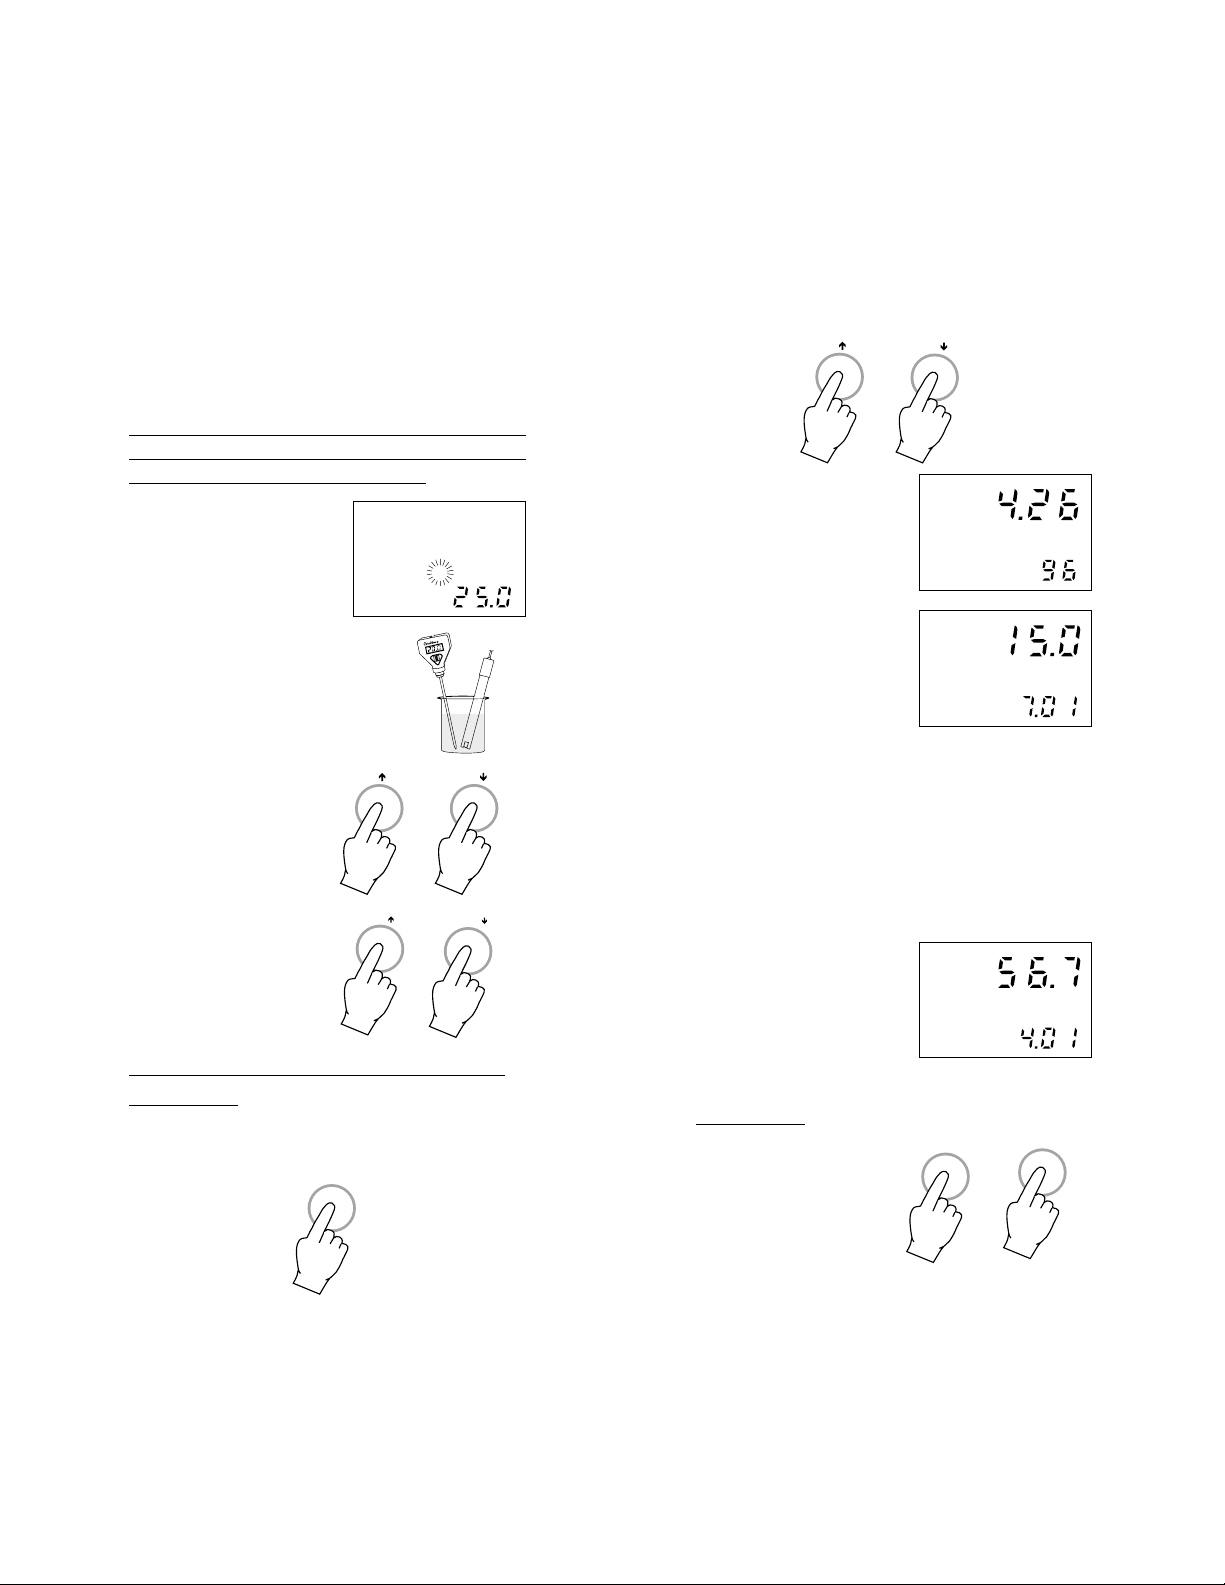
If you know the temperature of the sample to
be tested you can compensate for it manually.
If manual temperature compensation is desired the temperature probe must be disconnected from the instrument.
The display will then
show the default temperature of 25°C or the
last recorded tempera-
°C
ture reading. "°C" is
blinking.
Note the temperature of the
C
°
sample using a ChecktempC
or a glass thermometer.
The temperature can now be
adjusted with UP and DOWN.
If the temperature
°C °C
probe is connected to
the meter, the secondary LCD figure displays the measured
temperature reading
and the "°C" indicator
CFM/
ENTER/
does not blink. Pressing UP or DOWN will
not alter the temperature reading.
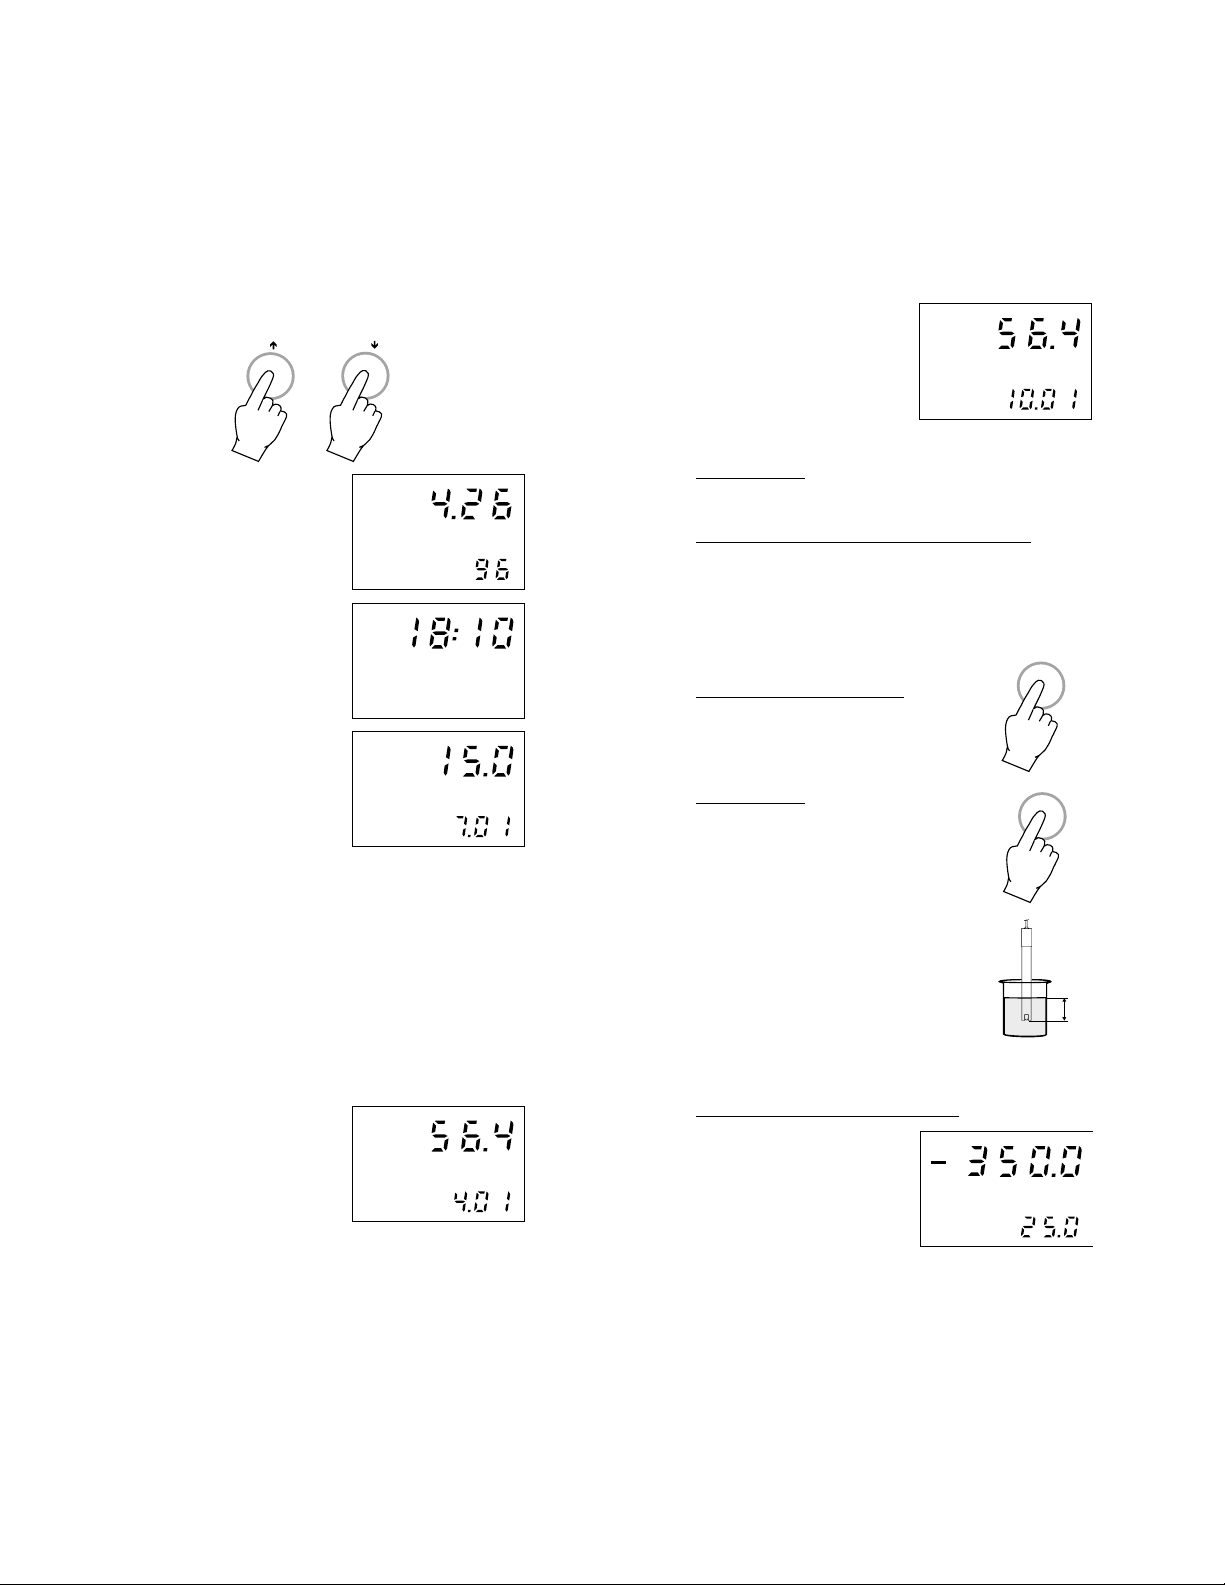
VIEWING THE pH CALIBRATION DATA
For pH 300:
Press CAL DATA and the meter will display
the last pH calibration data.
CAL DATA
Press UP or DOWN to get this information in
the following sequence:
°C
a. Date of the last pH
°C
DATE
calibration (month,
day and year)
b.Offset calibration
CAL
value expressed in
mV and displayed on
mV
the primary LCD with
the buffer used to
calibrate the offset on
the secondary LCD.
CAL
pH
1
The offset pH value should be between
±30 mV. For values between ±30 and
±60 mV change the reference electrolyte
and repeat the calibration procedure. For
values higher than +60 mV or lower than
-60mV the electrode is no longer reliable.
See the electrode maintenance section
on page 84.
c.Slope calibration
mV
value directly expressed in mV/pH is
displayed on the primary LCD with the
CAL
pH
2
2nd buffer used to
calibrate the offset on the secondary LCD.
For pH 301:
Press pH followed by
pH
CAL DATA
CAL DATA and the
meter will display the
last pH calibration
data.
2322
Page 13
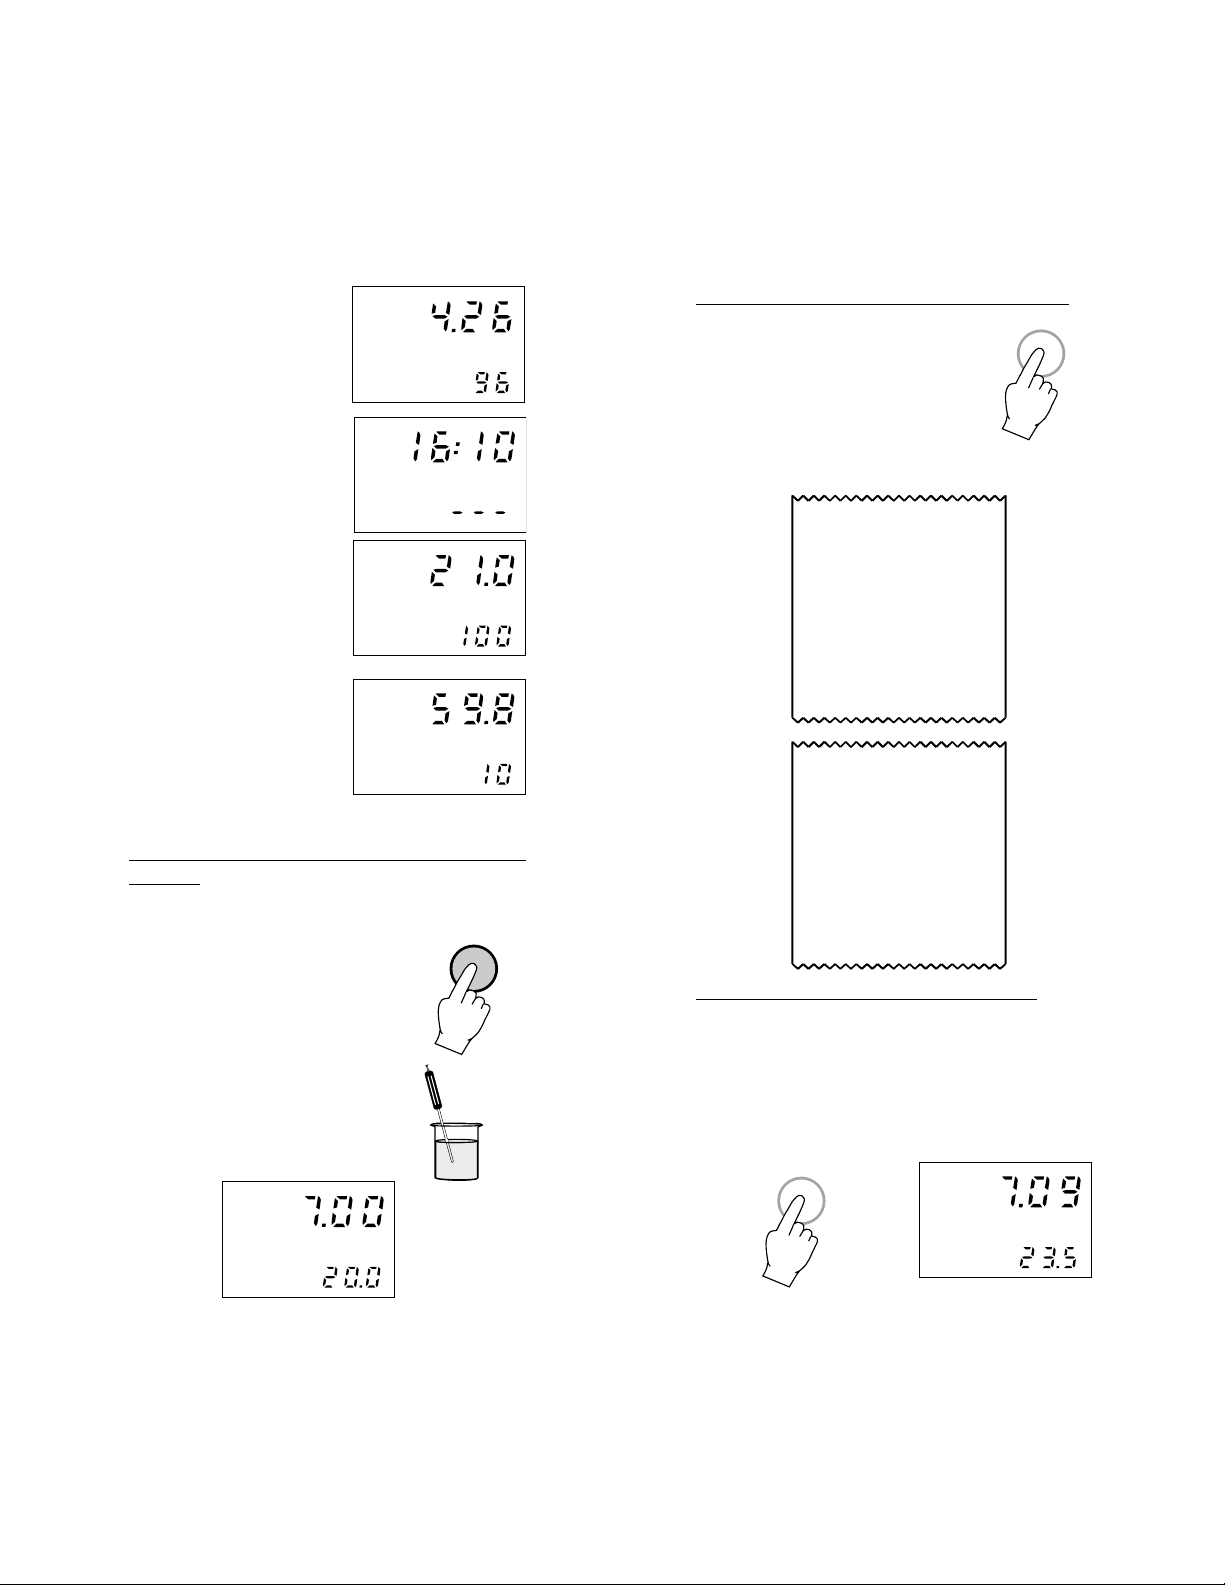
Press UP or DOWN to get this information in
the following sequence:
°C
a. Date of the last pH
°C
DATE
calibration (month,
day and year)
CAL
b. Time when the last
TIME
pH calibration was
completed (hour and
minutes).
CAL
c.Offset calibration
mV
value expressed in
mV and displayed on
the primary LCD
with the buffer used
CAL
pH
1
to calibrate the offset on the secondary LCD.
The offset pH value should be between
±30 mV. For values between ±30 and
±60 mV change the reference electrolyte
and repeat the calibration procedure. For
values higher than +60 mV or lower than
-60mV the electrode is no longer reliable.
See the electrode maintenance section
on page 84.
d. Acid slope calibra-
mV
tion value expressed
in mV/pH and displayed on the primary LCD with the
CAL
pH
2
2nd buffer used to
calibrate the offset on the secondary LCD.
e. Alkaline slope calibra-
tion value expressed
mV
in mV/pH and displayed on the primary
LCD with the 3
buffer used to cali-
rd
CAL
pH
3
brate the offset on the secondary LCD.
For pH 302:
See program #3 (page 66).
TAKING REDOX MEASUREMENTS
pH300, pH301 and pH302 have the capabil-
ity to take ORP measurements. An optional
ORP electrode must be used to perform these
measurements (see page 105).
RANGE
For pH 300 or pH 302:
To get into the mV mode (ORP),
press RANGE.
For pH 301:
mV
To get into the mV mode, press
mV.
To measure the mV of a solution simply submerge the
ORP electrode tip (4 cm/1½")
into the sample to be tested.
Allow a few minutes for the
(1
½
")
reading to stabilize.
The display will indicate the absolute mV value
(positive or negative).
For pH 300 and pH 302 only
When values are less
:
Rel mV
than ±400 mV, tenths of
mV are displayed; for
values greater than
°C
±400mV, the decimal
digit disappears.
4 cm
2524
Page 14

Note that the change in scale (from 0.1 mV
to 1 mV as resolution) is automatic.
For all models:
Rel mV
"---" appears if the value
exceeds ±1999 mV (out
of range).
Oxidation-reduction potential (REDOX) measurements provide the quantification of the
oxidizing or reducing power of the sample
tested.
To correctly perform a redox measurement,
the surface of the ORP electrode must be
clean and smooth.
When not in use, the tip of the electrode
should be kept moist and safe from any mechanical stress which might cause damage
to the gold/platinum junction.
TAKING ION MEASUREMENTS
pH300, pH301 and pH302 have the capabil-
ity to take ION measurements. An optional
ISE electrode must be used to perform these
measurements.
RANGE
For pH 300 or pH 302:
To get into the mV mode (ORP
or ISE), press RANGE.
For pH 300 and pH 302:
The display will indicate the absolute mV value
(positive or negative).
When values are less
Rel mV
than ±400 mV, tenths of
mV are displayed; for
°C
values greater than
±400mV, the decimal
digit disappears. Note that the change in
scale (from 0.1 mV to 1 mV as resolution) is
automatic.
For pH 301:
The display will indicate
ppm
the ppm value expressed
in ppm or mV (depend-
°C
ing on the measured
sample). Note that the
change in scale (from 0.001ppm to 0.01ppm or
0.1 ppm as resolution) is automatic.
For all models:
Rel mV
"---" appears if the value
exceeds ±1999 mV (out
of range).
When not in use, the tip
of the electrode should be kept moist and
safe from any mechanical stress which might
cause damage to the junction.
For pH 301:
To get into the ION mode, press
ION.
Simply submerge the ISE
electrode tip (4 cm/1½") into
the sample to be tested. Allow a few minutes for the reading to stabilize.
ION
VIEWING THE ION CALIBRATION FACTOR ON THE LCD (for pH 301 only)
Press ION followed
ION
CAL DATA
by CAL DATA and
the meter will display
the last ION cali-
bration data.
°C °C
(1
4 cm
½
")
Press UP or DOWN to get
this information in the following sequence:
2726
Page 15
a. Date of the last ION
DATE
calibration (month,
day and year)
b. Time when the last
CAL
ION calibration was
completed (hour and
TIME
minutes)
c.Offset calibration
value expressed in
CAL
INTV
mV and displayed on
the primary LCD
mV
with the value used
to calibrate the offset on the secondary LCD.
d. Slope calibration
value expressed in
CAL
mV
ppm
1
mV/[log (0.0001xppm)]
and displayed on the
primary LCD with
CAL
ppm
2
the 2nd value used to
calibrate the slope on the secondary LCD.
TAKING TEMPERATURE MEASUREMENTS
Taking a temperature measurement is very
easy.
ON
Connect the temperature probe
to the instrument and turn the
instrument ON.
Dip the liquid/general purpose
temperature probe HI7669/2W
into the sample
Allow the reading on the secondary display to stabilize (1
or 2 minutes).
pH
°C
PRINTING FUNCTION (for pH 302 only)
Press PRINT to get a printout at
PRINT
any time.
All the printouts will be complete
with date, time, sample No., temperature and measurement value
(pH or mV depending on the selected measurement range).
DATE 1/02
TIME 12:21
SAMPLE 1
°C 17.9
pH 7.18
DATE 1/02
TIME 12:40
SAMPLE 5
°C 20.5
mV -350.0
HOLD FUNCTION (for pH 300 only)
To hold and memorize the measured value,
press MS. The last reading will be frozen on
the display until the key is released. At the
same time, this reading is stored in the
memory. During this operation, the "MEM"
indicator is lit.
MS
MEM
pH
°C
2928
Page 16
MR
To recall the stored memory
value, press MR and the memorized reading will be displayed
with the MEM indicator lit.
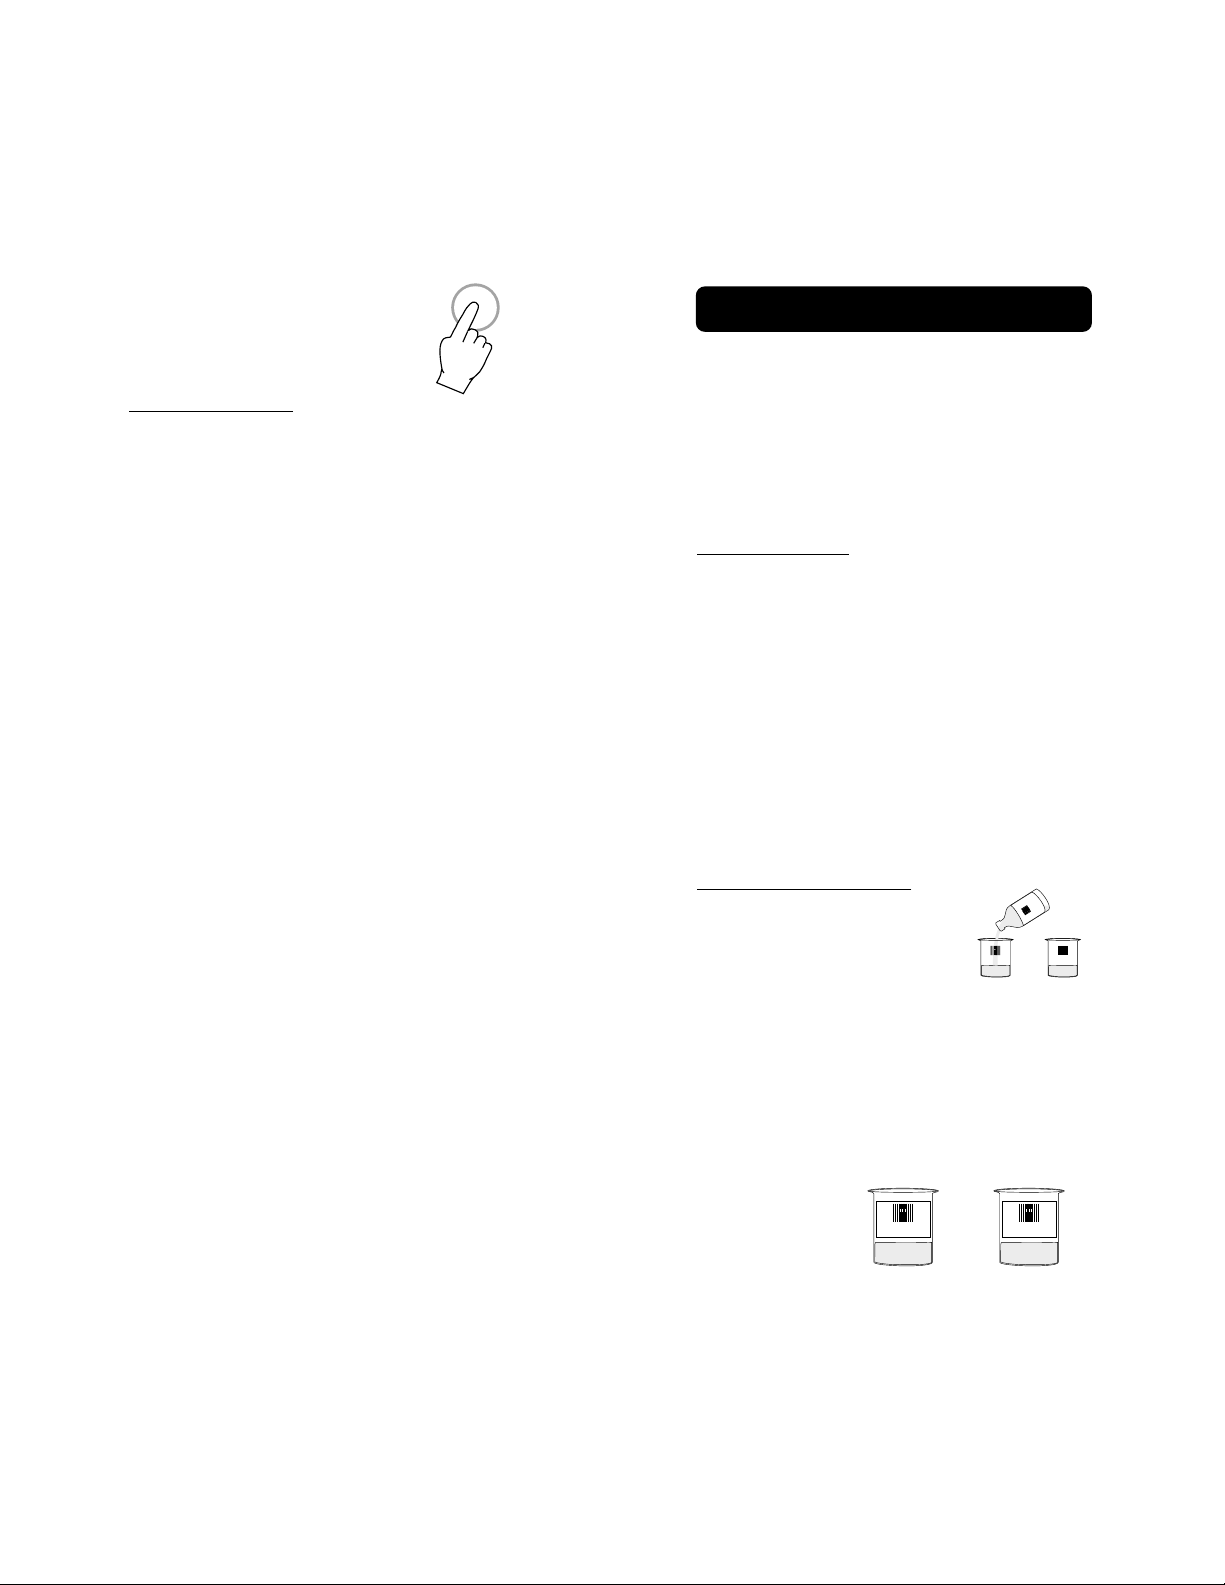
RESET BUTTON
The RESET button (see page 11) is used
when the instrument displays erroneous messages due to strong electrical interference or
when the instrument's power supply was disconnected before the meter was switched
off.
It is necessary to press the reset button and
restart the entire operation.
Calibration points should remain memorized.
It is recommended to verify calibration before proceeding.
pH CALIBRATION
For greatest accuracy, it is recommended
that the instrument is calibrated frequently.
For a faster operation, it is possible to standardize the electrode at a value close to the
expected sample value or at pH 7.01 only
(one point calibration), but it is always good
practice to calibrate at least 2 points.
For pH 301 only
:
Due to electrode conditioning time the electrode must be kept immersed for a few seconds to stabilize. The meters are equipped
with a stability indicator and the user will be
guided step by step with easy indications on
the display during the pH calibration. This will
make the calibration a simple and error-free
procedure.
The standard calibration program of the meter
is prepared for 3 (maximum) buffers. The
selectable pH values are: 1.68, 4.01, 6.86,
7.01, 9.18, 10.01.
INITIAL PREPARATION
Pour small quantities of
HI 7004
pH7.01 (HI7007/HI8007) and
pH4.01 (HI7004/HI8004) and/
HI 7004
HI 7007
or pH10.01 (HI7010/HI8010)
solution into individual beakers. If possible,
use plastic beakers to minimize any EMC
interferences.
For accurate calibration use two beakers for
each buffer solution, the first one for rinsing
the electrode, the second one for calibration.
By doing this,
RINSE
CALIBRATION
contamination
between the
buffers is mini-
HI 7007
HI 7007
mized.
To get accurate readings, use pH 7.01 and
3130
Page 17
pH 4.01 if you are going to measure acid
samples, or pH 7.01 and pH 10.01 for alkaline measurements or, for pH301 only, perform a 3-point calibration for the entire range.
PROCEDURE
RANGE
• Press RANGE (for pH300
and pH 302) to select the
pH measurement mode.
• Press pH (for pH301) to
select the pH measure-
pH
ment mode.
• Remove the protective cap
from the pH electrode.
ONE POINT CALIBRATION (OFFSET)
• Immerse the pH electrode
into the selected buffer (e.g.
pH 7.01) buffer solution and
shake briefly.
Note: the electrode should
HI 7007
be submerged approximately 4 cm
(1½") into the solution. The tempera-
(1
ture probe should be
located as close as
4 cm
½
")
possible to the pH
electrode.
• Press CAL. The primary LCD will display
the pH value using the current offset and
slope, with the "CAL" and "
CAL
1
BUF
" indicators lit.
CAL
pH
pH
1
BUF
For pH 302 only: the printer will also print
step by step instructions for the calibration procedure.
Dip the electrode in the pH 7
solution; wait
30 sec and then
press CFM
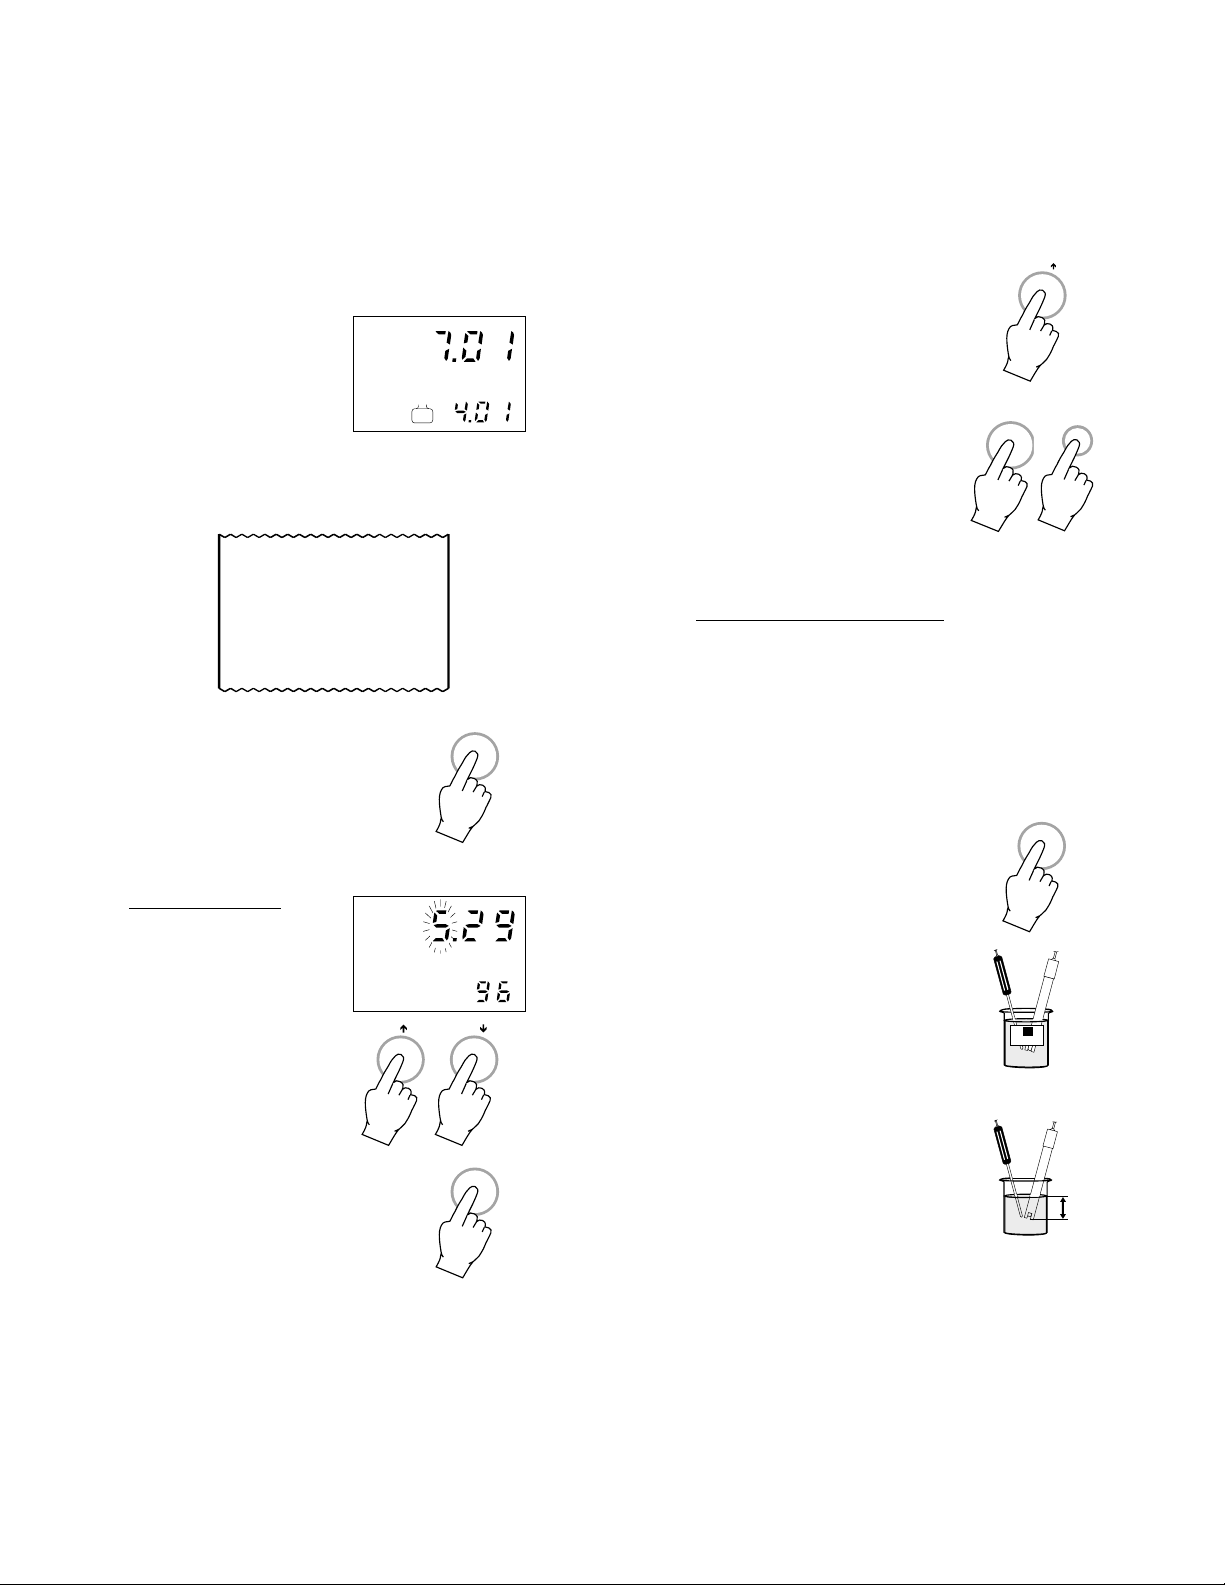
• Select the buffer value by pressing UP or
DOWN or just DOWN (for pH 302) until
the secondary LCD displays the value of
the first solution (e.g. “7.01”).
°C
ENTER/
°C
pH
CAL
1
BUF
• Only when the reading is stable (less
" in-
CFM
CFM/
CFM
than ±0.03 variation
in a 10 seconds time
interval) the "
1
BUF
dicator will stop flashing (after about 30
seconds) and the
"CFM" indicator will
start blinking.
• Press CFM to confirm the calibration.
If the reading is not
close to the selected
buffer, "WRONG
WRONG
1
BUF
"
and "WRONG " will
blink alternately. If
the reading is close
to the selected buffer
(±1pH), the meter
stores the reading
WRONG
BUF
3332
Page 18
CFM/
(and adjusts the offset point).
The buffer value is
pH
then displayed on
the primary LCD and
the secondary LCD
will display the ex-
CAL
2
BUF
pected second buffer value.
For pH 302 only: the printer will print
further instructions for the calibration procedure.
Now dip the electrode in 2nd
solution, wait
30 sec and then
press CFM
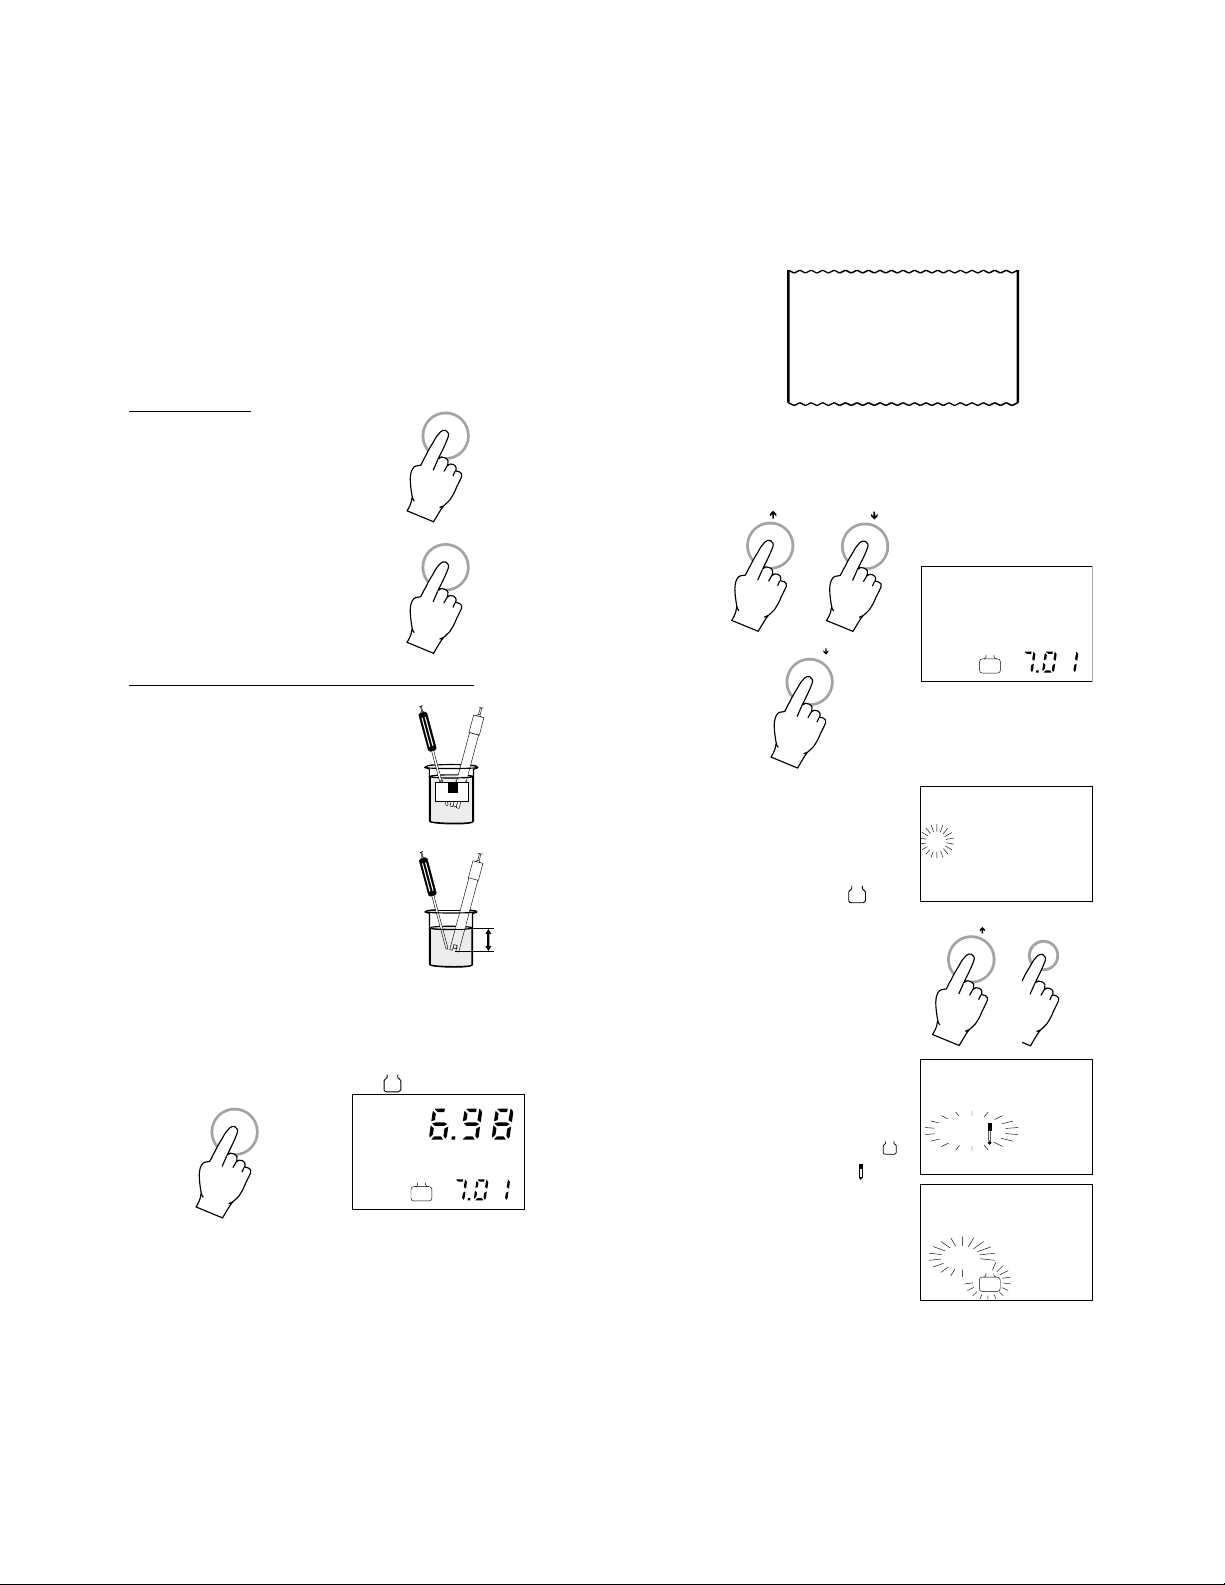
• Press CAL and the calibration process is ended with
just the offset of the meter
calibrated. For best accuracy
however, it is recommended
that a two-point calibration is
performed.
For pH 300 only
:
The calibration process
is complete and the display will ask for the date
CAL
entry.
°C
Use UP or DOWN to
select the month, the
day and the year.
Use CAL to toggle between
month, day and year.
CAL
CAL
°C
DATE
After entering the calibration date,
press CFM and the meter will
return to the normal operating
pH
mode.
Note: during calibration, the
RANGE
RANGE
secondary LCD displays
the selected buffer
value. By pressing
RANGE the temperature value can be also
displayed. This will allow you to check
the buffer temperature during calibration.
TWO-POINT CALIBRATION
A two-point calibration is recommended for
best accuracy. As a first point use pH 7.01
(or pH 6.86 can also be used for pH 301). As
a second point use pH 4.01 (or pH 1.68 for
pH 301 only) if you are going to measure acid
samples (pH 7 or less), use pH10.01 (or
pH 9.18 for pH301 only) if you are going to
measure alkaline samples.
CAL
• Proceed as described above
for one point calibration but
do not quit calibration by
pressing CAL at the end.
• After the first calibration
point is confirmed, immerse
the pH electrode into the
second buffer solution (pH
4.01 or pH10.01; for pH301
HI 7004
only, the second buffer can
also be pH 1.68 or pH 9.18) and shake
briefly.
Note: the electrode should
be submerged approximately 4 cm
(1½") into the solu-
(1
4 cm
½
")
tion. The temperature
probe should be located as close
as possible to the pH electrode.
3534
Page 19

• Press UP or DOWN or just DOWN (for
pH 302) until the secondary display
changes the value of the second solution
(e.g. “4.01”).
°C
ENTER/
°C
pH
CAL
2
BUF
• Only when the reading is stable (less
than ±0.03 variation
in a 10 seconds time
interval), the "
BUF
1
" in-
CFM
dicator will stop flashing (after about 30
CFM/
CFM
seconds) and the
"CFM" indicator will
blink.
• Press CFM to confirm the calibration.
If the reading is not
within 70% to 108%
of the buffer solution,
"WRONG
BUF
" and
2
WRONG
"WRONG " will blink
alternately. If the
reading is close to
the selected buffer
(between 70 to
108%), the meter
WRONG
BUF
stores the reading
(and adjusts the slope point).
For pH 300 only
:
DATE
The calibration process
is complete and the display will ask for the date
entry.
CAL
°C
°C
Use UP or DOWN to
select the month, the
day and the year.
Use CAL to toggle between month, day and
CAL
year.
After entering the cali-
bration date, press CFM
and the meter will re-
CFM/
turn to the normal operating mode.
For pH 302 only
:
The calibration process is complete. The meter
will print a confirm message and return to the
normal operating mode.
Calibration completed
For pH 301:
The second buffer value is then displayed on
the primary LCD and the secondary LCD will
display the expected third buffer
value.
CAL
• Press CAL and the calibration process is ended with
the offset and the 1st slope of
the meter calibrated.
Note: the meter will automatically skip the
buffer that was used for the first calibration to avoid erroneous calibration.
3736
Page 20

RANGE
RANGE
Note: during calibration, the
secondary LCD displays the selected
buffer value. By pressing RANGE the temperature value can be also displayed.
This will allow you to check the buffer
temperature during calibration.
THREE-POINT CALIBRATION (for pH301
only)
A three-point calibration (for the entire pH
range) can be performed with pH301. These
are the selectable buffers:
1st buffer 2nd/3rd buffer 3rd/2nd buffer
(offset) (1st slope) (2nd slope):
pH 6.86 pH 1.68 pH 9.18
or 7.01 or 4.01 or 10.01
or 9.18 or 4.01
• Proceed as described for the
CAL
two-point calibration but do not
quit calibration by pressing
CAL at the end.
• After the second calibration
point is confirmed, immerse
the pH electrode into the
third buffer solution (e.g.
pH10.01) and shake briefly.
HI 7004
HI 7010
Note: the electrode should
be submerged approximately 4 cm
(1½") into the solu-
(1
tion. The temperature
probe should be lo-
4 cm
½
")
cated as close as
possible to the
°C
°C
pH electrode.
• Select the 3rd buffer
value on the secondary
display by pressing UP
or DOWN (e.g.”10.01”).
• Only when the reading is stable (less
1
" in-
CFM
than ±0.03 variation
in a 10 seconds time
interval), the "
BUF
dicator will stop flashing (after about 30
CFM/
seconds) and the
"CFM" indicator will
blink.
• Press CFM to confirm the calibration.
If the reading is not
within 70% to 108%
of the buffer solution,
"WRONG
BUF
" and
3
WRONG
"WRONG " will blink
alternately. If the
reading is close to
the selected buffer
(between 70 and
108%), the meter
WRONG
BUF
stores the reading (and adjusts the 2
slope point).
• The calibration process is ended with the
offset and the 1st and 2nd slope of the
meter calibrated.
Note: the meter will automatically skip the
buffer that was used for the first and
second calibration to avoid erroneous
calibration.
Note: during calibration, the sec-
RANGE
ondary LCD displays the
selected buffer value. By
pressing RANGE the temperature value can be also
displayed. This will allow
you to check the buffer temperature during calibration.
3938
nd
Page 21

CALIBRATION WITH MANUAL TEMPERATURE COMPENSATION
If for some reason the temperature probe is
defective, or it is required to calibrate with
manual temperature compensation, follow the
procedure below:
• Unplug the temperature probe from the
meter.
• Note the temperature of the
°C
buffer solutions with a
ChecktempC or a glass
thermometer with a resolution of 0.1°C.
•
For pH300 and pH301 only
Use UP or DOWN to
°C°C
manually adjust the
display reading to the
value of the reference
thermometer (e.g.
20°C). The value will
be displayed on the
secondary LCD and
"°C" symbol will
flash.
•
For pH302 only
°C
Press the +/- key (for eventual negative
figures) followed by the noted temperature
on the numeric keypad (e.g. 20°C) and
ENTER. The value will be displayed on
the secondary LCD and "°C" symbol will
be flashing.
2
0
ENTER/
°C
• Follow the calibration procedure as for pH
calibration with temperature probe connected (see page 29).
pH VALUES AT VARIOUS
TEMPERATURE
The calibration buffer solutions are effected
by temperature changes to a lesser degree
than normal solutions.
When manually entering the calibration values (see program #2 for pH302) refer to the
following chart.
TEMP pH VALUES
°C °F 1.68 4.01 6.86 7.01 9.18 10.01
0
32
5
41
10
50
15
59
20
68
25
77
30
86
35
95
40
104
45
113
50
122
55
131
60
140
65
149
70
158
1.67
1.67
1.67
1.67
1.68
1.68
1.68
1.69
1.69
1.70
1.71
1.72
1.72
1.73
1.74
4.01
4.00
4.00
4.00
4.00
4.01
4.02
4.03
4.04
4.05
4.06
4.07
4.09
4.11
4.12
6.98
6.95
6.92
6.90
6.88
6.86
6.85
6.84
6.84
6.83
6.83
6.84
6.84
6.85
6.85
7.13
7.10
7.07
7.04
7.03
7.01
7.00
6.99
6.98
6.98
6.98
6.98
6.98
6.99
6.99
9.46
9.39
9.33
9.27
9.22
9.18
9.14
9.10
9.07
9.04
9.01
8.99
8.97
8.95
8.93
10.32
10.24
10.18
10.12
10.06
10.01
9.96
9.92
9.88
9.85
9.82
9.79
9.77
9.76
9.75
When using automatic calibration, the appropriate value will be displayed.
For instance, if the buffer temperature is at
25°C, the display will show "pH 4.01" or
"7.01" or "10.01".
If the buffer temperature is at 20°C, the display will show "pH 4.00"/"7.03"/"10.06".
If the buffer temperature is at 50°C, the display will show pH "4.06"/"6.98"/"9.82".
4140
Page 22

ION CALIBRATION (for pH301 only)
For greatest accuracy, it is recommended
that the instrument is calibrated frequently.
The standard calibration program of the meter,
however, is prepared for 2 (maximum) buffers. The selectable ION values are:
ppm 0.1, 1, 10, 100, 1000.
Due to electrode conditioning time the electrode must be kept immersed a few seconds
to stabilize. The meters are equipped with a
stability indicator and the user will be guided
step by step with easy indications on the
display during the ION calibration. This will
make the calibration a simple and error-free
procedure.
INITIAL PREPARATION
Pour small quantities of the
chosen ION calibration solution into individual beakers. If
possible, use plastic beakers
to minimize any EMC interferences.
For accurate
calibration use
two beakers
for each solution, the first
one for rinsing
the electrode, the second one for calibration.
By doing this, contamination between the buffers is minimized.
PROCEDURE
ION
• Press ION to select the ION
measurement mode.
• Remove the protective cap
from the ISE electrode.
ONE POINT CALIBRATION (OFFSET)
• Immerse the ISE electrode into the selected buffer (e.g. 10 ppm) solution and
shake briefly.
Note: the electrode should
be submerged approximately 4 cm
(1½") into the solution.
• Press CAL. The primary LCD will display
the ION value using the current offset and
slope, with the "CAL" and "
CAL
• Select the buffer value
CAL
1
BUF
" indicators.
ppm
ppm
1
BUF
°C
by pressing UP or
DOWN until the secondary LCD displays
the value of the first
solution (e.g. “10”).
• Only when the reading is stable, will the
1
BUF
"
" indicator stop
CFM
flashing (after about
30 seconds) and the
"CFM" the indicator
start blinking.
CFM/
• Press CFM to confirm the calibration. The meter stores the
reading (and adjusts the offset
point). The calibration solution
value is then displayed
on the primary LCD
ppm
and the secondary
LCD will display the expected 2nd calibration
value.
CAL
ppm
2
BUF
(1
4 cm
½
")
°C
4342
Page 23

• Press CAL and the calibra-
CAL
tion process is ended with
only the offset of the meter
calibrated. For best accuracy
however, it is recommended
that a two-point calibration is
performed.
Note: during calibration, the sec-
ondary LCD displays the
RANGE
selected buffer value. By
pressing RANGE the temperature value can be also
displayed. This will allow you
to check the buffer temperature during calibration.
TWO-POINT CALIBRATION
A two-point calibration is recommended for
best accuracy.
• Proceed as described above for one point
calibration but do not quit calibration by
pressing CAL at the end.
• After the first calibration point is confirmed,
immerse the ISE electrode into the second calibration solution (e.g. 100 ppm)
and shake briefly.
Note: the electrode should
be submerged approximately 4 cm
(1½") into the solu-
(1
½
")
tion.
• Press UP or DOWN until the secondary
display changes the value of the second
solution (e.g. “100”).
4 cm
• Only when the reading is stable, the "
indicator will stop
1
BUF
"
CFM
flashing (after about
30 seconds) and the
"CFM" indicator will
blink. The meter will check for the slope
reading.
CFM/
• Press CFM to confirm the
calibration.
The meter stores the reading (and adjusts the slope
point).
The ION calibration process is complete and
the meter will return to the normal operating
mode.
Note: the meter will automatically skip the buffer
that was used for the first calibration to
avoid erroneous calibration.
Note: during calibration, the sec-
ondary LCD displays the
RANGE
selected calibration value.
By pressing RANGE the
temperature value can be
also displayed. This will allow you to check the solution temperature during calibration.
°C
°C
ppm
CAL
2
BUF
4544
Page 24

mV CALIBRATION
The meter has been factory calibrated for the
mV and is ready for measurements. The calibration data are stored in the EEPROM.
The ORP electrodes are interchangeable and
no mV calibration is needed when the ORP
electrode is replaced.
• Set the simulator to
"390.0mV".
Wait for 5 seconds and press
CFM to confirm the value.
• The primary
LCD will display
"-390.0 mV".
CAL
CFM
mV
°C
If, for any reason, the mV measurements are
out of accuracy, re-calibration should be carried out as follows.
INITIAL PREPARATION
Prepare a simulator with an accuracy of
±0.1mV that can provide:
• ±390.0mV and ±1000.0mV for pH300
• 0.0 mV, ±500.0 mV and ±1500.0 mV for
pH301 and pH302 .
PROCEDURE FOR pH 300
• Connect the meter to the simulator through
the connection cable (connect it to the
BNC electrode socket).
• Turn the pH300 on by pressing ON plus
CFM simultaneously.
ON
CFM
Note: this calibration can also be per-
formed immediately after the temperature calibration (see page 50).
• The primary
LCD will display
mV
"390.0 mV".
°C
CAL
• Set the simulator to
CFM
"-390.0mV".
Wait for 5 seconds and press
CFM to confirm the value.
mV
• The primary LCD will
display "1000mV".
CAL
°C
• Set the simulator to
"1000.0mV".
CFM
Wait for 5 seconds and press
CFM to confirm the value.
mV
• The primary LCD will
display "-1000mV".
CAL
°C
• Set the simulator to
"-1000.0mV".
CFM
Wait for 5 seconds and press
CFM to confirm the value.
The mV calibration process is complete and
the meter will return to the normal operating
mode.
4746
Page 25

CFM
CFM
PROCEDURE FOR pH 301
• Connect the meter to the simulator through
the connection cable (connect it to the
BNC electrode socket).
• Turn the pH301 on by pressing ON plus
CAL simultaneously.
ON
CAL
• The primary LCD will
mV
display "0.0 mV".
• Set the simulator to
"0.0mV".
CAL
• As soon as the reading is stable (after about
10 seconds), the "CFM" indicator will start
blinking. Press CFM to confirm the value.
CFM
• The primary LCD will
mV
display "0.0 mV".
• Set the simulator to
"0.0mV".
CAL
• As soon as the reading is stable (after
about 10 seconds), the "CFM" indicator
will start blinking. Press CFM to confirm
the value.
CFM
• The primary
CFM
mV
LCD will display
"500 .0 mV".
• Set the simulator
to "500.0mV".
CAL
• As soon as the reading is stable (after
about 10 seconds), the "CFM" indicator
will start blinking. Press CFM to confirm
the value.
CFM
• The primary
mV
LCD will display
"1500.0 mV".
• Set the simulator
CAL
to "1500.0mV".
• As soon as the reading is stable (after about
10 seconds), the "CFM" indicator will start
blinking. Press CFM to confirm the value.
CFM
The mV calibration process is complete and the
meter will return to the normal operating mode.
PROCEDURE FOR pH 302
• Connect the meter to the simulator through
the connection cable (connect it to the
BNC electrode socket).
• Turn the pH302 on by pressing ON plus
CFM simultaneously.
ON
CFM/
CFM
4948
Page 26

CFM
mV
• The primary LCD will
display "0.0 mV",
• Set the simulator to
CAL
"0.0mV".
• As soon as the reading is stable (after about
10 seconds), the "CFM" indicator will start
blinking. Press CFM to confirm the value.
CFM/
CFM
mV
• The primary LCD will
display "500.0 mV".
• Set the simulator to
CAL
"500.0mV".
• As soon as the reading is stable (after about
10 seconds), the "CFM" indicator will start
blinking. Press CFM to confirm the value.
CFM/
• The primary
mV
LCD will display
"1500.0 mV".
• Set the simulator
CAL
to "1500.0mV".
• As soon as the reading is stable (after
about 10 seconds), the "CFM" indicator
will start blinking. Press CFM to confirm
the value.
CFM/
The mV calibration process is complete and
the meter will return to the normal operating
mode.
CFM
• The primary LCD will
mV
display "0.0 mV".
• Set the simulator to
"0.0mV".
CAL
• As soon as the reading is stable (after about
10 seconds), the "CFM" indicator will start
blinking. Press CFM to confirm the value.
CFM/
CFM
5150
Page 27

ON
TEMPERATURE CALIBRATION
(for Technical Personnel only)
The pH meter has been factory calibrated for
the temperature and is ready for measurements.
The temperature probes are interchangeable
and no temperature calibration is needed when
the temperature probe is replaced.
If, for any reason, the temperature measurements are inaccurate, re-calibration should
be carried out as follows.
• Wait for about 30 seconds. Press CFM.
The secondary LCD section will show
"50.0°C".
CFM
°C
CAL
°
C
• Immerse the temperature
probe in the vessel with hot
water.
50 °C
(122 °F)
INITIAL PREPARATION
• Prepare a
vessel con-
°C
°C
taining ice (at
0.0°C/32°F)
and water and
another one
0 °C
(32 °F)
50 ºC
(122 ºF)
containing hot
water (at a temperature of 50.0°C/122°F).
Place insulation material around the container to minimize temperature changes.
• Use a ChecktempC or a calibrated ther-
mometer with a resolution of 0.1 °C as a
reference thermometer.
PROCEDURE FOR pH 300
• Switch the pH300 on while pressing CAL.
The "CAL" indicator will be lit. The secondary LCD section will show "0.0°C".
ON
• Immerse the temperature
CAL
CAL
°C
°
C
probe in the vessel with the
ice and water.
0 °C
(32 °F)
CFM
• Wait for about 30 seconds.
Press CFM.
• Complete your temperature
CAL
calibration by pressing CAL
if you do not want to perform the mV calibration (see
page44).
PROCEDURE FOR pH 301
• Switch the pH301 on while pressing CFM.
The "CAL" indicator will be lit. The secondary LCD section will show "0.0°C".
CFM
°C
CAL
°
• Immerse the temperature
C
probe in the vessel with the
ice and water and wait for a
few minutes.
5352
0 °C
(32 °F)
Page 28

ON
• The secondary LCD
will display "0.0 °C"
with the "CAL" indicator.
• As soon as the
reading is stable the
"CFM" indicator will
start blinking.
• Press the CFM key
to confirm the calibration.
• Immerse the temperature probe in
the vessel with hot
water and wait for a
few minutes.
• The secondary
LCD will display
"50.0 °C" with
the "CAL" indicator.
• As soon as the reading is stable the
"CFM" indicator will
start blinking.
CAL
CFM
CFM
CAL
50 °C
(122 °F)
°C
CFM
PROCEDURE FOR pH 302
• Switch the pH302 on while pressing CAL.
The "CAL" indicator will be lit. The secondary LCD section will show "0.0°C".
CAL
°C
CAL
°
• Immerse the tem-
C
perature probe in the
vessel with the ice
and water and wait
for a few minutes.
°
C
• As soon as the
reading is stable
the "CFM" indica-
CFM
0 °C
(32 °F)
tor will start blinking.
• Press CFM to confirm the calibration.
°C
• Immerse the tem-
CFM/
°
C
perature probe in the
vessel with hot water
and wait for a few
minutes.
50 °C
(122 °F)
CFM
• Press CFM to confirm the calibration.
• The temperature calibration is complete
and the meter will return to the normal
operating mode.
• The secondary LCD
will display "50.0 °C"
with the "CAL" indicator.
• As soon as the reading is stable the
"CFM" indicator will
start blinking.
5554
°C
CAL
CFM
Page 29

CFM/
• Press CFM to confirm the calibration.
• The temperature calibration is complete
and the meter will return to the normal
operating mode.
LOGGING WITH pH301
This function permits the automatic logging
of pH or mV or ION measurements together
with the temperature without needing an operator and for a long period of time.
The lot number goes from 1 to 99 and then
back to #1.
The maximum capacity per lot is 8000
samples.
Set the appropriate logging interval (see
page 14) selectable between 1, 15, 30 seconds or 1, 5, 30, 60, 120, 180 minutes.
Select the appropriate measurement mode
by pressing the pH or mV or ION key.
pH mV ION
Press LOG and then CAL to enter the logging mode.
LOG
CAL
Once in the logging mode, the interval cannot be changed.
Exit the logging mode
LOG
CAL
first (by pressing LOG
and then CAL) before
setting a new interval.
During logging, you can check some information about the logged data.
5756
Page 30

ON
Press LOG and the primary LCD will show
the current lot number and the secondary
LCD will display the current page number.
LOG
LOG
Press LOG again to display the current sample
number (the number of values that have been
taken in the current lot).
LOG
LOG
TO STOP LOGGING
To stop logging press
LOG
CAL
LOG and then CAL.
when this happens the
LCD will show page "0",
indicating the overwriting has happened.
Each time a new logging period starts, it
automatically starts a new page.
When the samples collected for a single lot
are more than the limit (8000 samples) the
meter will automatically stop logging.
TO CLEAR LOGGED DATA
The entire logged data can be cleared by
pressing LOG as soon as the meter is
turned on (i.e. by pressing ON and LOG
simultaneously).
LOG
CFM
BUF
The choice has to be confirmed
CFM
by pressing CFM.
Press LOG to display the next lot number.
LOG
Note: if OFF is pressed while
OFF
logging, the meter will stop
the logging and then turn
off.
MEMORY ORGANIZATION
The memory used for storing the logged data
is divided into 16 pages. The capacity of
each page is 500 samples. It starts to log
from page 16 downwards until 1 and then 16
again, overwriting the previous data. However,
The next logging will
start from page 16.
5958
Page 31

PROGRAMMING FUNCTIONS
WITH pH302
There are 9 programs all together in the
instrument. To select a particular program,
press PGM followed by the program number
on the numeric keyboard.
E.g. To select program 1
PGM
• press PGM
1
• press 1
By pressing PGM
the secondary LCD will show "P" to confirm
the programming mode.
By pressing 1, the secondary LCD will show
"P1" to confirm the selected program.
At this stage, the secondary LCD
shows "Px - y", where x refers to
the program number you pressed
and y refers to 1 ENTER or 2
ENTER, i.e.:
1
ENTER/
• choice #1 selected
by pressing 1 followed by ENTER
or
2
ENTER/
• choice #2 selected
by pressing 2 followed by ENTER.
Whenever a numeric value is entered, the
entry appears on the primary display.
There will be a long beep after either 1+ ENTER or 2 +ENTER is pressed, when the entered value is either wrong or not acceptable
by the particular program.
The 9 programs stored in the instrument are:
Program #0
To end the program function.
Program #1
To set the sample number, the time and the
date (see page 60).
Program #2
To calibrate the meter using a nonstandard
calibration buffer value (see page 64).
Program #3
To print the pH calibration data complete with
date, time, pH offset and slope (see page66).
Program #4
To log and print the pH/mV/temperature values at the selected interval from the start to
the finishing time. The printout interval can
be selected from 1 minute to 24 hours. This
program can be stopped by selecting any
other PGM function (see page 67).
Program #5
To log and print the pH/mV/temperature values at a user-selectable interval from a given
time up to a selectable pH or mV value.
When this pH/mV value is exceeded, the
program stops by printing the endpoint hour
and minute. The printout interval can be selected from 1 minute to 24 hours. This program can also be stopped by selecting any
other PGM function (see page 71).
Program #6
To set the upper and the lower pH or mV
alarm limits. A beeper will sound whenever
the measured value exceeds the limit. This
program can only be terminated by pressing
PGM + 0 (see page 75).
6160
Page 32

Program #7
To select a different printing language (6
languages are available) (see page 78).
Program #8
To print the ion concentration in M for the
measured pH value (see page 79).
Program #9
To set the baud rate and the STRINGII code
of Escape character for the RS232 (see
page 79).
To stop or exit any program:
• press PGM
• press 0
PGM
0
PROGRAM 1
1 set sample no.
2 set time
3 set date
• To set the sample number (choice #1),
press 1 followed by ENTER. "P1.1" will
be displayed on the secondary LCD with
"0" on the primary one.
1
ENTER/
Enter the desired number (choose any
number from 1 to 999) followed by ENTER. E.g. sample number 200.
Note: the instrument must be in pH mode for
program #2, #3 and #8. Otherwise a
long beep will sound.
PROGRAM #1 (pH 302)
This program allows you to set sample number, time and date.
To enter program #1:
• Push the PGM key and then 1.
PGM
1
The printer will then define the three functions:
1 is the sample number,
2 is time,
3 is the date.
2
0
0
ENTER/
The printer will print the value.
PROGRAM 1
1 set sample no.
2 set time
3 set date
Sample number
200
Samples after 999 will be reset to zero
and the sample number will automatically
advance from 0 to 999 in increment of 1
each time the instrument logs and/or prints
a reading.
6362
Page 33

• "P1." will be displayed on the
secondary LCD.
• To set the time press 2 followed by ENTER. "P1.2" will be displayed on the secondary LCD with "0" on the primary one.
2
ENTER/
The time value (choice #2) can be set for
a 24 hour clock. Enter the desired number also using the decimal point followed
by ENTER.
E.g. 2 P.M. equals 14.00. Press "14.00"
followed by ENTER.
1
4
.
0
0
ENTER/
The printer will print the time.
PROGRAM 1
1 set sample no.
2 set time
3 set date
Sample number
200
• To set the date press 3 followed by ENTER. "P1.3" will be displayed on the secondary LCD with "0" on the primary one.
3
ENTER/
When setting the date (choice #3), enter
the month first. Separate month and day
by a decimal point.
E.g. February 4th is entered as "2.04"
followed by ENTER.
2
.
0
4
ENTER/
The printer will print the date.
PROGRAM 1
1 set sample no.
2 set time
3 set date
Sample number
200
Time
14.00
Date
2.04
Time
14.00
• "P1." will be displayed on the
secondary LCD.
• Press PGM and then 0 to exit from the
program mode.
PGM
6564
0
Page 34

PROGRAM #2 (pH 302)
This program lets you calibrate with buffer
values other than 4.01, 7.01 and 10.01 pH
which are pre-programmed into memory.
• To enter program #2, press PGM and
then 2.
PGM
2
• Check the appropriate value for the buffer
at the measured buffer temperature (see
page39).
• After about 30 seconds enter the 1st buffer
value at the working temperature followed
by ENTER. E.g. 6.92 (at 10°C).
6
.
9
2
ENTER/
The printer will then define the two functions:
1 is the first buffer,
2 is the second buffer.
PROGRAM 2
1 enter 1st buf fer
2 enter 2nd buf fer
• To meter will default to the 1
st
buffer value entry displaying
"P2.1" on the secondary LCD
with "0" on the primary one.
The buffers can be anywhere between 0 and
14 pH.
Example:
To calibrate with NBS buffers 6.86 pH and
9.18 pH at a temperature of 10°C.
The corresponding pH values at this tem-
perature are 6.92 and 9.33 respectively.
• Immerse the pH electrode
and the temperature probe
into the 1st buffer (e.g.
pH6.86).
The printer will print the 1st buffer value.
PROGRAM 2
1 enter 1st buf fer
2 enter 2nd buf fer
1st buffer
6.92
• The secondary display will
show "P2."
• To set the second buffer press 2 followed
by ENTER. "P2.2" will be displayed on
the secondary LCD with "0" on the primary one.
2
ENTER/
• Rinse the electrode and
immerse it in the 2
nd
buffer (e.g. pH 9.18).
• Check the appropriate value for the buffer
at the measured buffer temperature (see
page39).
6766
Page 35

• After about 30 seconds enter the 2nd buffer
value at the working temperature and then
press ENTER. E.g. 9.33 (at 10°C).
9
. 3
3
ENTER/
The printer will print the 2nd buffer value.
PROGRAM 2
1 enter 1st buf fer
2 enter 2nd buf fer
1st buffer
6.92
2nd buffer
9.33
• Press PGM to quit this pro-
PGM
gram.
• The calibration is now complete.
PROGRAM #3 (pH 302)
This program prints the date, time, the offset
and slope characteristics of the pH electrode.
Note: the offset and the slope characteristics
of the electrode are referred to the last
performed pH calibration.
No programming is required.
Simply press PGM and 3.
PGM
3
The printer will print the pH calibration data.
PROGRAM 3
DATE 2/04
TIME 14:04
OFFSET mV 0.16
SLOPE 95.3%
MM/DD
HH:MM
in mV
in %
The program function ends.
Changes in an electrode's performance can
be determined from this information.
The offset pH value should be between ±30mV.
For values between ±30 and ±60 mV change
the reference electrolyte and repeat the calibration procedure. For values higher than
+60 mV or lower than -60 mV the electrode is
no longer reliable. See the electrode maintenance section on page 84.
The slope characteristic is in percentage of
the theoretical value of 58.16 mV per pH unit
at 20°C.
PROGRAM #4 (pH 302)
This program logs and prints pH/mV and
temperature values at a preset interval between 1 minute and 24 hours.
To enter the program press PGM and 4.
PGM
4
The printout defines functions 1, 2 and 3:
1 is a start time,
2 is the time interval,
3 is the finish time.
6968
Page 36

PROGRAM 4
1 enter start
time
2 enter time int erval
3 enter end time
• To set the start time (choice #1), press 1
followed by ENTER. "P4.1" will be displayed on the secondary LCD with "0" on
the primary one.
1
ENTER/
• Enter the desired number followed by ENTER. E.g. Starting time 10:20.
1
0
.
2
ENTER/
0
• "P4." will be displayed on the
secondary LCD.
• To set the time interval (choice #2), press
2 followed by ENTER.
"P4.2" will be displayed on the secondary LCD with "0" on the primary one.
2
ENTER/
The minimum time interval is 1 minute.
The interval is expressed in HH:MM.
E.g printing interval of 5 minutes.
0
0
. 0
ENTER/
5
The printer will print the value.
Hours and minutes must be separated by
a decimal point.
The printer will print the value.
PROGRAM 4
1 enter start
time
2 enter time int erval
3 enter end time
start time
10:20
PROGRAM 4
1 enter start
time
2 enter time int erval
3 enter end time
start time
10:20
time interval
00:05
• "P4." will be displayed on the
secondary LCD.
7170
Page 37

• To set the finishing time (choice #3), press
3 followed by ENTER.
"P4.3" will be displayed on the secondary LCD with "0" on the primary one.
3
ENTER/
DATE 2/04
TIME 10.20
SAMPLE 202
°C 20.3
pH 6.38
DATE 2/04
TIME 10.25
SAMPLE 203
°C 20.4
pH 6.39
• Enter the desired number followed by ENTER. E.g. Finishing time 11:30.
Hours and minutes must be separated by
a decimal point.
1
1
. 3
ENTER/
0
The printer will print the value.
PROGRAM 4
1 enter start
time
2 enter time int erval
3 enter end time
start time
10:20
time interval
00:05
finishing time
11:30
DATE 2/04
TIME 10.30
SAMPLE 204
°C 20.3
pH 6.38
The "LOG" indicator is displayed
when the meter starts to log.
LOG
When the instrument
is in this mode and
PGM
0
you want to stop before the end time,
press PGM plus 0.
PROGRAM #5 (pH 302)
This is the same as program #4 except that
function "3" allows you to select an interrupt
value for pH/mV instead of end time.
When this interrupt value is exceeded, the
program prints the hour and minute of the
endpoint.
To enter the program press PGM plus 5.
PGM
5
7372
Page 38

2
1
The printout defines functions 1, 2 and 3:
1 is a start time,
2 is the time interval,
3 is the interrupt value of pH/mV.
PROGRAM 5
1 enter start
time
2 enter time in terval
3 enter end
pH/mV value
• "P5." will be displayed on the
secondary LCD.
• To set the time interval (choice #2), press
2 followed by ENTER.
"P5.2" will be displayed on the secondary LCD with "0" on the primary one.
ENTER/
• To set the start time (choice #1), press 1
followed by ENTER. "P5.1" will be displayed on the secondary LCD with "0" on
the primary one.
1
ENTER/
• Enter the desired number followed by ENTER. E.g. Starting time 10:30.
Hours and minutes must be separated by
a decimal point.
ENTER/
1
0
.
3
0
The printer will print the value.
PROGRAM 5
1 enter start
time
2 enter time in terval
3 enter end
pH/mV value
Start time
10.30
The minimum time interval is 1 minute.
The interval is expressed in HH:MM.
E.g printing interval of 1 hour and 30
minutes.
.
3
ENTER/
The printer will print the value.
PROGRAM 5
1 enter start
time
2 enter time in terval
3 enter end
pH/mV value
Start time
10.30
Time Interval
1.30
• "P5." will be displayed on the
secondary LCD.
7574
Page 39

• To set the end pH/mV value (choice #3),
press 3 followed by ENTER. "P5.3" will
be displayed on the secondary LCD with
"0" on the primary one.
3
ENTER/
• Enter the desired number followed by ENTER. E.g. pH 3.50 (supposed that the
meter is in pH mode).
Note: the value will automatically be pH or
mV depending on the selected measurement range.
3
.
5
ENTER/
DATE 2/04
TIME 10.30
SAMPLE 210
°C 20.3
pH 4.50
DATE 2/04
TIME 12.00
SAMPLE 211
°C 20.4
pH 4.01
DATE 2/04
TIME 12.25
SAMPLE 212
°C 20.3
pH 3.50
The "LOG" indicator is displayed
when the meter starts to log.
When the instrument is in this
mode and it is desired
PGM
to stop before the end
time, press PGM plus 0.
LOG
0
The printer will print the value.
PROGRAM 5
1 enter start
time
2 enter time in terval
3 enter end
pH/mV value
Start time
10.30
Time Interval
1.30
End point
3.50
PROGRAM #6 (pH 302)
This program allows you
to set upper and lower limits for pH/mV
values.
A beeper will sound whenever the measured
value exceeds the limit.
To enter the program press PGM plus 6.
PGM
6
The printout defines functions 1, 2 and 3:
1 is the lower limit,
2 is the upper limit,
3 clears the alarm.
7776
Page 40

7
PROGRAM 6
1 set lower limit
2 set upper limit
3 clear alarm
• To set the lower limit (choice #1), press 1
followed by ENTER. "P6.1" will be displayed on the secondary LCD with "0" on
the primary one.
• "P6." will be displayed on the
secondary LCD.
• To set the upper limit (choice #2), press 2
followed by ENTER. "P6.2" will be displayed on the secondary LCD with "0" on
the primary one.
2
ENTER/
1
ENTER/
• Enter the desired number followed by ENTER. E.g. lower limit pH 6.50 (supposed
that the meter is in pH mode).
Note: the value will automatically be pH or
mV depending on the selected measurement range.
6
.
5
ENTER/
The printer will print the value.
PROGRAM 6
1 set lower limit
2 set upper limit
• Enter the desired number followed by ENTER. E.g. upper limit pH 7.50.
.
5
ENTER/
The printer will print the value.
PROGRAM 6
1 set lower limit
2 set upper limit
3 clear alarm
lower limit
6.50
upper limit
7.50
3 clear alarm
To stop the beeper from sound-
3
ing when the limit is exceeded,
lower limit
6.50
press 3.
7978
Page 41

PGM
0
To definitely exit the
program press PGM
plus 0.
PROGRAM #7 (pH 302)
This program allows the user to select a
different working language.
Press PGM and then 7.
PGM
7
The printer will print out a list of languages
available.
PROGRAM 7
1. English
2. Deutsch
3. Français
4. Español
5. Italiano
6. Svenska
Press PRINT and the printout will be in French.
PRINT
DATE (M/J) 2/04
HEURE 10.20
ECHANTILLON 215
°C 20.0
pH 6.52
PROGRAM #8 (pH 302)
This program prints out the ion concentration
in M for the pH value measured.
To activate the program, press PGM and
then 8.
PGM
PROGRAM 8
3.88 pH--
0.132mM H+
8
The default working language is English.
To choose a language, key in the corre-
sponding number then press ENTER.
E.g. To select French press 3 and ENTER.
PROGRAM 7
3
ENTER/
1. English
2. Deutsch
3. Français
4. Español
5. Italiano
6. Svenska
Français
Note: Make sure the meter is in pH mode,
otherwise a long beep will be heard.
PROGRAM #9 (pH 302)
This program is to set the baud rate and the
STRINGII code of Escape character.
To enter the program press PGM plus 9.
PGM
9
8180
Page 42

The printout defines functions 1 and 2:
1 is the baud rate,
2 to set the STRINGII code of Escape char-
acter
PROGRAM 9
1 enter baud rate
2 enter STRINGII code
of escape
character
• "P9." will be displayed on the
secondary LCD.
• To set the command prefix (choice #2),
press 2 followed by ENTER. "P9.2" will
be displayed on the secondary LCD with
"0" on the primary one.
2
ENTER/
• To set the baud rate (choice #1), press 1
followed by ENTER. "P9.1" will be displayed on the secondary LCD with "0" on
the primary one.
1
ENTER/
• Enter the desired number followed by ENTER. E.g. 4800 as baud rate.
4
8
0
0
ENTER/
The printer will print the value.
PROGRAM 9
1 enter baud rate
2 enter STRINGII
code of escape
character
baud rate
4800
• Enter the desired number followed by ENTER. E.g. STRINGII code 25.
5
ENTER/
The printer will print the value.
PROGRAM 9
1 enter baud rate
2 enter STRINGII code
of escape
character
baud rate
4800
STRINGII code
25
Press PGM to quit this program.
PGM
8382
Page 43

INTERFACE WITH PC
TROUBLESHOOTING GUIDE
Data transmission from the instrument to the
PC is now much easier with the new HI 92000
Windows® compatible application software offered by Hanna Instruments.
User friendly, HI 92000 offers a variety of
features and has an on-line help feature to
support you throughout all situations.
HI92000 allows you to use the powerful means
of the most diffused spread sheet programs
(e.g. Excel©, Lotus 1-2-3©). Simply run your
favorite spread sheet and open the file downloaded by HI92000. It is then possible to
make any elaboration available with your software (e.g. graphics, statistical analysis).
To install HI 92000 you need a 3.5" drive and
a few minutes to follow the instructions conveniently printed on the disk label.
Contact your Hanna Dealer to request a copy.
To connect your pH meter to the PC use
HI 920010, available through your Hanna
Dealer. Make sure that your meter is switched
off and plug the connectors, one into the
meter RS232 connector, the other into the
serial port of your PC.
Note: Cables which are different from the
HI920010 may use a different con-
figuration. In which case any communication between the meter and the
PC is not possible.
Excel© Copyright of "Microsoft Co."
Lotus 1-2-3© Copyright of "Lotus Co."
Windows® and Windows Terminal® are registered Trademark of "Microsoft Co."
Symptoms Problem Solution
The meter does not
work with the
temperature probe
The meter fails to
calibrate or gives
faulty readings
The meter is slow
in responding or
gives faulty
readouts
The meter does not
accept the 2nd buffer
solution for
calibration
The reading drifts
Display shows:
pH
Display shows:
°C
Display shows:
Rel mV
Display shows:
"WRONG
and/or
"WRONG "
Display shows:
"WRONG
and/or
"WRONG "
1
BUF
BUF
2
"
"
Defective ATC
probe
Defective pH
electrode
The electrode is
not working or
the reference
junction is
clogged
Defective pH
electrode
Defective pH
electrode
Out of range-pH
scale
Out of range-°C
scale
Out of range-mV
scale or ION for
pH301
Erroneous buffer
solution used for
offset cal.
Defective
electrode
Erroneous buffer
solution used for
slope cal.
Defective
electrode
8584
Replace the probe
Replace the electrode
Leave the electrode in a
storage solution after
cleaning the junction. If
problem persists,
replace the electrode
Follow the cleaning
procedure. If this doesn't
work replace the
electrode
Replace the electrode
a) Check the calibration
b) Assure the pH sample
is in the range 0 to 14
c) Check the level of
electrolyte and the
state of the electrode
itself
Make sure the °C is within
0-100° and temperature
probe is plugged
Electrode not connected
Make sure the buffer solution
used corresponds to the
selected buffer value and
replace if necessary
Replace the electrode
Use fresh buffer solution
Replace the electrode
Page 44

ELECTRODE CONDITIONING
AND MAINTENANCE
Reference
Filling Hole
Fill Hole
Screw
Sensitive
Wire
Reference
Wire
Reference
Junction
Glass
Bulb
Plastic Body
pH Electrode
Reference
Wire
Reference
Junction
Platinum or
Gold tip
Plastic Body
ORP Electrode
Glass Body
pH Electrode
Reference
Wire
Glass Body
ORP Electrode
Reference
Filling Hole
Reference
Wire
Sensitive
Wire
Reference
Junction
Glass
Bulb
Reference
Junction
Platinum or
Gold tip
ing down" the electrode as you would do with
a glass thermometer.
If the bulb and/or junction are dry, soak the
electrode in HI70300 or HI 80300 Storage
Solution for at least one hour.
For refillable electrodes:
If the filling solution (electrolyte) is more
than 1 cm (½") below the fill hole, add HI7082
or HI8082 3,5M KCl Electrolyte Solution
for double junction or HI7071 or HI8071
3,5M KCl+AgCl Electrolyte Solution for
single junction electrodes.
For a faster response, unscrew the fill hole
screw during measurements.
For AmpHel® electrodes:
If the electrode does not respond to pH
changes, the battery is run down and the
electrode should be replaced.
MEASUREMENT
Rinse the electrode tip with distilled water.
Immerse the tip (4 cm /1½") in the sample
and stir gently for at least 30 seconds.
For a faster response and to avoid cross
contamination of the samples, rinse the electrode tip with a few drops of the solution to
be tested, before taking measurements.
PREPARATION
Remove the protective cap.
DO NOT BE ALARMED IF ANY SALT DE-
POSITS ARE PRESENT.
This is normal with electrodes and they will
disappear when rinsed with water.
During transport tiny bubbles of air may have
formed inside the glass bulb. The electrode
cannot function properly under these conditions. The bubbles can be removed by "shak-
STORAGE
To minimize clogging and assure a quick
response time, the glass bulb and the junction should be kept moist and not allowed to
dry out.
Replace the solution in the protective cap
with a few drops of HI70300 or HI80300
Storage Solution or, in its absence, Filling
Solution (HI7071 or HI8071 for single junc-
tion or HI7082 or HI8082 for double junction
AmpHel® is registered Trademark of "Hanna Instruments"
8786
Page 45

electrodes). Follow the Preparation Procedure above before taking measurements.
Note: NEVER STORE THE ELECTRODE IN
DISTILLED WATER OR DRY.
PERIODIC MAINTENANCE
Inspect the electrode and the cable. The cable
used for the connection to the meter must be
intact and there must be no points of broken
insulation on the cable or cracks on the electrode stem or bulb. Connectors must be perfectly clean and dry.
If any scratches or cracks are present, replace the electrode.
Rinse off any salt deposits with water.
For refillable electrodes:
Refill the reference chamber with fresh electrolyte (HI7071 or HI8071 for single junction
or HI7082 or HI8082 for double junction
electrodes). Allow the electrode to stand upright for 1 hour.
Follow the Storage Procedure above.
CLEANING PROCEDURE
General Soak in Hanna HI7061 or
HI 8061 General Cleaning Solution for approximately 1 hour.
Removal of film, dirt or deposits on the membrane/junction:
-
Protein
-
Inorganic
-
Oil/grease
Soak in Hanna HI7073 or
HI8073 Protein Cleaning Solution for 15 minutes.
Soak in Hanna HI7074 or
HI8074 Inorganic Cleaning Solution for 15 minutes.
Rinse with Hanna HI7077 or
HI 8077 Oil and Fat Cleaning
Solution.
IMPORTANT: After performing any of the
cleaning procedures rinse the electrode thoroughly with distilled water, refill the reference
chamber with fresh electrolyte, (not necessary for GEL filled electrodes) and soak the
electrode in HI 70300 or HI80300 Storage
Solution for at least 1 hour before taking
measurements.
TROUBLESHOOTING
Evaluate your electrode performance based
on the following.
• Noise (Readings fluctuate up and down)
could be due to:
- Clogged/Dirty Junction: Refer to the
Cleaning Procedure above.
- Loss of shielding due to low electrolyte
level (in refillable electrodes only): refill
with fresh HI 7071 or HI 8071 for single
junction or HI7082 or HI8082 for double
junction electrodes.
• Dry Membrane/Junction: Soak in Stor-
age Solution HI70300 or HI80300 for at
least 1 hour.
• Drifting: Soak the electrode tip in warm
Hanna Solution HI7082 or HI8082 for one
hour and rinse tip with distilled water. Refill with fresh HI7071 or HI8071 for single
junction electrodes and HI7082 or HI8082
for double junction electrodes.
• Low Slope: Refer to the cleaning proce-
dure above.
• No Slope: Check the electrode for cracks
in glass stem or bulb and replace the
electrode.
• Slow Response/Excessive Drift: Soak
the tip in Hanna Solution HI7061 or HI8061
for 30 minutes, rinse thoroughly in distilled water and then follow the Cleaning
Procedure above.
8988
Page 46

TEMPERATURE-RESISTANCE CORRE-
0
0+10+20+30+40+50+60+70+80+90
C
LATION FOR HANNA pH SENSITIVE
GLASS
The resistance of glass electrodes partially
depends on the temperature. The lower the
temperature, the higher the resistance. It takes
longer for the reading to stabilize if the resistance is higher. In addition, the response
time will suffer to a greater degree at tem-
Ω
9
2x10
-10
9
1x10
-10
8
-10
2x10
8
1x10
-10
7
2x10
-10
-10
7
1x10
-10
-10
-20-2
peratures below 10°C.
Since the resistance of the pH electrode is in
the range of 200 Mohm, the current across
the membrane is in the pico Ampere range.
Large currents can disturb the calibration of
the electrode for hours.
Typical Electrode Life
Ambient Temperature 1- 3 years
90 °C Less than 4 months
120°C Less than 1 month
High concentrations of sodium ions interfere
with readings in alkaline solutions; the pH at
which the interference starts to be significant
depends upon the composition of the glass.
This interference is the alkaline error and
causes the pH to be underestimated. Hanna's
glass formulations have the indicated characteristics.
Alkaline Error
Sodium Ion Correction for the Glass
at 20-25°C
°
Concentration pH Error
0.1 Mol L-1 Na
1.0 Mol L-1 Na
+
13.00
13.50
14.00
+
12.50
13.00
13.50
14.00
0.10
0.14
0.20
0.10
0.18
0.29
0.40
For these reasons high humidity environ-
ments, short circuits and static discharges
are detrimental for a stable pH reading.
The life of a pH electrode also depends on
temperature. If constantly used at high temperatures, electrode life is drastically reduced.
9190
Page 47

ADDITIONAL INFORMATION ABOUT
INTERFACE WITH PC
(for technical personnel only)
If you are not using Hanna Instruments
HI92000 application software, please find here
below some additional information to help your
connection to the PC.
SETTING THE BAUD RATE AND THE
COMMAND PREFIX
The transmission speed (baud rate) of your
pH meter and of the external device must be
the same.
Procedure for pH 300:
To set the baud rate of the meter press
COMM, the primary LCD shows the current
baud rate.
COMM
Note: the Command Prefix has not to be
changed using HI92000 Hanna Software.
°C
°C
Select a different command prefix (between 0
to 47 in decimal) by
pressing UP and DOWN.
Press CFM to confirm the set-
CFM
ting.
Procedure for pH 301:
To set the baud rate of the meter press
COMM, the primary LCD shows the current
baud rate.
COMM
The following baud
rate can be selected
°C
°C
through UP and
DOWN:
150, 300, 600, 1200
(factory setting) and
2400.
Press CFM to confirm the setting and the
primary LCD shows the current command
prefix: 16 is the factory setting.
CFM
The following baud rate
°C
°C
can be selected through
UP and DOWN:
150, 300, 600, 1200
(factory setting), 2400,
4800, 9600.
Press COMM to confirm the setting and the
primary LCD shows the current command
prefix: 16 is the factory setting.
COMM
Note: the Command Prefix has not to be
changed using HI92000 Hanna Software.
9392
Page 48
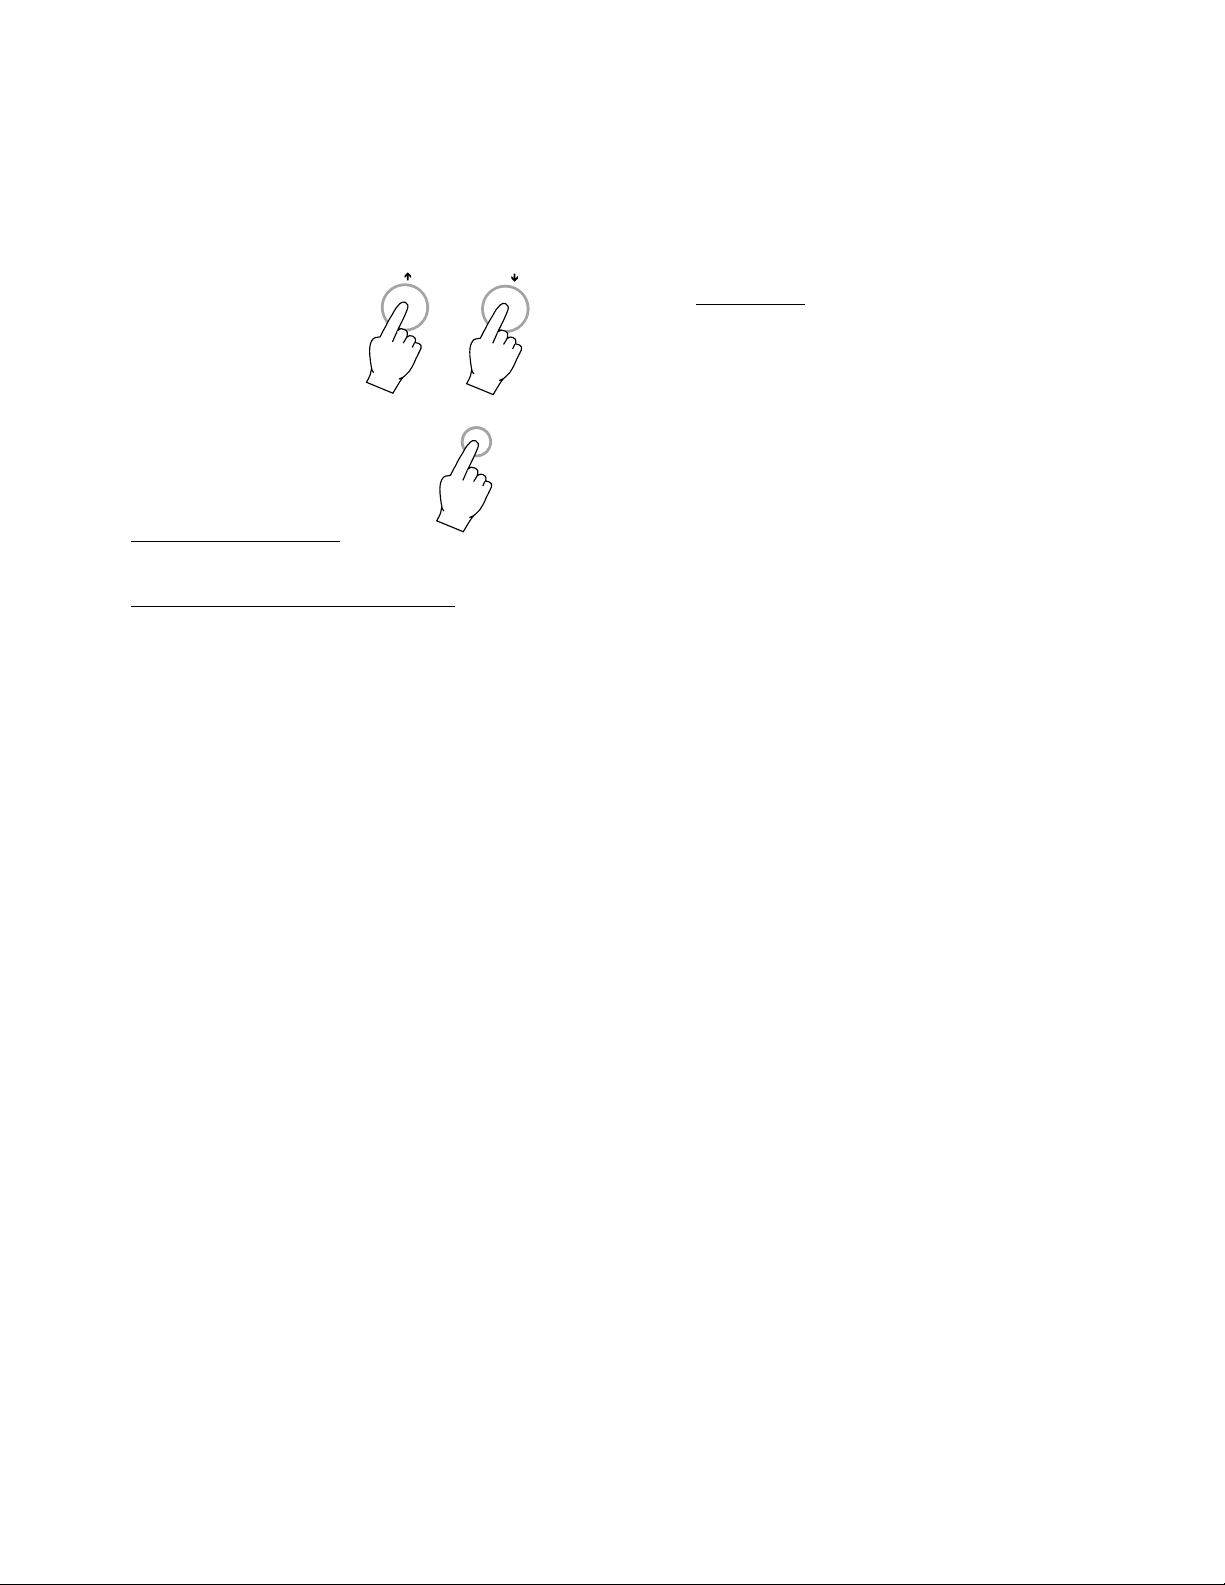
°C
°C
Select a different command prefix (between 0
to 47 in decimal) by
pressing UP and DOWN.
COMM
Press COMM to confirm the setting.
Procedure for pH 302:
See program #9 (page 79).
SENDING COMMANDS FROM PC
With terminal programs such as, for example,
Telix®, Windows Terminal®, it is possible to
remotely control your pH meter. Use
HI920010 cable to connect the meter to the
PC, start the terminal program and set the
communication options as follows: 8, N, 1,
no flow control.
Command Types
To send a command to the pH meter the
scheme is:
<DLE> <
command>
<CR>
This line makes the computer send a Data
Link Escape character, the command expressed as a number or a 3-character sequence) and a CR character.
Note: Windows Terminal® and all the other
terminal programs that support the
ANSI escape sequence, represent the
DLE character by the string '^P' and
the CR character by the string '^M'.
E.g. the line '^PPHR^M' sets the range
to pH.
Windows Terminal® are registered Trademark of "Microsoft Co."
TELIX® is registered Trademark of "Deltacomm"
For pH 300:
Commands not requiring an answer from
the pH meter:
PHR sets the range to pH
MVR sets the range to mV
CAL is equivalent to pressing the CAL key
CON is equivalent to pressing the CFM key
UPC is equivalent to pressing the ↑°C key
DWC is equivalent to pressing the ↓°C key
MEM is equivalent to pressing the MEM key
MRR is equivalent to pressing the MR key
COM is equivalent to pressing the COMM key
Commands requiring an answer:
pH? Causes the meter to send the pH value.
If the reading is out of range "Err 1" is
sent.
MV? Causes the meter to send the mV value.
If the reading is out of range "Err 2" is
sent.
TM? Causes the meter to send the tempera-
ture value. If the reading is out of range
"Err 3" is sent.
FA? Requests the meter to send the calibra-
tion factor of pH. The order of data is
as follows:
1) Month, day and Year
(when the calibration was done)
E.g. "123195" for 31st of Dec. 95
2) Buffer used when the offset was done
E.g. "0701" for 7.01 pH
3) Offset in mV
E.g. "_00504" for 50.4 mV
"-00504" for 50.4 mV
4) Buffer used when slope was done
E.g. "0401" for 4.01 pH
5) Slope in mV
E.g. "000592" for 59.2 mV
6) Temperature
E.g. "_01199" for 119.9°C
"-00099" for -9.9°C
BAR Requests the meter to send the RS232
baud rate
9594
Page 49

PRE Requests the meter to send the RS232
command prefix
Commands setting parameters:
/BR To set the RS232 baud rate. E.g.
send "/BR0" to set the meter to baud rate of
150
send "/BR1" to set the meter to baud rate of
300
send "/BR2" to set the meter to baud rate of
600
send "/BR3" to set the meter to baud rate of
1200
send "/BR4" to set the meter to baud rate of
2400
/PF To set the RS232 command prefix. E.g.
send "/PF05" to set the command prefix to
05.
For pH 301:
Commands not requiring an answer from
the pH meter:
PHR sets the range to pH
PPM sets the range to ppm
MVR sets the range to mV
OFF is equivalent to pressing the OFF key
Commands requiring an answer:
pH? Causes the meter to send the pH value.
If the reading is out of range "Err 1" is
sent.
pM? Causes the meter to send the ppm value.
If the reading is out of range "Err 5" is
sent.
MV? Causes the meter to send the mV value.
If the reading is out of range "Err 2" is
sent.
TM? Causes the meter to send the tempera-
ture value. If the reading is out of range
"Err 3" is sent.
The meter will send "Err6" if in a different
measurement range.
FA? Requests the meter to send the calibra-
tion factor of pH. The order of data is
as follows:
1) Month, day and Year
(when the calibration was done)
E.g. "123195" for 31st of Dec. 95
2) Time (when the calibration was done)
E.g. "1259" for 12:59 hh/mm
3) Buffer used when the offset was done
E.g. "0701" for 7.01 pH
4) Offset in mV
E.g. "_00504" for 50.4 mV
"-00504" for 50.4 mV
5) Buffer used when 1st slope was done
E.g. "0401" for 4.01 pH
6) 1st slope in mV
E.g. "000592" for 59.2 mV
7) Buffer used when 2nd slope was done
E.g. "1001" for 10.01 pH
8) 2nd slope in mV
E.g. "000569" for 56.9 mV
9) Temperature
E.g. "_01105" for 110.5°C
"-00099" for -9.9°C
FI? Requests the meter to send the calibra-
tion factor of ION. The order of data is
as follows:
1) Month, day and Year
(when the calibration was done)
E.g. "060395" for 6th of March 95
2) Time (when the calibration was done)
E.g. "1651" for 16:51 hh/mm
2) Buffer used when the offset was done
E.g. "000100" for 10.0ppm
3) Offset in mV
E.g. "000234" for 23.4 mV
4) Buffer used when slope was done
E.g. "010000" for 1000 mV
5) mV measured when the slope was done
E.g. "012345" for 1234.5 mV
6) Temperature
E.g. "_00105" for 10.5°C
"-00099" for -9.9°C
DA? Requests the meter to send the date
E.g. "022896" for 28th Feb. 96
9796
Page 50

TI? Requests the meter to send the time
E.g. "233001"
for 23:30 hr, 1 sec. as interval
"233002"
for 23:30 hr, 15 sec. as interval
"233003"
for 23:30 hr, 30 sec. as interval
"233004"
for 23:30 hr, 1 min. as interval
"233005"
for 23:30 hr, 5 min. as interval
"233006"
for 23:30 hr, 30 min. as interval
"233007"
for 23:30 hr, 60 min. as interval
"233008"
for 23:30 hr, 120 min. as interval
"233009"
for 23:30 hr, 180 min. as interval
BAR Requests the meter to send the RS232
baud rate
PRE Requests the meter to send the RS232
command prefix
Commands setting parameters:
/BR To set the RS232 baud rate. E.g.
send "/BR0" to set the meter to baud rate of
150
send "/BR1" to set the meter to baud rate of
300
send "/BR2" to set the meter to baud rate of
600
send "/BR3" to set the meter to baud rate of
1200
send "/BR4" to set the meter to baud rate of
2400
send "/BR5" to set the meter to baud rate of
4800
send "/BR6" to set the meter to baud rate of
9600
/PF To set the RS232 command prefix. E.g.
send "/PF05" to set the command prefix to
05.
For pH 302:
Commands not requiring an answer from
the pH meter:
PHR sets the range to pH
MVR sets the range to mV
CAL is equivalent to pressing the CAL key
CFM is equivalent to pressing the CFM key
PRT is equivalent to pressing the PRINT key
PGM is equivalent to pressing the PGM key
CLR is equivalent to pressing the CLEAR key
OFF is equivalent to pressing the OFF key
Commands requiring an answer:
pH? Causes the meter to send the pH value.
If the reading is out of range "Err 1" is
sent.
MV? Causes the meter to send the mV value.
If the reading is out of range "Err 2" is
sent.
TM? Causes the meter to send the tempera-
ture value. If the reading is out of range
"Err 3" is sent.
The meter will send "Err6" if in a different
measurement range.
FA? Requests the meter to send the calibra-
tion factor of pH. The order of data is
as follows:
1) Month, day and Year
(when the calibration was done)
E.g. "123195" for 31st of Dec. 95
2) Buffer used when the offset was done
E.g. "0701" for 7.01 pH
3) Offset in mV
E.g. "_00504" for 50.4 mV
"-00504" for 50.4 mV
4) Buffer used when slope was done
E.g. "0401" for 4.01 pH
5) Slope in mV
E.g. "000592" for 59.2 mV
6) Temperature
E.g. "_01199" for 119.9°C
"-00099" for -9.9°C
9998
Page 51

DA? Requests the meter to send the date
status (MMDD)
TI? Requests the meter to send the time
status (HHMM)
Commands setting parameters:
/BR To set the RS232 baud rate. E.g.
send "/BR0" to set the meter to baud rate of
150
send "/BR1" to set the meter to baud rate of
300
send "/BR2" to set the meter to baud rate of
600
send "/BR3" to set the meter to baud rate of
1200
send "/BR4" to set the meter to baud rate of
2400
send "/BR5" to set the meter to baud rate of
4800
send "/BR6" to set the meter to baud rate of
9600
/PF To set the RS232 command prefix.
E.g. send "/PF05" to set the command
prefix to 05.
For all models
Note: <ACK> will be sent by the meter if the
command received is accepted, other-
wise it will send <CAN>.
<ACK> equals to ASCII code 06 and
<CAN> equals to ASCII code 24.
These commands may be sent with either
capital or small letters. Invalid commands will
be ignored. The characters sent by the pH
meter are always capital letters.
ACCESSORIES
pH CALIBRATION SOLUTIONS
HI774P pH 4.01 & 7.01 Buffer Solution,
30mL each
HI7004M pH 4.01 Buffer Solution, 230 mL
HI7004L pH 4.01 Buffer Solution, 460 mL
HI7006M pH 6.86 Buffer Solution, 230 mL
HI7006L pH 6.86 Buffer Solution, 460 mL
HI777P pH 7.01 Buffer Sol. 2x30 mL
HI7007M pH 7.01 Buffer Solution, 230 mL
HI7007L pH 7.01 Buffer Solution, 460 mL
HI7009M pH 9.18 Buffer Solution, 230 mL
HI7009L pH 9.18 Buffer Solution, 460 mL
HI7710P pH 7.01 & 10.01 Buffer Solution,
30 mL each
HI7010M pH 10.01 Buffer Solution, 230 mL
HI7010L pH 10.01 Buffer Sol., 460 mL
pH CALIBRATION SOLUTIONS IN FDA
APPROVED BOTTLE
HI8004L pH 4.01 Buffer Solution, 460 mL
HI8006L pH 6.86 Buffer Solution, 460 mL
HI8007L pH 7.01 Buffer Solution, 460 mL
HI8009L pH 9.18 Buffer Solution, 460 mL
HI8010L pH 1 0.0 1 B uf fe r S ol ut io n, 460 mL
ELECTRODE STORAGE SOLUTIONS
HI70300M Storage Solution, 230 mL
HI70300L Storage Solution, 460 mL
ELECTRODE STORAGE SOLUTIONS IN
FDA APPROVED BOTTLE
HI80300M Storage Solution, 230 mL
HI80300L Storage Solution, 460 mL
ELECTRODE CLEANING SOLUTIONS
HI7061M General Cleaning Sol., 230 mL
101100
Page 52

HI7061L General Cleaning Sol., 460 mL
HI7073M Protein Cleaning Sol., 230 mL
HI7073L Protein Cleaning Sol., 460 mL
HI7074M Inorganic Cleaning Sol., 230 mL
HI7074L Inorganic Cleaning Sol., 460 mL
HI7077M Oil & Fat Cleaning Sol., 230 mL
HI7077L Oil & Fat Cleaning Sol.,460 mL
pH & ORP ELECTRODES
B = BNC CONNECTION PLUG + 1 m (3.3’) CABLE
S = SCREW-TYPE CONNECTOR
ELECTRODE CLEANING SOLUTIONS
IN FDA APPROVED BOTTLE
HI8061M General Cleaning Solution, 230 mL
HI8061L General Cleaning Solution, 460 mL
HI8073M Protein Cleaning Solution, 230 mL
HI8073L Protein Cleaning Solution, 230 mL
HI8077M Oil & Fat Cleaning Solution, 230mL
HI8077L Oil & Fat Cleaning Solution, 460 mL
REFILLING ELECTROLYTE SOLUTIONS
HI7071 3.5M KCl + AgCl Electrolyte,
4x50 mL, for single junction electrodes
HI7072 1M KNO3 Electrolyte, 4x50 mL
HI7082 3.5M KCl Electrolyte, 4x50 mL,
for double junction electrodes
REFILLING ELECTROLYTE SOLUTIONS
IN FDA APPROVED BOTTLE
HI8071 3.5M KCl + AgCl Electrolyte,
4x50 mL, for single junction electrodes
HI8072 1M KNO3 Electrolyte, 4x50 mL
HI8082 3.5M KCl Electrolyte, 4x50 mL,
for double junction electrodes
ORP PRETREATMENT SOLUTIONS
HI7091M Reducing Pretreat. Sol., 230 mL
HI7091L Reducing Pretreat. Sol., 460 mL
HI7092M Oxidizing Pretreat. Sol., 230 mL
HI7092L Oxidizing Pretreat. Sol., 460 mL
HI1043B / HI1040S
Glass-body, double junction, refillable, combination pH electrode. Use: strong acid/alkali.
12 mm
0.5"
HI 1043
"S" VERSION
9.5mm DIA
120 mm
4.7"
0.37"
HI1053B / HI1050S
Glass-body, triple ceramic, conic shape, refillable, co mbination pH electrode. Use: emulsions.
12 mm
0.5"
HI 1053
"S" VERSION
120 mm
4.7"
HI1083B
Glass-body, micro, Viscolene, nonrefillable,
combination pH electrode. Use: biotechnology,
micro titration.
HI 1083
12 mm
0.5"
5 mm
0.2"
120 mm
3 mm
0.12"
"
3.0 mm DIA
0.12"
HI1131B / HI1111S
Glass-body, single junction, refillable, combination pH electrode. Use: general purpose.
12 mm
0.5"
HI 1131
"S" VERSION
9.5mm DIA
120 mm
4.7"
0.37"
103102
Page 53

HI1330B / HI1310S
Glass-body, semimicro, single junction, refillable,
combination pH electrode. Use: laboratory.
HI 1330
"S" VERSION
120 mm
4.7"
5mm DIA
0.2"
5mm
0.2"
HI1331B / HI1311S
Glass-body, semimicro, single junction, refillable, combination pH electrode. Use: flasks.
HI 1331
"S" VERSION
8 mm
0.3"
7.5mm DIA
210 mm
8.25"
0.29"
HI1230B / HI1210S
Plastic-body (Ultem®), double junction, gel-filled,
combination pH electrode. Use: general purpose.
12 mm
0.5"
HI 1230
120 mm
"
"
4.7"
HI2031B / HI2020S
Glass-body, semimicro, conic, refillable, combination pH electrode. Use: semisolid products.
6 mm
0.25"
HI 2031
75 mm
"
"
2.95"
HI1332B / HI1312S
Plastic-body (Ultem®), double junction, refillable,
combination pH electrode. Use: general purpose.
12 mm
0.5"
HI 1332
"S" VERSION
120 mm
4.7"
FC100B
Plastic-body (Kynar®), double junction, refillable, combination pH electrode. Use: general
purpose for food industry.
12 mm
0.5"
FC 100
120 mm
4.7"
FC200B / FC200S
Plastic-body (Kynar®), single junction, conic,
Viscolene, refillable, combination pH electrode.
Use: meat & cheese.
6 mm
0.25"
FC 200
75 mm
2.95"
FC210B
Glass-body, double junction, conic, Viscolene,
combination pH electrode. Use: milk, yogurt.
12 mm
0.5"
FC 210
120 mm
4.7"
FC220B
Glass-body, single junction, refillable, combination pH electrode. Use: food & wine process-
ing.
12 mm
0.5"
FC 220
9.5mm DIA
120 mm
4.7"
0.37"
Ultem® is registered Trademark of "General Electrics Co."
Kynar® is registered Trademark of "Pennwalt Corp."
105104
Page 54

120 mm
4.7"
12 mm
0.5"
HI 4430
"S" VERSION
FC911B
Plastic-body (Kynar®), double junction, refillable with built-in amplifier, combination pH
electrode. Use: very high humidity.
12 mm
0.5"
FC 911
110 mm
4.3"
HI1413B / HI1410S
Glass-body, single junction, flat tip, Viscolene,
combination pH electrode. Use: surface mea-
surement.
12 mm
0.5"
HI 1413
110 mm
4.3"
Half-cell electrodes:
HI2110B
Glass-body, single half-cell pH electrode. Use:
general purpose.
12 mm
0.5"
HI 2110
9.5mm DIA
120 mm
0.37"
"
HI5311
Glass-body, Ag/AgCl reference half-cell electrode, double junction, refillable with 4mm plug
with 1m (3.3') cable. Use: general purpose with
wide temperature range.
12 mm
0.5"
HI5412
Glass-body, single Calomel reference half-cell
electrode, refillable with 4mm plug with 1m (3.3')
cable. Use: general purpose with constant temperature range.
12 mm
0.5"
HI 5412
120 mm
4.7"
ORP electrodes:
HI3131B / HI3111S
Glass-body, refillable, combination platinum
ORP electrode. Use: titration.
12 mm
0.5"
HI 3131
150 mm
"S" VERSION
5.9"
HI3230B / HI3210S
Plastic-body (Ultem®), gel-filled, combination
platinum ORP electrode. Use: general purpose.
12 mm
0.5"
HI 3230
120 mm
"S" VERSION
4.7"
HI4430B / HI4410S
Plastic-body (Ultem®), gel-filled, combination
gold ORP electrode. Use: general purpose.
HI 5311
120 mm
4.7"
Kynar® is registered Trademark of "Pennwalt Corp."
Ultem® is registered Trademark of "General Electrics Co."
107106
Page 55

EXTENSION CABLES FOR SCREWTYPE ELECTRODES ONLY (SCREW TO
BNC CONNECTOR)
HI7855/1 Extension cable 1m (3.3') long
HI7855/3 Extension cable 3m (9.9') long
HI7855/5 Extension cable 5m (16.5') long
HI7855/10 Extension cable 10m (33') long
HI7855/15 Extension cable 15m (49.5') long
HI 7855 SERIES CABLE CONNECTORS
CONNECTOR AND 3.0 mm (0.12") CABLE WITH BNC
CONNECT TO
SCREW TYPE
ELECTRODES
CONNECT TO THE
BNC SOCKET
OF THE METER
POWER UNITS
HI710005 115VAC-12VDC voltage adapter
HI710006 230VAC-12VDC voltage adapter
OTHER ACCESSORIES
ChecktempC Thermometer with penetration
probe (range -50.0 to 150.0°C)
HI76405 Electrode holder
HI7669/2W Temperature probe with 1 m (3.3')
screened cable
HI710032 Pack of 10 plain paper spare rolls
(for pH 302 only)
HI710033 Replacement ink cartridge (for
pH 302 only)
HI 92000 Windows® compatible application
software
HI 920010 9 to 25-pin PC connection cable
HI 920010/9 9 to 9-pin PC connection cable
MANpH300R1 Instruction manual
Windows® is registered Trademark of "Microsoft Co."
ELECTRODE APPLICATION
REFERENCE GUIDE
Application Electrodes
1. Aquarium HI1332B, HI1911B, HI1312S
2. Bath-water HI1910B, HI1130B, HI1110S
3. Beer HI1131B, HI1111S
4. Bread HI2031B, FC200B, HI 2020S, FC200S
5. Cheese FC200B, FC200S
6. Dairy products FC911B, FC100B
7. Dirty water HI1910B, HI1912B
8. Emulsions HI1053B, HI1050S
9. Environment HI1230B, HI1210S
10. Flasks HI1331B, HI1310S
11. Food industry general use FC911B, FC 100B
12 . Fruit FC 200B, FC220B, FC200S
13 . Fruit juices, organic FC210B
14. Galvanizing waste solution HI1130B, HI1912B, HI1110S
15. Heavy-duty applications HI1135B, HI 1115S
16 . High purity water H I1053B, HI1050S
17. Horticulture HI1053B, FC200B, HI1050S, FC200S
18. In-line applications HI 1134B, HI1135B, HI2114B, HI 2910B,
19. Laboratory general use HI1131B, HI 1230B, HI1332B, HI1330B
20. Leather HI1413B, HI1410S
21. Lemon juice FC100B
22. Meat FC200B, HI2031B, FC200S, HI2020S
23 . Micro plate sampling of less than HI1083B, HI1080S
100 mL
24 . Milk and Yogurt FC210B
25. Paints HI1053B, HI1050S
26. Paper HI 1413B, HI1410S
27. Photographic chemicals HI1230B, HI1210S
28 . Quality control HI1332B, HI 1312S
29. Sausages FC200B, HI 2031B, FC200S, HI2020S
30. Semisolid products HI 2031B, HI2020S
31. Skin HI1413B, HI1410S
32 . Soil samples HI1230B, HI1210S
33. Solvents HI1043B, HI 1040S
34. Strong acid HI1043B, HI1040S
35. Submersion application HI1130B, HI1110S
36. Surface measurements HI1413B, HI1410S
37. Swimming pool H 1130B, HI 2114B, HI2910B
38. Titrations with constant temperature HI 1131B, HI1111S
range
39 . Titrations with wide temperature HI1131B, HI1111S
range
40. Very high humidity FC911B, HI1912B, HI 1911B
41. Vials and test tube HI1330B, HI 1310S
42. Wine processing FC220B
HI1114S, HI1115S
HI1111S, HI1210S, HI 1312S, HI1310S
B = BNC connection plug
S = Screw-type connection plug
109108
Page 56

WARRANTY
All Hanna Instruments are warranted for two
years against defects in workmanship and
materials when used for their intended purpose
and maintained according to the instructions.
The probes and the electrodes are warranted for a period of six months.
CE DECLARATION OF CONFORMITY
DECLARATION OF CONFORMITY
Damages due to accident, misuse, tampering
or lack of prescribed maintenance are not
covered. This warranty is limited to repair or
replacement free of charge of the meter only,
whenever due to defect of manufacturing.
If service is required, contact the dealer from
whom you purchased the instrument. If under
warranty, report the model number, date of
purchase, serial number and the nature of the
failure. If the repair is not covered by the
warranty, you will be notified of the charge for
repair or replacement. If the instrument is to be
returned to Hanna Instruments, obtain a Return
Goods Authorization from the Customer Service Department first and then send it with
shipment cost prepaid. When shipping any
instrument, make sure it is properly packaged
for complete protection.
To validate your warranty, fill out and return the
enclosed warranty card within 14 days from the
date of purchase.
All rights are reserved. Reproduction in whole
or in part is prohibited without the written
permission of the copyright owner.
Hanna Instruments reserves the right to modify
the design, construction and appearance of its
products without advance notice.
We
Hanna Instruments Srl
V.le delle industrie 12
35010 Ronchi di Villafranca (PD)
ITALY
herewith certify that the bench pH meters
have been tested and found to be in compliance with the following regulations:
IEC 801-2 Electrostatic Discharge
IEC 801-3 RF Radiated
IEC 801-4 Fast Transient
EN 55022 Radiated, Class B
Date of Issue: 30-05-1996
Recommendations for Users
Before using these products, make sure that they are entirely suitable for the
environment in which they are used.
Operation of these instruments in residential area could cause unacceptable
interferences to radio and TV equipments, requiring the operator to take all necessary
steps to correct interferences.
The glass bulb at the end of the electrode is sensitive to electrostatic discharges.
Avoid touching this glass bulb at all times.
During operation, ESD wrist straps should be worn to avoid possible damage to the
electrode by electrostatic discharges.
Any variation introduced by the user to the supplied equipment may degrade the
instrument's EMC performance.
To avoid electrical shock, do not use these instruments when voltages at the
measurement surface exceed 24VAC or 60VDC.
To avoid damages or burns, do not perform any measurement in microwave ovens.
pH 300 pH 301 pH 302
D.Volpato - Engineering Manager
Hanna Instruments S.r.l.
On behalf of
111110
Page 57

PRINTED IN
ITALY
MANpH300R1
07/96
112
http://www.hannainst.com
 Loading...