

Page 1
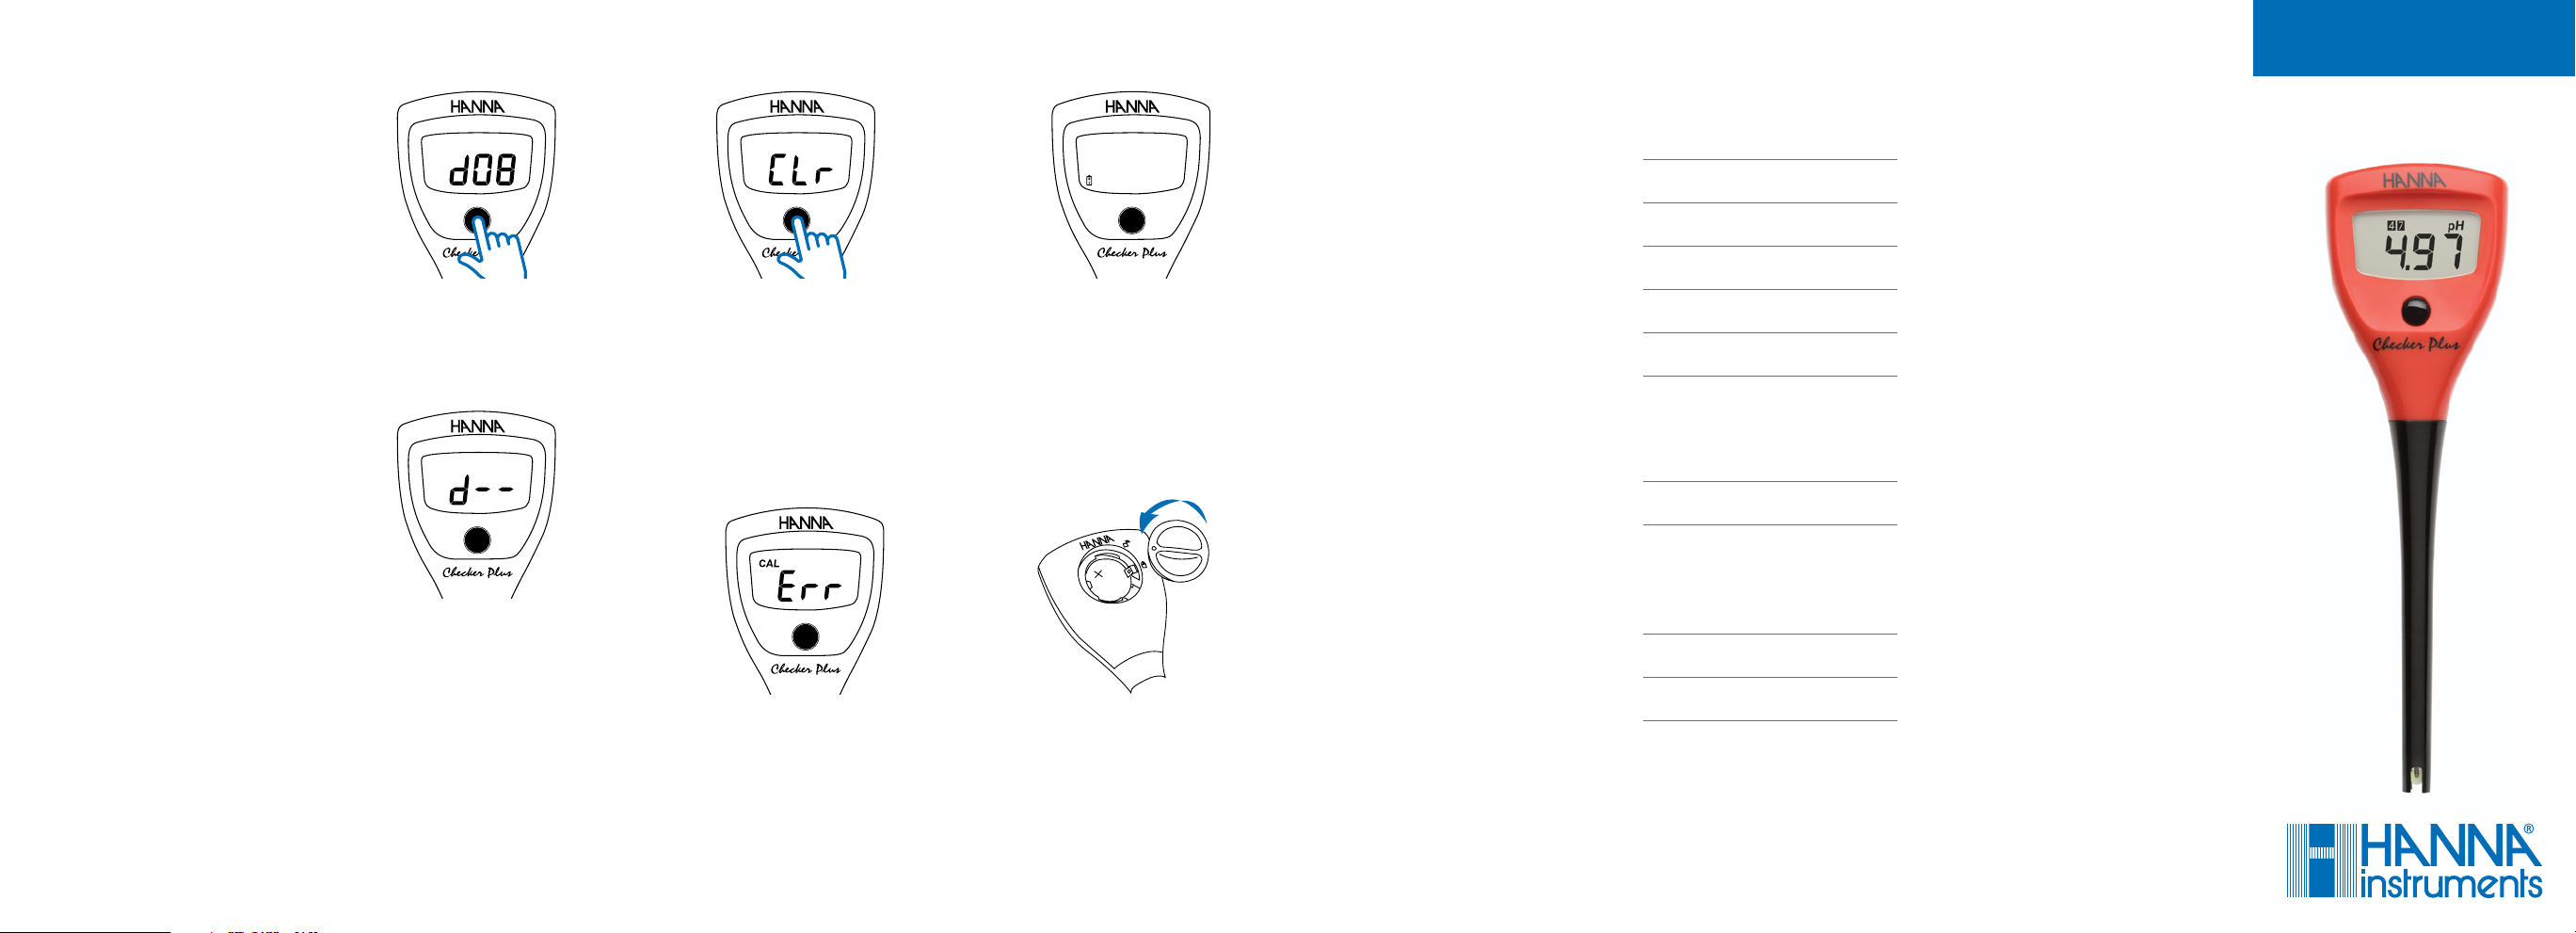
Auto-o
Clear Calibration
Battery Indicator
Care and Maintenance
Accessories
Warranty
INSTRUCTION MANUAL
From measurement mode, press
and hold the ON/OFF button. The
meter will cycle through “OFF,” “CAL,”
then current auto-o setting.
The default setting is 8 minutes
(“d08”). Press ON/OFF button
to change. “d60” is auto-o
after 60 minutes, and “d--”
disables the auto-o feature.
Place meter in calibration mode.
Press and hold ON/OFF until “CLr”
is displayed. The meter will now be
at default calibration. No tags will
be shown in measurement mode
until calibration is performed.
“Err” Message
In calibration mode, if the meter
displays an “Err” message when in
the correct fresh buer solution then
the probe should be cleaned. Place
the probe in the HI700601 cleaning
solution for 15 minutes. Rinse with
puried water and place in storage
solution for 1 hour before calibrating.
If the “Err” message persists then the
HI1271 probe should be replaced.
The Checker®Plus features a low
battery indicator. When the battery
is running low, the tag will appear
on screen. When the battery has
been depleted, the tag will blink.
Battery Replacement
To change the CR2032 Li-ion battery,
turn the battery cover located on the
back of the meter counterclockwise
to unlock. Remove cover and
replace with + side facing up.
Note: Ba tteries s hould only b e replaced in a s afe area
using th e batter y type spe cified in t his instru ction
manual. O ld batte ries shoul d be dispose d in accordan ce
with local regulations.
To obtain the highest accuracy
for measurements it is impor tant
to follow these tips:
• Calibration is only as good as the
buffer being used. The pH buffer
values change over time once the
sachets are opened. Fresh buffer
should be used for each calibration.
• The probe should be rinsed
with purified water each time
before placing in buffer or sample
to be tested.
• When the meter is not in use it is
important to add several drops of
storage solution to the protective
cap to keep the probe hydrated. If
storage solution is not available,
pH 4 or pH 7 buffer can be used.
• For improved accuracy it is
recommended to calibrate a
minimum of t wo points. It is
important to use buffers that
bracket the expected value of the
sample to be tested. For example,
if the expected value is pH 8, the
Checker®Plus should be calibrated
using pH 7 and pH 10 buffers.
• It is important to calibrate and
measure samples at the same
temperature. A dramatic change
in temperature between buffer
solutions and samples to be tested
will give inaccurate readings.
pH Buer Solution
Code Description
HI70004P
HI70007P
HI70010P
HI 7740 0P
HI770710 P
pH 4.01 buf fer solut ion,
20 mL sac hets (25)
pH 7.01 buffer s olution,
20 mL sac hets (25)
pH 10.01 buf fer solut ion,
20 mL sac hets (25)
pH 4.01 & 7.01 buffe r solution ,
20 mL sac hets (10 pcs ., 5 ea.)
pH 10.01 & 7.01 buffe r solution ,
20 mL sac hets (10 pcs ., 5 ea.)
Electrode Cleaning Solution
Code Description
HI700601P
gener al purpose c leaning
solut ion, 20 mL sac hets (25)
Electrode Storage Solution
Code Description
HI70300L
HI70300M
electrode storage solution,
500 mL bo ttle
electrode storage solution,
230 mL bo ttle
Check er®Plus is gua ranteed fo r a period of
one yea r for meter and s ix months for p robe
afte r date of purch ase agains t defects i n
work manship and m aterials wh en used for
their in tended pur pose and mai ntained
accord ing to instr uctions . This warra nty
is limit ed to repair or r eplacement f ree of
charg e. Damage due t o accidents , misuse,
tamp ering or lack o f prescrib ed maintena nce
is not cov ered. If ser vice is requ ired,
conta ct your loc al Hanna oce. I f under
warr anty, repor t the model nu mber, date
of purc hase, seria l number and t he nature
of the pr oblem. If th e repair is not co vered
by the wa rranty, you w ill be notie d of the
charg es incurre d. If the inst rument is to b e
retur ned to Hanna In strumen ts, rst ob tain
a Retur n Goods Auth orizatio n number fro m
the Technic al Servic e departm ent and then
send it w ith shippi ng costs pre paid. When
shippi ng any instr ument, make s ure it is
properly packed for complete protection.
Recommendations
for Users
Befor e using Hanna pr oducts , make sure that
they ar e entirely su itable for yo ur specic
applic ation and fo r the environ ment in which
they ar e used. Oper ation of the se instru ments
may cau se unaccept able inter ferences to
other e lectroni c equipment , thus requi ring the
opera tor to take all n ecessar y steps to cor rect
such in terferen ces. Any var iation intr oduced
by the us er to the suppl ied equipme nt may
degra de the inst rument’s E MC perfor mance.
To avoid damag es or burns, d o not put the
instr ument in micr owave oven. F or yours and
the ins trument s afety do no t use or store
the ins trument in h azardous en vironmen ts.
All righ ts are rese rved. Rep roducti on in whole or
in part i s prohibit ed withou t the writ ten consent
of the cop yright own er, Hanna Instr uments Inc .,
Woonso cket, Rhod e Island, 0289 5, USA.
HI98100 I NSTMAN 1.0 0 6/15
HI98100
Checker®Plus
Page 2
Thank You Operation
Thank you for choosing a Hanna
Instruments product. Please read
this instruction manual carefully
before using the instrument.
For additional information, visit
www.hannainst.com or e-mail
us at [email protected].
Specications
Range 0.00 to 14.00 pH
Resolution 0.01 pH
Accur acy
(@25° C/ 77°F )
Calibration au tomatic, o ne or two-p oint
Electrode HI1271 (included)
Battery Type CR2032 L i-ion
Battery Life
Auto-off
Environment
Dimensions
Weight 50 g (1.8 oz .)
±0.2 pH
approx imately 100 0 hours
of continuous use
8 minutes, 60 minutes,
or can be d isabled
0 to 50°C ( 32 to 122°F);
RH 95% max
50 x 174 x 21 mm (2 x 6.8 x 0.9 “)
(excluding probe)
Meter Overview
Preparation:
The pH electrode is shipped dry.
Before using the Checker®Plus,
remove the protec tive cap and
condition the electrode by soaking
the tip (bottom 4 cm (1.5”)) in pH 7.01
buer solution for several hours. Then
follow the calibration procedure.
• Do not be alarmed if white cr ystals
appear around the cap. This is
normal with pH electrodes and they
dissolve when rinsed with water.
• Connect the electrode to the meter.
• Turn the Checker ®Plus on by
pressing ON/OFF button.
• Remove the protective cap and
immerse the tip of the electrode
in the sample to be tested.
• Stir gently and wait for a
stable reading.
NEVER IMMERSE THE ELEC TRODE
OVER THE MAXIMUM IMMERSION
LEVEL. THE CONNECTOR MUST
ALWAYS BE CLEAN AND DRY.
• After use, rinse the electrode with
water and store it with a few drops
of HI70300 storage solution in the
protective cap.
• Replace protective cap af ter
each use.
DO NOT USE DISTILLED OR
DEIONIZED WATER FOR STORAGE
PURPOSES.
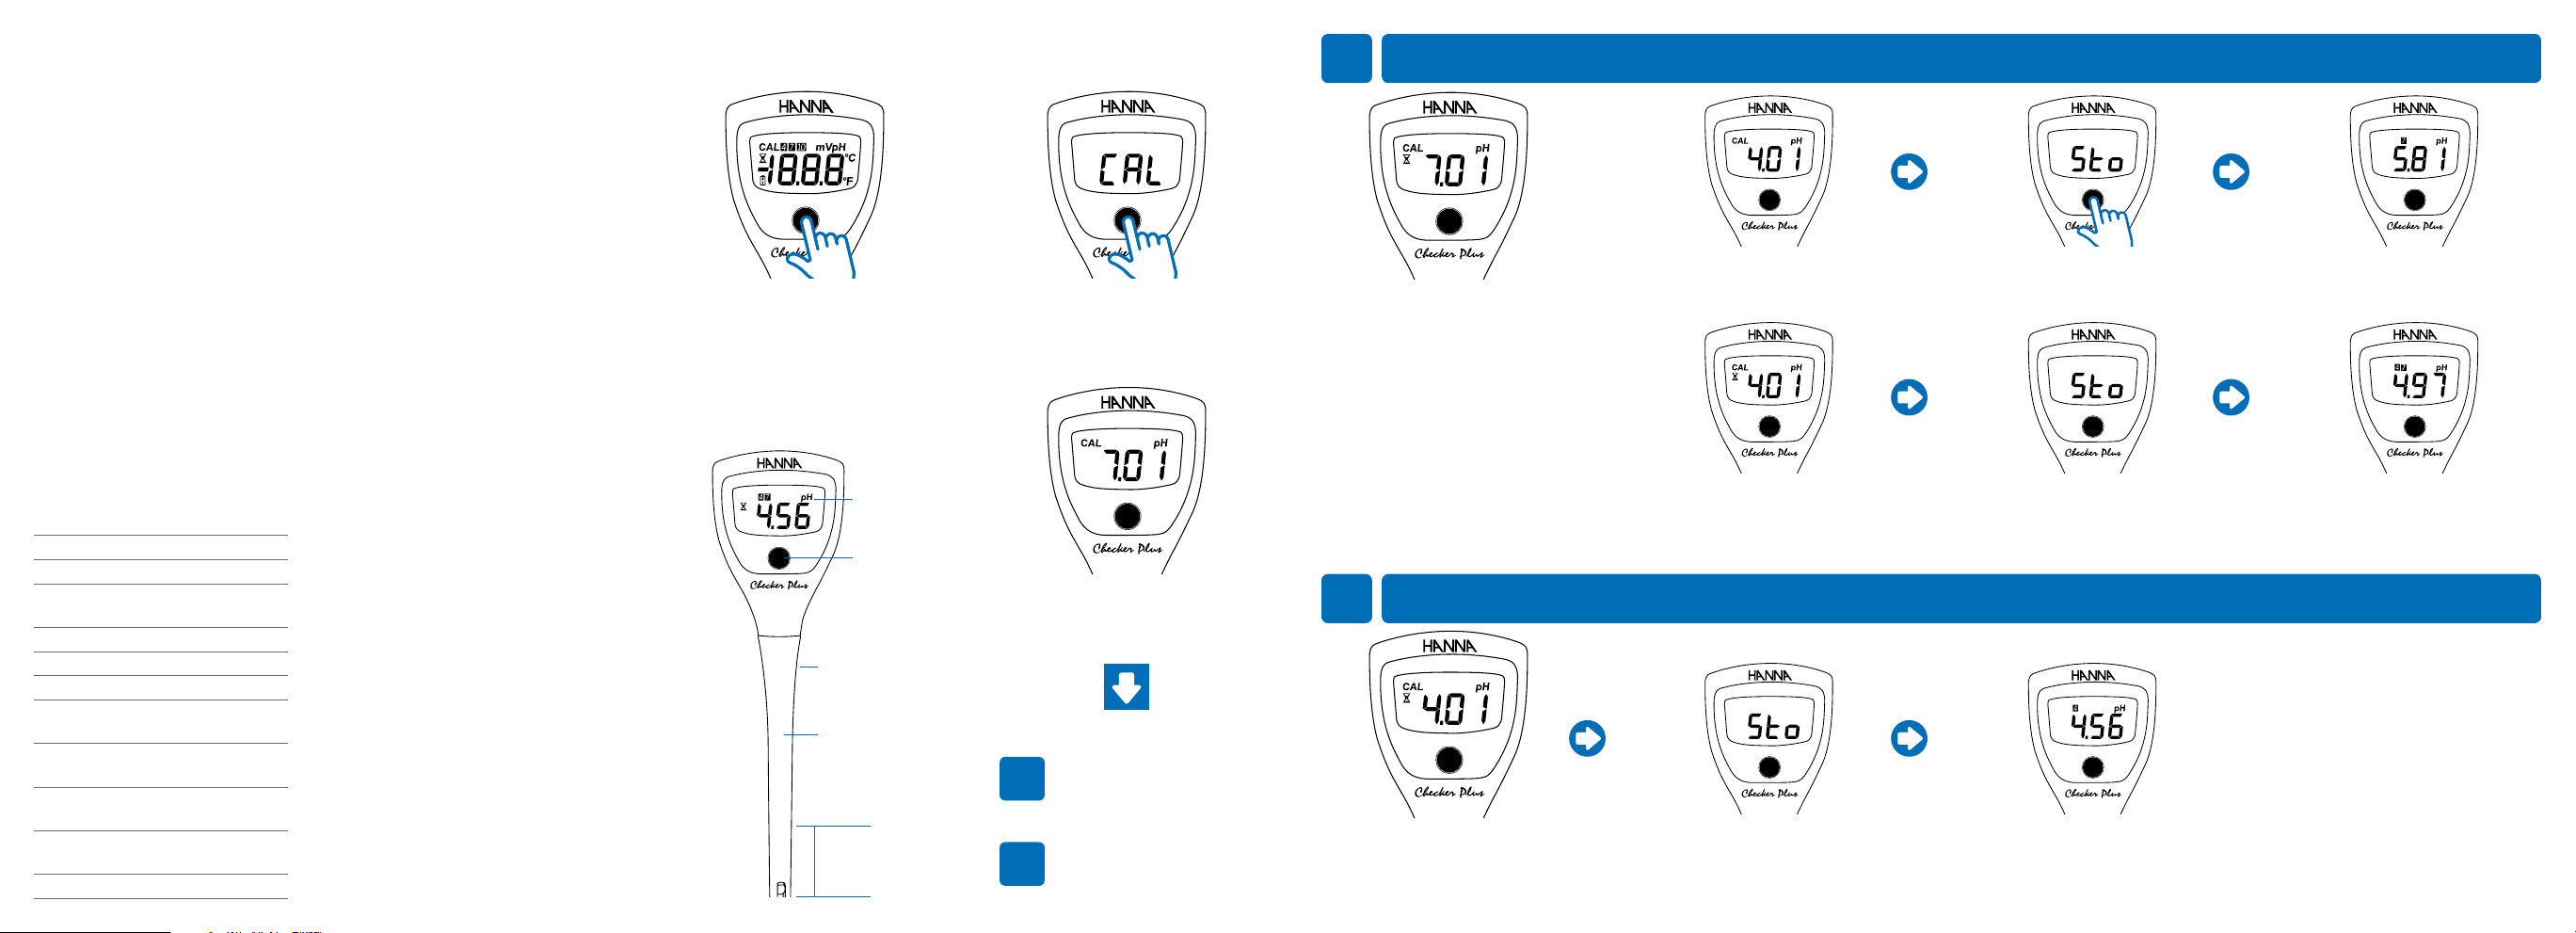
Press the ON/OFF button to turn the
meter on. All tags will be displayed.
The meter will go into measurement
mode: current reading and
calibrated buers are displayed.
Liquid
Cry stal
Display
ON/OFF
Button
Maximum
Immersion
Level
pH Probe
Recommended
Immersion
Level 4 cm ( 1.5”)
Meter Calibration
From measurement mode, press
and hold the ON/OFF button
until “CAL” is displayed.
When “7.01” blinks on the display,
place the tip of the probe into a
pH 4, 7, or 10 buer solution.
For one or t wo-point
calibration using pH 7
A
buer go to procedure A
For one-point calibration
using pH 4 or pH 10 buer
B
go to procedure B
One or Two-Point Calibration with pH 7
A
If pH 7 buer solution is used as the
rst point the buer is recognized
with the blinking stability indicator.
When the reading is stable, the
stability indicator will disappear
and pH 7 will be calibrated. If pH 7
is the only calibration point, nish
one-point procedure at right.
If using pH 4 or pH 10 as a second point,
continue two-point procedure at right.
One-Point Calibration with pH 4 or pH 10
B
If pH 4 or 10 buer solution is used
as the rst point the value of the
buer is recognized and displayed
with the blinking stability indicator.
One-Point
pH 4 will th en blink on the disp lay.
Two-Poi n t
Use pH 4 or 10 to p erform a two-poin t
calibr ation. The value is auto matically
recogn ized and display ed with the
blinking stability indicator.
When the reading is stabl e, the stabili ty
indica tor will disapp ear. “Sto” will be
displayed when the calibr ation is saved.
Press t he button to e xit and save
calibr ation. “Sto” will then be di splayed.
When the reading is stabl e, the stabili ty
indica tor will disapp ear. “Sto” will be
displayed when the calibr ation is saved.
Meter will exit to m easurement mode and
the calibration tag will be displayed.
Meter will exit to m easurement mode
and the c alibration t ag will be display ed.
Meter will exit to m easurement mode and
the calibration tags will be displayed.
 Loading...