

Page 1
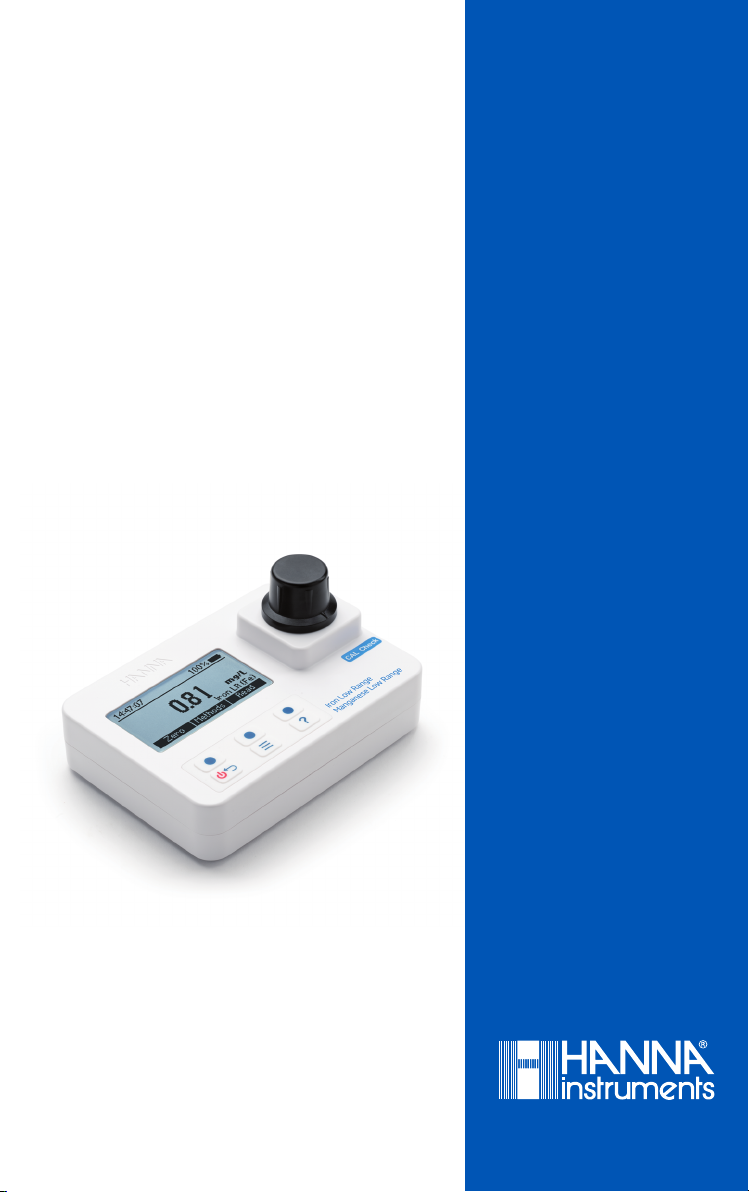
HI97742
Iron Low Range
& Manganese Low Range
Photometer
INSTRUCTION MANUAL
Page 2

Dear
Customer,
Thank you for choosing a Hanna Instruments product.
Please read this instruction manual carefully before using this instrument.
This manual will provide you with the necessary information for correct
use of this instrument, as well as a precise idea of its versatility.
If you need additional technical information, do not hesitate to e‑mail
us at [email protected] or view our worldwide contact list at
www.hannainst.com.
All rights are reserved. Reproduction in whole or in part is prohibited without the written consent
of the copyright owner, Hanna Instruments Inc., Woonsocket, Rhode Island, 02895, USA.
Page 3

TABLE OF CONTENTS
1. PRELIMINARY EXAMINATION .......................................................................... 4
2. SAFETY MEASURES ........................................................................................ 5
3. ABBREVIATIONS ........................................................................................... 5
4. SPECIFICATIONS ............................................................................................ 6
5. DESCRIPTION ................................................................................................ 7
5.1. GENERAL DESCRIPTION & INTENDED USE .............................................. 7
5.2. FUNCTIONAL DESCRIPTION ................................................................... 8
5.3. PRECISION & ACCURACY ....................................................................... 9
5.4. PRINCIPLE OF OPERATION .................................................................... 9
5.5. OPTICAL SYSTEM ................................................................................10
6. GENERAL OPERATIONS .................................................................................11
6.1. METER VALIDATION: CAL CHECK & CALIBRATION ...................................11
6.2. CHEMICAL FORMULA & UNIT CONVERSION .......................................... 13
6.3. GLP ...................................................................................................13
6.4. LOGGING DATA & LOG RECALL ............................................................. 13
6.5. GENERAL SETUP ................................................................................ 14
6.6. REAGENTS & ACCESSORIES .................................................................17
6.7. CONTEXTUAL HELP ............................................................................. 17
6.8. BATTERY MANAGEMENT .....................................................................18
7. PHOTOMETER ..............................................................................................19
7.1. METHOD SELECTION ..........................................................................19
7.2. COLLECTING & MEASURING SAMPLES AND REAGENTS ...........................19
7.3. CYLINDER & CUVETTE PREPARATION ....................................................20
8. METHOD PROCEDURE .................................................................................. 23
8.1. IRON LOW RANGE .............................................................................. 23
8.2. MANGANESE LOW RANGE ................................................................... 26
9. WARNING & ERROR DESCRIPTIONS...............................................................30
10. BATTERY REPLACEMENT ............................................................................. 32
11. ACCESSORIES ............................................................................................33
11.1. REAGENT SETS.................................................................................33
11.2. OTHER ACCESSORIES ....................................................................... 33
CERTIFICATION ................................................................................................. 34
RECOMMENDATIONS FOR USERS .......................................................................34
WARRANTY ...................................................................................................... 34
TABLE OF CONTENTS
3
Page 4

PRELIMINARY EXAMINATION
1. PRELIMINARY EXAMINATION
Remove the instrument and accessories from the packaging and examine it carefully.
For further assistance, please contact your local Hanna Instruments Office or email us
at [email protected].
Each HI97742C is delivered in a rugged carrying case and is supplied with:
• Sample cuvette (2 pcs.)
• Sample cuvette cap (2 pcs.)
• Plastic stopper (2 pcs.)
• A ZERO - CAL Check Cuvette A
• HI97742B - CAL Check Cuvette B for Iron Low Range
• HI97748B - CAL Check Cuvette B for Manganese Low Range
• Cloth for wiping cuvettes
• Scissors
• 1.5V AA Alkaline batteries
• CAL Check standard certificate
• Instrument quality certificate
• Instruction manual
Each HI97742 is delivered in a cardboard box and is supplied with:
• Sample cuvette (2 pcs.)
• Sample cuvette cap (2 pcs.)
• Plastic stopper (2 pcs.)
• 1.5V AA Alkaline batteries
• Instrument quality certificate
• Instruction manual
Note: Save all packing material until you are sure that the instrument works
correctly. Any damaged or defective item must be returned in its original packing
material with the supplied accessories.
4
Page 5

2. SAFETY MEASURES
• The chemicals contained in the reagent kits may be hazardous if
improperly handled.
• Read the Safety Data Sheets (SDS) before performing tests.
• Safety equipment: Wear suitable eye protection and clothing when
required, and follow instructions carefully.
• Reagent spills: If a reagent spill occurs, wipe up immediately and rinse
with plenty of water. If reagent contacts skin, rinse the affected area
thoroughly with water. Avoid breathing released vapors.
• Waste disposal: For proper disposal of reagent kits and reacted samples,
contact a licensed waste disposal provider.
SAFETY MEASURES
3. ABBREVIATIONS
µg/L micrograms per liter (ppb)
mg/L milligrams per liter (ppm)
mL milliliter
°C degree Celsius
°F degree Fahrenheit
EPA US Environmental Protection Agency
GLP Good Laboratory Practice
HDPE High Density Polyethylene
LED Light Emitting Diode
LR Low Range
NIST National Institute of Standards and Technology
ABBREVIATIONS
5
Page 6

SPECIFICATIONS
4. SPECIFICATIONS
Range 0.00 to 1.60 mg/L (as Fe)
Iron LR
Manganese
LR
Measurement
System
Additional
Specifications
Resolution 0.01 mg/L
Accuracy ±0.01 mg/L ±8% of reading at 25 °C
Method Adaptation of the TPTZ Method
Range 0 to 300 µg/L (as Mn)
Resolution 1 µg/L
Accuracy ±10 µg/L ±3% of reading at 25 °C
Method
Light source Light Emitting Diode
Bandpass filter 575 nm
Bandpass filter
bandwidth
Bandpass filter
wavelength accuracy
Light detector Silicon photocell
Cuvette type Round 24.6 mm diameter (22 mm inside)
Auto logging 50 readings
Display 128 x 64 pixel B/W LCD with backlight
Auto-off
Battery type 1.5 V AA Alkaline (3 pcs.)
Battery life > 800 measurements (without backlight)
Environment
Dimensions 142.5 x 102.5 x 50.5 mm (5.6 x 4.0 x 2.0")
Weight
(with batteries)
Case ingress
protection rating
Adaptation of the 1-(2-Pyridylazo)-2-Naphthol
PAN Method
8 nm
±1.0 nm
After 15 minutes of inactivity
(30 minutes before a READ measurement)
0 to 50 °C (32 to 122 °F);
0 to 100% RH, non-serviceable
380 g (13.4 oz.)
IP67, floating case
6
Page 7

5. DESCRIPTION
5.1. GENERAL DESCRIPTION & INTENDED USE
The HI97742 is an auto-diagnostic portable photometer that benefits from Hanna’s
years of experience as a manufacturer of analytical instruments. It has an advanced
optical system that uses a Light Emitting Diode (LED) and a narrow band interference
filter that allows for accurate and repeatable readings.
The optical system is sealed from outside dust, dirt and water. The meter uses an
exclusive positive-locking system to ensure that the cuvettes are placed into the holder
in the same position every time.
With the CAL Check™ functionality, users are able to validate the performance of the
instrument at any time and apply a user calibration (if necessary). Hanna Instruments
CAL Check cuvettes are made with NIST traceable standards.
The built-in tutorial mode guides users step-by-step through the measurement
process. It includes all steps required for sample preparation, the required reagents
and quantities.
The HI97742 meter measures the iron content in water samples from 0.00 to 1.60
mg/L (ppm) and manganese content in water samples in the 0 to 300 µg/L (ppb).
The method for iron is an adaptation of the TPTZ Method. The method for manganese
is an adaptation of the 1-(2-Pyridylazo)-2-Naphthol PAN Method.
The HI97742 photometer is a compact and versatile meter suitable for field or bench
measurements, featuring a:
• Sophisticated optical system
• Meter validation using certified CAL Check cuvettes
• Tutorial mode guides the user step-by-step
• Auto logging
• Waterproof IP67, floating case
• GLP features
DESCRIPTION
7
Page 8
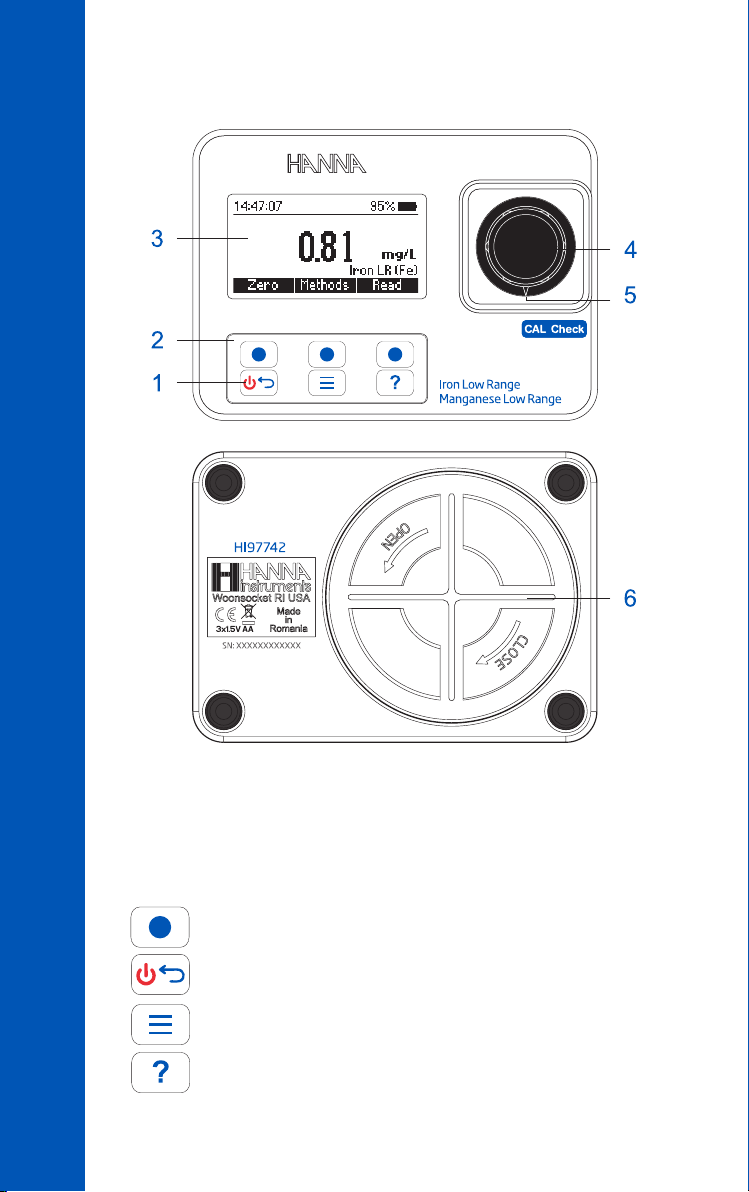
5.2. FUNCTIONAL DESCRIPTION
DESCRIPTION
1. ON/OFF power button 3. Liquid Crystal Display (LCD) 5. Indexing mark
2. Keypad 4. Cuvette holder 6. Battery cover
Keypad Description
The keypad contains 3 direct keys and 3 functional keys with the following functions:
Press the functional key to perform the function displayed above it on the LCD.
Press and hold to power off/on. Press briefly to return to the previous screen.
Press to access the menu screen.
Press to display the context-sensitive help menu.
8
Page 9
5.3. PRECISION & ACCURACY
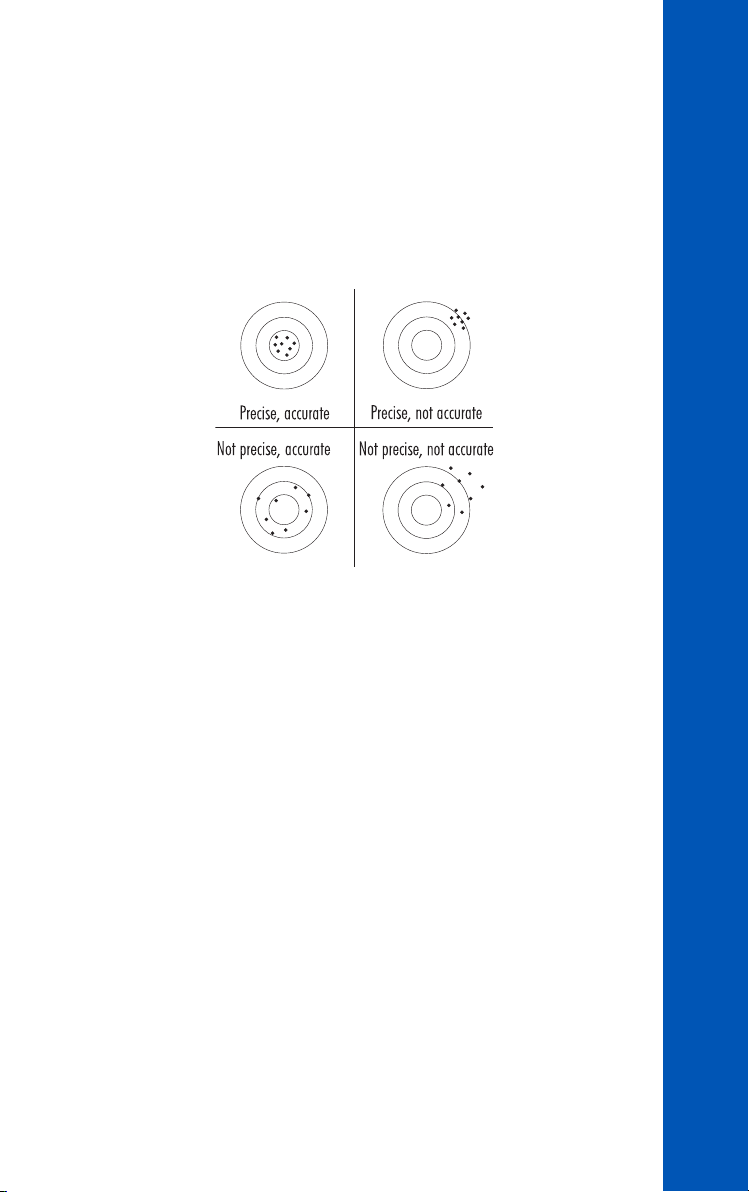
Precision is how closely repeated measurements are to one another. Precision is usually
expressed as standard deviation (SD).
Accuracy is defined as the closeness of a test result to the true value and is method
specific.
Although good precision suggests good accuracy, precise results can be inaccurate. The
figure explains these definitions.
5.4. PRINCIPLE OF OPERATION
Absorption of light is a typical phenomenon of interaction between electromagnetic
radiation and matter. When a light beam crosses a substance, some of the radiation
may be absorbed by atoms, molecules or crystal lattices. Photometric chemical analysis
is based on specific chemical reactions between a sample and reagent to produce a
light-absorbing compound.
If pure absorption occurs, the fraction of light absorbed depends both on the optical
path length through the matter and on the physical-chemical characteristics of the
substance according to the Lambert-Beer Law. If all other factors are constant, the
concentration "c" can be calculated form the absorbance of the substance.
Lambert-Beer Law:
= el c d
-log I/I
o
or
A = el c d
= intensity of incident light beam
I
o
I = intensity of light beam after absorption
el = molar extinction coefficient at wavelength l
c = molar concentration of the substance
d = optical path through the substance
DESCRIPTION
9
Page 10
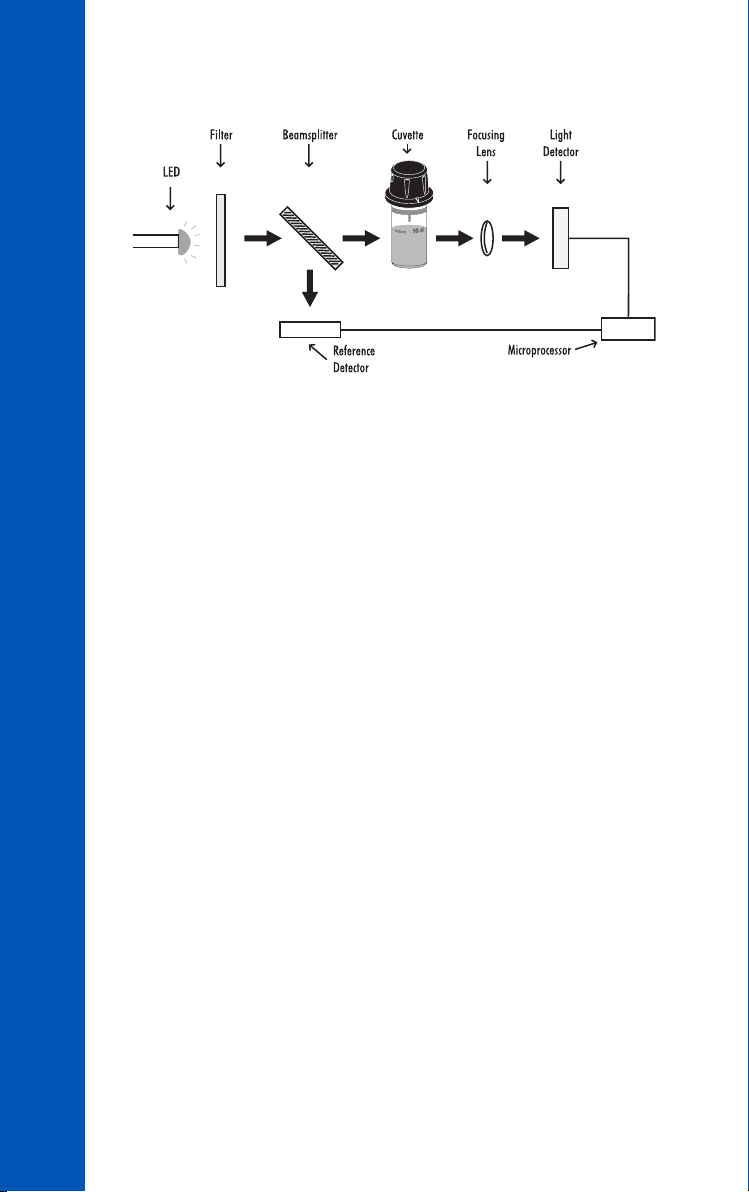
5.5. OPTICAL SYSTEM
DESCRIPTION
The internal reference system (reference detector) of the HI97742 photometer
compensates for any drifts due to power fluctuations or ambient temperature changes,
providing a stable source of light for your blank (zero) measurement and sample
measurement.
LED light sources offer superior performance compared to tungsten lamps. LEDs have
a much higher luminous efficiency, providing more light while using less power. They
also produce little heat, which could otherwise affect electronic stability. LEDs are
available in a wide array of wavelengths, whereas tungsten lamps have poor blue/
violet light output.
Improved optical filters ensure greater wavelength accuracy and allow a brighter,
stronger signal to be received. The end result is higher measurement stability and less
wavelength error.
A focusing lens collects all of the light that exits the cuvette, eliminating errors from
cuvette imperfections and scratches, eliminating the need to index the cuvette.
Instrument Block Diagram
10
Page 11
6. GENERAL OPERATIONS
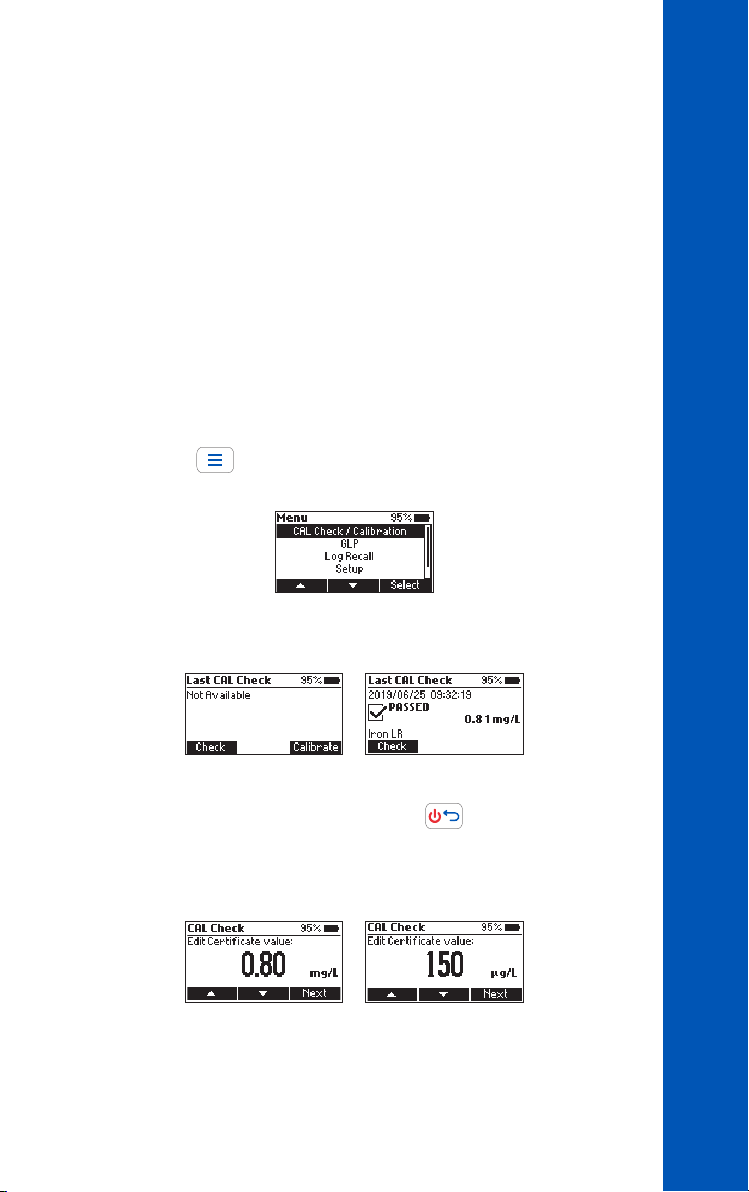
6.1. METER VALIDATION: CAL CHECK & CALIBRATION
Validation of the HI97742 involves verifying the concentration of the certified CAL Check
standards. The CAL Check screen guides the user step-by-step through the validation
process and user calibration (if necessary).
WARNING: Do not use any solutions or standards other than the Hanna
Instruments
please perform these at room temperature, 18 to 25 °C (64.5 to 77.0 °F).
Note: CAL Check Standards will not read the specified value in measurement
mode. Protect the CAL Check cuvettes from direct sunlight by keeping them in
the original packing. Store between 5 and 30
To perform a CAL Check:
1. Press the
®
CAL Check Standards. For accurate validation and calibration results,
°
C (41 to 86 °F), do not freeze.
key to enter menu. Use the functional keys to select
CAL Check / Calibration and press Select.
The “Not Available“ message or the date, time and status of the last CAL Check
will be displayed on the screen.
GENERAL OPERATIONS
Note: CAL Check & Calibration is for the selected method.
2. Press Check to start a new CAL Check. Press the
the validation process.
3. Use the functional keys to enter the certificate value of the calibration standard
found on the CAL Check Standard Certificate. Press Next to continue.
Note: This value will be saved in the instrument for future validation. If a new set
of calibration standards is obtained please update the certificate value.
key at any time to abort
11
Page 12
GENERAL OPERATIONS
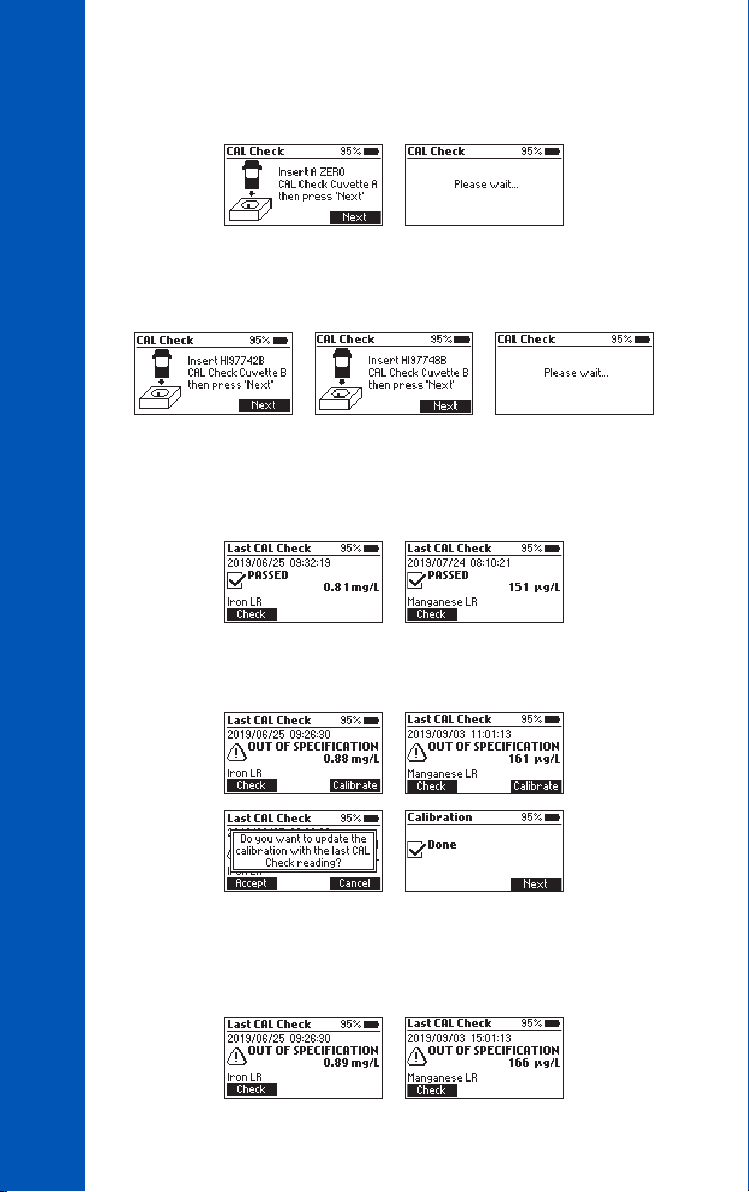
4. Insert the A ZERO CAL Check Cuvette A then press Next to continue. The “Please
wait...“ message will be displayed during the measurement.
5. Insert the CAL Check Cuvette B for the selected method (HI97742B for Iron LR or
HI97748B for Manganese LR) then press Next to continue. The “Please wait...“
message will be displayed during the measurement.
6. When the CAL Check is complete the display will show one of the following
messages and the value obtained during the measurement:
• “PASSED“: The measured value is within the accuracy specification, no user
calibration is required.
• “OUT OF SPECIFICATION“ and Calibrate is available: The measured value
is near the expected value. To update the user calibration press Calibrate. Press
Accept to confirm or Cancel to return to the previous screen.
12
• “OUT OF SPECIFICATION“: A user calibration is not allowed, the measured
value is outside of the tolerance window. Check the certified value, expiration date
and clean the outside of the cuvette. Repeat the CAL Check procedure. If this error
continues contact your nearest Hanna Instruments Customer Service Center.
Page 13
6.2. CHEMICAL FORMULA & UNIT CONVERSION
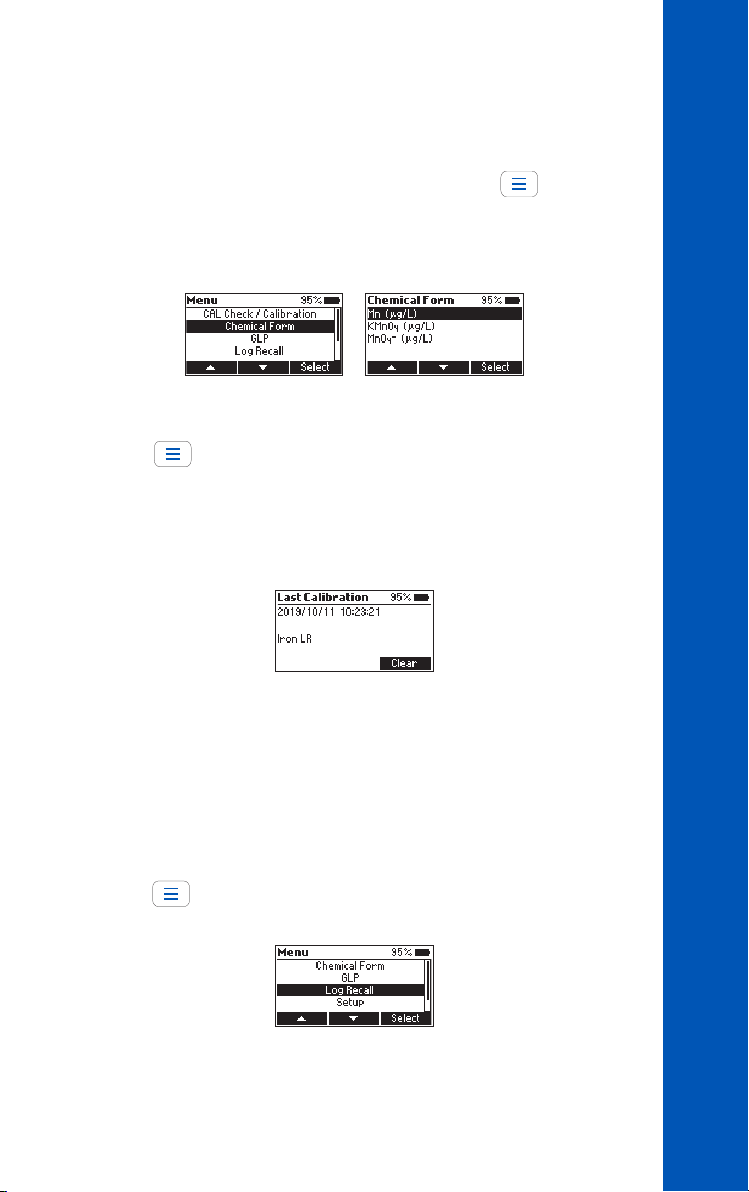
Chemical formula and unit conversion factors are pre-programmed into the instrument
and are method specific. In order to view the displayed result in the desired chemical
formula, for the manganese LR method, enter menu by pressing
functional keys to select Chemical Form. Press Select to change the displayed chemical
formula. Use the functional keys to highlight the desired chemical formula and press
Select. The selected formula will be saved when the instrument is powered off.
6.3. GLP
Press the
press Select. Good Laboratory Practice (GLP) shows the date and time of the last user
calibration (if available) or factory calibration. To erase the last user calibration and to
clear the CAL Check press Clear and follow the prompts. Press Yes to erase and return
to the factory calibration data or No to exit the clear procedure.
key to enter the menu. Use the functional keys to select GLP and
and use the
GENERAL OPERATIONS
6.4. LOGGING DATA & LOG RECALL
The instrument features a data autolog function to help users keep track of all
measurements. Every time a measurement is made the data is automatically saved.
The data log can hold 50 individual measurements. When the data log is full (50 data
points) the meter will rewrite the oldest data point.
Viewing and deleting the data is possible using the Log Recall menu.
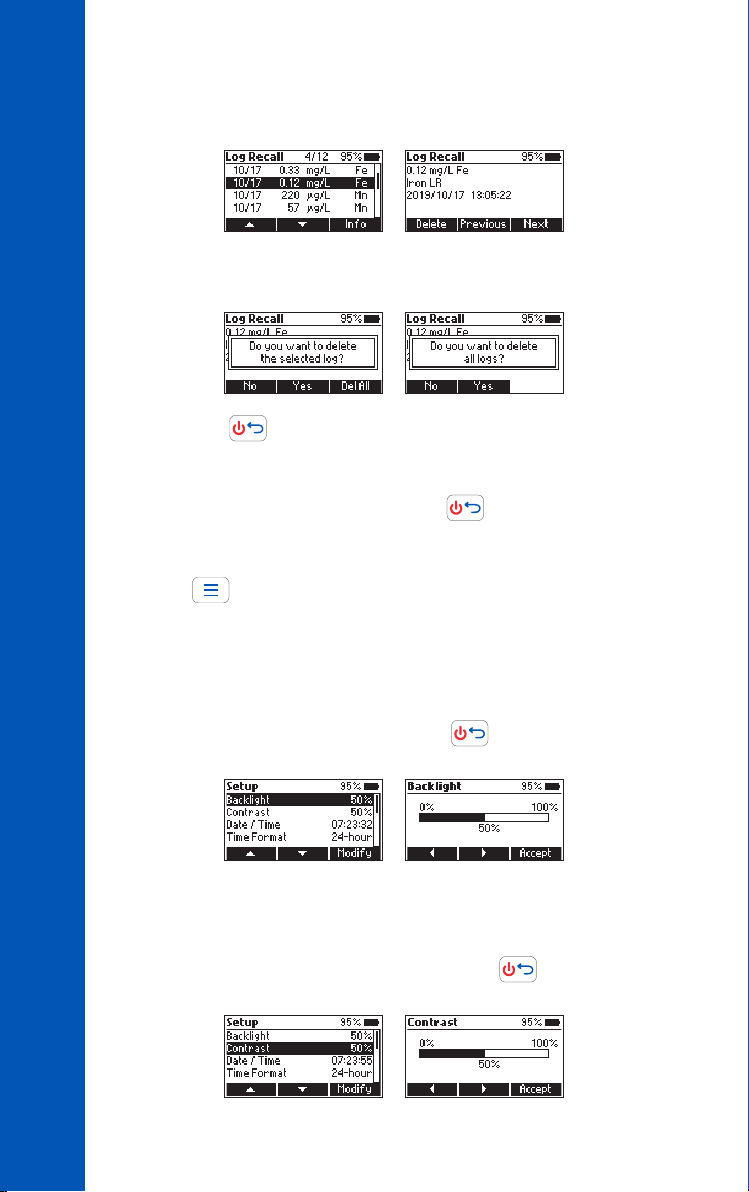
Press the
and press Select.
key to enter the menu. Use the functional keys to select Log Recall
13
Page 14
GENERAL OPERATIONS
Use the functional keys to highlight a log and press Info to view additional information
about the log. From this screen Next and Previous can be used to view other logs.
Press Delete to erase logged data. After pressing Delete a prompt on display is asking
for confirmation.
Press No or the key to return to the previous screen.
Press Yes to delete selected log.
Press Del All to erase all the logged data. If Del All is pressed follow the prompt to
confirm. Press Yes to delete all logged data, No or the
6.5. GENERAL SETUP
Press the
press Select. Use the functional keys to highlight desired option.
Backlight
Option: 0 to 100 %
Press Modify to access the backlight intensity. Use the functional keys to increase or
decrease the value. Press Accept to confirm or the
menu without saving the new value.
key to enter the menu. Use the functional keys to select Setup and
key to return to the log recall.
key to return to the Setup
14
Contrast
Option: 0 to 100 %
Press Modify to change the display’s contrast. Use the functional keys to increase or
decrease the value. Press Accept to confirm the value or the
Setup menu without saving the new value.
key to return to the
Page 15
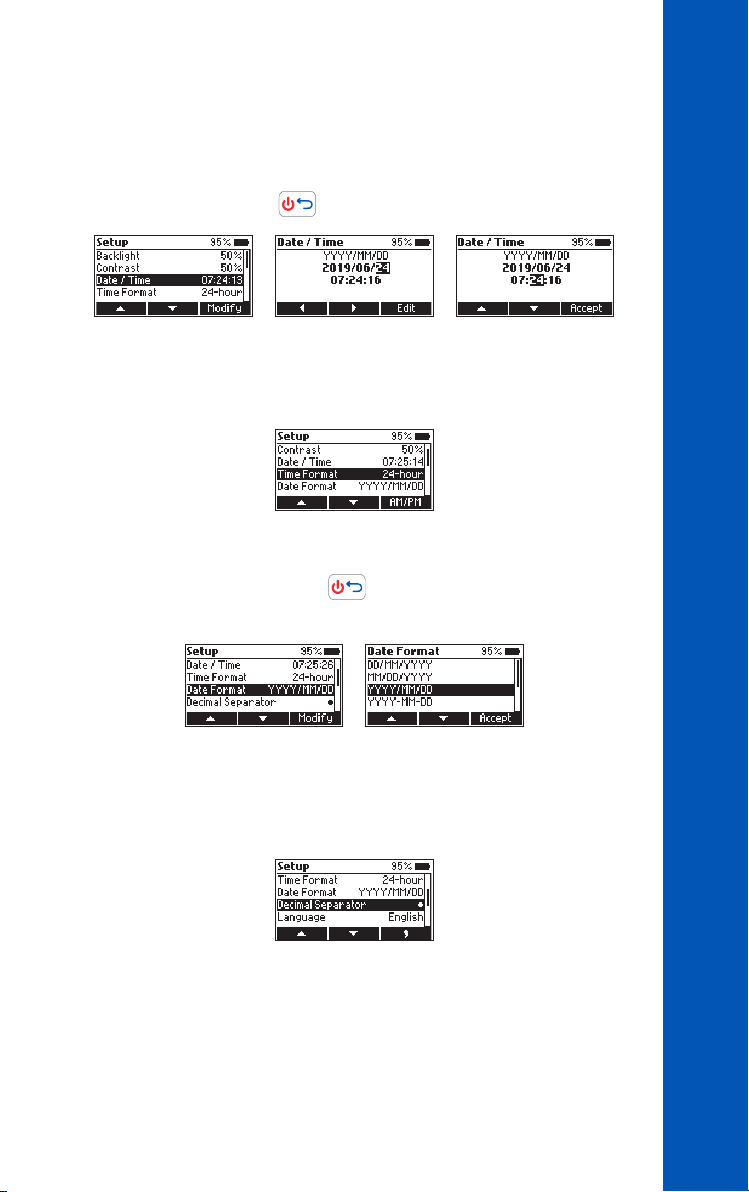
Date & Time
Press Modify to change the date and time. Press the functional keys to highlight the
value to be modified (year, month, day, hour, minute or second). Press Edit to modify
the highlighted value. Use the functional keys to change the value.
Press Accept to confirm or the
Time Format
Option: AM/PM or 24-hour
Press the functional key to select the desired time format.
Date Format
Press Modify to change the date format. Use the functional keys to select the desired
format. Press Accept to confirm or the
saving the new format.
key to return to the previous screen.
key to return to the Setup menu without
GENERAL OPERATIONS
Decimal Separator
Option: Comma ( , ) or Period ( . )
Press the functional key to select the desired decimal separator. The decimal separator
is used on the measurement screen.
15
Page 16
GENERAL OPERATIONS
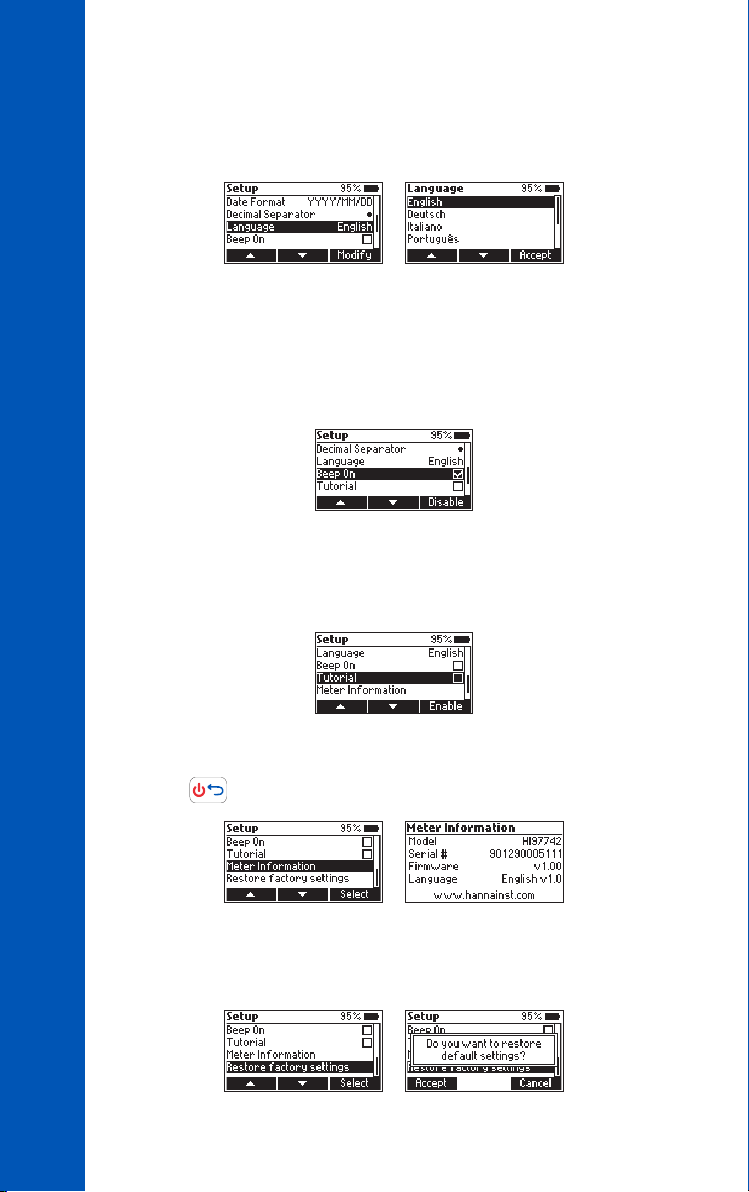
Language
Press Modify to change the language. Use the functional keys to select the desired
language. Press Accept to choose one of the languages installed.
Beeper
Option: Enable or Disable
When enabled, a short beep is heard every time a key is pressed. A long beep alert
sounds when the pressed key is not active or an error is detected. Press the functional
key to enable or disable the beeper.
Tutorial
Option: Enable or Disable
When enabled, the user will be guided step-by-step through the measurement
procedure.
16
Meter Information
Press Select to view the model, serial number, firmware version and selected language.
Press the
Restore Factory Settings
Press Select to reset to factory settings. Press Accept to confirm or Cancel to exit
without restoring the factory settings.
key to return to the Setup menu.
Page 17
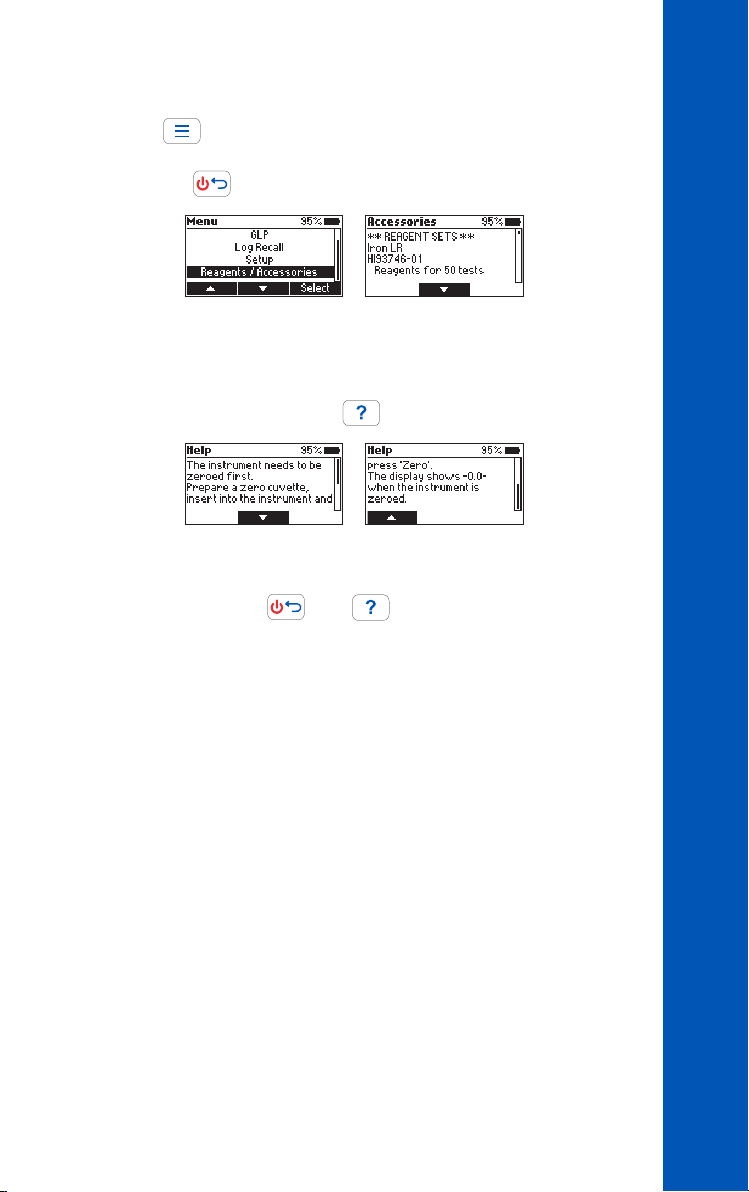
6.6. REAGENTS & ACCESSORIES
Press the
Reagents / Accessories and press Select to access a list of reagents and accessories.
To exit press the
6.7. CONTEXTUAL HELP
The HI97742 offers an interactive contextual help mode that assists the user at any
time. To access the help screen press the
The instrument will display additional information related to the current screen. To read
all the available information, scroll the text using the functional keys.
To exit help mode press the
previous screen.
key to enter the menu. Use the functional keys to select
key.
key.
or the key and the meter will return to the
GENERAL OPERATIONS
17
Page 18
GENERAL OPERATIONS
6.8. BATTERY MANAGEMENT
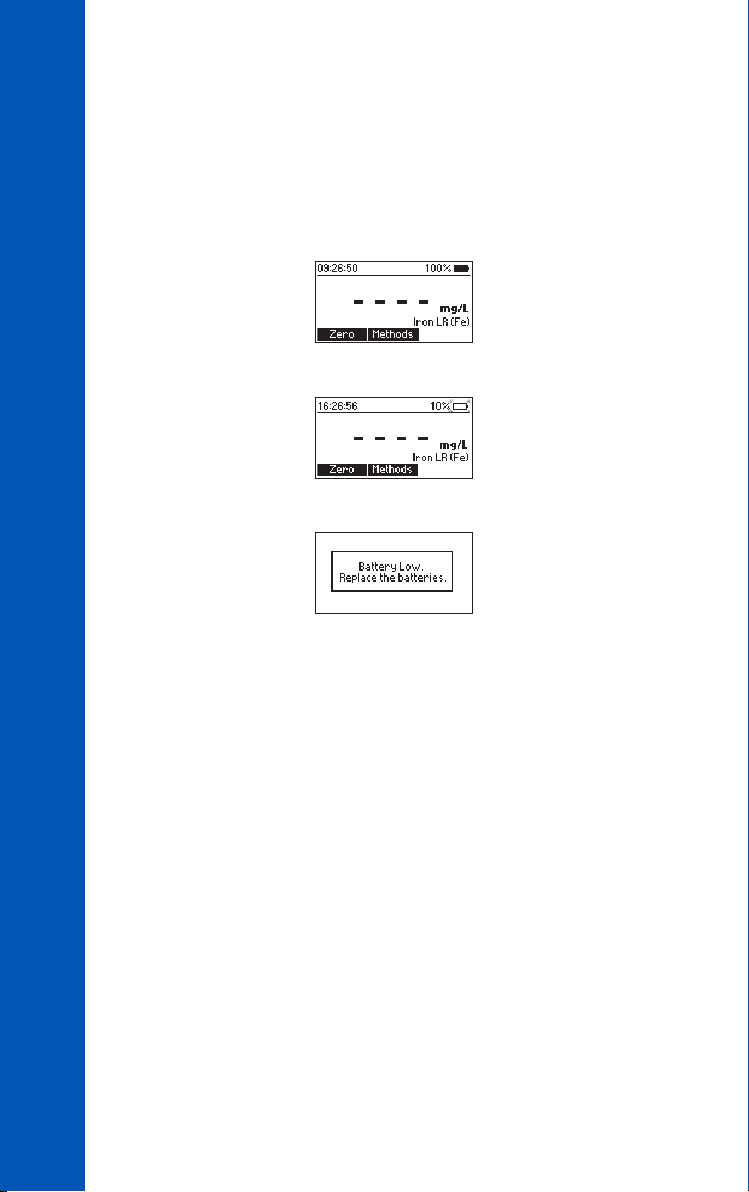
The meter will perform an auto-diagnostic test when it is powered on. During this test,
the Hanna Instruments
successful, the meter is ready for use. The battery icon on the LCD will indicate the
battery status:
• battery full
• battery below 10%, replace the batteries soon
• battery is low, replace the batteries with new ones
To conserve battery, the meter will turn off automatically after 15 minutes of
inactivity. If a zero reading has been done but not a read, auto-off time is increased
to 30 minutes.
®
logo will appear on the LCD. If the auto-diagnostic test was
18
Page 19
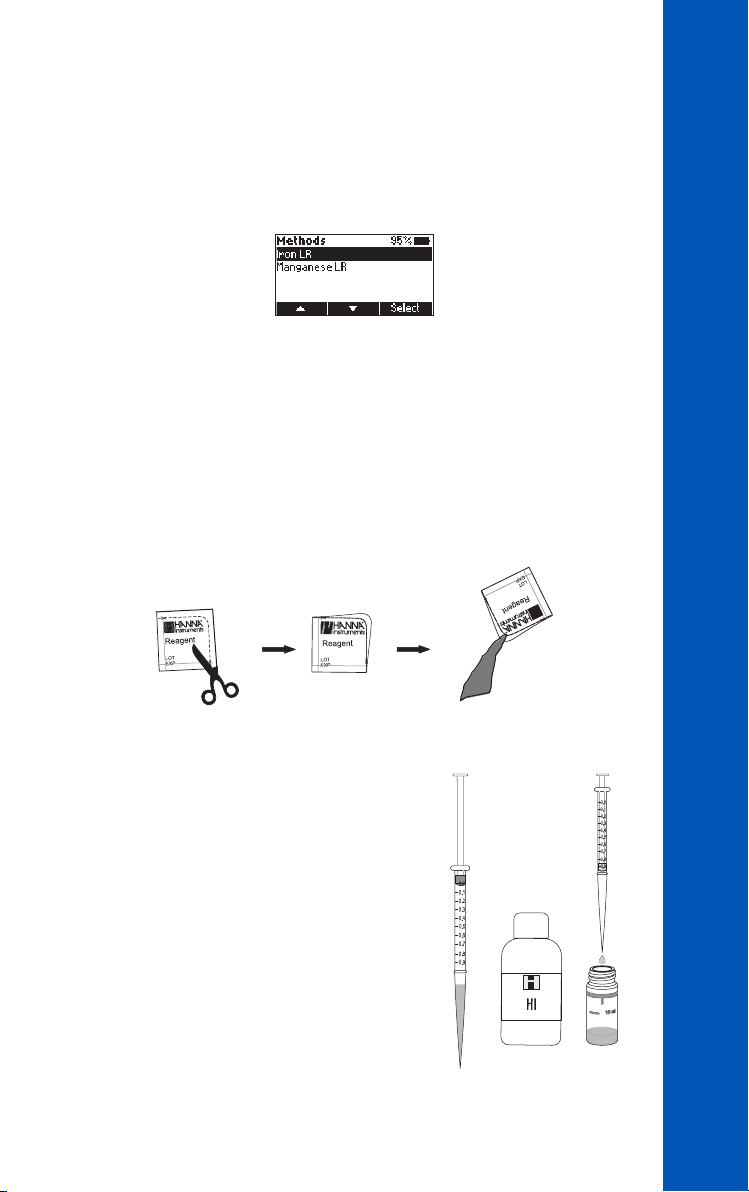
7. PHOTOMETER
7.1. METHOD SELECTION
Press Methods when in measurement mode to access the list of methods. Use the
functional keys to highlight the desired method then press Select.
The selected method will be saved when the instrument is powered off.
7.2. COLLECTING & MEASURING SAMPLES AND REAGENTS
Proper Use of Powder Packet
1. Use scissors to open the powder packet.
2. Push the edges of the packet to form a spout.
3. Pour out the content of the packet.
PHOTOMETER
Proper Use of Syringe
1. Push the plunger completely into the syringe and
insert the tip into the solution.
2. Pull the plunger up until the lower edge of
the seal is exactly on the mark for the desired
volume.
3. Take out the syringe and clean the outside of the
syringe tip, be sure that no drops are hanging on
the tip of the syringe. Then, keeping the syringe
in vertical position above the cuvette, push
the plunger down into the syringe, the desired
volume has been delivered into the cuvette.
19
Page 20
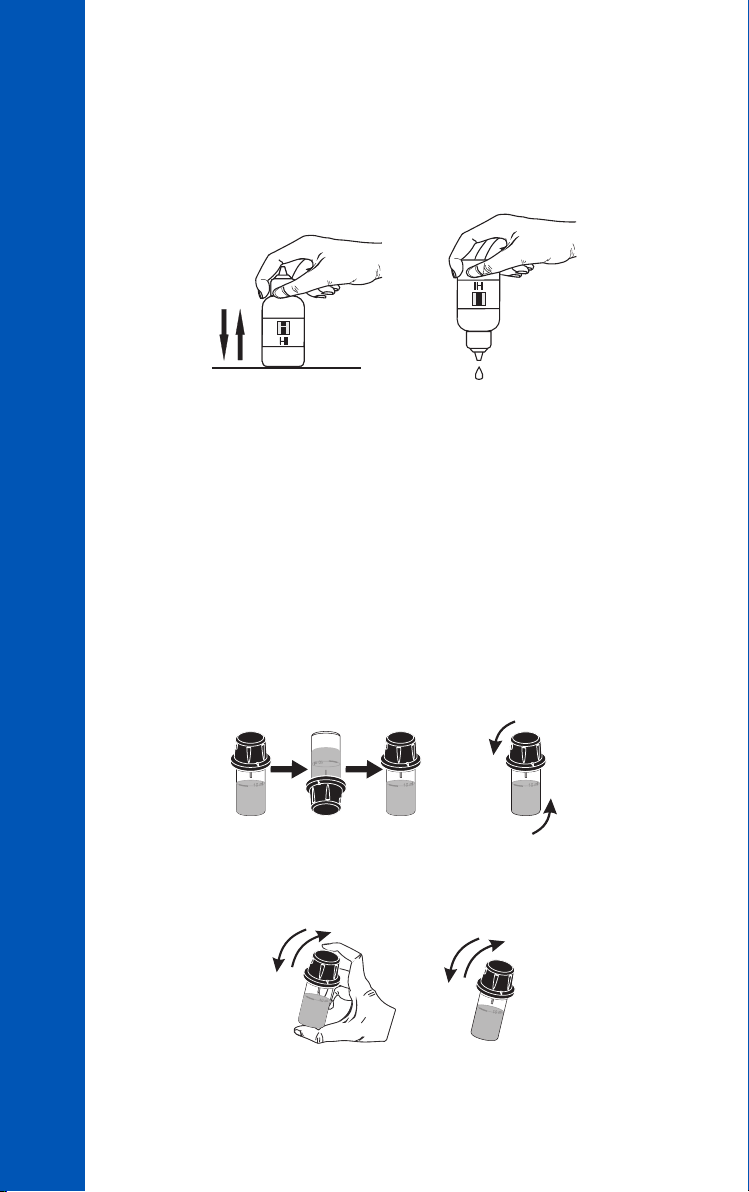
Proper Use of Dropper Bottle
1. Tap the dropper on the table several times and wipe the outside of the tip with
2. Always keep the dropper bottle in a vertical position while dosing the reagent.
PHOTOMETER
7.3. CYLINDER & CUVETTE PREPARATION
Proper mixing is very important for reproducibility of the measurements. The proper
mixing technique is listed in the method procedure.
(a) Invert the cuvette a couple of times or for a specified time: hold the cuvette in the
a cloth.
vertical position. Turn the cuvette upside-down and wait for all of the solution to
flow to the cap end, then return the cuvette to the upright vertical position and
wait for all of the solution to flow to the cuvette bottom. This is one inversion.
The correct speed for this mixing technique is 10-15 complete inversions in 30
seconds. This mixing technique is indicated with “invert to mix” and the following
icons:
20
(b) The mixing method is indicated with “shake gently“ using one of the following
icons:
Page 21
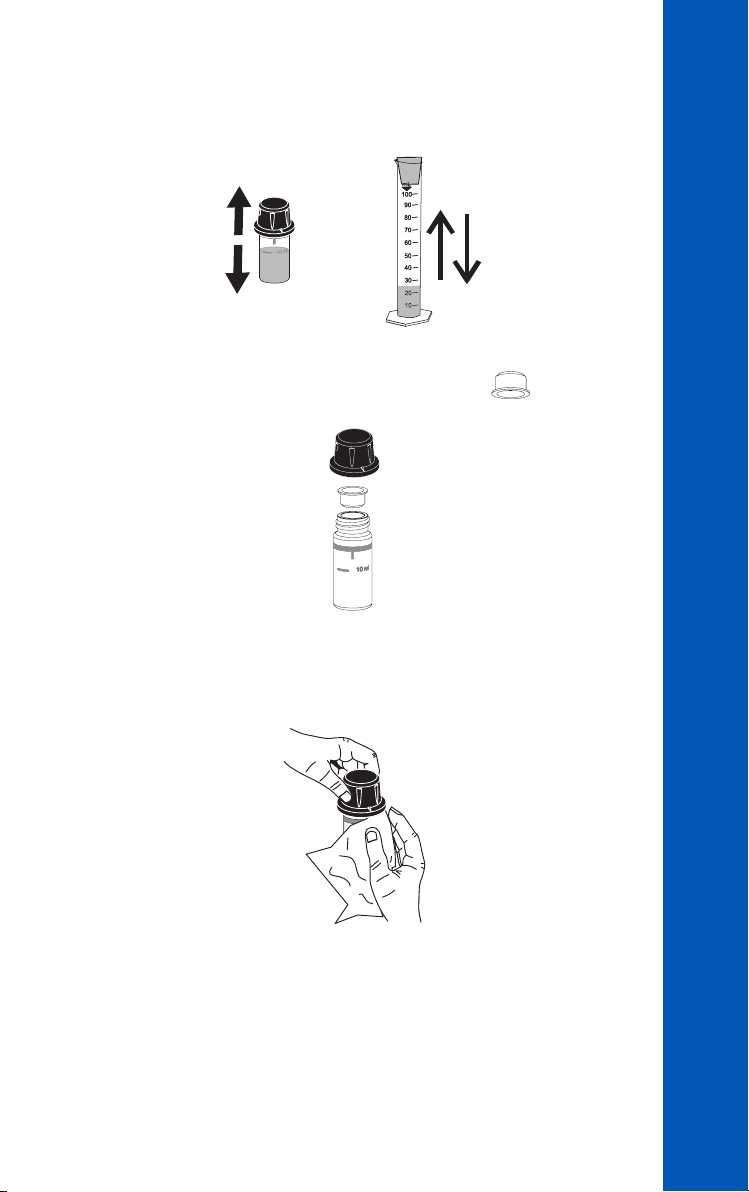
(c) The mixing method is indicated with “shake vigorously“ using one of the
following icons:
In order to avoid reagent leaking and to obtain more accurate measurements,
close the cuvette first with the supplied HDPE plastic stopper and then the
black cap.
Whenever the cuvette is placed into the measurement holder, it must be dry outside
and free of fingerprints, oil or dirt. Wipe it thoroughly with HI731318 microfiber
cleaning cloth or a lint-free wipe prior to insertion.
PHOTOMETER
Shaking the cuvette can generate bubbles in the sample, causing higher readings. To
obtain accurate measurements, remove such bubbles by swirling or by gently tapping
the cuvette.
21
Page 22

Do not let the reacted sample stand too long after reagent has been added. For best
accuracy, respect the timings described in the method.
It is possible to take multiple readings in a row, but it is recommended to take a new
zero reading for each sample and to use the same cuvette for zeroing and measurement
when possible.
PHOTOMETER
Discard the sample immediately after the reading has been taken, or the glass might
become permanently stained.
All the reaction times reported in this manual are at 25 °C (77 °F). In general, the
reaction time should be increased for temperatures lower than 20 °C (68 °F), and
decreased for temperatures higher than 25 °C (77 °F).
22
Page 23
8. METHOD PROCEDURE
8.1. IRON LOW RANGE
REQUIRED REAGENTS
Code Description Quantity
HI93746-0 Iron LR Reagent 2 packets
REAGENT SETS
HI93746-01 Iron LR Reagent - 50 tests
HI93746-03 Iron LR Reagent - 150 tests
For other accessories see ACCESSORIES section.
MEASUREMENT PROCEDURE
• Select the Iron LR method using the procedure described in the METHOD SELECTION
section.
Note: If tutorial mode is disabled, follow the measurement procedure below. If the
tutorial mode is enabled, press Measure and follow the messages on the screen.
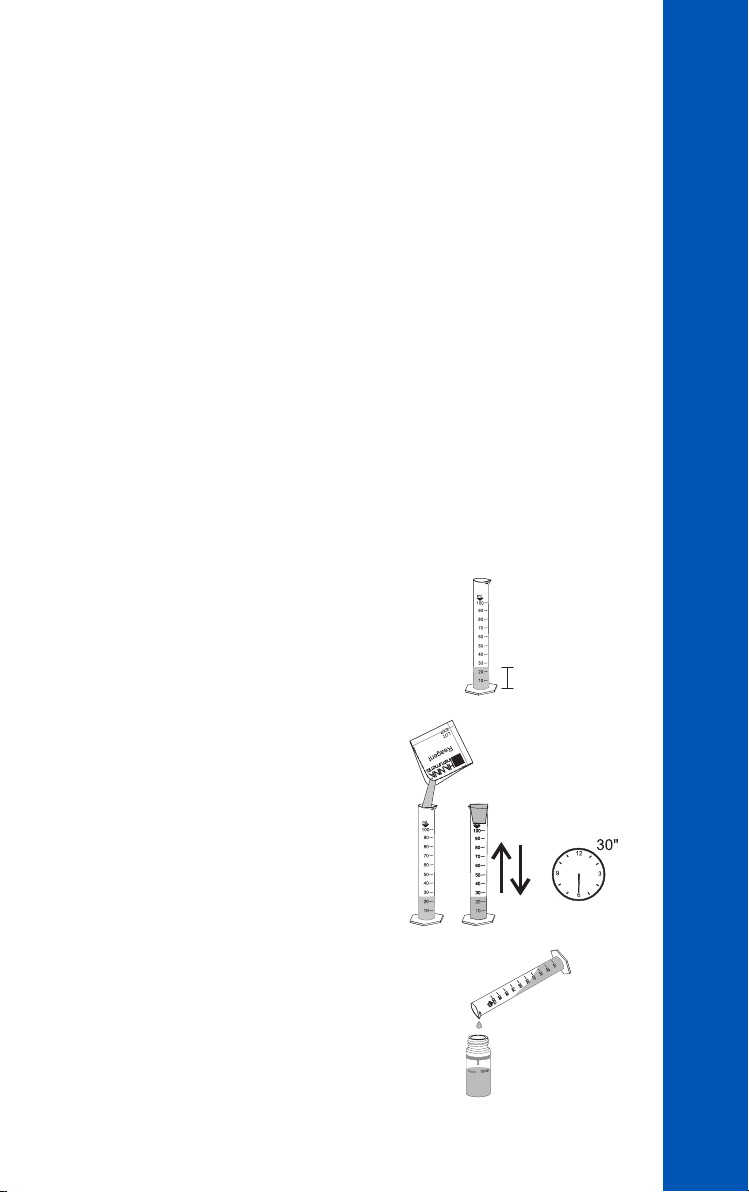
# 1
• Fill one graduated mixing cylinder with
deionized water up to the 25 mL mark.
25 mL
METHOD PROCEDURE
• Add one packet of HI93746-0 Iron
LR Reagent, close the cylinder with a
rubber stopper and shake vigorously for
30 seconds. This is the blank.
• Fill a cuvette with 10 mL of the blank (up
to the mark). Replace the plastic stopper
and the cap.
10 mL
23
Page 24
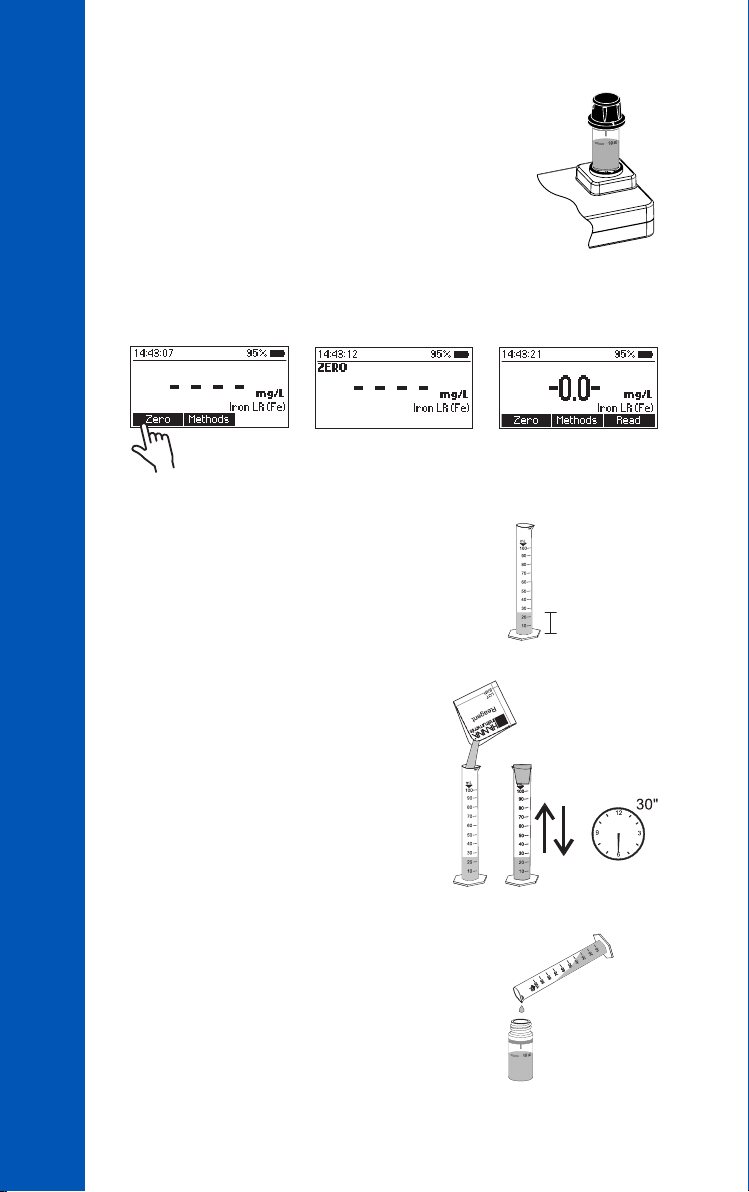
• Insert the cuvette into the holder and
ensure that the notch on the cap is
positioned securely in the groove.
• Press Zero. The display will show “-0.0-” when the meter is zeroed and ready for
METHOD PROCEDURE
measurement.
• Remove the cuvette.
• Fill another graduated mixing cylinder
with the sample up to the 25 mL mark.
# 2
25 mL
24
• Add one packet of HI93746-0 Iron
LR Reagent, close the cylinder with a
rubber stopper and shake vigorously for
30 seconds. This is the reacted sample.
• Fill a cuvette with 10 mL of the reacted
sample (up to the mark). Replace the
plastic stopper and the cap.
10 mL
Page 25
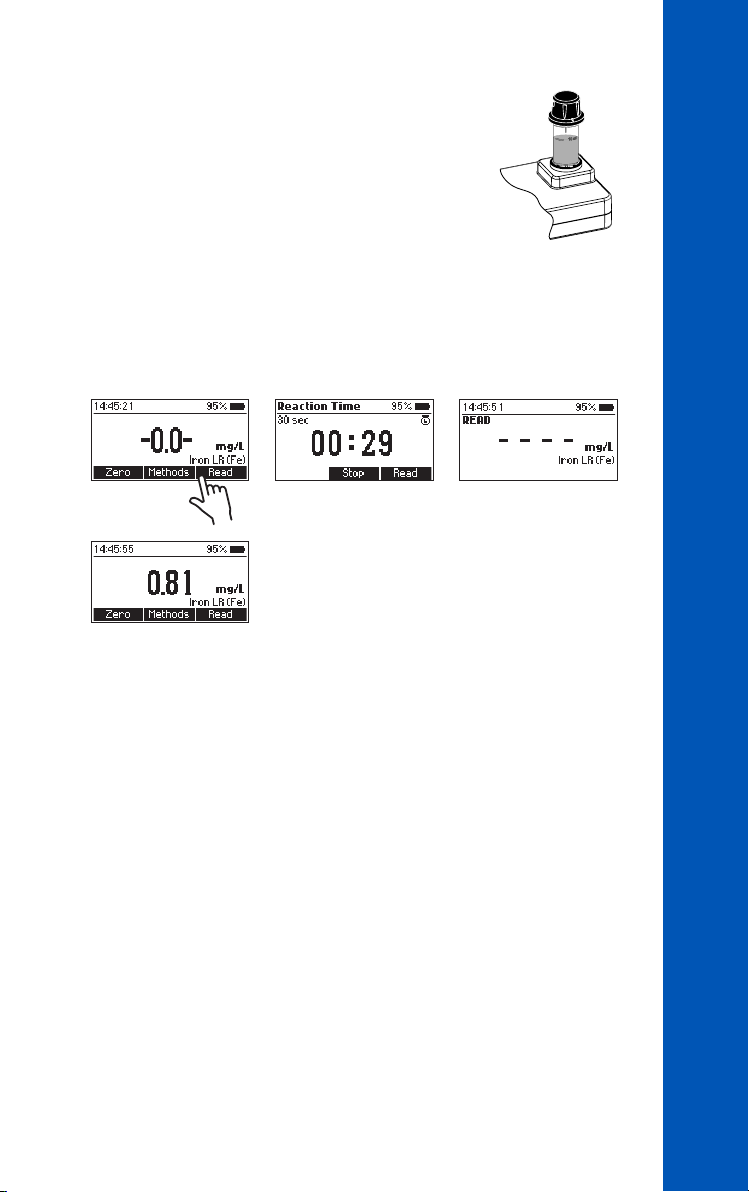
• Insert the cuvette into the holder and
ensure that the notch on the cap is
positioned securely in the groove.
• Press Read and the display will show a 30 second countdown prior to the
measurement. To skip the timer press Read twice. When the timer ends the
meter will perform the reading. The instrument displays concentration in mg/L of
iron (Fe).
METHOD PROCEDURE
INTERFERENCES
Interference may be caused by:
• Manganese above 50.0 mg/L
• Cadmium, Molybdenum above 4.0 mg/L
• Cyanide above 2.8 mg/L
• Chromium(VI) above 1.2 mg/L
• Nickel above 1.0 mg/L
• Nitrite ion above 0.8 mg/L
• Copper above 0.6 mg/L
• Mercury above 0.4 mg/L
• Chromium(III) above 0.25 mg/L
• Cobalt above 0.05 mg/L
• Sample pH should be between 3 and 4 to avoid fading or turbidity formation
25
Page 26
8.2. MANGANESE LOW RANGE
REQUIRED REAGENTS
Code Description Quantity
HI93748A-0 Manganese LR Reagent A 2 packets
HI93748B-0 Manganese LR Reagent B 0.40 mL
HI93748C-0 Manganese LR Reagent C 2 mL
HI93703-51 Dispersing Agent 6 drops
METHOD PROCEDURE
REAGENT SETS
HI93748-01 Manganese LR Reagent - 50 tests
HI93748-03 Manganese LR Reagent - 150 tests
For other accessories see ACCESSORIES section.
MEASUREMENT PROCEDURE
• Select the Manganese LR method using the procedure described in the METHOD
SELECTION section.
Note: If tutorial mode is disabled, follow the measurement procedure below. If the
tutorial mode is enabled, press Measure and follow the messages on the screen.
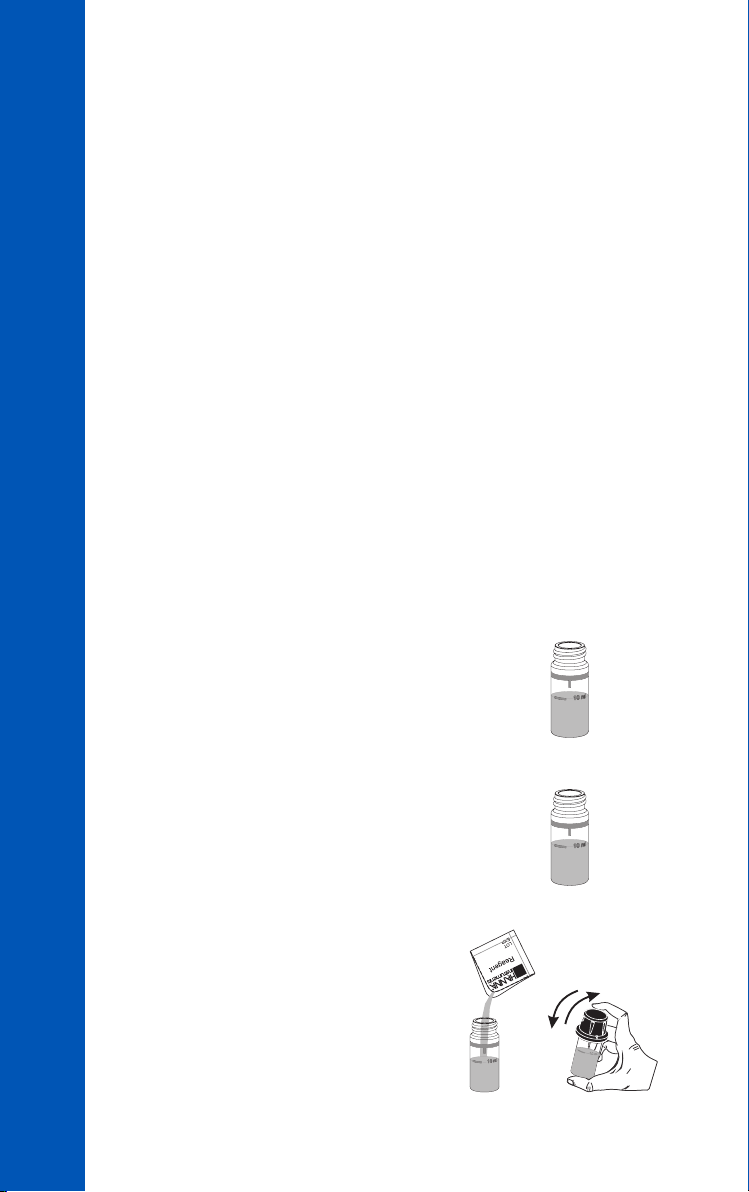
• Fill one cuvette (#1) with 10 mL of deionized
water (up to the mark).
• Fill a second cuvette (#2) with 10 mL of
sample (up to the mark).
10 mL
# 1
10 mL
# 2
26
• Add one packet of HI93748A-0 Manganese LR
Reagent A to each cuvette. Replace the plastic
stoppers and the caps. Shake gently until
completely dissolved.
Page 27
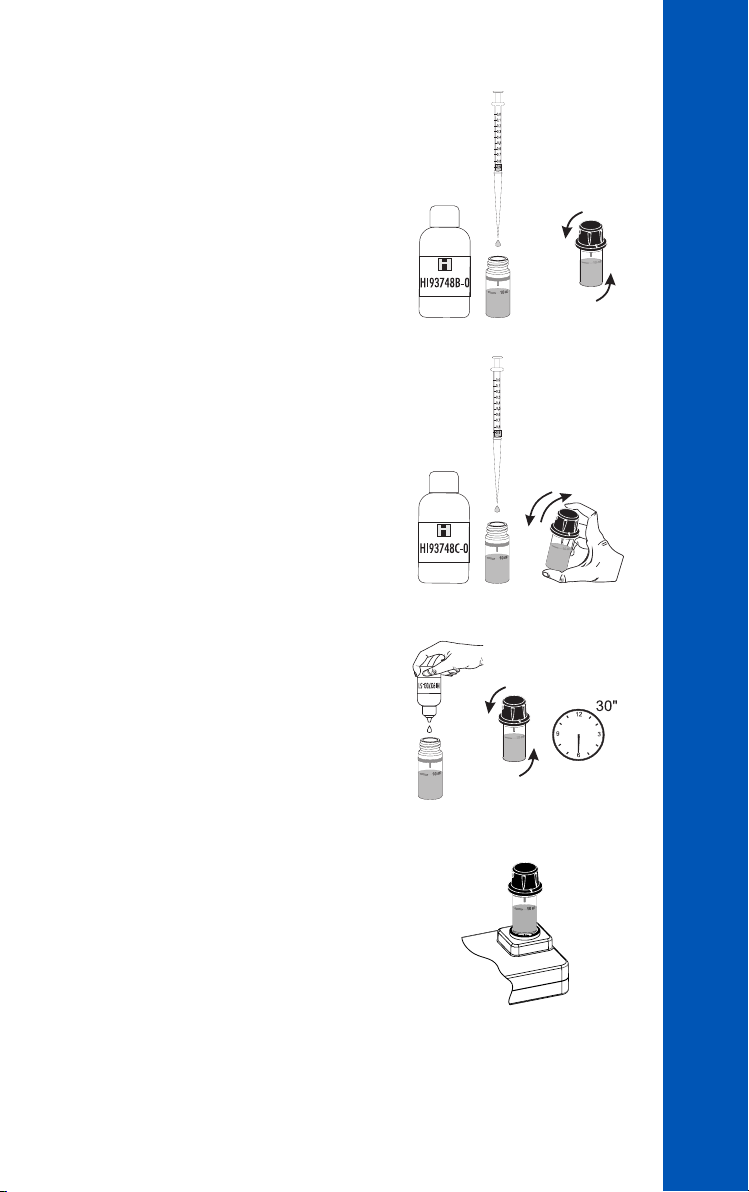
• Add 0.2 mL of the HI93748B-0 Manganese
LR Reagent B to each cuvette. Replace the
plastic stoppers and the caps. Invert gently to
mix for about 30 seconds.
• Add 1 mL of the HI93748C-0 Manganese
LR Reagent C to each cuvette, replace
the plastic stoppers and the caps. Shake
gently for 15 seconds.
METHOD PROCEDURE
0.2 mL
1 mL
• Add 3 drops of HI93703-51 Dispersing
Agent to each cuvette. Replace the plastic
stoppers and the caps. Invert gently to mix
for about 30 seconds.
• Insert the first cuvette (#1) with the
reacted deionized water into the holder
and ensure that the notch on the cap is
positioned securely in the groove.
×3
27
Page 28
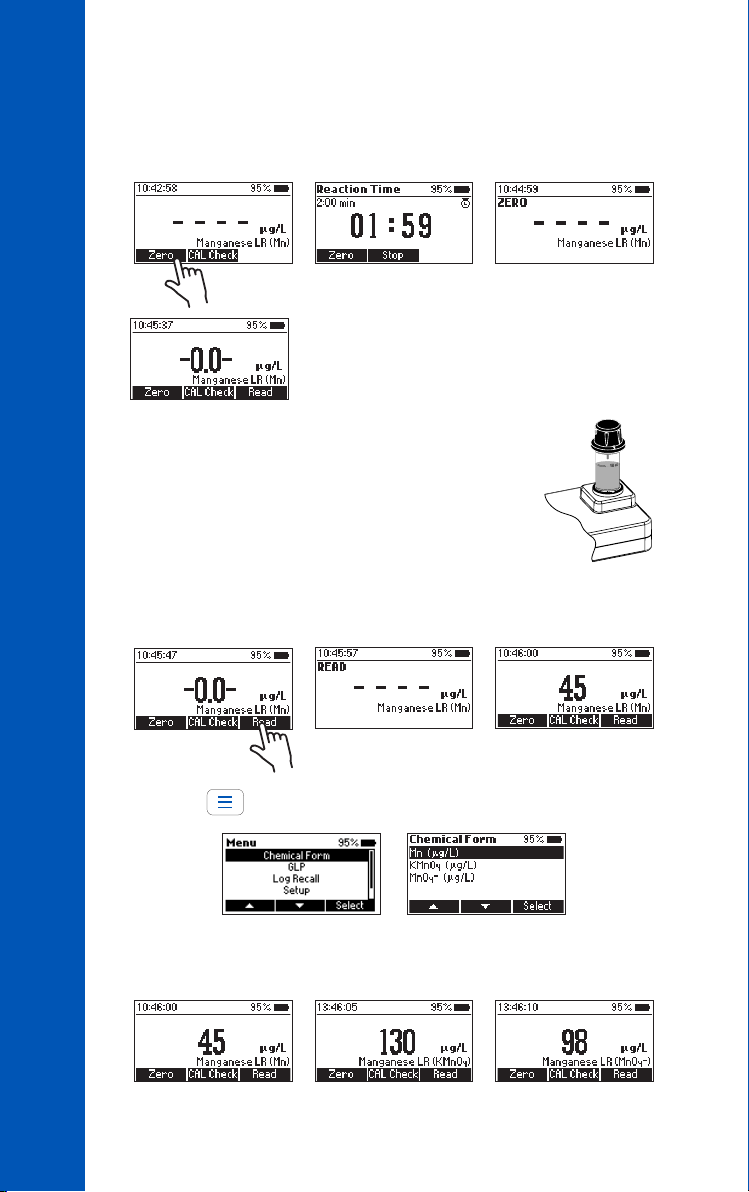
• Press Zero and the display will show the countdown prior to zeroing the blank. To skip
the timer, press Zero twice. When the timer ends the meter will perform the zero reading.
The display will show ”-0.0-” when the meter is zeroed and ready for measurement.
METHOD PROCEDURE
• Remove the cuvette.
• Insert the second cuvette (#2) with the reacted
deionized water into the holder and ensure that the
notch on the cap is positioned securely in the groove.
• Press Read to start the reading. The instrument displays the results in µg/L of
manganese (Mn).
28
• Press the key and use the functional keys to select Chemical Form.
• Use the functional keys and press Select to change the displayed chemical formula
to µg/L of potassium permanganate (KMnO4) and permanganate (MnO
-
).
4
Page 29

INTERFERENCES
Interference may be caused by:
• Calcium above 200 mg/L CaCO
3
• Magnesium above 100 mg/L CaCO
• Copper above 50 mg/L
• Nickel above 40 mg/L
• Aluminum, Cobalt above 20 mg/L
• Zinc above 15 mg/L
• Cadmium, Iron above 10 mg/L
• Lead above 0.5 mg/L
METHOD PROCEDURE
3
29
Page 30
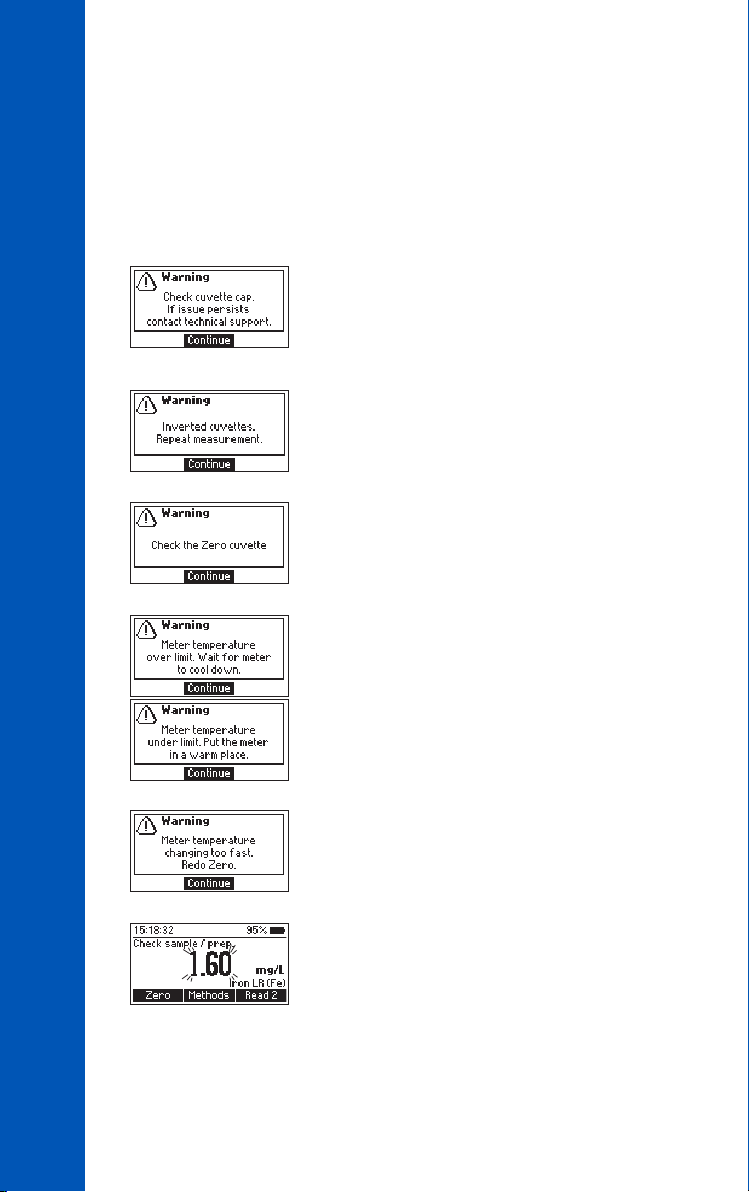
9. WARNING & ERROR DESCRIPTIONS
The instrument shows clear warning messages when erroneous conditions appear and
when measured values are outside the expected range.
The information below provides an explanation of the errors and warnings, and
recommended action to be taken.
There is an excess amount of ambient light reaching
the detector. Ensure that the notch on the cap is
positioned securely in the groove before performing
any measurements. If the issue persists, please contact
Hanna Instruments technical support.
The sample and the zero cuvettes are inverted. Swap the
cuvettes and repeat the measurement.
WARNING & ERROR DESCRIPTIONS
There is either too much light or the instrument can not
adjust the light level. Please check the preparation of
the zero cuvette and that the sample does not contain
any debris.
The meter is either overheating or its temperature has
dropped too low to operate within published accuracy
specifications. The meter must be between 0 and 50 °C
(32 and 122 °F) to perform any measurements.
30
Meter temperature has changed significantly since
the zero measurement has been performed. The zero
measurement must be performed again.
The measured value is outside the limits of the method.
Verify that the sample does not contain any debris.
Check the sample preparation and the measurement
preparation.
Page 31
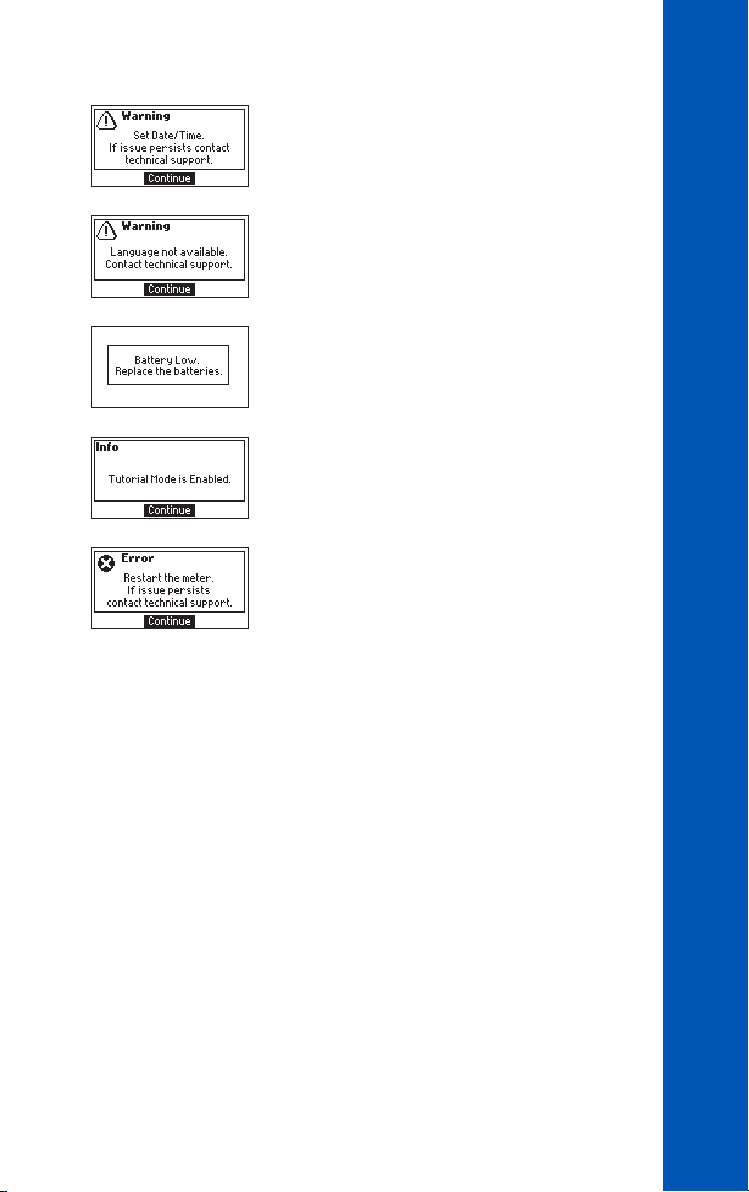
Date and time settings have been lost. Please reset
the values. If the issue persists, please contact Hanna
Instruments technical support.
English is the only available language. Help function
is not available. Restart the meter. If the issue persists,
please contact Hanna Instruments technical support.
Battery level is too low for the meter to function properly.
Replace the batteries with new ones.
Tutorial mode has been enabled in the Setup menu.
Press Continue and follow the prompt on the screen.
Tutorial mode can be disabled in the Setup menu.
A critical error has occurred. Restart the meter. If the
issue persists, please contact Hanna Instruments
technical support.
WARNING & ERROR DESCRIPTIONS
31
Page 32
10. BATTERY REPLACEMENT
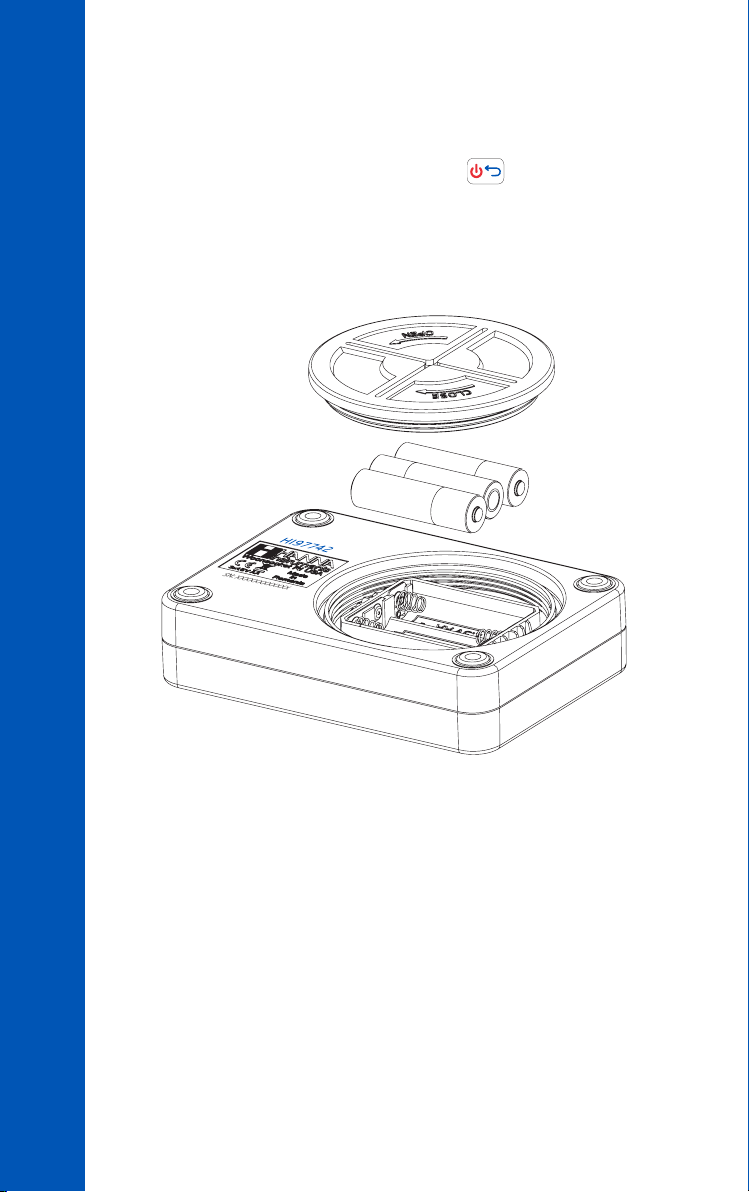
To replace the instrument’s batteries, follow these steps:
• Turn the instrument off by pressing and holding the
• Remove the battery cover by turning it counterclockwise.
• Remove the old batteries, replace them with three new 1.5V AA batteries.
• Replace the battery cover, turn it clockwise to close.
BATTERY REPLACEMENT
key.
32
Page 33

11. ACCESSORIES
11.1. REAGENT SETS
Code Description
HI93746-01 Iron LR Reagent - 50 tests
HI93746-03 Iron LR Reagent - 150 tests
HI93748-01 Manganese LR Reagent - 50 tests
HI93748-03 Manganese LR Reagent - 150 tests
11.2. OTHER ACCESSORIES
Code Description
HI7101413 blue carrying case for HI977xx and 3 CAL Check cuvettes
HI731318 cloth for wiping cuvettes (4 pcs.)
HI731331 glass cuvette (4 pcs.)
HI731336N cap for glass cuvette (4 pcs.)
HI740143 1 mL graduated syringe (6 pcs.)
ACCESSORIES
HI740144 pipette tip (6 pcs.)
HI740220 25 mL graduated glass vial (2 pcs.)
HI740229 100 mL graduated cylinder
HI93703-50 cuvette cleaning solution (230 mL)
®
HI97742-11 CAL Check
HI97748-11 CAL Check
standards for Iron LR - cuvette kit
®
standards for Manganese LR - cuvette kit
33
Page 34

CERTIFICATION
compliant
All Hanna Instruments conform to the CE European Directives.
RoHS
CERTIFICATION
Disposal of Electrical & Electronic Equipment. The product should not be treated
as household waste. Instead hand it over to the appropriate collection point for the
recycling of electrical and electronic equipment which will conserve natural resources.
Disposal of waste batteries. This product contains batteries, do not dispose of them
with other household waste. Hand them over to the appropriate collection point for
recycling.
Ensuring proper product and battery disposal prevents potential negative consequences
for the environment and human health. For more information, contact your city, your local
household waste disposal service, the place of purchase or go to www.hannainst.com.
RECOMMENDATIONS FOR USERS
Before using this product, make sure it is entirely suitable for your specific application
and for the environment in which it is used. Any variation introduced by the user to the
supplied equipment may degrade the meter’s performance. For yours and the meter’s
safety do not use or store the meter in hazardous environments.
WARRANTY
The HI97742 is warranted for two years against defects in workmanship and materials
when used for its intended purpose and maintained according to instructions. This
warranty is limited to repair or replacement free of charge. Damage due to accidents,
misuse, tampering or lack of prescribed maintenance is not covered.
If service is required, contact your local Hanna Instruments Office. If under warranty,
report the model number, date of purchase, serial number (engraved on the bottom of
the meter) and the nature of the problem. If the repair is not covered by the warranty,
you will be notified of the charges incurred. If the meter is to be returned to Hanna
Instruments, first obtain a Returned Goods Authorization (RGA) number from the
Technical Service department and then send it with shipping costs prepaid. When
shipping any meter, make sure it is properly packed for complete protection.
34
MAN97742 10/19
Page 35

Hanna Instruments reserves the right to modify the design, construction or appearance
of its products without advance notice.
Page 36

World
Headquarters
Hanna Instruments Inc.
Highland Industrial Park
584 Park East Drive
Woonsocket, RI 02895 USA
www.hannainst.com
MAN97742 Printed in ROMANIA
 Loading...