

Page 1

1
Instruction Manual
HI 931100 HI 931101
HI 931102
Accurate
Sodium/Sodium Chloride
and Temperature
Meters
www.hannainst.com
Page 2

2
TABLE OF CONTENTS
WARRANTY ............................................................................................. 2
PRELIMINARY EXAMINATION ...................................................................... 3
GENERAL DESCRIPTION ............................................................................ 3
FUNCTIONAL DESCRIPTION ........................................................................ 4
SPECIFICATIONS HI 931100 ..................................................................... 5
SPECIFICATIONS HI 931101 ..................................................................... 6
SPECIFICATIONS HI 931102 ..................................................................... 7
OPERATIONAL GUIDE ................................................................................ 8
CALIBRATION ........................................................................................ 11
SETUP .................................................................................................. 15
SPECIAL APPLICATIONS & ADDITIONAL INFORMATION .................................. 16
TEMPERATURE CALIBRATION (for technical personnel only) ......................... 18
BATTERY REPLACEMENT ......................................................................... 20
LCD MESSAGE GUIDE .............................................................................. 21
FC300B CONDITIONING & MAINTENANCE ................................................. 22
TROUBLESHOOTING GUIDE ..................................................................... 24
ACCESSORIES ........................................................................................ 25
HI 931100, HI 931101 and HI 931102 are guaranteed for two years
against defects in workmanship and materials when used for their
intended purpose and maintained according to instructions. Electrodes
and probes are guaranteed for six months. This warranty is limited to
repair or replacement free of charge.
Damages due to accidents, misuse, tampering or lack of prescribed
maintenance is not covered.
If service is required, contact the dealer from whom you purchased the
instrument. If under warranty, report the model number, date of
purchase, serial number and the nature of the problem. If the repair
is not covered by the warranty, you will be notified of the charges
incurred. If the instrument is to be returned to Hanna Instruments,
first obtain a Returned Goods Authorization number from the Technical Service department and then send it with shipping costs prepaid.
When shipping any instrument, make sure it is properly packed for
complete protection.
WARRANTY
Dear Customer,
Thank you for choosing a Hanna Instruments product.
Please read this instruction manual carefully before using these
instruments. This manual will provide you with the necessary
information for correct use of these instruments, as well as a precise
idea of their versatility.
If you need additional technical information, do not hesitate to
e-mail us at tech@hannainst.com or view our worldwide contact list
at www.hannainst.com.
Page 3

3
Hanna Instruments reserves the right to modify the design, construction
and appearance of its products without advance notice.
Hanna Instruments Sodium (HI 931101) / Sodium Chloride (HI 931100/
HI 931102) analyzers are state-of-the-art, hand held meters, designed to
provide laboratory results and accuracy under harsh industrial conditions.
All meters come equipped with a large and easy-to-read LCD, which
shows sodium/sodium chloride and temperature values simultaneously
and guides the user through the calibration procedure with easy-tofollow graphic symbols.
In addition, HI931101 and HI931102 provide pNa or % NaCl
readings respectively through the MODE key.
Automatic calibration, rundown batteries indicator and water-resistant housing are the features which make these meters easy to use
and versatile both in the laboratory and in the field applications.
GENERAL DESCRIPTION
PRELIMINARY EXAMINATION
Remove the instrument from the packing material and examine it
carefully to make sure that no damage has occurred during shipping. If
there is any damage, notify your Dealer or the nearest Hanna Customer
Service Center.
Each instrument is supplied with:
• Batteries (3 x 1.5V AAA)
• Instruction Manual
• Rugged Carrying Case
Note: Save all packing material until you are sure that the instru-
ment functions correctly. All defective items must be returned in
the original packing with the supplied accessories.
Page 4

4
FUNCTIONAL DESCRIPTION
1) BNC electrode connector
2) Temperature probe socket
3) Battery holder cap
4) Liquid Crystal Display (LCD)
5) On/Off key, to turn the instrument ON and OFF.
6) MODE key, to select the range (HI 931101, HI 931102 only)
7) CAL key, to enter/exit calibration mode.
8) Select key, to select setup item.
STD key, to select calibration standard.
9) Setup key, to enter/exit SETUP mode.
CFM key, to confirm calibration point.
10) Secondary LCD.
11) Primary LCD.
Page 5

5
SPECIFICATIONS HI 931100
EGNAR
L/g005.1ot051.0
L/g00.51ot05.1
L/g0.051ot0.51
L/g003ot051
)F°0.842ot0.4-(C°0.021ot0.02-
NOITULOSER
L/g100.0
L/g10.0
L/g1.0
L/g1
)F°1.0(C°1.0
YCARUCCA
Fº86/Cº02@
gnidaerfo%5±
rorreeborpgnidulcxe)F°4.0±(C°2.0±
noitarbilaC
tatniop2ro1,citamotuA
(L/g03.0 5807IH )
(L/g00.3 3807IH )
(L/g0.03 1807IH )
noitasnepmocerutarepmeT )F°77(C°52tadexif
edortcelE
B003CF edortceleevitisnes-muidosnoitanibmocssalg
)dedulcniton(
eborperutarepmeT 2667IH )dedulcniton(elbac)'3.3(m1htiw
efiL/epyTyrettaB
seirettabAAAV5.1x3
esusuounitnocfosruoh002.xorppa
snoisnemiD )”4.1x8.2x3.7(mm63x27x581
)ylnoretem(thgieW ).zo6.01(g003
tnemnorivnE
)Fº221–23(Cº05–0
%001HR.xam
ytnarraW sraey2
Page 6

6
SPECIFICATIONS HI 931101
EGNAR
00.3ot00.0
)mpp(L/gm0.051ot0.51
L/g005.1ot051.0
L/g00.51ot05.1
L/g0.06ot0.51
)F°0.842ot0.4-(C°0.021ot0.02-
NOITULOSER
10.0
L/gm1.0
L/g100.0
L/g10.0
L/g1.0
)F°1.0(C°1.0
YCARUCCA
Fº86/Cº02@
50.0±
gnidaerfo%5±
rorreeborpgnidulcxe)F°4.0±(C°2.0±
noitarbilaC
tatniop2ro1,citamotuA
(L/g32.0 7808IH/7807IH )
(L/g3.2 0808IH/0807IH )
(L/g0.32 6808IH/6807IH )
noitasnepmocerutarepmeT )F°77(C°52tadexif
edortcelE
B003CF edortceleevitisnes-muidosnoitanibmocssalg
)dedulcniton(
eborperutarepmeT 2667IH )dedulcniton(elbac)'3.3(m1htiw
efiL/epyTyrettaB
seirettabAAAV5.1x3
esusuounitnocfosruoh002.xorppa
snoisnemiD )”4.1x8.2x3.7(mm63x27x581
)ylnoretem(thgieW ).zo6.01(g003
tnemnorivnE
)Fº221–23(Cº05–0
%001HR.xam
ytnarraW sraey2
Page 7

7
SPECIFICATIONS HI 931102
EGNAR
L/g005.1ot051.0
L/g00.51ot05.1
L/g0.051ot0.51
L/g003ot051
00.03ot00.0
)F°0.842ot0.4-(C°0.021ot0.02-
NOITULOSER
L/g100.0
L/g10.0
L/g1.0
L/g1
10.0
)F°1.0(C°1.0
YCARUCCA
Fº86/Cº02@
gnidaerfo%5±
gnidaerfo%5±
rorreeborpgnidulcxe)F°4.0±(C°2.0±
noitarbilaC
tatniop2ro1,citamotuA
(L/g03.0 5807IH )
(L/g00.3 3807IH )
(L/g0.03 1807IH )
noitasnepmocerutarepmeT )F°77(C°52tadexif
edortcelE
B003CF edortceleevitisnes-muidosnoitanibmocssalg
)dedulcniton(
eborperutarepmeT 2667IH )dedulcniton(elbac)'3.3(m1htiw
efiL/epyTyrettaB
seirettabAAAV5.1x3
esusuounitnocfosruoh002.xorppa
snoisnemiD )”4.1x8.2x3.7(mm63x27x581
)ylnoretem(thgieW ).zo6.01(g003
tnemnorivnE
)Fº221–23(Cº05–0
%001HR.xam
ytnarraW sraey2
Page 8
8
OPERATIONAL GUIDE
INITIAL PREPARATION
The instruments are supplied complete with batteries. For placing the
batteries inside the meter, see page 14.
To prepare the instrument for use, connect the sodium sensitive
electrode FC300B to the input socket on the top of the instrument.
Connect the temperature probe to the temperature socket too. The
temperature probe can be used independently to take temperature
measurements. If the probe is disconnected, 25.0 °C (72.0 °F) is
displayed with °C or °F symbol blinking.
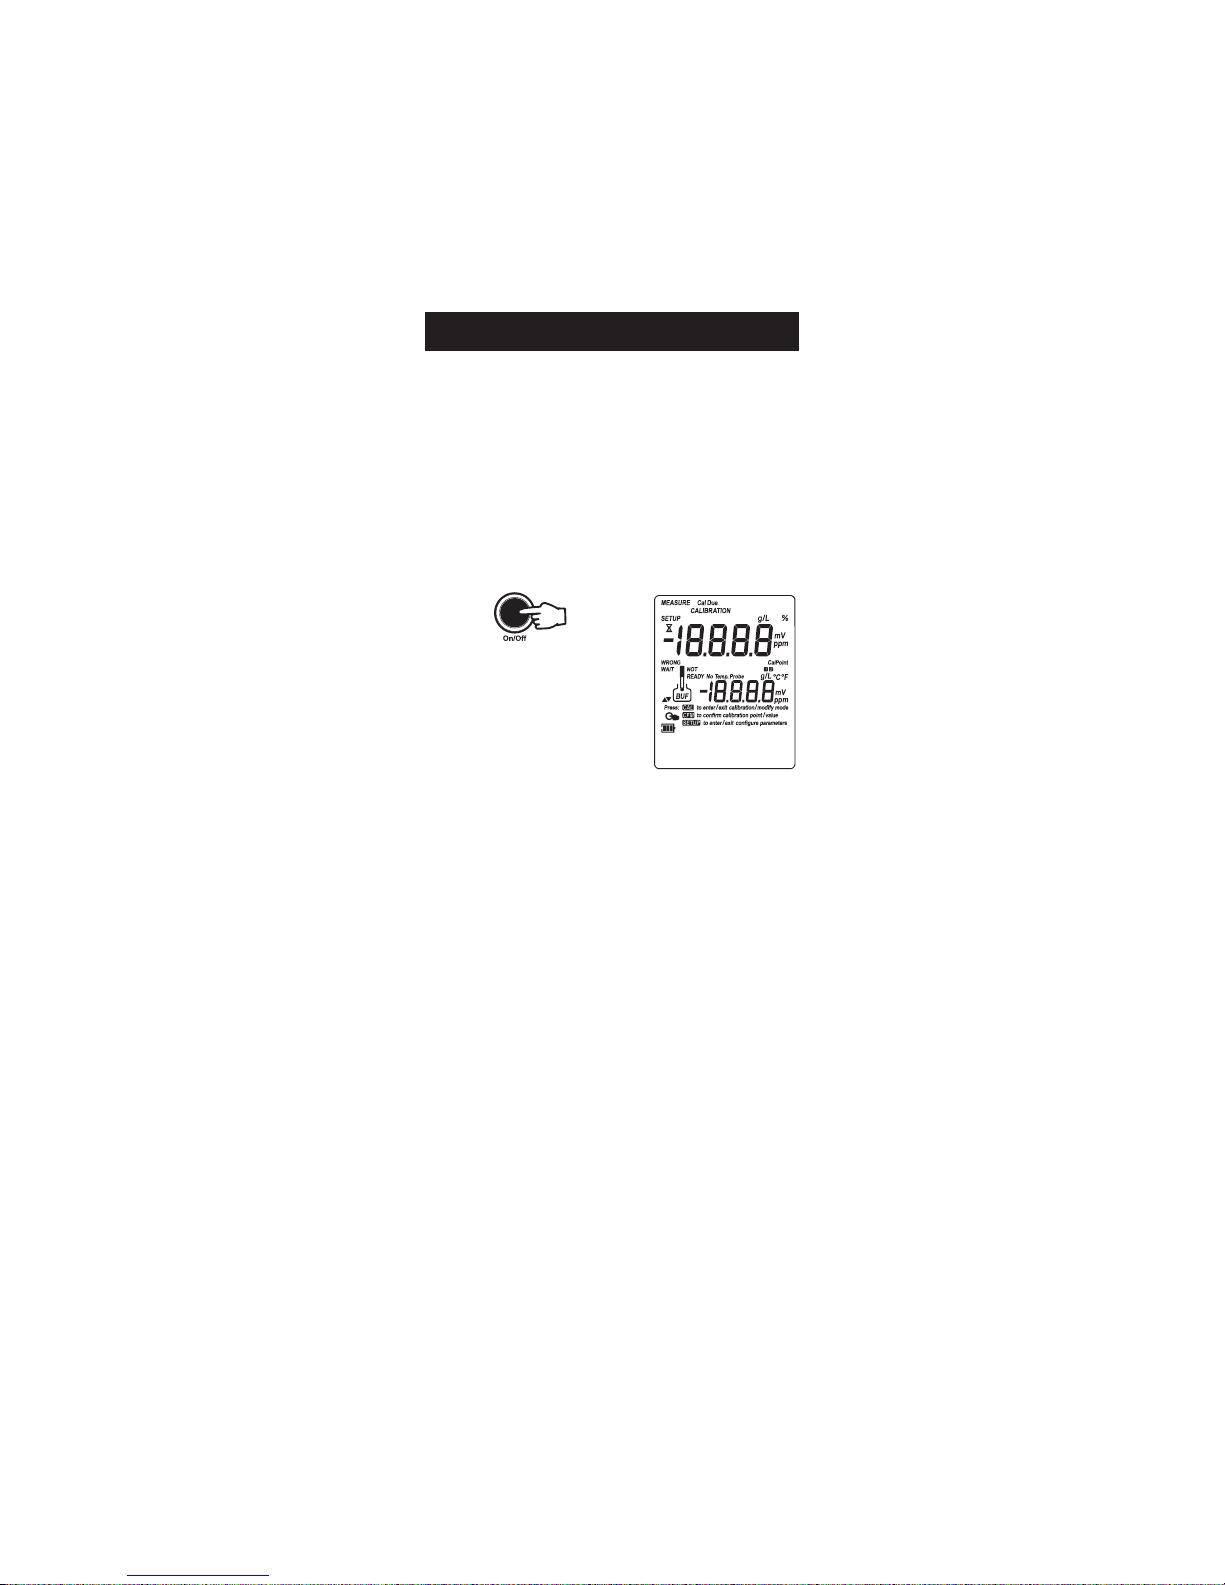
Turn the instrument ON by pressing On/Off.
At start-up the display will show all
the used segments for a few seconds (or
while the button is held), followed
by the percentage indication of the
remaining battery life. The meter is
now ready to operate.
After measurement switch the instrument off, and remove the electrodes.
For a fast and accurate measurement, the electrode should be stored
in a solution with a Na/NaCl concentration similar to the sample to
be measured. Upper the rubber sleeve after use.
The auto-off feature turns the instrument off after a set period
(default 20 min) to save battery life. To set another period or to
disable this feature, see SETUP menu on page 11.
In order to take accurate measurements, make sure the instrument is calibrated before use (see page 11 for HI 931101 and
page 13 for HI 931100 & HI 931102).
For greatest accuracy, calibration should be performed (or at least
verified) every day for measurements taken in the same type of
samples (e.g. cheese) or every time the sample type is changed (e.g.
cheese, meat, sea water, etc.).
The best working temperature is around 20-25°C (68-77°F). For
greater accuracy, perform the calibration of the meter with standard
solution at a temperature as close as possible to the temperature of
the sample (±1°C/±2°F).
Page 9

9
MAGNETIC STIRRER
HI 190M
POWER
SPEED
ON
OFF MAX
TAKING SODIUM MEASUREMENTS
Remove the protective cap of the FC300B
sodium-sensitive electrode and, if possible,
rinse it with some of the sample you are
going to measure.
Lower the rubber sleeve to get the junction
to work properly.
Immerse the tip of the FC300B electrode
(2.5cm/1" i.e. the electrode junction must
be completely immersed) into the sample
to be tested without touching the bottom
of the beaker.
Wait for up to 10 to 15 minutes to allow
for the electrode to adjust and stabilize, i.e. until there is no drifting
for at least a couple of minutes.
During measurement, if possible, the sample should be gently stirred
(100 rpm).
pNa (for HI931101) and NaCl% (for HI931102)
measurements
Press the MODE key during measurement to convert the displayed
value of HI931101
to pNa.
pNa = -log a
Na
where a
Na
is the activity of ion
Na.
Page 10

10
Press the MODE key during measurement to convert the displayed value of
HI931102
to %.
Press the same key to return to g/L
measurements.
AFTER USE
Turn the meter off by pressing the ON/OFF
key again.
For a faster and accurate measure, the electrode should be stored in a solution with a
Na/NaCl concentration similar to the sample
to be measured.
Upper the rubber sleeve after use.
For infrequent use (once a month or less)
store the electrode dry. Before using it again,
let it condition overnight in HI7081/HI8081
(30.0 g/L NaCl) or
HI7086/HI8086 (23 g/
L Na 1M).
To avoid very long response time, do not store or rinse the
electrode with deionized water. Never rub or blot the electrode.
TEMPERATURE MEASUREMENT
The temperature can be measured independently.
• Immerse the temperature probe at
least 1 cm (½”) in the prepared sample.
• Wait for the reading to stabilize. The
temperature of the solution will be shown
on the lower part of the display.
Notes: • If the temperature is out of
range, the last range value
will be displayed and the
“°C” (“°F”) tag will blink.
• If the temperature probe is not connected, the 25.0 °C
value will be displayed together with the blinking tags
“No Temp Probe” and “°C” (“°F”).
Page 11

11
CALIBRATION
In order to obtain accurate measurements, frequent calibration is
recommended.
For better results, calibrate at a temperature close to that of the
solution to be tested (no more than ±3°C apart).
The instrument can be calibrated in 1 or 2 points. Two-point
calibration is always recommended for better accuracy.
The user can select the calibration stability criteria in Setup menu in
accordance with the application. “ACCU” - accurate is recommended.
Note: For best results, it is recommended to prepare two beakers for
each calibration point: the first one to rinse the probes and
the second one to calibrate.
Note: It is recommended to use clean plastic beakers.
Na CALIBRATION (HI 931101)
The calibration is performed by immersing the
FF
FF
F
CC
CC
C
300B300B
300B300B
300B sodium-
sensitive electrode
in 2 different standard Na solutions to achieve
accurate 2 point calibration.
It is also possible to calibrate just the offset (2.3 g/L Na) following
the single point calibration procedure described below.
For best accuracy, a two-point calibration is recommended (see below).
PREPARATION
• Pour small quantities of HI7080
or
HI8080 (2.3 g/L Na) solution and
HI7087 or HI8087 (0.23 g/L Na)
or HI7086 or HI8086 (23 g/L Na)
into two clean beakers.
To obtain accurate readings, use
HI7080/HI8080 and HI7087/HI8087 if you are going to measure
samples with low sodium content (below 2.3 g/L) or HI7080/
HI8080 and HI7086/HI8086 if you are going to measure samples
with high sodium content (over 2.3 g/L).
• For accurate calibration use two
beakers for each buffer calibration, the first one for rinsing the
electrode, the second one for calibration. This way, contamination of the buffer is minimized.
Whenever possible use plastic beakers to minimize any EMC interferences.
• Turn the meter on by pressing
the ON/OFF key.
HI 7080 HI 7087
HI 7080
HI 7080 HI 7080
RINSE CALIBRATION
Page 12

12
• Remove the protective cap of the
electrode and rinse it with some
of the buffer calibration solution
you are going to use first.
• Lower the rubber sleeve to get
the junction to work properly.
TWO-POINT CALIBRATION
• Press CAL. The instrument will dis-
play the measured concentration
on the primary LCD, if a previous
calibration exists, or “----” and
the “2.3” standard on the secondary LCD, together with “CAL”
and “Cal Point 1” tags.
• If necessary, press the STD key to select a different standard value.
• If the STD key is pressed, the instrument circles through all
available calibration standards. Choose the point corresponding to
the first calibration solution.
• The “ ” tag will blink on the LCD until the reading is stable.
• When the reading is stable and
close to the selected standard,
“CFM” tag blinks.
• Press CFM to confirm calibration.
• The calibrated value is then dis-
played on the primary LCD and
the secondary LCD will display the
second expected standard value,
together with “CAL” and “Cal
Point 2” tags.
• After the first calibration point is confirmed, submerse the
electrode approximately 3 cm (1¼”) into the second standard
solution and stir gently.
• If necessary, press the STD key to select the appropriate buffer value.
• The “ ” tag will blink on the LCD until the reading is stable.
• When the reading is stable and close to the selected buffer,
“CFM” tag blinks.
• Press CFM to confirm calibration.
• The instrument stores the calibra-
tion values and returns to normal
measurement mode.
Page 13

13
HI 7083 HI 7085
HI 7083
ONE-POINT CALIBRATION
• Proceed as described in TWO-POINT CALIBRATION section.
• Press CAL after the first calibration
point was confirmed. The instruments
will memorize the one-point calibration data and will return to
measurement mode.
NaCl CALIBRATION (HI 931100 / HI 931102)
The calibration is performed by immersing the FC300B sodium-
sensitive electrode in 2 different standard NaCl solutions to achieve
accurate 2 point calibration.
It is also possible to calibrate just the offset (3.00 g/L NaCl) following
the single point calibration procedure described below.
For best accuracy, a two-point calibration is recommended (see below).
PREPARATION
• Pour small quantities of HI7083 or HI8083
(3.00 g/L NaCl) solution and HI7085 or
HI8085 (0.30 g/L) or HI7081 or HI8081
(30 g/L) into two clean beakers.
To get accurate readings use HI7083/HI8083 and HI7085/
HI8085 if you are going to measure samples with low sodium
chloride content (below 3 g/L) or HI7083/HI8083 and HI7081/
HI8081 if you are going to measure samples with high sodium
chloride content (over 3 g/L).
• For accurate calibration, use two
beakers for each buffer calibration, the first one for rinsing the
electrode, the second one for
calibration. This way, contamination of the buffer is minimized.
Whenever possible use plastic beakers to minimize any EMC interferences.
• Turn the meter on by pressing the ON/OFF key.
• Remove the protective cap of the electrode and
rinse it with some of the buffer calibration
solution you are going to use first.
• Lower the rubber sleeve to get the junction to
work properly.
Page 14

14
TWO-POINT CALIBRATION
• Press CAL. The instrument will dis-
play the measured concentration
on the primary LCD, if a previous
calibration exists, or “----”, and
the “3.00 g/L” standard on the
secondary LCD, together with “CAL”
and “Cal Point 1” tags.
• If necessary, press the STD key to select a different standard value.
• If the STD key is pressed, the instrument circles through all
available calibration standards. Choose the point corresponding to
the first calibration solution.
• The “ ” tag will blink on the LCD until the reading is stable.
• When the reading is stable and close to the selected standard,
“CFM” tag blinks.
• Press CFM to confirm calibration.
• The calibrated value is then dis-
played on the primary LCD and
the secondary LCD will display the
second expected standard value,
together with “CAL” and “Cal
Point 2” tags.
• After the first calibration point is
confirmed, submerse the electrode
approximately 3 cm (1¼”) into the second standard solution and
stir gently.
• If necessary, press the STD key to select the appropriate buffer value.
• The “ ” tag will blink on the LCD until the reading is stable.
• When the reading is stable and close to the selected buffer,
“CFM” tag blinks.
• Press CFM to confirm calibration.
• The instrument stores the calibra-
tion values and returns to normal
measurement mode.
ONE-POINT CALIBRATION
• Proceed as described in TWO-POINT CALIBRATION section.
• Press CAL after the first calibration
point was confirmed. The instruments
will memorize the one-point calibration
data and will return to measurement
mode.
Page 15

15
SETUP
Setup mode allows viewing and configuring the following parameters:
• Beep Status (bEEP)
• Auto power off timer (AOFF)
• Temperature Unit
• Calibration Stability Criteria
To enter SETUP mode, press Setup while
the instrument is in measurement mode.
Select the desired setup parameter us-
ing the STD key.
Press CAL if you want to change the
item value. The selected item starts
blinking for about 8 seconds.
Press the Select key to change the
displayed value.
Wait until item stops blinking to complete selection or press CAL to
escape.
Press the STD key to select the next parameter.
Press Setup to exit SETUP menu at any time.
The following table lists the SETUP parameters, their valid values
range and the factory settings (default).
Notes: • For best results, wait for a couple of minutes before
pressing the CFM key.
• Press and hold Setup then Select before “CFM” tag
appears, to toggle between standard and temperature
display on secondary LCD line reading during calibration.
• If the value measured by the instrument is not close to the
selected standard, “WRONG” “ ” and “WRONG” “ ” tags
will blink alternately. In this case check if the correct standard
has been selected or used, or regenerate the electrode and the
reference by following the Cleaning Procedure (see page 16). If
necessary, change the standard, the electrode, or the reference.
• Press CFM, then CAL before “CFM” tag appears in order
to clear previous calibration and set the default values.
The “CLR ALL” message is displayed on both LCD lines
and the instrument returns to measurement mode.
Page 16

16
SRETEMARAPPUTES
noitaiverbbA seodtitahW
dilaV
seulaV
tluafeD
PEEb
srorrelangisotdesuenotpeeB
.egnahcgnimrifnocdna
ffO/nO FFO
FFOA
nrutottinustimreP:remitffootuA
yrettabevasotemitteserpretfaffo
.rewop
,01,5,ffO
06ro02
setunim
setunim02
.deyalpsidtinuerutarepmeT F°roC° C°
bAtS
.airetircytilibatsnoitarbilactceleS UCCA,rEtnI
tSAFro
UCCA
The Stability Criteria offers the posibility to select the appropriate time
before confirmation in accordance with the application.
ACCU - about 3-4 minutes / calibration point
IntEr - about 2 minutes / calibration point
FASt - about 1 minute / calibration point
Note: ACCU criteria is recommended.
HOW TO MEASURE SODIUM CHLORIDE IN CHEESE AND
MEAT (HI931100 & HI931102)
1. Take a sample of cheese or meat to be
analyzed.
2. Grind the sample.
3. Pour a quantity of X g in a glass beaker.
Add (X)x10mL of deionized water (note:
ignoring water content in cheese and meat).
SPECIAL APPLICATIONS &
ADDITIONAL INFORMATION
Page 17

17
MAGNETIC STIRRER
HI 190M
POWER
SPEED
ON
OFF MAX
FILTERED
SOLUTION
4. Cover the beaker to prevent any spilling during stirring, place
the beaker on the top of a hot plate stirrer and agitate the
sample at 40-50°C (104-122°F) for 15-20 minutes.
5. Let the sample cool to the ambient temperature, then filter it.
6. Dip the sodium electrode FC300B into the filtered sample. The
tip of the electrode should be immersed for approximately
2.5cm/1" (i.e. the electrode junction must be completely immersed) without touching the bottom of the beaker. During
measurement, the sample should be gently stirred (100 rpm).
7. Wait for the reading to stabilize, i.e. no drift for at least a
couple of minutes.
Take note of the measured value.
8. Since the dilution rate is 1/10, the reading in the g/L range
has to be divided by 100 to get the actual reading of NaCl (per
gram of cheese or meat) or it can be considered the value
directly expressed in % of NaCl.
NoteNote
NoteNote
Note: 10 to 15 minutes as response time, in the first measure-
ment taken in samples of cheese or meat, is the right
amount of time needed by the electrode to stabilize. The
next measurements in cheese or meat samples will have a
shorter response time (less than 2 minutes). Do not rinse
the sodium electrode between measurements since contamination is negligible.
Page 18

18
TEMPERATURE CALIBRATION
(for technical personnel only)
IONIC STRENGTH ADJUSTER (ISA)
It is recommend the use of HI7090 ISA solution when the NaCl
concentration of the sample is lower than 5 g/L. In such case, the
calibration of the meters should be performed with standard solution
containing 2% of ISA.
ISA (Ionic Strength Adjuster) = 50% of NH4 Cl 4M +50% of NH
4
OH 4M (use 2mL of ISA every 100 mL of sample).
TEMPERATURE
The best working temperature is around 20-25°C (68-77°F).
For greatest accuracy, we suggest to perform the calibration of the
meter with standard solution at a temperature as close as possible to
the temperature of the sample (±1°C/±2°F).
Na CONCENTRATION WITH HI 931100 AND HI 931102
It is always possible to determine the Na concentration by using the
formula:
XNa = X
NaCl
• (23 / 58.4)
where
XNa = Na concentration
and
X
NaCl
= NaCl concentration
All the instruments are factory calibrated for temperature.
Hanna’s temperature probes are interchangeable and no tempera-
ture calibration is needed when they are replaced.
If the temperature measurements are inaccurate, temperature
recalibration should be performed.
For an accurate recalibration, contact your dealer or the nearest
Hanna Customer Service Center, or follow the instructions below.
• Prepare a vessel containing ice and water and another one containing
hot water (at approximately 50 ºC or 122 ºF). Place insulation
material around the vessels to minimize temperature changes.
• Use a calibrated thermometer with a resolution of 0.1 ºC as a
reference thermometer. Connect the HI 7662 temperature probe
to the appropriate socket.
• With the instrument off, press and hold down the CAL & Setup
keys, then power on the instrument. The “CAL” tag will appear
and the secondary LCD will show “0.0 ºC”. The primary LCD will
display the measured temperature or the ”----” message, if the
measured temperature is out of range.
Page 19

19
• Submerse the temperature probe into the vessel with ice and
water as close as possible to the reference thermometer. Allow a
few seconds for the probe to stabilize.
• Use the Select key to set the reading on the
secondary LCD to that of ice and water, measured
by the reference thermometer. The value can be
changed in a circling way in the ±2.0 °C
interval, around the selected point. When the
reading is stable and close to the selected calibration point, “CFM” tag will blink.
• Press CFM to confirm. The secondary LCD will
display “50.0 ºC”.
• Submerse the temperature probe into the sec-
ond vessel as close as possible to the reference
thermometer. Allow a few seconds for the probe
to stabilize.
• Use the Select key to set the reading on the
secondary LCD to that of the hot water. The
value can be changed in a circling way in the
±2.0 °C interval, around the selected point.
• When the reading is stable and close to the
selected calibration point, “CFM” tag will blink.
• Press CFM to confirm. The instrument returns to
measurement mode.
Note: If the reading is not close to the selected point, “WRONG” tag
will blink. Change the temperature probe and restart calibration.
Page 20

20
If the batteries become weak, the display will flash the battery symbol
to advise the user that approx. 1 hour of working time is left.
It is recommended to replace the batteries soon.
To replace the batteries, follow the next steps:
• Turn the instrument OFF.
• Open the battery compartment cap (located on the top of the
instrument).
• Remove old batteries.
• Insert three new 1.5V AAA batteries in the battery compart-
ment, following the instructions on the rear of the instrument.
• Reattach the battery compartment cap.
BATTERIES REPLACEMENT
Page 21

21
The instrument is provided with the BEPS (Battery Error Prevention
System) feature, which automatically turns the instrument off when
the batteries level is too low to ensure reliable readings. At start up
the display will show “0 bAtt” message for a few seconds, then the
instrument automatically turns off.
LCD MESSAGE GUIDE
TAGS & SYMBOLS
• Mode tags light up for indicating the corresponding active mode,
and blink for warning the user.
MEASURE on: Instrument in measurement mode.
SETUP on: SETUP menu mode has been entered.
CALIBRATION on: calibration mode has been entered.
• Indication of temperature compensation mode:
ATC for automatic compensation, “ATC” blink for compensation at 25 °C.
• blinking (while in calibration): reading unstable.
• Main active key messages light up for indicating the correspond-
ing active key.
CAL on: CAL key available.
CFM blinking: ask confirmation of calibration.
SETUP on: SETUP key available.
• Battery symbol blinking: low battery condition.
• Calibration messages:
WRONG and WRONG blinking alternatively: wrong
buffer, value not recognized.
Page 22

22
FC300B CONDITIONING &
MAINTENANCE
PREPARATION
Remove the protective cap.
DO NOT BE ALARMED IF ANY SALT DEPOSITS ARE
PRESENT.
This is normal with sodium electrodes and they
will disappear when rinsed with water.
During transport tiny bubbles of air may have formed
inside the glass bulb. The electrode cannot function
properly under these conditions. These bubbles can
be removed by "shaking down" the electrode as you
would do with a glass thermometer.
If the bulb and/or junction are dry, soak
the electrode overnight in HI 7081 NaCl
30.0 g/L solution before using with the
HI 931100 or HI931102 sodium meter.
Soak it overnight in HI7086 or HI8086 Na
23 g/L solution before using with the
HI931101 sodium meter.
If the fill solution (electrolyte) is more than
1cm (½") below the fill hole, add HI8093
1M KCl+AgCl Electrolyte Solution.
Lower the rubber sleeve during measurements and calibration.
SODIUM MEASUREMENT
Rinse the sodium electrode tip with
some of the sample to be tested to
remove any contamination.
Immerse the tip (2.5 cm /1") in
the sample and stir gently.
The sensitive bulb should not touch
the bottom of the beaker.
The Hanna HI76405 electrode
holder can be used for this purpose
(see page 35).
During measurement, the sample
should be gently stirred (approx.
100 rpm). The Hanna HI190M
stirrer can be used for this purpose
(see page34).
MAGNETIC STIRRER
HI 190M
POWER
SPEED
ON
OFF MAX
Page 23

23
STORAGE
When used frequently, the electrode should be stored in a solution
with a Na or NaCl concentration similar to the sample to be
measured. For longer periods of storage, the electrode should be
capped with a few drops of appropriate solution.
For frequent use in different samples (1 or 2 times per week), store
the electrode in HI 7081 or HI 8081 (30.0 g/L NaCl) if used for NaCl
measurements (in conjunction with HI 931100 or HI 931102).
Store the electrode in HI 7080 or HI 8080 (2.3g/L Na) if used for
Na measurements (in conjunction with HI 931101).
For occasional use (once a month or less) store the electrode dry and
let it conditioning overnight in HI 7081 or HI 8081 (30.0 g/L NaCl)
or HI 7086 or HI 8086 (23 g/L Na) before use.
Note: NEVER STORE OR RINSE THE ELECTRODE IN DIS-
TILLED OR DEIONIZED WATER.
PERIODIC MAINTENANCE
Inspect the electrode and the cable. The cable used for connection to
the meter must be intact and there must be no points of broken
insulation on the cable or cracks on the electrode stem or bulb.
Connectors must be perfectly clean and dry.
If any scratches or cracks are present, replace the electrode.
Rinse off any salt deposits with water.
Refill the electrode with fresh electrolyte (HI8093) and let it stand
upright for 1 hour.
Follow the Storage Procedure above.
CLEANING PROCEDURE
General Soak in Hanna HI7061 or HI8061 General
Cleaning Solution for approximately 1 hour.
Removal of films, dirt or deposits on the membrane/junction:
- Protein Soak in Hanna HI7073 or HI8073 Protein
Cleaning Solution for 15 minutes.
- Inorganic Soak in Hanna HI7074 or HI8074 Inorganic
Cleaning Solution for 15 minutes.
- Oil/grease Rinse with Hanna HI7077 or HI8077 Oil and
Fat Cleaning Solution.
IMPORTANT: After performing any of the cleaning procedures rinse the
electrode thoroughly with a solution containing 2% ISA (see page 22),
refill (if necessary) the reference chamber with fresh electrolyte (HI8093)
and soak the electrode in a solution very close to the next sample to be
measured for at least 1 hour before taking measurements.
NEVER RUB OR BLOT DRY THE ELECTRODE.
Page 24

24
TROUBLESHOOTING GUIDE
SMOTPMYS MELBORP NOITULOS
pusetautculfgnidaeR
.)esion(nwoddna
dekcolbroytriD
.noitcnujedortcele
.edortceleehtnaelC
gniknilbswohsyalpsiD
.eulavelacslluf
.egnarfotuognidaeR sielpmastahtkcehC
;egnarelbarusaemnihtiw
dnaleveletylortcelekcehC
.sutatsedortcelelareneg
gniknilbswohsyalpsiD
“ C° “ro” F° .”
roredrofotuO
erutarepmetgnissim
.eborp
roeborperutarepmetecalpeR
.noitcennocehtkcehc
.edortceleecalpeR
gniknilbswohsyalpsiD
.lobmysyrettab
nolevelegrahcwoL
.yrettab
.seirettabecalpeR
htiwkrowtonseodreteM
.eborperutarepmet
erutarepmetnekorB
.eborp
erutarepmetecalpeR
.eborp
etarbilacotsliafreteM
.sgnidaerytluafsevigro
.edortceleESInekorB .edortceleecalpeR
“ GNORW ”
“ edortceleGNORW ”
gniruddeyalpsidsi
.erudecorpnoitarbilac
detanimatnocrognorW
.dradnats
dradnatstahtkcehC
dnatcerrocsinoitulos
ehtesU.hserf DTS otyek
etaiporppaehttceles
.reffub
.ffostuhsreteM ;yrettabdaeD
sierutaefffo-otuA
,esacsihtni:delbane
retfaffostuhsretem
fodoirepdetceles
.esu-non
.seirettabecalpeR
sserP FFO/NO .
“ xxrE taegassem”
.putrats
.rorrelanretnI ynarorelaedruoytcatnoC
.retneCecivreSannaH
tonseodtnemurtsniehT
nehwpotstonrotrats
gnisserp FFO/NO .
.rorrenoitazilaitinI nwoddlohdnasserP
FFO/NO 52tuobarof
erawdraharofsdnoces
tsisreprorreehtfI.teser
ynarorelaedruoytcatnoc
.retneCecivreSannaH
"euDlaC" " dorP "
.putratstasegassem
yrotcaftontnemurtsnI
.detarbilac
lacinhceTannaHtcatnoC
yrotcafroftroppuS
.noitarbilac
Page 25

25
ACCESSORIES
Na CALIBRATION (& STORAGE) SOLUTIONS FOR
HI931101:
HI 7080M 2.3 g/L Na solution, 230 mL
HI 7080L 2.3 g/L Na solution, 460 mL
HI 7086M 23 g/L Na solution, 230 mL
HI 7086L 23 g/L Na solution, 460 mL
HI 7087M 0.230 g/L Na solution, 230 mL
HI 7087L 0.230 g/L Na solution, 460 mL
Na CALIBRATION (& STORAGE) SOLUTIONS IN FDA
APPROVED BOTTLES FOR HI931101:
HI 8080M 2.3 g/L Na solution, 230 mL
HI 8080L 2.3 g/L Na solution, 460 mL
HI 8086M 23 g/L Na solution, 230 mL
HI 8086L 23 g/L Na solution, 460 mL
HI 8087M 0.230 g/L Na solution, 230 mL
HI 8087L 0.230 g/L Na solution, 460 mL
NaCl CALIBRATION (& STORAGE) SOLUTIONS FOR
HI 931100 & HI 931102:
HI 7081M 30 g/L NaCl solution, 230 mL
HI 7081L 30 g/L NaCl solution, 460 mL
HI 7083M 3.0 g/L NaCl solution, 230 mL
HI 7083L 3.0 g/L NaCl solution, 460 mL
HI 7085M 0.3 g/L NaCl solution, 230 mL
HI 7085L 0.3 g/L NaCl solution, 460 mL
HI 7090M ISA solution, 230 mL
HI 7090L ISA solution, 460 mL
NaCl CALIBRATION (& STORAGE) SOLUTIONS IN
FDA APPROVED BOTTLES FOR HI 931100 & HI 931102:
HI 8081M 30 g/L NaCl solution, 230 mL
HI 8081L 30 g/L NaCl solution, 460 mL
HI 8083M 3.0 g/L NaCl solution, 230 mL
HI 8083L 3.0 g/L NaCl solution, 460 mL
HI 8085M 0.3 g/L NaCl solution, 230 mL
HI 8085L 0.3 g/L NaCl solution, 460 mL
HI 8090M ISA solution, 230 mL
HI 8090L ISA solution, 460 mL
Page 26

26
ELECTRODE CLEANING SOLUTIONS:
HI7061M General Cleaning Sol., 230 mL
HI7061L General Cleaning Sol., 460 mL
HI7073M Protein Cleaning Sol., 230mL
HI7073L Protein Cleaning Sol., 460mL
HI7074M Inorganic Cleaning Sol., 230mL
HI7074L Inorganic Cleaning Sol.,460mL
HI7077M Oil & Fat Cleaning Sol., 230 mL
HI7077L Oil & Fat Cleaning Sol.,460 mL
ELECTRODE CLEANING SOLUTIONS IN FDA APPROVED
BOTTLES:
HI8061M General Cleaning Solution, 230 mL
HI8061L General Cleaning Solution, 460 mL
HI8073M Protein Cleaning Solution, 230mL
HI8073L Protein Cleaning Solution, 230mL
HI8077M Oil & Fat Cleaning Solution, 230mL
HI8077L Oil & Fat Cleaning Solution, 460mL
REFILLING ELECTROLYTE SOLUTION IN FDA APPROVED
BOTTLE:
HI8093 1M KCl + AgCl Electrolyte, 4x50mL
OTHER ACCESSORIES:
ChecktempC Pocket-size thermometer with penetration probe
and 0.1°C resolution (range -50.0 to 150.0°C)
FC 300B Sodium electrode, glass body, single junction,
refillable, with 1 meter (3.3') cable
HI190M-2 Mini-stirrer 220V (max. stirring capacity 1 liter,
speed range min.100 max. 1000 rpm)
HI190M-1 Mini-stirrer 115V (max. stirring capacity 1 liter,
speed range min.100 max. 1000 rpm)
HI 710031 Rugged carrying case
HI 721308 1.5V AA alkaline battery (10 pcs)
HI 7662 Temperature probe with 1 m (3.3') cable
HI 76405 Electrode holder
Page 27

27
RECOMMENDATIONS FOR USERS
Before using these products, make sure that they are entirely suitable for
the environment in which they are used.
Operation of these instruments in residential area could cause unacceptable
interferences to radio and TV equipments, requiring the operator to take
all necessary steps to correct interferences.
Any variation introduced by the user to the supplied equipment may
degrade the instruments' EMC performance.
To avoid electrical shock, do not use these instruments when voltages at
the measurement surface exceed 24VAC or 60VDC.
To avoid damages or burns, do not perform any measurement in microwave
ovens.
Page 28

28
Printed in ROMANIA MAN931100Y 11/12
Hanna Instruments Inc.
Highland Industrial Park
584 Park East Drive
Woonsocket, RI 02895 USA
Technical Support for Customers
Tel. (800) 426 6287
Fax (401) 765 7575
E-mail tech@hannainst.com
www.hannainst.com
Local Sales and Customer Service Office
 Loading...