

Page 1
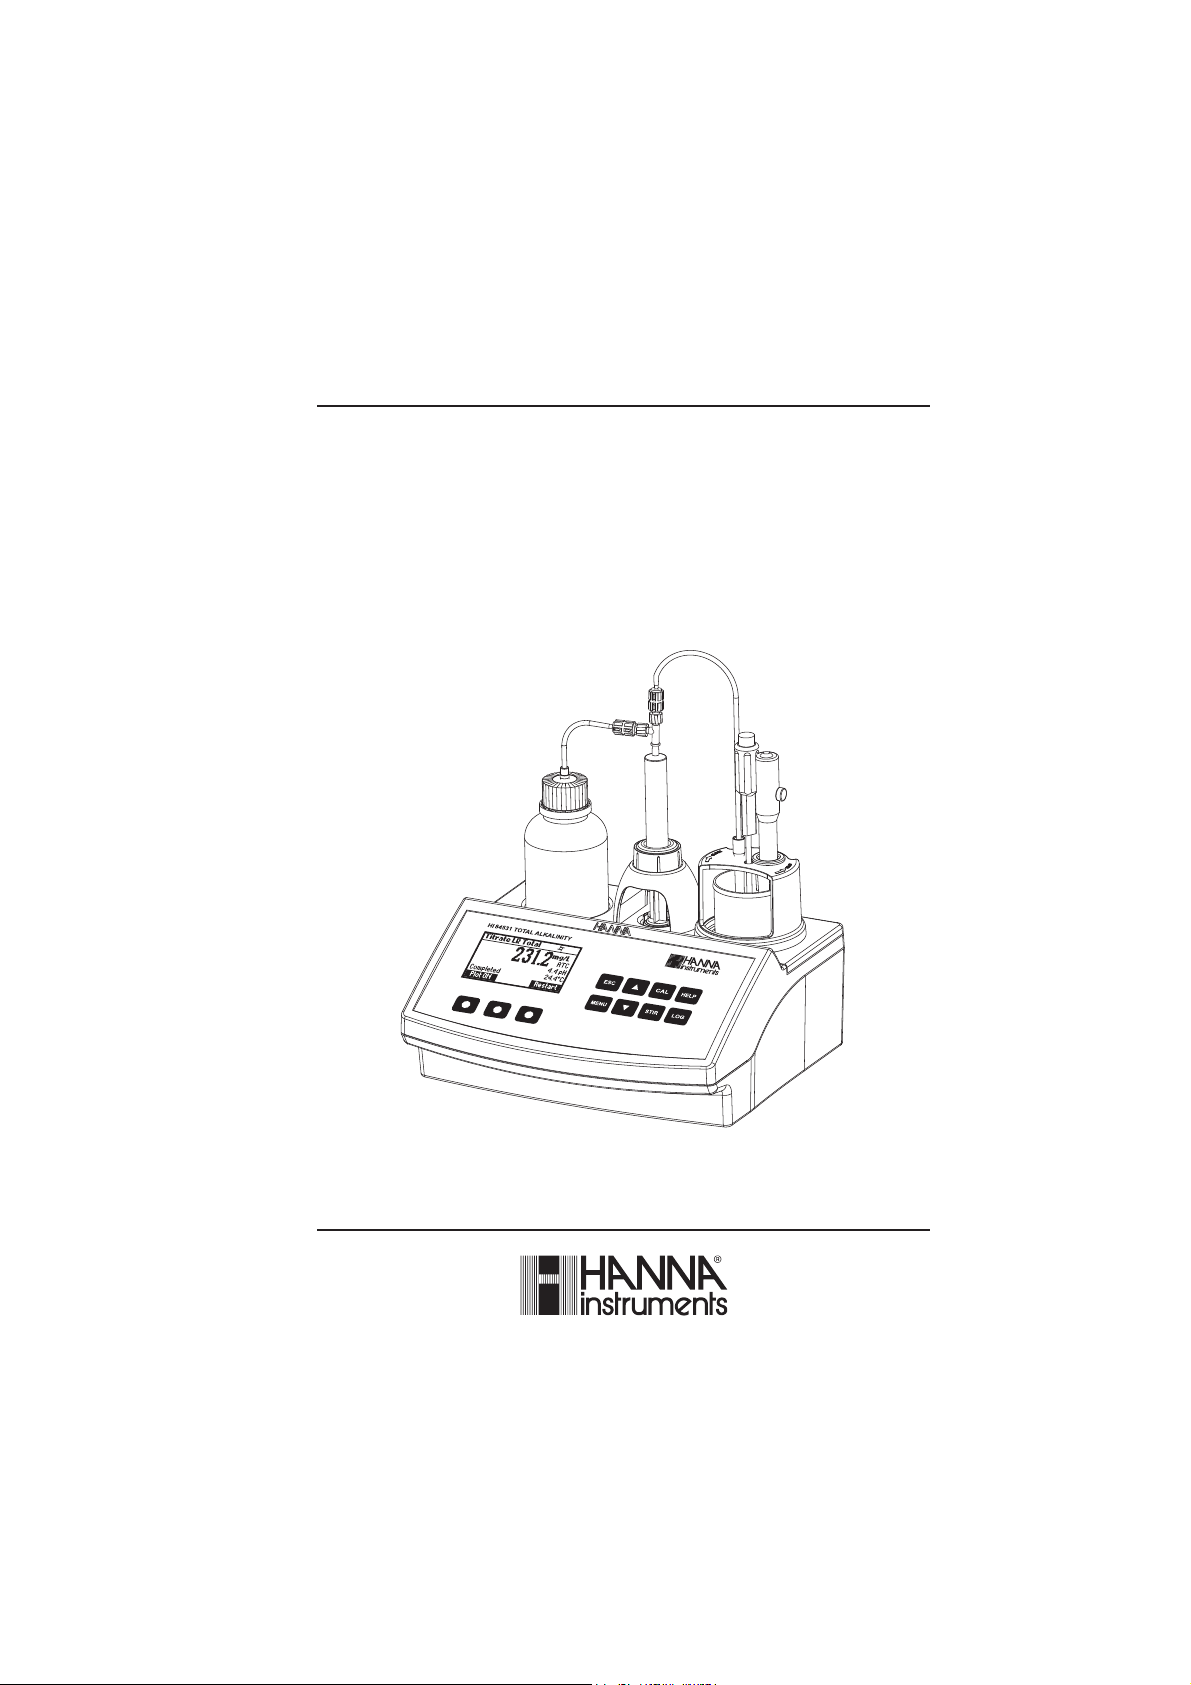
Instruction Manual
HI 84531
TOTAL ALKALINITY
MINITITRATOR & pH METER
for Water Analysis
www.hannainst.com
1
Page 2

Dear Customer,
Thank you for choosing a Hanna Instruments product.
Please read this instruction manual carefully before using this meter. This manual will provide you
with the necessary information for correct use of this meter, as well as a precise idea of its
versatility.
If you need additional technical information, do not hesitate to e-mail us at [email protected]
or view our worldwide contact list at www.hannainst.com.
2
Page 3

TABLE OF CONTENTS
PRELIMINARY EXAMINATION ................................................................................................. 4
GENERAL DESCRIPTION ......................................................................................................... 4
SIGNIFICANCE OF USE .......................................................................................................... 5
SPECIFICATIONS .................................................................................................................. 6
PRINCIPLE OF OPERATION..................................................................................................... 7
FUNCTIONAL DESCRIPTION ................................................................................................... 8
TITRATOR STARTUP ............................................................................................................ 10
SETUP MENU ..................................................................................................................... 11
GUIDE TO DISPLAY CODES .................................................................................................. 14
ELECTRODE PREPARATION................................................................................................... 19
ELECTRODE CALIBRATION PROCEDURE ................................................................................. 19
pH BUFFER TEMPERATURE DEPENDENCE ............................................................................. 23
DOSING PUMP INSTALLATION ............................................................................................. 24
DOSING PUMP PRIME PROCEDURE ...................................................................................... 24
PUMP CALIBRATION PROCEDURE ......................................................................................... 26
TITRATION PROCEDURE ...................................................................................................... 28
pH MEASUREMENT ............................................................................................................ 33
PC INTERFACE AND DATA TRANSFER .................................................................................... 37
TROUBLESHOOTING GUIDE ................................................................................................. 38
ELECTRODE CONDITIONING AND MAINTENANCE .................................................................... 40
ACCESSORIES .................................................................................................................... 41
WARRANTY ........................................................................................................................ 42
All rights are reserved. Reproduction in whole or in part is prohibited without the written consent of
the copyright owner, Hanna Instruments Inc., Woonsocket, Rhode Island, 02895, USA.
3
Page 4

PRELIMINARY EXAMINATION
Please examine this product carefully. Make sure that the instrument is not damaged. If any
damage occurred during shipment, please notify your Dealer.
Each HI 84531 minititrator is supplied complete with:
• HI 84531-70 Reagent Kit for titrable alkalinity in water
• HI 1131B pH electrode
• HI 7082 Electrode fill solution
• HI 7662-T Temperature probe
• Two 100 mL beakers
• Dosing Pump Valve
• 5 mL syringe
• 2000 µL automatic pipette with two plastic tips
• Two 20 mL beakers
• Tube set (aspiration tube with titrant bottle cap and dispensing tube with tip)
• Stir bar
• Power Adapter
• Instruction manual
Note: Save all packing material until you are sure that the instrument works correctly. Any
defective item must be returned in its original packing.
GENERAL DESCRIPTION
The HI 84531 is a low-cost, easy to use, microprocessor-based automatic minititrator and pH meter
designed for the rapid and accurate analysis of Total Titratable Alkalinity in water. By eliminating
subjective factors including color indicators, errors in mathematical calculations or erratic titrant
additions from the measurement, this meter will quickly become a valuable analysis tool for water
and wastewater.
The meter benefits from Hanna’s many years of experience as a manufacturer of quality analytical
instrumentation. A clear and well-designed user interface makes the meter intuitive and simple to
use.
The meter employs a powerful and effective built-in algorithm to analyze the pH response to determine
the exact pH end point, then uses this to make the necessary calculations.
By simply pressing the Start key in Titrator mode, the instrument will automatically titrate the
sample to the end point. The current pH and temperature are continuous displayed during titration
process. The concentration is instantaneously displayed in selected measurement units on the large
dot matrix display, then the instrument is ready for another titration by pressing the Restart key.
4
Page 5

A dedicated HELP key aids in setup, calibration, status and troubleshooting.
Other features:
• pH meter / mV meter
• Stir speed control
• Data can be stored using the log feature and then exported to a USB stick or transferred
to a PC using the USB connection
• Log on demand for up to 400 samples (200 for pH measurements; 200 for titration
results)
• GLP feature, to view calibration data for pH electrode and pump
SIGNIFICANCE OF USE
Alkalinity is an important parameter for control and treatment of water (surface, drinking and
wastewater) it is indication of the waters buffering capacity or its ability to resist pH change.
Low alkalinity signifies that the water is susceptible to pH change, while high alkalinity indicates that
the water is able to resist a major change in pH.
Alkalinity is primarily a result of the carbonate (CO
concentration in water. However alkalinity concentrations include all contributions from borate,
phosphates, silicates, and other base species present.
Water samples are subject to interferences including:
• Dissolved gases that contribute to alkalinity are lost or gained during sampling, transport or
storage, these gasses can include carbon dioxide.
• Oily matter, suspend solids, precipitated and other waste matter can coat the glass electrode
causing a slow response time.
The HI 84531 minititrator uses a method based on Standard Methods for the Examination Water and
Wastewater. Standard Methods refers two types of alkalinity:
1) Strong Alkalinity or Phenolphthalein Alkalinity is typically determined by a titration to pH 8.3.
2) Total Alkalinity or Bromcresol Green Alkalinity is typically determined by a titration to pH 4.5.
The water sample is titrated until a fixed pH end point (4.5 or 8.3), the end point is determined by
the potentiometric input.
2
¯), bicarbonate (HCO3) and hydroxide (OH¯)
3
5
Page 6

SPECIFICATIONS
Titrator Range Low Range (LR): 30.0 - 400.0 mg/L CaCO
0.6 - 8.0 meq/L CaCO
High Range (HR): 300 - 4000 mg/L CaCO
6.0 - 80.0 meq/L CaCO
3
3
3
3
Resolution LR: 0.1 mg/L / 0.1 meq/L
HR: 1 mg/L / 0.1 meq/L
Accuracy LR:± 1 mg/L or 3% of reading @ 25 °C whichever is greater
HR: ± 10 mg/L or 3% of reading @ 25 °C whichever is greater
Sample Volume 50 mL
Titration method Acid-base titration
Principle End point titration pH 4.50 or pH 8.30
Pump speed 10 mL/min
Stirring speed 600 rpm
Log data Up to 200 samples
pH meter pH meter -2.0 to 16.0 pH / -2.00 to 16.00 pH
pH resolution: 0.1 pH / 0.01 pH
pH accuracy: ± 0.01 pH
pH calibration: 1, 2 or 3 calibration points;
4 available buffers (4.01, 7.01, 8.30, 10.01)
Temperature Manual or automatic
Compensation
mV meter mV meter -2000.0 to 2000.0 mV
mV resolution: 0.1 mV
mV accuracy: ± 1.0 mV
Log data Up to 200 samples (pH or mV)
Temperature Range -20.0 to 120.0 °C (-4.0 to 248.0 °F)
Resolution 0.1 °C
Accuracy ±0.4 °C without probe error
Electrode HI 1131B
Temperature Probe HI 7662-T
Environment 0 to 50 °C (32 to 122 °F); max 95% RH non-condensing
Power supply 12 Vdc power adapter
Dimensions 235 x 200 x 150 mm (9.2 x 7.9 x 5.9”)
Weight 1.9 kg (67.0 oz.)
6
Page 7

REQUIRED REAGENTS
Code Description
HI 84531-50 Low Range Titrant
HI 84531-51 High Range Titrant
HI 84531-55 Calibration Standard
PRINCIPLE OF OPERATION
Water alkalinity determinations are based on the neutralization of all basic species contained in the
sample by titration with an acid:
OH¯ + H+ à H2O
In an ideal solution, the end point of an alkalinity titration corresponds stoichimetrically to the
complete neutralization of all the bases present. Due to the complex sample matrix, titrations are
typically performed to a fixed pH end point. Two types of alkalinity can be determined based on the
selected end point Total Alkalinity (pH 4.5) or Strong Alkalinity (pH 8.3). The endpoint can be
determined visually using a color indicator (i.e. phenolphthalein or bromocresol green), however this
endpoint can be become objective depending on the analysts. The HI 84531 removes this issue by
titrating to a fixed pH endpoint (4.5 or 8.3) determined by the user. The concentration can vary
significantly with the selected pH end-point. For precise analysis the sample size, volume of titrant
added and titrant concentration must be known.
The HI 84531 Total Alkalinity Minititrator utilizes a simple sample preparation, a high quality dosing
pump for titrant additions, potentiometric endpoint determination and instantaneous computations.
To maintain the high accuracy of the minititrator a simple pump calibration is required. The pump
calibration uses a known quantity of a known solution to compensate for changes in the dosing
system, this procedure should be performed regularly.
7
Page 8
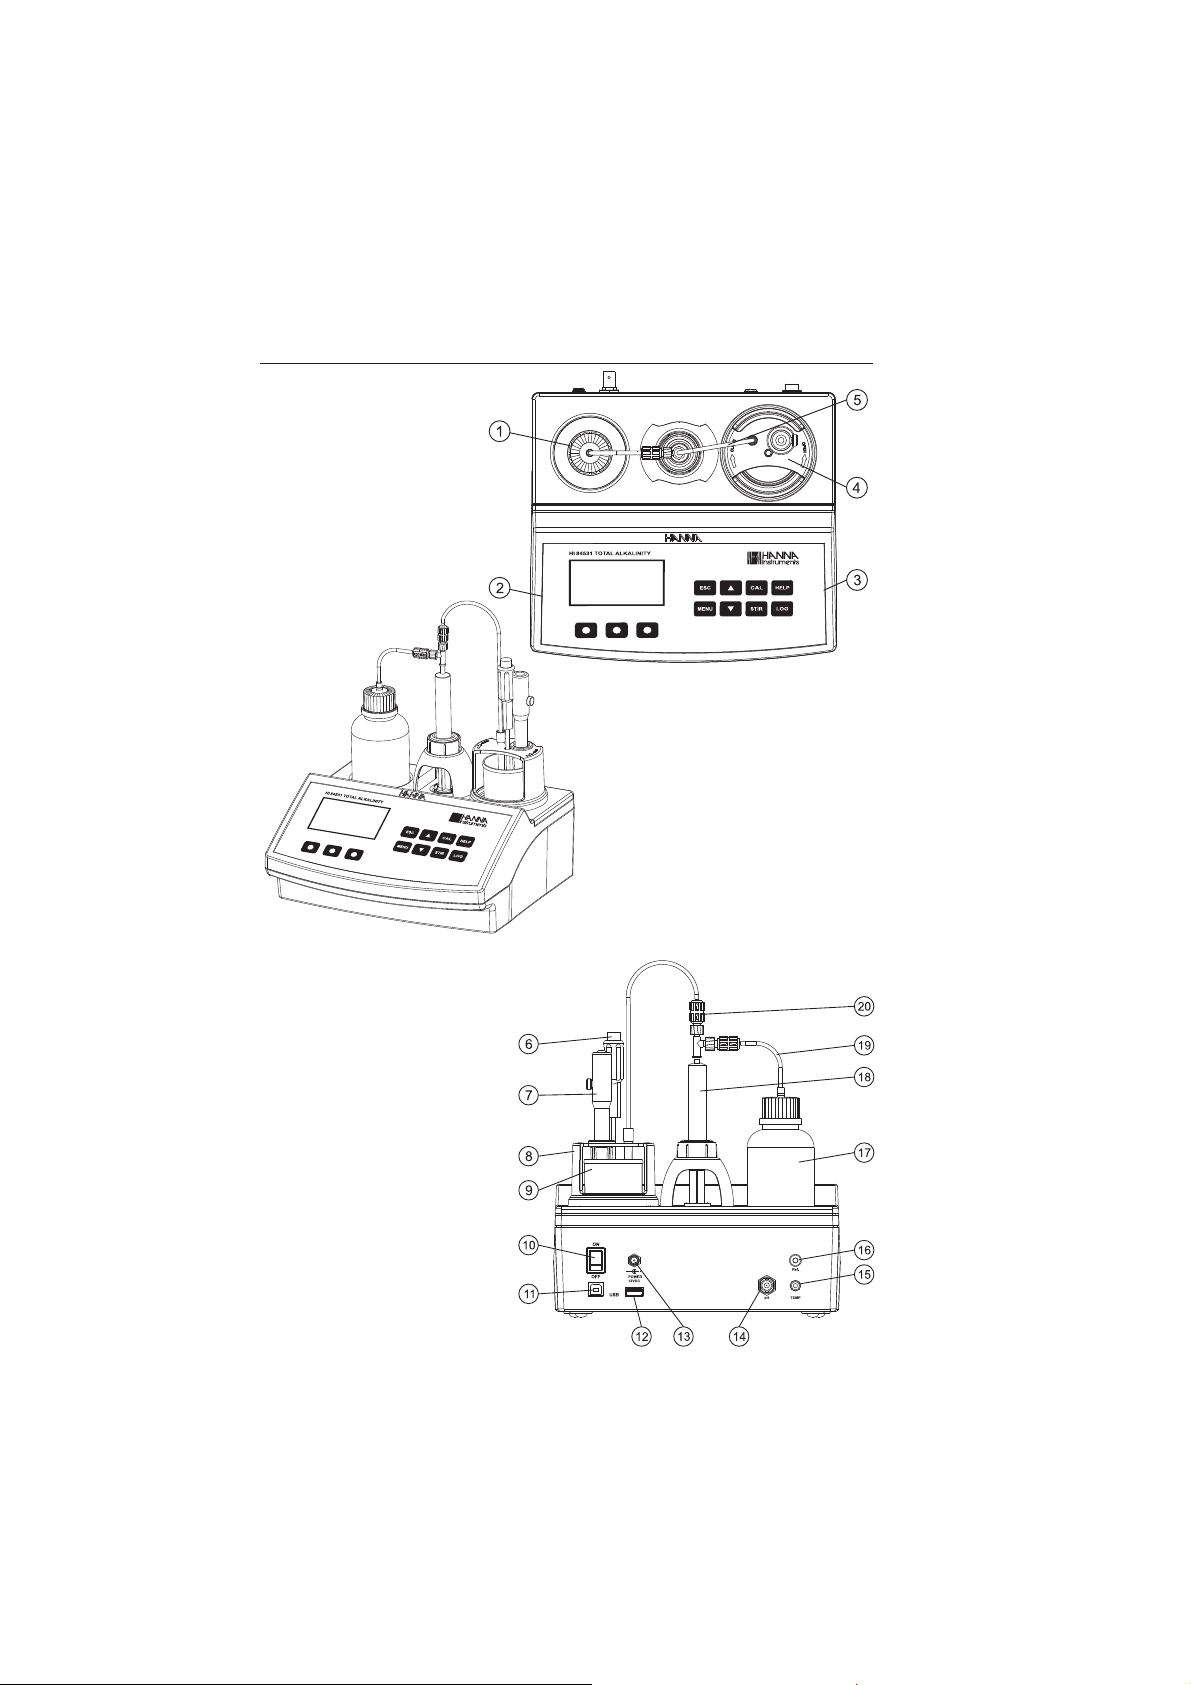
FUNCTIONAL DESCRIPTION
OVERHEAD VIEW
1) Titrant bottle
2) Liquid Crystal Display (LCD)
3) Keypad
4) Electrode holder
5) Dispensing tube
FRONT VIEW
REAR VIEW
6) Temperature probe
7) pH Electrode
8) Electrode holder
9) Beaker
10) Power switch
11) USB connector (PC interface)
12) USB connector (Storage interface)
13) Power adapter
14) BNC electrode connector
15) Temperature connector
16) Reference connector
17) Titrant bottle
18) Syringe
19) Aspiration tube
20) Dosing Pump Valve
8
Page 9
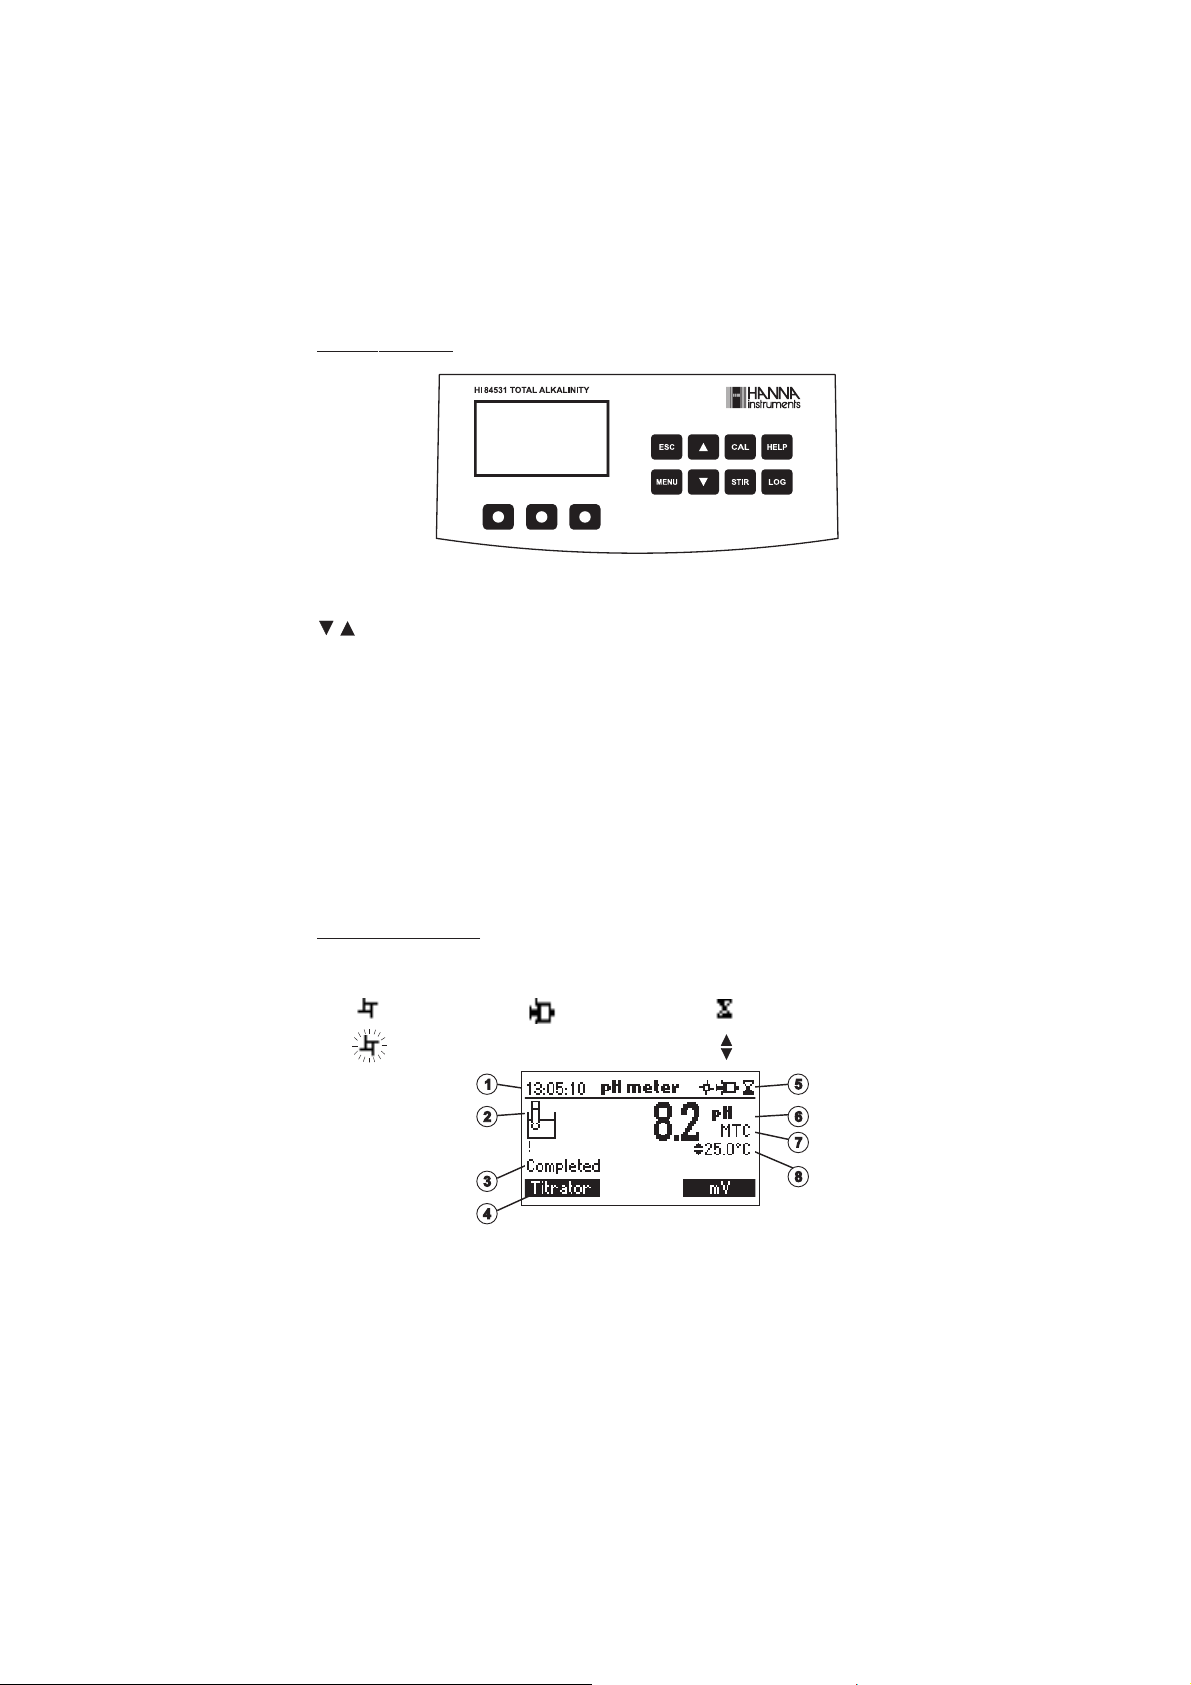
KEYPAD FUNCTION
ESC - used to leave the current screen and to return either to the previous screen or to the
main screen. In Setup menu, exits a parameter without changing the value.
/ - used to modify the parameter values, to scroll the information displayed while viewing
a help screen or to move between the options from the instrument’s Setup menu
CAL - used to access the Electrode and Pump calibration options
HELP - used to access/exit the instrument’s contextual help
LOG - used to save the current mV/pH reading in pH meter mode and the titration result
MENU - used to enter Setup, Recall or GLP selection menu, while instrument is in pH or
Titration mode
STIR - used to start/stop the stirrer
Note: The stirrer starts automatically during pump calibration and titration, it cannot
be stopped by pressing STIR key.
GUIDE TO INDICATORS
During the instrument’s operation information is displayed on the LCD.
Displayed icons:
Unstable reading.Stirrer on. Pump running.
Parameter can be modified.Stirrer is not working properly.
1) Current time and instrument mode information (pH meter or Titrator)
2) pH electrode condition
3) Instrument status
4) Virtual option keys
9
Page 10

5) Stirrer and reading status
6) Main reading information
7) pH temperature compensation mode (Manual or Automatic)
8) Temperature reading
DOSING PUMP
The dosing pump is based on a valve that automatically moves the titrant between the titrant
bottle and syringe when filling the syringe and between the syringe and sample when dispensing.
A replaceable 5 mL plastic syringe is used to limit the amount of titrant used per test to ensure the
highest possible accuracy. Before a set of titrations, it is necessary to prime the dosing system.
Note: Once titrations have been completed, the dosing system should be cleaned with deionized
water using the prime feature.
TITRATOR STARTUP
This is a general outline of the steps required to perform a titration. The following topics are
expanded upon each section that follows.
• Place the instrument on a flat table. Do not place the instrument in direct sun light.
• Connect the power adapter to the instrument.
• Turn the instrument ON using the power switch from the rear panel of the instrument.
• Set up the instrument. See the “Setup Menu” section for details.
• Connect the pH electrode to the instrument.
• Connect the temperature sensor to the instrument.
• Calibrate the pH electrode.
• Connect the tubes and the valve. See the “Dosing Pump Installation” section for the procedure.
• Remove the titrant bottle cap and replace it with the bottle cap with tubes. Place the titrant
bottle in the appropriate place on the titrator top.
Note: Different titrants are required based on the concentration. See “Pump Calibration Procedure”
for details.
• Prime the syringe. To assure high accuracy, verify there are no air bubbles in the syringe or
tubing.
• Calibrate the pump.
Note: Different volumes of standard are required based on the concentration. See “Titration
Procedure” for details.
• Prepare the sample.
• Run a titration and log sample results.
10
Page 11

SETUP MENU
egnaRtnemerusaeM woL hgiH
R egna
L/gm 0.03 - 0.004 003 - 0004
L/qem 0 6. - 8 0. 6 0. - 0.08
epyTytidicA latoT gnortS latoT gnortS
Hp tniopdnE Hp5.4 Hp3.8 Hp5.4 Hp3.8
elpmasmuminiM Hp > 5.4 Hp Hp3.8> > 5.4 Hp .8> 3 Hp
The titrator’s setup menu may be accessed from the main screen (meter or titrator) by pressing the
MENU key, then Setup.
A list of setup parameters will be displayed with currently configured setting.
While in the setup menu, it is possible to modify the instrument’s operation parameters. The
ARROW keys permit the user to scroll the setup parameters.
Press HELP to view the contextual help.
Press ESC to return to the main screen.
Concentration Unit
mg/L or meq/L.
Press the corresponding virtual option key to change
the option.
Measurement Range
LR or HR.
Use the table below to determine the appropriate
range. Press the corresponding virtual option key to
change the option.
Note: Different titrant solutions are required for each
Alkalinity Type
From your knowledge of expected concentrations, use the table below to determine which settings
and solutions are appropriate:
range.
Strong or Total.
Use the table below to determine the appropriate
range.
Press the corresponding virtual option key to change
the option.
11
Page 12
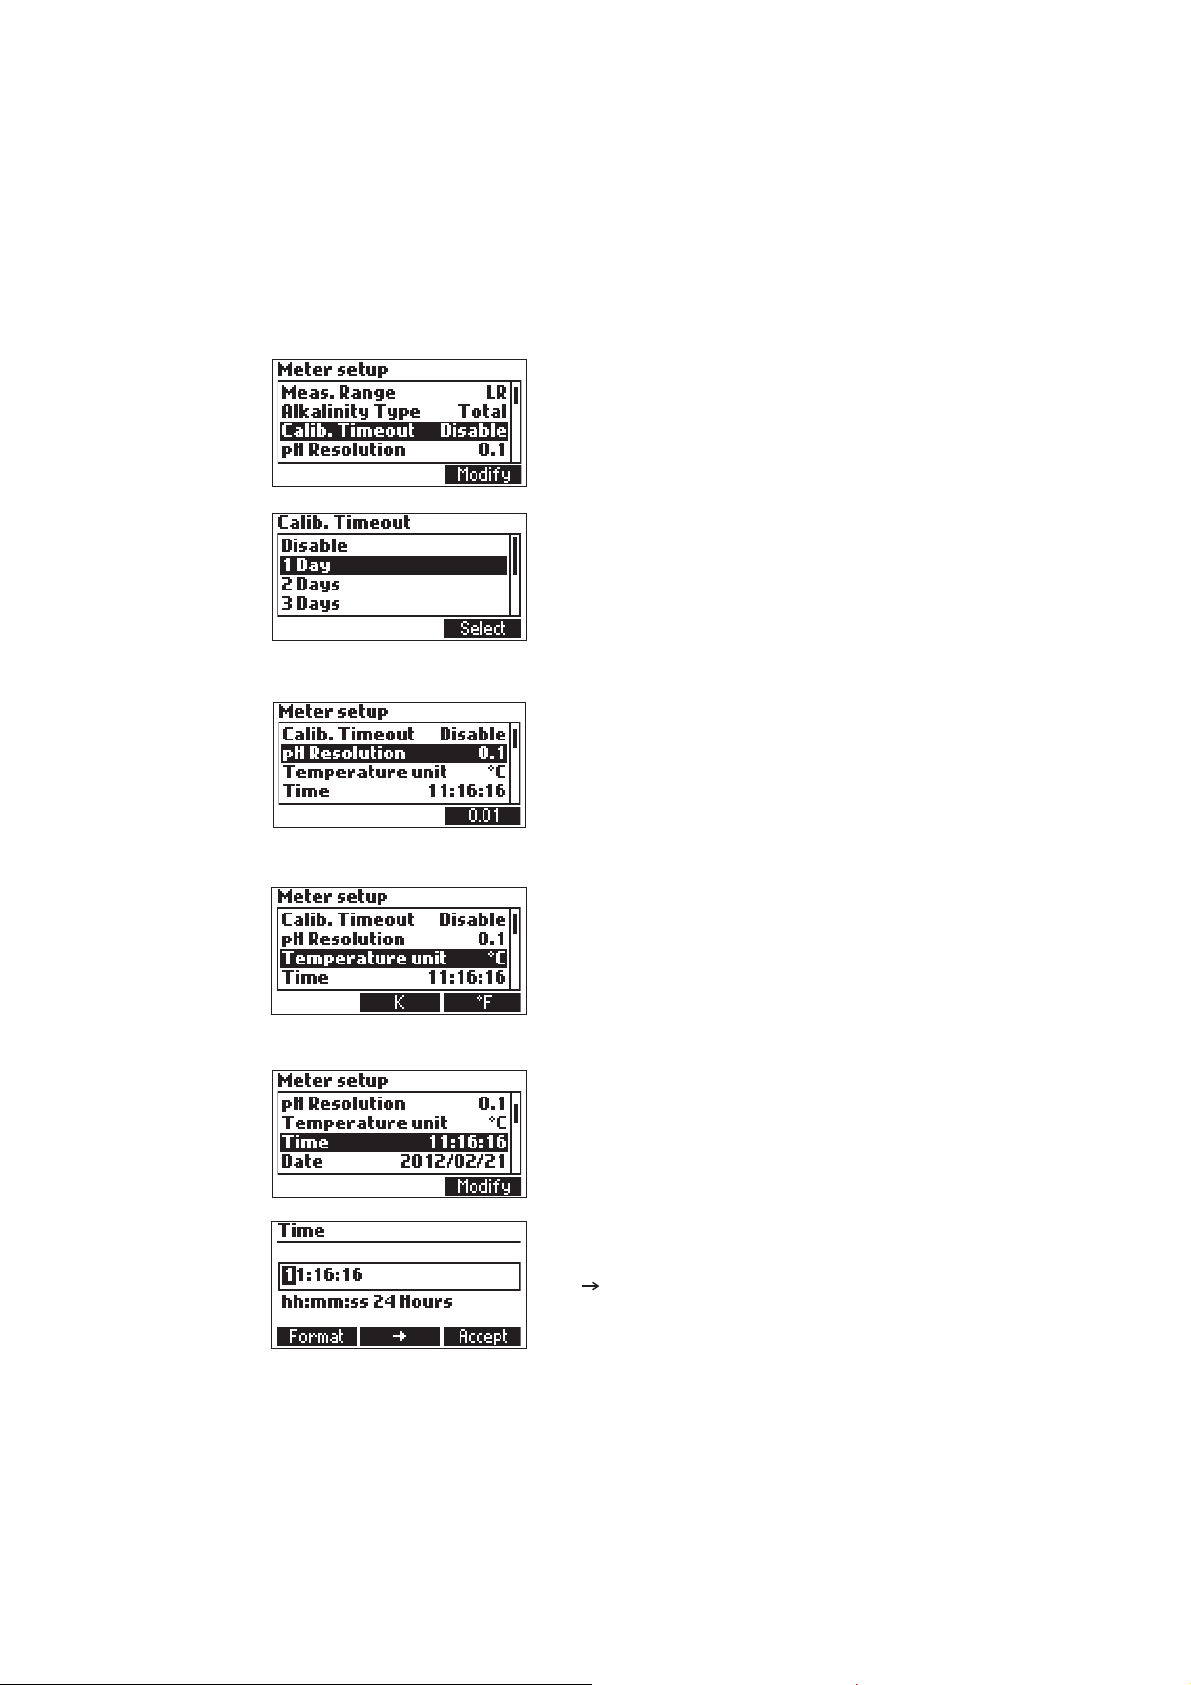
Calibration Timeout
pH Resolution
Temperature Unit
Disabled or 1 to 7 days.
Set the number of days before the pH calibration
expired warning message is displayed.
Press Modify to access the calibration timeout screen.
Use the ARROW keys to select the value.
Press Select to confirm or ESC to return to the setup
menu without saving the changes.
0.1 or 0.01.
Press the displayed virtual option key to change the
resolution.
°C, °F or K.
Press the virtual option key to change the option.
Time
Press the Modify key to change the time and time
format.
Press Format to switch between 12 hour (am/pm)
and 24 hour mode.
Press to highlight the value to be modified. Use
the ARROW keys to change the value. Press Accept to
confirm the new value or ESC to return to the setup.
12
Page 13
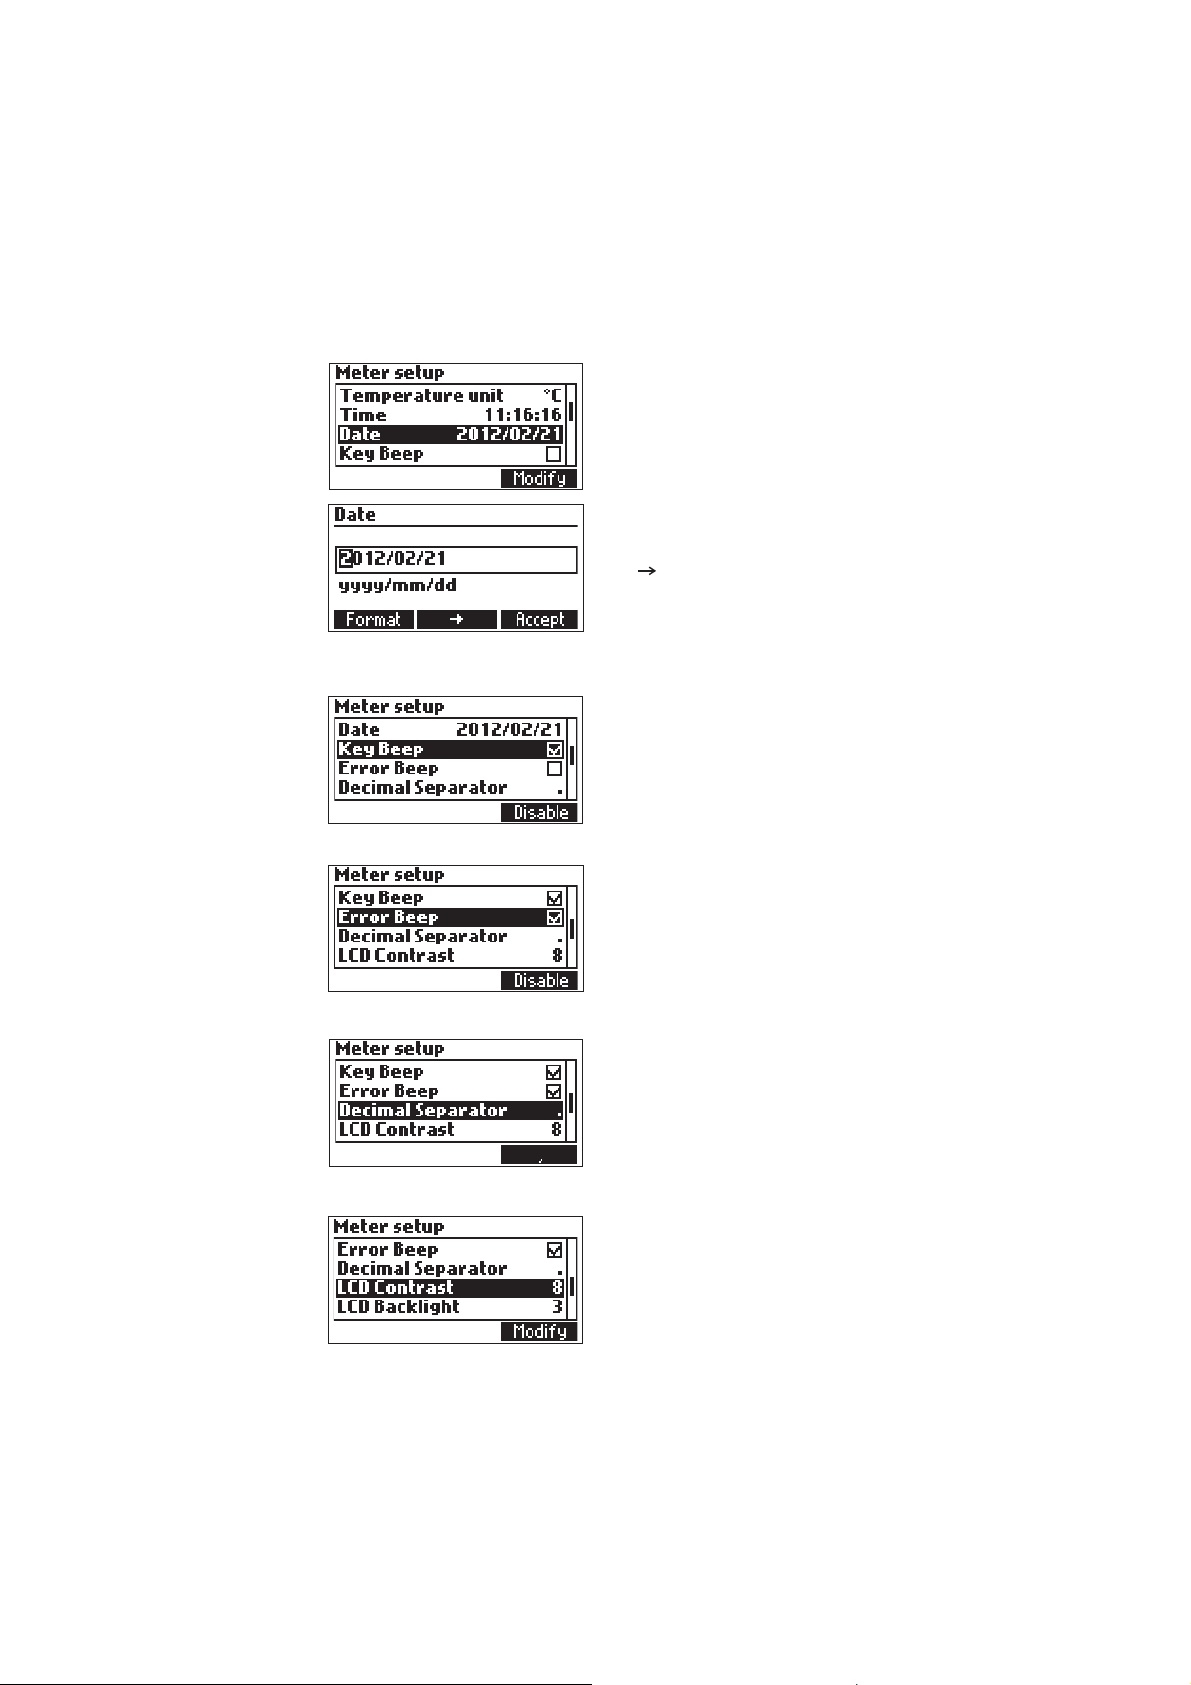
Date
Key Beep
Error Beep
Press the Modify key to change the date and date
format.
Press Format to cycle between the available date
formats.
Press to highlight the value to be modified. Use
the ARROW keys to change the value. Press Accept to
confirm the new value or ESC to return to the setup.
Select Enable to activate or Disable to deactivate
the Key Beep function.
If enabled, a short beep will be heard every time a
key is pressed.
Select Enable to activate or Disable to deactivate
the Error Beep function.
If enabled, a beep will be heard when an error
condition occurs.
Decimal Separator
LCD Contrast
Select the symbol used for a decimal separator.
Press Modify to change the display’s contrast.
The default value is 8.
13
Page 14
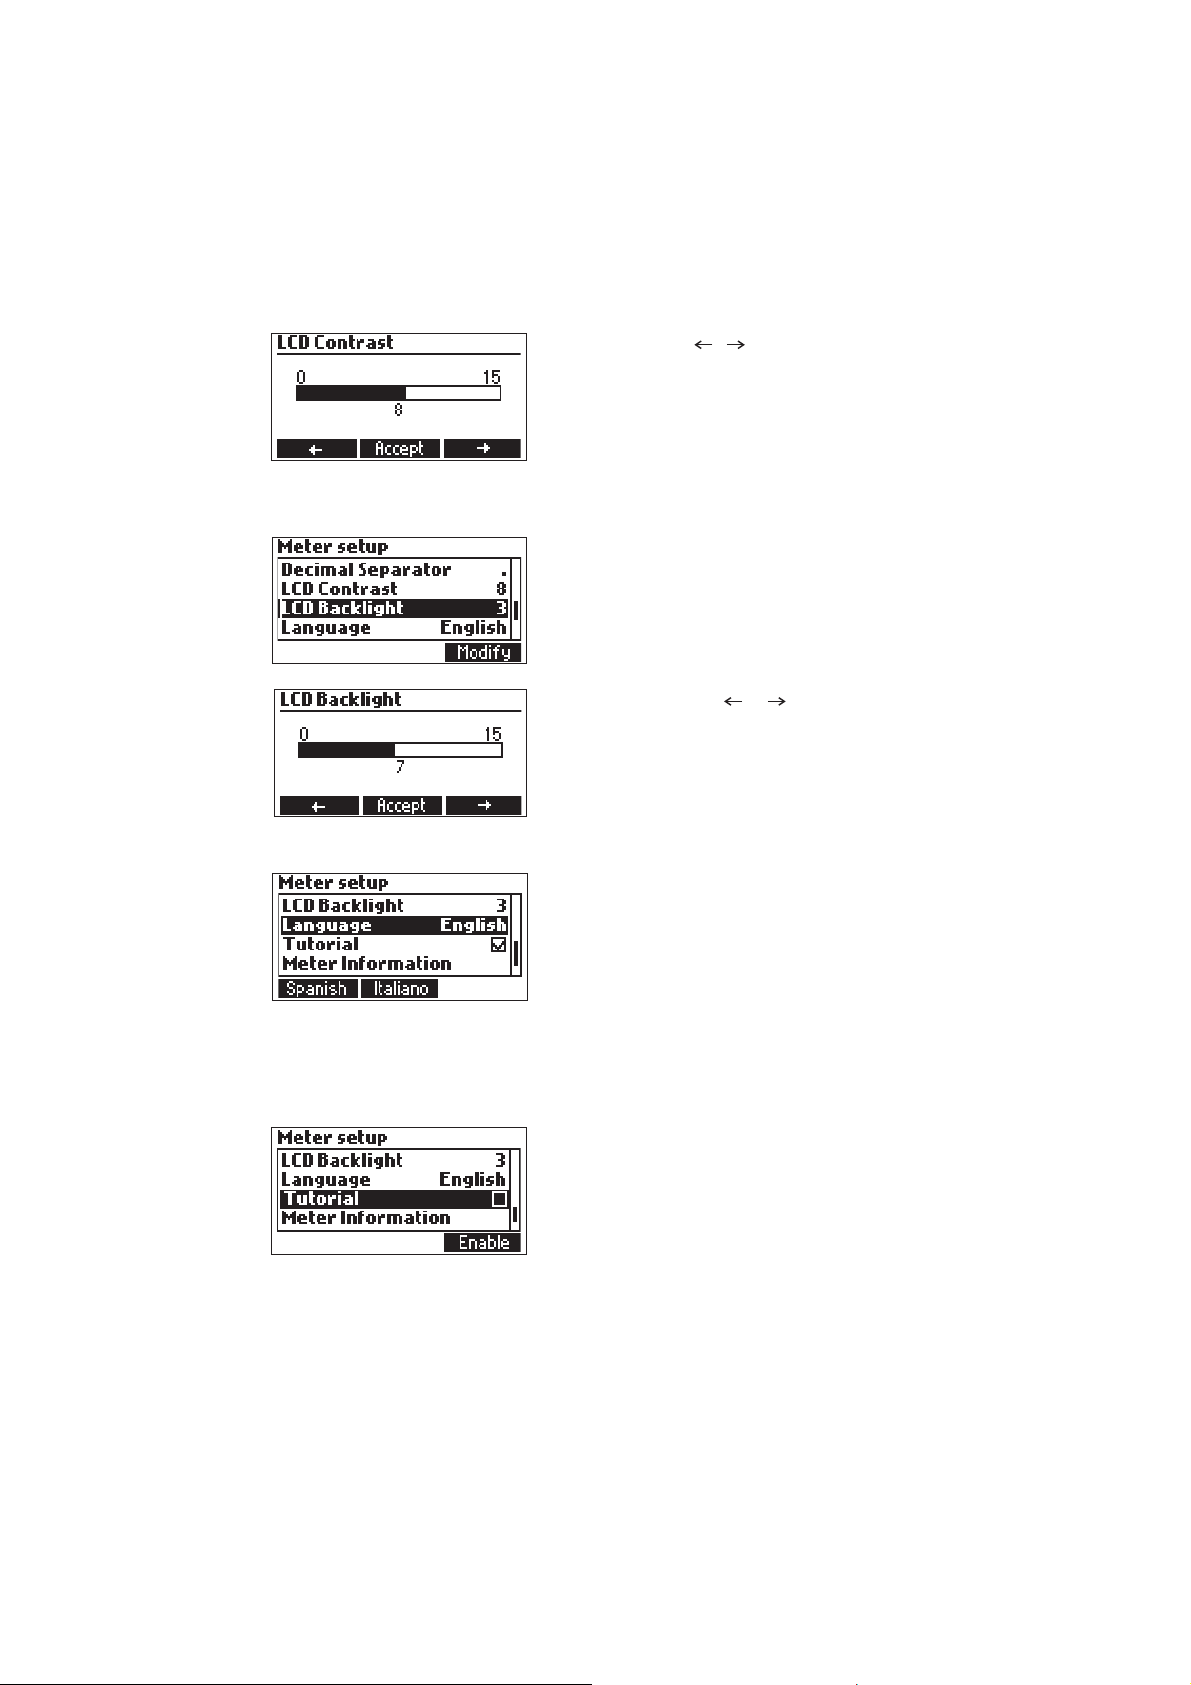
LCD Backlight
Language
Use the ARROW keys or / to increase/decrease
the value.
Press Accept to confirm the value or ESC to return to
the setup menu.
Press Modify to change the backlight level.
The default value is 3.
Use the ARROW keys or / to increase/
decrease the backlight level.
Press Accept to confirm or ESC to return to the setup
menu.
Press the corresponding virtual option key to change
the option.
If the selected language cannot be loaded, the
previously selected language will be reloaded.
If no language can be loaded at startup the instrument
will work in the “safe mode”. In “safe mode” all
messages are displayed in English and tutorial and
help information are not available.
Tutorial
Enable or Disable the Tutorial. This helpful tool
offers additional information during calibration and
titration.
14
Page 15
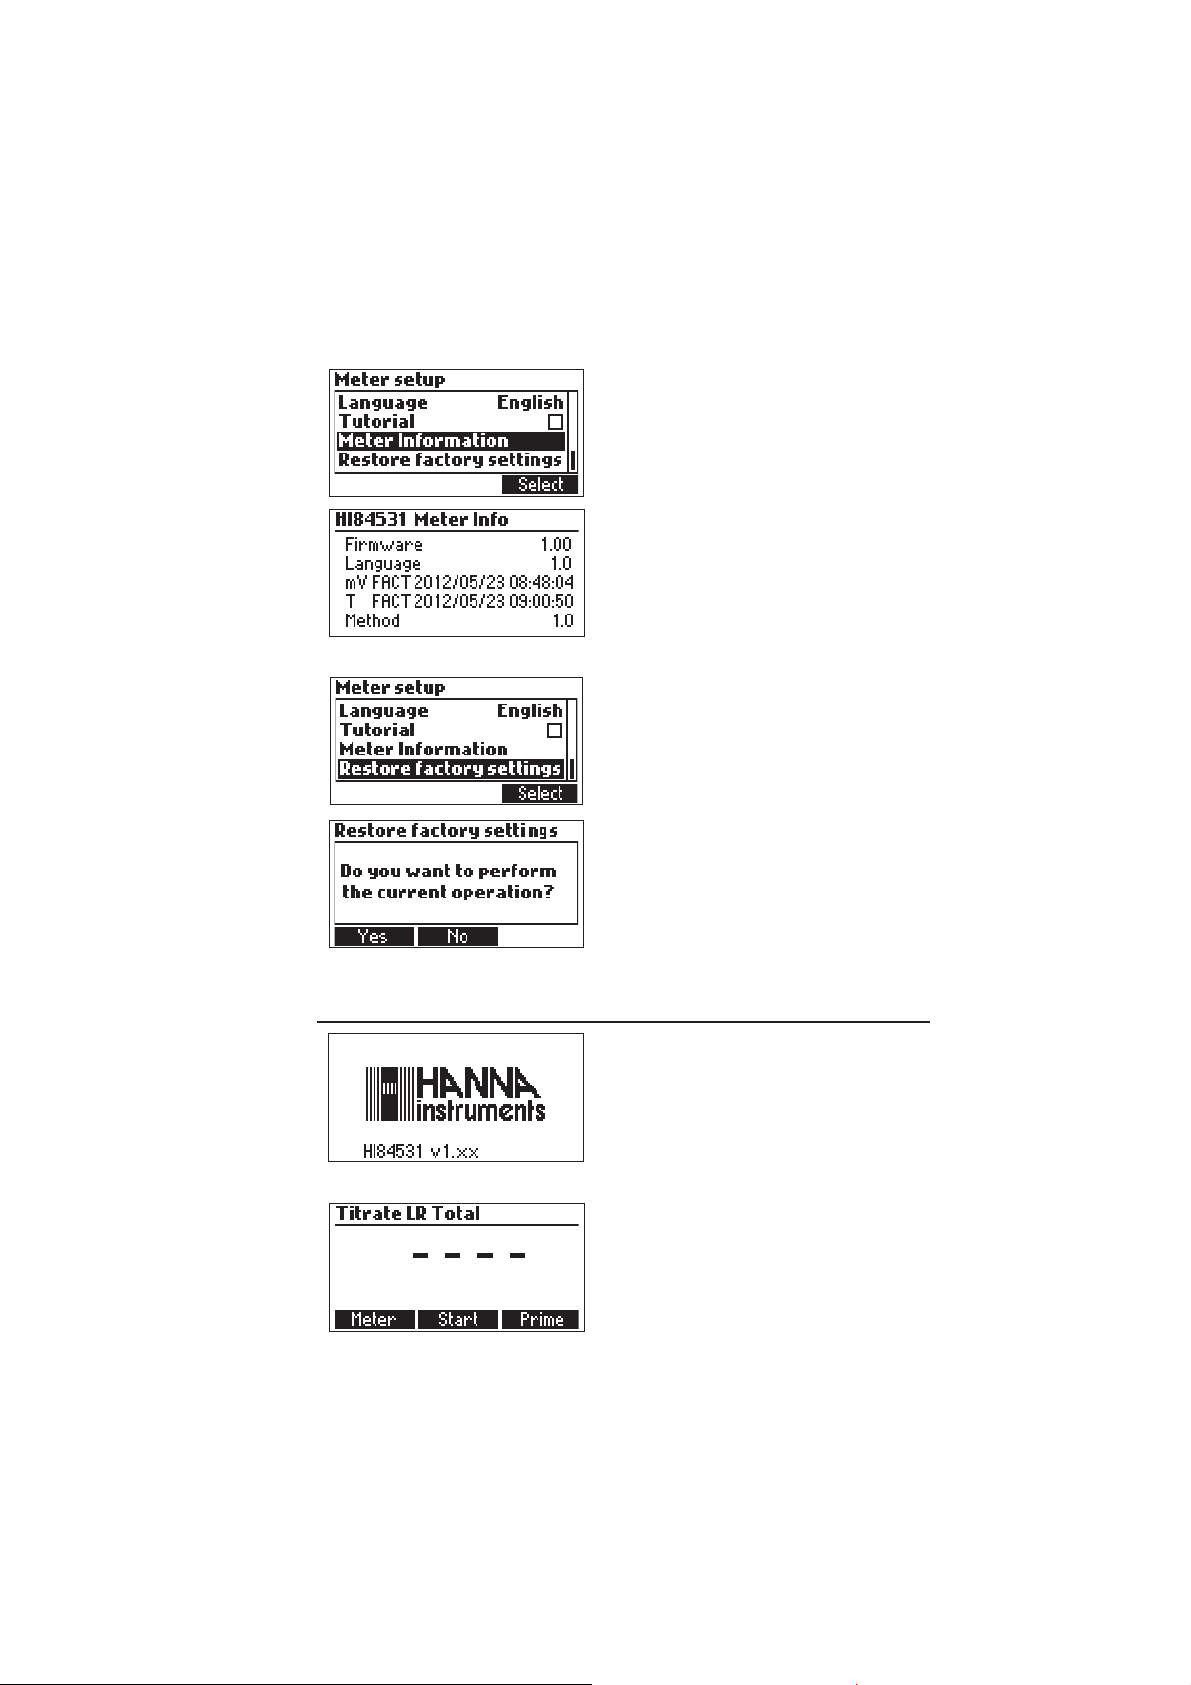
Meter Information
Restore Factory Settings
Press Select to view the firmware version, language
version, mV factory calibration date and time,
temperature factory calibration date and time and
method version.
Press ESC to return to the setup menu.
Press Select to restore the factory settings.
Press Yes to confirm the restore process or No to
return without restoring.
Press ESC to return to the setup menu.
GUIDE TO DISPLAY CODES
This screen appears when the instrument is turned
on during the initialization process.
Titration screen display.
15
Page 16
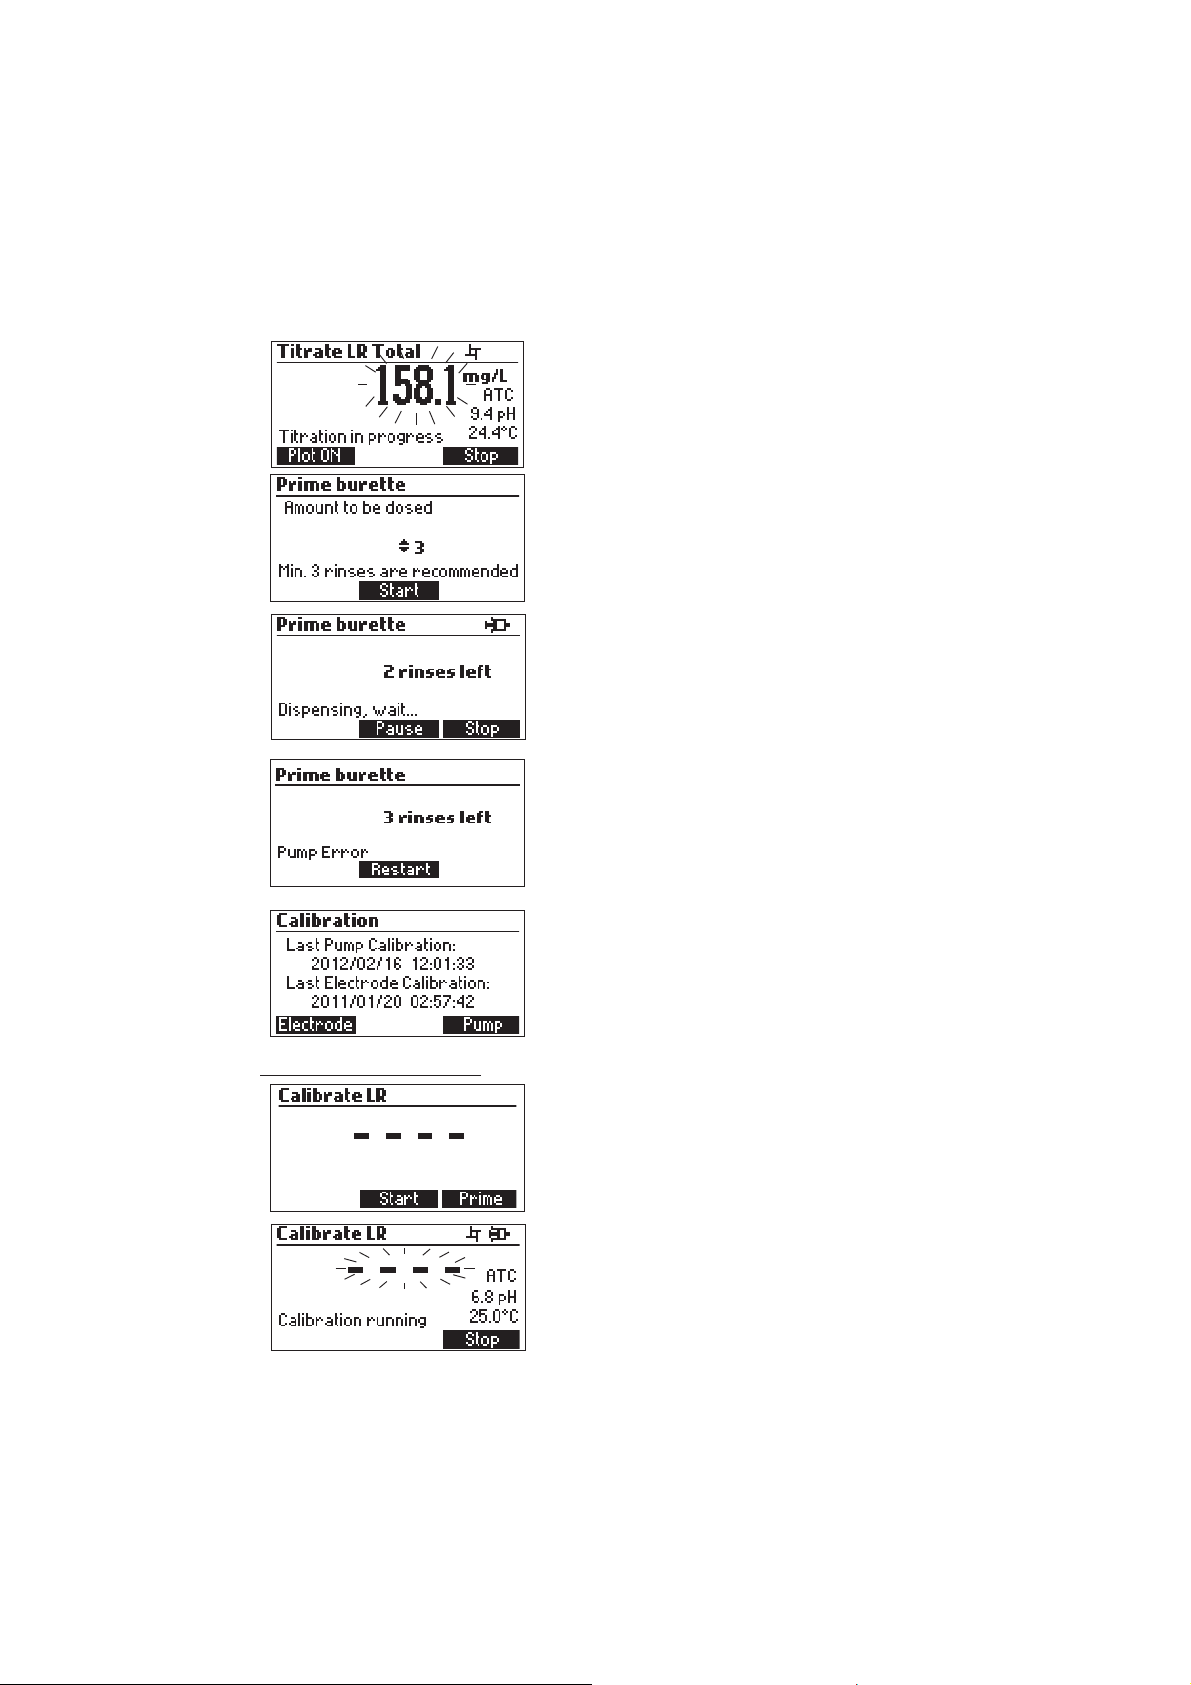
Titration screen when a titration is in progress.
Prime burette screen.
Prime burette screen when the dosing system is
running.
This error message appears when the pump is not
working properly. Check the tubing, valve and syringe.
Press Restart to try again.
This screen appears when the titrator is in calibration
mode.
Press Pump to calibrate Pump.
Press Electrode to calibrate pH Electrode.
PUMP CALIBRATION MESSAGES
Pump calibration is initiated by pressing the Start
key.
This screen appears while pump calibration is in
progress. Pressing ESC or Stop key, to return to the
Pump Calibration screen.
16
Page 17
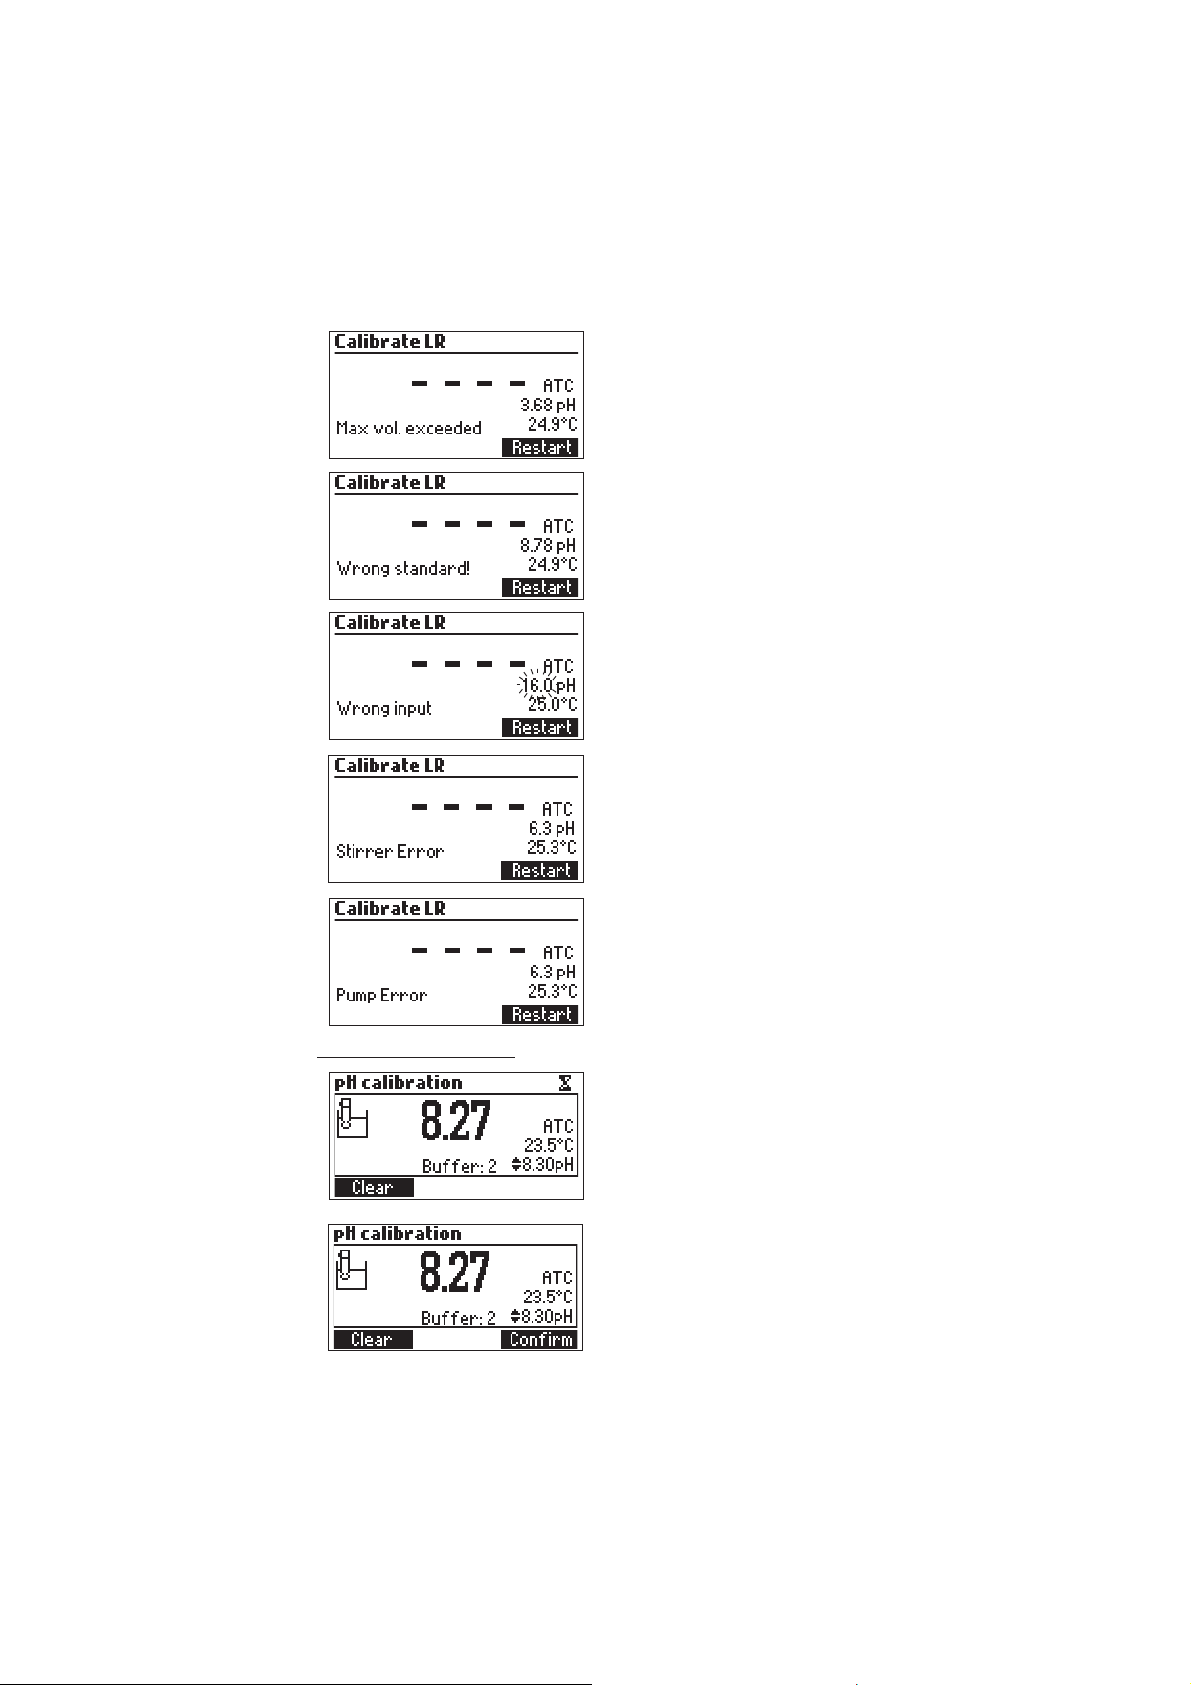
This error message appears during pump calibration
when the end point can not be reached and the
maximum amount of titrant is exceeded. Check
standard, electrode and/or dosing system and try
again.
The calibration was outside the acceptable limits.
Prepare a new standard and try again.
This error message appears when the pH reading
exceeds the acceptable input limits (-2.00 < pH >
16.00).
This screen appears when the stirrer is not working
properly. Check the stir bar and beaker content. Press
Restart to try again.
This error message appears when the pump is not
working properly. Check the tubing, valve and syringe.
Press Restart to try again.
pH CALIBRATION MESSAGES
pH calibration mode.
When the reading has stabilized press Confirm to
accept the calibration or Clear to restore the default
calibration.
17
Page 18
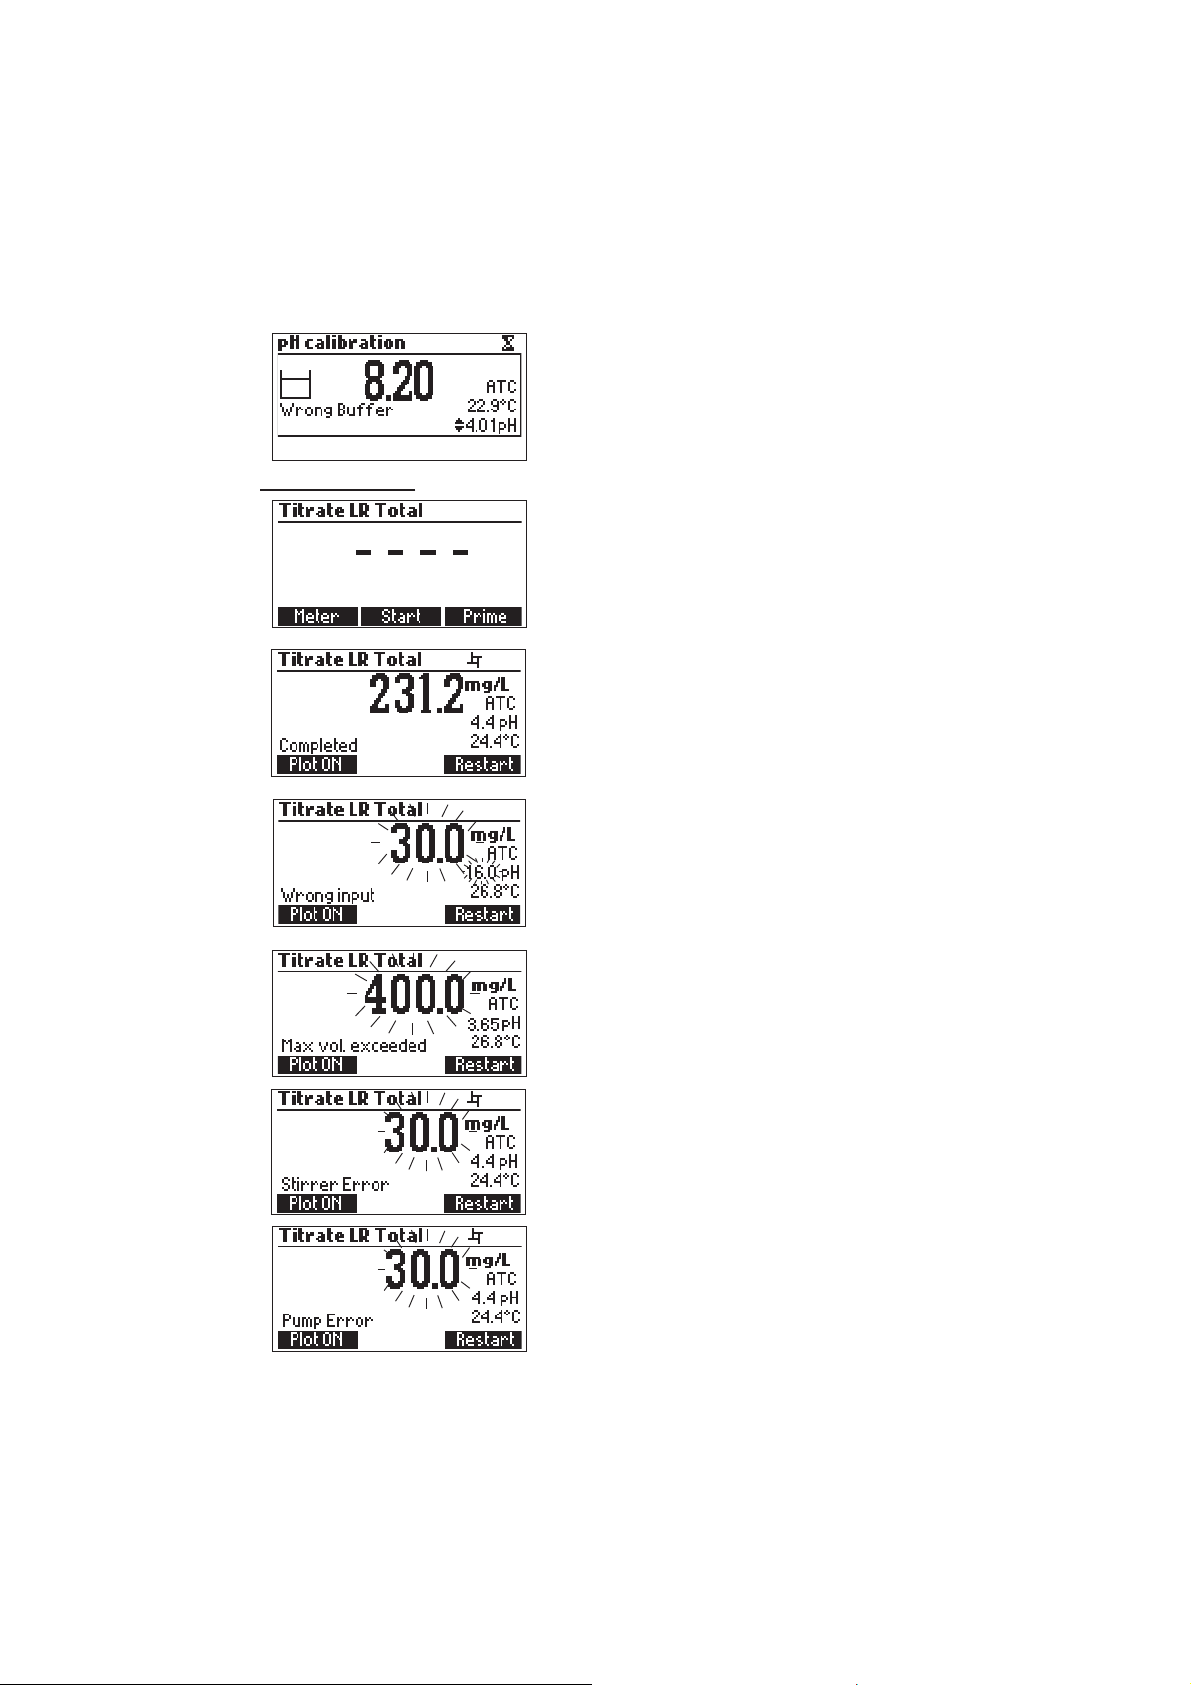
TITRATION MESSAGES
The “Wrong Buffer” message is displayed when the
pH value is outside of the acceptable range. Clean the
electrode by following the Cleaning Procedure and/or
check the buffer concentration before continuing the
pH calibration.
Press the ESC key to exit pH calibration mode.
This screen is displayed when the instrument is in
titration mode. Press Start to begin a titration, Meter
to enter pH meter mode or Prime to enter into the
prime function.
The titration result, expressed in mg/L or meq/L as
CaCO3, is displayed automatically at the end of the
titration. Press Restart to start another titration or ESC
to return to the main screen.
This error message appears when the input reading
(pH or temperature) exceeds the specified limits. The
pH or temperature value and the concentration will
blink indicating an error.
This screen appears when the sample concentration
is out of range.
This screen appears when the stirrer is not working
properly. Check the stir bar and beaker content.
Press Restart to try again.
This error message appears when the pump is not
working properly. Check the tubing, valve and syringe.
Press Restart to try again.
18
Page 19

ELECTRODE PREPARATION
PREPARATION PROCEDURE
Remove the electrode protective cap.
DO NOT BE ALARMED IF ANY SALT DEPOSITS ARE PRESENT. This is normal with electrodes and
they will disappear when rinsed with distilled/deionized water.
During transport tiny bubbles of air may have formed inside the glass bulb. The electrode cannot
function properly under these conditions. These bubbles can be removed by "shaking down" the
electrode as you would do with a glass thermometer.
If the bulb is dry, soak the electrode in HI 70300 Storage Solution for at least one hour.
ELECTRODE CALIBRATION PROCEDURE
It is recommended to calibrate the instrument frequently, especially if high accuracy is required.
The pH electrode should be recalibrated:
a) Whenever the pH electrode is replaced
b) At least once a week, but daily is advised
c) After testing aggressive chemicals and after electrode is cleaned
d) When high accuracy is required
e) If the pH calibration expired warning is displayed during measurement.
Every time you calibrate the instrument use fresh buffers and clean the electrode (see page 40).
PROCEDURE
A single one, two or three-point calibration can be performed, using the four predefined buffers
4.01, 7.01, 8.30 and 10.01 pH. For a single point calibration any of the three buffers may be
used, 8.30 pH is recommended.
Note: The HI 84531 will not accept other pH buffers for calibration.
• Pour small quantities of selected buffer solutions into clean beakers. For accurate calibration
use two beakers for each buffer solution, the first one for rinsing the electrode and the second
one for calibration.
• Put a magnetic stir bar in the beaker that will be used for calibration.
• Remove the protective cap and rinse the electrode with some of the buffer solution to be used
for the first calibration point.
• Put the first beaker with calibration buffer in the beaker holder.
• Place the electrode holder on the top of the beaker and secure it by turning clockwise and press
STIR.
19
Page 20
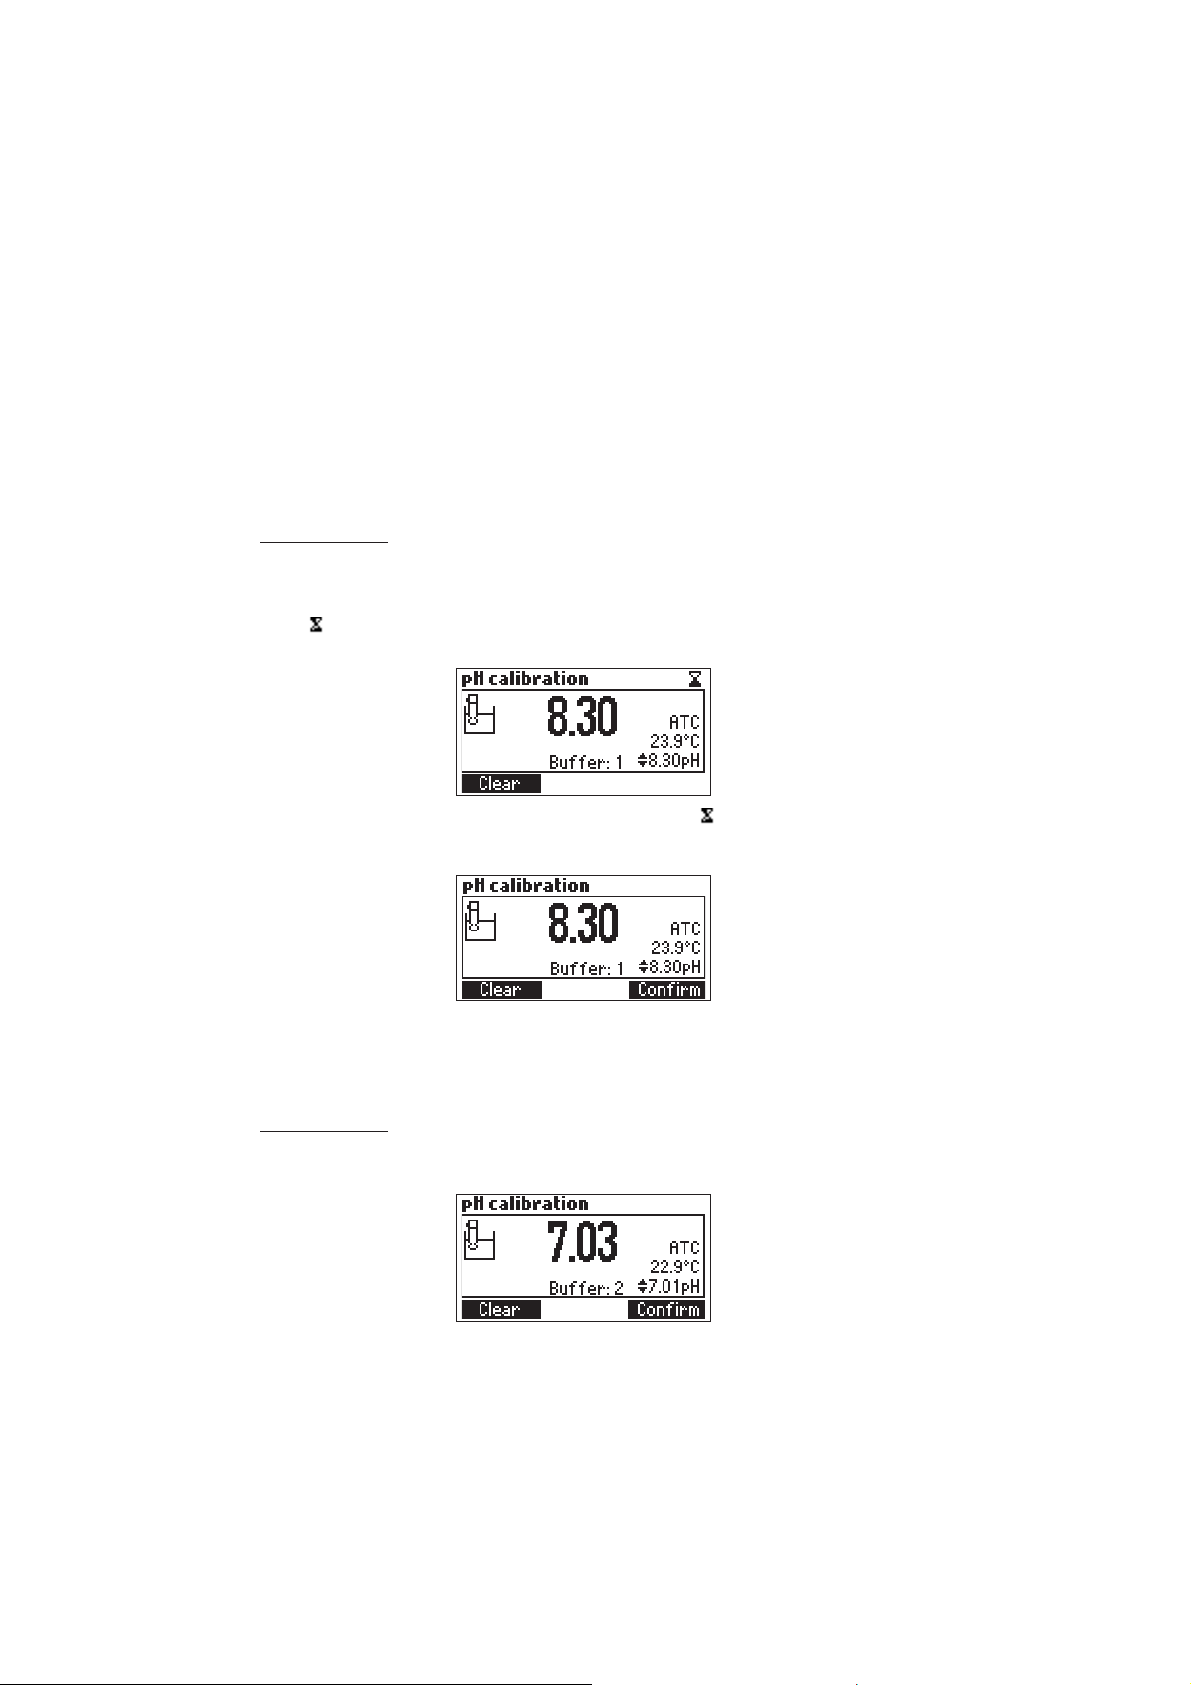
• Immerse the pH and the temperature probe approximately 2 cm (0.8”) into the buffer paying
attention not to touch the stir bar.
To enter Electrode Calibration follow the next steps:
• Press CAL key then Electrode.
• The electrode calibration screen will be displayed.
• Press Clear to delete the previous calibration.
Point 1 calibration
• The 8.30 buffer will be selected by default. If necessary press the ARROW keys in order to
select a different buffer value.
• The (unstable measurement) symbol will be shown on the display until the reading becomes
stable.
• When the reading is stable and close to the selected buffer, the (unstable measurement)
symbol will disappear and the Confirm key will become active.
• Press Confirm to confirm the calibration or ESC to exit calibration.
• After the calibration point has been confirmed, press ESC to exit without performing the second
calibration point.
Point 2 calibration
• The calibrated value will be shown on the display and the second expected buffer value will be
displayed.
• Remove the electrode holder with electrodes from the top of the beaker.
20
Page 21

• Place the second beaker with calibration buffer in the beaker holder. Rinse the electrodes in a
beaker containing the second buffer rinsing solution.
• Place the electrode holder (with electrodes) on the top of the beaker and secure it by turning
clockwise and press STIR.
• If necessary, press the ARROW keys in order to select a different buffer value.
• The (unstable measurement) symbol will be shown on the display until the reading becomes
stable.
• When the reading is stable and close to the selected buffer, the (unstable measurement)
symbol will disappear and the Confirm key will become active.
• Press Confirm to confirm the calibration.
• The calibrated value will be shown on the display and the third expected buffer value will be
automatically selected.
• After the second calibration point has been confirmed, press ESC to exit without performing the
third calibration point.
Point 3 calibration
• Remove the electrode holder with electrodes from the top of the beaker.
• Place the third beaker with calibration buffer in the beaker holder. Rinse the electrodes in a
beaker containing the third buffer rinsing solution.
• Place the electrode holder (with electrodes) on the top of the beaker and secure it by turning
clockwise and press STIR.
• The (unstable measurement) symbol will be shown on the display until the reading becomes
stable.
• When the reading is stable and close to the selected buffer, the (unstable measurement)
symbol will disappear and the Confirm key will become active.
• Press Confirm to confirm the calibration. The instrument stores the calibration value and
returns to calibration menu, where the date and time for the pH calibration will be updated.
Note:
• A buffer confirmed during the calibration process is removed from the list of available buffers.
• If the value measured by the instrument is not close to the selected buffer a “Wrong Buffer”
error message will be shown on the display.
Check if the correct buffer has been used or regenerate the pH electrodes by following the
Cleaning Procedure (see page 40). If necessary change the buffer or the electrode.
21
Page 22
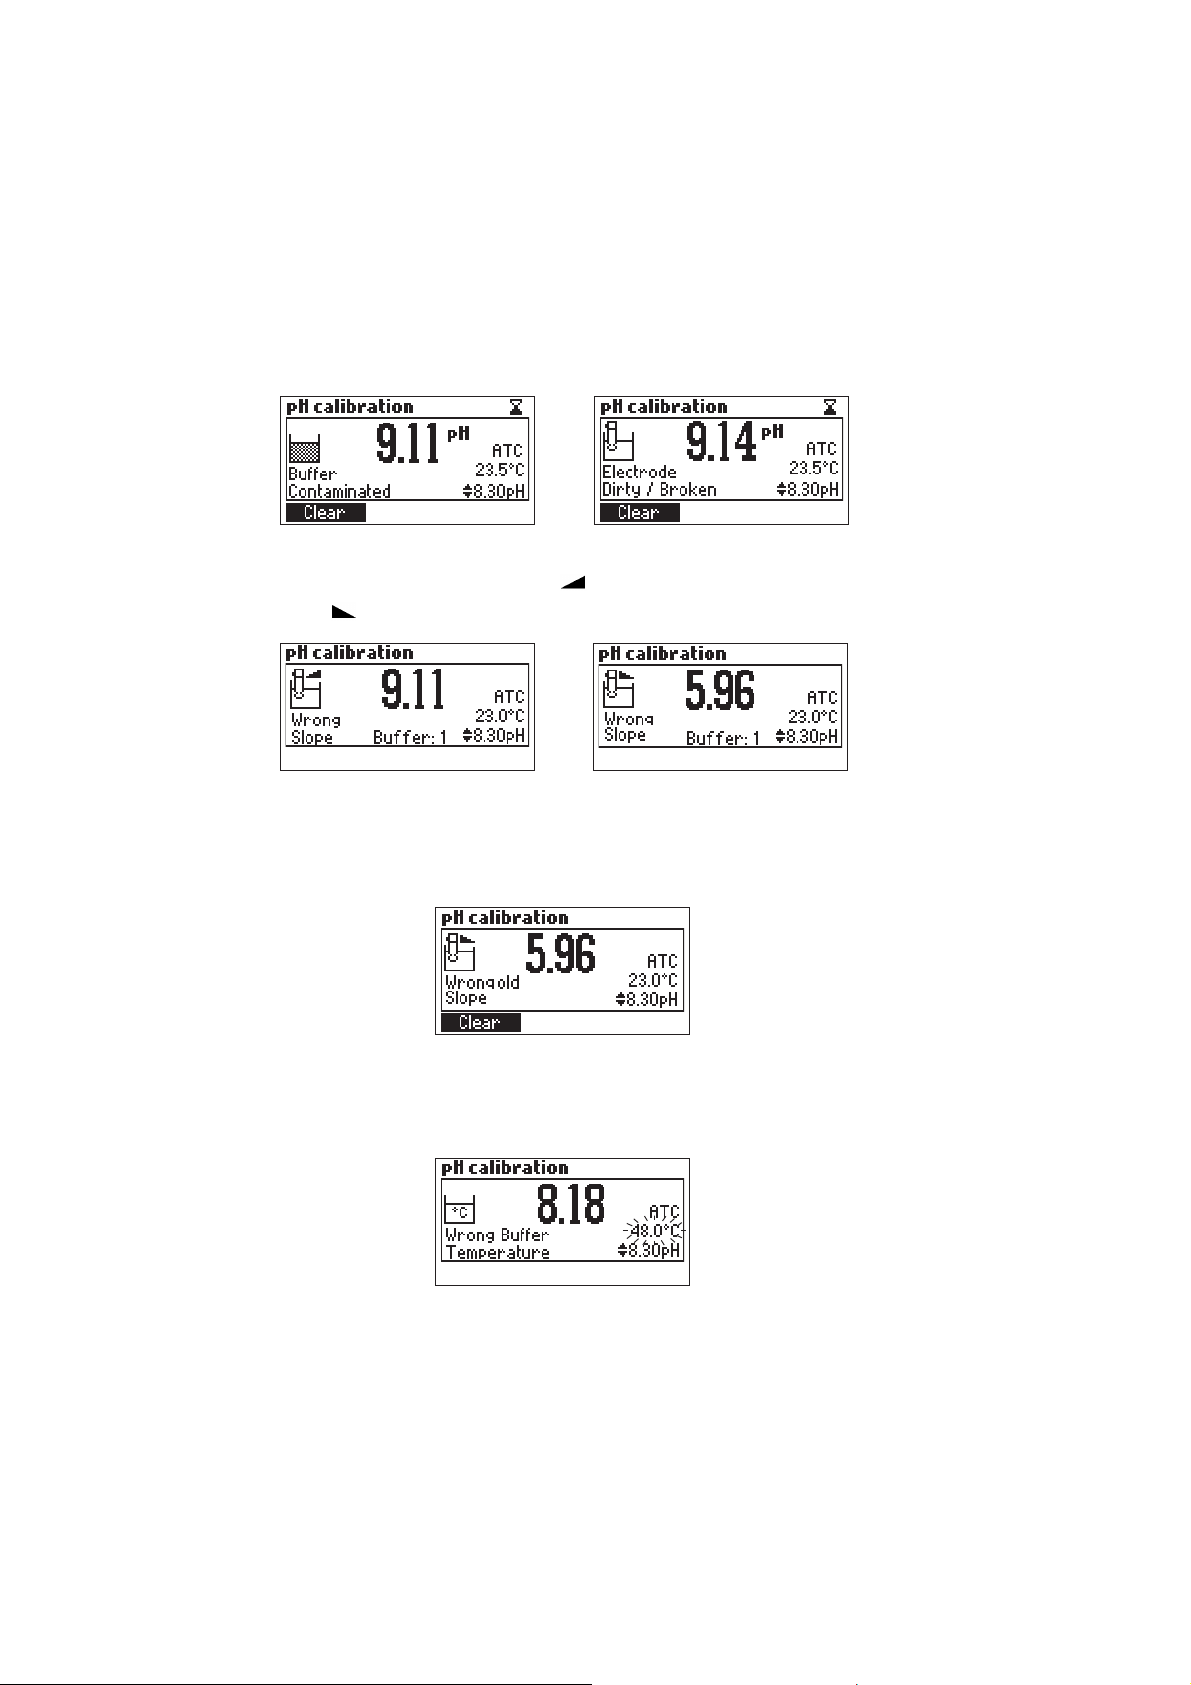
• If the measured offset isn’t within the preset limits (±45 mV), the meter will display the
message “Buffer Contaminated” alternatively with ”Electrode Dirty/Broken”.
• If the computed slope isn’t within the preset limits, the meter will display the message “Wrong
Slope”. If the slope is too high the symbol will be displayed. If the slope is too low the
symbol will be displayed.
• If the “Wrong Old Slope” error message is displayed, an inconsistency exists between the
current and the previous (old) calibration. Clear the previous calibration by pressing Clear and
proceed with calibration from the current calibration point. The instrument will keep all the
confirmed values during the current calibration.
• If the temperature reading is out of the defined temperature range of the buffer (0 to 45 °C),
the “Wrong Buffer Temperature” error message will be displayed, and the temperature
symbol will blink on the display. Calibration cannot be confirmed in this situation.
22
Page 23
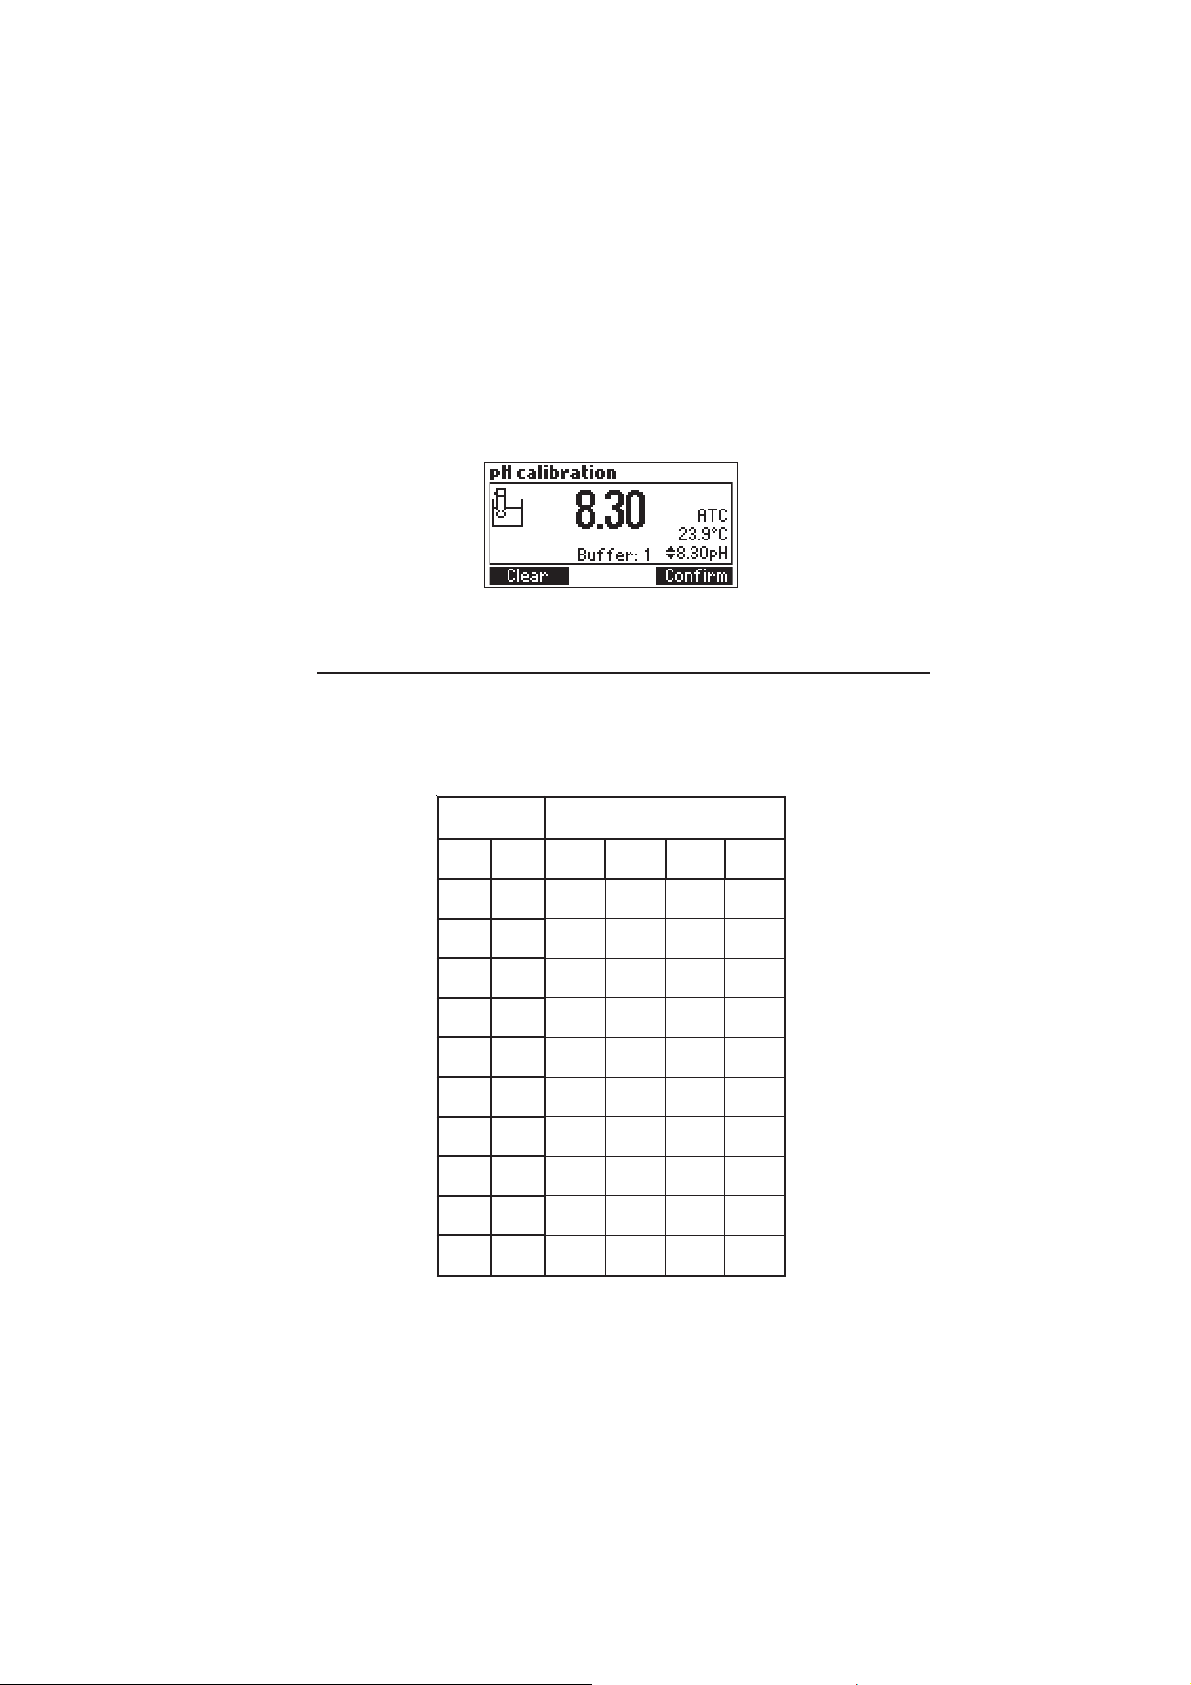
Note: • To clear a previous calibration and to return to the default value, press Clear at any
PMET SREFFUBHp
C° F° 10.4 10.7 03.8 10.01
0 23 10.4 31.7 84.8 23.01
5 14 00.4 01.7 44.8 42.01
01 05 00.4 70.7 14.8 81.01
51 95 00.4 40.7 73.8 21.01
02 86 00.4 30.7 33.8 60.01
52 77 10.4 10.7 03.8 10.01
03 68 20.4 00.7 72.8 69.9
53 59 30.4 99.6 42.8 29.9
04 401 40.4 89.6 12.8 88.9
54 311 50.4 89.6 81.8 58.9
time after entering calibration mode. If Clear is invoked during the first calibration
point the instrument returns to the measurement mode.
• The Clear key is displayed only if a previous calibration exists.
pH BUFFER TEMPERATURE DEPENDENCE
Temperature has an effect on pH. The calibration buffer solutions are affected by temperature
changes to a lesser degree than normal solutions. During calibration, the instrument will automatically calibrate to the pH value corresponding to the measured or set temperature.
During calibration the instrument will display the pH buffer value at 25 ºC.
23
Page 24
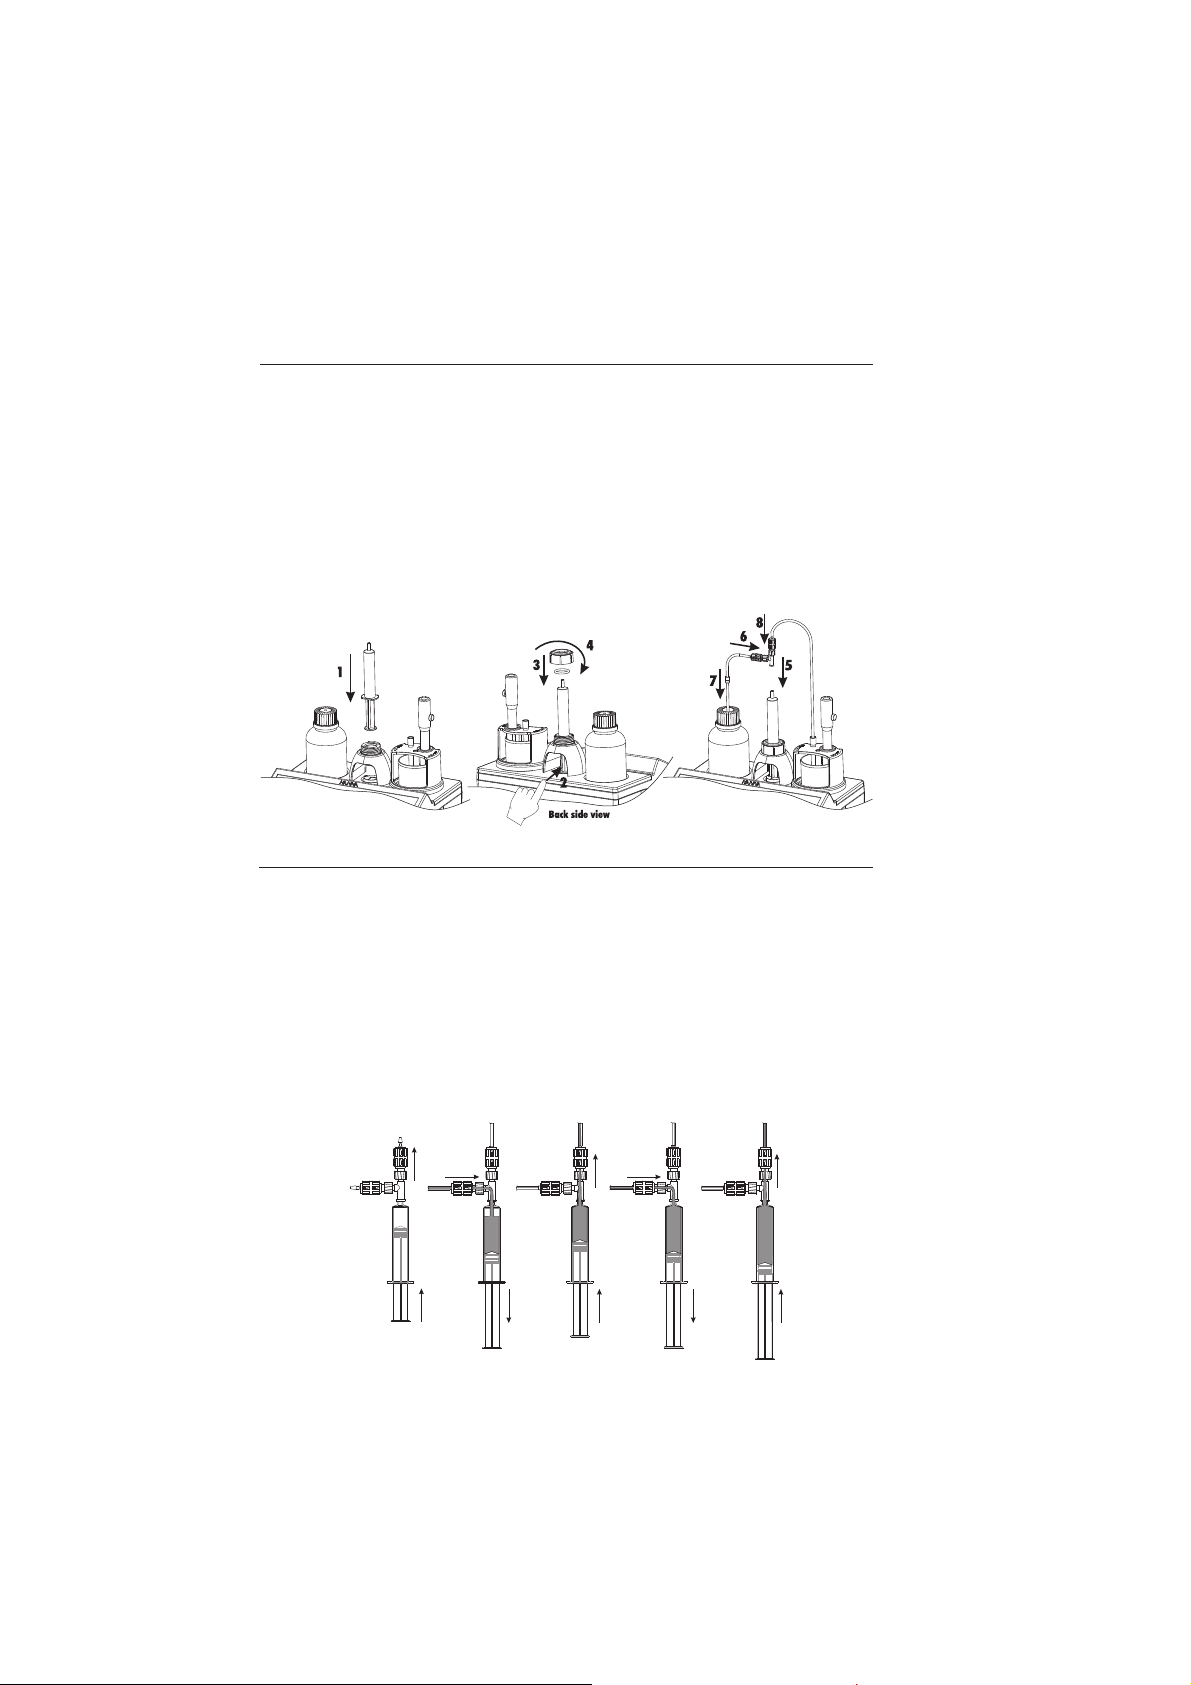
DOSING PUMP INSTALLATION
To install dosing pump follow the procedure below:
• Extend the plunger on the 5 mL syringe to its maximum volume.
• Place the syringe in the dedicated spot on the top of the meter (1).
• Arrange the bottom of the syringe into the holder on the pump (2). Once the syringe is in place
lower the barrel until it sits flush on the holder.
• Put the o-ring and syringe-fixing nut over the syringe (3) and turn clockwise to secure it in place (4).
• Place the valve on the top of the syringe (5). Ensure it fits securely.
• Insert the aspiration tube into the left side of the valve (6) and replace the titrant bottle cap with
the attached cap (7).
• Insert the dispensing tube into the top of the valve (8).
DOSING PUMP PRIME PROCEDURE
Prime cycle should be performed:
• if you notice there is no titrant in the tip
• whenever the dosing system tubes are replaced
• whenever a new bottle of titrant is used
• before starting a pump calibration
• before starting a series of titrations
The prime cycle is used to fill the syringe before starting a set of titrations.
Two rinses cycles of syringe are shown in the figure below. The dispensing tube is connected to the top
of the valve and the aspiration tube on the left side.
24
Page 25
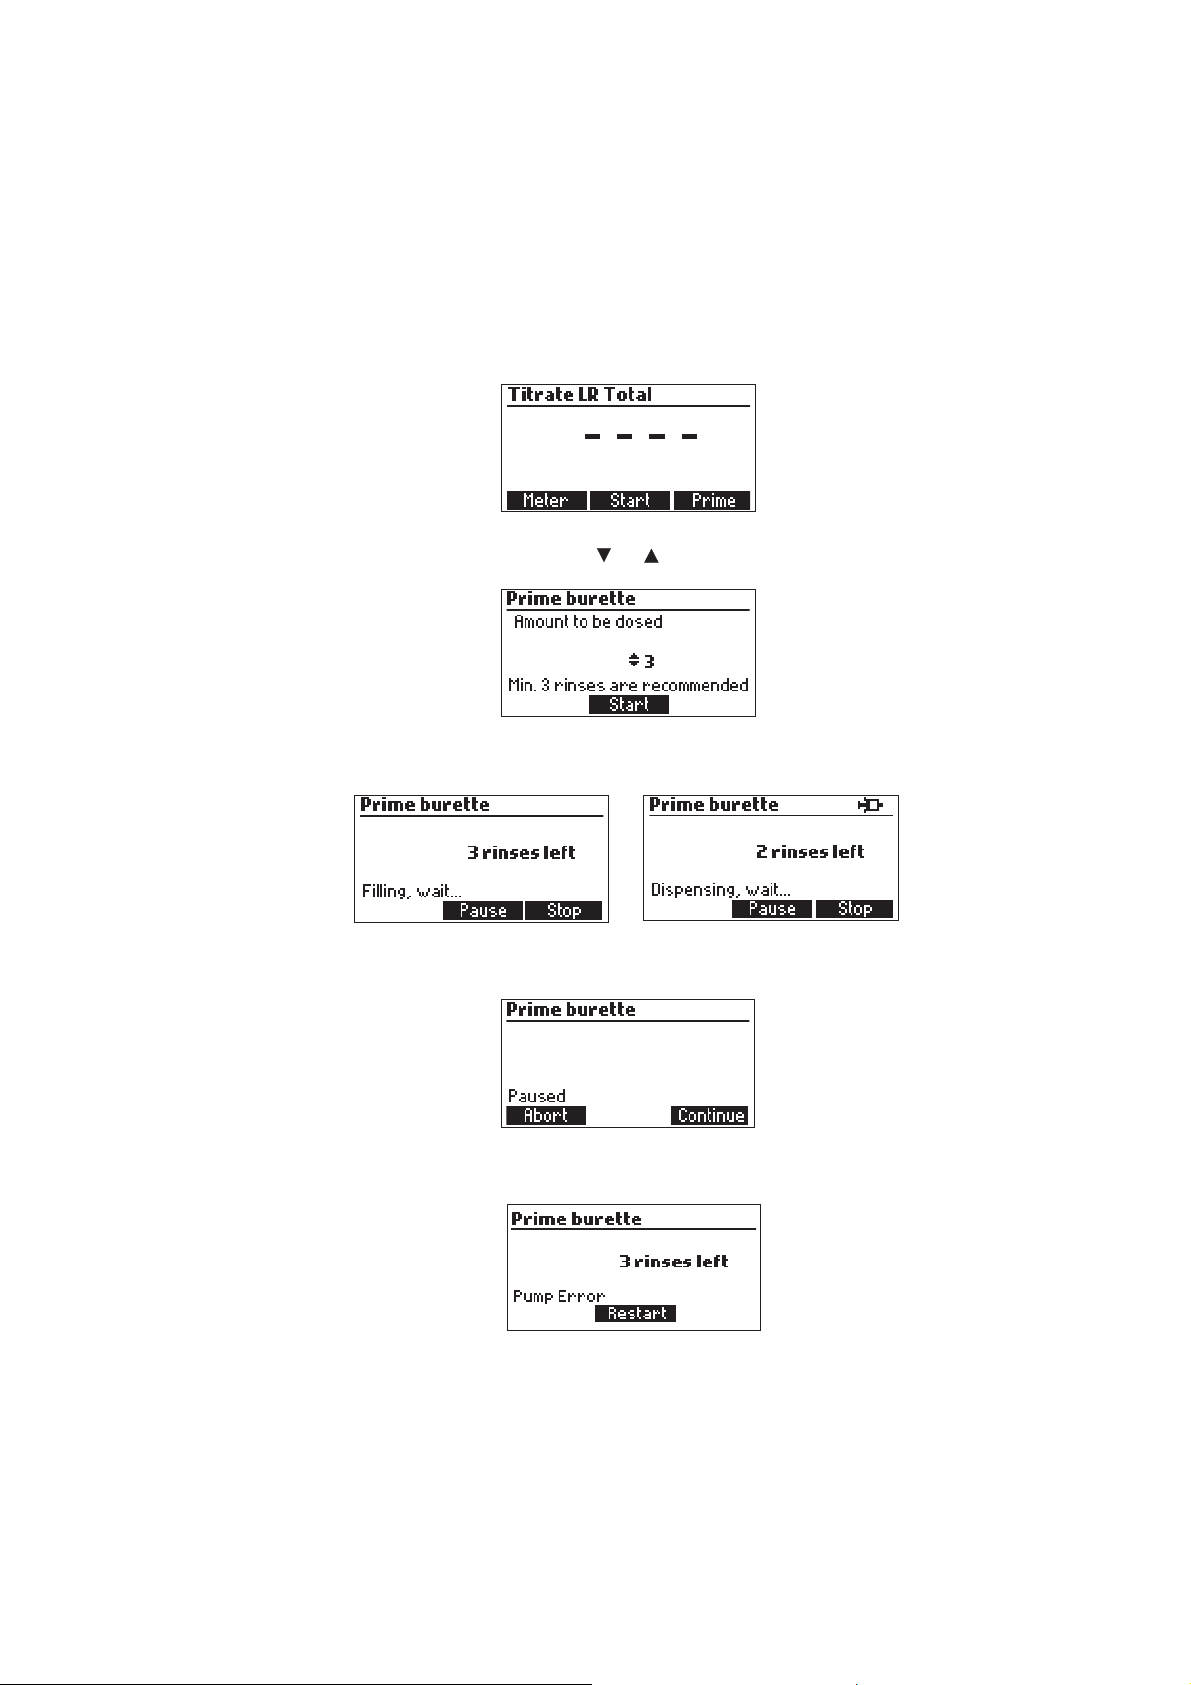
Note: The aspiration tube must be inserted in the titrant bottle. The dosing tip must be placed over
a rinse beaker.
• To prime the burette, select Prime option from Titration mode.
• Adjust the rinses number by pressing the and keys and press Start.
• The number of syringe rinses can be set between 1 and 5 (at least three rinses are recommended
to ensure that the air bubbles are completely removed).
• To pause the prime process press the Pause key, to continue press the Continue key. To stop the
prime process press the Stop key.
Note: This error message appears when the pump is not working properly. Check the tubing, valve
and syringe. Press Restart to try again.
25
Page 26
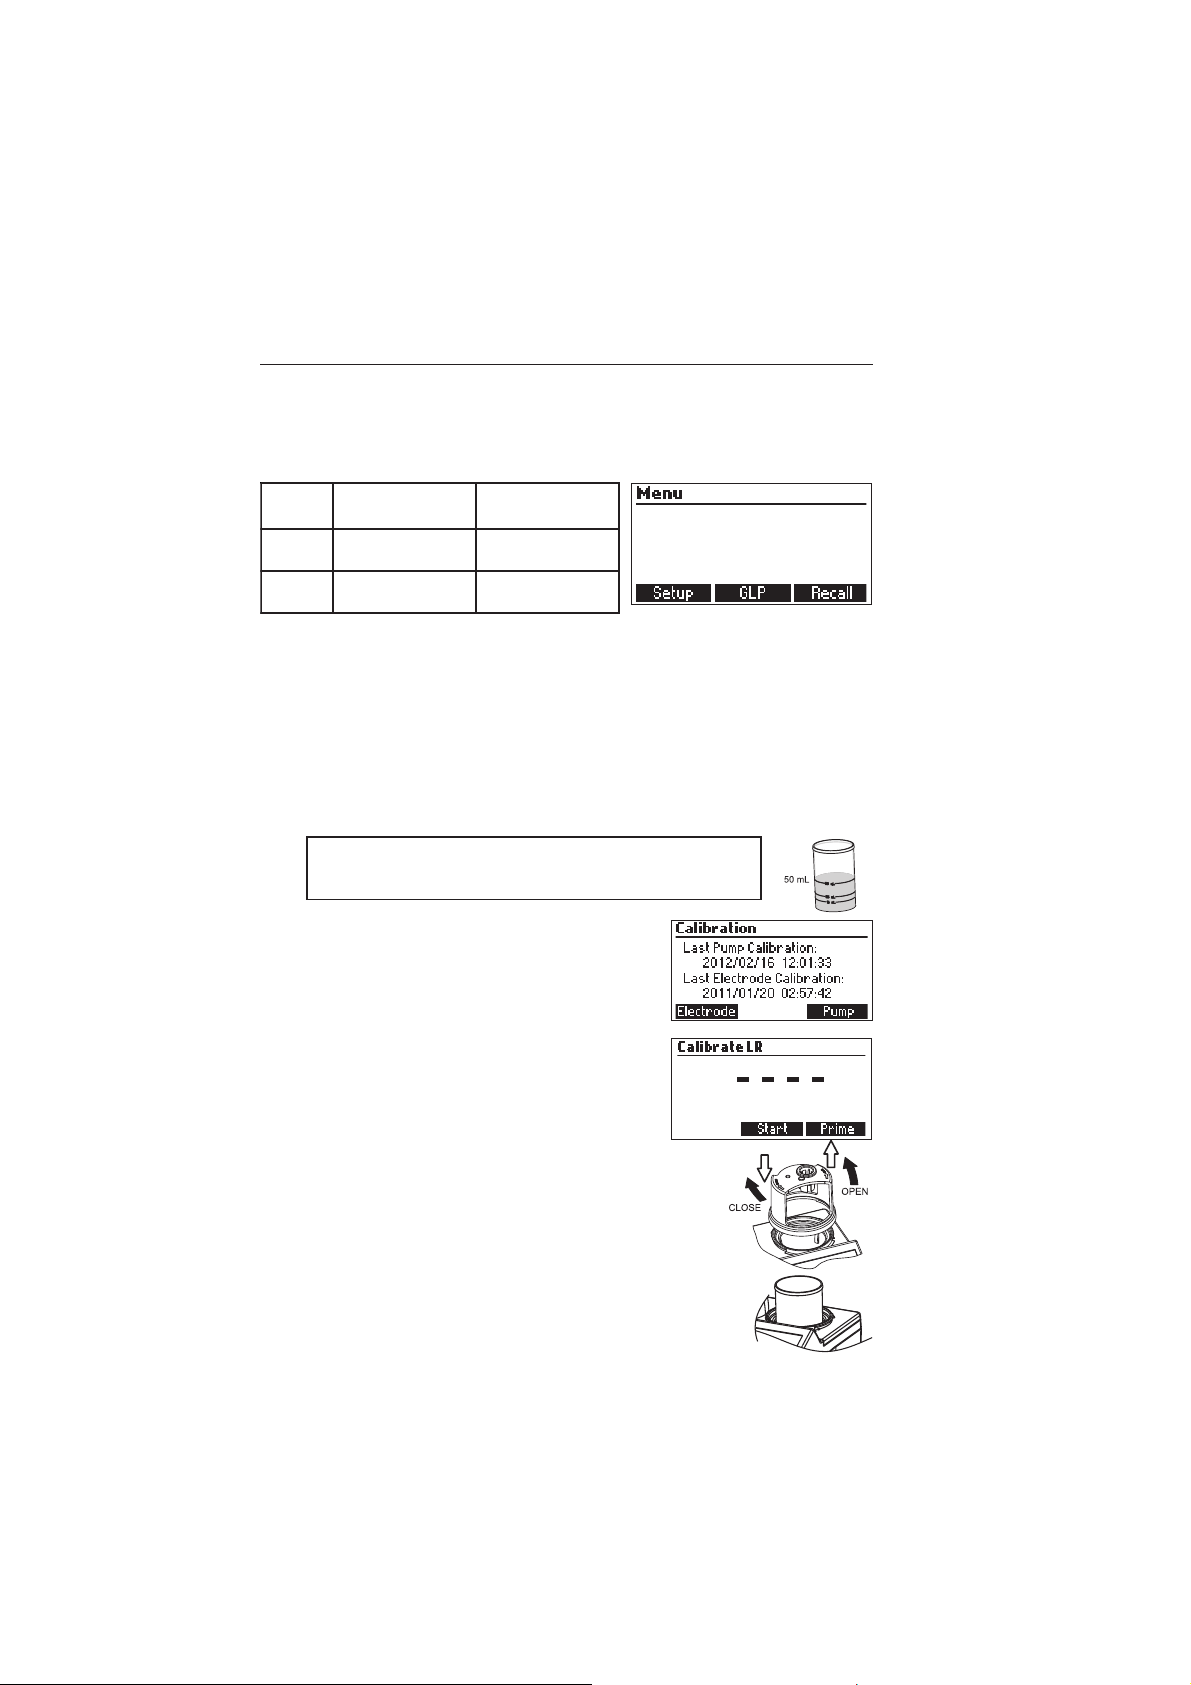
PUMP CALIBRATION PROCEDURE
TINU egnaRwoL egnaRhgiH
L/gm 0.004ot0.03 0004ot003
L/qem 0.8ot6.0 0.08ot0.6
The calibration of the pump must be performed every time the syringe, pump tube, the titrant
bottle or the pH electrode is changed. A pump calibration is recommended before each set of
titrations, after the titrator is left idle for several hours or once daily.
• Press MENU, select Setup and select the corresponding range according to the table below:
• Verify the electrode has been calibrated in 8.30 pH buffer.
• Ensure the pump is primed with the correct titrant for the selected range (HI 84531-50 Low
Range Titrant and HI 84531-51 High Range Titrant).
Note: Before performing a calibration in high range dispense roughly 1 mL of titrant in a waste
beaker. This will remove any air bubbles in the tubing. Press Prime then Stop once the
volume has been delivered.
Sample preparation: Use a clean pipette to add precisely measured amount of HI 84531-55
Calibration Standard to a clean beaker as indicated below:
Low Range (LR Strong, LR Total) - 2 ml 30.0 - 400.0 mg/L as CaCO
High Range (HR Strong, HR Total) - 20 ml 300 - 4000 mg/L as CaCO
Note: Failure to use a clean pipette will result in erroneous
readings.
• Fill the beaker up to the 50 mL mark with the distilled or
deionized water.
• Press CAL key. The instrument displays the date and time of
the last electrode calibration, and the last pump calibration.
• Press Pump key.
Note: DO NOT PLACE THE TIP INTO THE CALIBRATION
BEAKER, PLACE THE TIP OVER A WASTE BEAKER.
A SMALL AMOUNT OF TITRANT IS DISPENSED WHEN THE
PUMP RESETS.
• Press Start, wait for the syringe refill.
• Place the stir bar in the calibration solution beaker and put the beaker
in the minititrator top.
• Place the probe holder on the top of the beaker and secure it by
turning clockwise.
26
3
3
Page 27
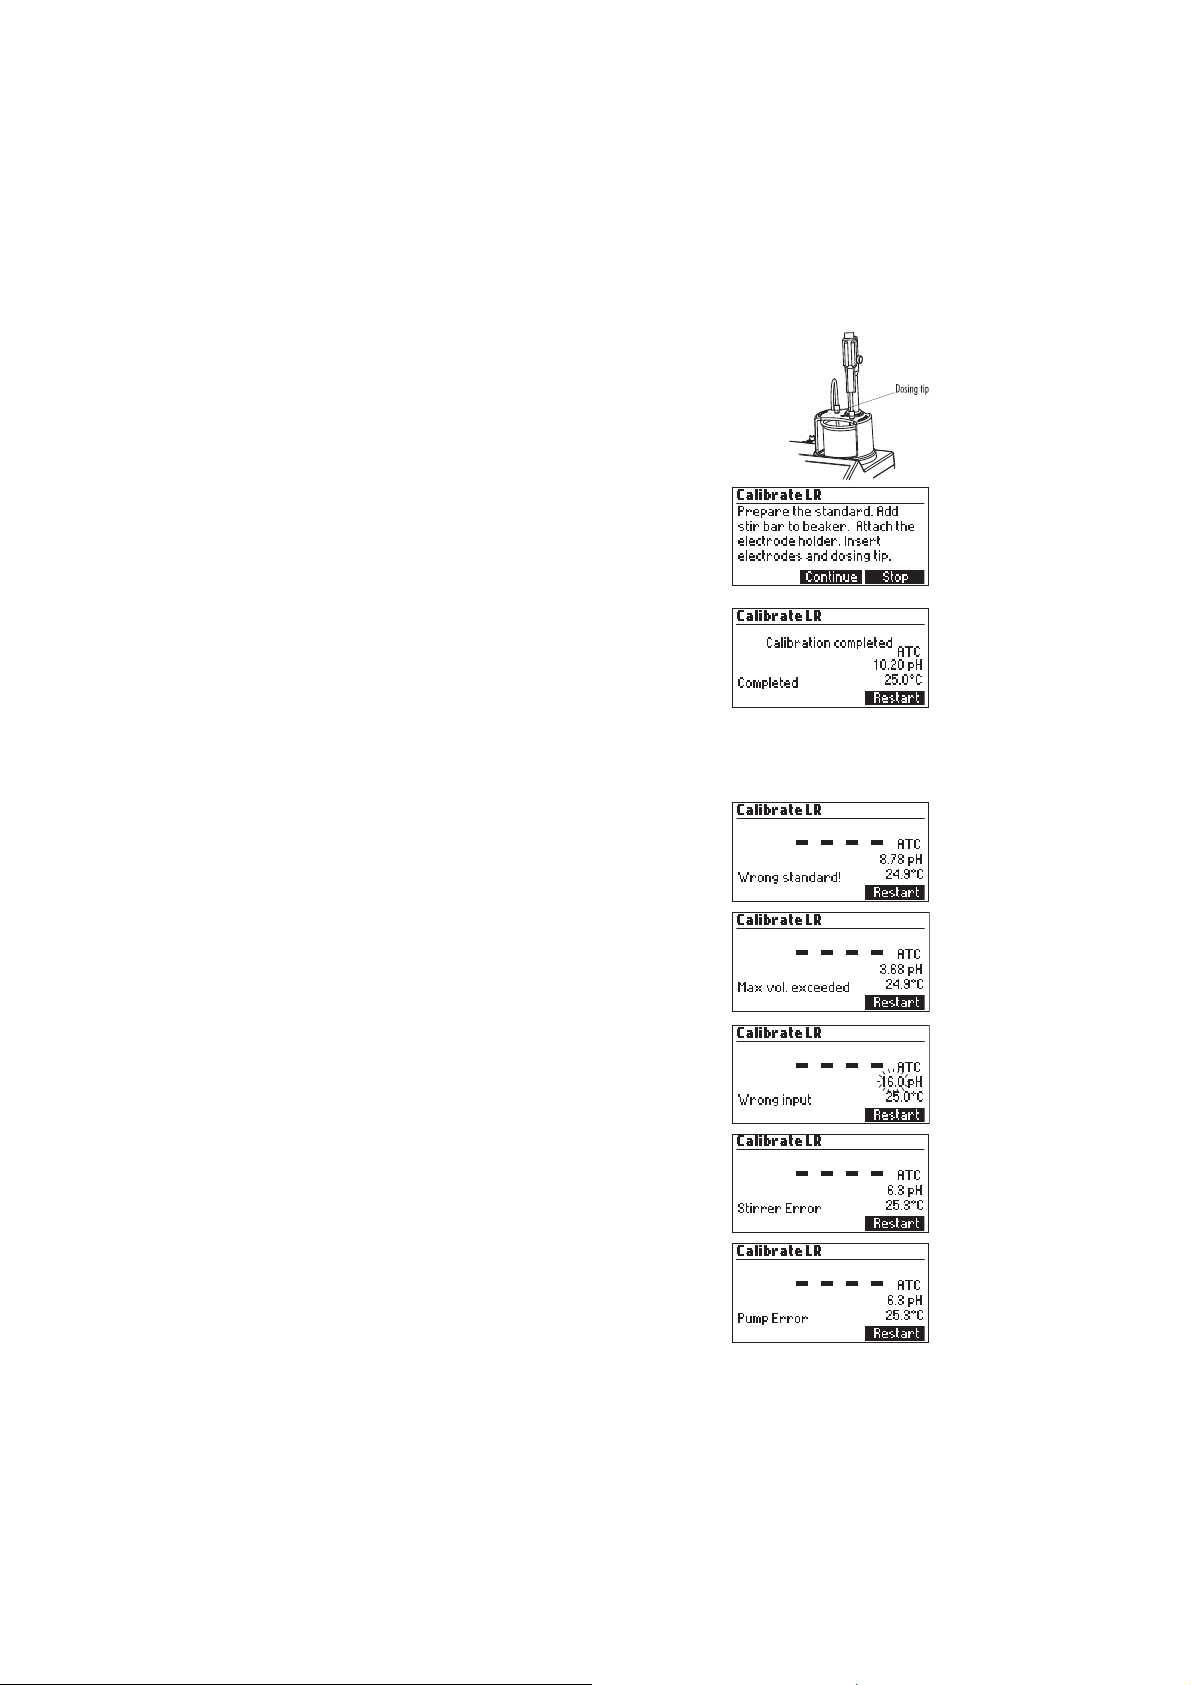
• Rinse the pH electrode with deionized water and immerse into
the calibration solution until the reference junction is completely
submerged. Be sure that the tip of the electrode is not hitting
the stir bar. If necessary additional distilled or deionized water
can be added.
• Verify if the titrant corresponds to selected titration range.
• Insert the dosing tip into the titrant tube sleeve. IT IS CRITICAL
THAT THE TIP BE IMMERSED APPROXIMATELY 0.25 CM (0.1")
INTO THE SOLUTION BEING TITRATED.
• Press Continue to begin the calibration and Stop to abort it.
• At the end of the calibration, ”Calibration Completed“
appears on display. To repeat the calibration press Restart or
ESC to return to the main screen.
Note: • If temperature probe is not connected, Manual Temperature Compensation is used
and MTC appears on the right side of the screen. If Automatic Temperature
Compensation is in use the ATC appears on the right side of the screen.
• If an erroneous situation is encountered during the
calibration, an error message is displayed and the
calibration can be restarted by pressing Restart.
Prepare a new standard, rinse electrode, temperature
probe and dosing tip and try again.
• If the calibration doesn’t complete and the max
titrant volume of titrant is reached an error message
will be displayed. The calibration can be restarted
by pressing Restart. Prepare a new standard, rinse
electrode, temperature probe and dosing tip and try
again.
• This error message appears when the pH reading
exceeds the acceptable input limits (-2.00 < pH
> 16.00).
• This screen appears when the stirrer is not working
properly. Check the stir bar and beaker content.
Press Restart to try again.
• This error message appears when the pump is not
working properly. Check the tubing, valve and syringe.
Press Restart to try again.
27
Page 28
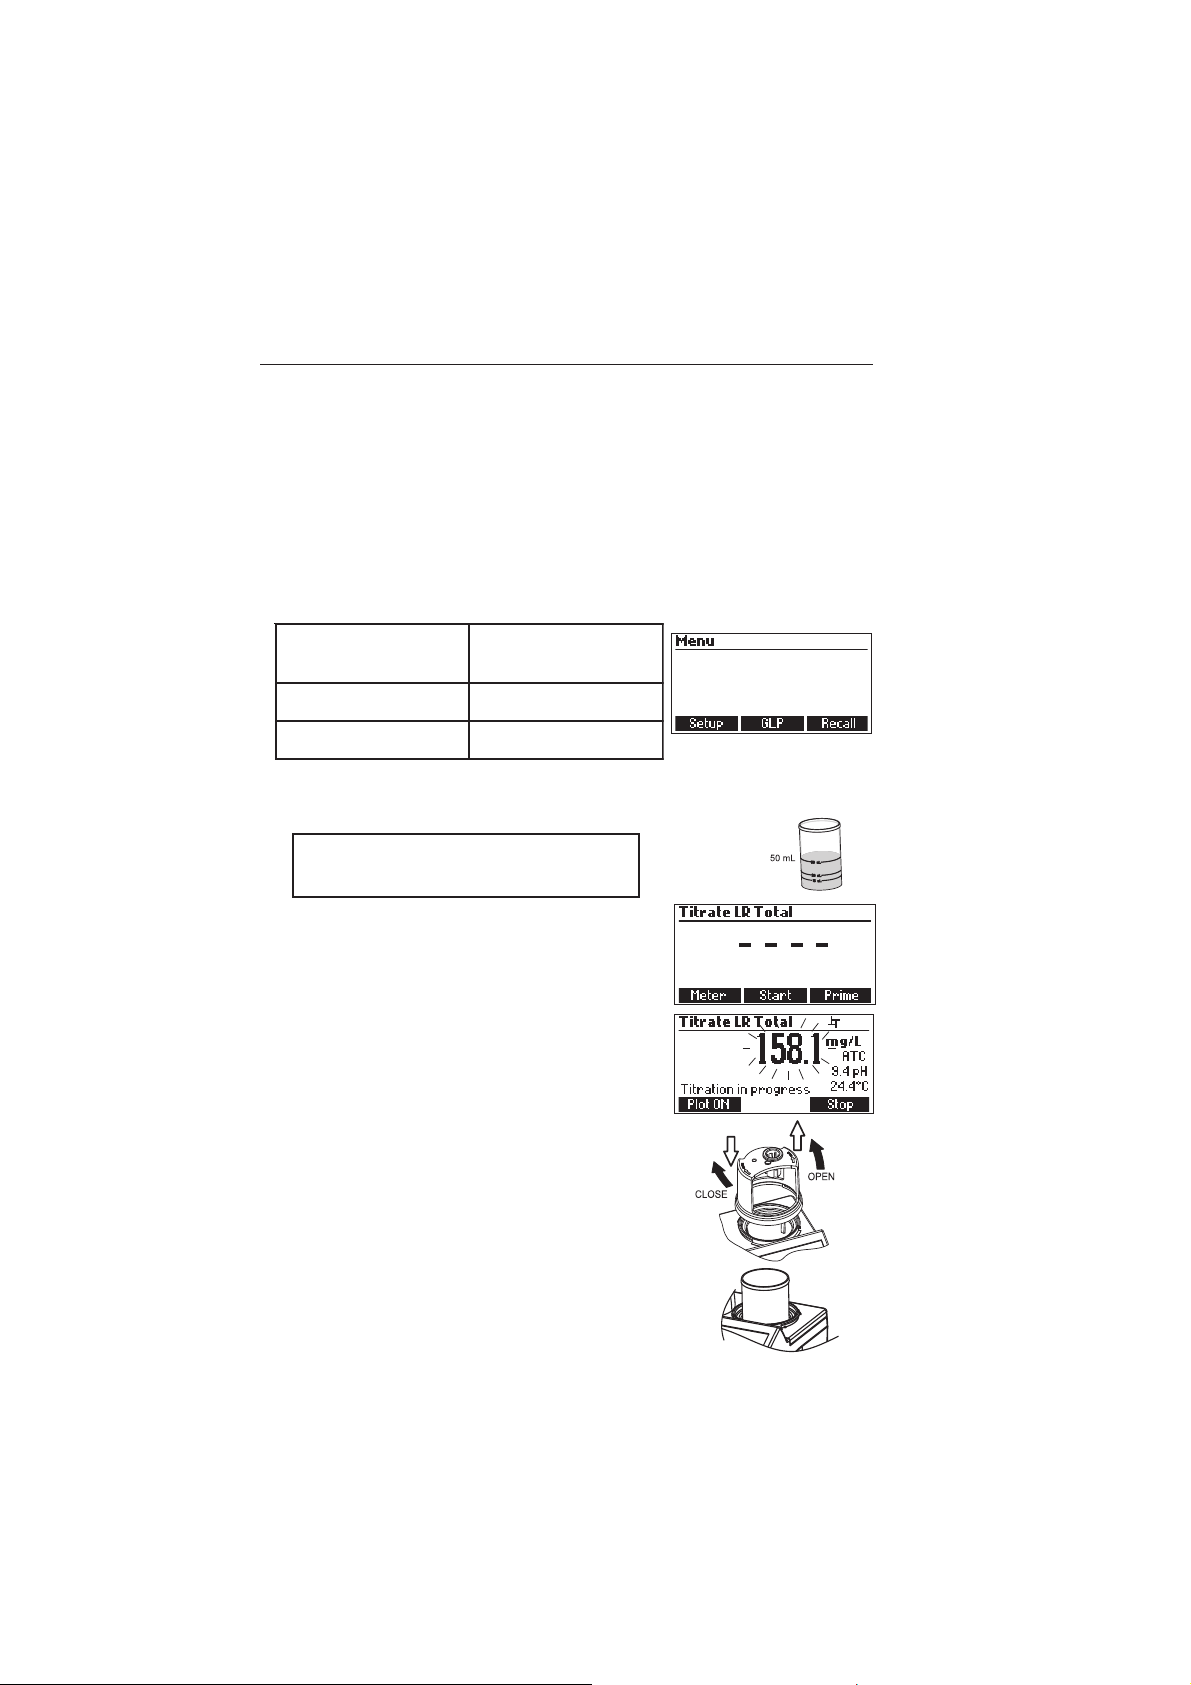
egnaRwoL
)elpmasLm05(
egnaRhgiH
)elpmasLm05(
OCaCsaL/gm0.004ot0.03
3
OCaCsaL/gm0004ot003
3
OCaCsaL/qem0.8ot6.0
3
OCaCsaL/qem0.08ot0.6
3
TITRATION PROCEDURE
For best accuracy, before taking any measurement, ensure that the pump is calibrated on the
selected range following the “Pump Calibration Procedure” (see page 26).
Note: Verify that the instrument has been calibrated (pH and pump) before performing any
titrations. An electrode calibration in 8.30 pH buffer is recommended.
• Refer to “Setup Menu” (see page 11) to set up instrument for your measurement.
• Select the corresponding measurement range.
Note: Before performing a titration in high range dispense roughly 1 mL of titrant in a waste
beaker. This will remove any air bubbles in the tubing. Press Prime then Stop once the
volume has been delivered.
Sample preparation: Use a clean pipette to add precisely measured amount of sample to a
clean beaker as indicated below:
Low Range (50 ml) - 30.0 - 400.0 mg/L as CaCO
High Range (50 ml) - 300 - 4000 mg/L as CaCO
3
3
Note: Failure to use a clean pipette will result in erroneous
readings.
• Put the 50 mL sample in the 100 mL beaker.
• Press Titrator.
Note: DO NOT PLACE THE TIP INTO THE SAMPLE BEAKER.
PLACE THE TIP OVER A WASTE BEAKER. A SMALL
AMOUNT OF TITRANT IS DISPENSED WHEN THE
PUMP RESETS.
• Press Start to begin a titration.
• Place the stir bar in the beaker and put the beaker in the
minititrator top.
• Place the probe holder on the top of the beaker and secure it
by turning clockwise.
28
Page 29
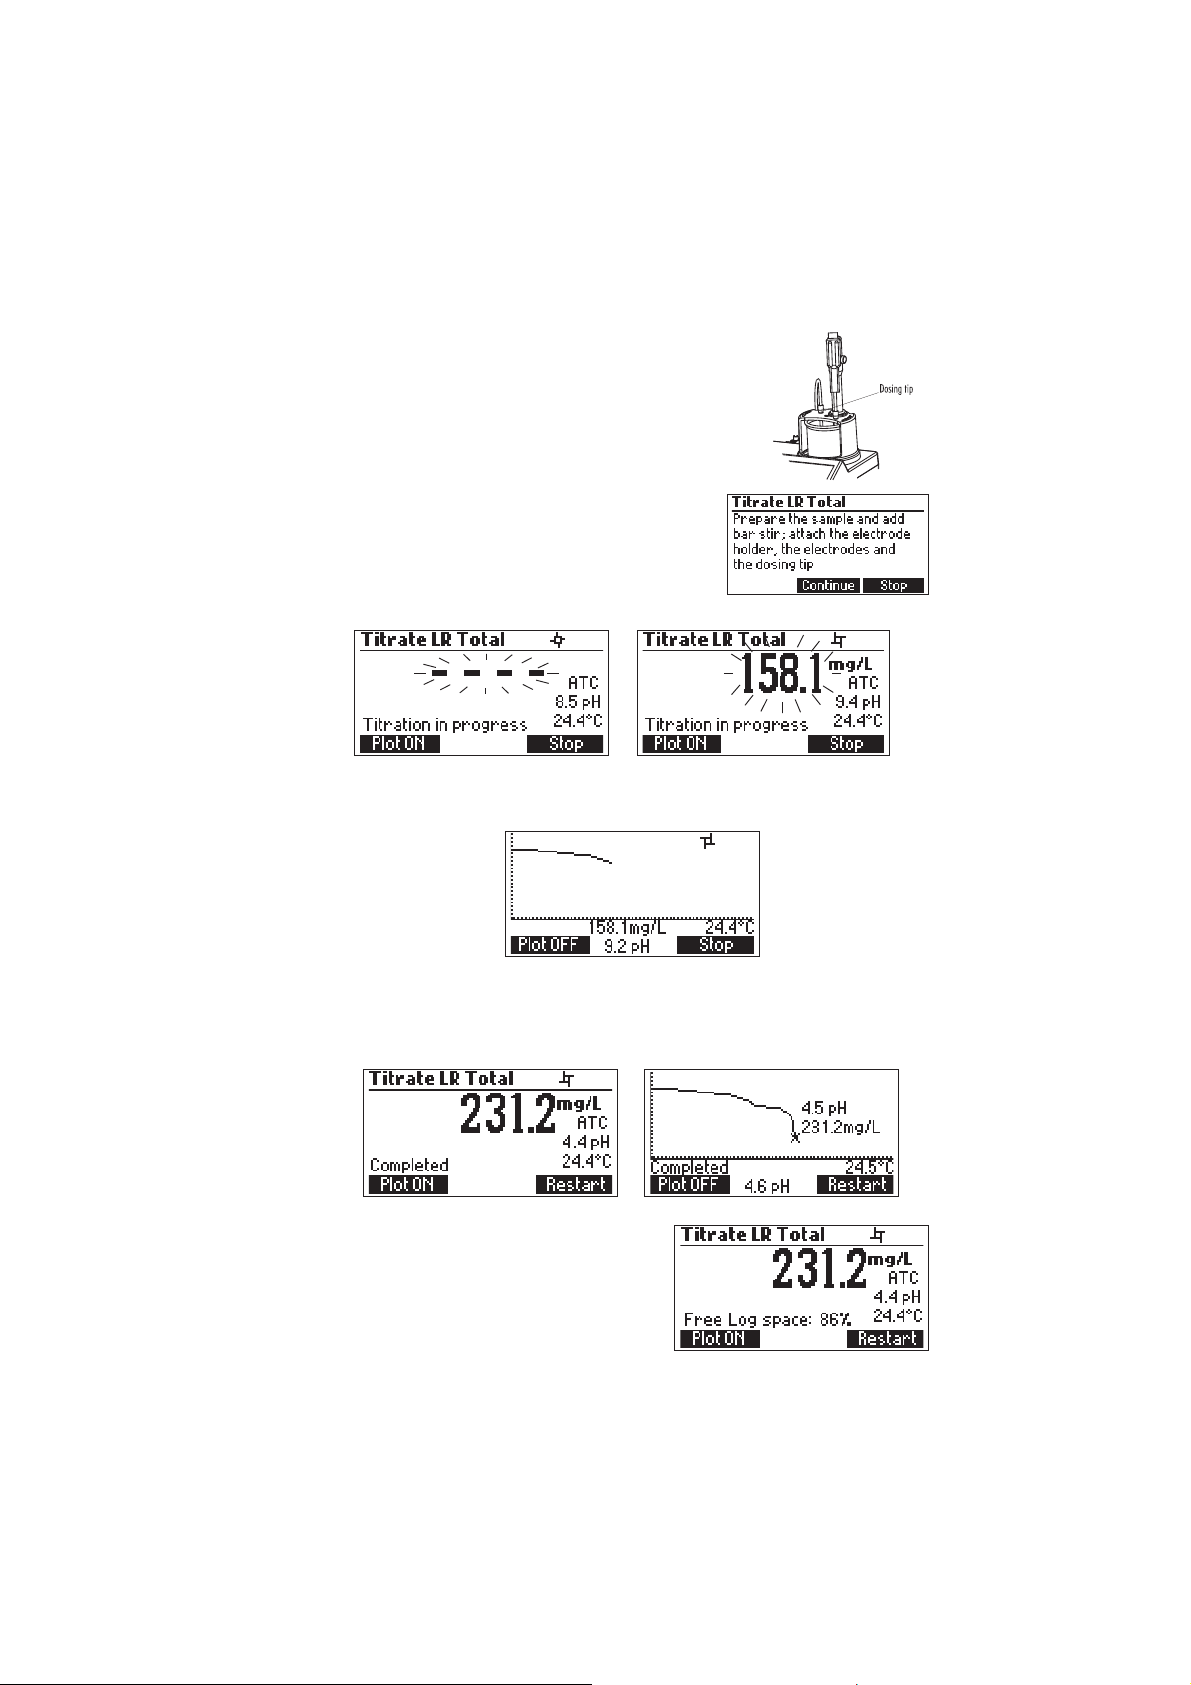
• Rinse the pH electrode with deionized water and immerse into
the sample until the reference junction is completely submerged.
Be sure that the tip of the electrode is not hitting the stir bar.
• Insert the dosing tip into the titrant tube sleeve. IT IS CRITICAL
THAT THE TIP BE IMMERSED APPROXIMATELY 0.25 CM (0.1")
INTO THE SOLUTION BEING TITRATED.
• Press Continue to begin the titration and Stop to abort it.
• The instrument will continuously update the concentration on
the display. The value will be displayed blinking. When the
reading is under range “----” symbol appears blinking.
• The titration curve can be visualized during a titration by pressing Plot ON. Press Plot OFF or
ESC to exit this mode.
• At the end of the titration, the total or strong alkalinity of water sample in the selected unit of
measurement (mg/L or meq/L) is displayed. The titration curve can be viewed by pressing Plot
ON. Press Plot OFF or ESC to exit this mode.
• Press LOG to record the concentration value into
the instrument’s memory. A message will be
displayed for a few seconds indicating the amount
of the free log space. Up to 200 log samples can
be recorded in the instrument’s memory.
29
Page 30
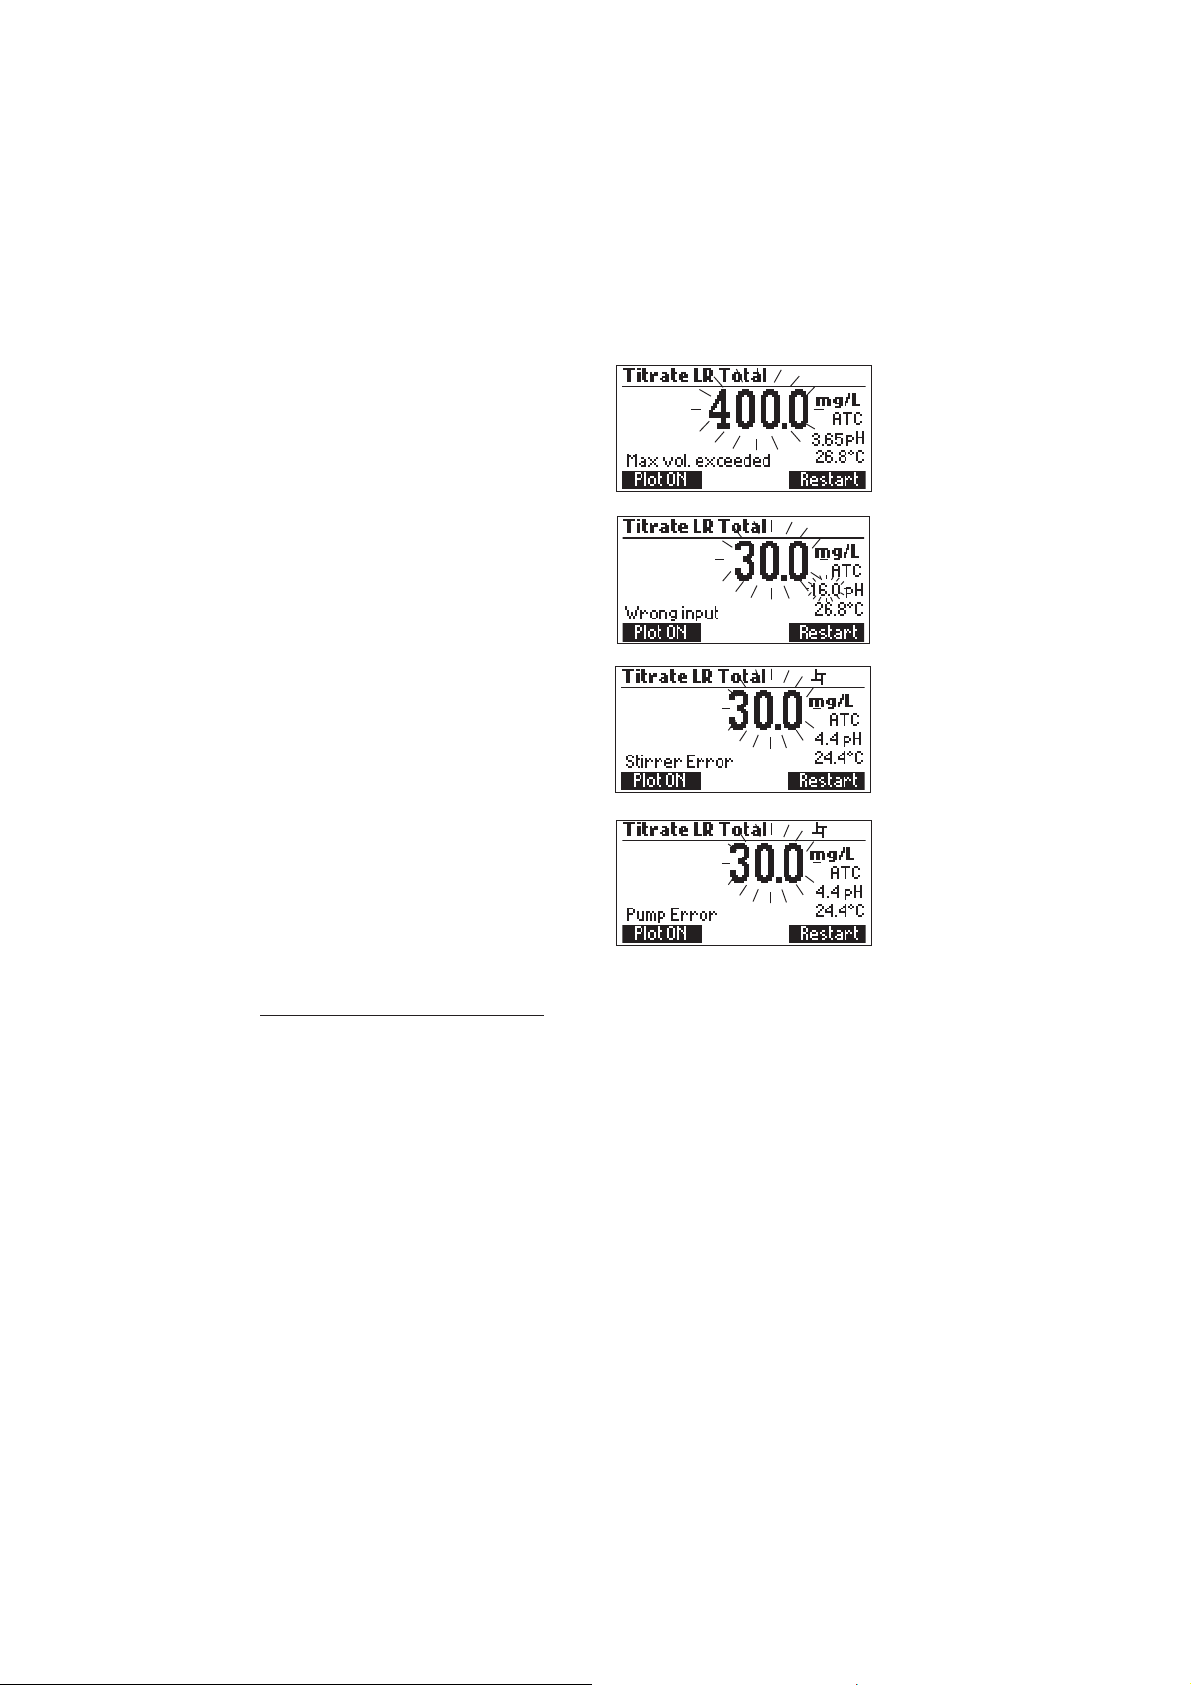
• Press Restart to begin a new titration or ESC to return to the titration menu.
• If the concentration exceeds the range limits the
exceeded range limit will be displayed blinking.
Another titration can be started by pressing Restart.
• “Wrong input” error message appears when the
input reading (pH, temperature) exceeds the
specified limits. The pH or temperature value and
concentration will blink indicating an error.
• This screen appears when the stirrer is not working
properly. Check the stir bar and beaker content.
Press Restart to try again.
• This error message appears when the pump is not
working properly. Check the tubing, valve and
syringe. Press Restart to try again.
TIPS FOR AN ACCURATE MEASUREMENT
The instructions listed below should be followed carefully to ensure measurements are conducted
with the highest possible accuracy and precision.
• IT IS CRITICAL THAT THE TIP BE IMMERSED IN THE SOLUTION BEING TITRATED (APPROXIMATELY
0.25 CM).
• Use a clean, volumetric pipette to measure and transfer the necessary volume of sample into
the titration beaker.
• Calibrate the pump prior to each series of titrations.
• Calibrate the pump if the meter is left idle for several hours.
• Analyze the sample immediately after the sample is obtained.
• For better performance, soak the electrode in HI 70300 storage solution for at least one hour,
before use.
30
Page 31
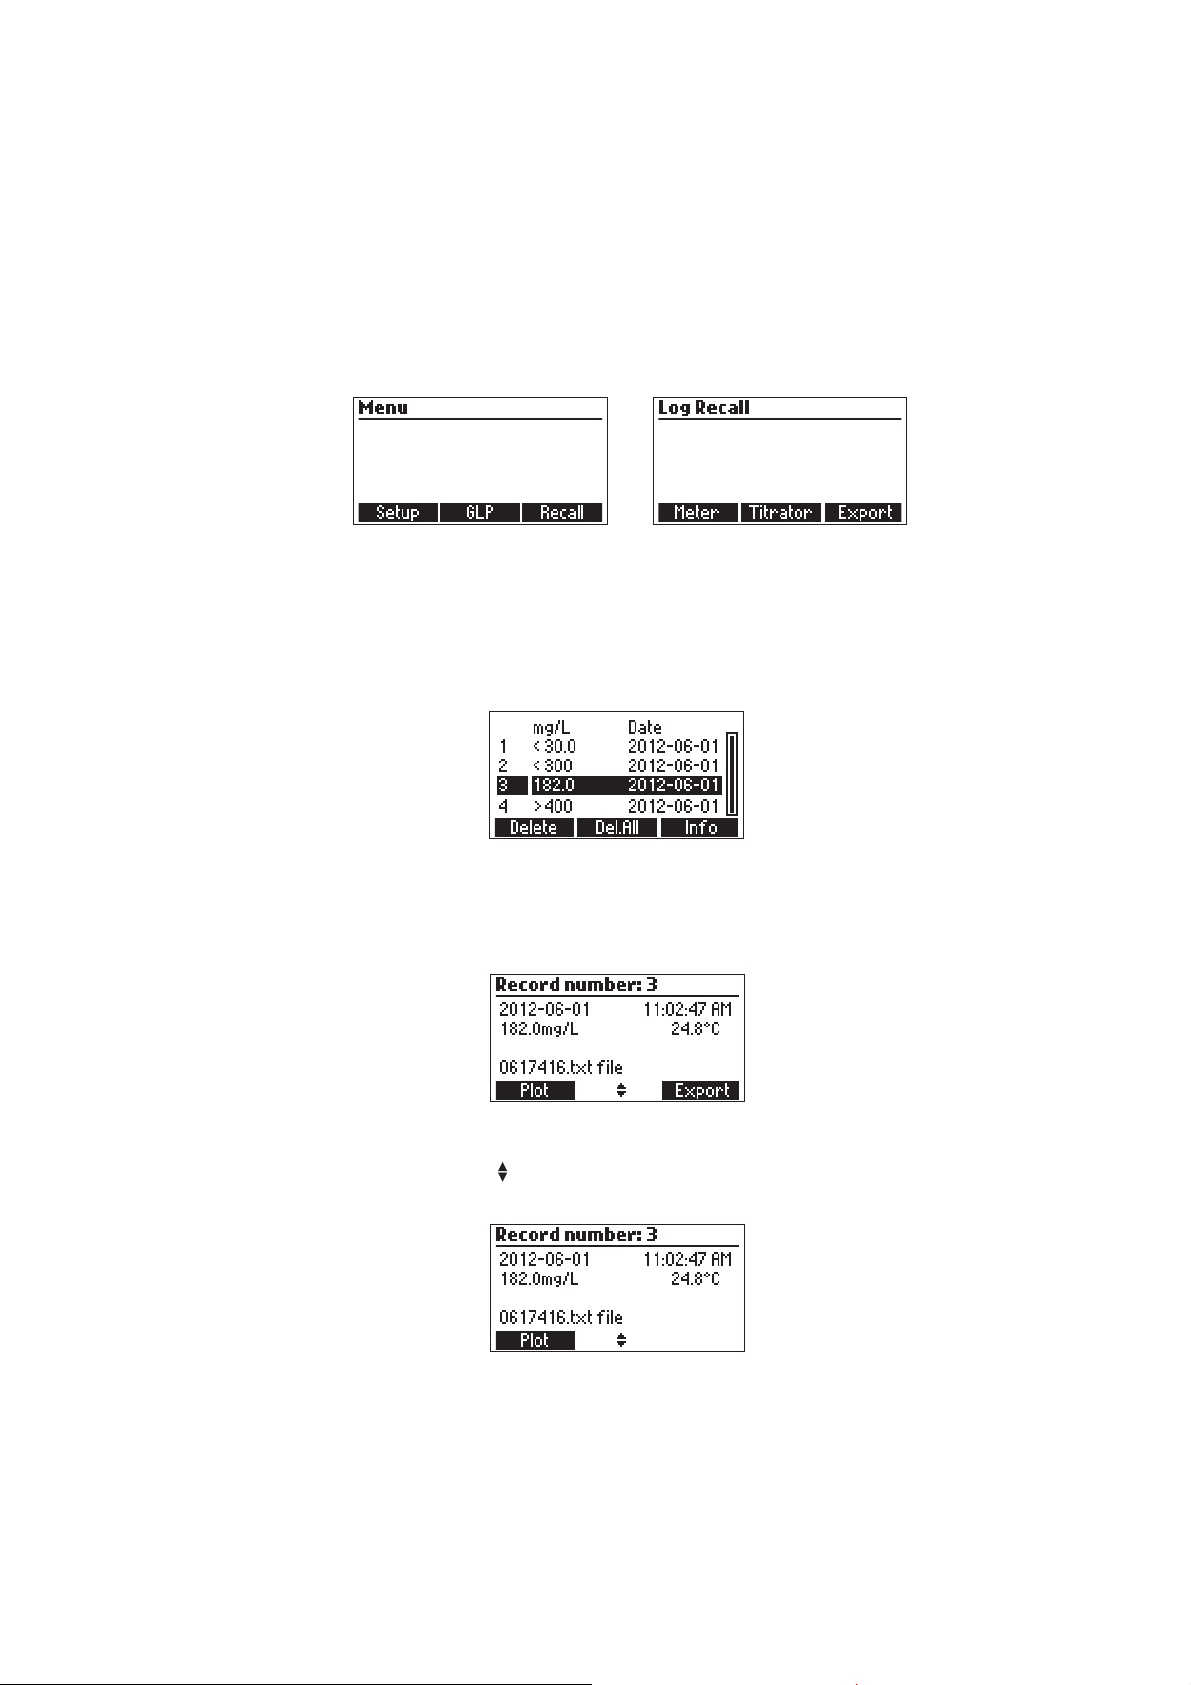
VIEW/DELETE TITRATOR RECORDED DATA
Press MENU then Recall to access the Titrator logs.
When an external USB storage device is connected, the Export key is displayed. It saves the meter and
titrator logs in two text format files on the storage device.
Press Meter or Titrator to view the respective logs.
The instrument will display a list of all the records stored in the log.
Use the ARROW keys to scroll the stored records list.
If the saved concentration was out of range, the “<” or “>” symbols are displayed in front of
the reading.
Press Delete to delete the selected record from the memory.
Press Del.All to delete all the records.
Press Info to see detailed information about the highlighted record.
The selected record data and the titration curve data file name are displayed.
When an USB storage device is connected, the Export key is displayed. It saves the titration curve
data as a text file on the storage device using the displayed file name.
Use the ARROW keys when is displayed to scroll between the log records.
Press ESC to return to the previous screen.
31
Page 32
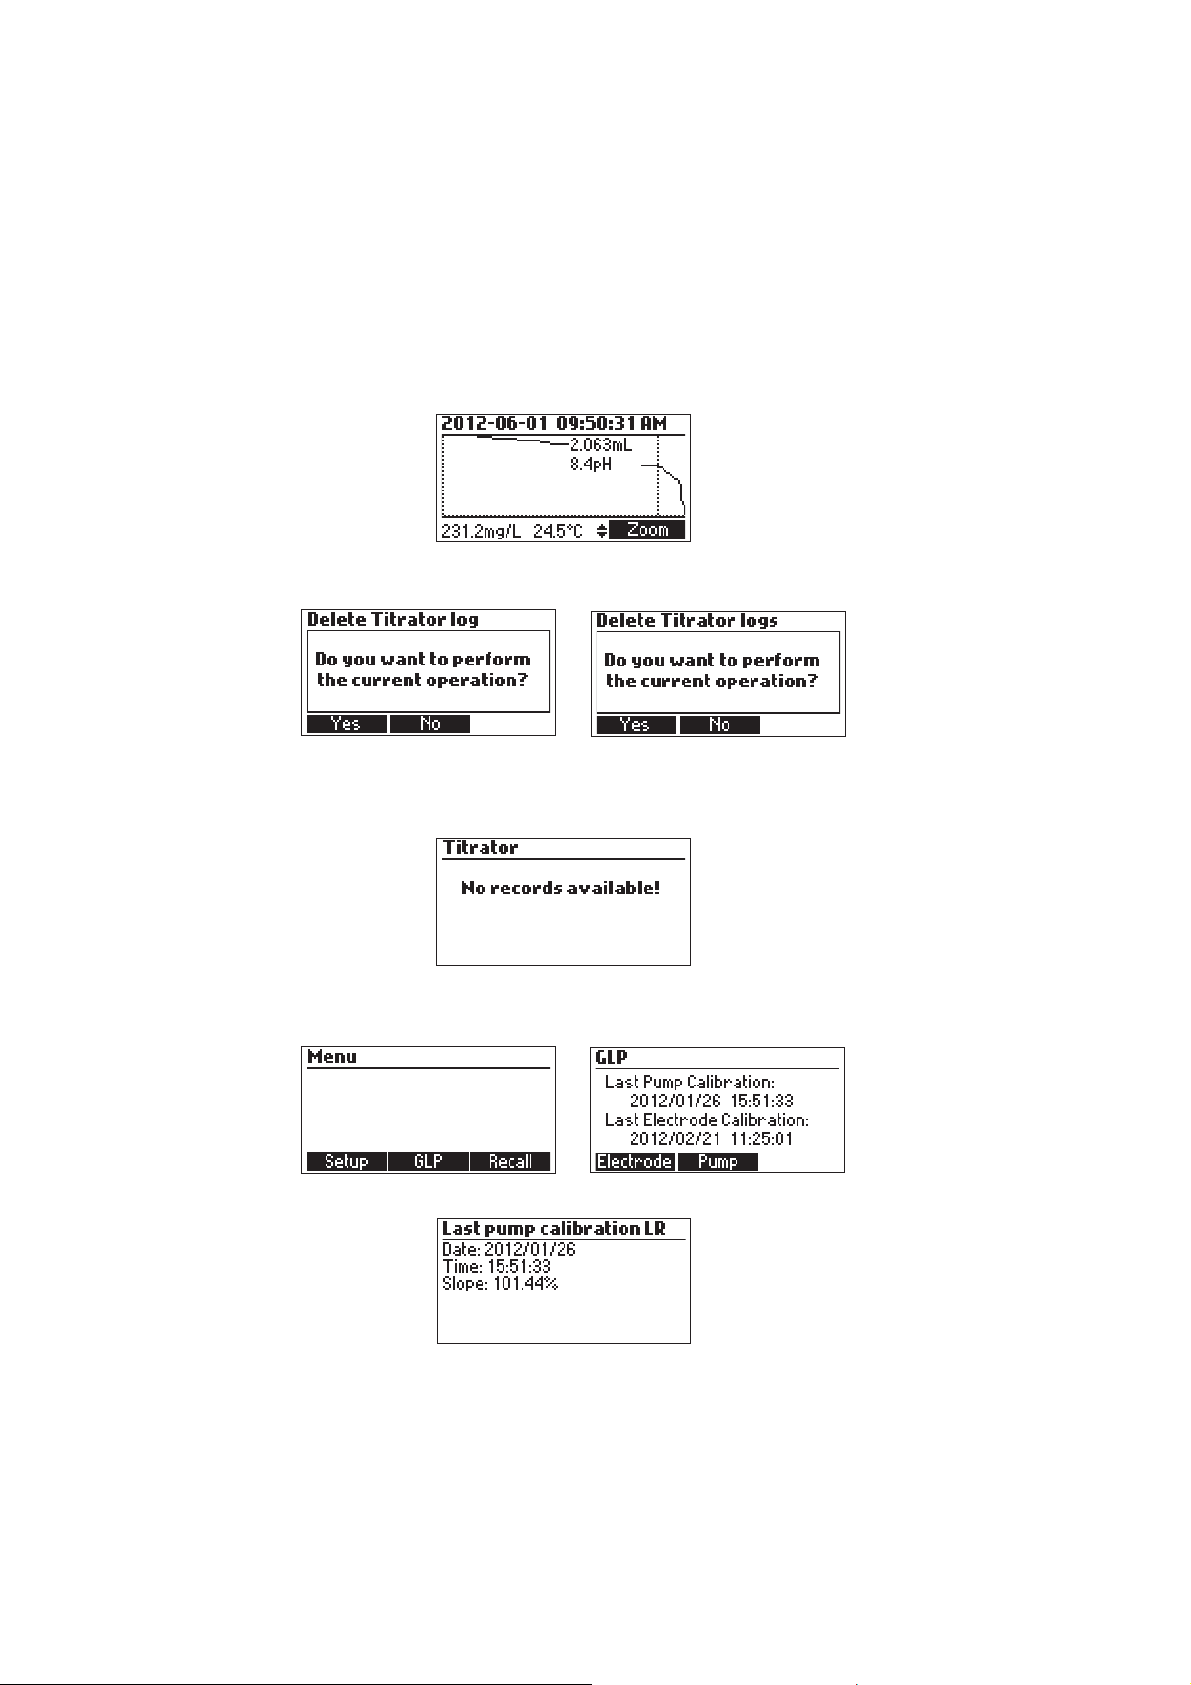
Press Plot
to visualize the titration curve or ESC to return to the previous screen. On the titration
curve, the end point volume and pH are displayed. The titration data (Total Titrant Volume on the xaxis and pH on the y-axis) can be scanned through with the doted line by using the ARROW keys.
To zoom on the titration curve press Zoom.
If Delete or Del.All is pressed the instrument will ask for confirmation.
Press Yes to delete all the records or No to return to the previous screen.
Deleting a single record will renumber the list of records.
If the titrator log is empty, the message “No Records Available!” will be displayed.
TITRATOR GLP INFORMATION
Press MENU then GLP.
From this screen it is possible to select Electrode or the Pump GLP.
32
Page 33
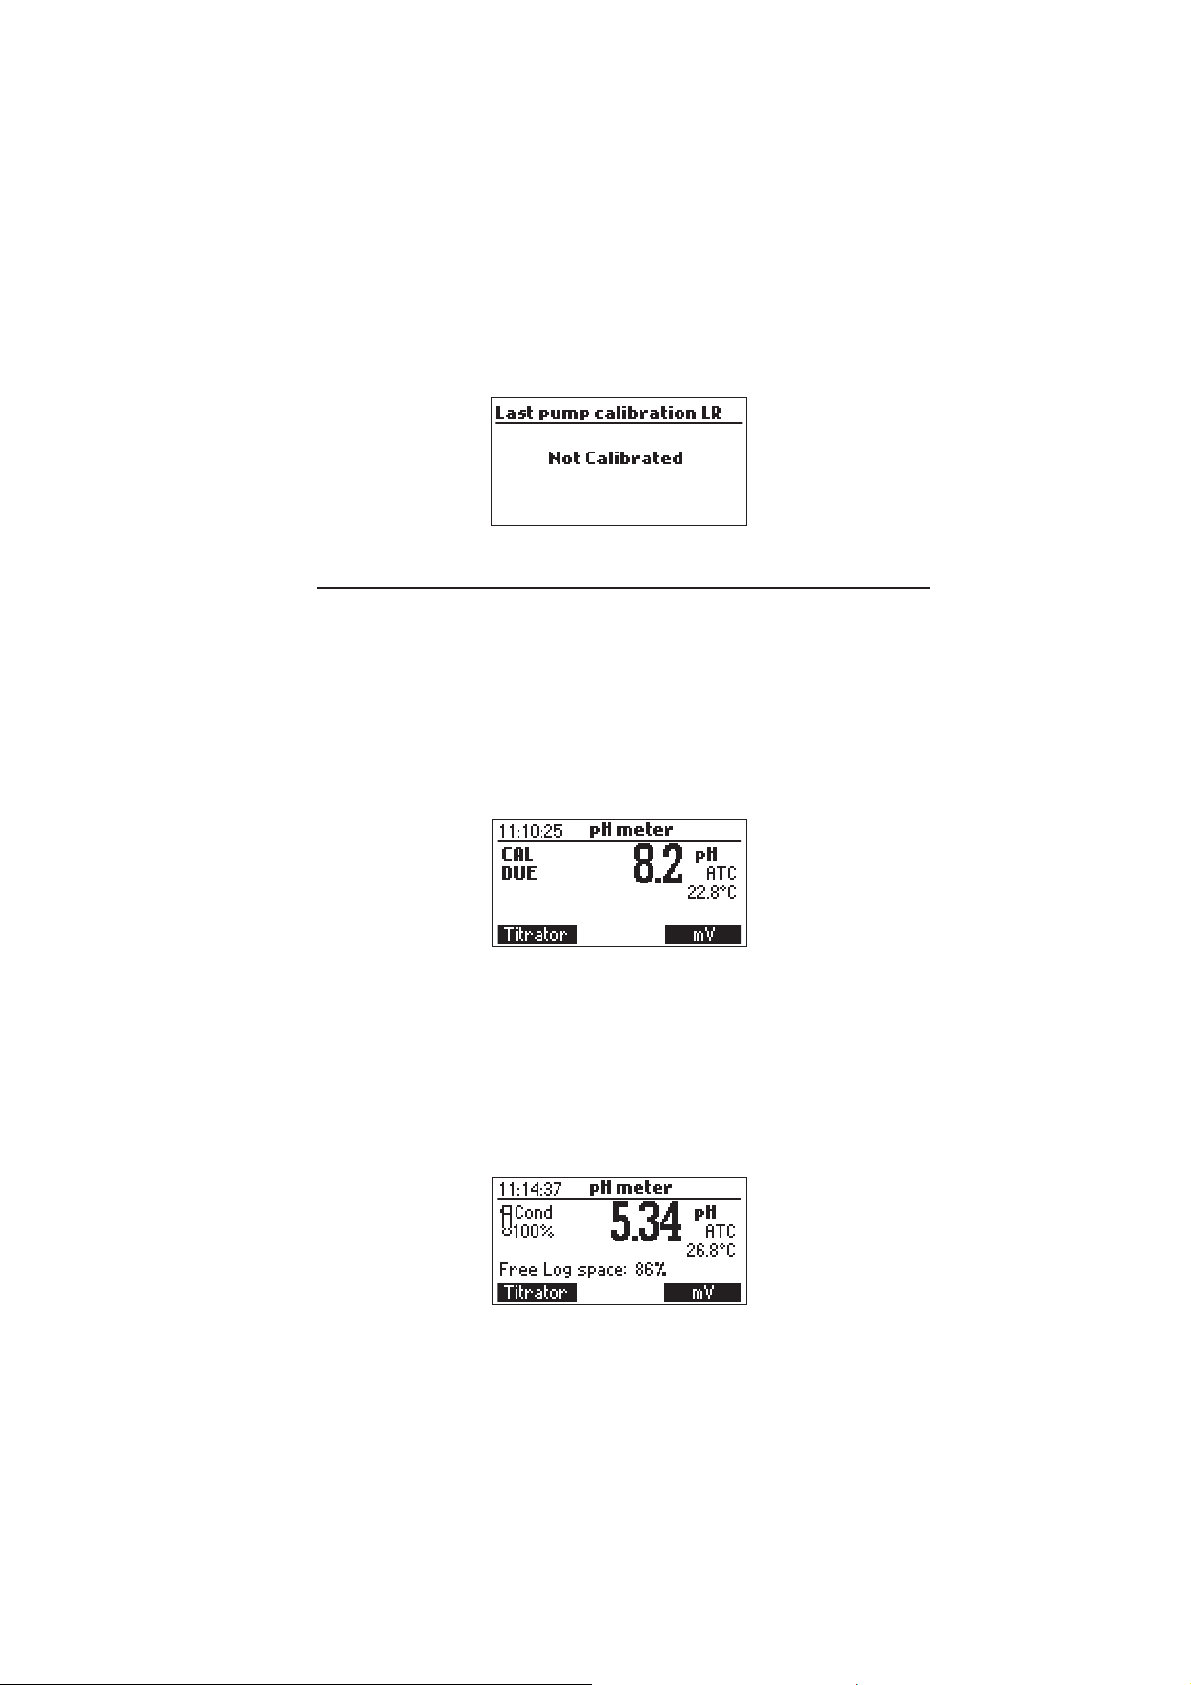
Press Pump to view the pump’s last calibration time, date and slope.
If a calibration hasn’t been performed, the message “Not Calibrated” will be displayed.
pH MEASUREMENT
The HI 84531 can be used as a pH meter for direct measurements.
Verify that the instrument has been calibrated before taking pH measurements. Set the instrument
to pH meter. From titrator mode press Meter until pH units are displayed.
If an electrode calibration hasn’t been performed, or the number of days exceeds the calibration
time out value set, the message “CAL DUE” will blink on the left side of the display (see
Calibration timeout option in Setup for details).
If CAL DUE is displayed perform an electrode calibration.
Press MENU to access the instrument’s menu.
Press HELP to view the contextual help, every time you need additional information.
Press STIR to start/stop the stirrer.
Press Titrator to enter titration mode.
Press CAL to access the calibration menu.
Press LOG to save the current reading. A message indicating the free log space will be displayed
for a few seconds.
33
Page 34
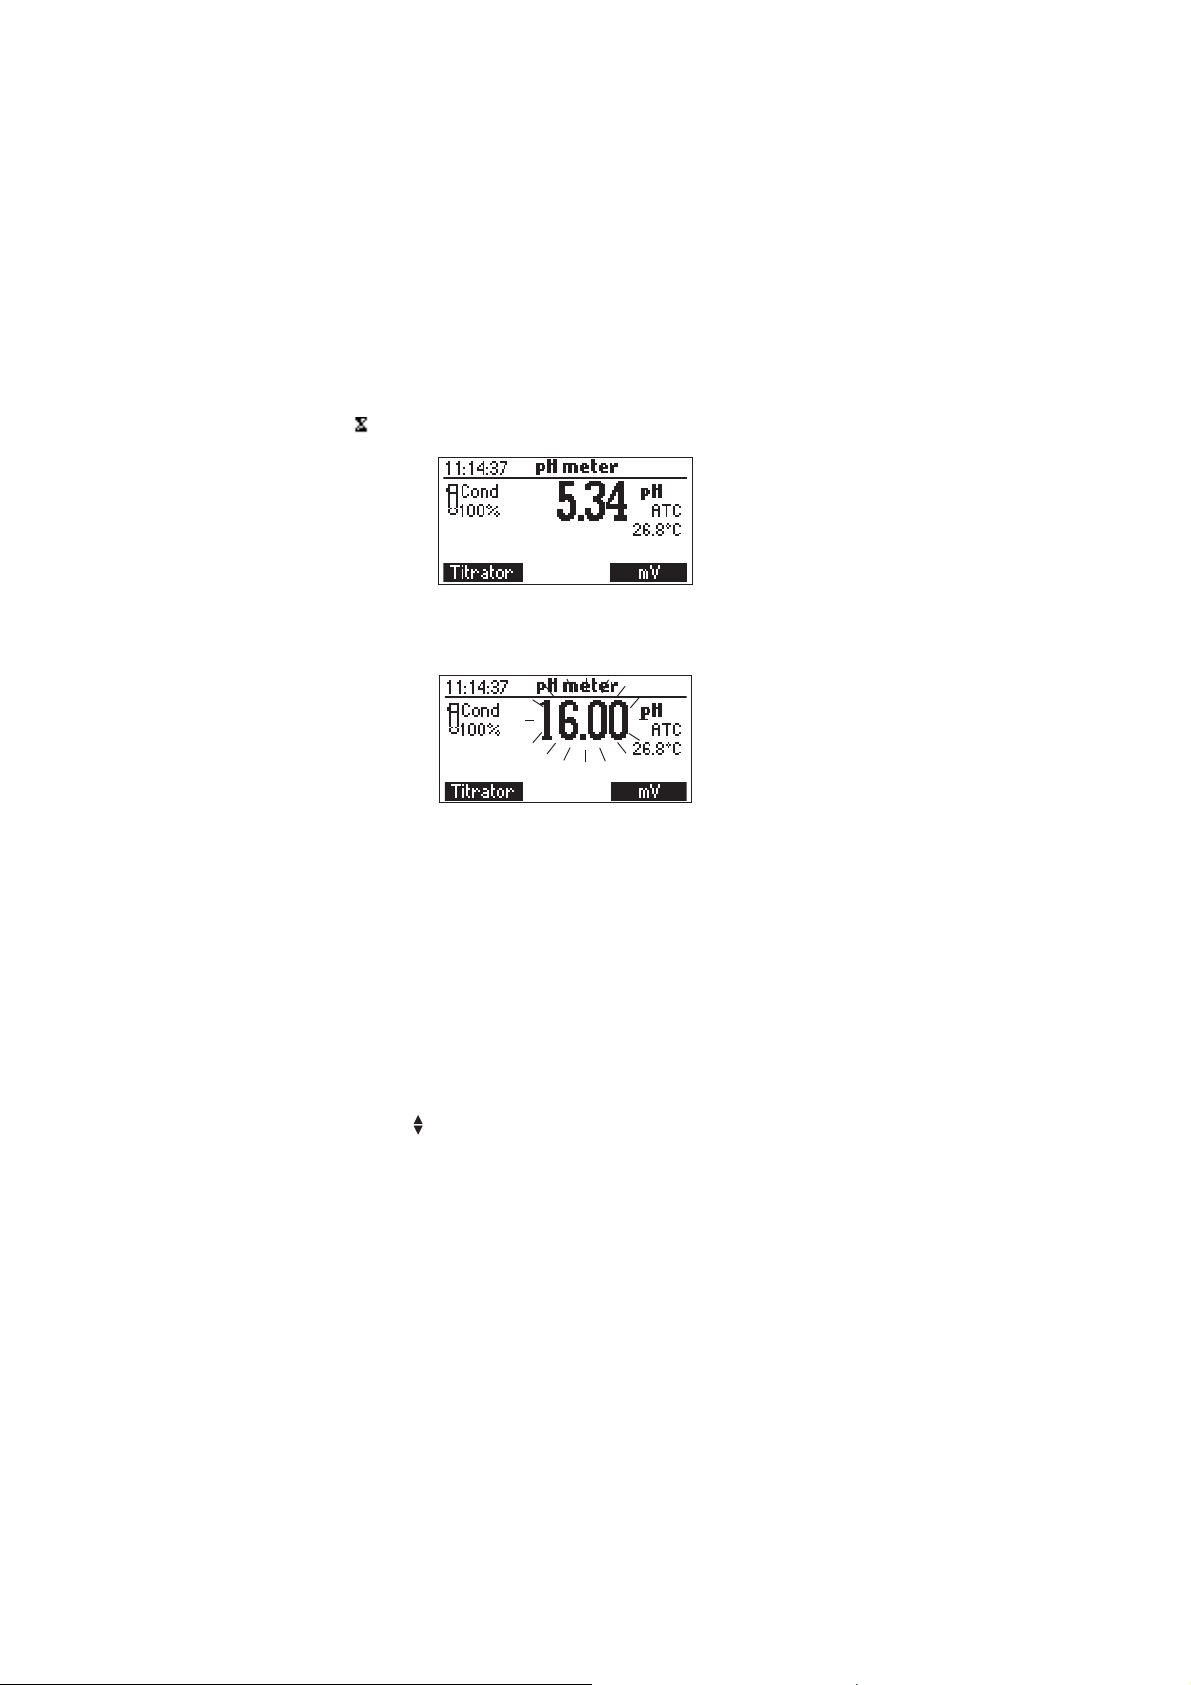
In order to take pH measurements, follow the next steps:
• Submerge the tip of pH electrode 2 cm (0.8’’) and the temperature probe into the sample to
be tested and stir gently. Allow time for the electrode to stabilize. When the reading becomes
stable, the (unstable measurement) symbol will disappear.
• If the pH reading is less than -2.00 pH or greater than 16.00 pH, the closest full-scale value
will be displayed blinking.
If measurements are taken successively in different samples, it is recommended to rinse the
electrodes thoroughly with deionized or distilled water and then with some of the next sample to
prevent cross-contamination.
The pH measurement is affected by temperature. In order to have accurate pH measurements, the
temperature effect must be compensated for. To use the Automatic Temperature Compensation
(ATC) feature, connect and submerge the HI 7662-T temperature probe into the sample as close
as possible to the electrode and wait for a few seconds. The “ATC” message will be shown on the
display. Automatic Temperature Compensation will provide pH corrected values for the measured
temperature. If Manual Temperature Compensation (MTC) is desired, the temperature probe must
be disconnected from the instrument.
The default temperature of 25 °C (77 °F) or the last temperature reading will be displayed
preceded by the symbol and the “MTC” message.
The temperature can be adjusted with the ARROW keys (from -20.0 to 120.0 °C).
34
Page 35
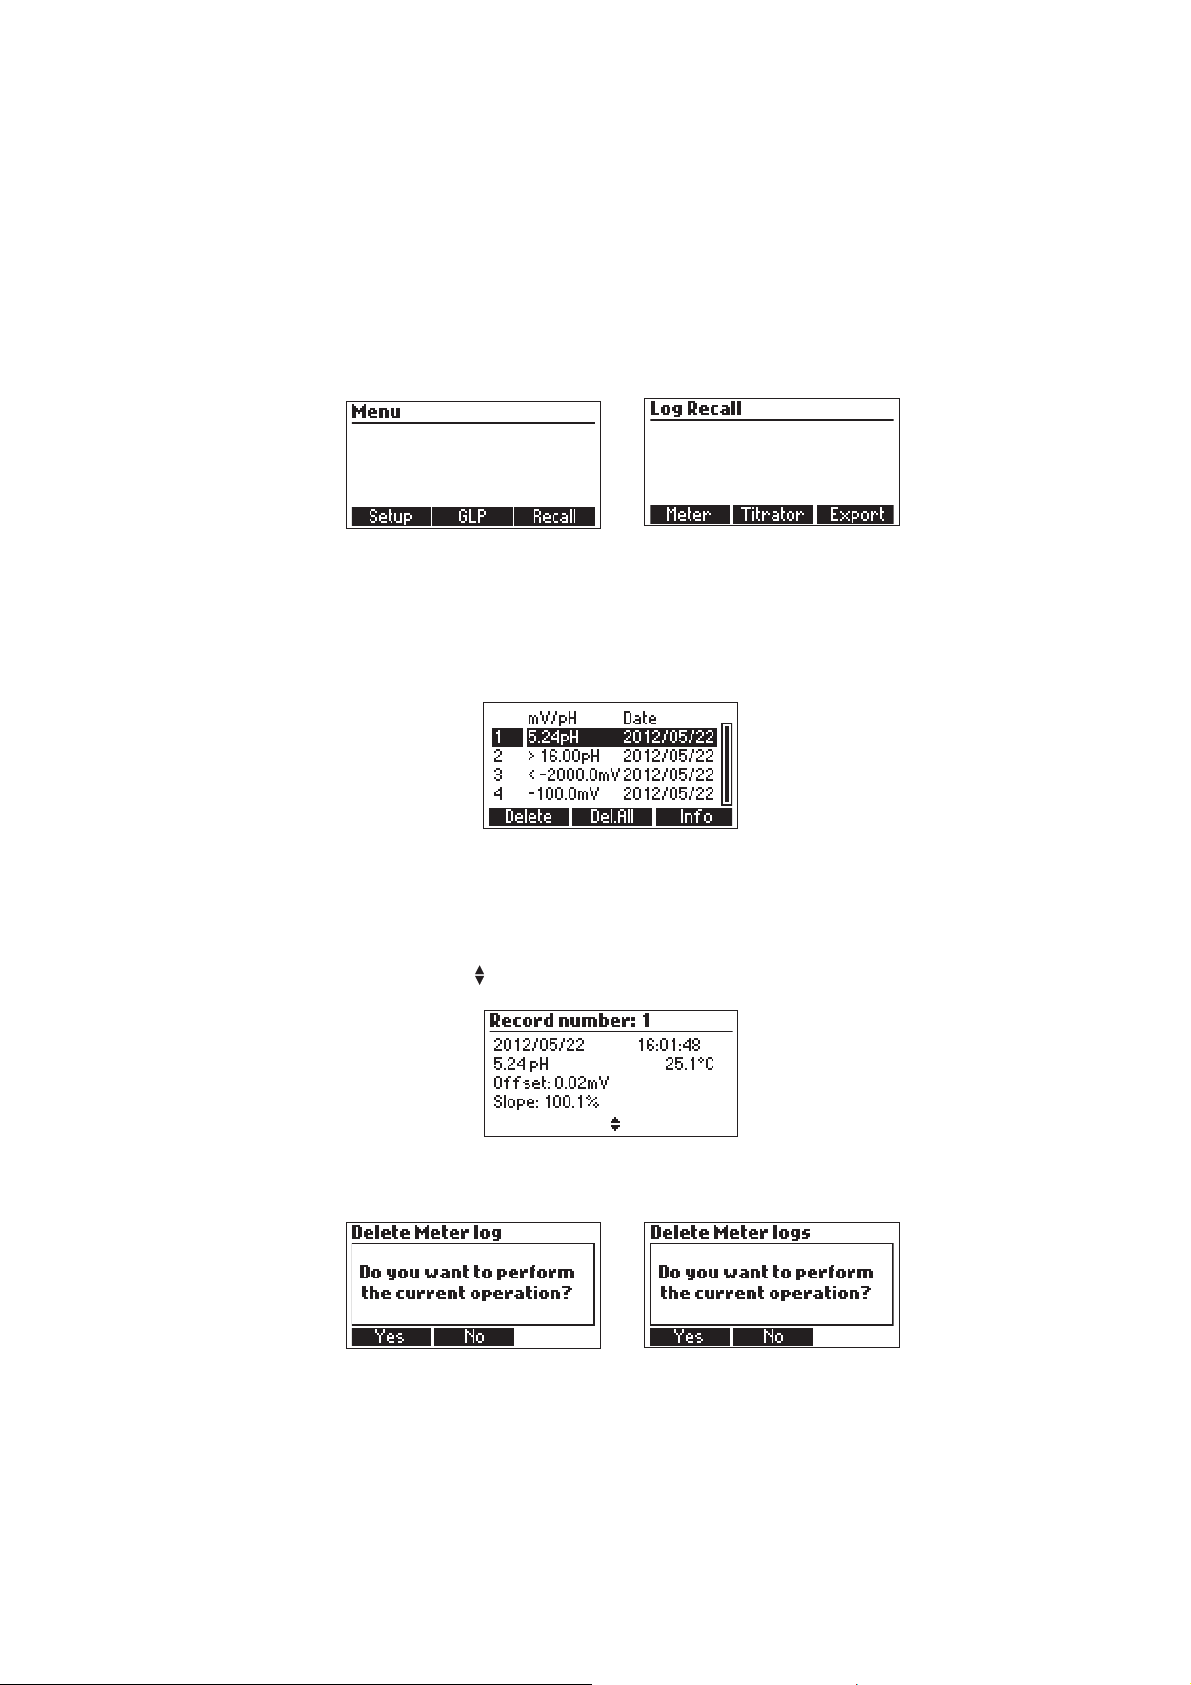
VIEW/DELETE RECORDED pH DATA
Press MENU key while in pH meter screen then Recall to access the meter logs.
When an external USB storage device is connected, the Export key is displayed. It saves the meter
and titrator logs in two text format files on the storage device.
Press Meter or Titrator to view the respective logs.
A list of records is stored in the pH log.
If the saved mV/pH measurements are out of range, the “<“ or “>” symbols are displayed in front
of the reading.
Use the ARROW keys to scroll the list of records.
Press Delete to delete the selected record.
Press Del.All to delete all the records.
Press Info to see detailed information about the highlighted record.
Use ARROW keys when is displayed to scroll between the records.
Press ESC to return to the previous screen.
If Delete or Del.All is pressed the instrument will ask for confirmation.
35
Page 36

Press Yes to delete the record or No to return to the previous screen without deleting.
Deleting a single record will renumber the list of records.
If the pH log is empty, the message “No records available!” will be displayed.
pH METER GLP INFORMATION
The pH meter GLP screens displays the pH calibration data.
To view this information, press MENU key while in pH meter mode then GLP.
Press Electrode to view information regarding electrode calibration.
The following items are included in electrode GLP: the time and date of the last calibration, offset,
slope, electrode condition, calibration timeout and the calibration buffers. The buffers displayed in
video inverse mode are from the previous calibration.
If a calibration hasn’t been performed, the message “Not Calibrated” will be displayed.
36
Page 37
PC INTERFACE AND DATA TRANSFER
Data stored on meter with the LOG function during pH/mV measurement and titrations can be
transferred from the meter to a USB stick using the Export function from the log recall menu. Two
text files are transferred on the USB stick. These files can be used for further analysis on a PC.
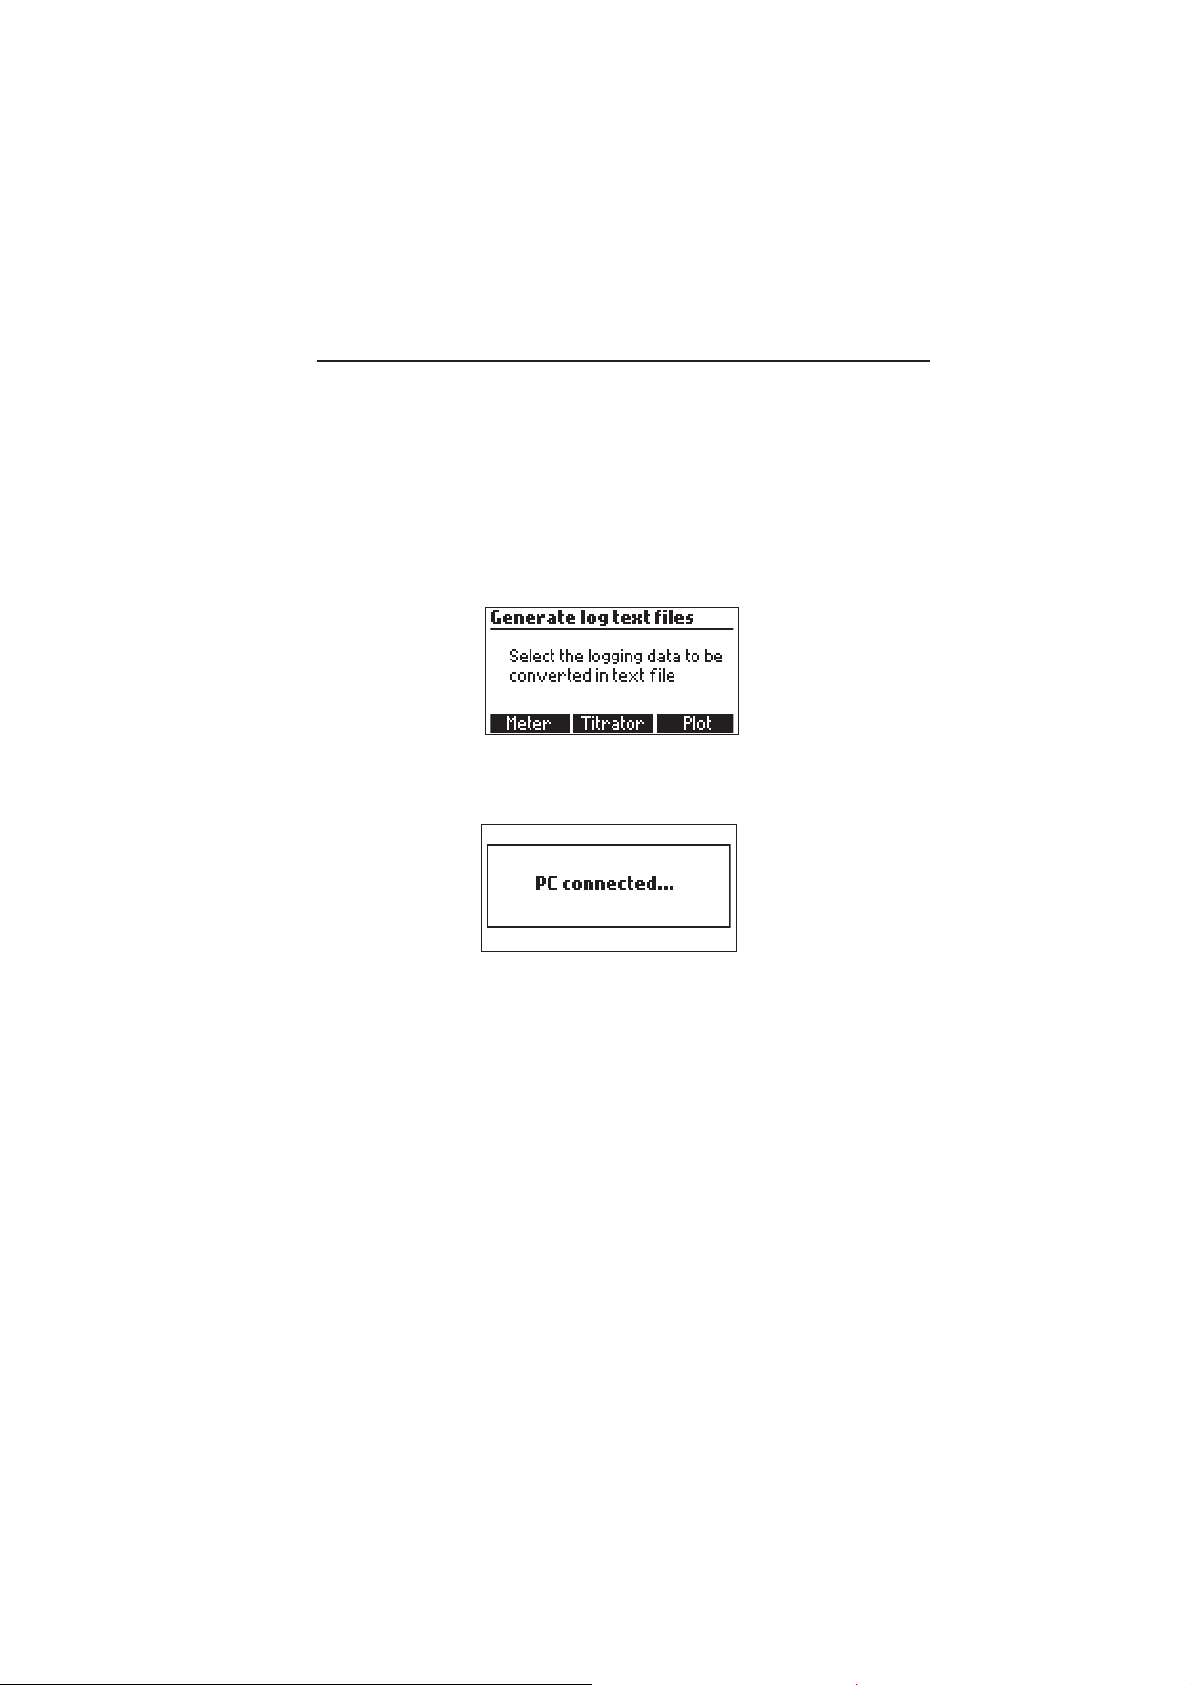
The logged data can also be transferred from the instrument to the PC using a USB cable. Connect
the USB cable and the following screen will be displayed.
Press Meter to generate the text file with Meter log data.
Press Titrator to generate the text file with Titrator log data.
Press Plot to generate the text files with Titration Plots.
The generated files are now visible and can be used for further analysis.
If the instrument has no logged Meter or Titrator records, the PC connected screen is displayed.
37
Page 38

TROUBLESHOOTING GUIDE
SMOTPMYS MELBORP NOITULOS
evissecxe/esnopserwolS
.tfird
.edortceleHpytriD
nipitedortceleehtkaoS 1607IH
setunim03rofnoitulosgninaelc
.erudecorpgninaelcehtwollofdna
.noitulosllifhserfhtiwllifeR
pusetautculfgnidaeR
.)esion(nwoddna
.noitcnujytrid/deggolC
leveletylortcelewoL
Hpelballifer(
.)ylnosedortcele
.noitcennocelbaC
nipitedortceleehtkaoS 1607IH
.setunim03rofnoitulosgninaelc
.noitulosllifhserfhtiwllifeR
retemotnoitcennocelbackcehC
.ffosipacevitcetorpyfirevdna
gnidaerHpnielihW
00.61ro00.2-,edom
deyalpsidsiHp
.gniknilb
.egnarfotuognidaeR
retemotnoitcennocelbackcehC
.ffosipacevitcetorpyfirevdna
.elpmasehtfoytilauqehtkcehC
htiwllifeR.sedortceleehtnaelC
.noitulosllifhserf
tonseodretemehT
reffubHpehttpecca
.noitarbilacrofnoitulos
.edortceleHpnekorB
gninaelcedortceleehtwolloF
stsisreprorreehtfI.erudecorp
ehttcatnocroedortceleehtecalper
.rodnev
noitarbilacpmupehT
demrofrepebt'nac
.gnibutpmupnekorB
rognorW
pmupdetanimatnoc
.noitulosnoitarbilac
nekorB Hp .edortcele
eraegnirys,evlav,gnibutyfireV
nehwsessapnoitulosdnatcatni
riaondnademirpsipmup
.tneserperaselbbub
noitarbilacpmupehtkcehC
siedortceleyfireV.noitulos
.sreffubHphserfnidetarbilac
emirp,dradnatsrehtonaeraperP
ehttratserdnapmupeht
.noitarbilac
eborperutarepmetehT
ehttub,detcennocsi
"syalpsidretem CTM ."
erutarepmetnekorB
.eborp
.eborperutarepmetecalpeR
38
Page 39

SMOTPMYS MELBORP NOITULOS
ehtnoitartitaretfA
deyalpsidsigniwollof
:gniknilb
L/gm0.004:egnaRwoL
L/qem0.8ro
0004:egnaRhgiH
.L/qem08roL/gm
.edortcelenekorB
tontnemurtsnI
.detarbilac
.detcelesegnargnorW
fotuonoitartnecnoC
.egnar
.edortceleehtnaelc/kcehC
tnemurtsniehtetarbilaceR
eracesU.)pmupdnaHp(
elpmasgnirud
.noitaraperp
.egnardetcelesegnahC
retemehtputratstA
ANNAHehtsyalpsid
.yltnenamrepogol
.kcutssisyekehtfoenO
rodraobyekehtkcehC
.rodnevehttcatnoc
" xxrorrE siegassem"
.deyalpsid
.rorrelanretnI
dnaretemehtfforewoP
fI.niaganotirewopneht
tcatnoc,stsisreprorreeht
.rodneveht
" rorrererritS egassem"
dneehttadeyalpsidsi
ronoitarbilacpmupfo
.noitartit
gninoitcnuftonrerritS
.ylreporp
tcatnoc,stsisreprorreehtfI
.rodneveht
nocirerritsgninnips-noN
Hpnigniknilb
retemdnanoitarbilac
.edom
gninoitcnuftonrerritS
.ylreporp
tcatnoc,stsisreprorreehtfI
.rodneveht
" rorrepmuP egassem"
.deyalpsidsi
evlav,gnibutehtkcehC
.egnirysdna
tcatnoc,stsisreprorreehtfI
.rodneveht
retemehtputratstA
"syalpsid sdohteM
detpurroc ."
sawelifdohtemehT
.detpurroc
.rodnevehttcatnoC
39
Page 40

ELECTRODE CONDITIONING AND MAINTENANCE
STORAGE PROCEDURE
To assure a quick response time, the glass bulb should be kept moist and not allowed to dry out.
Replace the solution in the protective cap with a few drops of HI 70300 or HI 80300 Storage
Solution. Follow the Preparation Procedure section before taking measurements.
Note: NEVER STORE THE pH ELECTRODE IN DISTILLED OR DEIONIZED WATER.
PERIODIC MAINTENANCE
Inspect the electrodes and the cables. The cable used for connection to the instrument must be
intact and there must be no broken insulation on the cable or cracks on the electrode stem or bulb.
Connectors must be perfectly clean and dry. If any scratches or cracks are present, replace the
electrode. Rinse off any salt deposits with distilled/deionized water.
pH CLEANING PROCEDURE
•
General
IMPORTANT: After performing any of the cleaning procedures, rinse the electrode thoroughly with
distilled or deionized water and soak the electrode in HI 70300 or HI 80300 Storage Solution for
at least 1 hour before use. Recalibrate electrode before taking measurements.
Soak in Hanna HI 7061 or HI 8061 General Cleaning Solution for
approximately ½ hour.
40
Page 41

ACCESSORIES
REAGENTS
HI 84531-50 Low Range Titrant (120 mL)
HI 84531-51 High Range Titrant (120 mL)
HI 84531-55 Calibration Standard (230 mL)
pH CALIBRATION SOLUTIONS
HI 7004M Buffer Solution pH 4.01 (230 mL)
HI 7007M Buffer Solution pH 7.01 (230 mL)
HI 70083M Buffer Solution pH 8.30 (230 mL)
HI 7010M Buffer Solution pH 10.01 (230 mL)
ELECTRODES
HI 1131B pH Electrode
HI 7662-T Temperature probe
ELECTRODE FILL SOLUTION
HI 7082 Electrode fill solution (4 x 30 mL)
ELECTRODE STORAGE SOLUTION
HI 70300M Storage Solution (230 mL)
HI 70300L Storage Solution (500 mL)
HI 80300M Storage Solution (230 mL)
HI 80300L Storage Solution (500 mL)
ELECTRODE CLEANING SOLUTION
HI 7061M Electrode Cleaning Solution, 230 mL bottle
HI 7061L Electrode Cleaning Solution, 500 mL bottle
HI 8061M Electrode Cleaning Solution, 230 mL bottle
HI 8061L Electrode Cleaning Solution, 500 mL bottle
41
Page 42

OTHER ACCESSORIES
HI 70501 Tube set with cap for titrant bottle, tip and valve
HI 71005/8 115 Vac to 12 Vdc, 800 mA
HI 71006/8 230 Vac to 12 Vdc, 800 mA
HI 731319 Stir bar (10 pcs., 25 x 7 mm)
HI 731342 Automatic pipette 2000 µL
HI 731352 Tips for 2000 µL automatic pipette (4 pcs.)
HI 740036P 100 mL plastic beaker (10 pcs.)
HI 740037P 20 mL plastic beaker (10 pcs.)
HI 740236 5 mL Syringe for minititrator
HI 920013 PC Connection Cable
WARRANTY
HI 84531 is guaranteed for two years against defects in workmanship and materials when used
for it’s intended purpose and maintained according to instructions. Electrodes and probes are
guaranteed for six months. This warranty is limited to repair or replacement free of charge.
Damage due to accidents, misuse, tampering or lack of prescribed maintenance is not covered.
If service is required, contact your dealer from whom you purchased the instrument. If under
warranty, report the model number, date of purchase, serial number and the nature of the
problem. If the repair is not covered by the warranty, you will be notified of the charges incurred.
If the instrument is to be returned to Hanna Instruments, first obtain a Returned Goods Authorization
number from the Technical Service department and then send it with shipping costs prepaid. When
shipping any instrument, make sure it is properly packed for complete protection.
To validate your warranty, fill out and return the enclosed warranty card within 14 days from the
date of purchase.
42
Page 43

RECOMMENDATION FOR USERS
Before using this product, make sure that it is entirely suitable for your specific application and for the
environment in which it is used.
Operation of this instrument may cause unacceptable interferences to other electronic equipment, thus
requiring the operator to take all necessary steps to correct interferences.
Any variation introduced by the user to the supplied equipment may degrade the instrument’s EMC
performance.
To avoid damages or burns, do not put the instrument in microwave ovens. For your and the instrument’s
safety, do not use or store the instrument in hazardous environments.
Hanna Instruments reserves the right to modify the design, construction or appearance of its products without
advance notice.
43
Page 44

Hanna Instruments Inc.
Highland Industrial Park
584 Park East Drive
Woonsocket, RI 02895 USA
Technical Support for Customers
Tel. (800) 426 6287
Fax (401) 765 7575
E-mail [email protected]
www.hannainst.com
Local Sales and Customer Service Office
Printed in ROMANIA
MAN84531 11/13
44
 Loading...