

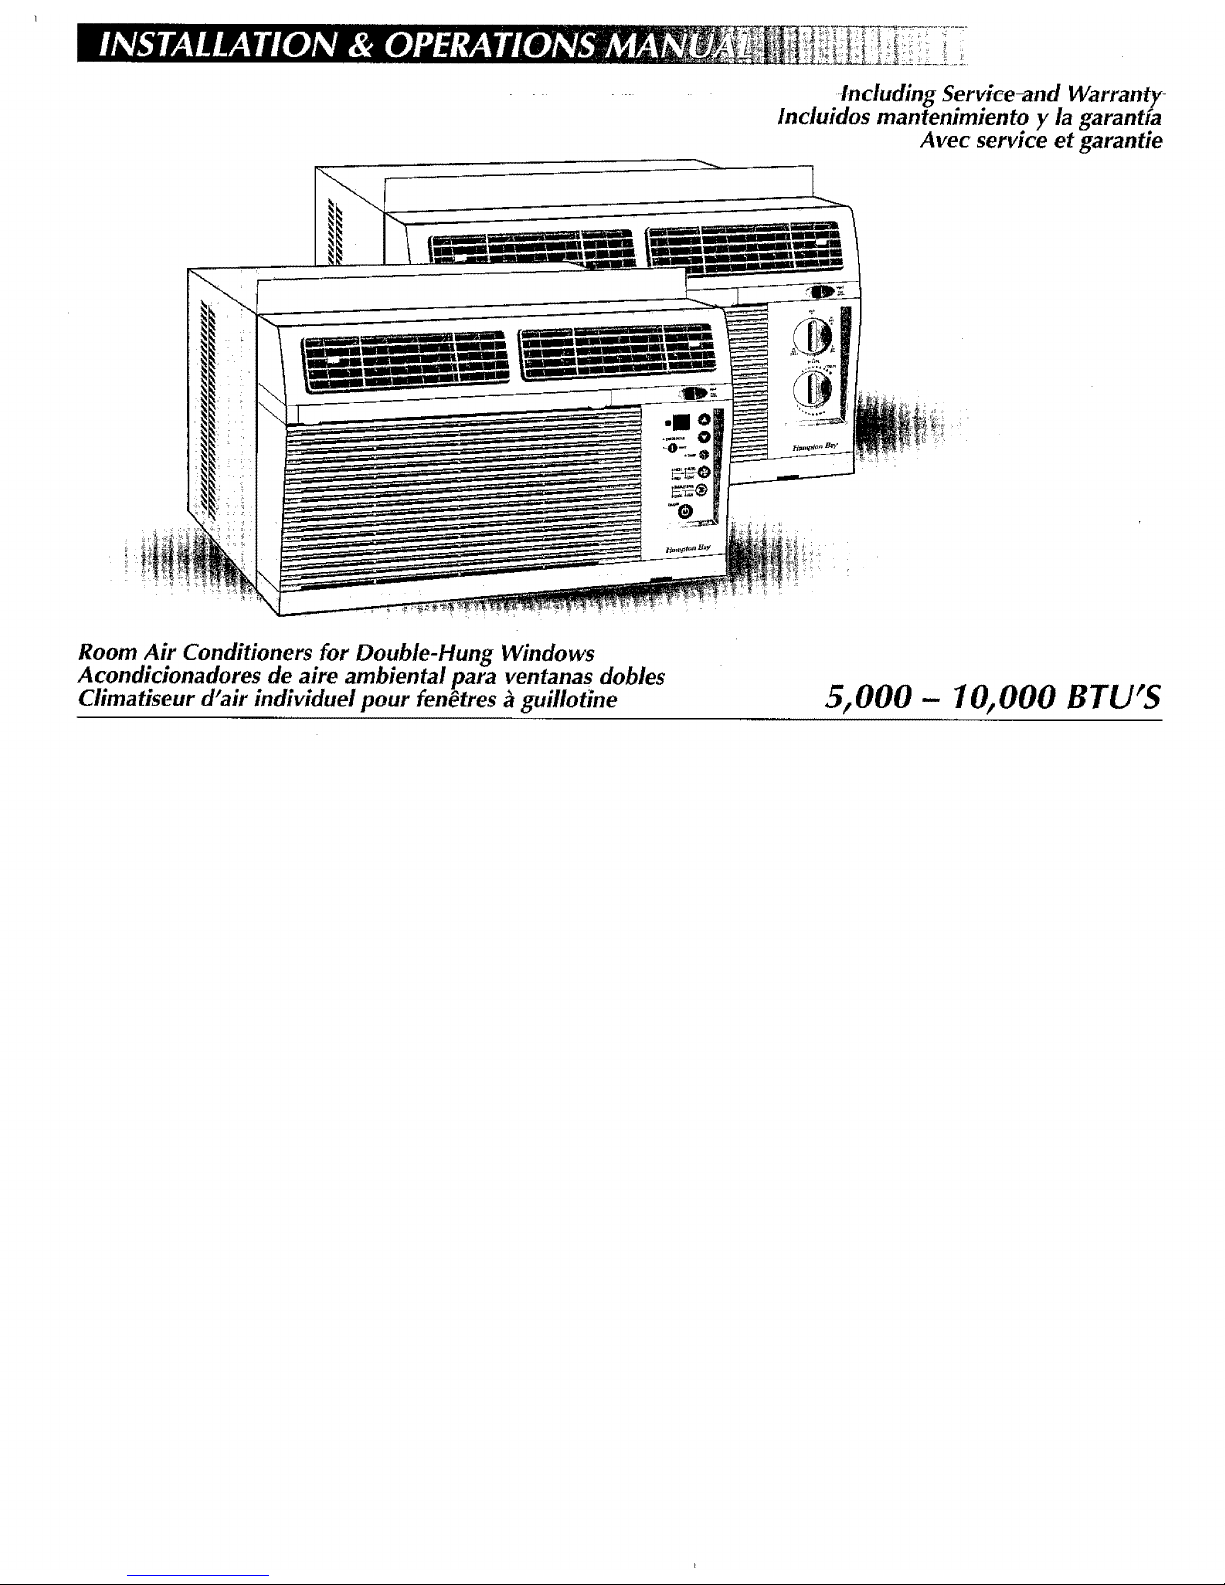
HAMPTON BAY HBQ100 Installation & Operation Manual
-Including Service-and Warranty-
Incluidos mantenimlento y la garanffa
Avec service et garantie
Room Air Conditioners for Double-Hung Windows
Acondicionadores de aire ambiental para ventanas dobles
Ciimatiseur d'air individuel pour fen_tres _ guillotine
•mo|
5,000 - 10,000 BTU'S
ENGLISH
Installation ........................... 1
Warning (Electrical)
Important Grounding Requirements
Warning (Product Damage & Safety)
Tools Needed
Window Requirements
Unit & Window Size
Attach Filler Panels
Installation in Normal Width Window
hTstallation in Minimum Width Window
Operation ............................. 5
MECHANICAL CONTROL PANEL _ Control Functions •
Cooling Operation • Air Circulation Without Cooling •
ExlTaustOperation Without Cooling
ELECTRONIC CONTROL PANEL - Control Function_ • "
Cooling Operation • Air Circulation Without Cooling.
Exhaust Operation without cooling
Directing Airflow (Unit With Adjustable Louvers)
Cleaning Air Filter
Service & Warranty. ............. 9
Insufficient Cooling
Unit Fails to Start
Service or Parts are Required
Room Air Conditioner Warranty
ESPA OL
Instalaci6n ......................... 11
Aviso (El_ctrica)
Requistos importantes para la conexi6n
Aviso (Daffo al producto y seguridad)
Hen'amientas necesarias
Requisitos de la ventana
Tamafio de la ventana y la unidad
Instate los paneles de tlenado
Instalaci6n en una ventana de ancho nom_al
lnstatacidn en una ventana de ancho mfnimo
Funcionamiento ................. 15
PANEL DE CONTROL MEC,_NICO - rundon_s de los
controlus • Operaddn de enfriamiento • CirculaciSn de aire
sin enfriamientn • Ventitaci6n del cuarto sin enfriamiento
PANEL DE CONTROL ELECTR_NtCO Funciones de 1o5
cont_otes ° Operacidn de on#(am(onto • Circulacidn de aire
sin enfrian_iento • Ventilaci6n del cuarto sin enfriamientn
Orientaci6n de la corrienze de aire
(Unidad con rejilla directriz ajustabte)
Limpieza dot fittro de aire
Servicio y Garantia ............ 19
Enfriamiento insuficiente
Sila unidad no se enciende
Necesidad de servicio o piezas
Garanffa de! acondicionador de aire
IIII
FRAN_AI$
Montage. ............................ 21
Avertissement (E'/ectrique)
lmportantes exigences de raise _ la terre
Avertissement (Endommagement du produit et s#cufit#)
Outils n_cessaires
Caract#ristiques des fenOtres
Dimensions de i'appareil et de la fen_tre
Fixation des panneaux de rempiissage
Pose dons une fen_tre de iargeur normale
Pose dons une fengtre de largeur minimum
Fonctionnement ................. 25
PANNEAU DE COMMANDE ML'CANtQUE -
Fonctionsde commando • Refroidissement * Circulation d'air
sansrefroidissement •Sortie d'air sans refroidissemen[
PANNEAU DE COMMANDE ELECTRONIQUE-
fonctions de commando • Refroidissement * Circulation d'ah"
sans refroidissement , Sortie d'air sans ret?oidissement
Orientation de ['air (Modble avec d_ftecteurs r@lables)
Nettoyage du fiftre _ air
Service et Garant|e ............ 2-(
Refroidissement insuffisant
L'apparei] nese met pasen marche
Roarations ou pi_ees s'av_rent n#cessaires
Garantie du climatiseur
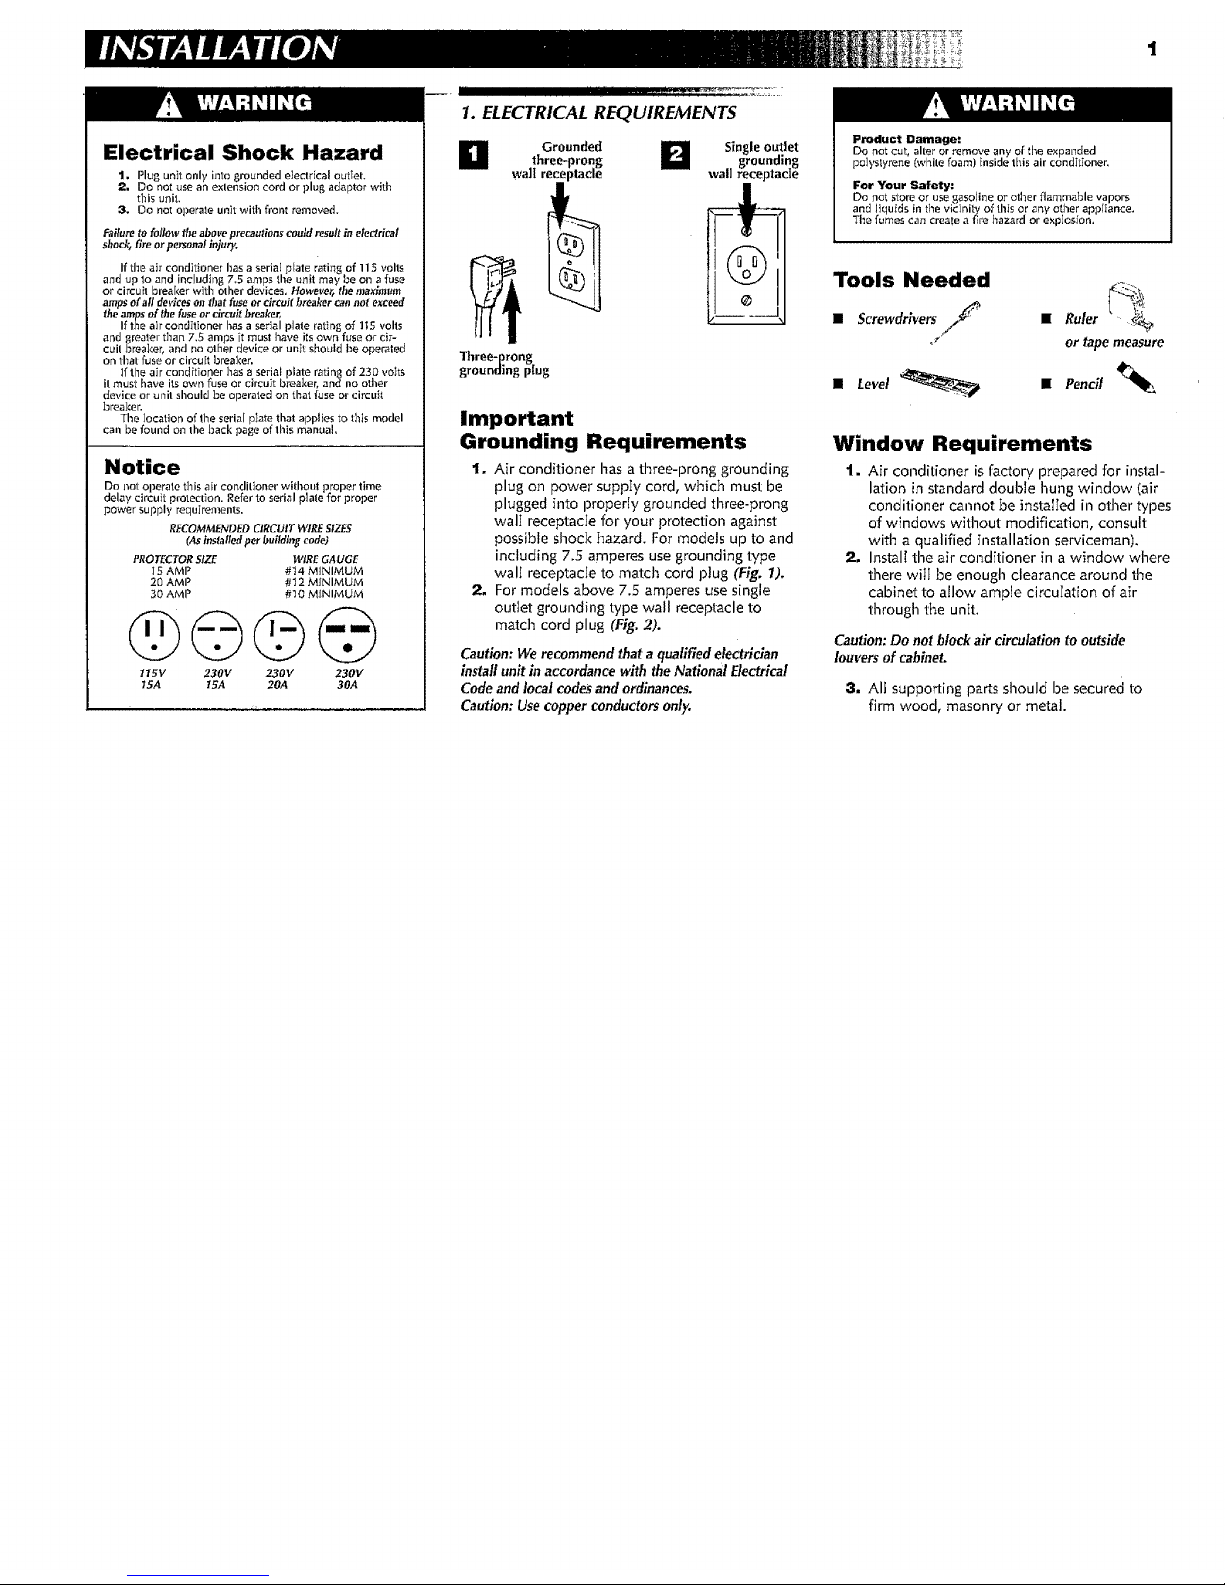
Electrical Shock Hazard
_ Plug unit on)y into grounded ele_rical out_et.
Do not use an exlension cord or ])lug adaptor with
this unit.
3. Do not operate unit with front removed.
Failure to follow the aboveprecautions could result in deClrieal
shade fire or personalinj.ry,
If the ak conditioner has a serial _late ratin_ of 11_ volts
and up lo and including 7,5 amps the unit mat,' be on a fuse
or circuit breaker with other devices, However, themarlmum
amps of all devlees on lbat fu_eor drcuit breaker can not exceed
the amps of the fuse or circuit breaker,
If the air conditioner has a serial plate rating of 1t5 volts
and l]reater than 7.5 amps it must have itsown fuse or dr-
cull breaker, and no other device or unit should be operated
on that fuse or circuit breaker.
If the air conditioner has a serial plate ratin_ of 230 voIts
it must have its ov.,n fuse or circuit breaker, and no other
device or unit should be operated on that fuse or circuit
breaker.
The location of the serial pIate that applies to this model
can be found on the back page of this manual,
Notice
Do not operate this air conditioner witl:tout )roper time
delay circuit protection. Refer to serial plate 1"orproper
power supply requirements.
gECOMMENDED ORCUIT WIRE SIZES
(As installedper buildiag code)
PROTECTORSiZE WIREGAUGE
I5 AMP #t4 MINIMUM
20 AMP #12 MINIMUM
30 AMP #'_0 MINIMUM
@©©@
115V 230V 230V 230V
I5A tSA 20A 30A
IIIII Ii I1[111III I I
1. ELECTRICAL REQUIREMENTS
D Grounded
three-prong
wall receplacle
Three-prong
grounding plug
D
Single outlet
grounding
wall receptacle
Important
Grounding Requirements
1. Air conditioner has a three-prong grounding
plug on power suppIy cord, which must be
plugged into properly grounded three-prong
walI receptacle for your protection against
possible shock hazard. For models up to and
including 7.5 amperes use grounding type
wall receptacle to match cord plug (Fig, 1).
2, For models above 7.5 amperes use single
outlet grounding type wall receptacle to
match cord plug (Jig. 2).
Caution: We recommend that a qualified electrician
install unit in accordance with the National Electrical
Code and local codes and ordinances.
Caution:Usecopperconductorsonly.
Product Damage:
Do not cut, alter or remove any of the expanded
polystyrene {white foam) }nside this air condiL_oner,
For Your Safety:
Do not store or use gasoliee or other flammable vapors
and liquids in the vicinity o_ this or any other appliance,
The fumes can create a fire hazard or explosion,
Tools Needed
• Screwdrivers /_ " Ruler - _
,_ or tape measure
Window Requirements
1. Air conditioner is factory prepared for instal-
lation in standard double hung window (air
conditioner cannot be insta[Ied in other types
of windows without modification, consult
with a qualified installation serviceman).
2, Instal[ the air conditioner in a window where
there will be enough clearance around the
cabinet to allow ample circuIat[on of air
through the unit.
Caution: Do not block air circulation to outside
louvers of cabinet.
3. All supporting parts should be secured to
firm wood, masonry or metal.
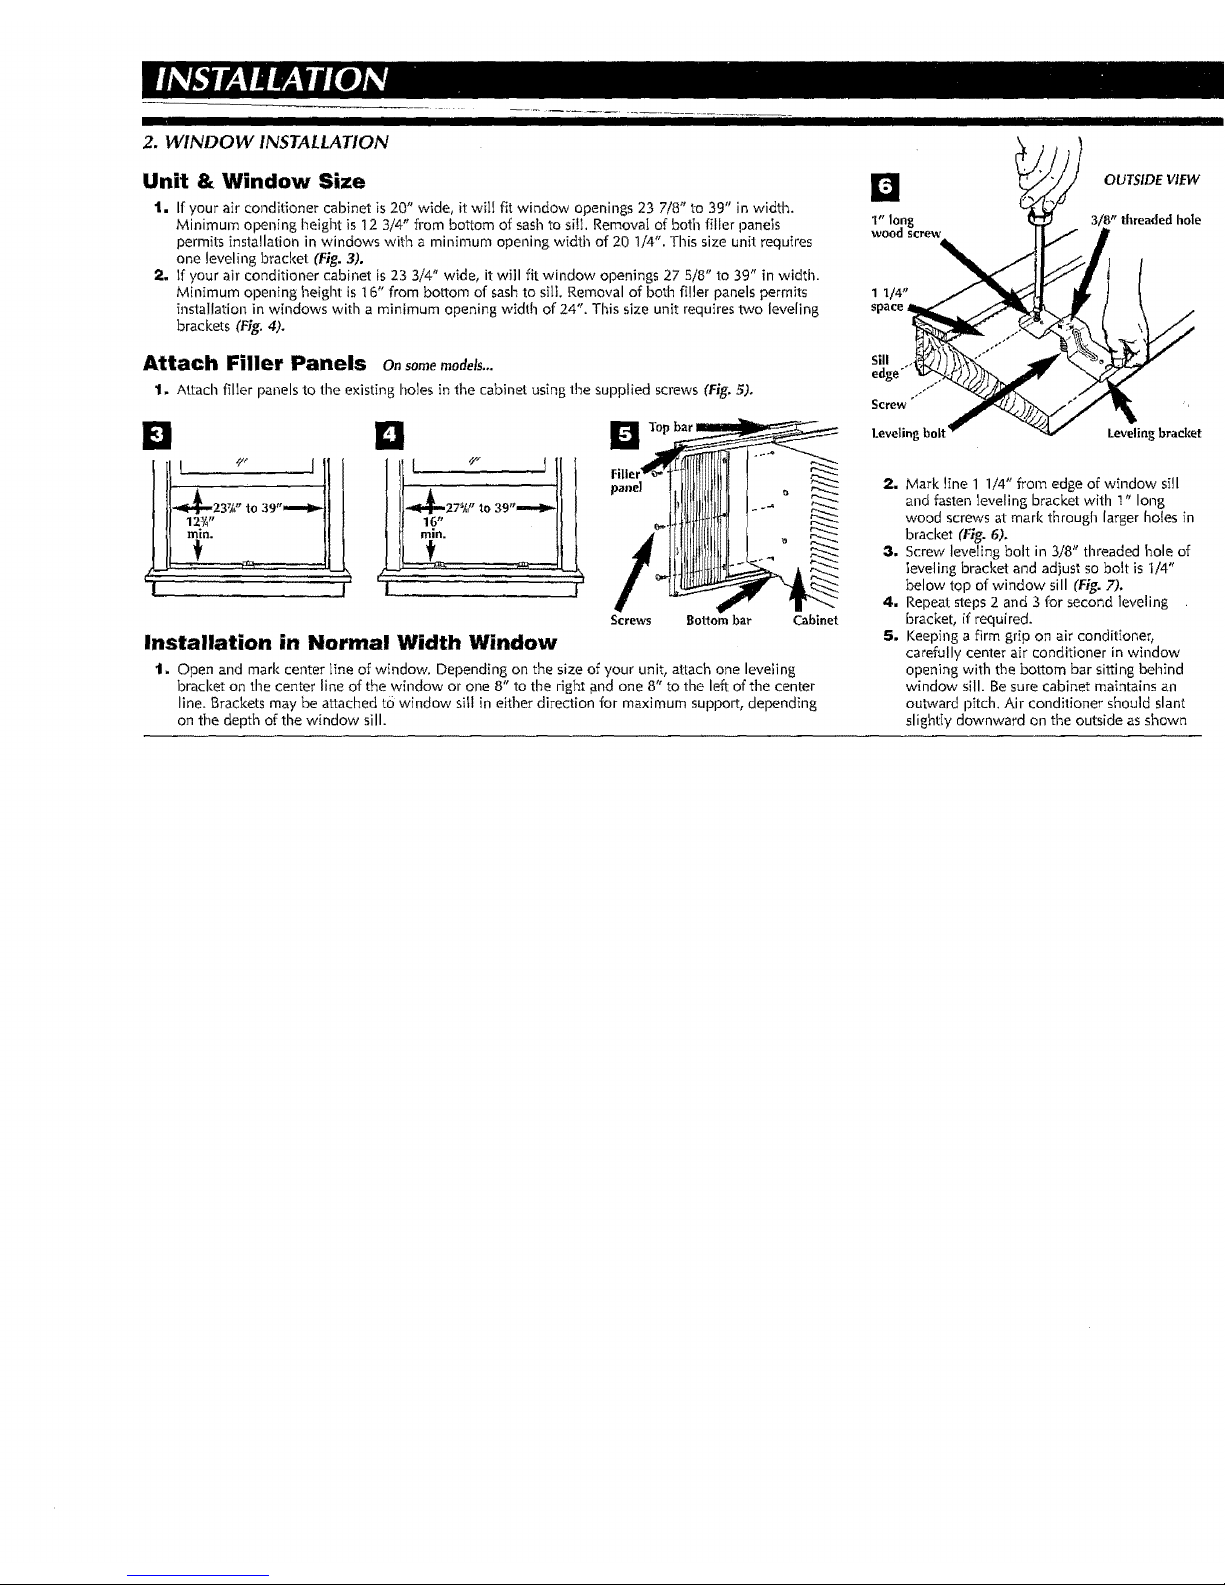
2. WINDOW INSTALLATION
Unit & Window Size
1. If your air conditioner cabinet is 20" wide, it will fit window openings 23 7/8" Io39" in width.
Minimum opening heigi_t is 12 3/4" from bottom of sasb to sill. Removal of botil filler panels
permits installation in windows with a minimum opening width of 20 1/4". This size unit requires
one leveling bracket (Fig. 3).
2, If your air conditioner cabinet is 23 3/4" wide, it will fit window openings 27 5/8" to 39" in widti_.
Minimum opening height is 16" from bottom of sash to silt. Removal of both filler panels permits
installation in windows with a minimum opening width of 24". This size unit requh'es two leveling
brackets (Fig, 4).
1" long
wood screw
1 1/4"
OUTSIDE VIEW
3/8" tbreaded hole
Attach Filler Panels on somemodels.,.
1, Attach filler panels to the existing holes in timecabinet using the supplied screws (Fig. 5),
n rl
o 9--.-i11
D Top bar
Screws Bottom bar Cabinet
Installation in Normal Width Window
1. Open and marl( center line of window. Dependh_g on the size of your unit, attach one leveling
bracket on the center line of the window or one 8" to the right and one 8" to the left of the center
line. Brackets may be attached to window sitl in either direction for maximum support, depending
on the depth of the window sill.
Sill
edge"
Screw
Leveling bolt Leveling bracket
2. Mark line 1 1/4" from edge of window sill
and fasten leveling bracket with 1" long
wood screws at marl( through larger holes in
bracket (Fig. 6).
3, Screw leveling bolt in 3/8" threaded hole of
leveling bracket and adjust so bolt is 1/4"
below t(_p of window sill (Fig. 7).
4. Repeat steps 2 and 3 for second leveling
bracket, if required.
5. Keeping a firm grip on air conditioner,
carefully center air conditioner in window
opening with the bottom bar sitting behind
window sill. Be sure cabinet maintains an
outward pitch. Air conditioner should slant
slightly downward on the outside as shown
 Loading...