

Page 1

READ BEFORE USE
LIRE AVANT UTILISATION
LEA ANTES DE USAR
Visit www.hamiltonbeach.com for our
complete line of products and Use and
Care Guides – as well as delicious recipes,
tips, and to register your product online!
Rendez-vous sur www.hamiltonbeach.ca
pour notre liste complète de produits et de
nos manuels utilisateur – ainsi que nos
délicieuses recettes et nos conseils !
¡Visite www.hamiltonbeach.com (
o
www.hamiltonbeach.com.mx (México)
para ver otros productos de Hamilton Beach
o para contactarnos!
EE. UU.)
Stand Mixer
Questions?
Please call us – our friendly
associates are ready to help.
USA: 1.800.851.8900
Questions ?
N’hésitez pas à nous appeler –
nos associés s’empresseront
de vous aider.
CAN : 1.800.267.2826
¿Preguntas?
Por favor llámenos – nuestros
amables representantes están
listos para ayudar.
EE. UU.: 1.800.851.8900
MEX: 01 800 71 16 100
Le invitamos a leer cuidadosamente este
instructivo antes de usar su aparato.
Batteur
sur socle
Batidora de
Pedestal
English ...................... 2
Français ................... 16
Español ................... 30
Page 2

IMPORTANT SAFEGUARDS
When using electrical appliances, basic safety precautions should always be followed to reduce the risk of fire, electric shock,
and/or injury to persons, including the following:
1. Read all instructions.
2. This appliance is not intended for use by persons
(including children) with reduced physical, sensory, or
mental capabilities, or lack of experience and knowledge,
unless they are closely supervised and instructed
concerning use of the appliance by a person responsible
for their safety.
3. Close supervision is necessary when any appliance is
used by or near children. Children should be supervised to
ensure that they do not play with the appliance.
4. To protect against risk of electric shock, do not put cord,
plug, or mixer body in water or other liquid.
5. Unplug from outlet when not in use, before putting on or
taking off parts, and before cleaning.
6. Avoid contacting moving parts. Keep hands, hair, and
clothing, as well as spatulas and other utensils, away from
attachments during operation to reduce risk of injury to
persons and/or damage to mixer.
7. Remove attachments from mixer before washing.
8. Do not let cord hang over edge of table or counter or
touch hot surfaces, including stove.
9. Do not operate any appliance with a damaged supply
cord or plug, or after the appliance malfunctions or
has been dropped or damaged in any manner. Supply
cord replacement and repairs must be conducted by
the manufacturer, its service agent, or similarly qualified
persons in order to avoid a hazard. Call the provided
customer service number for information on examination,
repair, or adjustment.
10. The use of attachments not recommended or sold by the
appliance manufacturer for use with this model may cause
fire, electric shock, or injury.
11. Do not use outdoors.
12. Do not place on or near a hot gas or electric burner, or in
a heated oven.
13. Check that control is off before plugging cord into wall
outlet. To disconnect, turn control to OFF (O) and then
remove plug from wall outlet.
14. Do not use appliance for other than intended purpose.
15. CAUTION: In order to avoid a hazard due to inadvertent
resetting of the thermal cut-out, this appliance must not be
supplied through an external switching device, such as a
timer, or connected to a circuit that is regularly switched on
and off by the utility.
SAVE THESE INSTRUCTIONS!
2
Page 3

Other Consumer Safety Information
This appliance is intended for household use only.
w WARNING
Electrical Shock Hazard: This appliance is
provided with a polarized plug (one wide blade) to reduce
the risk of electric shock. The plug fits only one way into a
polarized outlet. Do not defeat the safety purpose of the plug
by modifying the plug in any way or by using an adapter. If
the plug does not fit fully into the outlet, reverse the plug. If it
still does not fit, have an electrician replace the outlet.
The length of the cord used on this appliance was selected
to reduce the hazards of becoming tangled in or tripping
over a longer cord. If a longer cord is necessary, an approved
extension cord may be used. The electrical rating of the
extension cord must be equal to or greater than the rating of
the appliance. Care must be taken to arrange the extension
cord so that it will not drape over the countertop or tabletop
where it can be pulled on by children or accidentally tripped
over.
w WARNING
Moving Parts Hazard.
To reduce the risk of personal injury, always unplug mixer
before inserting or removing attachments.
WATTAGE/PEAK POWER INFORMATION
The marked rating of the stand mixer is defined by agency
safety standards as the maximum stabilized power
consumption of the stand mixer at high speed under a
loaded condition.
Peak power is an average of the maximum wattage a stand
mixer may consume during initial operation at high speed.
3
Page 4
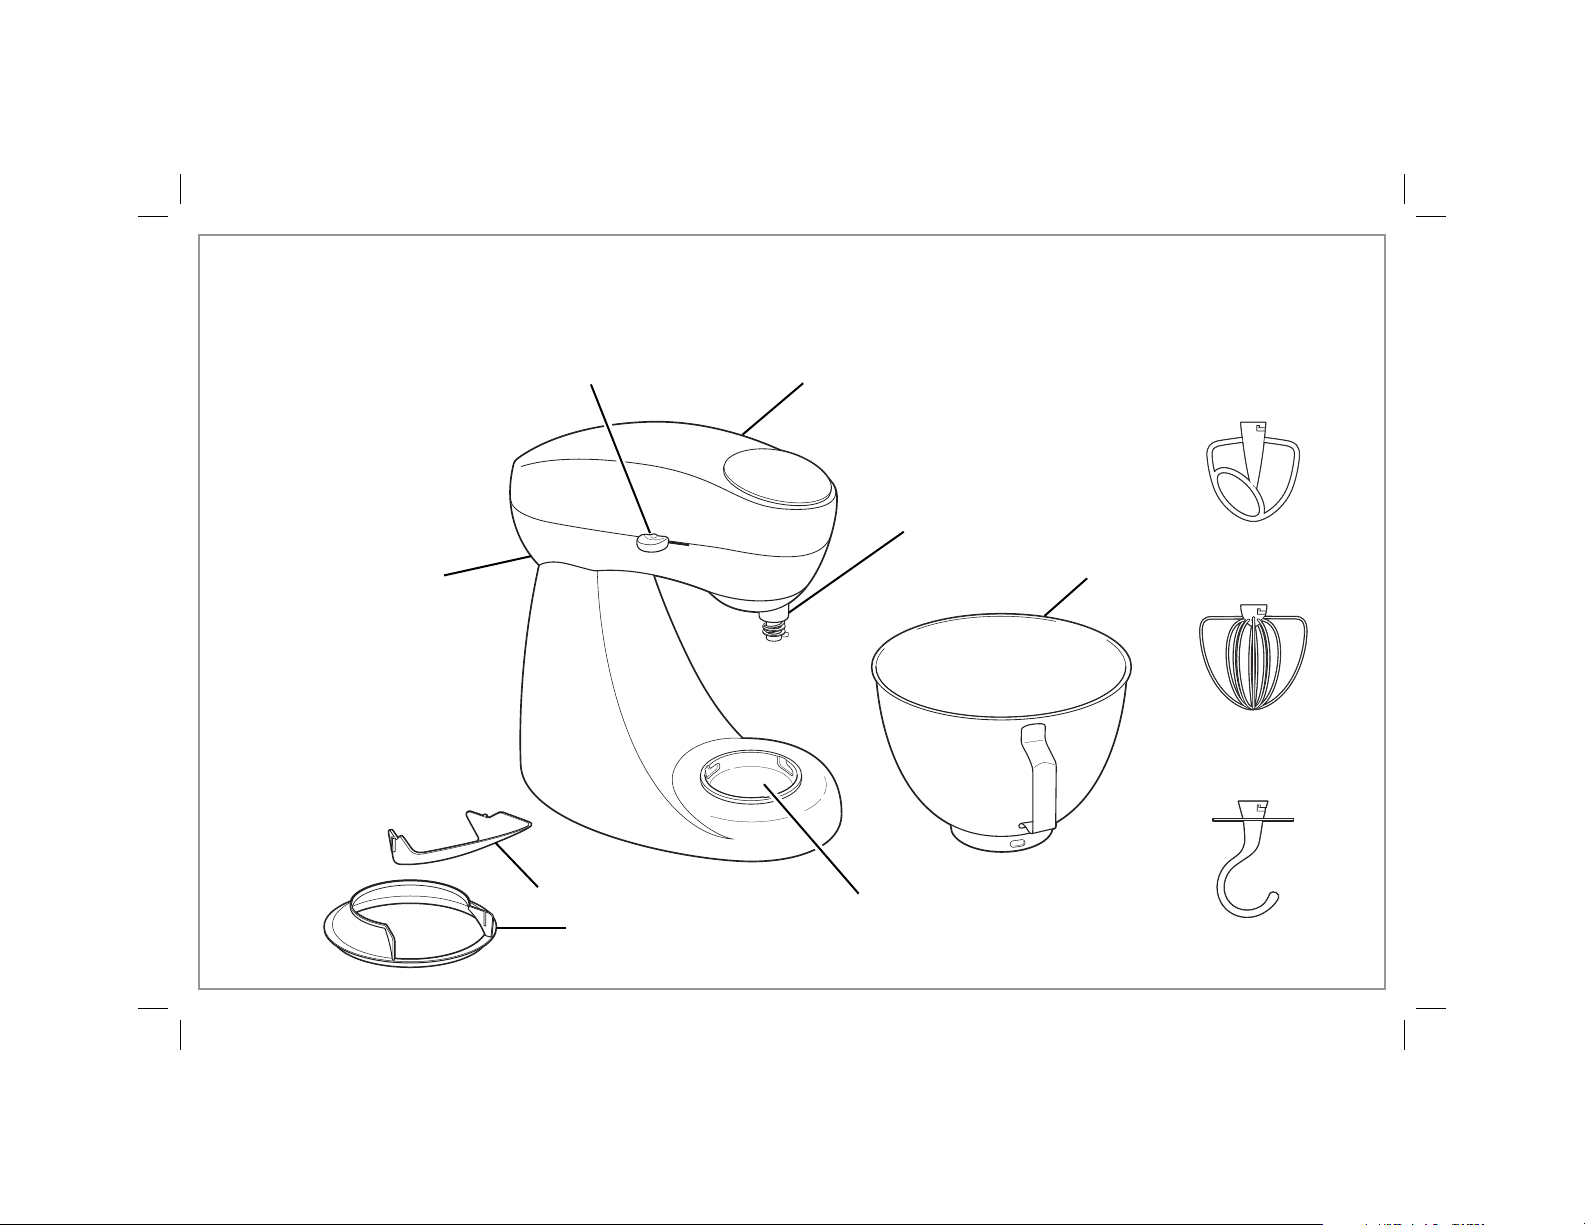
Parts and Features
*To order parts:
US: 1.800.851.8900
www.hamiltonbeach.com
Canada: 1.800.267.2826
Mexico: 01 800 71 16 100
Speed
Control
BEFORE FIRST USE: Wash bowl and attachments in warm, sudsy
water; rinse and dry. Always unplug mixer from electrical outlet
before inserting or removing attachments.
Mixer Head
ATTACHMENTS
Attachment Shaft
Mixer Release
Button
Pouring Shield*
Pouring Shield Collar*
4
Bowl Lock
Bowl*
Flat Beater*
Whisk*
Dough Hook*
Page 5

How to Use
BEFORE FIRST USE: Wash bowl
and attachments in warm, sudsy
water; rinse and dry. Always
unplug mixer from electrical outlet
before inserting or removing
attachments.
w WARNING
Unplug mixer before inserting or removing attachments.
Failure to do so can result in broken bones or cuts.
Cut and Crush Hazard.
4
Place bowl in bowl lock and turn
clockwise until bowl locks into
place.
1
Always make sure mixer is
unplugged and setting control
is set to OFF (O).
5
Insert attachment onto attachment
shaft and press upward as far
as possible. Turn the attachment
clockwise, hooking attachment
over pin on shaft.
2
Press up on mixer release button. Tilt mixer head up.
6
Slide the narrow section of the
pouring shield collar under mixer
attachment.
3
7
Place pouring shield collar on
bowl. Sides of shield should be
above the rim of the bowl when
positioned correctly.
5
Page 6

How to Use (cont.)
8
Insert pouring shield tabs in slots
on collar.
12
Select desired speed.
6
9 10 11
Turn the opening of the pouring
shield and collar to desired
position.
Press up on mixer release button.
Tilt mixer head down.
13 14
When finished, slide speed
control to OFF (O). Unplug from
outlet.
Press up on mixer release button.
Tilt mixer head up.
Plug mixer into wall outlet.
15
Remove attachment by pressing
attachment upward as far as
possible. Turn the attachment
counterclockwise and pull to
remove.
Page 7

The following mixing guide is a suggestion for selecting mixing speeds. Begin on
Mixing Guide
FOOD ATTACHMENT SETTING
Cakes (mixes and from scratch) Flat Beater 4–6
Cookie Dough Flat Beater 4–6
Mashed Potatoes Flat Beater 6–8
Frosting Flat Beater 6–8
Egg Whites (for meringues, etc.) Whisk 10–12
Whipped Cream Whisk 12
Instant Pudding Whisk 2
Bread Dough Hook 2–4
setting 2 and increase to desired speed, depending on the recipe consistency.
General Mixing Tips
• Place liquid ingredients in bowl first and then add dry ingredients.
• Always stay near mixer during use.
• To begin mixing, use the lower settings until the ingredients are
thoroughly combined. This will reduce splattering.
• Always add ingredients as close to the sides of the bowl as
possible, not directly into the moving attachment.
• When preparing package cake mixes, use setting 2 for low speed,
setting 4 for medium speed, and setting 6 for high speed. For best
results, mix for the time stated on the package directions.
• Mixtures containing large amounts of liquid ingredients should be
mixed at lower speeds to avoid splashing. Increase speed only after
the mixture has thickened.
• When mixing thin batters, use medium speeds and frequently stop
the mixer to scrape the sides of the bowl with a spatula.
7
Page 8

Flat Beater Tips
Flat beater is used for most of your mixing needs.
Use the flat beater to mix cakes, cookie dough, fudge, or potatoes.
Cookie dough is one of the thickest doughs to mix. Make it easier by following these tips:
• Have butter or margarine at room temperature.
• Add ingredients one at a time, thoroughly mixing after each addition.
• Add flour one cup at a time.
• If the mixer seems to struggle, increase the speed setting.
Dough Hook Tips
Dough hook is for recipes that require kneading.
• Always stay near mixer during use.
• If a spoon is accidentally caught in an attachment or the motor stalls, turn the setting control to OFF (O) and then
unplug. Clear the obstruction or reduce the amount of mixture in the bowl. Let the motor cool for 5 minutes before
continuing.
8
Page 9

Whisk Tips
• The whisk is designed to whip liquids, such as egg whites and cream. Do not use the whisk for mixing thick mixtures,
such as dough, fudge, or mashed potatoes.
• Your mixer is designed to whisk a minimum of 2 large egg whites or 1 cup (237 ml) of cream. Mixer performance
is enhanced as the tip of the whisk is immersed into the liquid. If smaller quantities are needed, a hand mixer is
recommended.
EGG WHITES
Place egg whites in a clean, dry mixing bowl. Attach bowl and whisk.
To avoid splashing, gradually turn speed control to desired speed.
See chart below.
AMOUNT SETTING
2 to 4 egg whites up to 10
6 or more egg whites up to 8
Your stand mixer whips egg whites quickly. Watch carefully to avoid
overwhipping. Here is what to expect:
Frothy: Large, uneven air bubbles.
Begins to Hold Shape: Air bubbles are fine and compact; product
is white.
Soft Peak: Tips of peaks fall over when whisk is removed.
Almost Stiff: Sharp peaks form when whisk is removed, but
whites are still soft.
Stiff But Not Dry: Sharp, stiff peaks form when whisk is removed.
Whites are uniform in color and glisten.
Stiff and Dry: Sharp, stiff peaks form when whisk is removed.
Whites are speckled and dull in appearance.
WHIPPED CREAM
Pour cold whipping cream into chilled bowl. Attach bowl and whisk.
To avoid splashing, gradually turn to designated speed and whip to
desired stage. See chart below.
AMOUNT SETTING
1 cup (237 ml) up to 10
1 pint (473 ml) up to 8
Your stand mixer whips cream very quickly. Watch cream closely
during whipping because there are just a few seconds between
whipping stages. Look for these characteristics:
Begins to Thicken: Cream is thick and custard-like.
Holds Its Shape: Cream forms soft peaks when whisk is removed.
Can be folded into other ingredients when making desserts and
sauces.
Stiff: Cream stands in stiff, sharp peaks when whisk is removed.
Use for topping on cakes or desserts, or filling for cream puffs.
9
Page 10

Care and Cleaning
Electrical Shock Hazard.
w WARNING
Do not immerse mixer, cord, or plug in water or any other liquid.
Bowl
Flat Beater
1 2
Make sure mixer is unplugged
and speed control is set to OFF
(O).
4
10
Dough Hook
Pouring Shield Collar
3
Whisk
Pouring
Shield
DISHWASHER-SAFE
DO NOT use the “SANI” setting
when washing in the dishwasher.
“SANI” cycle temperatures could
damage your product.
Page 11

Troubleshooting
PROBLEM PROBABLE CAUSE/SOLUTION
Food is not mixed. • Place liquid ingredients in bowl before adding dry ingredients.
• Stop mixer and scrape sides of bowl.
• Increase speed.
Food splatters during
mixing.
Mixer “walks” on counter
during mixing.
• Mixtures containing large amounts of liquid ingredients should be mixed at lower speeds to avoid
splashing. Increase speed only after the mixture has thickened.
• Reduce speed.
• Reduce quantity of ingredients in bowl.
• Make sure countertop is clean. This allows the mixer feet to grip countertop and reduce mixer
movement.
11
Page 12

Recipes
Chocolate Velvet Layer Cake
2 cups (473 ml) cake flour
1/2 cup (118 ml) unsweetened baking cocoa
2 teaspoons (10 ml) baking soda
1/4 teaspoon (1.2 ml) salt
10 tablespoons (148 ml) butter, room temperature
2 cups (473 ml) light brown sugar, packed
2 eggs
1 teaspoon (5 ml) vanilla
3/4 cup (177 ml) sour cream
3/4 cup (177 ml) cold brewed coffee
Preheat oven to 350°F (180°C). In a small bowl, stir together
flour, cocoa, baking soda and salt. Set aside. Using flat
beater, cream butter and sugar on setting 4. Add eggs, one at
a time, beating well after each addition. Add vanilla. Reduce
speed to setting 2. Add half of flour mixture, then all of
sour cream. Add remaining flour mixture; then slowly pour
in coffee. Mix on setting 2 for about 30 seconds. Turn off
mixer and scrape sides and bottom of bowl. Turn mixer on
to setting 4 and mix until thoroughly blended. Divide batter
between 2 greased and wax paper-lined 9-inch (23-cm) round
cake pans. Bake 30 to 35 minutes or until tests done. Cool in
pan for 5 minutes; then remove from pans and cool on racks.
Frost with Bittersweet Chocolate Frosting.
Makes one 2-layer cake.
12
Bittersweet Chocolate Frosting
1/3 cup (79 ml) butter, room 1/4 cup (59 ml) milk
temperature 1 to 2 tablespoons (15
2 1/2 cups (591 ml) confectioners’ to 30 ml) cold brewed
sugar coffee
3/4 cup (177 ml) unsweetened 1 teaspoon (5 ml) vanilla
baking cocoa
Using flat beater, beat butter on setting 4 until smooth. Add
confectioners’ sugar and cocoa alternately with milk and
continue beating until smooth. Add vanilla and beat until
smooth and blended.
Magic Cookies
1 cup (237 ml) butter 1/2 teaspoon (2.5 ml) salt
1 cup (237 ml) sugar 2 cups (473 ml) oatmeal
1 cup (237 ml) light brown sugar 1 tablespoon (15 ml)
2 eggs vanilla
2 cups (473 ml) flour 12 ounces (340 g)
1 teaspoon (5 ml) baking soda chocolate chips
1/2 teaspoon (2.5 ml) baking 1 1/2 cups (355 ml)
powder coconut
Preheat oven to 350°F (180°C). With flat beater, cream
together butter, sugar and brown sugar at a medium setting
until well blended. Mix in vanilla and eggs. Reduce speed
and gradually add flour, baking soda, baking powder and salt
mix until smooth. On a low setting, mix in oatmeal, chocolate
chips and coconut until well mixed. Drop rounded spoonful
onto ungreased cookie sheet. Bake on middle rack of oven
for 12 to 14 minutes.
Makes 3 dozen cookies.
Page 13

Recipes (cont.)
Best Ever Sugar Cookies
2 1/2 cups (591 ml) all-purpose flour
1 teaspoon (5 ml) baking powder
1/2 teaspoon (2.5 ml) baking soda
1/4 teaspoon (1.2 ml) salt
1/4 teaspoon (1.2 ml) nutmeg
3/4 cup (177 ml) butter, softened
3/4 cup (177 ml) sugar
1 egg
1 teaspoon (5 ml) vanilla
1/4 cup (59 ml) milk
Preheat oven to 375°F (190°C). Mix together flour, baking
powder, baking soda, salt and nutmeg and set aside. Using
flat beater, cream butter on high speed until light and fluffy.
Reduce speed to lowest setting. Add sugar, egg and vanilla,
mixing thoroughly. Gradually add dry ingredients and milk;
continue mixing until thoroughly mixed. Form cookie dough
into 1 1/2-inch (3.5-cm) diameter balls and arrange balls
on ungreased baking sheets. Flatten balls slightly with the
bottom of a drinking glass. Bake in oven for 6 to 7 minutes
or until lightly golden around edges. Cool on wire racks.
Makes about 4 dozen.
Simple Yeast Rolls
1 cup (237 ml) warm water, 100° to 110°F (38° to 43°C)
.25 ounce (7 g) package active dry yeast
1/4 cup (59 ml) butter, melted and cooled
3 tablespoons (44 ml) sugar
1 teaspoon (5 ml) salt
1 egg
3 to 3 1/2 cups (710 to 828 ml) flour
Pour water into mixing bowl. Add yeast and let dissolve for
5 minutes. Add butter, sugar, salt and egg. Using dough
hook, mix on setting 2 for about 30 seconds. Add 3 cups
(710 ml) of the flour and mix on setting 4 for about 2 minutes.
Add additional flour, if necessary, to make a soft dough.
Cover and let rise in a warm place for about 1 hour.
Preheat oven to 350°F (180°C). Stir down the dough and
dump onto lightly floured surface. Divide the dough into
4 equal portions; then divide each portion into 4 golf ballsized balls. Place the 16 balls in a greased 9- x 13-inch
(23- x 33-cm) baking pan. Let rise in a warm place for about
30 minutes. Bake 25 to 30 minutes.
Makes 16 rolls.
13
Page 14

Recipes (cont.)
Sour Cream Coffee Cake
Crumb Topping
1 1/2 cups (355 ml) all-purpose flour
1 1/2 sticks (3/4 cup [177 ml]) unsalted butter, softened
1/3 cup (79 ml) packed light brown sugar
1/3 cup (79 ml) sugar
1 1/4 teaspoons (6.2 ml) ground cinnamon
1 cup (237 ml) pecans, chopped
Cake
1 1/2 sticks (3/4 cup [177 ml]) unsalted butter, softened
1 1/4 cups (296 ml) sugar
1 tablespoon (15 ml) baking powder
3/4 teaspoon (3.7 ml) baking soda
3/4 teaspoon (3.7 ml) salt
4 large eggs
1 tablespoon (15 ml) vanilla
1 1/2 cups (355 ml) sour cream
2 1/4 cups (532 ml) all-purpose flour
Streusel
1/3 cups (79 ml) all-purpose flour
1/2 cup (118 ml) packed light brown sugar, divided
3/4 teaspoon (3.7 ml) ground cinnamon
3 tablespoons (44 ml) cold butter
Crumb Topping: In a small bowl, combine flour, butter,
brown sugar, granulated sugar and cinnamon; mix with
fork until large crumbs are formed. Add pecans and mix
to incorporate.
Streusel: In another small bowl, combine flour, brown sugar,
cinnamon and butter. Mix with fork until large crumbs are
formed.
Cake: Lower oven rack to lowest position. Preheat oven
350°F (180°C). Grease 10-inch (26-cm) bundt pan with butter.
Using the flat beater, cream butter on medium speed until
smooth. Add sugar, baking powder, baking soda and salt.
Beat on medium speed for 3 minutes. With mixer on low
speed, add in eggs, one at a time, until well blended. Mix in
vanilla and sour cream. Gradually add flour. Continue to mix
until well blended.
Spread about 2 cups (473 ml) of batter into the bottom of
prepared pan. Sprinkle evenly with half of streusel mixture.
Repeat. Spread remaining batter over and top with crumb
topping.
Bake 50 to 60 minutes or until a toothpick inserted into the
center of the cake comes out clean. Cool on wire rack 30
minutes. Invert cake onto plate and then flip on wire rack with
topping side up. Cool completely.
Makes one cake.
14
Page 15

Limited Warranty
This warranty applies to products purchased and used in the U.S. and Canada. This is the only express warranty for this product and
is in lieu of any other warranty or condition.
This product is warranted to be free from defects in material and workmanship for a period of five (5) years from the date of original
purchase in Canada and three (3) years from the date of original purchase in the U.S. During this period, your exclusive remedy is
repair or replacement of this product or any component found to be defective, at our option; however, you are responsible for all
costs associated with returning the product to us and our returning a product or component under this warranty to you. If the product
or component is no longer available, we will replace with a similar one of equal or greater value.
This warranty does not cover glass, filters, wear from normal use, use not in conformity with the printed directions, or damage to
the product resulting from accident, alteration, abuse, or misuse. This warranty extends only to the original consumer purchaser or
gift recipient. Keep the original sales receipt, as proof of purchase is required to make a warranty claim. This warranty is void if the
product is used for other than single-family household use or subjected to any voltage and waveform other than as specified on the
rating label (e.g., 120V ~ 60 Hz).
We exclude all claims for special, incidental, and consequential damages caused by breach of express or implied warranty. All
liability is limited to the amount of the purchase price. Every implied warranty, including any statutory warranty or condition
of merchantability or fitness for a particular purpose, is disclaimed except to the extent prohibited by law, in which case such
warranty or condition is limited to the duration of this written warranty. This warranty gives you specific legal rights. You may have
other legal rights that vary depending on where you live. Some states or provinces do not allow limitations on implied warranties or
special, incidental, or consequential damages, so the foregoing limitations may not apply to you.
To make a warranty claim, do not return this appliance to the store. Please call 1.800.851.8900 in the U.S. or 1.800.267.2826 in Canada
or visit hamiltonbeach.com in the U.S. or hamiltonbeach.ca in Canada. For faster service, locate the model, type, and series numbers
on your appliance.
15
Page 16

PRÉCAUTIONS IMPORTANTES
Pour utiliser un appareil électroménager, vous devez toujours prendre des mesures élémentaires de sécurité pour réduire le
risque d’incendie, d’électrocution et/ou de blessure corporelle, en particulier les mesures suivantes :
1. Lire toutes les instructions.
2. Cet appareil n’est pas destiné à être utilisé par des personnes (y
compris les enfants) dont les capacités physiques, sensorielles
ou mentales sont réduites, ou manquant d’expérience et de
connaissance, sauf si elles sont étroitement surveillées et instruites
sur l’utilisation de l’appareil par une personne responsable de leur
sécurité.
3. Une surveillance étroite est requise pour tout appareil utilisé par
ou près des enfants. Surveiller que les enfants ne jouent pas avec
l’appareil.
4. Pour protéger contre le risque de choc électrique, ne pas immerger
le cordon, la fiche ou le boîtier du batteur dans l’eau ou autre
liquide.
5. Débrancher l’appareil de la prise de courant électrique lorsqu’il n’est
pas utilisé et avant d’ajouter ou d’y enlever des pièces et avant le
nettoyage.
6. Éviter le contact avec les pièces mobiles. Garder les mains, les
cheveux et les vêtements, de même que les spatules et autres
ustensiles, loin des accessoires durant l’opération pour réduire le
risque de blessure aux personnes et/ou des dommages au batteur.
7. Enlever les accessoires du batteur avant le lavage.
8. Ne pas laisser le cordon pendre du bord d’une table ou d’un
comptoir, ou toucher des surfaces chaudes, y compris la cuisinière.
9. Ne pas faire fonctionner un appareil électroménager avec un
cordon ou une fiche endommagée, ou lorsque l’appareil ne
fonctionne pas bien ou a été échappé ou endommagé d’une
manière quelconque. Le remplacement et la réparation du
cordon d’alimentation doivent être faits par le fabricant, son
agent de service ou toute personne qualifiée de façon à éviter
tout danger. Appeler le numéro de service à la clientèle fourni
pour des renseignements concernant l’examen, la réparation ou
l’ajustement.
10. L’utilisation d’accessoires non recommandés ou vendus par le
fabricant de l’appareil pour utilisation avec ce modèle peut causer
un incendie, un choc électrique ou une blessure.
11. Ne pas utiliser à l’extérieur.
12. Ne pas placer l’appareil sur ou près d’un brûleur à gaz ou d’un
élément électrique chaud, ou dans un four chauffé.
13. Vérifier que le réglage est à ARRÊT avant de brancher le cordon
dans une prise de courant murale. Pour le débrancher, tourner le
réglage à ARRÊT (O) et ensuite retirer la fiche de la prise de courant
murale.
14. Ne pas utiliser l’appareil pour un usage autre que celui auquel il est
destiné.
15. MISE EN GARDE : Afin d’éviter les risques occasionnés par une
réinitialisation accidentelle des rupteurs thermiques, cet appareil
doit être alimenté par un dispositif de commande externe comme
une minuterie, ou être branché sur un circuit mis hors et sous
tension régulièrement par le service.
16
CONSERVEZ CES INSTRUCTIONS
Page 17

Autres consignes de sécurité pour le consommateur
Cet appareil est destiné à un usage domestique uniquement.
w AVERTISSEMENT
est fourni avec une fiche polarisée (une broche large) pour
réduire le risque d’électrocution. Cette fiche n’entre que dans
un seul sens dans une prise polarisée. Ne contrecarrez pas
l’objectif sécuritaire de cette fiche en la modifiant de quelque
manière que ce soit ou en utilisant un adaptateur. Si vous
ne pouvez pas insérer complètement la fiche dans la prise,
inversez la fiche. Si elle refuse toujours de s’insérer, faire
remplacer la prise par un électricien.
La longueur du cordon installé sur cet appareil a été
sélectionnée afin de réduire les risques d’enchevêtrement
ou de faux pas causés par un fil trop long. L’utilisation d’une
rallonge approuvée est permise si le cordon est trop court.
Les caractéristiques électriques de la rallonge doivent être
équivalentes ou supérieures aux caractéristiques de l’appareil.
Prendre toutes les précautions nécessaires pour installer la
rallonge de manière à ne pas la faire courir sur le comptoir ou
sur une table pour éviter qu’un enfant ne tire sur le cordon ou
trébuche accidentellement.
Risque de choc électrique : Cet appareil
w AVERTISSEMENT
Pour réduire le risque de blessure corporelle, débrancher
toujours votre batteur avant d’y introduire ou d’en enlever
des accessoires.
RENSEIGNEMENTS SUR LA PUISSANCE/PUISSANCE
DE CRÊTE
Les caractéristiques nominales gravées sur le pied du
mélangeur sont définies par une agence de normes de
sécurité comme étant la puissance de consommation
stabilisée du mélangeur sur socle à vitesse élevée lorsqu’à
pleine puissance.
La puissance de crête est la puissance maximum moyenne
consommée par le batteur pendant son fonctionnement
initialà grande vitesse.
Risque de pièces en mouvement.
17
Page 18

Pièces et caractéristiques
*Pour commander des pièces :
Canada : 1.800.267.2826
Commande
de vitesse
Tête du batteur
AVANT LA PREMIÈRE UTILISATION : Laver le bol et
accessoires dans de l’eau chaude savonneuse; rincer
et essuyer. Toujours débrancher le batteur de la prise
électrique avant d’insérer ou de retirer les accessoires.
ACCESSOIRES
18
Bouton de
dégagement du
batteur
Pare-éclaboussures*
Goulotte verseuse*
Tige de fixation
Mécanisme de
blocage du bol
Fouet plat*
Bol*
Fouet*
Crochet à pâte*
Page 19

Utilisation
AVANT LA PREMIÈRE
UTILISATION : Laver le bol et
accessoires dans de l’eau chaude
savonneuse; rincer et essuyer.
Toujours débrancher le batteur de
la prise électrique avant d’insérer
ou de retirer les accessoires.
w AVERTISSEMENT
Débrancher le batteur avant d’insérer ou d’enlever des accessoires. Le nonrespect de cette instruction peut provoquer des fractures ou des coupures.
Risque de coupure et d’écrasement.
4
Insérer le bol dans le mécanisme
de blocage du bol et tourner vers
la droite pour immobiliser en
place.
1
Toujours s’assurer que le batteur est débranché et que la commande
de vitesse est en position ARRÊT (O). Pousser le bouton de
dégagement du batteur vers le haut.
5
Insérer l’accessoire sur l’arbre d’accessoire et pousser le plus loin
possible vers le haut. Tourner l’accessoire vers la droite pour faire
passer l’accessoire par-dessus la clavette de l’arbre.
étroite de la goulotte verseuse sous l’accessoire du batteur.
2
6
Glisser la partie
3
Relever la tête du batteur.
7
Installer la goulotte verseuse
sur le bol. Lorsque placé
correctement, le pourtour du
pare-éclaboussures doit reposer
sur le bord du bol.
19
Page 20

Utilisation (suite)
8
Insérer les languettes du pareéclaboussures dans les fentes de
la goulotte.
12
Sélectionner la vitesse désirée.
20
9 10 11
Tourner l’ouverture du pareéclaboussures et de la goulotte à
la position désirée.
Pousser le bouton de dégagement du batteur vers le haut. Incliner la
tête du batteur vers le bas. Brancher de la prise.
13 14
Arrêter l’appareil en tournant la
commande de vitesse sur (O).
Débrancher de la prise.
Pousser le bouton de dégagement
du batteur vers le haut. Relever la
tête du batteur.
15
Retirer l’accessoire en le
poussant le plus loin possible
vers le haut. Tourner l’accessoire
vers la gauche et tirer pour le
dégager.
Page 21

Le guide suivant est une suggestion pour le choix des vitesses de
Guide pour mélanger
ALIMENT ACCESSOIRE RÉGLAGE
Gâteaux (mélanges ou faits maison) Fouet plat 4–6
Pâte à biscuits Fouet plat 4–6
Purée de pommes de terre Fouet plat 6–8
Glaçage Fouet plat 6–8
Blancs d’oeufs (pour meringues, etc.) Fouet 10–12
Crème fouettée Fouet 12
Crème-dessert instantanée Fouet 2
Pain Crochet à pâte 2–4
mélange. Commencer en réglant la vitesse à 2 et en l’augmentant
jusqu’au réglage désiré, selon la consistance de la recette.
Conseils généraux de mélange
• Mettre les ingrédients liquides dans le bol en premier, puis ajouter
les ingrédients secs.
• Toujours rester près du batteur durant l’utilisation.
• Pour commencer le mélange, utiliser les vitesses moins élevées
jusqu’à ce que les ingrédients soient complètement combinés.
Ceci réduira les éclaboussures.
• Toujours ajouter les ingrédients le plus près possible des bords
du bol, non directement dans le fouet en mouvement.
• Pour préparer les mélanges de gâteau au fromage, utiliser le réglage
2 pour la basse vitesse, le réglage 4 pour la vitesse moyenne et le
réglage 6 pour la vitesse élevée. Pour les meilleurs résultats, suivre
les indications de durée de mélange données sur l’emballage.
• Les mélanges contenant de grandes quantités de liquides
devraient être mélangés à des vitesses plus basses pour éviter
les éclaboussures. N’augmenter la vitesse qu’une fois le mélange
épaissi.
• Lors du mélange de pâtes coulantes, utiliser des vitesses moyennes
et arrêter fréquemment le batteur pour racler les côtés du bol avec
une spatule.
21
Page 22

Conseils pour le fouet plat
Le fouet plat est utilisé pour la plupart des besoins de malaxage.
Utiliser le fouet plat pour mélanger gâteaux, pâte à biscuits, caramel, ou pommes de terre.
La pâte à biscuits est l’une des pâtes les plus épaisses à mélanger. Les conseils suivants faciliteront la tâche :
• Veiller à ce que le beurre ou la margarine soit à la température ambiante.
• Ajouter les ingrédients un à la fois en les mélangeant bien après chaque addition.
• Ajouter la farine une tasse à la fois.
• Si le batteur semble forcer, accroître le réglage.
Conseils pour le crochet à pâte
Le crochet à pâte est utilisé pour les recettes nécessitant un pétrissage.
• Toujours rester près du batteur durant l’utilisation.
• Si une cuiller se prend accidentellement dans l’accessoire ou si le moteur cale, glisser la commande de vitesse à ARRÊT
(O), puis débrancher le batteur. Dégager l’obstruction ou réduire la quantité du mélange dans le bol. Laisser le moteur
refroidir pendant 5 minutes avant de continuer.
22
Page 23

Conseils pour le fouet
• Le fouet à fil est conçu pour battre les liquides tels que les blancs d’oeufs et la crème. Ne pas utiliser le fouet à fil
pour malaxer des mélanges épais tels que la pâte, le caramel ou les pommes de terre en purée.
• Votre batteur est conçu pour battre un minimum de 2 gros blancs d’oeufs ou 1 tasse (237 ml) de crème. Le rendement
du batteur s’améliore au fur et à mesure que le fouet est immergé dans le liquide. Si des quantités moindres sont
requises, l’utilisation d’un batteur à main est recommandée.
BLANCS D’OEUFS
Mettre les blancs d’oeufs dans un bol à mélanger propre et sec.
Fixer le bol et le fouet à fil. Pour éviter les éclaboussures, augmenter
graduellement la vitesse au réglage désiré. Voir le tableau ci-dessous.
QUANTITÉ RÉGLAGE
2 à 4 blancs d’oeufs jusqu’à 10
6 blancs d’oeufs ou plus jusqu’à 8
Votre batteur sur socle bat les blancs d’oeufs rapidement. Surveiller
attentivement pour ne pas les battre excessivement. La liste suivante
vous dit à quoi vous attendre :
Mousseux : Grosses bulles d’air inégales.
Commence à prendre forme : Les bulles d’air sont fines et
compactes; le produit est blanc.
Pointe molle : Les pointes retombent quand le fouet est retiré.
Presque fermes : Des pointes acérées se forment quand le fouet
est retiré, mais les blancs sont encore mous.
Fermes mais pas secs : Pointes acérées et fermes quand le fouet
est retiré. Les blancs sont de couleur homogène et brillante.
Fermes et secs : Pointes acérées et fermes quand le fouet est retiré.
Les blancs sont tachetés et d’apparence fade.
CRÈME À FOUETTER
Verser la crème à fouetter froide dans un bol réfrigéré. Fixer le bol et
le fouet à fil. Pour éviter les éclaboussures, augmenter graduellement
la vitesse au réglage désiré et fouetter à la consistance désirée. Voir
le tableau ci-dessous.
QUANTITÉ RÉGLAGE
1 tasse (237 ml) jusqu’à 10
1 chopine (473 ml) jusqu’à 8
Votre batteur sur socle fouette la crème très rapidement. Surveiller
la crème attentivement durant l’opération car quelques secondes
seulement séparent les stades de consistance. Rechercher les
caractéristiques suivantes :
Commence à épaissir : La crème est épaisse et ressemble à une
crème dessert.
Conserve sa forme : La crème forme des pointes molles quand le
fouet est retiré. Peut être incorporée aux autres ingrédients lors de
la préparation de desserts et sauces.
Ferme : La crème forme des pointes fermes et acérées quand le fouet
est retiré. L’utiliser comme garniture sur des gâteaux ou desserts ou
pour fourrer des choux à la crème.
23
Page 24

Entretien et nettoyage
w AVERTISSEMENT
Ne pas immerger le batteur, le cordon ou la fiche dans
l’eau ou autre liquide.
Bol
Fouet plat
Risque d’électrocution.
1 2
Assurer que le batteur est
débranché et que la commande
de vitesse est en position
ARRÊT (O).
4
24
Crochet à pâte
Goulotte verseuse
3
Fouet
Pare-
éclaboussures
LAVABLE AU
LAVE-VAISSELLE
NE PAS utiliser le réglage
“SANI” du lave-vaisselle. Les
températures du cycle “SANI”
peuvent endommager le produit.
Page 25

Dépannage
PROBLÈME CAUSE PROBABLE/SOLUTION
Aliments non mélangés. • Mettre les ingrédients liquides dans le bol avant d’ajouter les ingrédients secs.
• Arrêter le batteur et racler les cotés du bol.
• Augmenter de la vitesse.
Éclaboussures d’aliments
durant le mélange.
Le batteur se déplace sur le
comptoir durant le mélange.
• Les mélanges contenant de grandes quantités de liquides devraient être mélangés à des vitesses plus
basses pour éviter les éclaboussures. N’augmenter la vitesse qu’une fois le mélange épaissi.
• Réduire de la vitesse.
• Réduire la quantité d’ingrédients dans le bol.
• S’assurer que le comptoir est propre. Ceci permet les pieds du batteur d’agripper le comptoir et réduit le
déplacement du batteur.
25
Page 26

Recettes
Gâteau étagé au chocolat velouté
2 tasses (473 ml) de farine à gâteau
1/2 tasse (118 ml) de cacao à cuire non sucré
2 c. à thé (10 ml) de bicarbonate de soude
1/4 c. à thé (1,2 ml) de sel
10 c. à soupe (148 ml) de beurre, à la température ambiante
2 tasses (473 ml) de cassonade claire, tassée
2 oeufs
1 c. à thé (5 ml) d’extrait de vanille
3/4 tasse (177 ml) de crème sure
3/4 tasse (177 ml) de café filtre, refroidi
Instructions :
Préchauffer le four à 180 °C (350 °F). Dans un petit bol,
mélanger la farine, le cacao, le bicarbonate de soude et le sel.
Réserver. Avec le fouet plat et le batteur réglé à 4, battre le
beurre et la cassonade en crème. Ajouter les oeufs un à un,
en battant bien après chaque ajout. Ajouter l’extrait de vanille.
Régler la vitesse à 2. Ajouter la moitié des ingrédients secs et
la crème sure. Ajouter le reste des ingrédients secs. Verser
petit à petit le café. Mélanger environ 30 secondes à vitesse
2. Interrompre le fonctionnement et racler la paroi et le fond
du bol. Régler la vitesse à 4 et mélanger jusqu’à consistance
parfaitement homogène. Verser la pâte dans 2 moules à
gâteaux ronds de 9 po (23 cm) beurrés et recouverts de
papier ciré. Cuire au four préchauffé de 30 à 35 minutes ou
jusqu’à ce qu’un cure-dent inséré au centre du gâteau en
ressorte propre. Laisser refroidir 5 minutes puis démouler
et laisser refroidir sur une grille. Recouvrir de Glaçage au
chocolat mi-sucré.
Donne un gâteau à 2 étagese.
26
Glaçage au chocolat mi-sucré
1/3 tasse (79 ml) de beurre, à la température ambiante
2 1/2 tasses (591 ml) de sucre glace
3/4 tasse (177 ml) de cacao à cuire non sucré
1/4 tasse (59 ml) de lait
1 à 2 c. à soupe (15 à 30 ml) de café filtre, refroidi
1 c. à thé (5 ml) d’extrait de vanille
Instructions :
Avec le fouet plat et le batteur réglé à 4, battre le beurre en crème. Ajouter le
sucre glace et le cacao en alternance avec le lait et continuer de battre jusqu’à
consistance homogène. Ajouter le café et l’extrait de vanille et battre jusqu’à
consistance homogène.
Biscuits magiques
1 tasse (237 ml) de beurre
1 tasse (237 ml) de sucre
1 tasse (237 ml) de cassonade claire
2 oeufs
2 tasses (473 ml) de farine
1 c. à thé (5 ml) de bicarbonate de
soude
Préchauffer le four à 180 °C (350 °F). Avec le fouet plat, battre à vitesse moyenne
le beurre, le sucre et la cassonade jusqu’à consistance homogène. Ajouter
la vanille et les oeufs et mélanger. Réduire la vitesse et ajouter petit à petit
la farine, le bicarbonate de soude, la levure chimique et le sel et mélanger
jusqu’à consistance homogène. Régler à vitesse minimale et ajouter la farine
d’avoine, les grains de chocolat et la noix de coco. Mélanger jusqu’à consistance
homogène. Déposer par cuillerées combles sur une plaque à pâtisserie non
graissée. Cuire au four préchauffé de 12 à 14 minutes sur la grille du centre.
Donne 3 douzaines de biscuits.
1/2 c. à thé (2,5 ml) de levure
chimique
1/2 c. à thé (2,5 ml) de sel
2 tasses (473 ml) de farine d’avoine
1 c. à soupe (15 ml) d’extrait de
vanille
12 oz (340 g) de grains de chocolat
1 1/2 tasse (355 ml) de noix de coco
Page 27

Recettes (suite)
Biscuits au sucre imbattables
2 1/2 tasses (591 ml) de farine tout usage
1 c. à thé (5 ml) de levure chimique
1/2 c. à thé (2,5 ml) de bicarbonate de soude
1/4 c. à thé (1,2 ml) de sel
1/4 c. à thé (1,2 ml) de muscade
3/4 tasse (177 ml) de beurre, ramolli
3/4 tasse (177 ml) de sucre
1 oeuf
1 c. à thé (5 ml) d’extrait de vanille
1/4 tasse (59 ml) de lait
Instructions:
Préchauffer le four à 190 °C (375 °F). Mélanger la farine,
la levure chimique, le bicarbonate de soude, le sel et la
muscade et réserver. Avec le fouet plat, battre le beurre
à vitesse maximale jusqu’à ce qu’il devienne léger et
mousseux. Réduire à vitesse minimale, ajouter le sucre,
l’oeuf et la vanille et bien mélanger. Ajouter petit à petit
les ingrédients secs et le lait et continuer de battre pour
bien mélanger. Façonner la pâte en boules de 1 1/2 po
(3,5 cm) de diamètre et les disposer sur des plaques
à pâtisserie non beurrées. Écraser légèrement les boules
de pâte avec le fond d’un verre. Cuire au four préchauffé
6 ou 7 minutes, jusqu’à ce que le pourtour des biscuits soit
légèrement doré. Laisser refroidir sur des grilles.
Donne 4 douzaines de biscuits.
Petits pains mollets
1 tasse (237 ml) d’eau tiède, entre 38 °C et 43 °C
(100 °F et 110 °F)
1 sachet de 0,25 oz (7 g) de levure sèche active
1/4 tasse (59 ml) de beurre, fondu et refroidi
3 c. à soupe (44 ml) de sucre
1 c. à thé (5 ml) de sel
1 oeuf
3 à 3 1/2 tasses (710 ml à 828 ml) de farine
Instructions:
Verser l’eau dans le bol à mélanger. Ajouter la levure et
laisser dissoudre 5 minutes. Ajouter le beurre, le sucre,
le sel et l’oeuf. Avec le crochet à pâte et le batteur réglé à
2, mélanger les ingrédients environ 30 secondes. Ajouter
3 tasses (710 ml) de farine et mélanger environ 2 minutes à
vitesse 4. Ajouter de la farine au besoin jusqu’à l’obtention
d’une pâte souple. Couvrir et laisser lever la pâte environ
1 heure dans un endroit chaud.
Préchauffer le four à 180 °C (350 °F). Écraser la pâte et la
déposer sur un plan de travail légèrement fariné. Diviser la
pâte en 4 puis façonner 4 boules de la taille d’une balle de
golf dans chaque quart. Mettre les 16 boules de pâte sur
une plaque de cuisson beurrée de 9 po x 13 po (23 cm x
33 cm). Laisser lever environ 30 minutes dans un endroit
chaud. Cuire au four préchauffé de 25 à 30 minutes.
Donne 16 petits pains.
27
Page 28

Recettes (suite)
Gâteau danois à la crème sure
Garniture
1 1/2 tasse (355 ml) de farine tout usage
3/4 tasse (177 ml) de beurre non salé, ramolli
1/3 tasse (79 ml) de cassonade claire, tassée
1/3 tasse (79 ml) de sucre
1 1/4 c. à thé (6,2 ml) de cannelle moulue
1 tasse (237 ml) de pacanes, hachées
Gâteau
3/4 tasse (177 ml) de beurre non salé, ramolli
1 1/4 tasse (296 ml) de sucre granulé
1 c. à soupe (15 ml) de levure chimique
3/4 c. à thé (3,7 ml) de bicarbonate de soude
3/4 c. à thé (3,7 ml) de sel
4 gros oeufs
1 c. à soupe (15 ml) d’extrait de vanille
1 1/2 tasse (355 ml) de crème sure
2 1/4 tasses (532 ml) de farine tout usage
Streusel
1/3 tasse (79 ml) de farine tout usage
1/2 tasse (118 ml) de cassonade claire tamisée, tassée
3/4 c. à thé (3,7 ml) de cannelle moulue
3 c. à soupe (44 ml) de beurre froid
28
Garniture : Dans un petit bol, mélanger à la fourchette la
farine, le beurre, la cassonade, le sucre et la cannelle jusqu’à
ce que de gros grumeaux se forment. Ajouter les pacanes et
mélanger.
Streusel : Dans un autre petit bol, mélanger à la fourchette
la farine, la cassonade, la cannelle et le beurre jusqu’à ce que
de gros grumeaux se forment.
Gâteau : Mettre la grille du four à la position inférieure.
Préchauffer le four qà 180 °C (350 °F). Beurrer un moule à
bundt cake de 10 po (26 cm).
Instructions :
Avec le fouet plat, battre le beurre en crème à vitesse
moyenne. Ajouter le sucre, la levure chimique, le bicarbonate
de soude et le sel. Battre 3 minutes à vitesse moyenne.
Réduire à vitesse minimale, ajouter les oeufs, un à la fois,
jusqu’à ce que le mélange soit homogène. Ajouter la vanille
et la crème sure en mélangeant. Ajouter petit à petit la farine.
Continuer de mélanger jusqu’à consistance homogène.
Verser environ 2 tasses (473 ml) de cette pâte dans le moule
à gâteau préparé. Saupoudrer uniformément de la moitié du
mélange de streusel. Recouvrir du reste de pâte à gâteau et
saupoudrer du reste de streusel.
Cuire au four préchauffé de 50 à 60 minutes ou jusqu’à ce
qu’un cure-dent inséré au centre du gâteau en ressorte
propre. Laisser refroidir 30 minutes sur une grille. Renverser
le gâteau dans une assiette et le renverser de nouveau sur la
grille, garniture sur le dessus. Laisser refroidir complètement.
Donne 1 gâteau.
Page 29

Garantie limitée
Cette garantie s’applique aux produits achetés et utilisées aux É.-U. et au Canada. C’est la seule garantie expresse pour ce
produit et est en lieu et place de tout autre garantie ou condition.
Ce produit est garanti contre tout défaut de matériaux et de main-d’oeuvre pour une période des cinq (5) ans à compter de
la date d’achat d’origine au Canada et trois (3) ans à compter de la date d’achat d’origine aux É.-U. Au cours de cette période,
votre seul recours est la réparation ou le remplacement de ce produit ou tout composant s’avérant défectueux, à notre gré,
mais vous êtes responsable de tous les coûts liés à l’expédition du produit et le retour d’un produit ou d’un composant dans
le cadre de cette garantie. Si le produit ou un composant n’est plus offert, nous le remplacerons par un produit similaire de
valeur égale ou supérieure.
Cette garantie ne couvre pas le verre, les filtres, l’usure d’un usage normal, l’utilisation non conforme aux directives imprimées,
ou des dommages au produit résultant d’un accident, modification, utilisation abusive ou incorrecte. Cette garantie s’applique
seulement à l’acheteur original ou à la personne l’ayant reçu en cadeau. La présentation du reçu de vente d’origine comme
preuve d’achat est nécessaire pour faire une réclamation au titre de cette garantie. Cette garantie s’annule si le produit est
utilisé autrement que par une famille ou si l’appareil est soumis à toute tension ou forme d’onde différente des caractéristiques
nominales précisées sur l’étiquette (par ex. : 120 V ~ 60 Hz).
Nous excluons toutes les réclamations au titre de cette garantie pour les dommages spéciaux, consécutifs et indirects causés
par la violation de garantie expresse ou implicite. Toute responsabilité est limitée au prix d’achat. Chaque garantie implicite,
y compris toute garantie ou condition de qualité marchande ou d’adéquation à un usage particulier, est exonérée, sauf
dans la mesure interdite par la loi, auquel cas la garantie ou condition est limitée à la durée de cette garantie écrite. Cette
garantie vous donne des droits légaux précis. Vous pouvez avoir d’autres droits qui varient selon l’endroit où vous habitez.
Certaines provinces ne permettent pas les limitations sur les garanties implicites ou les dommages spéciaux ou indirects de
telle sorte que les limitations ci-dessus ne s’appliquent peut-être pas à votre cas.
Ne pas retourner cet appareil au magasin lors d’une réclamation au titre de cette garantie. Téléphoner au 1.800.851.8900 aux
É.-U. ou au 1.800.267.2826 au Canada ou visiter le site internet www.hamiltonbeach.com aux É.-U. ou www.hamiltonbeach.ca
au Canada. Pour un service plus rapide, trouvez le numéro de modèle, le type d’appareil et les numéros de série sur votre
appareil.
29
Page 30

SALVAGUARDIAS IMPORTANTES
Cuando utilice artefactos eléctricos, siempre deben seguirse precauciones de seguridad básicas a fin de reducir el riesgo de
incendio, descarga eléctrica, y/o lesiones a personas, incluyendo las siguientes:
1. Lea todas las instrucciones.
2. Este aparato no se destina para utilizarse por personas
(incluyendo niños) cuyas capacidades físicas, sensoriales
o mentales sean diferentes o estén reducidas, o carezcan
de experiencia o conocimiento, a menos que dichas
personas reciban una supervisión o capacitación para el
funcionamiento del aparato por una persona responsable
de su seguridad.
3. Se requiere de una estrecha supervisión cuando el aparato
se use cerca de niños. Los niños deben supervisarse para
asegurar que ellos no empleen los aparatos como juguete.
4. Verifique que el voltaje de su instalación corresponda con
el del producto.
5. Para protegerse contra el riesgo de choque eléctrico, no
sumerja el cable, el enchufe ni el cuerpo de la batidora en
agua ni en ningún otro líquido.
6. Desenchúfela del tomacorriente cuando no la esté usando,
antes de colocar o sacar alguna pieza y antes de la
limpieza.
7. Evite todo contacto con piezas móviles. Mantenga las manos,
el cabello y la ropa, así como las espátulas y otros utensilios
lejos de los accesorios durante la operación para reducir el
riesgo de lesiones a personas y/o averías en la batidora.
8. Saque los accesorios de la batidora antes de lavarlos.
9. No deje que el cable cuelgue sobre el borde de una mesa
o de un mostrador, o que toque alguna superficie caliente,
incluyendo la superficie de una cocina.
10. No opere ningún aparato con cables o enchufe dañados
o después de que el aparato funcione mal o se caiga o
dañe de cualquier manera. El reemplazo del cable de
suministro y las reparaciones deben ser efectuadas por el
fabricante, su agente de servicio, o personas igualmente
calificadas para poder evitar un peligro. Llame al número
de servicio al cliente proporcionado para información
sobre examinación, reparación o ajuste.
11. El uso de accesorios no recomendados ni vendidos por
el fabricante del aparato para usar con este modelo puede
causar incendio, choque eléctrico o lesiones.
12. No lo use al aire libre.
13. No coloque el aparato sobre o cerca de una fuente de gas
caliente o de un quemador eléctrico, ni dentro de un horno
caliente.
14. Verifique que el control esté en la posición apagada antes
de enchufar el cable en el tomacorriente de pared. Para
desconectar, coloque el control en la posición APAGADO
(O) y luego saque el enchufe del tomacorriente de pared.
15. No use el aparato para ningún otro fin que no sea el indicado.
16. PRECAUCIÓN: A fin de evitar un riego debido a la
reconfiguración inadvertida de la protección térmica,
este artefacto no debe recibir suministro mediante un
dispositivo de derivación externo, como un temporizador, o
conectarse a un circuito que la empresa de servicio active
y desactive regularmente.
30
¡GUARDE ESTAS INSTRUCCIONES!
Page 31

Otra Información de Seguridad para el Cliente
Este aparato ha sido diseñado solamente para uso
doméstico.
w ADVERTENCIA
aparato es provisto con un enchufe polarizado (una pata
más ancha) para reducir el riesgo de una descarga eléctrica.
El enchufe embona únicamente en una dirección dentro
de un tomacorriente polarizado. No trate de obviar el
propósito de seguridad del enchufe modificándolo de alguna
manera o utilizando un adaptador. Si el enchufe no entra
completamente en la toma, invierta el enchufe. Si aún no
entra, haga que un electricista reemplace la toma.
El largo del cable que se usa en este aparato fue seleccionado
para reducir el peligro de que alguien se enganche o tropiece
con un cable más largo. Si es necesario usar un cable
más largo, se podrá usar un cable de extensión aprobado.
La clasificación eléctrica nominal del cable de extensión
debe ser igual o mayor que la clasificación nominal del
aparato. Es importante tener cuidado de colocar el cable de
extensión para que no se pliegue sobre el mostrador o la
mesera en donde niños puedan tirar del mismo o tropezarse
accidentalmente.
Peligro de Descarga Eléctrica: Este
w ADVERTENCIA
Para reducir el riesgo de lesiones personales, siempre
desenchufe la batidora antes de colocar o quitar batidores.
INFORMACIÓN SOBRE VATAJE/PICO DE ENERGÍA
La clasificación marcada de la batidora de pedestal está
determinada por las normas de seguridad de una agencia
como el consumo de energía estabilizado máximo de la
batidora de pedestal a alta velocidad bajo una condición de
carga.
El pico de energía es un promedio del vataje máximo que
una batidora de mano puede consumir durante la operación
inicial a alta velocidad.
Peligro de Piezas en Movimiento.
31
Page 32

Partes y Características
*Para ordenar partes:
EE. UU.:
www.hamiltonbeach.com
México:
1.800.851.8900
Cabeza de la Batidora
01 800 71 16 100
Control de Velocidad
ANTES DEL PRIMER USO: Lave tazón o accesorios en
agua tibia jabonosa; enjuague y seque. Siempre
desenchufe la batidora del tomacorriente antes de
introducir o quitar accesorios.
ACCESORIOS
32
Botón para
Destrabar
la Batidora
Protector de Vertido*
Collar de Protector de Vertido*
Eje de Acoplamiento
Traba del Tazón
Batidor Tradicional*
Tazón*
Batidor*
Gancho para Masa*
Page 33

Cómo Usar
ANTES DEL PRIMER USO: Lave
tazón o accesorios en agua tibia
jabonosa; enjuague y seque.
Siempre desenchufe la batidora
del tomacorriente antes de
introducir o quitar accesorios.
w ADVERTENCIA
Desenchufe la batidora antes de insertar o quitar los accesorios. El no seguir
estas instrucciones puede resultar en fractura de huesos o cortaduras.
Riesgo de Cortes y Aplastamientos.
4
Coloque el tazón en la traba del
tazón y gírelo hacia la derecha
hasta que encaje en su lugar.
1
Siempre verifique que la batidora
esté desenchufada y que el control
de adjuste esté en APAGADO (O).
5
Inserte el accesorio en el eje de
acoplamiento y presione hacia
arriba tan lejos como le sea posible.
Gire el accesorio hacia la derecha,
enganchando el accesorio sobre el
enganche del eje.
2
Presione el botón para levantar
la batidora.
6
Deslice la sección angosta del
collar de protector de vertido
debajo del accesorio de la
batidora.
3
Incline la cabeza de la batidora
hacia arriba.
7
Coloque el collar de protector de
vertido en el tazón. Los lados del
protector deben estar en posición
elevada en el tazón cuando se
halla colocado en forma correcta.
33
Page 34

Cómo Usar (cont.)
8
Inserte las lengüetas del
protector de vertido en las
ranuras que están sobre el collar.
12
Seleccione la velocidad deseada.
34
9 10 11
Gire la abertura del protector
de vertido y el collar hacia la
posición deseada.
Presione hacia arriba el botón para
destrabar la batidora e incline la
cabeza de la batidora hacia abajo.
13 14
Cuando haya terminado,
deslice el control de velocidad a
APAGADO (O). Desenchufe del
tomacorriente.
Presione hacia arriba el botón
para destrabar la batidora e incline
la cabeza de la batidora hacia
arriba.
Enchufe la batidora en un
tomacorriente.
15
Quite el accesorio presionándolo
hacia arriba lo máximo posible.
Gire el accesorio en sentido
contrario a las agujas del reloj y
tire para quitarlo.
Page 35

La siguiente guía de batido es una sugerencia para seleccionar velocidades de batido.
Guía de Batido
ALIMENTO ACCESORIO CONFIGURACIÓN
Pasteles (mezclas comerciales y caseras) Batidor tradicional 4–6
Masa para galletas Batidor tradicional 4–6
Puré de papas Batidor tradicional 6–8
Glaseado Batidor tradicional 6–8
Claras de huevo (para merengues, etc.) Batidor 10–12
Crema batida Batidor 12
Budín instantáneo Batidor 2
Pan Gancho para Masa 2–4
Comience en la configuración 2 y suba hasta la velocidad deseada en base a la
consistencia de la receta.
Consejos Generales para Batir
• Coloque primero los ingredientes líquidos en el tazón y luego
agregue los ingredientes secos.
• Siempre permanezca cerca de la batidora durante el uso.
• Para comenzar a batir, utilice las velocidades más bajas hasta
que los ingredientes estén bien mezclados. Esto reducirá las
salpicaduras.
• Siempre agregue los ingredientes tan cerca de los lados del tazón
como le sea posible, no lo haga directamente dentro de la batidora
en movimiento.
• Cuando prepare paquetes con mezclas para pastel, use la
configuración 2 para una velocidad baja, ajuste 4 para una
velocidad media y configuración 6 para una velocidad alta. Para
obtener óptimos resultados, bata por el tiempo indicado en las
instrucciones del paquete.
• Las mezclas que contienen grandes cantidades de ingredientes
líquidos deben batirse a velocidades bajas para evitar salpicaduras.
Aumente la velocidad solamente después de que la mezcla se haya
espesado.
• Cuando bata masas poco espesas use velocidades medias y
detenga con frecuencia la batidora para raspar las paredes del
tazón con una espátula.
35
Page 36

Consejos para el Batidor Tradicional
El batidor tradicional se utiliza para la mayoría de sus necesidades de batido.
Use el batidor tradicional para mezclar pasteles, masa de galletas, caramelo y papas.
La masa de galletas es una de las masas más espesas para mezclar. Haga esta tarea más fácil siguiendo estos consejos:
• Tenga la mantequilla o la margarina a temperatura ambiente.
• Agregue los ingredientes uno por uno y mezcle bien después de cada adición.
• Agregue harina una taza por vez.
• Si la batidora parece hacer mucha fuerza, aumente la velocidad.
Consejos para el Gancho para Masa
El gancho para masa es para recetas que requieren amasado.
• Siempre permanezca cerca de la batidora durante el uso.
• Si una cuchara queda accidentalmente atrapada en un accesorio o si el motor se atasca, deslice el control de velocidad
a APAGADO (O) y luego desenchufe. Saque el objeto o reduzca la cantidad de la mezcla en el tazón. Deje que el motor
se enfríe por 5 minutos antes de continuar.
36
Page 37

Consejos para el Batidor
• El batidor de alambre está diseñado para batir líquidos como claras de huevos y crema. No use el batidor de alambre
para batir mezclas espesas como masa, caramelo o puré de papas.
• Su batidora está diseñada para batir un mínimo de 2 claras de huevo grandes o 1 taza (237 ml) de crema. El
funcionamiento de la batidora mejora cuando la punta del batidor se sumerge en el líquido. Si se necesitan cantidades
menores, se recomienda una batidora de mano.
CLARAS DE HUEVO
Coloque las claras de huevo en un tazón para mezclar limpio y
seco. Coloque el tazón y el batidor. Para evitar salpicaduras, gire
gradualmente el control de velocidad a la velocidad deseada. Vea el
cuadro debajo.
CANTIDAD CONFIGURACIÓN
de 2 a 4 claras de huevo hasta 10
6 o más claras de huevo hasta 8
Su batidora de pedestal bate rápidamente las claras de huevo. Mire
con cuidado para que no se batan de más. He aquí lo que se espera:
Espumosas: Burbujas de aire grandes y desiguales.
Comienzan a Tomar Forma: Las burbujas de aire son finas y
compactas; el producto está blanco.
Pico Suave: Las puntas de los picos se caen cuando se saca el
batidor.
Casi firmes: Se forman picos marcados cuando se saca el batidor,
pero las claras todavía están blandas.
Firme Pero no Seco: Se forman picos marcados y firmes cuando
se saca el batidor. Las claras tienen color uniforme y brillan.
Firme y Seco: Se forman picos marcados y firmes cuando se saca
el batidor. Las claras tienen pintitas y apariencia opaca.
CREMA BATIDA
Vierta la crema para batir fría en un tazón frío. Coloque el tazón
y el batidor. Para evitar salpicaduras, gire gradualmente el control
de velocidad a la velocidad deseada. Vea el cuadro debajo.
CANTIDAD CONFIGURACIÓN
1 taza (237 ml) hasta 10
1 pinta (473 ml) hasta 8
Su batidora de pedestal bate rápidamente la crema. Cuide la crema
atentamente durante el batido, ya que transcurren pocos segundos
entre las etapas de batido. Busque estas características:
Comienza a Espesar: La crema es espesa y similar al flan.
Mantiene la Forma: La crema forma picos suaves cuando se saca
el batidor. Puede agregarse a los otros ingredientes cuando haga
postres y salsas.
Firme: La crema permanece con picos firmes y marcados cuando se
saca el batidor. Use como baño para crema en pasteles o postres, o
como relleno para bollos de crema.
37
Page 38

Cuidado y Limpieza
w ADVERTENCIA
No sumerja la batidora, el cable o el enchufe en agua o en otro líquido.
Batidor Tradicional
Peligro de Descarga Eléctrica.
Tazón
1 2
Siempre verifique que la batidora
esté desenchufada y que el
control de velocidad esté en
APAGADO (O).
4
38
Gancho para
Masa
Collar de Protector de Vertido
3
Batidor
Protector
de Vertido
RESISTENTE AL
LAVAVAJILLAS
No utilice la configuración
“SANI” cuando la lave en el
lavavajillas. Las temperaturas del
ciclo “SANI” pueden dañar su
producto.
Page 39

Resolviendo Problemas
PROBLEMA CAUSA PROBABLE/SOLUCIÓN
El alimento no está
mezclado.
El alimento se salpica
durante el batido.
La batidora “camina” sobre
el mostrador durante el
mezclado.
• Coloque los ingredientes líquidos en el tazón antes de agregar los ingredientes secos.
• Detenga la batidora y raspe las paredes del tazón.
• Aumente la velocidad.
• Las mezclas que contienen grandes cantidades de ingredientes líquidos deben batirse a velocidades bajas
para evitar salpicaduras. Aumente la velocidad solamente después de que la mezcla se haya espesado.
• Reduzca la velocidad.
• Reduzca la cantidad de los ingredientes en el tazón.
• Asegúrese de que esté limpio el mostrador. Esto permite que los pies de la batidora se agarren al
mostrador, disminuyendo el movimiento de ésta.
39
Page 40

Recetas
Pastel Terciopelo de Capas de Chocolate
2 tazas (473 ml) harina para pastel
1/2 taza (118 ml) de cacao para hornear sin endulzar
2 cucharaditas (10 ml) bicarbonato de sodio
1/4 cucharadita (1.2 ml) de sal
10 cucharadas (148 ml) de mantequilla, a temperatura
ambiente
2 tazas (473 ml) azúcar moreno clara, en paquete
2 huevos
1 cucharadita (5 ml) vainilla
3/4 taza (177 ml) crema agria
3/4 taza (177 ml) café preparado frío
Precaliente el horno a 350°F (180°C). En un tazón pequeño, mezcle la
harina, el cacao, el bicarbonato y la sal. Separe. Utilizando el batidor
tradicional, mezcle la mantequilla y el azúcar en la configuración
4. Agregue los huevos, uno por vez, mezclando bien después de
verterlos. Agregue la vainilla. Reduzca la velocidad a la configuración
2. Agregue la mitad de la mezcla de harina, luego toda la crema agria.
Agregue la mezcla restante de harina; luego vierta el café lentamente.
Mezcle en la configuración 2 por alrededor de 30 segundos. Apague
la batidora y raspe los lados y el fondo del tazón. Encienda la batidora
en la configuración 4 y mezcle hasta que quede bien homogéneo.
Divida la masa entre 2 moldes redondos para pasteles enmantecados
y recubiertos con papel encerado de 9 pulgadas (23 cm). Hornee por
30 a 35 minutos o hasta comprobar que estén listos. Deje enfriar en
una bandeja por 5 minutos; luego quite de la bandeja y enfríe sobre
una rejilla. Coloque glaseado de chocolate amargo.
Rinde para un pastel de 2 capas.
40
Glaseado de Chocolate Amargo
1/3 taza (79 ml) de mantequilla, 1/4 taza (59 ml) de leche
a temperatura ambiente 1 a 2 cucharaditas (15 a
2 1/2 tazas (591 ml) azúcar 30 ml) café preparado frío
en polvo 1 cucharadita (5 ml) vainilla
3/4 taza (177 ml) de cacao para
hornear sin endulzar
Utilizando el batidor tradicional, bata la mantequilla en la configuración
4 hasta que quede homogénea. Agregue el azúcar en polvo y el cacao
en forma alternativa con la leche y siga batiendo hasta que quede
homogéneo. Agregue vainilla y bata hasta que quede bien mezclado.
Galletas Mágicas
1 taza (237 ml) mantequilla
1 taza (237 ml) de azúcar
1 taza (237 ml) azúcar moreno
clara
2 huevos
2 tazas (473 ml) harina
1 cucharadita (5 ml) bicarbonato
de sodio
Precaliente el horno a 350°F (180°C). Con el batidor tradicional, mezcle
la mantequilla, el azúcar y el azúcar moreno en una configuración
media hasta mezclar bien. Vierta la vainilla y los huevos. Reduzca la
velocidad y gradualmente agregue la harina, el bicarbonato de sodio,
el polvo para hornear y la sal y mezcle hasta que quede homogéneo.
En una configuración baja mezcle la avena, los trocitos de chocolate y
el coco hasta que queden bien mezclados. Coloque cucharadas llenas
sobre una bandeja para galletas sin enmantecar. Hornee en la bandeja
del horno del medio por 12 a 14 minutos.
Rinde para 3 docenas de galletas.
1/2 cucharadita (2.5 ml) polvo
para hornear
1/2 cucharadita (2.5 ml) de sal
2 tazas (473 ml) avena
1 cucharada (15 ml) vainilla
12 oz (340 g) trocitos de
chocolate
1 1/2 tazas (355 ml) de coco
Page 41

Recetas (cont.)
Galletas de Azúcar Las Mejores
2 1/2 tazas (591 ml) de harina común
1 cucharadita (5 ml) polvo para hornear
1/2 cucharadita (2.5 ml) bicarbonato de sodio
1/4 cucharadita (1.2 ml) de sal
1/4 cucharadita (1.2 ml) nuez moscada
3/4 taza (177 ml) mantequilla, derretida
3/4 taza (177 ml) de azúcar
1 huevo
1 cucharadita (5 ml) vainilla
1/4 taza (59 ml) de leche
Precaliente el horno a 375°F (190°C). Mezcle la harina, el polvo
para hornear, el bicarbonato de sodio, la sal, la nuez moscada y
dejarlos de lado. Utilizando el batidor tradicional, bata la mantequilla
a velocidad alta hasta que quede suave y esponjosa. Reduzca la
velocidad a la configuración más baja. Agregue el azúcar, el huevo
y la vainilla y mezcle bien. Gradualmente agregue los ingredientes
secos y la leche; siga batiendo hasta que quede bien mezclado.
Forme la masa de galletas en bolas de un diámetro de 1 1/2 pulgadas
(3.5 cm) y colóquelas sobre bandejas para hornear sin enmantecar.
Aplaste las bolas ligeramente con la base de un vaso. Hornee en el
horno de 6 a 7 minutos o hasta que queden ligeramente doradas en
los bordes. Enfríe en rejillas de alambre.
Rinde para 4 docenas.
Pancitos Simples de Levadura
1 taza (237 ml) agua tibia, 100° a 110°F (38° a 43°C)
.25 oz (7 g) paquete de levadura seca activa
1/4 taza (59 ml) mantequilla, derretida y enfriada
3 cucharadas (44 ml) de azúcar
1 cucharadita (5 ml) de sal
1 huevo
3 a 3 1/2 tazas (710 a 828 ml) harina
Vierta el agua en un tazón. Agregue la levadura y deje disolver
por 5 minutos. Agregue la mantequilla, el azúcar, la sal y el huevo.
Utilizando el gancho para masa, mezcle a configuración 2 por
30 segundos. Agregue 3 tazas (710 ml) de la harina y mezcle a
configuración 4 por 2 minutos. Agregue harina adicional, si fuera
necesario, para obtener una masa suave. Cubra y deje levar en un
lugar tibio por alrededor de 1 hora.
Precaliente el horno a 350°F (180°C). Tome la masa y colóquela sobre
una superficie ligeramente enharinada. Divida la masa en 4 porciones
iguales; luego divida cada porción en 4 bolas del tamaño de una
pelota de golf. Coloque las 16 bolas en una bandeja para hornear
enmantecada de 9 x 13 pulgadas (23 x 33 cm). Deje levar en un lugar
tibio por 30 minutos. Hornee de 25 a 30 minutos.
Rinde para 16 pancitos.
41
Page 42

Recetas (cont.)
Pastel de Café y Crema Agria
Cobertura de Migajas
1 1/2 tazas (355 ml) de harina común
1 1/2 palos (3/4 taza [177 ml]) mantequilla sin sal, derretida
1/3 taza (79 ml) azúcar moreno clara, en paquete
1/3 taza (79 ml) de azúcar
1 1/4 cucharaditas (6.2 ml) canela molida
1 taza (237 ml) pecanas, picadas
Pastel
1 1/2 palos (3/4 taza [177 ml]) mantequilla sin sal, derretida
1 1/4 tazas (296 ml) de azúcar
1 cucharada (15 ml) polvo para hornear
3/4 cucharadita (3.7 ml) bicarbonato de sodio
3/4 cucharadita (3.7 ml) de sal
4 huevos grandes
1 cucharada (15 ml) vainilla
1 1/2 tazas (355 ml) crema agria
2 1/4 tazas (532 ml) de harina común
Streusel
1/3 taza (79 ml) de harina común
1/2 taza (118 ml) azúcar moreno clara, en paquete, dividida
3/4 cucharadita (3.7 ml) canela molida
3 cucharadas (44 ml) mantequilla fría
Cobertura de Migajas: En un tazón pequeño mezcle la harina, la
mantequilla, el azúcar moreno, el azúcar granulado y la canela;
mezcle con un tenedor hasta formar migajas grandes. Agregue las
pecanas y mezcle para incorporarlas.
Streusel: En otro tazón pequeño, mezcle la harina, el azúcar moreno,
la canela y la mantequilla. Mezcle con un tenedor hasta formar
migajas grandes.
Pastel: Coloque la parrilla del horno en la posición más baja.
Precaliente el horno a 350°F (180°C). Enmanteque un recipiente para
bundt de 10 pulgadas (26 cm).
Utilizando el batidor tradicional, mezcle la mantequilla a velocidad
media hasta que quede homogénea. Agregue el azúcar, el polvo
para hornear, el bicarbonato de sodio y la sal. Bata a velocidad media
durante 3 minutos. Con la batidora a velocidad baja, agregue los
huevos, 1 por vez, hasta mezclar bien. Vierta la vainilla y la crema
agria. Agregue la harina en forma gradual. Siga mezclando hasta que
quede bien homogéneo.
Coloque 2 tazas (473 ml) de mezcla en el fondo de un recipiente
preparado. Vierta en forma pareja con la mitad de la mezcla de
streusel. Repita. Esparza la masa restante sobre la parte superior con
la cobertura de migajas.
Hornee de 50 a 60 minutos o hasta que un escarbadientes salga
limpio al introducirlo en el centro del pastel. Enfríe en una rejilla de
alambre durante 30 minutos. Invierta el pastel en un plato y luego
délo vuelta en una rejilla con el lado de la cobertura hacia arriba.
Enfríe por completo.
Rinde para un pastel.
42
Page 43

Grupo HB PS, S.A. de C.V.
Monte Elbruz 124-301
Colonia Palmitas, Delegación Miguel Hidalgo
C.P. 11560, México, Distrito Federal
01 800 71 16 100
PÓLIZA DE GARANTÍA
PRODUCTO:
MARCA:
Grupo HB PS, S.A. de C.V. cuenta con una Red de Centros de Servicio Autorizada, por favor consulte en la lista anexa el nombre y dirección de los establecimientos en la
República Mexicana en donde usted podrá hacer efectiva la garantía, obtener partes, componentes, consumibles y accesorios; así como también obtener servicio para
productos fuera de garantía. Para mayor información llame sin costo: Centro de Atención al consumidor: 01 800 71 16 100
Grupo HB PS, S.A. de C.V. le otorga a partir de la fecha de compra:
GARANTÍA DE 3 AÑOS.
COBERTURA
• Esta garantía ampara, todas las piezas y componentes del producto que resulten con defecto de fabricación incluyendo la mano de obra.
Grupo HB PS,
•
todo lo anterior sin costo adicional para el consumidor.
• Esta garantía incluye los gastos de transportación del producto que deriven de su cumplimiento dentro de su red de servicio.
S.A. de C.V. se obliga a reemplazar, reparar o reponer, cualquier pieza o componente defectuoso; proporcionar la mano de obra necesaria para su diagnóstico y reparación,
LIMITACIONES
• Esta garantía no ampara el reemplazo de piezas deterioradas por uso o por desgaste normal, como son: cuchillas, vasos, jarras, filtros, etc.
• Grupo HB PS, S.A. de C.V. no se hace responsable por los accidentes producidos a consecuencia de una instalación eléctrica defectuosa, ausencia de toma de tierra, clavija de enchufe
en mal estado, etc.
EXCEPCIONES
Esta garantía no será efectiva en los siguientes casos:
a) Cuando el producto se hubiese utlizado en condiciones distintas a las normales. (Uso industrial, semi-industrial o comercial.)
b) Cuando el producto no hubiese sido operado de acuerdo con el instructivo de uso.
c) Cuando el producto hubiese sido alterado o reparado por personas no autorizadas por Grupo HB PS, S.A. de C.V. el fabricante nacional, importador o comercializador responsable
respectivo.
El consumidor puede solicitar que se haga efectiva la garantía ante la propia casa comercial donde adquirió su producto, siempre y cuando Grupo HB PS, S.A. de C.V. no cuente con talleres de
servicio.
MODELO:
43
Page 44

PROCEDIMIENTO PARA HACER EFECTIVA LA GARANTÍA
• Para hacer efectiva la garantía no deben exigirse mayores requisitos que la presentación del producto y la póliza correspondiente, debidamente sellada por el establecimiento que lo vendió.
• Para hacer efectiva la garantía, lleve su aparato al Centro de Servicio Autorizado más cercano a su domicilio (consulte la lista anexa).
• Si no existe Centro de Servicio Autorizado en su localidad llame a nuestro Centro de Atención al Consumidor para recibir instrucciones de como hacer efectiva su garantía.
• El tiempo de reparación, en ningún caso será mayor de 30 días naturales contados a partir de la fecha de recepción del producto en nuestros Centros de Servicio Autorizados.
• En caso de que el producto haya sido reparado o sometido a mantenimiento y el mismo presente deficiencias imputables al autor de la reparación o del mantenimiento dentro de los treinta
días naturales posteriores a la entrega del producto al consumidor, éste tendrá derecho a que sea reparado o mantenido de nuevo sin costo alguno. Si el plazo de la garantía es superior a
los treinta días naturales, se estará a dicho plazo.
• El tiempo que duren las reparaciones efectuadas al amparo de la garantía no es computable dentro del plazo de la misma. Cuando el bien haya sido reparado se iniciará la garantía respecto
de las piezas repuestas y continuará con relación al resto. En el caso de reposición del bien deberá renovarse el plazo de la garantía.
SELLO DEL VENDEDOR QUEJAS Y SUGERENCIASFECHA DE ENTREGA
DÍA___ MES___ AÑO___
Si desea hacer comentarios o sugerencias con respecto a nuestro servicio o tiene alguna queja derivada de la atención recibida en
alguno de nuestros Centros de Servicio Autorizados, por favor dirigirse a:
GERENCIA INTERNACIONAL DE SERVICIO
Email: mexico.service@hamiltonbeach.com.mx
01 800 71 16 100
RED DE CENTROS DE SERVICIO AUTORIZADA GRUPO HB PS, S.A. DE C.V.
Distrito Federal
ELECTRODOMÉSTICOS
Av. Plutarco Elias Cailes No. 1499
Zacahuitzco MEXICO 09490 D.F.
Tel: 01 55 5235 2323 • Fax: 01 55 5243 1397
CASA GARCIA
Av. Patriotismo No. 875-B
Mixcoac MEXICO 03910 D.F.
Tel: 01 55 5563 8723 • Fax: 01 55 5615 1856
Nuevo Leon
FERNANDO SEPULVEDA REFACCIONES
Ruperto Martínez No. 238 Ote.
Centro MONTERREY, 64000 N.L.
Tel: 01 81 8343 6700 • Fax: 01 81 8344 0486
Jalisco
SERVICIOS DE MANTENIMIENTO CASTILLO
Garibaldi No. 1450
Ladrón de Guevara
GUADALAJARA 44660 Jal.
Tel: 01 33 3825 3480 • Fax: 01 33 3826 1914
Chihuahua
DISTRIBUIDORA TURMIX
Av. Paseo Triunfo de la Rep. No. 5289 Local 2 A.
Int. Hipermart
Alamos de San Lorenzo
CD. JUAREZ 32340 Chih.
Tel: 01 656 617 8030 • Fax: 01 656 617 8030
Modelos:
63220, 63221, 63227, 63232, 63233, 63266
Tipo:
SM04
Características Eléctricas:
120V ~ 60Hz 400 W
Los modelos incluídos en el instructivo de Uso y Cuidado pueden ir seguidos o no por un sufijo correspondiente a una
o varias letras del alfabeto y sus combinaciones, separadas o no por un espacio, coma, diagonal, o guión. Como ejemplos
los sufijos pueden ser: “Y” y/o “MX” y/o “MXY” y/o “Z”.
12/15840264301
 Loading...