

Page 1
840082000
Stand Mixer
Stand Mixer Safety ........................ 3
Know Your Stand Mixer ................ 4
How to Use Your Stand Mixer ...... 5
To Clean .......................................... 6
Recipes...................................... 6-10
Customer Service ........................ 11
In USA: 1-800-851-8900
840082000 Ev01.qxd 2/22/01 9:57 AM Page 1
Digitally signed by Anna
Creery
cn=Anna Creery, c=US
Date: 2001.02.27 10:50:10
-05'00'
Reason: I am approving
this document
Page 2

2
840082000 Ev01.qxd 2/22/01 9:57 AM Page 2
Page 3

3
Consumer Safety Information
IMPORTANT SAFEGUARDS
When using electric appliances, basic safety
precautions should always be followed,
including the following:
1. Read all instructions.
2. To protect against risk of electrical
shock, do not put cord, plug, or Mixer
body in water or other liquid.
3. Close supervision is necessary when
any appliance is used by or near
children.
4. Unplug from outlet when not in use,
before putting on or taking off parts,
and before cleaning.
5. Remove beaters and other attachments
from Mixer before washing.
6. Do not operate any appliance with
a damaged cord or plug or after the
appliance malfunctions or is dropped
or damaged in any manner. Call our
toll-free customer service number for
information on examination, repair, or
electrical or mechanical adjustment.
7. The use of attachments not
recommended or sold by Hamilton
Beach/Proctor-Silex, Inc. for use with
this model may cause fire, electric
shock or injury.
8. Avoid contacting moving parts. Keep
hands, hair, and clothing, as well as
spatulas and other utensils, away from
beaters during operation to reduce risk
of injury to persons, and/or damage to
Mixer.
9. Do not use outdoors.
10. Do not let cord hang over edge of table
or counter. Do not let cord contact hot
surfaces, including stove.
11. Do not place on or near a hot gas or
electric burner, or in a heated oven.
12. Check that control is off before plugging
cord into wall outlet. To disconnect, turn
control to OFF, then remove plug from
wall outlet.
13. Do not use appliance for other than
intended purpose.
SAVE THESE INSTRUCTIONS
Stand Mixer Safety
This appliance is intended for household
use only.
This appliance is equipped with a polarized
plug. This type of plug has one blade wider
than the other. The plug will fit into an
electrical outlet only one way. This is a
safety feature intended to help reduce the
risk of electrical shock. If you are unable to
insert the plug into the outlet, try reversing
the plug. If the plug should still fail to fit,
contact a qualified electrician to replace the
obsolete outlet. Do not attempt to defeat
the safety purpose of the polarized plug by
modifying the plug in any way.
The length of the cord used on this appliance was selected to reduce the hazards
of becoming tangled in, or tripping over a
longer cord. If a longer cord is necessary an
approved extension cord may be used.
The electrical rating of the extension cord
must be equal to or greater than the rating
of the stand mixer. Care must be taken to
arrange the extension cord so that it will not
drape over the countertop or tabletop where
it can be pulled on by children or accidentally tripped over.
840082000 Ev01.qxd 2/22/01 9:57 AM Page 3
Page 4
4
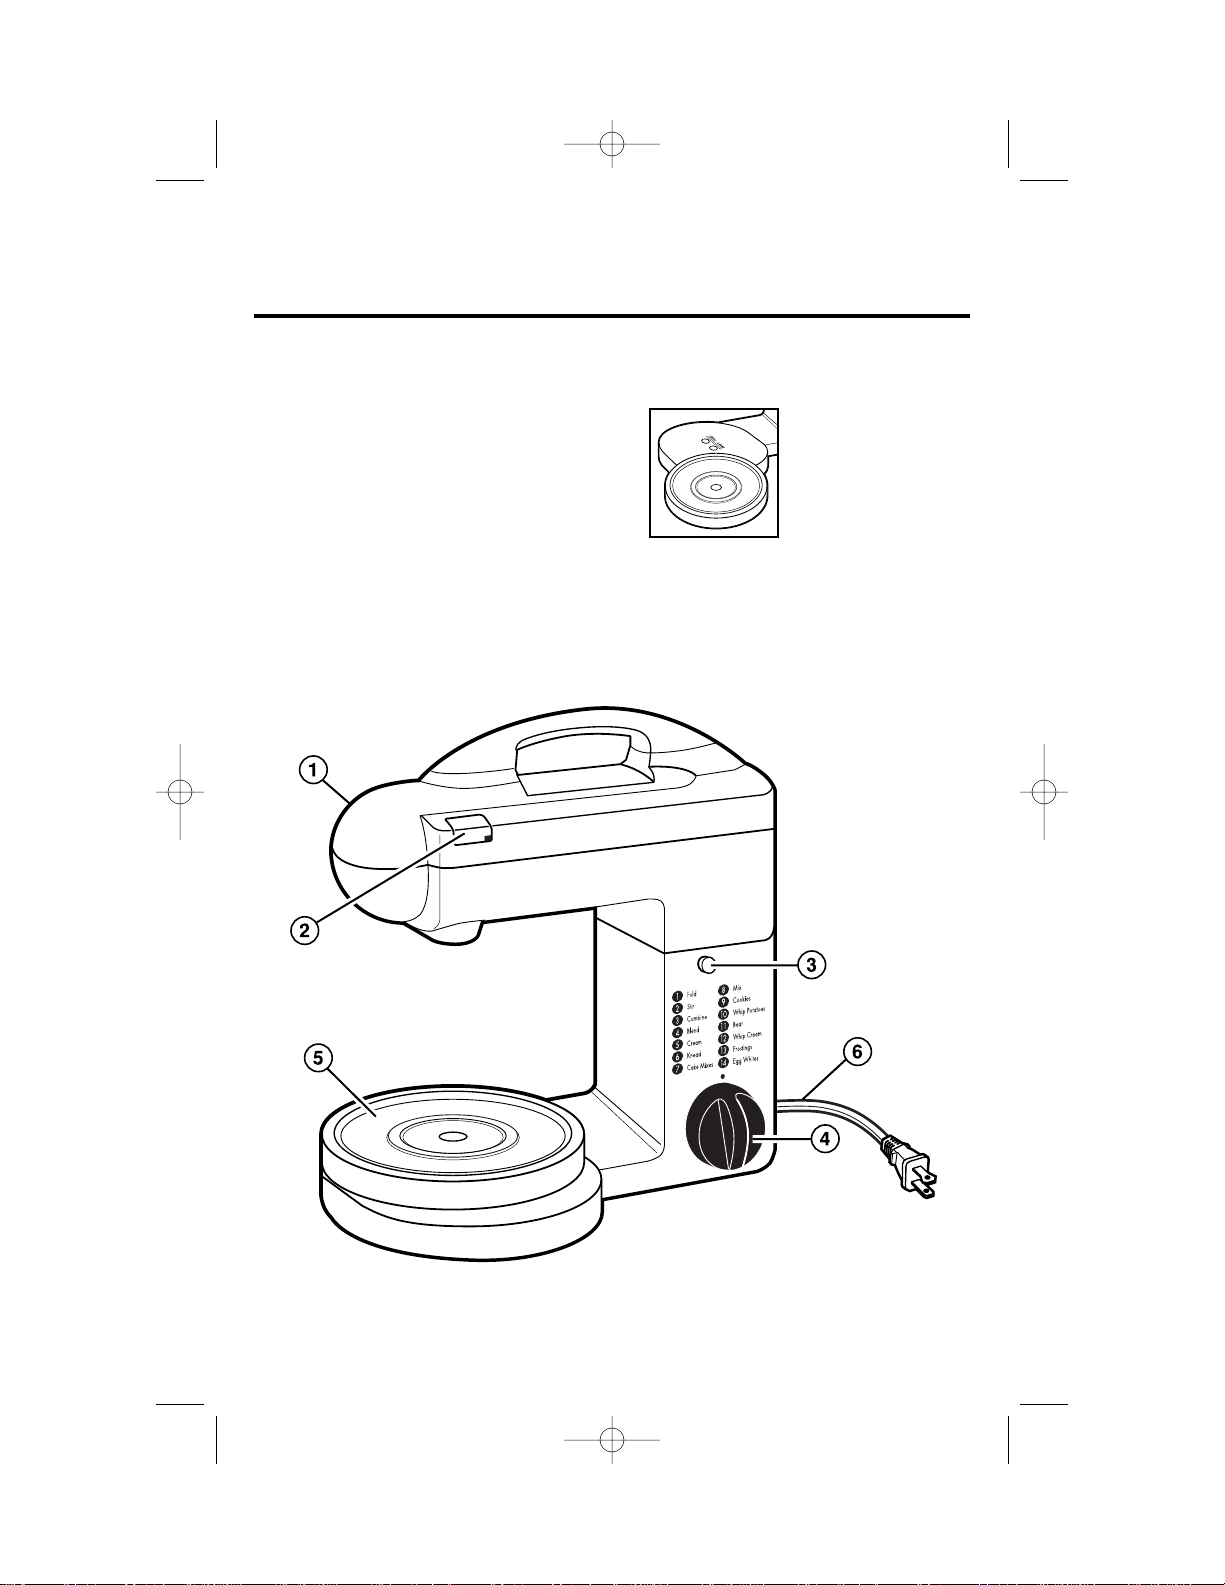
Know Your Stand Mixer
Parts and Features
1. Mixer Head
2. Beater Eject Button
This button allows finger-tip release
of all attachments. Fully depress
button to eject attachments.
3. Mixer Release Button
This button locks the Mixer Head
down to ensure thorough mixing.
When the Mixer Head is raised it
also locks it in the upright position.
Hold the Mixer Head when lowering
it into the bowl.
Do not press the Mixer Release
Button and let Mixer Head fall into
bowl.
4. Sensor Speed™Control
5. 2-Position Turntable
The turntable places large or small
bowls close to the
attachments to
minimize having to
scrape the sides of
the bowls. It is
important to have
the turntable in
proper position to ensure thorough
mixing, kneading, and whisking.
6. Cord Storage
840082000 Ev01.qxd 2/22/01 9:57 AM Page 4
Page 5

5
Sensor Speed™ Guide
This is an illustration of the Sensor
Speed Guide on your Mixer. The guide
may help you select a speed for most
mixing tasks. These guides are
recommendations. Please adjust Mixer
speed as needed.
How to Insert Attachments
Right
Left
1. Before using, wash bowls and
attachments in hot, soapy water.
Rinse and dry.
2. Make sure the Mixer is turned to
OFF and unplugged.
3. Place small post on bottom of
Turntable in hole on Mixer Base that
matches bowl to be used.
4. Press the Mixer Release button and
raise the Mixer Head up.
5. The beaters and dough hooks must
be inserted into specific holes in the
Mixer Head. See “How to Insert
Attachments.”
6. Place bowl onto Turntable. To
lower Mixer Head, first raise Mixer
Mixer Head Graphics
How To Use Your Stand Mixer
Each set of attachments must be
inserted into the proper hole in the
Mixer Head. They are not interchangeable; there is a right and a left. Beneath
the collar is etched a small R or L. This
indicates the correct hole to place
attachment. The “RIGHT” side of the
Mixer is the side with the Sensor Speed
control. The beater marked R, with
the flat bottom, should be placed in the
hole on the right side of the Mixer first.
Insert attachment into hole and turn
slowly until tabs slip into slots in hole.
Push in until attachment locks in place.
Then insert the beater marked L, with
the rounded bottom. If difficult to insert,
turn beater one quarter turn and try
again.
Head slightly and press Mixer
Release button to release. Lower
into bowl. When lowered, the
Mixer Head automatically locks
into place.
7. Plug cord into electrical outlet.
Select desired speed. Prepare
recipe according to instructions.
8. When finished, turn Sensor Speed
Control to OFF. Unplug from outlet.
9. Press Mixer Head release button,
raise Mixer Head until locked into
place.
10. Press Beater Eject Button to
remove attachments.
840082000 Ev01.qxd 2/22/01 9:57 AM Page 5
Page 6

6
Notes About Your Stand Mixer
• The Mixer Head locks down for
thorough mixing. However, there
will be some “bouncing” of the
Mixer Head during heavy mixing
or kneading. This is caused by the
flexibility designed into the Mixer.
• If a spoon is accidentally caught in
attachments or the motor stalls, the
Mixer will automatically shut off. If this
happens, turn Mixer off, then unplug.
Clear obstruction. Let motor cool for
5 minutes before continuing.
• Always stay near Mixer during use.
The speed of turning bowls should
always be monitored.
1. Make sure Sensor Speed Control is
turned to OFF and Mixer is unplugged.
2. Raise Mixer Head to up locked
position.
3. Press Beater Eject Button to eject
attachments.
To Clean
4. Bowls, beaters, and dough hooks
may be washed in hot, soapy water
or in automatic dishwasher.
5. Wipe Head, Base, and Turntable of
Mixer with a damp cloth.
Recipes
Check our Web site at www.hamiltonbeach.com for more recipes.
A Few Words About Baking Bread...
All of our recipes were tested using
all-purpose flour. Bread flour can
also be used.
Most of these recipes call for shaping
bread into a loaf and baking in a loaf
pan. However, bread can be shaped
into any shape and baked in almost
any pan. The only thing this affects
is the baking time.
All of the yeast bread recipes were
made using the dough hooks on
Knead (6).
Bread Tips!
• When yeast is dissolved in warm
water, the water temperature should
be 105° to 115°F. This is usually very
warm tap water.
• Bread rises best in a moist, warm
environment. For a perfect place to
raise bread, place bread in a microwave oven or regular oven with a pan
of steaming water. Do not turn oven
on, but close the door.
Hints!
Follow these helpful hints when
mixing thin batters:
• Use medium speeds.
• Bowl may not automatically rotate.
Simply rotate bowl by hand.
• Scrape sides of bowl with spatula
frequently.
• When whipping cream, eggs or
liquids, use the smaller bowl and
higher speeds.
840082000 Ev01.qxd 2/22/01 9:57 AM Page 6
Page 7

7
Basic White Bread
2 packages active dry yeast
21⁄2 cups warm water
3 tablespoons butter or margarine,
melted
Using dough hooks, in large mixing bowl combine yeast and 1⁄2 cup of warm
water. Knead (6) until dissolved. Add remaining warm water, butter, sugar, and
salt. Add 6 cups of flour and Knead (6) until blended. Add enough of remaining
flour and continue to knead until dough forms a smooth ball that is slightly sticky
to the touch. Place dough in large, greased bowl. Cover and let rise until double in
size, about 1 hour. Punch dough down, divide in half, and shape into loaves. Place
loaves into two 9x5-inch greased loaf pans and let rise until double in size, about
1 hour. Bake at 350°F for 40 minutes.
100% Whole Wheat Bread
2 packages active dry yeast
2 cups warm water
1
⁄3 cup vegetable oil
1
⁄3 cup honey
In a large bowl, sprinkle yeast over water and let stand 5 to 10 minutes or until
foamy. Stir to mix, then add oil, honey, salt, and egg. Add 3 cups of the flour and,
using dough hooks, Knead (6) for about 1 minute. Let stand about 20 minutes
until bubbly and starting to rise. Add 3 more cups flour and Knead (6) until mixed.
Add enough of remaining flour and Knead (6) until dough forms a smooth ball that
is slightly sticky to the touch. Place dough in large, greased bowl. Cover and let
rise 30 minutes or until double. Punch down and let rise 1 hour. Punch down.
Divide into two pieces and shape into loaves. Let rise 30 minutes or until double.
Bake at 400°F for 25 minutes.
Honey Wheat Bread
2 packages active dry yeast
1
⁄2 cup warm water
13⁄4 cups milk
1
⁄4 cup butter or margarine, melted
In a large mixing bowl, combine yeast and water. Stir until dissolved. Add milk,
butter, honey, and salt. Stir until mixed. Add whole wheat flour and 2 cups of
all-purpose flour and, using dough hooks, Knead (6) until blended. Add enough of
remaining flour, and continue kneading, until dough forms a smooth ball that is
slightly sticky to the touch. Place dough in large greased bowl and cover with a
towel. Let rise until double in size, about an hour. Punch dough down, divide in
half, and shape into loaves. Place loaves into 2 9x5-inch greased loaf pans and let
rise until double in size, about 1 hour. Bake at 350°F about 35 minutes.
1 teaspoon salt
1 egg
6 to 7 cups whole wheat flour
1
⁄4 cup honey
2 teaspoons salt
3 cups whole wheat flour
2 to 3 cups all-purpose flour
3 tablespoons sugar
2 teaspoons salt
6 to 7 cups all-purpose flour
840082000 Ev01.qxd 2/22/01 9:57 AM Page 7
Page 8

8
Dinner Pan Rolls
1
⁄2 cup warm water
1 package active dry yeast
1
⁄2 cup warm milk
1
⁄4 cup vegetable oil
In large mixing bowl, dissolve yeast in warm water. Add milk, oil, sugar, egg, salt,
and 2 cups flour. Using dough hooks, Knead (6) until blended. Add 1 more cup
flour and Knead (6). Add remaining flour as needed until a ball of dough forms
and is slightly sticky to the touch. Place dough in greased bowl and cover with a
towel. Let rise 45 minutes. Punch dough down and pat into a greased 9x13-inch
pan. Using a sharp knife, cut almost through dough into squares. Brush cuts with
melted butter. Let rise until double in size, about 1 hour. Bake at 400°F for 20 to
25 minutes.
Onion Herb Bread
2 packages active dry yeast
1
⁄2 cup warm water
2 tablespoons vegetable oil
1
⁄2 cup finely chopped onion
12⁄3 cups milk
2 tablespoons dried parsley flakes
In a small bowl, dissolve yeast in water. In a small pan, saute onion in oil until
tender. In large mixing bowl, combine onion, milk, parsley, sugar, salt, dill, sage, and
dissolved yeast. Stir to mix. Add cornmeal and 3 cups of the flour. Using dough
hooks, Knead (6) until mixed. Add enough of remaining flour until dough forms a
smooth ball that is slightly sticky to the touch. Place dough in large, greased bowl.
Cover and let rise until double in size. Punch down dough then divide in half.
Shape into 2 loaves. Cover and let rise about 40 minutes or until double in size.
Bake at 350°F for 45 minutes.
Bran Raisin Muffins
1
⁄2 cup vegetable shortening
1
⁄2 cup sugar
1
⁄2 cup dark brown sugar
2 eggs
21⁄2 cups all-purpose flour
21⁄2 teaspoons baking soda
(To make a substitute for 2 cups buttermilk, put 2 tablespoons lemon juice or
vinegar in a 2 cup measure. Fill to 2 cups with milk.)
In a large bowl, using beaters, Cream (5) together shortening and sugars. Add
eggs and blend. Stir together flour, baking soda, and salt. Alternately add flour
mixture and buttermilk to mixture in mixing bowl then Mix (8). Reduce to Fold (1)
and add bran flakes and raisins. Spoon into greased muffin pans. Bake at 400°F
for 20 minutes. Yield: 2 dozen.
1
⁄4 cup sugar
1 egg
11⁄2 teaspoon salt
31⁄2 to 4 cups all-purpose flour
3 tablespoons sugar
1 teaspoon salt
1
⁄2 teaspoon dried dill
1
⁄4 teaspoon ground sage
3
⁄4 cup yellow cornmeal
4 cups whole wheat flour
1 teaspoon salt
2 cups buttermilk
(or see substitute below)
5 cups bran flakes
1 cup raisins
840082000 Ev01.qxd 2/22/01 9:57 AM Page 8
Page 9

9
Mashed Potatoes
11⁄2 pounds all-purpose
white potatoes
5-ounce can evaporated
fat-free milk
Wash potatoes and peel if desired. Cut into pieces the size of golf balls. Place in
saucepan and cover with water. Bring to a boil and let cook 15 to 20 minutes or
until fork tender. Drain. Heat the evaporated milk. In mixing bowl, place potatoes,
heated milk, butter, salt and pepper. Using beaters, Mix (8) until combined then
increase to Whip Potatoes (10) until smooth.
White Chocolate Cheesecake
6 ounces white chocolate, chopped
2 cups vanilla wafer crumbs
1
⁄4 cup butter or margarine, melted
1 tablespoon all-purpose flour
3
⁄4 cup sugar
In top of a double boiler, over simmering water, melt white chocolate. Set aside
and cool slightly.
In a small bowl, combine vanilla wafer crumbs and butter. Press onto bottom and
up sides of 9-inch springform pan. Stir flour into sugar. In a large mixing bowl,
using beaters, Beat (11) cream cheese. Add sugar/flour mixture and Blend (4)
until smooth. Add eggs, one at a time, and Beat (11) until smooth. Add vanilla and
melted chocolate and Mix (8). Pour into prepared pan. Bake in preheated 350°F
oven for 45 to 50 minutes or until edges are set. Center will be shaky. Cool then
refrigerate at least 4 hours before serving. May be prepared 1 to 2 days in advance.
Dark Chocolate Walnut Cake
Cake:
8 ounces semi-sweet baking chocolate
5 eggs, separated
1 cup (2 sticks) butter or margarine
1 cup sugar
2 tablespoons flour
3 tablespoons unsweetened baking cocoa
1 cup finely ground walnuts
In the top of a double boiler, over simmering water, melt chocolate. Set aside and
cool slightly.
Using beaters, beat the egg whites in a small mixing bowl on Egg Whites (14)
until stiff but not dry. Set aside. In large mixing bowl Cream (5) butter and sugar
until fluffy. Add egg yolks, one at a time. Reduce speed to Blend (4). Combine
flour and cocoa, then add flour mixture to butter/egg mixture and mix until blended.
Add melted chocolate and nuts. Reduce to Fold (1) and add half of beaten egg
whites. Fold in remaining egg whites by hand. Pour mixture into greased and
floured tube or bundt pan. Bake at 350°F for 50 minutes. The cake will not rise
to the top of the pan. A crust will form on the top but the center will be moist.
Cool in pan 10 minutes then turn out onto cooling rack. The cake will fall. Let
cool completely then drizzle with glaze.
To make glaze, combine chocolate and milk in a small saucepan over low heat.
Stir occasionally until melted, then spoon over top of cake, letting glaze drip
down sides.
3 8-ounce packages cream cheese,
room temperature
4 eggs
1 teaspoon vanilla extract
1 tablespoon butter or margerine,
room temperature
1
⁄4 teaspoon salt
1
⁄4 teaspoon pepper
Glaze:
3 ounces semi-sweet baking chocolate
1
⁄4 cup milk
840082000 Ev01.qxd 2/22/01 9:57 AM Page 9
Page 10

10
Sour Cream Pound Cake
1 cup (2 sticks) butter or margarine
1
⁄2 cup vegetable
21⁄2 cups sugar
5 eggs
In a large mixing bowl, using beaters Cream (5) butter, shortening, and sugar. Add
eggs. Reduce speed to Blend (4) then add flour, sour cream, and vanilla. Mix until
well blended. Spoon into greased and floured tube or bundt pan. Bake at 325°F
for 11⁄2 hours or until the cake tests down with a toothpick.
Ginger Cookie Bars
3
⁄4 cup vegetable shortening
1 cup sugar
1
⁄4 cup molasses
1 egg
1
⁄2 teaspoon vanilla
2 cups flour
In a mixing bowl, using beaters combine shortening, sugar, molasses, egg, and
vanilla. Cream (5) until smooth. Add flour, baking soda, cinnamon, cloves, ginger,
and salt. Stir (2) until blended. Spread in an ungreased 15x10x1-inch baking pan.
Bake at 375ºF for 12 minutes or until lightly browned. Do not overbake. Cool on a
wire rack before cutting. Makes about 4 dozen bars.
Brown Sugar Butterscotch Cookies
1 cup butter, room temperature
1 cup white sugar
1 cup brown sugar
2 eggs
2 teaspoon vanilla
21⁄2 cups flour
In a large mixing bowl, using beaters Cream (5) butter and sugars. Add eggs and
vanilla and continue mixing. Add flour, salt, and baking soda and Mix (8) until just
mixed. Add rice cereal and chips and mix on speed 8 until mixed. Drop by spoonfuls onto cookie sheet. Bake at 350ºF for 12 to 15 minutes or until lightly browned.
Makes 6 dozen.
3 cups all-purpose flour
1 8-ounce container sour cream
2 teaspoons vanilla
2 teaspoons baking soda
1 teaspoon ground cinnamon
1
⁄2 teaspoon ground cloves
1
⁄2 teaspoon ground ginger
1
⁄2 teaspoon salt
1
⁄2 teaspoon salt
1 teaspoon baking soda
4 cups crispy rice cereal
2 cups butterscotch chips
840082000 Ev01.qxd 2/22/01 9:57 AM Page 10
Page 11

11
LIMITED WARRANTY
This product is warranted to be free from defects in material and workmanship for a period
of two (2) years for Hamilton Beach Portfolio products or one (1) year for Hamilton Beach
products from the date of original purchase, except as noted below. During this period, we
will repair or replace this product, at our option, at no cost. THE FOREGOING WARRANTY
IS IN LIEU OF ANY OTHER WARRANTY, WHETHER EXPRESS OR IMPLIED, WRITTEN
OR ORAL INCLUDING ANY WARRANTY OF MERCHANTABILITY OR FITNESS FOR A
PARTICULAR PURPOSE. ANY LIABILITY IS EXPRESSLY LIMITED TO AN AMOUNT
EQUAL TO THE PURCHASE PRICE PAID, AND ALL CLAIMS FOR SPECIAL, INCIDENTAL
AND CONSEQUENTIAL DAMAGES ARE HEREBY EXCLUDED. There is no warranty with
respect to the following, which may be supplied with this product: glass parts, glass
containers, cutter/strainer, blades, and/or agitators. This warranty extends only to the
original consumer purchaser and does not cover a defect resulting from abuse, misuse,
neglect, use for commercial purposes, or any use not in conformity with the printed
directions. This warranty gives you specific legal rights, and you may also have other legal
rights which vary from state to state, or province to province. Some states or provinces do
not allow limitations on implied warranties or special, incidental or consequential damages,
so the foregoing limitations may not apply to you.
If you have a claim under this warranty, DO NOT RETURN THE APPLIANCE TO THE
STORE! Please call our CUSTOMER SERVICE NUMBER. (For faster service please have
model, series, and type numbers ready for operator to assist you.)
CUSTOMER SERVICE NUMBERS
In the U.S. 1-800-851-8900
In Canada 1-800-267-2826
Web site address: www.hamiltonbeach.com
KEEP THESE NUMBERS FOR FUTURE REFERENCE!
Customer Service
If you have a question about your stand mixer, call our toll-free customer service
number. Before calling, please note the model, type, and series numbers and fill in
that information below. These numbers can be found on the bottom of your stand
mixer. This information will help us answer your question much more quickly.
MODEL: ______________ TYPE: _______________ SERIES: _________________
840082000 Ev01.qxd 2/22/01 9:57 AM Page 11
Page 12

Web site address: www.hamiltonbeach.com
HAMILTON BEACH PROCTOR-SILEX,INC.
P
ROCTOR-SILEX CANADA,INC.
263 Yadkin Road
Southern Pines, North Carolina 28387
Picton, Ontario K0K 2T0
2/01
840082000
840082000 Ev01.qxd 2/22/01 9:57 AM Page 12
 Loading...