

Hamilton Beach 58150 User Manual
840120300
Mélangeur
Blender
Licuadora
English .................................................. 2
USA: 1-800-851-8900
Français .............................................. 12
Canada : 1-800-267-2826
Español .............................................. 25
En México: 01-800-71-16-100
Le invitamos a leer cuidadosamente este
instructivo antes de usar su aparato.
840120300 ENv02.qxd 12/16/03 2:36 PM Page 1

2
3
IMPORTANT SAFEGUARDS
SAVE THESE INSTRUCTIONS
CONSUMER SAFETY INFORMATION
When using electric appliances, basic safety precautions should
always be followed, including the following:
1. Read all instructions. Keep these instructions for future reference.
2. To protect against risk of electrical shock, do not put cord, plug,
base, or motor in or near water or other liquid.
3. Close supervision is necessary when any appliance is used by or
near children.
4. Unplug cord from outlet when not in use, before putting on or
taking off parts, and before cleaning.
5. Avoid contact with moving parts.
6. Do not operate any appliance with a damaged cord or plug,
or after the appliance malfunctions or is dropped or damaged
in any manner. Contact an authorized service facility for
information on examination, repair, mechanical or electrical
adjustment.
7. The use of attachments, including canning jars, not recommended
or sold by Hamilton Beach/Proctor-Silex, Inc. may cause a
risk of injury to persons.
8. Do not use outdoors.
9. Do not let cord hang over edge of table or counter, or touch hot
surfaces, including the stove.
10. Keep hands and utensils out of container while blending to
reduce the risk of severe personal injury and/or damage to
blender. A rubber spatula may be used but must be used only
when blender is not running.
11. Blades are sharp, handle carefully.
12. Do not use a broken, chipped or cracked blender jar.
13. Do not use broken, cracked or loose cutting blades.
14. To reduce the risk of injury, never place cutting unit blades on
base without jar properly attached.
15. Always operate blender with cover in place.
16. When blending hot liquids, remove center piece of two-piece
cover. Do not fill blender container beyond the 3 cup level.
Always begin processing at the lowest speed setting. Keep
hands and other exposed skin away from the cover opening to
prevent possible burns.
17. Screw on jar retaining ring firmly. Injury can result if moving
blades accidentally become exposed.
18. If the jar should turn when the motor is switched ON, switch
OFF ( O ) immediately and tighten jar in threaded retaining ring.
19. Do not leave blender unattended while it is operating.
20. To disconnect cord, turn the control to OFF ( O ), then remove
plug from wall outlet.
21. Do not use appliance for other than intended purpose.
This appliance intended for household use only. Use for food or
liquids only.
This appliance is equipped with a polarized plug. This type of plug
has one blade wider than the other. The plug will fit into an electrical
outlet only one way. This is a safety feature intended to help reduce
the risk of electrical shock. If you are unable to insert the plug into
the outlet, try reversing the plug. If the plug should still fail to fit,
contact a qualified electrician to replace the obsolete outlet. Do
not attempt to defeat the safety purpose of the polarized plug by
modifying the plug in any way.
The length of the cord used on this appliance was selected to reduce
the hazards of becoming tangled in, or tripping over a longer cord. If
a longer cord is necessary an approved extension cord may be used.
The electrical rating of the extension cord must be equal to or greater
than the rating of the blender. Care must be taken to arrange the
extension cord so that it will not drape over the countertop or tabletop
where it can be pulled on by children or accidentally tripped over.
If the cutting unit blades lock and do not move, it will damage the
motor. Do not use. Call the toll-free customer service number for
information.
Do not place blender jar in the freezer filled with food or liquid. This
will freeze and damage the cutting unit, jar, and motor.
840120300 ENv02.qxd 12/16/03 2:36 PM Page 2
5
4
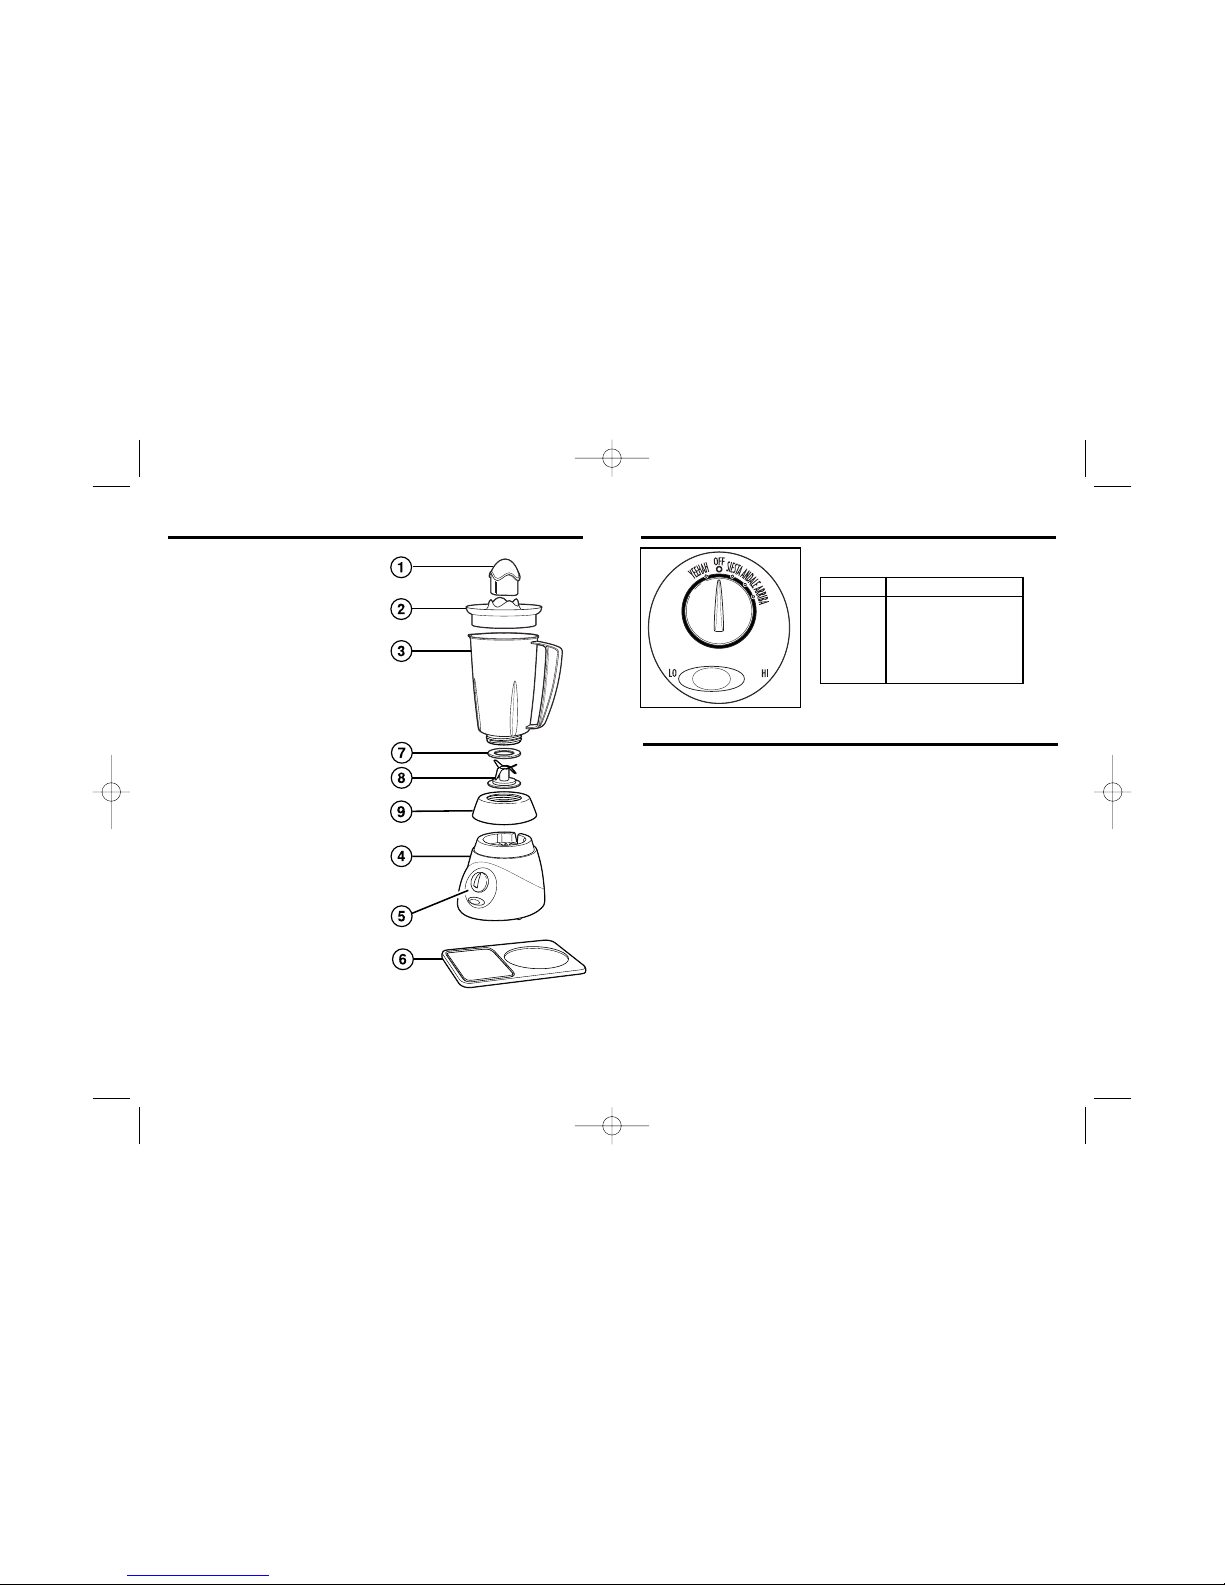
1. Filler-Cap
2. Lid
3. Jar
PULSE Button – For instant
control. Pulse operates only as
long as the dial is aligned with
Pulse “P”. The blender motor
stops when the dial
is released.
4. Base
5. Rotary Dial (see page 5
for more information)
6. Cutting and Salting Board*
Cutting Unit
Assembly
7. Gasket
8. Blades
9. Jar Collar
*optional feature
8-Speed Control
• For best blending results, fill the blender jar at least half full.
• Use the round area of the cutting and salting board to salt your
margarita glass.
• Use the square area of the cutting and salting board to cut
limes.
• Use the blender’s filler cap as a 2-ounce (60 ml) liquid measure.
• Processing hot foods or liquids in blender may cause hot liquid
to spurt out when the cover is removed. Always remove the
filler-cap from the cover before blending hot foods or liquids.
• To add foods when blender is operating, remove filler-cap from
container cover and add ingredients through the opening.
• If blending action stops during blending or ingredients stick to
sides of the jar, turn blender OFF. Remove cover and use a
rubber spatula to push mixture toward blades.
• Do not try to mash potatoes, mix stiff dough, whip egg whites,
grind raw meat, or extract juices from fruits and vegetables.
The blender is not made to perform these tasks.
• Do not store food or liquids in the blender jar.
• Avoid bumping or dropping the blender.
Parts and Features Parts and Features
Tips and Hints for Best Use
Before First Use: After
unpacking the blender, wash
everything except the blender
base in hot, soapy water. Dry thoroughly. Do not place in
dishwasher. Wipe the blender base with a damp cloth or
sponge. DO NOT IMMERSE THE BASE IN WATER. Care
should be taken when handling the blades as they are very
sharp.
LO HI
Yeehah 1 or 5 (Pulse)
Siesta 2 or 6
Andale 3 or 7
Arriba 4 or 8
840120300 ENv02.qxd 12/16/03 2:36 PM Page 4

7
6
How to Assemble and Use the Blender
IMPORTANT: Your blender jar and cutting blades are subject
to wear during normal use. Always inspect jar for nicks, chips
or cracks. Always inspect cutting blades for broken, cracked
or loose blades. If jar or cutting blades are damaged, do
not use. Contact an authorized service facility to obtain
replacement parts.
1. Make sure blender is unplugged. Place blender base on
clean, dry surface to keep foreign particles from being
pulled up into motor during operation.
2. Place blades in retaining ring. Fit gasket over blades. The
gasket must lie flat. Set jar on top of gasket and screw on
jar collar.
3. Make sure the jar collar is firmly screwed onto the jar.
If not, it may loosen later when motor is turned on.
4. Set jar into place on blender base, making sure it is
securely seated. If not, gently rock the jar until seated.
5. Put ingredients in jar, place lid on jar.
6. Plug cord into outlet.
7. Process food or beverages. Place hand on lid when
blending liquids. Rotate dial on control panel to start
blender. For 10 or more speeds, rotate dial to desired
speed then slide switch to LO or HI. For models with
fewer speeds, select LO or HI, then rotate dial to
desired speed.
8. ALWAYS turn blender off and wait until blades have
stopped rotating before removing jar.
9. To remove jar after blending is complete, lift the jar
straight up. If it is not easily removed, rock gently and lift.
Do not twist.
10. NEVER replace jar onto unit while motor is running.
How to Clean the Blender
1. Unplug blender from electrical outlet.
2. Wipe blender base, control panel, and cord with a damp
cloth or sponge. To remove stubborn spots, use a mild,
non-abrasive cleanser.
3. To clean jar, unscrew jar collar and remove cutting unit
assembly from jar.
4. Carefully remove blades and gasket from bottom of
jar collar.
5. Carefully wash blades, jar collar, gasket, jar (if plastic),
and lid in hot, soapy water. Rinse and dry thoroughly. Do
not soak. Do not wash blades, jar collar, gasket, plastic
jar, lid, filler-cap or cutting and salting board in a
dishwasher.
6. Reassemble cutting unit assembly onto jar, replace jar
onto blender base.
7. Store blender with lid ajar to prevent container odor.
Recipes
Frozen Margarita
4 ounces (125 ml) lime
6 ounces (175 ml) tequila
2 ounces (60 ml) Triple Sec
Approximately 2 cups (500 ml) crushed ice
Rub rim of glass with lime juice then dip in salt, set aside.
In the assembled blender jar, add lime juice, tequila, Triple
Sec and ice. Blend on highest speed until all ingredients are
incorporated. Increase or decrease amount of ice to reach
desired consistency. To add ice reduce speed, removing filler
cap, and gradually add ice to mixture. Pour the margarita into
previously prepared glasses and serve. Serves 4.
840120300 ENv02.qxd 12/16/03 2:36 PM Page 6

9
8
Frozen Strawberry Daiquiri
16-ounce (450 g) package. frozen strawberries, thawed slightly
1 teaspoon (5 ml) lime juice
1
⁄4 cup (35 g) powered sugar
6 ounces (175 ml) light rum
4 ounces (125 ml) Triple Sec
Approximately 2 cups (500 ml) crushed ice
In the assembled blender jar, add strawberries, lime, powered
sugar, rum. Triple Sec and ice. Blend on highest speed until all
ingredients are incorporated. Increase or decrease amount of
ice to reach desired consistency. To add ice, reduce speed,
remove filler cap, and gradually add ice to mixture. Serves 4.
Piña Colada
8 ounces (250 ml) pineapple juice
6 ounces (175 ml) cream of coconut
2 ounces (60 ml) heavy cream
6 ounces. (175 ml) light rum
Approximately 2 cups (500 ml) crushed ice
In the blender jar, add pineapple juice, cream of coconut,
cream, rum, and ice. Blend on highest speed until all ingredients are incorporated. Increase or decrease amount of ice to
reach desired consistency. To add ice, reduce speed, removing filler cap, and gradually add ice to mixture. Serves 4.
Orange Dream (non-alcoholic)
1 cup (250 ml) milk
1 cup (250 ml) ice water
6-ounce (175 ml) can frozen orange juice concentrate
12 ice cubes
1
⁄4 teaspoon (1.25 ml) vanilla extract
1
⁄8 cup (58 ml) white sugar
In a blender jar combine milk, water, orange juice concentrate,
ice cubes, vanilla, and sugar. Blend until smooth. Serves 4.
Easy Frozen Margarita
4 ounces (125 ml) Limeade (frozen concentrate)
4 ounces (125 ml) tequila
1 ounces (30 ml) Triple Sec
Approximately 2 cups (500 ml) crushed ice
Rub rim of glass with lime juice then dip in salt, set aside. In
the assembled blender jar, add lime aid, tequila, Triple Sec
and ice. Blend on highest speed until all ingredients are incorporated. Increase or decrease amount of ice to reach desired
consistency. To add ice reduce speed, removing filler cap,
and gradually add ice to mixture. Pour the margarita into previously prepared glasses and serve. Serves 4.
Blue Frozen Margarita
2 ounces (60 ml) tequila
8 ounces (250 ml) Blue Curacao
2 ounces (60 ml) Triple Sec
2 ounces (60 ml) lime juice
Approximately 2 cups (500 ml) crushed Ice
Rub rim of glass with lime juice then dip in salt, set aside. In
the assembled blender jar, add tequila, blue curacao triple sec,
lime juice and ice. Blend on highest speed until all ingredients
are incorporated. Increase or decrease amount of ice to reach
desired consistency. To add ice reduce speed, removing filler
cap, and gradually add ice to mixture. Pour the margarita into
previously prepared glasses and serve. Serves 4.
Frozen Grasshopper
3 ounces (80 ml) Creme de Menthe
3 ounces (80 ml) Creme de Cacao
4 cups (1 L) vanilla ice cream
In the assembled blender jar, mix all ingredients together until
drink has a milkshake consistency. Serve with straw. Serves 4
840120300 ENv02.qxd 12/16/03 2:36 PM Page 8

11
10
Customer Service
If you have a question about your blender, call our toll-free
customer service number. Before calling, please note the
model, type, and series numbers and fill in that information
below. These numbers can be found on the bottom of your
blender. This information will help us answer your question
much more quickly.
MODEL:_____________ TYPE:_____________ SERIES: ______________
Easy Salsa
2 28-ounce (794 g) cans whole tomatoes, undrained
1
⁄2 onion
1
⁄2 teaspoon (2.5 ml) minced garlic
1 tablespoon (15 ml) lime juice
1 teaspoon (5 ml) salt
1
⁄2 teaspoon (2.5 ml) cumin
4-ounce can (115g) canned green chiles, undrained
2 tablespoons (30ml) fresh cilantro, chopped
Hot sauce to taste, optional
Place the tomatoes, onion, garlic, lime juice, salt, cumin,
green chiles, cilantro and hot sauce in assembled blender jar.
Blend on low speed to desired consistency.
The following warranty applies only to product purchased
in the United States and Canada.
LIMITED WARRANTY
This product is warranted to be free from defects in material and workmanship for a
period of two (2) years for Hamilton Beach Portfolio products, one (1) year for Hamilton
Beach products or one hundred eighty (180) days for Proctor-Silex products from the
date of original purchase, except as noted below. During this period, we will repair or
replace this product, at our option, at no cost. THE FOREGOING WARRANTY IS IN
LIEU OF ANY OTHER WARRANTY, WHETHER EXPRESS OR IMPLIED, WRITTEN OR
ORAL INCLUDING ANY WARRANTY OF MERCHANTABILITY OR FITNESS FOR A
PARTICULAR PURPOSE. ANY LIABILITY IS EXPRESSLY LIMITED TO AN AMOUNT
EQUAL TO THE PURCHASE PRICE PAID, AND ALL CLAIMS FOR SPECIAL,
INCIDENTAL AND CONSEQUENTIAL DAMAGES ARE HEREBY EXCLUDED. There is
no warranty with respect to the following, which may be supplied with this product:
glass parts, glass containers, cutter/strainer, blades, and/or agitators. This warranty
extends only to the original consumer purchaser and does not cover a defect resulting
from abuse, misuse, neglect, use for commercial purposes, or any use not in
conformity with the printed directions. This warranty gives you specific legal rights,
and you may also have other legal rights which vary from state to state, or province to
province. Some states or provinces do not allow limitations on implied warranties or
special, incidental or consequential damages, so the foregoing limitations may not
apply to you.
If you have a claim under this warranty, DO NOT RETURN THE APPLIANCE TO THE
STORE! Please call our CUSTOMER SERVICE NUMBER. (For faster service please
have model, series, and type numbers ready for operator to assist you.)
CUSTOMER SERVICE NUMBERS
In the U.S. 1-800-851-8900
In Canada 1-800-267-2826
hamiltonbeach.com or proctorsilex.com
KEEP THESE NUMBERS FOR FUTURE REFERENCE!
840120300 ENv02.qxd 12/16/03 2:36 PM Page 10

13
13. Ne pas utiliser de lames cassées, fissurées ou desserrées.
14. Pour réduire le risque de blessure, ne jamais mettre les lames
de coupe sur le socle sans mettre le récipient correctement
en place.
15. Toujours faire fonctionner le mélangeur avec le couvercle en
place.
16. Lors du mélange de liquides chauds, retirer la partie centrale
du couvercle en deux parties. Ne pas dépasser le repère de 3
tasses lorsqu’on remplit le mélangeur. Toujours commencer la
préparation au réglage de vitesse le plus faible. Garder les mains
et toute autre partie du corps exposée éloignées de l’ouverture
sur le couvercle afin d’éviter toute brûlure.
17. Bien visser la bague de retenue du récipient. Une exposition
accidentelle des lames en mouvement peut entraîner des
blessures.
18. Si le récipient tourne lorsque le moteur est mis en marche ( I ),
l’éteindre immédiatement ( O ) et serrer le récipient sur la bague
de retenue.
19. Ne pas laisser l’appareil sans surveillance lorsqu’il fonctionne.
20. Pour débrancher le cordon, régler la commande à OFF ( O ), puis
retirer la fiche de la prise de courant.
21. Ne pas utiliser l’appareil autrement qu’aux fins auxquelles il
a été prévu.
CONSERVEZ CES INSTRUCTIONS
12
INSTRUCTIONS IMPORTANTES
Lorsqu’on utilise un appareil électrique, il faut toujours respecter
certaines règles de sécurité fondamentales, notamment les suivantes :
1. Lire toutes les instructions. Conserver ces instructions pour
consultation ultérieure.
2.
Afin d’éviter le risque de choc électrique, ne pas mettre le cordon, la
fiche, le socle ou le moteur dans ou près de l’eau ou d’autres liquides.
3. Une surveillance étroite est nécessaire lorsque tout appareil est
utilisé par ou à proximité d’un enfant.
4. Débrancher le cordon de la prise de courant lorsqu’on n’utilise
pas l’appareil, avant d’installer ou de retirer des pièces et avant
de le nettoyer.
5. Éviter tout contact avec les pièces mobiles.
6. Ne pas utiliser un appareil dont la fiche ou le cordon est
abîmé, qui présente un problème de fonctionnement ou qui
a été échappé ou endommagé d’une manière quelconque.
Contacter un établissement de service autorisé pour obtenir
des informations sur un examen, une réparation ou un réglage
mécanique ou électrique.
7. L’utilisation d’accessoires, y compris les récipients de mise
en conserve, non recommandés ou vendus par Hamilton
Beach/Proctor-Silex, Inc. peut entraîner un risque de
blessure personnelle.
8. Ne pas utiliser à l’extérieur.
9. Ne pas laisser le cordon pendre d’une table ou d’un comptoir,
ou entrer en contact avec une surface chaude, y compris une
cuisinière.
10. Ne pas mettre la main ou un ustensile dans le récipient lorsque
l’appareil fonctionne pour réduire le risque de blessure corporelle
grave et/ou d’endommagement du mélangeur. On peut utiliser
une spatule en caoutchouc, mais uniquement
lorsque le
mélangeur n’est pas en marche.
11. Les lames sont coupantes. Manipuler avec précaution.
12. Ne pas utiliser de récipient cassé, écaillé ou fissuré.
840120300 FRv02.qxd 12/16/03 2:36 PM Page 12
 Loading...