

Page 1
COLD & HOT
Cell Wall
Breaking
Blender
冷热一体
破壁机
如有疑问?
请致电我们,我们的团队
随时准备为您提供帮助。
中国大陆客服热线:
400-852-2655
官方网站:www.hamiltonbeach.cn
此说明书中图片仅供参考,
产品以实物为准。
使用产品前请仔细阅读本
使用说明书,并妥善保管。
English .................2
简体中文..............15
Page 2
IMPORTANT SAFEGUARDS
When using electrical appliances, basic safety precautions should always be followed to
reduce the risk of fire, electric shock, and/or injury to persons, including the following:
1. Read all instructions.
2. This appliance is not intended for use
by persons with reduced physical,
sensory, or mental capabilities, or lack of
experience and knowledge, unless they
are closely supervised and instructed
concerning use of the appliance by a
person responsible for their safety.
3. This appliance shall not be used by
children. Keep the appliance and its cord
out of reach of children.
4. Close supervision is necessary when any
appliance is used near children. Children
should be supervised to ensure that they
do not play with the appliance.
5. To protect against risk of electrical shock,
do not put cord, plug, base, or motor in
water or other liquid.
6. Turn the appliance OFF (
from the outlet when not in use, before
assembling or disassembling parts, and
before cleaning. To unplug, grasp the
plug and pull from the outlet. Never pull
from the power cord.
7. Avoid contact with moving parts.
8. Do not operate any appliance with a
damaged supply cord or plug, or after
the appliance malfunctions or has been
dropped or damaged in any manner.
If the supply cord is damaged, it must
be replaced by the manufacturer, its
service agent or similarly qualified
persons in order to avoid a hazard. Call
the provided customer service number
for information on examination, repair, or
adjustment
9. The use of attachments, including
canning jars, not recommended or sold
by the appliance manufacturer may
cause a risk of injury to persons.
10. Do not use outdoors.
11. Do not let cord hang over edge of
table or counter or touch hot surfaces,
including stove.
12. Do not place on or near a hot gas or
electric burner, or in a heated oven.
); then unplug
13. Keep hands and utensils, other than the
tamper provided, out of container while
blending to reduce the risk of severe
injury to persons or damage to the
blender. The cover must remain in place
when using the tamper through the
cover opening. A scraper may be used
but must be used only when the blender
is not running.
14. Blades are sharp; handle carefully—
especially when emptying or cleaning
the blender jar.
15. Do not use a broken, chipped, or
cracked blender jar.
16. Do not use broken, cracked, or loose
cutting blade assembly.
17. Always operate blender with Lid in place.
Remove emulsion cup only for adding
ingredients or to insert the tamper.
18. When blending hot liquids, remove
emulsion cup and close any edge
cover opening intended for pouring. To
prevent possible burns: Do not exceed
1000-ml level. Hot liquids may push off
Lid during blending; therefore, with the
protection of an oven mitt or thick towel,
place one hand on top of the Lid, keep
exposed skin away from the Lid, and
start blending at lowest speed.
19. Ensure cutter assembly is tight and
secure to jar. Injury can result if moving
blades accidentally become exposed.
20. Do not leave blender unattended while it
is operating.
21. Check that the appliance is OFF (
before plugging cord into wall outlet. To
disconnect cord, switch to OFF (
remove plug from wall outlet. To unplug,
grasp the plug and pull from the outlet.
Never pull from the power cord.
22. Do not use appliance for other than
intended purpose.
)
). Then
2
Page 3

23. CAUTION: In order to avoid a hazard due
to inadvertent resetting of the thermal
cut-out, this appliance must not be
supplied through an external switching
device, such as a timer, or connected to
a circuit that is regularly switched on and
off by the utility.
24. Be careful if hot liquid is poured into the
blender container as it can be ejected
out of the appliance due to a sudden
steaming.
25. In manual mode do not exceed normal
SAVE THESE INSTRUCTIONS
Other Consumer Safety Information
This product is intended for household use only.
The length of the cord used on this
appliance was selected to reduce the
hazards of becoming tangled in or tripping
over a longer cord. If a longer cord is
necessary, an approved extension cord
may be used. The electrical rating of
the extension cord must be equal to or
greater than the rating of the appliance.
The extension cord must be a groundingtype, 3-wire cord. Care must be taken to
arrange the extension cord so that it will
not drape over the countertop or tabletop
where it can be pulled on by children or
accidentally tripped over.
If the cutting blade assembly locks and will
not move, it will damage the motor. Do
not use. Call customer service number for
information.
Do not place blender jar in the freezer
filled with food or liquid. This can result
in damage to the cutting blade assembly,
jar, blender, and possibly result in personal
injury.
When using a new blender, the motor will
sometimes give off a burning smell. This
is not a sign of a problem. However, if
you are concerned about the motor smell
or have a question, please call us via our
customer service number at 400-852-2655.
operating cycle of 2 minutes on and 1
minute OFF. In smoothie mode, allow
appliance to cool for 2 minutes between
each cycle. In hot soup mode, allow
appliance to cool for 10 minutes between
each cycle.
NOTE:
1. This machine is equipped with motor overload protection. If the motor stops during
operation due to overheating, unplug and allow it to cool down for approximately 15
minutes. Plug machine back in to resume normal operation.
2. This machine can not refrigerate the food. If you want to make the cold food, please
add the ice cubes into the ingredient and make the food per instructions in this book.
3
Page 4
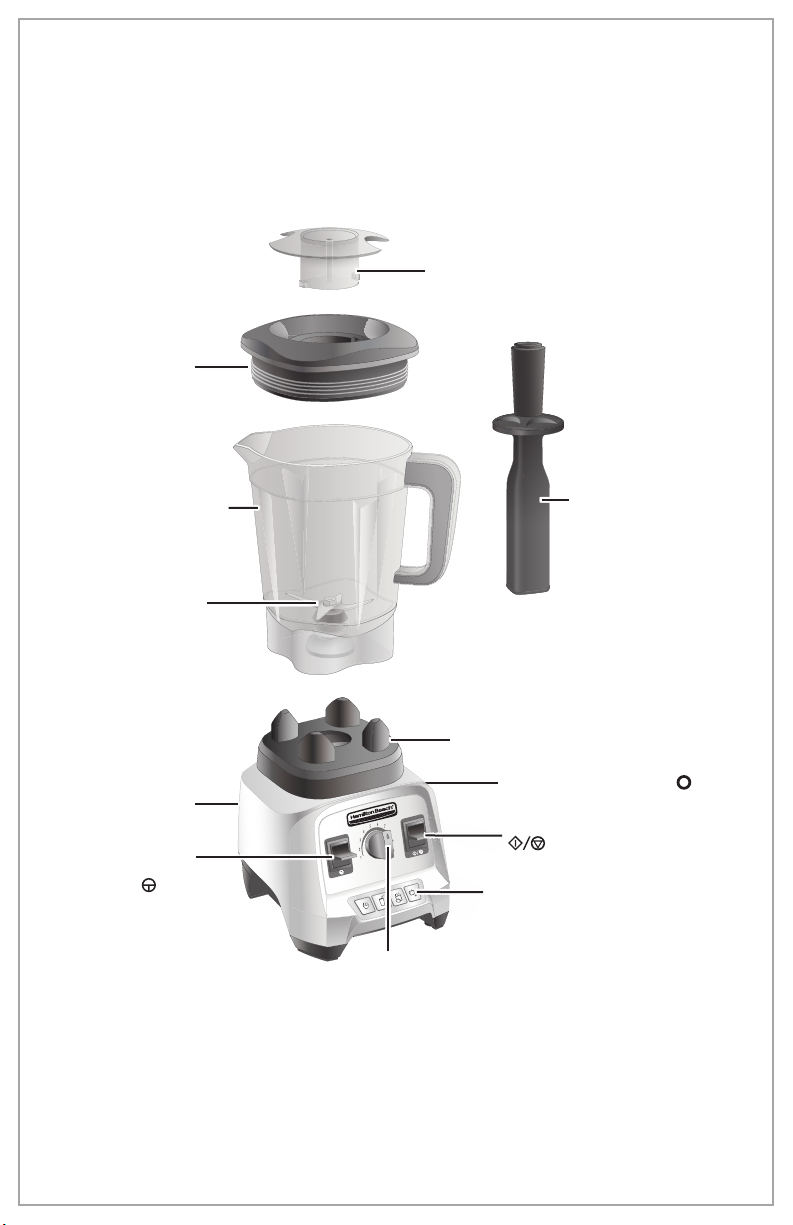
Parts and Features
Before first use: After unpacking the Blender, follow the instructions in “Cleaning Your
Blender.”
Emulsion Cup
Lid
Blender
Jar
Cutting
Blade
Assembly
Base
PULSE
) Switch
(
Variable
Speed Dial
Tamper
Jar Pad
RESET/OFF (Power) (I/ ) Switch
START/STOP
(
) Button
Program
Buttons
4
Page 5
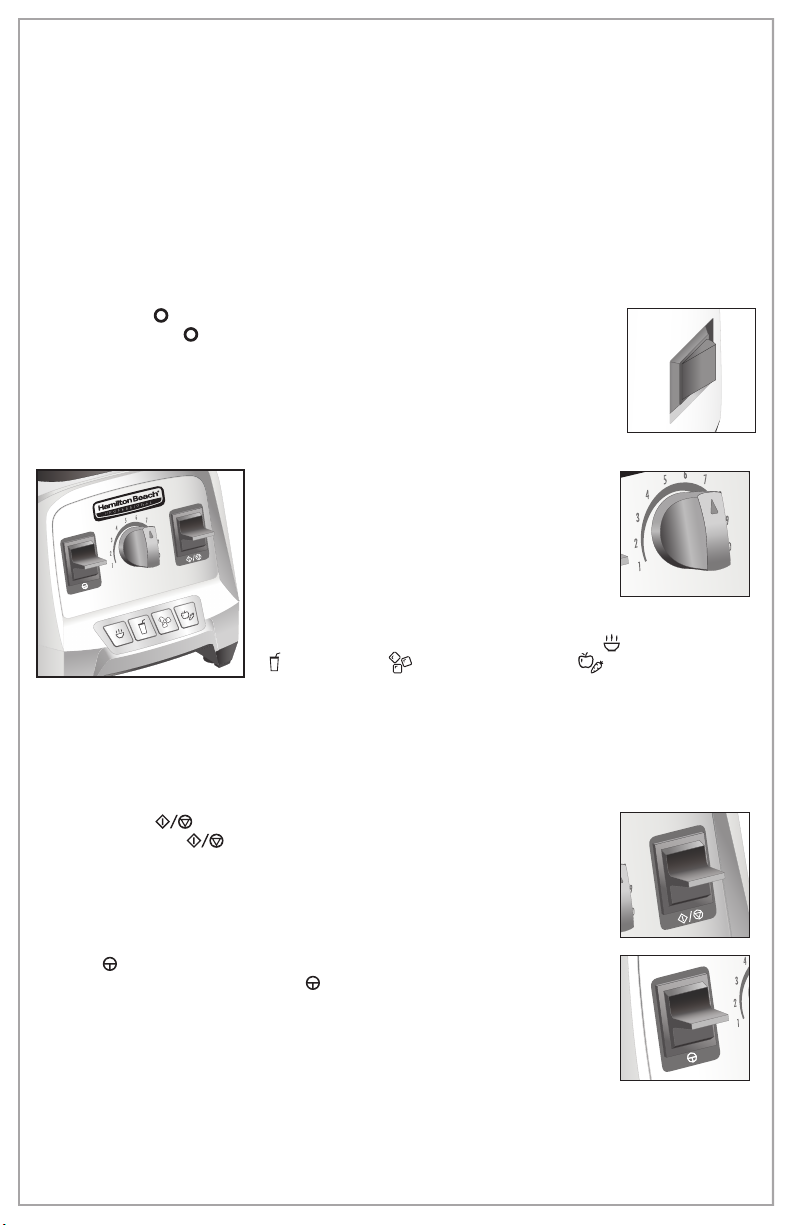
Control Panel
Emulsion Cup: The Emulsion Cup helps create dressings and sauces that require slowly
adding liquid ingredients into the Blender Jar while the Blender is in operation.
Lid: The Lid is easy to put on, take off, and clean. Always use the Lid and the Emulsion
Cup when the machine is in operation.
Blender Jar: Volume measures are clearly marked.
Tamper: The Tamper helps mix thick or frozen recipes that cannot be processed with
regular blending. It prevents air pockets from forming and is a handy tool when making
nut butters or frozen desserts.
RESET/OFF (I/ ) (Power) Switch/Circuit Breaker:
The RESET/OFF (I/
the Blender Base. This switch controls power to the Blender. This switch
is also a circuit breaker that, if tripped, must be turned off and back on to
reset.
) (Power) Switch is located on the right-hand side of
Control Panel
Variable Speed Dial:
The Variable Speed Dial can be adjusted to
the desired speed when blending in Manual
mode. The Speed Indicator Light(s) will
illuminate to show the selected speed.
Program Buttons:
There are four program settings: HOT SOUP ( ), SMOOTHIE
(
),ICE CRUSH ( ), and WHOLE JUICE ( ). Select the desired
program by pressing the button for that program. The Speed
Indicator Light(s) will illuminate to show the programmed speeds.
START/STOP ( ) Button:
The START/STOP (
mode or to stop a program before the cycle ends.
) Button is used to begin or end the MANUAL
PULSE (
Press and hold down the PULSE (
shown on the VARIABLE SPEED DIAL in MANUAL mode.
Automatic Overload Protection: This machine is equipped with motor overload
protection. If the motor stops during operation due to overheating, unplug and allow
it to cool down for approximately 15 minutes. Plug machine back in to resume normal
operation.
) Button:
) Button to blend at the speed setting
5
Page 6
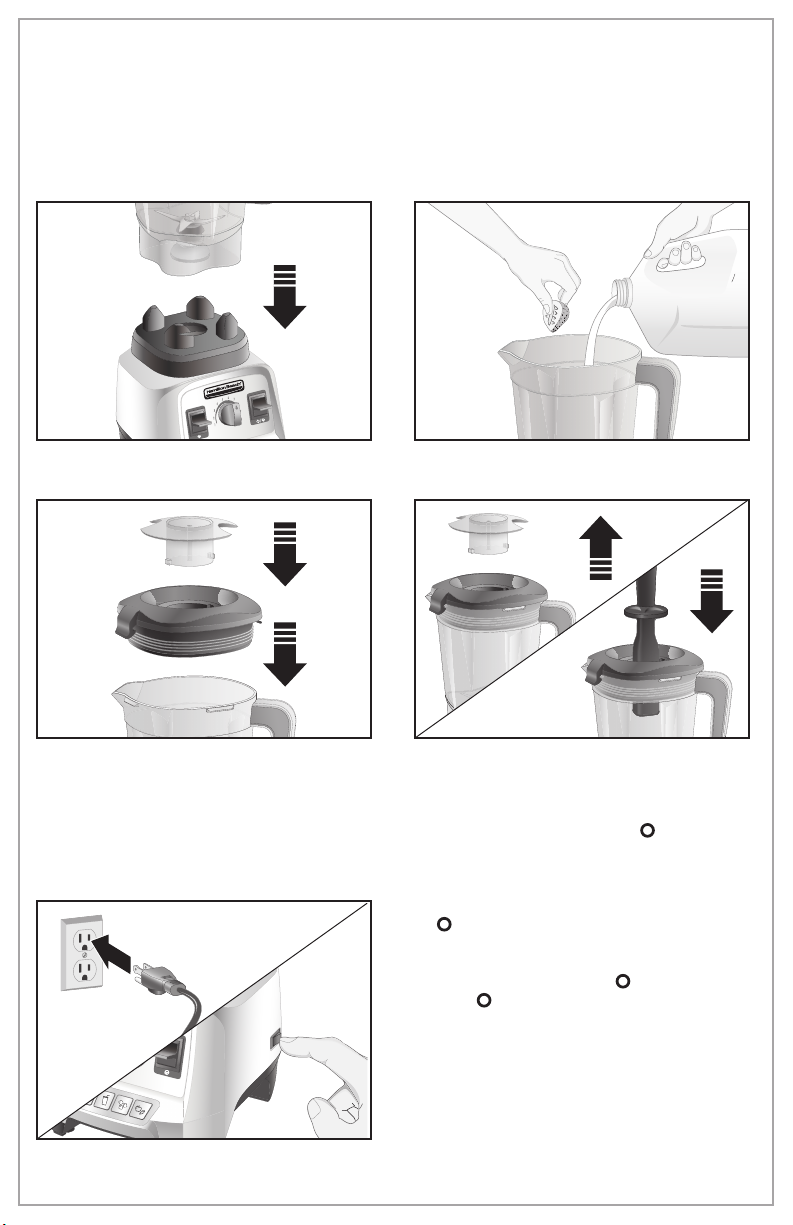
Using Your Blender
Before first use: After unpacking the Blender, follow the instructions in “Care and Cleaning.”
IMPORTANT:
use. Always inspect Jar for nicks, chips, or cracks. Always inspect Cutting Blade Assembly for
broken, cracked, or loose blades. If Jar or Cutting Blade Assembly is damaged, do not use.
1. Place Blender Jar on base. 2. Add ingredients.
The Blender Jar and Cutting Blade Assembly are subject to wear during normal
3. Place Lid on Jar. Insert the Emulsion
Cup into the Lid and secure by turning
clockwise. Remove cup to use the
Tamper or to add ingredients.
6
4. Remove Emulsion Cup; rotate
counterclockwise from “locked” to
“unlocked” position and lift out. Insert
Tamper into hole in Lid.
NOTE: Turn Blender OFF (
removing Emulsion Cup and when
adding the Tamper.
5. Plug in Blender. Move the RESET/OFF (I/
) Switch to the RESET (I) position to turn
on power to the Blender and ready it for
blending. The front lights will come on.
Move the RESET/OFF (I/
) position anytime the machine is
OFF (
left unattended. If Blender is plugged in
and Switch is in ON (I) position, but panel
lights are not illuminated, the Blender has
entered standby mode. This will happen
after 3 minutes of inactivity. Press any
control panel button to resume normal
operation.
) before
) Switch to the
Page 7
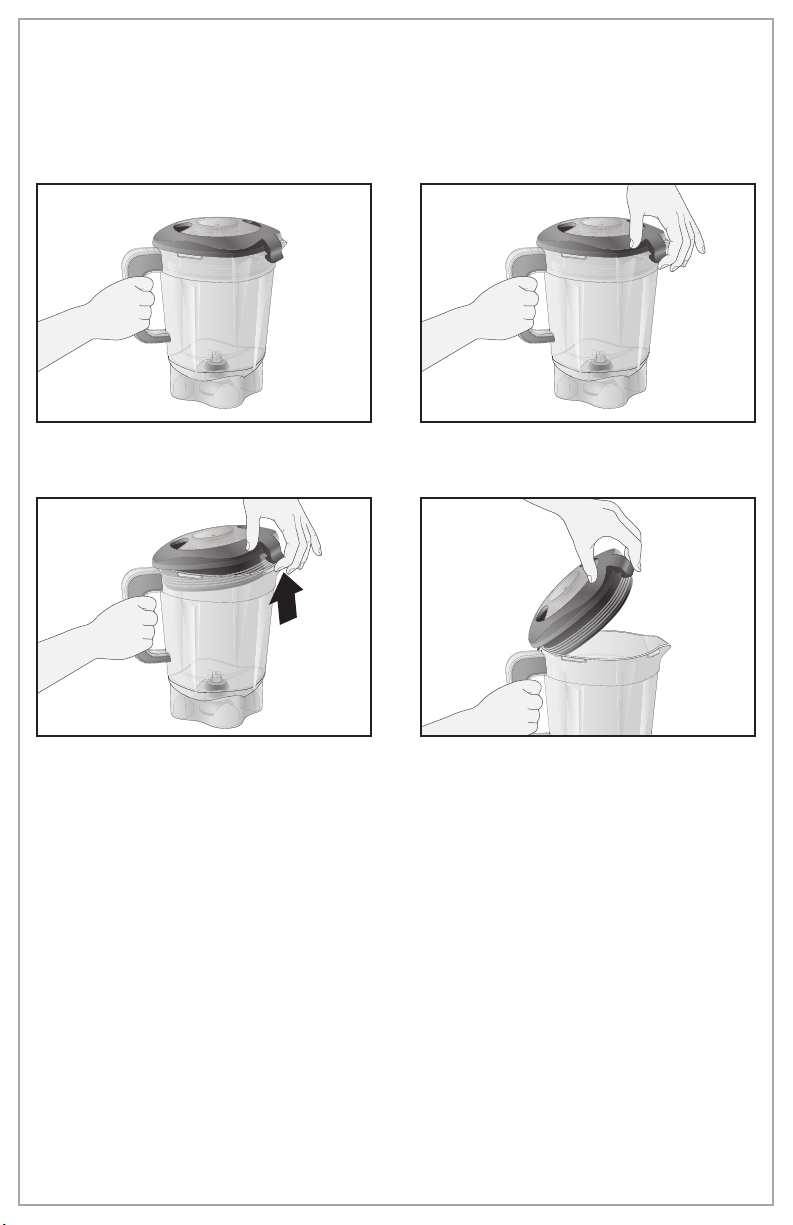
How to Open Blender Lid
IMPORTANT: To remove the Lid, use your finger to pull up on the front tab. Do not twist the
Lid to take it off the Jar — this might harm the Lid material and prevent it from sealing the
Blender Jar.
1. Hold Jar handle firmly. 2. To open Lid, place a finger on the front
3. Apply a small amount of force on Lid
until Lid is separated from the Jar.
tab.
4. Continue to hold the front tab with your
finger and use thumb to support the Lid
until it completely opens.
7
Page 8
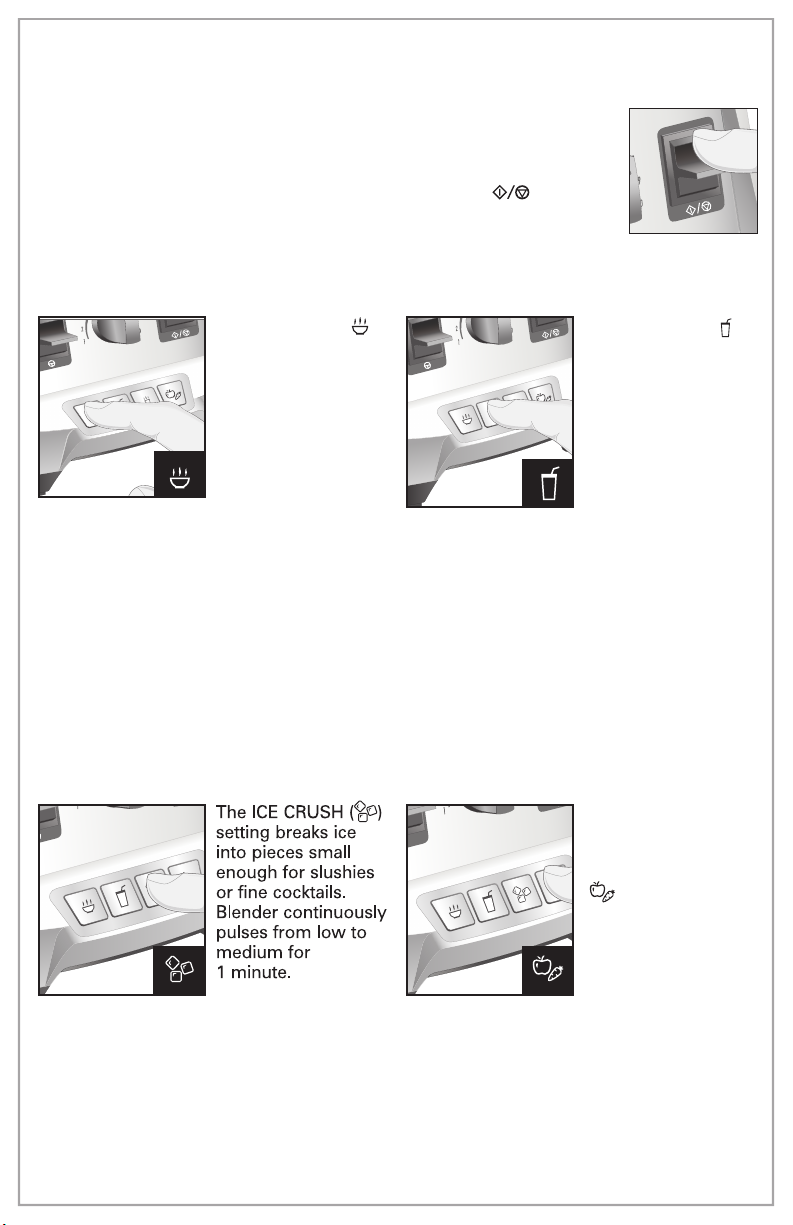
Using Program Settings
Programs are optimized for recipe categories and vary in blending speed
and duration. Pressing a Program Button illuminates only the program
selected. The Blender automatically starts when the Program Button
is pressed and automatically stops at the end of the program. To stop
Blender before program cycle ends, press START/STOP (
the Program Button. This will stop the Blender and return it to MANUAL
mode. Pressing a Program button again will start the Blender from the
beginning of the selected program.
) Button or
The HOT SOUP ( )
program purees
ingredients at
high speeds. As a
result, friction heats
ingredients. Do not
blend more than
1000 ml on this
program. When
making soups, start
with cold or room-temperature ingredients.
The Emulsion Cup can be kept in the Lid.
Blender runs for 6 minutes, 45 seconds.
* After using the HOT SOUP program
once, we recommend that you leave the
Blender to rest for 10 minutes to cool. If
there is no short break after the HOT SOUP
program is used, there is a risk of damage
to the blender jar.
* In addition, if the HOT SOUP Button is
used to make soy milk, it must not exceed
800 ml.
The SOY MILK ( )
program blends
precooked soy beans
and hot water into
smooth milk. Do not
blend more than 800
ml on the program.
Blender runs for 3
minutes.
fine texture when whole grains or seeds
are included in the juice recipe. It is great
for blending more fibrous fruits and
vegetables into a delicious, healthy juice.
The Blender ramps up from low to high,
running for total 55 seconds.
Note: The running time of the four preset buttons might have minor adjustments
without prior notice.
8
The SMOOTHIE ( )
program blends
frozen or fresh
smoothies. Blender
pulses three times
at the beginning to
chop ice or frozen
ingredients and then
ramps up to run on
high speed. Blender
runs for total 45
seconds.
When a recipe calls
for making a fruit or
vegetable juice, run
the WHOLE JUICE
(
) program. The
WHOLE JUICE
program gives a
smooth consistency
to pureed fruit or
vegetables and a
Page 9
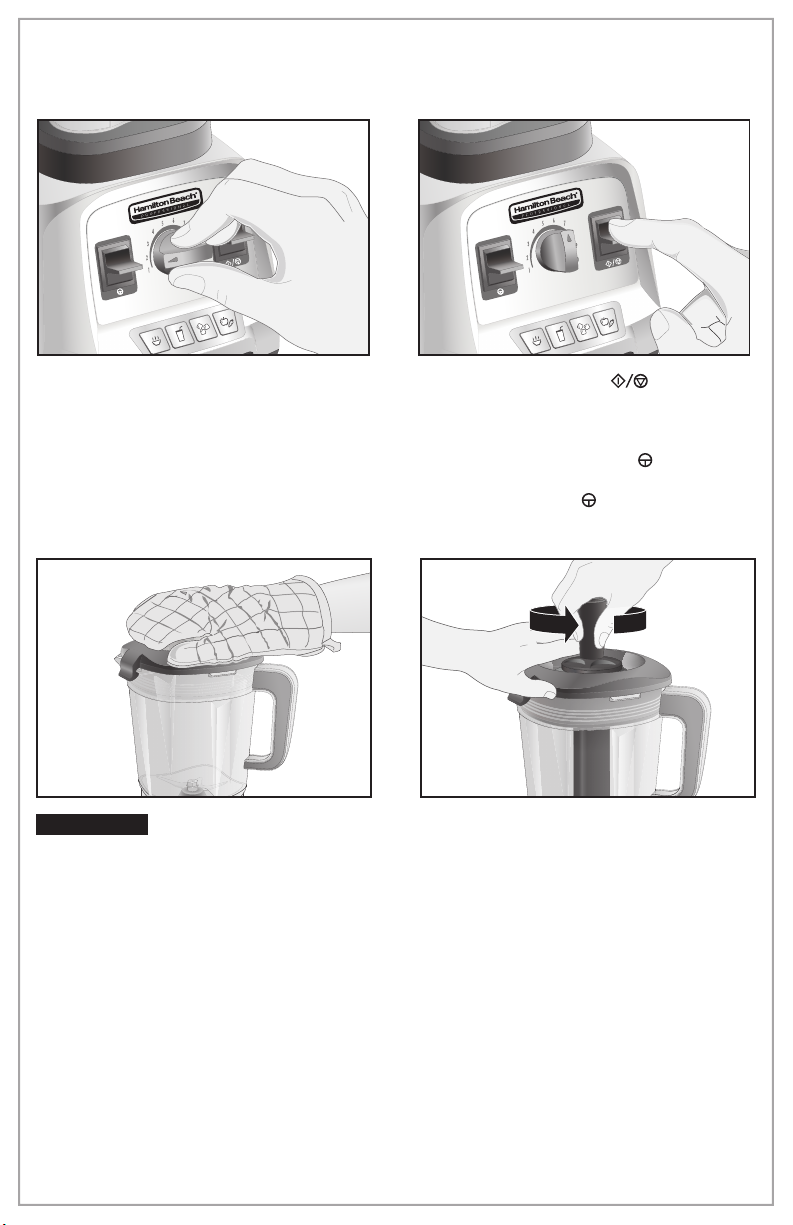
Using Manual Mode
1. Rotate the VARIABLE SPEED DIAL to
leftmost.
w WARNING
Hot Soup Mode or blending hot liquids,
do not fill Blender Jar with liquid beyond
the 1000 ml level. With the protection of
an oven mitt or thick towel, place one
hand on top of Lid. Keep exposed skin
away from Lid. Start blending at lowest
speed.
Burn Hazard. When using
2. Press START/STOP ( ) and slowly
rotate the VARIABLE SPEED DIAL to
the right or left during blending to
increase or decrease blending speed.
When pressing PULSE (
Blender will run at selected speed
until the PULSE (
3. Place one hand on top of Lid to move
thick mixtures around in Blender Jar.
), the
) Button is released.
9
Page 10
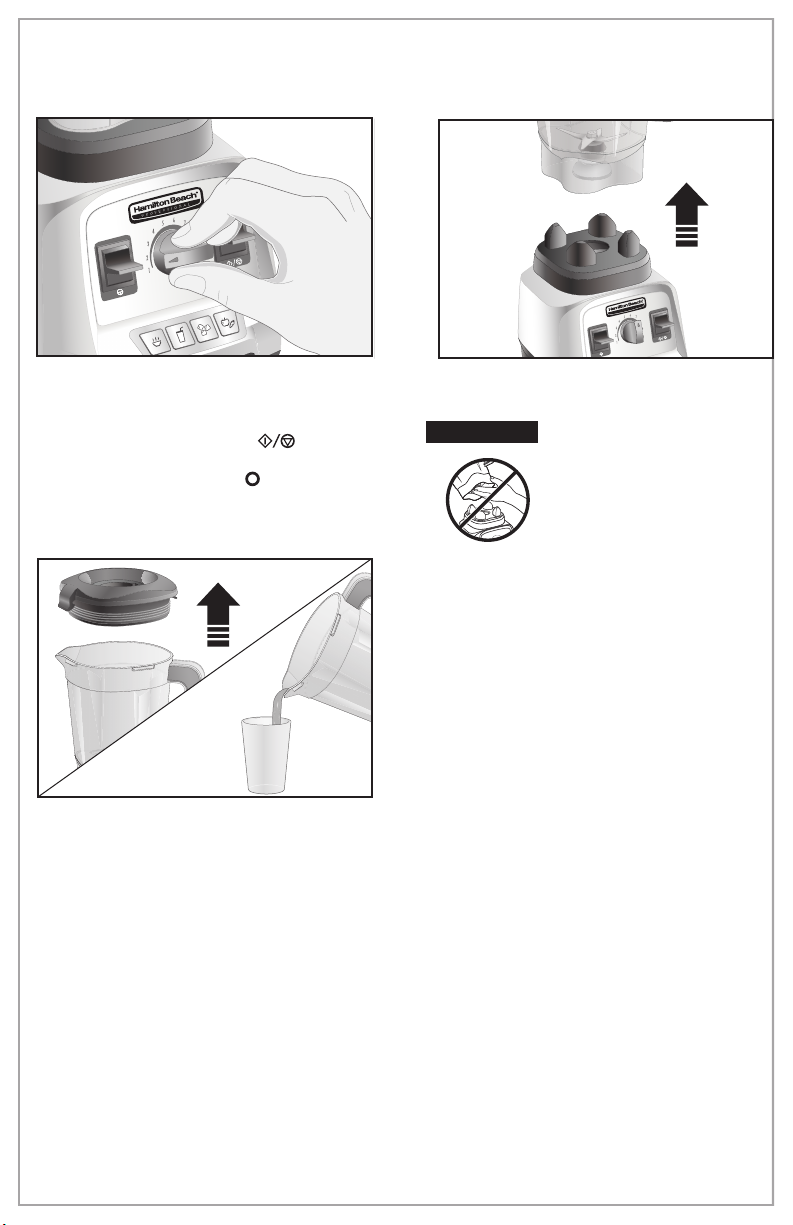
Using Manual Mode (cont.)
4. At the end of the blending cycle,
rotate the VARIABLE SPEED DIAL
back to the leftmost position and
press the START/STOP (
to stop blending. Turn off the Blender
with the RESET/OFF (I/
the right side of the Base. Unplug
Blender after blending.
6. Remove Lid while holding blending
Jar securely. Serve.
) Button
) Switch on
5. Remove Blender Jar.
w WARNING
7. If the Blender runs in empty state,
the recommended times is controlled
for 1 minute, and then leave for 4
minutes to cool, as one cycle. If there
is no short break after running in
empty state, there is a risk of damage
to the blender jar.
After blending nuts or ice cubes, the
surface on inner wall of the blender jar
will have normal wear marks; such wear
depends on the hardness of the food and
the time of blending. After long periods
of use, the surface on inner wall of the
blender jar will have normal wear marks
as well. These are all normal.
Burn Hazard.
Metal parts under
blending Jar get hot
after extended use.
10
Page 11

Blender and Accessory Tips
Blender Tips
• To add foods when Blender is operating,
remove Emulsion Cup and add
ingredients through the opening.
• For best performance, the minimum
amount of liquid needed per recipe is
one cup (8 ounces [237 ml]). Add more
liquid if food is not blending properly.
The amount of liquid needed will vary
based on the other ingredients required
for blending.
• If blending action stops during blending
or ingredients stick to sides of Jar,
remove Emulsion Cup and insert Tamper
to help move the mixture around or add
more liquid to Blender Jar.
• Do not store food or liquids in Blender
Jar.
• Avoid bumping or dropping Blender
when in operation or at any time.
• Use Tamper when making nut butters
and blend in 1-minute intervals.
Using the Tamper
• Cutting large whole fruits and
vegetables may allow them to blend
more quickly.
• Do not fill Blender Jar past highest
graduation marking.
• Always place liquid in Blender Jar first,
then remaining ingredients.
• If ice or frozen fruit pieces are not
blending, stop the Blender and pulse a
few times.
• Do not allow ice to stand or freeze
in Jar. Immediately crush ice after
placing in Jar.
NOTE: This machine is equipped
with motor overload protection. If the
motor stops during operation due to
overheating, unplug and allow it to cool
down for approximately 15 minutes.
Plug machine back in to resume normal
operation. (See “Troubleshooting” on
page 13.)
• The hand protector on the Tamper and
the Lid work together to prevent the
Tamper from hitting the blades when the
Lid is secured properly on the Blender Jar.
• The Blender Jar should not be more than
two-thirds full when the Tamper is used
during blending.
• Only use the Tamper provided with this
model Blender. Do not use Tampers made
for any other Blender or Blender model.
• If food does not circulate, an air bubble
may be trapped in the mixture. Remove
the Blender Jar from the Blender base.
Remove the Emulsion Cup. Release
the air bubble by inserting the Tamper
through the Emulsion Cup opening.
• Holding the Tamper straight down may
not help ingredients circulate. If necessary,
point the Tamper toward the sides or
corners of the Blender Jar. DO NOT try to
force the Tamper deeper into the Jar.
11
Page 12
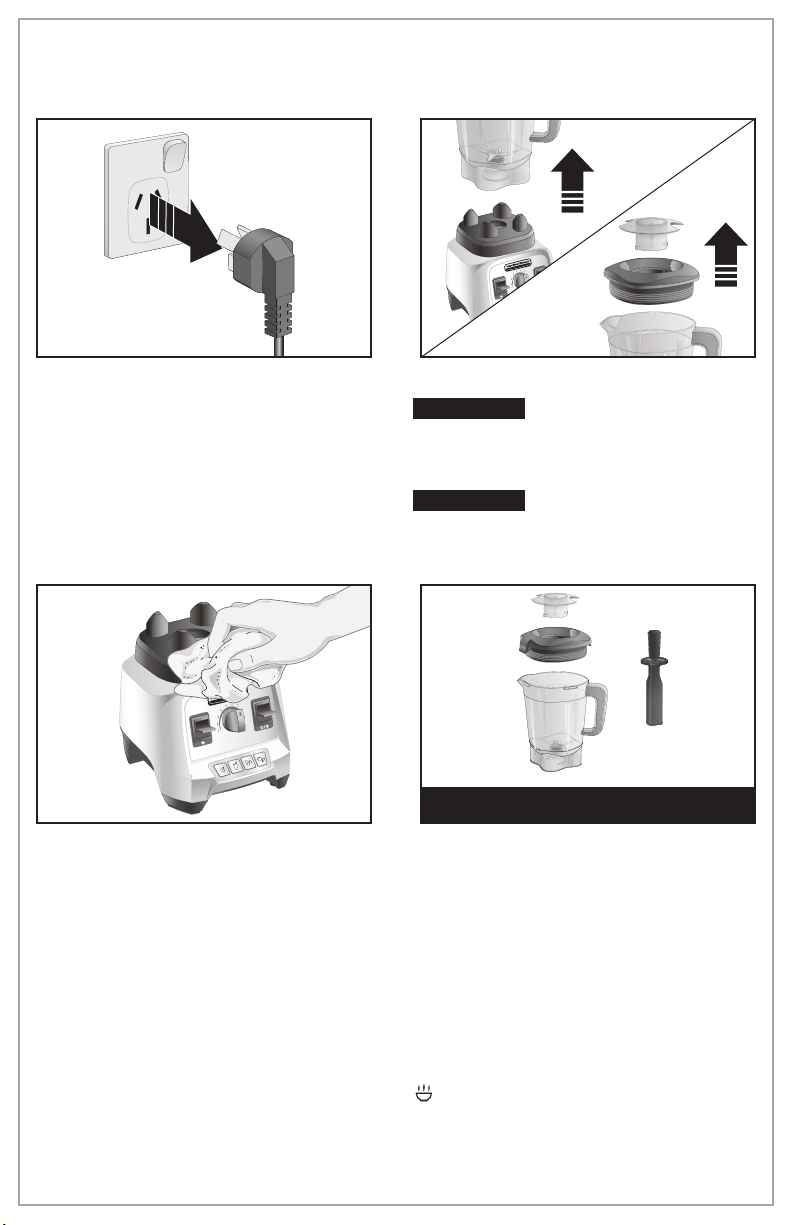
Care and Cleaning
1. Unplug Blender. 2. Remove Jar, Lid, and Emulsion Cup.
Electrical Shock Hazard.
w WARNING
Disconnect power before cleaning. Do
not immerse cord, plug, base, or motor in
water or other liquid.
w WARNING
Metal parts under blending Jar get hot after
extended use.
Burn Hazard.
DISHWASHER-SAFE
3. Wipe Blender base, control panel, and
cord with a damp cloth or sponge. To
remove stubborn spots, use a mild,
nonabrasive cleanser.
NOTES:
• HAND-WASH BLENDER JAR. Alternative is to fill Jar halfway with water and add 2–3
drops of dish soap. Blend for 30 seconds. Rinse and dry thoroughly.
• To clean after blending oily foods, sprinkle 1/4 cup (59 ml) baking soda in Blender. Add
1 cup (237 ml) white vinegar. Mixture will bubble. When bubbling subsides, add 2 cups
(473 ml) water and blend on the HOT SOUP (
with dish soap and water. Rinse and dry thoroughly.
• The lid seal can be removed for cleaning. Install it back in reverse order to removal
after cleaning
12
DO NOT use the “SANI” setting when
washing in the dishwasher. “SANI”
cycle temperatures could damage your
product. Parts may also be washed
with hot, soapy water. Rinse and dry
thoroughly. Do not soak.
) cycle. Wash any remaining residue
Page 13
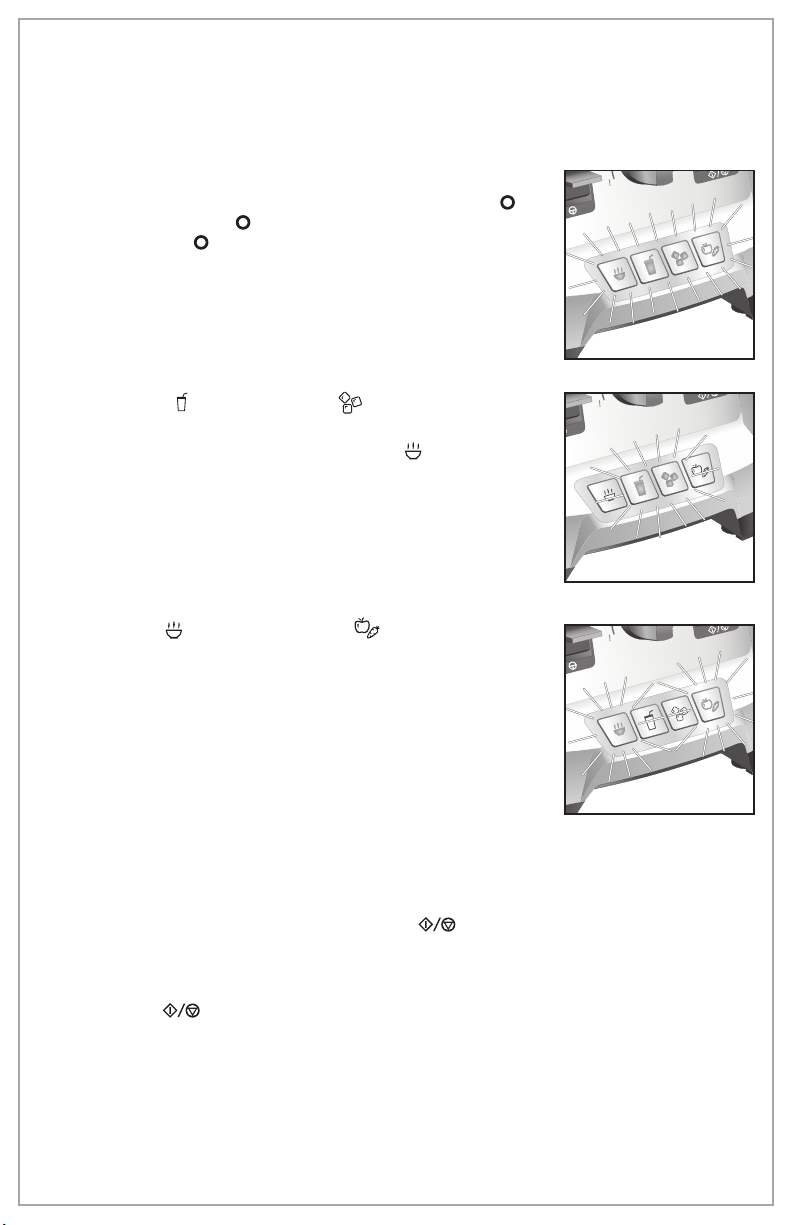
Troubleshooting
flashing.
flashing.
flashing.
)
Error Messages
All Program Buttons are flashing.
• The motor has overheated during use. Turn RESET/OFF (I/ )
(Power) Switch to OFF (
Flip RESET/OFF (I/
normal operation.
The SMOOTHIE ( ) and ICE CRUSH ( ) Buttons are flashing.
• The motor cannot work. Remove the Blender Jar and Lid.
Stir contents. Replace Lid. Press HOT SOUP (
problem persists, turn unit off, unplug from electrical outlet,
and contact the customer service center.
) and allow to cool for 15 minutes.
) (Power) Switch to RESET (I), and resume
) Button. If the
The HOT SOUP (
flashing.
• The Blender speed has ramped up to high too quickly and
run on high speed. Turn the unit off, unplug from the electrical
outlet, and call the customer service center.
Blender is plugged in and switch is in ON (I) position, but panel lights are not
illuminated.
• Blender enters standby mode after 3 minutes of inactivity to conserve power. Press
any control panel button or switch to resume normal operation.
Blender stops while running and START/STOP (
• Mixture in Blender is too heavy of a load on the motor. This Blender is programmed
to stop running to protect itself from electrical damage. Remove some of the
ingredients from the Blender Jar. Turn VARIABLE SPEED DIAL to 1 and press the
START/STOP (
as necessary. If this issue happens again, remove more of the Blender mixture and
start the process again.
NOTE: Buttons start flashing after a problem has occurred until the problem
is addressed or the unit is turned off.
) and WHOLE JUICE ( ) Buttons are
) Button flashes.
) switch to continue to process in MANUAL mode. Increase speed
13
Page 14

Troubleshooting (cont.)
Blender fails to start and Program Lights are not illuminated.
• Make sure that the main power
• Check to see if unit is securely plugged into an electrical outlet of the proper voltage and
frequency.
• Check to see if the fuse for the electrical outlet has blown or if a circuit breaker has
tripped.
Blender stops while it is running and the Program Lights are illuminated.
• This Blender is equipped with motor overload protection. If the motor stops during
operation due to overheating, unplug and allow the Blender to cool down. Plug Blender
back in after 15 minutes.
• Resume normal operation.
Ingredients will not mix properly.
• Check to see if enough liquid has been added to the ingredients. Mixture should be fluid
and free-running at all times.
• Solid pieces are too large.
• Container is too full. Do not fill past highest 1800 ml graduation marking.
• Cutting Blades are not sharp or are damaged. Inspect container and Cutting Assembly
daily.
• Select speed to create a fluid blend.
Blender smells like it is burning.
• Due to high-speed operation, the temperature of the motor increases, and the grease
and insulation material in the motor will emit odors when heated. At this point, turn off
the Blender and let it cool down.
• Although motors are tested during the manufacturing process, heavy use may cause
curing of motor windings. The smell may quickly dissipate after a few heavy uses.
• If smell continues after additional heavy uses, call our customer service center.
There is grease around the bottom of the Blender Jar or on the counter top.
• Monitor the problem and source. This may indicate an issue with the Jar bearings.
• Call our customer service center if the condition persists.
Blender Jar is cloudy or stained.
• Some cloudiness may be natural after use. The minerals from fruits, produce, and leafy
greens, in addition to the oils of various nut butters, can sometimes cause a film on the
Blender Jar or may be difficult to clean.
• Sprinkle 1/4 cup (59 ml) baking soda in Blender. Add 1 cup (237 ml) white vinegar.
Mixture will bubble. When bubbling subsides, add 2 cups (473 ml) water and blend on
the HOT SOUP (
and dry thoroughly.
Blender fails to start.
• Jar is not in place.
Storage of the blender jar
• Carefully place the blender jar to avoid damage caused by falling.
) cycle. Wash any remaining residue with dish soap and water. Rinse
RESET/OFF (I/ ) Switch
is in the RESET (I) position.
14
Page 15
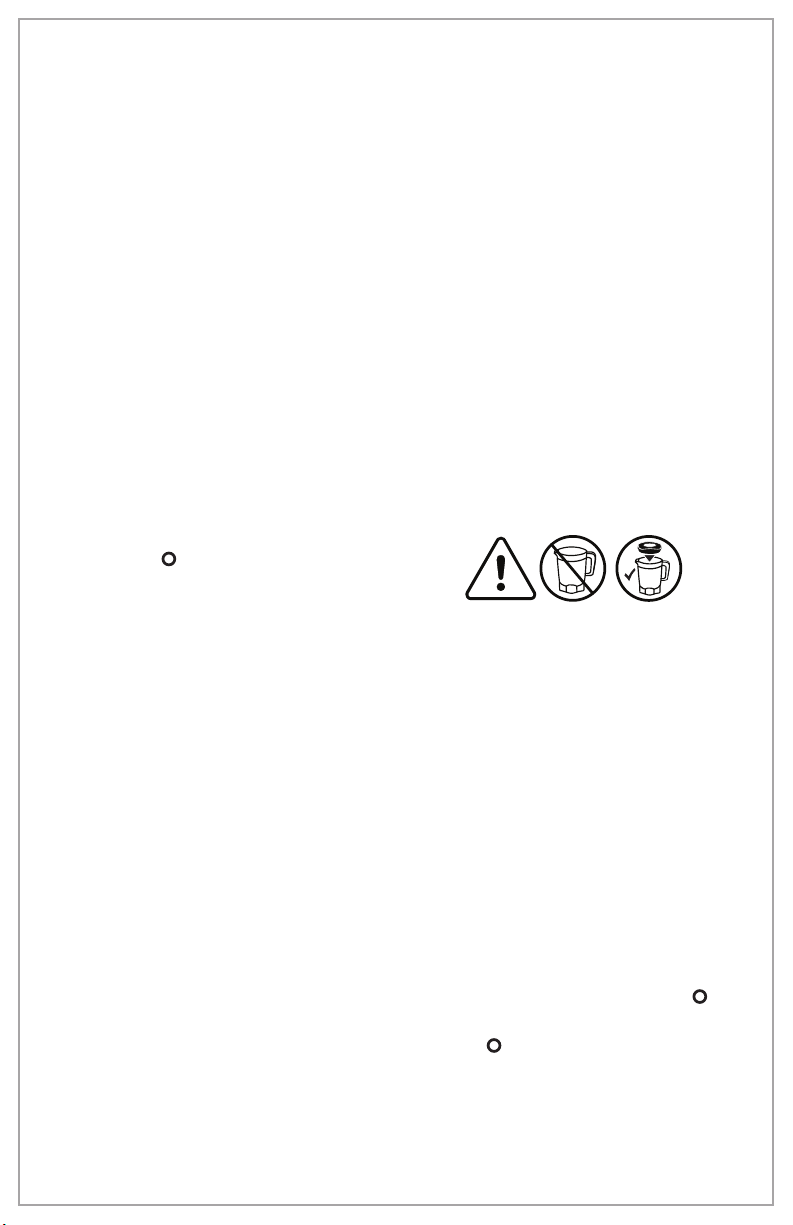
重要安全说明
当使用电器时,应始终遵守基本的安全防范措施,以减少火灾、触电和/或人身
伤害的风险,包括以下内容:
1. 阅读所有相关说明。
2. 本电器不适合以下人群使用:行动
不便者、精神或智商缺陷者、缺少
经验和常识者,除非他们在监护人
的密切监督和指导下使用,以确保
安全。
3. 本电器不得由儿童使用。本电器及
其电源线应远离儿童。
4. 当电器在儿童附近使用时,应予以
密切监护。请勿将本电器用于儿童
玩耍。
5. 为防止触电危险,请勿将电源线、
插头、底座或电机放入水或其他液
体中。
6. 当本电器未使用时、安装或拆解部
件和清洁该电器前,将本电器开关
转至关闭( )位置,并从插座拔下
电源线。应抓住插头端从插座中拔
下。禁止直接拉扯电源线。
7. 避免接触正在运动的部件。
8. 在下列情况下,请勿使用电器:电
源线或插头破损、电器出现故障、
电器跌落或已经出现任何形式的损
坏。如果电源软线损坏,为了避免
危险, 必须由制造商、其维修部或
类似部门的的专业人员更换。请拨
打我们的客服电话,咨询有关电器
检查、修理或调整的相关信息。
9. 使用非由本电器制造商建议或出售
的包括搅拌杯在内的附件,可能导
致人身伤害。
10. 请勿户外使用。
11. 请勿将电源线悬挂在桌子或柜台边
缘,或接触包括炉子在内的热表
面。
12. 请勿将电器放置在高温气体或电炉
之上或附近,或放置在加热的烤箱
内。
13. 搅拌时,除了随带的搅拌棒,双手
及用具请勿伸入到搅拌杯中,以降
低人员严重受伤或搅拌器损坏的风
险。当通过盖孔插入搅拌棒使用
时,杯盖必须盖好。 可使用刮铲,
但仅限于在破壁机未运行时使用。
14. 刀片很锋利;排空搅拌杯和清洗
时,务必要小心处理。
15. 请勿使用破损、有裂口或裂痕的搅
拌杯。
16. 请勿使用有裂口、裂痕或松动的切
割刀片组件。
17. 务必在搅拌杯盖好杯盖以后才操作
破壁机。仅作添加食材或插入搅拌
棒时才可以打开加料口盖。
18. 搅拌热液体时,打开加料口盖,同
时盖好杯盖和倾倒口盖。为了防止
可能的烫伤:请勿超过 1000 毫升
的液位。搅拌过程中热液体可能会
将杯盖推出;因此,应戴上烤箱手
套或用厚毛巾进行保护,用戴手套
的手压住杯盖的顶部,保持裸露的
皮肤远离杯盖,然后以最低速度开
始搅拌。
19. 确保搅拌杯底座的刀片组件和搅拌
杯卡紧。如果转动刀片意外暴露,
则可能导致受伤。
20. 请勿让破壁机在无人看管的情况下
运行。
21. 把电源线插入到电源插座前,请检
本电器的开关是否处于关闭 ( ) 位
置。拔掉电源线前,将开关转到关
闭( )位置。然后从电源插座拔掉
电源线插头。应抓住插头端从插座
中拔下。禁止直接拉扯电源线。
15
Page 16

22. 请勿将该电器用于非预期用途。
23. 小心:为了避免由于热熔断器意外
重置导致的危险,本电器禁止通过
外接开关设备(例如:定时器)进
行供电,或禁止连接到由供电部门
定期开启或关闭的电路。
24. 当心,如果热液体倒入到破壁机搅
拌杯中,由于突然的蒸汽可能会导
致液体从破壁机中喷出。
25. 在手动模式下,请勿超出正常工作
周期(即开启运行 2 分钟,关闭停
止 1 分钟)。在果昔模式下,每周
期将让机器冷却 2 分钟。在热汤模
式下,每周期间隔时间为 10 分钟,
让机器冷却。
请妥善保管说明书!
其他用户安全信息
本产品适用于家庭正常使用, 不可用于其他用途。
本电器电源线的长度经过设计挑选,以
减少长电源线缠绕或绊倒的危险。倘若
需要更长的电源线,可使用经认证的电
源延长线。电源延长线的额定功率必须
等于或大于本电器的额定功率。电源延
长线必须为接地型的 3 线电源线。电
源延长线使用时需特别注意,以防将其
搭设在工作台或桌台上,造成儿童扯拉
或绊倒他人。
如果切割刀片组件锁住而不能移动,可
能会损坏电机。请勿使用。要了解有关
信息,请拨打售后服务电话。
请勿将装有食物或液体的搅拌杯放入冰
箱中。这可能导致切割刀片组件、搅拌
杯、破壁机损坏及可能的人身伤害。
新机器在初始几次使用时,或者在搅拌
粘稠,高负载的食物时,马达可能会
有轻微焦味,这个属于正常现象,可以
放心使用。如果焦糊味很重,请停止
使用,并联系客户服务热线 400-852-
2655.
注意:
1. 本机配有电机过热保护。在操作期间如果电机因过热而停止,请拔掉电源插头
并让机器冷却 15 分钟。然后再插上机器的电源插头以恢复正常操作。
2. 本机不能制冷食物。如需制作冰爽食物,请在食物原料中加冰并按本说明书指
引操作
16
Page 17
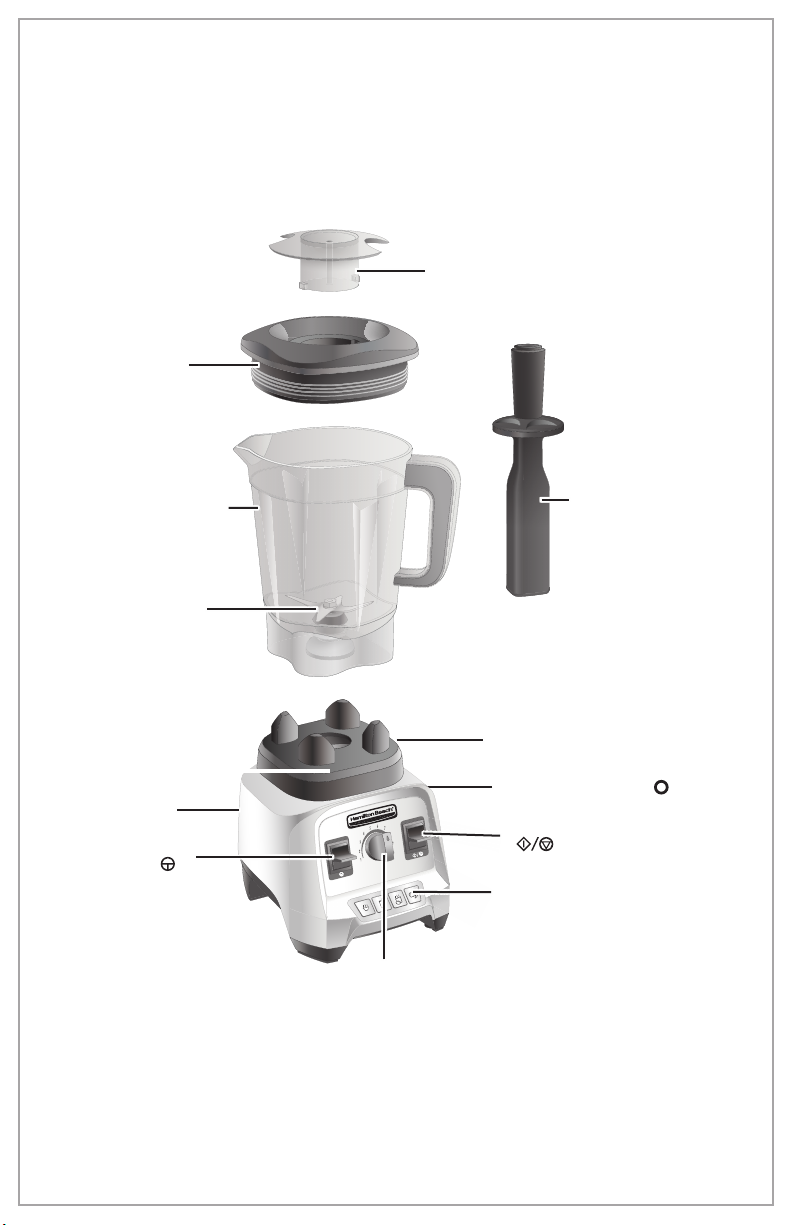
部件和功能
首次使用前:拆开破壁机的包装后,请遵循“清洁您的破壁机”中的说明。
加料口盖
杯盖
搅拌杯
切割刀片
组件
底座
脉冲(
开关
搅拌棒
搅拌杯垫
重置/关闭(电源)(I/ ) 开关
启动/停止
(
)
变速旋钮
)开关
程序按钮
17
Page 18
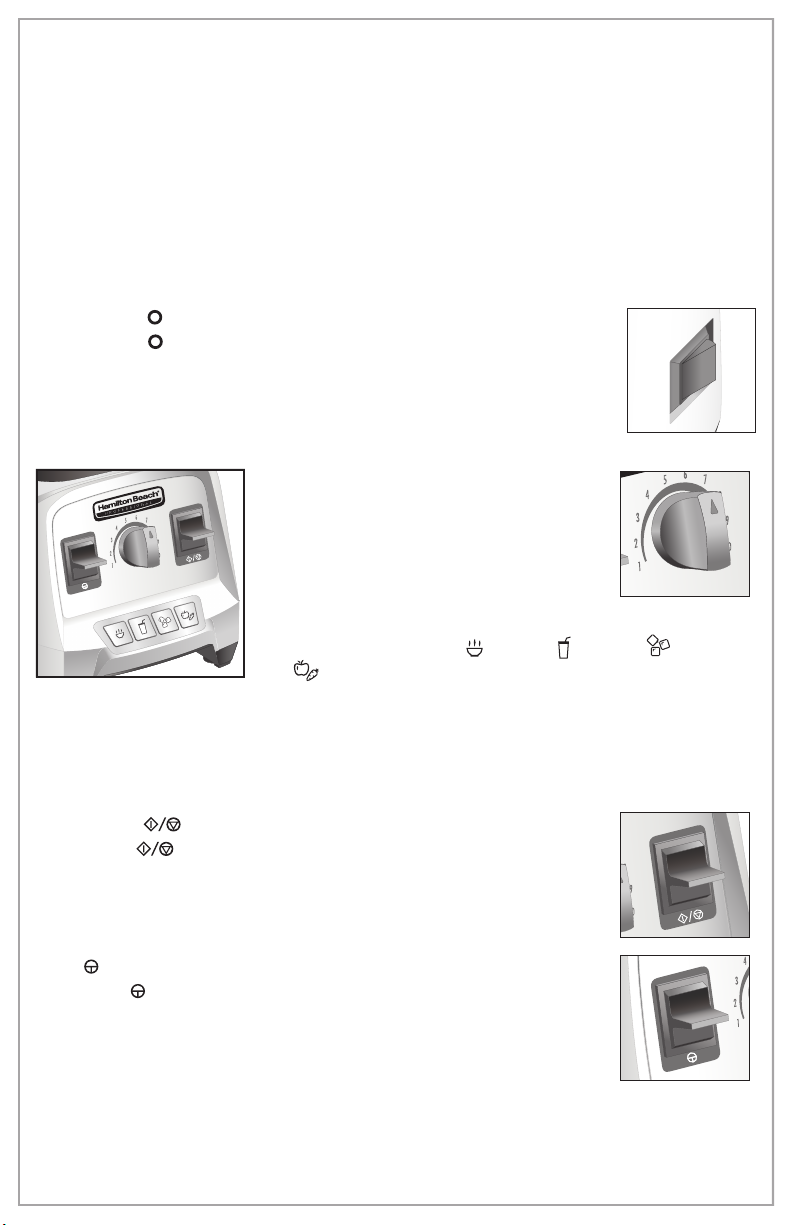
加料口盖:在破壁机运行时,使用加料口盖慢慢地将液体成分加入到搅拌杯中,
Control Panel
从而协助制作调料和酱汁。
杯盖:杯盖的设计便于盖上、拿下及清理。机器运行时,务必盖好杯盖和加料口盖。
搅拌杯:容量刻度清晰标记。
搅拌棒:搅拌棒有助于混合不适用普通搅拌功能搅拌的浓稠或冷冻材料的食物。
它可防止气泡形成,是制作果仁酱或冷冻甜点的好帮手。
重置/关闭 (I/ ) (电源) 开关/断路器:
重置/关闭 (I/ ) (电源)开关位于破壁机底座的右侧。此开关控制破
壁机的电源。此开关也用作断路器使用,如果跳闸将关闭机器,
复位后重置。
控制面板
变速旋钮:
当以手动模式搅拌时,可调节变速旋钮
到所需的速度。速度指示灯将亮起以显
示所选的对应速度。
程序按钮:
有四种程序设置:热汤 ( )、果昔 ( )、刨冰 ( )和纯果
汁 ( ).按对应的按钮选择所需的程序。速度指示灯将亮
起以显示所选程序的速度。
启动/停止( )按钮:
启动/停止 ( ) 按钮用于开始或停止手动模式或在某一程序结束
前停止该程序。
脉冲(
按住脉冲 ( ) 按钮,以手动模式按在变速旋钮上所设定的速度进
行搅拌。
)按钮:
自动过载保护:本机配有电机过热保护。在操作期间如果电机因过热而停止,请
拔掉电源插头并让机器冷却 15 分钟。然后再插上机器的电源插头以恢复正常操
作。
18
Page 19
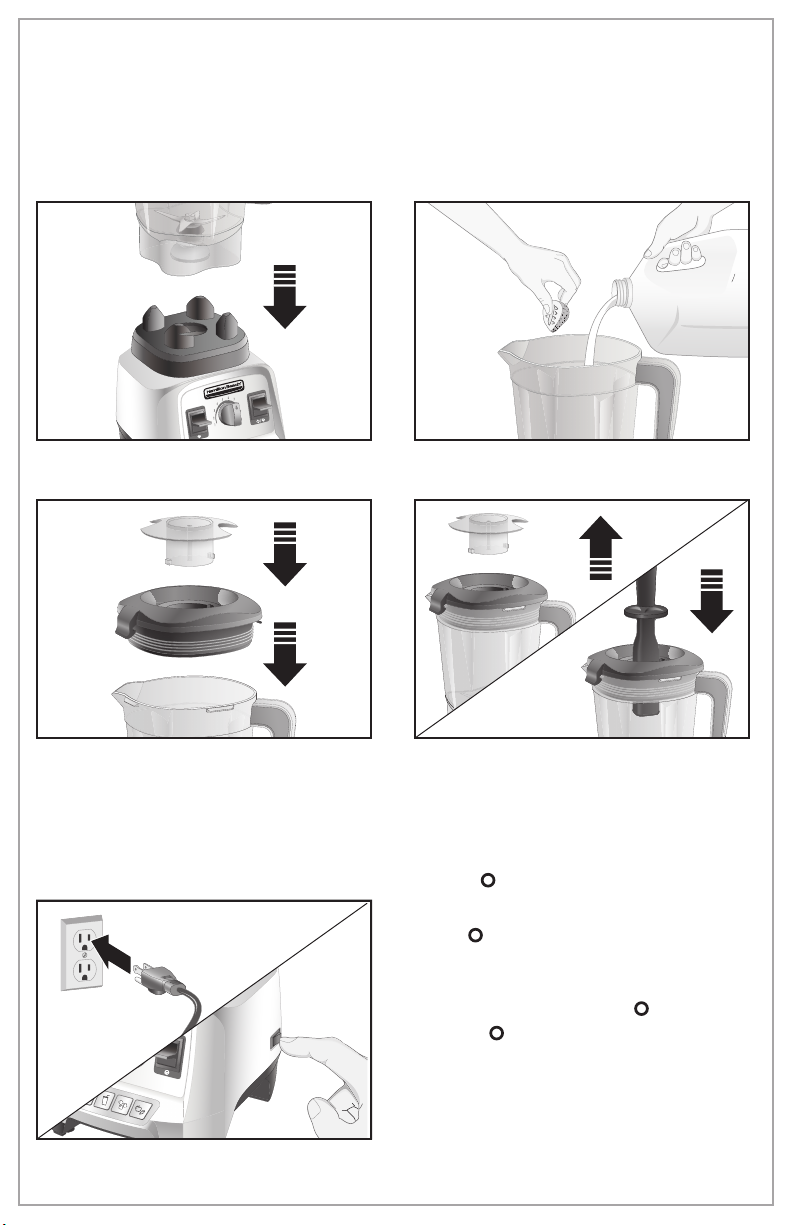
使用您的破壁机
首次使用前:拆开破壁机的包装后,请遵循“保养与清洗破壁机”中的说明。
重要提示:
查搅拌杯是否有裂纹、缺口或裂缝。请务必检查切割刀片组件是否有破损、破裂或
松动。如果搅拌杯或切割刀片组件损坏,请勿使用。
1. 将搅拌杯放置到底座上。 2. 添加食材。
您的搅拌杯和切割刀片组件在正常使用过程中可能会磨损。请务必检
3. 盖上搅拌杯盖。将加料口盖插入到
搅拌杯盖中并顺时针旋转固定。取
下加料口盖,以使用搅拌棒或添加
食材。
4. 将加料口盖从“上锁”位置逆时
针旋转至“解锁”位置并将其提
出。将搅拌棒插入到盖孔中。
注意:取下加料口盖并插入搅拌
棒前,请将破壁机开关调整到关
闭( )位置。
5. 插上破壁机插头。将重置/关闭
(I/ )开关调到重置 (I) 位置开启破
壁机,并准备进行搅拌。正面的指
示灯点亮。在机器处于无人看管状
态时,将重置/关闭(I/ )开关调到
关闭 ( ) 位置。如果破壁机已经插
上电源并且开关位于开启 (I) 位置,
但面板指示灯不点亮,表明破壁机
已进入待机模式。3 分钟内无任何
操作将出现这种情况。按控制面板
上的任意按钮以恢复正常操作。
19
Page 20
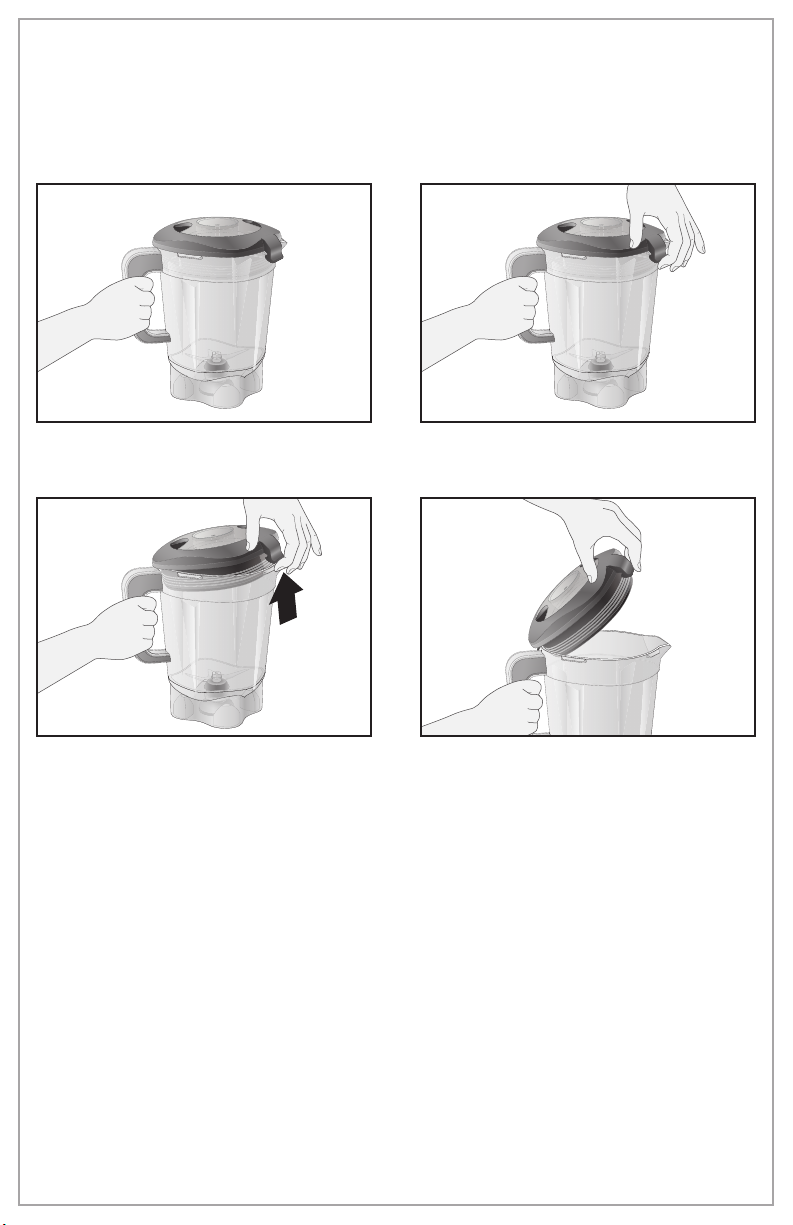
如何打开搅拌杯盖
重要提示:使用手指上拉正面的卡扣以取下杯盖。请勿试图用力将杯盖从搅拌杯
上扭转取下 - 这可能会损坏杯盖材料并导致搅拌杯的密封性降低。
1. 抓牢搅拌杯手柄 2. 打开杯盖时,用手指扣住正面的
卡扣。
3. 用适量的力上掀直到杯盖从搅拌杯
脱离。
20
4. 此时用手指始终抓住卡扣,用拇指
拖住杯盖直到杯盖完全打开。
Page 21
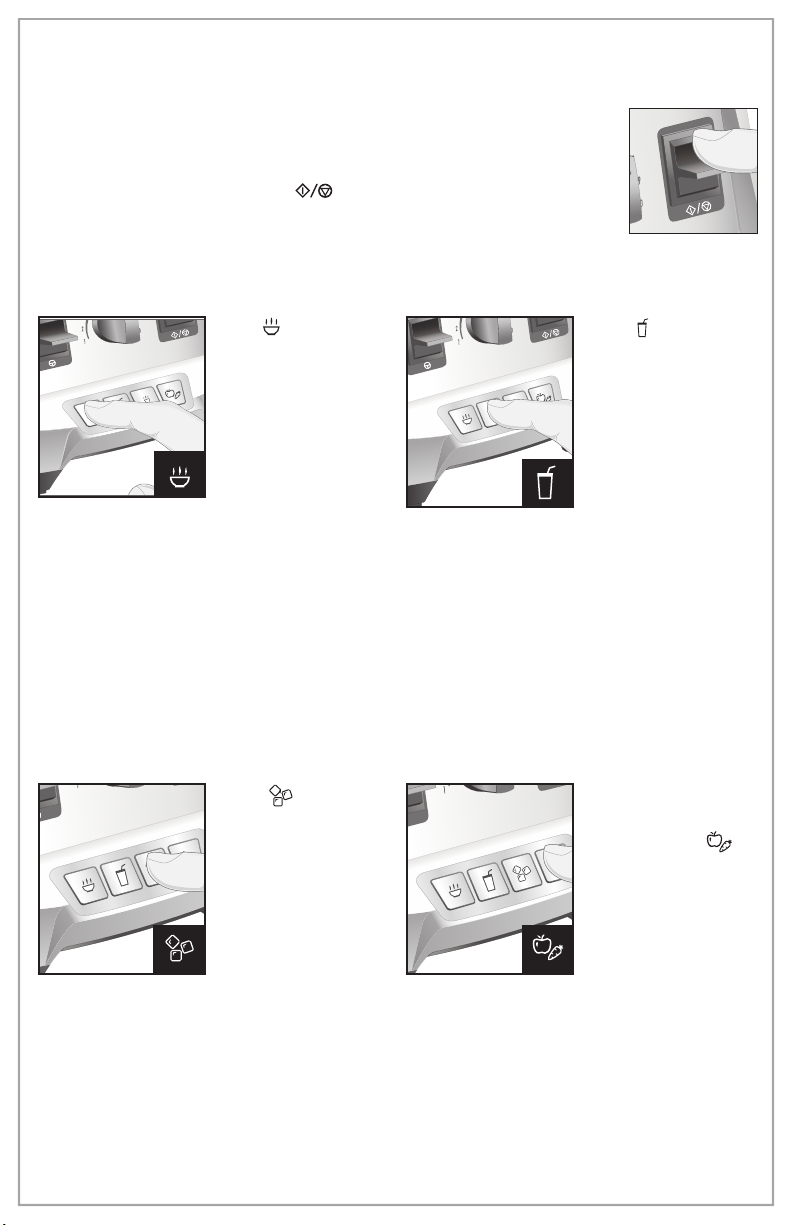
使用程序设置
程序实现了食谱种类优化及多元化的搅拌速度和时长。按下一个
程序按钮仅所选程序指示灯点亮。当按下程序按钮后,破壁机自
动开始工作,程序结束后,破壁机自动停止工作。若在程序结束
前停止破壁机,按启动/停止( ) 按钮或该程序按钮。这将停止
破壁机并返回到手动模式。再按程序按钮,将从所需程序的开头
启动破壁机。
热汤( )
高速将食材打成糊
状的程序。最终摩
擦产生的热量将食
材加热。此程序搅
拌量不得超过 1000
毫升。制作汤时,
请从低温或室温开
始搅拌食材。加料口盖必须保持在杯盖
上。破壁机运行 6 分 45 秒。
*当使用1次热汤程序循环后,我们建议
您将破壁机静置10分钟以转换冷却。若
热汤程序循环后没有进行短暂休止,则
搅拌杯有损坏的风险。
*另外,当用热汤建制作豆浆时,不得
超过800毫升。
刨冰 ( )
设置将冰块粉碎,
用于制作糖浆饮料
或精美鸡尾酒。料
理机从低脉冲执行
至中脉冲,时长为
1分钟。
果昔 ( )
搅拌冰冻或新鲜果
昔的程序。破壁机
首先脉冲运行三
次,将冰或冰冻原
料震碎,然后变换
为高速运行。破壁
机运行总计 45 秒。
如果食谱需要制作
果汁或蔬菜汁,请
运行纯果汁(
程序。纯果汁程序
可实现对水果泥或
蔬菜泥的均匀搅
拌,将全谷物或种
籽加入果汁后,会
令成品看起来十分
精细。多纤维水果及蔬菜因此得以打成
美味健康的果蔬汁。破壁机慢慢从低速
到高速,总共运行 55 秒。
)
注意: 四个预设键的运行时间或许有轻微调整,恕不另行通知。
21
Page 22
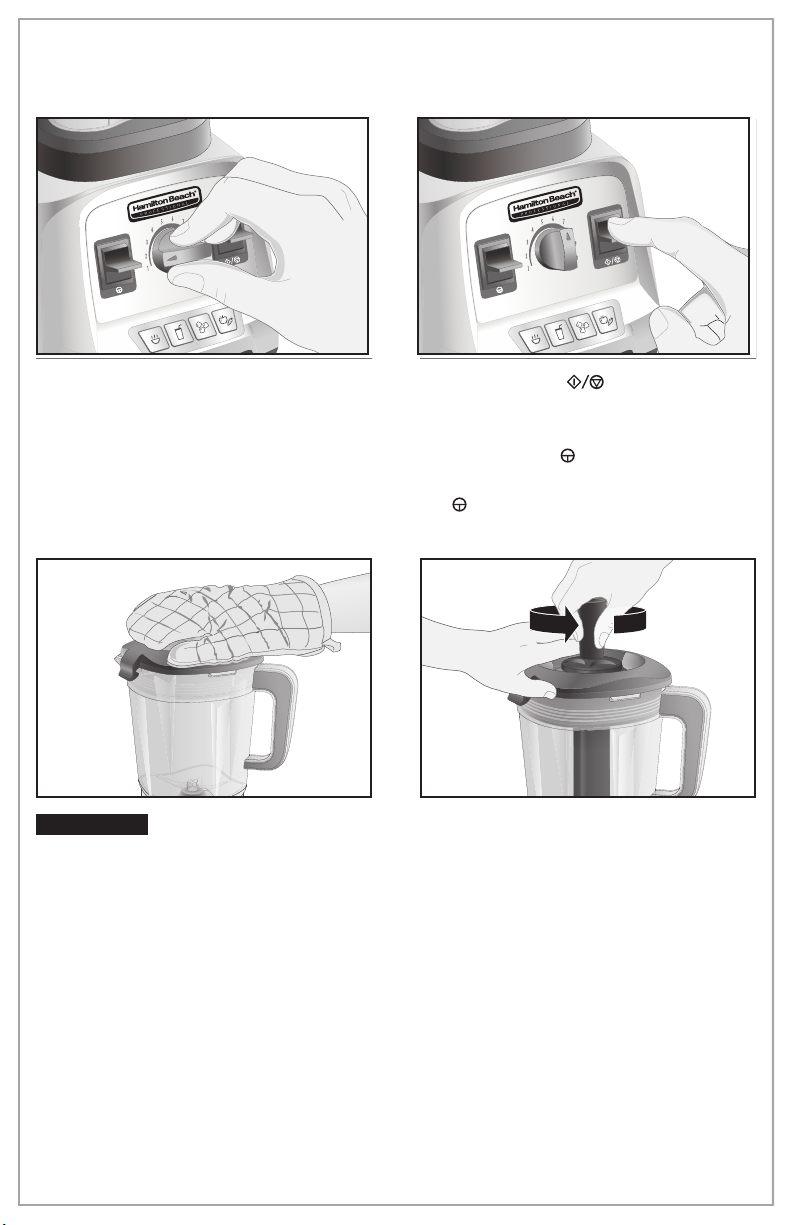
使用手动模式
1. 旋转变速旋钮到最左边位置。
w 警告
模式或搅拌热液体时,搅拌杯内的液
位请勿超过 1000 毫升。戴上烤箱手
套或用厚毛巾进行保护,将一只手放
在杯盖的顶部。让暴露的皮肤远离杯
盖。以最低速度开始搅拌。
烫伤危险。当使用热汤
2. 按启动/停止 ( ) 按钮,在搅拌
期间慢慢向右或向左旋转变速旋钮
增加或降低搅拌速度。
当按住脉冲 (
按所选的速度运行,直到松开脉冲
( ) 按钮。
3. 请将一只手压住杯盖顶部,使用搅
拌棒将周围浓稠混合料推进搅拌
杯内。
) 按钮时,破壁机将
22
Page 23
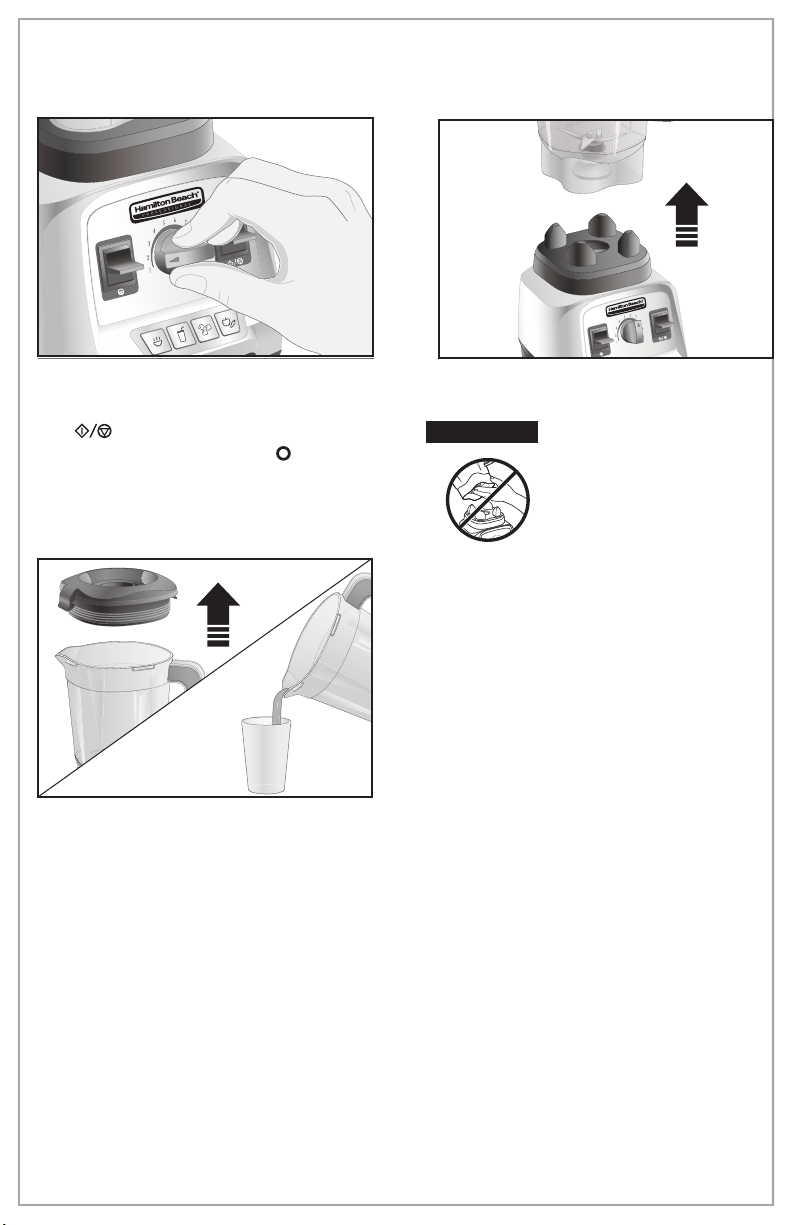
使用手动模式 (续)
4. 在搅拌周期结束时,旋转变速旋
钮至最左边位置,并按启动/停止
) 按钮以停止搅拌操作。使用
(
底座右侧的重置/关闭 (I/ ) 开关关
闭破壁机。搅拌后拔掉破壁机的电
源插头。
6. 握紧搅拌杯,取下杯盖。倒出饮
用。
5. 取下搅拌杯。
w 警告
7. 若进行干打时, 建议时间控制在1分
钟, 以后静置4分钟以转换冷却, 作
为一次循环。若干打时没有进行短
暂休止,则搅拌杯有损坏的风险。
杯桶内壁经过打粉之后,表面会有正
常的使用磨损痕迹,磨损情况和食物
的坚硬度,打粉时间有关系。杯桶内
壁经过长时间使用之后,表面也会有
正常的使用磨损痕迹。这都属于正常
情况。
烫伤危险。
长时间使用破壁机
后,其杯下的金属部
分会发烫。
23
Page 24

破壁机和附件小贴士
破壁机小贴士
• 若要在破壁机运行时加入食材,请从
杯盖上取下加料口盖,并通过开口加
入食材。
• 为获得最佳性能,每种食谱至少需要
一杯液体 (8 盎司/237 毫升)。如果食
材未正确混合,请加入更多液体。根
据搅拌的食材,所需的液体量可能有
所不同。
• 如果搅拌过程中搅拌操作停止或食材
粘在搅拌杯壁上,取下加料口盖插入
搅拌棒搅动杯内壁上的食材或向搅拌
杯中再添加液体。
• 请勿将食物或液体储存在搅拌杯中。
• 避免在运行过程中或在任何时间碰撞
破壁机或使其跌落。
• 制作果仁酱时,请使用搅拌棒并且按
1 分钟间隔间进行搅拌。
使用搅拌棒
• 当杯盖正确固定到搅拌杯上时,搅拌
棒的把手需配合杯盖一起操作,以防
搅拌棒碰撞刀片。
• 在搅拌过程中使用搅拌棒时,加入搅
拌杯的食材不得超过搅拌杯的三分之
二。
• 仅能使用由本型号破壁机提供的搅拌
棒。请勿使用其他破壁机或其他破壁
机型号专用的搅拌棒。
• 将大型水果蔬菜切块后搅拌可加快它
们的搅拌速度。
• 加入到搅拌杯中的食材量不得超过最
高刻度标记。
• 务必先将液体倒入搅拌杯中,然后加
入其他食材。
• 如果无法搅拌冰冻水果,请停止破壁
机运作,先脉冲几次。
• 请勿让冰块在搅拌杯中存留或结冰。
冰块放入搅拌杯后,请即刻粉碎。
注意:本机配有电机过热保护。在操作
期间如果电机因过热而停止,请拔掉
电源插头并让机器冷却 15 分钟。然后
再插上机器的电源插头以恢复正常操
作。(请参见第 26页的“故障排除”。)
• 如果食材不流通,混合料中将可能出
现气泡。将搅拌杯从底座中取下。取
下加料口盖。将搅拌棒插入加料口盖
孔中以排出气泡。
• 垂直下按搅拌棒不能协助食材流通。
如有必要,请将搅拌棒对着搅拌杯的
侧壁或角落。请勿尝试强制性地将搅
拌棒插入搅拌杯的更深处。
24
Page 25
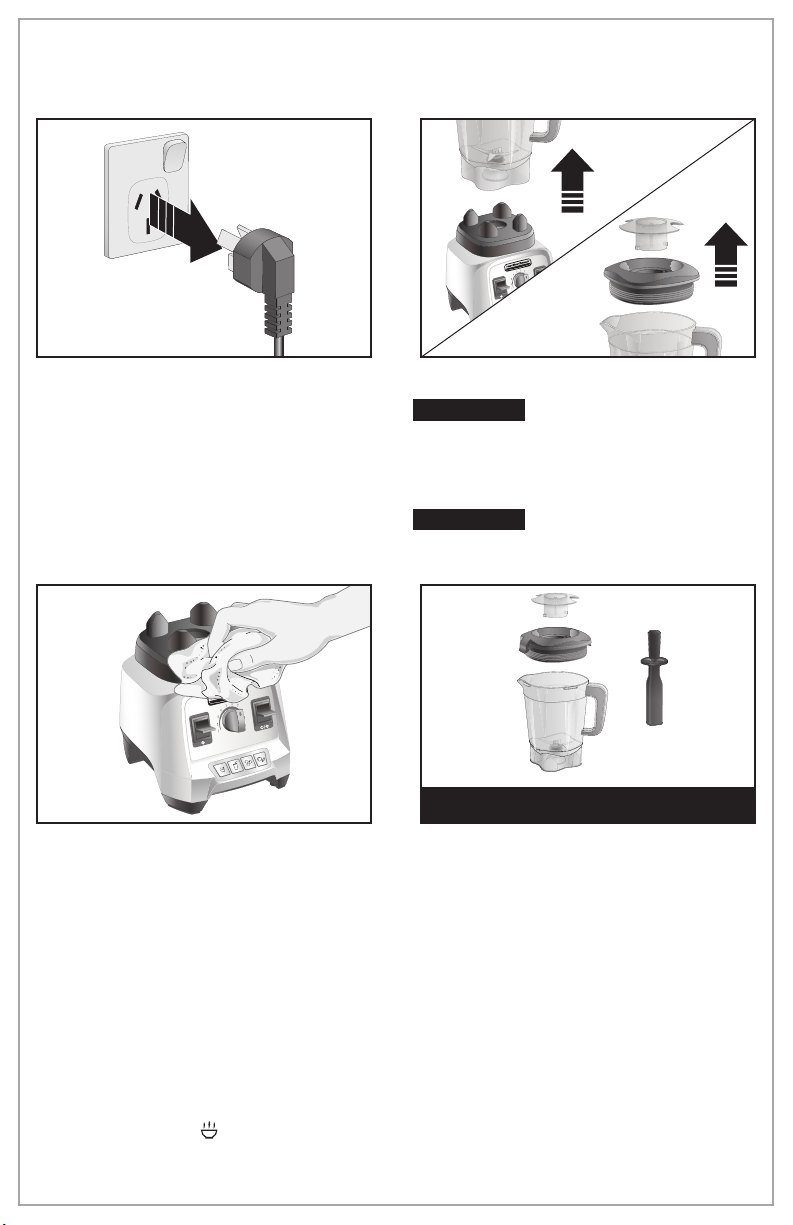
保养与清洗
1. 拔掉破壁机电源插头。 2. 取出搅拌棒、杯盖和加料口盖。
w 警告
清洁前断开电源。请勿将电源线、
插头、底座或电机浸入水或其他液体
中。
w 警告
长时间使用破壁机后,其杯下的金属部
分会发烫。
触电危险。
烫伤危险。
可在洗碗机中安全清洗
3. 用湿布或海绵擦拭破壁机底座、控
制面板和电源线。若要去除顽固
的斑点,请使用温和的非研磨性清
洁剂。
注意:
• 手洗搅拌杯。在搅拌杯中注入一半的水,然后添加 2 至 3 滴洗洁精。搅拌 30
秒钟。清洗后,然后彻底晾干。
• 在搅拌了油性食材后进行清洗,在破壁机内洒上 1/4 杯 (59 毫升) 小苏打。加
1 杯 (237 毫升) 白醋。混合料将会起泡。泡沫消退后,加 2 杯 (473 毫升) 水
后,使用热汤 (
后,然后彻底晾干。
• 盖子密封圈可以拆下清洗,清洗之后按照原样装回。
) 程序搅拌。用洗洁精和清水冲洗掉所有的残余液体。清洗
在洗碗机中清洗时,请勿使用“消
毒”设置。“消毒”循环温度会损坏
本产品。部件也可以在带清洁剂的温
水中清洗。清洗后,然后彻底晾干。
请勿浸泡。
25
Page 26
故障排除
flashing.
flashing.
flashing.
)
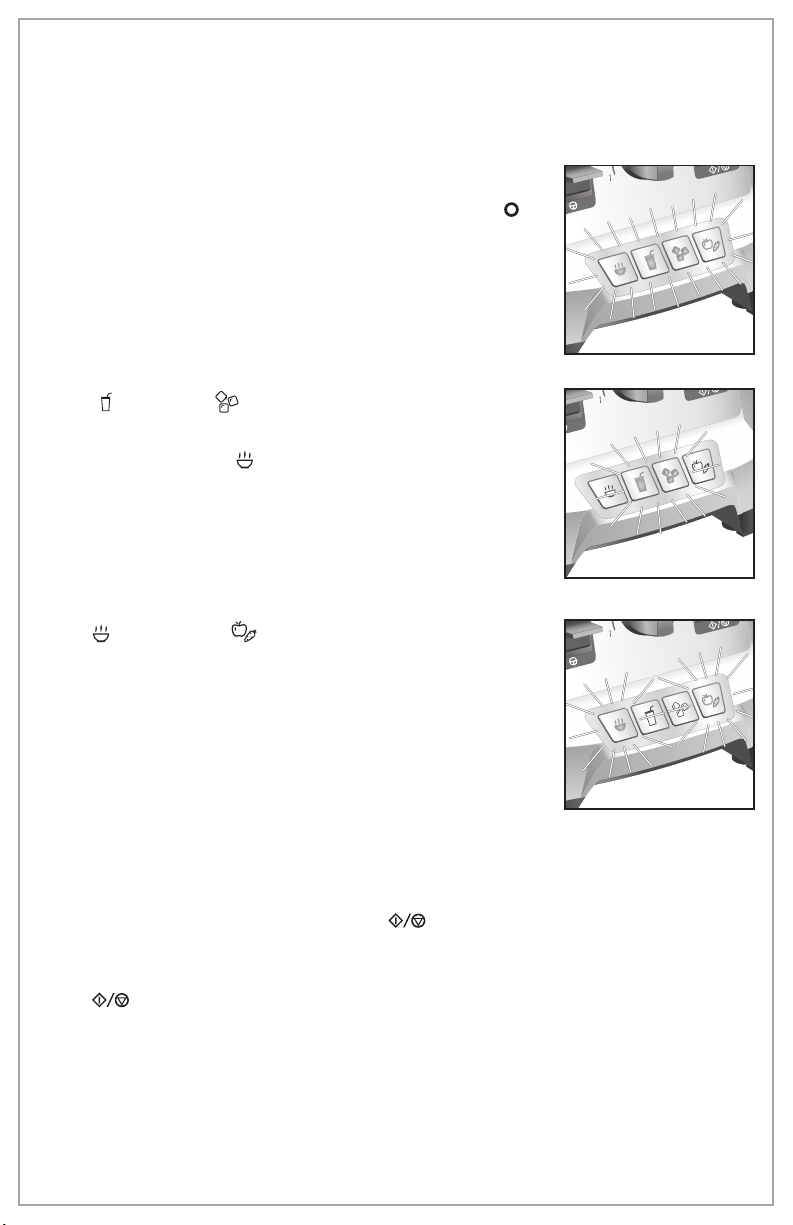
错误信息
所有程序按钮都在闪烁。
• 使用过程中,电机温度过高。将电源开关调至关闭 ( )
位置,冷却 15 分钟。将电源开关调至重置(I)位置,以恢
复正常操作。
冰沙( )和刨冰( )按钮一直闪烁。
• 电机无法转动。请取下搅拌杯和杯盖,搅拌食材,重新
装上杯盖,按热汤(
关闭电源,拔掉电源插座,并联系客户服务中心。
)按钮。如果问题仍未解决,请
热汤(
• 破壁机速度上升过快,并以高速运作。请关闭电源,拔
掉电源插座,并联系客户服务中心。
破壁机电源已插上且开关处于开启 (
• 无任何操作超过 3 分钟,破壁机进入待机模式以节省电能。按控制面板上的
破壁机在运行过程中停止且启动/停止(
• 破壁机里的搅拌物过重,超出电机负载量。此款破壁机能自动停止运作以避免
26
)和纯果汁( )按钮一直闪烁。
I
) 位置,但是面板指示灯不亮。
任意按钮或旋转开关以恢复正常操作。
)按钮指示灯闪烁。
发生电力损坏。将一部分食材移出搅拌杯。将变速旋钮旋转至 1 并按启动/停
止( ) 开关继续以手动模式运行。必要时增高速度。如果再次出现此问
题,请继续移出搅拌杯中的部分搅拌物,随后重启程序。
注意:问题出现后,按键将持续闪烁直到故障被消除或电源被断开。
Page 27

故障排除(续)
破壁机启动失败且程序指示灯不亮。
• 确保主电源的
• 检查插头是否安全插入到正确电源和频率的电源插座中。
• 检查电源插座的保险丝是否熔断,或电源开关是否切断。
破壁机在运行过程中停止且程序指示灯点亮。
• 此款破壁机具备电机过载保护功能。在操作期间如果电机因过载而停止,请拔
出插头,让破壁机冷却。15 分钟后,重新插上破壁机的插头。
• 恢复正常操作。
食材搅拌不均匀。
• 检查食材中是否添加了足够量的液体。应保证混合料为流质且能随时自由运
行。
• 固体块过大。
• 容器过满。请勿超过最高刻度标记 1800 毫升。
• 切割刀片组件不锋利或已磨损。每日检查容器和切割组件。
• 选择合适液体混合料的搅拌速度。
破壁机有焦味。
• 由于电机高速运转,温度升高,电机内润滑油脂及绝缘材料受热散发导致气
味。请关闭破壁机,让机器冷却。
• 虽然在制造过程中对电机进行了测试,但是大量使用可能会导致电机绕组固
化。频繁使用几次后,此味道迅速消失。
• 如果多次频繁使用后仍有此味道,请致电我们的客户服务中心。
搅拌杯底部或台面上有油脂。
• 查找问题和来源。这可能是搅拌杯轴承相关的问题。
• 如果情况持续,请致电我们的客户服务中心。
搅拌杯颜色暗沉或污迹斑斑。
• 使用后可能会出现一些颜色暗沉,属正常现象。除了各种果仁酱里的油外,水
果、农作物及绿色蔬菜中的矿物质有时可在搅拌杯中形成一层薄膜,或者可能
难以清洗。
• 在破壁机内喷洒 1/4 杯 (59 毫升) 食用苏打水。加 1 杯 (237 毫升) 白醋。混合
料将会起泡。泡沫消退后,加 2 杯 (473 毫升) 水后,使用热汤 (
拌。用洗洁精和清水冲洗掉所有的残余液体。清洗后,然后彻底晾干。
破壁机启动失败。
• 搅拌杯位置摆放不当。
搅拌杯存放
• 请小心放置搅拌杯桶,以免跌落造成损坏。
重置/关闭(I/ ) 开关
位于重置 (I) 位置。
) 程序搅
27
Page 28

注意
28
Page 29
食品接触材料信息
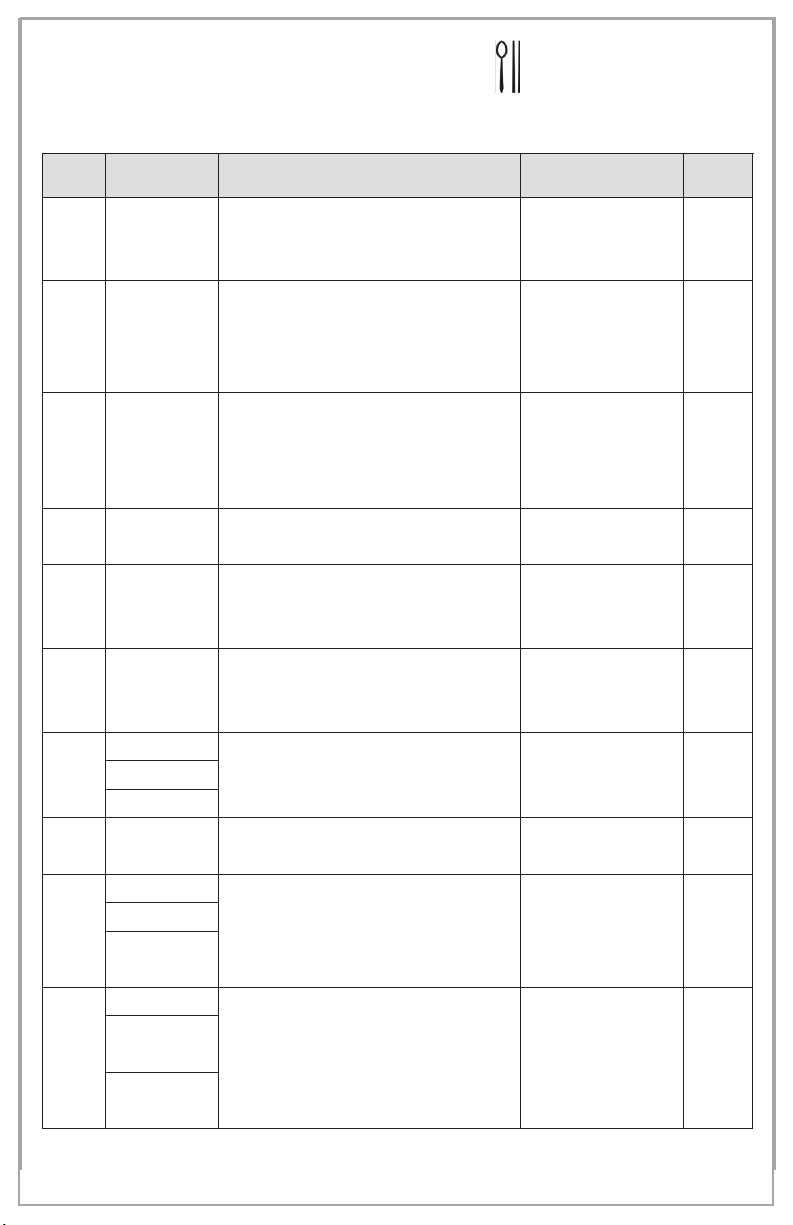
本产品符合相应食品安全国家标准要求,食品接触用材料及其执行标准的符合性信息说明如下:
序号 部件名称 材质 执行标准 备注
1 搅拌棒
对苯二甲酸二甲酯和1,4-环己烷二甲
2 加料口盖
3 搅拌杯
4 杯盖 乙烯与丙烯的共聚物
5 杯盖射包架
铁氟龙密封
6
7
8 刀片
9
10
注: 特殊使用说明:请严格遵照说明书及产品所带附件资料使用本产品。
圈
杯盖密封圈
O型圈
铁氟龙O型圈
刀具固定座
刀轴
刀下垫片
(平华司)
刀上螺母
刀上垫片
(平华司)
刀螺母垫片
(平华司)
醇,2,2,4,4-四甲基-1,3-环丁二醇
对苯二甲酸二甲酯和1,4-环己烷二甲
醇,2,2,4,4-四甲基-1,3-环丁二醇
聚乙烯
(PE)
的聚合物
(改性PCT)
的聚合物
(改性PCT)
聚丙烯
(PP)
聚四氟乙烯
(PTFE)
乙烯与丙烯的共聚物
不锈钢 12Cr17Ni7
(SUS 301)
不锈钢 Y12Cr18Ni9
(SUS 303)
不锈钢 06Cr19Ni10
(SUS 304)
GB 4806.1-2016
GB 4806.6-2016
GB 4806.7-2016
GB 4806.1-2016
GB 4806.6-2016
GB 4806.7-2016
GB 4806.1-2016
GB 4806.6-2016
GB 4806.7-2016
GB 4806.1-2016
GB 4806.11-2016
GB 4806.1-2016
GB 4806.6-2016
GB 4806.7-2016
GB 4806.1-2016
GB 4806.6-2016
GB 4806.7-2016
GB 4806.1-2016
GB 4806.11-2016
GB 4806.1-2016
GB 4806.9-2016
GB 4806.1-2016
GB 4806.9-2016
GB 4806.1-2016
GB 4806.9-2016
29
Page 30
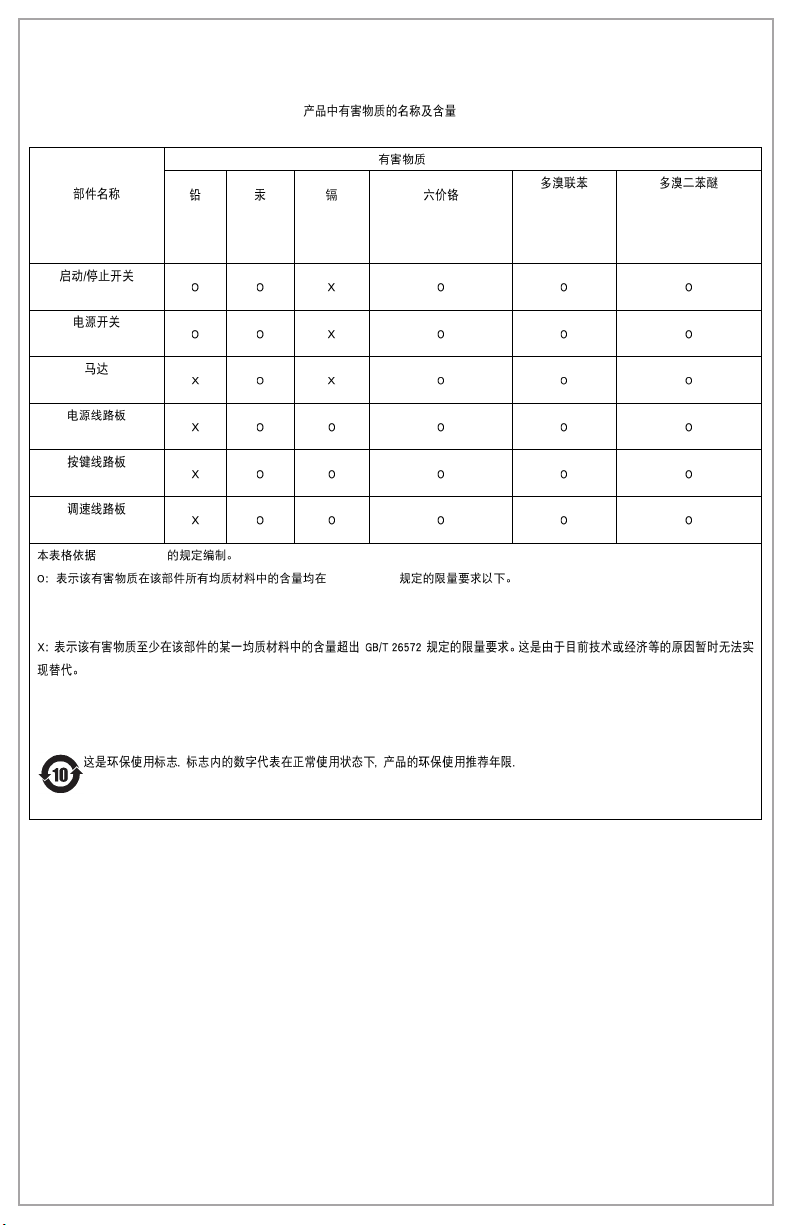
Name and content of hazardous substances in product
(Component name)
(hazardous substance)
Lead
(Pb)
Mercury
(Hg)
Cadmium
(Cd)
Hexavalent Chromium
(Cr(VI))
Polybrominate
d biphenyls
(PBB)
Polybrominated
diphenyl ethers
(PBDE)
(START/STOP Switch)
(Power Switch)
(MOTOR)
(Power PCBA)
(Button PCBA)
(Timing PCBA)
SJ/T 11364 This table is prepared in accordance with the provisions of SJ/T 11364.
GB/T 26572
Indicates that the said hazardous substance contained in all the homogeneous materials for this component is below the limi t
requirement in GB/T 26572.
Indicates that the said hazardous substance contained in at least one of the homogeneous materials used for this component is above
the limit requirement in GB/T 26572. Due to technological and/ or economic reasons, these hazardous substances cannot be easily
replaced at this time.
This is the logo of environmental protection use. The number inside indicates the environmental protection use
recommended period (Year) of product in normal use.
30
Page 31
产品保修卡
产品名称: _______________________
产品类别: _______________________
产品型号: _______________________
购买日期: _______________________
购买商店: _______________________
经
销 商: _______________________
1. 自购买之日起,在本保修规定的八年保修期内或使用次数累计在9500次以内,按
照使用说明及其它注意事项使用的情况下,出现故障时,依照保修规定可持商品
及商品发票和保修卡到当地维修站,进行免费维修或免费更换。
2. 如在保修期内出现以下情况时,不享受免费维修,修理费或更换费自付。
① 因使用上的错误和擅自改动、修理而产生的故障及损伤。
② 购买后因跌落、搬运不当等而产生的故障及损伤。
③ 因火灾、地震、水灾、打雷、其它天灾人祸及公害、异常电压、其它外部因
④ 属于家庭正常使用以外而出现的故障及损伤。
⑤ 不出示本保修卡的。
⑥ 本保修卡只在中国大陆有效。
⑦ 本保修卡不再发行,请妥善保管。
⑧ 在不能携带本产品进行修理的情况下,请向本公司维修站询问。
冷热一体破壁机
B79
保修规定
素而产生的故障及损伤。
维修记录
维修日期 维修内容 维修结果 维修地点 维修人签字
中国大陆客服热线:
400-852-2655
官方网站:www.hamiltonbeach.cn
制造商:汉密尔顿海滩电器(深圳)有限公司
地 址:深圳市福田区深南西路车公庙工业区天安数码
时代大厦主楼1306-1308、1309-1311单元
31
Page 32
Model/型号: Type/类别: Capacity/容积: Rating/规格:
58912-CN
58913-CN
地址:深圳市福田区深南西路车公庙工业区天安数码时代大厦主楼
本产品执行标准:GB4706.1-2005, GB4706.30-2008
B79
制造商:汉密尔顿海滩电器(深圳)有限公司
1306-1308、1309-1311 单元
以上内容如有改动,恕不预先通知
1800毫升
220V, 50Hz, 1400W
添加官方微博 微信
开启美食人生
840257205
 Loading...