

Page 1
READ BEFORE USE
LIRE AVANT UTILISATION
LEA ANTES DE USAR
Visit www.hamiltonbeach.com for our
complete line of products and Use and
Care Guides – as well as delicious recipes,
tips, and to register your product online!
Rendez-vous sur www.hamiltonbeach.ca
pour notre liste complète de produits et de
nos manuels utilisateur – ainsi que nos
délicieuses recettes et nos conseils !
¡Visite www.hamiltonbeach.com (
o
www.hamiltonbeach.com.mx (México)
para ver otros productos de Hamilton Beach
o para contactarnos!
EE. UU.)
Single-Serve
Coffee Maker
Questions?
Please call us – our friendly
associates are ready to help.
USA: 1.800.851.8900
Questions ?
N’hésitez pas à nous appeler –
nos associés s’empresseront
de vous aider.
CAN : 1.800.267.2826
¿Preguntas?
Por favor llámenos – nuestros
amables representantes están
listos para ayudar.
EE. UU.: 1.800.851.8900
MEX: 01 800 71 16 100
Le invitamos a leer cuidadosamente este
instructivo antes de usar su aparato.
Cafetière 1 tasse
Cafetera para
Servicio Individual
English ...................... 2
Français ................... 15
Español ................... 29
Page 2

IMPORTANT SAFEGUARDS
When using electrical appliances, basic safety precautions should always be followed to reduce the risk of fire, electric shock, and/or injury to
persons, including the following:
1. Read all instructions.
2. This appliance is not intended for use by persons (including
children) with reduced physical, sensory, or mental capabilties,
or lack of experience and knowledge, unless they are closely
supervised and instructed concerning use of the appliance by a
person responsible for their safety.
3. Close supervision is necessary when any appliance is used by or
near children. Children should be supervised to ensure that they
do not play with the appliance.
4. Do not touch hot surfaces. Use handles or knobs. Care must
be taken, as burns can occur from touching hot parts or from
spilled, hot liquid.
5. To protect against electric shock, do not place cord, plug, or
coffee maker in water or other liquid.
6. Unplug from outlet when the coffee maker is not in use and
before cleaning. Allow to cool before putting on or taking off
parts and before cleaning the appliance.
7. Coffee maker must be operated on a flat surface away from the
edge of counter to prevent accidental tipping.
8. Do not operate any appliance with a damaged supply cord or
plug, or after the appliance malfunctions or has been dropped
or damaged in any manner. Supply cord replacement and
repairs must be conducted by the manufacturer, its service
agent, or similarly qualified persons in order to avoid a hazard.
Call the provided customer service number for information on
examination, repair, or adjustment.
9. The use of accessory attachments not recommended by the
appliance manufacturer may cause injuries.
10. Do not use outdoors.
11. Do not let cord hang over edge of table or counter or touch hot
surfaces, including stove.
12. Do not place on or near a hot gas or electric burner, or in a
heated oven.
13. Do not use appliance for other than intended use.
14. WARNING: To reduce the risk of fire or electric shock, do not
remove the bottom cover of the coffee maker. There are no
user-serviceable parts inside. Repair should be done by
authorized service personnel only.
15. CAUTION! Cut Hazard: Removable single-serve pack holder
contains a sharp blade. Use caution when handling.
16. CAUTION! Cut Hazard: Piercing nozzle is sharp. Use caution
when cleaning.
SAVE THESE INSTRUCTIONS!
Other Consumer Safety Information
This appliance is intended for household use only.
w WARNING
with a polarized plug (one wide blade) to reduce the risk of electric
shock. The plug fits only one way into a polarized outlet. Do not
defeat the safety purpose of the plug by modifying the plug in any
way or by using an adapter. If the plug does not fit fully into the
outlet, reverse the plug. If it still does not fit, have an electrician
replace the outlet.
2
Electrical Shock Hazard: This appliance is provided
The length of the cord used on this appliance was selected to reduce
the hazards of becoming tangled in or tripping over a longer cord. If a
longer cord is necessary, an approved extension cord may be used.
The electrical rating of the extension cord must be equal to or greater
than the rating of the appliance. Care must be taken to arrange the
extension cord so that it will not drape over the countertop or tabletop
where it can be pulled on by children or accidentally tripped over.
To avoid an electrical circuit overload, do not use another high-wattage
appliance on the same circuit with this appliance.
Page 3
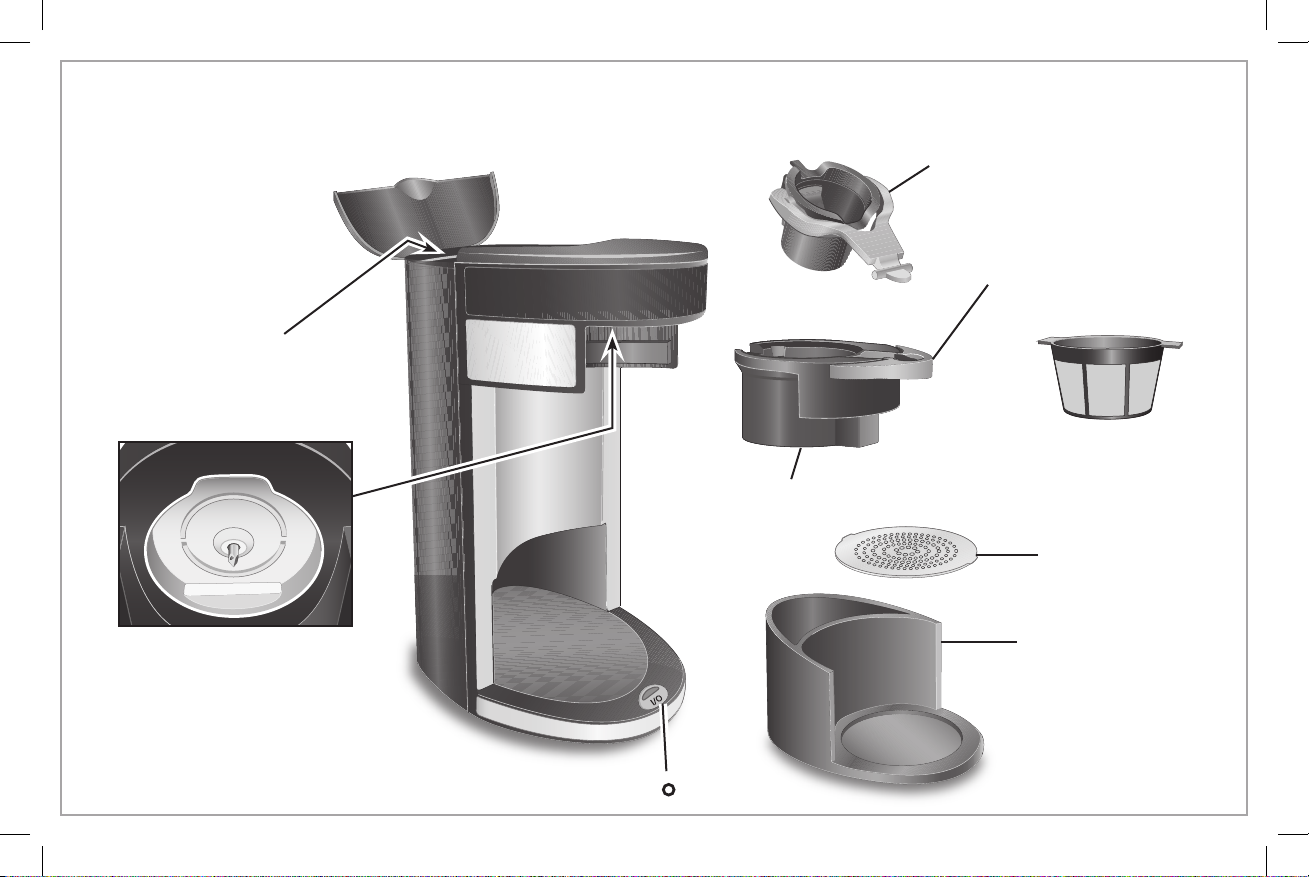
Parts and Features
*To order parts:
US: 1.800.851.8900
www.hamiltonbeach.com
Canada: 1.800.267.2826
Mexico:
01 800 71 16 100
Reservoir
Piercing Nozzle
(punches hole in top of
single-serve pack)
BEFORE FIRST USE: Wash all removable parts in hot, soapy water. Rinse
and dry. Brew one cycle with water and discard water.
Removable Single-Serve Pack
Holder* (punches hole on bottom
of pack)
Brew Basket Handle
and Lock
Removable Holder for
Ground Coffee* (fits into
Brew Basket*
brew basket for brewing)
Drip Tray*
Multilevel
Cup Rest*
ON/OFF (I/ ) Button
3
Page 4
How to Brew a Single-Serve Pack
w CAUTION
To avoid contact with hot coffee
or water:
• Do not fill water above MAX fill
line (10 ounces [296 ml]).
• Fill reservoir with cup or travel
mug of water into which the
coffee will be brewed.
• Fully insert cup or travel mug
under brew basket.
• For best results, use K-Cup®*
packs.
w CAUTION
Removable single-serve pack
holder has a sharp blade. Use
caution when handling.
NOTE: It can take up to 2 minutes
before brewed coffee starts
dispensing into your cup or travel
mug. Total brew time average is
4 minutes. For best results, allow
the coffee maker to cool for at
least 2 minutes between brewing
cycles.
4
Burn Hazard.
Cut Hazard.
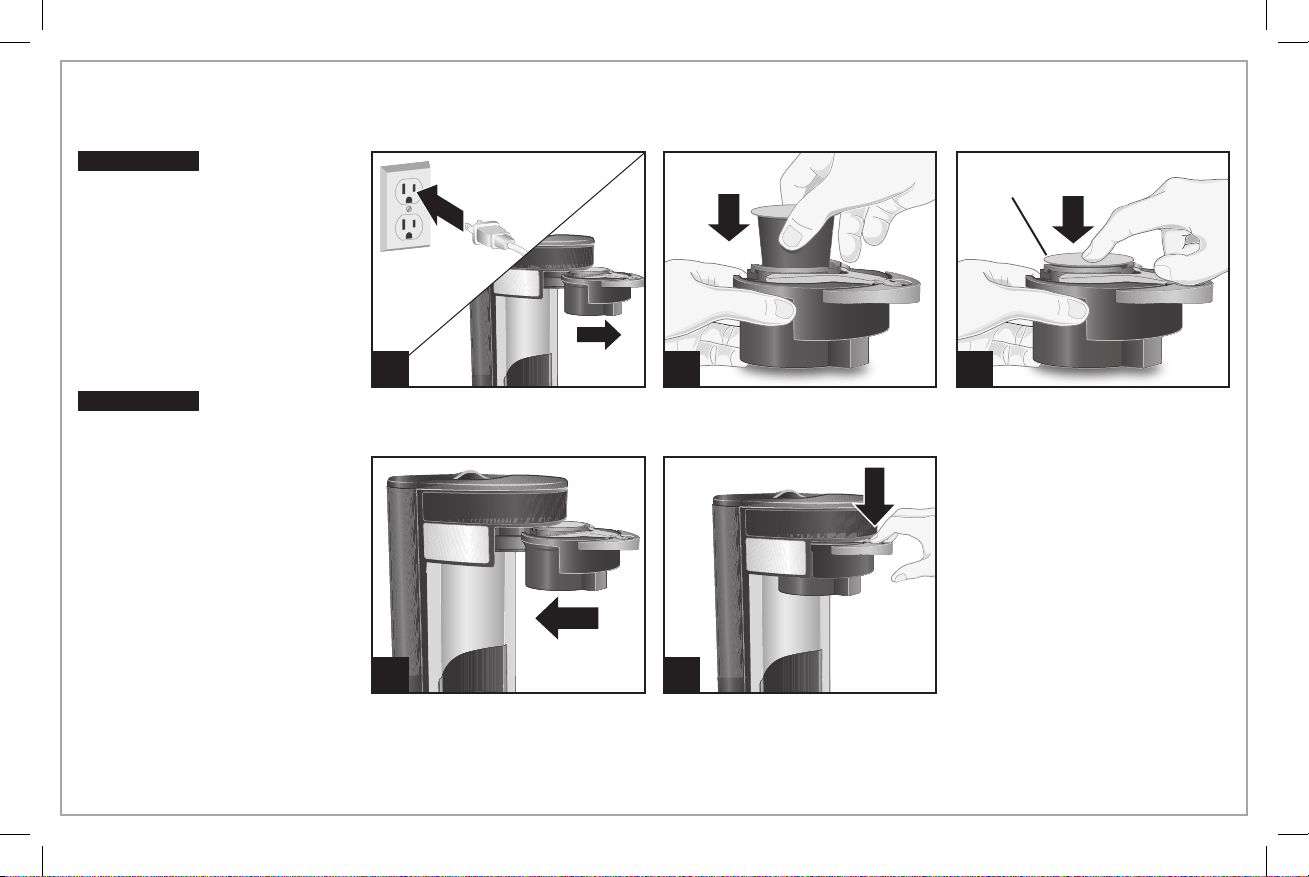
1 2 3
Place a pack into the single-serve
pack holder.
Press down on edge of the pack
until the pack snaps into place
and hole is punched in the
bottom. Do not remove foil.
4 5
Press down on brew basket
handle to lock and puncture
the foil lid on the pack.
*K-Cup is a registered trademark of Keurig, Inc. Use of the K-Cup trademark does not imply any affiliation with
or endorsement by Keurig, Inc.
“SNAP”
Page 5
How to Brew a Single-Serve Pack (cont.)
6
7
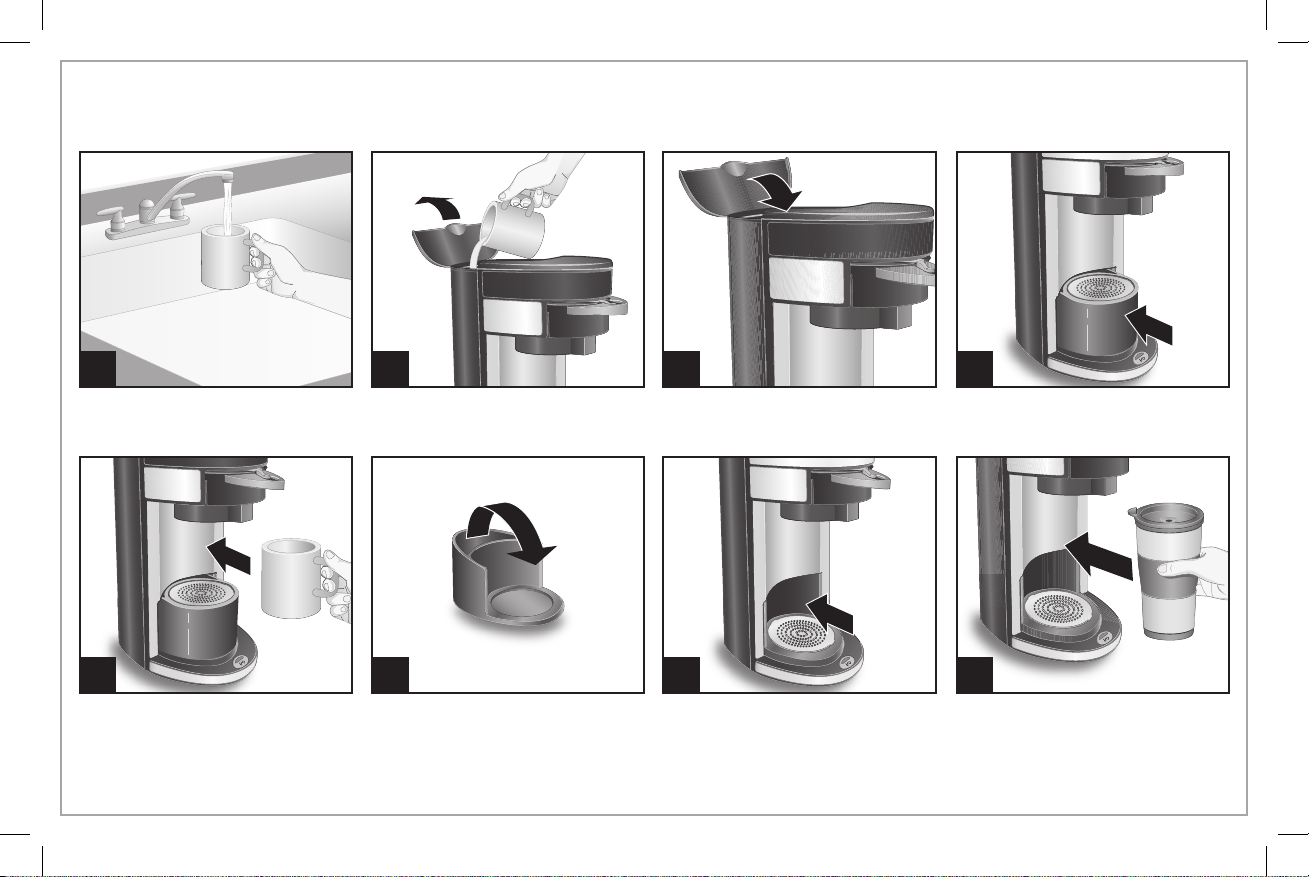
Fill reservoir with cup or travel
mug into which the coffee will
be brewed.
11
Use the taller cup position for a
larger cup, such as a travel mug.
98
1210
13
5
Page 6
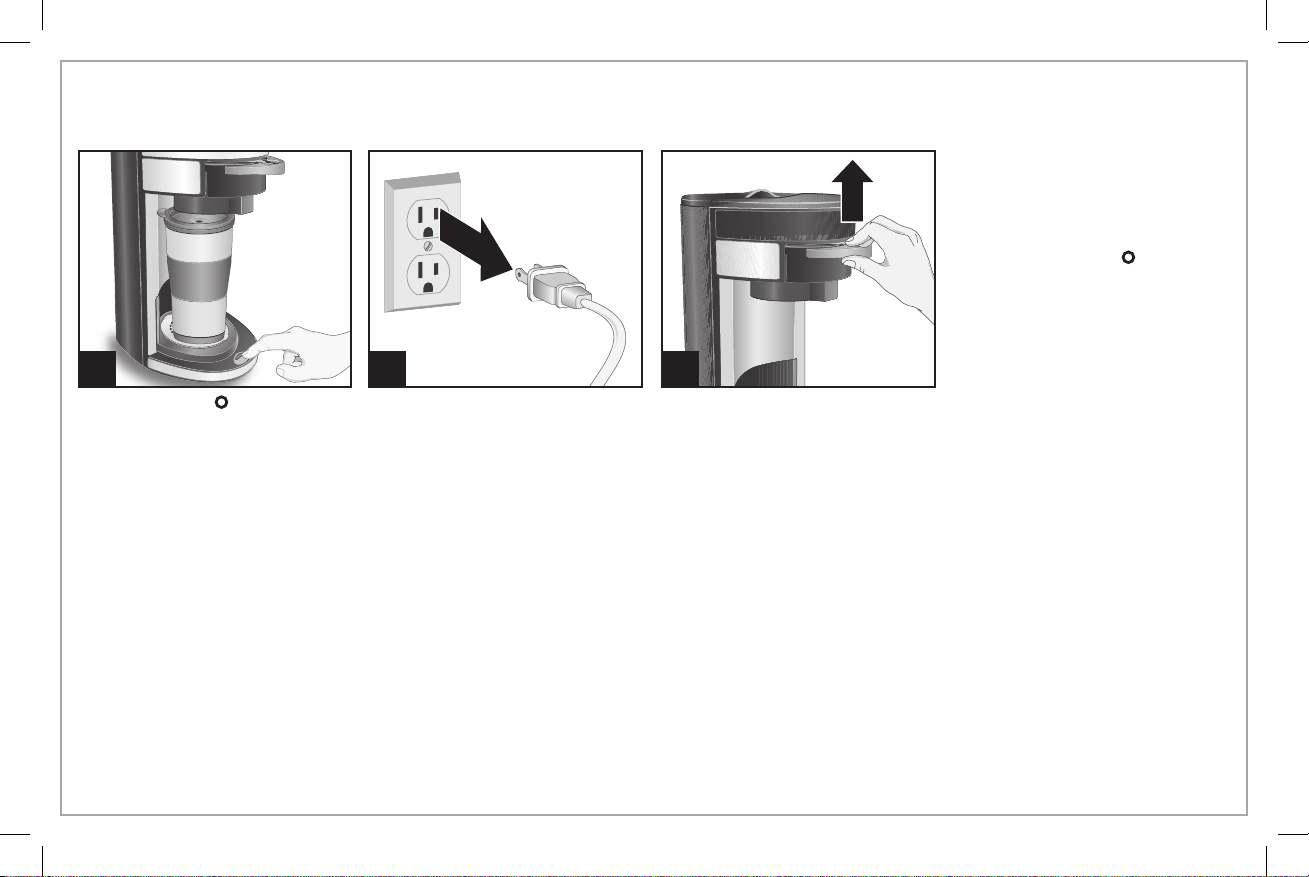
How to Brew a Single-Serve Pack (cont.)
Coffee maker will shut off
automatically and light will go off
when brew cycle is completed.
Press the ON/OFF (I/ ) button
again to STOP brewing midcycle.
Allow 2 minutes to cool in
between brews.
Brew basket and single-serve
14
Press ON/OFF (I/ ) button. The
power ON indicator light will light
up to show that coffee maker is
on.
15
16
Pull up on brew basket handle to
unlock and remove.
pack holder should be rinsed
after every use.
6
Page 7
How to Brew Ground Coffee
w CAUTION
To avoid contact with hot coffee
or water:
• Do not fill water above MAX fill
line (10 ounces [296 ml]).
• Fill reservoir with cup or travel
mug of water into which the
coffee will be brewed.
• Fully insert cup or travel mug
under brew basket.
• To avoid overflow, keep ground
coffee below MAX fill line.
NOTE: It can take up to 2 minutes
before brewed coffee starts
dispensing into your cup or travel
mug. Total brew time average is
4 minutes. For best results, allow
the coffee maker to cool for at
least 2 minutes between brewing
cycles.
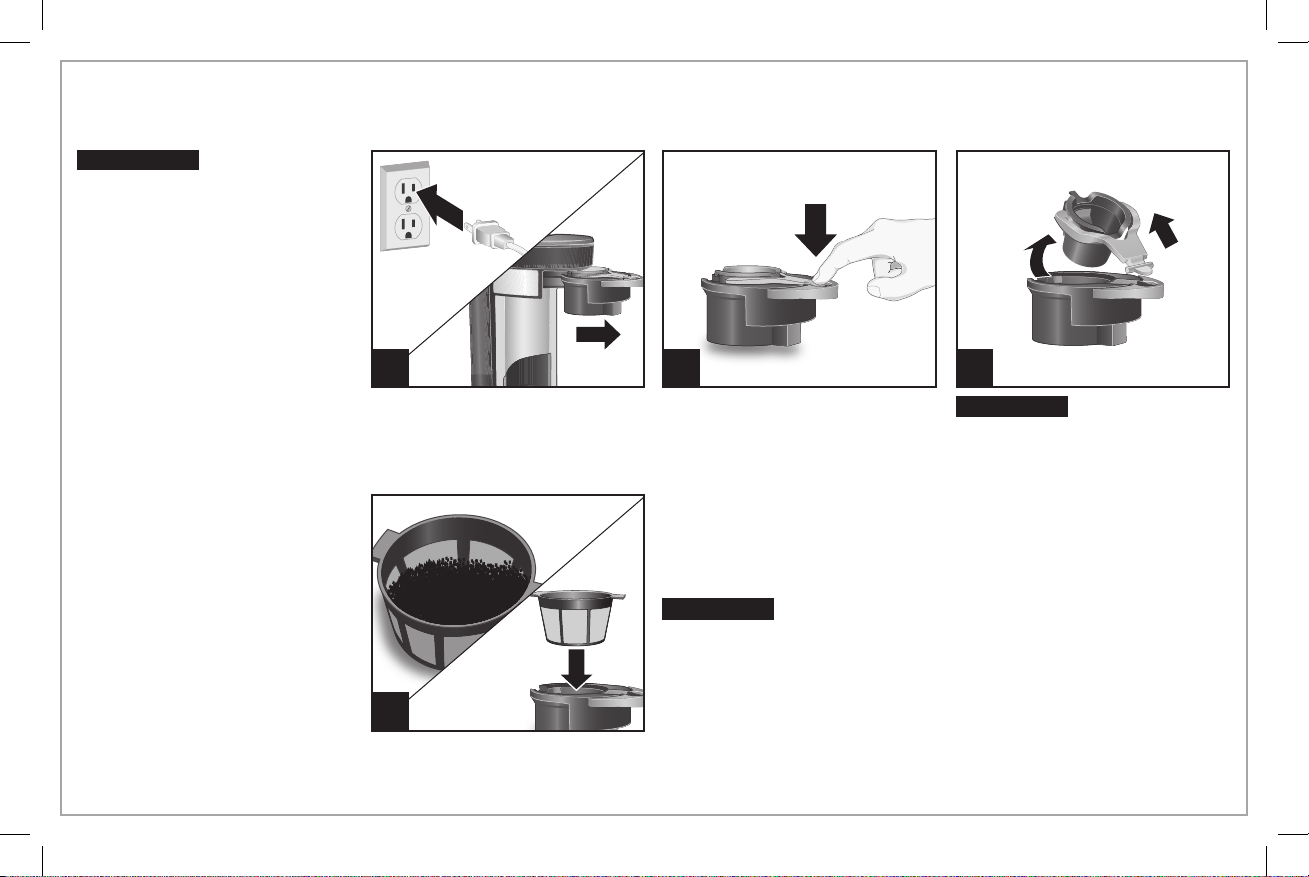
Burn Hazard.
1
4
2
To remove single-serve pack
holder, press down on the singleserve pack holder tab; then lift
out.
w WARNING
To avoid overflow, keep ground
coffee below MAX fill line.
Add coffee to removable holder.
Place holder in brew basket.
(2 tablespoons [30 ml] is the MAX
amount of any type of grounds.)
Burn Hazard.
3
w CAUTION
Removable single-serve pack
holder has a sharp blade. Use
caution when handling.
Cut Hazard.
7
Page 8
How to Brew Ground Coffee (cont.)
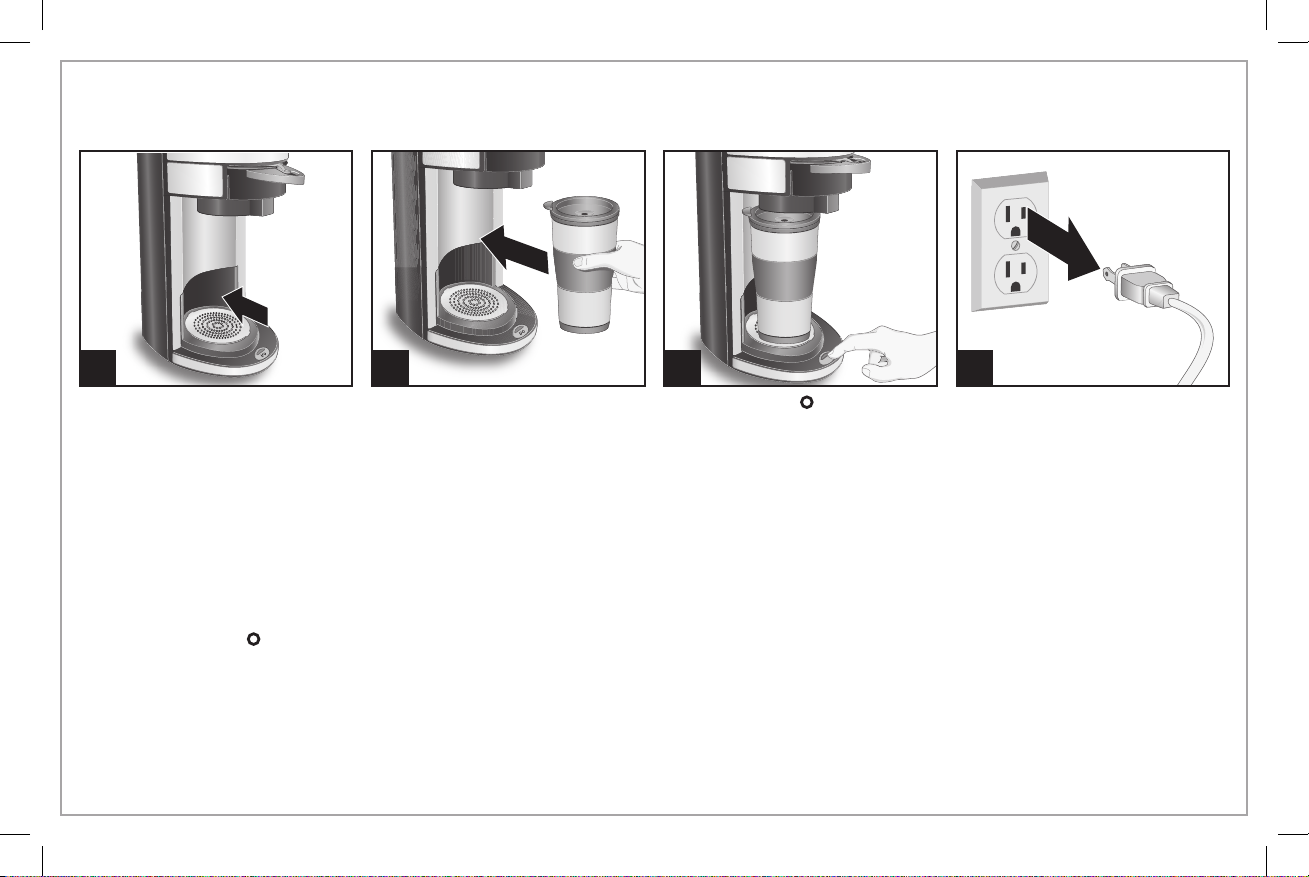
5
9 10 12
8
6
Push down to lock.
7
11
8
Fill reservoir with cup or travel
mug into which the coffee will
be brewed.
Use the taller cup position for a
larger cup, such as a travel mug.
Page 9
How to Brew Ground Coffee (cont.)
13
Coffee maker will shut off automatically and light will go off when
brew cycle is completed.
If finer ground coffee is used, coffee will continue to drip after the light
has gone off.
Press the ON/OFF (I/ ) button again to STOP brewing midcycle.
Allow 2 minutes to cool in between brews.
Brew basket and single-serve pack holder should be rinsed after every
use.
14
15
Press ON/OFF (I/ ) button. The
power ON indicator light will light
up to show that coffee maker is
on.
16
9
Page 10
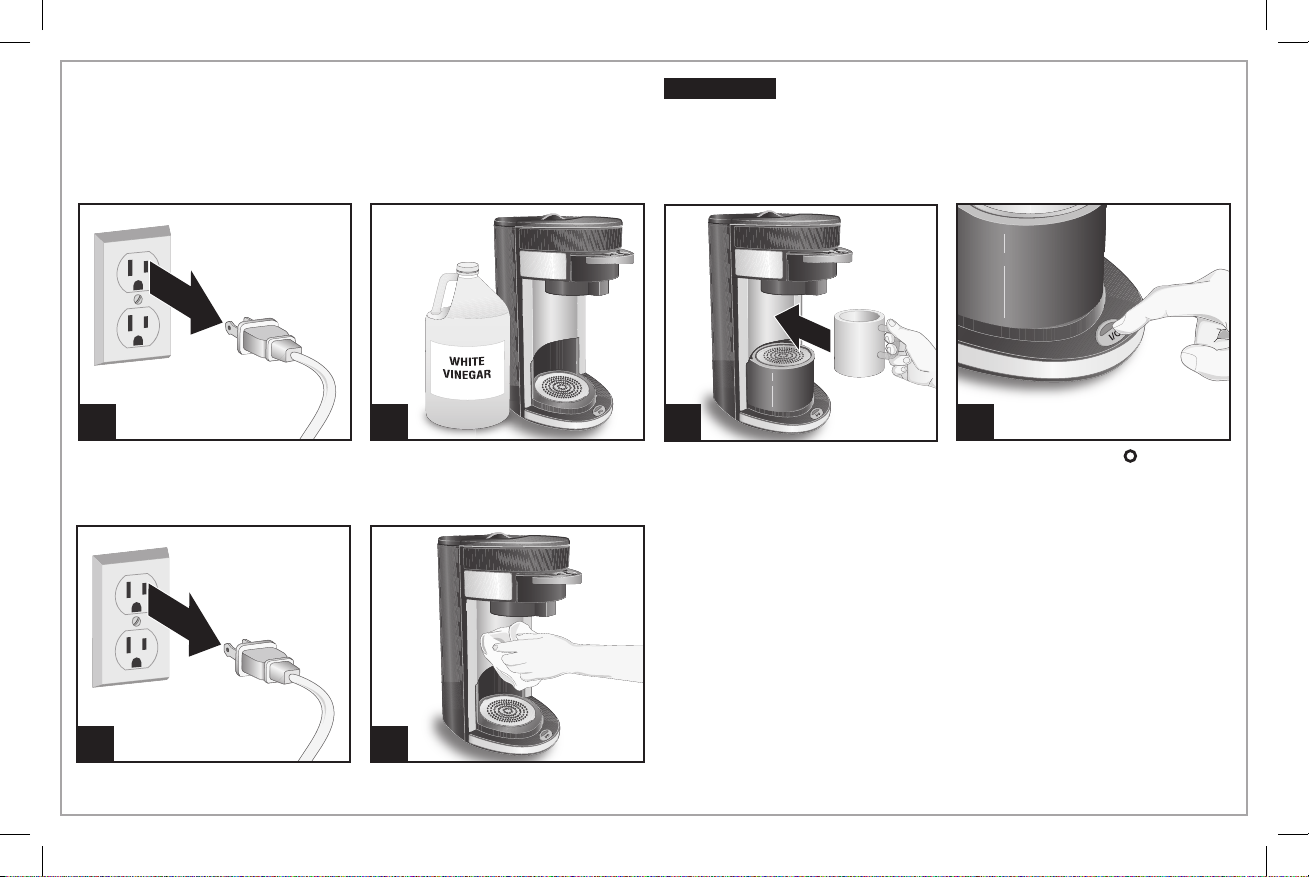
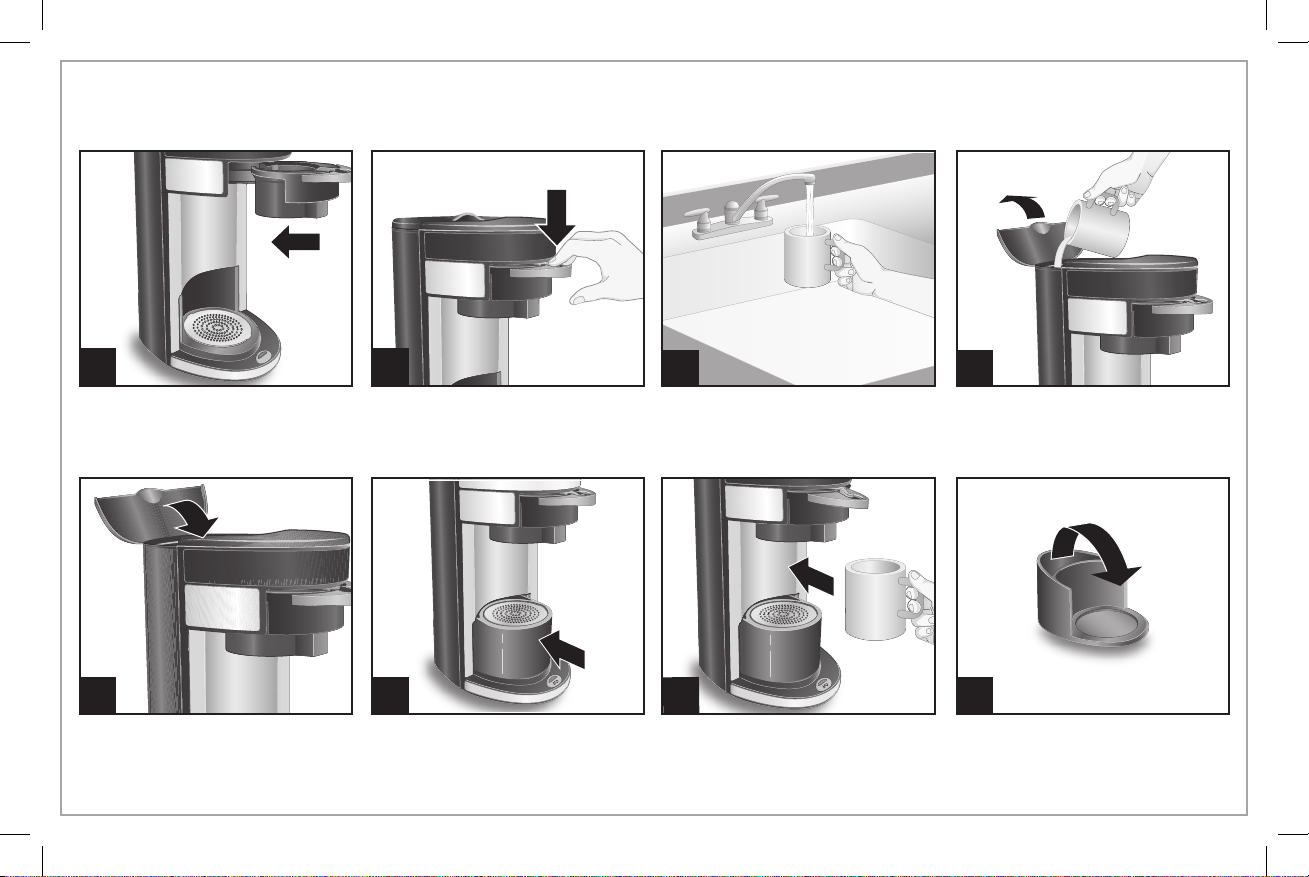
Care and Cleaning
All coffee makers should be cleaned at least once a month (once a
week for areas with hard water).
w WARNING
Do not immerse cord, plug, or coffee maker in any liquid.
Shock Hazard.
1 2
10
Pour 1/2 cup (118 ml) of plain
white vinegar and 1/2 cup (118 ml)
of cold water into reservoir.
65
3
Place a cup underneath to catch
the water/vinegar solution.
4
Press the ON/OFF (I/ ) button
once. After 30 seconds, unplug
unit and allow vinegar to clean.
After 30 minutes, plug in unit and
allow it to finish the brew cycle.
When brew cycle is finished,
wait for unit to cool. Empty cup
and rinse. Repeat steps 1–4 with
1 cup (237 ml) of cold tap water
instead of 1/2 cup (118 ml) of
vinegar and 1/2 cup (118 ml) of
water.
Page 11
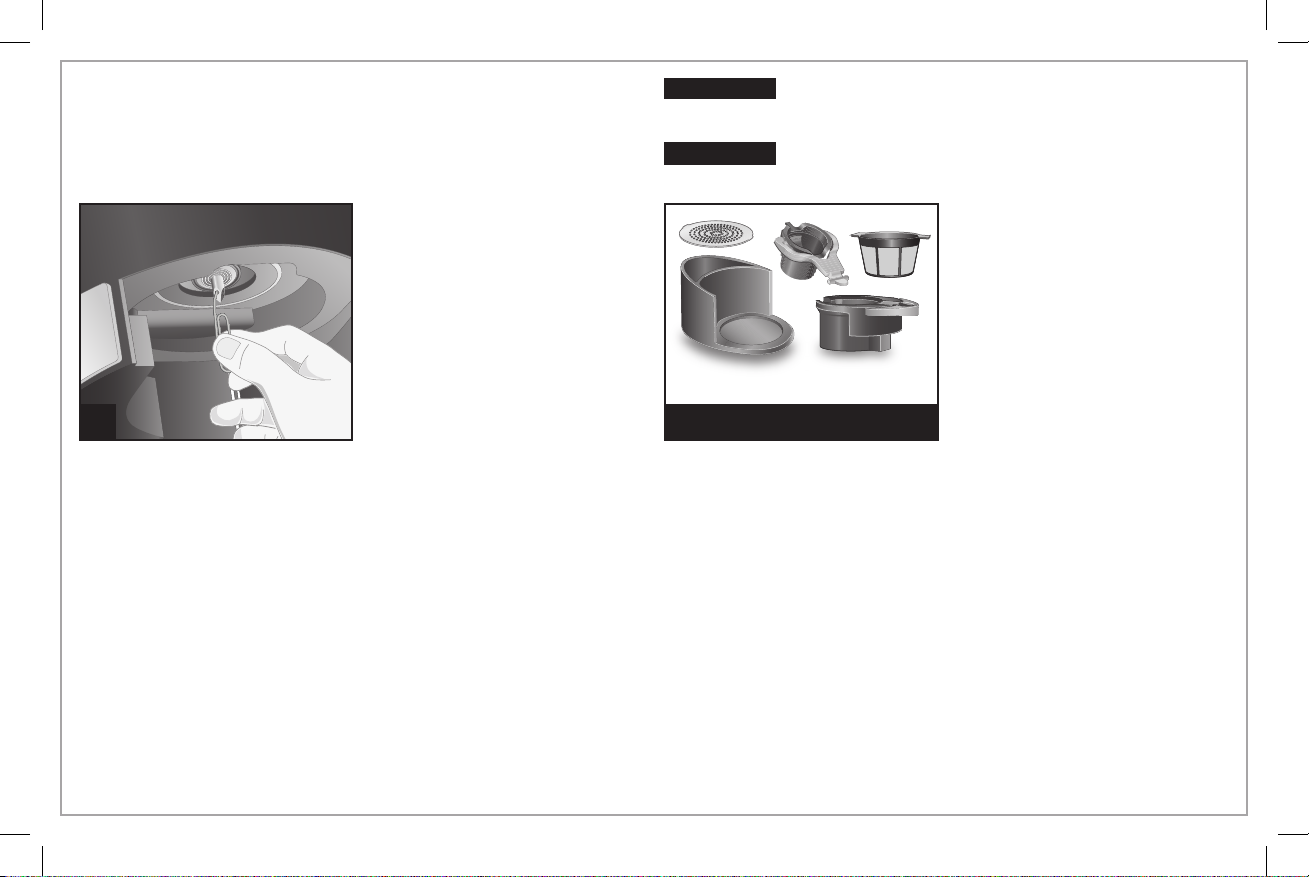
Care and Cleaning (cont.)
Routine cleaning of the piercing
nozzle: The nozzle is located in
the lid of the coffee maker. Bend a
small paper clip as shown; insert
the tip of the paper clip through
the holes of the piercing nozzle
and up into the piercing nozzle
to ensure grounds have been
removed. Brew 2 or 3 times with
cold water to make sure grounds
7
have been removed from the
piercing nozzle.
w WARNING
Failure to allow coffee maker to cool down may cause hot water or
coffee to spray from the piercing nozzle. Use caution when cleaning.
w CAUTION
Piercing nozzle is sharp. Use caution when cleaning.
Burn Hazard.
Cut Hazard.
DISHWASHER-SAFE
DO NOT use the “SANI” setting
when washing in the dishwasher.
“SANI” cycle temperatures could
damage your product.
11
Page 12

Troubleshooting
PROBLEM PROBABLE CAUSE/SOLUTION
Coffee tastes bad. • Coffee maker needs cleaning. See Care and Cleaning on page 10.
• Coffee ground too coarsely or too finely. Set coffee grinder to automatic drip grind.
• Poor coffee quality and freshness.
• Poor water quality. Use filtered or bottled water.
Water on counter under
unit.
Coffee maker will not
brew.
Coffee overflows from
brew basket.
Coffee overflows from
mug or travel mug.
Water remaining in
reservoir.
Noise or steam at the
end of brew cycle.
• Overfilled water reservoir. Also check cup used to fill reservoir. Some mugs/cups do not pour
cleanly and can dribble water down the side of the cup and onto counter.
• Make sure you have allowed for the 2 minutes of cool-down time.
• Check for water in water reservoir. If there is no water in the reservoir and the brew button is
pushed, the unit will not brew.
• Piercing nozzle is clogged. Follow cleaning piercing nozzle instructions on page 11.
• Use removable holder for ground coffee.
• Use a lesser amount of ground coffee.
• When using whole bean coffee, a standard automatic drip coffee grind will yield best results.
Be careful not to overgrind, since very finely ground coffee can cause overflow in this unit.
• To prevent coffee overflowing from a mug/travel mug, use the same mug/travel mug to brew into
that was used to fill the water reservoir. Do not add more than 10 ounces (296 ml) of water.
• Added too much water. Remove single-serve pack and replace brew basket. Repeat brewing
cycle.
• Reduce amount of water in reservoir.
• Brew a different type of single-serve pack.
12
Page 13

Troubleshooting (cont.)
PROBLEM PROBABLE CAUSE/SOLUTION
Coffee not dispensing. • Piercing nozzle is clogged with coffee grounds. Turn unit off; unplug. Allow unit to cool
completely. To remove any built-up coffee grounds, insert end of bent paper clip into eye of
piercing nozzle. Follow cleaning piercing nozzle instructions on page 11.
Water reservoir fills too
slowly.
Failed foil seal. • There is variability in the single-serve pack manufacturing process which causes some types
• Unit hasn’t cooled down. Allow 2 minutes between brewing cycles.
• Try filling water reservoir before pushing down brew basket handle to pierce single-serve pack.
Start brewing cycle.
of single-serve packs to be weaker at the seams. Let cool 2 minutes between brewing, use less
water, or try a different brand.
13
Page 14

Limited Warranty
This warranty applies to products purchased and used in the U.S. and Canada. This is the only express warranty for this product and
is in lieu of any other warranty or condition.
This product is warranted to be free from defects in material and workmanship for a period of five (5) years from the date of original
purchase in Canada and one (1) year from the date of original purchase in the U.S. During this period, your exclusive remedy is repair
or replacement of this product or any component found to be defective, at our option; however, you are responsible for all costs
associated with returning the product to us and our returning a product or component under this warranty to you. If the product or
component is no longer available, we will replace with a similar one of equal or greater value.
This warranty does not cover glass, filters, wear from normal use, use not in conformity with the printed directions, or damage to
the product resulting from accident, alteration, abuse, or misuse. This warranty extends only to the original consumer purchaser or
gift recipient. Keep the original sales receipt, as proof of purchase is required to make a warranty claim. This warranty is void if the
product is used for other than single-family household use or subjected to any voltage and waveform other than as specified on the
rating label (e.g., 120V ~ 60 Hz).
We exclude all claims for special, incidental, and consequential damages caused by breach of express or implied warranty. All
liability is limited to the amount of the purchase price. Every implied warranty, including any statutory warranty or condition
of merchantability or fitness for a particular purpose, is disclaimed except to the extent prohibited by law, in which case such
warranty or condition is limited to the duration of this written warranty. This warranty gives you specific legal rights. You may have
other legal rights that vary depending on where you live. Some states or provinces do not allow limitations on implied warranties or
special, incidental, or consequential damages, so the foregoing limitations may not apply to you.
To make a warranty claim, do not return this appliance to the store. Please call 1.800.851.8900 in the U.S. or 1.800.267.2826 in Canada
or visit hamiltonbeach.com in the U.S. or hamiltonbeach.ca in Canada. For faster service, locate the model, type, and series numbers
on your appliance.
14
Page 15

PRÉCAUTIONS IMPORTANTES
Pour utiliser un appareil électroménager, vous devez toujours prendre des mesures élémentaires de sécurité pour réduire le risque d’incendie,
d’électrocution et/ou de blessure corporelle, en particulier les mesures suivantes :
1. Lire toutes les instructions.
2. Cet appareil n’est pas destiné à être utilisé par des personnes (y
compris les enfants) dont les capacités physiques, sensorielles
ou mentales sont réduites, ou manquant d’expérience et
de connaissance, sauf si elles sont étroitement surveillées
et instruites sur l’utilisation de l’appareil par une personne
responsable de leur sécurité.
3. Une surveillance étroite est requise pour tout appareil utilisé par
ou près des enfants. Surveiller que les enfants ne jouent pas
avec l’appareil.
4. Ne pas toucher les surfaces chaudes. Utiliser les poignées ou
les boutons. La prudence s’impose car des brûlures peuvent
survenir si on touche des pièces chaudes ou si on renverse
des liquides chauds.
5. Pour protéger contre le choc électrique, ne pas placer le cordon,
la fiche ou la cafetière dans l’eau ou autre liquide.
6. Débrancher l’appareil de la prise de courant lorsque la cafetière
n’est pas utilisée et avant le nettoyage. Laisser refroidir l’appareil
avant de placer ou de retirer des pièces, et avant de le nettoyer.
7. La cafetière doit être utilisée sur une surface droite loin du bord
du comptoir, pour empêcher le basculement accidentel.
8. Ne pas faire fonctionner un appareil électroménager avec un
cordon ou une fiche endommagée, ou lorsque l’appareil ne
fonctionne pas bien ou a été échappé ou endommagé d’une
manière quelconque. Le remplacement et la réparation du
cordon d’alimentation doivent être faits par le fabricant, son
agent de service ou toute personne qualifiée de façon à éviter
tout danger. Appeler le numéro de service à la clientèle fourni
pour des renseignements concernant l’examen, la réparation ou
l’ajustement.
9. L’utilisation d’accessoires non recommandés par le fabricant
d’électroménagers peut causer des blessures.
10. Ne pas utiliser à l’extérieur.
11. Ne pas laisser le cordon pendre par dessus le bord d’une table
ou d’un comptoir, ou toucher des surfaces chaudes, y compris
la cuisinière.
12. Ne placer jamais votre appareil sur ou à proximité d’un brûleur
électrique ou à gaz chaud, ou dans un four chauffé.
13. Ne pas utiliser cet appareil pour un autre usage que celui auquel
il est destiné.
14. AVERTISSEMENT : Pour réduire le risque d’incendie ou de choc
électrique, ne pas enlever le dessous de la cafetière. Aucune pièce
à l’intérieur n’est réparable par l’utilisateur. Les réparations
doivent être faites par du personnel d’entretien autorisé
seulement.
15. MISE EN GARDE ! Risque de coupures. Le support amovible
de la dosette 1 tasse contient une lame coupante. Manipuler
avec soin.
16. MISE EN GARDE ! Risque de coupures. Le perforateur est
coupant. Être prudent lors du nettoyage.
CONSERVER CES INSTRUCTIONS !
15
Page 16

Autres renseignements relatifs à la sécurité du consommateur
Cet appareil est destiné à un usage domestique uniquement.
w AVERTISSEMENT
fourni avec une fiche polarisée (une broche large) pour réduire le
risque d’électrocution. Cette fiche n’entre que dans un seul sens
dans une prise polarisée. Ne contrecarrez pas l’objectif sécuritaire
de cette fiche en la modifiant de quelque manière que ce soit ou en
utilisant un adaptateur. Si vous ne pouvez pas insérer complètement
la fiche dans la prise, inversez la fiche. Si elle refuse toujours de
s’insérer, faire remplacer la prise par un électricien.
Risque de choc électrique : Cet appareil est
La longueur du cordon installé sur cet appareil a été sélectionnée
afin de réduire les risques d’enchevêtrement ou de faux pas
causés par un fil trop long. L’utilisation d’une rallonge approuvée
est permise si le cordon est trop court. Les caractéristiques
électriques de la rallonge doivent être équivalentes ou supérieures
aux caractéristiques de l’appareil. Prendre toutes les précautions
nécessaires pour installer la rallonge de manière à ne pas la faire
courir sur le comptoir ou sur une table pour éviter qu’un enfant ne
tire sur le cordon ou trébuche accidentellement.
Afin d’éviter une surcharge électrique, évitez d’utiliser un autre
appareil à haute puissance sur le même circuit que la cafetière.
16
Page 17

Pièces et caractéristiques
*Pour commander des pièces :
Canada : 1.800.267.2826
Réservoir
Perforateur
(perfore un trou sur le dessus
de la dosette 1 tasse)
Panier-filtre*
AVANT LA PREMIÈRE UTILISATION : Laver toutes les
pièces amovibles dans de l’eau chaude savonneuse. Rincer
et sécher. Faire un cycle d’infusion en ayant ajouter de l’eau
de chaque côté puis jeter l’eau à la fin du cycle.
Support amovible de dosette
1 tasse* (perforateur de trou
au fond de la dosette)
Poignée et verrouillage
du panier-filtre
Filtre amovible pour café
moulu* (à insérer dans
le panier-filtre lors d’une
infusion)
Plateau
d’égouttage*
Socle de tasse
à hauteur
réglable*
Bouton MARCHE/ARRÊT (I/ )
17
Page 18

Comment infuser la dosette 1 tasse
w MISE EN GARDE
Risque de brûlures.
Pour éviter tout contact avec le
café ou l’eau brûlant :
• Ne pas remplir au-delà de la
ligne de remplissage MAX
(10 onces [296 ml]).
• Remplir le réservoir d’eau
avec la tasse ou le gobelet à
emporter dans laquelle sera
infusé le café.
• Insérer complètement la tasse
ou le gobelet à emporter sous
le panier-filtre.
• Pour des résultats optimaux,
utiliser les dosettes K-CupMD*.
w MISE EN GARDE
Risque de coupures.
Le support amovible de la
dosette 1 tasse contient une lame
coupante. Manipuler avec soin.
REMARQUE : Il peut s’écouler
jusqu’à 2 minutes avant que le
café infusé commence à couler
dans la tasse ou le gobelet à
emporter. La durée moyenne
du cycle d’infusion complet
est d’environ 4 minutes. Pour
de meilleurs résultats, laisser
refroidir la cafetière pendant au
moins 2 minutes entre les cycles
d’infusion.
18
1 2 3
Déposer la dosette dans le support
de la dosette 1 tasse.
4 5
* K-Cup est une marque déposée de Keurig, Inc. L’usage du nom de la marque déposée commerce K-Cup n’implique aucune
affiliation et aucun endossement par Keurig, Inc.
Appuyer sur le contour de la
dosette et l’enfoncer jusqu’à ce
que celle-ci s’insère correctement
et que le fond soit perforé. Ne
pas retirer la feuille métallique.
Abaisser la poignée du panierfiltre pour verrouiller et perforer
la feuille métallique de la dosette.
“CLIC”
Page 19

Comment infuser la dosette 1 tasse (suite)
6
7
Remplir le réservoir avec la tasse
ou le gobelet à emporter dans
lequel sera infusé le café.
11
Utiliser la position de tasse plus
haute pour une tasse plus grande,
comme un gobelet à emporter.
98
1210
13
19
Page 20

Comment infuser la dosette 1 tasse (suite)
La cafetière se coupe
automatiquement et le voyant
s’éteint lorsque le cycle d’infusion
est terminé.
Appuyer à nouveau sur le bouton
MARCHE/ARRÊT (I/ ) pour
INTERROMPRE l’infusion à la
moitié du cycle.
Laisser refroidir 2 minutes entre
chaque cycle d’infusion.
Le panier-filtre et le support de
14
Appuyer sur le bouton MARCHE/
ARRÊT (I/ ). Le voyant
d’alimentation s’allume pour
indiquer que la cafetière est sous
tension.
15
16
Soulever la poignée du panierfiltre pour déverrouiller et retirer.
la dosette 1 tasse doivent être
rincés après chaque utilisation.
20
Page 21

Comment infuser le café moulu
w MISE EN GARDE
Risque de brûlures. Pour éviter tout
contact avec le café ou l’eau brûlant :
• Ne pas remplir au-delà de la
ligne de remplissage MAX
(10 onces [296 ml]).
• Remplir le réservoir d’eau avec
la tasse ou le gobelet à emporter
dans laquelle sera infusé le café.
• Insérer complètement la tasse
ou le gobelet à emporter sous le
panier-filtre.
• Pour éviter le débordement,
ne pas remplir de mouture
de café au-delà de la ligne de
remplissage MAX.
REMARQUE : Il peut s’écouler
jusqu’à 2 minutes avant que le
café infusé commence à couler
dans la tasse ou le gobelet à
emporter. La durée moyenne
du cycle d’infusion complet
est d’environ 4 minutes. Pour
de meilleurs résultats, laisser
refroidir la cafetière pendant au
moins 2 minutes entre les cycles
d’infusion.
21
Pour enlever le support de
la dosette 1 tasse, abaisser
la languette du support de la
dosette 1 tasse; puis soulever
pour enlever.
w AVERTISSEMENT
de brûlures.
débordement, ne pas remplir de
mouture de café au-delà de la
ligne de remplissage MAX.
Ajouter du café dans le filtre
amovible. Déposer le filtre dans le
panier-filtre. (Quantité maximale
4
pour toutes moutures de grains de
café : 2 c. à soupe [30 ml]).
Pour éviter le
Risque
3
w MISE EN GARDE
Risque de coupures. Le support
amovible de la dosette 1 tasse
contient une lame coupante.
Manipuler avec soin.
21
Page 22

Comment infuser le café moulu
(suite)
65
Abaisser pour verrouiller.
9 10 12
22
7
11
8
Remplir le réservoir avec la tasse
ou le gobelet à emporter dans
lequel sera infusé le café.
Utiliser la position de tasse plus
haute pour une tasse plus grande,
comme un gobelet à emporter.
Page 23

Comment infuser le café moulu
(suite)
13
La cafetière se coupe automatiquement et le voyant s’éteint lorsque
le cycle d’infusion est terminé.
Si l’on utilise une mouture de café plus fine, le café continuera de couler
même si le témoin est éteint.
Appuyer à nouveau sur le bouton MARCHE/ARRÊT (I/ ) pour
INTERROMPRE l’infusion à la moitié du cycle.
Laisser refroidir 2 minutes entre chaque cycle d’infusion.
Le panier-filtre et le support de la dosette 1 tasse doivent être
nettoyés après chaque utilisation.
14
15
Appuyer sur le bouton MARCHE/
ARRÊT (I/ ). Le voyant
d’alimentation s’allume pour
indiquer que la cafetière est sous
tension.
16
23
Page 24

Entretien et nettoyage
Toutes les cafetières doivent être nettoyées au moins une fois par
mois (une fois par semaine pour les zones à eau calcaire).
w AVERTISSEMENT
Ne pas immerger le cordon, la fiche ou la cafetière dans aucun
liquide.
Risque d’électrocution.
24
1
2
Verser 1/2 tasse (118 ml) de
vinaigre blanc ordinaire et de
mise en 1/2 tasse (118 ml) d’eau
froide dans le réservoir.
3
Placer une tasse en dessous pour
récupérer la solution eau/vinaigre.
4
Appuyer une fois sur le bouton
MARCHE/ARRÊT (I/ ). Au bout
de 30 secondes, débrancher la
cafetière et laisser le vinaigre agir.
Au bout de 30 minutes, brancher
la cafetière et laisser-la finir le
cycle d’infusion. Lorsque le cycle
d’infusion est terminé, attender
que la cafetière refroidisse.
la tasse et rincer-la. Répéter les
étapes 1 à 4 avec 1 tasse (237 ml)
d’eau froide du robinet au lieu de
1/2 tasse (118 ml) de vinaigre
et 1/2 tasse (118 ml) d’eau.
Vider
65
Page 25

Entretien et nettoyage (suite)
Nettoyage périodique du
perforateur : Le perforateur est
situé sous le couvercle de la
cafetière. Plier un petit trombone,
comme illustré, et insérer la
pointe du trombone dans les
trous du perforateur vers le haut
pour retirer tous les grains de
café. Faire 2 ou 3 infusions avec
7
de l’eau froide pour déloger tous
les grains de café du perforateur.
NE PAS utiliser le réglage
“SANI” du lave-vaisselle. Les
températures du cycle “SANI”
peuvent endommager le produit.
LAVABLES AU
LAVE-VAISSELLE
w AVERTISSEMENT
Ne pas laisser refroidir la cafetière représente un
risque d’éclaboussures d’eau ou de café chaud
provenant du perforateur. Nettoyer avec prudence.
w MISE EN GARDE
Le perforateur est coupant. Nettoyer avec
prudence.
Risque de brûlures.
Risque de coupures.
25
Page 26

Dépannage
PROBLÈME CAUSE PROBABLE/SOLUTION
Le café a un mauvais
goût.
Présence d’eau sur le
comptoir et sous la
cafetière.
La cafetière n’infusera
pas.
Le café déborde du
panier-filtre.
Le café déborde de la
grande tasse ou du
gobelet à emporter.
Eau résiduelle dans
le réservoir.
• La cafetière a besoin d’être nettoyée. Voir le chapitre « Entretien et nettoyage » à la page 24.
• La mouture du café est trop grossière ou trop fine. Régler le moulin à café sur café moulu pour
cafetière automatique.
• La qualité et la fraîcheur du café laissent à désirer.
• L’eau est de piètre qualité. Utiliser de l’eau filtrée ou en bouteille.
• Le réservoir contient trop d’eau. Vérifier également la tasse utilisée pour remplir le réservoir.
Certaines tasses ne versent pas correctement et de l’eau peut couler le long de la tasse et sur
le plan de travail.
• S’assurer que le temps de refroidissement est de 2 minutes.
• Vérifier si le réservoir contient de l’eau. L’appareil ne fonctionnera pas si le réservoir est vide et
que l’on enfonce le bouton d’infusion.
• Le perforateur est obstrué. Suivre les instructions de nettoyage du perforateur à la page 25.
• Utiliser le filtre amovible pour le café moulu.
• Utiliser moins de café moulu.
• Lorsque vous utiliser du café en grain, un café moulu comme pour une cafetière à filtre
automatique donnera de meilleurs résultats. Attention de ne pas trop moudre le café. Si le café
est moulu trop finement, l’appareil peut déborder.
• Pour éviter que le café ne déborde de la tasse/gobelet à emporter, utiliser la même grande tasse/
gobelet à emporter pour infuser ayant été utilisée pour remplir le réservoir d’eau. Ne pas ajouter
plus de 10 oz (296 ml) d’eau.
• Trop d’eau ajoutée. Retirer la dosette 1 tasse et réinstaller le panier-filtre. Répéter le cycle
d’infusion.
26
Page 27

Dépannage (suite)
PROBLÈME CAUSE PROBABLE/SOLUTION
Bruit ou vapeur à la fin
du cycle d’infusion.
Le café ne se verse pas
dans la tasse.
Le réservoir se remplit
trop lentement.
Bris du sceau
d’aluminium.
• Diminuer la quantité d’eau dans le réservoir.
• Infuser une autre sorte de dosette 1 tasse.
• Le café moulu obstrue le perforateur. Éteindre l’appareil et le débrancher. Permettre le
refroidissement complet de l’appareil. Insérer un trombone à papier plié dans l’orifice du
perforateur pour déloger l’accumulation de café moulu. Suivre les instructions de nettoyage du
perforateur à la page 25.
• L’appareil n’est pas assez froid. Patienter 2 minutes avant le prochain cycle d’infusion.
• Essayer de remplir le réservoir d’eau avant d’abaisser la poignée du panier-filtre servant à
perforer la dosette 1 tasse. Démarrer le cycle d’infusion.
• Il existe plusieurs procédés de fabrication de dosettes 1 tasse pouvant causer le bris de certains
rebords des dosettes 1 tasse. Laisser refroidir 2 minutes entre les cycles d’infusion, utiliser moins
d’eau ou essayer une autre marque.
27
Page 28

Garantie limitée
Cette garantie s’applique aux produits achetés et utilisées aux É.-U. et au Canada. C’est la seule garantie expresse pour ce
produit et est en lieu et place de tout autre garantie ou condition.
Ce produit est garanti contre tout défaut de matériaux et de main-d’oeuvre pour une période des cinq (5) ans à compter de
la date d’achat d’origine au Canada et un (1) an à compter de la date d’achat d’origine aux É.-U. Au cours de cette période,
votre seul recours est la réparation ou le remplacement de ce produit ou tout composant s’avérant défectueux, à notre gré,
mais vous êtes responsable de tous les coûts liés à l’expédition du produit et le retour d’un produit ou d’un composant dans
le cadre de cette garantie. Si le produit ou un composant n’est plus offert, nous le remplacerons par un produit similaire de
valeur égale ou supérieure.
Cette garantie ne couvre pas le verre, les filtres, l’usure d’un usage normal, l’utilisation non conforme aux directives imprimées,
ou des dommages au produit résultant d’un accident, modification, utilisation abusive ou incorrecte. Cette garantie s’applique
seulement à l’acheteur original ou à la personne l’ayant reçu en cadeau. La présentation du reçu de vente d’origine comme
preuve d’achat est nécessaire pour faire une réclamation au titre de cette garantie. Cette garantie s’annule si le produit est
utilisé autrement que par une famille ou si l’appareil est soumis à toute tension ou forme d’onde différente des caractéristiques
nominales précisées sur l’étiquette (par ex. : 120 V ~ 60 Hz).
Nous excluons toutes les réclamations au titre de cette garantie pour les dommages spéciaux, consécutifs et indirects causés
par la violation de garantie expresse ou implicite. Toute responsabilité est limitée au prix d’achat. Chaque garantie implicite,
y compris toute garantie ou condition de qualité marchande ou d’adéquation à un usage particulier, est exonérée, sauf
dans la mesure interdite par la loi, auquel cas la garantie ou condition est limitée à la durée de cette garantie écrite. Cette
garantie vous donne des droits légaux précis. Vous pouvez avoir d’autres droits qui varient selon l’endroit où vous habitez.
Certaines provinces ne permettent pas les limitations sur les garanties implicites ou les dommages spéciaux ou indirects de
telle sorte que les limitations ci-dessus ne s’appliquent peut-être pas à votre cas.
Ne pas retourner cet appareil au magasin lors d’une réclamation au titre de cette garantie. Téléphoner au 1.800.851.8900 aux
É.-U. ou au 1.800.267.2826 au Canada ou visiter le site internet www.hamiltonbeach.com aux É.-U. ou www.hamiltonbeach.ca
au Canada. Pour un service plus rapide, trouvez le numéro de modèle, le type d’appareil et les numéros de série sur votre
appareil.
28
Page 29

SALVAGUARDIAS IMPORTANTES
Cuando utilice artefactos eléctricos, siempre deben seguirse precauciones de seguridad básicas a fin de reducir el riesgo de incendio,
descarga eléctrica, y/o lesiones a personas, incluyendo las siguientes:
1. Lea todas las instrucciones.
2. Este aparato no se destina para utilizarse por personas
(incluyendo niños) cuyas capacidades físicas, sensoriales o
mentales sean diferentes o estén reducidas, o carezcan de
experiencia o conocimiento, a menos que dichas personas
reciban una supervisión o capacitación para el funcionamiento
del aparato por una persona responsable de su seguridad.
3. Se requiere de una estrecha supervisión cuando el aparato se
use cerca de niños. Los niños deben supervisarse para asegurar
que ellos no empleen los aparatos como juguete.
4. Verifique que el voltaje de su instalación corresponda con
el del producto.
5. No toque superficies calientes. Use manijas o perillas. Es
importante tener cuidado ya que pueden ocurrir quemaduras
al tocar partes calientes o como resultado del derrame de líquido
caliente.
6. Para protegerse contra choques eléctricos no sumerja el cordón,
el enchufe o la cafetera en el agua o en otro líquido.
7. Desenchufe la cafetera cuando no esté en uso y antes de la
limpieza. Deje que se enfríe antes de ponerle o quitarle piezas
y antes de su limpieza.
8. La cafetera debe ser operada sobre una superficie plana lejos
del borde de la mesera o mostrador para evitar que se vuelque
accidentalmente.
9. No opere ningún aparato con cables o enchufe dañados o
después de que el aparato funcione mal o se caiga o dañe de
cualquier manera. El reemplazo del cable de suministro y las
reparaciones deben ser efectuadas por el fabricante, su agente
de servicio, o personas igualmente calificadas para poder evitar
un peligro. Llame al número de servicio al cliente proporcionado
para información sobre examinación, reparación o ajuste.
10. El uso de aditamentos de accesorio no recomendados por el
fabricante del aparato pueden causar lesiones.
11. No lo use a la intemperie.
12. No deje que el cable cuelgue del borde de la mesa, mostrador,
ni que toque superficies calientes, incluyendo la estufa.
13. No lo coloque sobre o cerca de una cocina eléctrica o a gas
caliente o dentro de un horno caliente.
14. No use el artefacto para fines ajenos a los que está destinado.
15. ADVERTENCIA: Para reducir el riesgo de incendio o choque
eléctrico, no quite la cubierta inferior de la cafetera. En el interior
no hay piezas que el usuario pueda reparar. Las reparaciones
deberán ser realizadas solamente por personal de servicio
autorizado.
16. ¡PRECAUCIÓN! Peligro de Cortaduras: El soporte de paquete
desmontable de servicio individual contiene una hoja de corte
filosa. Tenga cuidado al manipular.
17. ¡PRECAUCIÓN! Peligro de Cortaduras: La boquilla de
perforación es filosa. Tenga cuidado al lavarla.
¡GUARDE ESTAS INSTRUCCIONES!
29
Page 30

Otra Información de Seguridad para el Cliente
Este aparato ha sido diseñado solamente para uso doméstico.
w ADVERTENCIA
es provisto con un enchufe polarizado (una pata más ancha) para
reducir el riesgo de una descarga eléctrica. El enchufe embona
únicamente en una dirección dentro de un tomacorriente polarizado.
No trate de obviar el propósito de seguridad del enchufe
modificándolo de alguna manera o utilizando un adaptador. Si el
enchufe no entra completamente en la toma, invierta el enchufe.
Si aún no entra, haga que un electricista reemplace la toma.
Peligro de Descarga Eléctrica: Este aparato
El largo del cable que se usa en este aparato fue seleccionado para
reducir el peligro de que alguien se enganche o tropiece con un
cable más largo. Si es necesario usar un cable más largo, se podrá
usar un cable de extensión aprobado. La clasificación eléctrica
nominal del cable de extensión debe ser igual o mayor que la
clasificación nominal del aparato. Es importante tener cuidado de
colocar el cable de extensión para que no se pliegue sobre el
mostrador o la mesera en donde niños puedan tirar del mismo o
tropezarse accidentalmente.
Para evitar una sobrecarga eléctrica del circuito, no use otro aparato
de alto voltaje en el mismo circuito con este aparato.
30
Page 31

Piezas y Características
*Para ordenar partes:
EE. UU.:
www.hamiltonbeach.com
México:
1.800.851.8900
01 800 71 16 100
Depósito
Boquilla de Perforación
(perfora un orificio en la
parte superior del paquete
de servicio individual)
ANTES DEL PRIMER USO: Lave todas las piezas
desmontables en agua caliente jabonosa. Enjuague y seque.
Prepare un ciclo con agua y descarte el agua.
Soporte Desmontable del Paquete
de Servicio Individual* (perfora
un orificio en la parte inferior del
paquete)
Manija y Traba de la
Canasta de Preparación
Soporte Desmontable
para Café Molido* (entra
Canasta de Preparación*
dentro de la canasta de
preparación)
Bandeja
de Goteo*
Soporte Multinivel
para Taza*
Botón ENCENDIDO/APAGADO (I/ )
31
Page 32

Cómo Preparar un Paquete de Servicio Individual
w PRECAUCIÓN
Peligro de Quemaduras.
Para evitar contacto con café o
agua caliente:
• No llene con agua por encima
de la línea de llenado MAX
(10 onzas [296 ml]) de agua.
• Llene el depósito con agua con
la taza o la taza de viaje en la
que preparará el café.
• Coloque la taza o la taza de viaje
totalmente debajo de la canasta
de preparación.
• Para mejores resultados, utilice
los paquetes K-Cup®*.
w PRECAUCIÓN
Peligro de Cortaduras.
El soporte de paquete
desmontable de servicio
individual contiene una hoja de
corte filosa. Tenga cuidado al
manipular.
NOTA: Pueden pasar hasta 2
minutos antes de que el café
preparado comience a verterse
en su taza o taza de viaje. El
promedio de preparación total
es de 4 minutos. Tenga cuidado
al manipular. Para mejores
resultados, deje que la cafetera
se enfríe por al menos 2 minutos
entre los ciclos de preparación.
32
1 2 3
Coloque un paquete en el soporte
de paquete desmontable de
servicio individual.
4 5
* K-Cup es una marca registrada de Keurig, Inc. El uso de la marca registrada K-Cup no implica ninguna afiliación o
promoción por parte de Keurig, Inc.
Presione hacia abajo sobre el
borde del paquete hasta que
éste quede en su lugar con un
clic y se perfore el orificio en la
parte inferior.
metálico.
Presione hacia abajo la manija de
la canasta de preparación para
trabar y perforar la tapa de papel
metálico del paquete.
“CHASQUIDO”
No quite el papel
Page 33

Cómo Preparar un Paquete de Servicio Individual (cont.)
6
7
Llene el depósito con la taza o
la taza de viaje en la que va a
preparar el café.
11
Utilice una posición de taza más
alta para una taza más grande,
como una taza de viaje.
98
1210
13
33
Page 34

Cómo Preparar un Paquete de Servicio Individual (cont.)
La cafetera se apagará
automáticamente y la luz se
apagará cuando el ciclo de
preparación se haya completado.
Presione el botón ENCENDIDO/
APAGADO (I/ ) de nuevo para
DETENER la preparación a mitad
del ciclo.
Deje pasar 2 minutos para enfriar
la unidad entre preparaciones.
14
Presione el botón ENCENDIDO/
APAGADO (I/ ). La luz indicadora
de encendido se encenderá para
indicar que la cafetera está
encendido.
15
16
Tire la manija de la canasta de
preparación hacia arriba para
destrabar y quitar.
La canasta de preparación y el
soporte de paquete desmontable
de servicio individual deben
enjuagarse
después de cada uso.
34
Page 35

Cómo Preparar con Café Molido
w PRECAUCIÓN
Peligro de Quemaduras.
Para evitar contacto con café o
agua caliente:
• No llene con agua por encima
de la línea de llenado MAX
(10 onzas [296 ml]).
• Llene el depósito con agua con
la taza o la taza de viaje en la
que preparará el café.
• Coloque la taza o la taza de
viaje totalmente debajo de la
canasta de preparación.
• Para evitar los desbordes,
mantenga el café molido por
debajo de la línea de llenado
MAX.
NOTA: Pueden pasar hasta 2
minutos antes de que el café
preparado comience a verterse
en su taza o taza de viaje. El
promedio de preparación total es
de 4 minutos. Tenga cuidado al
manipular. Para mejores resultados,
deje que la cafetera se enfríe por al
menos 2 minutos entre los ciclos
de preparación.
4
21
Para quitar el soporte de paquete
de servicio individual, presione
en la lengüeta del soporte del
paquete de servicio individual;
luego levántelo.
w ADVERTENCIA
Peligro de Quemaduras.
los desbordes, mantenga el café
molido por debajo de la línea de
llenado MAX.
Agregue café al soporte
desmontable. Coloque el soporte
en la canasta de preparación.
(2 cucharadas [30 ml] es la
cantidad MAX de cualquier tipo de
café molido).
Para evitar
3
w PRECAUCIÓN
Peligro de Cortaduras.
El soporte de paquete
desmontable de servicio individual
tiene una hoja filosa. Tenga
cuidado al manipular.
35
Page 36

Cómo Preparar con Café Molido (cont.)
5
9 10 12
36
6
Presione hacia abajo para
bloquear.
7
11
8
Llene el depósito con la taza o
la taza de viaje en la que va a
preparar el café.
Utilice una posición de taza más
alta para una taza más grande,
como una taza de viaje.
Page 37

Cómo Preparar con Café Molido (cont.)
13
La cafetera se apagará automáticamente y la luz se apagará
cuando el ciclo de preparación se haya completado.
Si se utiliza café molido más fino, éste seguirá goteando después de
que se haya apagado la luz.
Presione el botón ENCENDIDO/APAGADO (I/ ) de nuevo para
DETENER la preparación a mitad del ciclo.
Deje pasar 2 minutos para enfriar la unidad entre preparaciones.
La canasta de preparación y el soporte de paquete de servicio
individual deben limpiarse después de cada uso.
14
15
Presione el botón ENCENDIDO/
APAGADO (I/ ). La luz
indicadora de encendido se
encenderá para indicar que la
cafetera está encendido.
16
37
Page 38

Cuidado y Limpieza
Todas las cafeteras deben limpiarse por lo menos una vez por mes
(una vez por semana en áreas de agua dura).
w ADVERTENCIA
No sumerja el cable, enchufe o cafetera en ningún líquido.
Peligro de Descarga.
1 2
38
Vierta 1/2 taza (118 ml) de
vinagre blanco y 1/2 taza (118 ml)
de agua fría en el depósito.
65
3
Coloque una taza debajo para
recoger la solución de agua/
vinagre.
4
Presione el botón ENCENDIDO/
APAGADO (I/ ) una vez.
Después de 30 segundos,
desenchufe la unidad y deje que
el vinagre realice la limpieza.
Después de 30 minutos, enchufe
la unidad y deje finalizar el ciclo
de preparación. Cuando el ciclo
de preparación haya finalizado,
espere a que la unidad se enfríe.
Vacíe la taza y enjuague. Repita
los pasos 1–4 con 1 taza (237 ml)
de agua fría de grifo en lugar de
1/2 taza (118 ml) de vinagre y
1/2 taza (118 ml) de agua.
Page 39

Cuidado y Limpieza (cont.)
Limpieza de rutina de la boquilla
de perforación: La boquilla se
encuentra ubicada en la tapa de la
cafetera. Doble un ganchito para
papel como se indica; introduzca
la punta del ganchito a través
de los orificios de la boquilla
de perforación y dentro de la
boquilla para verificar que se haya
eliminado todo el resto de café.
Haga funcionar 2 o 3 veces con
agua fría para asegurar que se
7
haya eliminado todo el resto de
café de la boquilla de perforación.
No utilice la configuración
“SANI” cuando la lave en el
lavavajillas. Las temperaturas del
ciclo “SANI” pueden dañar su
producto.
w ADVERTENCIA
No permitir que la cafetera se enfríe puede provocar que
agua caliente o café salgan disparados de la boquilla de
perforación. Tenga cuidado al lavarla.
w PRECAUCIÓN
La boquilla de perforación es filosa. Tenga cuidado al lavarla.
Peligro de Quemaduras.
Peligro de Cortaduras.
RESISTENTE AL
LAVAVAJILLAS
39
Page 40

Resolviendo Problemas
PROBLEMA CAUSA PROBABLE/SOLUCIÓN
El café sabe mal. • La cafetera necesita limpiarse. Vea “Cuidado y Limpieza” en la página 38.
• El café molido es muy grueso o muy fino. Ajuste el molino de café a molido goteo automático.
• El café es de baja calidad y frescura.
• El agua es de baja calidad. Use agua filtrada o embotellada.
Hay agua en el
mostrador debajo
de la unidad.
La cafetera no prepara
café.
El café se derrama de
la canasta de
preparación.
El café se derrama
de la taza para viaje
o taza común.
Queda agua en el
depósito.
• Se llenó de más el depósito de agua. También verifique la taza utilizada para llenar el depósito.
Algunas jarras/tazas no vierten el líquido limpiamente y pueden derramar agua por el costado de
la taza o sobre el mostrador.
• Asegúrese de haber dejado pasar los 2 minutos de tiempo de enfriamiento.
• Controle la presencia de agua en el depósito. Si no hay agua en el depósito y el botón de
preparación se ha accionado, la unidad no efectuará la preparación.
• La boquilla de perforación está tapada. Siga las instrucciones “Limpieza de rutina de la boquilla
de perforación” en la página 39.
• Utilice el soporte desmontable para café molido.
• Utilice una menor cantidad de café molido.
• Cuando utilice café en granos, un molido común para cafeteras automáticas de filtro dará el
mejor resultado. Tenga cuidado de no moler los granos de más, porque un café muy fino puede
provocar desbordes en esta unidad.
• Para evitar que el café se derrame de la taza/taza de viaje, utilice la misma taza/taza de viaje
que usó para llenar el depósito de agua. No agregue más de 10 onzas (296 ml) de agua.
• Se agregó demasiada agua. Quite el paquete de servicio individual y vuelva a colocar la canasta
de preparación. Repita el ciclo de preparación.
40
Page 41

Resolviendo Problemas (cont.)
PROBLEMA CAUSA PROBABLE/SOLUCIÓN
Ruidos o vapor en
el final del ciclo de
preparación.
No sale café. • La boquilla de perforación está atascada con borra de café. Apague la unidad, desenchufe. Deje
El depósito de agua se
llena muy lentamente.
Se rompió el sello
metálico.
• Reduzca la cantidad de agua del depósito.
• Prepare un tipo diferente de paquete de servicio individual.
que el aparato se enfríe completamente. Para quitar acumulaciones de borra de café, introduzca
el extremo de un gancho para papel dentro del ojo de la boquilla de penetración. Siga las
instrucciones de “Limpieza de rutina de la boquilla de perforación” de la página 39.
• La unidad no se ha enfriado. Deje pasar 2 minutos entre preparaciones.
• Trate de llenar el depósito de agua antes de presionar hacia abajo la palanca de la canasta de
preparación para perforar el paquete de servicio individual. Comience el ciclo de preparación.
• Existe variabilidad en el proceso de fabricación de los paquetes de servicio individual, lo que
provoca que algunos tipos de paquetes de servicio individual sean más débiles en las juntas.
Deje enfriar por 2 minutos entre preparaciones, utilice menos agua, o pruebe una marca
diferente.
41
Page 42

Grupo HB PS, S.A. de C.V.
Monte Elbruz 124-301
Colonia Palmitas, Delegación Miguel Hidalgo
C.P. 11560, México, Distrito Federal
01 800 71 16 100
PÓLIZA DE GARANTÍA
PRODUCTO:
MARCA:
Grupo HB PS, S.A. de C.V. cuenta con una Red de Centros de Servicio Autorizada, por favor consulte en la lista anexa el nombre y dirección de los establecimientos en la
República Mexicana en donde usted podrá hacer efectiva la garantía, obtener partes, componentes, consumibles y accesorios; así como también obtener servicio para
productos fuera de garantía. Para mayor información llame sin costo: Centro de Atención al consumidor: 01 800 71 16 100
Grupo HB PS, S.A. de C.V. le otorga a partir de la fecha de compra:
GARANTÍA DE 1 AÑO.
COBERTURA
• Esta garantía ampara, todas las piezas y componentes del producto que resulten con defecto de fabricación incluyendo la mano de obra.
Grupo HB PS,
•
todo lo anterior sin costo adicional para el consumidor.
• Esta garantía incluye los gastos de transportación del producto que deriven de su cumplimiento dentro de su red de servicio.
S.A. de C.V. se obliga a reemplazar, reparar o reponer, cualquier pieza o componente defectuoso; proporcionar la mano de obra necesaria para su diagnóstico y reparación,
LIMITACIONES
• Esta garantía no ampara el reemplazo de piezas deterioradas por uso o por desgaste normal, como son: cuchillas, vasos, jarras, filtros, etc.
• Grupo HB PS, S.A. de C.V. no se hace responsable por los accidentes producidos a consecuencia de una instalación eléctrica defectuosa, ausencia de toma de tierra, clavija de enchufe
en mal estado, etc.
EXCEPCIONES
Esta garantía no será efectiva en los siguientes casos:
a) Cuando el producto se hubiese utlizado en condiciones distintas a las normales. (Uso industrial, semi-industrial o comercial.)
b) Cuando el producto no hubiese sido operado de acuerdo con el instructivo de uso.
c) Cuando el producto hubiese sido alterado o reparado por personas no autorizadas por Grupo HB PS, S.A. de C.V. el fabricante nacional, importador o comercializador responsable
respectivo.
El consumidor puede solicitar que se haga efectiva la garantía ante la propia casa comercial donde adquirió su producto, siempre y cuando Grupo HB PS, S.A. de C.V. no cuente con talleres de
servicio.
MODELO:
42
Page 43

PROCEDIMIENTO PARA HACER EFECTIVA LA GARANTÍA
• Para hacer efectiva la garantía no deben exigirse mayores requisitos que la presentación del producto y la póliza correspondiente, debidamente sellada por el establecimiento que lo vendió.
• Para hacer efectiva la garantía, lleve su aparato al Centro de Servicio Autorizado más cercano a su domicilio (consulte la lista anexa).
• Si no existe Centro de Servicio Autorizado en su localidad llame a nuestro Centro de Atención al Consumidor para recibir instrucciones de como hacer efectiva su garantía.
• El tiempo de reparación, en ningún caso será mayor de 30 días naturales contados a partir de la fecha de recepción del producto en nuestros Centros de Servicio Autorizados.
• En caso de que el producto haya sido reparado o sometido a mantenimiento y el mismo presente deficiencias imputables al autor de la reparación o del mantenimiento dentro de los treinta
días naturales posteriores a la entrega del producto al consumidor, éste tendrá derecho a que sea reparado o mantenido de nuevo sin costo alguno. Si el plazo de la garantía es superior a
los treinta días naturales, se estará a dicho plazo.
• El tiempo que duren las reparaciones efectuadas al amparo de la garantía no es computable dentro del plazo de la misma. Cuando el bien haya sido reparado se iniciará la garantía respecto
de las piezas repuestas y continuará con relación al resto. En el caso de reposición del bien deberá renovarse el plazo de la garantía.
SELLO DEL VENDEDOR QUEJAS Y SUGERENCIASFECHA DE ENTREGA
DÍA___ MES___ AÑO___
Si desea hacer comentarios o sugerencias con respecto a nuestro servicio o tiene alguna queja derivada de la atención recibida en
alguno de nuestros Centros de Servicio Autorizados, por favor dirigirse a:
GERENCIA INTERNACIONAL DE SERVICIO
Email: mexico.service@hamiltonbeach.com.mx
01 800 71 16 100
RED DE CENTROS DE SERVICIO AUTORIZADA GRUPO HB PS, S.A. DE C.V.
Distrito Federal
ELECTRODOMÉSTICOS
Av. Plutarco Elias Cailes No. 1499
Zacahuitzco MEXICO 09490 D.F.
Tel: 01 55 5235 2323 • Fax: 01 55 5243 1397
CASA GARCIA
Av. Patriotismo No. 875-B
Mixcoac MEXICO 03910 D .F.
Tel: 01 55 5563 8723 • Fax: 01 55 5615 1856
Nuevo Leon
FERNANDO SEPULVEDA REFACCIONES
Ruperto Martínez No. 238 Ote.
Centro MONTERREY, 64000 N.L.
Tel: 01 81 8343 6700 • Fax: 01 81 8344 0486
Jalisco
SERVICIOS DE MANTENIMIENTO CASTILLO
Garibaldi No. 1450
Ladrón de Guevara
GUADALAJARA 44660 Jal.
Tel: 01 33 3825 3480 • Fax: 01 33 3826 1914
Chihuahua
DISTRIBUIDORA TURMIX
Av. Paseo Triunfo de la Rep. No. 5289 Local 2 A.
Int. Hipermart
Alamos de San Lorenzo
CD. JUAREZ 32340 Chih.
Tel: 01 656 617 8030 • Fax: 01 656 617 8030
43
Page 44

Modelos:
49962, 49963, 49995R, 49999A
Tipo:
A93
Características Eléctricas:
120 V~ 60 Hz 600 W
Los modelos incluídos en el instructivo de Uso y Cuidado pueden ir seguidos o no por un sufijo correspondiente a una
o varias letras del alfabeto y sus combinaciones, separadas o no por un espacio, coma, diagonal, o guión. Como ejemplos
los sufijos pueden ser: “Y” y/o “MX” y/o “MXY” y/o “Z”.
840225003
2/16
 Loading...