

Hamilton Beach 47950C, 47900C User Manual
READ BEFORE USE
LIRE AVANT UTILISATION
LEA ANTES DE USAR
Questions?
Please call us – our friendly
associates are ready to help.
USA: 1.800.851.8900
¿Preguntas?
Por favor llámenos – nuestros
amables representantes están
listos para ayudar.
MEX: 01 800 71 16 100
Le invitamos a leer cuidadosamente
este instructivo antes de usar su
aparato.
Visit www.hamiltonbeach.com for our
complete line of products and Use and
Care Guides – as well as
delicious recipes, tips, and
to register your product online!
Rendez-vous sur www.hamiltonbeach.ca
pour notre liste complète de produits et de
nos manuels utilisateur – ainsi que nos
délicieuses recettes, nos conseils et pour
enregistrer votre produit en ligne !
¡Visite www.hamiltonbeach.com.mx para
obtener nuestra línea completa de productos
y las Guías de Uso y Cuidado, además de
deliciosas recetas, consejos y para registrar
su producto en línea!
Questions ?
N’hésitez pas à nous appeler –
nos associés s’empresseront
de vous aider.
CAN : 1.800.267.2826
BrewStation
®
English ...................... 2
Français .................. 13
Español ................... 25

2
IMPORTANT SAFEGUARDS
1. Read all instructions.
2. Do not touch hot surfaces. Use handles or knobs. Care must
be taken, as burns can occur from touching hot parts or from
spilled, hot liquid.
3. To protect against electric shock, do not place cord, plug, or
BrewStation
®
in water or other liquid.
4. Close supervision is necessary when any appliance is used
by or near children.
5. Unplug from outlet when either the BrewStation
®
or clock is
not in use and before cleaning. Allow to cool before putting
on or taking off parts and before cleaning the appliance.
6. Scalding may occur if the lid is lifted during the brewing cycle.
Do not open lid until coffeemaker has cooled completely.
7. BrewStation
®
must be operated on a flat surface away from
the edge of counter to prevent accidental tipping.
8. Do not operate any appliance with a damaged cord or plug,
or after the appliance malfunctions or is dropped or damaged
in any manner. Call our toll-free customer service number for
information on examination, repair, or adjustment.
9. The use of accessory attachments not recommended by the
appliance manufacturer may cause injuries.
10. Do not use outdoors.
11. Do not let cord hang over edge of table or counter or touch
hot surfaces, including stove.
12. The coffee tank is designed for use with this BrewStation
®
. It
must never be used on a range top or in a microwave oven.
13. Do not place BrewStation
®
on or near a hot gas or electric
burner or in a heated oven.
14. To disconnect BrewStation
®
, turn controls to OFF and then
remove plug from wall outlet.
15. WARNING! To reduce the risk of fire or electric shock,
do not remove the bottom cover. No user-serviceable parts
are inside. Repair should be done by authorized service
personnel only.
16. Do not use appliance for other than intended use.
When using electrical appliances, basic safety precautions should always be followed to reduce the risk of fire, electric shock, and/or
injury to persons, including the following:
SAVE THESE INSTRUCTIONS!
3
Other Consumer Safety Information
This appliance is intended for household use only.
WARNING! Shock Hazard: This appliance has a polarized plug
(one wide blade) that reduces the risk of electric shock. The
plug fits only one way into a polarized outlet. Do not defeat the
safety purpose of the plug by modifying the plug in any way or
by using an adapter. If the plug does not fit fully into the outlet,
reverse the plug. If it still does not fit, have an electrician replace
the outlet.
The length of the cord used on this appliance was selected to
reduce the hazards of becoming tangled in or tripping over a
longer cord. If a longer cord is necessary, an approved extension
cord may be used. The electrical rating of the extension cord
must be equal to or greater than the rating of the appliance. Care
must be taken to arrange the extension cord so that it will not
drape over the countertop or tabletop where it can be pulled on
by children or accidentally tripped over.
To avoid an electrical circuit overload, do not use another highwattage appliance on the same circuit with your BrewStation
®
.
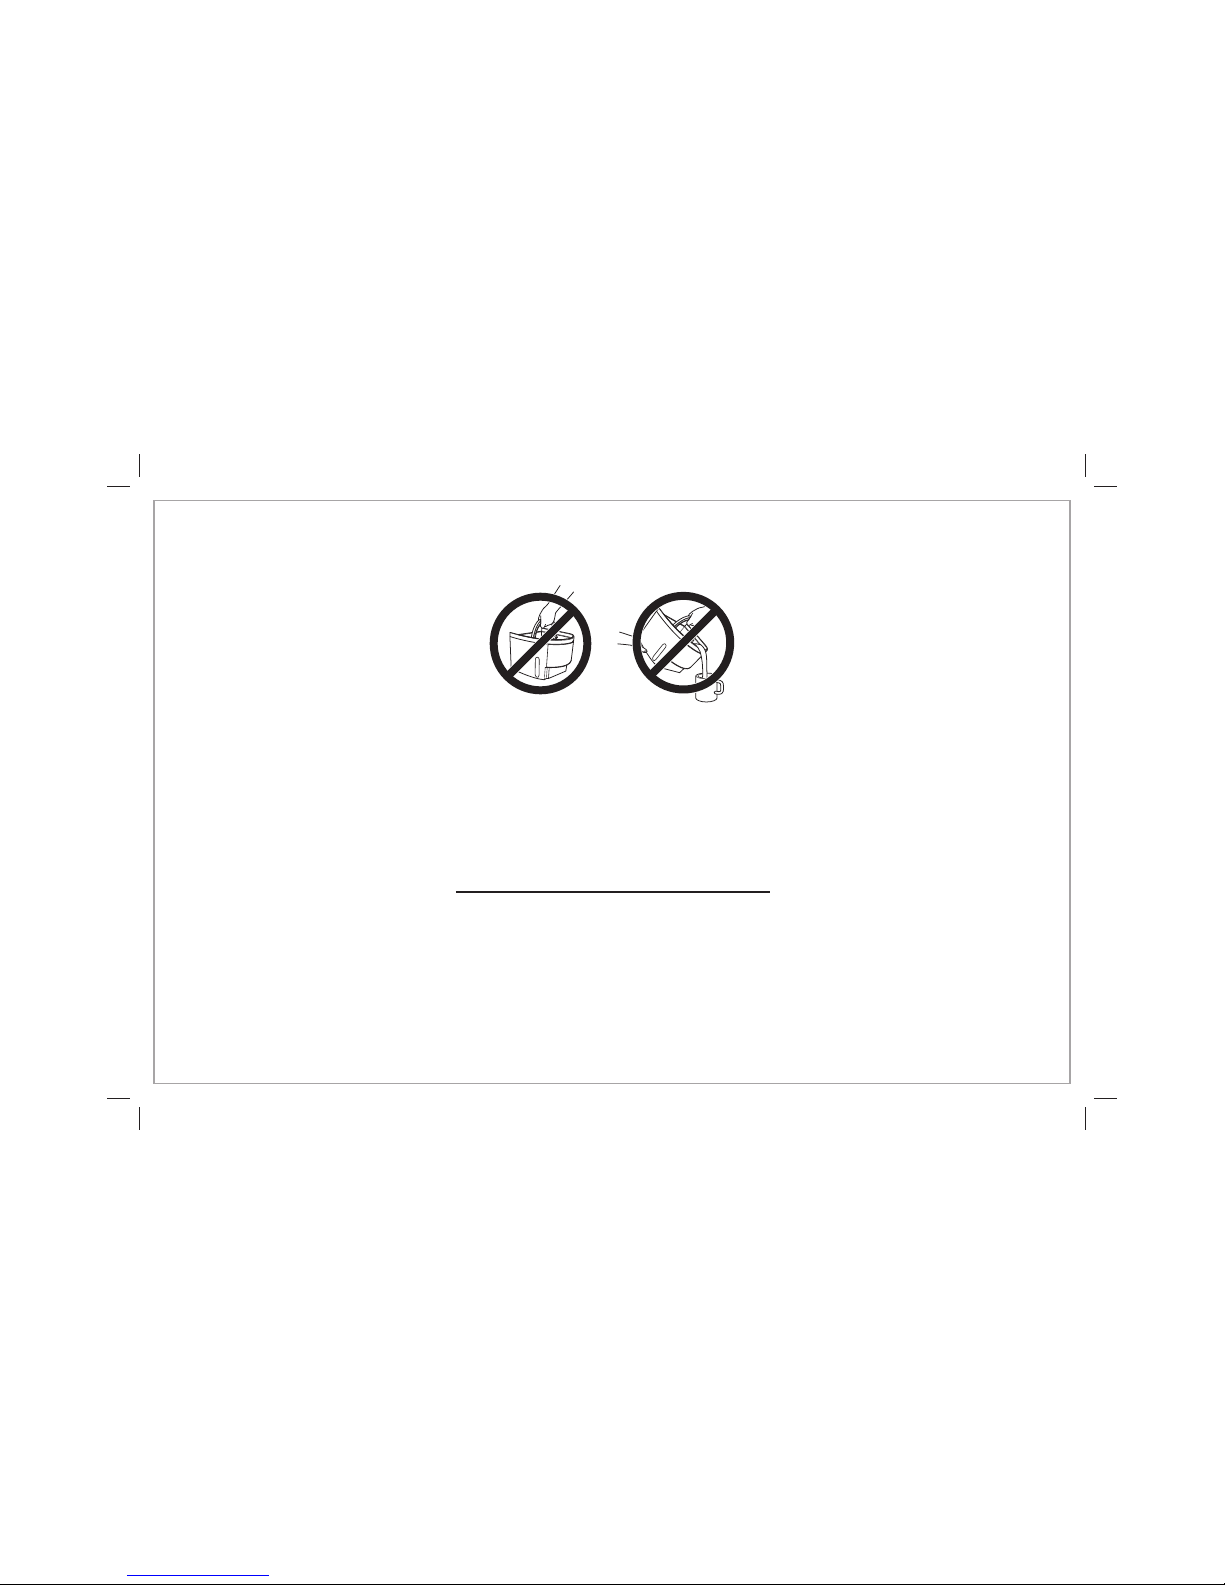
IMPORTANT
Never use coffee tank to pour hot coffee or carry hot coffee.
Handle coffee tank when it holds only cold water or iced coffee.
Additional Information
• If overflow occurs: Let unit, coffee, and grounds cool completely before attempting any cleanup.
• Use only brand-name, high-quality filters.
• Use only 1 tablespoon of ground coffee for each cup of water. When making iced coffee, use 2 tablespoons of ground coffee
for each cup of water.
• Use coffeemaker cleaner to prevent hard water deposits that affect coffeemaker performance. Clean monthly.
• Do not clean coffee tank in dishwasher.
• Read instructions before using.
4
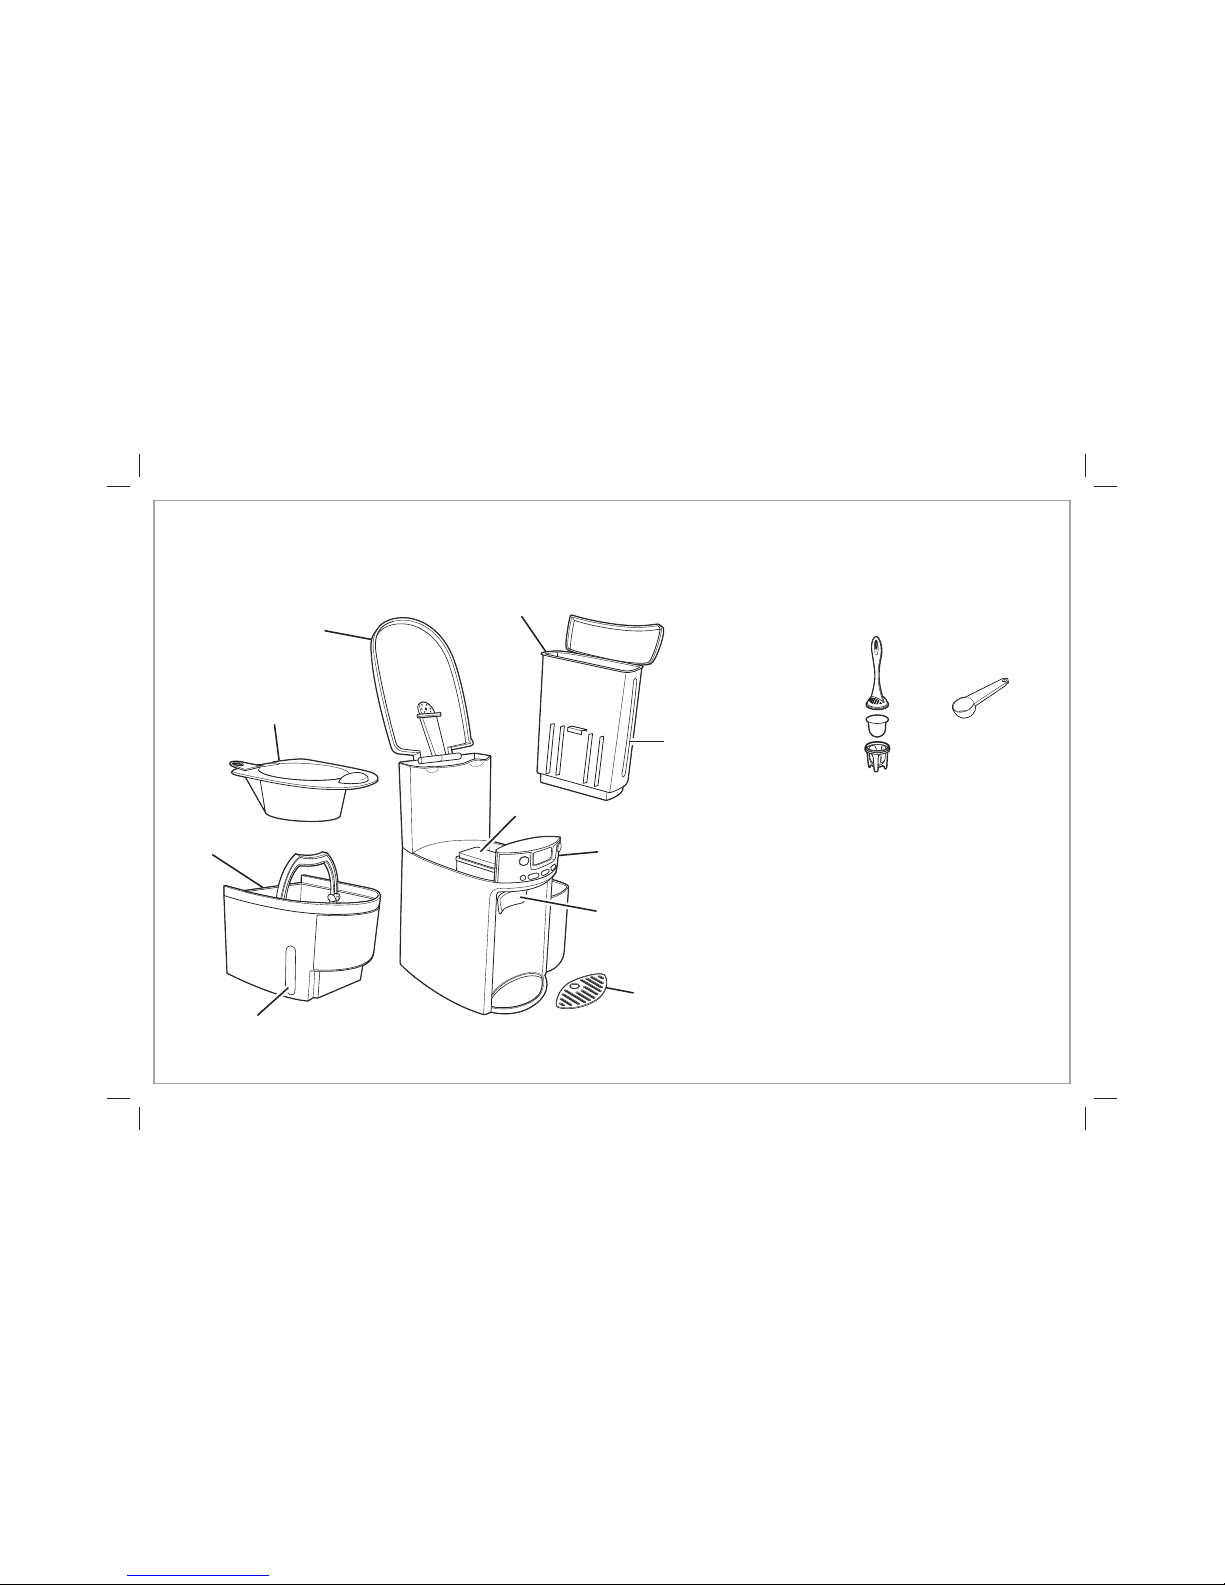
Parts and Features
Filter Basket
Coffee
Tank
Coffee Level
Guide
Coffee Dispenser
Bar
Removable
Drip Tray
Water
Level
Guide
Water Filter
Lid
Control Panel
and Display
To Order Accessories:
1.800.851.8900 (U.S.)
1.800.267.2826 (Canada)
01.800.71.16.100 (Mexico)
or visit
hamiltonbeach.com
hamiltonbeach.ca
Coffee Scoop
Optional Accessories
Removable
Water Reservoir
Keep Warm Plate
5
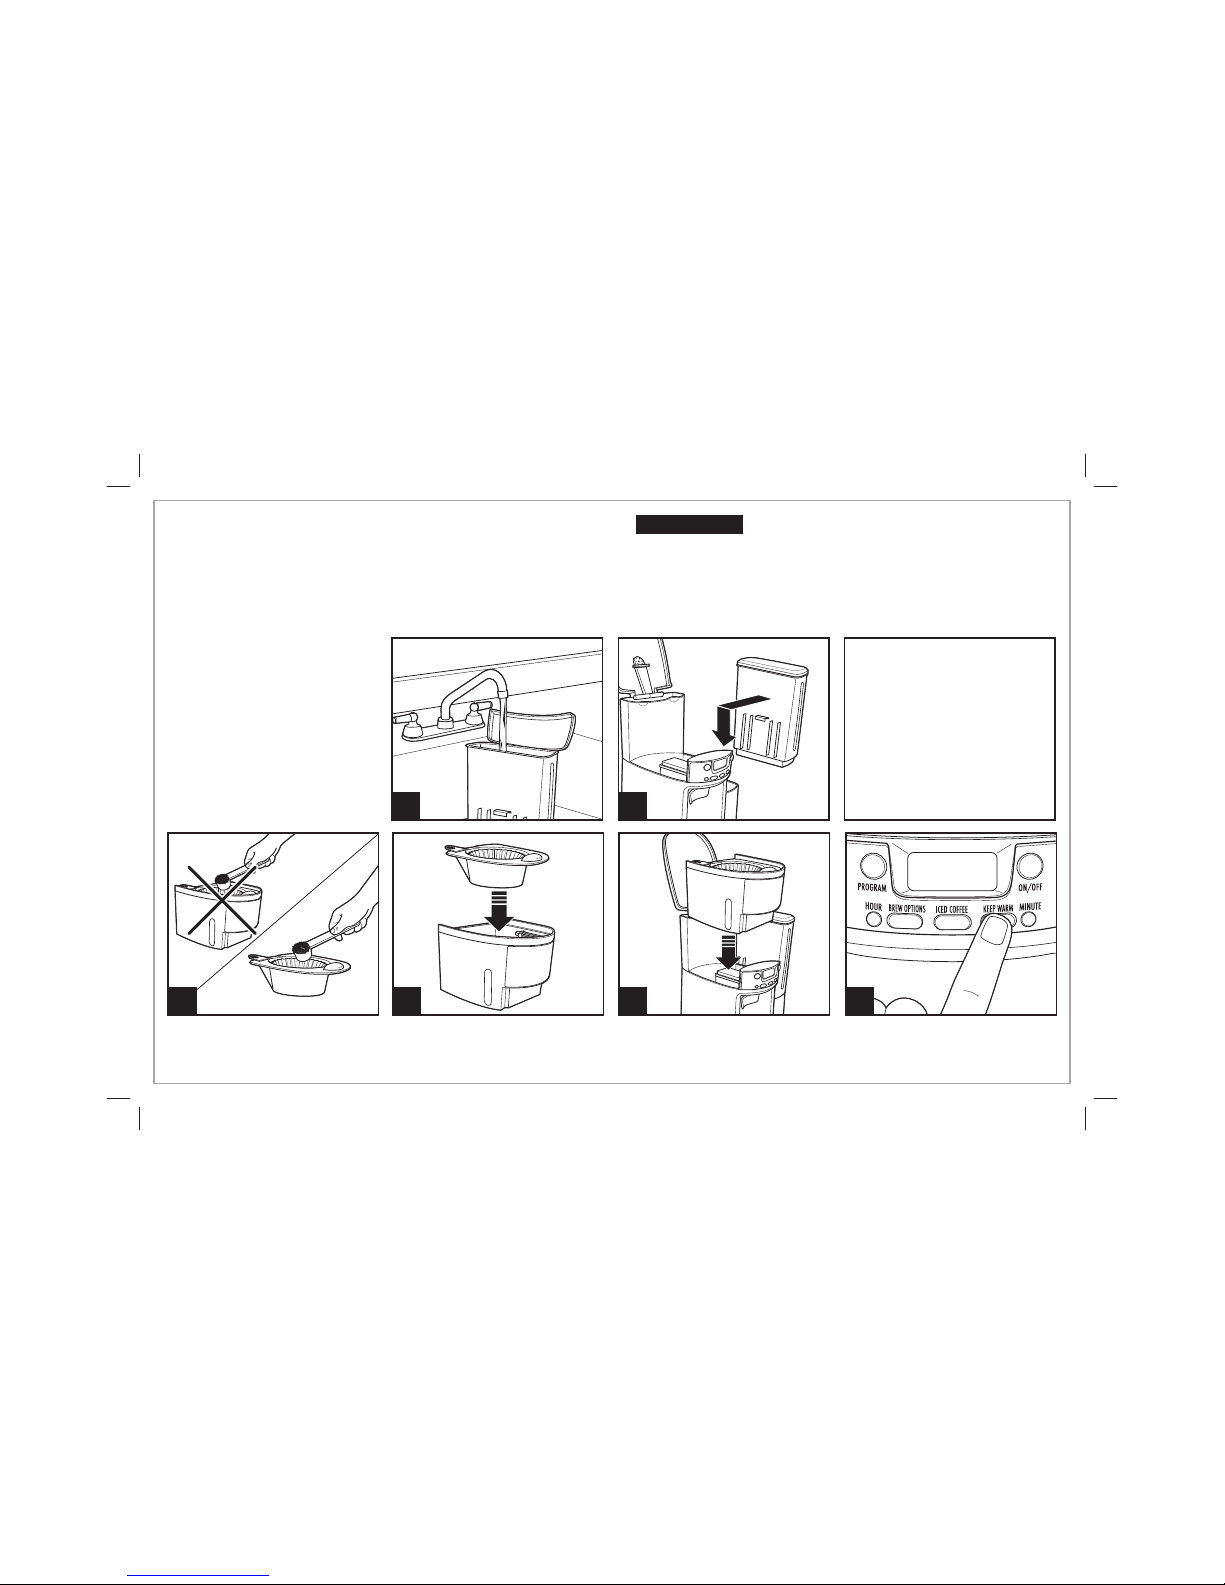
How To Make Coffee
1 2
4 5
Place paper filter in brew basket;
add coffee. Avoid getting coffee
grounds in any other areas of the
BrewStation®.
BEFORE FIRST USE: Wash
coffee tank, filter basket, and drip
tray in hot, soapy water. NEVER
put the coffee tank in dishwasher.
BrewStation
®
can be programmed
to automatically shut off in 0, 1, 2,
3, or 4 hours as desired. Default is
2 hours for automatic shutoff.
*Coffee scoop is optional feature on select models.
Recommended Coffee Per Cup:
1 scoop* or 1 level tablespoon per cup
For Iced Coffee:
2 scoops or 2 level tablespoons
per cup
Maximum Amount of Coffee
for BrewStation
®
:
12 tablespoons
3
Burn Hazard.
•
Never use coffee tank to pour or carry hot coffee.
• Handle coffee tank only when filling with ice for iced coffee and
to clean tank after BrewStation
®
has been shut off and the coffee
is cool.
• If BrewStation
®
overflows, unplug unit. Allow unit, coffee, and
grounds to cool before cleaning unit, coffee, or grounds.
w WARNING
6
Set KEEP WARM hours to 0, 1, 2, 3,
or 4.
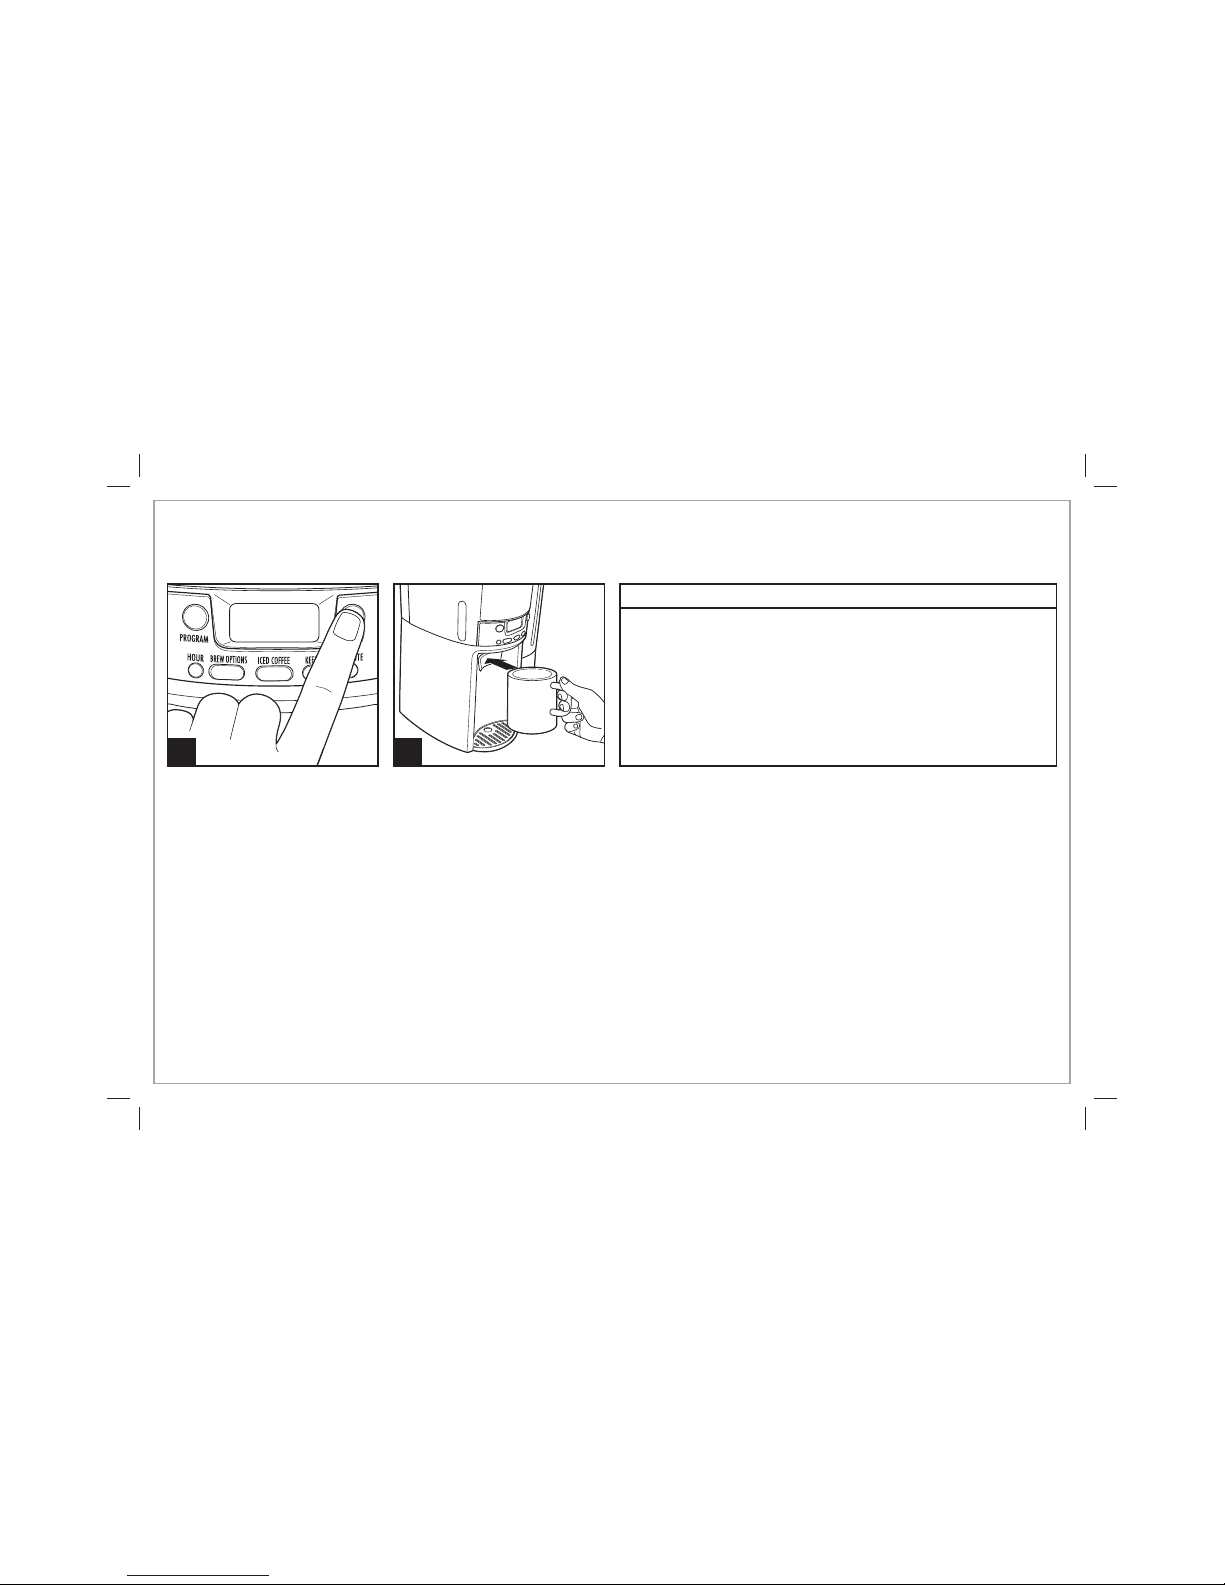
6
8
How To Make Coffee
(cont.)
7
Brew Options
NOTE: BOLD mode will require additional time to complete a brewing
cycle. It is recommended to select a Brew Option before pressing the
ON
button. However, the setting can be changed during the brewing
cycle. If a Brew Option is not selected, the coffeemaker will
automatically brew on the regular/default setting.
TO REHEAT COFFEE: Press and hold ON/OFF button for 3 seconds.
This will reset the timer and keep coffee warm for selected number
of hours (0, 1, 2, 3, or 4).
REGULAR
Press Brew Options button, no display
BOLD
Enhanced full/strong-flavored coffee: Press BREW OPTIONS button until BOLD is
displayed
1-4 CUPS
When brewing 1–4 cups of coffee: Press BREW OPTIONS button until 1–4 CUPS
is displayed
7
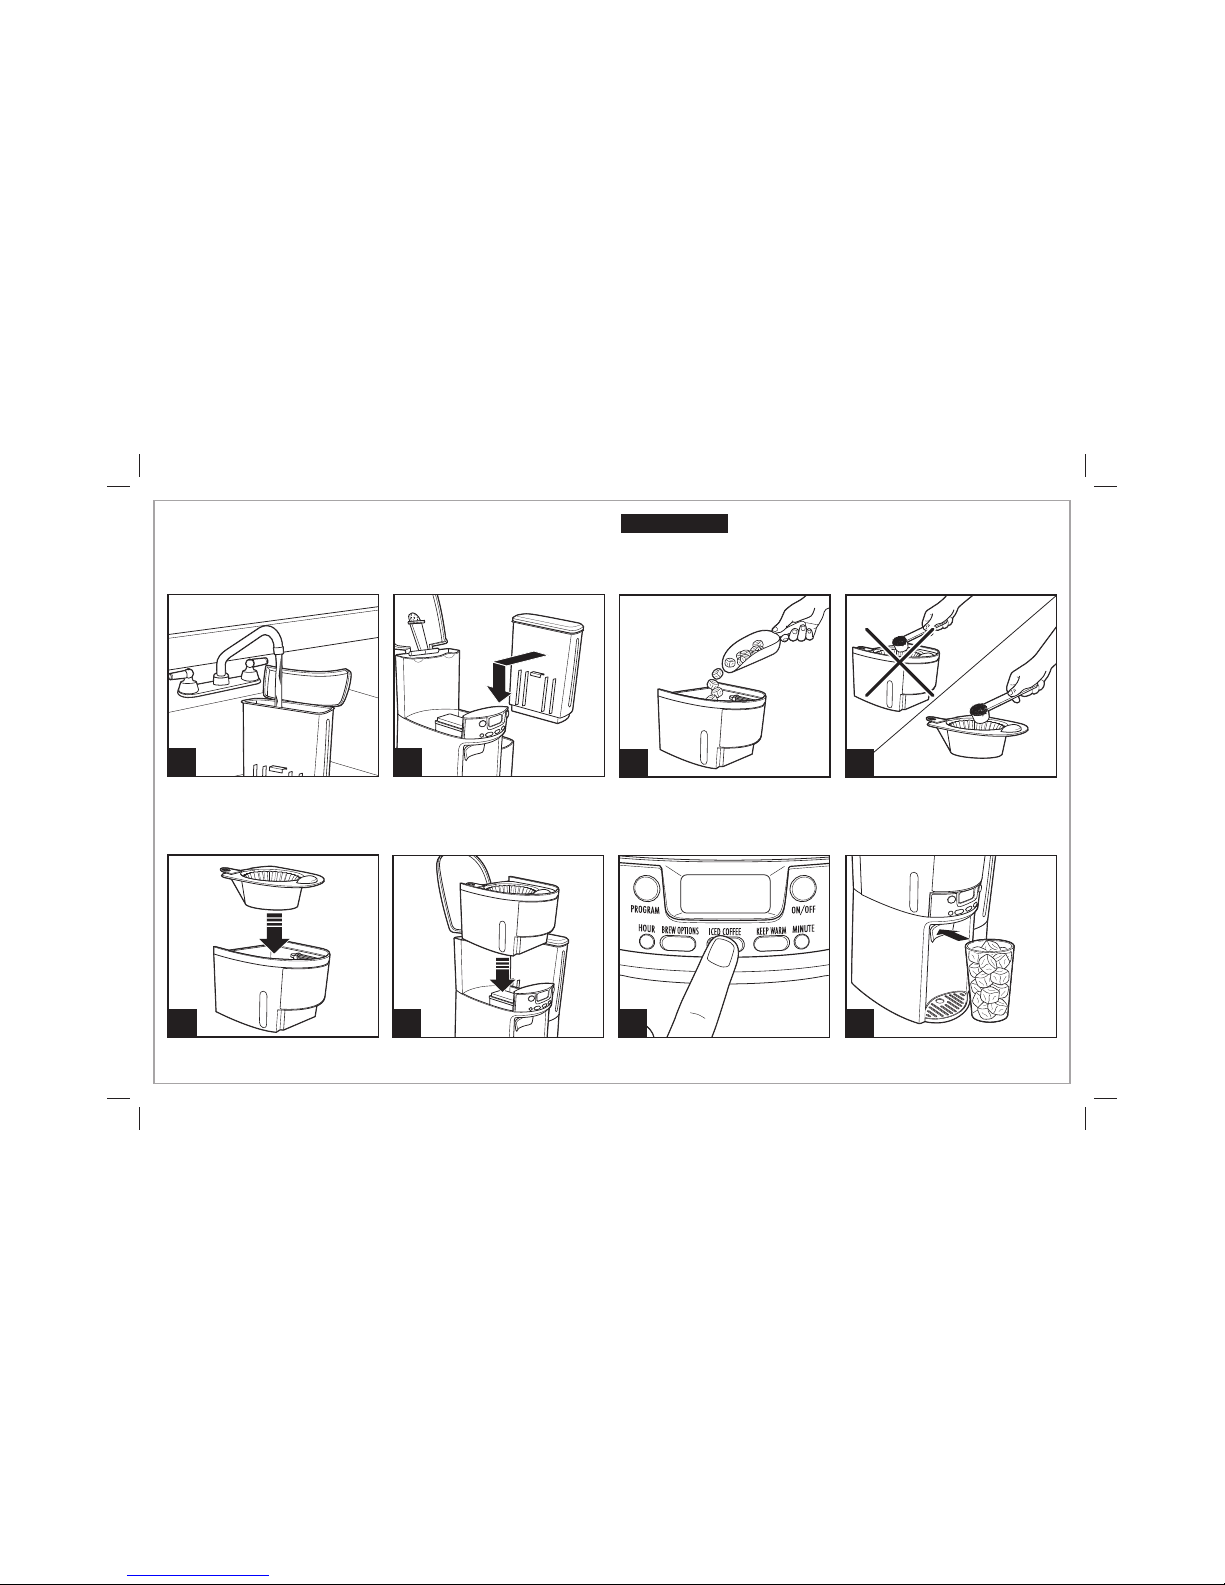
1 2
6 7
Fill removable water reservoir
with water. Do not fill beyond
the 6-cup line when making iced
coffee.
Fill coffee tank with ice to the
10 CUP marking line.
Select ICED COFFEE. Press ON. Keep
Warm setting defaults to 0.
Make sure filter basket does not touch ice. If basket touches ice, tank
is too full. Reduce ice to 10-cup marking line.
To Make Iced Coffee
*Coffee scoop is optional feature on select models.
8
43
Place paper filter in brew basket.
Brew double-strength coffee for
iced coffee. Add 2 scoops* or
2 level tablespoons of ground
coffee per cup (up to 12 scoops).
5
Burn Hazard.
If BrewStation
®
overflows, unplug unit. Allow unit, coffee,
and grounds to cool before cleaning unit, coffee, or grounds.
w WARNING
8
Programming
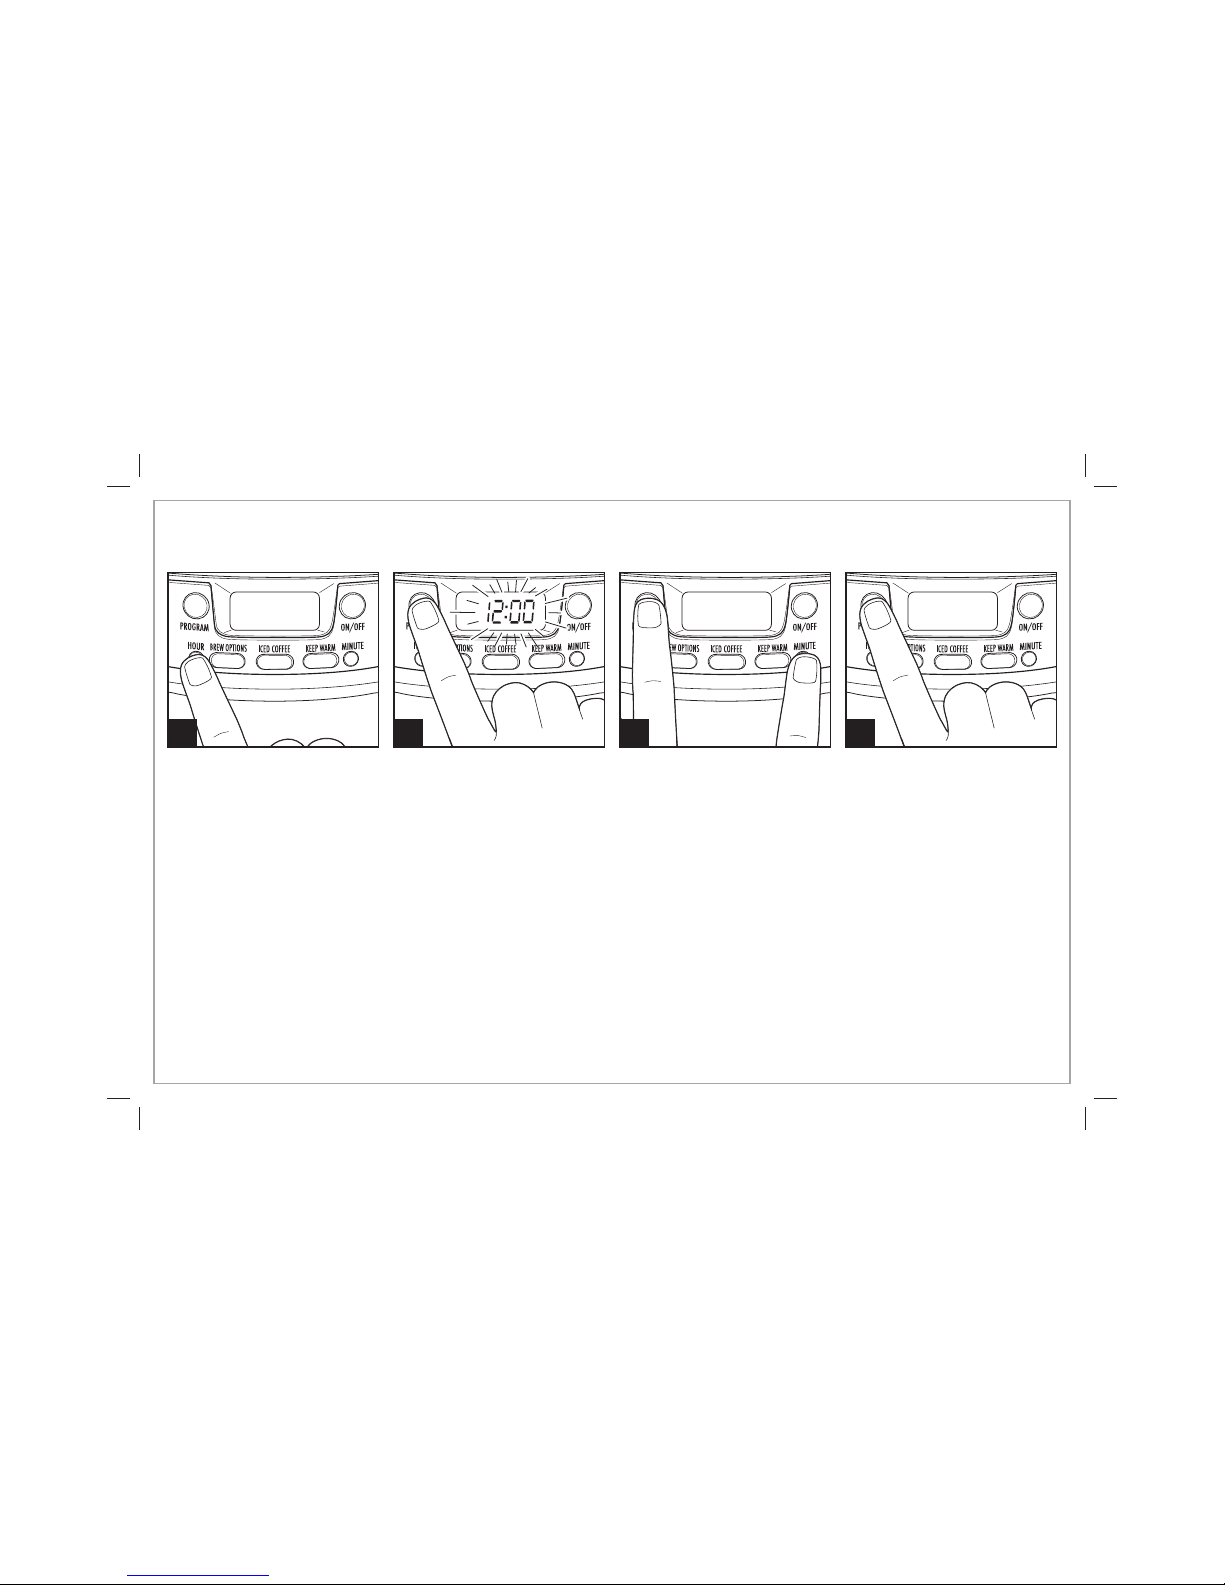
1 2 3 4
To set clock: Press
HOUR
and then
MINUTE
. NOTE: Clock time must
be set for programming function
to work.
To program auto brew: Press and hold PROGRAM until clock flashes.
Continue holding
PROGRAM;
then press
HOUR
and
MINUTE
until the
desired brewing start time is reached. “START TIME” will display
after time is selected. Select
BREW OPTIONS
and KEEP WARM settings,
if desired.
Press and release
PROGRAM
to
activate automatic brewing. A
green light will signal that the
unit is in program mode. “START
TIME” will disappear in the display
after
PROGRAM
button is pressed.
Mocha Cinnamon Iced Coffee
12 tablespoons ground coffee 1 cup chocolate syrup
1/2 teaspoon ground cinnamon 8 cups ice cubes
1 1/2 cups half-and-half
1. Fill water reservoir with water to the 6-cup line. Fill coffee tank with ice cubes to the 10-cup marking line. Place over water reservoir.
2. Place filter basket over coffee tank. Add coffee filter, coffee, and cinnamon to basket. Brew coffee.
3. For one serving, dispense 8 ounces of brewed coffee into a 12-ounce thermal cup or glass. Add 3 tablespoons half-and-half, 2 tablespoons
chocolate syrup, and 1 cup ice. Stir and enjoy. Servings: 8 (12-ounce)
Iced Coffee Recipe
9
INSIDE OF COFFEEMAKER:
Follow steps 1–5 in “Cleaning With Vinegar.”
WATER FILTER:
Remove the water filter from the water reservoir and wash by hand with warm, soapy water.
COFFEE TANK FILTER SCREEN:
The coffee tank filter screen cannot be removed. To clean, run water through the top and bottom of
the tank. Check for leaks.
OUTSIDE OF COFFEEMAKER:
Wipe outside with a soft cloth and warm, soapy water. Do not use abrasive cleaners, since they will
scratch the finish of the product.
w WARNING
General Cleaning Instructions
Shock Hazard. Do not immerse
cord, plug, or coffeemaker in any
liquid.
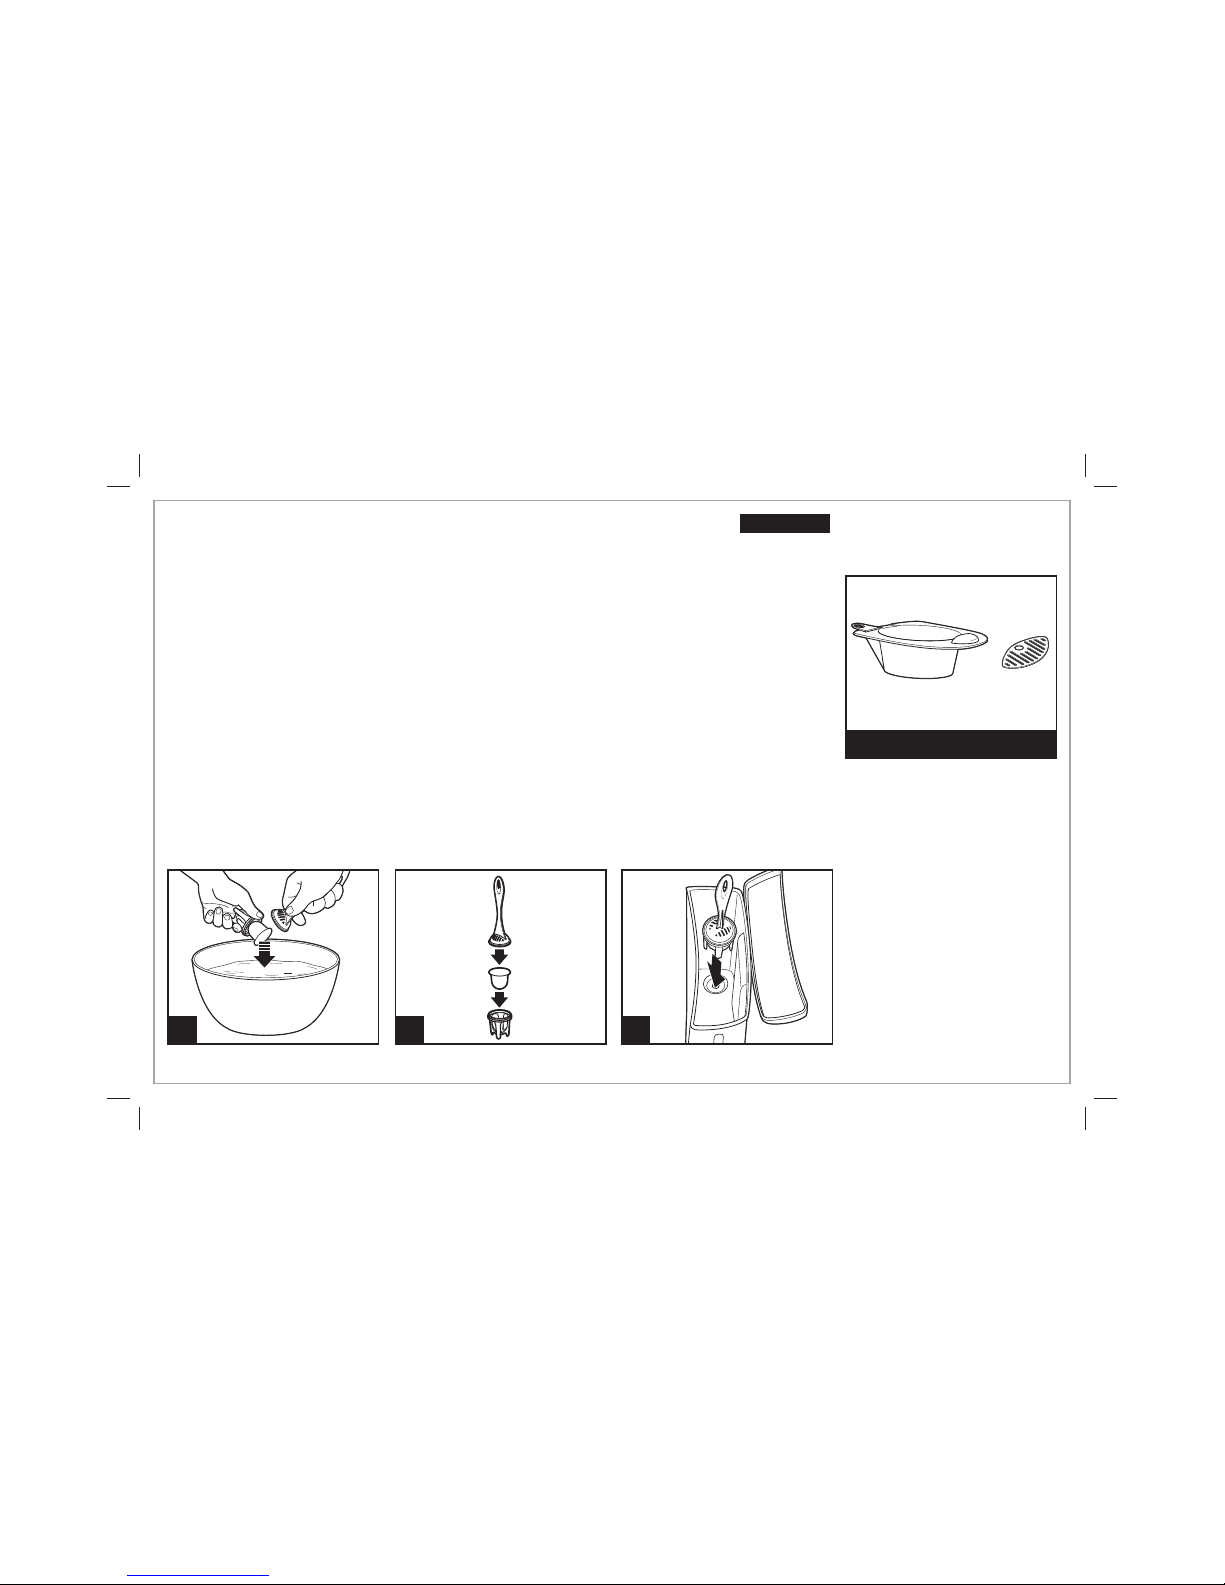
Water Filter
(optional accessory)
2
3
Water Filter (Optional Accessory)
If using a water filter, it should be
replaced every 60 cycles for best
tasting coffee.
For better tasting coffee, use a water filter.
Filter replacement is recommended every 60 cycles.
To Order a Water Filter Call:
1.800.851.8900 (U.S.)
1.800.267.2826 (Canada)
01.800.71.16.100 (Mexico)
or visit hamiltonbeach.com
hamiltonbeach.ca
1
15 min.
DISHWASHER-SAFE
DO NOT use the “SANI” setting
when washing in the dishwasher.
“SANI” cycle temperatures could
damage your product.
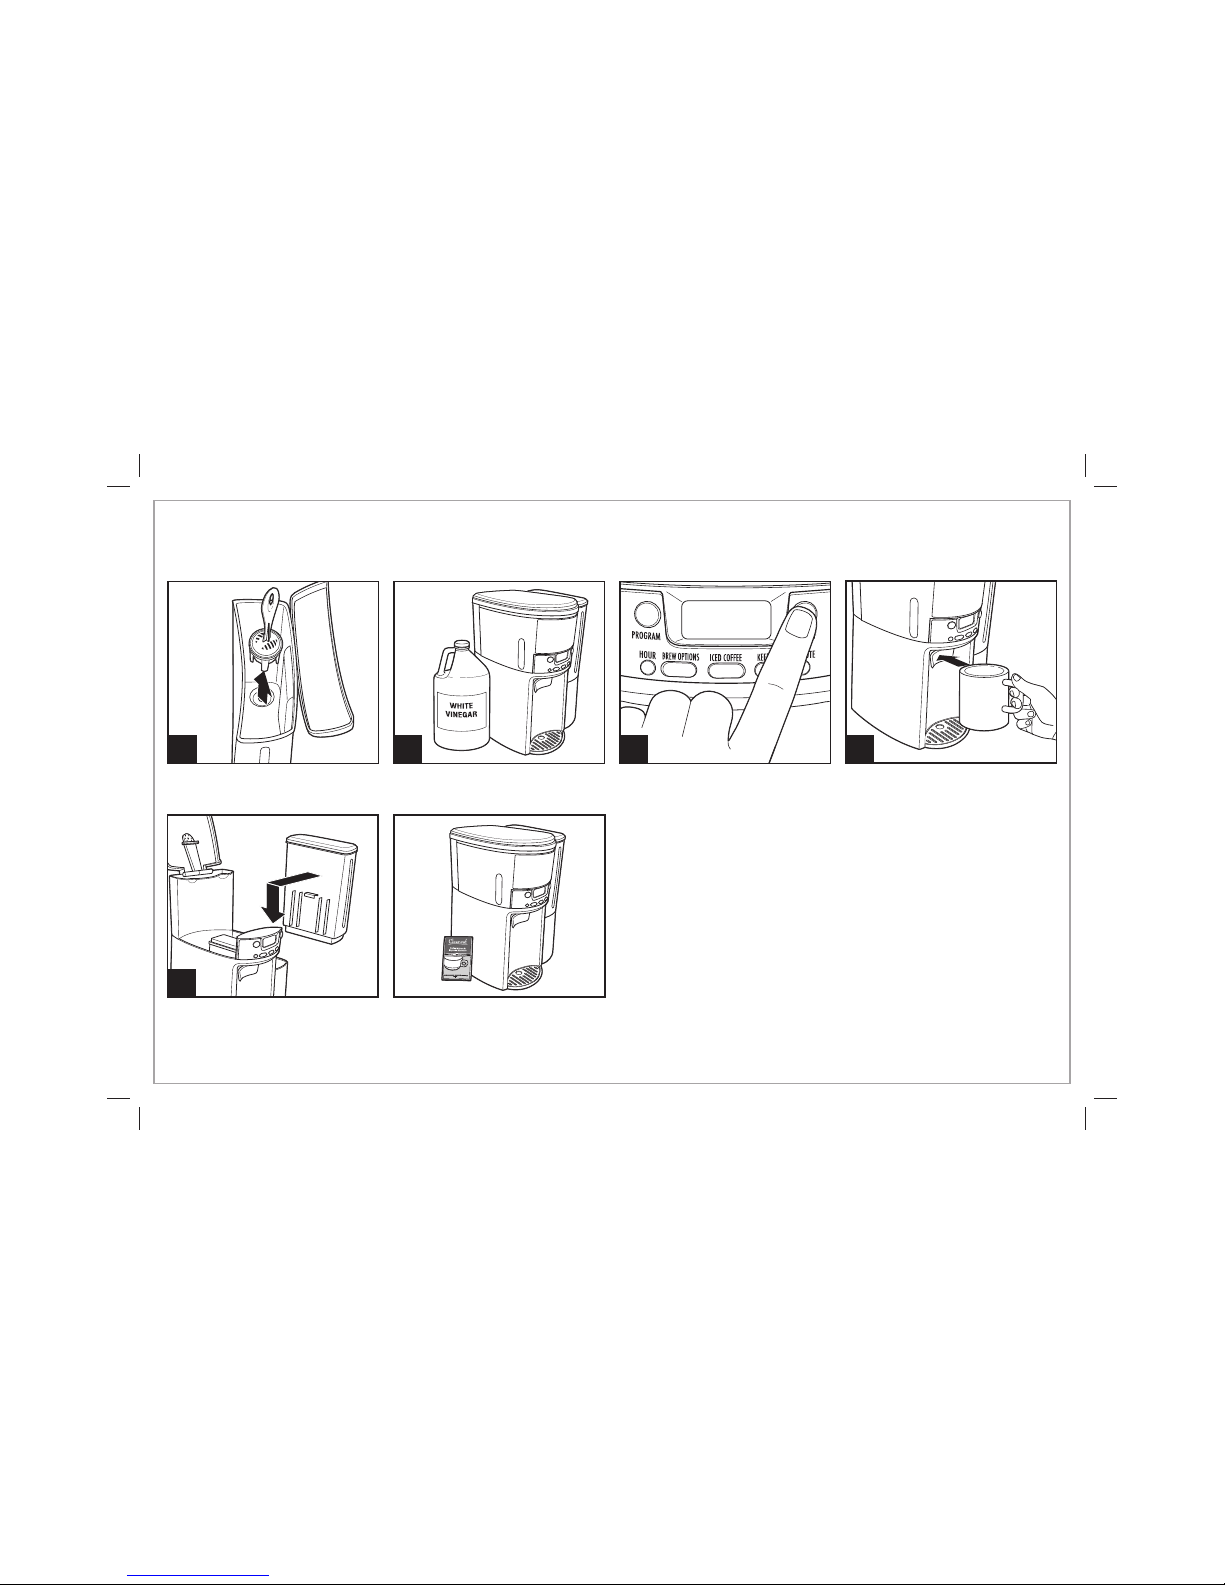
Cleaning with Vinegar
1 2 3
Remove optional water filter.
Pour 1 pint (2 cups/500 ml) vinegar
into water reservoir.
Press ON. Turn OFF after 20 seconds and wait 30 minutes. Press
ON. Turn OFF when finished. When cool, dispense several cups before
emptying and rinsing reservoir. NOTE: Coffeemaker will remind you it
is time for cleaning in two ways:
• Built-in cycle timer—Every 30 cycles, CLEAN will flash in display and
stay illuminated for 2 cycles.
• Built-in residue sensor—CLEAN will appear in display when unit
senses residue buildup and remain illuminated until the unit has
been cleaned.
Clean BrewStation
®
at least once a month (once a week for areas with hard water).
5
Run 2–3 more brew cycles with
CLEAN WATER only. Allow to cool
between cycles.
4
10
Coffeemaker cleaner is the recommended method for
cleaning and is preferred over vinegar since it is more effective
and leaves no odor. Follow package directions on coffeemaker
cleaner. Dispense several cups before discarding solution.
To Order Cleaner/Descaler Call:
1.800.851.8900 (U.S.)
1.800.267.2826 (Canada)
01.800.71.16.100 (Mexico)
or visit hamiltonbeach.com
hamiltonbeach.ca

PROBLEM
Coffee leaks from dispenser.
“CLEAN” appears in display.
Coffee tastes bad.
Coffee not brewing or stops
brewing/unit will not turn on.
Coffee brews slowly.
Coffee overflows basket.
Coffee is cold when
dispensed (when not using
ICED COFFEE setting).
PROBABLE CAUSE
• Coffee grounds trapped in coffee tank dispensing mechanism under seal in coffee tank.
See “Cleaning with Vinegar.”
• This is a reminder to clean coffeemaker. See “Cleaning with Vinegar.”
•
Coffeemaker needs cleaning.
• Coffee ground too coarsely or too finely. Set coffee grinder to automatic drip grind.
• Coffee-to-water ratio unbalanced. Adjust for personal preference.
• Poor water quality. Use water filter or bottled water to make coffee. For iced coffee, too much
ice in tank causing too long extraction time for grounds. Make sure ice is not above the 10-cup
marking line.
• Mineral deposits have built up. Clean the coffeemaker following “Cleaning with Vinegar.”
• Water reservoir is empty.
• Unit is unplugged.
• Power outage or power surge. If surge, unplug; then plug back in.
• Coffeemaker needs cleaning. Clean at least every 30 days to maintain proper performance.
• Coffeemaker is in the 1–4 CUPS or BOLD modes. Press BREW OPTIONS button until no lights appear.
• Excessive amounts of coffee grounds. See Table on page 5.
• Coffee ground too finely. Set coffee grinder to automatic drip grind.
• More than one paper filter in filter basket. Poor quality paper filter or wrong size paper filter.
• Selected Keep Warm hours have elapsed and coffeemaker has automatically shut off. See “To
Reheat Coffee” instructions on page 6, or brew new cycle.
Troubleshooting
11
 Loading...