

Page 1
READ BEFORE USE
LIRE AVANT UTILISATION
LEA ANTES DE USAR
Visit www.hamiltonbeach.com for our
complete line of products and Use and
Care Guides – as well as delicious recipes,
tips, and to register your product online!
Rendez-vous sur www.hamiltonbeach.ca
pour notre liste complète de produits et de
nos manuels utilisateur – ainsi que nos
délicieuses recettes et nos conseils !
¡Visite www.hamiltonbeach.com (
o
www.hamiltonbeach.com.mx (México)
para ver otros productos de Hamilton Beach
o para contactarnos!
Questions?
Please call us – our friendly
associates are ready to help.
USA: 1.800.851.8900
Questions ?
N’hésitez pas à nous appeler –
nos associés s’empresseront
de vous aider.
CAN : 1.800.267.2826
¿Preguntas?
Por favor llámenos – nuestros
amables representantes están
listos para ayudar.
EE. UU.: 1.800.851.8900
MEX: 01 800 71 16 100
Le invitamos a leer cuidadosamente este
instructivo antes de usar su aparato.
EE. UU.)
Coffee Maker
Cafetière
Cafetera
English ....................... 2
Français .................... 12
Español .................... 23
Page 2

When using electrical appliances, basic safety precautions should always be followed to reduce the risk of fire, electric shock, and/or injury to persons, including
the following:
1. Read all instructions.
2. This appliance is not intended for use by persons (including children) with
reduced physical, sensory, or mental capabilities, or lack of experience
and knowledge, unless they are closely supervised and instructed
concerning use of the appliance by a person responsible for their safety.
3. Close supervision is necessary when any appliance is used by or near
children. Children should be supervised to ensure that they do not
play with the appliance.
4. Do not touch hot surfaces. Use handles or knobs. Care must be taken
as burns can occur from touching hot parts or from spilled, hot liquid.
5. To protect against electric shock, do not place cord, plug, or coffee
maker in water or other liquid.
6. Unplug from outlet when either the coffee maker or clock is not in use
and before cleaning. Allow to cool before putting on or taking off parts
and before cleaning the appliance.
7. Coffee maker must be operated on a flat surface away from the edge
of counter to prevent accidental tipping.
8. Do not operate any appliance with a damaged supply cord or plug, or
after the appliance malfunctions or has been dropped or damaged in
any manner. Supply cord replacement and repairs must be conducted
by the manufacturer, its service agent, or similarly qualified persons in
order to avoid a hazard. Call the provided customer service number
for information on examination, repair, or adjustment.
9. The use of accessory attachments not recommended by the
appliance manufacturer may result in fire, electrical shock, or personal
injury.
10. Use only the carafe provided with the appliance.
11. Do not use outdoors.
12. Do not let cord hang over edge of table or counter or touch hot
surfaces, including stove.
13. The carafe is designed for use with this coffee maker. It must never be
used on a range top or in a microwave oven.
14. Do not set a hot carafe on a wet or cold surface.
15. Do not use a cracked carafe or one with a loose or weakened handle.
16. Do not clean carafe with cleansers, steel wool pads, or other abrasive
materials.
17. Be certain carafe lid is securely in place during brew cycle and when
pouring coffee. Do not use force when placing lid on carafe.
18. Do not place coffee maker on or near a hot gas or electric burner or in
a heated oven.
19. To disconnect coffee maker, turn controls to OFF (O) and then remove
plug from wall outlet.
20. WARNING! To reduce the risk of fire or electric shock, do not remove
the bottom cover. No user-serviceable parts are inside. Repair should
be done by authorized service personnel only.
21. Do not use appliance for other than intended use.
SAVE THESE INSTRUCTIONS!
Other Consumer Safety Information
IMPORTANT SAFEGUARDS
This appliance is intended for household use only.
w WARNING
with a polarized plug (one wide blade) to reduce the risk of electric
shock. The plug fits only one way into a polarized outlet. Do not defeat
the safety purpose of the plug by modifying the plug in any way or by
using an adapter. If the plug does not fit fully into the outlet, reverse
the plug. If it still does not fit, have an electrician replace the outlet.
2
Electrical Shock Hazard: This appliance is provided
The length of the cord used on this appliance was selected to reduce
the hazards of becoming tangled in or tripping over a longer cord. If a
longer cord is necessary, an approved extension cord may be used.
The electrical rating of the extension cord must be equal to or greater
than the rating of the appliance. Care must be taken to arrange the
extension cord so that it will not drape over the countertop or tabletop
where it can be pulled on by children or accidentally tripped over.
To avoid an electrical circuit overload, do not use another high-wattage
appliance on the same circuit with this appliance.
Page 3
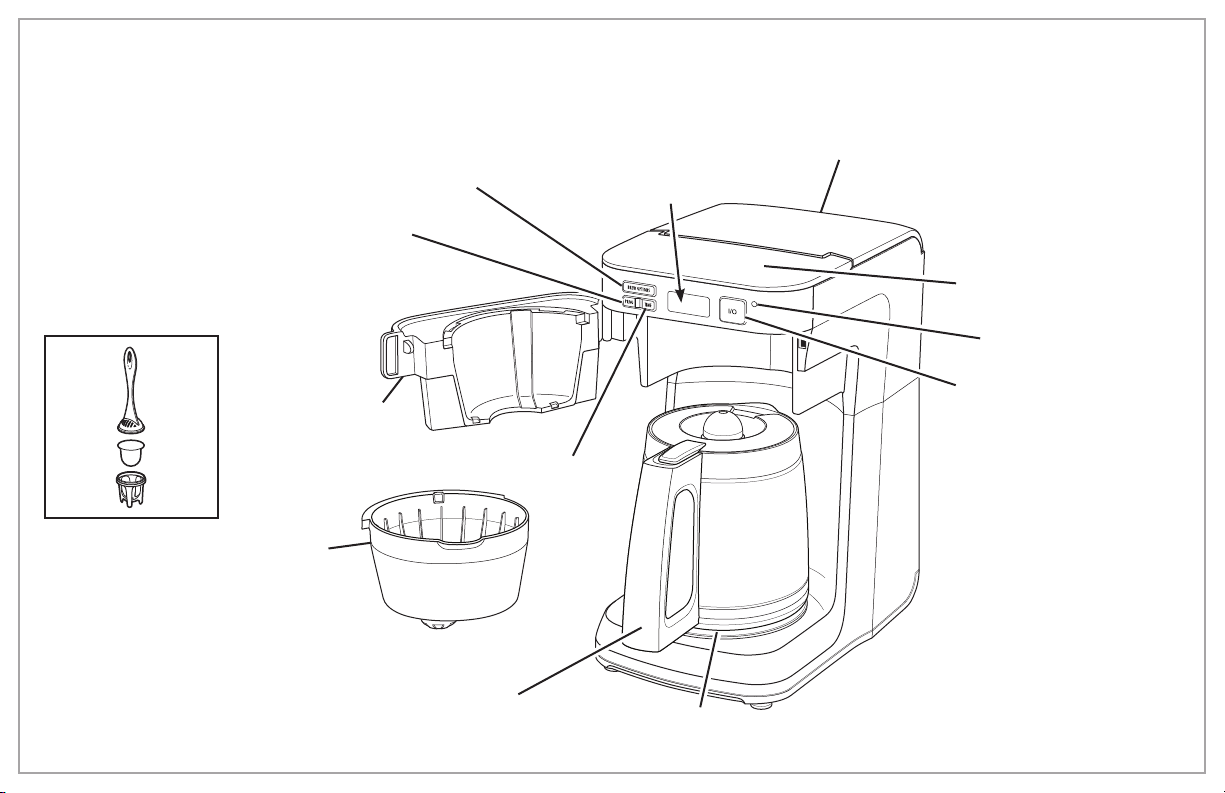
Parts and Features
*To order parts:
US: 1.800.851.8900
www.hamiltonbeach.com
Canada: 1.800.267.2826
Mexico:
Optional Water Filter*
01 800 71 16 100
Filter Basket*
PROG Button
Swivel Filter
Basket Holder
BREW MODE
TIME Button
Control
Panel With
Clock
BEFORE FIRST USE: Wash all removable
parts in hot, soapy water. Rinse and dry.
Brew one cycle with water and discard water.
Lid to Access
Optional Water Filter
Water Reservoir
Fill Lid
Power Light
ON/OFF Button (I/O)
Carafe*
Keep-Warm
Plate
3
Page 4
How to Make Coffee
w WARNING
To avoid hot coffee overflowing from the filter basket:
• When using decaffeinated coffee, do not exceed the coffee
manufacturer’s recommended serving amount.
• Ensure swivel filter basket is completely closed.
If filter basket overflow occurs, unplug coffee maker and allow
coffee in filter basket to cool before removing filter basket.
Burn Hazard.
21 4
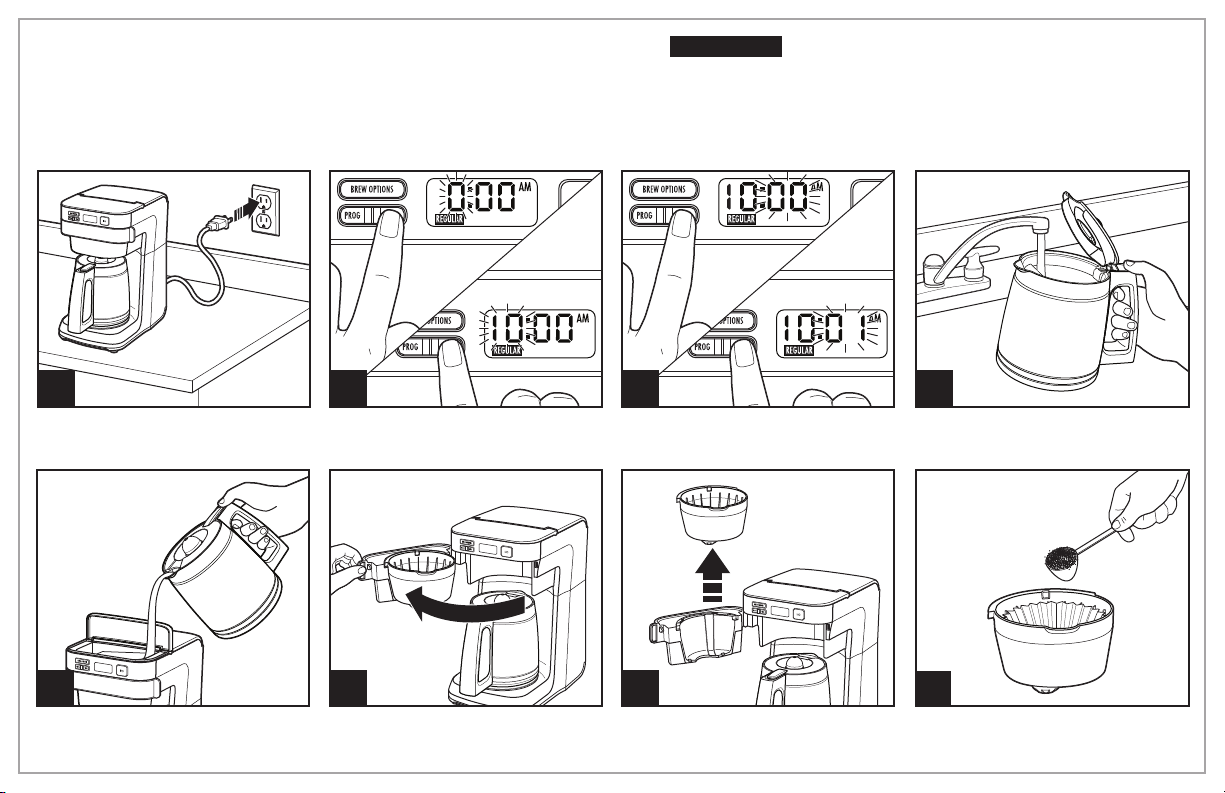
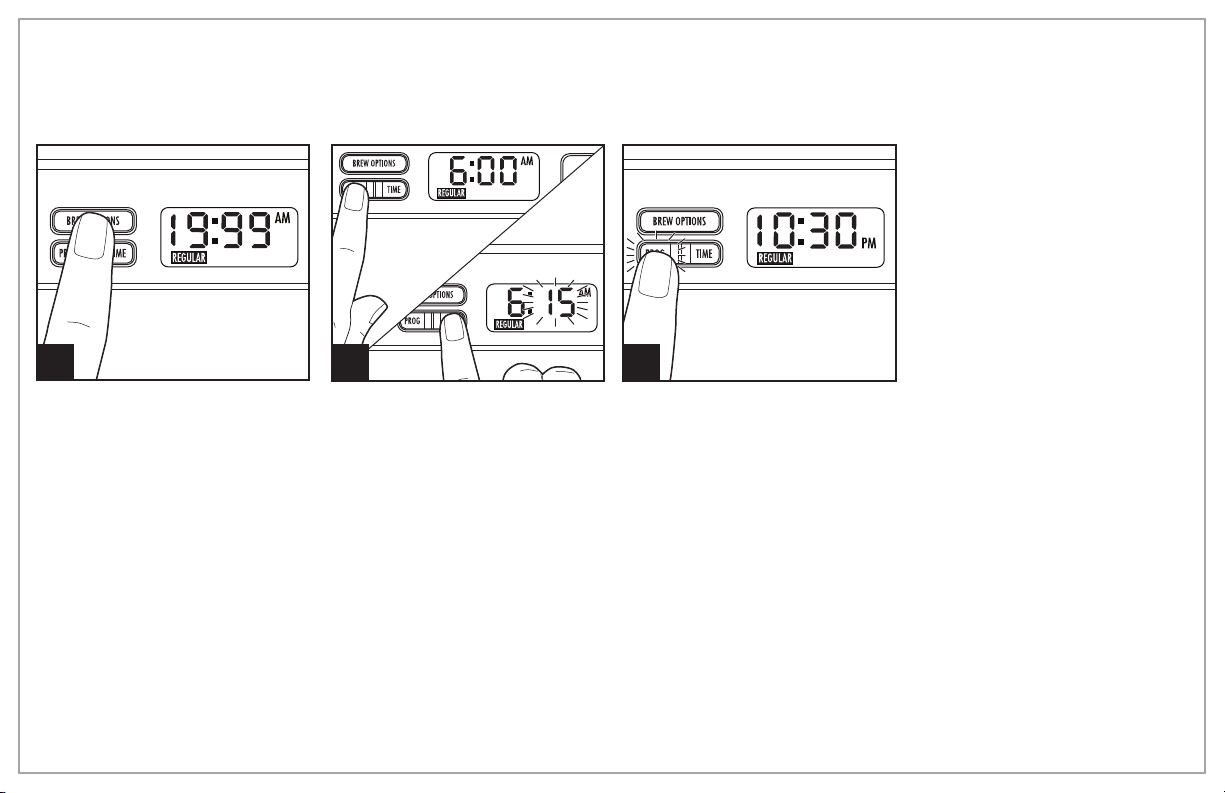
Press and release TIME button. Hour will flash in display. Press and pulse TIME button to increase to set current
hour in AM or PM. Wait 3 seconds; minutes will flash. Press and pulse TIME button to increase to set current
minutes. Set time will display constant.
5 6 7
Lift water reservoir fill lid to add
water.
4
For each cup of coffee being made, place one level tablespoon of ground coffee into filter. A permanent
filter may also be used with the filter basket.
3
Filter Basket With
8–12 Cups Paper
Filter
8
Page 5
How to Make Coffee (cont.)
w WARNING
Do not immerse cord, plug, or coffee maker in any liquid.
Shock Hazard.
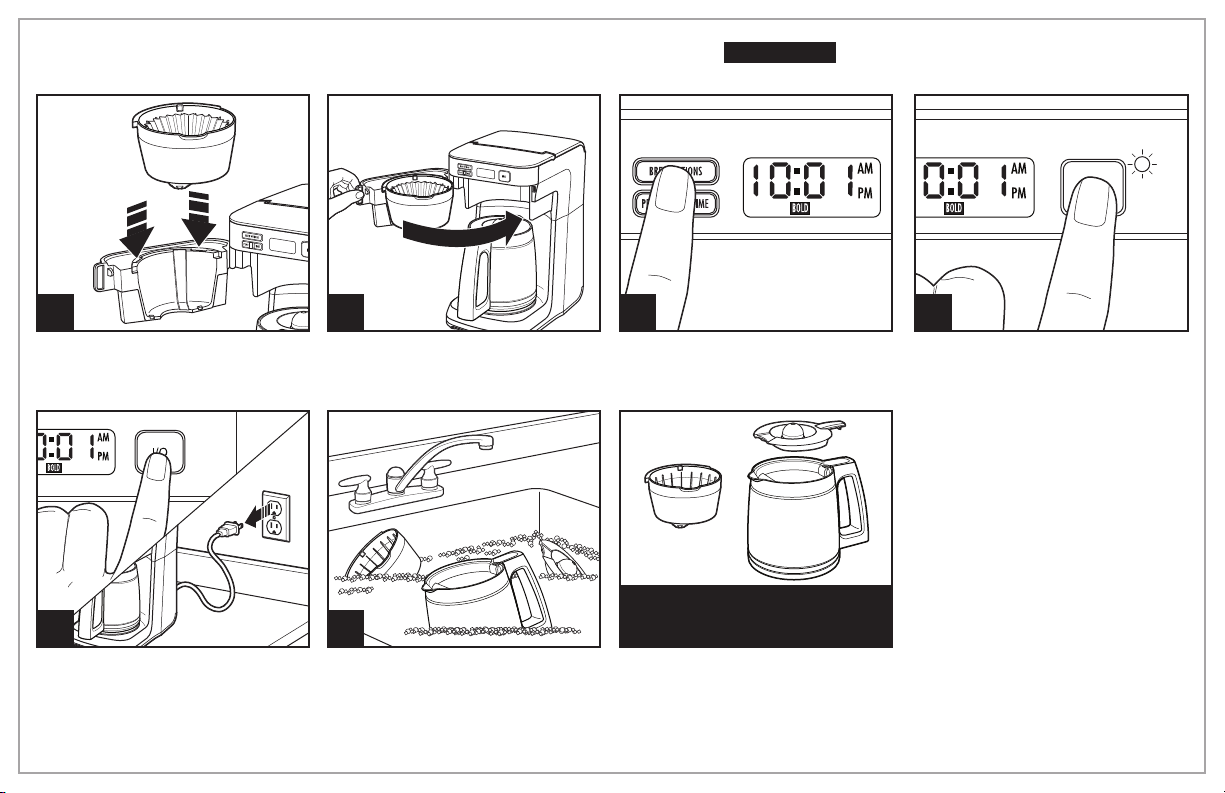
Place brew basket tabs in slots in
filter basket holder.
13
When finished, press I/O ON/OFF
button once and unplug.
NOTE: If the coffee maker is
not turned off manually, it will
automatically shut off in 2 hours
and the power light will turn off.
109
Close swivel filter basket holder
before brewing, and do not open
until brewing cycle is complete
and unit is cool.
14
Wash in warm, soapy water.
Rinse and dry.
11
Select your brew option. (See
“How to Use the Brew Options.”)
DISHWASHER-SAFE
(top rack)
Dishwasher-safe wash and dry in
TOP RACK only.
12
Press I/O
turn on the coffee maker. Power
light will illuminate.
ON/OFF
button once to
5
Page 6
To Program Automatic Brew
NOTE: White LED will illuminate to indicate PROGRAM is activated. White LED light will turn off when the
unit begins to brew at the preprogrammed time.
1
Choose a brew option. Then, hold PROG button. Next, press and pulse
TIME
button to set desired brewing hour in AM or PM. Wait 3 seconds;
minutes will flash. Then press and pulse
minutes. Set time will display constant. Release PROG and current time
is displayed.
2 3
Press and release PROG again to
TIME
button to increase to set
activate automatic brew. PROG
light will illuminate.
Tips for Best-Tasting Coffee
• All coffees are made from either arabica beans or robusta beans,
or some combination of both. Arabica beans are slightly more
expensive, but tend to produce better-tasting coffee.
• Ground coffee will become stale much faster than whole beans.
If buying preground coffee, chose a package with the latest
expiration date or a smaller quantity.
• If grinding whole beans, set your coffee grinder on a fine/
medium grind. This will yield the best-tasting grounds. Try to use
freshly ground coffee within about a week of grinding.
6
• Using a water filter, filtered water, or bottled water will yield
better-tasting coffee than tap water.
• Use approximately 1 tablespoon of grounds for each cup of
coffee being made. To avoid overflow, use about 1/3 less
grounds when brewing decaf or flavored coffees.
• Make sure your coffee maker is clean. See “Care and Cleaning”
section.
Page 7
How to Use the Brew Options and Clean Notification
BREW OPTIONS
Your coffee maker will default
to the “Regular” strength coffee
setting when brewing.
NOTE: Using the brew strength
options will increase the length
of brewing time slightly.
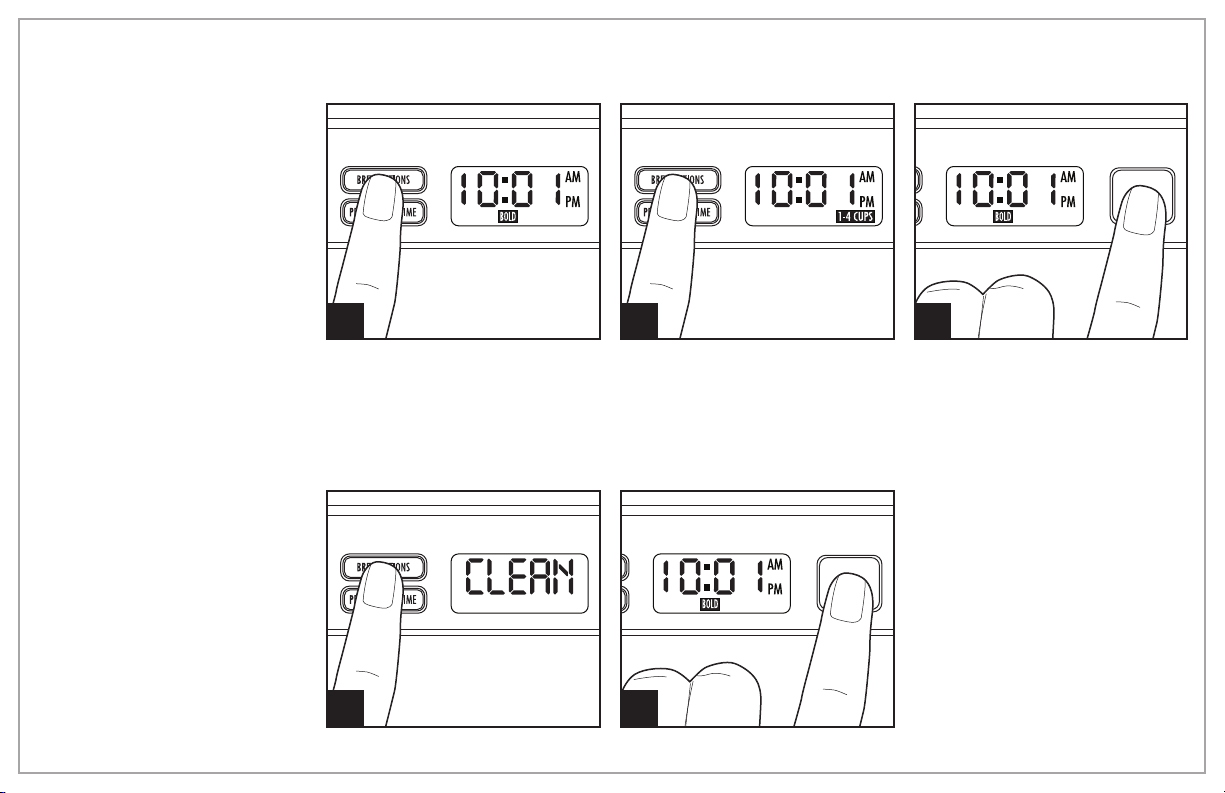
CLEAN NOTIFICATION
If unit is always plugged in, after
30 cycles CLEAN will scroll across
the display. Follow the directions
for “Care and Cleaning.”
NOTES:
• Performing the cleaning
procedure will clear the display.
• The brew cycle counter resets
every time the coffee maker is
unplugged.
1
For stronger coffee, press the
BREW OPTIONS button until
“BOLD” is illuminated.
1 2
2
For small amounts, use the 1–4
cup setting by pressing the BREW
OPTIONS button until “1–4 CUPS”
is illuminated.
3
Then, press the I/O ON/OFF
button or set the Automatic Brew
to start the coffee maker after your
brew option has been selected.
If you do not want to perform
the cleaning procedure, press the
I/O ON/OFF button two times to
clear the display.
7
Page 8
Care and Cleaning
w WARNING
Do not immerse cord, plug, or
coffee maker in any liquid.
Shock Hazard.
All coffee makers should be cleaned
at least once a month (once a week
for areas with hard water).
1 3
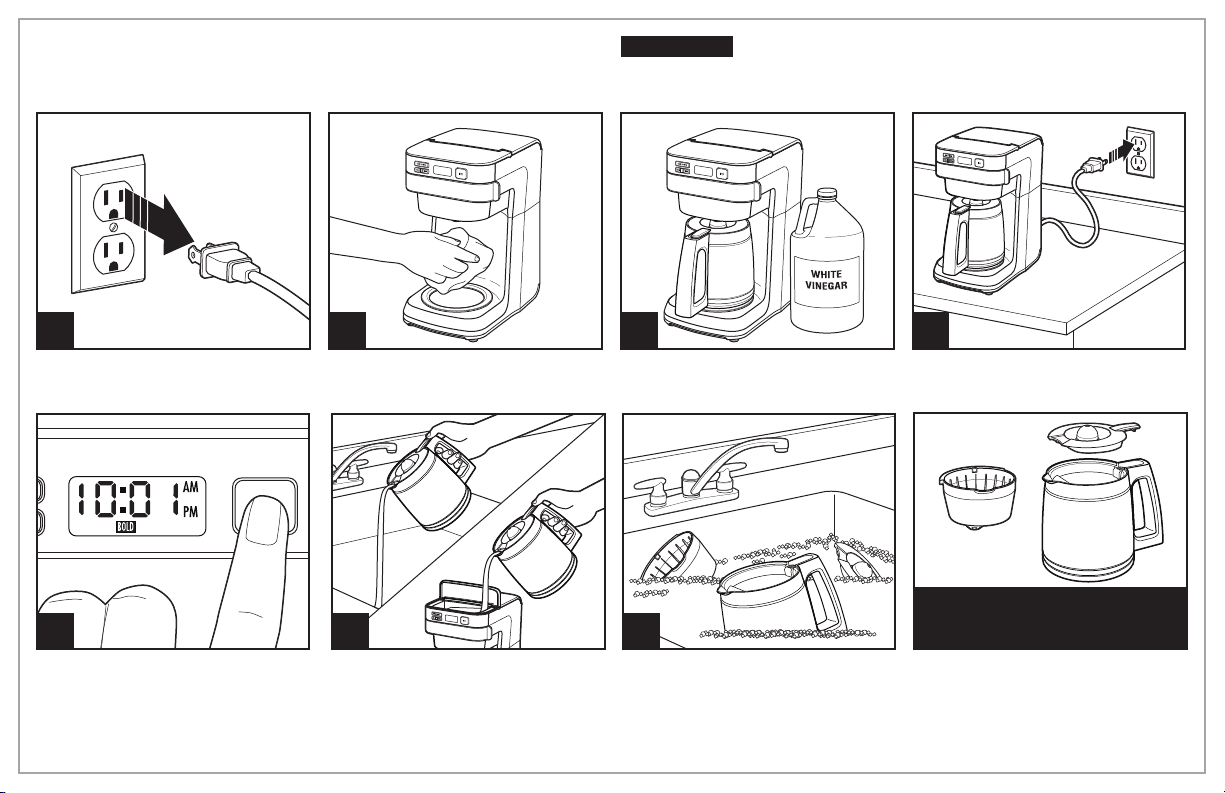
Unplug coffee maker (this resets brew counter for cleaning mode notification). Wipe coffee maker with
a damp cloth or sponge. Dry. Remove water filter and water filter base (see “How to Replace the Water
Filter”). Pour a minimum of 1 pint (2 cups/473 ml) white vinegar into water reservoir.
5
Press the I/O ON/OFF button once.
After 30 seconds, turn OFF. Wait 30
minutes to allow vinegar to clean.
Then turn ON again. When brew
cycle is finished, wait for unit to cool
8
2
6
Empty carafe and rinse. Run 2–3
more brew cycles with CLEAN
WATER only. Allow to cool
between cycles.
.
7
4
DISHWASHER-SAFE
(top rack)
Page 9
How to Replace the Water Filter (optional accessory)
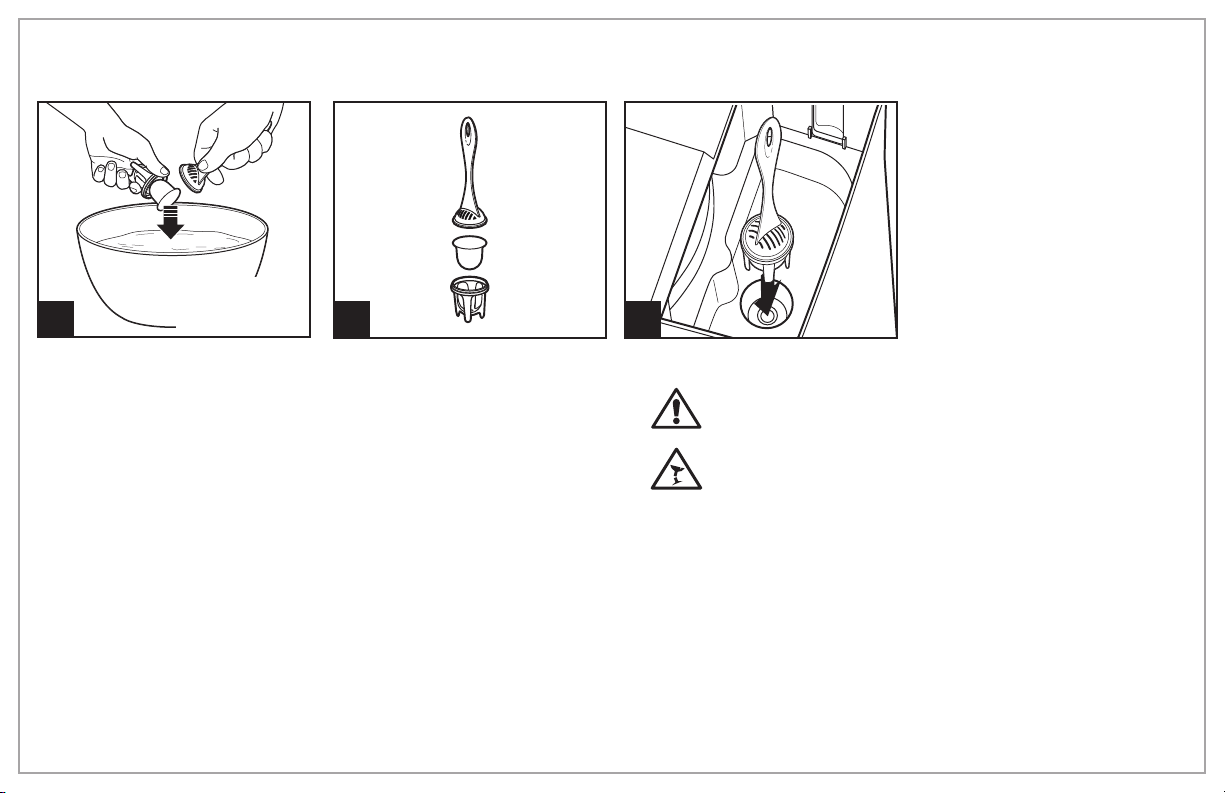
For better-tasting coffee, use a
water filter.
Filter replacement is
recommended every 60 cycles.
*To order parts:
US: 1.800.851.8900
www.hamiltonbeach.com
1
15 min.
2
Carafe Safety
Precautions
• Do not use a cracked carafe or a carafe having a loose or
weakened handle.
• This carafe is designed to be used only on the keep-hot plate
of your coffee maker. Do not use on a gas or electric rangetop,
or in a microwave or conventional oven.
• To avoid breakage, handle carafe with care. Avoid impact.
Glass will break as a result of impact. Use care when filling
with water to avoid hitting faucet.
• Do not place hot carafe on cool or wet surface. Allow to cool
before washing or adding liquids.
• Do not set empty carafe on a hot heating surface.
• Do not clean with steel wool pads, abrasive cleanser, or any
other materials that may scratch.
3
This symbol alerts you to the potential danger for
personal injury if you fail to read and follow these safety
precautions.
This symbol reminds you that glass is fragile and can break
which could result in personal injury.
• Do not place hands inside carafe. When handling, be careful if
wearing any hand jewelry, especially diamond rings. Jewelry
can scratch the glass, which increases possibility of breakage.
• Do not bump, scratch, or boil dry.
• Discard carafe if it is cracked, scratched, or heated while empty
for an extended period of time.
• To avoid accidents, do not pour in the direction of people.
• If stirring in the carafe, use only wooden, plastic, or rubber utensils.
Do not use metal utensils.
• Follow the above safety precautions carefully to avoid serious burn
injuries which may result if breakage occurs while carafe holds
heated liquids.
Canada: 1.800.267.2826
Mexico:
01 800 71 16 100
9
Page 10

Troubleshooting
PROBLEM PROBABLE CAUSE/SOLUTION
Filter basket overflows or
coffee brews slowly.
Coffee not brewing/unit will not
turn on.
• The “BOLD” or 1–4 cup brew option is recommended for brewing decaffeinated coffee.
• Excessive amounts of coffee.
• Coffee ground too finely (not automatic drip grind).
• Carafe not securely placed on keep-warm plate or swivel filter basket holder not closed completely.
• Carafe removed during brewing for more than 20 seconds and not placed securely back on keepwarm plate.
• Coffee maker needs cleaning.
• Coffee grounds between paper filter and filter basket.
• Paper filter not open and in proper position.
• Press the seamed edges of paper filter before inserting into basket.
• Rinse filter basket before inserting paper filter so the edges will remain pressed against the sides of
the basket.
• Poor-quality paper filter.
• Water reservoir is empty.
• Unit is unplugged.
• Power outage.
• Power surge. Unplug; then plug the unit back in.
• Clock requires reset after power outage.
10
Page 11

Limited Warranty
This warranty applies to products purchased and used in the U.S. and Canada. This is the only express warranty for this product and
is in lieu of any other warranty or condition.
This product is warranted to be free from defects in material and workmanship for a period of five (5) years from the date of original
purchase in Canada and one (1) year from the date of original purchase in the U.S. During this period, your exclusive remedy is repair
or replacement of this product or any component found to be defective, at our option; however, you are responsible for all costs
associated with returning the product to us and our returning a product or component under this warranty to you. If the product or
component is no longer available, we will replace with a similar one of equal or greater value.
This warranty does not cover glass, filters, wear from normal use, use not in conformity with the printed directions, or damage to
the product resulting from accident, alteration, abuse, or misuse. This warranty extends only to the original consumer purchaser or
gift recipient. Keep the original sales receipt, as proof of purchase is required to make a warranty claim. This warranty is void if the
product is used for other than single-family household use or subjected to any voltage and waveform other than as specified on the
rating label (e.g., 120V ~ 60 Hz).
We exclude all claims for special, incidental, and consequential damages caused by breach of express or implied warranty. All
liability is limited to the amount of the purchase price. Every implied warranty, including any statutory warranty or condition
of merchantability or fitness for a particular purpose, is disclaimed except to the extent prohibited by law, in which case such
warranty or condition is limited to the duration of this written warranty. This warranty gives you specific legal rights. You may have
other legal rights that vary depending on where you live. Some states or provinces do not allow limitations on implied warranties or
special, incidental, or consequential damages, so the foregoing limitations may not apply to you.
To make a warranty claim, do not return this appliance to the store. Please call 1.800.851.8900 in the U.S. or 1.800.267.2826 in Canada
or visit hamiltonbeach.com in the U.S. or hamiltonbeach.ca in Canada. For faster service, locate the model, type, and series numbers
on your appliance.
11
Page 12

PRÉCAUTIONS IMPORTANTES
Pour utiliser un appareil électroménager, vous devez toujours prendre des mesures élémentaires de sécurité pour réduire le risque d’incendie,
d’électrocution et/ou de blessure corporelle, en particulier les mesures suivantes :
1. Lire toutes les instructions.
2. Cet appareil n’est pas destiné à être utilisé par des personnes (y
compris les enfants) dont les capacités physiques, sensorielles
ou mentales sont réduites, ou manquant d’expérience et
de connaissance, sauf si elles sont étroitement surveillées
et instruites sur l’utilisation de l’appareil par une personne
responsable de leur sécurité.
3. Une surveillance étroite est requise pour tout appareil utilisé par
ou près des enfants. Surveiller que les enfants ne jouent pas
avec l’appareil.
4. Ne pas toucher aux surfaces chaudes. Utiliser les poignées ou les
boutons. Prendre toutes les précautions nécessaires pour éviter
les risques de brûlures occasionnés par les surfaces chaudes, les
déversements de liquides chauds.
5. Pour éviter les risques d’électrocution, ne pas immerger le cordon ou
la fiche ou la cafetière dans l’eau ou tout autre liquide.
6. Débrancher de la prise murale lorsque la cafetière ou l’horloge n’est
pas utilisée et avant le nettoyage. Laisser refroidir la cafetière avant
d’installer ou de retirer des pièces et avant de la nettoyer.
7. Toujours placer la cafetière sur une surface plane et loin des bords
de comptoir pour éviter le basculement accidentel lors de son
fonctionnement.
8. Ne pas faire fonctionner un appareil électroménager avec un cordon
ou une fiche endommagée, ou lorsque l’appareil ne fonctionne pas
bien ou a été échappé ou endommagé d’une manière quelconque. Le
remplacement et la réparation du cordon d’alimentation doivent être
faits par le fabricant, son agent de service ou toute personne qualifiée
de façon à éviter tout danger. Appeler le numéro de service à la clientèle
fourni pour des renseignements concernant l’examen, la réparation ou
l’ajustement.
9. L’utilisation d’accessoires non recommandés par le fabricant
d’électroménagers peut causer des blessures.
10. Utiliser uniquement la verseuse à café fournie avec cet appareil.
11. Ne pas utiliser à l’extérieur.
12. Ne pas laisser pendre le cordon de la table ou du comptoir et éviter
tout contact avec les surfaces chaudes incluant la cuisinière.
13. La verseuse à café est conçue exclusivement pour cette cafetière.
Elle ne doit jamais être utilisée sur une table de cuisson ou dans un
four à micro-ondes.
14. Ne pas placer la verseuse à café chaude sur une surface mouillée ou
froide.
15. Ne pas utiliser une verseuse à café fissurée ou avec une poignée
lâche ou usée.
16. Ne pas nettoyer la verseuse à café avec de la poudre à nettoyer, des
tampons métalliques ou autres matériaux abrasifs.
17. S’assurer que le couvercle de la verseuse à café est bien fixé pendant
le cycle d’infusion et au moment de verser le café. Ne pas utiliser la
force pour fixer le couvercle de la verseuse à café.
18. Ne pas placer la cafetière sur ou près d’une cuisinière électrique ou
à gaz ou dans un four chaud.
19. Pour débrancher la cafetière, tourner les boutons de réglage à
ARRÊT (O) puis débrancher la fiche de la prise murale.
20. AVERTISSEMENT ! Pour éviter les risques d’incendie et
d’électrocution, ne pas enlever le couvercle inférieur de la cafetière.
Aucune pièce réparable à l’intérieur. Les réparations doivent être
faites par un technicien agréé seulement.
21. N’utiliser cet appareil que pour les fonctions auxquelles il est
destiné.
12
CONSERVEZ CES INSTRUCTIONS !
Page 13

Autres renseignements relatifs à la sécurité du consommateur
Cet appareil est destiné à un usage domestique uniquement.
w AVERTISSEMENT
fourni avec une fiche polarisée (une broche large) pour réduire le
risque d’électrocution. Cette fiche n’entre que dans un seul sens dans
une prise polarisée. Ne contrecarrez pas l’objectif sécuritaire de cette
fiche en la modifiant de quelque manière que ce soit ou en utilisant
un adaptateur. Si vous ne pouvez pas insérer complètement la fiche
dans la prise, inversez la fiche. Si elle refuse toujours de s’insérer, faire
remplacer la prise par un électricien.
Risque de choc électrique : Cet appareil est
La longueur du cordon installé sur cet appareil a été sélectionnée afin de
réduire les risques d’enchevêtrement ou de faux pas causés par un fil
trop long. L’utilisation d’une rallonge approuvée est permise si le cordon
est trop court. Les caractéristiques électriques de la rallonge doivent être
équivalentes ou supérieures aux caractéristiques de l’appareil. Prendre
toutes les précautions nécessaires pour installer la rallonge de manière à
ne pas la faire courir sur le comptoir ou sur une table pour éviter qu’un
enfant ne tire sur le cordon ou trébuche accidentellement.
Pour éviter la surcharge du circuit électrique, ne pas utiliser un autre
appareil à haute puissance sur le même circuit que cet appareil.
13
Page 14

Pièces et caractéristiques
*Pour commander des pièces :
Canada : 1.800.267.2826
Bouton PROG (programmation)
Filtre à eau en option*
Panier à filtre*
MODE D’INFUSION
Support du
panier à filtre
pivotant
Bouton TIME (heure)
Panneau de
commande
et horloge
AVANT LA PREMIÈRE UTILISATION : Laver toutes
les pièces amovibles dans de l’eau chaude
savonneuse. Rincer et sécher. Faire un cycle
d’infusion avec de l’eau puis jeter l’eau.
Couvercle d’accès au
filtre à eau facultatif
Couvercle pour
remplissage du
réservoir d’eau
Témoin
Bouton de
marche/arrêt (I/O)
14
Verseuse*
Plaque de
garde au chaud
Page 15

Préparation du café
w AVERTISSEMENT
Pour éviter le débordement de café chaud du panier-filtre :
• Lors de l’utilisation d’un café décaféiné, ne dépassez pas les quantités
recommandées par le fabricant de café.
• Assurez-vous que le panier à filtre pivotant est complètement fermé.
Si le panier-filtre déborde, débrancher la cafetière et laisser refroidir le
contenu du panier-filtre avant de retirer le panier-filtre.
Risque de brûlure.
21 4
Appuyer et relâcher le bouton TIME (heure). L’heure clignotera sur l’afficheur. Appuyer à plusieurs reprises sur le bouton TIME (heure) pour régler
l’heure du matin ou du soir (AM ou PM) actuelle. Attendre 3 secondes avant que les minutes clignotent. Appuyer à plusieurs reprises sur le bouton
TIME (heure) pour régler les minutes actuelles. L’heure enregistrée restera affichée.
5 6 7
Soulever le couvercle de remplissage du réservoir d’eau et ajouter de l’eau.
de café moulu au fond du filtre. Un filtre permanent peut aussi être utilisé avec le panier à filtre.
3
Panier-filtre avec
filtre de 8 à 12
tasses en papier
8
Pour chaque tasse de café prévue, déposer 1 cuillère à soupe rase
15
Page 16

Préparation du café
(suite)
w AVERTISSEMENT
Ne pas immerger le cordon, la fiche ou la cafetière dans aucun liquide.
Risque d’électrocution.
109
Insérer les languettes du panier à
filtre dans les fentes du support à
panier à filtre.
13
Lorsque vous avez terminé, appuyer un fois sur le bouton
cafetière n’est pas éteinte en appuyant manuellement sur le bouton, la cafetière s’éteindra automatiquement
après 2 heures et le témoin s’éteindra. Laver dans de l’eau chaude savonneuse.
lave-vaisselle dans le PANIER SUPÉRIEUR seulement.
16
Fermer le support du panier à
filtre pivotant avant d’infuser et
ne l’ouvrer pas avant que le cycle
d’infusion ne soit terminé et que
l’appareil ne soit refroidi.
14
I/O
(MARCHE/ARRÊT) puis débrancher.
11
Sélectionner l’option d’infusion
désiré. (Voir le chapitre
« Utilisation des options
d’infusion »).
LAVABLES AU
LAVE-VAISSELLE
(le panier supérieur)
NOTE: Si la
Rincer et sécher. Lavable au
12
Appuyer sur le bouton
(MARCHE/ARRÊT) pour démarrer
le cycle d’infusion.
s’allumera.
I/O
Le témoin
Page 17

Programmation de l’infusion automatique
NOTE: Le témoin à DEL blanche s’allumera pour indiquer que la fonction PROGRAM (programmation) est
activée. Le témoin à DEL blanche s’éteindra dès que l’infusion commence à l’heure programmée.
1
Sélectionner une option d’infusion puis maintenir le bouton PROG (programmation) enfoncé. Appuyer ensuite à plusieurs reprises sur le
bouton
clignotent. Appuyer à plusieurs reprises sur le bouton
Relâcher le bouton PROG (programmation). L’heure actuelle sera maintenant affichée. Appuyer sur PROG (programme) et relâcher de nouveau
pour activer l’infusion automatique. Le témoin PROG (programmation) s’allumera.
TIME
(heure) pour régler l’heure du matin ou du soir (AM ou PM) du début d’infusion. Attendre 3 secondes avant que les minutes
2 3
TIME
(heure) pour régler les minutes actuelles. L’heure enregistrée restera affichée.
Conseils pour obtenir un excellent café
• Tous les cafés sont faits à partir de grains arabica ou robusta ou
une combinaison des deux. Les grains Arabica sont légèrement
plus coûteux, mais ont tendance à produire le meilleur café.
• Le café moulu s’évente beaucoup plus rapidement que les grains
entiers. Si vous achetez du café moulu, choisissez un paquet avec
la date d’expiration la plus tardive ou une plus petite quantité.
• Pour moudre des grains entiers, réglez votre moulin à café sur un
réglage fine / moyen. Ceci donnera des moutures au meilleur
arôme. Essayez d’utiliser du café fraîchement moulu dans la
semaine qui suit.
• Utiliser un filtre à eau, de l’eau filtrée ou en bouteille donne un café
de meilleur arôme que d’utiliser de l’eau du robinet.
• Utilisez environ 1 cuillère à soupe de café moulu pour chaque tasse
de café à infuser. Pour le café décaféiné et les cafés aromatisés,
utilisez environ 1/3 de moins de café moulu pour éviter les
débordements.
• Assurez-vous que la cafetière est propre. Consultez le chapitre
« Entretien et nettoyage ».
17
Page 18

Utilisation des options d’infusion et du rappel de nettoyage
OPTIONS D’INFUSION
Votre cafetière fonctionnera
selon le réglage d’intensité de
café « Régulier » par défaut
tandis que l’infusion se produit.
REMARQUE : La durée du temps
d’infusion pourra être augmentée
légèrement lorsque vous utilisez
les option d’intensité d’infusion.
RAPPEL DE NETTOYAGE
Si l’appareil n’a pas été
débranché, le mot CLEAN
(nettoyage) défilera à l’afficheur
après 30 cycles. Suivre les
instructions au chapitre
« Entretien et nettoyage ».
REMARQUES :
• La procédure de nettoyage
effacera tous les programmes
et options.
• Le compteur de cycles
d’infusion se réinitialise
chaque fois que la cafetière est
débranchée.
18
1
Pour obtenir une infusion
plus corsée, appuyer sur le
bouton BREW OPTIONS (options
d’infusion) jusqu’à ce que le mot
« BOLD » (corsé) s’affiche.
1 2
2
Pour les petites quantités, utiliser
le réglage de 1 à 4 tasses en
appuyant sur le bouton BREW
OPTIONS (options d’infusion)
jusqu’à ce que « 1–4 CUPS »
s’affiche.
3
Puis, appuyez sur le bouton I/O
(MARCHE/ARRÊT) ou régler
sur l’infusion automatique pour
lancer la cafetière
d’infusion sélectionnée.
Si l’on ne désire pas nettoyer
la cafetière, appuyer deux fois
sur le bouton de I/O (MARCHE/
ARRÊT) pour effacer le message
de l’afficheur.
une fois l’option
Page 19

Entretien et nettoyage
w AVERTISSEMENT
d’électrocution. Ne pas immerger
le cordon, la fiche ou la cafetière
dans aucun liquide.
Risque
Toutes les cafetières doivent être
nettoyées au moins une fois par
mois (une fois par semaine dans les
régions où l’eau est calcaire).
1 3
Débrancher la cafetière (ceci réinitialisera le compteur de cycle d’infusion du rappel de nettoyage).
Essuyer la cafetière avec un linge humide ou une éponge. Sécher. Retirer le filtre à eau et la base du
filtre à eau (voir le chapitre « Comment remplacer le filtre à eau »). Verser au moins 2 tasses (473 ml) de
vinaigre blanc dans le réservoir d’eau.
5
Appuyer une fois sur le bouton I/O (MARCHE/ARRÊT). Au bout de 30 secondes, éteindre la cafetière.
Attendre 30 minutes pour laisser le vinaigre agir. Mettre en marche de nouveau. Lorsque le cycle
d’infusion est terminé, attendre que l’appareil soit refroidi. Vider la verseuse et rincer-la. Faites fonctionner
2–3 autres cycles d’infusion avec SEULEMENT DE L’EAU. Laisser refroidir entre les cycles.
2
6
7
4
LAVABLES AU
LAVE-VAISSELLE
(le panier supérieur)
19
Page 20

Comment remplacer le filtre à eau (accessoire en option)
Pour obtenir un café qui a
meilleur goût, utiliser un filtre à
eau.
Nous vous recommandons
de changer le filtre tous les 60
cycles.
*Pour commander des pièces :
Canada : 1.800.267.2826
1
Précautions à prendre
avec la verseuse
15 min.
2
3
Ce symbole vous indique les dangers possibles de
blessures corporelles si vous omettez de lire et de suivre
ces précautions de sécurité.
C
e symbole vous rappelle que le verre est fragile et qu’une
brisure peut entraîner des blessures corporelles.
• N’utiliser pas une verseuse fêlée ou dont la poignée est desserrée.
• Cette verseuse est conçue pour être utilisée uniquement sur la plaque
chauffante de votre cafetière. Éviter de la faire fonctionner sur le dessus
d’une cuisinière électrique ou à gaz, ou dans un four à micro-ondes ou
conventionnel.
• Pour éviter de la briser, manipuler la verseuse avec soin. Éviter tout
impact car le verre cassera. Lorsque vous la remplir d’eau, agir avec
précaution pour éviter de heurter un robinet.
• Ne placer pas la verseuse chaude sur une surface froide ou humide.
Laisser-la refroidir avant de la nettoyer ou d’y verser un liquide.
• Ne laisser pas une verseuse vide sur une surface chauffante.
• Éviter de nettoyer la verseuse avec des produits qui égratignent comme
les tampons en laine d’acier ou les produits nettoyants abrasifs.
20
• N’insérer pas les mains dans la verseuse. Manipuler celle-ci avec soin
si vous porter des bijoux, particulièrement des bagues avec diamants.
Les bijoux peuvent égratigner le verre, ce qui augmente la possibilité de
casse.
• Éviter de heurter, d’égratigner la cafetière ou de laisser l’eau s’évaporer
entièrement.
• •Jeter immédiatement la verseuse lorsque celle-ci est craquelée,
égratignée, ou chauffée à vide durant une longue période.
• Afin d’éviter les accidents, ne verser pas le liquide en faisant face aux gens.
• Pour remuer le liquide dans la verseuse, n’utiliser que des ustensiles en
plastique, en bois ou en caoutchouc. N’utiliser pas d’ustensiles en métal.
• Veuiller suivre à la lettre ces précautions de sécurité pour éviter toute
brûlure grave qui pourrait être causée par le bris d’une verseuse remplie
de liquide chaud.
Page 21

Dépannage
PROBLÈME CAUSE PROBABLE/SOLUTION
Le panier de filtre déborde ou
le café infuse lentement.
La cafetière n’infuse pas de
café/l’appareil ne se met
pas en marche.
• L’option « BOLD » ou infusion de 1 à 4 tasses est recommandée pour infuser le café décaféiné.
• Quantités excessives de café.
• Mouture de café trop fine (inadaptée pour cafetière automatique).
• Verseuse pas fermement positionnée sur la plaque de garde au chaud ou support de panier à filtre
pivotant pas complètement fermé.
• La verseuse a été enlevée durant l’infusion pendant plus de 20 secondes et n’a pas été bien remise
en place sur la plaque de garde au chaud.
• La cafetière a besoin d’être nettoyée.
• De la mouture de café a pénétré entre le filtre en papier et le panier de filtre.
• Le filtre en papier n’est pas ouvert ou est mal positionné.
• Appuyer sur le joint rabattu du filtre en papier avant de l’insérer dans le panier.
• Rincer le panier à filtre avant d’y placer le filtre en papier pour que les bords de celui-ci adhèrent
aux parois humides du panier.
• Filtre en papier de mauvaise qualité.
• Le réservoir d’eau est vide.
• L’appareil est débranché.
• Il y a eu une panne d’électricité.
• Il y a eu une surtension électrique. Débrancher l’appareil et brancher-le à nouveau.
• L’horloge doit être réglée de nouveau après la panne d’électricité.
21
Page 22

Garantie limitée
Cette garantie s’applique aux produits achetés et utilisées aux É.-U. et au Canada. C’est la seule garantie expresse pour ce
produit et est en lieu et place de tout autre garantie ou condition.
Ce produit est garanti contre tout défaut de matériaux et de main-d’oeuvre pour une période des cinq (5) ans à compter de
la date d’achat d’origine au Canada et un (1) an à compter de la date d’achat d’origine aux É.-U. Au cours de cette période,
votre seul recours est la réparation ou le remplacement de ce produit ou tout composant s’avérant défectueux, à notre gré,
mais vous êtes responsable de tous les coûts liés à l’expédition du produit et le retour d’un produit ou d’un composant dans
le cadre de cette garantie. Si le produit ou un composant n’est plus offert, nous le remplacerons par un produit similaire de
valeur égale ou supérieure.
Cette garantie ne couvre pas le verre, les filtres, l’usure d’un usage normal, l’utilisation non conforme aux directives imprimées,
ou des dommages au produit résultant d’un accident, modification, utilisation abusive ou incorrecte. Cette garantie s’applique
seulement à l’acheteur original ou à la personne l’ayant reçu en cadeau. La présentation du reçu de vente d’origine comme
preuve d’achat est nécessaire pour faire une réclamation au titre de cette garantie. Cette garantie s’annule si le produit est
utilisé autrement que par une famille ou si l’appareil est soumis à toute tension ou forme d’onde différente des caractéristiques
nominales précisées sur l’étiquette (par ex. : 120 V ~ 60 Hz).
Nous excluons toutes les réclamations au titre de cette garantie pour les dommages spéciaux, consécutifs et indirects causés
par la violation de garantie expresse ou implicite. Toute responsabilité est limitée au prix d’achat. Chaque garantie implicite,
y compris toute garantie ou condition de qualité marchande ou d’adéquation à un usage particulier, est exonérée, sauf
dans la mesure interdite par la loi, auquel cas la garantie ou condition est limitée à la durée de cette garantie écrite. Cette
garantie vous donne des droits légaux précis. Vous pouvez avoir d’autres droits qui varient selon l’endroit où vous habitez.
Certaines provinces ne permettent pas les limitations sur les garanties implicites ou les dommages spéciaux ou indirects de
telle sorte que les limitations ci-dessus ne s’appliquent peut-être pas à votre cas.
Ne pas retourner cet appareil au magasin lors d’une réclamation au titre de cette garantie. Téléphoner au 1.800.851.8900 aux
É.-U. ou au 1.800.267.2826 au Canada ou visiter le site internet www.hamiltonbeach.com aux É.-U. ou www.hamiltonbeach.ca
au Canada. Pour un service plus rapide, trouvez le numéro de modèle, le type d’appareil et les numéros de série sur votre
appareil.
22
Page 23

SALVAGUARDIAS IMPORTANTES
Cuando utilice artefactos eléctricos, siempre deben seguirse precauciones de seguridad básicas a fin de reducir el riesgo de incendio,
descarga eléctrica, y/o lesiones a personas, incluyendo las siguientes:
1. Lea todas las instrucciones.
2. Este aparato no se destina para utilizarse por personas
(incluyendo niños) cuyas capacidades físicas, sensoriales o
mentales sean diferentes o estén reducidas, o carezcan de
experiencia o conocimiento, a menos que dichas personas
reciban una supervisión o capacitación para el funcionamiento
del aparato por una persona responsable de su seguridad.
3. Se requiere de una estrecha supervisión cuando el aparato se
use cerca de niños. Los niños deben supervisarse para asegurar
que ellos no empleen los aparatos como juguete.
4. Verifique que el voltaje de su instalación corresponda con el del
producto.
5. No toque superficies calientes. Use las manijas o perillas. Se
debe de tener cuidado, ya que pueden ocurrir quemaduras al
tocar partes calientes o liquido caliente derramado.
6. Para protegerse de una descarga eléctrica, no coloque el cable,
enchufe o cafetera en agua u otros líquidos.
7. Desconecte de la toma cuando ya sea que la cafetera o reloj no
estén en uso o antes de limpiar. Deje enfriar antes de poner o
quitar partes y antes de limpiar el aparato.
8. La cafetera debe funcionar sobre una superficie plana lejos de
borde de una cubierta para prevenir que se ladee.
9. No opere ningún aparato con cables o enchufe dañados o
después de que el aparato funcione mal o se caiga o dañe de
cualquier manera. El reemplazo del cable de suministro y las
reparaciones deben ser efectuadas por el fabricante, su agente
de servicio, o personas igualmente calificadas para poder evitar
un peligro. Llame al número de servicio al cliente proporcionado
para información sobre examinación, reparación o ajuste.
10. El uso de aditamentos de accesorio no recomendados por el
fabricante del aparato puede causar daños.
11. Use solo la jarra provista con este aparato.
12. No use en exteriores.
13. No deje que el cable cuelgue del borde de la mesa o cubierta o
toque superficies calientes, incluyendo el horno.
14. La jarra está diseñada para uso con esta cafetera. No debe
usarse sobre una estufa o en un horno de microondas.
15. No ponga una jarra caliente sobre una superficie mojada o fría.
16. No use una jarra quebrada o una con manijas flojas o debilitadas.
17. No limpie la jarra con limpiadores, estropajos de acero u otros
materiales abrasivos.
18. Asegúrese que la tapa de la jarra esté de manera segura en su
lugar antes del ciclo de preparación y cuando vacíe café, no use
fuerza cuando coloque la tapa en la jarra.
19. No coloque la cafetera sobre o cerca de un quemador de gas o
eléctrico caliente o en un horno caliente.
20. Para desconectar la cafetera, ponga los controles en APAGADO
(O), luego remueva el enchufe de la toma de pared.
21. ¡ADVERTENCIA! Para reducir el riesgo de fuego o descarga
eléctrica, no remueva la cubierta inferior. No hay partes servibles
en el interior. La reparación debe hacerse por personal de
servicio autorizado únicamente.
22. No use el aparato para otro uso más que para el que fue
diseñado.
¡GUARDE ESTAS INSTRUCCIONES!
23
Page 24

Otra Información de Seguridad para el Cliente
Este aparato ha sido diseñado solamente para uso doméstico.
w ADVERTENCIA
provisto con un enchufe polarizado (una pata más ancha) para reducir
el riesgo de una descarga eléctrica. El enchufe embona únicamente
en una dirección dentro de un tomacorriente polarizado. No trate
de obviar el propósito de seguridad del enchufe modificándolo de
alguna manera o utilizando un adaptador. Si el enchufe no entra
completamente en la toma, invierta el enchufe. Si aún no entra, haga
que un electricista reemplace la toma.
Peligro de Descarga Eléctrica: Este aparato es
El largo del cable que se usa en este aparato fue seleccionado para
reducir el peligro de que alguien se enganche o tropiece con un cable
más largo. Si es necesario usar un cable más largo, se podrá usar un
cable de extensión aprobado. La clasificación eléctrica nominal del
cable de extensión debe ser igual o mayor que la clasificación nominal
del aparato. Es importante tener cuidado de colocar el cable de
extensión para que no se pliegue sobre el mostrador o la mesera en
donde niños puedan tirar del mismo o tropezarse accidentalmente.
Para evitar una sobrecarga eléctrica del circuito, no use otro aparato de
alto voltaje en el mismo circuito con este aparato.
24
Page 25

Piezas y Características
ANTES DEL PRIMER USO: Lave todas las piezas
desmontables en agua caliente jabonosa. Enjuague y
seque. Prepare un ciclo con agua y descarte el agua.
*Para ordenar partes:
EE. UU.:
1.800.851.8900
www.hamiltonbeach.com
México:
01 800 71 16 100
Filtro de Agua
en option*
Portafiltros*
Botón PROG
(programar)
Soporte del
Portafiltros
Giratorio
MODO BREW
(preparar)
Botón TIME (hora)
Jarra*
Panel de
Control
con Reloj
Placa para
Mantenere Caliente
Tapa para Acceder al
Filtro de Agua Opcional
Tapa de Llenado del
Depósito de Agua
Luz de Encendido
Botón ON/OFF
Encendido/
Apagado) (I/O)
25
Page 26

Cómo Prepara Café
w ADVERTENCIA
Para evitar que el café caliente se desborde de la canastilla de filtro:
• Cuando use café descafeinado, no exceda la cantidad de porción
recomendada por el fabricante de café.
• Verifique que el portafiltros giratorio esté completamente cerrado.
Si ocurre un desborde de la canastilla de filtro, desconecte la cafetera y deje que
el café en la canastilla de filtro se enfríe antes de remover la canastilla de filtro.
Peligro de Quemarse.
21 4
Presione y libere el botón TIME (hora). En la pantalla destellará la hora. Presione y luego toque repetidamente el botón TIME para configurar la hora
actual en AM o PM. Espere 3 segundos; los minutos destellarán. Presione y luego toque repetidamente el botón TIME para incrementar los minutos
actuales. La hora configurada permanecerá en forma constante.
5 6 7
Levante la tapa de llenado del
depósito de agua para agregar agua.
26
Por cada taza de café que prepare, coloque una cucharada de café molido en el filtro. También puede
utilizarse
un filtro permanente con el portafiltros.
3
Portafiltros con
Filtro de Papel
para 8–12 Tazas
8
Page 27

Cómo Prepara Café
(cont.)
w ADVERTENCIA
No sumerja el cable, enchufe o cafetera en ningún líquido.
Peligro de Descarga.
109
Coloque las lengüetas de la
canasta de preparación en
las ranuras del soporte del
portafiltro.
13
Cuando haya terminado, presione una vez el botón
APAGADO) y desenchufe.
manual, ésta se apagará automáticamente en 2 horas y también lo hará
la luz de encendido.
NOTA: Si la cafetera no se apaga en forma
Lave en agua tibia jabonosa.
Cierre el soporte del portafiltros
giratorio antes de la preparación
y no lo abra hasta que haya
finalizado el ciclo de preparación
y la unidad esté fría.
14
I/O
(ENCENDIDO/
Enjuague y seque.
11
Seleccione la opción de
preparación. (Ver “Cómo usar las
opciones de preparación”).
RESISTENTE AL
LAVAVAJILLAS
(la canasta superior)
Sólamente lavado y secado apto
para lavavajillas en el ESTANTE
SUPERIOR.
12
Presione una vez el botón de
(ENCENDIDO/APAGADO) para
encender la cafetera.
encendido se activará.
I/O
La luz de
27
Page 28

Para Programar la Preparación Automática
NOTA: La luz LED blanca se iluminará para indicar que se ha activado PROGRAM (programar). La luz LED
blanca se apagará cuando la unidad comienza la preparación a la hora pre-programada.
1
Elija una opción de preparación. Luego, sostenga el botón PROG. Luego,
presione y toque repetidamente el botón
de preparación deseada en AM o PM. Espere 3 segundos; los minutos
destellarán. Luego presione y toque repetidamente el botón
incrementar los minutos actuales. La hora configurada permanecerá en
forma constante. Libere PROG y se visualizará la hora actual.
2 3
TIME
para configurar la hora
TIME
Presione y libere PROG (programa)
de nuevo para activar la
preparación automática. La luz
PROG se iluminará.
Consejos para Lograr un Café más Rico
• Todos los cafés están hechos de granos de arábica o robusta, o de
una combinación de ambos. Los granos de arábica son un poco
más caros pero tienden a producir una café de mejor sabor.
• El café molido se pone rancio más rápido que los granos enteros.
Si compra café premolido, elija un paquete con la fecha de
vencimiento más alejada o de menor cantidad.
• Si va a moler granos enteros, configure su molino de café en un
molido fino/mediano. Esto genera el café molido de mejor sabor.
Trate de utilizar el café recién molido dentro de la semana de molido.
28
• Usar un filtro de agua, agua filtrada o agua mineral genera un café
más rico que usar agua de grifo.
• Utilice aproximadamente 1 cucharada de café molido por cada taza
de café a preparar. Para evitar los desbordes, utilice 1/3 menos de
café cuando prepare cafés descafeinados o saborizados.
• Asegúrese de que su cafetera esté limpia. Ver la sección “Cuidado
y Limpieza”.
Page 29

Cómo Utilizar las Opciones de Preparación y la Notificación de Limpieza
OPCIONES DE PREPARACIÓN
Su cafetera está predeterminada
en el ajuste de para un café con
concentración “Regular”.
NOTA: Usando la opción de
concentración de preparación
incrementará el tiempo de
preparación ligeramente.
NOTIFICACIÓN DE LIMPIEZA
Si la unidad está siempre
enchufada, aparecerá “CLEAN”
(limpieza) en la pantalla
después de 30 ciclos. Siga las
instrucciones de “Cuidado y
Limpieza”.
NOTAS:
• Al realizar el procedimiento
de limpieza desaparecerá la
notificación de la pantalla.
• El contador de ciclos de
preparación se reconfigura
cada vez que se desenchufa la
cafetera.
1
Para un café más intenso,
presione el botón BREW
OPTIONS (opciones de
preparación) hasta que se
ilumine “BOLD” (intenso).
1 2
2
Para cantidades pequeñas,
use la configuración 1–4
tazas presionando el botón
BREW OPTIONS (opciones de
preparación) hasta que se
ilumine “1–4 CUPS” (1–4 tazas).
3
Luego, presione el botón I/O
(ENCENDIDO/APAGADO)
o configure la Preparación
Automática para iniciar la
después de haber seleccionado
opción de preparación.
Si usted no desea realizar el
procedimiento de limpieza,
presione el botón I/O
(ENCENDIDO/APAGADO) dos
veces para borrar la pantalla.
cafetera
la
29
Page 30

Cuidado y Limpieza
w ADVERTENCIA
No sumerja el cable, enchufe o cafetera
en ningún líquido.
Peligro de Descarga.
Todas las cafeteras se deberán
limpiar por lo menos una vez por
mes (una vez por semana las áreas
con agua dura).
1 3
Desenchufe la cafetera (esto reconfigura el contador de preparación de la notificación de modo de limpieza). Limpie la cafetera con un paño
húmedo o esponja. Seque. Quite el filtro de agua y la base del filtro de agua (ver “Cómo Reemplazar el Filtro de Agua”). Coloque un mínimo
de 1 pinta (2 tazas/473 ml) de vinagre blanco en el depósito de agua.
5
Oprima el botón de I/O (ENCENDIDO/APAGADO). Después de 30 segundos,
apague. Espere 30 minutos para dejar que el vinagre limpie. Después
encienda de nuevo. Cuando el ciclo de preparación termine, espere a que la
unidad se enfríe. Vacie la jarra y enjuague. Haga funcionar durante 2–3 ciclos
sólo con AGUA LIMPIA. Deje enfriar entre ciclos.
30
2
6
7
4
RESISTENTE AL
LAVAVAJILLAS
(la canasta superior)
Page 31

Cómo Reemplazar el Filtro de Agua (accesorio opcional)
Para lograr un café de mejor
sabor, use un filtro de agua.
Se recomienda un cambio de
filtro cada 60 ciclos.
*Para ordenar partes:
1
15 min.
2
Precauciones de
Seguridad de la Jarra
EE. UU.:
www.hamiltonbeach.com
3
Este símbolo le advierte de un riesgo potencial de lesiones
personales si no se leen y siguen estas instrucciones de
seguridad.
Este símbolo le recuerda que el vidrio es frágil y que puede
romperse resultando en lesiones personales.
México:
1.800.851.8900
01 800 71 16 100
• Nunca use una jarra rajada o una cuya agarradera esté floja o débil.
• Esta jarra está diseñada para usarse solo sobre la placa que
mantiene caliente el café de su cafetera. No la use encima de
una estufa eléctrica o de gas o en el interior de un horno de
microondas o un horno convencional.
•
Para evitar rupturas, maneje la jarra cuidadosamente. Evite los
impactos. El vidrio se romperá como resultado de un impacto. Tenga
cuidado al llenar la jarra con agua para evitar golpearla con el grifo.
• Nunca deposite la jarra caliente sobre una superficie húmeda o fría.
Permita que se enfríe antes de lavarla o de agregarle algún líquido.
• Nunca deposite la jarra vacía encima de una superficie de
calentamiento que esté caliente.
• No la limpie con estropajos de fibra metálica, limpiadores abrasivos
o cualquier otro material que pudiese rayarla.
• No coloque las manos dentro de la jarra. Cuando la esté
manipulando, tenga cuidado si usa joyas en sus manos,
particularmente anillos de diamantes. Las joyas pueden rayar
el vidrio, lo que aumenta la posibilidad de que se rompa.
• No la golpee, raye ni permita que se sobrecaliente en seco.
• Si es que la jarra está rajada, rayada o se mantuvo caliente estando
vacía por un período prolongado de tiempo, deshágase de ella.
• Para evitar accidentes no vierta líquidos en dirección a las personas.
• Si necesita revolver el contenido de la jarra, use utensilios de
madera, plástico o hule solamente. Nunca use utensilios de metal.
• Siga cuidadosamente las instrucciones mencionadas anteriormente
para evitar quemaduras serias que pudiesen resultar si es que
alguna jarra se rompiese mientras contenga líquidos calientes.
31
Page 32

Resolviendo Problemas
PROBLEMA CAUSA PROBABLE/SOLUCIÓN
El portafiltros se desborda o la
preparación del café es muy
lenta.
No está en marcha la
preparación del café/la unidad
no enciende.
• Se recomienda la opción de preparación “BOLD” o de 1–4 tazas para preparar café descafeinado.
• Cantidad de café en exceso.
• El grano del café es muy fino (no es grano para goteo automático).
• No se ha colocado la jarra firmemente en su lugar sobre la placa para mantener caliente o el soporte
del portafiltros giratorio no se ha cerrado por completo.
• La jarra se quitó durante la preparación por más de 20 segundos y no se colocó adecuadamente
de regreso en la placa que mantiene caliente el café.
• La cafetera necesita limpiarse.
• Hay granos de café entre el filtro de papel y el portafiltros.
• El filtro de papel no está abierto ni en la posición apropiada.
• Presione los bordes cosidos del filtro de papel antes de colocarlo en la canasta.
• Enjuague el portafiltros antes de insertar el filtro de papel para que los bordes permanezcan
presionados contra los lados de la canasta.
• El filtro de papel es de baja calidad.
• El depósito de agua está vacío.
• La unidad está desenchufada.
• Corte de corriente.
• Subida de voltaje. Desenchufe, luego enchufe la unidad de nuevo.
• El reloj necesita ser reajustado después de un corte de corriente.
32
Page 33

Notas
33
Page 34

Notas
34
Page 35

Grupo HB PS, S.A. de C.V.
Monte Elbruz 124-301
Colonia Palmitas, Delegación Miguel Hidalgo
C.P. 11560, México, Distrito Federal
01 800 71 16 100
PÓLIZA DE GARANTÍA
PRODUCTO:
MARCA:
Grupo HB PS, S.A. de C.V. cuenta con una Red de Centros de Servicio Autorizada, por favor consulte en la lista anexa el nombre y dirección de los establecimientos en la
República Mexicana en donde usted podrá hacer efectiva la garantía, obtener partes, componentes, consumibles y accesorios; así como también obtener servicio para
productos fuera de garantía. Para mayor información llame sin costo: Centro de Atención al consumidor: 01 800 71 16 100
Grupo HB PS, S.A. de C.V. le otorga a partir de la fecha de compra:
GARANTÍA DE 1 AÑO.
COBERTURA
• Esta garantía ampara, todas las piezas y componentes del producto que resulten con defecto de fabricación incluyendo la mano de obra.
Grupo HB PS,
•
todo lo anterior sin costo adicional para el consumidor.
• Esta garantía incluye los gastos de transportación del producto que deriven de su cumplimiento dentro de su red de servicio.
S.A. de C.V. se obliga a reemplazar, reparar o reponer, cualquier pieza o componente defectuoso; proporcionar la mano de obra necesaria para su diagnóstico y reparación,
LIMITACIONES
• Esta garantía no ampara el reemplazo de piezas deterioradas por uso o por desgaste normal, como son: cuchillas, vasos, jarras, filtros, etc.
• Grupo HB PS, S.A. de C.V. no se hace responsable por los accidentes producidos a consecuencia de una instalación eléctrica defectuosa, ausencia de toma de tierra, clavija de enchufe
en mal estado, etc.
EXCEPCIONES
Esta garantía no será efectiva en los siguientes casos:
a) Cuando el producto se hubiese utlizado en condiciones distintas a las normales. (Uso industrial, semi-industrial o comercial.)
b) Cuando el producto no hubiese sido operado de acuerdo con el instructivo de uso.
c) Cuando el producto hubiese sido alterado o reparado por personas no autorizadas por Grupo HB PS, S.A. de C.V. el fabricante nacional, importador o comercializador responsable
respectivo.
El consumidor puede solicitar que se haga efectiva la garantía ante la propia casa comercial donde adquirió su producto, siempre y cuando Grupo HB PS, S.A. de C.V. no cuente con talleres de
servicio.
MODELO:
35
Page 36

PROCEDIMIENTO PARA HACER EFECTIVA LA GARANTÍA
• Para hacer efectiva la garantía no deben exigirse mayores requisitos que la presentación del producto y la póliza correspondiente, debidamente sellada por el establecimiento que lo vendió.
• Para hacer efectiva la garantía, lleve su aparato al Centro de Servicio Autorizado más cercano a su domicilio (consulte la lista anexa).
• Si no existe Centro de Servicio Autorizado en su localidad llame a nuestro Centro de Atención al Consumidor para recibir instrucciones de como hacer efectiva su garantía.
• El tiempo de reparación, en ningún caso será mayor de 30 días naturales contados a partir de la fecha de recepción del producto en nuestros Centros de Servicio Autorizados.
• En caso de que el producto haya sido reparado o sometido a mantenimiento y el mismo presente deficiencias imputables al autor de la reparación o del mantenimiento dentro de los treinta
días naturales posteriores a la entrega del producto al consumidor, éste tendrá derecho a que sea reparado o mantenido de nuevo sin costo alguno. Si el plazo de la garantía es superior a
los treinta días naturales, se estará a dicho plazo.
• El tiempo que duren las reparaciones efectuadas al amparo de la garantía no es computable dentro del plazo de la misma. Cuando el bien haya sido reparado se iniciará la garantía respecto
de las piezas repuestas y continuará con relación al resto. En el caso de reposición del bien deberá renovarse el plazo de la garantía.
SELLO DEL VENDEDOR QUEJAS Y SUGERENCIASFECHA DE ENTREGA
DÍA___ MES___ AÑO___
Si desea hacer comentarios o sugerencias con respecto a nuestro servicio o tiene alguna queja derivada de la atención recibida en
alguno de nuestros Centros de Servicio Autorizados, por favor dirigirse a:
GERENCIA INTERNACIONAL DE SERVICIO
Email: mexico.service@hamiltonbeach.com.mx
01 800 71 16 100
RED DE CENTROS DE SERVICIO AUTORIZADA GRUPO HB PS, S.A. DE C.V.
Distrito Federal
ELECTRODOMÉSTICOS
Av. Plutarco Elias Cailes No. 1499
Zacahuitzco MEXICO 09490 D.F.
Tel: 01 55 5235 2323 • Fax: 01 55 5243 1397
CASA GARCIA
Av. Patriotismo No. 875-B
Mixcoac MEXICO 03910 D .F.
Tel: 01 55 5563 8723 • Fax: 01 55 5615 1856
Nuevo Leon
FERNANDO SEPULVEDA REFACCIONES
Ruperto Martínez No. 238 Ote.
Centro MONTERREY, 64000 N.L.
Tel: 01 81 8343 6700 • Fax: 01 81 8344 0486
Jalisco
SERVICIOS DE MANTENIMIENTO CASTILLO
Garibaldi No. 1450
Ladrón de Guevara
GUADALAJARA 44660 Jal.
Tel: 01 33 3825 3480 • Fax: 01 33 3826 1914
Chihuahua
DISTRIBUIDORA TURMIX
Av. Paseo Triunfo de la Rep. No. 5289 Local 2 A.
Int. Hipermart
Alamos de San Lorenzo
CD. JUAREZ 32340 Chih.
Tel: 01 656 617 8030 • Fax: 01 656 617 8030
Modelo:
46300
Tipo:
A118
Características Eléctricas:
120 V~ 60 Hz 950 W
Los modelos incluídos en el instructivo de Uso y Cuidado pueden ir seguidos o no por un sufijo correspondiente a una
o varias letras del alfabeto y sus combinaciones, separadas o no por un espacio, coma, diagonal, o guión. Como ejemplos
los sufijos pueden ser: “Y” y/o “MX” y/o “MXY” y/o “Z”.
840263900
11/15
 Loading...