

Page 1

READ BEFORE USE
LIRE AVANT UTILISATION
LEA ANTES DE USAR
Visit www.hamiltonbeach.com for our
complete line of products and Use and
Care Guides – as well as delicious recipes,
tips, and to register your product online!
Rendez-vous sur www.hamiltonbeach.ca
pour notre liste complète de produits et de
nos manuels utilisateur – ainsi que nos
délicieuses recettes et nos conseils !
¡Visite www.hamiltonbeach.com (
o
www.hamiltonbeach.com.mx (México)
para ver otros productos de Hamilton Beach
o para contactarnos!
EE. UU.)
Roaster Oven
Rôtissoire
Questions?
Please call us – our friendly
associates are ready to help.
USA: 1.800.851.8900
Questions ?
N’hésitez pas à nous appeler –
nos associés s’empresseront
de vous aider.
CAN : 1.800.267.2826
¿Preguntas?
Por favor llámenos – nuestros
amables representantes están
listos para ayudar.
EE. UU.: 1.800.851.8900
MEX: 01 800 71 16 100
Le invitamos a leer cuidadosamente este
instructivo antes de usar su aparato.
Horno Asador
English ....................... 2
Français .....................15
Español .....................29
Page 2

IMPORTANT SAFEGUARDS
When using electrical appliances, basic safety precautions should always be followed to reduce the risk of fire, electric shock, and/or injury to
persons, including the following:
1. Read all instructions.
2. This appliance is not intended for use by persons (including
children) with reduced physical, sensory, or mental capabilities,
or lack of experience and knowledge, unless they are closely
supervised and instructed concerning use of the appliance by a
person responsible for their safety.
3. Close supervision is necessary when any appliance is used by or
near children. Children should be supervised to ensure that they
do not play with the appliance.
4. Do not touch hot surfaces. Use handles or knobs.
5. Use oven mitts to remove the roasting pan or rack from the
roaster oven, or to remove a baking pan or cooked food from
the roasting pan.
6. To protect against electrical shock do not immerse roaster base,
cord, or plug in water or other liquid.
7. Unplug from outlet when not in use and before cleaning. Allow
to cool before putting on or taking off parts and before cleaning.
8. Do not operate any appliance with a damaged supply cord or
plug, or after the appliance malfunctions or has been dropped
or damaged in any manner. Supply cord replacement and
repairs must be conducted by the manufacturer, its service
agent, or similarly qualified persons in order to avoid a hazard.
Call the provided customer service number for information on
examination, repair, or adjustment.
9. The use of accessory attachments not recommended by the
appliance manufacturer may cause injuries.
10. Do not use outdoors.
11. Do not let cord hang over edge of table or counter, or touch hot
surfaces, including the stove.
12. To disconnect, turn any control to MIN and then remove plug
from wall outlet.
13. Do not place on or near a hot gas or electric burner, or in a
heated oven.
14. Extreme caution must be used when moving an appliance
containing hot oil or other hot liquids.
15. Steam escaping from under lid is hot and can burn.
16. Do not use without the roasting pan specifically designed for
this model.
17. Do not use appliance to melt wax or any other nonfood use.
18. Do not allow flammable materials such as curtains, draperies,
walls, cabinets, backsplashes, and the like to touch any part of
the roaster oven while it is in operation.
19. Do not use appliance for other than intended use.
SAVE THESE INSTRUCTIONS!
2
Page 3

Other Consumer Safety Information
This appliance is intended for household use only. This roaster
oven is not intended for commercial, professional, or industrial
type usage. This roaster oven is designed only for cooking food. It
should not be used for heating nonfood products such as melting
wax. This appliance is designed, built, and intended for household
use only.
w WARNING
with a polarized plug (one wide blade) to reduce the risk of electric
shock. The plug fits only one way into a polarized outlet. Do not
defeat the safety purpose of the plug by modifying the plug in any
way or by using an adapter. If the plug does not fit fully into the
outlet, reverse the plug. If it still does not fit, have an electrician
replace the outlet.
Electrical Shock Hazard: This appliance is provided
The length of the cord used on this appliance was selected to reduce
the hazards of becoming tangled in or tripping over a longer cord. If
a longer cord is necessary, an approved extension cord may be used.
The electrical rating of the extension cord must be equal to or greater
than the rating of the appliance. Care must be taken to arrange
the extension cord so that it will not drape over the countertop or
tabletop where it can be pulled on by children or accidentally tripped
over.
To avoid an electrical circuit overload, do not use another highwattage appliance on the same circuit with this appliance.
3
Page 4

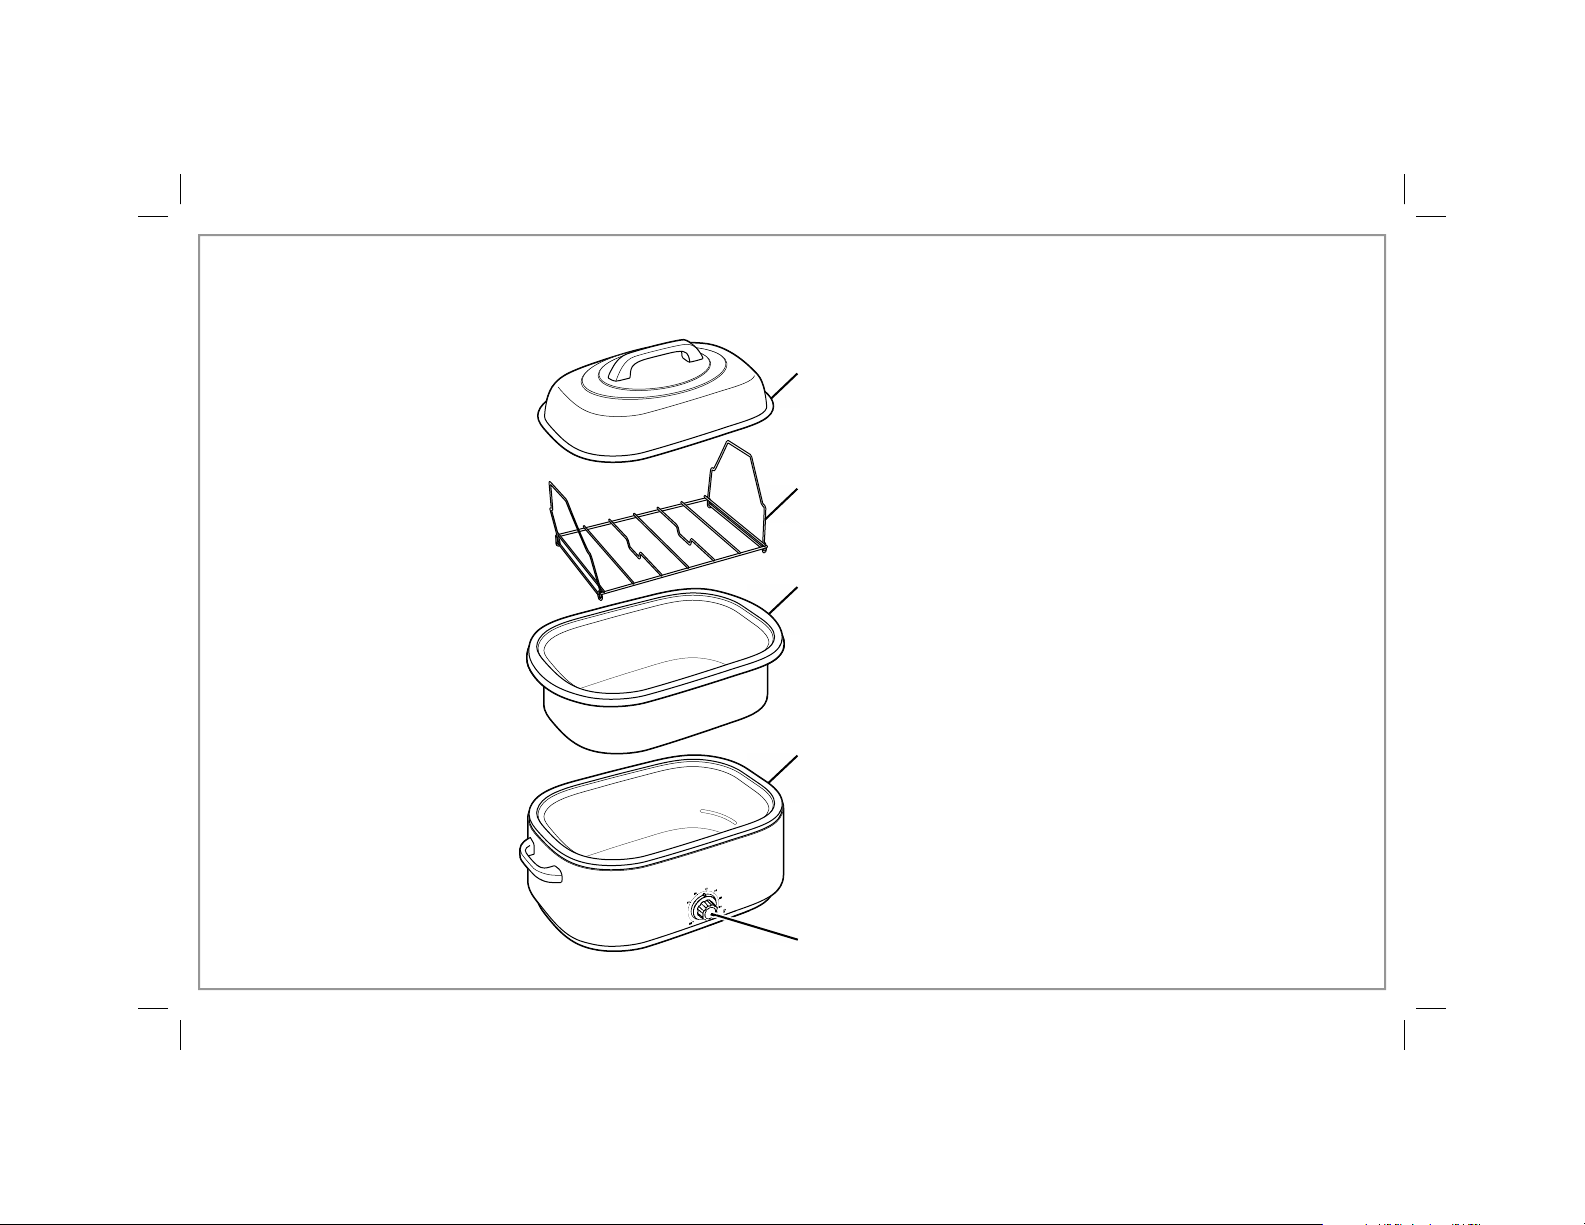
Parts and Features
*To order parts:
US: 1.800.851.8900
www.hamiltonbeach.com
Canada: 1.800.267.2826
Mexico:
01 800 71 16 100
BEFORE FIRST USE: Wash roasting pan, rack, and lid in hot, soapy
water. Rinse and dry. During the first use of the roaster oven, some
smoke and odor may be noticed. The smoke and odor should not occur
after this first heating of the oven.
Lid*
Rack*
Removable Roasting Pan*
Base
Temperature Control Knob*
4
Page 5

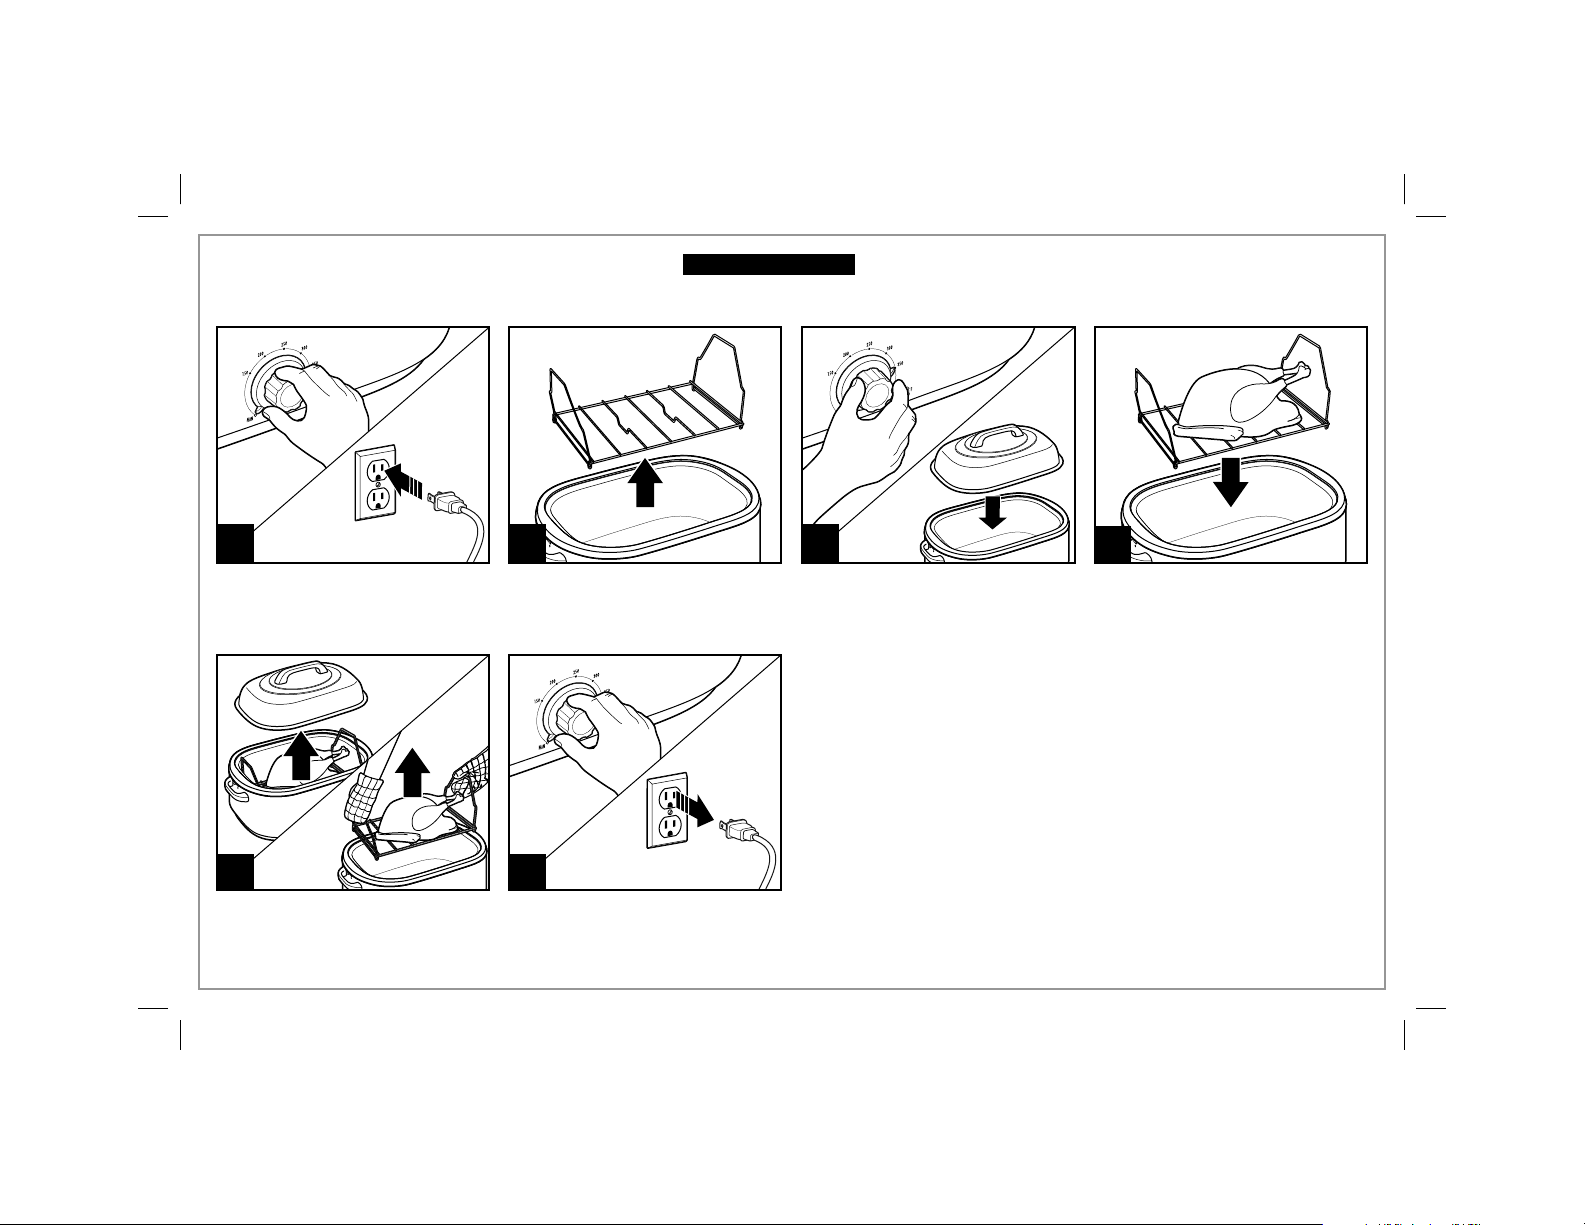
Using Your Roaster Oven
w WARNING
burns. Use hot mitts to protect hands when removing
roasting pan, rack, baking pan, or cooked food.
Burn Hazard. Escaping steam may cause
1 2 3
Make sure temperature control
is turned to MIN. Plug cord into
outlet.
5
When finished cooking, remove
lid. Wearing oven mitts, remove
food by using the rack.
Remove rack. Leave roasting pan
in roaster oven.
6
Turn temperature control to MIN
and unplug.
Set temperature control to
desired setting and let preheat
15 minutes with lid on.
NOTE: The roasting pan should
always be placed in the roaster
base when cooking.
4
Place food to be cooked in a pan
on the rack (or directly in the
roasting pan). Then place rack in
oven and replace the lid.
5
Page 6

Tips for Using Your Roaster Oven
• Before baking or roasting in the roaster oven, make sure the pan or
dish you plan to use will fit by placing it in the roasting pan. Most
heat-resistant glass casserole dishes fit in the roaster oven.
• The roasting pan must always be used when cooking in the roaster
oven. If cooking large quantities of soups or stews, the roasting
pan may be used as the cooking pan in the roaster base. It may
also be used as a large roasting pan in the roaster base.
• Do not use the roasting pan as a baking pan or casserole dish for
cakes, breads, or casseroles. A separate pan must be placed in the
roasting pan when cooking these foods.
• Baking pans and casserole dishes should be placed on the rack for
best heat circulation. If necessary, the rack can be removed to fit a
large roasting pan or two casseroles in roaster oven.
• Foil oven roasting bags can be used in the roaster oven. We do not
recommend using plastic oven roasting bags in the roaster oven.
• Do not remove the lid of the roaster oven unless necessary.
Removing the lid allows heat to escape and affects the temperature of
the roaster oven.
• Unless otherwise instructed, preheat roaster oven for 15 minutes
to the temperature stated in recipes.
• If a recipe calls for the use of a baking pan or dish, take the rack
out of the roaster oven. Preheat oven to desired temperature. Then
place pan on the rack and then place both into the roaster oven.
Bake as instructed in recipe. The rack makes it easier to place or
remove pans or dishes in the hot roaster oven.
Following are pan sizes which will fit in the roaster oven:
• One 9- x 13-inch (23 x 33 cm) baking or 10- x 14-inch (25 x 36 cm)
roasting pan
• Two 9- x 5-inch (23 x 13 cm) or 8- x 4-inch (20 x 10 cm) loaf pans
• One tube or bundt pan
6
Page 7

Roasting Meats and Poultry
• We recommend the use of a meat thermometer to ensure perfectly
cooked roasts and poultry every time. If using a meat thermometer,
the meat or poultry should be removed from the roaster oven when
the thermometer reading is 5 to 10 degrees below the desired
temperature. The internal temperature will continue to rise after
the meat has been removed from the roaster oven.
• Most hams sold today are labeled as “Cook Before Eating” or “Fully
Cooked.” Ham labeled “Cook Before Eating” has been smoked or
cured but NOT cooked. This ham must be thoroughly cooked to
an internal temperature of 155º to 160°F (68º to 71ºC). The “Fully
Cooked” hams have been smoked or cured and already cooked.
The ham does not require further cooking, but heating to 140°F (60ºC)
improves the flavor.
• The roaster oven cooks turkeys in less time than conventional
ovens. A 25- to 28-pound (11.3–12.7 kg) unstuffed turkey will cook in
approximately 3 1/2 to 4 hours. A turkey cooked in the roaster oven
is moist and juicy, but is lighter brown than a conventional oven
roasted turkey. To enhance the appearance, use the Turkey Browning
Sauce in the “Recipe” section.
• The Roasting Chart lists cooking times for tender cuts of meat that
are usually dry-roasted. These roasts are from the rib or sirloin area.
To tenderize cuts from the leg (ham) or shoulder/chuck area, cook in
liquid for a longer period of time.
• Times indicated are approximate and should be used only as a
general guideline. Individual cuts of meat and personal preference
may dictate longer or shorter roasting times.
• Food must be hot enough to prevent bacterial growth. Visit
foodsafety.gov for more information.
7
Page 8

Roasting Chart
NOTE: Roasting chart is for reference only. Follow package directions or
USDA recommendations. Visit www.foodsafety.org for more information on
safe internal cooking temperatures.
WT. LBS
FOOD
Whole Turkey 14–18
Whole Turkey 19–24
Whole Turkey 25–28
Turkey Breast 5–7
Roasting Chicken 6–8
Beef Roast 5–7
Fresh Pork Roast 5–7
Picnic Shoulder Ham
(Fully Cooked)
Whole Ham
(Fully Cooked)
WT. KGS
8.6–10.9
11.3–12.7
6.4–8.2
2.3–3.2
2.7–3.6
2.3–3.2
2.3–3.2
7–10
3.2–4.5
15–18
6.8–8.2
COOK TIME
MEAT
THERM.
180°F/82ºC 2 to 3 hours 2 to 3 hours
180°F/82ºC N/A 2 to 3 hours
180°F/82ºC N/A 3 1/2 to 4 hours
180°F/82ºC 1
180°F/82ºC 1 to 1 1/2 hours 1 to 1 1/2 hours
160°F/71ºC
(med.)
160°F/71ºC
(med.)
140°F/60ºC 2 to 3 hours 2 to 3 hours
140°F/60ºC 2 to 3 hours 2 to 3 hours
(18 qt./325°F)
(18 L/160ºC)
1/2 hours 1 1/2 hours
2 1/2 hours 2 1/2 hours
2 hours 2 hours
COOK TIME
(22 qt./325°F)
(22 L/160ºC)
8
Page 9

Baking
The roaster oven can bake your favorite cakes, pies, breads, or
casseroles like a conventional oven. Pans and dishes should be
placed on the rack for best heat circulation. Using the rack is also
recommended for convenience in removing hot dishes and pans
from the roaster oven.
Do not remove the lid of the roaster oven unless necessary. Removing
the lid allows heat to escape and affects the temperature of the roaster
oven.
Steaming
Preheat roaster oven to 450ºF (232ºC). To steam in the roaster
oven, you will need a metal colander. Place rack in the roasting
pan. Place roasting pan in roaster oven. Pour 1 quart (946 ml)
boiling water into the roasting pan. Place food to be steamed
in the colander and place colander in roasting pan. Cover and
steam according to the chart times or until desired doneness.
ITEM TO STEAM AMOUNT OF TIME
2 cauliflower heads, cut up 10 minutes
2 bunches of broccoli, cut up 10 minutes
2 pounds (907 g) shrimp 10 minutes
Warming Rolls and Biscuits
Preheat roaster over to 250ºF (121ºC). You will need two small
ovenproof containers to hold water. Emptied and washed food cans are
perfect. Fill the cans two-thirds full with hot water and place in opposite
corners of the roasting pan.
Stack rolls, biscuits, or pancakes in roasting pan. Do not let them touch
sides of pan. Cover and keep warm up to 1 hour.
Quantity Cooking
The roasting pan may be used as a large cooking utensil when cooking
or heating large quantities. It may be used to simmer sauces, soups,
or stews, or simply to heat or warm large quantities. When cooking or
heating soups or stews in the roaster oven, stir occasionally for quicker,
even heating.
For example, set the temperature control at 400°F (204ºC) and the
roaster oven will warm vegetable beef soup from refrigerated
temperature to serving temperature in about 2 hours. To cook soups,
stews, or sauces, set the temperature control on 225°F (107ºC) and
allow 4 to 8 hours to simmer, depending on recipe.
9
Page 10

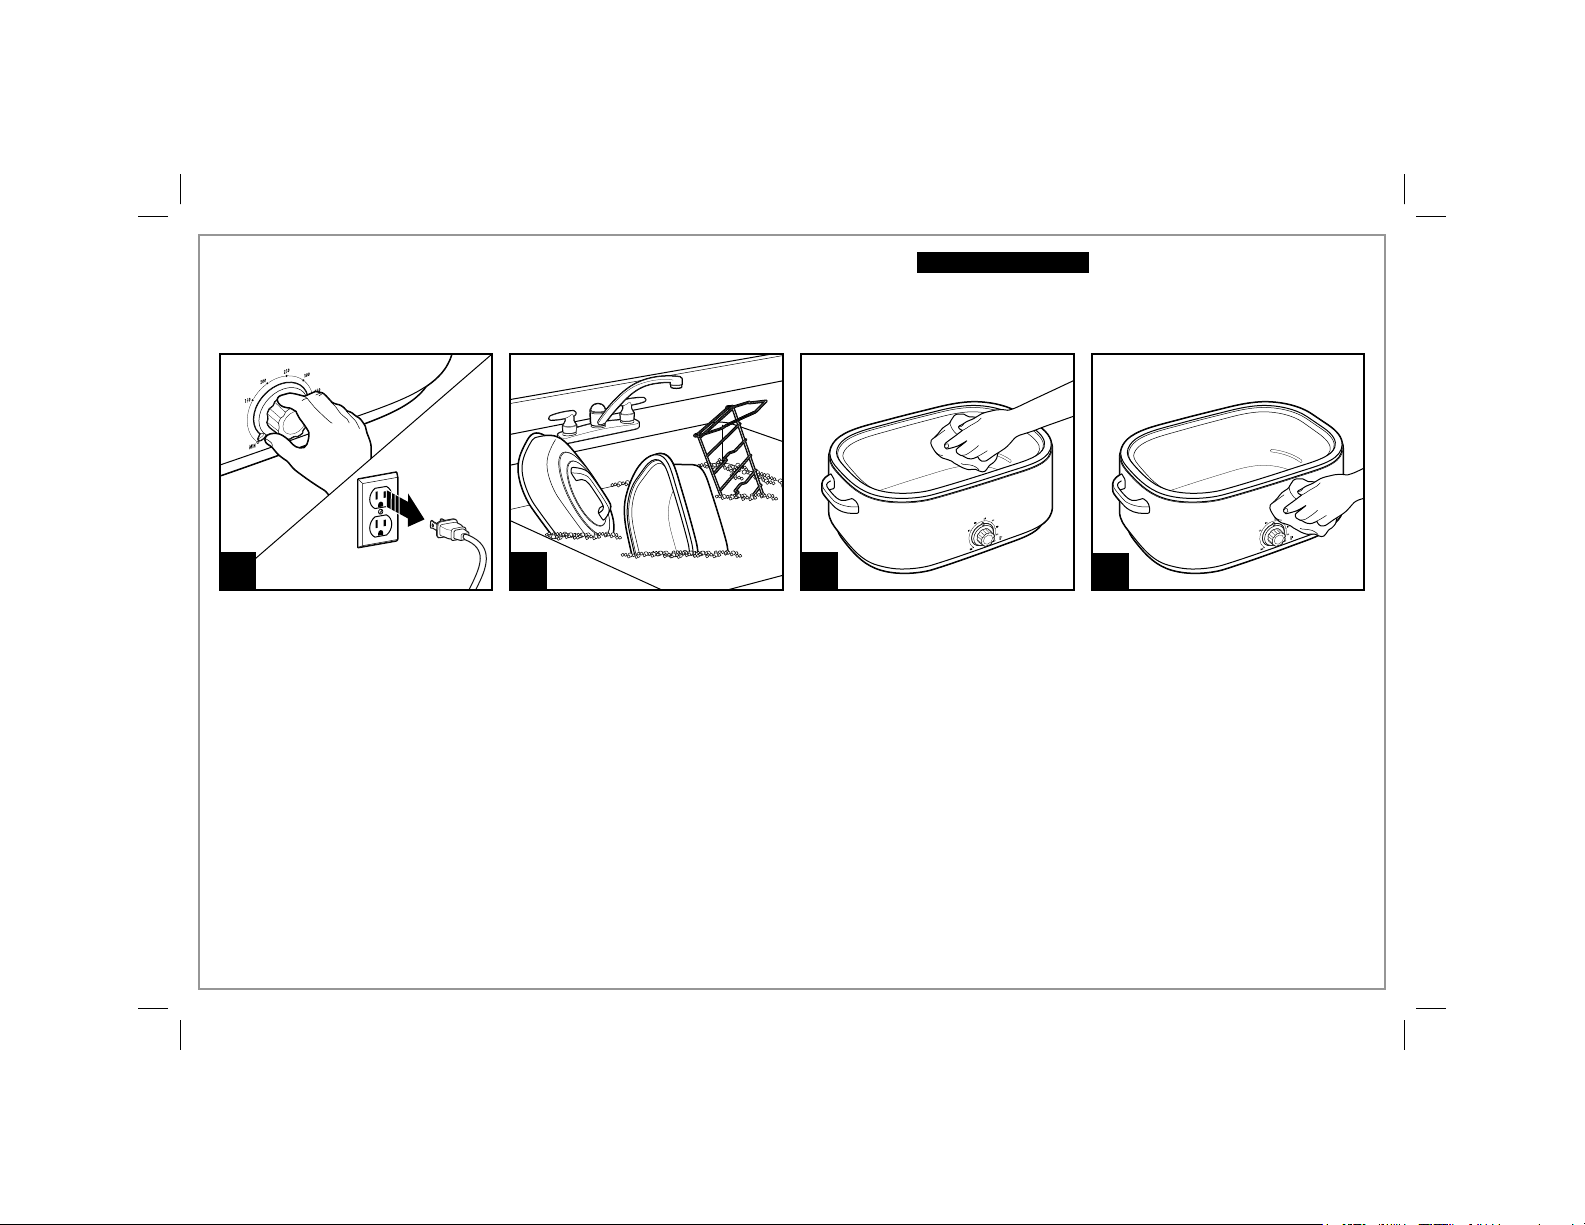
Cleaning
w WARNING
Do not immerse cord, plug, or base in any liquid. Failure to follow these
instructions can result in death or electrical shock.
Electrical Shock Hazard. Disconnect power before cleaning.
1 2 3
Turn temperature control to
MIN. Unplug and let cool
completely.
10
Wash cover, rack, and roasting
pan in hot, soapy water. To
remove burned-on food, let soak;
then scrub with a nylon scouring
pad. Rinse in hot water; then dry.
4
Wipe the inside of the roaster base with a damp cloth. Wipe the
outside of the roaster oven with a damp, soapy cloth; then dry.
NOTE: The lid may discolor from the cooking process. It is a natural
occurrence and does not affect performance.
Page 11

Roaster Oven Recipes
Unless otherwise instructed, preheat roaster oven for 15 minutes to
the temperature stated in the recipe.
Cooking Recipes
Party Meatballs
5- pound (2.3 kg) bag pre-cooked frozen meatballs
12-ounce (340 g) jar grape jelly
12-ounce (340 g) jar currant jelly
12-ounce (340 g) bottle chili sauce
12-ounce (340 g) bottle cocktail sauce
Let meatballs thaw overnight in refrigerator. Place meatballs in
roasting pan. In a large mixing bowl, beat together jellies and sauces.
Pour over meatballs. Bake at 250ºF (121ºC) for 2 hours or until heated
through.
If recipe calls for the use of a baking pan or dish, take the rack out of
the oven. Preheat oven to desired temperature. Then place pan on
the rack and then place both into the roaster oven. Bake as instructed
in the recipe. The rack makes it easier to place or remove pans or
dishes in the hot roaster oven.
Chili
2 tablespoons (30 ml) oil
2 pounds (907 g) beef chuck, cut into small pieces
1 pound (454 g) hot Italian sausage, removed from casings
1 pound (454 g) sweet Italian sausage, removed from casings
2 large onions, chopped
1 large green pepper, seeded and chopped
1 tablespoon (15 ml) minced garlic
4 tablespoons (59 ml) canned, sliced jalapeno peppers (half of
4-ounce [113 g] can)
4 tablespoons (59 ml) chili powder
2 tablespoons (30 ml) ground cumin
1 teaspoon (5 ml) black pepper
2 (16-ounce [454 g]) can kidney beans
28- ounce (794 g) can diced tomatoes, undrained
12-ounce (340 g) can tomato paste
2 (15-ounce [425 g]) cans chicken broth
Set temperature dial to 400ºF (204ºC). In roasting pan, heat the
oil. Add the beef and sausage and cook about 20 minutes. Add
the onions, pepper, garlic and jalapeno and cook 5 minutes. Stir in
remaining ingredients. Reduce temperature to 275ºF (135ºC). Cover
and bake for 2 hours, stirring halfway though. Makes 5 quarts (4.7 L).
11
Page 12

Roasting Recipes
Quick Roast Turkey
The roaster oven cooks a turkey in about half the time of a regular
oven, but use a meat thermometer to make sure your turkey is
thoroughly cooked.
14- to 18-pound (6.3–8.2 kg) fresh or thawed turkey
1 onion, cut in half
2 stalks celery
1 teaspoon (5 ml) salt
1/2 teaspoon (2.5 ml) pepper
1/4 cup (59 ml) butter, melted
Remove the rack. Pour 1/2 cup (118 ml) water into the roasting pan, cover,
and preheat to 325ºF (160ºC). Remove giblets and neck from cavities of
turkey. Set aside and use for giblet gravy. Rinse bird inside and out with cold
water. Place onion and celery inside turkey. Rub outside with salt and pepper.
Place on rack. Brush whole turkey with butter. Place in roaster. Cover and
cook at 325ºF (163ºC) for 2 to 2 1/2 hours. Check meat thermometer reading.
Continue cooking until meat thermometer registers 165ºF (74ºC).
NOTES:
For food safety, turkey must reach an internal temperature of 165°F (74ºC).
Visit www.foodsafety.gov for more information on safe internal cooking
temperatures.
Always thaw a frozen turkey in the refrigerator, not at room temperature.
A 12–15 pound (5.4–6.8 kg) frozen turkey will take 2–3 days to thaw in the
refrigerator. If pressed for time, this size turkey can be thawed in cold water
in 6-9 hours. Be sure to change the water often.
The roaster oven cooks a turkey in less time than a regular oven, but use a
meat thermometer to make sure your turkey is thoroughly cooked.
Turkey cooked in a roaster oven will be very moist, but less brown than
a traditionally roasted turkey. Seasoning rubs add flavor and enhance the
appearance of a roaster oven cooked turkey.
Turkey Browning Sauce
For turkey with a brown skin, use the following recipe before
cooking:
1/4 cup (59 ml) melted butter or margarine
1 1/2 teaspoons (7.5 ml) browning sauce, like Kitchen Bouquet
1 teaspoon (5 ml) paprika
Wash turkey with cold water. Pat dry. Paint turkey with the browning
mixture and cook as directed.
12
Page 13

Baking Recipes
Baked Potatoes
10 pounds (4.5 kg) baking potatoes
Wash and scrub the potatoes. Pierce all the potatoes, several times.
Stack in the roaster oven so that they are not touching the sides of
the roasting pan. Bake at 400ºF (204ºC) for 1 hour, or until done.
Check for doneness by piercing with a fork.
The Perfect Cheesecake
You need a springform pan for this, but cheesecakes are easy to
make. The roaster oven cooks the cheesecake with gentle heat by
surrounding it with water like the professionals do.
Butter
1/2 cup (118 ml) graham cracker crumbs
6 (8-ounce [227 g]) packages cream cheese, room temperature
1 1/2 cups (355 ml) sugar
5 eggs
1 teaspoon (5 ml) vanilla
1 tablespoon (15 ml) lemon juice
Generously butter bottom and sides of 9 1/2-inch (24-cm) springform
pan. Sprinkle crumbs evenly over bottom of pan. In a large mixing
bowl, beat cream cheese until smooth. Add sugar and continue to
beat until smooth. Add eggs, beating well after each addition. Stir in
vanilla and lemon juice. Pour into prepared springform pan. Cover
springform pan with aluminum foil. (This prevents condensation
in roaster from dripping onto cake.) Pour 3 quarts (2.8 L) hot water
into roasting pan. Place springform pan on rack and place in roaster.
Cover and bake at 325ºF (163ºC) for 1 1/2 hours. Carefully remove
and let cool; then refrigerate thoroughly before serving. Yield: 16 to
20 servings.
Baked Eggs
1 1/2 cups (355 ml) milk
3 dozen eggs
1 teaspoon (5 ml) salt
1/2 teaspoon (2.5 ml) pepper
1/4 cup (59 ml) melted butter
In a large bowl, beat milk, eggs, salt and pepper with mixer. Pour
melted butter into 9- x 13-inch (23 x 33 cm) baking pan and tilt pan
to coat bottom and sides. Pour egg mixture into pan. Place in roaster
oven and bake eggs at 400ºF (204ºC) for 30 minutes, stirring and
scraping sides of pan with a rubber spatula every 10 minutes to
ensure even cooking. Makes 15 servings.
13
Page 14

Limited Warranty
This warranty applies to products purchased and used in the U.S. and Canada. This is the only express warranty for this product and
is in lieu of any other warranty or condition.
This product is warranted to be free from defects in material and workmanship for a period of five (5) years from the date of original
purchase in Canada and one (1) year from the date of original purchase in the U.S. During this period, your exclusive remedy is repair
or replacement of this product or any component found to be defective, at our option; however, you are responsible for all costs
associated with returning the product to us and our returning a product or component under this warranty to you. If the product or
component is no longer available, we will replace with a similar one of equal or greater value.
This warranty does not cover glass, filters, wear from normal use, use not in conformity with the printed directions, or damage to
the product resulting from accident, alteration, abuse, or misuse. This warranty extends only to the original consumer purchaser or
gift recipient. Keep the original sales receipt, as proof of purchase is required to make a warranty claim. This warranty is void if the
product is used for other than single-family household use or subjected to any voltage and waveform other than as specified on the
rating label (e.g., 120V ~ 60 Hz).
We exclude all claims for special, incidental, and consequential damages caused by breach of express or implied warranty. All
liability is limited to the amount of the purchase price. Every implied warranty, including any statutory warranty or condition
of merchantability or fitness for a particular purpose, is disclaimed except to the extent prohibited by law, in which case such
warranty or condition is limited to the duration of this written warranty. This warranty gives you specific legal rights. You may have
other legal rights that vary depending on where you live. Some states or provinces do not allow limitations on implied warranties or
special, incidental, or consequential damages, so the foregoing limitations may not apply to you.
To make a warranty claim, do not return this appliance to the store. Please call 1.800.851.8900 in the U.S. or 1.800.267.2826 in Canada
or visit hamiltonbeach.com in the U.S. or hamiltonbeach.ca in Canada. For faster service, locate the model, type, and series numbers
on your appliance.
14
Page 15

PRÉCAUTIONS IMPORTANTES
Pour utiliser un appareil électroménager, vous devez toujours prendre des mesures élémentaires de sécurité pour réduire le risque d’incendie,
d’électrocution et/ou de blessure corporelle, en particulier les mesures suivantes :
1. Lire toutes les instructions.
2. Cet appareil n’est pas destiné à être utilisé par des personnes (y
compris les enfants) dont les capacités physiques, sensorielles
ou mentales sont réduites, ou manquant d’expérience et
de connaissance, sauf si elles sont étroitement surveillées
et instruites sur l’utilisation de l’appareil par une personne
responsable de leur sécurité.
3. Une surveillance étroite est requise pour tout appareil utilisé par
ou près des enfants. Surveiller que les enfants ne jouent pas
avec l’appareil.
4. Ne pas toucher les surfaces chaudes. Utiliser les poignées ou
boutons.
5. Utiliser des gants de cuisine pour retirer le plat amovible ou la
grille de la rôtissoire ; ou pour sortir un moule à gâteau ou des
aliments cuits du contenant intérieur.
6. Pour protéger contre le risque de choc électrique, ne pas
immerger la base de la rôtissoire, le cordon ou la fiche dans
l’eau ou autre liquide.
7. Débrancher l’appareil de la prise de courant électrique lorsqu’il
n’est pas utilisé et avant un nettoyage. Le laisser refroidir avant
d’y placer ou d’y enlever des pièces et avant un nettoyage.
8. Ne pas faire fonctionner un appareil électroménager avec un
cordon ou une fiche endommagée, ou lorsque l’appareil ne
fonctionne pas bien ou a été échappé ou endommagé d’une
manière quelconque. Le remplacement et la réparation du
cordon d’alimentation doivent être faits par le fabricant, son
agent de service ou toute personne qualifiée de façon à éviter
tout danger. Appeler le numéro de service à la clientèle fourni
pour des renseignements concernant l’examen, la réparation ou
l’ajustement.
9. L’utilisation d’accessoires non recommandés par le fabricant de
l’appareil ménager peut causer des blessures.
10. Ne pas utiliser à l’extérieur.
11. Ne pas laisser le cordon pendre du bord d’une table ou d’un
comptoir, ni toucher des surfaces chaudes, y compris la
cuisinière.
12. Pour déconnecter, tourner la commande de température sur
MIN, puis débrancher la fiche de la prise murale.
13. Ne pas placer l’appareil sur ou près d’un brûleur à gaz chaud, ou
d’un élément électrique, ou dans un four chauffé.
14. Une grande précaution doit être prise lors de l’utilisation d’un
appareil électroménager contenant de l’huile chaude ou autres
liquides chauds.
15. La vapeur s’échappant de dessous le couvercle est chaude et
peut causer des brûlures.
16. Ne pas utiliser sans le plat amovible conçu spécialement pour ce
modèle.
17. Ne pas utiliser cet appareil pour faire fondre de la cire ou pour
tout autre usage non alimentaire.
18. Veiller à ce que les matériaux inflammables tels que les rideaux,
tentures, murs, armoires, dosserets, etc. ne touchent aucune
partie de la rôtissoire durant son utilisation.
19. Ne pas utiliser l’appareil électroménager à une fin autre que
l’utilisation prévue.
CONSERVEZ CES INSTRUCTIONS
15
Page 16

Autres renseignements de sécurité aux consommateurs
Cet appareil est destiné à un usage domestique uniquement. Cette
rôtissoire n’est pas destinée à un usage commercial, professionnel
ou industriel. Elle est conçue uniquement pour la cuisson
d’aliments. Elle ne doit pas être utilisée pour chauffer des produits
non alimentaires, comme faire fondre de la cire. Cet appareil est
conçu, fabriqué et destiné à l’usage ménager seulement.
w AVERTISSEMENT
fourni avec une fiche polarisée (une broche large) pour réduire le
risque d’électrocution. Cette fiche n’entre que dans un seul sens dans
une prise polarisée. Ne contrecarrez pas l’objectif sécuritaire de cette
fiche en la modifiant de quelque manière que ce soit ou en utilisant
un adaptateur. Si vous ne pouvez pas insérer complètement la fiche
dans la prise, inversez la fiche. Si elle refuse toujours de s’insérer,
faire remplacer la prise par un électricien.
Risque de choc électrique : Cet appareil est
La longueur du cordon installé sur cet appareil a été sélectionnée afin
de réduire les risques d’enchevêtrement ou de faux pas causés par
un fil trop long. L’utilisation d’une rallonge approuvée est permise
si le cordon est trop court. Les caractéristiques électriques de la
rallonge doivent être équivalentes ou supérieures aux caractéristiques
de l’appareil. Prendre toutes les précautions nécessaires pour installer
la rallonge de manière à ne pas la faire courir sur le comptoir ou sur
une table pour éviter qu’un enfant ne tire sur le cordon ou trébuche
accidentellement.
Pour éviter la surcharge du circuit électrique, ne pas utiliser un autre
appareil à haute puissance sur le même circuit que cet appareil.
16
Page 17
Pièces et caractéristiques
*Pour commander des pièces :
Canada : 1.800.267.2826
Couvercle*
Grille*
Plat amovible*
Base
AVANT L’UTILISATION INITIALE : Laver le plat
amovible, la grille et le couvercle dans l’eau chaude
savonneuse. Rincer et sécher. Lors de l’utilisation
initiale de la rôtissoire, on remarquera peut-être de la
fumée et une odeur. On ne devrait pas percevoir de
fumée ou d’odeur après le premier chauffage de la
rôtissoire.
Bouton de commande de température*
17
Page 18
Mode d’emploi
w AVERTISSEMENT
brûlures. Utiliser des gants de cuisine pour protéger les mains lors du retrait de la
plat amovible, la grille, la grille de cuisson ou des aliments cuits.
Risque de brûlure. La vapeur qui s’échappe peut causer des
1 2 3
S’assurer que la commande de
température est tournée sur MIN.
Brancher le cordon dans une
prise de courant.
5
Une fois la cuisson terminée, enlever le couvercle. Avec des gants
de cuisine, sortir prudemment les aliments au moyen de la grille.
Tourner la commande de température sur MIN, puis débrancher.
18
Enlever la grille. Laisser le plat
amovible dans la rôtissoire.
6
Régler la température tel que
désiré et laisser préchauffer 15
minutes avec le couvercle mis.
REMARQUE : Le plat amovible
doit toujours être placé dans la
rôtissoire lors de la cuisson.
4
Placer la nourriture à faire cuire
dans une grille (ou directement
dans le plat amovible). Placer
dans la rôtissoire et remettre en
place le couvercle.
Page 19

Conseils à propos de la rôtissoire
• Avant de faire cuire ou de rôtir dans la rôtissoire, s’assurer que le plat
que vous prévoyez d’utiliser conviendra en le plaçant dans le plat
amovible. La plupart des plats en verre réfractaire conviennent à la
rôtissoire.
• Le plat amovible doit toujours être utilisé lors de la cuisson dans la
rôtissoire. Si l’on prépare de grandes quantités de soupes ou de
ragoûts, le plat amovible peut être utilisé comme plat de cuisson dans
la base de la rôtissoire. Il peut également servir de grande rôtissoire
dans la base.
• Ne pas utiliser le plat amovible comme plat de cuisson au four ou
cocotte pour les gâteaux, pains ou mets en sauce. Un plat distinct doit
être placé dans le plat amovible lors de la cuisson de ces aliments.
• Les plats pour la cuisson doivent être placés sur la grille pour une
circulation maximale de la chaleur. Si nécessaire, la grille peut être
retirée pour accommoder un grand plat ou deux plats dans la
rôtissoire.
• Les sacs de rôtissage au four en papier d’aluminium peuvent être
utilisés dans la rôtissoire. Nous ne recommandons pas d’utiliser des
sacs plastique de rôtissage au four dans la rôtissoire.
• Ne pas enlever le couvercle de la rôtissoire inutilement. Enlever le
couvercle laisse la chaleur s’échapper et affecte la température de la
rôtissoire.
• À moins d’indication contraire, préchauffer la rôtissoire 15 minutes à
la température demandée dans les recettes.
• Si la recette nécessite l’utilisation d’une casserole ou d’un moule,
enlever la grille de la rôtissoire. Préchauffer à la température désirée.
Mettre la casserole ou le moule sur la grille, puis mettre les deux
ensemble dans la rôtissoire. Cuire selon les instructions de la recette.
La grille permet de mettre et de retirer plus facilement la casserole ou
le moule dans la rôtissoire chaude.
Les plats de tailles suivantes conviennent à la rôtissoire :
• Un plat de cuisson de 9 x 13 po (23 x 33 cm) ou une plaque à rôtir de
10 x 14 po (25 x 36 cm)
• Deux moules à pain de 9 x 5 po (23 x 13 cm) ou 8 x 4 po (20 x 10 cm)
• Un moule long ou en cheminée
19
Page 20

Rôtissage de viandes et volailles
• Nous recommandons l’utilisation d’un thermomètre à viande pour
assurer une cuisson parfaite des rôtis et de la volaille à chaque fois.
Si on utilise un thermomètre à viande, la viande ou la volaille doit
être retirée de la rôtissoire lorsque la température indiquée par le
thermomètre est de 5 à 10° en-dessous de la température désirée. La
température interne continuera de s’élever une fois la viande retirée
de la rôtissoire.
• La plupart des jambons vendus aujourd’hui portent une étiquette
« Prêt à manger » ou « Entièrement cuit ». Les jambons étiquetés
« Cuire avant de manger » ont été fumés ou saumurés SANS AVOIR
été cuits. Ce jambon doit être entièrement cuit jusqu’à ce que la
température interne soit de 155 à 160 °F (68 à 71 °C). Les jambons
« Entièrement cuits » ont été fumés ou saumurés et déjà cuits. Ce
jambon ne requiert pas de cuisson additionnelle, mais les faire
réchauffer jusqu’à une température de 140 °F (60 °C) en rehaussera la
saveur.
• La cuisson des dindes à la rôtissoire est plus rapide que celle faite au
four traditionnel. Une dinde sans farce de 25 à 28 livres (11,3–12,7 kg)
cuira en environ 3,5 à 4 heures. Une dinde cuite dans la rôtissoire
sera tendre et juteuse, mais sera moins grillée qu’une dinde cuite au
four traditionnel. Pour améliorer son apparence, utiliser la sauce de
brunissage pour dinde au chapitre « Recettes ».
• Le « Tableau de rôtissage » donne les durées de cuisson pour les
pièces de viande tendres habituellement rôties à sec. Ces rôtis
proviennent des côtes ou de la surlonge. Pour attendrir les pièces
provenant de la cuisse (jambon) ou de l’épaule/bas de palette, faire
cuire dans le liquide pendant une période plus longue.
• Les durées indiquées sont approximatives et ne doivent servir qu’à
titre indicatif. Les pièces de viande individuelles et les préférences
personnelles peuvent nécessiter des durées de rôtissage plus longues
ou plus courtes.
• Le mets doit être assez chaud pour empêcher la croissance de
bactéries. Visiter les différents sites gouvernementaux pour plus
d’information.
20
Page 21

Tableau de rôtissage
NOTE: Le tableau de rôtissage est pour la référence seulement. Suivre
les directions de packet ou les recommandations de USDA. Visiter les
différents sites gouvernementaux pour plus d’information à propos des
températures internes de cuisson.
PDS
ALIMENT
Dinde entière 14–18
Dinde entière 19–24
Dinde entière 25–28
Blanc de dinde 5–7
Poulet à rôtir 6–8
Rôti de bœuf 5–7
Rôti de porc frais 5–7
Jambon pour
pique-nique
(entièrement cuit)
Jambon entier
(entièrement cuit)
KGS
6,4–8,2
8,6–10,9
11,3–12,7
2,3–3,2
2,7–3,6
2,3–3,2
2,3–3,2
7–10
3,2–4,5
15–18
6,8–8,2
TEMPS DE CUISSION
TEMP
VIANDE
180 °F/82 ºC 2 à 3 heures 2 à 3 heures
180 °F/82 ºC N/A 2 à 3 heures
180 °F/82 ºC N/A 3 1/2 à 4 heures
180 °F/82 ºC 1
180 °F/82 ºC 1 à 1 1/2 heures 1 à 1 1/2 heures
160 °F/71 ºC
(med.)
160 °F/71 ºC
(med.)
140 °F/60 ºC 2 à 3 heures 2 à 3 heures
140 °F/60 ºC 2 à 3 heures 2 à 3 heures
(18 QT./325 °F)
(18 L/160 ºC)
1/2 heures 1 1/2 heures
2 1/2 heures 2 1/2 heures
2 heures 2 heures
TEMPS DE CUISSON
(22 QT./325 °F)
(22 L/160 ºC)
21
Page 22
Cuisson au four
La rôtissoire peut cuire vos gâteaux, tartes, pains ou mets en sauce favoris
comme un four conventionnel. Les plats doivent être placés sur la grille
pour la meilleure circulation de la chaleur. L’utilisation de la grille est aussi
recommandée pour la commodité de sortir les plats chauds de la rôtissoire.
Ne pas ôter le couvercle de la rôtissoire inutilement. Ôter le couvercle laisse
la chaleur s’échapper et affecte la température de la rôtissoire.
Étuvage
Préchauffer la rôtissoire à 450 ºF (232 ºC). Pour cuire à la vapeur
dans la rôtissoire, il vous faudra une passoire de métal. Placer la
grille dans le plat amovible. Placer le plat amovible dans la rôtissoire.
Verser une pinte (1 L) d’eau bouillante dans le plat amovible. Placer
les aliments à faire cuire à la vapeur dans la passoire et placer la
passoire dans le plat amovible. Couvrir et cuire à la vapeur pendant
les durées ci-dessous ou jusqu’au degré de cuisson désiré.
ALIMENT À FAIRE CUIRE À LA VAPEUR DURÉE DE CUISSON
2 têtes de choux-fleurs coupées 10 minutes
2 branches de brocoli coupées 10 minutes
2 livres (907 g) de crevettes 10 minutes
Réchauffage de petits pains et biscuits
Préchauffer la rôtissoire à 250 ºF (121 ºC). Vous aurez besoin de deux
petits contenants allant au four pour contenir l’eau. Les boîtes de
conserve vides et lavées conviennent parfaitement. Remplir les boîtes
aux deux tiers d’eau chaude et les placer dans les coins opposés du
plat amovible. Empiler les petits pains, biscuits ou crêpes dans le plat
amovible. Ne pas les laisser toucher les côtés du plat. Couvrir et garder
au chaud pendant 1 heure.
Cuisson en quantité
La plat amovible peut servir pour la cuisson ou le réchauffage de grandes
quantités. Il peut servir pour faire mijoter les sauces, soupes ou ragoûts, ou
simplement pour faire chauffer ou réchauffer de grandes quantités. Lors de
la cuisson ou de réchauffage de soupes ou de ragoûts dans la rôtissoire,
remuer occasionnellement pour un réchauffage plus rapide et uniforme.
22
Par exemple, régler la commande de température sur 400 ºF (204 ºC)
et la rôtissoire réchauffera une soupe aux légumes et au boeuf d’une
température réfrigérée à une température de service en environ deux
heures. Pour faire cuire des soupes, ragoûts ou sauces, régler la
commande de température sur 225 ºF (107 ºC) et prévoir 4 à 8 heures de
mijotage selon la recette.
Page 23
Nettoyage
w AVERTISSEMENT
Débrancher l’appareil avant le nettoyage. Ne pas
immerger le cordon, la fiche ou la base dans aucune
liquide. Le non-respect de ces instructions peut
entraîner la mort ou l’électrocution.
Risque d’électrocution.
1 2 3
Tourner le régulateur de
température jusqu’à MIN.
Débrancher et laisser
complètement refroidir.
Laver le couvercle, la grille et
le plat amovible dans de l’eau
chaude savonneuse. Pour
enlever les aliments brûlés sur la
surface, faire tremper, puis frotter
avec un tampon de récurage en
nylon. Rincer à l’eau chaude, puis
sécher.
4
Essuyer l’intérieur de la base de la rôtissoire avec un linge humide.
Essuyer l’extérieur de la rôtissoire avec un linge humide savonneux,
puis sécher.
REMARQUE : Le couvercle peut se décolorer à cause de la méthode
de cuisson. Ceci est normal et ne nuira pas à la performance.
23
Page 24

Recettes pour cuisson à la rôtissoire
Sauf si indiqué autrement, préchauffer la rôtissoire pendant
15 minutes à la température indiquée dans la recette.
Si la recette requiert l’utilisation du plat amovible ou d’une
assiette, retirer la grille de la rôtissoire. Préchauffer la rôtissoire à la
température requise. Déposer ensuite le plat sur la grille et déposer
les deux morceaux dans la rôtissoire. Cuire selon les indications de
la recette. La grille facilite l’insertion et le retrait des plats ou assiettes
d’une rôtissoire chaude.
Recettes de cuisine
Boulettes de viande festives
1 sac de 5 lb (2,3 kg) de boulettes de viande congelées et précuites
1 pot de 12 oz (340 ml) de gelée de raisin
1 pot de 12 oz (340 ml) de gelée de groseilles
1 bouteille de 12 oz (340 ml) de sauce chili
1 bouteille de 12 oz (340 ml) de sauce cocktail
Faire décongeler les boulettes de viande au réfrigérateur pendant
la nuit. Déposer les boulettes de viande dans la rôtissoire. Dans
un grand bol, mélanger toutes les gelées et sauces. Verser sur les
boulettes de viande. Cuire à 250 °F (121 °C) pendant 2 heures ou
jusqu’à ce que les boulettes soient entièrement chaudes.
Chili
2 c. à soupe (30 ml) d’huile
2 lb (907 g) de macreuse de bœuf, coupée en petits morceaux
1 lb (454 g) de saucisse italienne piquante, sans la peau
1 lb (454 g) de saucisse italienne douce, sans la peau
2 gros oignons, hachés
1 gros poivron vert égrené et haché
1 c. à soupe (15 ml) d’ail émincé
4 c. à soupe (59 ml) de piments jalapenos tranchés en conserve (1/2
boîte de 113 g)
4 c. à soupe (59 ml) de poudre chili
2 c. à soupe (30 ml) de cumin moulu
1 c. à thé (5 ml) de poivre noir
2 boîtes de 16 oz (454 g) de haricots secs
1 boîte de 28 oz (794 g) de tomates en dés égouttées
1 boîte de 12 oz (340 g) de pâte de tomate
2 boîtes de 15 oz (425 g) de bouillon de poulet
Régler la température à 400 °F (204 °C). Faire chauffer l’huile dans le
plat de la rôtissoire. Ajouter le bœuf, les saucisses et cuire pendant
20 minutes. Ajouter les oignons, le poivre, les piments et cuire
pendant 5 minutes. Incorporer et remuer le reste des ingrédients.
Diminuer la température à 275 °F (135 °C). Couvrir et cuire pendant
2 heures en mélangeant à la mi-cuisson. Donne 5 pintes (4,7 L).
24
Page 25

Recettes pour rôtir
Dinde rôtie rapide
La rôtissoire cuit une dinde deux fois plus rapidement qu’un four
conventionnel. L’utilisation d’un thermomètre à viande est idéale pour
s’assurer que la dinde est bien cuite.
1 dinde fraîche ou décongelée de 14 à 18 lb (6,3 à 8,2 kg)
1 oignon coupé en deux
2 branches de céleri
1 c. à thé (5 ml) de sel
1/2 c. à thé (2,5 ml) de poivre
1/4 tasse (59 ml) de beurre fondu
Retirer la grille. Verser 1/2 tasse (118 ml) d’eau dans la rôtissoire, couvrir et
faire chauffer à 325 °F (160 °C). Retirer les abattis et le cou des cavités de la
dinde. Mettre de côté et utiliser pour faire la sauce aux abattis de volaille.
Rincer la volaille à l’intérieur et à l’extérieur avec de l’eau froide. Déposer
l’oignon et le céleri à l’intérieur de la dinde. Frotter l’extérieur de la dinde
avec le sel et le poivre. Installer la grille. Brosser toute la dinde avec le beurre.
Déposer dans la rôtissoire. Couvrir et cuire à 325 °F (163 °C) pendant 2 à 2,5
heures. Vérifier la lecture du thermomètre à viande. Continuer la cuisson
jusqu’à ce que la température du thermomètre atteigne 165 °F (74 °C).
REMARQUE :
L’innocuité de la dinde est atteinte lorsque la température interne est de
165 °F (74 °C). Visiter le site www.foodsafety.gov pour obtenir plus de
renseignements au sujet des températures internes et sécuritaires de cuisson.
Toujours faire décongeler une dinde au réfrigérateur et non à la température
ambiante. Une dinde congelée de 12 à 15 lb (5,4 à 6,8 kg) devra décongeler
au réfrigérateur pendant 2 à 3 jours. Faire décongeler une dinde de cette
pesanteur plus rapidement en l’immergeant dans l’eau froide pendant 6 à 9
heures. S’assurer de changer fréquemment l’eau.
La rôtissoire cuit une dinde deux fois plus rapidement qu’un four
conventionnel. L’utilisation d’un thermomètre à viande est idéale pour
s’assurer que la dinde est bien cuite.
Une dinde cuite dans la rôtissoire sera très juteuse, mais sera moins grillée
qu’une dinde cuite au four traditionnel. Des épices à frotter ajouteront de la
saveur et amélioreront l’apparence d’une dinde cuite à la rôtissoire.
Sauce de brunissage pour dinde
Suivre la recette suivante pour obtenir une peau de dinde bien rôtie :
1/4 tasse (59 ml) de beurre ou margarine fondu
1 1/2 c. à thé (7,5 ml) de sauce de brunissage (comme la sauce
« Kitchen Bouquet »
1 c. à thé (5 ml) de paprika
Laver la dinde à l’eau froide. Éponger pour sécher. Étendre le mélange
de brunissage au pinceau et cuire selon les instructions.
25
Page 26

Recettes pour rôtir (suite)
Pommes de terre au four
10 lb (4,5 kg) de pommes de terre pour cuisson au four
Laver et brosser les pommes de terre. Percer les pommes de terre à plusieurs
reprises. Déposer dans la rôtissoire en évitant qu’elles touchent les parois de la
rôtissoire. Cuire à 400 °F (204 °C) pendant 1 heure ou jusqu’à ce qu’elles soient
cuites. Vérifier la cuisson en perçant avec une fourchette.
Gâteau au fromage parfait
La recette requiert un moule à charnière et les gâteaux au fromage sont faciles
à faire. La rôtissoire cuit le gâteau au fromage à une température faible parce
qu’il est entouré d’eau, comme le font les professionnels.
Beurre
1/2 tasse (118 ml) de miettes de biscuits Graham
6 paquets de 8 oz (227 g) de fromage à la crème, à la température
ambiante
1 1/2 tasse (355 ml) de sucre
5 œufs
1 c. à thé (5 ml) de vanille
1 c. à soupe (15 ml) de jus de citron
Beurrer généreusement le fond et les parois d’un moule à charnière de 9 1/2
po (24 cm). Parsemer uniformément les miettes sur le fond du moule. Dans un
grand bol à mélanger, battre le fromage à la crème jusqu’à ce qu’il soit lisse.
Ajouter le sucre et continuer de battre pour homogénéiser le tout. Ajouter les
œufs, en battant après chaque œuf. Incorporer la vanille et le jus de citron.
Verser le mélange dans le moule à charnière. Couvrir le moule à charnière
avec du papier d’aluminium (ceci évitera la formation de condensation dans
la rôtissoire qui pourrait s’égoutter sur le gâteau). Verser 3 pintes (2,8 litres)
d’eau chaude dans le plat amovible. Déposer le moule à charnière sur la grille
et déposer dans la rôtissoire. Couvrir et cuire à 325 °F (163 °C) pendant 1 1/2
heure. Retirer lentement et laisser refroidir puis réfrigérer jusqu’à ce que le
gâteau soit complètement froid. Donne de 16 à 20 portions.
Œufs sur le plat
1 1/2 tasse (355 ml) de lait
36 œufs
1 c. à thé (5 ml) de sel
1/2 c. à thé (2,5 ml) de poivre
1/4 tasse (59 ml) de beurre fondu
Dans un grand bol, battre le lait, les œufs, le sel et le poivre avec un
batteur. Verser le beurre fondu dans un moule de 9 x 13 po (23 x
33 cm) et incliner le moule pour répandre le beurre au fond et sur les
parois du moule. Verser le mélange d’œufs dans le moule. Déposer
dans la rôtissoire et cuire les œufs à 400 °F (204 °C) pendant 30
minutes en mélangeant et en raclant les parois du moule avec une
spatule toutes les 10 minutes pour assurer une cuisson uniforme.
Donne 15 portions.
26
Page 27

Notes
27
Page 28

Garantie limitée
Cette garantie s’applique aux produits achetés et utilisées aux É.-U. et au Canada. C’est la seule garantie expresse pour ce
produit et est en lieu et place de tout autre garantie ou condition.
Ce produit est garanti contre tout défaut de matériaux et de main-d’oeuvre pour une période des cinq (5) ans à compter de
la date d’achat d’origine au Canada et un (1) an à compter de la date d’achat d’origine aux É.-U. Au cours de cette période,
votre seul recours est la réparation ou le remplacement de ce produit ou tout composant s’avérant défectueux, à notre gré,
mais vous êtes responsable de tous les coûts liés à l’expédition du produit et le retour d’un produit ou d’un composant dans
le cadre de cette garantie. Si le produit ou un composant n’est plus offert, nous le remplacerons par un produit similaire de
valeur égale ou supérieure.
Cette garantie ne couvre pas le verre, les filtres, l’usure d’un usage normal, l’utilisation non conforme aux directives imprimées,
ou des dommages au produit résultant d’un accident, modification, utilisation abusive ou incorrecte. Cette garantie s’applique
seulement à l’acheteur original ou à la personne l’ayant reçu en cadeau. La présentation du reçu de vente d’origine comme
preuve d’achat est nécessaire pour faire une réclamation au titre de cette garantie. Cette garantie s’annule si le produit est
utilisé autrement que par une famille ou si l’appareil est soumis à toute tension ou forme d’onde différente des caractéristiques
nominales précisées sur l’étiquette (par ex. : 120 V ~ 60 Hz).
Nous excluons toutes les réclamations au titre de cette garantie pour les dommages spéciaux, consécutifs et indirects causés
par la violation de garantie expresse ou implicite. Toute responsabilité est limitée au prix d’achat. Chaque garantie implicite,
y compris toute garantie ou condition de qualité marchande ou d’adéquation à un usage particulier, est exonérée, sauf
dans la mesure interdite par la loi, auquel cas la garantie ou condition est limitée à la durée de cette garantie écrite. Cette
garantie vous donne des droits légaux précis. Vous pouvez avoir d’autres droits qui varient selon l’endroit où vous habitez.
Certaines provinces ne permettent pas les limitations sur les garanties implicites ou les dommages spéciaux ou indirects de
telle sorte que les limitations ci-dessus ne s’appliquent peut-être pas à votre cas.
Ne pas retourner cet appareil au magasin lors d’une réclamation au titre de cette garantie. Téléphoner au 1.800.851.8900 aux
É.-U. ou au 1.800.267.2826 au Canada ou visiter le site internet www.hamiltonbeach.com aux É.-U. ou www.hamiltonbeach.ca
au Canada. Pour un service plus rapide, trouvez le numéro de modèle, le type d’appareil et les numéros de série sur votre
appareil.
28
Page 29

SALVAGUARDIAS IMPORTANTES
Cuando utilice artefactos eléctricos, siempre deben seguirse precauciones de seguridad básicas a fin de reducir el riesgo de incendio,
descarga eléctrica, y/o lesiones a personas, incluyendo las siguientes:
1. Lea todas las instrucciones.
2. Este aparato no se destina para utilizarse por personas
(incluyendo niños) cuyas capacidades físicas, sensoriales o
mentales sean diferentes o estén reducidas, o carezcan de
experiencia o conocimiento, a menos que dichas personas
reciban una supervisión o capacitación para el funcionamiento
del aparato por una persona responsable de su seguridad.
3. Se requiere de una estrecha supervisión cuando el aparato se
use cerca de niños. Los niños deben supervisarse para asegurar
que ellos no empleen los aparatos como juguete.
4. Verifique que el voltaje de su instalación corresponda con el del
producto.
5. No toque superficies calientes. Use las manijas o las perillas.
6. Use guantes de cocina para sacar la asadera para asar o la rejilla
del horno asador; o para sacar una asadera o alimentos cocidos
de la asadera para asar.
7. Para protegerse contra el riesgo de choque eléctrico, no sumerja
la base del asador, el cordón ni el enchufe en agua ni en ningún
otro líquido.
8. Desenchúfelo del tomacorriente cuando no lo esté usando y
antes de la limpieza. Deje que se enfríe antes de colocar o sacar
alguna pieza, y antes de limpiarlo.
9. No opere ningún aparato con cables o enchufe dañados o
después de que el aparato funcione mal o se caiga o dañe de
cualquier manera. El reemplazo del cable de suministro y las
reparaciones deben ser efectuadas por el fabricante, su agente
de servicio, o personas igualmente calificadas para poder evitar
un peligro. Llame al número de servicio al cliente proporcionado
para información sobre examinación, reparación o ajuste.
10. El uso de accesorios no recomendados por el fabricante del
aparato puede causar lesiones.
11. No lo use al aire libre.
12. No deje que el cordón cuelgue sobre el borde de una mesa
o de un mostrador, o que toque alguna superficie caliente,
incluyendo la superficie de una cocina.
13. Para desconectar, coloque el control en la posición apagada MIN
y luego saque el enchufe del tomacorriente.
14. No coloque el aparato sobre o cerca de una fuente de gas
caliente o de un quemador eléctrico, ni dentro de un horno
caliente.
15. Es importante tener extremo cuidado cuando se mueva un
aparato electrodoméstico que contenga aceite caliente u otros
líquidos calientes.
16. El vapor que se escapa por debajo de la tapa es caliente y
puede causar quemaduras.
17. No utilice este artefacto sin la bandeja para asar específicamente
diseñada para este modelo.
18. No use el aparato para derretir cera ni para cualquier otra
aplicación no relacionada con alimentos.
19. No permita que materiales inflamables como cortinas,
colgaduras, paredes, armarios, placas posteriores y otras
superficies toquen ninguna parte del horno asador mientras esté
funcionando.
20. No use el aparato electrodoméstico para ningún otro fin que no
sea el indicado.
GUARDE ESTAS INSTRUCCIONES
29
Page 30

Otra información para la seguridad del consumidor
Este aparato ha sido diseñado solamente para uso doméstico.
No use este horno asador en aplicaciones de tipo comercial,
profesional o industrial. Este horno asador ha sido diseñado
solamente para cocinar alimentos. No debe usarse para calentar
productos no comestibles, tales como la cera. Este aparato ha sido
diseñado y construido para aplicaciones domésticas solamente y
debe utilizarse con ese fin.
w ADVERTENCIA
es provisto con un enchufe polarizado (una pata más ancha)
para reducir el riesgo de una descarga eléctrica. El enchufe
embona únicamente en una dirección dentro de un tomacorriente
polarizado. No trate de obviar el propósito de seguridad del enchufe
modificándolo de alguna manera o utilizando un adaptador. Si el
enchufe no entra completamente en la toma, invierta el enchufe. Si
aún no entra, haga que un electricista reemplace la toma.
Peligro de Descarga Eléctrica: Este aparato
El largo del cable que se usa en este aparato fue seleccionado para
reducir el peligro de que alguien se enganche o tropiece con un
cable más largo. Si es necesario usar un cable más largo, se podrá
usar un cable de extensión aprobado. La clasificación eléctrica
nominal del cable de extensión debe ser igual o mayor que la
clasificación nominal del aparato. Es importante tener cuidado
de colocar el cable de extensión para que no se pliegue sobre el
mostrador o la mesera en donde niños puedan tirar del mismo o
tropezarse accidentalmente.
Para evitar una sobrecarga eléctrica del circuito, no use otro aparato
de alto voltaje en el mismo circuito con este aparato.
30
Page 31

Piezas y características
*Para ordenar partes:
EE. UU.:
www.hamiltonbeach.com
México:
1.800.851.8900
01 800 71 16 100
ANTES DEL PRIMER USO: Lave la bandeja para asar,
la rejilla y la tapa en agua caliente jabonosa. Enjuague y
seque. Durante el primer uso del horno asador, es posible
que se observe un poco de humo y olor. El humo y el
olor no deberán ocurrir después de la primera vez que se
caliente el horno.
Tapa*
Rejilla*
Bandeja para Asar Removible*
Base
Perilla de Control de Temperatura*
31
Page 32
Cómo se Usa el Horno Asador
w ADVERTENCIA
vapor que sale puede causar quemaduras.
Use guantes para proteger las manos cuando
remueva la asadera para asar, rejilla, asadera
de cocinado, o alimento cocido.
Peligro de Quemarse. El
1 2 3
Asegúrese de que el control de temperatura esté en la posición
apagada. Enchufe el cable en el tomacorriente. Saque la rejilla. Deje la
asadera para asar en el horno asador.
5
Cuando termine de cocinar, quite
la tapa. Con guantes de cocina,
saque la comida usando la rejilla.
32
6
Coloque el control de temperatura
en la posición apagada y
desenchufe el horno asador.
Fije la temperatura al nivel
deseado y deje que se caliente
por 15 minutos con la tapa puesta.
NOTE: La asadera para asar
siempre debe estar colocada en
la base del asador cuando se esté
cocinando.
4
Coloque la comida que se
cocinará en una asadera sobre
la rejilla (o directamente en
la asadera para asar). Luego
coloque la rejilla en el horno y
vuelva a tapar.
Page 33

Consejos para Utilizar su Horno Asador
• Antes de hornear o de asar en el horno asador, coloque la asadera
o cacerola que tenga planeado usar en la asadera para asar para
asegurarse de que encaje debidamente. La mayoría de las cacerolas
de vidrio resistentes al calor encajan bien en el horno asador.
• Siempre se debe usar la asadera para asar cuando se cocine en el
horno asador. Si se cocina una gran cantidad de sopa o guisado, se
puede usar la asadera para asar como asadera común en la base del
asador. También se puede usar como asadera grande común en la
base del asador.
• No use la asadera para asar como asadera común o cacerola para
pasteles, panes o guisados. Cuando se cocine este tipo de comida, se
deberá colocar una asadera separada en la asadera para asar.
• Las asaderas comunes y cacerolas deben colocarse sobre la rejilla
para permitir que el calor circule mejor. Si es necesario, se puede
sacar la rejilla para adaptar una asadera más grande o dos cacerolas
en el horno asador.
• Se pueden usar bolsas de aluminio para asar en el horno asador. No
recomendamos el uso de bolsas de plástico para asar en el horno
asador.
• No quite la tapa del horno asador a menos que sea necesario. Si se
quita la tapa, se permite que el calor escape, afectando la temperatura
del horno asador.
• A menos que se haya indicado lo contrario, precaliente el horno
asador durante 15 minutos a la temperatura indicada en las recetas.
• Si la receta indica que se debe usar una asadera o fuente, saque la
rejilla del horno. Precaliente el horno a la temperatura deseada. Luego
coloque la asadera sobre la rejilla y luego coloque ambos en el horno
asador. Hornee según las instrucciones de la receta. La rejilla hace
que sea más fácil colocar o sacar las asaderas o las fuentes del horno
asador caliente.
A continuación indicamos los tamaños de asaderas que encajarán en el
horno asador
• Una asadera de 9 x 13 pulgadas (23 x 33 cm) o una fuente de horno
de 10 x 14 pulgadas (25 x 36 cm).
• Dos moldes para pan de 9 x 5 (23 x 13 cm) u 8 x 4 pulgadas
(20 x 10 cm)
• Una tortera con tubo o para Bundt
33
Page 34

Cómo Asar Carnes Rojas y de Ave
• Recomendamos el uso de un termómetro para carne para que las
carnes rojas y de ave siempre estén perfectamente cocidas. Si usa un
termómetro para carne, se deberá sacar las carnes rojas o de ave del
horno asador cuando el termómetro haya alcanzado una temperatura
de 5 a 10 grados inferior a la temperatura deseada. La temperatura
interna continuará aumentando después de haber sacado la carne del
horno asador.
• La mayoría de los jamones que se venden en la actualidad tienen
etiquetas que dicen “Cocine antes de comer” o “Completamente
cocido”. Un jamón que tienen la etiqueta “Cocine antes de comer” ha
sido ahumado y curado pero NO se ha cocinado. Este jamón debe
cocinarse por completo hasta alcanzar una temperatura interna de
155º a 160°F (68º a 71ºC). Los jamones “Completamente cocidos” han
sido ahumados o curados y ya están cocinados. No hace falta cocinar
este jamón, pero calentarlo a 140°F (60ºC) mejora el sabor.
• El horno asador cocina los pavos en menos tiempo que los hornos
convencionales. Un pavo sin rellenar 25 a 28 libras (11.3–12.7 kg)
se cocinará en aproximadamente 3 1/2 a 4 horas. Un pavo cocido
en el horno asador queda más húmedo y jugoso, pero su color
es de un marrón más claro que el de un pavo hecho en un horno
convencional. Para mejorar la apariencia, utilice la salsa para dorar
pavos de la sección de “Recetas”.
• La “Tabla de asado” indica los tiempos de cocción para cortes tiernos
de carne que generalmente se asan en seco. Estos cortes son de la
zona de las costillas o del lomo. Para suavizar los cortes de la nalga
(jamón) o de la paleta o corte delantero, se deberán cocinar en líquido
por un período más largo de tiempo.
• Los tiempos indicados son aproximados y se deben usar solamente
como guía general. Los cortes individuales de carne y las preferencias
personales dictarán tiempos de asado más largos o más cortos.
• Es importante que la comida esté lo suficientemente caliente para
evitar el crecimiento de bacteria. Para más información, visite
foodsafety.gov.
34
Page 35

Tabla de asado
NOTA: El tabla de asado es para la referencia sólo. Siga paquete las
direcciones o las recomendaciones de USDA. Visite www.foodsafety.gov
para más información sobre temperaturas internas seguras para cocinar.
PESO
ALIMENTO
Pavo entero 14–18
Pavo entero 19–24
Pavo entero 25–28
Pechuga de pavo 5–7
Pavo asado al horno 6–8
Carne al horno 5–7
Cerdo fresco al horno 5–7
Jamón de paleta
para picnic
(completamente
cocinado)
Jamón entero
(completamente
cocinado)
KGS
6.4–8.2
8.6–10.9
11.3–12.7
2.3–3.2
2.7–3.6
2.3–3.2
2.3–3.2
7–10
3.2–4.5
15–18
6.8–8.2
TIEMPO DE COCCIÓN
CARNE
TERM.
180°F/82ºC 2 a 3 horas 2 a 3 horas
180°F/82ºC N/A 2 a 3 horas
180°F/82ºC N/A 3 1/2 to 4 horas
180°F/82ºC 1
180°F/82ºC 1 a 1 1/2 horas 1 to 1 1/2 horas
160°F/71ºC
(medio.)
160°F/71ºC
(medio.)
140°F/60ºC 2 a 3 horas 2 a 3 horas
140°F/60ºC 2 a 3 horas 2 a 3 horas
(18 QT./325°F)
(18 L/160ºC)
1/2 horas 1 1/2 horas
2 1/2 horas 2 1/2 horas
2 horas 2 horas
TIEMPO DE COCCIÓN
(22 QT./325°F)
(22 L/160ºC)
35
Page 36

Para Hornear
El horno asador puede hornear sus pasteles, pais, panes o guisados favoritos
como un horno convencional. Las asaderas y las fuentes se deben colocar sobre
la rejilla para hacer circular mejor el calor. También se recomienda el uso de la rejilla
por conveniencia para sacar las fuentes y las asaderas calientes del horno asador.
No quite la tapa del horno asador a menos que sea necesario. Si se quite la tapa,
se permite que el calor escape, afectando la temperatura del horno asador.
Para Cocinar al Vapor
Caliente el horno asador a 450°F (232°C). Para cocinar al vapor en el horno
asador, se necesitará un colador métalico. Coloque la rejilla en la asadera
para asar. Coloque la asadera para asar en el horno asador. Vierta 1 cuarto
de galón (946 ml) de agua hirviendo en la asadera para asar. Coloque la
comida que desee cocinar al vapor en el colador y coloque el colador en
la asadera para asar. Cubra y cocine al vapor según los tiempos que se
indican a continuación o hasta que se haya obtenido la cocción deseada.
PRODUCTOS QUE SE DESEA COCINAR AL VAPOR
2 cabezas de coliflor, cortadas 10 minutos
2 ramilletes de brócoli, cortados 10 minutos
2 libras (907 g) de camarones 10 minutos
Para Calentar Panecillos y Galletas
Precaliente el horno asador a 250°F (121ºC). Necesitará dos envases
refractarios pequeños para el agua. Latas de comida vaciadas y lavadas
son una perfecta solución. Llene dos tercios de las latas con agua
caliente y colóquelas en esquinas opuestas de la asadera para asar.
Coloque los panecillos o panqueques apilados en la asadera para asar.
No deje que toquen los costados de la asadera. Cubra y manténgalos
calientes hasta por una hora.
Para Cocinar en Cantidades
La asadera para asar se puede usar como utensilio grande de cocción cuando
se cocinen o se calienten cantidades grandes. Se puede usar para hervir salsas,
sopas o guisados a fuego lento, o simplemente para calentar o entibiar cantidades
grandes. Cuando cocine o caliente sopas o guisados en el horno asador, revuelva
ocasionalmente para que se calienten en forma más uniforme y más rápida.
36
Por ejemplo, gradúe la temperatura a 400ºF (204ºC) y el horno asador calentará
sopa de carne con vegetales desde la temperatura de refrigeración a la
temperatura para servirla en unas dos horas. Para cocinar sopas, guisados o
salsas, gradúe la temperatura a 225ºF (107ºC) y deje calentar a fuego lento entre 4
y 8 horas, según la receta.
CANTIDAD DE TIEMPO
Page 37

Limpieza
w ADVERTENCIA
limpiar. No sumerja el cable, enchufe o base en ningún líquido. El no seguir estas
instrucciones puede resultar en la muerte o descarga eléctrica.
Peligro de Descarga Eléctrica. Desconecte la energía antes de
1 2 3
Gire el control de temperatura a
MIN. Desenchufe y deje enfriar
por completo.
Limpie la tapa, la rejilla y la
asadera para asar en agua
caliente y jabonosa. Para eliminar
la comida quemada que se haya
pegado, deje en remojo, y luego
frote con una esponjilla de nilón.
Enjuague en agua caliente y
luego seque.
4
Limpie el interior de la base del asador con un paño húmedo. Limpie
el exterior del horno asador con un paño húmedo y jabonoso y luego
deje que se seque.
NOTA: La tapa puede decolorarse debido al proceso de cocción. Es
algo natural y no afecta el desempeño de la unidad.
37
Page 38

Recetas del Horno Asador
A menos que se indique otra cosa, precaliente el horno asador por
15 minutos hasta alcanzar la temperatura establecida en la receta.
Si la receta requiere el uso de una bandeja o plato para hornear,
quite la rejilla del horno. Precaliente el horno a la temperatura
deseada. Luego ponga la bandeja sobre la rejilla y después coloque
ambas dentro del horno asador. Hornee siguiendo las instrucciones
de la receta. La rejilla facilita colocar o quitar las bandejas o platos en
el horno asador caliente.
Recetas de cocina
Albóndigas para fiestas
1 bolsa de 5 libras (2.3 kg) de albóndigas congeladas precocidas
1 frasco de 12 onzas (341 g) de jalea de uvas
1 frasco de 12 onzas (341 g) de jalea de grosellas
1 botella de 12 onzas (341 g) de salsa chile
1 botella de 12 onzas (341 g) de salsa para cóctel
Deje que las albóndigas se descongelen durante la noche en el
refrigerador. Coloque las albóndigas en la bandeja para asar. En
un tazón grande, mezcle las jaleas y las salsas. Viértalas sobre las
albóndigas. Hornee a 250ºF (121ºC) por 2 horas o hasta que se
hayan calentado por completo.
38
Chile
2 cucharadas (30 ml) de aceite
2 libras (907 g) de carne vacuna de cuarto delantero cortada en trozos
pequeños
1 libra (454 g) de salchichas italianas picantes sin la piel
1 libra (454 g) de salchichas italianas dulces sin la piel
2 cebollas grandes picadas
1 pimiento verde grande sin semillas y en cubos
1 cucharada (15 ml) de ajo picado
4 cucharadas (59 ml) de pimientos jalapeños enlatados en rebanadas (la
mitad de una lata de 4 onzas [113 g])
4 cucharadas (59 ml) de chile en polvo
2 cucharadas (30 ml) de comino molido
1 cucharadita (5 ml) de pimienta negra
2 latas de frijoles rojos (16 onzas [454 g])
1 lata de 28 onzas (794 g) de tomates en cubos sin escurrir
1 lata de 12 onzas (340 g) de pasta de tomate
2 latas (15 onzas [425 g]) de caldo de pollo
Configure la temperatura en 400ºF (204ºC). En una bandeja para asar, caliente
el aceite. Agregue la carne vacuna y las salchichas y cocine por alrededor de
20 minutos. Agregue las cebollas, el pimiento, el ajo, el jalapeño y cocine por
5 minutos. Incorpore los ingredientes restantes. Reduzca la temperatura a
275ºF (135ºC). Cubra y hornee por 2 horas, mezclando en la mitad del tiempo
de cocción. Rinde 5 cuartos de galón (4.7 L).
Page 39

Recetas para Asar
Pavo Asado Rápido
El horno asador cocina un pavo en la mitad del tiempo que un horno común,
pero utilice un termómetro para garantizar que el pavo esté cocido por completo.
1 pavo fresco o descongelado de 14 a 18 libras (6.3–8.2 kg)
1 cebolla cortada a la mitad
2 palitos de apio
1 cucharadita (5 ml) de sal
1/2 de cucharadita (2.5 ml) de pimienta
1/4 taza (59 ml) de mantequilla derretida
Retire la rejilla. Vierta 1/2 taza (118 ml) de agua dentro de la bandeja para asar,
cubra y precaliente a 325ºF (160ºC). Quite las menudencias y el cogote de las
cavidades del pavo. Separe y utilice para el gravy de menudencias. Enjuague el
pavo por dentro y fuera con agua fría. Coloque la cebolla y el apio dentro del ave.
Frote por fuera con sal y pimienta. Colóquelo en la rejilla. Pinte todo el pavo con
mantequilla. Colóquelo en el horno. Cubra y cocine a 325ºF (163ºC) por 2 a 2 1/2
horas. Controle la medición del termómetro de carne. Continúe cocinando hasta
que el termómetro de carne registre 165ºF (74ºC).
NOTA:
Para seguridad de los alimentos, el pavo debe alcanzar una temperatura interna
de 165°F (74ºC). Visite www.foodsafety.gov para obtener más información sobre
temperaturas seguras de cocción interna.
Siempre descongele un pavo congelado dentro del refrigerador, no a
temperatura ambiente. Un pavo congelado de 12–15 libras (5.4–6.8 kg) tardará
2–3 días en descongelarse en el refrigerador. Si no cuenta con ese tiempo, un
pavo de ese tamaño puede descongelarse en agua fría en 6-9 horas. Asegúrese
de cambiar el agua regularmente.
El horno asador cocina un pavo en menos tiempo que un horno común, pero
utilice un termómetro de carne para garantizar que el pavo esté cocido por
completo.
Un pavo cocinado en el horno asador quedará muy húmedo, pero menos
dorado que un pavo asado en forma tradicional. Los condimentos que se frotan
agregan sabor y mejoran la apariencia del pavo cocido en el horno asador.
Salsa para Dorar Pavos
Para obtener un pavo con una piel dorada, utilice la siguiente receta
antes de cocinar.
1/4 taza (59 ml) de mantequilla o margarina
1 1/2 cucharadita (7.5 ml) de salsa para dorar, como Kitchen Bouquet
1 cucharadita (5 ml) de páprika
Lave el pavo con agua fría. Seque dando golpecitos con toalla de
papel. Pinte el pavo con la mezcla para dorar y cocine según las
instrucciones.
39
Page 40

Recetas para Hornear
Papas Horneadas
10 libras (4.5 kg) de papas para hornear
Lave y cepille las papas. Pinche todas las papas, varias veces. Colóquelas
en el horno asador de modo que no toque los lados de la bandeja
para asar. Hornee a 400ºF (204ºC) por 1 hora, o hasta que estén listas.
Verifique el nivel de cocción pinchando las papas con un tenedor.
El Pastel de Queso Perfecto
Usted necesita un molde desarmable con resorte para esta receta, pero
los pasteles de queso son fáciles de hacer. El horno asador cocina el
pastel de queso con calor suave rodéandolo con agua como lo hacen
los profesionales.
Mantequilla
1/2 taza (118 ml) de galletas integrales picadas
6 paquetes (8 onzas [227 g]) de queso crema a temperatura ambiente
1 1/2 taza (355 ml) de azúcar
5 huevos
1 cucharadita (5 ml) de vainilla
1 cucharada (15 ml) de jugo de limón
Enmantequille bien la base y los lados del molde desarmable con resorte
de 9 1/2 pulgadas (24 cm). Vierta las galletas picadas en forma pareja
sobre la base del molde. En un tazón grande, bata el queso crema hasta
que quede homogéneo. Agregue el azúcar y continúe batiendo hasta
que quede sin grumos. Agregue los huevos, batiendo bien después de
agregar cada elemento. Coloque la vainilla y el jugo de limón. Vierta
la mezcla en el molde preparado. Cubra el molde desarmable con
resorte con papel de aluminio. (Esto evita que la condensación del
horno caiga dentro del pastel). Vierta 3 cuartos de galón (2.8 L) de agua
caliente dentro de la bandeja para asar. Deposite el molde en la rejilla e
introdúzcala en el horno. Cubra y cocine a 325ºF (163ºC) por 1 1/2 horas.
Quite con cuidado y deje enfriar; luego refrigere bien antes de servir.
Rendimiento: 16 a 20 porciones.
40
Huevos Horneados
1 1/2 taza (355 ml) de leche
3 docenas de huevos
1 cucharadita (5 ml) de sal
1/2 cucharadita (2.5 ml) de pimienta
1/4 taza (59 ml) de mantequilla derretida
En un tazón grande, bata la leche, los huevos, la sal y la pimienta.
Coloque la mantequilla derretida en una bandeja para hornear de
9 x 13 pulgadas (23 x 33 cm) e incline la bandeja para recubrir la
base y los lados. Vierta la mezcla de huevos en la bandeja. Coloque
en el horno asador y hornee los huevos a 400ºF (204ºC) por 30
minutos, mezclando y raspado los lados de la bandeja con una
espátula de goma cada 10 minutos para garantizar una cocción
pareja. Alcanza para 15 porciones.
Page 41

Notas
41
Page 42

Grupo HB PS, S.A. de C.V.
Monte Elbruz 124-301
Colonia Palmitas, Delegación Miguel Hidalgo
C.P. 11560, México, Distrito Federal
01 800 71 16 100
PÓLIZA DE GARANTÍA
PRODUCTO:
MARCA:
Grupo HB PS, S.A. de C.V. cuenta con una Red de Centros de Servicio Autorizada, por favor consulte en la lista anexa el nombre y dirección de los establecimientos en la
República Mexicana en donde usted podrá hacer efectiva la garantía, obtener partes, componentes, consumibles y accesorios; así como también obtener servicio para
productos fuera de garantía. Para mayor información llame sin costo: Centro de Atención al consumidor: 01 800 71 16 100
Grupo HB PS, S.A. de C.V. le otorga a partir de la fecha de compra:
GARANTÍA DE 1 AÑO.
COBERTURA
• Esta garantía ampara, todas las piezas y componentes del producto que resulten con defecto de fabricación incluyendo la mano de obra.
Grupo HB PS,
•
todo lo anterior sin costo adicional para el consumidor.
• Esta garantía incluye los gastos de transportación del producto que deriven de su cumplimiento dentro de su red de servicio.
S.A. de C.V. se obliga a reemplazar, reparar o reponer, cualquier pieza o componente defectuoso; proporcionar la mano de obra necesaria para su diagnóstico y reparación,
LIMITACIONES
• Esta garantía no ampara el reemplazo de piezas deterioradas por uso o por desgaste normal, como son: cuchillas, vasos, jarras, filtros, etc.
• Grupo HB PS, S.A. de C.V. no se hace responsable por los accidentes producidos a consecuencia de una instalación eléctrica defectuosa, ausencia de toma de tierra, clavija de enchufe
en mal estado, etc.
EXCEPCIONES
Esta garantía no será efectiva en los siguientes casos:
a) Cuando el producto se hubiese utlizado en condiciones distintas a las normales. (Uso industrial, semi-industrial o comercial.)
b) Cuando el producto no hubiese sido operado de acuerdo con el instructivo de uso.
c) Cuando el producto hubiese sido alterado o reparado por personas no autorizadas por Grupo HB PS, S.A. de C.V. el fabricante nacional, importador o comercializador responsable
respectivo.
El consumidor puede solicitar que se haga efectiva la garantía ante la propia casa comercial donde adquirió su producto, siempre y cuando Grupo HB PS, S.A. de C.V. no cuente con talleres de
servicio.
MODELO:
42
Page 43
PROCEDIMIENTO PARA HACER EFECTIVA LA GARANTÍA
• Para hacer efectiva la garantía no deben exigirse mayores requisitos que la presentación del producto y la póliza correspondiente, debidamente sellada por el establecimiento que lo vendió.
• Para hacer efectiva la garantía, lleve su aparato al Centro de Servicio Autorizado más cercano a su domicilio (consulte la lista anexa).
• Si no existe Centro de Servicio Autorizado en su localidad llame a nuestro Centro de Atención al Consumidor para recibir instrucciones de como hacer efectiva su garantía.
• El tiempo de reparación, en ningún caso será mayor de 30 días naturales contados a partir de la fecha de recepción del producto en nuestros Centros de Servicio Autorizados.
• En caso de que el producto haya sido reparado o sometido a mantenimiento y el mismo presente deficiencias imputables al autor de la reparación o del mantenimiento dentro de los treinta
días naturales posteriores a la entrega del producto al consumidor, éste tendrá derecho a que sea reparado o mantenido de nuevo sin costo alguno. Si el plazo de la garantía es superior a
los treinta días naturales, se estará a dicho plazo.
• El tiempo que duren las reparaciones efectuadas al amparo de la garantía no es computable dentro del plazo de la misma. Cuando el bien haya sido reparado se iniciará la garantía respecto
de las piezas repuestas y continuará con relación al resto. En el caso de reposición del bien deberá renovarse el plazo de la garantía.
SELLO DEL VENDEDOR QUEJAS Y SUGERENCIASFECHA DE ENTREGA
DÍA___ MES___ AÑO___
Si desea hacer comentarios o sugerencias con respecto a nuestro servicio o tiene alguna queja derivada de la atención recibida en
alguno de nuestros Centros de Servicio Autorizados, por favor dirigirse a:
GERENCIA INTERNACIONAL DE SERVICIO
Email: mexico.service@hamiltonbeach.com.mx
01 800 71 16 100
RED DE CENTROS DE SERVICIO AUTORIZADA GRUPO HB PS, S.A. DE C.V.
Distrito Federal
ELECTRODOMÉSTICOS
Av. Plutarco Elias Cailes No. 1499
Zacahuitzco MEXICO 09490 D.F.
Tel: 01 55 5235 2323 • Fax: 01 55 5243 1397
CASA GARCIA
Av. Patriotismo No. 875-B
Mixcoac MEXICO 03910 D.F.
Tel: 01 55 5563 8723 • Fax: 01 55 5615 1856
Nuevo Leon
FERNANDO SEPULVEDA REFACCIONES
Ruperto Martínez No. 238 Ote.
Centro MONTERREY, 64000 N.L.
Tel: 01 81 8343 6700 • Fax: 01 81 8344 0486
Jalisco
SERVICIOS DE MANTENIMIENTO CASTILLO
Garibaldi No. 1450
Ladrón de Guevara
GUADALAJARA 44660 Jal.
Tel: 01 33 3825 3480 • Fax: 01 33 3826 1914
Chihuahua
DISTRIBUIDORA TURMIX
Av. Paseo Triunfo de la Rep. No. 5289 Local 2 A.
Int. Hipermart
Alamos de San Lorenzo
CD. JUAREZ 32340 Chih.
Tel: 01 656 617 8030 • Fax: 01 656 617 8030
43
Page 44

Modelo:
32229R
Tipo:
R011
Características Eléctricas:
120 V~ 60 Hz 1450 W
Los modelos incluídos en el instructivo de Uso y Cuidado pueden ir seguidos o no por un sufijo correspondiente a una
o varias letras del alfabeto y sus combinaciones, separadas o no por un espacio, coma, diagonal, o guión. Como ejemplos
los sufijos pueden ser: “Y” y/o “MX” y/o “MXY” y/o “Z”.
840263301 12/15
 Loading...