

Page 1

READ BEFORE USE
LIRE AVANT UTILISATION
LEA ANTES DE USAR
Visit www.hamiltonbeach.com for our
complete line of products and Use and
Care Guides – as well as delicious recipes,
tips, and to register your product online.
Rendez-vous sur www.hamiltonbeach.ca
pour notre liste complète de produits et de
nos manuels utilisateur – ainsi que nos
délicieuses recettes et nos conseils.
Visite www.hamiltonbeach.com (
o
www.hamiltonbeach.com.mx (México)
para ver otros productos de Hamilton Beach
o para contactarnos.
EE. UU.)
Digital Countertop
Oven
Questions
Please call us – our friendly
associates are ready to help.
USA: 1.800.851.8900
Questions
N’hésitez pas à nous appeler –
nos associés s’empresseront
de vous aider.
CAN : 1.800.267.2826
Preguntas
Por favor llámenos – nuestros
amables representantes están
listos para ayudar.
EE. UU.: 1.800.851.8900
MEX: 01 800 71 16 100
Le invitamos a leer cuidadosamente este
instructivo antes de usar su aparato.
Four grille-pain
numérique
Horno Digital
para Mostrador
English ....................... 2
Français .................... 13
Español .................... 24
Page 2

When using electrical appliances, basic safety precautions should always be followed to reduce the risk of fire, electric shock, and/or injury to persons, including
IMPORTANT SAFEGUARDS
the following:
1.
Read all instructions.
2.
This appliance is not intended for use by persons (including
children) with reduced physical, sensory, or mental capabilities,
or lack of experience and knowledge, unless they are closely
supervised and instructed concerning use of the appliance by a
person responsible for their safety.
3.
Close supervision is necessary when any appliance is used by or
near children. Children should be supervised to ensure that they do
not play with the appliance.
4.
Do not touch hot surfaces. Use handles or knobs.
5.
To protect against electrical shock, do not immerse cord, plug, or
oven in water or other liquid.
6.
Unplug from outlet when not in use and before cleaning. Allow to
cool before cleaning appliance and putting on or taking off parts.
7.
Do not operate any appliance with a damaged cord or plug, or after
the appliance malfunctions or has been dropped or damaged in any
manner. Supply cord replacement and repairs must be conducted
by the manufacturer, its service agent, or similarly qualified persons
to avoid a hazard. Call the provided customer service number for
information on examination, repair, or adjustment.
8.
The use of accessory attachments not recommended by the
appliance manufacturer may cause injuries.
9.
Do not use outdoors.
10.
Do not let cord hang over edge of table or counter or touch hot
surfaces.
11.
Do not place on or near a hot gas or electric burner, or in a heated
oven.
12.
Extreme caution must be used when moving an appliance
containing hot oil or other hot liquids.
13.
To disconnect, turn all controls to OFF ( ); then remove plug from
wall outlet.
14.
Use extreme caution when removing pan or disposing of hot
grease.
15.
Do not clean with metal scouring pads. Pieces can break off the pad
and touch electrical parts, creating a risk of electrical shock.
16.
Oversize foods or metal utensils must not be inserted in an oven as
they may create a fire or risk of electric shock.
17.
A fire may occur if the oven is covered, touching, or near flammable
material, including curtains, draperies, walls, and the like, when in
operation. Do not store any item on top of the appliance when in
operation or before the appliance cools down.
18.
Extreme caution should be exercised when using containers
constructed of materials other than metal or glass.
19.
Do not store any materials, other than manufacturer-recommended
accessories, in this oven when not in use.
20.
Do not place any of the following materials in the oven: paper,
cardboard, plastic, and the like.
21.
Do not cover crumb/drip tray or any part of the oven with metal foil.
This will cause overheating of the oven.
22.
To turn oven off, turn timer to OFF ( ) position. See “Parts and
Features” section.
23.
Do not place eyes or face in close proximity with tempered safety
glass door, in the event that the safety glass breaks.
24.
Always use appliance with crumb/drip tray securely in place.
25.
Do not use appliance for other than intended use.
26.
Clean oven interior carefully. Do not scratch or damage heating
element tube.
27.
Do not operate the appliance by means of an external timer or
separate remove-control system.
SAVE THESE INSTRUCTIONS
2
Page 3

w WARNING
• Do not operate oven unattended.
• If contents ignite, do not open oven door. Unplug oven and allow contents to stop burning and cool before opening door.
• Do not use oven cooking bags.
• Do not heat foods in plastic containers.
• Always allow at least 1 inch (2.5 cm) between food and heating element.
• Follow food manufacturer’s instructions.
• Regular cleaning reduces risk of fire hazard.
• Always unplug oven when not in use.
Fire Hazard.
Other Consumer Safety Information
This appliance is intended for household use only.
This appliance is only intended for the preparation, cooking, and
serving of foods. This appliance is not intended for use with any
nonfood materials or products.
w WARNING
with a polarized plug (one wide blade) to reduce the risk of electric
shock. The plug fits only one way into a polarized outlet. Do not defeat
the safety purpose of the plug by modifying the plug in any way or by
using an adapter. If the plug does not fit fully into the outlet, reverse
the plug. If it still does not fit, have an electrician replace the outlet.
Electrical Shock Hazard: This appliance is provided
The length of the cord used on this appliance was selected to reduce
the hazards of becoming tangled in or tripping over a longer cord. If a
longer cord is necessary, an approved extension cord may be used.
The electrical rating of the extension cord must be equal to or greater
than the rating of the appliance. Care must be taken to arrange the
extension cord so that it will not drape over the countertop or tabletop
where it can be pulled on by children or accidentally tripped over.
To avoid an electrical circuit overload, do not use another high-wattage
appliance on the same circuit with this appliance.
3
Page 4

Parts and Features
To order parts:
US: 1.800.851.8900
www.hamiltonbeach.com
Canada: 1.800.267.2826
Mexico:
01 800 71 16 100
BEFORE FIRST USE: Most heating appliances produce an odor
and/or smoke when used for the first time. Plug into outlet. Turn
function dial to BAKE. Press TEMP button and use + button to set
temperature to 450°F (232°C). Press TIME button and use + button
to set TIMER for 5 minutes. The odor should not be present after this
initial preheating. Wash baking pan, broil rack, and oven rack in hot,
soapy water before using.
CAUTION! HOT SURFACE. The temperature of accessible
surfaces may be high when the appliance is operating.
Slide-Out Crumb/
Drip Tray
Probe Storage Tray
(stored on bottom-right side of oven)
4
LCD Display
Probe Jack
Nonstick Coated
Interior
Probe Plug End
Temperature Probe
Oven Rack
Broil Rack
Baking Pan With Broil Rack
Slide-Out Crumb/Drip Tray
Page 5

Getting to Know Your Display
LCD Display – The easy-to-read digital LCD screen illuminates after any
control is pressed. It will go into sleep mode after 30 seconds if START
button is not pressed. In REHEAT, KEEP WARM, BAKE, and CONV
modes, temperature and cooking time are displayed. In BROIL, “HI”
and time are displayed. On TOAST and BAGEL, the shade setting and
number of slices are displayed.
When probe is in use, a probe icon will be displayed on bottom left of
screen. On bottom right, temperature setting will be displayed.
Function Dial – Use dial to select cooking mode.
TEMP/SHADE Button – Press when adjusting temperature or shade
for TOAST or BAGEL. Temperature display can be switched between
Fahrenheit and Celsius by pressing and holding for 5 seconds.
TIME/SLICES Button – Press when adjusting cook time or number of
slices. Press +/– buttons to decrease or increase setting.
Decrease (–)/Increase (+) Buttons
START/STOP Button With Red Power Indicator Light – Press to
illuminate display and to start or end cooking mode.
Special Features
Probe – Integrated temperature probe with auto shutoff cooks to desired
internal temperature for precise results. The display will show Lo until
temperature of the food reaches 100°F (38°C), then will toggle between
actual temperature and set temperature.
Display – Toggles between actual oven temperature and set temperature
during preheat, and chimes once preheated. Arrow up will show until set
temperature is reached.
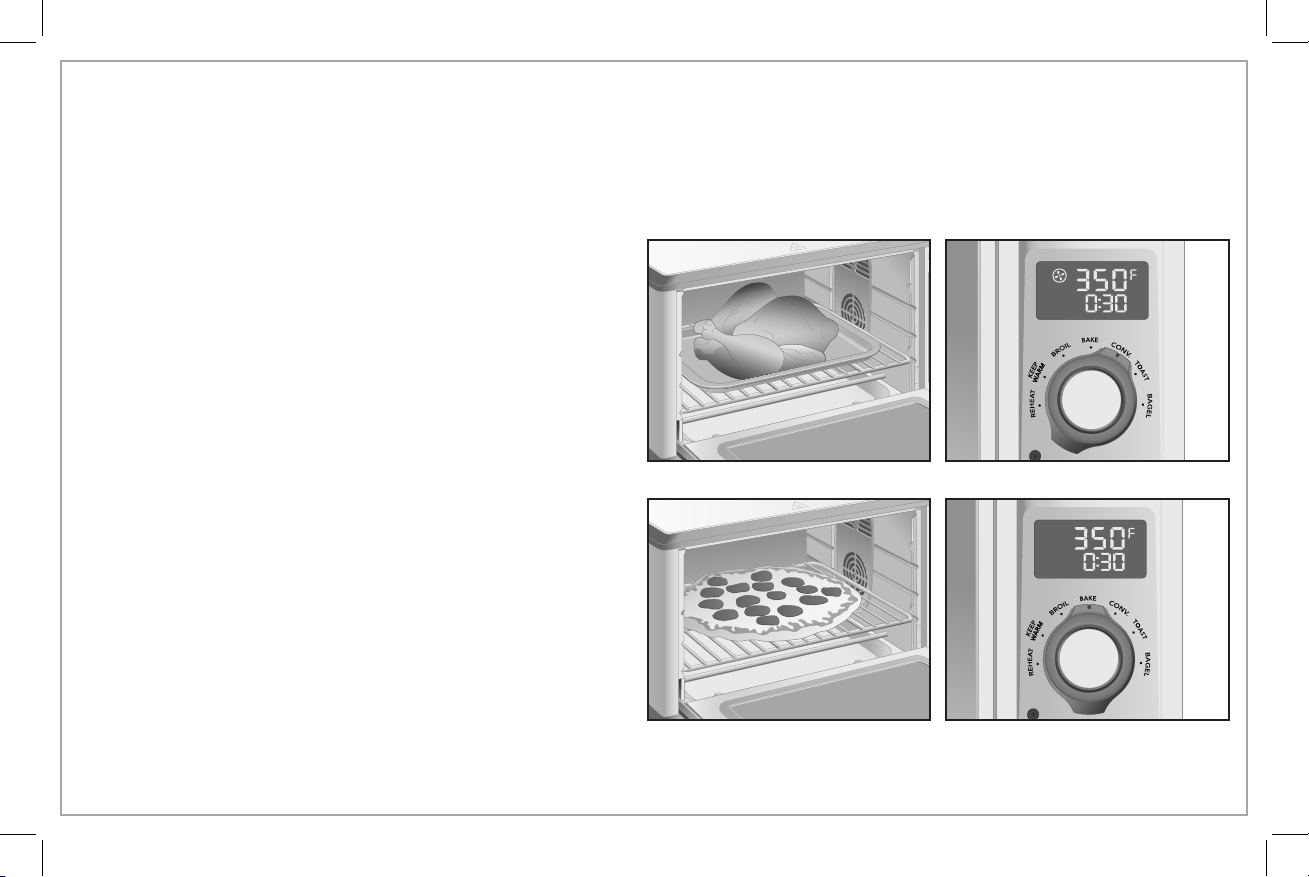
NOTE: The oven can hold a 5-lb (2.3-kg) chicken or 12-in. (30.5-cm)
pizza and fits a 13- x 9-in. (33- x 22.9-cm) baking pan without handles.
Flexible Oven Rack Positions – Three positions allow for optimal cooking.
Slots on both sides of the oven make it easy to slide the tray in and out of
position.
• The top rack position is perfect for broiling fish or hamburgers.
• Use middle rack for toasting or baking pizza.
• The bottom rack is great for baking a large chicken.
Timer with Auto Shutoff – Oven turns off automatically when timer
reaches 00:00 and chimes 3 times.
Stay On Function – The oven can be set to stay on by pressing the minus
button just past 1. It can be used in any cooking mode except BROIL.
Oven will turn off automatically after 4 hours of cooking.
5
Page 6
How to Use
Place oven rack in desired position with crumb tray in place.
Plug into outlet. If display is blank, press any button to illuminate
display. Rack can be in middle or bottom position for convection
or baking mode, depending on size of food.
Convection Mode
Circulates forced hot air to speed baking/roasting process for faster,
more even cooking. When using convection baking, reduce cooking
time or reduce recipe temperature by 25°F.
1. Turn function dial to CONV. Convection icon displays. Select
temperature between 200°F (93°C) and 450°F (232°C) by
pressing TEMP/SHADE button and increasing or decreasing
temperature using + or – buttons. If using probe, set probe
temperature between 100°F (38°C) and 200°F (93°C).
2. Set time for up to 2 hours by pressing TIME/SLICES button,
using + or – buttons to adjust. Default temperature is 350°F.
Bake Mode
Use as a normal kitchen oven for foods such as roasts, potatoes, or
cakes.
1. Turn function dial to BAKE. Select temperature between 200°F
(93°C) and 450°F (232°C) by pressing TEMP/SHADE button and
increasing or decreasing temperature using + or – buttons. If
using probe, set probe temperature between 100°F (38°C) and
200°F (93°C). Default temperature is 350°F.
2. Set time for up to 2 hours by pressing TIME/SLICES button,
using + or – buttons to adjust.
Stay On Function – The oven can be set to stay on by pressing the
minus button just past 1, and ON will be displayed in Convection or
Bake modes.
6
Page 7

How to Use (cont.)
Broil Mode
Use to brown foods such as beef, chicken, fish, pork, and
casseroles. Broil food on broil rack in baking pan in top or middle
rack position. Food must be a minimum of 1 inch (2.5 cm) from the
heating elements.
1. Turn function dial to BROIL. “HI” shows in the display and time
default is 30 minutes. Oven broils on HIGH temperature and
may not be adjusted.
2. Adjust cooking time by pressing TIME/SLICES button, using +
or – buttons to adjust. Broiling time can be set from 1 minute to
30 minutes.
3. Special feature allows door to hold open slightly during broiling
without shutting off.
Reheat Mode
Use to quickly warm cooked foods. Reheat food with rack in middle
or bottom position.
1. Turn function dial to REHEAT.
2. Temperature will default to 325°F (163°C) with 15 minutes of
cooking time.
3. Temperature can be set from 300°F (149°C) to 400°F (205°C)
and can be changed by pressing TEMP/SHADE button and
using + or – button to adjust.
4. Time can be set from 1 minute to 2 hours and can be changed
at any time during cycle by using TIME/SLICES button, using
+ or – button to adjust.
Stay On Function – The oven can be set to stay on by pressing
the minus button just past 1, and ON will be displayed in Reheat
mode.
7
Page 8
How to Use (cont.)
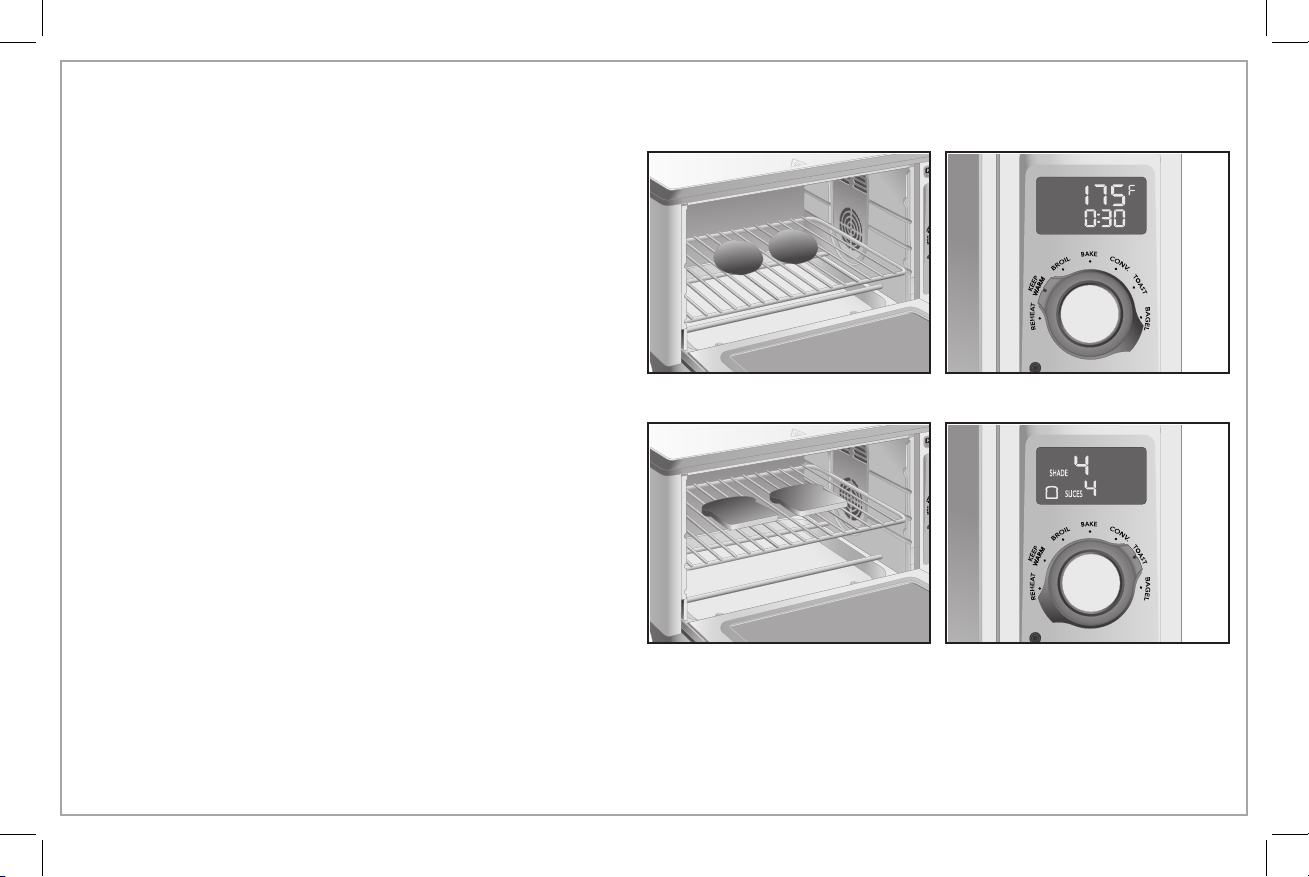
Keep Warm Mode
Use to hold cooked foods at temperature for up to 2 hours. Place
rack in bottom.
1. Turn function dial to KEEP WARM. Temperature will default to
175°F (80°C) for 30 minutes but can be changed by pressing
TEMP/SHADE button and using + or – button to adjust.
Temperature range is 150°F (65°C) to 200°F (93°C).
2. Time can be set from 1 minute to 2 hours and can be changed
at any time during cycle by pressing TIME/SLICES button, using
+ or – button to adjust.
Stay On Function – The oven can be set to stay on by pressing
the minus button just past 1, and ON will be displayed in Keep
Warm mode.
Toast Mode
Use for browning and toasting breads. Rack should be in middle
position.
1. Turn function dial to TOAST.
2. Select one of 7 shades of browning by pressing TEMP/SHADE
button and adjust setting using + or – buttons. Default shade
setting is 4.
3. Select the number of slices by pressing the TIME/SLICES button
and adjust setting using + or – buttons. Default number of
slices is 4. Adjust to 1 through 6 slices.
8
Page 9

How to Use (cont.)
Bagel Mode
Use for browning and toasting bagels. Bagel mode toasts the top
cut side and warms the round bottom of bagels. Bagels should be
placed on middle rack with cut side facing up.
1. Turn function dial to BAGEL.
2. Select one of 7 shades of browning by pressing TEMP/SHADE
button and adjust setting using + or – buttons. Default shade
setting is 4.
3. Select the number of slices by pressing the TIME/SLICES button
and adjust setting using + or – buttons. Default number of
slices is 4. Adjust to 1 through 6 slices.
Probe Mode
To use probe, slide out removable probe storage tray located on the
bottom-right side of oven and remove probe.
1. Set function dial to BAKE or CONV. Probe does not work in
other cooking modes.
2. Plug probe into probe jack located on control panel under LCD
display. Probe icon will illuminate on display.
3. Blinking temperature lights indicate probe temperature is ready
to be set. If probe light is solid, press TEMP/SHADE button once
to activate the cavity temperature setting; then press it again to
activate probe temperature setting.
4. Oven will chime 3 times once probe temperature reaches
desired setting, and oven turns off.
9
Page 10

Cleaning Your Oven
w WARNING
scouring pads. Pieces can break off pad and touch electrical parts,
causing a risk of electric shock.
1. Unplug oven and let cool completely.
2. Wipe control panel display with a slightly damp sponge and
dry. Protect display when cleaning any other surfaces.
3. Use a nonabrasive stainless steel cleaner to clean the exterior
stainless steel areas. Apply cleaner with a soft, lint-free cloth.
To bring out the natural luster, lightly wipe surface with a
water-dampened, lint-free cloth followed by a dry polishing
cloth. Always follow the grain of stainless steel. Signature
Polish can be ordered via their website at
www.signaturepolishonline.com.
4. Wipe oven walls and bottom of oven with a damp, soapy
cloth. Repeat with a damp, clean cloth. For stubborn stains,
use a plastic scouring pad.
5. Carefully use a razor blade to gently lift baked-on foods from
the glass window. Spray glass cleaner on cloth to clean. Wipe
with a damp sponge to rinse and dry.
6. Clean oven racks with a mild abrasive cleaner and rinse. Dry
with clean cloth.
7. Slide out crumb/drip tray. Hand wash crumb/drip tray and
baking pan with broil rack in hot, soapy water. Rinse and dry.
8. Wipe control knobs with a damp, soapy cloth. Repeat with a
damp, clean cloth and dry.
9. Clean both ends of probe with soapy water. Rinse and dry.
10. When window is cool, use a razor blade to gently lift bakedon foods. Spray glass cleaner on cloth to clean. Wipe with a
damp sponge to rinse. Dry thoroughly with a clean cloth.
Electrical Shock Hazard: Do not clean with metal
10
Page 11
Troubleshooting
In case of power interruption:
• If power is out for less than 15 seconds, oven will go back to
previous setting. If more than 15 seconds, oven switches to
standby mode once power returns.
How large a bake pan will the oven hold?
• The oven will hold most 13" x 9" (33 cm x 23 cm) bake pans
without handles.
How big a chicken will the oven handle?
• The oven will hold a 5-pound (2.3-kg) chicken.
When should I choose BAKE or BROIL?
• Choose BAKE for foods such as roasts, potatoes, or cakes.
• Choose BROIL to brown foods such as beef, chicken, fish, pork,
and casseroles.
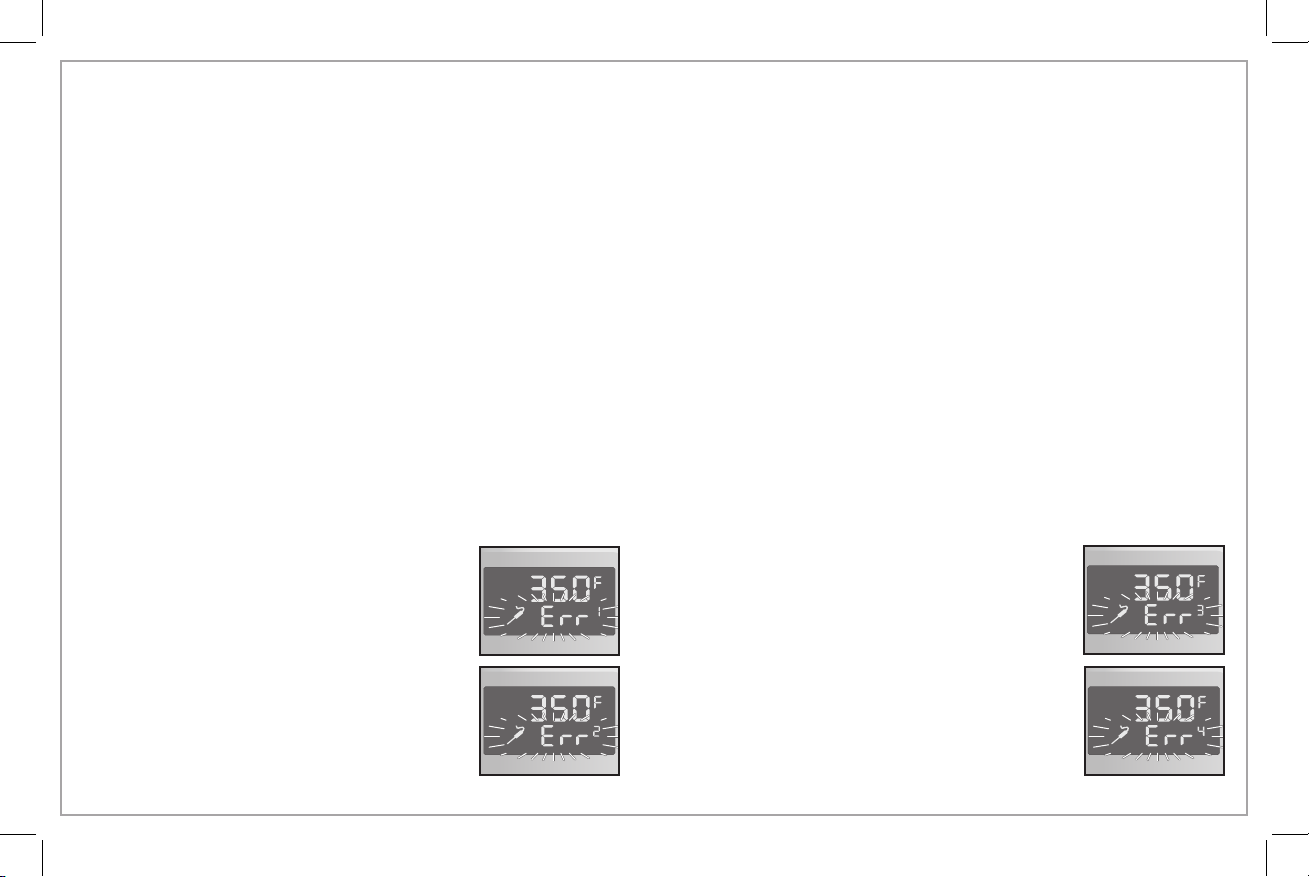
Error Messages
• “Err 1” and a flashing probe icon.
Temperature probe is broken. Call a
Customer Service Representative.
• “Err 2” and a flashing probe icon.
Clean both ends of temperature probe.
If I want to toast bread, what setting is best?
• The TOAST mode is best for toasting both sides of sliced breads,
or use the BROIL mode for open-faced sandwiches, baguettes,
and crostini. The BROIL mode activates the top heating element
and is great when toasting is required on one side only, or the
breads can be "flipped" when the desired level of browning is
reached.
Where is the slide-out crumb/drip tray?
• The slide-out crumb/drip tray is located in the front of the unit
under the oven door.
• “Err 3” and a flashing probe icon.
Wrong mode was selected. Probe only
works with Convection and Bake modes.
• “Err 4” and a flashing probe icon.
Oven temperature sensor is broken. Do
not use oven. Call a Customer Service
Representative.
11
Page 12

Hamilton Beach Limited Warranty
This warranty applies to products purchased and used in the U.S. and Canada. This is the only express warranty for this product and
is in lieu of any other warranty or condition.
This product is warranted to be free from defects in material and workmanship for a period of five (5) years from the date of original
purchase in Canada and three (3) years from the date of original purchase in the U.S. During this period, your exclusive remedy is
repair or replacement of this product or any component found to be defective, at our option; however, you are responsible for all
costs associated with returning the product to us and our returning a product or component under this warranty to you. If the product
or component is no longer available, we will replace with a similar one of equal or greater value.
This warranty does not cover glass, filters, wear from normal use, use not in conformity with the printed directions, or damage to
the product resulting from accident, alteration, abuse, or misuse. This warranty extends only to the original consumer purchaser or
gift recipient. Keep the original sales receipt, as proof of purchase is required to make a warranty claim. This warranty is void if the
product is used for other than single-family household use or subjected to any voltage and waveform other than as specified on the
rating label (e.g., 120 V ~ 60 Hz).
We exclude all claims for special, incidental, and consequential damages caused by breach of express or implied warranty. All
liability is limited to the amount of the purchase price. Every implied warranty, including any statutory warranty or condition
of merchantability or fitness for a particular purpose, is disclaimed except to the extent prohibited by law, in which case such
warranty or condition is limited to the duration of this written warranty. This warranty gives you specific legal rights. You may have
other legal rights that vary depending on where you live. Some states or provinces do not allow limitations on implied warranties or
special, incidental, or consequential damages, so the foregoing limitations may not apply to you.
To make a warranty claim, do not return this appliance to the store. Please call 1.800.851.8900 in the U.S. or 1.800.267.2826 in Canada
or visit hamiltonbeach.com in the U.S. or hamiltonbeach.ca in Canada. For faster service, locate the model, type, and series numbers
on your appliance.
Hamilton Beach Brands, Inc.
4421 Waterfront Drive
Glen Allen
Virginia 23060
USA
12
Page 13

Pour utiliser un appareil électroménager, vous devez toujours prendre des mesures élémentaires de sécurité pour réduire le risque d’incendie,
PRÉCAUTIONS IMPORTANTES
d’électrocution et/ou de blessure corporelle, en particulier les mesures suivantes :
1.
Lire toutes les instructions.
2.
Cet appareil n’est pas destiné à être utilisé par des personnes (y compris les
enfants) dont les capacités physiques, sensorielles ou mentales sont réduites,
ou manquant d’expérience et de connaissance, sauf si elles sont étroitement
surveillées et instruites sur l’utilisation de l’appareil par une personne
responsable de leur sécurité.
3.
Une surveillance étroite est requise pour tout appareil utilisé par ou près des
enfants. Surveiller que les enfants ne jouent pas avec l’appareil.
4.
Ne pas toucher les surfaces chaudes. Utiliser les poignées ou boutons.
5.
Pour protéger contre le risque de choc électrique, ne pas immerger le cordon,
la fi che ou le four grille-pain dans l’eau ou autre liquide.
6.
Débrancher l’appareil de la prise de courant électrique lorsqu’il n’est pas utilisé
et avant un nettoyage. Le laisser refroidir avant le nettoyage et avant d’y placer
ou d’y enlever des pièces.
7.
Ne pas faire fonctionner un appareil électroménager avec un cordon ou une
fiche endommagée, ou lorsque l’appareil ne fonctionne pas bien ou a été
échappé ou endommagé d’une manière quelconque. Le remplacement et la
réparation du cordon d’alimentation doivent être faits par le fabricant, son agent
de service ou toute personne qualifiée de façon à éviter tout danger. Appeler
le numéro de service à la clientèle fourni pour des renseignements concernant
l’examen, la réparation ou l’ajustement.
8.
L’utilisation d’accessoires non recommandés par le fabricante d’appareil peut
causer des blessures.
9.
Ne pas utiliser à l’extérieur.
10.
Ne pas laisser le cordon pendre du bord d’une table ou d’un comptoir, ou
toucher des surfaces chaudes.
11.
Ne pas placer l’appareil sur ou près d’un brûleur chaud à gaz ou d’un élément
électrique, ou dans un four chauffé.
12.
Une précaution extrême doit être employée lors du déplacement d’un appareil
électroménager contenant de l’huile chaude ou autre liquide chaud.
13.
Pour débrancher l’appareil, tourner tous les réglages à OFF ( /arrêt), ensuite
retirer la fiche de la prise de courant murale.
14. Une prudence extrême s’impose lors de l’enlèvement du plateau ou de la
vidange de graisse chaude.
15. Ne pas nettoyer avec des tampons à récurer en métal. Des particules
peuvent se détacher du tampon et toucher les pièces électriques, créant un
risque de choc électrique.
16. Des aliments ou des ustensiles de métal de grosseur excessive ne doivent
pas être insérés dans un four grille-pain, car ils peuvent créer un incendie ou
un risque de choc électrique.
17. Un incendie peut survenir si le four grille-pain est recouvert, touche ou est
près de matériaux inflammables, y compris rideaux, tentures, murs et autres
articles semblables, lorsqu’il fonctionne. Ne pas remiser des articles sur
le dessus de l’appareil lorsqu’il est utilisé, ou avant le refroidissement de
l’appareil.
18. Une grande précaution doit être prise lors de l’utilisation de contenants
construits en matériaux autre que le métal ou le verre.
19. Ne pas remiser des matériaux autres que les accessoires recommandés par
le fabricant dans cet appareil lorsqu’il n’est pas utilisé.
20. Ne pas placer l’un des matériaux suivants dans le four : papier, carton,
plastique et articles semblables.
21. Ne pas couvrir le plateau à miettes/gouttes ou toute pièce du four avec du
papier métallique. Ceci causera un surchauffe du four.
22. Pour éteindre le four, tourner la bouton de minuterie à la position OFF
(
/arrêt). Voir la section « Pièces et caractéristiques ».
23. Ne pas placer les yeux ou le visage près de la porte en verre renforcé de
sécurité, au cas où le verre de sécurité se briserait.
24. Toujours utiliser cet appareil avec le plateau à miettes/gouttes bien en place.
25. Ne pas utiliser cet appareil pour tout autre usage que celui recommandé.
26. Nettoyer l’intérieur du four avec précaution. Ne pas égratigner ou
endommager le tube de l’élément chauffant.
27. Ne pas faire fonctionner cet appareil avec une minuterie externe ou un
système de commande à distance.
CONSERVER CES INSTRUCTIONS
13
Page 14

w AVERTISSEMENT
• Ne pas faire fonctionner le four sans supervision.
• Si le contenu s’enflamme, ne pas ouvrir la porte. Débrancher le four et laisser le contenu s’éteindre et refroidir avant d’ouvrir la porte.
• Ne pas utiliser de sac brunisseur dans le four.
• Ne pas chauffer d’aliments dans un contenant en plastique.
• Toujours garder au moins 1 po (2,5 cm) entre les aliments et l’élément chauffant.
• Suivre les instructions indiquées par le fabricant de produits alimentaires.
• Un nettoyage régulier réduit les risques d’incendie.
• Toujours débrancher le four lorsqu’il n’est pas utilisé.
Risques d’incendie.
Autres renseignements de sécurité
Cet appareil est destiné à un usage domestique uniquement.
Cet appareil est conçu uniquement pour préparer, faire cuire et servir
des aliments. Cet appareil n’est pas conçu pour une utilisation avec
toute autre matière ou produit non alimentaire.
w AVERTISSEMENT
fourni avec une fiche polarisée (une broche large) pour réduire le
risque d’électrocution. Cette fiche n’entre que dans un seul sens dans
une prise polarisée. Ne contrecarrez pas l’objectif sécuritaire de cette
fiche en la modifiant de quelque manière que ce soit ou en utilisant
un adaptateur. Si vous ne pouvez pas insérer complètement la fiche
dans la prise, inversez la fiche. Si elle refuse toujours de s’insérer, faire
remplacer la prise par un électricien.
Risque de choc électrique : Cet appareil est
La longueur du cordon installé sur cet appareil a été sélectionnée afin de
réduire les risques d’enchevêtrement ou de faux pas causés par un fil
trop long. L’utilisation d’une rallonge approuvée est permise si le cordon
est trop court. Les caractéristiques électriques de la rallonge doivent être
équivalentes ou supérieures aux caractéristiques de l’appareil. Prendre
toutes les précautions nécessaires pour installer la rallonge de manière
à ne pas la faire courir sur le comptoir ou sur une table pour éviter qu’un
enfant ne tire sur le cordon ou trébuche accidentellement.
Pour éviter la surcharge du circuit électrique, ne pas utiliser un autre
appareil à haute puissance sur le même circuit que cet appareil.
14
Page 15

Pièces et caractéristiques
Pour commander des pièces :
Canada : 1.800.267.2826
AVANT LA PREMIÈRE UTILISATION : La majorité des appareils avec un élément
chauffant produisent une odeur ou de la fumée lorsqu’ils sont utilisés pour la
première fois. Brancher dans une prise de courant. Placer la commande sur
BAKE (cuisson) Appuyer sur le bouton TEMP et utiliser le bouton + pour régler
la température à 450 °F (232 °C). Appuyer sur le bouton TIME (durée) pour
régler une minuterie de 5 minutes. L’odeur devrait disparaître après le premier
préchauffage. Laver la plaque de cuisson, la grille de lèchefrite et la grille du
four dans de l’eau chaude savonneuse avant de les utiliser.
ATTENTION ! SURFACE CHAUDE. La température des surfaces d’accès
peut être élevée pendant que l’appareil fonctionne.
Ramasse-miettes/
gouttes amovible
Plateau de rangement pour la
sonde (rangement dans le coin
inférieur droit du four)
Affichage ACL
Prise pour sonde
Intérieur à
revêtement
antiadhésif
Prise de la sonde
Sonde de température
Grille du four
Grille lèchefrite
Plaque de cuisson avec grille
lèchefrite
Ramasse-miettes/gouttes amovible
15
Page 16

Découverte de l’affichage
Affichage ACL – L’écran ACL facile à lire s’illumine dès qu’on touche une commande. Il se met
en mode veille après 30 secondes si on n’appuie pas sur le bouton START (mise en marche). En
modes REHEAT, KEEP WARM, BAKE et CONV (réchauffer, garder au chaud, cuire et convection), les
températures et durées de cuisson sont affichées. En mode BROIL (griller) « HI » (élevée) et la durée
sont affichés. En mode TOAST et BAGEL (rôties et bagel), le réglage de brunissage et le nombre de
tranches sont affichés.
Lorsque la sonde est utilisée, une icône de sonde s’affiche dans le coin inférieur gauche de l’écran.
Le réglage de température est affiché dans le coin inférieur droit.
Commande de fonction – Utiliser cette commande pour sélectionner le mode de cuisson.
Bouton TEMP/SHADE (température/brunissage) – À utiliser pour régler la température ou le
brunissage de TOAST ou BAGEL (rôties ou bagel). La température peut être affichée en Fahrenheit
ou Celsius en maintenant enfoncé ce bouton pendant 5 secondes.
Bouton TIME/SLICES (durée/tranches) – À utiliser pour régler la minuterie ou choisir le nombre de
tranches. Appuyer sur les boutons +/– pour modifier le réglage.
Boutons (–) réduire/(+) augmenter
Bouton START/STOP (marche/arrêt) avec témoin d’alimentation rouge – Toucher pour réveiller
l’affichage, mettre en marche la cuisson et l’arrêter.
Caractéristiques spéciales
Sonde – Sonde de température intégrée avec arrêt automatique de la cuisson lorsque
la température souhaitée est atteinte pour des résultats précis. L’affichage indique
« Lo » (bas) jusqu’à ce que la température de l’aliment ait atteint 100 °F (38 °C), puis
basculera entre la température actuelle et la température réglée.
Affichage – Bascule entre la température actuelle et la température réglée du four
pendant le réchauffage et fera entendre une tonalité une fois la température atteinte.
Une flèche pointant vers le haut s’affiche jusqu’à ce que la température souhaitée soit
atteinte.
16
REMARQUE : Le four peut cuire un poulet de 5 lb (2,3 kg) ou une pizza de 12 po
(30,5 cm) et accueillir une plaque de cuisson sans poignée de 13 x 9 po (33 x 22,9 cm).
Position flexible de la grille du four – Les trois positions permettent une cuisson
optimale. Les fentes de chaque côté du four permettent de facilement sortir et replacer
la grille.
• La position du haut est parfaite pour faire griller le poisson ou les galettes de
viandes.
• La position du milieu convient pour les rôties et la pizza.
• La position du bas peut être utilisée pour faire cuire un gros poulet.
Minuterie avec arrêt automatique – Le four se ferme automatiquement lorsque la
minuterie atteint 00:00, 3 tonalités se feront entendre.
Fonction Stay On (reste en marche) – Le four peut être configuré pour rester allumé
en appuyant sur le bouton (–) jusqu’à ce que 1 soit passé. Elle peut être utilisée avec
tous les modes sauf BROIL (griller). Le four s’arrête automatiquement après 4 heures.
Page 17

Utilisation
Placer la grille du four à la position désirée et le ramasse-miettes. Brancher
dans une prise de courant. S’il n’y a rien sur l’affichage, appuyer sur un
bouton pour le réveiller. La grille peut être placée à la position du milieu ou
du bas pour les modes Convection et Cuisson, selon la taille des aliments.
Mode Convection
Fait circuler de l’air pour faire cuire ou rôtir les aliments rapidement et de façon
égale. La durée de cuisson devrait être écourtée ou la température réduite de
25 °F (14 °C) avec ce mode.
1. Placer la commande sur CONV. L’icône de convection s’affiche.
Sélectionner une température entre 200 °F (93 °C) et 450 °F (232 °C)
en appuyant sur le bouton TEMP/SHADE (température/brunissage) et
augmenter ou réduire la température en utilisant les boutons + ou –. Si la
sonde est utilisée, régler la température de sonde entre 100 °F (38 °C) et
200 °F (93 °C).
2. Régler la minuterie pour une durée allant jusqu’à 2 heures en appuyant
sur le bouton TIME/SLICES (durée/tranches) et en utilisant les bottons
+ ou – pour obtenir le bon réglage. La température par défaut est de
350 °F.
Mode Bake (cuisson)
Fonctionne comme un four de cuisine conventionnel pour les rôtis, pommes de
terre et gâteaux.
1. Placer la commande sur BAKE (cuisson) Sélectionner une température
entre 200 °F (93 °C) et 450 °F (232 °C) en appuyant sur le bouton
TEMP/SHADE (température/brunissage) et augmenter ou réduire la
température en utilisant les boutons + ou –. Si la sonde est utilisée,
régler la température de sonde entre 100 °F (38 °C) et 200 °F (93 °C). La
température par défaut est de 350 °F.
2. Régler la minuterie pour une durée allant jusqu’à 2 heures en appuyant
sur le bouton TIME/SLICES (durée/tranches) et en utilisant les bottons
+ ou – pour obtenir le bon réglage.
Fonction Stay On (reste en marche) – Le four peut être configuré pour rester en
marche en appuyant sur le bouton (–) jusqu’à ce que 1 soit passé, ON (marche)
s’affichera lorsque les modes Convection et Cuisson sont utilisés.
17
Page 18

Utilisation (suite)
Mod Broil (griller)
Ce mode permet de faire griller les aliments comme le bœuf, le poulet,
le poisson, le porc et les casseroles. Griller les aliments dans la grille
lèchefrite en les plaçant à la position du haut ou du milieu. Les aliments
doivent se trouver à une distance d’au moins 1 po (2,5 cm) de l’élément
chauffant.
1. Placer la commande sur BROIL (griller) « HI » (élevée) s’affiche,
ainsi qu’une minuterie par défaut de 30 minutes. Le four grille à une
température ÉLEVÉE qui ne peut être modifiée.
2. Régler la minuterie en appuyant sur le bouton TIME/SLICES (durée/
tranches) et en utilisant les boutons + ou – pour obtenir le bon
réglage. La minuterie pendant le mode griller peut être réglée entre
1 et 30 minutes.
3. Une caractéristique spéciale permet à la porte de rester légèrement
ouverte pendant ce mode sans causer d’arrêt de la cuisson.
Mode Reheat (réchauffer)
Ce mode permet de rapidement réchauffer des aliments déjà cuits.
Réchauffer des aliments en les plaçant à la position du milieu ou du bas.
1. Placer la commande sur REHEAT (réchauffer).
2. La température par défaut est de 325 °F (163 °C) et la minuterie de
15 minutes.
3. La température peut être réglée entre 300 °F (149 °C) et 400 °F
(205 °C) et modifiée en appuyant sur le bouton TEMP/SHADE
(température/brunissage) ou les boutons + et –.
4. La minuterie peut être réglée de 1 minute à 2 heures et peut être
modifiée à tout moment en utilisant le bouton TIME/SLICES (durée/
tranches) ou les boutons + et –.
Fonction Stay On (reste en marche) – Le four peut être configuré
pour rester en marche en appuyant sur le bouton (–) jusqu’à ce
que 1 soit passé, ON (marche) s’affichera lorsque le mode Reheat
(réchauffer) est utilisé.
18
Page 19

Utilisation (suite)
Mode Keep Warm (maintien au chaud)
Ce mode permet de maintenir la température des aliments cuits pendant
2 heures. Placer la grille à la position du bas.
1. Placer la commande sur KEEP WARM (maintien au chaud). La
température se place par défaut à 175 °F (80 °C) pour 30 minutes,
mais peut être modifiée en appuyant sur le bouton TEMP/SHADE
(température/brunissage) ou les boutons + et –. La température peut
être réglée de 150 °F (65 °C) à 200 °F (93 °C).
2. La minuterie peut être réglée de 1 minute à 2 heures et peut être
modifiée à tout moment en utilisant le bouton TIME/SLICES (durée/
tranches) ou les boutons + et –.
Fonction Stay On (reste en marche) – Le four peut être configuré
pour rester en marche en appuyant sur le bouton (–) jusqu’à ce que
1 soit passé, ON (marche) s’affichera lorsque le mode Maintien au
chaud est utilisé.
Mode Toast (rôties)
Ce mode permet de faire grille du pain. La grille devrait être placée à la
position du centre.
1. Placer la commande sur Toast (rôties).
2. Sélectionner l’un des 7 niveaux de brunissage en appuyant sur le
bouton TEMP/SHADE (température/brunissage), puis en utilisant les
boutons + et –. Le brunissage est placé par défaut à 4.
3. Sélectionner le nombre de tranches en appuyant sur le bouton
TIME/SLICE (durée/tranches), puis en utilisant les boutons + et –.
Le nombre de tranches par défaut est de 4. Le four peut contenir de
1 à 6 tranches.
19
Page 20

Utilisation (suite)
Mode Bagel (bagel)
Ce mode permet de faire grille des bagels. Le mode bagel fait griller la
moitié tranchée sur le dessus et réchauffer la partie ronde du dessous. Les
bagels devraient être placés sur la grille du milieu, la moitié tranchée vers
le haut.
1. Placer la commande sur BAGEL (bagel).
2. Sélectionner l’un des 7 niveaux de brunissage en appuyant sur le
bouton TEMP/SHADE (température/brunissage), puis en utilisant les
boutons + et –. Le brunissage est placé par défaut à 4.
3. Sélectionner le nombre de tranches en appuyant sur le bouton
TIME/SLICE (durée/tranches), puis en utilisant les boutons + et –. Le
nombre de tranches par défaut est de 4. Le four peut contenir de 1 à
6 tranches.
Mode Sonde
Pour utiliser le mode Sonde, ouvrir le plateau de rangement pour la sonde
situé dans le coin inférieur droit du four et retirer la sonde.
1. Placer la commande sur BAKE (cuisson) ou CONV (convection). La
sonde ne fonctionne pas avec les autres modes.
2. Branchez la sonde à la prise de la sonde située sur le panneau de
commande, sous l’affichage ACL. Une icône de sonde s’affiche.
3. La température de la sonde peut être réglée lorsque le témoin de
température clignote. Si le témoin de la sonde reste allumé, appuyer
sur le bouton TEMP/SHADE (température/brunissage) une fois pour
activer le réglage de température de la cavité, puis appuyer de
nouveau sur le bouton pour activer le réglage de la température de la
sonde.
4. Le four fait entendre 3 tonalités et le four s’arrête lorsque la sonde
atteint la température souhaitée.
20
Page 21

Nettoyage de votre four
w AVERTISSEMENT
d’un tampon à récurer en acier. Des morceaux du tampon pourraient se briser
pendant le nettoyage de la plaque et toucher les parties électriques, causant
ainsi un risque de décharge électrique.
1. Débrancher le four et le laisser refroidir.
2. Essuyer le panneau de commande à l’aide d’une éponge légèrement
humide, puis sécher. Protéger l’affichage pendant le nettoyage des
autres parties.
3. Utiliser un nettoyant non abrasif pour acier inoxydable pour nettoyer
les parties externes en acier inoxydable. Appliquer le nettoyant à l’aide
d’un chiffon non pelucheux. Pour faire ressortir le lustre naturel, frotter
doucement la surface à l’aide d’un chiffon humide, d’un chiffon non
pelucheux, puis d’un chiffon à lustrer sec. Toujours suivre le grain de
l’acier inoxydable. Le produit Signature Polish peut être commandé sur
leur site Web au www.signaturepolishonline.com.
4. Essuyer les parois intérieures et la base à l’aide d’un chiffon humide et
savonneux. Répéter à l’aide d’un chiffon humide sans savon. Pour les
taches rebelles, utiliser un tampon à récurer en plastique.
5. Utiliser avec prudence une lame de rasoir pour dégager doucement les
aliments cuits collés sur le verre. Vaporiser un nettoyant pour vitres sur
un chiffon pour nettoyer. Essuyer à l’aide d’une éponge humide pour
rincer et sécher.
6. Nettoyer les grilles du four à l’aide d’un nettoyant légèrement abrasif,
puis rincer. Sécher à l’aide d’un chiffon propre.
7. Retirer le ramasse-miettes/gouttes. Laver à la main le ramasse-miettes/
gouttes, la plaque de cuisson et la grille lèchefrite dans de l’eau chaude
savonneuse. Rincer et sécher.
8. Essuyer les boutons avec un chiffon humide et savonneux. Répéter à
l’aide d’un chiffon humide sans savon, puis sécher.
9. Nettoyer les deux bouts de la sonde à l’eau savonneuse. Rincer et
sécher.
10. Lorsque la fenêtre est froide, utiliser une lame de rasoir pour dégager
doucement les aliments cuits. Vaporiser un nettoyant pour vitres sur un
chiffon pour nettoyer. Essuyer à l’aide d’une éponge humide pour rincer.
Bien sécher à l’aide d’un chiffon propre.
Risque de choc électrique. Ne pas nettoyer à l’aide
21
Page 22

Dépannage
En cas de panne de courant :
• Si la panne dure moins de 15 secondes, le four conserver les réglages.
Si la panne dure plus de 15 secondes, le four passera en mode attente
au retour de l’alimentation.
Quelle taille maximale de plaque puis-je utiliser dans ce four?
• Le four peut accueillir la majorité des plaques sans poignée de
13 po x 9 po (33 cm x 23 cm).
Quelle taille de poulet puis-je faire cuire dans ce four?
• Le four peut cuire un poulet de 5 lb (2,3 kg).
Dans quelle situation dois-je choisir BAKE (cuisson) ou BROIL (griller)?
• BAKE (cuisson) doit être choisi pour les rôtis, pommes de terre et
gâteaux.
• BROIL (griller) permet de faire griller les aliments comme le bœuf, le
poulet, le poisson, le porc et les casseroles.
Messages d’erreur
• « Err 1 » et icône de sonde qui clignote.
La sonde de température est brisée.
Communiquer avec un membre du service à la
clientèle.
• « Err 2 » et icône de sonde qui clignote.
Nettoyer les deux extrémités de la sonde de
température.
Quel réglage devrais-je choisir pour faire griller du pain?
• Le mode TOAST (rôties) est conçu pour faire griller les deux côtés
d’une tranche de pain, le mode BROIL (griller) peut être utilisé pour
faire grille les tranches sur un seul côté, les baguettes et les crostinis.
Le mode BROIL (griller) active l’élément du haut et est parfait pour faire
griller un seul côté. Il est aussi possible de retourner le pain une fois le
brunissage souhaité atteint.
Où est situé le ramasse-miettes/gouttes amovible?
• Le ramasse-miettes/gouttes amovible est situé à l’avant de l’appareil,
sous la porte du four.
• « Err 3 » et icône de sonde qui clignote.
Le mauvais mode a été sélectionné. La sonde
ne fonctionne qu’avec les modes Convections
et Cuisson.
• « Err 4 » et icône de sonde qui clignote.
Le capteur de température du four est brisé.
Ne pas utiliser le four. Communiquer avec un
membre du service à la clientèle.
22
Page 23

Hamilton Beach garantie limitée
Cette garantie s’applique aux produits achetés et utilisées aux É.-U. et au Canada. C’est la seule garantie expresse pour ce produit et est en
lieu et place de tout autre garantie ou condition.
Ce produit est garanti contre tout défaut de matériaux et de main-d’oeuvre pour une période des cinq (5) ans à compter de la date d’achat
d’origine au Canada et trois (3) ans à compter de la date d’achat d’origine aux É.-U. Au cours de cette période, votre seul recours est la
réparation ou le remplacement de ce produit ou tout composant s’avérant défectueux, à notre gré, mais vous êtes responsable de tous les
coûts liés à l’expédition du produit et le retour d’un produit ou d’un composant dans le cadre de cette garantie. Si le produit ou un composant
n’est plus offert, nous le remplacerons par un produit similaire de valeur égale ou supérieure.
Cette garantie ne couvre pas le verre, les filtres, l’usure d’un usage normal, l’utilisation non conforme aux directives imprimées, ou des
dommages au produit résultant d’un accident, modification, utilisation abusive ou incorrecte. Cette garantie s’applique seulement à l’acheteur
original ou à la personne l’ayant reçu en cadeau. La présentation du reçu de vente d’origine comme preuve d’achat est nécessaire pour faire
une réclamation au titre de cette garantie. Cette garantie s’annule si le produit est utilisé autrement que par une famille ou si l’appareil est
soumis à toute tension ou forme d’onde différente des caractéristiques nominales précisées sur l’étiquette (par ex. : 120 V ~ 60 Hz).
Nous excluons toutes les réclamations au titre de cette garantie pour les dommages spéciaux, consécutifs et indirects causés par la violation
de garantie expresse ou implicite. Toute responsabilité est limitée au prix d’achat. Chaque garantie implicite, y compris toute garantie ou
condition de qualité marchande ou d’adéquation à un usage particulier, est exonérée, sauf dans la mesure interdite par la loi, auquel cas la
garantie ou condition est limitée à la durée de cette garantie écrite. Cette garantie vous donne des droits légaux précis. Vous pouvez avoir
d’autres droits qui varient selon l’endroit où vous habitez. Certaines provinces ne permettent pas les limitations sur les garanties implicites ou
les dommages spéciaux ou indirects de telle sorte que les limitations ci-dessus ne s’appliquent peut-être pas à votre cas.
Ne pas retourner cet appareil au magasin lors d’une réclamation au titre de cette garantie. Téléphoner au 1.800.851.8900 aux É.-U. ou au
1.800.267.2826 au Canada ou visiter le site internet www.hamiltonbeach.com aux É.-U. ou www.hamiltonbeach.ca au Canada. Pour un service
plus rapide, trouvez le numéro de modèle, le type d’appareil et les numéros de série sur votre appareil.
Hamilton Beach Brands, Inc.
4421 Waterfront Drive
Glen Allen
Virginia 23060
USA
23
Page 24

Cuando utilice artefactos eléctricos, siempre deben seguirse precauciones de seguridad básicas a fin de reducir el riesgo de incendio,
SALVAGUARDIAS IMPORTANTES
descarga eléctrica, y/o lesiones a personas, incluyendo las siguientes:
1.
Lea todas las instrucciones.
2.
Este aparato no se destina para utilizarse por personas (incluyendo niños)
cuyas capacidades físicas, sensoriales o mentales sean diferentes o estén
reducidas, o carezcan de experiencia o conocimiento, a menos que dichas
personas reciban una supervisión o capacitación para el funcionamiento del
aparato por una persona responsable de su seguridad.
3.
Se requiere de una estrecha supervisión cuando el aparato se use cerca de
niños. Los niños deben supervisarse para asegurar que ellos no empleen los
aparatos como juguete.
4.
Verifique que el voltaje de su instalación corresponda con el del producto.
5.
No toque superficies calientes. Use manijas o perillas.
6.
Para protegerse contra el riesgo de choque eléctrico, no sumerja el cable, el
enchufe o el horno eléctrico en agua ni en ningún otro líquido.
7.
Desenchúfelo del tomacorriente cuando no lo esté usando y antes de la
limpieza. Deje que el aparato se enfríe antes de limpiarlo o de colocar o sacar
alguna pieza.
8.
No opere ningún aparato con cables o enchufe dañados o después de que el
aparato funcione mal o se caiga o dañe de cualquier manera. El reemplazo del
cable de suministro y las reparaciones deben ser efectuadas por el fabricante,
su agente de servicio, o personas igualmente calificadas para poder evitar un
peligro. Llame al número de servicio al cliente proporcionado para información
sobre examinación, reparación o ajuste.
9.
El uso de accesorios no recomendados por fabricante de electrodomésticos
puede causar lesiones.
10.
No lo use al aire libre.
11.
No deje que el cable cuelgue sobre el borde de una mesa o de un mostrador, o
que toque alguna superficie caliente.
12.
No coloque el aparato sobre o cerca de un quemador a gas o eléctrico caliente,
ni dentro de un horno caliente.
13.
Es importante tener extremo cuidado cuando se mueva un aparato eléctrico
que contenga aceite caliente u otros líquidos calientes.
14. Para desconectar, coloque todos los controles en la posición de OFF
( /apagado) y luego saque el enchufe del tomacorriente.
15. Tenga mucho cuidado cuando saque la charola o elimine la grasa caliente.
16. No limpie con esponjillas metálicas. La esponjilla se puede desintegrar y
los trozos pueden tocar las partes eléctricas, creando un riesgo de choque
eléctrico.
17. No introduzca alimentos de tamaño demasiado grande ni utensilios metálicos
en el horno eléctrico ya que pueden crear un incendio o riesgo de choque
eléctrico.
18. Puede ocurrir un incendio si el horno eléctrico se cubre, toca o se encuentra
cerca de materiales inflamables, incluyendo cortinas, colgaduras, paredes
y superficies similares cuando esté funcionando. No guarde ningún artículo
sobre el aparato cuando esté funcionando, o antes de que se enfríe.
19. Se debe tener mucho cuidado cuando se usan envases que no sean de metal
o de vidrio.
20. No guarde ningún material adentro del horno cuando no se use, exceptuando
los accesorios recomendados por el fabricante.
21. No coloque ninguno de los siguientes materiales en el horno: papel, cartón,
plástico y similares.
22. No cubra la charola para migajas/goteo ni ninguna otra parte del horno con
papel metálico. Eso hará que el horno se recaliente.
23. Para apagar el horno, coloque el temporizador en la posición de OFF
( /apagado). Consulte la sección “Partes y Características”.
24. No ponga los ojos o la cara cerca de la puerta de seguridad de vidrio
templado, en caso de que el vidrio de seguridad se rompa.
25. Siempre use el aparato con la charola para migajas/goteo firmemente en su
lugar.
26. No use el aparato eléctrico para ningún otro fin que no sea el indicado.
27. Limpie con cuidado el interior del horno. No raye ni dañe el tubo del elemento
de calentamiento.
28. No opere el artefacto mediante un programador de tiempo externo o un
sistema de control remoto separado.
24
GUARDE ESTAS INSTRUCCIONES
Page 25

w ADVERTENCIA
• No haga funcionar el horno sin vigilancia.
• Si el contenido se incendia, no abra la puerta del horno. Desenchufe el horno y espere hasta que el contenido deje de quemarse y se
enfríe antes de abrir la puerta.
• No use bolsas para cocinar en el horno.
• No caliente alimentos en recipientes plásticos.
• Siempre deje al menos 1 pulgada (2.5 cm) entre los alimentos y el elemento calentador.
• Siga las instrucciones del fabricante del alimento.
• La limpieza periódica reduce el riesgo de peligro de incendio.
• Siempre desenchufe el horno cuando no esté en uso.
Peligro de Incendio.
Otra Información para la Seguridad del Consumidor
Este aparato ha sido diseñado solamente para uso doméstico.
Este aparato ha sido diseñado solamente para la preparación, cocción
y servido de alimentos. No está diseñado para usarse con materiales
que no sean alimentos ni con productos no alimenticios.
w ADVERTENCIA
provisto con un enchufe polarizado (una pata más ancha) para reducir
el riesgo de una descarga eléctrica. El enchufe embona únicamente
en una dirección dentro de un tomacorriente polarizado. No trate
de obviar el propósito de seguridad del enchufe modificándolo de
alguna manera o utilizando un adaptador. Si el enchufe no entra
completamente en la toma, invierta el enchufe. Si aún no entra, haga
que un electricista reemplace la toma.
Peligro de Descarga Eléctrica: Este aparato es
El largo del cable que se usa en este aparato fue seleccionado para
reducir el peligro de que alguien se enganche o tropiece con un cable
más largo. Si es necesario usar un cable más largo, se podrá usar un
cable de extensión aprobado. La clasificación eléctrica nominal del
cable de extensión debe ser igual o mayor que la clasificación nominal
del aparato. Es importante tener cuidado de colocar el cable de
extensión para que no se pliegue sobre el mostrador o la mesera en
donde niños puedan tirar del mismo o tropezarse accidentalmente.
Para evitar una sobrecarga eléctrica del circuito, no use otro aparato de
alto voltaje en el mismo circuito con este aparato.
25
Page 26

Partes y Características
Para ordenar partes:
EE. UU.: 1.800.851.8900
www.hamiltonbeach.com
México:
01 800 71 16 100
ANTES DEL PRIMER USO: La mayoría de los electrodomésticos que se calientan
produce olor y/o humo la primera vez que se usa. Enchufe en el tomacorriente.
Lleve el cuadrante de funciones hasta BAKE (hornear). Presione el botón TEMP
(temperatura) y use el botón + para ajustar la temperatura a 450°F (232°C).
Presione el botón TIME (tiempo) el botón + para ajustar TIMER (temporizador) para
5 minutos. No debe haber olor después de este precalentamiento inicial. Lave la
bandeja para hornear, la parrilla para asar al horno y la rejilla del horno en agua
jabonosa caliente antes de usarlas.
PRECAUCIÓN! SUPERFICIE CALIENTE. La temperatura de las superficies
accesibles puede ser alta cuando el artefacto se encuentra en funcionamiento.
Rejilla del Horno
Pantalla LCD
Conector de la
Sonda
Interior Revestido
Antiadherente
Parrilla para Asar al Horno
Bandeja para
Migas/Goteo
Extraíble
Bandeja de Almacenamiento de
la Sonda (almacenada en el lado
inferior derecho del horno)
26
Extremo con Enchufe
de la Sonda
Sonda de Temperatura
Bandeja de Hornear con Parrilla
para Asar al Horno
Bandeja para Migas/Goteo
Extraíble
Page 27

Información Sobre la Pantalla
Pantalla LCD – La pantalla digital LCD de fácil lectura se ilumina después de que se presiona
cualquier control. Entrará en modo en suspensión después de 30 segundos si no se presiona
el botón START (inicio). En los modos REHEAT (recalentar), KEEP WARM (mantener caliente),
BAKE (hornear), y CONV (convección), la pantalla muestra la temperatura y el tiempo de
cocción. En BROIL (asar al horno), la pantalla muestra “HI” (alto) y el tiempo. En TOAST (tostar)
y BAGEL (roscas), muestra el ajuste de tonalidad y el número de rebanadas.
Cuando la sonda esté en uso, aparecerá el icono de una sonda en la parte inferior izquierda de
la pantalla. En la parte inferior derecha, aparecerá el ajuste de la temperatura.
Cuadrante de funciones – Use el cuadrante para seleccionar el modo de cocción.
Botón TEMP/SHADE (Temperatura/Tonalidad) – Presione cuando regule la temperatura o la
tonalidad para TOAST (tostar) o BAGEL (roscas). Para cambiar el formato en que aparece la
temperatura entre Fahrenheit y Celsius, mantenga presionado durante 5 segundos.
Botón TIME/SLICES (Tiempo/Rebanadas) – Presione cuando regule el tiempo de cocción o el
número de rebanadas. Presione los botones +/– para disminuir o aumentar el ajuste.
Botones para disminuir (–)/aumentar (+)
Botón START/STOP (Inicio/Detener) con luz roja indicadora de encendido – Presione para
iluminar la pantalla e iniciar o finalizar el modo de cocción.
NOTA: El horno puede contener un pollo de 5 lb (2.3 kg) o una pizza de 12" (30.5 cm)
Características Especiales
Sonda: La sonda de temperatura integrada con apagado automático cocina hasta la
temperatura interna deseada para obtener resultados precisos. La pantalla mostrará
"Lo" (baja) hasta que la temperatura de los alimentos alcance 100°F (38°C); después,
alternará entre la temperatura real y la temperatura ajustada.
Pantalla: Alterna entre la temperatura real del horno y la temperatura ajustada durante
el precalentamiento y emite un sonido una vez que se ha precalentado. La flecha hacia
arriba aparecerá hasta que se alcance la temperatura ajustada.
pizza y permite colocar una bandeja de hornear de 13" x 9" (33 x 22.9 cm) sin manijas.
Posiciones flexibles de la rejilla del horno: Tres posiciones permiten una cocción
óptima. Las ranuras en ambos lados del horno permiten deslizar la bandeja con
facilidad para colocarla y retirarla de su posición.
• La posición superior de la rejilla es ideal para asar al horno pescado o
hamburguesas.
• Use la posición media para tostar u hornear pizza.
• La posición inferior es ideal para hornear un pollo grande.
Temporizador con apagado automático :
temporizador llega a 00:00 y emite un sonido 3 veces.
Función de permanecer encendido: El horno se puede ajustar para que permanezca
encendido si se presiona el botón con el signo menos apenas después de 1. Se
puede usar en cualquier modo de cocción excepto BROIL (asar al horno). El horno se
apagará automáticamente después de 4 horas.
El horno se apaga automáticamente cuando el
27
Page 28

Modo de Uso
Coloque la rejilla del horno en la posición deseada con la bandeja
para migas en su lugar. Enchufe en el tomacorriente. Si la pantalla
está en blanco, presione cualquier botón para que se ilumine. La
rejilla puede estar en la posición media o inferior para el modo de
convección o de horneado, según el tamaño de los alimentos.
Modo Convection (convección)
Hace circular aire caliente forzado para acelerar el proceso de horneado/
asado y obtener una cocción más rápida y uniforme. Al usar el horneado
con convección, reduzca el tiempo de cocción o reduzca la temperatura
de la receta unos 25°F (14°C).
1. Lleve el cuadrante de funciones hasta CONV (convección). Aparecerá
el icono de convección. Para seleccionar la temperatura entre 200°F
(93°C) y 450°F (232°C), presione el botón TEMP/SHADE (temperatura/
tonalidad) y aumente o disminuya la temperatura con los botones +
o –. Si usa una sonda, ajuste la temperatura de la sonda entre 100°F
(38°C) y 200°F (93°C).
2. Para ajustar el tiempo con un máximo de 2 horas, presione el botón
TIME/SLICES (tiempo/rebanadas) y use los botones + o – para
regular. La temperatura predeterminada es de 350°F.
Modo Bake (Hornear)
Se usa como un horno de cocina normal para alimentos como asados,
patatas, o pasteles.
1. Lleve el cuadrante de funciones hasta BAKE (hornear). Para
seleccionar la temperatura entre 200°F (93°C) y 450°F (232°C),
presione el botón TEMP/SHADE (temperatura/tonalidad) y aumente
o disminuya la temperatura con los botones + o –. Si usa una sonda,
ajuste la temperatura de la sonda entre 100°F (38°C) y 200°F (93°C). La
temperatura predeterminada es de 350°F.
2. Para ajustar el tiempo con un máximo de 2 horas, presione el botón
TIME/SLICES (tiempo/rebanadas) y use los botones + o – para regular.
Función de Stay On (permanecer encendido): El horno se puede
ajustar para que permanezca encendido si se presiona el botón con
el signo menos apenas después de 1; aparecerá ON (encendido) en
los modos Convection (convección) o Bake (hornear).
28
Page 29

Modo de Uso (cont.)
Modo Broil (Asar al horno)
Es adecuado para tostar alimentos como carne vacuna, pollo, pescado,
puerco y guisados. Ase al horno los alimentos sobre la parrilla para asar
al horno en la bandeja para hornear en la posición superior o media de la
rejilla. Los alimentos deben estar como mínimo a 1 pulgada (2.5 cm) de
los elementos calentadores.
1. Lleve el cuadrante de funciones hasta BROIL (asar al horno). La
pantalla muestra “HI” (alto) y el tiempo predeterminado es de 30
minutos. El horno asa en temperatura ALTA y no puede regularse.
2. Para ajustar el tiempo de cocción, presione el botón TIME/SLICES
(tiempo/rebanadas) y use los botones + o – para regular. El tiempo
de asar al horno se puede ajustar desde 1 minuto hasta 30 minutos.
3. Una característica especial permite que se mantenga la puerta un
poco abierta durante el asado al horno sin que el horno se apague.
Modo Reheat (Recalentar)
Es adecuado para calentar rápidamente alimentos cocidos. Recaliente
alimentos con la rejilla en la posición media o inferior.
1. Lleve el cuadrante de funciones hasta REHEAT (recalentar).
2. La temperatura se ajustará de manera predeterminada en 325°F
(163°C) con 15 minutos de tiempo de cocción.
3. La temperatura se puede ajustar entre 300°F (149°C) y 400°F (205°C);
para cambiarla, presione el botón TEMP/SHADE (temperatura/
tonalidad) y use los botones + o – para regular.
4. El tiempo se puede ajustar entre 1 minuto y 2 horas; para cambiarlo,
presione el botón TIME/SLICES (tiempo/rebanadas) y use los botones
+ o – para regular.
Función de Stay On (permanecer encendido): El horno se puede
ajustar para que permanezca encendido si se presiona el botón con
el signo menos apenas después de 1; aparecerá ON (encendido) en
el modo Reheat (recalentar).
29
Page 30

Modo de Uso (cont.)
Modo Keep Warm (Mantener caliente)
Es adecuado para mantener alimentos cocidos a cierta temperatura
durante un máximo de 2 horas. Coloque la rejilla en la parte inferior.
1. Lleve el cuadrante de funciones hasta KEEP WARM (mantener
caliente). La temperatura se ajustará de manera predeterminada en
175°F (80°C) durante 30 minutos; para cambiarla, presione el botón
TEMP/SHADE (temperatura/tonalidad) y use los botones + o – para
regular. El rango de temperatura es entre 150°F (65°C) y 200°F (93°C).
2. El tiempo se puede ajustar entre 1 minuto y 2 horas; para cambiarlo
en cualquier momento, presione el botón TIME/SLICES (tiempo/
rebanadas) y use los botones + o – para regular.
Función de Stay On (permanecer encendido): El horno se puede
ajustar para que permanezca encendido si se presiona el botón con
el signo menos apenas después de 1; aparecerá ON (encendido) en
el modo Keep Warm (mantener caliente).
Modo Toast (Tostar)
Es adecuado para dorar y tostar panes. La rejilla debe estar en la posición
media.
1. Lleve el cuadrante de funciones hasta TOAST (tostar).
2. Para seleccionar una de las 7 tonalidades de dorado, presione el
botón TEMP/SHADE (temperatura/tonalidad) y regule el ajuste con
los botones + o –. El ajuste de tonalidad predeterminado es el 4.
3. Para seleccionar el número de rebanadas, presione el botón TIME/
SLICES (tiempo/rebanadas) y regule el ajuste con los botones
+ o –. El número de rebanadas predeterminado es 4. Regule de 1 a
6 rebanadas.
30
Page 31

Modo de Uso (cont.)
Modo Bagel (Roscas)
Es adecuado para dorar y tostar roscas. El modo Bagel (rosca) tuesta
el lado superior del corte y calienta la parte inferior redondeada de las
roscas. Las roscas deben colocarse en la rejilla media con el lado del corte
orientado hacia arriba.
1. Lleve el cuadrante de funciones hasta BAGEL (roscas).
2. Para seleccionar una de las 7 tonalidades de dorado, presione el
botón TEMP/SHADE (temperatura/tonalidad) y regule el ajuste con
los botones + o –. El ajuste de tonalidad predeterminado es 4.
3. Para seleccionar el número de rebanadas, presione el botón TIME/
SLICES (tiempo/rebanadas) y regule el ajuste con los botones
+ o –. El número de rebanadas predeterminado es 4. Regule de 1 a
6 rebanadas.
Modo Sonda
Para usar la sonda, deslice la bandeja extraíble de almacenamiento de la
sonda que está en el costado inferior derecho del horno y retire la sonda.
1. Lleve el cuadrante de funciones hasta BAKE (hornear) o CONV
(convección). La sonda no funciona en otros modos de cocción.
2. Enchufe la sonda en su conector que está en el panel de control
debajo de la pantalla LCD. El icono de la sonda se iluminará en la
pantalla.
3. Las luces de temperatura que parpadean indican que la sonda de
temperatura está lista para ser ajustada. Si la luz de la sonda está fija,
presione el botón TEMP/SHADE (temperatura/tonalidad) una vez para
activar el ajuste de la temperatura de la cavidad; después, presiónelo
nuevamente para activar el ajuste de la temperatura de la sonda.
4. El horno emitirá un sonido 3 veces una vez que la temperatura de
la sonda alcance el ajuste deseado y el horno se apagará.
31
Page 32

Limpieza de su Horno
w ADVERTENCIA
metálicos. Trozos de estropajo se pueden desprender y tocar piezas eléctricas,
lo cual genera el riesgo de una descarga eléctrica.
1. Desenchufe el horno y déjelo enfriar por completo.
2. Repase la pantalla del panel de control con una esponja ligeramente
húmeda y seque. Proteja la pantalla cuando limpie cualquier otra
superficie.
3. Use un limpiador no abrasivo para acero inoxidable para limpiar las
zonas exteriores de acero inoxidable. Aplique el limpiador con un paño
suave sin pelusa. Para recuperar el lustre natural, repase suavemente
la superficie con un paño sin pelusa humedecido con agua y, después,
con un paño de pulir seco. Siga siempre la veta del acero inoxidable.
Puede pedir Signature Polish a través de su sitio web en www.
signaturepolishonline.com.
4. Repase las paredes y el piso del horno con un paño enjabonado
húmedo. Repita con un paño limpio húmedo. Para las manchas
rebeldes, use un estropajo plástico.
5. Use con cuidado una hoja de rasurar para levantar con suavidad los
alimentos endurecidos por el horneado de la ventana de vidrio. Rocíe
limpiavidrios en un paño para limpiar. Repase con una esponja húmeda
para enjuagar y seque.
6. Limpie las rejillas del horno con un limpiador abrasivo suave y
enjuague. Seque con un paño limpio.
7. Deslice y extraiga la bandeja para migas/goteo. Lave a mano la bandeja
para migas/goteo y la bandeja para hornear con la parrilla para asar al
horno en agua jabonosa caliente. Enjuague y seque.
8. Repase las perillas de control con un paño enjabonado húmedo. Repita
con un paño limpio húmedo y seque.
9. Limpie ambos extremos de la sonda con agua jabonosa. Enjuague y
seque.
10. Cuando la ventana esté fría, use una hoja de rasurar para levantar
con suavidad los alimentos endurecidos por el horneado. Rocíe
limpiavidrios en un paño para limpiar. Repase con una esponja húmeda
para enjuagar. Seque meticulosamente con un paño limpio.
Peligro de Descarga Eléctrica: No limpie con estropajos
32
Page 33

Solución de Problemas
En caso de un corte de energía:
• Si la electricidad se corta durante menos de 15 segundos, el horno
volverá al ajuste anterior. Si el corte dura más de 15 segundos, el horno
cambiará al modo en espera cuando la electricidad regrese.
¿Qué tamaño de bandeja para hornear se puede colocar en el horno?
• En el horno se puede colocar la mayoría de las bandejas para hornear
de 13" x 9" (33 cm x 23 cm) sin manijas.
¿Qué tamaño de pollo se puede colocar en el horno?
• En el horno se puede colocar un pollo de 5 lb (2.3 kg).
¿Cuándo se debe seleccionar BAKE (hornear) o BROIL (asar al horno)?
• Seleccione BAKE (hornear) para alimentos como asados, patatas, o
pasteles.
• Seleccione BROIL (asar al horno) para tostar alimentos como carne
vacuna, pollo, pescado, puerco y guisados.
Mensajes de Error
• “Err 1” y un icono de sonda que destella.
La sonda de temperatura está rota. Llame a un
representante de servicio al cliente.
• “Err 2” y un icono de sonda que destella.
Limpie ambos extremos de la sonda de
temperatura.
¿Cuál es el ajuste óptimo para tostar pan?
• El modo TOAST (tostar) es óptimo para tostar ambos lados de panes
en rebanadas; o bien use el modo BROIL (asar al horno) para los
emparedados abiertos, las baguettes y los crostini. El modo BROIL
(asar al horno) activa el elemento calentador superior y es excelente
cuando se requiere tostar un solo lado; o bien los panes pueden darse
vuelta al alcanzar la intensidad de tostado deseada.
¿Dónde está la bandeja para migas/goteo extraíble?
• La bandeja para migas/goteo extraíble está en la parte delantera de la
unidad debajo de la puerta del horno.
• “Err 3” y un icono de sonda que destella.
Se seleccionó un modo incorrecto. La sonda
solo funciona con los modos Convection
(convección) y Bake (hornear).
• “Err 4” y un icono de sonda que destella.
El sensor de temperatura del horno está roto.
No use el horno. Llame a un representante de
servicio al cliente.
33
Page 34

Grupo HB PS, S.A. de C.V.
Monte Elbruz No. 124 - 401
Col. Polanco V Sección, Miguel Hidalgo
Ciudad de México, C.P. 11560
PÓLIZA DE GARANTÍA
PRODUCTO: MARCA: MODELO:
Grupo HB PS, S.A. de C.V. cuenta con una Red de Centros de Servicio Autorizada, por favor consulte en la lista anexa el nombre y dirección de los establecimientos en la
República Mexicana en donde usted podrá hacer efectiva la garantía, obtener partes, componentes, consumibles y accesorios; así como también obtener servicio para
productos fuera de garantía. Para mayor información llame sin costo: Centro de Atención al consumidor: 01 800 71 16 100
Grupo HB PS, S.A. de C.V. le otorga a partir de la fecha de compra:
• Esta garantía ampara, todas las piezas y componentes del producto que resulten con defecto de fabricación incluyendo la mano de obra.
• Grupo HB PS, S.A. de C.V. se obliga a reemplazar, reparar o reponer, cualquier pieza o componente defectuoso; proporcionar la mano de obra necesaria para su diagnóstico y reparación,
todo lo anterior sin costo adicional para el consumidor.
• Esta garantía incluye los gastos de transportación del producto que deriven de su cumplimiento dentro de su red de servicio.
• Esta garantía no ampara el reemplazo de piezas deterioradas por uso o por desgaste normal, como son: cuchillas, vasos, jarras, filtros, etc.
• Grupo HB PS, S.A. de C.V. no se hace responsable por los accidentes producidos a consecuencia de una instalación eléctrica defectuosa, ausencia de toma de tierra, clavija de enchufe
en mal estado, etc.
Esta garantía no será efectiva en los siguientes casos:
a) Cuando el producto se hubiese utlizado en condiciones distintas a las normales. (Uso industrial, semi-industrial o comercial.)
b) Cuando el producto no hubiese sido operado de acuerdo con el instructivo de uso.
c) Cuando el producto hubiese sido alterado o reparado por personas no autorizadas por Grupo HB PS, S.A. de C.V. el fabricante nacional, importador o comercializador responsable
respectivo.
El consumidor puede solicitar que se haga efectiva la garantía ante la propia casa comercial donde adquirió su producto, siempre y cuando Grupo HB PS, S.A. de C.V. no cuente con talleres de
servicio.
GARANTÍA DE 1 AÑO.
COBERTURA
LIMITACIONES
EXCEPCIONES
34
Page 35

PROCEDIMIENTO PARA HACER EFECTIVA LA GARANTÍA
• Para hacer efectiva la garantía no deben exigirse mayores requisitos que la presentación del producto y la póliza correspondiente, debidamente sellada por el establecimiento que lo vendió.
• Para hacer efectiva la garantía, lleve su aparato al Centro de Servicio Autorizado más cercano a su domicilio (consulte la lista anexa).
• Si no existe Centro de Servicio Autorizado en su localidad llame a nuestro Centro de Atención al Consumidor para recibir instrucciones de como hacer efectiva su garantía.
• El tiempo de reparación, en ningún caso será mayor de 30 días naturales contados a partir de la fecha de recepción del producto en nuestros Centros de Servicio Autorizados.
• En caso de que el producto haya sido reparado o sometido a mantenimiento y el mismo presente deficiencias imputables al autor de la reparación o del mantenimiento dentro de los treinta
días naturales posteriores a la entrega del producto al consumidor, éste tendrá derecho a que sea reparado o mantenido de nuevo sin costo alguno. Si el plazo de la garantía es superior a
los treinta días naturales, se estará a dicho plazo.
• El tiempo que duren las reparaciones efectuadas al amparo de la garantía no es computable dentro del plazo de la misma. Cuando el bien haya sido reparado se iniciará la garantía respecto
de las piezas repuestas y continuará con relación al resto. En el caso de reposición del bien deberá renovarse el plazo de la garantía.
SELLO DEL VENDEDOR QUEJAS Y SUGERENCIASFECHA DE ENTREGA
DÍA___ MES___ AÑO___
Si desea hacer comentarios o sugerencias con respecto a nuestro servicio o tiene alguna queja derivada de la atención recibida en
alguno de nuestros Centros de Servicio Autorizados, por favor dirigirse a:
GERENCIA INTERNACIONAL DE SERVICIO
Email: mexico.service@hamiltonbeach.com.mx
01 800 71 16 100
RED DE CENTROS DE SERVICIO AUTORIZADA GRUPO HB PS, S.A. DE C.V.
Distrito Federal
ELECTRODOMÉSTICOS
Av. Plutarco Elias Cailes No. 1499
Zacahuitzco MEXICO 09490 D.F.
Tel: 01 55 5235 2323 • Fax: 01 55 5243 1397
CASA GARCIA
Av. Patriotismo No. 875-B
Mixcoac MEXICO 03910 D .F.
Tel: 01 55 5563 8723 • Fax: 01 55 5615 1856
Nuevo Leon
FERNANDO SEPULVEDA REFACCIONES
Ruperto Martínez No. 238 Ote.
Centro MONTERREY, 64000 N.L.
Tel: 01 81 8343 6700 • Fax: 01 81 8344 0486
Jalisco
SERVICIOS DE MANTENIMIENTO CASTILLO
Garibaldi No. 1450
Ladrón de Guevara
GUADALAJARA 44660 Jal.
Tel: 01 33 3825 3480 • Fax: 01 33 3826 1914
35
Page 36

Modelo:
31240
Tipo:
O73
Características eléctricas:
120 V~ 60 Hz 1500 W
Los modelos incluidos en las instrucciones de Uso y cuidado pueden estar seguidos o no de un sufijo correspondiente a una o varias
letras y sus combinaciones, separadas o no por un espacio, coma, barra o guión. Ejemplos de los sufijos pueden ser: “Y” y/o “MX”
y/o “MXY” y/o “Z”.
840289600
12/17
 Loading...