

Page 1
00
123125
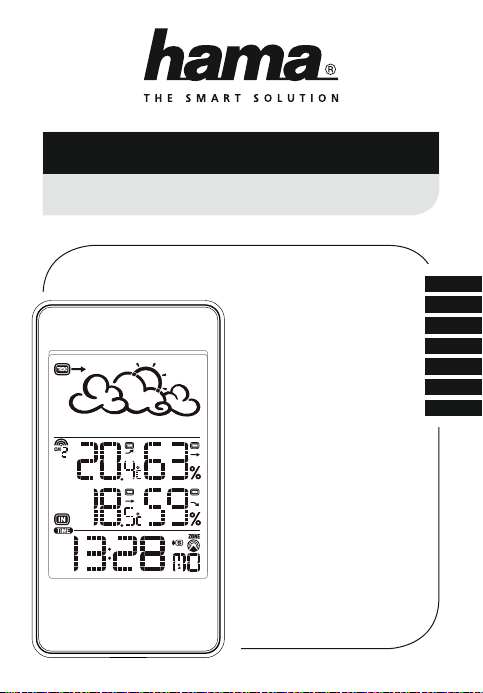
Weather Station
Wetterstation
EWS-860
Operating Instructions
Bedienungsanleitung
Mode d‘emploi
Instrucciones de uso
Руководство по эксплуатации
Istruzioni per l‘uso
Instrukcja obsługi
GB
D
F
E
RUS
I
PL
Page 2
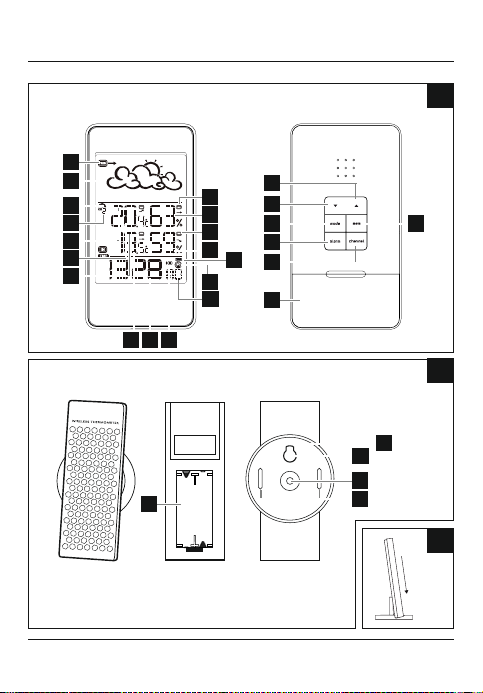
A
1
2
3
4
5
6
7
8
17
16
15
14
12
11
10
9
18
19
20 23
21
13
22
24
B
26
27
28
25
29
C
Page 3

G Operating instruction
Controls and Displays
ABase station
1. Atmospheric pressuretrend
2. Weather forecast symbol
3. Measuring station wireless symbol
4. Channel display
5. Outdoor temperaturetrend
6. Outdoor temperature
7. Room temperaturetrend
8. Room temperature
9. Time/date
10. Alarm symbol
11. Weekday /seconds
12. Wireless symbol
13. Time zone
14. Room humidity
15. Room humidity trend
16. Outdoor humidity
17. Outdoor humidity trend
button =increasing the current setting /activating/ deactivating manual radio signal
18.
reception /Switches between TIME and temperaturemode
19. button =reducingthe current setting /manually searching for the signal from the
measuring station /Switches between TIME and temperaturemode
20. mode button =settings /conrming the setting /toggling between seconds, weekday
and time zone display /Switches between °C and°F
21. alarm button =display /setting alarm modes
22. channel button =channel selection
23. mem.button =accessing/ resetting the stored maximum/minimum values
24. Battery compartment
BMeasuring station
25. Battery compartment
26. Mounting plate
27. Cut-out for vertical mounting
28. Cut-out for horizontal mounting
29. Clips
2
Page 4
Thank you for choosing aHama product.
Take your time and read the following instructions and information completely.Please keep
these instructions in asafe place for futurereference. If you sellthe device, please pass these
operating instructions on to the new owner.
1. Explanation of Warning Symbols and Notes
Warning
This symbol is used to indicate safety instructions or to draw your attention to specic
hazards and risks.
Note
This symbol is used to indicate additional information or important notes.
2. Package Contents
• Weather station EWS-860
(base station for indoor/outdoor measuring station)
• Base
• 4xAAA batteries
• These operating instructions
3. Safety Instructions
• The product is intended for private, non-commercial use only.
• Do not operate the product outside the power limits given in the specications.
• Do not use the product in moist environments and avoid splashes.
• Do not use the product in the immediate vicinity of heaters or other heat sources or in
direct sunlight.
• Do not use the product in areas wherethe use of electronic devices is not permitted.
• Do not place the product near interference elds, metal frames, computers, TVs, etc.
Electronic devices and window frames can negatively affect the product’sfunctionality.
• Do not drop the product and do not expose it to any major shocks.
• Do not open the device or continue to operate it if it becomes damaged.
• Do not attempt to service or repair the product yourself.Leave any and allservice work to
qualied experts.
• Keep the packaging material out of the reach of children due to the risk of suffocation.
3
Page 5
• Dispose of packaging material immediately according to locally applicable regulations.
• Do not modify the product in any way.Doing so voids the warranty.
Warning –Batteries
• Immediately remove and dispose of dead batteries from the product.
• Only use batteries (or rechargeable batteries) that match the specied type.
• Do not mix old and new batteries or batteries of adifferent type or make.
• When inserting batteries, note the correct polarity (+ and -markings) and insert
the batteries accordingly.Failure to do so could result in the batteries leaking or
exploding.
• Do not charge batteries.
• Keep batteries out of the reach of children.
• Do not short circuit the batteries/rechargeable batteries and keep them away from
uncoated metal objects.
4. Getting Started
4.1. Measuring station
• Open the battery compartment (25) and insert two AAA batteries with the correct polarity.
Close the battery compartment.
Note
Beforeuse, ensureyou insert the batteries inthe measuring station rst and then in the
base station.
4.2. Base station
• Open the battery compartment (24) and insert two AAA batteries with the correct polarity.
Close the battery compartment.
4
Page 6

5. Installation
Note –Installation
• We recommend initially placing the base and measuring stations in the intended
locations without installing them and making all the settings described in
6. Operation –todo.
• Only install the stations once the appropriate settings have been made and astable
wireless connection is established.
Note
• The wireless transmission range between the measuring and base stations is up to 30
minopen spaces.
• Beforeinstallation, ensurethat wireless transmission will not be disrupted by
interference or obstacles like buildings, trees, vehicles, high-voltage lines, etc.
• Beforethe nal installation, ensurethat thereissucient reception between the
intended installation locations.
• When installing the measuring station, ensurethat it is protected from direct sunlight
and rain.
• The international standardheight for measuring air temperatureis1.25 m(4ft) above
ground.
Warning
• Buy special or suitable installation material from aspecialised dealer for wall-mounting.
• Ensurethat no faulty or damaged parts areinstalled.
• Never apply force during installation. This could damage the product.
• Beforeinstallation, ensurethat the chosen wall is suitable for the weight tobe
mounted, and make surethat thereare no electrical wires, water,gas or other linesat
the installation site on the wall.
5
Page 7
5.1. Base station
• Use the base to position the base station on alevel surface. (C)
5.2. Measuring station
• Youcan fasten the measuring station horizontally or verticallyto an outer wall using a
mounting plate (26).
• If you want to mount the measuring station horizontally,use rawl plugs, screws, etc. to
fasten the mounting plate (26) using the central cut-out (28) to the wall intended for
installation.
• If you want to mount the measuring station vertically,use rawl plugs, screws, etc. in the
wall intended for installation and hang the mounting plate (26) using cut-out (27).
• Gently push the measuring station until you hear alatching sound (“click”) as it engages
with the clips (29).
6. Operation
Note –Input
Hold down the - button (18) or the - button (19) to select the values faster.
6.1. Connection to the measuring station
• After you insert the batteries, the base station automatically searches for aconnection to
the measuring station and performs initial setup.
Note
• Initial setup takes approx. 3minutes.
• During connection, the wireless symbol on the measuring station will ash (3).
• Do not press any buttons during setup. Otherwise, values may not be transmitted
correctly and thereisarisk of value errors and inaccuracies.
• The setup process is completed when the indoor (18, 14) and outdoor (6, 16)
measurement data is displayed.
• If the base station still does not receive asignal from the measuringstation, press and hold
the -button (19) for approx. 3seconds to start the manual search for the signal.
6
Page 8
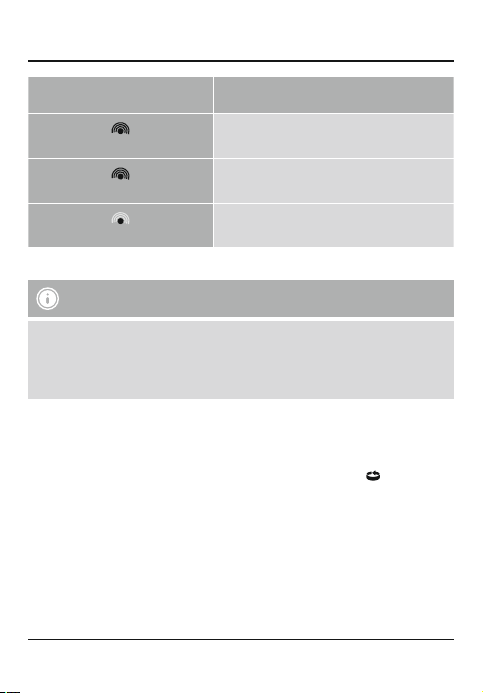
Display Search for asignal from the measuring station
Display ashing
Displayed continuously
Displayed continuously
Successful –signal is being received
Inactive –nosignal reception for >1hour
Active
6.2. Selecting the channel/other measuring stations
Note
• Youcan install two moremeasuring stations in addition to the included measuring
station. Ensurethat the base and measuring stations areset to the same channel.
Visit www.hama.com for suitable measuring stations.
• The transmission channel on the supplied measuringstation cannot be changed/set
(CH1).
• Press the channel button (22) repeatedly to set the channel to that set on the respective
measuring station. CH1, CH2 or CH3 (4) is displayed.
• Select CH1 if you areonly using the measuring station supplied.
• The base station now shows thedata measured (16, 6) on the selected measuringstation
(4).
• Press and hold the channel button (22) to select the channel scan. The symbol and
measurement values of the individual measuring stations/channels (4) aredisplayed
consecutively for 5seconds each.
6.3. Basic and manual settings
Automatic setting using the DCF signal
After the rst time the base station is switched on and successful transmission is established
between the base station and the measuring station, the clock will automatically search for a
DCF signal. During the search, the wireless symbol (12) will ash.
7
Page 9
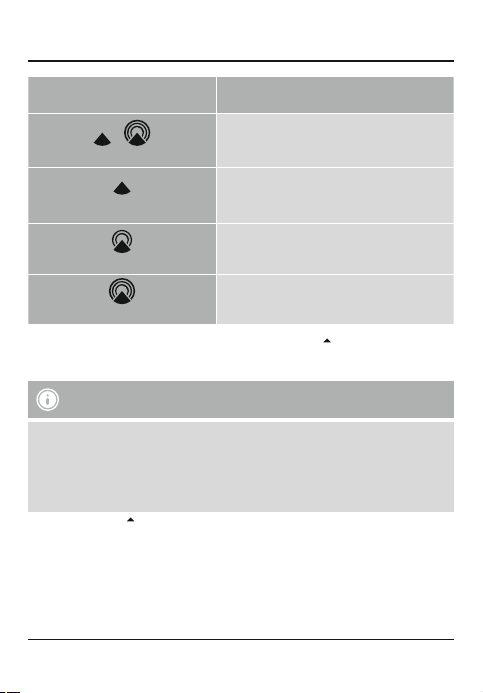
Display Searching for the DCF signal
/
Display ashing
Displayed continuously
Displayed continuously
Displayedcontinuously
• If the station still does notreceive asignal, press and holdthe –button (18) for approx.
3seconds to start the manual search for theDCF signal. The wireless symbol (12) will start
to ash.
Note –Time settings
• The search process takes about 3-10 minutes. If the search fails, itends and is repeated
at the next clock hour.
• In the meantime you can, however,set the time and the date manually.
• The clock automatically continues to search for the DCF signal onadaily basis (00:00
a.m., 03:00 a.m., 06:00 a.m., 12:00 p.m.). If the signal is received successfully,the
manually-set time and date areoverwritten.
• Press and hold the –button (18) again forapprox. 3seconds to stop the manualsearch.
8
Inactive –nosignal reception in the last 24
Successful –signal is being received
Active
hours
Successful –strong signal
Page 10

Manually setting the date/time
Note –TIME mode
• Press the button (18) or the button (19) repeatedly until the symbol starts
ashing in the display.
Note –Time and time zone
• In TIME mode, press the mode button (20) repeatedly to toggle between the following
different displays:
• Time with seconds display,time with weekday display,time adjusted according to time
zone with weekday display,time adjusted according to time zone with seconds display,
date
• The time zone symbol (13) isdisplayed when the time has been adjusted according to
the time zone.
• Press and hold the -button (18) forapprox. 3seconds to stop the search for the DCF
signal. The wireless symbol (12) goes out and you can set the time manually.
• In TIME mode, repeatedly press the mode button (20) untilthe time zone symbol (13) is
no longer displayed.
• Press and hold the mode button (20)for approx. 3seconds to make the following settings
one after the other:
•Weekday (11)
•Year (9)
•Month (9)
•Day (9)
•D/M –M/D (9) display
•12/24 hour format (9)
•Hours (9)
•Minutes (9)
• To select the individual values, press the -button (18) or the -button (19) and conrm
each selection by pressing the mode button (20).
• If you do not make anentry for 2minutes, you automaticallyexit the setup mode.
9
Page 11
Note –Weekday
Youcan choose from German (DE), English (En), Swedish (SW), Dutch (Du), Italian (IT),
Spanish (SP) or French (Fr) for the weekday display.
Setting the time zone
Note –Time zone
• The DCF signal can be received over long distances, but always transmits the current
Central European Time in Germany.Make sureyou account for the time difference in
countries with another time zone.
• If you areinMoscow,the time is 3hours later than in Germany.This means that you
should set +3 for the time zone. The clock then automatically sets the time to3hours
after the DCF signal received or relative tothe manually set time.
• In TIME mode, repeatedly press the mode button (20) untilthe time zone symbol (13) is
displayed.
• Press and hold the mode button (20)for approx. 3seconds to set the required time shift.
• To select individual values, press the button (18) or the button (19) and conrm each
selection by pressing the mode button (20).
• If you do not make anentry for 2minutes, you automaticallyexit the setup mode.
Alarm
• In TIME mode, repeatedly press the alarm button (21) todisplay the different alarms.
The respective alarm symbols (10) / / and the corresponding alarm time/
time interval and/or OFF aredisplayed.
• Press and hold the alarm button (21) for approx. 3seconds toset the alarm time of the
alarm displayed. The hours display/time interval starts to ash.
• Press the -button (18) or the -button (19) to select thehour for the alarm time/time
interval and conrm your selection by pressing the alarm button (21).
The minutes display begins to ash.
The early alarm is already activated after conrming the time interval.
• Repeat the process to set the minutesfor the alarm time.
10
Page 12
• Press the alarm button (21) repeatedly to also set the other alarm mode orreturn to the
time display (9).
• If you do not make anentry for 2minutes, you automaticallyexit the setup mode.
Note –Alarm
• When activated, the weekday alarm onlytriggers an alarm on weekdays (Monday to
Friday). The alarm symbol (10) is displayed if this alarm is activated.
• When activated, the once-only alarm onlytriggers an alarm once. The alarm symbol
(10) is displayed if this alarm is activated. This alarm is automatically deactivated
after the alarm has sounded.
• When activated and when the outsidetemperatureis<0°C/ 32°F,the early alarm
triggers an alarm 15, 30, 45, 60 or 90 minutes beforethe actual alarm ( and/or
). The alarm symbol (10) is displayed if this alarm is activated.
• In the corresponding display,press the
deactivate the corresponding alarm.
The alarm symbol (10) will appear/not appear.
Note –Early alarm
The early alarm can only be activated if at least one of the two alarmfunctions ( / )
has already been activated.
• If the alarm is triggered, the alarmsymbol (10) will begin to ash and an alarm willsound.
• Press the alarm button (21) to stopthe alarm. Otherwise, it will stop automatically after
2minutes.
-button (18) or the -button (19) toactivate/
6.4. Weather
Note –Temperaturemode
• Press the button (18) or the button (19) repeatedly until the symbol starts
ashing in the display.
Celsius/Fahrenheit
• In temperaturemode, press and hold themode button (20) for approx. 3seconds to
switch the temperaturedisplay between °C and °F.
11
Page 13

Weather forecast
• Based on changes in the atmosphericpressureand the data saved, the base station is able
to make weather forecasts for the next 12 to 24 hours.
Note –Weather forecast
• The weather forecast function is not available during the rst few hours of operation
because it requires data that is collected during operation.
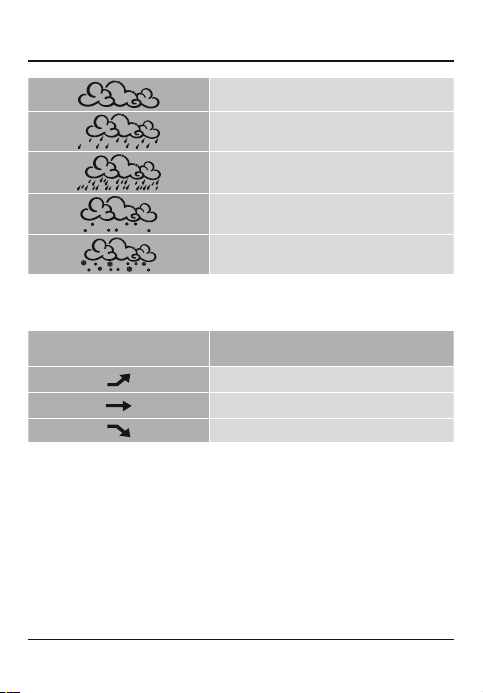
• The weather forecast and the current weather areindicated bydifferent symbols (2):
Symbol (2) Weather
Sun
Slightly cloudy
Cloudy
Rain
Heavy rain
Snow
Heavy snow
• The weather station indicates atrend as to how the values for the outdoor temperature/
humidity (5/17), room temperature/humidity (7/15) and atmospheric pressure(1) arelikely
to develop over the next few hours.
12
Page 14
Display Trend
Increasing
Constant
Decreasing
6.5. Maximum and minimum temperature values
The base station automatically stores the maximum and minimum indoor/outdoor
temperatureand humidity values.
• In temperaturemode, repeatedly press the mem. button (23) toswitch between the
current temperature, minimum temperature(MIN) and maximum temperature(MAX).
• Press and hold the mem.button (23) for approx. 3seconds to reset the stored maximum
and minimum values.
6.6. Outdoor temperature alarm
• Repeatedly press the channel button (22) to select the measuring station channel (4) for
which you would like to set an alarm.
• In temperaturemode, repeatedly press the alarm button (21) todisplay the outdoor
temperaturealarms / .
• Press and hold the alarm button (21) for approx. 3seconds untilthe outdoor temperature
display (6) begins to ash.
• Press the button (18) or the button (19) to set the displayed limit value andconrm
your selection by pressing the alarm button (21).
• While the upper or lower limit values aredisplayed, press the button (18) or the
button (19) to select the temperaturevalue or OFF and then press the alarm button to
conrm the selection (21).
Select the temperaturevalue/OFF to activate/deactivate the outdoor temperaturealarm.
• The alarm is triggered accordingly if the outdoor temperaturereachesone of these limit
values.
The symbol and the outdoor temperaturestart to ash and an alarm signal sounds.
Press the alarm button (21) to stop the alarm. Otherwise, it will stop automatically after
2minutes.
13
Page 15
Note –Outdoor temperaturealarm
• Youcan dene alower and an upper limit value and activate analarm for each channel
and/or connected measuring station.
• Note that the lower limit valuemust be at least 1°C/1°F below the upper limit value.
6.7. Comfort range
The base station displays the following comfort ranges based on the ration between the
current room temperatureand room humidity:
Display temperaturerange Humidity range
COMFORT
WET
DRY
-
20°C –25°C
68°F –77°F
-5°C –50°C
23°F –122°F
-5°C –50°C
23°F –122°F
<20°C />25°C
<68°F />77°C
14
Comfort range
40% –70%
>70%
<40%
40% -70% -Noindicator -
–Pleasant –
Ideal temperature
and humidity
–Moist –
Humidity too high
–Dry –
Ambient air too dry
Page 16
6.8 Low battery capacity
As soon as the battery symbol appears on the display of the base station, the capacity of
the batteries in the base/measuring station is very low.Replace thebatteries immediately.
Note –Replacing the batteries
• Note that the stations have tobe resynchronised each time after you changethe
batteries in the measuring or base station.
• To do this, remove the batteries from the other station and then reinsert them, or
change them as required.
7. Care and Maintenance
Only clean this product with aslightly damp, lint-free cloth and do not useaggressive
cleaning agents.
8. Warranty Disclaimer
Hama GmbH &CoKGassumes no liability and provides no warranty for damage resulting
from improper installation/mounting, improper use of the product or from failuretoobserve
the operating instructions and/or safety notes.
9. Service and Support
Please contact Hama Product Consulting if you have any questions about this product.
Hotline: +49 9091 502-115 (German/English)
Further support information can be found here:
www.hama.com
15
Page 17
10. Technical Data
Base station Measuring station
Power supply
Power consumption <2,5 mA <1,0 mA
3.0 V
2xAAA batteries
2xAAA batteries
3.0 V
Measuring range
Temperature
Measuring increments
Temperature
Temperatureand
humidity measuring
cycle
Humidity 25%–95%30% –80%
Radio-controlled DCF
clock
Frequency 433 MHz
Range ≤30m
16
0°C –+50°C/
32°F –122°F
0,1°C /0,2°F 0,1°C /0,2°F
~45s ~45s
YesNo
-20°C –+60°C/
-4°F –140°F
Page 18
11. Recycling Information
Note on environmental protection:
After the implementation of the European Directive 2012/19/EU and 2006/66/EU
in the national legal system, the following applies: Electric and electronic devices
as well as batteries must not be disposed of with household waste. Consumers are
obliged by law to return electrical and electronic devices as well asbatteries at the
end of their service lives to the public collecting points set up for this purposeor
point of sale. Details to this aredened bythe national law of the respective country.This
symbol on the product, the instruction manual or the package indicates that aproduct is
subject to these regulations. By recycling, reusing the materials or other forms of utilising old
devices/batteries, you aremaking an important contribution to protecting our environment.
12. Declaration of Conformity
Hereby,Hama GmbH &CoKGdeclares that the radio equipment type [00123125]
is in compliance with Directive 2014/53/EU.The fulltext of the EU declaration of
conformity is available at the following internet address:
www.hama.com->00123125->Downloads.
Frequency band(s) 433 MHz
Maximum radio-frequency
power transmitted
0,021 mW
17
Page 19

D Bedienungsanleitung
Bedienungselemente und Anzeigen
ABasisstation
1. Luftdrucktendenz
2. Wettervorhersagesymbol
3. Funksymbol Messstation
4. Kanalanzeige
5. Außentemperaturtendenz
6. Außentemperatur
7. Raumtemperaturtendenz
8. Raumtemperatur
9. Uhrzeit /Datum
10. Alarmsymbol
11. Wochentag /Sekunde
12. Funksymbol
13. Zeitzone
14. Raumluftfeuchtigkeit
15. Raumluftfeuchtigkeitstendenz
16. Außenluftfeuchtigkeit
17. Außenluftfeuchtigkeitstendenz
-Taste =Erhöhung des aktuellen Einstellungswertes /Aktivierung/ Deaktivierung
18.
manueller Funksignal-Empfang /Wechsel zwischen TIME- und Temperatur-Modus
19. -Taste =Verringerung des aktuellen Einstellungswertes /Manuelle Suche nach Signal
von der Messstation /Wechsel zwischen TIME- und Temperatur-Modus
20. mode-Taste =Einstellungen /Bestätigung des Einstellungswerts /Wechsel zwischen
Sekunden-, Wochentag- und Zeitzonenanzeige /Wechsel zwischen °Cund °F
21. alarm-Taste =Anzeige /Einstellung Alarm-Modi
22. channel-Taste =Kanalauswahl
23. mem-Taste =Abruf/ Reset der gespeicherten Höchst-/Tiefstwerte
24. Batteriefach
BMessstation
25. Batteriefach
26. Montageplatte
27. Aussparung für senkrechte Befestigung
28. Aussparung für waagerechte Befestigung
29. Clips
18
Page 20
Vielen Dank, dass Sie sich für ein Hama Produkt entschieden haben!
Nehmen Sie sich Zeit und lesen Sie die folgenden Anweisungen und Hinweise zunächst ganz
durch. Bewahren Sie diese Bedienungsanleitung anschließend an einem sicheren Ort auf,um
bei Bedarf darin nachschlagen zu können. Sollten Sie das Gerät veräußern, geben Sie diese
Bedienungsanleitung an den neuen Eigentümer weiter.
1. Erklärung von Warnsymbolen und Hinweisen
Warnung
Wirdverwendet, um Sicherheitshinweise zu kennzeichnen oder um Aufmerksamkeit
auf besondereGefahren und Risiken zu lenken.
Hinweis
Wirdverwendet, um zusätzlich Informationen oder wichtige Hinweise zu
kennzeichnen.
2. Packungsinhalt
• Wetterstation EWS-860
(Basisstation für den Innenbereich /Messstation für den Außenbereich)
• Standfuß
• 4AAA Batterien
• diese Bedienungsanleitung
3. Sicherheitshinweise
• Das Produkt ist für den privaten, nicht-gewerblichen Haushaltsgebrauch vorgesehen.
• Betreiben Sie das Produkt nicht außerhalbseiner in den technischen Daten angegebenen
Leistungsgrenzen.
• Verwenden Sie das Produkt nicht in einer feuchten Umgebungund vermeiden Sie
Spritzwasser.
• Betreiben Sie das Produkt nicht in unmittelbarer Nähe der Heizung, anderer Hitzequellen
oder in direkter Sonneneinstrahlung.
• Benutzen Sie das Produkt nicht in Bereichen, in denen elektronische Produkte nicht erlaubt
sind.
19
Page 21
• Positionieren Sie das Produkt nicht inder Nähe von Störfeldern, Metallrahmen, Computern
und Fernsehern etc. Elektronische Geräte sowie Fensterrahmen beeinträchtigen die
Funktion des Produktes negativ.
• Lassen Sie das Produkt nicht fallen undsetzen Sie es keinen heftigen Erschütterungen aus.
• Öffnen Sie das Produkt nicht und betreiben Sie es bei Beschädigungen nichtweiter.
• Versuchen Sie nicht, dasProdukt selbst zu warten oder zu reparieren. Überlassen Sie
jegliche Wartungsarbeit dem zuständigen Fachpersonal.
• Halten Sie Kinder unbedingt von demVerpackungsmaterial fern, es besteht
Erstickungsgefahr.
• Entsorgen Sie das Verpackungsmaterial sofortgemäß den örtlich gültigen
Entsorgungsvorschriften.
• Nehmen Sie keine Veränderungen am Produkt vor.Dadurch verlieren sie jegliche
Gewährleistungsansprüche.
Warnung -Batterien
• Entfernen und entsorgen Sie verbrauchte Batterien unverzüglich aus dem Produkt.
• Verwenden Sie ausschließlich Akkus(oder Batterien), die dem angegebenen Ty p
entsprechen.
• Mischen Sie alte und neue Batteriennicht, sowie Batterien unterschiedlichen Ty ps oder
Herstellers.
• Beachten Sie unbedingt die korrekte Polarität (Beschriftung +und -) der Batterien
und legen Sie diese entsprechend ein. Bei Nichtbeachtung besteht dieGefahr des
Auslaufens oder einer Explosion der Batterien.
• Laden Sie Batterien nicht.
• Bewahren Sie Batterien außerhalb der Reichweite von Kindern auf.
• Schließen Sie Akkus/Batterien nicht kurz undhalten Sie sie von blanken
Metallgegenständen fern.
4. Inbetriebnahme
4.1. Messstation
• Öffnen Sie das Batteriefach (25) undlegen Sie zwei AAA Batterien polrichtig ein. Schließen
Sie die Batteriefachabdeckung anschließend.
20
Page 22
Hinweis
Beachten Sie, dass Sie bei der Inbetriebnahme immer zuerst die Batterien in die
Messstation, und dann in die Basisstation einlegen.
4.2. Basisstation
• Öffnen Sie das Batteriefach (24) undlegen Sie zwei AAA Batterien polrichtig ein. Schließen
Sie die Batteriefachabdeckung anschließend.
5. Montage
Hinweis –Montage
• Es wirdempfohlen, die Basis- und Messstation zunächstan den gewünschten
Aufstellorten ohne Montage zu platzieren und alle Einstellungen -wie in 6. Betrieb
beschrieben –vorzunehmen.
• Montieren Sieerstnachkorrekter Einstellungund stabiler Funkverbindungdie Station/en.
Hinweis
• Die Reichweite der Funkübertragung zwischen derMess- und Basisstation beträgt im
freien Gelände bis zu 30m.
• Achten Sie vor der Montagedarauf,dass die Funkübertragung nicht durch Störsignale
oder Hindernisse wie Gebäude, Bäume, Fahrzeuge, Hochspannungsleitungen, u.a.
beeinusst wird.
• Stellen Sie vor der endgültigenMontage sicher,dass zwischen den gewünschten
Aufstellorten ausreichender Empfang besteht.
• Achten Sie bei der Montageder Messstation darauf,dass diese vor direkter Sonne und
Regen geschützt positioniert ist.
• Die internationale Standardhöhe für die Messungder Lufttemperatur beträgt 1,25 m
(4 ft) über Grund.
21
Page 23
Warnung
• Besorgen Sie sich spezielles bzw.geeignetes Montagematerial im Fachhandel für die
Montage an der vorgesehenen Wand.
• Stellen Sie sicher,dass keine fehlerhaften oder beschädigtenTeile montiert werden.
• Wenden Sie bei der Montageniemals Gewalt oder hohe Kräfte an. Diese können das
Produkt beschädigen.
• Prüfen Sie vor Montage die Eignungder vorgesehenen Wand für das anzubringende
Gewicht und vergewissern Sie sich, dass sich an der Montagestelle in der Wand keine
elektrischen Leitungen, Wasser-, Gas- oder sonstige Leitungen benden.
5.1. Basisstation
• Stellen Sie die Basisstation mithilfedes Standfußes auf einer ebenen Fläche auf.(C)
5.2. Messstation
• Sie können die Messstation mithilfe derMontageplatte (26) waagerecht oder senkrecht an
einer Außenwand befestigen.
• Für eine waagerechte Anbringung der Messstation befestigenSie die Montageplatte (26)
an der mittigen Aussparung (28) mit Dübel, Schraube, etc. in der dafür vorgesehenen
Wand.
• Für eine senkrechte Anbringung der Messstation befestigenSie die Dübel, Schraube,
Nagel, etc. in der dafür vorgesehenen Wand undhängen die Montageplatte (26) mit der
Aussparung (27) daran ein.
• Drücken Sie die Messstation mit leichtemDruck bis zum deutlichen Einrasten („Klick“) in
die Clips (29) ein.
6. Betrieb
Hinweis –Eingabe
Halten Sie die -Taste (18) oder die -Taste (19) gedrückt, um dieWerte schneller
auswählen zu können.
6.1. Verbindung zur Messstation
• Nach dem Einlegen der Batterien suchtdie Basisstation automatisch nach einer
Verbindung zur Messstation und führt die Ersteinrichtung durch.
22
Page 24
Hinweis
• Die Ersteinrichtung dauert ca. 3Minuten.
• Während dem Verbindungsversuch blinkt dasFunksymbol Messstation (3) auf.
• Vermeiden Sie in dieserZeit jegliche Betätigung der Ta sten! Andernfalls können Fehler
und Ungenauigkeiten bei den Werten und deren Übertragung entstehen.
• Der Vorgang ist beendet, sobald dieMessdaten für Innen- (8, 14) und Außenbereich (6,
16) angezeigt werden.
• Wirdwiederholt kein Signal von der Messstation empfangen,drücken und halten Sie die
-Taste (19) für ca. 3Sekunden, um die manuelleSuche nach dem Signal zu starten.
Anzeige Suche nach Signal von der Messstation
Blinkende Anzeige
Dauerhafte Anzeige
Dauerhafte Anzeige
Erfolgreich –Signal wirdempfangen
Inaktiv –Kein Signalempfang seit >1Stunde
Aktiv
6.2. Kanalauswahl/ Weitere Messstationen
Hinweis
• Sie können zusätzlich zu der mitgeliefertenMessstation zwei weitereMessstationen
installieren. Achten Sie hierbei auf die identische Kanaleinstellung an Basis- und
jeweiliger Messstation.
Passende Messstationen nden Sie unter www.hama.com
• Der Sendekanal der mitgelieferten Messstation lässtsich nicht verändern/einstellen
(CH1).
• Drücken Sie wiederholt die channel-Taste (22), umdenselben Kanal wie an der jeweiligen
Messstation einzustellen. Es wird CH1, CH2 oder CH3 (4) angezeigt.
23
Page 25
• Wählen Sie CH1 für den Fall, dass Sie nur die mitgelieferte Messstation verwenden.
• Die Basisstation zeigt nun die gemessenenDaten (6, 16) der ausgewählten Messstation
(4) an.
• Drücken und halten Sie die channel-Taste (22) gedrückt, umden Kanaldurchlauf
auszuwählen. Das Symbol sowie die Messwerte der einzelnen Messstationen/ Kanäle
(4) werden nacheinander für jeweils 5Sekunden angezeigt.
6.3. Grundeinstellungen und manuelle Einstellungen
Automatische Einstellung nach DCF-Signal
Nach dem ersten Einschalten der Basisstation und erfolgreicher Übertragung zwischen Basisund Messstation, beginnt die Uhr automatisch die Suche nach einem DCF-Signal. Während
des Suchvorgangs blinkt das Funksymbol (12) auf.
Anzeige Suche nach DCF-Signal
/
Blinkende Anzeige
Dauerhafte Anzeige
Keine Anzeige
Keine Anzeige
• Wirdwiederholt kein Signal empfangen, drücken und haltenSie die ▲–Taste (18) für ca. 3
Sekunden, um die manuelle Suche nach dem DCF-Signal zu starten. Das Funksymbol (12)
beginnt zu blinken.
24
Inaktiv –Kein Signalempfang in den letzten
Erfolgreich –Signal wirdempfangen
Aktiv
24 Stunden
Erfolgreich –starkes Signal
Page 26

Hinweis –Uhrzeiteinstellung
• Der Suchvorgang dauert etwa 3-10 Minuten. Falls dieser fehlschlägt, wirddie Suche
beendet und zur nächsten vollen Stunde wiederholt.
• Sie können währenddessen eine manuelle Einstellung von Uhrzeit und Datum
vornehmen.
• Die Uhr sucht automatisch weiterhin täglich(00:00, 03:00, 06:00, 12:00 Uhr) nach
dem DCF-Signal. Bei erfolgreichem Signalempfang werden die manuell eingestellte
Uhrzeit und das Datum überschrieben.
• Drücken und halten Sie die ▲–Taste (18) erneut für ca. 3Sekunden, um den manuellen
Suchvorgang zu beenden.
Manuelle Einstellung Datum/ Uhrzeit
Hinweis –TIME-Modus
• Drücken Sie wiederholt die -Taste (18) oderdie -Taste (19), bis im Anzeigenfenster
das Symbol zu blinken beginnt.
Hinweis –Uhrzeit und Zeitzone
• Drücken Sie im TIME-Modus wiederholt diemode-Taste (20), um zwischen den
verschiedenen Anzeigen zu wechseln:
• Uhrzeit mit Sekundenanzeige, Uhrzeit mit Wochentaganzeige, zeitzonenversetzte
Uhrzeit mit Wochentaganzeige, zeitzonenversetzte Uhrzeit mit Sekundenanzeige, Datum
• Bei der zeitzonenversetzten Uhrzeit wirddas Symbol Zeitzone (13) angezeigt.
• Drücken und halten Sie die -Taste (18) für ca. 3Sekunden, um den Suchvorgang nach
dem DCF-Signal zu beenden. Das Funksymbol (12) erlischt und Sie können die Uhrzeit
manuell einstellen.
• Drücken Sie im TIME-Modus wiederholt diemode-Taste (20), bis das Symbol Zeitzone (13)
nicht mehr angezeigt wird.
• Drücken und halten Sie die mode-Taste (20) für ca. 3Sekunden, um folgende
Einstellungen nacheinander vorzunehmen:
25
Page 27
•Wochentag (11)
•Jahr (9)
•Monat (9)
•Tag (9)
•Anzeige D/M –M/D (9)
•12/24-Stunden-Format (9)
•Stunden (9)
•Minuten (9)
• Drücken Sie zum Auswählen der einzelnenWerte die -Taste (18) oder die -Taste (19)
und bestätigen Sie die jeweilige Auswahl durch Drücken der mode-Taste (20).
• Erfolgt 2Minuten keine Eingabe, wirdder Einstellungsmodus automatisch verlassen.
Hinweis –Wochentag
Sie können für die Wochentaganzeige die Sprachen Deutsch (DE), Englisch (En),
Schwedisch (SW), Niederländisch (Du), Italienisch (IT), Spanisch (SP)oder Französisch
(Fr) wählen.
Einstellung Zeitzone
Hinweis –Zeitzone
• Das DCF-Signal kann weitläug empfangen werden, entspricht jedoch immer der MEZ,
die in Deutschland gilt. Beachten Sie daher,dass Sie in Ländern mit anderer Zeitzone
die Zeitverschiebung beachten.
• Benden Sie sich in Moskau, istes dort bereits 3Stunden später als in Deutschland.
Stellen Sie daher bei der Zeitzone +3 ein. Die Uhr stellt sich dann immernach Empfang
des DCF-Signals bzw.inBezug auf die manuell eingestellte Uhrzeit automatisch3
Stunden weiter.
• Drücken Sie im TIME-Modus wiederholt diemode-Taste (20), bis das Symbol Zeitzone (13)
angezeigt wird.
• Drücken und halten Sie die mode-Taste (20) für ca. 3Sekunden, um die gewünschte
Zeitverschiebung einzustellen.
• Drücken Sie zum Auswählen der einzelnenWerte die
und bestätigen Sie die jeweilige Auswahl durch Drücken der mode-Taste (20).
• Erfolgt 2Minuten keine Eingabe, wirdder Einstellungsmodus automatisch verlassen.
-Taste (18) oder die -Taste (19)
26
Page 28
Wecker
• Drücken Sie im TIME-Modus wiederholt diealarm-Taste (21), um die verschiedenen
Alarme anzuzeigen.
Es werden die jeweiligen Alarmsymbole (10) / / und die entsprechende
Weckzeit/ Zeitintervall bzw. OFF angezeigt.
• Drücken und halten Sie die alarm-Taste (21) für ca. 3Sekunden, um die Weckzeit des
angezeigten Alarms einzustellen. Die Stundenanzeige/ das Zeitintervall beginnt zu blinken.
• Drücken Sie die -Taste (18) oder die -Taste (19), um die Stunden der Weckzeit/ das
Zeitintervall auszuwählen und bestätigen Sie die Auswahl durch Drücken deralarm-Taste
(21).
Die Minutenanzeige beginnt zu blinken.
Der vorzeitige Alarm ist bereits nach Bestätigung des Zeitintervalls aktiviert.
• Wiederholen Sie diesen Vorgang für die Minuten der Weckzeit.
• Drücken Sie wiederholt die alarm-Taste (21), umden anderen Alarmmodus ebenfalls
einzustellen oder zurück zur Anzeige der Uhrzeit (9) zu gelangen.
• Erfolgt 2Minuten keine Eingabe, wirdder Einstellungsmodus automatisch verlassen.
Hinweis –Wecker
• Der Alarm an Werktagen löst–wenn aktiviert –nur an Wochentagen (Montag bis
Freitag) ein Wecksignal aus. Ist dieser Alarm aktiv,wirddas Alarmsymbol (10)
angezeigt.
• Der einmalige Alarm löst –wenn aktiviert –nur einmalig einWecksignal aus. Ist dieser
Alarm aktiv,wirddas Alarmsymbol (10) angezeigt. Nach erfolgtemWecksignal
wirddieser Alarm automatisch deaktiviert.
• Der vorzeitige Alarm löst –wenn aktiviert und Außentemperatur <0°C/ 32°F–15,
30, 45, 60 oder 90 Minuten vor dem eigentlichen Alarm ( und/ oder )ein
Wecksignal aus. Ist dieser Alarm aktiv,wirddas Alarmsymbol (10) angezeigt.
• Drücken Sie während der jeweiligen Anzeige die -Taste(18) oder die -Taste (19), um
den jeweiligen Alarm zu aktivieren/ deaktivieren.
Das Alarmsymbol (10) wirdangezeigt/ nicht angezeigt.
Hinweis –Vorzeitiger Alarm
Der vorzeigte Wecksignal kann nur dann aktiviert werden, wenn mindestens eine der
beiden Weckfunktionen (
/ )bereits aktiviert ist.
27
Page 29
• Wirdder Wecker entsprechend ausgelöst, beginnt das Alarmsymbol (10) zu blinken und ein
Wecksignal ertönt.
• Drücken Sie die alarm-Taste (21), um denAlarm zu beenden. Andernfalls endet dieser
automatisch nach 2Minuten.
6.4. Wetter
Hinweis –Temperatur-Modus
• Drücken Sie wiederholt die -Taste (18) oderdie -Taste (19), bis im Anzeigenfenster
das Symbol zu blinken beginnt.
Celsius /Fahrenheit
• Drücken und halten Sie im Temperatur-Modus die mode-Taste (20) für ca. 3Sekunden, um
bei der Temperaturanzeige zwischen °C und °Fzu wechseln.
Wettervorhersage
• Anhand von atmosphärischen Luftdruckveränderungen undder gespeicherten Daten kann
die Basisstation Angaben zu der Wetteraussicht für die kommenden 12 bis 24 Stunden
machen.
Hinweis –Wettervorhersage
• In den ersten Stunden desBetriebs ist die Wettervorhersage aufgrund von fehlenden
Daten, die erst im Laufe des Betriebs abgespeichert werden, nicht möglich.
• Die Wettervorhersage und das aktuelleWetter werden durch verschiedene Symbole (2)
dargestellt:
Symbol (2) Wetter
Sonne
Leichte Bewölkung
28
Page 30
Bewölkung
Regen
Starker Regen
Schneefall
Starker Schneefall
• Die Wetterstation gibt für Außentemperatur/ -luftfeuchtigkeit (5/17), Raumtemperatur/
-luftfeuchtigkeit (7/15) und Luftdruck (1) eine Te ndenz an, wie sich diese Werte
wahrscheinlich für die nächsten Stunden entwickeln werden.
Anzeige Tendenz
Steigend
Beständig
Fallend
6.5. Höchst- und Tiefstwerte der Temperatur
Die Basisstation speichert die Höchst- und Tiefstwerte der Te mperatur sowie der
Luftfeuchtigkeit im Außen- und Raumbereich automatisch ab.
• Drücken Sie im Te mperatur-Modus wiederholt die mem-Taste (23), um zwischen der
Anzeige von aktueller Temperatur,niedrigster Te mperatur (MIN) und höchster Temperatur
(MAX) zu wechseln.
• Drücken und halten Sie die mem-Taste (23) für ca. 3Sekunden, um die abgespeicherten
Höchst- und Tiefstwerte zurückzusetzen.
29
Page 31

6.6. Alarm Außentemperatur
• Drücken Sie wiederholt die channel-Taste (22), umden Kanal (4) der Messstation
auszuwählen, für deren Werte Sie einen Alarm einstellen möchten.
• Drücken Sie im Te mperatur-Modus wiederholt die alarm-Taste (21), um die Alarme
Außentemperatur / anzuzeigen.
• Drücken und halten Sie die alarm-Taste (21) für ca. 3Sekunden, bis die
Außentemperaturanzeige (6) zublinken beginnt.
• Drücken Sie die -Taste (18) oder die -Taste (19), um den angezeigten Grenzwert
einzustellen und bestätigen Sie die Auswahl durch Drücken der alarm-Taste (21).
• Drücken Sie während der Anzeige des oberen bzw.unteren Grenzwerts die -Taste
(18) oder die -Taste (19), um den Temperaturwert oder OFF auszuwählen und bestätigen
Sie die Auswahl durch Drücken der alarm-Taste (21).
Wählen Sie den Temperaturwert/ OFF,umden Alarm Außentemperatur zu aktivieren/
deaktivieren.
• Erreicht die Außentemperatur einen der Grenzwerte, wirdder Alarm entsprechend
ausgelöst.
Das Symbol und die Außentemperatur beginnen zu blinken und ein Alarmsignal ertönt.
Drücken Sie die alarm-Taste (21), um den Alarm zu beenden. Andernfalls endet dieser
automatisch nach 2Minuten.
Hinweis –Alarm Außentemperatur
• Sie können für jeden Kanal bzw.verbundene Messstation einen unteren und oberen
Grenzwert festlegen und den Alarm aktivieren.
• Beachten Sie, dass der untereGrenzwert mind. 1°C/ 1°F unter dem oberen Grenzwert
liegen muss.
6.7. Wohlfühlbereich
Die Basisstation zeigt folgende Wohlfühlbereiche, basierend auf dem Verhältnis von aktueller
Raumtemperatur und –luftfeuchtigkeit, an: (123129)
30
Anzeige
COMFORT
Temperaturbereich Luftfeuchtigkeitsbereich Wohlfühlbereich
20°C –25°C
68°F –77°F
40% –70%
–angenehm–
ideale Temperatur
undLuftfeuchtigkeit
Page 32

WET
DRY
-
-5°C –50°C
23°F –122°F
-5°C –50°C
23°F –122°F
<20°C />25°C
<68°F />77°C
>70%
<40%
40% -70% –KeinIndikator –
–feucht–
zu hohe
Luftfeuchtigkeit
–trocken –
zu trockene
Umgebungsluft
6.8.Niedrige Batteriekapazität
Sobald das Batteriesymbol auf dem Display der Basisstation angezeigt wird, ist die
Kapazität der Batterien in der Basis-/ Messstation sehr gering. Wechseln Sie die Batterien
umgehend aus.
Hinweis –Batteriewechsel
• Beachten Sie, dass Sie nach jedemBatteriewechsel an Mess- oder Basisstation eine
neue Synchronisation der Stationen erfolgen muss.
• Nehmen Sie dazu die Batterien deranderen Station heraus und setzen Sie erneut ein
oder wechseln Sie diese bei Bedarf ebenfalls aus.
7. Wartung und Pflege
Reinigen Sie dieses Produkt nur mit einem fusselfreien, leicht feuchten Tuch und verwenden
Sie keine aggressiven Reiniger.
8. Haftungsausschluss
Die Hama GmbH &CoKGübernimmt keinerlei Haftung oder Gewährleistung für Schäden,
die aus unsachgemäßer Installation, Montage und unsachgemäßem Gebrauch des Produktes
oder einer Nichtbeachtung der Bedienungsanleitung und/oder der Sicherheitshinweise
resultieren.
9. Service und Support
Bitte wenden Sie sich bei Fragen zum Produkt gerne an die Hama-Produktberatung.
Hotline: +49 9091 502-115 (Deu/Eng)
WeitereSupportinformationen nden sie hier: www.hama.com
31
Page 33

10. Technische Daten
Basisstation Messstation
Stromversorgung
Stromaufnahme <2,5 mA <1,0 mA
3,0 V
2xAAA Batterie
2xAAA Batterie
3,0 V
Messbereich
Temperatur
Messschritte
Temperatur
Messzyklus
Temperatur
Luftfeuchtigkeit 25%–95%30% –80%
DCF-Funkuhr Ja Nein
Frequenz 433 MHz
Reichweite ≤30m
32
0°C –+50°C/
32°F –122°F
0,1°C /0,2°F 0,1°C /0,2°F
~45s ~45s
-20°C –+60°C/
-4°F –140°F
Page 34

11. Entsorgungshinweise
Hinweis zum Umweltschutz:
Ab dem Zeitpunkt der Umsetzung der europäischen Richtlinien 2012/19/EU und
2006/66/EG in nationales Recht gilt folgendes: Elektrische und elektronische
Geräte sowie Batterien dürfen nicht mit dem Hausmüll entsorgt werden. Der
Verbraucher ist gesetzlich verpichtet, elektrische und elektronische Geräte sowie
Batterien am Ende ihrer Lebensdauer an den dafür eingerichteten, öffentlichen
Sammelstellen oder an die Verkaufsstelle zurückzugeben. Einzelheiten dazu regelt das
jeweilige Landesrecht. Das Symbol auf dem Produkt, der Gebrauchsanleitung oder der
Verpackung weist auf diese Bestimmungen hin. Mit der Wiederverwertung, der stoichen
Verwertung oder anderen Formen der Verwertung von Altgeräten/Batterien leisten Sie einen
wichtigen Beitrag zum Schutz unserer Umwelt.
12. Konformitätserklärung
Hiermit erklärt die Hama GmbH &CoKG, dass der Funkanlagentyp [00123125] der
Richtlinie 2014/53/EU entspricht. Der vollständige Text der EU-
Konformitätserklärung ist unter der folgenden Internetadresse verfügbar:
www.hama.com->00123125->Downloads.
Frequenzband/Frequenzbänder 433 MHz
Abgestrahlte maximale Sendeleistung 0,021 mW
33
Page 35

F Mode d‘emploi
Éléments de commande et d'affichage
AStation de base
1. Tendance de la pression atmosphérique
2. Icône de prévisions météorologiques
3. Icône radio (station de mesure)
4. Achage du canal
5. Tendance de la températureextérieure
6. Températureextérieure
7. Tendance de la températureambiante
8. Températureambiante
9. Heure/date
10. Icône alarme
11. Jour de la semaine /seconde
12. Icône radio
13. Fuseau horaire
14. Humidité de l’air ambiant
15. Tendance de l’humidité de l’air ambiant
16. Humidité de l‘air extérieur
17. Tendance de l’humidité de l’air extérieur
18. Touche
19. Touche =diminution de la valeur en cours de réglage /recherche manuelle du signal
20. Touche mode =réglage /conrmation de la valeur en cours de réglage /commutation
21. Touche alarm =achage /réglage des modes d’alarme
22. Touche channel =sélection du canal
23. Touche mem =consultation /réinitialisation des valeurs maximales -minimales en
24. Compartiment àpiles
BStation de mesure
25. Compartiment àpiles
26. Plaque de montage
27. Encoche pour une installation verticale
28. Encoche pour une installation horizontale
29. Clips
=augmentation de la valeur en cours de réglage/désactivation de la réception
manuelle du signal radio /Commutation entremode TIME et mode température
provenant de la station de mesure/Commutation entremode TIME et mode température
entrel’achage des secondes, du jour de la semaineet du fuseau horaire/Commutation
entreachage °C et °F
mémoire
34
Page 36

Nous vous remercions d’avoir choisi un produit Hama.
Veuillez prendreletemps de lirel‘ensemble des remarques et consignes suivantes. Veuillez
conserver ce mode d‘emploi àportée de mainan de pouvoir le consulter en cas de besoin.
Transmettez-le au nouveau propriétaireavec l’appareil le caséchéant.
1. Explication des symboles d‘avertissement et des remarques
Avertissement
Ce symbole est utilisé pour indiquer des consignes de sécurité ou pour attirer votre
attention sur des dangers et risques particuliers.
Remarque
Ce symbole est utilisé pour indiquer des informations supplémentaires ou des remarques
importantes.
2. Contenu de l'emballage
• Station météo EWS-860
(station de base pour l‘intérieur /station demesurepour l‘extérieur)
• Pied
• 4piles AAA
• Mode d‘emploi
3. Consignes de sécurité
• Ce produit est destiné àune installation domestique non commerciale.
• N'utilisez pas le produit en dehors deslimites de puissance indiquées dans les
caractéristiques techniques.
• N'utilisez pas le produit dans un environnement humide et évitez toute projection
d'eau.
• Évitez d’utiliser le produit àproximité immédiate d'un chauffage, d’autres sources de
chaleur ou exposé aux rayons directs du soleil.
• N'utilisez pas le produit dans les zonesdans lesquelles l'utilisation d'appareils
électroniques est interdite.
• Ne placez pas le produit àproximité de champs parasites, de cadres métalliques,
d’ordinateurs, de téléviseurs, etc. Les appareils électroniques ainsi que les cadres de fenêtre
ont une inuence négative sur le fonctionnement du produit.
35
Page 37

• Protégez le produit des secousses violentes et évitez tout choc ou toute chute.
• Ne tentez pas d'ouvrir le produit en cas de détérioration et cessezde l’utiliser.
• Ne tentez pas de réparer l’appareil vous-même ni d’effectuer des travaux d’entretien.
Déléguez tous travaux d'entretien àdes techniciens qualiés.
Tenez les emballages d'appareils hors deportée des enfants, risque d'étouffement.
• Recyclez les matériaux d’emballage conformément auxprescriptions locales en
vigueur.
• N’apportez aucune modication àl’appareil. Des modications vous feraient perdre
vos droits de garantie.
Avertissement concernant les piles
• Retirez les piles usagées immédiatement du produit pour les recycler.
• Utilisez exclusivement des batteries (ou despiles) du type indiqué.
• N’utilisez pas simultanément des piles usagéeset des piles neuves ou des piles de
différents types.
• Respectez impérativement la polarité de la pile (marquage +et-)lors de l'insertion
dans le boîtier ;risques d'écoulement et d'explosiondes piles si tel n'est pas le cas.
• Ne tentez pas de recharger les piles.
• Conservez les piles hors de portéedes enfants.
• Ne court-circuitez pas les batteries/piles et éloignez-les des objets métalliques.
4. Mise en service
4.1. Station de mesure
• Ouvrez le compartiment àpiles (25) et insérez deux piles AAA conformément aux
indications de polarité.
• Refermez le couvercle du compartiment.
Remarque
Lors de la premièremise en service, veuillez premièrement insérer les piles dans lastation
de mesure, puis dans la station de base.
4.2. Station de base
• Ouvrez le compartiment àpiles (24) et insérez deux piles AAA conformément aux
indications de polarité. Refermez le couvercle du compartiment.
36
Page 38

5. Installation
Remarque concernant l‘installation
• Nous vous recommandons de positionnerla station de base et la station de mesure
dans les endroits envisagés sans effectuer le montage, puis d‘effectuer les réglages tels
que décrits au chapitre 6.(fonctionnement des stations).
• Procédez ensuite àl‘installation desstations après avoir effectué le réglage et reçu une
connexion radio stable.
Remarque
• La portée de la transmission radio entrelastation de base etla station de mesureest
de 30 mdans un espace dégagé.
• Veuillez contrôler,avant l‘installation, que la portéeradio ne soit pas altérée par des
interférences ou des obstacles tels que bâtiments, arbres, véhicules, lignes haute
tension, etc.
• Veuillez contrôler,avant l‘installation dénitive, la bonnequalité de la transmission
entreles deux stations.
• Veuillez également protéger les stationsde l‘ensoleillement direct et de la pluie lorsde
l‘installation.
• La hauteur standardinternationale de mesuredela températuredel‘air est de 1,25 m
(4 ft) au-dessus du sol.
Avertissement
• En vue de l‘installation, procurez-vous le matériel d‘installation adéquat pourle mur
concerné dans un commerce spécialisé.
• Veuillez contrôler que l‘emballagene contienne aucune pièce erronée ni endommagée.
• N‘appliquezen aucun cas une force excessive lors de l‘installation. Une force excessive
est susceptible d‘endommager le produit.
• Avant l‘installation, vériez que lemur prévu pour recevoir le produit dispose d‘une
force portante susante et qu‘aucune conduite d‘électricité, d‘eau, de gaz ni aucune
autreconduite ne passe dans cette partie de lacloison.
37
Page 39

5.1. Station de base
• Placez la station de base surune surface plane àl‘aide de son pied. (C)
5.2 Station de mesure
• Vous pouvez installer lastation de mesureàune paroi extérieureàlaverticale ou à
l’horizontale àl'aide de la plaque de montage(26).
• Pour une installation dela station de mesureàl’horizontale, utilisez l’encoche (26) pour
xer la plaque de montage (28) àl’endroit prévu àl’aide d’une cheville, d’une vis, etc.
• Pour une installation dela station de mesureàlaverticale, xez une cheville, une vis, un
clou, etc. àl’endroit prévu, puis utilisez l’encoche(26) an de suspendrelaplaque de
montage (27).
• Exercez une légèrepression sur la station demesurejusqu'à ce que vous entendiez un
déclic de xation dans les clips (29).
6. Fonctionnement
Remarque concernant la saisie
Appuyez et maintenez enfoncé le bouton (18) ou sur la touche enfoncée (19) pour
sélectionner les valeurs plus rapidement.
6.1. Connexion vers la station de mesure
• La station de base recherche automatiquement une connexion àlastation de mesureet
effectue la premièreconguration après avoir inséré les piles.
Remarque
• La premièreconguration dureenviron 3minutes.
• L‘icône radio de la station de mesure(3) clignote pendant la tentative de connexion.
• N‘appuyezsur aucune touche pendant cette phase ;des erreurs ou des inexactitudes de
mesureoudetransmission pourraient en résulter.
• La conguration est terminée dès que les valeurs mesurées pour la zone intérieure
(8, 14) et pour la zone extérieure(6, 16)apparaissent àl‘écran.
• En cas de nouvel échec deréception, appuyez sur la touche (19) pendant environ
3secondes an de lancer une recherche manuelle du signal horaire.
38
Page 40

Achage
Achage clignotant
Recherche du signal provenant de la station
de mesure
Recherche active
Achage permanent
Achage permanent
Recherche aboutie -signal en cours de réception
Inactif –aucune réception de signal depuis >
d’une heure
6.2. Sélection du canal /autres stations de mesure
Remarque
• Vous pouvez installer deuxstations de mesuresupplémentaires en plus de la station
fournie. Lors de l’installation de stations supplémentaires, veuillez utiliser les mêmes
réglages de canal de la station de base vers la station de mesure.
Vous trouverez des stations mesureadaptées sur www.hama.com
• Impossible de modier /régler le canal d’émission de la station de mesurelivrée (CH1).
• Appuyez plusieurs fois sur la touchechannel (22) an d’utiliser le même canal que celui
de la station de mesure. CH1, CH2 ou CH3 (4) apparaît àl’écran.
• Sélectionnez CH1 dans le cas oùvous désirez utiliser la station de mesurelivrée.
• La station de base ache lesdonnées de base (6, 16) provenant de lastation de mesure
sélectionnée (4).
• Appuyez sur la touche channel (22) et maintenez-la enfoncée an de lancer une recherche
des canaux. L’icône ainsi que les valeurs des différentes stations demesure/des
différents canaux (4) apparaissent successivement àl’écran pendant 5secondes.
6.3. Réglages de base et paramétrage manuel
Réglage automatique sur la base du signal horaire DCF
Après avoir mis la station de base sous tension et en cas de transmission correcte entre
la station de base et la station de mesure, l‘horloge recherche automatiquement lesignal
horaireDCF.L’icôneradio (12) clignote pendant la recherche du signal horaire.
39
Page 41

Achage Recherche du signal horaireDCF
/
Achage clignotant
Achage permanent
Achage permanent
Achagepermanent
• En cas de nouvel échec deréception, appuyez sur la touche (18) pendant environ 3
secondes an de lancer une recherche manuelle du signal horaireDCF.L’icôneradio (12)
se met àclignoter.
Remarque -paramètres de temps
• Cette recherche dureenviron 3-10 minutes. En cas d‘échec de détection du signal, le
réveil recommence àrechercher le signal àl‘heurepleine suivante.
• Vous pouvez également réglerl‘heureetladate manuellement.
• L’horloge continue àrechercher quotidiennement (00h00, 3h00, 6h00, 12h00) le signal
horaireDCF.Les réglages manuels de l'heureetdela date seront corrigés dès que la
station reçoit correctement le signal horaireDCF.
• Maintenez ànouveau la touche (18) enfoncée pendant environ 3secondes an
d’interromprelarecherche manuelle.
40
Inactif –aucune réception de signal lors des
Recherche active
dernière24heures
Recherche aboutie -signal en cours de
réception
Réception conforme –signal fort
Page 42

Réglage manuel de la date /del'heure
Remarque concernant le mode TIME
• Appuyez plusieurs fois sur la touche (18) ou sur la touche (19) jusqu’à ce que
l’icône se mette àclignoter àl’écran.
Remarque -unfuseau horaire
• En mode TIME, appuyez plusieurs foissur la touche mode (20) an de sélectionner un
des différents modes d’achage :
• Heureavec achage des secondes, heureavec achage des jours de la semaine, heure
en fonction des paramètres de fuseau horaireavec achage des jours de la semaine,
heureenfonction des paramètres de fuseau horaireavec achage des secondes, date
• L’icône fuseau horaire(13) apparaît àl’écran en cas d’achage de l’heureenfonction
des paramètres de fuseau horaire.
• Appuyez sur la touche (18) pendant environ 3secondes an d’interromprelarecherche
du signal DCF.L’icôneradio (12) s’éteint etvous pouvez régler l’heuremanuellement.
• En mode TIME, appuyez plusieurs foissur la touche mode (20), jusqu’à ce que l’icône
fuseau horaire(13) disparaisse de l’écran.
• Appuyez sur la touche mode (20) pendant environ 3secondes and'effectuer
successivement les réglages suivants :
•jour de la semaine (11)
•année (9)
•mois (9)
•jour (9)
•achage J/M –M/J (9)
•format horaire12/24 heures (9)
•heure(9)
•minutes (9)
• Appuyez sur la touche
valeurs, puis conrmez votresélection en appuyant sur latouche mode (20).
• Le mode de paramétrage s'interrompt automatiquement si vous n'appuyez sur aucune
touche pendant plus de 2secondes.
(18) ou la touche (19) an de sélectionner les différentes
41
Page 43

Remarque concernant l‘achage des jours de la semaine
Vous pouvez acher le jour de la semaine dans les langues suivantes :allemand (DE),
anglais (En), suédois (SW), néerlandais (Du), italien (IT), espagnol (SP) ou français (Fr).
Réglage du fuseau horaire
Remarque concernant les fuseaux horaires
• Il est possible de recevoir le signal horaireàgrande distance ;cesignal ne correspond
toutefois pas toujours àGMT +1,l‘heureenvigueur enAllemagne. Veuillez donc noter
qu‘un décalage horairedoit êtreadopté dans les payssitués dans un autrefuseau
horaire.
• Si vous vous trouvez, par exemple, àMoscou, ledécalage horaireentreMoscou et
l‘Allemagne est de 3heures (l‘heuredeMoscou est en avance). Réglez donc lefuseau
horairesur +3. L‘horloge s‘adapteraalors automatiquement àl‘heurecaptée par le
signal horaireDCF (ou àl‘heureréglée manuellement)et lui ajoutera3heures.
• En mode TIME, appuyez plusieurs foissur la touche mode (20), jusqu’à ce que l’icône
fuseau horaire(13) apparaisse àl’écran.
• Maintenez la touche mode (20) enfoncéependant environ 3secondes an de régler le
décalage horairesouhaité.
• Appuyez sur la touche
puis conrmez votresaisie àl’aide de la touche mode (20).
• Le mode de paramétrage s'interrompt automatiquement si vous n'appuyez sur aucune
touche pendant plus de 2secondes.
(18) ou sur la touche (19) an de régler les différentes valeurs,
Réveil
• En mode TIME, appuyez plusieurs foissur la touche alarm (21) an d’acher les
différentes alarmes.
Les icônes d’alarme concernés (10) / / et l’heurederéveil sélectionnée /
l’intervalle temps ou OFF apparaissent àl’écran.
• Appuyez sur la touche alarm (21) pendant environ 3secondes ande régler l’heurede
réveil de l’alarme sélectionnée. Les chiffres des secondes /l’intervalle temps se mettent à
clignoter.
• Appuyez sur la touche (18) ou sur la touche (19) an de sélectionner l'heurederéveil /
l’intervalle temps, puis conrmez votresélection en appuyant sur la touche alarm (21).
42
Page 44

• Les chiffres des minutes se mettent àclignoter.
L’alarme prématurée estactivée dès conrmation de l’intervalle temps.
• Répétez cette étape pour les minutesde l'heurederéveil.
• Appuyez plusieurs fois sur la touchealarm (21) an de régler également l’autremode
d’alarme ou retourner àl’achage de l’heure(9).
• Le mode de paramétrage s'interrompt automatiquement si vous n'appuyez sur aucune
touche pendant plus de 2secondes.
Remarque concernant le réveil
• Le mode alarme 1déclenche –lorsqu’il est activé –une sonnerie uniquement les jours
ouvrables (du lundi àvendredi). L’ icône alarme (10) apparaît àl’écran lorsque cette
alarme est activée.
• Le mode alarme unique déclenche –lorsqu’il estactivé –une sonnerie une seule fois.
L’icône alarme (10) apparaît àl’écran lorsque cettealarme est activée. Cette alarme
est automatiquement désactivée après la sonnerie.
• L’alarme prématurée déclenche –lorsqu’elle est activée –une sonnerie lorsque la
températureextérieure<0°C /32°F( et /ou )15, 30, 45,60 ou 90 minutes
avant la véritable alarme. L’ icône alarme (10) apparaît àl’écran lorsque cette
alarme est activée.
• Pendant l’achage de l’alarme, appuyez sur la touche
d’activer /désactiver le mode alarme concerné.
L'icône d'alarme (10) apparaît àl'écran (ou n'apparaît pas, le cas échéant).
Remarque concernant l’alarme prématurée
Vous ne pouvez activer l’alarme prématurée que lorsqu’au moins une des deux fonctions
d’alarme ( / )est activée.
• L'icône d'alarme (10) se met àclignoter et une alarme sonoreretentit lors du
déclenchement de l’alarme.
• Appuyez sur la touche alarm (21) an d'arrêter l'alarme. L'alarme s'arrête également
automatiquement au bout de 2minutes.
(18) ou sur la touche (19) an
43
Page 45

6.4. Météo
Remarque concernant le mode température
• Appuyez plusieurs fois sur la touche (18) ou sur la touche (19) jusqu’à ce que
l’icône se mette àclignoter àl’écran.
Degrés Celsius /Fahrenheit
• En mode température, maintenez la touche mode (20) enfoncée pendant env.3secondes
an de sélectionner l’achage en degrés °C ou °F.
Prévisions météorologiques
• La station de base peut acherdes prévisions météo pour les prochaines 12 à24heures
sur la base des variations de la pression atmosphérique et des données enmémoire.
Remarque concernant les prévisions météorologiques
• Dans les premières heures suivant la mise en service, la station n‘est pas capable
d‘acher de prévisions météo en raison du manque de données qui seront enregistrées
pendant le fonctionnement ultérieur de la station.
• Les prévisions météo ainsi que lesconditions météo actuelles sont achées àl‘aide de
icônes différents (2).
Icône (2) Météo
Ensoleillé
Légèrement nuageux
Nuageux
44
Page 46

Pluvieux
Très pluvieux
Chute de neige
Forte chute de neige
• La station météo indique une tendanced’évolution de la températureextérieure(5/17), de
la températureambiante (7/15) et de la pression atmosphérique (1) pour les prochaines
heures.
Achage Tendance
en hausse
stable
en baisse
6.5. Valeurs maximales et minimales de température
La station de base garde automatiquement en mémoireles valeurs minimales et maximales
de la températureetdel‘humidité de l‘air àl‘extérieur et àl‘intérieur.
• En mode température, appuyez plusieurs fois sur la touche mem (23) an de passer de
l’achage de la températureactuelle àl’achage de la températureminimale (MIN) ou
maximale (MAX).
• Appuyez sur la touche mem (23) pendant environ 3secondes ande réinitialiser les
valeurs maximales et minimales en mémoire.
45
Page 47

6.6. Alarme de température extérieure
• Appuyez plusieurs fois sur la touchechannel (22) an de sélectionner le canal (4) de la
station de mesurepour les valeurs de laquelle vousdésirez dénir une alarme.
• En mode température, appuyez plusieurs fois sur la touche alarm (21) an d’acher
l’alarme de températureextérieure / .
• Maintenez la touche alarm (21) enfoncéependant env.3secondes jusqu’à ce que la
températureextérieure(6) se mette àclignoter àl’écran.
• Appuyez sur la touche (18) ou sur la touche (19) an de régler lavaleur limite
achée, puis conrmez votresélection en appuyant sur latouche alarm (21).
• En mode d'achage de la valeurlimite inférieureoudela valeurlimite supérieure /
,utilisez la touche (18) ou la touche (19) an de régler la températureouOFF,puis
conrmez votresélection en appuyant sur la touche alarm(21).
• Sélectionnez la températuresélectionnée ou OFFan d’activer /désactiver l’alarme de
températureextérieure.
• L’alarme (de la limite inférieureousupérieure) se déclenche dès que la température
extérieureatteint une de ces valeurs limites.
L'icône et la températureextérieuresemettent àclignoter et l’alarme sonoreretentit
Appuyez sur la touche alarm (21) an d'arrêter l'alarme. L'alarme s'arrête également
automatiquement au bout de 2minutes.
Remarque concernant l’alarme de températureextérieure
• Vous pouvez dénir unelimite supérieureetune limiteinférieurepour chaque canal ou
pour chaque station connectée et activer la fonction d’alarme.
• Veuillez noter que lalimite inférieuredoit êtreaumoins 1°C/1°Fau-dessous de la
limite supérieure.
46
Page 48

6.7. Zone de confort
La station de base ache les zones de confort suivantes sur la base du rapport entrela
températureetl’humidité de l’air ambiantes actuelles :
Achage plagedetempératurePlage d'humidité Zone de confort
–agréable –
températureet
humidité de l’air
optimales
–humide –
humidité de l’air trop
élevée
–sec –
air ambiant trop sec
COMFORT
WET
DRY
-
20°C –25°C
68°F –77°F
-5°C –50°C
23°F –122°F
-5°C –50°C
23°F –122°F
<20°C />25°C
<68°F />77°C
40% –70%
>70%
<40%
40% -70% -Aucun indicateur -
6.8 Piles faibles
La capacité des piles de la station de base /delastation de mesureest très basse dès que
l’icône de pile apparaît àl’écran de lastation de base /demesure. Veuillez remplacer les
piles au plus vite.
Remarque -Remplacement de la pile
• Veuillez noter qu‘après chaque remplacement de piles de la station de base ou de la
station de mesure, vous devrez effectuer une nouvelle synchronisation der stations.
• Lors de cette synchronisation, extrayez également les piles de la station qui continuait à
fonctionner,puis réinsérez-les ou remplacez ces dernières.
7. Nettoyage et entretien
Nettoyez ce produit uniquement àl’aide d’un chiffon nonpelucheux légèrement humide ;
évitez tout détergent agressif.Veillez àcequ’aucun liquide ne pénètredans le produit.
47
Page 49

8. Exclusion de garantie
La société Hama GmbH &CoKGdécline toute responsabilité en cas dedommages provoqués
par une installation, un montage ou une utilisation du produit non conformes ouencore
provoqués par un non respect des consignes du mode d‘emploi et/ou desconsignes de sécurité.
9. Service et assistance
Pour toute question concernant le produit, veuillez vous adresser au service deconseil
produits de Hama.
Assistance :+49 9091 502-115 (all./angl.)
Vous trouverez ici de plus amples informations concernant le service d‘assistance :
www.hama.com
10. Caractéristiques techniques
Station de base Station de mesure
Alimentation électrique
Consommation de
courant
Plage de mesure
Température
Incréments de mesure
Température
Cycle de mesure
température/humidité
de l‘air
3,0 V
2piles AAA
<2,5 mA <1,0 mA
0°C –+50°C/
32°F –122°F
0,1°C /0,2°F 0,1°C /0,2°F
~45s ~45s
3,0 V
2piles AAA
-20°C –+60°C/
-4°F –140°F
Humiditédel‘air 25%–95%30% –80%
Horloge radio-pilotée
DCF
YesNo
Fréquence 433 MHz
Portée ≤30m
48
Page 50

11. Consignes de recyclage
Remarques concernant la protection de l’environnement:
Conformément àladirective européenne 2012/19/EU et 2006/66/CE, et an
d‘atteindreuncertain nombred‘objectifs en matièredeprotection de
l‘environnement, les règles suivantes doivent êtreappliquées: Les appareils
électriques et électroniques ainsi que les batteries ne doivent pas êtreéliminés
avec les déchets ménagers. Le pictogramme “picto” présent sur le produit, son
manuel d‘utilisation ou son emballage indique que le produit est soumis àcette
réglementation. Le consommateur doit retourner le produit/la batterie usager aux points de
collecte prévus àcet effet. Il peut aussile remettreàunrevendeur.Enpermettant ennle
recyclage des produits ainsi que les batteries, le consommateur contribueraàla protection de
notreenvironnement. C‘est un acte écologique.
12. Déclaration de conformité
Le soussigné, Hama GmbH &CoKG, déclareque l‘équipement radioélectrique du
type [00123125] est conforme àladirective 2014/53/UE. Le texte complet de la
déclaration UE de conformité est disponible àl‘adresse internet suivante:
www.hama.com->00123125->Downloads.
Bandes de fréquences 433 MHz
Puissance de radiofréquence maximale 0,021 mW
49
Page 51

E Instrucciones de uso
Elementos de manejo eindicadores
AEstación base
1. Tendencia de la presión atmosférica
2. Símbolo de pronóstico del tiempo
3. Símbolo de radiofrecuencia estación de medición
4. Visualización del canal
5. Tendencia de la temperaturaexterior
6. Temperaturaexterior
7. Tendencia de la temperaturaambiente
8. Temperaturaambiente
9. Hora/fecha
10. Símbolo de alarma
11. Día de la semana/segundo
12. Símbolo de radiofrecuencia
13. Zona horaria
14. Humedad ambiente
15. Tendencia de la humedad ambiente
16. Humedad exterior
17. Tendencia de la humedad exterior
=Aumento del valor de ajuste actual /activación/desactivación dela recepción
18. Tecla
manual de la señal de radiofrecuencia /Conmutación entreelmodo TIME yde
temperatura
19. Tecla =Disminución del valor de ajuste actual /búsqueda manual de la señal de la
estación de medición /Conmutación entreelmodo TIME ydetemperatura
20. Tecla mode =Ajustes/conrmación del valor de ajuste/conmutación entrelavisualización
de los segundos, el día de la semana ylazona horaria /Conmutación entre°Cy°F
21. Tecla alarm =Visualización/ajuste de los modos de alarma
22. Tecla channel =Selección de canal
23. Tecla mem =Consulta/reseteo de los valores máximos/mínimos almacenados
24. Compartimento parapilas
BEstación de medición
25. Compartimento parapilas
26. Placa de montaje
27. Aberturaparalajación vertical
28. Aberturaparalajación horizontal
29. Clips
50
Page 52

Le agradecemos que se haya decidido por un producto de Hama.
Tómese tiempo yléase primerolas siguientes instrucciones eindicaciones. Después, guarde
estas instrucciones de manejo en un lugar seguroparapoder consultarlas cuando sea
necesario. Si vende el aparato, entregue estas instrucciones de manejo alnuevo propietario.
1. Explicación de los símbolos de aviso ydelas indicaciones
Aviso
Se utiliza paracaracterizar las indicaciones de seguridad oparallamar la atención
sobrepeligros yriesgos especiales.
Nota
Se utiliza paracaracterizar informaciones adicionales oindicaciones importantes.
2. Contenido del paquete
• Estación meteorológica EWS-860
(Estación base parainterior/estación de medición paraelexterior)
• Pie
• 4pilas AAA
• Estas instrucciones de manejo
3. Instrucciones de seguridad
• El producto es paraeluso doméstico privado, no comercial.
• No opereelproducto fueradelos límites depotencia indicados en los datos técnicos.
• No utilice el producto en entornos húmedos yevite el contacto con las salpicaduras de
agua.
• No opereelproducto en las inmediaciones de la calefacción, deotras fuentes de calor o
bajo la radiación directa del sol.
• No utilice el producto en áreas donde no se permitan aparatos electrónicos.
• No coloque el producto cerca de campos de interferencia, marcos de metal, ordenadores
ytelevisores, etc. Losdispositivos electrónicos ylos marcos de ventanas inuyen
negativamente en el funcionamiento del producto.
• No deje caer el producto ni lo someta asacudidas fuertes.
• No abraelproducto ynolo siga operando de presentar deterioros.
51
Page 53

• No intente mantener oreparar el aparato por cuenta propia. Encomiende cualquier trabajo
de mantenimiento al personal especializado competente.
• Mantenga el material de embalaje fueradel alcance de los niños, existe peligrodeasxia.
• Deseche el material de embalaje enconformidad con las disposiciones locales sobreel
desecho vigentes.
• No realice cambios en elaparato. Esto conllevaría la pérdida de todos los derechos
de la garantía.
Nota -pilas
• Retireydeseche de inmediato las pilas gastadas del producto.
• Utilice exclusivamente pilas recargables (o pilas)que sean del mismo tipo.
• No mezcle pilas viejas ynuevas, ni tampoco pilas de tipos ofabricantes diferentes.
• Observe siemprelacorrecta polaridad (inscripciones +y-)delas pilasycoloque éstas
de forma correspondiente. La no observación de lo anterior conlleva el riesgo de
derrame oexplosión de las pilas.
• No cargue las pilas.
• Mantenga las pilas fueradel alcance de los niños.
• No cortocircuite las pilas recargables/baterías ymanténgalas alejadas de objetos
metálicos.
4. Puesta en funcionamiento
4.1. Estación de medición
• Abraelcompartimento parapilas (25) ycoloque dos pilas AAAatendiendo alapolaridad
correcta. Acontinuación, cierrelacubierta delcompartimento parapilas.
Nota
En la puesta en funcionamiento, es importante que coloque las pilas en la estación de
medición, en primer lugar,y,seguidamente, en la estación base.
4.2. Estación base
• Abraelcompartimento parapilas (24) ycoloque dos pilas AAAatendiendo alapolaridad
correcta. Acontinuación, cierrelacubierta delcompartimento parapilas.
52
Page 54

5. Montaje
Nota –Montaje
• Se recomienda colocar primero, sin montar,laestación de base ylaestación de
medición, en los lugares de instalación deseados yllevar acabo todos los ajustes tal y
como se describe en 6. Funcionamiento.
• Proceda amontar la(s) estación(es) únicamente cuando hayapodido realizar
correctamente los ajustes ycuente con una conexión inalámbricaestable.
Nota
• El alcance de la transmisión por radio entrelaestación base ylaestación de medición
al airelibreesdehasta 30 m.
• Antes de proceder al montaje, preste atención aque la transmisión por radio no se
vea inuida, entreotros, por interferencias uobstáculos tales como edicios, árboles,
vehículos olíneas de alta tensión.
• Antes de proceder al montaje denitivo, asegúrese de que cuenta con recepción
suciente entrelos lugares de instalación deseados.
• Al montar la estación de medición,procuresituarla de maneraque quede protegida de
la radiación directa del sol ydelalluvia.
• La alturaestándar internacional paralamedición de latemperaturadel aireesde1,25
m(4pies) sobreelsuelo.
Aviso
• Adquieramaterial de montaje especial oadecuado en un comercio especializado para
el montaje en la pared prevista.
• Compruebe que no haya piezas deterioradas odefectuosas.
• No ejerza nunca fuerza durante el montaje.El producto podría verse dañado.
• Antes de empezar con el montaje,compruebe que la pared puede soportar el peso
que se va amontar yasegúrese de que por el punto de montaje de la pared no pasan
cables eléctricos ni tuberías de agua, gas odeotrotipo.
53
Page 55

5.1. Estación base
• Coloque la estación base sobreuna supercie plana utilizando el pie. (C)
5.2. Estación de medición
• Puede jar la estación de mediciónvertical uhorizontalmente auna pared exterior
mediante la placa de montaje (26).
• Para jar laestación de medición horizontalmente, je la placa de montaje (26) utilizando
la aberturacentral (28) alapared prevista mediante taco, tornillo, etc.
• Para jar laestación de medición verticalmente, je el taco, tornillo, clavo, etc. alapared
prevista ycuelgue de ellos la placa de montaje(26) utilizando la abertura(27).
• Ejerza una ligerapresión sobrelaestación de medición hasta que la oiga encajar en los
clips (29) (mediante un "clic").
6. Funcionamiento
Nota –Introducción de datos
Mantenga pulsadas las teclas (18) o (19) paraseleccionar los valores más
rápidamente.
6.1 Conexión con la estación de medición
• Realizados los ajustes previos, la estación basebusca automáticamente una conexión con
la estación de medición, realizando entonces el ajuste inicial.
Nota
• El ajuste inicial duraaprox. 3minutos.
• Durante el intento de conexión, el símbolode radiofrecuencia comienza aparpadear
(3).
• No pulse ninguna tecla mientras dureelajuste. De lo contrario, pueden producirse
fallos oimprecisiones en los valores ysutransmisión.
• El proceso naliza en cuanto se visualizanlos valores de medición registrados para
interior (8, 14) yexterior (6, 16).
• Si no se recibe ningunaseñal de la estación de medición repetidamente, mantenga
pulsada la tecla (19) durante aprox. 3segundos parainiciar la búsqueda manual de la
señal.
54
Page 56

Visualización Búsqueda de la señal de la estación de medición
Parpadea
Visualización permanente
Visualización permanente
La búsqueda ha nalizado con éxito,
Inactiva –Sin recepción de señal desde >1hora
Activa
se recibe la señal
6.2. Selección de canal/estaciones de medición adicionales
Nota
• Además de la estación de mediciónsuministrada, puede instalar dos estaciones de
medición adicionales. Al hacerlo, preste atención arealizar ajustes decanal idénticos
en la estación de base ylaestación de medición correspondiente. Encontrará
estaciones de medición adecuadas en www.hama.com
• No es posible modicar/ajustar el canalde emisión de la estación de medición
suministrada (CH1).
• Pulse repetidamente la tecla channel(22) paraajustar el mismo canal queen la estación
de medición correspondiente. Se visualiza CH1, CH2 o CH3 (4).
• Seleccione CH1 en caso de utilizarúnicamente la estación de medición suministrada.
• La estación base muestraahoralos datos medidos (6, 16) en la estaciónde medición
seleccionada (4).
• Pulse ymantenga pulsada la tecla channel (22) paraseleccionar la visualización de
canales en serie. El símbolo
canal (4) se muestran de forma consecutiva durante 5segundos por canal.
ylos valores de medición de cada estación demedición/
6.3. Ajustes básicos yajustes manuales
Ajuste automático según la señal DCF
Encendida la estación base por primeravez ytrasuna transmisión correcta entrelaestación
base ylaestación de medición, el reloj inicia automáticamente la búsqueda de una señal
DCF.Elsímbolo de radiofrecuencia (12) parpadea durante el proceso de búsqueda.
55
Page 57

Visualización Búsqueda de señal DCF
/
Parpadea
Visualización permanente
Visualización permanente
Visualización permanente
• Si no se recibieraseñal repetidamente, pulse ymantenga pulsada la tecla (18) durante
aprox. 3segundos parainiciar la búsqueda manual de la señal DCF.Elsímbolo de
radiofrecuencia (12) comienza aparpadear.
Nota –Ajuste de hora
• El proceso de búsqueda duraaproximadamente 3-10 minutos. Si la búsqueda falla,
ésta se termina yserepiteala siguiente horaenpunto.
• Mientras tanto, puede realizar un ajustemanual de la horayla fecha.
• En cualquier caso, el reloj sigue buscando la señal DCF diariamente (00:00, 03:00,
06:00, 12:00 hora). En caso de recibirse la señal correctamente, la horaylafecha
ajustadas se sobrescriben.
• Pulse ymantenga pulsada nuevamente la tecla (18) durante aprox. 3segundos para
nalizar el proceso de búsqueda manual.
56
Inactiva –Sin recepción de señal en las últimas
La búsqueda ha nalizado con éxito,
Activa
24 horas
se recibe la señal
Exitosa-señal fuerte
Page 58

Ajuste manual de fecha/hora
Nota –Modo TIME
• Pulse repetidamente la tecla (18) olatecla (19) hasta que el símbolo
comience aparpadear en la ventana de visualización.
Nota –Horayzona horaria
• En el modo TIME, pulse repetidamente la tecla mode (20) paraalternar entrelas
diferentes visualizaciones:
• Horacon visualización de los segundos, horacon visualización del día de la semana,
horaenuna zona horaria diferente con visualización del día de la semana, horaenuna
zona horaria diferente con visualización de los segundos, fecha
• Con la horaenuna zona horaria diferente se muestraelsímbolo de zona horaria (13).
• Pulse ymantenga pulsada la tecla (18) durante aprox. 3segundos paranalizar el
proceso de búsqueda de la señal de radiofrecuencia. El símbolode radiofrecuencia (12) se
apaga, permitiéndole ajustar la horadeforma manual.
• En el modo TIME, pulse repetidamente la tecla mode (20) hasta que deje de visualizarse el
símbolo de zona horaria (13).
• Pulse ymantenga pulsada la tecla mode (20) durante aprox. 3segundos pararealizar los
siguientes ajustes, consecutivamente:
•Día de la semana (11)
•Año (9)
•Mes (9)
•Día (9)
•Visualización D/M –M/D (9)
•Formato 12/24 horas (9)
•Horas (9)
•Minutos (9)
• Para seleccionar cadavalor,pulse la tecla (18) olatecla (19) yconrme la selección
correspondiente pulsando la tecla mode (20).
• Si no se introduce ningún dato en 2minutos, se abandona automáticamente el modo de
ajuste.
57
Page 59

Nota –Día de la semana
Para la visualización del día de la semana puede elegir entrelos idiomas alemán (DE),
inglés (En), sueco (SW), neerlandés (Du), italiano (IT), español (SP) ofrancés (Fr).
Ajuste de la zona horaria
Nota –Zona horaria
• La señal DCF puede recibirse agrandistancia, correspondiéndose siemprecon la HCE
vigente en Alemania. Porello, tengaen cuenta la posible diferencia horaria en países
situados en otrazona horaria.
• Si se encuentraenMoscú, la diferencia es de 3horas de adelanto con respecto a
Alemania. Porello, debe ajustar lazona horaria +3. Se sumarán automáticamente 3
horas alahorarecibida oajustada manualmente tras la recepción de laseñal DCF.
• Pulse repetidamente la tecla mode(20) hasta que se visualice el símbolo de zona horaria
(9).
• Pulse ymantenga pulsada la tecla mode (20) durante aprox. 3segundos paraajustar la
diferencia horaria deseada.
• Para seleccionar cadavalor,pulse la tecla (18) olatecla (19) yconrme la selección
correspondiente pulsando la tecla mode (20).
• Si no se introduce ningún dato en 2minutos, se abandona automáticamente el modo de
ajuste.
Despertador
• En el modo TIME, pulse repetidamente la tecla alarm (21) paramostrar las diferentes
alarmas.
Se visualizan los símbolos de alarma correspondientes (10) / / así como la
horadealarma/el intervalo de tiempo u OFF.
• Pulse ymantenga pulsada la tecla alarm (21) durante aprox. 3segundos paraajustar la
horadealarma de la alarma visualizada. La visualización de la hora/el intervalo detiempo
comienza aparpadear.
• Pulse la tecla (18) olatecla (19) paraseleccionar las horas de la horadealarma/el
intervalo de tiempo yconrme la selección pulsandola tecla alarm (21).
La visualización de los minutos comienza aparpadear.
58
Page 60

La alarma previa queda activa tras la conrmación del intervalo detiempo.
• Repita este proceso paralos minutos de la horadealarma del despertador.
• Pulse repetidamente la tecla alarm(21) paraajustar igualmente el otromodo de alarma o
retornar alavisualización de la hora(9).
• Si no se introduce ningún dato en 2minutos, se abandona automáticamente el modo de
ajuste.
Nota –Despertador
• La alarma 1paradías laborables activa, en caso de estar activada, unaseñal de alarma
solo en los días laborables de la semana (de lunes aviernes). Si esta alarma está activa
se visualiza el símbolo de alarma (10).
• La alarma puntual activa, de estaractivada, una señal de alarma una única vez. Si esta
alarma está activa se visualiza el símbolo de alarma (10) .Efectuada la señal de
alarma, esta alarma se desactiva automáticamente.
• La alarma previa, de estar activada ydarse unatemperaturaexterior <0°C/
32°F,activa una señal de alarma15, 30, 45, 60 o90minutos antes de la alarma
correspondiente (
alarma (10) .
• Pulse, durante la visualización correspondiente, la tecla
activar/desactivar la alarma correspondiente.
El símbolo de alarma (10) se visualiza/deja de visualizarse.
Nota –Alarma previa
La señal de alarma previa solo puede activarse de encontrarse activa una de lasfunciones
de despertador ( / )como mínimo.
• Si se activa el despertador comocorresponde, el símbolo de alarma (10) comienza a
parpadear ysuena una señal de alarma.
• Pulse la tecla alarm (21) paracancelar la alarma. De otromodo, ésta naliza
automáticamente pasados 2minutos.
y/o ). Si esta alarma está activa se visualizael símbolo de
(18) olatecla (19) para
59
Page 61

6.4. Tiempo
Nota –Modo de temperatura
• Pulse repetidamente la tecla (18) olatecla (19) hasta que el símbolo
comience aparpadear en la ventana de visualización.
Celsius/Fahrenheit
• En el modo de temperatura, pulse ymantenga pulsada la tecla mode (20) durante aprox.
3segundos paraalternar,enlavisualización de la temperatura, entre°Cy°F.
Previsión meteorológica
• La estación base da información sobreelpronóstico del tiempo paralas siguientes 12 a
24 horas basándose en las variaciones registradas en la presión atmosférica ylos datos
almacenados
Nota –Símbolos paraelpronóstico del tiempo
• El pronóstico del tiempo no es posible en las primeras horas de funcionamiento
al no contar la estación con los datos necesarios, que se registran alolargo del
funcionamiento.
• El pronóstico del tiempo yeltiempo actual se indican mediante símbolosdiferentes (2):
Visualización (2) Tendencia
Sol
Nubosidad ligera
Nubosidad
60
Page 62

Lluvia
Fuertes precipitaciones
Nevada
Fuerte nevada
• La estación meteorológica indica la tendencia quepodrían mostrar la temperaturaexterior/
la humedad exterior (5/17), la temperaturaambiente/la humedad ambiente (7/15)yla
presión atmosférica (1) en las siguientes horas.
Visualización Tendencia
En aumento
Constante
En descenso
6.5. Valores máximos ymínimos de la temperatura
La estación base almacena automáticamente los valores máximos ymínimos de la
temperaturaylahumedad, tanto interiores como exteriores.
• En el modo de temperatura, pulse repetidamente la tecla mem (23) paraalternar entre
la visualización de la temperaturaactual, la temperaturamínima (MIN) ylatemperatura
máxima (MAX).
• Pulse ymantenga pulsada la tecla mem (23) durante aprox. 3segundos paraponer acero
los valores máximos ymínimos almacenados.
61
Page 63

6.6. Alarma por la temperatura exterior
• Pulse repetidamente la tecla channel (22) paraseleccionar el canal(4) de la estación de
medición paracuyos valores desee ajustar una alarma.
• En el modo de temperatura, pulse repetidamente la tecla alarm (21) paramostrar las
alarmas de temperaturaexterior / .
• Pulse ymantenga pulsada la tecla alarm (21) durante aprox. 3segundos hasta que la
visualización de la temperatura(6) comience aparpadear.
• Pulse la tecla (18) olatecla (19) paraajustar el valor límite visualizado yconrme la
selección pulsando la tecla alarm (21).
• Durante la visualización del valor límite superioroinferior,pulse la tecla (18) olatecla
(19) paraseleccionar el valor de temperaturauOFF yconrme la selección pulsando la
tecla alarm (21).
Seleccione el valor de temperatura/OFF paraactivar/desactivar la alarma por temperatura
exterior.
• Si la temperaturaexterior alcanza alguno de los valores límite se disparalaalarma que
corresponda.
El símbolo ylatemperaturaexterior comienzan aparpadear ysuena una señal de alarma.
Pulse la tecla alarm (21) paracancelar la alarma.De otromodo, ésta naliza
automáticamente pasados 2minutos.
Nota –Alarma por la temperaturaexterior
• Puede establecer un valor límite inferiorysuperior yactivar la alarma paracada canal o
estación de medición conectada.
• Tenga en cuenta que el valor límite inferior debe estarcomo mínimo 1°C/1°F por
debajo del valor límite superior.
62
Page 64

6.7. Rango de comodidad higrotérmica
La estación base muestralos siguientes rangos decomodidad higrotérmica, basándose en la
relación entrelatemperaturaambiente ylahumedad del aireactuales:
Visualización
COMFORT
WET
DRY
-
rangodetemperatura
20°C –25°C
68°F –77°F
-5°C –50°C
23°F –122°F
-5°C –50°C
23°F –122°F
<20°C />25°C
<68°F />77°C
Rango de humedad
40% –70%
>70%
<40%
40% -70% -Sin indicador -
Rango de comodidad
higrotérmica
–agradable –
Temperaturay
humedad del aire
óptimas
–húmedo –
Humedad del aire
demasiado alta
–seco –
Airedel ambiente
demasiado seco
6.8.Capacidad de pilas baja
Si se visualiza el símbolo de pila
pilas de la estación base/de medición es baja. Sustituya las pilas de forma inmediata.
Nota –Cambio de pilas
• Tenga en cuenta que es necesario resincronizar las estaciones tras realizar un cambio
de pilas en la estación de medición obase.
• Para ello, retirelas pilas de la otraestación yvuelva acolocarlas o, de ser necesario,
proceda asustituirlas.
en la pantalla de la estación base, la capacidad de las
7. Mantenimiento ycuidado
Limpie este producto sólo con un paño ligeramente humedecido que no deje pelusas yno
utilice detergentes agresivos. Asegúrese de que no entreagua en el producto.
63
Page 65

8. Exclusión de garantía
Hama GmbH &CoKGnoseresponsabiliza ni concede garantía por los daños que surjan por
una instalación, montaje omanejo incorrectos del producto opor la no observación de las
instrucciones de manejo y/o de las instrucciones de seguridad.
9. Servicio ysoporte
Si tiene que hacer alguna consulta sobreelproducto, diríjase al asesoramiento de productos
Hama.
Línea directa: +49 9091 502-115 (alemán/inglés)
Encontrará más información de soporte en:
www.hama.com
10. Datos técnicos
Estación base Estación de medición
Alimentación de
corriente
3,0 V
2pilas AAA
3,0 V
2pilas AAA
Consumo de corriente <2,5 mA <1,0 mA
Rango de medición
Temperatura
Intervalos de medición
Temperatura
Ciclo de medición de la
temperatura
0°C –+50°C/
32°F –122°F
-20°C –+60°C/
-4°F –140°F
0,1°C /0,2°F 0,1°C /0,2°F
~45s ~45s
Humedad delaire 25%–95% 30% –80%
Radiorreloj por
radiofrecuencia
Sí No
Frecuencia 433MHz
Alcance ≤30m
64
Page 66

11. Instrucciones para desecho yreciclaje
Nota sobrelaprotección medioambiental:
Después de la puesta en marcha de la directiva Europea 2012/19/EU y2006/66/EU
en el sistema legislativo nacional, se aplicaralosiguiente: Losaparatos eléctricos y
electrónicos, así como las baterías, no se deben evacuar en la basuradoméstica. El
usuario está legalmente obligado allevar los aparatos eléctricos yelectrónicos, así
como pilas ypilas recargables, al nal desu vida útil alos puntosde recogida
comunales oadevolverlos al lugar donde los adquirió. Losdetalles quedaran denidos por la
ley de cada país. El símbolo en el producto, en las instrucciones deuso oenelembalaje hace
referencia aello. Gracias al reciclaje, al reciclaje del material oaotras formas de reciclaje de
aparatos/pilas usados, contribuye Usted de forma importante alaprotección de nuestro
medio ambiente.
12. Declaración de conformidad
Porlapresente, Hama GmbH &CoKG, declaraque el tipo de equiporadioeléctrico
[00123125] es conforme con la Directiva 2014/53/UE. El texto completo de la
declaración UE de conformidad está disponible en la dirección Internet siguiente:
www.hama.com->00123125->Downloads.
Banda obandas de frecuencia 433 MHz
Potencia máxima de radiofrecuencia 0,021 mW
65
Page 67

R Руководство по эксплуатации
Органы управления ииндикации
AОсновной блок
1. Динамика изменения давления
2. Значок прогноза погоды
3. Значок радиосигнала внешнегодатчика
4. Канал
5. Динамика изменения наружной температуры
6. Наружная температура
7. Динамика изменения температуры впомещении
8. Температура впомещении
9. Переключение режима часов ирежима термометра
10. Значок будильника
11. День недели /секунды
12. Значок радиосигнала
13. Часовой пояс
14. Влажность воздуха впомещении
15. Динамика изменения влажности воздуха впомещении
16. Влажность воздуха вне помещения
17. Динамика изменения влажности наружноговоздуха
18. Кнопка
19. Кнопка =уменьшение настраиваемогозначения /включение принудительного
20. Кнопка mode =настройка /подтверждение ввода значения /переключение
21. Кнопка alarm =индикация /настройка будильника
22. Кнопка channel -выбор канала
23. Кнопка mem =просмотр/сброс сохраненных макс. иминим. значений
24. Отсекбатарей
ВБлок внешнего датчика
25. Отсекбатарей
26. Монтажная плата
27. Отверстие для вертикальногокрепления
28. Отверстие для горизонтальногокрепления
29. Зажимы
=увеличение настраиваемогозначения /включение/ выключение
принудительногоприема радиосигнала /Переключение режима часов ирежима
термометра
поиска сигнала внешнегодатчика /Переключение режима часов ирежима
термометра
индикации секунд, дня недели, часовогопояса /Выбор единицы измерения
температуры (°C, °F)
66
Page 68

Благодарим за покупку изделия фирмы Hama.
внимательно ознакомьтесь снастоящей инструкцией. Храните инструкцию внадежном
месте для справок вбудущем. Вслучае передачи изделия другому лицу приложите и
этуинструкцию.
1. Предупредительные пиктограммы иинструкции
Внимание
Данным значком отмечены инструкции, несоблюдение которых может
привести копасной ситуации.
Примечание
Дополнительная или важная информация.
2. Комплект поставки
• Метеорологический прибор EWS-860 (основной блок дляконтроля воздуха внутри
помещения, блок датчика внешних атмосферных условий)
• Подставка
• 2батареи ААА
• Настоящая инструкция
3. Техника безопасности
• Изделие предназначено толькодля домашнегоприменения.
• Соблюдатьтехнические характеристики.
• Беречь от влаги ибрызг.
• Не эксплуатировать внепосредственной близости снагревательными приборами и
беречь от прямых солнечных лучей
• Не применять взапретных зонах.
• Не размещайте устройство рядом смагнитными полями, металлическими рамами,
компьютером, телевизором ит.д. Электронные приборы отрицательно влияютна
работу устройства.
• Не ронять. Беречь от сильных ударов.
• Изделие не открывать. Запрещается эксплуатировать неисправное изделие.
67
Page 69

• Запрещается самостоятельно ремонтировать устройство. Ремонт разрешается
производить толькоквалифицированному персоналу.
• Упаковку не давать детям: опасность асфиксии.
• Утилизировать упаковку всоответствии сместными нормами.
• Запрещается вносить изменения вконструкцию. Впротивном случае гарантийные
обязательства аннулируются.
Батареи. Техникабезопасности
• Израсходованные батареи немедленно удалять из прибораиутилизировать.
• Разрешается применять аккумуляторы толькоуказанноготипа.
• Не применять различные типы или новыеистарые батареи вместе.
• Соблюдатьполярность батарей (+ и-). Несоблюдение полярности можетстать
причиной взрыва батарей.
• Обычные батареи не заряжать.
• Батареи хранить вбезопасном месте инедавать детям.
• Не закорачивать контакты батарей. Не хранить рядом сметаллическими
объектами.
4. Ввод вэксплуатацию
4.1 Блок внешнего датчика
• Откройте крышку отсека батарей (25)ивставьте две батареи ААА, соблюдая
полярность.
• Закройте крышку отсека батарей.
Примечание
При вводе вэксплуатацию всегда сначала вставляйте батареи вблок наружного
датчика, азатем восновной блок.
4.2. Основной блок
• Откройте крышку отсека батарей (24)ивставьте две батареи ААА, соблюдая
полярность. Закройте крышку отсека батарей.
68
Page 70

5. Монтаж
Примечание. Монтаж
• Перед тем как монтировать блоки, рекомендуется сначала завершить настройки в
местах будущей установки (см. 6). Смотрите описание работы основногоблока.
• Монтаж следует производить после того,как правильные настройки обеспечат
надежную радиосвязь между блоками.
Примечание
• Максимально допустимое расстояние между блоками составляет 30 метров.
• Монтируя блоки, следует учесть, чторазличные препятствия (стены, деревья,
автомобили, высоковольтные линии идр.) создаютпомехи радиосвязи между
блоками.
• Перед монтажом убедитесь, чтовместах расположения блоков обеспечивается
устойчивая радиосвязь.
• Блок внешнегодатчика должен размещаться вместе, защищенном от
воздействия прямых солнечных лучей иосадков.
• Международный стандартвысоты для измерения влажности воздуха составляет
1,25 метра (4 фута) над землей.
Предупреждение
• Подготовьтемонтажный материал (приобретается отдельно), соответствующий
свойствам стены.
• Перед началом эксплуатации убедитесь вотсутствии дефектных или
поврежденных деталей.
• При монтаженеприменять чрезмерных усилий. Впротивном случае можно
повредить устройство.
• Убедитесь, чтостена подходит для монтажа. Встене наместе монтажа не
должно быть электрической проводки, газопровода, водопровода идругих
трубопроводов.
69
Page 71

5.1. Основной блок
• Спомощью подставки установите основной блок на ровную поверхность. (C)
5.2. Блок внешнего датчика
• Блок датчика закрепляется на стене снаружи спомощью монтажной платы (26) в
вертикальном или горизонтальном положении.
• Чтобы разместить внешний датчик вгоризонтальном положении, спомощью дюбеля
ивинтазакрепите монтажную (26) плату за среднее отверстие (28).
• Чтобы разместить внешний датчик ввертикальном положении, подвесьте монтажную
плату (26) за отверстие (27).
• Прижмите блок датчика кмонтажной плате так, чтобы он вошел взажимы (29).
6. Эксплуатация
Вводданных
Чтобы ускорить изменение значения во время настройки, удерживайтекнопку (18)
или кнопку (19) .
6.1. Соединение сблоком внешнего датчика
• После загрузки батарей основной блок начинает автоматический поиск сигнала
внешнегодатчика ивыполняет операцию ввода устройства вэксплуатацию.
Примечание
• Автоматическая настройка при вводе вэксплуатацию длится ок. 3минут.
• Во время поиска радиосигнала мигает значок радиосвязисвнешним датчиком
(3).
• Втечение этого времени не нажимайте кнопки устройства! Впротивном случае
можетвозникнуть сбой точной настройки значений ипередачи сигнала.
• Автоматическая настройка завершена, когданадисплее начнут отображаться
данные измерения внутри помещения (8, 14) ивне помещения (6, 16).
• Если сигнал автоматически принять не удается, нажмите иок. 3секунд удерживайте
кнопку (19), чтобы включить поиск радиосигнала DCF вручную.
70
Page 72

Индикация Поиск радиосигнала внешнегодатчика
мигает
горит непрерывно
Неактивный –прием сигнала отсутствует
горит непрерывно
активный
сигнал принят успешно
более 1часа
6.2. Выбор канала /дополнительные внешние датчики
Примечание
• Максимальное количество внешних датчиков: 3. Чтобы установить соединение
основной блок ивнешний датчик должны работатьнаодном канале.
Совместимые блоки внешних датчиков смотрите по адресу www.hama.com.
• Передающий канал внешнегодатчика из комплектапоставки изменить
невозможно (СН1).
• Несколькораз нажмите кнопку channel(22), чтобы установить канал всоответствии
сканалом внешнегодатчика. Отображается индикация CH1, CH2или CH3 (4).
• При использовании тольковнешнегодатчика из комплектапоставки установите
канал СН1.
• Основной блок показывает измеренные данные(6, 16), которая измеряется вместе
установки внешнегодатчика (4).
• Чтобы выбрать канал, нажмите иудерживайте кнопку канала (22). Каждые 5
секунд на дисплее будут попеременно меняться измеренные значения каналов с
соответствующим значком (4).
6.3 Основные параметры иручные настройки
Автоматический прием радиосигнала DCF
После первоговключения основногоблока иустановки радиосвязи сблокомвнешнего
датчика часы прибора автоматически начинаютпоиск радиосигнала точноговремени
(DCF). Во время этого процесса на дисплее мигает значок радиосигнала (12) .
71
Page 73

Индикация Поиск сигнала DCF
/
мигает
горит непрерывно
горит непрерывно
горит непрерывно
• Если сигнал автоматически принять не удается, нажмите иок. 3секунд удерживайте
кнопку – (18), чтобы включить поискрадиосигнала DCF вручную. Значок
радиосигнала (12) мигает.
Настройкачасов. Примечания
• Поиск длится около3-1 0минут. Если сигнал принять не удалось, операция
завершается автоматически. Повторная попытка будет произведена вследующий
полный час.
• При необходимости часы икалендарь можно настроить вручную.
• Режим поиска радиосигнала DCF включается ежедневно автоматически в00:00,
03:00, 06:00, 12:00. При успешном приеме радиосигнала введенные вручную
значения времени икалендаря заменяются.
• Чтобы принудительно завершить поиск радиосигнала, нажмите иок. 3секунд
удерживайте кнопку – (18).
72
Неактивный -сигнал отсутствует последние
Успешно -высокий уровень сигнала
активный
24 часа
сигнал принят успешно
Page 74

Настройка календаря ичасов вручную
Режим часов. Примечание
• Нажимайте кнопку (18) или кнопку (19), пока на дисплее не появится значок
Часы ичасовой пояс. Примечание
• Врежиме часов нажимайтекнопку выбора режимов (20), чтобы переключать
режимы индикации:
• время ссекундами, время сднем недели, время часовогопояса сднем недели,
время часовогопояса ссекундами, дата.
• При индикации времени часовогопояса отображается соответствующий значок
(13).
• Нажмите иоколо3секунд удерживайте кнопку – (18), чтобы принудительно
завершить поиск радиосигнала DCF.Значок радиосигнала (12) не горит. Теперь часы
можно настроить вручную.
• Врежиме часов нажимайте кнопку выбора режимов(20), пока на дисплее не
появится значок часовогопояса (13).
• Нажмите иоколо3секунд удерживайте кнопку mode (20), чтобы настроить
параметры вследующем порядке:
•День недели (11)
•Год (9)
•Месяц (9)
•Число месяца (9)
•ФорматД/М -М/Д (9)
•Формат12/24-ч. (9)
•Час (9)
•Минуты (9)
• Кнопкой
• Режим настройки выключается автоматически, если нажатий на кнопки не
(18) или (19) установите значение инажмите кнопкуmode (20), чтобы
подтвердить настройку.
производилось втечение 2минут.
73
Page 75

День недели. Примечание
Дни недели могут отображаться на следующих языках: немецкий (DE), английский
(En), шведский (SW), голландский (Du), итальянский (IT), испанский (SP),
французский (Fr).
Настройка часового пояса
Часовой пояс. Примечание
• Радиосигнал точноговремени DCF соответствует среднеевропейскому времени.
Если часы эксплуатируютсявдругом часовом поясе, то их необходимо настроить
соответствующим образом.
• Например, разница во времени между МосквойиБерлином составляет 3часа. В
Москве, таким образом, необходимо сделать поправку в+3часа. Вэтомслучае
кпоказателю времени (установленному автоматически по радиосигналу DCF или
вручную) часы автоматически будут прибавлять 3часа.
• Врежиме часов нажимайтекнопку mode (20), пока на дисплее не погаснет значок
часовогопояса (13).
• Нажмите иок. 3секунд удерживайте кнопку выбора режимов (20), чтобы настроить
смещение часовогопояса.
• Установите значение кнопкой (18) или кнопкой (19), затем подтвердите выбор
кнопкой выбора режимов (20).
• Режим настройки выключается автоматически, если нажатий на кнопки не
производилось втечение 2минут.
Будильник
• Чтобы просмотреть время срабатывания будильников, нажимайте кнопку
будильника (21).
На дисплее отображается соответствующие значки будильников (10))
,атакжевремя/интервал или значок OFF.
• Нажмите иоколо3секунд удерживайте кнопку alarm (21), чтобы настроить время
срабатывания будильника. Индикация времени/интервала начинает мигать.
• Кнопкой
• Значение минут мигает.
(18) или (19) установите значение часа,затем нажмите кнопку alarm
(21), чтобы подтвердить настройку.
Предупредительный будильник активируется после подтверждения интервала.
/ /
74
Page 76

• Настройте минуты.
• Нажмите кнопку alarm (21), чтобы настроить второй будильник или перейти врежим
индикации времени (9).
• Режим настройки выключается автоматически, если нажатий на кнопки не
производилось втечение 2минут.
Будильник. Примечание
• Будильник рабочих дней включается тольковбудни (понедельник-пятница). Если
данный будильник активный, отображается значок (10).
• Одноразовый будильник подает сигнал толькоодин раз. Если данный будильник
активный, отображается значок (10). После подачи сигнала будильник
автоматически деактивируется.
• Если устройство регистрирует наружную температуру <0°C/ 32°F,то
предупредительный будильник срабатывает перед основным будильником (
и/или )сучетом установленногоинтервала (15,30, 45, 60, 90 минут). Если
данный будильник активный, отображается значок (10)
• Чтобы включить/выключить будильник, перейдите врежим егоиндикации, нажмите
кнопку (18) или (19)
Значок (10) отображается или не отображается взависимости от того,включен или
выключен будильник.
Предупредительный будильник. Примечание
Предупредительный будильник можно активировать, если активирован хотябы
один из основных будильников ( / ).
• При срабатывании будильника мигает соответствующий значок (10), иподается
звуковой сигнал.
• Чтобы отключить подачу сигнала предупреждения, нажмите кнопку alarm (21). Если
сигнал не был отключен вручную, то он автоматически отключится через 2минуты.
75
Page 77

6.4. Погода
Режим термометра. Примечания
• Нажимайте кнопку (18) или кнопку (19), пока на дисплее не появится значок
.
Цельсий /Фаренгейт
• Врежиме термометра нажмите иок. 3секунд удерживайте кнопку выбора режимов
(20), чтобы установить единицу измерения температуры (°C или °F).
Прогноз погоды
• На основе изменений атмосферногодавления исохраненных данных прибор
прогнозирует погодунапериодот12до24часов.
Прогноз погоды
• Впервые часы после ввода вэксплуатацию из-за отсутствия необходимых данных
функция прогноза погодынеработает.
• Прогноз погодыотображается спомощью пяти значков (2):
Значок (2) Погода
ясно
переменная облачность
облачность
дождь
76
Page 78

сильный дождь
снегопад
сильный снегопад
• Прибор отображает прогноз изменений нанесколькочасов для наружной
температуры/влажности (5/17), температуры/влажности впомещении (7/15) и
давления воздуха (1).
Индикация Динамика изменений
повышается
понижается
убывающий
6.5. Максимальные иминимальные значения температуры
Зафиксированные максимальные иминимальные значения наружной икомнатной
температуры, атакжевлажности воздуха автоматически сохраняютсявпамяти
прибора.
• Врежиме термометра нажимайте кнопку памяти (23),чтобы переключить
индикацию текущей температуры, минимальной температуры (MIN) имаксимальной
температуры (MAX).
• Нажмите иок. 3секунд удерживайте кнопку mem (23), чтобы удалить сохраненные
макс. иминим. значения.
77
Page 79

6.6. Предупреждение наружной температуры
• Несколькораз нажмите кнопку каналов(22), чтобы выбрать канал (4) наружного
датчика, для котороготребуется настроить предупреждение.
• Чтобы просмотреть время срабатывания будильников/наружную температуру, в
режиме термометра нажимайте кнопку будильника (21).
• Нажмите иок. 3секунд удерживайте кнопку будильника (2), покане начнет мигать
индикация наружной температуры (6).
• Кнопкой (18) или (19) установите предельное значение, затем подтвердите
настройку кнопкой будильника (21).
• Во время индикации верхнегоили нижнегопредела нажмите кнопку (18) или
(19), чтобы просмотреть значение температуры или выключить функцию (OFF), затем
подтвердите выбор кнопкой будильника (21).
Выберите значение температуры/ВЫКЛ, чтобы включить/выключить предупреждение
наружной температуры.
• Если наружная температура достигнет предельногозначения, сработает будильник.
Значок изначение наружной температуры мигают, атакжеподается сигнал
предупреждения.
Чтобы отключить подачу сигнала предупреждения, нажмите кнопку будильника
(21). Если сигнал не был отключен вручную, то он автоматически отключится через
2минуты.
Предупреждение наружной температуры. Примечание
• Нижние иверхние предельные значениядля подачи сигнала предупреждения
можно настроить на каждый канал.
• Нижнее предельное значение должно находиться по крайней мере на 1°C/ 1°F
нижеверхнегопредельногозначения.
78
Page 80

6.7 Диапазон комфортного климата
На основе отношения текущей температуры впомещении ивлажности прибор
показывает следующие диапазоны комфортногоклимата:
Индикация
COMFORT
WET
DRY
-
диапазон
температур
20°C –25°C
68°F –77°F
-5°C –50°C
23°F –122°F
-5°C –50°C
23°F –122°F
<20°C />25°C
<68°F />77°C
Диапазон влажности
40% –70%
>70%
<40%
40% -70% -Нет показатель -
Диапазон
комфортного
климата
–приятно –
оптимальная
температура и
влажность
–влажно –
повышенная
влажность
–сухо–
слишком сухой
воздух
6.8.Разряд батарей
Значок показывает малую остаточную емкость батарей основногоблока илиблока
внешнегодатчика. Замените батареи.
Замена батарей. Примечание
• После замены батарей основногоблокаиблока внешнего датчика необходимо
заново выполнить синхронизацию блоков.
• Для этого необходимо удалить батареи втом числе из другогоблока, азатем
снова загрузить их вотсекбатарей.
79
Page 81

7. Уход итехобслуживание
Чистку изделия производить толькобезворсовой слегка влажной салфеткой.
Запрещается применять агрессивные чистящие средства. Следите за тем, чтобы в
устройство не попала вода.
8. Отказ от гарантийных обязательств
Компания Hama GmbH &CoKGненесет ответственность за ущерб, возникший
вследствие неправильногомонтажа, подключения ииспользования изделия не по
назначению, атакжевследствие несоблюдения инструкции по эксплуатации итехники
безопасности.
9. Отдел техобслуживания
По вопросам ремонтаили замены неисправных изделий обращайтесь кпродавцу или в
сервисную службукомпании Hama.
«Горячая линия»: +49 9091 502-115 (немецкий/английский)
Подробнее смотрите здесь:
www.hama.com.
10. Технические характеристики
Основной блок Блок внешнегодатчика
Питание
3,0 В
2батареи ААА
3,0 В
2батареи ААА
Токпотребления <2,5 mA <1,0 mA
Диапазон измерения
Температура
Шаг шкалы
Температура
Цикл измерения
температуры
0°C –+50°C/
32°F –122°F
-20°C –+60°C/
-4°F –140°F
0,1°C /0,2°F 0,1°C /0,2°F
~45s ~45s
Влажность воздуха25% –95% 30%–80%
80
Page 82

Часы скоррекцией по
радиосигналуточного
времени
Да Нет
Частота 433 MHz
Дальность действия ≤30m
11. Инструкции по утилизации
Охрана окружающей среды:
Смоментапереходанациональногозаконодательства на европейские
нормативы 2012/19/EU и2006/66/EU действительно следующее:
Электрические иэлектронные приборы, атакже батареи запрещается
утилизировать собычным мусором. Потребитель, согласно закону, обязан
утилизировать электрические иэлектронные приборы, атакже батареи и
аккумуляторы после их использования вспециально предназначенных для этого
пунктах сбора, либо впунктах продажи. Детальная регламентация этих требований
осуществляется соответствующим местным законодательством. Необходимость
соблюдения данных предписанийобозначается особым значком на изделии,
инструкции по эксплуатации или упаковке. При переработке, повторном использовании
материалов или при другой форме утилизации бывших вупотреблении приборов Вы
помогаете охране окружающей среды. Всоответствии спредписаниями по обращению
сбатареями, вГермании вышеназванные нормативы действуютдля утилизации
батарей иаккумуляторов.
12. Декларация производителя
Настоящим компания Hama GmbH &CoKGзаявляет, чторадиооборудование
типа [00123125] отвечает требованиям директивы 2014/53/ЕС. Сполным
текстом декларации осоответствии требованиям ЕС можно ознакомиться
здесь: www.hama.com->00123125->Downloads.
Диапазон/диапазоны частот 433 MHz
Максимальная излучаемая мощность 0,021 mW
81
Page 83

I Istruzioni per l‘uso
Elementi di comando eindicazioni
Stazione base A
1. Tendenza pressione atmosferica
2. Simbolo previsioni del tempo
3. Simbolo radio stazione di misurazione
4. Indicazione canale
5. Tendenza temperaturaesterna
6. Temperaturaesterna
7. Tendenza temperaturaambiente
8. Temperaturaambiente
9. Ora/data
10. Simbolo allarme
11. Giorno della settimana /secondi
12. Simbolo radio
13. Fuso orario
14. Umidità aria ambiente
15. Tendenza umidità aria ambiente
16. Umidità aria esterna
17. Tendenza umidità aria esterna
=aumento del valoreimpostato attuale /attivazione/disattivazione manuale
18. Tasto
della ricezione di segnale radio /Commutazione tramodalità TIME etemperatura
19. Tasto =diminuzione del valoreimpostato attuale /ricerca manuale del segnale dalla
stazione di misurazione /Commutazione tramodalità TIME etemperatura
20. Tasto mode =impostazioni /conferma del valoreimpostato /Passaggio trasecondi,
giorni della settimana efuso orario /Commutazione tragradi °C e°F
21. Tasto alarm =indicazione /impostazione della modalità sveglia
22. Tasto channel =scelta canale
23. Tasto mem =richiamo /resetdei valori massimi eminimi memorizzati
24. Vano batterie
BStazione di misurazione
25. Vano batterie
26. Piastradimontaggio
27. Aperturaper ssaggio verticale
28. Aperturaper ssaggio orizzontale
29. Clip
82
Page 84

Grazie per avereacquistato un prodotto Hama!
Prima della messa in esercizio, leggete attentamente le seguenti istruzionieavvertenze,
quindi conservatele in un luogo sicuroper una eventualeconsultazione. In caso di cessione
dell‘apparecchio, consegnate anche le presenti istruzioni al nuovo proprietario.
1. Spiegazione dei simboli di avvertimento edelle indicazioni
Attenzione
Viene utilizzato per contrassegnareleindicazioni di sicurezza oppureper rivolgere
l‘attenzione verso particolari rischi epericoli.
Avvertenza
Viene utilizzato per contrassegnareinformazioni supplementari oindicazioni
importanti.
2. Contenuto della confezione
• stazione meteo EWS-860 (stazione base perinterni /stazione di misurazione per esterni)
• Base
• 4batterie AAA
• Queste istruzioni per l’uso
3. Avvertenze di sicurezza
• Il prodotto èconcepito per l’uso domestico privato,non commerciale.
• Non mettereinesercizio il prodotto al di fuori dei suoi limiti di rendimento indicati nei dati
tecnici.
• Non usareilprodotto in ambienti umidi ed evitareilcontatto con gli spruzzi.
• Evitaredimettereinesercizio il prodotto in prossimità di riscaldamento, altrefonti di calore
olaluce diretta del sole.
• Non utilizzareilprodotto in zone in cui non sono ammessele apparecchiatureelettroniche.
• Non posizionareilprodotto nelle vicinanze di campi di disturbo, telaimetallici, computer
etelevisori ecc. Gli apparecchi elettronici compromettono negativamente il funzionamento
del prodotto.
• Non farecadereilprodotto enon sottoporlo aforti scossoni!
• Non aprireilprodotto enon utilizzarlo più se danneggiato
83
Page 85

• Non tentarediaggiustareoripararel’apparecchio da soli. Fare eseguirequalsiasi lavorodi
riparazione al personale specializzato competente.
• Tenerel’imballo fuori dalla portata dei bambini, pericolo disoffocamento!
• Smaltireimmediatamente il materiale d'imballaggioattenendosi alle prescrizioni locali
vigenti.
• Non apportaremodiche all’apparecchio per evitarediperdereidiritti di garanzia.
Avvertenza –Batterie
• Rimuovereesmaltireimmediatamente le batterie scariche.
• Utilizzareunicamente accumulatori (o batterie)conformi al tipo indicato.
• Non utilizzarebatterie di tipiocostruttori diversi, né mischiarebatterie vecchie enuove.
• Attenersi semprealla corretta polarità (scritte+e-)delle batterieeinserirle
• di conseguenza. La mancata osservanza comportala perdita di potenza oilrischio di
esplosione delle batterie.
• Non caricarelebatterie.
• Conservarelebatterie al di fuori della portata dei bambini
• Non cortocircuitarelebatterie etenerle lontano da oggetti metallici.
4. Messa in esercizio
4.1. Stazione di misurazione
• Aprireilvano batterie (25) einseriredue batterie AAAcon la polarità corretta. Quindi
chiudereilcoperchio del vano batterie.
Nota
Permettereinservizio l‘apparecchio, inseriresempreprima le batterie nella stazione di
misura, quindi nella stazione base.
4.2. Stazione base
• Aprireilvano batterie (24) einseriredue batterie AAAcon la polarità corretta. Quindi
chiudereilcoperchio del vano batterie.
84
Page 86

5. Montaggio
Nota –Montaggio
• Si consiglia di collocarelastazione base edimisuranel luogo di montaggio desiderato
senza montarla edieffettuaretutte le impostazioni come descritto al capitolo
6. Esercizio.
• Montarela/le stazioni solo dopoavereeffettuato l‘impostazione corretta eun
collegamento radio stabile.
Nota
• La portata della trasmissione radio tralastazione base edimisurazione all‘aperto èdi
max. 30m.
• Prima del montaggio prestareattenzione chela trasmissione radio non venga impedita
da segnali di disturbo oostacoli come edici,alberi, veicoli, linee di alta tensione ecc.
• Prima del montaggio denitivo, accertarsi chetrailuoghi di montaggio desiderati vi sia
una ricezione suciente.
• Durante il montaggio della stazione di misurazione, accertarsi che il luogo
d‘installazione sia protetto dalla luce diretta del sole edalla pioggia.
• L‘altezza standardinternazionale per la misurazione della temperaturadell‘aria èpari a
1,25 m(4ft) dal suolo.
Attenzione
• Procurarsi il materiale di installazione idoneo per il montaggio alla parete prevista
presso irivenditori specializzati.
• Vericareche non vengano montati pezzi difettosi odanneggiati.
• Non usaretroppa forza,né violenza durante il montaggio per evitaredidanneggiare
il prodotto.
• Prima di procederealmontaggio, vericareche la parete sia idonea per ilpeso
da montareeaccertarsi che nel punto della parete dove si desideraappendere
l’apparecchio non vi siano cavi elettrici, né tubazioni di acqua, gas oaltro.
85
Page 87

5.1. Stazione base
• Posizionarelastazione base con il piedino di sostegno su una supercie piana. (C)
5.2. Stazione di misurazione
• La stazione di misurazione può esseressata auna parete esterna mediante una piastradi
montaggio (26) in orizzontale oinverticale.
• Perilmontaggio orizzontale della stazione di misurazione, ssarelapiastradimontaggio
(26) all’aperturacentrale (28) con tasselli, viti ecc. sulla parete prevista.
• Perilmontaggio verticale della stazione di misurazione, ssaretasselli, viti, chiodi ecc. alla
parete prevista eagganciarvi la piastradimontaggio (26) mediante l’apertura(27).
• Premerelastazione di misurazione esercitando una leggerapressione nché non scatta in
sede (29) (si deve sentireun"clic").
6. Esercizio
Nota –Immissione
Tenerepremuto il tasto (18) oiltasto (19), per selezionareivalori più velocemente.
6.1. Connessione alla stazione di misurazione
• Dopo avereinserito le batterie,la stazione base ricerca automaticamente la connessione
alla stazione di misurazione eavvia la prima congurazione.
Nota
• La prima congurazione duraca. 3minuti.
• Durante il tentativo di connessione, il simbolo della radio della stazione di misurazione
(3) lampeggia.
• Non premerealcun tasto in questolasso di tempo per evitareerrori eimprecisioni dei
valori edella lorotrasmissione.
• La proceduraèconclusa non appena vengono visualizzati idati di misurazione per
l‘interno (8, 14) el‘esterno (6, 16).
• Se per diverse volte non vienericevuto alcun segnale, tenerepremuto iltasto (19) per ca.
3secondi, per avviarelaricerca manuale del segnale.
86
Page 88

Indicazione
Indicazione lampeggiante
Ricerca manuale del segnale dalla stazione di
misurazione
Attivo
Indicazione ssa
Indicazione ssa
Ricerca riuscita -ilsegnale viene ricevuto
Inattivo -nessuna ricezione del segnale da
almeno 1ora
6.2. Scelta del canale/ altre stazioni di misurazione
Nota
• Oltrealla stazione di misurazione in dotazione, èpossibile installarealtredue stazioni di
misurazione. Attenzione: ènecessario impostarelostesso canale per la stazione base e
la stazione di misurazione corrispondente.
Le stazioni di misurazione idonee sono disponibili sul sito www.hama.com
• Il canale emittente della stazione dimisurazione in dotazione non può essere
modicato/impostato (CH1).
• Premereripetutamente il tasto channel (22) per selezionarelostesso canale su cui
trasmette la stazione di misurazione. Viene visualizzato CH1, CH2 o CH3 (4).
• Scegliere CH1 nel caso in cui si utilizzi esclusivamente la stazione di misurazione in
dotazione.
• La stazione base mostraora la temperaturamisurata (6, 16) della stazione di misurazione
selezionata (4).
• Tenerepremuto il tasto channel (22), per selezionarelasequenza canale. Il simbolo e
ivalori di misurazione di singoli canali /stazioni (4) di misurazione vengono visualizzati in
sequenza per 5secondi ciascuno.
6.3. Impostazioni di base emanuali
Impostazione automatica secondo il segnale DCF
Dopo la prima accensione della stazione base elatrasmissione trastazione baseedi
misurazione, l‘orologio inizia automaticamente acercareunsegnale DCF.Durante il processo
di ricerca, il simbolo della radio (12) lampeggia.
87
Page 89

Indicazione Ricerca del segnale DCF
/
Indicazione lampeggiante
Indicazione ssa
Indicazione ssa
Indicazione ssa
• Se per diverse volte non vienericevuto alcun segnale, tenerepremuto iltasto – (18) per
ca. 3secondi, per avviarelaricerca manuale del segnale DCF.Ilsimbolo radio (12) inizia
alampeggiare.
Nota –Impostazione dell‘ora
• Questo procedimento duracirca 3-10 minuti. Se la ricerca non ha successo, viene
terminata eriprende alla prossima orapiena.
• In questo lasso di tempo sipuò effettuareun‘impostazione manuale di oraedata.
• L'orologio continua acercareautomaticamente ogni giorno (ore00:00, 03:00, 06:00,
12:00) il segnale DCF.Seil tentativo di ricezione ha successo, l'oraela data impostate
manualmente vengono sovrascritte.
• Tenerepremuto il tasto – (18) per ca. 3secondi perterminarelaricerca manuale.
88
Inattivo -nessun segnale ricevuto nelle ultime
Ricerca riuscita -ilsegnale viene ricevuto
Ricezione avvenuta -segnale forte
Attivo
24 ore
Page 90

Impostazione manuale data/ora
Nota –Modalità TIME
• Premereripetutamente il tasto (18) oiltasto (19), nché nellanestrailsimbolo
non inizia alampeggiare.
Nota -edel fuso orario
• In modalità TIME,premereripetutamente il tasto mode (20) per passaretra lediverse
visualizzazioni:
• Oracon indicazione dei secondi, oracon indicazionedel giorno della settimana, ora
con diverso fuso orario con indicazione dei giorni della settimana, oracon diversofuso
orario con indicazione dei secondi, data
• Perl’oracon diverso fuso orario viene visualizzato il simbolo fuso orario (13).
• Tenerepremuto il tasto (18) per ca. 3secondi per terminarelaricerca manuale
dopo il segnale DCF.Ilsimbolo della radio (12) si spegne edèpossibile impostarel'ora
manualmente.
• In modalità TIME,premereripetutamente il tasto mode (20) nché nonviene più
visualizzato il simbolo del fuso orario (13).
• Tenerepremuto il tasto mode (20) per ca.3secondi per effettuareinsequenza le seguenti
impostazioni:
•Giorno della settimana (11)
•Anno (9)
•Mese (9)
•Giorno (9)
•Indicazione G/M –M/G (9)
•Formato 12/24 ore(9)
•Ore (9)
•Minuti (9)
• Perselezionareisingoli valori, premereiltasto
la selezione corrispondente premendo il tasto mode(20).
• Se per 2secondi non si effettua alcuna immissione, si esce automaticamente dalla
modalità d'impostazione.
(18) oppureiltasto – (19) econfermare
89
Page 91

Nota –Giorno della settimana
Igiorni della settimana si possono visualizzarenelle lingue tedesco (DE), inglese (En),
svedese (SW), olandese (Du), italiano (IT), spagnolo (SP) ofrancese (Fr).
Impostazione del fuso orario
Nota -fuso orario
• Il segnale DCF può esserericevuto in tutto il mondo ma corrisponde semprealCET
vigente in Germania. Nei paesi con altri fusi orari deve essereconsiderata la variazione
dell‘ora.
• Se ci si trova aMosca, dove l‘oraèspostata in avanti di 3ore rispetto alla Germania,
occorreimpostareper il fuso orario +3. Dopo laricezione del segnale DCF o
dell‘impostazione manuale, l‘orologio si porta quindi sempreautomaticamente 3ore
avanti.
• In modalità TIME,premereripetutamente il tasto mode (20) nché nonviene più
visualizzato il simbolo del fuso orario (13).
Tenerepremuto il tasto mode (20) per ca. 3secondi per impostarel’orario dell’allarme
visualizzato.
• Perselezionareisingoli valori, premereiltasto (18) oiltasto (19) econfermaredi
volta in volta la selezione con il tasto mode (20).
• Se per 2secondi non si effettua alcuna immissione, si esce automaticamente dalla
modalità d'impostazione.
Sveglia
• In modalità TIME,premereripetutamente il tasto alarm (21), per visualizzareidiversi
allarmi.
Vengono visualizzati isimboli di allarmecorrispondenti (10) / / el’ora
della sveglia /l’intervallo temporale ovvero OFF.
• Tenerepremuto il tasto alarm (21) per ca.3secondi per impostarel’orario dell’allarme
visualizzato. L’indicazione delleore/dell’intervallo di tempo inizia alampeggiare.
90
Page 92

• Premereiltasto (18) oiltasto (19), per selezionareleore della sveglia/l’intervallo di
tempo econfermarelaselezione premendo il tasto alarm (21).
Le cifredei minuti iniziano alampeggiare.
L’allarme anticipato vieneattivato già dopo aver confermato l’intervallo di tempo.
• Ripeterequesto procedimento per selezionareiminuti della sveglia.
• Premereripetutamente il tasto alarm (21) per impostareanche l’altramodalità allarme
oppureritornareall’indicazione dell’ora(9).
• Se per 2secondi non si effettua alcuna immissione, si esce automaticamente dalla
modalità d'impostazione.
Nota
• La sveglia dei giorni lavorativi –seattivata –suona soltanto dal lunedì al venerdì. Se
questa sveglia èattiva, viene visualizzato il simbolodell’allarme (10).
• La sveglia una tantum -seattivata -scatta una sola volta. Se questa sveglia èattiva,
viene visualizzato il simbolo dell’allarme (10). Dopo il segnale di sveglia, questo
allarme viene disattivato automaticamente.
• La sveglia anticipata suona –seattivata econ temperaturaesterna <0°C/ 32°F –15,
30, 45, 60 o90minuti prima della sveglia effettiva ( e/o ). Se questa sveglia è
attiva, viene visualizzato il simbolo dell’allarme (10).
• Durante l’indicazione corrispondente, premereiltasto
disattivarel’allarme corrispondente.
Il simbolo della sveglia (10) viene visualizzato/non viene visualizzato.
Nota –Sveglia anticipata
La sveglia anticipata può essereattivata solo se èattivata almenouna delle due funzioni
di sveglia ( / ).
• Se si attiva la sveglia, ilsimbolo corrispondente (10) inizia alampeggiareeviene emesso
un segnale di sveglia.
• Premereiltasto alarm (21), per spegnerelasveglia. Diversamente, l'allarmetermina
automaticamente dopo 2minuti.
(18) oiltasto (19) per attivare/
91
Page 93

6.4. Meteo
Nota –modalità temperatura
• Premereripetutamente il tasto (18) oiltasto (19), nché nella nestrailsimbolo
non inizia alampeggiare.
Celsius /Fahrenheit
• In modalità temperatura, tenerepremuto iltasto (20) per ca. 3secondi, per alternare
l’indicazione della temperaturatra °C e°F.
Previsioni del tempo
• Sulla base delle variazioni della pressione atmosferica edei dati raccolti, la stazione base
può effettuareleprevisioni del tempo per le 12-24 oresuccessive.
Avvertenza –previsioni del tempo
• Nelle prime orediesercizio non èpossibile effettuareprevisioni del tempo, acausa
della mancanza di dati che vengono memorizzati solo durante il funzionamento.
• Le previsioni del tempo eiltempo attuale vengono rappresentate mediante simbolidiversi
(2):
Simbolo (2) Meteo
Sole
Poco nuvoloso
Nuvoloso
Pioggia
92
Page 94

Forte pioggia
Nevicata
Forte nevicata
• La stazione meteo indica per temperatura/umidità dell’aria esterna (5/17), temperatura/
umidità dell’aria ambiente (7/15) epressione atmosferica(1) una tendenza per il possibile
sviluppo di questi valori nelle oresuccessive.
Indicazione Tendenza
In aumento
Costante
discendente
6.5. Valori massimi eminimi di temperatura
La stazione base memorizza automaticamente ivalori massimieminimi della temperaturae
dell‘umidità dell‘aria esterna.
• In modalità temperatura, premereripetutamente il tasto mem(23) per passaretra
l’indicazione della temperaturaedell’umidità dell’aria attuale, della temperaturae
dell’umidità dell’aria più bassa (MIN) epiù alta(MAX).
• Tenerepremuto il tasto mem (23) per ca. 3secondi per ripristinareivalori massimi e
minimi memorizzati.
93
Page 95

6.6. Allarme temperatura esterna
• Premereripetutamente il tasto channel (22), per selezionareilcanale (4) della stazione di
misurazione per icui valori si desideraimpostareunallarme.
• In modalità temperatura, premereripetutamente il tasto alarm(21), per visualizzaregli
allarmi temperaturaesterna / .
• Premereetenerepremuto il tasto (21) per ca. 3secondi, nché l’indicazione della
temperaturaesterna (6) non inizia alampeggiare.
• Premereiltasto (18) oiltasto (19), per impostareilvalorelimite visualizzato e
confermarelaselezione corrispondente premendo il tasto alarm (21).
• Durante l’indicazione del valorelimite superioreoinferiore, premereiltasto (18) oil
tasto (19), perimpostareilvaloredella temperaturaoselezionareOFF econfermarela
selezione premendo il tasto alarm (21).
Selezionareilvaloreditemperatura/OFF per attivare/disattivarel’allarme temperatura
esterna.
• Se la temperaturaesterna raggiunge uno dei valori limite, scatta il corrispondente allarme.
Il simbolo elatemperaturaesterna inizianoalampeggiareesi sente un segnale di allarme.
Premereiltasto alarm (21), per spegnerelasveglia. Diversamente, l'allarme termina
automaticamente dopo 2minuti.
Nota –Allarme temperaturaesterna
• Stabilireper ciascun canaleostazione di misurazione collegata un valorelimite inferiore
osuperioreeattivarel’allarme.
• Prestareattenzione che il valorelimite inferioredeve esserealmeno 1°C/ 1°Fal di sotto
del valorelimite superiore.
94
Page 96

6.7. Campo benessere
La stazione base indica iseguenti campi benessereinfunzione del rapporto della temperatura
edell’umidità dell’aria ambiente attuali:
-
Range di tempe-
ratura
20°C –25°C
68°F –77°F
-5°C –50°C
23°F –122°F
-5°C –50°C
23°F –122°F
<20°C />25°C
<68°F />77°C
Umidità relativa Campo benessere
40% –70%
>70%
<40%
40% -70% -Nessunindicatore-
–piacevole –
Temperaturaeumidi-
tà dell’aria ottimali
–umido –
Umidità dell’aria
troppo elevata
–asciutto –
Aria ambiente troppo
secca
Indicazione
COMFORT
WET
DRY
6.8 Capacità ridotta delle batterie
Quando il simbolo della batteria viene visualizzato sul display della stazione base,
la capacità delle batterie nella stazione base/di misurazione èmolto bassa. Sostituire
immediatamente le batterie.
Nota -Sostituzione della batteria
• Accertarsi che dopo ogni sostituzionedelle batterie sulla stazione di misurazione osulla
stazione base avvenga una nuova sincronizzazione delle stazioni.
• Estrarreanche le batterie dall‘altra stazione einserirle nuovamente o, se necessario,
sostituirle.
95
Page 97

7. Manutenzione ecura
Pulireilprodotto unicamente con un panno che non lasciapelucchi eappena inumidito enon
ricorrereadetergenti aggressivi. Fare attenzione anon farepenetrareacqua nel prodotto.
8. Esclusione di garanzia
Hama GmbH &CoKGnon si assume alcuna responsabilità per idanni derivati dal montaggio
odall‘utilizzo scorretto del prodotto, nonché dalla mancata osservanza delle istruzioni per
l‘uso e/o delle indicazioni di sicurezza.
9. Assistenza esupporto
In caso di domande in merito al prodotto, rivolgersi al servizio di consulenzaprodotti Hama.
Hotline: +49 9091 502-115 (tedesco/inglese)
Ulteriori informazioni sul supporto sono disponibili sul sito www.hama.com.
10. Dati tecnici
Stazione base Stazione di misurazione
Alimentazione elettrica
3,0 V
2xAAA Batterie
3,0 V
2xAAA Batterie
Potenza assorbita <2,5 mA <1,0 mA
Campo di misurazione
Temperatura
Passi di misura
Temperatura
Ciclo di misurazione
temperatura
0°C –+50°C/
32°F –122°F
-20°C –+60°C/
-4°F –140°F
0,1°C /0,2°F 0,1°C /0,2°F
~45s ~45s
Umidità dell’aria25% –95% 30% –80%
Segnale orario via
radio DCF
Sì No
Frequenza 433 MHz
Portata ≤30m
96
Page 98

11. Indicazioni di smaltimento
Informazioni per protezione ambientale:
Dopo l’implementazione della Direttiva Europea 2012/19/EU e2006/66/EU nel
sistema legale nazionale, ci sono le seguenti applicazioni: Le apparecchiature
elettriche ed elettroniche elebatterie non devono esseresmaltite con iriuti
domestici. Iconsumatori sono obbligati dalla legge arestituireIdispositivi elettrici
ed elettronici elebatterie alla nedella lorovita utile ai punti diraccolta pubblici
preposti per questo scopo onei punti vendita. Dettaglidi quanto riportato sono deniti dalle
leggi nazionali di ogni stato. Questo simbolo sul prodotto, sul manuale d’istruzioni o
sull’imballo indicano che questo prodotto èsoggetto aqueste regole. Riciclando,
ri-utilizzando imateriali outilizzando sotto altraforma ivecchi prodotti/le batterie, darete un
importante contributo alla protezione dell’ambiente.
12. Dichiarazione di conformità
Il fabbricante, Hama GmbH &CoKG, dichiarache il tipo di apparecchiaturaradio
[00123125] èconforme alla direttiva 2014/53/UE. Il testo completodella
dichiarazione di conformità UE èdisponibile al seguente indirizzoInternet:
www.hama.com->00123125->Downloads.
Bande di frequenza 433 MHz
Massima potenza aradiofrequenza trasmessa 0,021 mW
97
Page 99

P Instrukcja obsługi
Elementy obsługi isygnalizacji
AStacja bazowa
1. Trend zmiany ciśnienia atmosferycznego
2. Symbol prognozy pogody
3. Symbol sygnału radiowego stacji pomiarowej
4. Wskaźnik kanałów
5. Trend zmiany temperatury zewnętrznej
6. Temperaturazewnętrzna
7. Trend zmiany temperatury wpomieszczeniu
8. Temperaturawpomieszczeniu
9. Godzina /data
10. Symbol alarmowy
11. Dzień tygodnia /sekunda
12. Symbol sygnału radiowego
13. Strefa czasowa
14. Wilgotność powietrza wpomieszczeniu
15. Trend zmiany wilgotności powietrza wpomieszczeniu
16. Wilgotność powietrza na zewnątrz
17. Trend zmiany wilgotności powietrza na zewnątrz
18. Przycisk =zwiększanie aktualnie ustawionejwartości /włączanie/ wyłączanie ręcznego
odbioru sygnału radiowego /Przełączanie między wskazywaniem czasu itemperatury
19. Przycisk =zmniejszanie aktualnie ustawionejwartości /ręczne wyszukiwanie sygnału
ze stacji pomiarowej /Przełączanie między wskazywaniem czasu itemperatury
20. Przycisk mode =ustawienia /potwierdzanie ustawionej wartości /przełączanie między
wskaźnikiem sekund, dnia tygodnia istrefy czasowej /Przełączanie między °C i°F
21. Przycisk alarm =wskaźnik /ustawianie trybów alarmowych
22. Przycisk channel =wybór kanału
23. Przycisk mem =odczyt /resetowanie zapisanych najwyższych /najniższych wartości
24. Schowek na baterie
BStacja pomiarowa
25. Schowek na baterie
26. Płyta montażowa
27. Otwór do montażu wpionie
28. Otwór do montażu wpoziomie
29. Zacisk
98
Page 100

Dziękujemy za zakup naszego produktu!
Przed pierwszym użyciem należy dokładnie przeczytać instrukcję obsługi. Instrukcję należy
przechować, gdyż może być jeszcze potrzebna.
1. Objaśnienie symboli ostrzegawczych iwskazówek
Ostrzeżenie
Używane wcelu zwrócenia uwagi na szczególne niebezpieczeństwolub ryzyko.
Wskazówki
Używane wcelu zwrócenia uwagi na szczególnie przydatneinformacje.
2. Zawartość opakowania
• stacja pogodowa EWS-860
(stacja bazowa do stosowania wewnątrz /stacja pomiarowa do stosowania na zewnątrz)
• Podpórka
• 4baterie AAA
• niniejsza instrukcja obsługi
3. Wskazówki bezpieczeństwa
• Produkt jest przeznaczony do prywatnego, niekomercyjnego użytku domowego.
• Nie stosować produktu poza zakresem mocy podanym wdanych technicznych.
• Nie stosować produktu wwilgotnym otoczeniu ichronić go przed bryzgami wody.
• Nie używać produktu wbezpośredniej bliskości ogrzewania, innych źródeł ciepła ani nie
wystawiać go na bezpośrednie promieniowanie słoneczne
• Nie używać produktu wmiejscach, gdzie nie jest dozwolone stosowanie urządzeń
elektronicznych.
• Nie ustawiać produktu wpobliżu źródeł zakłóceń, rammetalowych, komputerów,
telewizorów itp. Urządzenia elektroniczne ifutryny okienne wpływają negatywniena
działanie produktu.
• Chronić produkt przed upadkiem isilnymi wstrząsami.
• Nie otwierać produktu inie używaćgo, gdy jest uszkodzony.
• Nie próbować naprawiać samodzielnie urządzenia. Prace serwisowe zlecać
wykwalikowanemu personelowi fachowemu.
99
 Loading...