

Page 1
00
123127
Weather Station
Wetterstation
EWS-810
Operating Instructions
Bedienungsanleitung
Mode d‘emploi
Instrucciones de uso
Руководство по эксплуатации
Istruzioni per l‘uso
Οδηγίες χρήσης
Instrukcja obsługi
Návod na použitie
Manual de instruções
GB
D
F
E
RUS
I
GR
PL
SK
P
Page 2

A
S N O O Z E / L I G H T
321
13
12
11
10
9
8
14
15 16 17 18 19
MODE ALARM
4
5
6
_
CONTRAST
+
20
7
B
21 24
22
2523
26
Page 3

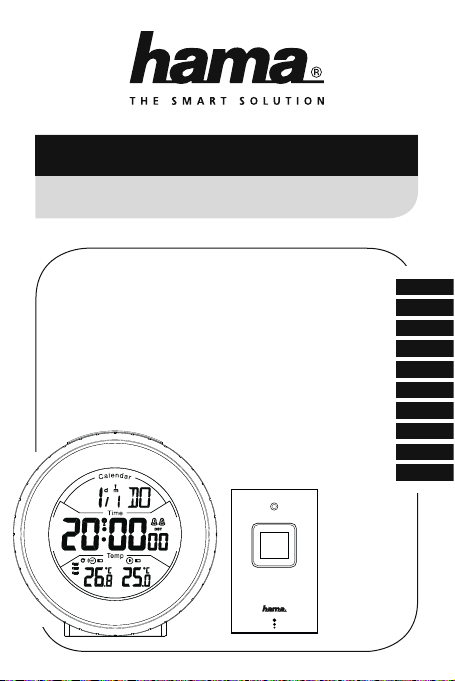
G Operating instruction
Controls and Displays
A Base station
1. Day
2. Month
3. Weekday
4. Alarm symbol
5. Summer time
6. Battery symbol (base station)
7. Room temperature
8. Outdoor temperature
9. Channel display
10. Channel overview
11. Battery symbol (measuring station)
12. Time
13. Wireless symbol
14. SNOOZE/LIGHT button = Stops the alarm/Activates the backlight (approx. 5 seconds)
15. MODE button = Settings/Conrms the setting/Switches display mode
16. ALARM button = Deactivates/Activates the alarm functions
17. + button = Increases the current setting/Selects channel if there are multiple external
temperature sensors/Manual search for a signal from the measuring station
18. – button = Decreases the current setting/Toggles between °C and °F/Activates/
deactivates manual radio signal reception
19. CONTRAST button = Controls the backlight
20. Battery compartment
B Measuring station
21. Tr ansmission indicator lamp
22. Display
23. CH button = Selects the channel
24. Opening for wall mounting
25. °C/°F button = Switches between °C and °F
26. Battery compartment
Thank you for choosing a Hama product.
Take your time and read the following instructions and information completely. Please keep
these instructions in a safe place for future reference. If you sell the device, please pass these
operating instructions on to the new owner.
2
Page 4

1. Explanation of Warning Symbols and Notes
Warning
This symbol is used to indicate safety instructions or to draw your attention to specic
hazards and risks.
Note
This symbol is used to indicate additional information or important notes.
2. Package Contents
• Weather station EWS-810
(base station for indoor/outdoor measuring station)
• 4 AAA batteries
• These operating instructions
3. Safety Instructions
• The product is intended for private, non-commercial use only.
• Do not operate the product outside the power limits given in the specications.
• Do not use the product in moist environments and avoid splashes.
• Do not use the product in the immediate vicinity of heaters or other heat sources or in
direct sunlight.
• Do not use the product in areas where the use of electronic devices is not permitted.
• Do not place the product near interference elds, metal frames, computers, TVs, etc.
Electronic devices and window frames can negatively affect the product’s functionality.
• Do not drop the product and do not expose it to any major shocks.
• Do not open the device or continue to operate it if it becomes damaged.
• Do not attempt to service or repair the product yourself. Leave any and all service work to
qualied experts.
• Keep the packaging material out of the reach of children due to the risk of suffocation.
• Dispose of packaging material immediately according to locally applicable regulations.
• Do not modify the product in any way. Doing so voids the warranty.
3
Page 5

Warning – Batteries
• Immediately remove and dispose of dead batteries from the product.
• Only use batteries (or rechargeable batteries) that match the specied type.
• Do not mix old and new batteries or batteries of a different type or make.
• When inserting batteries, note the correct polarity (+ and - markings) and insert the
batteries accordingly. Failure to do so could result in the batteries leaking or exploding.
• Do not charge batteries.
• Keep batteries out of the reach of children.
• Do not short circuit the batteries/rechargeable batteries and keep them away from
uncoated metal objects.
4. Getting Started
4.1. Measuring station
• Open the battery compartment (26) and insert two AAA batteries with the correct polarity.
• Press the CH button (23) repeatedly to select the channel the measuring station is to use
for transmission. CH1, CH2 or CH3 is shown on the display.
• Press the °C/°F button (25) to choose between °C and °F for the temperature display.
• Close the battery compartment.
Note
Before use, ensure you insert the batteries in the measuring station rst and then in the
base station.
4.2. Base station
• Open the battery compartment (20) and insert two AAA batteries with the correct polarity.
Close the battery compartment.
4
Page 6

5. Installation
Note – Installation
• We recommend initially placing the base and measuring stations in the intended
locations without installing them and making all the settings described in 6. Operation
– to do.
• Only install the stations once the appropriate settings have been made and a stable
wireless connection is established.
Note
• The wireless transmission range between the measuring and base stations is up to 30
m in open spaces.
• Before installation, ensure that wireless transmission will not be disrupted by
interference or obstacles like buildings, trees, vehicles, high-voltage lines, etc.
• Before the nal installation, ensure that there is sucient reception between the
intended installation locations.
• When installing the measuring station, ensure that it is protected from direct sunlight
and rain.
• The international standard height for measuring air temperature is 1.25 m (4 ft) above
ground.
Warning
• Buy special or suitable installation material from a specialised dealer for wall-mounting.
• Ensure that no faulty or damaged parts are installed.
• Never apply force during installation. This could damage the product.
• Before installation, ensure that the chosen wall is suitable for the weight to be
mounted, and make sure that there are no electrical wires, water, gas or other lines at
the installation site on the wall.
5.1. Base station
• Use the base to position the base station on a level surface.
5.2. Measuring station
• You can also position the measuring station on a level outdoor surface.
• We recommend installing the measuring station securely on an outdoor wall using the
5
Page 7

opening (24).
• Install an anchor, screw, nail, etc. in the wall of your choice.
• Hang up the base/measuring station using the opening intended for this purpose.
6. Operation
Note – Input
Hold down the + button (17) or the – button (18) to select the values faster.
6.1. Connection to the measuring station
• After you insert the batteries, the base station automatically searches for a connection to
the measuring station and performs initial setup.
Note
• Initial setup takes approx. 3 minutes.
• Do not press any buttons during setup. Otherwise, values may not be transmitted
correctly and there is a risk of value errors and inaccuracies.
• The setup process is completed when the indoor (7) and outdoor (8) measurement data
is displayed.
• If the base station still does not receive a signal from the measuring station, press and hold
the + button (17) for approx. 3 seconds to start the manual search for the signal.
6.2. Selecting the channel/Other measuring stations
Note
You can install two more measuring stations in addition to the included measuring station.
Ensure that the base and measuring stations are set to the same channel.
Visit www.hama.com for suitable measuring stations.
6
Page 8

• Press the + button (17) repeatedly to set the channel to that set on the respective
measuring station – see 4.1. Measuring station . CH1, CH2, CH3 (9) or Channel
overview (10) is displayed.
• The base station now shows the temperature measured (8) on the selected measuring
station (9).
• Select Channel overview (10) to show the measurement values of the individual measuring
stations/channels consecutively for 5 seconds each.
6.3. Basic and manual settings
Automatic setting using the DCF signal
• After the rst time the base station is switched on and successful transmission is established
between the base station and the measuring station, the clock will automatically search for
a DCF signal. During the search, the wireless symbol (13) will ash.
Display Searching for the DCF signal
Flashing
Displayed continuously
No display Deactivated
• If the station still does not receive a signal, press and hold the – button (18) for approx. 3
seconds to start the manual search for the DCF signal. The wireless symbol (13) willstart
to ash.
Note – Time settings
• The search process takes about 7 minutes. If the search fails, it ends and is repeated at
the next clock hour. The wireless symbol (13) will go out.
• In the meantime you can, however, set the time and the date manually.
• The clock automatically continues to search for the DCF signal on a daily basis (between
1:00 a.m. and 3:00 a.m.). If the signal is received successfully, the manually-set time
and date are overwritten.
Successful – signal is being received
Active
7
Page 9

Note – Summer time
• The clock automatically switches to summer time. DST (5) appears on the display as
long as summer time is activated.
• Press and hold the – button (18) again for approx. 3 seconds to stop the manual search.
(Manual) settings
• Press and hold the – button (18) for approx. 3 seconds to stop the search for the DCF
signal. The wireless symbol (13) goes out and you can set the time manually.
• Press and hold the MODE button (15) for approx. 3 seconds to make the following settings
one after the other:
• 12/24 hour format (12)
• Time zone (12)
• Hours (12)
• Minutes (12)
• Weekday (3)
• Year (12)
• Month (2)
• Day (1)
• To select the individual values, press the + button (17) or the – button (18) and conrm
each selection by pressing the MODE button (15).
• If you do not make an entry for 13 seconds, you automatically exit setup mode.
Note – Time zone
• The DCF signal can be received over long distances, but always transmits the current
Central European Time in Germany. Make sure you account for the time difference in
countries with another time zone.
• If you are in Moscow, the time is 3 hours later than in Germany. This means that you
should set +3 for the time zone. The clock then automatically sets the time to 3 hours
after the DCF signal received or relative to the manually set time.
8
Page 10

Note – Weekday
You can choose from German (GE), English (EN), Danish (DA), Dutch (NE), Italian (IT),
Spanish (ES) and French (FR) for the weekday display.
Celsius/Fahrenheit
• Press the – button (18) to switch between °C and °F for the temperature display.
Alarm
• Repeatedly press the MODE button (15) to access alarm mode 1 or 2 .
A1 or A2 is displayed accordingly in the seconds display.
• Press and hold the MODE button (15) for approx. 3 seconds to set the signal time of the
alarm displayed. The hours display begins to ash.
• Press the + button (17) or the – button (18) to select the hour for the alarm time and
conrm your selection by pressing the MODE button (15). The minutes display begins to
ash.
• Repeat the process to set the minutes for the alarm time.
• Press the MODE button (15) repeatedly to also set the other alarm mode or return to the
time display (12).
• If you do not make an entry for 13 seconds, you automatically exit the setting mode.
• Press the ALARM button (16) to activate/deactivate Alarm 1, Alarm 2 or both. The alarm
symbol (4) will appear/not appear.
• If the alarm is triggered, the alarm symbol (4) will begin to ash and an alarm will sound.
• Press any button (except the SNOOZE/LIGHT button (14)) to stop the alarm. Otherwise, it
will stop automatically after 2 minutes.
• If you press the SNOOZE/LIGHT button (14) during the alarm, the alarm is interrupted for
5 minutes and then goes off again. The alarm symbol (4) will ash.
6.4. Backlight
Note – Backlight
• If you press the SNOOZE/LIGHT button (14), the display will light up for approx. 5
seconds.
9
Page 11

• Press and hold the CONTRAST button (19) for approx. 3 seconds and press the + button
(17) or – button (18) to select the contrast of the digits of LCD.
6.5. Low battery capacity
As soon as the (6/11) battery symbol appears on the display of the base station, the capacity
of the batteries in the base/measuring station is very low. Replace the batteries immediately.
Note – Replacing the batteries
• Note that the stations have to be resynchronised each time after you change the
batteries in the measuring or base station.
• To do this, remove the batteries from the other station and then reinsert them, or
change them as required.
7. Care and Maintenance
Only clean this product with a slightly damp, lint-free cloth and do not use aggressive cleaning
agents.
8. Warranty Disclaimer
Hama GmbH & Co. KG assumes no liability and provides no warranty for damage resulting
from improper installation/mounting, improper use of the product or from failure to observe
the operating instructions and/or safety notes.
9. Service and Support
Please contact Hama Product Consulting if you have any questions about this product.
Hotline: +49 9091 502-115 (German/English)
Further support information can be found here:
www.hama.com
10
Page 12

10. Technical Data
Base station Measuring station
Power supply
Power consumption 0.5 mA 3 mA
Measuring range
Temperature
Measuring increments
Temperature
Temperature measurement cycle 43 – 47 s43 – 47 s
Radio-controlled DCF clock Ja Nein
Max. number of measuring
stations
Frequency 433 MHz
Range ≤ 50 m
11. Recycling Information
Note on environmental protection:
After the implementation of the European Directive 2012/19/EU and 2006/66/EU
in the national legal system, the following applies: Electric and electronic devices
as well as batteries must not be disposed of with household waste. Consumers are
obliged by law to return electrical and electronic devices as well as batteries at the
end of their service lives to the public collecting points set up for this purpose or
point of sale. Details to this are dened by the national law of the respective country. This
symbol on the product, the instruction manual or the package indicates that a product is
subject to these regulations. By recycling, reusing the materials or other forms of utilising old
devices/Batteries, you are making an important contribution to protecting our environment.
12. Declaration of Conformity
Hama GmbH & Co. KG hereby declares that the device complies with the essential
requirements and other relevant provisions of Directive 2014/53/EU. See www.
hama.com for the declaration of conformity with the relevant directive.
3.0 V
2 x AAA batteries
0°C – +50°C/
32°F – 122°F
0,1°C / 0,2°F 0,1°C / 0,2°F
3
3.0 V
2 x AAA batteries
-20°C – +60°C/
-4°F – 140°F
11
Page 13

D Bedienungsanleitung
Bedienungselemente und Anzeigen
A Basisstation
1. Tag
2. Monat
3. Wochentag
4. Alarmsymbol
5. Sommerzeit
6. Batteriesymbol (Basisstation)
7. Raumtemperatur
8. Außentemperatur
9. Kanalanzeige
10. Kanaldurchlauf
11. Batteriesymbol (Messstation)
12. Uhrzeit
13. Funksymbol
14. SNOOZE/LIGHT-Taste = Unterbrechung des Wecksignals / Aktivierung
Hintergrundbeleuchtung (ca. 5 Sekunden)
15. MODE-Taste = Einstellungen / Bestätigung des Einstellungswerts / Wechsel
Anzeigemodus
16. ALARM-Taste = Deaktivierung/ Aktivierung Alarmfunktionen
17. + -Taste = Erhöhung des aktuellen Einstellungswertes / Kanalauswahl bei mehreren
externen Temperatursensoren / Manuelle Suche nach Signal von der Messstation
18. – -Taste = Verringerung des aktuellen Einstellungswertes / Wechsel zwischen °C und °F /
Aktivierung/ Deaktivierung manueller Funksignal-Empfang
19. CONTRAST-Taste = Regelung der Hintergrundbeleuchtung
20. Batteriefach
B Messstation
21. Kontrollleuchte Übertragung
22. Display
23. CH-Taste = Kanalauswahl
24. Aussparung für Wandmontage
25. °C/°F-Taste = Wechsel zwischen °C und °F
26. Batteriefach
Vielen Dank, dass Sie sich für ein Hama Produkt entschieden haben!
Nehmen Sie sich Zeit und lesen Sie die folgenden Anweisungen und Hinweise zunächst ganz
durch. Bewahren Sie diese Bedienungsanleitung anschließend an einem sicheren Ort auf, um
bei Bedarf darin nachschlagen zu können. Sollten Sie das Gerät veräußern, geben Sie diese
Bedienungsanleitung an den neuen Eigentümer weiter.
12
Page 14

1. Erklärung von Warnsymbolen und Hinweisen
Warnung
Wird verwendet, um Sicherheitshinweise zu kennzeichnen oder um Aufmerksamkeit auf
besondere Gefahren und Risiken zu lenken.
Hinweis
Wird verwendet, um zusätzlich Informationen oder wichtige Hinweise zu kennzeichnen.
2. Packungsinhalt
• Wetterstation EWS-810
(Basisstation für den Innenbereich / Messstation für den Außenbereich)
• 4 AAA Batterien
• diese Bedienungsanleitung
3. Sicherheitshinweise
• Das Produkt ist für den privaten, nicht-gewerblichen Haushaltsgebrauch vorgesehen.
• Betreiben Sie das Produkt nicht außerhalb seiner in den technischen Daten angegebenen
Leistungsgrenzen.
• Verwenden Sie das Produkt nicht in einer feuchten Umgebung und vermeiden Sie
Spritzwasser.
• Betreiben Sie das Produkt nicht in unmittelbarer Nähe der Heizung, anderer Hitzequellen
oder in direkter Sonneneinstrahlung.
• Benutzen Sie das Produkt nicht in Bereichen, in denen elektronische Produkte nicht erlaubt
sind.
• Positionieren Sie das Produkt nicht in der Nähe von Störfeldern, Metallrahmen, Computern
und Fernsehern etc. Elektronische Geräte sowie Fensterrahmen beeinträchtigen die
Funktion des Produktes negativ.
• Lassen Sie das Produkt nicht fallen und setzen Sie es keinen heftigen Erschütterungen aus.
• Öffnen Sie das Produkt nicht und betreiben Sie es bei Beschädigungen nicht weiter.
• Versuchen Sie nicht, das Produkt selbst zu warten oder zu reparieren. Überlassen Sie
jegliche Wartungsarbeit dem zuständigen Fachpersonal.
• Halten Sie Kinder unbedingt von dem Verpackungsmaterial fern, es besteht
Erstickungsgefahr.
13
Page 15

• Entsorgen Sie das Verpackungsmaterial sofort gemäß den örtlich gültigen
Entsorgungsvorschriften.
• Nehmen Sie keine Veränderungen am Produkt vor. Dadurch verlieren sie jegliche
Gewährleistungsansprüche.
Warnung - Batterien
• Entfernen und entsorgen Sie verbrauchte Batterien unverzüglich aus dem Produkt.
• VerwendenSie ausschließlich Akkus (oder Batterien), die dem angegebenen Typ
entsprechen.
• Mischen Sie alte und neue Batterien nicht, sowie Batterien unterschiedlichen Typs oder
Herstellers.
• BeachtenSie unbedingt die korrekte Polarität (Beschriftung + und -) der Batterien und
legen Sie diese entsprechend ein. Bei Nichtbeachtung besteht die Gefahr des Auslaufens
oder einer Explosion der Batterien.
• LadenSie Batterien nicht.
• Bewahren Sie Batterien außerhalb der Reichweite von Kindern auf.
• Schließen Sie Akkus/Batterien nicht kurz und halten Sie sie von blanken
Metallgegenständen fern.
4. Inbetriebnahme
4.1. Messstation
• Öffnen Sie das Batteriefach (26) und legen Sie zwei AAA Batterien polrichtig ein.
• Drücken Sie wiederholt die CH-Taste (23), um den Kanal, auf dem die Messstation sendet,
auszuwählen. Auf dem Display wird CH1, CH2 oder CH3 angezeigt.
• Drücken Sie die °C/°F-Taste (25), um bei der Temperaturanzeige zwischen °C und °F zu
wechseln.
• Schließen Sie die Batteriefachabdeckung anschließend.
Hinweis
Beachten Sie, dass Sie bei der Inbetriebnahme immer zuerst die Batterien in die
Messstation, und dann in die Basisstation einlegen.
4.2. Basisstation
• Öffnen Sie das Batteriefach (20) und legen Sie zwei AAA Batterien polrichtig ein. Schließen
Sie die Batteriefachabdeckung anschließend.
14
Page 16

5. Montage
Hinweis – Montage
• Es wird empfohlen, die Basis- und Messstation zunächst an den gewünschten
Aufstellorten ohne Montage zu platzieren und alle Einstellungen - wie in 6. Betrieb
beschrieben – vorzunehmen.
• Montieren Sie erst nach korrekter Einstellung und stabiler Funkverbindung die Station/
en.
Hinweis
• Die Reichweite der Funkübertragung zwischen der Mess- und Basisstation beträgt im
freien Gelände bis zu 30m.
• Achten Sie vor der Montage darauf, dass die Funkübertragung nicht durch Störsignale
oder Hindernisse wie Gebäude, Bäume, Fahrzeuge, Hochspannungsleitungen, u.a.
beeinusst wird.
• Stellen Sie vor der endgültigen Montage sicher, dass zwischen den gewünschten
Aufstellorten ausreichender Empfang besteht.
• Achten Sie bei der Montage der Messstation darauf, dass diese vor direkter Sonne und
Regen geschützt positioniert ist.
• Die internationale Standardhöhe für die Messung der Lufttemperatur beträgt 1,25 m
(4 ft) über Grund.
Warnung
• Besorgen Sie sich spezielles bzw. geeignetes Montagematerial im Fachhandel für die
Montage an der vorgesehenen Wand.
• Stellen Sie sicher, dass keine fehlerhaften oder beschädigten Te ile montiert werden.
• Wenden Sie bei der Montage niemals Gewalt oder hohe Kräfte an. Diese können das
Produkt beschädigen.
• Prüfen Sie vor Montage die Eignung der vorgesehenen Wand für das anzubringende
Gewicht und vergewissern Sie sich, dass sich an der Montagestelle in der Wand keine
elektrischen Leitungen, Wasser-, Gas- oder sonstige Leitungen benden.
5.1. Basisstation
• Stellen Sie die Basisstation mithilfe des Standfußes auf einer ebenen Fläche auf.
15
Page 17

5.2. Messstation
• Die Messstation können Sie ebenfalls auf einer ebenen Fläche im Außenbereich aufstellen.
• Es wird empfohlen, die Messstation sicher und fest an einer Außenwand mithilfe der
Aussparung (24) zu montieren.
• Befestigen Sie Dübel, Schraube, Nagel, etc. in der dafür vorgesehenen Wand.
• Hängen Sie die Messstation mit der dafür vorgesehenen Aussparung daran ein.
6. Betrieb
Hinweis – Eingabe
Halten Sie die + -Taste (17) oder die – -Taste (18) gedrückt, um die Werte schneller
auswählen zu können.
6.1. Verbindung zur Messstation
• Nach dem Einlegen der Batterien sucht die Basisstation automatisch nach einer Verbindung
zur Messstation und führt die Ersteinrichtung durch.
Hinweis
• Die Ersteinrichtung dauert ca. 3 Minuten.
• Vermeiden Sie in dieser Zeit jegliche Betätigung der Tasten! Andernfalls können Fehler
und Ungenauigkeiten bei den Werten und deren Übertragung entstehen.
• Der Vorgang ist beendet, sobald die Messdaten für Innen- (7) und Außenbereich (8)
angezeigt werden.
• Wird wiederholt kein Signal von der Messstation empfangen, drücken und halten Sie die
+ -Taste (17) für ca. 3 Sekunden, um die manuelle Suche nach dem Signal zu starten.
6.2. Kanalauswahl/ Weitere Messstationen
Hinweis
Sie können zusätzlich zu der mitgelieferten Messstation zwei weitere Messstationen
installieren. Achten Sie hierbei auf die identische Kanaleinstellung an Basis- und jeweiliger
Messstation. Passende Messstationen nden Sie unter www.hama.com
16
Page 18

• Drücken Sie wiederholt die + -Taste (17), um denselben Kanal wie an der jeweiligen
Messstation – siehe 4.1. Messstation – einzustellen. Es wird CH1, CH2, CH3 (9) oder
Kanaldurchlauf (10) angezeigt.
• Die Basisstation zeigt nun die gemessene Temperatur (8) der ausgewählten Messstation
(9) an.
• Wählen Sie den Kanaldurchlauf (10) aus, damit die Messwerte der einzelnen Messstationen/
Kanäle nacheinander für jeweils 5 Sekunden angezeigt werden.
6.3. Grundeinstellungen und manuelle Einstellungen
Automatische Einstellung nach DCF-Signal
• Nach dem ersten Einschalten der Basisstation und erfolgreicher Übertragung zwischen
Basis- und Messstation, beginnt die Uhr automatisch die Suche nach einem DCF-Signal.
Während des Suchvorgangs blinkt das Funksymbol (13) auf.
Anzeige Suche nach DCF-Signal
Blinkende Anzeige
Dauerhafte Anzeige
Keine Anzeige Inaktiv
• Wird wiederholt kein Signal empfangen, drücken und halten Sie die – -Taste (18) für ca. 3
Sekunden, um die manuelle Suche nach dem DCF-Signal zu starten. Das Funksymbol (13)
beginnt zu blinken.
Hinweis – Uhrzeiteinstellung
• Der Suchvorgang dauert etwa 7 Minuten. Falls dieser fehlschlägt, wird die Suche
beendet und zur nächsten vollen Stunde wiederholt. Das Funksymbol (13) erlischt.
• Sie können währenddessen eine manuelle Einstellung von Uhrzeit und Datum
vornehmen.
• Die Uhr sucht automatisch weiterhin täglich (zwischen 01:00 und 03:00 Uhr) nach dem
DCF-Signal. Bei erfolgreichem Signalempfang werden die manuell eingestellte Uhrzeit
und das Datum überschrieben.
Erfolgreich – Signal wird empfangen
Aktiv
17
Page 19

Hinweis – Sommerzeit
• Die Uhrzeit stellt sich automatisch auf die Sommerzeit um. Solange die Sommerzeit
aktiv ist, wird auf dem Display DST (5) angezeigt.
• Drücken und halten Sie die – -Taste (18) erneut für ca. 3 Sekunden, um den manuellen
Suchvorgang zu beenden.
(Manuelle) Einstellung
• Drücken und halten Sie die – -Taste (18) für ca. 3 Sekunden, um den Suchvorgang nach
dem DCF-Signal zu beenden. Das Funksymbol (13) erlischt und Sie können die Uhrzeit
manuell einstellen.
• Drücken und halten Sie die MODE-Taste (15) für ca. 3 Sekunden, um folgende
Einstellungen nacheinander vorzunehmen:
• 12/24-Stunden-Format (12)
• Zeitzone (12)
• Stunden (12)
• Minuten (12)
• Wochentag (3)
• Jahr (12)
• Monat (2)
• Tag (1)
• Drücken Sie zum Auswählen der einzelnen Werte die + -Taste (17) oder die – -Taste (18)
und bestätigen Sie die jeweilige Auswahl durch Drücken der MODE-Taste (15). .
• Erfolgt 13 Sekunden keine Eingabe, wird der Einstellungsmodus automatisch verlassen.
Hinweis – Zeitzone
• Das DCF-Signal kann weitläug empfangen werden, entspricht jedoch immer der MEZ,
die in Deutschland gilt. Beachten Sie daher, dass Sie in Ländern mit anderer Zeitzone
die Zeitverschiebung beachten.
• Benden Sie sich in Moskau, ist es dort bereits 3 Stunden später als in Deutschland.
Stellen Sie daher bei der Zeitzone +3 ein. Die Uhr stellt sich dann immer nach Empfang
des DCF-Signals bzw. in Bezug auf die manuell eingestellte Uhrzeit automatisch 3
Stunden weiter.
18
Page 20

Hinweis – Wochentag
• Sie können für die Wochentaganzeige die Sprachen Deutsch (GE), Englisch (EN),
Dänisch (DA), Niederländisch (NE), Italienisch (IT), Spanisch (ES) oder Französisch (FR)
wählen.
Celsius / Fahrenheit
• Drücken Sie die – -Taste (18), um bei der Temperaturanzeige zwischen °C und °F zu
wechseln.
Wecker
• Drücken Sie wiederholt die MODE-Taste (15), um in den Alarmmodus 1 oder 2 zu
gelangen.
In der Sekundenanzeige wird entsprechend A1 oder A2 angezeigt.
• Drücken und halten Sie die MODE-Taste (15) für ca. 3 Sekunden, um die Weckzeit des
angezeigten Alarms einzustellen. Die Stundenanzeige beginnt zu blinken.
• Drücken Sie die + -Taste (17) oder die – -Taste (18), um die Stunden der Weckzeit
auszuwählen und bestätigen Sie die Auswahl durch Drücken der MODE-Taste (15). Die
Minutenanzeige beginnt zu blinken.
• Wiederholen Sie diesen Vorgang für die Minuten der Weckzeit.
• Drücken Sie wiederholt die MODE-Taste (15), um den anderen Alarmmodus ebenfalls
einzustellen oder zurück zur Anzeige der Uhrzeit (12) zu gelangen.
• Erfolgt 13 Sekunden keine Eingabe, wird der Einstellungsmodus automatisch verlassen.
• Drücken Sie die ALARM-Taste (16), um Alarm 1, Alarm 2 oder beide zu aktivieren/
deaktivieren. Das Alarmsymbol (4) wird angezeigt/ nicht angezeigt.
• Wird der Wecker entsprechend ausgelöst, beginnt das Alarmsymbol (4) zu blinken und ein
Wecksignal ertönt.
• Drücken Sie eine beliebige Taste (außer die SNOOZE/LIGHT-Taste (14), um den Alarm zu
beenden. Andernfalls endet dieser automatisch nach 2 Minuten.
• Drücken Sie während des Wecksignals die SNOOZE/LIGHT-Taste (14), wird das Wecksignal
für 5 Minuten unterbrochen und dann erneut ausgelöst. Das Alarmsymbol (4) blinkt.
6.4. Hintergrundbeleuchtung
Hinweis – Hintergrundbeleuchtung
• Drücken Sie die SNOOZE/LIGHT-Taste (14), wird das Display für ca. 5 Sekunden
beleuchtet.
19
Page 21

• Drücken und halten Sie die CONTRAST-Taste (19) für ca. 3 Sekunden und wählen Sie durch
Drücken der + -Taste (17) und – -Taste (18) die gewünschte Stärke der LCD-Ziffern aus.
6.5. Niedrige Batteriekapazität
Sobald das Batteriesymbol (6/11) auf dem Display der Basisstation angezeigt wird, ist die
Kapazität der Batterien in der Basis-/ Messsation sehr gering. Wechseln Sie die Batterien
umgehend aus.
Hinweis – Batteriewechsel
• Beachten Sie, dass Sie nach jedem Batteriewechsel an Mess- oder Basisstation eine
neue Synchronisation der Stationen erfolgen muss.
• Nehmen Sie dazu die Batterien der anderen Station heraus und setzen Sie erneut ein
oder wechseln Sie diese bei Bedarf ebenfalls aus.
7. Wartung und Pflege
Reinigen Sie dieses Produkt nur mit einem fusselfreien, leicht feuchten Tuch und verwenden
Sie keine aggressiven Reiniger. Achten Sie darauf, dass kein Wasser in das Produkt eindringt.
8. Haftungsausschluss
Die Hama GmbH & Co. KG übernimmt keinerlei Haftung oder Gewährleistung für Schäden, die
aus unsachgemäßer Installation, Montage und unsachgemäßem Gebrauch des Produktes oder
einer Nichtbeachtung der Bedienungsanleitung und/oder der Sicherheitshinweise resultieren.
9. Service und Support
Bitte wenden Sie sich bei Fragen zum Produkt gerne an die Hama-Produktberatung.
Hotline: +49 9091 502-115 (Deu/Eng)
Weitere Supportinformationen nden sie hier:
www.hama.com
20
Page 22

10. Technische Daten
Basisstation Messstation
Stromversorgung
Stromaufnahme 0,5 mA 3 mA
Messbereich
Temperatur
Messschritte
Temperatur
Messzyklus Temperatur 43 – 47 s43 – 47 s
DCF-Funkuhr Ja Nein
Max. Anzahl Messstationen 3
Frequenz 433 MHz
Reichweite ≤ 50 m
11. Entsorgungshinweise
Hinweis zum Umweltschutz:
Ab dem Zeitpunkt der Umsetzung der europäischen Richtlinien 2012/19/EU und
2006/66/EG in nationales Recht gilt folgendes: Elektrische und elektronische
Geräte sowie Batterien dürfen nicht mit dem Hausmüll entsorgt werden. Der
Verbraucher ist gesetzlich verpichtet, elektrische und elektronische Geräte sowie
Batterien am Ende ihrer Lebensdauer an den dafür eingerichteten, öffentlichen
Sammelstellen oder an die Verkaufsstelle zurückzugeben. Einzelheiten dazu regelt das
jeweilige Landesrecht. Das Symbol auf dem Produkt, der Gebrauchsanleitung oder der
Verpackung weist auf diese Bestimmungen hin. Mit der Wiederverwertung, der stoichen
Verwertung oder anderen Formen der Verwertung vonAltgeräten/Batterien leisten Sie einen
wichtigen Beitrag zum Schutz unserer Umwelt.
12. Konformitätserklärung
Hiermit erklärt Hama GmbH & Co. KG, dass sich dieses Gerät in Übereinstimmung
mit den grundlegenden Anforderungen und den anderen relevanten Vorschriften
der Richtlinie 2014/53/EU bendet. Die Konformitätserklärung gemäß der
entsprechenden Richtlinie nden Sie unter www.hama.com.
3,0 V
2 x AAA Batterie
0°C – +50°C/
32°F – 122°F
0,1°C / 0,2°F 0,1°C / 0,2°F
3,0 V
2 x AAA Batterie
-20°C – +60°C/
-4°F – 140°F
21
Page 23

F Mode d‘emploi
Éléments de commande et d'affichage
A Station de base
1. Jour
2. Mois
3. Jour de la semaine
4. Icône alarme
5. Heure d‘été
6. Icône de pile (station de base)
7. Température ambiante
8. Température extérieure
9. Achage du canal
10. Recherche du canal
11. Icône de pile (station de mesure)
12. Heure
13. Icône radio
14. To uche SNOOZE/LIGHT = interruption de la sonnerie de réveil / allumage du rétroéclairage (env. 5 secondes)
15. Touche MODE = réglage / conrmation de la valeur sélectionnée
16. To uche ALARM = désactivation / activation des alarmes
17. To uche + = augmentation de la valeur en cours de réglage / sélection du canal en
présence de plusieurs capteurs de température externe / recherche manuelle du signal
provenant de la station de base
18. To uche – = diminution de la valeur en cours de réglage / commutation entre °C et °F /
activation / désactivation de la réception manuelle du signal radio
19. To uche CONTRAST = réglage du rétro-éclairage
20. Compartiment à piles
B Station de mesure
21. Témoin de contrôle transmission
22. Écran
23. To uche CH = sélection du canal
24. Fente pour l‘installation murale
25. To uche°C/°F = commutation entre achage °C et °F
26. Compartiment à piles
Nous vous remercions d’avoir choisi un produit Hama.
Veuillez prendre le temps de lire l‘ensemble des remarques et consignes suivantes. Veuillez
conserver ce mode d‘emploi à portée de main an de pouvoir le consulter en cas de besoin.
Transmettez-le au nouveau propriétaire avec l’appareil le cas échéant.
22
Page 24

1. Explication des symboles d‘avertissement et des remarques
Avertissement
Ce symbole est utilisé pour indiquer des consignes de sécurité ou pour attirer votre attention sur
des dangers et risques particuliers.
Remarque
Ce symbole est utilisé pour indiquer des informations supplémentaires ou des remarques
importantes.
2. Contenu de l'emballage
• Station météo EWS-810
(station de base pour l‘intérieur / station de mesure pour l‘extérieur)
• 4 piles LR03/AAA
• Mode d‘emploi
3. Consignes de sécurité
• Ce produit est destiné à une installation domestique non commerciale.
• N‘utilisez pas le produit en dehors des limites de puissance indiquées dans les
caractéristiques techniques.
• N‘utilisez pas le produit dans un environnement humide et évitez toute projection d‘eau.
• Évitez d’utiliser le produit à proximité immédiate d‘un chauffage, d’autres sources de
chaleur ou exposé aux rayons directs du soleil.
• N‘utilisez pas le produit dans les zones dans lesquelles l‘utilisation d‘appareils
électroniques est interdite.
• Ne placez pas le produit à proximité de champs parasites, de cadres métalliques,
d’ordinateurs, de téléviseurs, etc. Les appareils électroniques ainsi que les cadres de fenêtre
ont une inuence négative sur le fonctionnement du produit.
• Protégez le produit des secousses violentes et évitez tout choc ou toute chute.
• Ne tentez pas d‘ouvrir le produit en cas de détérioration et cessez de l’utiliser.
• Ne tentez pas de réparer l’appareil vous-même ni d’effectuer des travaux d’entretien.
Déléguez tous travaux d‘entretien à des techniciens qualiés.
• Tenez les emballages d‘appareils hors de portée des enfants, risque d‘étouffement.
• Recyclez les matériaux d’emballage conformément aux prescriptions locales en vigueur.
• N’apportez aucune modication à l’appareil. Des modications vous feraient perdre
vos droits de garantie.
23
Page 25

Avertissement concernant les piles
• Retirez les piles usagées immédiatement du produit pour les recycler.
• Utilisez exclusivement des batteries (ou des piles) du type indiqué.
• N’utilisez pas simultanément des piles usagées et des piles neuves ou des piles de
différents types.
• Respectez impérativement la polarité de la pile (marquage + et -) lors de l‘insertion
dans le boîtier ; risques d‘écoulement et d‘explosion des piles si tel n‘est pas le cas.
• Ne tentez pas de recharger les piles.
• Conservez les piles hors de portée des enfants.
• Ne court-circuitez pas les batteries/piles et éloignez-les des objets métalliques.
4. Mise en service
4.1. Station de mesure
• Ouvrez le compartiment à piles (26) et insérez deux piles LR03/AAA conformément aux
indications de polarité.
• Appuyez plusieurs fois sur la touche CH (23) an de sélectionner le canal de transmission
depuis la station de mesure. CH1, CH2 ou CH3 apparaît à l’écran.
• Appuyez sur la touche °C/°F (25), an de sélectionner l‘achage en degrés Celsius ou
Fahrenheit.
• Refermez le couvercle du compartiment..
Remarque
Lors de la première mise en service, veuillez premièrement insérer les piles dans la station
de mesure, puis dans la station de base.
4.2. Station de base
• Ouvrez le compartiment à piles (20) et insérez deux piles LR03/AAA conformément aux
indications de polarité. Refermez le couvercle du compartiment.
24
Page 26

5. Installation
Remarque concernant l‘installation
• Nous vous recommandons de positionner la station de base et la station de mesure
dans les endroits envisagés sans effectuer le montage, puis d‘effectuer les réglages tels
que décrits au chapitre6. (fonctionnement des stations).
• Procédez ensuite à l‘installation des stations après avoir effectué le réglage et reçu une
connexion radio stable.
Remarque
• La portée de la transmission radio entre la station de base et la station de mesure est de
30 m dans un espace dégagé.
• Veuillez contrôler, avant l‘installation, que la portée radio ne soit pas altérée par des
interférences ou des obstacles tels que bâtiments, arbres, véhicules, lignes haute
tension, etc.
• Veuillez contrôler, avant l‘installation dénitive, la bonne qualité de la transmission
entre les deux stations.
• Veuillez également protéger les stations de l‘ensoleillement direct et de la pluie lors de
l‘installation.
• La hauteur standard internationale de mesure de la température de l‘air est de 1,25 m
(4 ft) au-dessus du sol.
Avertissement
• En vue de l‘installation, procurez-vous le matériel d‘installation adéquat pour le mur
concerné dans un commerce spécialisé.
• Veuillez contrôler que l‘emballage ne contienne aucune pièce erronée ni endommagée.
• N‘appliquez en aucun cas une force excessive lors de l‘installation. Une force excessive
est susceptible d‘endommager le produit.
• Avant l‘installation, vériez que le mur prévu pour recevoir le produit dispose d‘une
force portante susante et qu‘aucune conduite d‘électricité, d‘eau, de gaz ni aucune
autre conduite ne passe dans cette partie de la cloison.
5.1. Station de base
• Placez la station de base sur une surface plane à l‘aide de son pied.
25
Page 27

5.2. Station de mesure
• Vous pouvez également placer la station de mesure à l‘extérieur, sur une surface plane, à
l‘aide de son pied.
• Nous vous recommandons d‘installer solidement la station de mesure à une paroi extérieure
à l’aide de l’encoche (24).
• Fixez cheville, vis, clou, etc. dans la paroi prévue pour recevoir l‘installation.
• Suspendez la station de mesure à l‘aide de la fente prévue à cet effet.
6. Fonctionnement
Remarque concernant la saisie
Maintenez la touche + (17) ou la touche – (18) enfoncée an de faire déler rapidement
les chiffres.
6.1. Connexion vers la station de mesure
• La station de base recherche automatiquement une connexion à la station de mesure et
effectue la première conguration après avoir inséré les piles.
Remarque
• La conguration dure environ 3 minutes.
• N‘appuyez sur aucune touche pendant cette phase ; des erreurs ou des inexactitudes de
mesure ou de transmission pourraient en résulter.
• La conguration est terminée dès que les valeurs mesurées pour la zone intérieure(7) et
pour la zone extérieure (8) apparaissent à l‘écran.
• En cas de nouvel échec de réception, appuyez sur la touche + (17) pendant environ 3
secondes an de lancer une recherche manuelle du signal horaire DCF.
6.2. Sélection du canal / autres stations de mesure
Remarque
Vous pouvez installer deux stations de mesure supplémentaires en plus de la station
fournie. Lors de l’installation de stations supplémentaires, veuillez utiliser les mêmes
réglages de canal de la station de base vers la station de mesure.
Vous trouverez des stations mesure adaptées sur www.hama.com
26
Page 28

• Appuyez plusieurs fois sur la touche + (17) an d’utiliser le même canal que celui de la
station concernée – voir 4.1. Station de mesure . CH1, CH2, CH3 (9) ou recherche de canal
(10) apparaît à l’écran.
• La température mesurée (8) provenant de la station sélectionnée (9) apparaît à l’écran de
la station de base.
• Sélectionnez la recherche de canal (10) an d’acher successivement les valeurs des
différentes stations de mesure / des différents canaux pendant 5 secondes.
6.3. Réglages de base et paramétrage manuel
Réglage automatique sur la base du signal horaire DCF
• Après avoir mis la station de base sous tension et en cas de transmission correcte entre
la station de base et la station de mesure, l‘horloge recherche automatiquement le signal
horaire DCF. L’icône radio (13) clignote pendant la recherche du signal horaire.
Achage Recherche du signal horaire DCF
Achage clignotant
Achage permanent
Aucun achage Inactif
• En cas de nouvel échec de réception, appuyez sur la touche – (18) pendant environ 3
secondes an de lancer une recherche manuelle du signal horaire DCF. L‘ icône radio (13)
se met à clignoter.
Remarque concernant le réglage de l‘heure
• Cette recherche dure environ 7 minutes. En cas d‘échec de détection du signal, le réveil
recommence à rechercher le signal à l‘heure pleine suivante. L’ icône radio (13) s’éteint.
• Vous pouvez également régler l‘heure et la date manuellement.
• L’horloge continue à rechercher quotidiennement le signal horaire DCF (entre 1h00 et
3h00). Les réglages manuels de l’heure et de la date seront corrigés dès que la station
reçoit correctement le signal horaire DCF.
Recherche aboutie - signal en cours de réception
Recherche active
27
Page 29

Remarque concernant l‘heure d‘été
• Le réveil s‘adapte automatiquement à l‘heure d‘été. DST (5) apparaît à l’écran pendant
la durée de l’heure d’été.
• Maintenez à nouveau la – (18) enfoncée pendant environ 3 secondes an d’interrompre la
recherche manuelle.
Réglages (manuels)
• Maintenez la touche - (18) enfoncée pendant environ 3 secondes an d’interrompre la
recherche du signal DCF. Le symbole radio (13) s’éteintet vous pouvez régler l’heure
manuellement.
• Appuyez sur la touche MODE (15) pendant environ 3 secondes an d‘effectuer
successivement les réglages suivants :
• format horaire 12/24 heures (12)
• fuseau horaire (12)
• heures (12)
• minutes (12)
• jour de la semaine (3)
• année (12)
• mois (2)
• jour (1)
• Appuyez sur la touche + (17) ou sur al touche –Taste (18), puis conrmez votre sélection en
appuyant sur la touche MODE(15). .
• Le mode de paramétrage s‘interrompt automatiquement si vous n‘appuyez sur aucune
touche pendant plus de 13 secondes.
Remarque concernant les fuseaux horaires
• Il est possible de recevoir le signal horaire à grande distance ; ce signal ne correspond
toutefois pas toujours à GMT + 1, l‘heure en vigueur en Allemagne. Veuillez donc noter
qu‘un décalage horaire doit être adopté dans les pays situés dans un autre fuseau
horaire.
• Si vous vous trouvez, par exemple, à Moscou, le décalage horaire entre Moscou et
l‘Allemagne est de 3 heures (l‘heure de Moscou est en avance). Réglez donc le fuseau
horaire sur +3. L‘ horloge s‘adaptera alors automatiquement à l‘heure captée par le
signal horaire DCF (ou à l‘heure réglée manuellement) et lui ajoutera 3 heures.
28
Page 30

Remarque concernant l‘achage des jours de la semaine
• Vous pouvez acher le jour de la semaine dans les langues suivantes : allemand (GE),
anglais (EN), danois (DA), néerlandais (NE), italien (IT), espagnol (ES) ou français (FR).
Degrés Celsius / Fahrenheit
• Appuyez sur la touche –(18) an de sélectionner l’achage en degrés Celsius ou
Fahrenheit.
Réveil
• Appuyez plusieurs fois sur la touche MODE (15) an de sélectionner le mode alarme1 ou 2.
• A1 ou A2 apparaît dans l’achage des secondes.
• Maintenez la touche MODE(15) enfoncée pendant environ 3 secondes an de régler
l’heure de réveil de l’alarme sélectionnée. Les chiffres de l‘heure se mettent à clignoter.
• Appuyez sur la touche + (17) ou sur la touche - (18) an de sélectionner l‘heure de réveil,
puis conrmez votre sélection en appuyant sur la touche MODE (15). Les chiffres des
minutes se mettent à clignoter.
• Répétez l‘étape précédente pour les minutes de l‘heure de réveil.
• Appuyez plusieurs fois sur la touche MODE (15) an de sélectionner l’autre mode alarme
ou retourner à l’achage de l’heure (12).
• Le mode de paramétrage s‘interrompt automatiquement si vous n‘appuyez sur aucune
touche pendant plus de 13 secondes.
• Appuyez sur la touche ALARM (16) an d’activer / désactiver l’alarme 1, l’alarme 2 ou les
deux alarmes . L‘ icône d‘alarme (4) apparaît à l‘écran (ou n‘apparaît pas, le cas échéant).
• Lors du déclenchement de l‘alarme de réveil, l‘icône d‘alarme (4) se met à clignoter et une
alarme sonore retentit.
• Appuyez sur n‘importe quelle touche (à part la touche SNOOZE / LIGHT (14)) an d‘arrêter
l‘alarme. L‘alarme s‘arrête également automatiquement au bout de 2 minutes.
• Si vous appuyez sur la touche SNOOZE / LIGHT (14) pendant le retentissement de
l‘alarme, l‘alarme s‘interrompt pendant 5 minutes, puis retentit à nouveau. L‘ icône d‘alarme
(4) clignote à l‘écran.
6.4. Rétro-éclairage
Remarque concernant le rétro-éclairage
• Appuyez sur la touche SNOOZE / LIGHT (14) an d‘allumer l‘écran pendant environ
5 secondes.
29
Page 31

• Maintenez la touche CONTRAST (19) enfoncée pendant environ 3 secondes, puis
sélectionnez les digits à cristaux liquides à l’aide de la touche + (17) et de la touche –(18).
6.5. Piles faibles
La capacité des piles de la station de mesure est très basse dès que l’icône(6/11) apparaît à
l’écran de la station de base / de mesure. Veuillez remplacer les piles au plus vite.
Remarque concernant le remplacement des piles
• Veuillez noter qu‘après chaque remplacement de piles de la station de base ou de la
station de mesure, vous devrez effectuer une nouvelle synchronisation der stations.
• Lors de cette synchronisation, extrayez également les piles de la station qui continuait à
fonctionner, puis réinsérez-les ou remplacez ces dernières.
7. Nettoyage et entretien
Nettoyez ce produit uniquement à l’aide d’un chiffon non pelucheux légèrement humide ;
évitez tout détergent agressif. Veillez à ce qu’aucun liquide ne pénètre dans le produit.
8. Exclusion de garantie
La société Hama GmbH & Co. KG décline toute responsabilité en cas de dommages provoqués
par une installation, un montage ou une utilisation non conformes du produit ou encore
provoqués par un non respect des consignes du mode d‘emploi et/ou des consignes de
sécurité.
9. Service et assistance
En cas de question concernant le produit, veuillez vous adresser au service de conseil produits
de Hama.
Ligne téléphonique directe : +49 9091 502-115 (allemand/anglais)
Vous trouverez ici de plus amples informations concernant l‘assistance : www.hama.com
30
Page 32

10. Caractéristiques techniques
Station de base Station de mesure
Alimentation en électricité
Consommation de courant 0,5 mA 3 mA
Plage de mesure
Température
incrément de mesure
Température
Cycle de mesure de la
température
Horloge radio-pilotée DCF oui non
nombre maxi de stations de
mesure
Fréquence 433 MHz
Portée ≤ 50 m
11. Consignes de recyclage
Remarques concernant la protection de l’environnement:
Conformément à la directive européenne 2012/19/EU et 2006/66/CE, et an
d‘atteindre un certain nombre d‘objectifs en matière de protection de
l‘environnement, les règles suivantes doivent être appliquées: Les appareils
électriques et électroniques ainsi que les batteries ne doivent pas être éliminés
avec les déchets ménagers. Le pictogramme “picto” présent sur le produit, son
manuel d‘utilisation ou son emballage indique que le produit est soumis à cette
réglementation. Le consommateur doit retourner le produit/la batterie usager aux points de
collecte prévus à cet effet. Il peut aussi le remettre à un revendeur. En permettant enn le
recyclage des produits ainsi que les batteries, le consommateur contribuera à la protection de
notre environnement. C‘est un acte écologique.
12. Déclaration de conformité
La société Hama GmbH & Co. KG déclare par la présente que cet appareil est
conforme aux exigences essentielles et aux autres dispositions de la directive
2014/53/UE. Voss trouverez la déclaration de conformité selon la directive
correspondante sur notre site: www.hama.com.
3,0 V
2 piles LR03/AAA
0 °C – +50 °C/
32 °F – 122 °F
0,1 °C / 0,2 °F 0,1 °C / 0,2 °F
43 – 47 s43 – 47 s
3-
3,0 V
2 piles LR03/AAA
-20 °C – +60 °C/
-4 °F – 140 °F
31
Page 33

E Instrucciones de uso
Elementos de manejo e indicadores
A Estación base
1. Día
2. Mes
3. Día de la semana
4. Símbolo de alarma
5. Horario de verano
6. Símbolo de batería (estación base)
7. Temperatura ambiente
8. Temperatura exterior
9. Visualización del canal
10. Visualización de canales en serie
11. Símbolo de batería (estación de medición)
12. Hora
13. Símbolo de radiofrecuencia
14. Te cla SNOOZE/LIGHT = Interrupción de la señal del despertador/ activación de la
retroiluminación (aprox. 5 segundos)
15. Tecla MODE = Ajustes / conrmación del valor de ajuste / conmutación modo de
visualización
16. Te cla ALARM = Desactivación/ activación de las funciones de alarma
17. Te cla + = Aumento del valor de ajuste actual / Selección del canal con varios sensores
de temperatura externos / Búsqueda manual de la señal de la estación de medición
18. Te cla – = Disminución del valor de ajuste actual / cambio entre °C y °F / activación/
desactivación de la recepción manual de la señal de radiofrecuencia
19. Te cla CONTRAST = Regulación de la retroiluminación
20. Compartimento para pilas
B Estación de medición
21. Luz de control de transmisión
22. Pantalla
23. Te cla CH = Selección de canal
24. Abertura para el montaje en pared
25. Te cla °C/°F = Conmutación entre °C y °F
26. Compartimento para pilas
Le agradecemos que se haya decidido por un producto de Hama.
Tómese tiempo y léase primero las siguientes instrucciones e indicaciones. Después, guarde
estas instrucciones de manejo en un lugar seguro para poder consultarlas cuando sea
necesario. Si vende el aparato, entregue estas instrucciones de manejo al nuevo propietario.
32
Page 34

1. Explicación de los símbolos de aviso y de las indicaciones
Aviso
Se utiliza para caracterizar las indicaciones de seguridad o para llamar la atención sobre
peligros y riesgos especiales.
Nota
Se utiliza para caracterizar informaciones adicionales o indicaciones importantes.
2. Contenido del paquete
• Estación meteorológica EWS-810
(Estación base para interior / estación de medición para el exterior)
• 4 pilas AAA
• Estas instrucciones de manejo
3. Instrucciones de seguridad
• El producto es para el uso doméstico privado, no comercial.
• No opere el producto fuera de los límites de potencia indicados en los datos técnicos.
• No utilice el producto en entornos húmedos y evite el contacto con las salpicaduras de
agua.
• No opere el producto en las inmediaciones de la calefacción, de otras fuentes de calor o
bajo la radiación directa del sol.
• No utilice el producto en áreas donde no se permitan aparatos electrónicos.
• No coloque el producto cerca de campos de interferencia, marcos de metal, ordenadores
y televisores, etc. Los dispositivos electrónicos y los marcos de ventanas inuyen
negativamente en el funcionamiento del producto.
• No deje caer el producto ni lo someta a sacudidas fuertes.
• No abra el producto y no lo siga operando de presentar deterioros.
• No intente mantener o reparar el aparato por cuenta propia. Encomiende cualquier trabajo
de mantenimiento al personal especializado competente.
• Mantenga el material de embalaje fuera del alcance de los niños, existe peligro de asxia.
• Deseche el material de embalaje en conformidad con las disposiciones locales sobre el
desecho vigentes.
• No realice cambios en el aparato. Esto conllevaría la pérdida de todos los derechos
de la garantía.
33
Page 35

Aviso – Pilas
• Retire y deseche de inmediato las pilas gastadas del producto.
• Utilice exclusivamente pilas recargables (o pilas) que sean del mismo tipo.
• Nodeje caer el producto ni lo someta a sacudidas fuertes.
• Observe siempre la correcta polaridad (inscripciones + y -) de las pilas y coloque éstas de
forma correspondiente. La no observación de lo anterior conlleva el riesgo de derrame o
explosión de las pilas.
• Nocargue las pilas.
• Mantengalas pilas fuera del alcance de los niños.
• Nocortocircuite las pilas recargables/baterías y manténgalas alejadas de objetos metálicos.
4. Puesta en funcionamiento
4.1. Estación de medición
• Abra el compartimento para pilas (26) y coloque dos pilas AAA atendiendo a la polaridad
correcta.
• Pulse repetidamente la tecla CH (23) para seleccionar el canal en el que desea que emita la
señal la estación de medición. En la pantalla se muestra CH1, CH2 o CH3.
• Pulse la tecla °C/°F (25) para conmutar entre °C y °F en la visualización de la temperatura.
• A continuación, cierre la cubierta del compartimento para pilas.
Nota
En la puesta en funcionamiento, es importante que coloque las pilas en la estación de
medición, en primer lugar, y, seguidamente, en la estación base.
4.2. Estación base
• Abra el compartimento para pilas (20) y coloque dos pilas AA atendiendo a la polaridad
correcta. A continuación, cierre la cubierta del compartimento para pilas.
34
Page 36

5. Montaje
Nota – Montaje
• Se recomienda colocar primero, sin montar, la estación de base y la estación de
medición, en los lugares de instalación deseados y llevar a cabo todos los ajustes tal y
como se describe en 6. Funcionamiento.
• Proceda a montar la(s) estación(es) únicamente cuando haya podido realizar
correctamente los ajustes y cuente con una conexión inalámbrica estable.
Nota
• El alcance de la transmisión por radio entre la estación base y la estación de medición
al aire libre es de hasta 30 m.
• Antes de proceder al montaje, preste atención a que la transmisión por radio no se
vea inuida, entre otros, por interferencias u obstáculos tales como edicios, árboles,
vehículos o líneas de alta tensión.
• Antes de proceder al montaje denitivo, asegúrese de que cuenta con recepción
suciente entre los lugares de instalación deseados.
• Al montar la estación de medición, procure situarla de manera que quede protegida de
la radiación directa del sol y de la lluvia.
• La altura estándar internacional para la medición de la temperatura del aire es de 1,25
m (4 pies) sobre el suelo.
Aviso
• Adquiera material de montaje especial o adecuado en un comercio especializado para
el montaje en la pared prevista.
• Compruebe que no haya piezas deterioradas o defectuosas.
• No ejerza nunca fuerza durante el montaje. El producto podría verse dañado.
• Antes de empezar con el montaje, compruebe que la pared puede soportar el peso
que se va a montar y asegúrese de que por el punto de montaje de la pared no pasan
cables eléctricos ni tuberías de agua, gas o de otro tipo.
5.1. Estación base
• Coloque la estación base sobre una supercie plana utilizando el pie.
35
Page 37

5.2. Estación de medición
• Igualmente, puede colocar la estación de medición sobre una supercie plana en el
exterior.
• Se recomienda jar la estación de medición a una pared exterior de forma segura y able
utilizando la abertura (24).
• Fije el taco, el tornillo, el clavo, etc., en la pared prevista.
• Cuelgue la estación de medición utilizando la abertura prevista para ello.
6. Funcionamiento
Nota – Introducción de datos
Mantenga pulsadas las teclas + (17) o – (18) para seleccionar los valores más
rápidamente.
6.1. Conexión con la estación de medición
• Una vez colocadas las pilas, la estación base busca automáticamente una conexión con la
estación de medición, realizando entonces el ajuste inicial.
Nota
• El ajuste inicial dura aprox. 3 minutos.
• No pulse ninguna tecla mientras dure el ajuste. De lo contrario, pueden producirse
fallos o imprecisiones en los valores y su transmisión.
• El proceso naliza en cuanto se visualizan los valores de medición registrados para
interior (7) y exterior (8).
• Si no se recibe ninguna señal de la estación de medición repetidamente, mantenga pulsada
la tecla + (17) durante aprox. 3 segundos para iniciar la búsqueda manual de la señal.
6.2. Selección de canal/ utilización con varias estaciones de medición
Nota
Además de la estación de medición suministrada, puede instalar dos estaciones de
medición adicionales. Al hacerlo, preste atención a realizar ajustes de canal idénticos en la
estación de base y la estación de medición correspondiente.
Encontrará estaciones de medición adecuadas en www.hama.com
36
Page 38

• Pulse repetidamente la tecla + (17) para ajustar el mismo canal que en la estación de
medición correspondiente – véase 4.1. Estación de medición . Se muestra CH1, CH2, CH3
(9) o la visualización de canales en serie (10).
• La estación base muestra ahora la temperatura medida (8) en la estación de medición
seleccionada (9).
• Seleccione la visualización de canales en serie (10) si desea que se muestren los valores de
medición de cada estación de medición/canal de forma consecutiva durante 5 segundos
por canal.
6.3. Ajustes básicos y ajustes manuales
Ajuste automático según la señal DCF
• Encendida la estación base por primera vez y tras una transmisión correcta entre la estación
base y la estación de medición, el reloj inicia automáticamente la búsqueda de una señal
DCF. El símbolo de radiofrecuencia (13) parpadeadurante el proceso de búsqueda.
Visualización Búsqueda de señal DCF
Parpadea
Visualización permanente
Ninguna visualización Inactivo
• Si no se recibiera señal repetidamente, pulse y mantenga pulsada la tecla – (18) durante
aprox. 3 segundos para iniciar la búsqueda manual de la señal DCF. El símbolo de
radiofrecuencia (13) comienzaa parpadear.
La búsqueda ha nalizado con éxito, se recibe la señal
Activa
37
Page 39

Nota – Ajuste de hora
• El proceso de búsqueda dura aproximadamente 7 minutos. Si la búsqueda falla, ésta
se termina y se repite a la siguiente hora en punto. El símbolo de radiofrecuencia (13)
se apaga.
• Mientras tanto, puede realizar un ajuste manual de la hora y la fecha.
• En cualquier caso, el reloj sigue buscando la señal DCF diariamente (entre las 01:00 y
las 03:00). En caso de recibirse la señal correctamente, la hora y la fecha ajustadas se
sobrescriben.
Nota – Horario de verano
• La hora se ajusta automáticamente al horario de verano. Durante el horario de verano
se muestra DST (5) en la pantalla.
• Pulse y mantenga pulsada nuevamente la tecla – (18) durante aprox. 3 segundos para
nalizar proceso de búsqueda manual.
Ajustes (manuales)
• Pulse y mantenga pulsada la tecla – (18) durante aprox. 3 segundos para nalizar el
proceso de búsqueda de la señal de radiofrecuencia. El símbolo de radiofrecuencia (13) se
apaga, permitiéndole ajustar la hora de forma manual.
• Pulse y mantenga pulsada la tecla MODE (15) durante aprox. 3 segundos para realizar los
siguientes ajustes, consecutivamente:
• Formato 12/24 horas (12)
• Zona horaria (12)
• Horas (12)
• Minutos (12)
• Día de la semana (3)
• Año (12)
• Mes (2)
• Día (1)
• Para seleccionar cada valor, pulse la tecla + (17) o la tecla – (18) y conrme la selección
correspondiente pulsando la tecla MODE (15).
• Si no se introduce ningún dato en 13 segundos, se sale automáticamente del modo de
ajuste.
38
Page 40

Nota – Zona horaria
• La señal DCF puede recibirse a gran distancia, correspondiéndose siempre con la HCE
vigente en Alemania. Por ello, tenga en cuenta la posible diferencia horaria en países
situados en otra zona horaria.
• Si se encuentra en Moscú, la diferencia es de 3 horas de adelanto con respecto a
Alemania. Por ello, debe ajustar la zona horaria +3. Se sumarán automáticamente 3
horas a la hora recibida o ajustada manualmente tras la recepción de la señal DCF.
Nota – Día de la semana
• Para la visualización del día de la semana puede elegir entre los idiomas alemán (GE),
inglés (EN), danés (DA), neerlandés (NE), italiano (IT), español (ES) o francés (FR).
Celsius / Fahrenheit
• Pulse la tecla – (18) para conmutar entre °C y °F en la visualización de la temperatura.
Despertador
• Pulse repetidamente la tecla MODE (15) para acceder al modo de alarma 1 o 2.
• En la visualización de los segundos se muestra A1 o A2, según corresponda.
• Pulse y mantenga pulsada la tecla MODE (15) durante aprox. 3 segundos para ajustar la
hora de alarma de la alarma visualizada. La indicación de las horas empieza a parpadear.
• Pulse la tecla + (17) o la tecla – (18) para seleccionar las horas de la hora de alarma y
conrme la selección pulsando la tecla MODE (15). La indicación de los minutos empieza
a parpadear.
• Repita este proceso para los minutos de la hora de alarma del despertador.
• Pulse repetidamente la tecla MODE (15) para ajustar igualmente el otro modo de alarma o
retornar a la visualización de la hora (12).
• Si no se introduce ningún dato en 13 segundos, se sale automáticamente del modo de
ajuste.
• Pulse la tecla ALARM (16) para activar/desactivar la alarma 1, la alarma 2 o ambas. Se
visualiza/Deja de visualizarse el símbolo de alarma (4).
• Si se activa el despertador como corresponde, el símbolo de alarma (4) comienza a
parpadear y suena una señal de alarma.
• Pulse cualquier tecla (salvo la tecla SNOOZE / LIGHT [14]) para cancelar la alarma. De otro
modo, ésta naliza automáticamente pasados 2 minutos.
• Si pulsa la tecla SNOOZE / LIGHT (14) mientras suena la señal del despertador, la señal
del despertador se interrumpe durante 5 minutos y se vuelve a activar pasado dicho
tiempo. El símbolo de alarma (4) parpadea.
39
Page 41

6.4. Retroiluminación
Nota – Iluminación de fondo
• Si pulsa la tecla SNOOZE / LIGHT (14), la pantalla se ilumina durante aprox. 5
segundos.
• Pulse y mantenga pulsada la tecla CONTRAST (19) durante aprox. 3 segundos y
selecciona, pulsando la tecla + (17) y – (18), la intensidad deseada para los dígitos LCD.
6.5. Capacidad de pilas baja
Si se visualiza el símbolo de pila (6/11) en la pantalla de la estación base, la capacidad de las
pilas de la estación base/de medición. Sustituya las pilas de forma inmediata.
Nota – Cambio de pilas
• Tenga en cuenta que es necesario resincronizar las estaciones tras realizar un cambio de
pilas en la estación de medición o base.
• Para ello, retire las pilas de la otra estación y vuelva a colocarlas o, de ser necesario,
proceda a sustituirlas.
7. Mantenimiento y cuidado
Limpie este producto sólo con un paño ligeramente humedecido que no deje pelusas y no
utilice detergentes agresivos. Asegúrese de que no entre agua en el producto.
8. Exclusión de responsabilidad
Hama GmbH & Co KG no se responsabiliza ni concede garantía por los daños que surjan por
una instalación, montaje o manejo incorrectos del producto o por la no observación de las
instrucciones de manejo y/o de las instrucciones de seguridad.
9. Servicio y soporte
Si tiene que hacer alguna consulta sobre el producto, diríjase al asesoramiento de productos
Hama.
Línea directa: +49 9091 502-115 (Alemán/Inglés)
Encontrar más información de soporte aquí:
www.hama.com
40
Page 42

10. Datos técnicos
Estación base Estación de medición
Alimentación de corriente
Consumo de corriente 0,5 mA 3 mA
Rango de medición
Temperatura
Intervalos de medición
Temperatura
Ciclo de medición de la
temperatura
Radiorreloj por radiofrecuencia Sí No
Número máx. de estaciones de
medición
Frecuencia 433MHz
Alcance ≤ 50 m
11. Instrucciones para desecho y reciclaje
Nota sobre la protección medioambiental:
Después de la puesta en marcha de la directiva Europea 2012/19/EU y 2006/66/
EU en el sistema legislativo nacional, se aplicara lo siguiente: Los aparatos
eléctricos y electrónicos, así como las baterías, no se deben evacuar en la basura
doméstica. El usuario está legalmente obligado a llevar los aparatos eléctricos y
electrónicos, así como pilas y pilas recargables, al nal de su vida útil a los puntos
de recogida comunales o a devolverlos al lugar donde los adquirió. Los detalles quedaran
denidos por la ley de cada país. El símbolo en el producto, en las instrucciones de uso o en el
embalaje hace referencia a ello. Gracias al reciclaje, al reciclaje del material o a otras formas
de reciclaje de aparatos/pilas usados, contribuye Usted de forma importante a la protección
de nuestro medio ambiente.
12. Declaración de conformidad
Madiante la presente, Hama GmbH & Co. KG delcara que este aparato cumple con
los requisitos esenciales y cualesquiera otras disposiciones aplicables o exigibles de
la directiva 2014/53/UE. La declaración de conformidad conforme a la directiva
correspondiente la encontrará en www.hama.com.
3,0 V
2 pilas AAA
0°C – +50°C/
32°F – 122°F
0,1°C / 0,2°F 0,1°C / 0,2°F
43 – 47 s43 – 47 s
3-
3,0 V
2 pilas AAA
-20°C – +60°C/
-4°F – 140°F
41
Page 43

R Руководство по эксплуатации
Органы управления и индикации
A Основной блок
1. Число месяца
2. Месяц
3. День недели
4. Значок будильника
5. Индикация летнего времени
6. Значок батареи(основной блок)
7. Температура в помещении
8. Наружная температура
9. Канал
10. Соединение по каналу
11. Значок батареи(блок внешнего датчика)
12. Время
13. Значок коррекции по радиосигналу точного времени
14. Кнопка SNOOZE/LIGHT = функция автоповтора сигнала будильника; включение
подсветки (ок. 5 секунд)
15. Кнопка MODE = настройки / подтверждение настройки / выбор режима
индикации
16. Кнопка ALARM = включение и выключение функций будильника
17. Кнопка + = увеличение настраиваемго значения / выбор канала при наличии
нескольких внешних датчиков температуры / принудительный поиск сигнала
внешнего датчика
18. Кнопка – = уменьшение настраиваемого значения / выбор единицы измерения
температуры (°C, °F) / включение/ выключение принудительного приема
радиосигнала
19. Кнопка CONTRAST = регулировка подсветки
20. Отсек батарей
В Блок внешнего датчика
21. Лампа индикации передачи данных
22. Дисплей
23. Кнопки CH = выбор канала
24. Отверстие для настенного монтажа
25. Кнопка °C/°F = выбор единицы измерения температуры (°C, °F)
26. Отсек батарей
Благодарим за покупку изделия фирмы Hama.
внимательно ознакомьтесь с настоящей инструкцией. Храните инструкцию в надежном
месте для справок в будущем. В случае передачи изделия другому лицу приложите и
эту инструкцию.
42
Page 44

1. Предупредительные пиктограммы и инструкции
Внимание
Данным значком отмечены инструкции, несоблюдение которых может привести к
опасной ситуации.
Примечание
Дополнительная или важная информация.
2. Комплект поставки
• Метеорологический прибор EWS-810
(основной блок для контроля воздуха внутри помещения, блок датчика внешних
атмосферных условий)
• 4 батареи ААА
• Настоящая инструкция
3. Техника безопасности
• Изделие предназначено только для домашнего применения.
• Соблюдать технические характеристики.
• Беречь от влаги и брызг.
• Не эксплуатировать в непосредственной близости с нагревательными приборами и
беречь от прямых солнечных лучей
• Не применять в запретных зонах.
• Не размещайте устройство рядом с магнитными полями, металлическими рамами,
компьютером, телевизором и т.д. Электронные приборы отрицательно влияют на
работу устройства.
• Не ронять. Беречь от сильных ударов.
• Изделие не открывать. Запрещается эксплуатировать неисправное изделие.
• Запрещается самостоятельно ремонтировать устройство. Ремонт разрешается
производить только квалифицированному персоналу.
• Упаковку не давать детям: опасность асфиксии.
• Утилизировать упаковку в соответствии с местными нормами.
• Запрещается вносить изменения в конструкцию. В противном случае гарантийные
обязательства аннулируются.
43
Page 45

Батареи. Техника безопасности
• Израсходованные батареи немедленно удалять из прибора и утилизировать.
• Разрешается применять аккумуляторы только указанного типа.
• Не применять различные типы или новые и старые батареи вместе.
• Соблюдать полярность батарей (+ и -). Несоблюдение полярности может стать
причиной взрыва батарей.
• Обычные батареи не заряжать.
• Батареи хранить в безопасном месте и не давать детям.
• Не закорачивать контакты батарей. Не хранить рядом с металлическими
объектами.
4. Ввод в эксплуатацию
4.1. Блок внешнего датчика
• Откройте крышку отсека батарей (26) и вставьте две батареи ААА, соблюдая
полярность.
• Несколько раз нажмите кнопку CH (23), чтобы выбрать канал внешнего датчика. На
дисплее отображается соответствующая индикация: CH1, CH2 или CH3.
• Выбор единицы измерения температуры осуществляется кнопкой °C/°F (25),
• Закройте крышку отсека батарей.
Примечание
При вводе в эксплуатацию всегда сначала вставляйте батареи в блок наружного
датчика, а затем в основной блок.
4.2. Основной блок
• Откройте крышку отсека батарей (20) и вставьте две батареи ААА, соблюдая
полярность. Закройте крышку отсека батарей.
44
Page 46

5. Монтаж
Примечание. Монтаж
• Перед тем как монтировать блоки, рекомендуется сначала завершить настройки в
местах будущей установки (см. 6). Смотрите описание работы основного блока.
• Монтаж следует производить после того, как правильные настройки обеспечат
надежную радиосвязь между блоками.
Примечание
• Максимально допустимое расстояние между блоками составляет 30 метров.
• Монтируя блоки, следует учесть, что различные препятствия (стены, деревья,
автомобили, высоковольтные линии и др.) создают помехи радиосвязи между
блоками.
• Перед монтажом убедитесь, что в местах расположения блоков обеспечивается
устойчивая радиосвязь.
• Блок внешнего датчика должен размещаться в месте, защищенном от
воздействия прямых солнечных лучей и осадков.
• Международный стандарт высоты для измерения влажности воздуха составляет
1,25 метра (4 фута) над землей.
Предупреждение
• Подготовьте монтажный материал (приобретается отдельно), соответствующий
свойствам стены.
• Перед началом эксплуатации убедитесь в отсутствии дефектных или
поврежденных деталей.
• При монтаже не применять чрезмерных усилий. В противном случае можно
повредить устройство.
• Убедитесь, что стена подходит для монтажа. В стене на месте монтажа не
должно быть электрической проводки, газопровода, водопровода и других
трубопроводов.
5.1. Основной блок
• С помощью подставки установите основной блок на ровную поверхность.
45
Page 47

5.2. Блок внешнего датчика
• Блок внешнего датчика можно разместить на улице с помощью подставки.
• Однако рекомендуется монтировать внешний блок на стене с помощью
соответствующего паза (24).
• С помощью дюбеля закрепите шуруп на стене.
• Подвесьте блок за соответствующий паз.
6. Эксплуатация
Ввод данных
Чтобы ускорить изменение значения во время настройки, удерживайтекнопку + (17)
или кнопку – (18) .
6.1. Соединение с блоком внешнего датчика
• После загрузки батарей основной блок начинает автоматический поиск сигнала
внешнего датчика и выполняет операцию ввода устройства в эксплуатацию.
Примечание
• Автоматическая настройка при вводе в эксплуатацию длится ок. 3 минут.
• В течение этого времени не нажимайте кнопки устройства! В противном случае
может возникнуть сбой точной настройки значений и передачи сигнала.
• Автоматическая настройка завершена, когда на дисплее начнут отображаться
данные измерения внутри помещения (7) и вне помещения (8).
• Если сигнал автоматически принять не удается, нажмите и ок. 3 секунд удерживайте
кнопку + (17), чтобы включить поиск радиосигнала DCF вручную.
6.2. Выбор канала / дополнительные внешние датчики
Примечание
Максимальное количество внешних датчиков: 3. Чтобы установить соединение
основной блок и внешний датчик должны работать на одном канале.
Совместимые блоки внешних датчиков смотрите по адресу www.hama.com.
46
Page 48

• Канал устанавливается кнопкой + (17) (см. 4.1). Настройка блока внешнего датчика.
На дисплее отображается индикация CH1, CH2, CH3 (9) или последовательное
переключение каналов (10).
• Основной блок показывает температуру (8), которая измеряется в месте установки
внешнего датчика (9).
• Если выбрать функцию последовательного переключения каналов (10), то каждые 5
секунд на дисплее будут попеременно меняться измеренные значения каналов.
6.3. Основные параметры и ручные настройки
Автоматический прием радиосигнала DCF
• После первого включения основного блока и установки радиосвязи с блоком
внешнего датчика часы прибора автоматически начинают поиск радиосигнала
точного времени (DCF). Во время этого процесса на дисплее мигает значок
радиосигнала точного времени (13).
Индикация Поиск сигнала DCF
мигает
горит непрерывно
не горит неактивный
• Если сигнал автоматически принять не удается, нажмите и ок. 3 секунд удерживайте
кнопку – (18), чтобы включить поиск радиосигнала DCF вручную. Значок
радиосигнала (13) мигает.
Настройка часов. Примечания
• Поиск длится около 7 минут. Если сигнал принять не удалось, операция
завершается автоматически. Повторная попытка будет произведена в следующий
полный час. Значок радиосигнала точного времени (13) гаснет.
• При необходимости часы и календарь можно настроить вручную.
• Поиск радиосигнала DCF осуществляется каждые сутки (между 01:00 и 03:00).
При успешном приеме радиосигнала введенные вручную значения времени и
календаря заменяются.
активный
сигнал принят успешно
47
Page 49

Индикация летнего времени
Переключение на летнее время происходит автоматически. Во время индикации
летнего времени на дисплее отображается DST (5).
• Чтобы принудительно завершить поиск радиосигнала, нажмите и ок. 3 секунд
удерживайте кнопку – (18).
Настройка вручную
• Нажмите и около 3 секунд удерживайте кнопку – (18), чтобы принудительно
заврешить поиск радиосигнала DCF. Значок радиосигнала DCF (13) не горит. Те перь
часы можно настроить вручную.
• Нажмите и около 3 секунд удерживайте кнопку MODE (15) , чтобы настроить
параметры в следующем порядке:
• Формат индикации времени (12)
• Часовой пояс (12)
• Час (12)
• Минуты (12)
• День недели (3)
• Год (12)
• Месяц (2)
• Число месяца (1)
• Кнопкой + (17) или – (18) установите значение и нажмите кнопку MODE (15), чтобы
подтвердить настройку. .
• Режим настройки выключается автоматически, если нажатий на кнопки не
производилось в течение 13 секунд.
Часовые пояса
• Радиосигнал точного времени DCF соответствует среднеевропейскому времени.
Если часы эксплуатируются в другом часовом поясе, то их необходимо настроить
соответствующим образом.
• Например, разница во времени между Москвой и Берлином составляет 3 часа. В
Москве, таким образом, необходимо сделать поправку в +3 часа. В этом случае
к показателю времени (установленному автоматически по радиосигналу DCF или
вручную) часы автоматически будут прибавлять 3 часа.
48
Page 50

День недели. Примечание
Дни недели могут отображаться на следующих языках: немецкий (GE), английский
(EN), датский (DA), голландский (NE), итальянский (IT), испанский (ES), французский
(FR).
Единицы измерения температуры (Цельсий / Фаренгейт)
• Кнопкой – (18) выберите единицу измерения температуры (°C или °F).
Будильник
• С помощью кнопки MODE (15) включите режим будильника 1 или 2 .
• На месте индикации секунд отображается соответственно А1 или А2.
• Нажмите и около 3 секунд удерживайте кнопку MODE (15), чтобы настроить время
срабатывания будильника. Значение часа мигает.
• Кнопкой + (17) или – (18) установите значение часа, затем нажмите кнопку MODE
(15), чтобы подтвердить настройку. Значение минут мигает.
• Настройте минуты.
• Нажмите кнопку MODE (15), чтобы настроить второй будильник или перейти в режим
индикации времени (12).
• Режим настройки выключается автоматически, если нажатий на кнопки не
производилось в течение 13 секунд.
• Включение и выключение будильников осуществляется кнопкой ALARM (16). Если
будильник включен, на дисплее отображается соответствующий значок (4).
• При срабатывании будильник мигает значок будильника (4), и подается звуковой
сигнал.
• Чтобы отключить сигнал, нажмите любую кнопку, кроме SNOOZE / LIGHT (14). Если
сигнал не был отключен вручную, то он автоматически отключится через 2 минуты.
• Чтобы включить автоповтор сигнала будильника (через 5 минут), нажмите кнопку
SNOOZE / LIGHT (14). Значок будильника (4) мигает.
6.4. Подсветка
Подсветка. Примечание
Нажмите кнопку SNOOZE / LIGHT (14), чтобы на 5 секунд включить дисплей.
49
Page 51

• Нажмите и в течение 3 секунд удерживайте кнопку CONTRAST (19), затем кнопкой +
(17) или – (18) установите на ЖК-дисплее цифры.
6.5. Разряд батарей
Значок (6/11) показывает малую остаточную емкость батарей основного блока или
блока внешнего датчика. Замените батареи.
Замена батарей. Примечание
• После замены батарей основного блока и блока внешнего датчика необходимо
заново выполнить синхронизацию блоков.
• Для этого необходимо удалить батареи в том числе из другого блока, а затем
снова загрузить их в отсек батарей.
7. Уход и техобслуживание
Чистку изделия производить только безворсовой слегка влажной салфеткой.
Запрещается применять агрессивные чистящие средства. Следите за тем, чтобы в
устройство не попала вода.
8. Отказ от гарантийных обязательств
Компания Hama GmbH & Co. KG не несет ответственность за ущерб, возникший
вследствие неправильного монтажа, подключения и использования изделия не по
назначению, а также вследствие несоблюдения инструкции по эксплуатации и техники
безопасности.
9. Отдел техобслуживания
По вопросам ремонта или замены неисправных изделий обращайтесь к продавцу или в
сервисную службу компании Hama.
Горячая линия отдела техобслуживания:
+49 9091 502-115 (немецкий, английский)
Подробнее смотрите здесь: www.hama.com
10. Технические характеристики
Основной блок Блок внешнего датчика
Питание
Ток потребления 0,5 мА 3 мА
3,0 В
2 батареи ААА
3,0 В
2 батареи ААА
50
Page 52

Диапазон измерения
Температура
Шаг шкалы
Температура
Цикл измерения температуры 43 – 47 с43 – 47 с
Часы с коррекцией по
радиосигналу точного
времени
Макс. кол-во внешних
датчиков
Частота 433 МГц
Дальность действия ≤ 50 м
11. Инструкции по утилизации
Охрана окружающей среды:
С момента перехода национального законодательства на европейские
нормативы 2012/19/EU и 2006/66/EU действительно следующее:
Электрические и электронные приборы, а также батареи запрещается
утилизировать с обычным мусором. Потребитель, согласно закону, обязан
утилизировать электрические и электронные приборы, а также батареи и
аккумуляторы после их использования в специально предназначенных для этого
пунктах сбора, либо в пунктах продажи. Детальная регламентация этих требований
осуществляется соответствующим местным законодательством. Необходимость
соблюдения данных предписаний обозначается особым значком на изделии,
инструкции по эксплуатации или упаковке. При переработке, повторном использовании
материалов или при другой форме утилизации бывших в употреблении приборов Вы
помогаете охране окружающей среды. В соответствии с предписаниями по обращению
с батареями, в Ге рмании вышеназванные нормативы действуют для утилизации батарей
и аккумуляторов.
12. Декларация производителя
Компания Hama GmbH & Co. KG настоящим подтверждает, что данное
изделие полностью соответствует основным и другим соответствующим
нормативам Директивы 2014/53/ЕС. Декларация о соответствии товара
нормативам смотрите на вебсайте www.hama.com.
0°C – +50°C/
32°F – 122°F
0,1°C / 0,2°F 0,1°C / 0,2°F
Да Нет
3
-20°C – +60°C/
-4°F – 140°F
51
Page 53

I Istruzioni per l‘uso
Elementi di comando e indicazioni
Stazione base A
1. Giorno
2. Mese
3. Giorno della settimana
4. Simbolo sveglia
5. Ora legale
6. Simbolo batterie (stazione base)
7. Temperatura ambiente
8. Temperatura esterna
9. Indicazione canale
10. Sequenza canale
11. Simbolo batterie (stazione di misurazione)
12. Ora
13. Simbolo radio
14. Ta sto SNOOZE/LIGHT = interruzione del segnale di sveglia /attivazione della
retroilluminazione (ca. 5 secondi)
15. Tasto MODE = impostazioni / conferma del valore d’impostazione / cambio modalità di
visualizzazione /
16. Ta sto ALARM = disattivazione / attivazione funzioni di allarme
17. Ta sto + = aumento del valore di impostazione attuale / cambio di canale con più sensori
temperatura esterna / ricerca manuale del segnale dalla stazione di misurazione
18. Ta sto – = diminuzione del valore d’impostazione attuale / passaggio tra °C e °F /
attivazione/disattivazione manuale della ricezione di segnale radio
19. Ta sto CONTRAST = regolazione della retroilluminazione
20. Vano batterie
B Stazione di misura
21. Spia di controllo trasmissione
22. Display
23. Ta sto CH = scelta canale
24. Foro per montaggio a parete
25. Ta sto °C/°F = commutazione tra gradi °C e °F
26. Vano batterie
Grazie per avere acquistato un prodotto Hama!
Prima della messa in esercizio, leggete attentamente le seguenti istruzioni e avvertenze,
quindi conservatele in un luogo sicuro per una eventuale consultazione. In caso di cessione
dell‘apparecchio, consegnate anche le presenti istruzioni al nuovo proprietario.
52
Page 54

1. Spiegazione dei simboli di avvertimento e delle indicazioni
Attenzione
Viene utilizzato per contrassegnare le indicazioni di sicurezza oppure per rivolgere
l‘attenzione verso particolari rischi e pericoli.
Avvertenza
Viene utilizzato per contrassegnare informazioni supplementari o indicazioni importanti.
2. Contenuto della confezione
• stazione meteo EWS-810
(stazione base per interni / stazione di misurazione per esterni)
• 4 batterie AAA
• queste istruzioni per l’uso
3. Avvertenze di sicurezza
• Il prodotto è concepito per l’uso domestico privato, non commerciale.
• Non mettere in esercizio il prodotto al di fuori dei suoi limiti di rendimento indicati nei dati
tecnici.
• Non usare il prodotto in ambienti umidi ed evitare il contatto con gli spruzzi.
• Evitare di mettere in esercizio il prodotto in prossimità di riscaldamento, altre fonti di calore
o la luce diretta del sole.
• Non utilizzare il prodotto in zone in cui non sono ammesse le apparecchiature elettroniche.
• Non posizionare il prodotto nelle vicinanze di campi di disturbo, telai metallici, computer
e televisori ecc. Gli apparecchi elettronici compromettono negativamente il funzionamento
del prodotto.
• Non fare cadere il prodotto e non sottoporlo a forti scossoni!
• Non aprire il prodotto e non utilizzarlo più se danneggiato
• Non tentare di aggiustare o riparare l’apparecchio da soli. Fare eseguire qualsiasi lavoro di
riparazione al personale specializzato competente.
• Tenere l’imballo fuori dalla portata dei bambini, pericolo di soffocamento!
• Smaltire immediatamente il materiale d‘imballaggio attenendosi alle prescrizioni locali
vigenti.
• Non apportare modiche all’apparecchio per evitare di perdere i diritti di garanzia.
53
Page 55

Avvertenza – Batterie
• Rimuovere e smaltire immediatamente le batterie scariche.
• Utilizzare unicamente accumulatori (o batterie) conformi al tipo indicato.
• Non utilizzare batterie di tipi o costruttori diversi, né mischiare batterie vecchie e nuove.
• Attenersi sempre alla corretta polarità (scritte + e -) delle batterie e inserirle
• di conseguenza. La mancata osservanza comporta la perdita di potenza o il rischio di
esplosione delle batterie.
• Non caricare le batterie.
• Conservare le batterie al di fuori della portata dei bambini
• Non cortocircuitare le batterie e tenerle lontano da oggetti metallici.
4. Messa in esercizio
4.1. Stazione di misurazione
• Aprire il vano batterie (26) e inserire due batterie AA con la polarità corretta.
• Premere ripetutamente il tasto CH (23) per selezionare il canale su cui trasmette la stazione
di misurazione. Sul display viene visualizzato CH1, CH2 o CH3.
• Premere il tasto °C/°F (25) per commutare tra °C e °F durante la visualizzazione della
temperatura.
• Quindi chiudere il coperchio del vano batterie.
Nota
Per mettere in servizio l‘apparecchio, inserire sempre prima le batterie nella stazione di
misura, quindi nella stazione base.
4.2. Stazione base
• Aprire il vano batterie (20) e inserire due batterie AA con la polarità corretta. Quindi
chiudere il coperchio del vano batterie.
54
Page 56

5. Montaggio
Nota – montaggio
• Si consiglia di collocare la stazione base e di misura nel luogo di montaggio desiderato
senza montarla e di effettuare tutte le impostazioni come descritto al capitolo 6.
Esercizio.
• Montare la/le stazioni solo dopo avere effettuato l‘impostazione corretta e un
collegamento radio stabile.
Nota
• La portata della trasmissione radio tra la stazione base e di misurazione all‘aperto è di
max. 30m.
• Prima del montaggio prestare attenzione che la trasmissione radio non venga impedita
da segnali di disturbo o ostacoli come edici, alberi, veicoli, linee di alta tensione ecc.
• Prima del montaggio denitivo, accertarsi che tra i luoghi di montaggio desiderati vi sia
una ricezione suciente.
• Durante il montaggio della stazione di misurazione, accertarsi che il luogo
d‘installazione sia protetto dalla luce diretta del sole e dalla pioggia.
• L‘altezza standard internazionale per la misurazione della temperatura dell‘aria è pari a
1,25 m (4 ft) dal suolo.
Avvertenza
• Procurarsi il materiale di installazione idoneo per il montaggio alla parete prevista
presso i rivenditori specializzati.
• Vericare che non vengano montati pezzi difettosi o danneggiati.
• Non usare troppa forza, né violenza durante il montaggio per evitare di danneggiare
il prodotto.
• Prima di procedere al montaggio, vericare che la parete sia idonea per il peso
da montare e accertarsi che nel punto della parete dove si desidera appendere
l’apparecchio non vi siano cavi elettrici, né tubazioni di acqua, gas o altro.
5.1. Stazione base
• Posizionare la stazione base con il piedino di sostegno su una supercie piana.
55
Page 57

5.2. Stazione di misurazione
• Anche la stazione di misurazione si può posizionare con il piedino di sostegno su una
supercie piana all‘esterno.
• Si consiglia di montare la stazione di misurazione in modo sicuro e stabile su una parete
esterna mediante l’apposito foro (24).
• Fissare tasselli, viti, chiodi ecc. alla parete prevista.
• Agganciare la stazione base/di misurazione con il foro previsto.
6. Esercizio
Nota – Immissione
Tenere premuto il tasto + (17) o il tasto – (18), per selezionare i valori più velocemente.
6.1. Connessione alla stazione di misurazione
• Dopo avere inserito le batterie, la stazione base ricerca automaticamente la connessione
alla stazione di misurazione.
Nota
• La prima congurazione dura ca. 3 minuti.
• Non premere alcun tasto in questo lasso di tempo per evitare errori e imprecisioni dei
valori e della loro trasmissione.
• La procedura è conclusa non appena vengono visualizzati i dati di misurazione per
l‘interno (7) e l‘esterno (8).
• Se per diverse volte non viene ricevuto alcun segnale, tenere premuto il tasto + (17) per ca.
3 secondi, per avviare la ricerca manuale del segnale.
6.2. Scelta del canale/ altre stazioni di misurazione
Nota
Oltre alla stazione di misurazione in dotazione, è possibile installare altre due stazioni di
misurazione. Attenzione: è necessario impostare lo stesso canale per la stazione base e la
stazione di misurazione corrispondente.
Le stazioni di misurazione idonee sono disponibili sul sito www.hama.com
56
Page 58

• Premere ripetutamente il tasto + (17) per impostare lo stesso canale della stazione di
misurazione – vedi 4.1. Stazione di misurazione. Viene visualizzato CH1, CH2, CH3 (9)
oppure sequenza canale (10).
• La stazione base mostra ora la temperatura misurata (8) della stazione di misurazione
selezionata (9).
• Scegliere la sequenza canale (10), anché i valori di misurazione di singoli canali / stazioni
di misurazione vengano visualizzati in sequenza per 5 secondi ciascuno.
6.3. Impostazioni di base e manuali
Impostazione automatica dopo il segnale DCF
• Dopo la prima accensione della stazione base e la trasmissione tra stazione base e di
misurazione, l‘orologio inizia automaticamente a cercare un segnale DCF.Durante il
processo di ricerca, il simbolo della radio (13) lampeggia.
Indicazione Ricerca del segnale DCF
Indicazione lampeggiante
Indicazione ssa
Ricerca riuscita - il segnale
viene ricevuto
• Se per diverse volte non viene ricevuto alcun segnale, tenere premuto il tasto – (18) per
ca. 3 secondi, per avviare la ricerca manuale del segnale DCF. Il simbolo radio (13) inizia
a lampeggiare.
Nota – Impostazione dell‘ora
• Questo procedimento dura circa 7 minuti. Se la ricerca non ha successo, viene terminata
e riprende alla prossima ora piena. Il simbolo radio (13) si spegne.
• In questo lasso di tempo si può effettuare un‘impostazione manuale di ora e data.
• L‘orologio continua a cercare automaticamente ogni giorno (tra l’1:00 e le 3:00)
il segnale DCF. Se il tentativo di ricezione ha successo, l‘ora e la data impostate
manualmente vengono sovrascritte.
Ricerca riuscita - il segnale viene ricevuto
Attiva
Non attivo
57
Page 59

Nota – Ora legale
L‘orario si regola automaticamente sull‘ora legale. Finché è attiva l’ora legale, sul display
appare DST ( 5).
• Tenere premuto il tasto – (18) per ca. 3 secondi per terminare la ricerca manuale.
Impostazioni (manuali)
• Tenere premuto il tasto – (18) per ca. 3 secondi per terminare la ricerca manuale dopo
il segnale DCF. Il simbolo della radio (13) sispegne ed è possibile impostare l‘ora
manualmente.
• Tenere premuto il tasto MODE (15) per ca. 3 secondi per effettuare in sequenza le seguenti
impostazioni.
• Formato 12/24 ore (12)
• Fuso orario (12)
• Ore (12)
• Minuti (12)
• Giorno della settimana (3)
• Anno (12)
• Mese (2)
• Giorno (1)
• Per selezionare i singoli valori, premere il tasto + (17) oppure il tasto – (18) e confermare la
selezione corrispondente premendo il tasto MODE (15). .
• Se per 13 secondi non si effettua alcuna immissione, si esce automaticamente dalla
modalità d‘installazione.
Nota – Fuso orario
• Il segnale DCF può essere ricevuto in tutto il mondo ma corrisponde sempre al CET
vigente in Germania. Nei paesi con altri fusi orari deve essere considerata la variazione
dell‘ora.
• Se ci si trova a Mosca, dove l‘ora è spostata in avanti di 3 ore rispetto alla Germania,
occorre impostare per il fuso orario +3. Dopo la ricezione del segnale DCF o
dell‘impostazione manuale, l‘orologio si porta quindi sempre automaticamente 3 ore
avanti.
58
Page 60

Nota – Giorno della settimana
I giorni della settimana si possono visualizzare nelle lingue tedesco (GE), inglese (EN),
danese (DA), olandese (NE), italiano (IT), spagnolo (ES) o francese (FR).
Celsius / Fahrenheit
• Premere il tasto – (18) per commutare tra °C e °F durante la visualizzazione della
temperatura.
Sveglia
• Premere ripetutamente il tasto MODE (15) per passare alla modalità allarme 1 o 2 .
Sul display dei secondi viene visualizzato A1 o A2.
• Tenere premuto il tasto MODE (15) per ca. 3 secondi per impostare l’orario dell’allarme
visualizzato. Le cifre delle ore iniziano a lampeggiare.
• Premere il tasto + (17) oppure il tasto – (18) per selezionare le ore della sveglia e
confermare la selezione corrispondente premendo il tasto MODE (15). Le cifre dei minuti
iniziano a lampeggiare.
• Ripetere questo procedimento per selezionare i minuti della sveglia.
• Premere ripetutamente il tasto MODE (15) per impostare anche l’altra modalità allarme
oppure ritornare all’indicazione dell’ora (12).
• Se per 13 secondi non si effettua alcuna immissione, si esce automaticamente dalla
modalità d‘impostazione.
• Premere il tasto ALARM (16), per attivare/disattivare Alarm 1, Alarm 2 o entrambe. Il
simbolo della sveglia (4) viene visualizzato/non viene visualizzato.
• Se si attiva la sveglia, il simbolo corrispondente (4) inizia a lampeggiare e viene emesso un
segnale di sveglia.
• Premere un tasto qualsiasi (eccetto il tasto SNOOZE/LIGHT (14)) per terminare la sveglia.
Diversamente, l‘allarme termina automaticamente dopo 2 minuti.
• Se mentre suona la sveglia si preme il tasto SNOOZE/LIGHT (14), la sveglia si interrompe
per 5 minuti, quindi ricomincia a suonare. Il simbolo della sveglia (4) lampeggia.
6.4. Retroilluminazione
Nota – Retroilluminazione
Se si preme il tasto SNOOZE / LIGHT (14), il display viene illuminato per ca. 5 secondi.
59
Page 61

• Tenere premuto il tasto CONTRAST (19) per ca. 3 secondi e selezionare l’intensità
desiderata per le cifre LCD premendo il tasto + (17) e il tasto – (18).
6.5. Capacità ridotta delle batterie
Quando il simbolo della batteria (6/11) viene visualizzato sul display della stazione base,
la capacità delle batterie nella stazione base/di misurazione è molto bassa. Sostituire
immediatamente le batterie.
Avvertenza – sostituzione delle batterie
• Accertarsi che dopo ogni sostituzione delle batterie sulla stazione di misurazione o sulla
stazione base avvenga una nuova sincronizzazione delle stazioni.
• Estrarre anche le batterie dall‘altra stazione e inserirle nuovamente o, se necessario,
sostituirle.
7. Manutenzione e cura
Pulire il prodotto unicamente con un panno che non lascia pelucchi e appena inumidito e non
ricorrere a detergenti aggressivi. Fare attenzione a non fare penetrare acqua nel prodotto.
8. Esclusione di garanzia
Hama GmbH & Co.KG non si assume alcuna responsabilità per i danni derivati dal montaggio
o l‘utilizzo scorretto del prodotto, nonché dalla mancata osservanza delle istruzioni per l‘uso
e/o delle indicazioni di sicurezza.
9. Assistenza e supporto
In caso di domande sul prodotto, rivolgersi alla Consulenza prodotto Hama.
Hotline: +49 9091 502-115 (ted./ing.)
Ulteriori informazioni sul supporto sono disponibili qui: www.hama.com
60
Page 62

10. Dati tecnici
Stazione base Stazione di misurazione
Alimentazione elettrica
Potenza assorbita 0,5 mA 3 mA
Campo di misurazione
Temperatura
Passi di misura
Temperatura
Ciclo di misurazione
temperatura
Segnale orario via radio DCF Si No
Max. Numero stazioni di
misurazione
Frequenza 433 MHz
Portata ≤ 50 m
11. Indicazioni di smaltimento
Informazioni per protezione ambientale:
Dopo l’implementazione della Direttiva Europea 2012/19/EU e 2006/66/EU nel
sistema legale nazionale, ci sono le seguenti applicazioni: Le apparecchiature
elettriche ed elettroniche e le batterie non devono essere smaltite con i riuti
domestici. I consumatori sono obbligati dalla legge a restituire I dispositivi elettrici
ed elettronici e le batterie alla ne della loro vita utile ai punti di raccolta pubblici
preposti per questo scopo o nei punti vendita. Dettagli di quanto riportato sono deniti dalle
leggi nazionali di ogni stato. Questo simbolo sul prodotto, sul manuale d’istruzioni o
sull’imballo indicano che questo prodotto è soggetto a queste regole. Riciclando, ri-utilizzando
i materiali o utilizzando sotto altra forma i vecchi prodotti/le batterie, darete un importante
contributo alla protezione dell’ambiente.
12. Dichiarazione di conformità
Hama GmbH & Co. KG dichiara che questo apparecchio soddisfa i requisiti
essenziali ed alle altre disposizioni pertinenti stabilite della direttiva 2014/53/UE.
La dichiarazione di conformità secondo la direttiva corrispondente è riportata
all´indirizzo www.hama.com.
3,0 V
2 batterie AAA
0°C – +50°C/
32°F – 122°F
0,1°C / 0,2°F 0,1°C / 0,2°F
43 – 47 s43 – 47 s
3
3,0 V
2 batterie AAA
-20°C – +60°C/
-4°F – 140°F
61
Page 63

J Οδηγίες χρήσης
Στοιχεία χειρισμού και ενδείξεις
A Κύρια μονάδα
1. Ημέρα
2. Μήνας
3. Ημέρα
4. Σύμβολο ειδοποίησης
5. Θερινή ώρα
6. Σύμβολο μπαταρίας (κύρια μονάδα)
7. Εσωτερική θερμοκρασία
8. Εξωτερική θερμοκρασία
9. Ένδειξη καναλιού
10. Ροή καναλιών
11. Σύμβολο μπαταρίας (μονάδα μέτρησης)
12. Ώρα
13. Σύμβολο ασύρματης λήψης
14. Πλήκτρο SNOOZE/LIGHT = Διακοπή του σήματος αφύπνισης / ενεργοποίηση του
εσωτερικού φωτισμού (5 δευτ/πτα)
15. Πλήκτρο MODE = Ρυθμίσεις/ αλλαγή της λειτουργίας ενδείξεων/ επιβεβαίωση της τιμής
ρύθμισης
16. Πλήκτρο ALARM = Ενεργοποίηση/ απενεργοποίηση ειδοποιήσεων.
17. Πλήκτρο + = Αύξηση της τρέχουσας τιμής ρύθμισης / επιλογή καναλιού σε
περισσότερους εξωτερικούς αισθητήρες θερμοκρασίας / χειροκίνητη αναζήτηση σήματος
από τη μονάδα μέτρησης
18. Πλήκτρο – = Μείωση της τρέχουσας τιμής ρύθμισης / αλλαγή μεταξύ °C και °F /
ενεργοποίηση/ απενεργοποίηση χειροκίνητης λήψης ασύρματου σήματος
19. Πλήκτρο CONTRAST = Ρύθμιση του εσωτερικού φωτισμού
20. Θήκη μπαταριών
Β Μονάδα μέτρησης
21. Μετάδοση λυχνίας ελέγχου
22. Οθόνη
23. Πλήκτρο CH = Επιλογή καναλιού
24. Εγκοπή για επιτοίχια τοποθέτηση
25. Πλήκτρο°C/°F = Αλλαγή μονάδων °C και °F
26. Θήκη μπαταριών
Σας ευχαριστούμε για την αγορά αυτού του προϊόντος. της Hama!
Διαβάστε προσεκτικά τις παρακάτω οδηγίες και υποδείξεις. Στη συνέχεια, φυλάξτε αυτό
το εγχειρίδιο σε ασφαλές μέρος για μελλοντική χρήση. Σε περίπτωση που πουλήσετε της
συσκευή, παραδώστε αυτό το εγχειρίδιο στον επόμενο αγοραστή.
62
Page 64

1. Επεξήγηση συμβόλων προειδοποίησης και υποδείξεων
Προειδοποίηση
Χρησιμοποιείται για τη σήμανση υποδείξεων ασφαλείας ή για να επιστήσει την προσοχή σε
ιδιαίτερους κινδύνους.
Υπόδειξη
Χρησιμοποιείται για τη σήμανση επιπλέον πληροφοριών ή σημαντικών υποδείξεων.
2. Περιεχόμενα συσκευασίας
• Μετεωρολογικός σταθμός EWS-810
(Κύρια μονάδα εσωτερικού χώρου / μονάδα μέτρησης εξωτερικού χώρου)
• 4 μπαταρίες ΑΑΑ
• Αυτό το εγχειρίδιο χειρισμού
3. Υποδείξεις ασφαλείας
• Το προϊόν προορίζεται για σκοπούς οικιακής χρήσης.
• Μην χρησιμοποιείτε τη συσκευή εκτός των ορίων απόδοσης που περιγράφονται στα τεχνικά
χαρακτηριστικά.
• Μην χρησιμοποιείτε το προϊόν σε υγρό περιβάλλον και αποφεύγετε τις σταγόνες νερού.
• Μην χρησιμοποιείτε το προϊόν κοντά σε καλοριφέρ, άλλες πηγές θερμότητας ή σε σημεία
όπου δέχεται άμεση ηλιακή ακτινοβολία.
• Μην χρησιμοποιείτε το προϊόν σε περιοχές όπου δεν επιτρέπονται ηλεκτρονικές συσκευές.
• Μην τοποθετείτε το προϊόν κοντά σε πεδία παρεμβολών, μεταλλικά πλαίσια, υπολογιστές,
τηλεοράσεις κλπ. Οι ηλεκτρονικές συσκευές καθώς και τα πλαίσια των παραθύρων
επηρεάζουν αρνητικά τη λειτουργία του προϊόντος.
• Το προϊόν δεν επιτρέπεται να πέφτει κάτω, ούτε και να δέχεται δυνατά χτυπήματα.
• Μην ανοίγετε το προϊόν και μην το χρησιμοποιείτε αν χαλάσει.
• Μην επιχειρήσετε να συντηρήσετε ή να επισκευάσετε τη συσκευή εσείς οι ίδιοι. Οι εργασίες
συντήρησης πρέπει να γίνονται από εξειδικευμένα άτομα.
• Τα παιδιά δεν επιτρέπεται να έρχονται σε επαφή με το υλικό της συσκευασίας, υπάρχει
κίνδυνος ασφυξίας.
• Απορρίψτε κατευθείαν το υλικό συσκευασίας σύμφωνα με τους ισχύοντες τοπικούς
κανονισμούς απόρριψης.
• Μην κάνετε μετατροπές στη συσκευή. Κατ‘ αυτόν τον τρόπο παύει να ισχύει η εγγύηση.
63
Page 65

Προειδοποίηση – Μπαταρίες
• Αφαιρέστε και απορρίψτε τις χρησιμοποιημένες μπαταρίες αμέσως από το προϊόν
• Χρησιμοποιείτε αποκλειστικά απλές ή επαναφορτιζόμενες μπαταρίες του
προβλεπόμενου τύπου.
• Μην μπερδεύετε παλιές και καινούριες μπαταρίες, καθώς και μπαταρίες διαφορετικού
τύπου και κατασκευαστή.
• Προσέξτε οπωσδήποτε τη σωστή πολικότητα (επιγραφή + και -) των μπαταριών και
τοποθετήστε τις ανάλογα. Η μη τήρηση μπορεί να οδηγήσει σε διαρροή του υγρού ή σε
έκρηξη των μπαταριών.
• Μην φορτίζετε τις απλές μπαταρίες.
• Φυλάτε τις μπαταρίες μακριά από παιδιά.
• Μην βραχυκυκλώνετε τις απλές/επαναφορτιζόμενες μπαταρίες και μην τις φέρνετε σε
επαφή με γυμνά μεταλλικά αντικείμενα.
4. Έναρξη χρήσης
4.1. Μονάδα μέτρησης
• Ανοίξτε τη θήκη μπαταριών (26) και τοποθετήστε δύο μπαταρίες AAΑ με σωστή πολικότητα.
• Πατήστε επαναλαμβανόμενα το πλήκτρο CH (23) για να επιλέξετε το κανάλι στο οποίο
γίνεται η μεταφορά δεδομένων από τη μονάδα μέτρησης. Στην οθόνη εμφανίζεται CH1,
CH2 ή CH3.
• Για να αλλάξετε τις μονάδες θερμοκρασίας μεταξύ °C και °F πατήστε το πλήκτρο °C/°F (25).
• Στη συνέχεια κλείστε το καπάκι της θήκης μπαταριών.
Υπόδειξη
Λάβετε υπόψη ότι κατά την έναρξη χρήσης οι μπαταρίες πρέπει να τοποθετηθούν πρώτα
στη μονάδα μέτρησης και μετά στην κύρια μονάδα.
4.2. Κύρια μονάδα
• Ανοίξτε τη θήκη μπαταριών (20) και τοποθετήστε δύο μπαταρίες ΑAA με σωστή πολικότητα.
Στη συνέχεια κλείστε το καπάκι της θήκης μπαταριών.
64
Page 66

5. Συναρμολόγηση
Υπόδειξη – Τοποθέτηση
• Συνιστάται η τοποθέτηση της κύριας μονάδας και της μονάδας μέτρησης στο επιθυμητό
μέρος χωρίς συναρμολόγηση και η εκτέλεση όλων των ρυθμίσεων - όπως περιγράφεται
στο κεφάλαιο 6. Λειτουργία.
• Συναρμολογήστε τη μονάδα/τις μονάδες αφού γίνει σωστή ρύθμιση και σταθεροποιηθεί
η ασύρματη σύνδεση.
Υπόδειξη
• Η ασύρματη μετάδοση ανάμεσα στη μονάδα μέτρησης και την κύρια μονάδα έχει
εμβέλεια 30 m σε ανοιχτό χώρο. Πριν από την τοποθέτηση λάβετε υπόψη ότι η
ασύρματη μετάδοση δεν πρέπει να παρεμποδίζεται από παρεμβολές ή εμπόδια όπως
κτίρια, δέντρα, οχήματα, αγωγούς υψηλής τάσης κ.α.
• Πριν την τελική τοποθέτηση βεβαιωθείτε ότι γίνεται επαρκής λήψη ανάμεσα στα
επιθυμητά σημεία τοποθέτησης.
• Κατά την τοποθέτηση της μονάδας μέτρησης λάβετε υπόψη ότι πρέπει να είναι
προστατευμένη από άμεση ηλιακή ακτινοβολία και βροχή.
• Το διεθνές τυπικό υψόμετρο για μέτρηση της θερμοκρασίας αέρα είναι 1,25 m (4 πόδια)
πάνω από το έδαφος.
Προειδοποίηση
• Προμηθευτείτε ειδικά ή ενδεδειγμένα υλικά από το εμπόριο για την τοποθέτηση στον
προβλεπόμενο τοίχο.
• Βεβαιωθείτε ότι δεν τοποθετούνται ελαττωματικά ή χαλασμένα εξαρτήματα.
• Κατά τη συναρμολόγηση του στηρίγματος μην χρησιμοποιείτε βία ούτε πολλή δύναμη.
Αυτό μπορεί να προκαλέσει ζη μιά στο προϊόν.
• Πριν από την τοποθέτηση ελέγξτε αν ο προβλεπόμενος τοίχος είναι κατάλληλος για το
βάρος που πρόκειται να τοποθετηθεί και βεβαιωθείτε πως στο σημείο τοποθέτησης στον
τοίχο δεν υπάρχουν σωλήνες νερού, αερίου, ηλεκτρικά καλώδια ή άλλου είδους αγωγοί.
5.1. Κύρια μονάδα
• Τοποθετήστε την κύρια μονάδα σε μια επίπεδη επιφάνεια μέσω του ποδιού στήριξης.
65
Page 67

5.2. Μονάδα μέτρησης
• Μπορείτε να τοποθετήσετε και τη μονάδα μέτρησης σε μια επίπεδη επιφάνεια εξωτερικά.
• Συνιστάται η ασφαλής και σταθερή τοποθέτηση της μονάδας μέτρησης σε έναν εξωτερικό
τοίχο μέσω της εγκοπής (24).
• Στερεώστε τα ούπα, τις βίδες, τα καρφιά κλπ. στον προβλεπόμενο τοίχο.
• Αναρτήστε τη μονάδα μέτρησης μέσω της προβλεπόμενης εγκοπής.
6. Λειτουργία
Υπόδειξη – Πληκτρολόγηση
Για να ρυθμίσετε τις τιμές γρηγορότερα κρατήστε πατημένο το πλήκτρο + (17) ή το
πλήκτρο – (18) .
6.1. Σύνδεση με τη μονάδα μέτρησης
• Μετά την τοποθέτηση των μπαταριών η κύρια μονάδα αναζητά αυτόματα σύνδεση με τη
μονάδα μέτρησης και πραγματοποιεί την πρώτη εγκατάσταση.
Υπόδειξη
• Η πρώτη εγκατάσταση διαρκεί 3 λεπτά.
• Κατά τη διαδικασία αυτή μην πατάτε τα πλήκτρα! Διαφορετικά μπορεί να παρουσιαστούν
σφάλματα και ανακρίβειες στις τιμές και τη μετάδοσή τους.
• Η διαδικασία ολοκληρώνεται όταν προβληθούν τα δεδομένα μέτρησης για τον εσωτερικό
(7) και τον εξωτερικό χώρο (8).
• Αν επανειλημμένα η μονάδα μέτρησης δεν μπορεί να εντοπίσει το σήμα, πατήστε και
κρατήστε πατημένο το πλήκτρο + (17) για 3 δευτερόλεπτα ώστε να αρχίσει η χειροκίνητη
αναζήτηση σήματος.
6.2. Επιλογή καναλιού/ επιπλέον μονάδες μέτρησης
Υπόδειξη
Επιπλέον προς την παρεχόμενη μονάδα μέτρησης μπορείτε να εγκαταστήσετε δύο ακόμα
μονάδες μέτρησης. Προσέξτε ώστε στην κύρια μονάδα και τη μονάδα μέτρησης να
ρυθμιστεί το ίδιο κανάλι.
Κατάλληλες μονάδες μέτρησης θα βρείτε στη σελίδα www.hama.com
66
Page 68

• Πατήστε επαναλαμβανόμενα το πλήκτρο + (17), για να ρυθμίσετε το ίδιο κανάλι με αυτό της
μονάδας μέτρησης - βλέπε 4.1. Μονάδα μέτρησης Προβάλλεται CH1, CH2, CH3 (9) ή στη
ροή καναλιών (10).
• Η κύρια μονάδα προβάλλει τώρα τη μετρηθείσα θερμοκρασία (8) της επιλεγμένης μονάδας
μέτρησης (9).
• Επιλέξτε τη ροή καναλιών (10) για να προβληθούν για 5 δευτερόλεπτα οι τιμές μέτρησης/ τα
κανάλια το ένα μετά το άλλο.
6.3. Βασικές ρυθμίσεις και χειροκίνητες ρυθμίσεις
Αυτόματη ρύθμιση σύμφωνα με το σήμα DCF
• Μετά την πρώτη εγκατάσταση της κύριας μονάδας και την επιτυχή μεταφορά ανάμεσα στην
κύρια μονάδα και τη μονάδα μέτρησης το ρολόι ξεκινά αυτόματη αναζήτηση σήματος DCF.
Όσο διαρκεί η αναζήτηση αναβοσβήνει το σύμβολο ασύρματης λήψης (13).
Ένδειξη Αναζήτηση του σήματος DCF
Η ένδειξη αναβοσβήνει
Μόνιμη ένδειξη
Καμία ένδειξη Ανενεργή
• Αν επανειλημμένα δεν μπορεί να εντοπιστεί το σήμα, πατήστε και κρατήστε πατημένο το
πλήκτρο –(18) για 3 δευτερόλεπτα, ώστε να αρχίσει η χειροκίνητη αναζήτηση σήματος DCF.
Το σύμβολο ασύρματης λήψης (13) αρχίζει να αναβοσβήνει.
Υπόδειξη – Ρύθμιση της ώρας
• Αυτή η διαδικασία διαρκεί περίπου 7 λεπτά. Αν η αναζήτηση αποτύχει, τερματίζεται και
επαναλαμβάνεται μετά από μία ώρα. Το σύμβολο ασύρματης λήψης (13) σβήνει.
• Στο διάστημα αυτό μπορείτε να ρυθμίσετε την ώρα και την ημερομηνία χειροκίνητα.
• Το ρολόι συνεχίζει καθημερινά να αναζητά αυτόματα (μεταξύ 01:00 και 03:00) σήμα DCF.
Αν γίνει επιτυχής λήψη σήματος διαγράφονται η ώρα και η ημερομηνία που ρυθμίστηκαν
χειροκίνητα.
Επιτυχώς – Γί νεται λήψη του σήματος
Ενεργή
67
Page 69

Υπόδειξη – Θερινή ώρα
Η ώρα ρυθμίζεται αυτόματα στη θερινή ώρα. Όσο ισχύει η θερινή ώρα, στην οθόνη
εμφανίζεται DST (5).
• Πατήστε πάλι και κρατήστε πατημένο για 3 δευτερόλεπτα το πλήκτρο – (18) για να
ολοκληρώσετε τη χειροκίνητη αναζήτηση.
(Χειροκίνητες) ρυθμίσεις
• Πατήστε πάλι και κρατήστε πατημένο για 3 δευτερόλεπτα το πλήκτρο – (18) για να
ολοκληρώσετε την αναζήτηση σήματος DCF. Το σύμβολο ασύρματης λήψης(13) σβήνεικαι
μπορείτε να ρυθμίσετε την ώρα χειροκίνητα.
• Πατήστε και κρατήστε πατημένο το πλήκτρο MODE (15) για 3 δευτερόλεπτα, για να
πραγματοποιήσετε τις παρακάτω ρυθμίσεις με τη σειρά:
• 12/24ωρη μορφή ώρας (12)
• Ζώνη ώρας (12)
• Ώρες (12)
• Λεπτά (12)
• Ημέρα (3)
• Έτος (12)
• Μήνας (2)
• Ημέρα (1)
• Για να επιλέξετε τις τιμές πατήστε το πλήκτρο + (17) ή το πλήκτρο – (18) και επιβεβαιώστε
την κάθε επιλογή με το πλήκτρο MODE (15).
• Εάν δεν γίνει κάποια εισαγωγή δεδομένων για 13 δευτερόλεπτα, η συσκευή εξέρχεται
αυτόματα από τη λειτουργία ρυθμίσεων.
Υπόδειξη – Ζώνη ώρας
• Μπορεί να γίνει ευρεία λήψη σήματος DCF, αυτό όμως αντιστοιχεί πάντα στην Ώρα
Κεντρικής Ευρώπης (CET) που ισχύει στη Γερμανία. Ως εκ τούτου, σε χώρες με άλλη
ζώνη ώρας πρέπει να λάβετε υπόψη τη διαφορά ώρας.
• Αν βρίσκεστε στη Μόσχα είστε 3 ώρες μπροστά από τη Γερμανία. Ως εκ τούτου, στη
ζώνη ώρας πρέπει να ρυθμίσετε +3. Το ρολόι θα ρυθμιστεί αυτόματα μετά τη λήψη του
σήματος DCF ή ανάλογα με την ώρα που ρυθμίστηκε χειροκίνητα 3 ώρες αργότερα.
68
Page 70

Υπόδειξη – Ημέρα
Για την ένδειξη ημέρας επιλέξτε τις γλώσσες Γερμανικά (GE), Αγγλικά (EN), Δανέζικα (DA),
Ολλανδικά (NE), Ιταλικά (IT), Ισπανικά (ES) ή Γαλλικά (FR).
Βαθμοί Κελσίου / Φαρενάιτ
• Για να αλλάξετε τις μονάδες θερμοκρασίας μεταξύ °C και °F πατήστε το πλήκτρο – (18).
Ξυπνητήρι
• Πατήστε επαναλαμβανόμενα το πλήκτρο MODE (15), για να μεταβείτε στη λειτουργία
ειδοποίησης 1 ή 2 . Στην ένδειξη δευτερολέπτων προβάλλεται A1 ή A2.
• Πατήστε και κρατήστε πατημένο το πλήκτρο MODE(15) για 3 δευτερόλεπτα για να
ρυθμίσετε το χρόνο αφύπνισης της προβαλλόμενης ειδοποίησης. Η ένδειξη ωρών αρχίζει
να αναβοσβήνει.
• Για να επιλέξετε την ώρα αφύπνισης πατήστε το πλήκτρο + (17) ή το πλήκτρο - (18)
και επιβεβαιώστε την επιλογή με το πλήκτρο MODE (15). Η ένδειξη λεπτών αρχίζει να
αναβοσβήνει.
• Επαναλάβετε τη διαδικασία, για να ρυθμίσετε τα λεπτά του χρόνου αφύπνισης.
• Πατήστε επαναλαμβανόμενα το πλήκτρο MODE (15), για να ρυθμίσετε την άλλη λειτουργία
ειδοποίησης και να μεταβείτε στην ένδειξη ώρας(12).
• Εάν δεν γίνει κάποια εισαγωγή δεδομένων για 13 δευτερόλεπτα, η συσκευή εξέρχεται
αυτόματα από τη λειτουργία ρυθμίσεων.
• Πατήστε το πλήκτρο ALARM (16), για να ενεργοποιήσετε/ απενεργοποιήσετε την
ειδοποίηση 1, ειδοποίηση 2 ή και τις δύο ειδοποιήσεις. Το σύμβολο ειδοποίησης (4)
προβάλλεται/ δεν προβάλλεται.
• Μόλις έλθει η ώρα αφύπνισης αρχίζει να αναβοσβήνει το σύμβολο ειδοποίησης (4) και
ακούγεται ένα ήχος.
• Πατήστε όποιο πλήκτρο θέλετε (εκτός από το πλήκτρο SNOOZE/LIGHT (14) για να
σταματήσει η αφύπνιση. Διαφορετικά ο ήχος θα σταματήσει αυτόματα μετά από 2 λεπτά.
• Αν πατήσετε το πλήκτρο SNOOZE/LIGHT (14) όσο ακούγεται ο ήχος αφύπνισης, αυτός
σταματά για 5 λεπτά και μετά ακούγεται πάλι. Το σύμβολο ειδοποίησης (4) αναβοσβήνει.
6.4. Φωτισμός οθόνης
Υπόδειξη – Φωτισμός οθόνης
Αν πατήστε το πλήκτρο SNOOZE / LIGHT (14), η οθόνη φωτίζεται για 5 δευτερόλεπτα.
69
Page 71

• Πατήστε και κρατήστε πατημένο το πλήκτρο CONTRAST (19) για 3 δευτερόλεπτα και
επιλέξτε πατώντας το πλήκτρο + (17) και – (18) την επιθυμητή ένταση του Ψηφίων LCD.
6.5. Χαμηλή στάθμη μπαταρίας
Όταν εμφανιστεί στην κύρια μονάδα το σύμβολο μπαταρίας (6/11) η στάθμη των μπαταριών
στην κύρια μονάδα/ στη μονάδα μέτρησης είναι χαμηλή. Αντικαταστήστε κατευθείαν τις
μπαταρίες
Υπόδειξη – Αλλαγή μπαταριών
• Λάβετε υπόψη ότι μετά από κάθε αλλαγή μπαταρίας στη μονάδα μέτρησης ή στην κύρια
μονάδα πρέπει να γίνει νέος συγχρονισμός των μονάδων.
• Για να γίνει αυτό πρέπει να αφαιρέσετε τις μπαταρίες της άλλης μονάδας, να τις
επανατοποθετήσετε ή, αν χρειάζεται, να τις αντικαταστήσετε.
7. Συντήρηση και φροντίδα
Καθαρίζετε αυτό το προϊόν μόνο με ένα ελαφρώς βρεγμένο πανί χωρίς χνούδια και μην
χρησιμοποιείτε επιθετικά καθαριστικά. Στο προϊόν δεν πρέπει να μπει νερό.
8. Απώλεια εγγύησης
Η εταιρεία Hama GmbH & Co KG δεν αναλαμβάνει καμία ευθύνη ή εγγύηση για ζημιές, οι
οποίες προκύπτουν από λανθασμένη εγκατάσταση και συναρμολόγηση ή λανθασμένη χρήση
του προϊόντος ή μη τήρηση των οδηγιών λειτουργίας και/ή των υποδείξεων ασφαλείας.
9. Σέρβις και υποστήριξη
Για ερωτήσεις σχετικά με το προϊόν απευθυνθείτε στην υπηρεσία εξυπηρέτησης πελατών της
Hama.
Γραμμή υποστήριξης: +49 9091 502-115 (Γερμανικά/Αγγλικά)
Περισσότερες πληροφορίες υποστήριξης θα βρείτε στη διεύθυνση: www.hama.com
10. Τεχνικά χαρακτηριστικά
Κύρια μονάδα Μονάδα μέτρησης
Ηλεκτρική τροφοδοσία
Κατανάλωση ρεύματος 0,5 mA 3 mA
Εύρος μέτρησης
Θερμοκρασία
3,0 V
2 x μπαταρίες AAA
0°C – +50°C/
32°F – 122°F
3,0 V
2 x μπαταρίες AAA
-20°C – +60°C/
-4°F – 140°F
70
Page 72

Βήματα μέτρησης
Θερμοκρασία
Κύκλος μέτρησης θερμοκρασίας 43 – 47 s43 – 47 s
Ασύρματη ώρα DCF Ναι Όχι
Μέγιστος αριθμός μονάδων
μέτρησης
Συχνότητα433 Mhz
Εμβέλεια ≤ 50 m
11. Υποδείξεις απόρριψης
Υπόδειξη σχετικά με την προστασία περιβάλλοντος:
Από τη στιγμή που η Ευρωπαϊκή Οδηγία 2012/19/EU και 2006/66/EE
ενσωματώνεται στο εθνικό δίκαιο ισχύουν τα εξής: Οι ηλεκτρικές και οι
ηλεκτρονικές συσκευές καθώς και οι μπαταρίες δεν επιτρέπεται να πετιούνται στα
οικιακά απορρίμματα. Οι καταναλωτές υποχρεούνται από τον νόμο να επιστρέφουν
τις ηλεκτρικές και ηλεκτρονικές συσκευές καθώς και τις μπαταρίες στο τέλος της
ζωής τους στα δημόσια σημεία περισυλλογής που έχουν δημιουργηθεί γι’ αυτό το σκοπό ή στα
σημεία πώλησης. Οι λεπτομέρειες ρυθμίζονται στη σχετική νομοθεσία. Το σύμβολο πάνω στο
προϊόν, στο εγχειρίδιο χρήσης ή στη συσκευασία παραπέμπει σε αυτές τις διατάξεις. Με την
ανακύκλωση, επαναχρησιμοποίηση των υλικών ή με άλλες μορφές χρησιμοποίησης παλιών
συσκευών / Μπαταριών συνεισφέρετε σημαντικά στην προστασία του περιβάλλοντος. Στη
Γερμανία ισχύουν αντίστοιχα οι παραπάνω κανόνες απόρριψης σύμφωνα με τον κανονισμό για
μπαταρίες και συσσωρευτές.
12. Δήλωση συμμόρφωσης
Η εταιρεία Hama GmbH & Co. KG δηλώνει πως η συσκευή αυτή πληροί τις βασικές
προϋποθέσεις και τις άλλες σχετικές προδιαγραφές της Οδηγίας 2014/53/ΕΕ. Στη
διεύθυνση www.hama.com θα βρείτε τη δήλωση συμμόρφωσης που αντιστοιχεί
στην οδηγία.
0,1°C / 0,2°F 0,1°C / 0,2°F
3-
71
Page 73

P Instrukcja obsługi
Elementy obsługi i sygnalizacji
A Stacja bazowa
1. Dzień
2. Miesiąc
3. Dzień tygodnia
4. Symbol alarmowy
5. Czas letni
6. Symbol baterii (stacja bazowa)
7. Temperatura w pomieszczeniu
8. Temperatura zewnętrzna
9. Wskaźnik kanałów
10. Przeszukiwanie kanałów
11. Symbol baterii (stacja pomiarowa)
12. Godzina
13. Symbol sygnału radiowego
14. Przycisk SNOOZE/LIGHT = przerywanie sygnału budzenia / aktywacja podświetlenia
ekranu (ok. 5 sekund)
15. PrzyciskMODE = ustawienia / potwierdzanie ustawionej wartości/ zmiana trybu
wyświetlania
16. PrzyciskALARM = wyłączanie / włączanie funkcji alarmowych
17. Przycisk + = zwiększanie aktualnie ustawionej wartości / wybór kanałów w przypadku
kilku zewnętrznych czujników temperatury / ręczne wyszukiwanie sygnału ze stacji
pomiarowej
18. Przycisk – = zmniejszanie aktualnie ustawionej wartości / zmiana między °C i °F /
włączanie/ wyłączanie ręcznego odbioru sygnału radiowego
19. Przycisk CONTRAST = regulacja podświetlenia
20. Schowek na baterie
B Stacja pomiarowa
21. Kontrolka transferu
22. Wyświetlacz
23. PrzyciskCH = wybór kanału
24. Otwór do mocowania na ścianie
25. Przycisk°C/°F = przełączanie między °C i °F
26. Schowek na baterie
Dziękujemy za zakup naszego produktu!
Przed pierwszym użyciem należy dokładnie przeczytać instrukcję obsługi. Instrukcję należy
przechować, gdyż może być jeszcze potrzebna.
72
Page 74

1. Objaśnienie symboli ostrzegawczych i wskazówek
Ostrzeżenie
Używane w celu zwrócenia uwagi na szczególne niebezpieczeństwo lub ryzyko.
Wskazówki
Używane w celu zwrócenia uwagi na szczególnie przydatne informacje.
2. Zawartość opakowania
• stacja pogodowa EWS-810
(stacja bazowa do stosowania wewnątrz / stacja pomiarowa do stosowania na zewnątrz)
• 4 baterie AAA
• niniejsza instrukcja obsługi
3. Wskazówki bezpieczeństwa
• Produkt jest przeznaczony do prywatnego, niekomercyjnego użytku domowego.
• Nie stosować produktu poza zakresem mocy podanym w danych technicznych.
• Nie stosować produktu w wilgotnym otoczeniu i chronić go przed bryzgami wody.
• Nie używać produktu w bezpośredniej bliskości ogrzewania, innych źródeł ciepła ani nie
wystawiać go na bezpośrednie promieniowanie słoneczne
• Nie używać produktu w miejscach, gdzie nie jest dozwolone stosowanie urządzeń
elektronicznych.
• Nie ustawiać produktu w pobliżu źródeł zakłóceń, ram metalowych, komputerów,
telewizorów itp. Urządzenia elektroniczne i futryny okienne wpływają negatywnie na
działanie produktu.
• Chronić produkt przed upadkiem i silnymi wstrząsami.
• Nie otwierać produktu i nie używać go, gdy jest uszkodzony.
• Nie próbować naprawiać samodzielnie urządzenia. Prace serwisowe zlecać
wykwalikowanemu personelowi fachowemu.
• Materiały opakowaniowe trzymać koniecznie z dala od dzieci, istnieje niebezpieczeństwo
uduszenia.
• Materiały opakowaniowe należy natychmiast poddać utylizacji zgodnie z obowiązującymi
przepisami miejscowymi.
• Nie modykować urządzenia. Prowadzi to do utraty wszelkich roszczeń z tytułu gwarancji.
73
Page 75

Ostrzeżenie - baterie
• Natychmiast usunąć z produktu zużyte baterie i poddać je utylizacji.
• Używać wyłącznie akumulatorów (lub baterii) odpowiadających podanemu typowi.
• Nie mieszać starych i nowych baterii ani baterii różnych typów lub producentów.
• Wkładając baterie, zwrócić koniecznie uwagę na właściwe podłączenie biegunów (znak
+ i -). Nieprzestrzeganie grozi wyciekiem lub wybuchem baterii.
• Nie ładować baterii.
• Przechowywać baterie poza zasięgiem dzieci.
• Nie zwierać akumulatorów / baterii oraz trzymać je z dala od odkrytych przedmiotów
metalowych.
4. Uruchamianie
4.1. Stacja pomiarowa
• Otworzyć schowek na baterie (26) i włożyć dwie baterie typu AAA, zwracając uwagę na
właściwą biegunowość.
• Ponownie nacisnąć przycisk CH (23), aby wybrać kanał, z którego stacja pomiarowa wysyła
sygnały. Na ekranie wyświetlany jest symbol CH1, CH2 lub CH3.
• Nacisnąć przycisk °C/°F (25), aby przełączać między jednostkami miary temperatury °C i
°F .
• Następnie zamknąć pokrywę schowka na baterie.
Wskazówka
Przed uruchomieniem należy pamiętać, aby zawsze włożyć najpierw baterie do stacji
pomiarowej, a następnie do stacji bazowej.
4.2. Stacja bazowa
• Otworzyć pokrywę schowka na baterie (20) i włożyć dwie baterie typu AAA, zwracając
uwagę na właściwą biegunowość. Następnie zamknąć pokrywę schowka na baterie.
74
Page 76

5. Montaż
Wskazówka - Montaż
• Zaleca się ustawić najpierw w wybranym miejscu stację bazową i stację pomiarową bez
montażu i skongurować wszystkie ustawienia – jak opisano w punkcie 6. Obsługa .
• Zamontować stacje dopiero po prawidłowej konguracji ustawień i znalezieniu stabilnej
łączności radiowej.
Wskazówka
• Zasięg transmisji radiowej między stacją pomiarową i stacją bazową wynosi na
otwartym terenie maks. 30 m.
• Przed montażem zwrócić uwagę, aby żadne sygnały zakłócające lub przeszkody, takie
jak budynki, drzewa, pojazdy, linie wysokiego napięcia itp., nie wpływały na transmisję
radiową.
• Przed ostatecznym montażem upewnić się, czy między wybranymi miejscami ustawienia
występuje dostateczny odbiór radiowy.
• Podczas montażu stacji pomiarowej należy pamiętać, aby zamontować ją w miejscu
zabezpieczonym przed bezpośrednim promieniowaniem słonecznym i deszczem.
• Międzynarodowa standardowa wysokość dla pomiaru temperatury powietrza wynosi
1,25 m (4 stopy) nad ziemią.
Ostrzeżenie
• Nabyć w specjalistycznym sklepie odpowiednie materiały montażowe do montażu na
przewidzianej ścianie.
• Sprawdzić, czy nie są montowane wadliwe bądź uszkodzone części.
• Podczas montażu nigdy nie wywierać nadmiernej siły. Może to spowodować
uszkodzenie produktu.
• Przed montażem sprawdzić, czy przewidziana ściana jest odporna na przyjęcie ciężaru
mocowanego produktu, i upewnić się, że w miejscu montażu na ścianie nie są
zainstalowane przewody elektryczne, wodne, gazowe bądź inne przewody.
5.1. Stacja bazowa
• Za pomocą podpórki ustawić stację bazową na równym podłożu.
75
Page 77

5.2. Stacja pomiarowa
• Stację pomiarową można także ustawić za pomocą podpórki na równym podłożu na
zewnątrz.
• Zaleca się bezpieczne i trwałe zamontowanie stacji pomiarowej na ścianie zewnętrznej za
pomocą otworu (24).
• Zamocować kołki rozporowe, śruby, gwoździe itp. na przewidzianej ścianie.
• Na przeznaczonych do tego otworach zawiesić stację bazową/ stację pomiarową.
6. Obsługa
Wskazówka – wprowadzanie danych
Trzymać wciśnięty przycisk + (17) lub – (18) , aby przyspieszyć nastawę wartości.
6.1. Połączenie ze stacją bazową
• Po włożeniu baterii, stacja bazowa automatycznie wyszukuje połączenie ze stacją
pomiarową i przeprowadza pierwszą kongurację.
Wskazówka
• Pierwsza konguracja trwa ok. 3 minuty.
• Nie naciskać w tym czasie żadnych przycisków! W przeciwnym razie wartości i ich
transmisja mogą zawierać błędy i niedokładne dane.
• Proces jest zakończony, gdy wyświetlane są zmierzone dane dla pomieszczenia (7) i na
zewnątrz (8).
• Jeżeli ze stacji pomiarowej ponownie nie zostanie odebrany żaden sygnał, nacisnąć
i trzymać wciśnięty przez ok. 3 sekundy przycisk + - (17) , aby rozpocząć ręczne
wyszukiwanie sygnału.
6.2. Wybór kanału/ dodatkowe stacje pomiarowe
Wskazówka
Do dostarczonej stacji pomiarowej można zainstalować dwie dodatkowe stacje
pomiarowe. Należy przy tym zwrócić uwagę na identyczne ustawienie kanałów stacji
bazowej i odpowiedniej stacji pomiarowej.
Pasujące stacje pomiarowe można znaleźć na stronie internetowej www.hama.com
76
Page 78

• Ponownie nacisnąć przycisk + (17), aby ustawić ten sam kanał jak na odpowiedniej stacji
pomiarowej – patrz 4.1. Stacja pomiarowa . Wyświetlane są symbole CH1, CH2, CH3 (9)
lub przeszukiwanie kanałów (10).
• Stacja bazowa wskazuje teraz zmierzoną temperaturę (8) przez wybraną stację pomiarową
(9).
• Wybrać przeszukiwanie kanałów (10), aby wyświetlić kolejno przez 5 sekund wartość
pomiarowe poszczególnych stacji pomiarowych/ kanały.
6.3. Ustawienia podstawowe i konfiguracja ręczna
Automatyczne ustawianie wg sygnału czasowego DCF
• Po pierwszym włączeniu stacji bazowej i udanej transmisji sygnałów między stacją bazową
i stacją pomiarową, zegar automatycznie rozpoczyna wyszukiwanie radiowego sygnału
czasowego DCF.Podczas wyszukiwania symbol sygnału radiowego (13) zaczyna migać.
Wskaźnik Wyszukiwanie sygnału czasowego DCF
Migający wskaźnik
Stały wskaźnik
Brak wskaźnika Nieaktywny
• Jeżeli sygnał ponownie nie zostanie odebrany, nacisnąć i trzymać wciśnięty przez ok. 3
sekundy przycisk – (18), aby rozpocząć ręczne wyszukiwanie radiowego sygnału czasowego
DCF. Symbol sygnału radiowego (13) zaczyna migać.
Wskazówka – ustawianie zegara
• Proces ręcznego wyszukiwania trwa ok. 7 minut. Jeżeli wyszukiwanie ręczne nie
powiedzie się, proces wyszukiwania jest przerywany i wznawiany o kolejnej pełnej
godzinie. Symbol sygnału radiowego (13) gaśnie.
• W tym czasie można ręcznie ustawić godzinę i datę.
• Zegar będzie codziennie szukał automatycznie (między godziną 01:00 i 03:00) sygnału
DCF. Po pomyślnym odbiorze sygnału ręcznie ustawiona godzina i data są nadpisywane.
Proces powiódł się - sygnał jest odbierany
Aktywne
77
Page 79

Wskazówka – czas letni
• Czas zegara jest automatycznie przestawiany na czas letni. Gdy czas letni jest aktywny,
na ekranie wyświetlany jest symbol DST (5) .
• Ponownie nacisnąć i trzymać wciśnięty przez ok. 3 sekundy przycisk – Taste (18), aby
zakończyć proces ręcznego wyszukiwania.
Ustawienie (ręczne)
• Nacisnąć i trzymać wciśnięty przez ok. 3 sekundy przycisk – (18), aby zakończyć proces
ręcznego wyszukiwania sygnału DCF.Symbol sygnału radiowego (13) gaśnie i można
ręcznie ustawiać godzinę.
• Nacisnąć i trzymać wciśnięty przez ok. 3 sekundy przycisk MODE (15) , aby po kolei
dokonać poniższych ustawień:
• format 12/24-godzinny (12)
• strefa czasowa (12)
• godzina (12)
• minuty (12)
• dzień tygodnia (3)
• rok (12)
• miesiąc (2)
• dzień (1)
• Ustawić poszczególne wartości przyciskiem + (17) lub – (18(18) i potwierdzić wybór
przyciskiem MODE (15). .
• Jeżeli w ciągu 13 sekund nie zostanie wprowadzona żadna wartość, tryb ustawiania jest
automatycznie zamykany.
Wskazówka – strefa czasowa
• Sygnał czasowy DCF może być odbierany na całym świecie, jednakże odpowiada on
zawsze stree czasu środkowoeuropejskiego (CET) obowiązującego w Niemczech.
Należy pamiętać, aby w krajach o innej stree czasowej przesunąć czas.
• Np. w Moskwie jest 3 godziny później niż w Niemczech. Przy stree czasowej należy
wtedy ustawić wartość +3. Po odbiorze sygnału czasowego DCF, wzgl. w odniesieniu do
ręcznie ustawionego czasu zegara, zegar ustawia się wtedy zawsze o 3 godziny później.
78
Page 80

Wskazówka – dzień tygodnia
Do wskazywania dni tygodnia można wybrać język: niemiecki (GE), angielski (EN), duński
(DA), niderlandzki (NE), włoski (IT), hiszpański (ES) lub francuski (FR).
Celsjusz / Fahrenheit
• Nacisnąć przycisk – (18), aby przełączyć między jednostkami miary temperatury °C i °F.
Budzik
• Kilkakrotnie nacisnąć przycisk MODE (15), aby przejść do trybu alarmowego 1 lub 2 .
Wskaźnik sekund wyświetla odpowiednio A1 lub A2.
• Nacisnąć i trzymać wciśnięty przez ok. 3 sekundy przycisk MODE (15) , aby ustawić czas
budzenia wyświetlonego alarmu. Zaczyna migać wskaźnik godzin.
• Nacisnąć przycisk + (17) lub – (18), aby wybrać godzinę czasu budzenia i potwierdzić
wybór, naciskając przycisk MODE (15). Zaczyna migać wskaźnik minut.
• Powtórzyć powyższe czynności, aby ustawić minuty czasu budzenia.
• Ponownie nacisnąć przycisk MODE (15), aby ustawić także inny tryb alarmowy lub
powrócić do wskaźnika godziny (12).
• Jeżeli w ciągu 13 sekund nie zostanie wprowadzona żadna wartość, tryb ustawiania jest
automatycznie zamykany.
• Nacisnąć przycisk ALARM (16), aby włączyć / wyłączyć alarm 1, alarm 2 lub oba . Symbol
alarmowy (4) jest wyświetlany/ nie jest wyświetlany.
• Włączenie budzika sygnalizuje migający symbol alarmowy (4) i sygnał akustyczny.
• Aby zakończyć alarm, nacisnąć dowolny przycisk (z wyjątkiem przycisku SNOOZE / LIGHT
(14). W przeciwnym razie zakończy się on automatycznie po upływie 2 minut.
• Naciśnięcie przycisku SNOOZE / LIGHT (14) w trakcie sygnału budzika przerywa sygnał na
5 minut, a następnie ponownie go wyzwala. Symbol alarmowy (4) miga.
6.4. Podświetlenie
Wskazówka - podświetlenie
Naciśnięcie przycisku SNOOZE / LIGHT (14) podświetla ekran przez ok. 5 sekund.
• Nacisnąć i trzymać wciśnięty przez ok. 3 sekundy przycisk CONTRAST (19) i naciskając
przycisk + (17) i – (18) wybrać żądaną intensywność Cyfry LCD.
79
Page 81

6.5. Niski stan naładowania baterii
Wyświetlenie na ekranie stacji bazowej symbolu baterii (6/11) oznacza bardzo niski poziom
naładowania baterii w stacji bazowej/pomiarowej. Natychmiast wymienić baterie.
Wskazówka – wymiana baterii
• Należy pamiętać, że po każdej wymianie baterii w stacji pomiarowej lub bazowej
konieczna jest ponowna synchronizacja stacji.
• W tym celu wyjąć baterie ze stacji i ponownie je włożyć lub w razie potrzeby także
wymienić.
7. Czyszczenie
Czyścić produkt tylko przy użyciu niestrzępiącej się, lekko zwilżonej szmatki i nie stosować
agresywnych detergentów. Uważać, aby do wnętrza produktu nie wniknęła woda.
8. Wyłączenie odpowiedzialności
Hama GmbH & Co. KG nie udziela gwarancji ani nie odpowiada za szkody wskutek
niewłaściwej instalacji, montażu oraz nieprawidłowego stosowania produktu lub
nieprzestrzegania instrukcji obsługi i/lub wskazówek bezpieczeństwa.
9. Serwis i pomoc techniczna
W razie pytań dotyczących produktu prosimy zwrócić się do infolinii Hama.
Gorąca linia: +49 9091 502-115 (niem./ang.)
Dodatkowe informacje są dostępne na stronie: www.hama.com
80
Page 82

10. Dane techniczne
Stacja bazowa Stacja pomiarowa
Zasilanie elektryczne
Pobór prądu 0,5 mA 3 mA
Zakres pomiarowy
Temperatura
Rozdzielczość pomiaru
Temperatura
Cykl pomiaru temperatury 43 – 47 s43 – 47 s
Zegar radiowy DCF TakNie
Maks. liczba stacji pomiarowych 3-
Częstotliwość 433 MHz
Zasięg ≤ 50 m
11. Informacje dotycząca recyklingu
Wskazówki dotyczące ochrony środowiska:
Od czasu wprowadzenia europejskiej dyrektywy 2012/19/EU i 2006/66/EU do
prawa narodowego obowiązują następujące ustalenia: Urządzeń elektrycznych,
elektronicznych oraz baterii jednorazowych nie należy wyrzucać razem z
codziennymi odpadami domowymi! Użytkownik zobowiązany prawnie do
odniesienia zepsutych, zniszczonych lub niepotrzebnych urządzeń elektrycznych i
elektronicznych do punktu zbiórki lub do sprzedawcy. Szczegółowe kwestie regulują przepisy
prawne danego kraju. Informuje o tym symbol przekreślonego kosza umieszczony na
opakowaniu. Segregując odpady pomagasz chronić środowisko!
12. Deklaracja zgodności
Hama GmbH & Co. KG oświadcza niniejszym, że niniejsze urządzenie jest zgodne z
podstawowymi wymaganiami i innymi właściwymi przepisami dyrektywy 2014/53/
UE. Deklaracja zgodności wg odpowiedniej dyrektywy dostępna jest na stronie
www.hama.com.
3,0 V
2 baterie typu AAA
0°C – +50°C/
32°F – 122°F
0,1°C / 0,2°F 0,1°C / 0,2°F
3,0 V
2 baterie typu AAA
-20°C – +60°C/
-4°F – 140°F
81
Page 83

Q Návod na použitie
Ovládacie prvky a indikácie
A Základňová stanica
1. Deň
2. Mesiac
3. Deň v týždni
4. Symbol alarmu
5. Letný čas
6. Batériový symbol (základňová stanica)
7. Teplota v miestnosti
8. Vonkajšia teplota
9. Indikácia kanálov
10. Prepínanie kanálov
11. Batériový symbol (rádiolokačná stanica)
12. Čas
13. Symbol rádiového spojenia
14. Tlačidlo SNOOZE/LIGHT = prerušenie signálu budenia / aktivácia podsvietenia (cca 5
sekúnd)
15. Tlačidlo MODE = Nastavenia / potvrdenie nastavovacej hodnoty / zmena režimu
zobrazenia
16. Tlačidlo ALARM = deaktivácia/aktivácia alarmových funkcií
17. Tlačidlo + = zvýšenie aktuálnej hodnoty / výber kanálu pri viacerých externých
snímačoch teploty / manuálne vyhľadávanie signálu rádiolokačnej stanice
18. Tlačidlo – = Zníženie aktuálnej hodnoty / striedanie medzi °C a °F / aktivácia /
deaktivácia manuálneho príjmu rádiového signálu
19. Tlačidlo CONTRAST = Regulácia podsvietenia
20. Batériová priehradka
B Rádiolokačná stanica
21. Kontrolka prenosu
22. Displej
23. Tlačidlo CH = Výber kanálov
24. Vybrania pre nástennú montáž
25. Tlačidlo °C/°F = Prepínanie medzi °C a °F
26. Batériová priehradka
Ďakujeme, že ste sa rozhodli pre výrobok Hama.
Prečítajte si všetky nasledujúce pokyny a informácie. Uchovajte tento návod na použitie pre
prípadné budúce použitie. Pokiaľ výrobok predáte, dajte tento návod novému majiteľovi.
82
Page 84

1. Vysvetlenie výstražných symbolov a upozornení
Upozornenie
Tento symbol označuje bezpečnostné upozornenie, ktoré poukazuje na určité riziká
a nebezpečenstva.
Poznámka
Tento symbol označuje dodatočné informácie, alebo dôležité poznámky.
2. Obsah balenia
• Meteorologická stanica EWS- 810
(základňová stanica pre interiér / rádiolokačná stanica pre exteriér)
• 4 AAA batérie
• tento návod na používanie
3. Техника безопасности
• Výrobok je určený pre súkromné použitie v domácnosti, nie je určený na komerčné použitie.
• Výrobok neprevádzkujte mimo svojich výkonových medzí uvedených
uvedených v technických údajoch.
• Výrobok nepoužívajte vo vlhkom prostredí a predchádzajte kontaktu so striekajúcou vodou.
• Výrobok nepoužívajte v bezprostrednej blízkosti kúrenia, iných zdrojov tepla a nevystavujte
ho účinkom priameho slnečného žiarenia.
• Nepoužívajte výrobok v prostredí, v ktorom nie je používanie elektronických prístrojov
dovolené.
• Neumiestňujte produkt v blízkosti rušivých polí, kovových rámov, počítačov a televízorov a
pod. Elektronické prístroje a okenné rámy majú negatívny vplyv na funkciu produktu.
• Výrobok nenechajte spadnúť a nevystavujte ho silným otrasom.
• Výrobok neotvárajte a nepoužívajte ho ďalej, ak je poškodený.
• Nepokúšajte sa prístroj samostatne ošetrovať alebo opravovať. Prenechajte akékoľvek úkony
údržby kompetentnému odbornému personálu.
• Obalový materiál uchovávajte mimo dosahu detí, hrozí nebezpečenstvo udusenia.
• Likvidujte obalový materiál okmžite podľa platných miestnych predpisov na likvidáciu
odpadov.
• Na zariadení/prístroji nerobte žiadne zmeny. Má to za následok stratu akýchkoľvek nárokov
na plnenie zo záruky.
83
Page 85

Батареи. Техника безопасности
• Spotrebované batérie bezodkladne odstráňte z výrobku a likvidujte ich.
• Používajte výlučne nové akumulátory (alebo batérie) zodpovedajúce uvedenému typu.
• Použité batérie nemiešajte s novými, nepoužívajte rozličné typy batérií alebo batérie od
rôznych výrobcov.
• Dbajte bezpodmienečne na správnu polaritu batérií (značenie + a -) a vložte
• ich príslušne. V prípade nerešpektovania hrozí nebezpečenstvo vytečenia alebo výbuchu
batérií.
• Batérie nevybíjajte do úplného vybitia.
• Batérie uchovávajte mimo dosahu detí.
• Akumulátory/batérie neskratujte a uchovávajte ich mimo dosahu holých kovových
predmetov.
4. Uvedenie do prevádzky
4.1. Rádiolokačná stanica
• Otvorte batériovú priehradku (26) a vložte dve AAA batérie so správnym pólovaním.
• Stlačte opakovane tlačidlo CH (23) na zvolenie kanálu, na ktorom rádiolokačná stanica
vysiela. Na displeji sú zobrazené CH1, CH2 alebo CH3.
• Na prepínanie medzi režimami indikácie °C a °F stlačte tlačidlo °C/°F (25).
• Zatvorte potom kryt batériovej priehradky.
Upozornenie
Pri uvádzaní do prevádzky dbajte na to, aby boli vždy vkladané najprv batérie do
rádiolokačnej stanice a až potom do základňovej stanice.
4.2. Základňová stanica
• Otvorte batériovú priehradku (20) a vložte dve AAA batérie so správnym pólovaním.
Zatvorte potom kryt batériovej priehradky.
84
Page 86

5. Montáž
Upozornenie – montáž
• Odporúča sa umiestniť základňovú a rádiolokačnú stanicu najprv na miesta inštalácie
bez montáže a urobiť všetky nastavenia - podľa opisu v odseku 6. Prevádzka.
• Stanicu/stanice namontujte až po správnom nastavení a dosiahnutí stabilného
rádiového spojenia.
Upozornenie
• Dosah rádiového prenosu medzi rádiolokačnou a základňovou stanicou je na voľnom
priestranstve až 30 m.
• Pred montážou dbajte na to, aby rádiový prenos nebol ovplyvnený rušivými signálmi
alebo prekážkami, ako sú budovy, stromy, vozidlá, vysokonapäťové vedenia atď.
• Pred denitívnou montážou sa ubezpečte, že medzi želanými miestami inštalácie
existuje dostatočný príjem.
• Pri montáži rádiolokačnej stanice dbajte na to, aby na tomto mieste nebola vystavená
účinkom priameho slnečného žiarenia a dažďa.
• Medzinárodná štandardná výška merania teploty vzduchu je 1,25 m (4 ft) nad
povrchom.
Výstraha
• Obstarajte si prosím špeciálny resp. vhodný montážny materiál v odbornej predajni pre
montáž na predpokladanú stenu.
• Zaistite, aby sa nemontovali žiadne chybné alebo poškodené súčasti.
• Pri montáži nikdy nepoužívajte násilie alebo veľkú silu. Mohlo by tak dôjsť k poškodeniu
výrobku.
• Pred montážou bezpodmienečne skontrolujte vhodnosť príslušnej steny pre umiestnenie
príslušnej hmotnosti a ubezpečte sa, že na mieste montáže nie sú v stene umiestnené
žiadne vodovody, plynové potrubia, elektrické alebo iné vedenia.
5.1. Základňová stanica
• Postavte základňovú stanicu so stojanom na rovnú plochu.
85
Page 87

5.2. Rádiolokačná stanica
• Rádiolokačnú stanicu môžete rovnako postaviť na rovnú plochu v exteriéru.
• Odporúča sa rádiolokačnú stanicu bezpečne a pevne namontovať na vonkajšiu stenu
pomocou vybrania (24).
• Pripevnite hmoždinku, skrutku, klinec atď. v príslušnej stene.
• Rádiolokačnú stanicu na nich zaveste na to určeným vybraním.
6. Prevádzka
Upozornenie – zadávanie
Podržte stlačené tlačidlo + (17) alebo tlačidlo – (18), umožní sa tak rýchlejšia voľba
hodnôt.
6.1. Spojenie s rádiolokačnou stanicou
• Po vložení batérií vyhľadáva základňová stanica automaticky spojenie s rádiolokačnou
stanicou a vykoná prvé nastavenie.
Upozornenie
• Prvé nastavenie trvá asi 3 minúty.
• Počas tejto doby sa nedotýkajte žiadneho tlačidla! Ináč by mohlo dôjsť k chybám a
nepresnostiam pri hodnotách a ich prenosu.
• Postup je ukončený, ak sa zobrazia namerané hodnoty pre interiér (7) a exteriér (8).
• Ak rádiolokačná stanica opakovane neprijíma žiadny signál, podržte po dobu asi 3 sekúnd
stlačené tlačidlo + (17) na spustenie manuálneho hľadania signálu DCF.
6.2. Voľba kanálu/ Ďalšie rádiolokačné stanice
Upozornenie
Okrem dodanej rádiolokačnej stanice môžete inštalovať dve ďalšie rádiolokačné stanice.
Dbajte pritom na zhodné nastavenie kanálu na základňovej a príslušnej rádiolokačnej
stanici. Vhodné rádiolokačné stanice nájdete na adrese www.hama.com
86
Page 88

• Stláčajte opakovane tlačidlo + (17) pre nastavenie rovnakého kanálu ako na príslušnej
rádiolokačnej stanici – pozri 4.1. Rádiolokačná stanica. Zobrazené sú CH1, CH2, CH3
(9) alebo prepínanie kanálov (10).
• Základňová stanica teraz ukazuje nameranú teplotu (8) zvolenej rádiolokačnej stanice (9).
• Vyberte prepínanie kanálov (10), spustí sa tak postupné zobrazovanie nameraných hodnôt
jednotlivých rádiolokačných staníc/ kanálov vždy po dobu 5 sekúnd.
6.3. Základné a manuálne nastavenia
Automatické nastavenie po príjme signálu DCF
• Po prvom zapnutí základňovej stanice a úspešnom prenose medzi základňovou a
rádiolokačnou stanicou spustia hodiny automaticky vyhľadávanie signálu DCF. Počas
hľadania sa rozbliká symbol rádiového spojenia (13).
Indikácia Vyhľadávanie signálu DCF
Blikajúca indikácia
Trvalá indikácia
Žiadna indikácia Neaktívny stav
• Ak sa opakovane neprijíma žiadny signál, podržte po dobu asi 3 sekúnd stlačené tlačidlo
– (18) na spustenie manuálneho hľadania signálu DCF. Rozbliká sa symbol rádiového
spojenia (13).
Aktívny stav
Úspešný výsledok - signál sa prijíma
87
Page 89

Upozornenie - nastavenie času
• Tento postup trvá asi 7 minút. V prípade neúspechu sa hľadanie ukončí a opakuje sa v
nasledujúcej plnej hodine. Symbol rádiového spojenia (13) zhasne.
• Medzitým môžete manuálne nastaviť čas a dátum.
• Hodiny ďalej automaticky hľadajú denne (medzi 01:00 hod. a 03:00 hod.) signál DCF.
Po úspešnom príjmu signálu sa ručne nastavené hodnoty času a dátumu prepíšu.
Upozornenie – letný čas
• Čas sa na letný čas prestavuje automaticky. Na displeji je zobrazený znak DST (5) počas
aktívnej fázy letného času.
• Podržte opäť po dobu asi 3 sekúnd stlačené tlačidlo – (18) na ukončenie manuálneho
vyhľadávania.
(Manuálne) Nastavenia
• Podržte po dobu asi 3 sekúnd stlačené tlačidlo – (18) na ukončenie vyhľadávania signálu
DCF. Symbol rádiového spojenia (13) zhasne a teraz môžete čas nastaviť manuálne.
• Podržte asi 3 sekundy stlačené tlačidlo MODE (15) na umožnenie následujúcich postupných
nastavení:
• 12/24 hodinový formát (12)
• Časová zóna (12)
• Hodiny (12)
• Minúty (12)
• Deň v týždni (3)
• Rok (12)
• Mesiac (12)
• Deň (1)
• Na zvolenie jednotlivých hodnôt stlačte tlačidlo + (17) alebo tlačidlo – (18) a príslušnú
voľbu potvrďte stlačením tlačidla MODE (15).
• Ak sa priebehu 13 sekúnd nebudú zadané žiadne hodnoty, opustí sa nastavovací režim
automaticky.
88
Page 90

Upozornenie – časová zóna
• Je možný rozsiahly príjem signálu DCF, zodpovedá ale vždy SEČ, ktorý platí v Nemecku.
Pamätajte preto na zohľadnenie posunutia času v krajinách s odlišnou časovou zónou.
• Pri pobyte v Moskve už je o 3 neskoršie ako v Nemecku. Včasovej zóne preto nastavte
+3. Hodiny sa potom vždy po príjmu signálu DCF resp. s ohľadom na manuálne
nastavený čas nastavia automaticky o 3 hodiny dopredu.
Upozornenie – deň v týždni
• Pre zobrazenie dňoch v týždni môžete vybrať tieto jazyky: nemecky (GE), anglicky (EN),
dánsky (DA), holandsky (NE), taliansky (IT), španielsky (ES) alebo francúzsky (FR).
Celzius / Fahrenheit
• Na prepínanie medzi režimami indikácie teploty °C a °F stlačte tlačidlo – (18).
Budík
• Stlačte opakovane tlačidlo MODE (15) na prechod do režimu budíka 1 alebo 2.
• V indikácii sekúnd sú príslušne zobrazené A1 alebo A2.
• Podržte asi 3 sekundy stlačené tlačidlo MODE (15) pre nastavenie doby budenia
zobrazeného budíka. Rozbliká sa indikácia hodín.
• Na zvolenie hodín pre budenie stlačte tlačidlo + (17) alebo tlačidlo – (18) a voľbu potvrďte
stlačením tlačidla MODE (15). Rozbliká sa indikácia minút.
• Tento postup opakujte pre minúty doby budenia.
• Stlačte opakovane tlačidlo MODE (15) pre nastavenie druhého režimu budíka alebo pre
návrat do indikácie času (12).
• Ak sa priebehu 13 sekúnd nebudú zadané žiadne hodnoty, opustí sa nastavovací režim
automaticky.
• Stlačte tlačidlo ALARM (16) pre aktiváciu/deaktiváciu funkcie Alarm 1, Alarm 2 alebo
obidvoch. Zobrazí/nezobrazí sa symbol alarmu (budenia) (4).
• Pri príslušnej aktivácii budíka sa rozbliká symbol alarmu (4) a zaznie signál budenia.
• Stlačte ľubovoľné tlačidlo (okrem tlačidla SNOOZE/LIGHT (14) na ukončenie budenia. Ináč
sa ukončí automaticky po 2 minútach.
• Ak stlačíte počas signálu budenia tlačidlo SNOOZE/LIGHT (14), preruší sa signál budenia
na 5 minút a potom sa aktivuje znova. Bliká symbol alarmu (14).
89
Page 91

6.4. Podsvietenie
Upozornenie – podsvietenie
Ak stlačíte tlačidlo SNOOZE/LIGHT (14), osvetlí sa displej po dobu asi 5 sekúnd.
• Podržte asi 3 sekundy stlačené tlačidlo CONTRAST (19) a zvoľte stlačením tlačidla + (17) a
tlačidla – (18) želanú intenzitu LCD číslica.
6.5. Nízka kapacita batérie
Ak sa na displeji základňovej stanice zobrazí symbol batérie (6/11), je kapacita batérií v
základňovej/rádiolokačnej stanici veľmi nízka. Vymeňte bezodkladne batérie.
Upozornenie – výmena batérie
• Uvedomte si, že sa po každej výmene batérií v rádiolokačnej alebo základňovej stanici
musí vykonať nová synchronizácia staníc.
• Vyberte batérie druhej stanice a opäť ich vložte alebo vymeňte ich tiež podľa potreby.
7. Údržba a starostlivosť
Na čistenie tohto výrobku používajte len navlhčenú utierku, ktorá nepúšťa vlákna a
nepoužívajte žiadne agresívne čistiace prostriedky. Dbajte na to, aby do výrobku nemohla
vniknúť voda.
8. Vylúčenie záruky
Firma Hama GmbH & Co KG neručí/nezodpovedá za škody vyplývajúce z neodbornej inštalácie,
montáže alebo neodborného používania výrobku alebo z nerešpektovania návodu na
používanie a/alebo bezpečnostných pokynov.
9. Servis a podpora
S otázkami týkajúcimi sa výrobku sa prosím obráťte na poradenské oddelenie rmy Hama.
Hotline: +49 9091 502-115 (nem./angl.)
Ďalšie informácie o podpore nájdete tu:
www.hama.com
90
Page 92

10. Technické údaje
Základňová stanica Rádiolokačná stanica
Napájanie
Odber prúdu 0,5 mA 3 mA
Rozsah merania
Teplota
Kroky merania
Teplota
Merací cyklus teploty 43 – 47 s43 – 47 s
Hodiny riadené rádiovým
signálom DCF
Max. Počet rádiolokačných
staníc
Frekvencia 433 MHz
Dosah ≤ 50 m
11. Pokyny pre likvidáciu
Ochrana životného prostredia:
Európska smernica 2012/19/EU a 2006/66/EU stanovuje: Elektrické a elektronické
zariadenia, rovnako ako batérie sa nesmú vyhadzovať do domáceho odpadu.
Spotrebiteľ je zo zákona povinný zlikvidovať elektrické a elektronické zariadenia,
rovnako ako batérie na miesta k tomu určené. Symbolizuje to obrázok v návode na
použitie, alebo na balení výrobku. Opätovným zužitkovaním alebo inou formou
recyklácie starých zariadení/batérií prispievate k ochrane životného prostredia.
12. Vyhlásenie o zhode
Spoločnosť Hama GmbH & Co. KG týmto vyhlasuje, že toto zariadenie spĺňa
základné požiadavky a ostatné relevantné predpisy smernice 2014/53/EÚ.
Vyhlásenie o zhode podľa príslušnej smernice si môžete pozrieť na adrese
www.hama.com.
3,0 V
2 x AAA batérie
0 °C – +50 °C/
32 °F – 122 °F
0,1 °C / 0,2 °F 0,1 °C / 0,2 °F
Áno Nie
3-
2 x AAA batérie
-20 °C – +60 °C/
-4 °F – 140 °F
3,0 V
91
Page 93

O Manual de instruções
Elementos de comando e indicadores
A Estação base
1. Dia
2. Mês
3. Dia da semana
4. Símbolo do alarme
5. Hora de verão
6. Símbolo das pilhas (estação base)
7. Temperatura ambiente
8. Temperatura exterior
9. Indicação do canal
10. Ciclo dos canais
11. Símbolo das pilhas (estação de medição)
12. Hora
13. Símbolo de rádio
14. Botão SNOOZE/LIGHT = Interrupção do sinal de despertar/ativação da retroiluminação
(aprox. 5 segundos)
15. Botão MODE = Denições/conrmação do valor de denição/comutação do modo de
visualização
16. Botão ALARM = Desativação/ativação das funções de alarme
17. Botão + = Aumento do valor de denição atual/seleção do canal no caso de vários
sensores de temperatura externos/procura manual pelo sinal da estação de medição
18. Botão – = Diminuição do valor de denição atual/comutação entre °C e °F/ativação/
desativação da receção manual do sinal de rádio
19. Botão CONTRAST = Regulação da retroiluminação
20. Compartimento das pilhas
B Estação de medição
21. Luz de controlo da transmissão
22. Visor
23. Botão CH = Seleção do canal
24. Abertura para montagem na parede
25. Botão °C/°F = Comutação entre °C e °F
26. Compartimento das pilhas
Agradecemos que se tenha decidido por este produto Hama!
Antes de utilizar o produto, leia completamente estas indicações e informações. Guarde,
depois, estas informações num local seguro para consultas futuras. Se transmitir o produto
para um novo proprietário, entregue também as instruções de utilização.
92
Page 94

1. Descrição dos símbolos de aviso e das notas
Aviso
É utilizado para identicar informações de segurança ou chamar a atenção para perigos
e riscos especiais.
Nota
É utilizado para identicar informações adicionais ou notas importantes.
2. Conteúdo da embalagem
• Estação meteorológica EWS-810
(estação base para o interior/estação de medição para o exterior)
• 4 pilhas AAA
• Estas instruções de utilização
3. Indicações de segurança
• O produto está previsto apenas para utilização doméstica e não comercial.
• Não utilize o produto fora dos limites de desempenho indicados nas especicações
técnicas.
• Não utilize o produto em ambientes húmidos e evite jactos de água.
• Não utilize o produto perto de aquecedores, outras fontes de calor ou directamente exposto
à luz solar.
• Não utilize o produto em áreas nas quais não são permitidos aparelhos electrónicos.
• Não coloque o produto na proximidade de campos de interferência, estruturas metálicas,
computadores, televisores, etc. Os aparelhos eletrónicos e os caixilhos das janelas afetam
negativamente o funcionamento do produto.
• Não deixe cair o produto nem o submeta a choques fortes.
• Öffnen Sie das Produkt nicht und betreiben Sie es bei Beschädigungen nicht weiter.
• Não tente fazer a manutenção ou reparar o aparelho. Qualquer trabalho de manutenção
deve ser executado por técnicos especializados.
• Mantenha a embalagem fora do alcance de crianças. Perigo de asxia.
• Elimine imediatamente o material da embalagem em conformidade com as normas locais
aplicáveis.
• Não efectue modicações no aparelho. Perda dos direitos de garantia.
93
Page 95

Aviso – Pilhas
• Retire imediatamente pilhas gastas do produto e elimine-as adequadamente.
• Utilize exclusivamente baterias (ou pilhas) que correspondam ao tipo
• indicado.
• Não utilize pilhas de diferentes tipos ou fabricantes nem misture pilhas novas e usadas.
• BAo colocar as pilhas, tenha em atenção a polaridade correcta (inscrições + e -). A não
observação da polaridade correcta poderá levar ao derrama das pilhas ou explosão.
• Não recarregue as pilhas.
• Mantenha as pilhas fora do alcance das crianças.
• Não provoque um curto-circuito em pilhas/baterias e mantenha-as afastadas de objetos
metálicos desprotegidos.
4. Colocação em funcionamento
4.1. Estação de medição
• Abra o compartimento das pilhas (26) e coloque duas pilhas AAA com a polaridade correta.
• Prima repetidamente o botão CH (23) para escolher o canal no qual a estação de medição
transmite. No visor, é apresentada a indicação CH1, CH2 ou CH3.
• Prima o botão °C/°F (25) para comutar a indicação da temperatura entre °C e °F.
• Em seguida, feche a tampa do compartimento das pilhas.
Nota
Tenha em atenção que, para a colocação em funcionamento, deve colocar primeiro as
pilhas na estação de medição e depois na estação base.
4.2. Estação base
• Abra o compartimento das pilhas (20) e coloque duas pilhas AAA com a polaridade correta.
Em seguida, feche a tampa do compartimento das pilhas.
94
Page 96

5. Montagem
Nota – Montagem
• Recomenda-se colocar primeiro a estação base e a estação de medição nos locais
de instalação pretendidos sem proceder à montagem e efetuar todas as denições,
conforme descrito no ponto 6. Operação.
• Monte as estações apenas após uma conguração correta e uma ligação de rádio
estável.
Nota
• O alcance da radiotransmissão entre a estação de medição e a estação base é de 30 m,
no máximo, ao ar livre.
Antes da montagem, certique-se de que a radiotransmissão não é afetada por sinais
de interferência ou obstáculos, como edifícios, árvores, veículos, cabos de alta tensão,
etc.
• Antes da montagem nal, assegure-se de que existe uma receção suciente entre os
locais de instalação pretendidos.
• Aquando da montagem da estação de medição, certique-se de que esta é posicionada
protegida da incidência direta da luz solar e da chuva.
• A altura padrão internacional para a medição da temperatura do ar é de 1,25 m (4 pés)
acima do solo.
Aviso
• Para a montagem na parede prevista, adquira material de instalação adequado ou
especial num estabelecimento especializado.
• Certique-se de que não são montadas peças avariadas ou danicadas.
• Ao montar o produto, nunca aplique uma força excessiva. Tal pode danicar o produto.
• Antes da montagem, verique a adequação da parede relativamente ao peso a aplicar
e certique-se de que, no local de montagem na parede, não existem cabos elétricos,
tubos de água ou gás ou outras tubagens.
5.1. Estação base
• Coloque a estação base numa superfície plana com a base de apoio.
95
Page 97

5.2. Estação de medição
• A estação de medição pode ser igualmente colocada numa superfície plana no exterior.
• Recomenda-se montar a estação de medição de forma segura e xa numa parede exterior
com o recurso à abertura (24).
• Fixe as buchas, parafusos, pregos, etc. na parede prevista para o efeito.
• Pendure a estação de medição na mesma através da respetiva abertura.
6. Operação
Nota – Introdução
Mantenha premido o botão + (17) ou o botão – (18) para poder selecionar os valores de
forma mais rápida.
6.1. Ligação à estação de medição
• Após a colocação das pilhas, a estação base procura automaticamente estabelecer uma
ligação à estação de medição e efetua a conguração inicial.
Nota
• A conguração inicial demora cerca de 3 minutos.
• Evite premir qualquer botão durante este tempo! Caso contrário, podem ocorrer erros e
imprecisões nos valores e na transmissão dos mesmos.
• O processo está terminado assim que forem apresentados os dados de medição para o
interior (7) e o exterior (8).
• Se não for recebido repetidamente qualquer sinal da estação de medição, mantenha
premido o botão + (17) durante cerca de 3 segundos, para iniciar a procura manual do
sinal.
6.2. Seleção do canal/estações de medição adicionais
Nota
Para além da estação de medição fornecida, pode instalar mais duas estações de medição.
Neste caso, certique-se de que a denição do canal na estação base e na respetiva
estação de medição é idêntica.
Encontrará estações de medição adequadas em www.hama.com.
96
Page 98

• Prima repetidamente o botão + (17) para denir o mesmo canal que na estação de
medição relevante – consultar 4.1. Estação de medição. As indicações CH1, CH2 e CH3 (9)
ou o ciclo dos canais (10) são apresentados.
• A estação base apresenta agora a temperatura medida (8) da estação de medição
selecionada (9).
• Selecione o ciclo dos canais (10) para que os valores de medição das estações de medição/
canais individuais sejam apresentados em sequência durante cerca de 5 segundos cada
um.
6.3. Definições básicas e definições manuais
Definição automática de acordo com o sinal DCF
• Após se ligar pela primeira vez a estação base e se estabelecer com sucesso a transmissão
entre a estação base e a estação de medição, o relógio inicia automaticamente a procura
por um sinal DCF. Durante o processo de procura, o símbolo de rádio (13) ca intermitente.
Indicação Procura do sinal DCF
Indicação intermitente
Indicação permanentemente
acesa
Sem indicação Inativa
• Se não for recebido repetidamente qualquer sinal, mantenha premido o botão – (18)
durante cerca de 3 segundos, para iniciar a procura manual do sinal DCF. O símbolo de
rádio (13) começa a piscar.
Nota – Denição da hora
• O processo de procura demora cerca de 7 minutos. Caso este falhe, a procura é
terminada e repetida na hora certa seguinte. O símbolo de rádio (13) apaga-se.
• Entretanto, pode efetuar uma denição manual da data e da hora.
• O relógio continua a procurar automaticamente o sinal DCF todos os dias (entre as
01:00h e as 03:00h). Se o sinal for recebido com sucesso, a data e hora denidas
manualmente são substituídas.
Efetuada com sucesso – o sinal é recebido
Ativa
97
Page 99

Nota – Hora de verão
A hora muda automaticamente para a hora de verão. Enquanto a hora de verão estiver
ativa, é apresentada no visor a indicação DST (5).
• Mantenha novamente premido o botão – (18) durante cerca de 3 segundos para terminar o
processo de procura manual.
Definições (manuais)
• Mantenha premido o botão – (18) durante cerca de 3 segundos para terminar o processo
de procura manual do sinal DCF. O símbolo de rádio (13) apaga-se e pode denir a hora
manualmente.
• Mantenha premido o botão MODE (15) durante cerca de 3 segundos para efetuar as
seguintes denições pela ordem indicada:
• Formato de 12/24 horas (12)
• Fuso horário (12)
• Horas (12)
• Minutos (12)
• Dia da semana (3)
• Ano (12)
• Mês (2)
• Dia (1)
• Para selecionar os valores individuais, prima o botão + (17) ou o botão – (18) e conrme a
seleção relevante, premindo o botão MODE (15).
• Se não for efetuada qualquer introdução durante 13 segundos, o modo de denição
termina automaticamente.
Nota – Fuso horário
• O sinal DCF pode ser recebido numa ampla extensão. No entanto, corresponde sempre
à hora da Europa Central, que é válida na Alemanha. Por conseguinte, em países com
outro fuso horário, deve ter em atenção a diferença horária.
• Caso se encontre em Moscovo, aí serão 3 horas mais tarde do que na Alemanha.
Portanto, dena +3 para o fuso horário. O relógio efetuará depois a denição da hora
automaticamente para 3 horas mais tarde após a receção do sinal DCF ou relativamente
à hora manualmente denida.
98
Page 100

Nota – Dia da semana
Para a indicação do dia da semana, pode selecionar entre os seguintes idiomas: alemão
(GE), inglês (EN), dinamarquês (DA), neerlandês (NE), italiano (IT), espanhol (ES) ou
francês (FR).
Celsius/Fahrenheit
• Prima o botão – (18) para comutar a indicação da temperatura entre °C e °F.
Despertador
• Prima repetidamente o botão MODE (15) para aceder ao modo de alarme 1 ou 2.
Na indicação dos segundos, é apresentada a indicação A1 ou A2.
• Mantenha premido o botão MODE (15) durante cerca de 3 segundos para denir a hora de
despertar do alarme indicado. A indicação das horas ca intermitente.
• Prima o botão + (17) ou o botão – (18) para selecionar a hora do sinal de despertar
e conrme a seleção, premindo o botão MODE (15). A indicação dos minutos ca
intermitente.
• Repita o procedimento para os minutos do sinal de despertar.
• Prima repetidamente o botão MODE (15) para denir o outro modo de alarme ou para
retroceder para a indicação da hora (12).
• Se não for efetuada qualquer introdução durante 13 segundos, o modo de denição
termina automaticamente.
• Prima o botão ALARM (16) para ativar/desativar o alarme 1, o alarme 2 ou ambos. O
símbolo do alarme (4) é apresentado/desaparece.
• Quando o despertador for acionado, o símbolo do alarme (4) começa a piscar e é emitido
um sinal de despertar.
• Prima qualquer botão (exceto o botão SNOOZE/LIGHT (14) para terminar o alarme. Caso
contrário, este termina automaticamente após 2 minutos.
• Durante o sinal de despertar, prima o botão SNOOZE/LIGHT (14) e o sinal de despertar
será interrompido durante 5 minutos e, em seguida, será novamente emitido. O símbolo do
alarme (4) ca intermitente.
99
 Loading...