

Page 1
00054883
(DIT2100MSBT)
00054890
(DIT2100MSBT)
Digital Tuner
Digital-Tuner
Руководство по эксплуатации/Istruzioni per l‘uso /Gebruiksaanwijzing / Οδηγίες χρήσης /Instrukcja obsługi /
Manual de utilizare/Bruksanvisning /Käyttöohje / Работна инструкция /Betjeningsvejledning /Manuelt stasjonssøk
Operating Instructions /Bedienungsanleitung /Mode d‘emploi /Instrucciones de uso /
Használati útmutató /Návod kpoužití/Návod na použitie /Manual de instruções /Kullanma kılavuzu /
Page 2
G Operating instructions
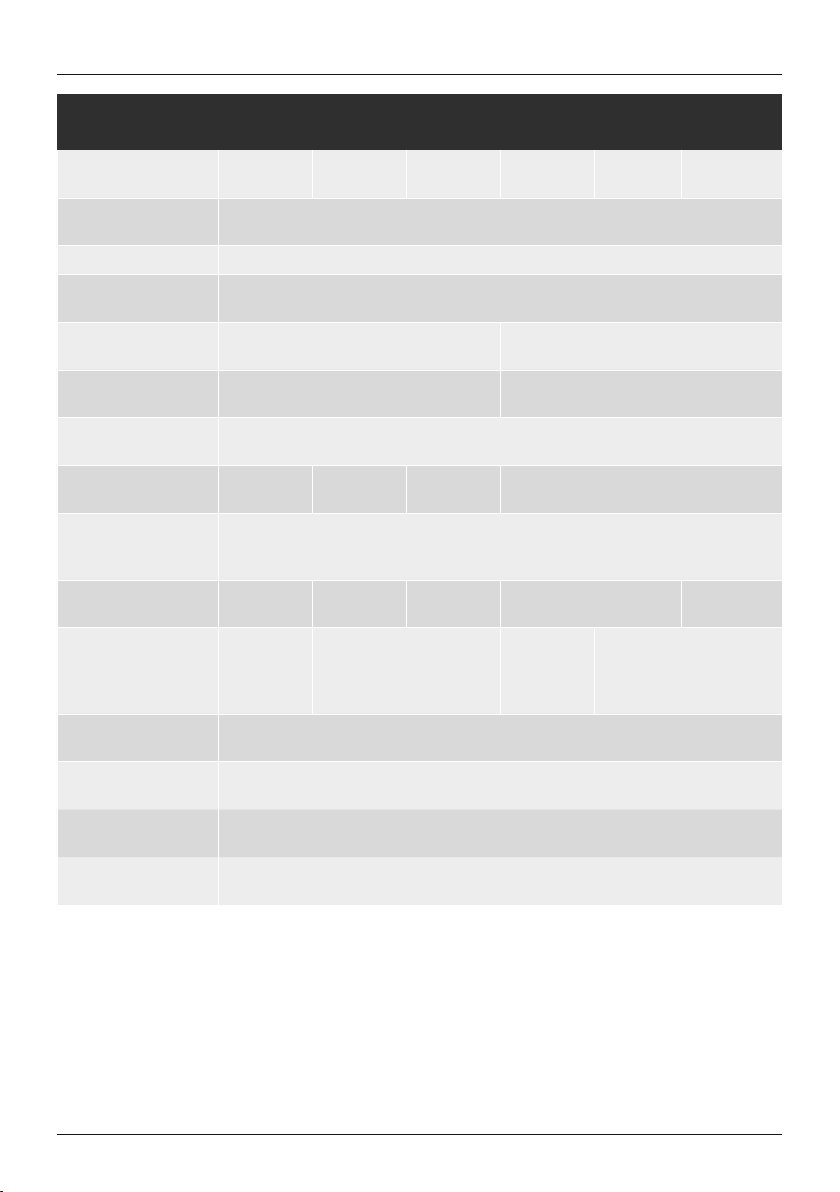
Technical data /
Technische Daten
Radio Receiver/
Radio Empfänger
Connectivity/
Konnektivität
Display 2.8" (7.11 cm) Colour TFT
Encryption/
Verschlüsselung
Frequency range/
Frequenzbereich
Sensitivity/
Empndlichkeit
Power input/
Stromeingang
Power Consumption/
Stromaufnahme
Input &Output/
Anschlüsse
Pr
esets/
voriten
Fa
Codec
UI Languages/
UI Sprachen
Package Content/
Verpackungsinhalt
Dimension (WxHxD)/
Größe (BxHxT)
Weight/
Gewicht
DAB
ü
LAN (10/100), WiFi 2.4GHz (b/g/n) /5GHz (a/n), USB (Play), Bluetooth 4.0
WEP,WPA,WPA2, WPS
DAB/DAB+:
174-240 MHz
DAB/DAB+:
-97 ~99dBm
100-240 V~50/60Hz
Operation/
Betrieb
AUX IN 3.5 mm, Headphone Out 3.5 mm, USB (Playback),
Digital Audio Optical &Coaxial, Analog Audio Output RCAL&R,
AUX OUT 3.5 mm, Ethernet
DAB/DAB+:
30
IR:
MP3, WMA,
ADTS, MPEGDASH
English, German, Danish, Dutch, Finnish, French, Italian, Norwegian, Polish, Portuguese, Spanish,
Swedish,Turkish, Czech, Slovak
DIT2100MSBT,WiFi Antenna, Telescope Antenna, BT Antenna, Remote Control, Batteries, Quick
Start Guide, RCAAudio Cable, Spotify Flyer
435 x74x297 mm
2780 g
DAB+
ü
max. 10 WStandby
FM:
30
UPNP :
MP3, WMA, v9/ASF,M4A,
ADTS, WAV, LPCM, FLAC, ALAC
FM
ü
Internet:
30
Internet
ü
FM:
87.5-108 MHz
FM:
-105 ~109 MHz
<2W(network standby)
<1W(non network mode)
Spotify Connect:
10
DAB:
MP2, AAC
Spotify
ü
USB:
MP3, WMA, M4A, ADTS,
FLAC, WAV
Amazon Music
ü
Amazon Music:
8
Page 3
A
B
C
1 3 12
5 7 8 10
16
2 4 6 9 111517
2119 27 25 2023
2
4 5
3
7
8
11
12
1
6
10
9
14
13
13
14
182226 24
15
18
19
21
25
26
16
17
20
23
22
24
27
Page 4
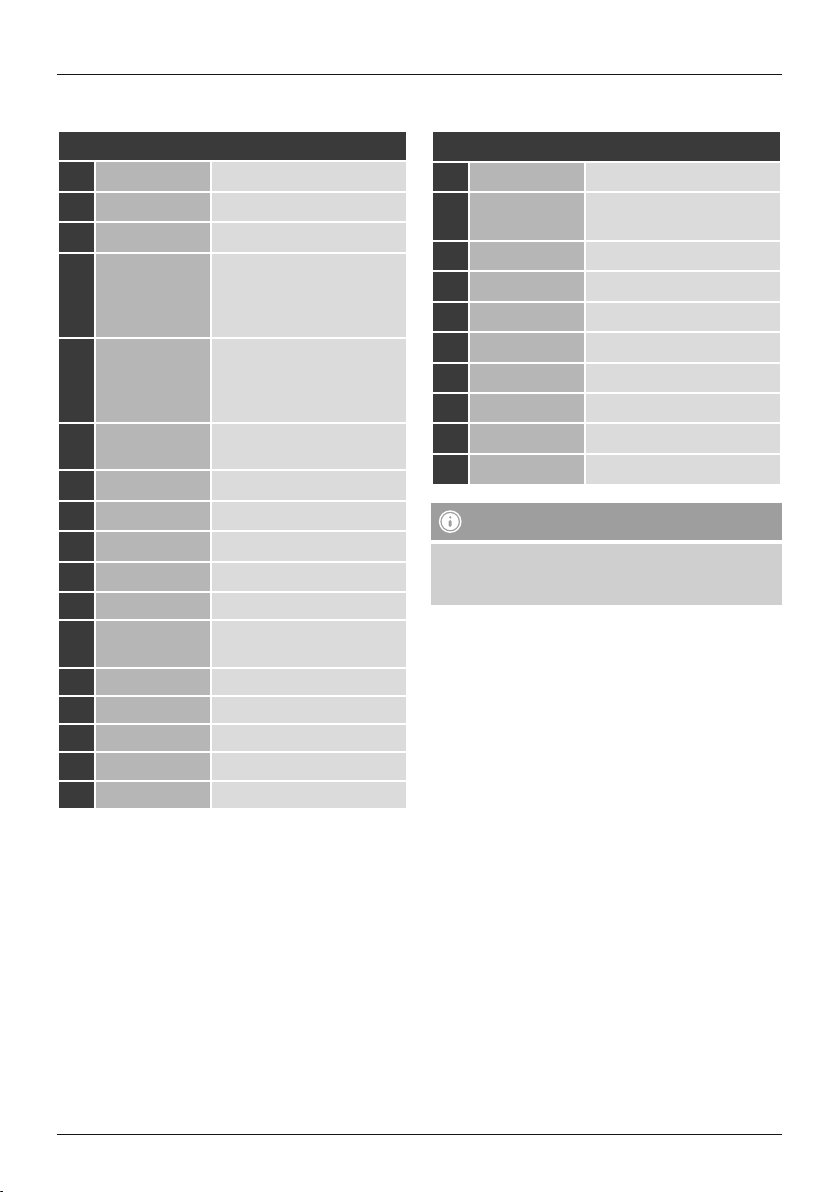
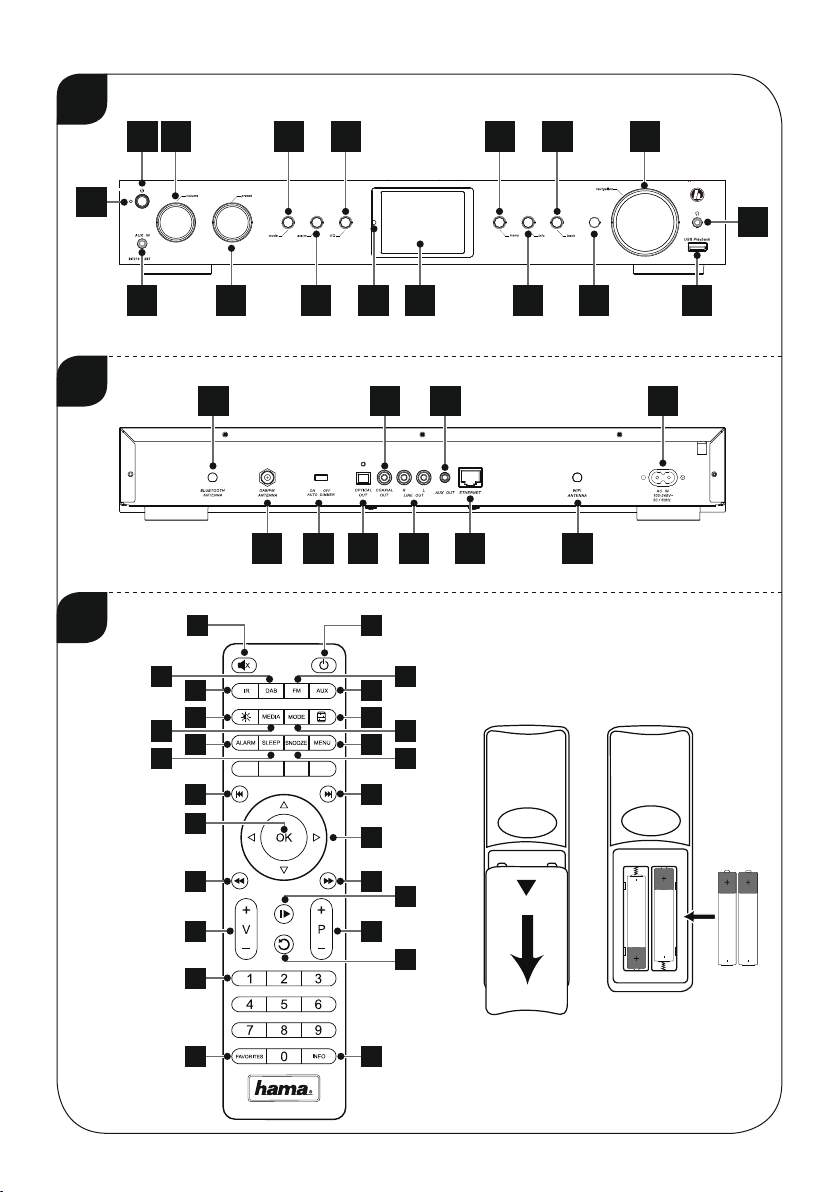
Controls and Displays
A: Front
1 [on /off]
2
3 [volume]
4 [preset]
5 [mode]
6 [alarm]
7 [EQ]
8
[menu]
9 [info]
10
11 Infrared receiver
12
13 Headphone socket
14 USB connection
15 2.8“ colour display
16 LED
17
[back]
[navigation]
On/ off switch
AUX IN socket
Rotate: Volume control
Rotate: Selection from
favourites list
Press: listing/ save/ conrm
favourites
Changing operating mode
(Internet Radio, Spotify
Connect, Music player,DAB,
FM, Aux in)
Direct access to alarm clock
settings
Equaliser settings
Direct access to the menu
Display additional information
Back one menu level
Rotate: Select
Press: Conrm
Brightness sensor
B: Rear
18
19
20
21
22
23
24
25
26
27
Note
*This radio has achangeable antenna. Youcan use
an active or passive antenna equipped with acoaxial
connetion.
Mains power supply
Connection DAB/FM wire
antenna*
Connection WiFi antenna*
Optical output
Coaxial output
Stereo Cinch L/R output
AUX OUT socket
LAN Connection
BT Antenna
Auto dimmer switch
1
Page 5
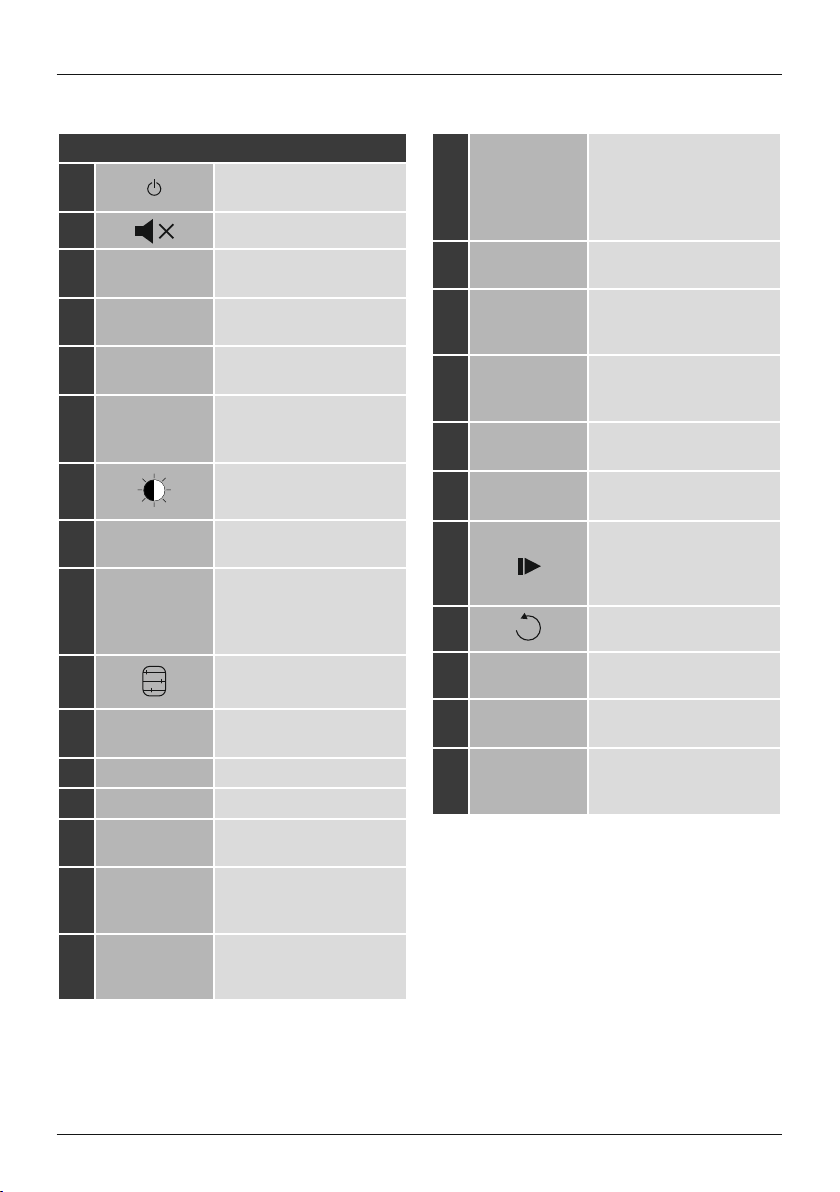
C: Remote Control
1
2
]
[
[ ]
3 [IR]
4 [DAB]
5 [FM]
6 [AUX]
7
[ ]
8 [MEDIA]
9 [MODE]
10
[ ]
11 [ALARM]
12 [SLEEP]
13 [SNOOZE]
14 [MENU]
15
16
[I◄◄ ]
[►►I ]
On/ off switch
[on /off]
≙
Mute
Direct access to operating
mode Internet radio
Direct access to operating
mode DAB≙[mode]
Direct access to operating
mode FM≙[mode]
Direct access to operating
mode Aux in
mode]
≙ [
Backlight settings
Direct access to operating
mode Music player
Changing operating mode
(Internet radio, Spotify
Connect, Music player,DAB,
FM, Aux in)≙[mode]
Equaliser settings
Direct access to alarm clock
settings≙[alarm]
Snooze settings
Activating Snooze
Direct access to the menu
[menu]
≙
previous track (operating
mode: Spotify Connect,
Music player)
next track (operating mode:
Spotify Connect,
Music player)
≙ [
≙ [
mode]
mode]
Navigation
17
keys
18 [OK]
19
20
21
22
23
24
[◄◄ ]
[►► ]
Volume keys
[+]/[-]
Favourite keys
[+]/[-]
[ ]
[ ]
25 Number keys
26 [FAVORITES]
27 [INFO]
▲ Up ▼ Down /
◄ Back on menu level
[back]
≙
► Forward/ Confirm
Press [tuning]/[OK]
≙
Conrm
Press [tuning]
≙
Rewind (operating mode:
Spotify Connect,
Music player)
Fast forward(operating
mode: Spotify Connect,
Music player)
Volume control
Rotate [volume]
≙
Selection from favourites list
Rotate [preset]
≙
Start/ Stop playback
(operating mode: Spotify
Connect, Music player,
Aux in)
Back one menu level≙[back]
Direct access to favourites/
Save favourites
List/save favourites
Press [preset]
≙
Display additional
information
[info]
≙
2
Page 6
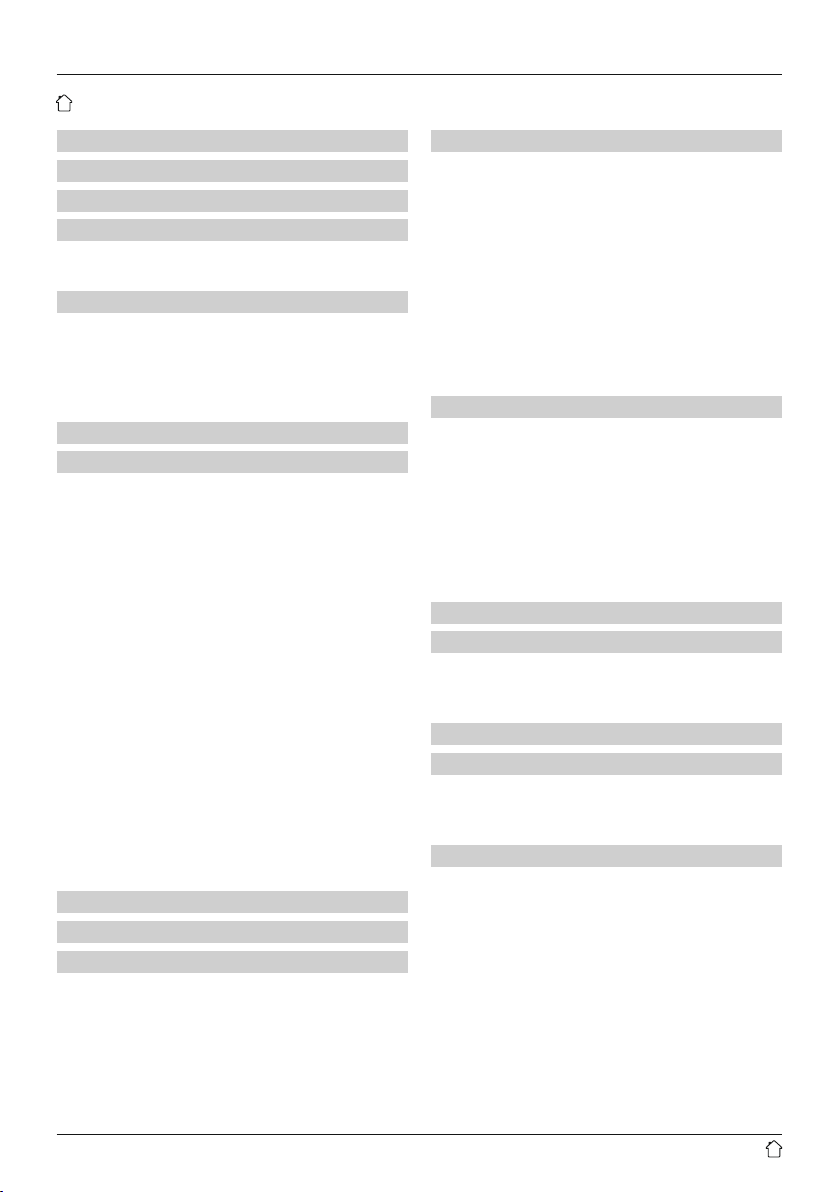
Content
1. Explanation of Warning Symbols and Notes ...........9
2. Package Contents ................................9
3. Safety Notes ....................................9
4. Informations and notes beforegetting started ........10
4.1 LAN connection (wired network) ......................10
4.2 WLAN connection (wireless network) ..................10
5. Getting started .................................10
5.1 Remote control ...................................10
5.2 Radio –Connecting and starting up ....................11
5.3. General notes on use ..............................11
5.4 Initial setup .....................................13
5.4.1 Setup wizard ..................................13
6. Main menu /modes .............................14
7. Internet radio ..................................14
7.1 Station search ....................................15
7.1.1 Search by country or region .......................15
7.1.2 Search by genre ...............................15
7.1.3 Search by name................................15
7.1.4 Popular stations ...............................15
7.1.5 New stations .................................16
7.1.6 Local stations .................................16
7.2 Podcasts ........................................16
7.2.1 Search by country or region .......................16
7.2.2 Search by format (subjects or categories) ............16
7.2.3 Search by name................................17
7.3 Last listened .....................................17
7.4 Favourites (local) ..................................17
7.4.1 Save favourites ................................17
7.4.2 Access favourites...............................17
7.4.3 Management of favourites with
the remote control ..................................18
7.5 Favourites .......................................18
7.5.1 First use –Registering your radio...................18
7.5.2 Managing favourites online ......................19
7.5.3 Opening the favourites list ........................19
7.5.4 My Added Stations .............................19
8. Amazon Music ..................................19
9. Spotify ........................................20
10. Music player (UPNP,USB) ........................21
10.1 Playback from external storage media (USB).............21
10.2 Playback from acomputer (streaming) .................22
10.3 Playback from the network –Accessing les using the radio 22
10.4 Playback of playlist ...............................23
10.5 General playback options ..........................23
11. DAB .........................................24
11.1 Search/ Automatic search...........................24
11.2 Station list ......................................24
11.3 Sort station list ..................................24
11.4 Slideshow/Station information
(Picturewith text/full screen) ............................25
11.5 Edit station list...................................25
11.6 Favourites ......................................25
11.6.1 Save favourites ...............................25
11.6.2 Access favourites..............................25
11.6.3 Management of favourites with
the remote control ..................................26
11.7 DRC (Dynamic Range Control) .......................26
12. FM ..........................................27
12.1 Scan setting ....................................27
12.2 Automatic station search ...........................27
12.3 Manual station search .............................27
12.4 Favourites ......................................27
12.4.1 Save favourites ...............................27
12.4.2 Access favourites..............................28
12.4.3 Management of favourites with
the remote control ..................................28
12.5 Audio setting ...................................28
13. Auxiliary Input.................................29
14. Bluetooth
14.1 BIuetooth®pairing................................29
14.2 Automatic Bluetooth®connection (after successful pairing) . 30
14.3 Terminate Bluetooth®connection.....................30
15. Sleep ........................................30
16. Alarms .......................................31
16.1 Alarm settings ...................................31
16.2 Activating/ deactivating the alarm ....................31
15.3 Stopping the alarm/ Snooze function ..................31
17. System settings ...............................32
17.1 Equaliser .......................................32
17.2 Network .......................................32
® ...................................................................29
15.6.1 Network wizard–Conguration of internet connection /
Automatic search ..................................32
17.2.2 Wireless network connection (WLAN) ..............33
17.2.3 Wired network connection (LAN) ..................34
17.2.4 Manual conguration of network
connection –wireless (WLAN) and wired (LAN) ............34
17.2.5 View settings.................................35
17.2.6 NetRemote PIN Setup /Smart Radio-App ...........35
17.2.7 Network prole ...............................35
17.2.8 Keep network connected ........................36
3
Page 7
17.3 Time/ Date .....................................36
17.4 Language ......................................36
16.5 Factory Reset ...................................36
17.5 Factory Reset ...................................37
17.6 Softwareupdate .................................37
17.7 Setup wizard ....................................37
17.8 Info...........................................37
17.9 Backlight.......................................38
17.10 Color theme....................................38
17.11 Auto-Standby...................................38
18. UNDOK –everything in the palm of your hand .......39
18.1 First-time setup of the device with UNDOK ..............39
18.1.1 Procedurefor iOS users .........................39
18.1.2 Procedurefor Android users .....................39
19. Careand Maintenance ..........................40
20. Warranty Disclaimer ............................40
21. Service and Support ............................40
22. Recycling Information ..........................40
Note on environmental protection: ...................40
23. Declaration of Conformity........................40
4
Page 8
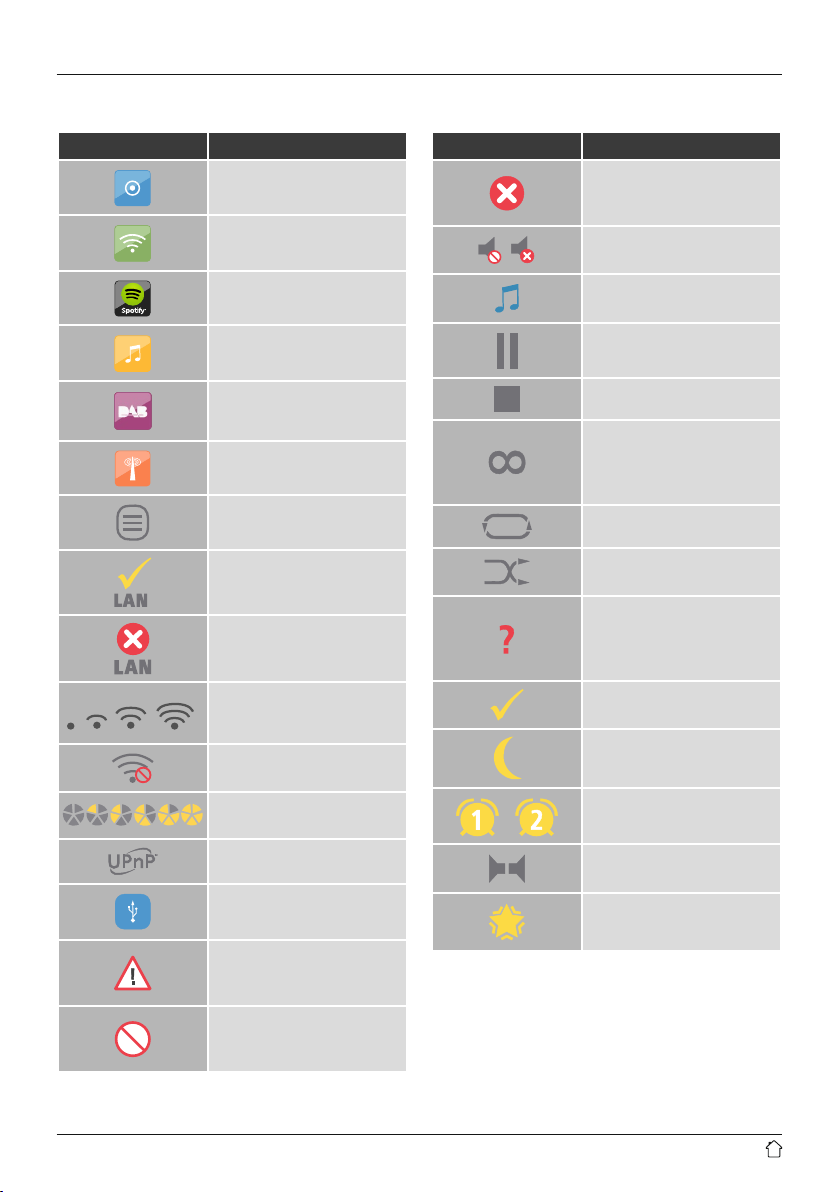
Icon overwiew
Icon Meaning
Operating mode: Aux in
Operating mode:
Internet radio
Operating mode:
Spotify Connect
Operating mode: Music player
Operating mode: DAB
Operating mode: FM
Menu
Successful LAN connection
Failed LAN connection
Signal strength (WLAN):
bad –very good
Icon Meaning
Application failed
See display for further
information
Muted
Shared Media Playback
Playback: Pause
Playback: Stop
RDS (Radio Data System)
Additional station
information available for FM
radio
Playpack: Repeat
Playback: Shue
Random playback
Further input specication
required
See display for further
information
Application successful
No WLAN reception
Signal strength (DAB)
bad –very good
UPnP playback (network)
USB connection
Attention!
See display for further
information
Application not possible
See display for further
information
Sleep activated
Alarm 1/2 activated
Stereo
Favourite
5
Page 9
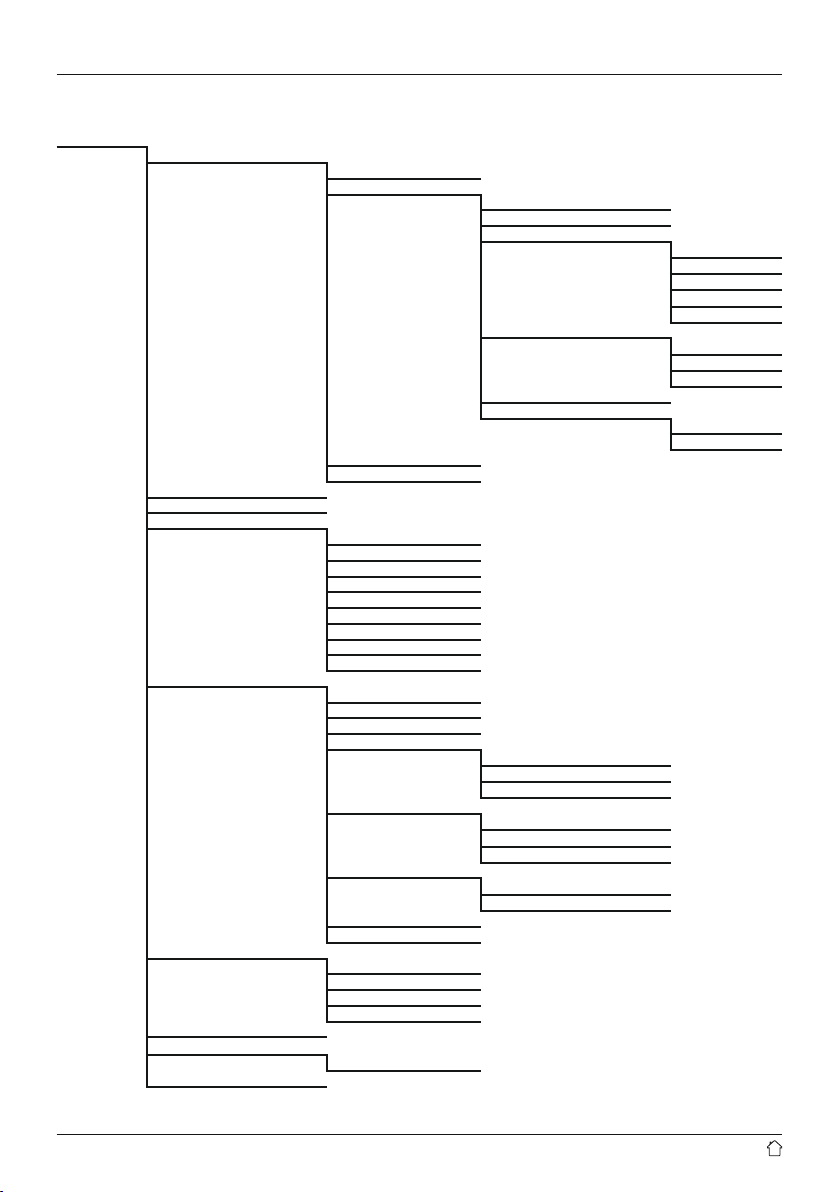
Menu structure
MAIN MENU*
INTERNET RADIO
AMAZON MUSIC
SPOTIFY
MUSIC PLAYER
DABRADIO
FM RADIO
AUX IN
BLUETOOTH
SLEEP
®
Last listened
Station list
System settings**
Main menu*
Shared media
USB playback
My playlist
Repeat play
Shueplay
Clear My playlist
Prune servers
System settings**
Main menu*
Station list
Scan
Prune invalid
DRC
Station order
Slide Show
System settings**
Main menu*
Scan setting
Audio setting
System settings**
Main menu*
BT disconnect
My Favourites
Local Germany
Stations
Podcasts
My added Stations
Help
DRC high
DRC low
DRC off
Alphanumeric
Ensemble
Valid
Small Image
Full Screen
Locations
Genre
Search stations
Popular stations
New stations
Locations
Genre
Search podcasts
Get access code
FAQ
6
Page 10
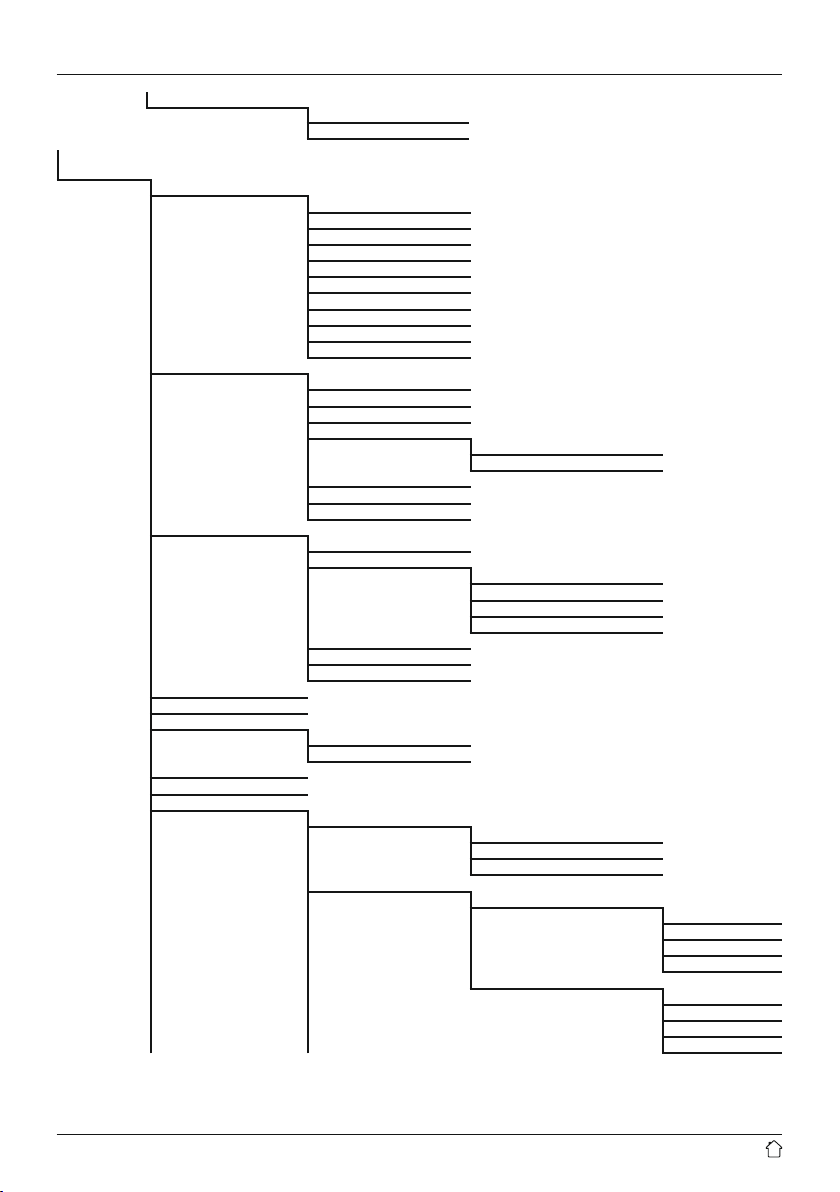
SYSTEM
SETTINGS**
ALARM
EQUALISER
NETWORK
TIME/DATE
LANGUAGE
FACTORY RESET
SOFTWARE UPDATE
SETUP WIZARD
INFO
BACKLIGHT
Alarm 1
Alarm 2
Normal
Fla
Jazz
Rock
Movie
Classic
Pop
News
My EQ
My EQ prole setup
Network wizard
PBC Wlan setup
View settings
Manual settings
NetRemote PIN-Setup
Network prole
Keep network connected
Set Time/Date
Auto update
Set format
Set timezome
Daylight savings
Auto-check setting
Check now
Operation Mode
Standby Mode
Wired
Wireless
Update from DAB
Update from FM
Update from Network
No update
High
Medium
Low
Timeout (sek)
Off
10 sec
30 sec
60 sec
Standby Lebel
High
Medium
Low
Off
7
Page 11
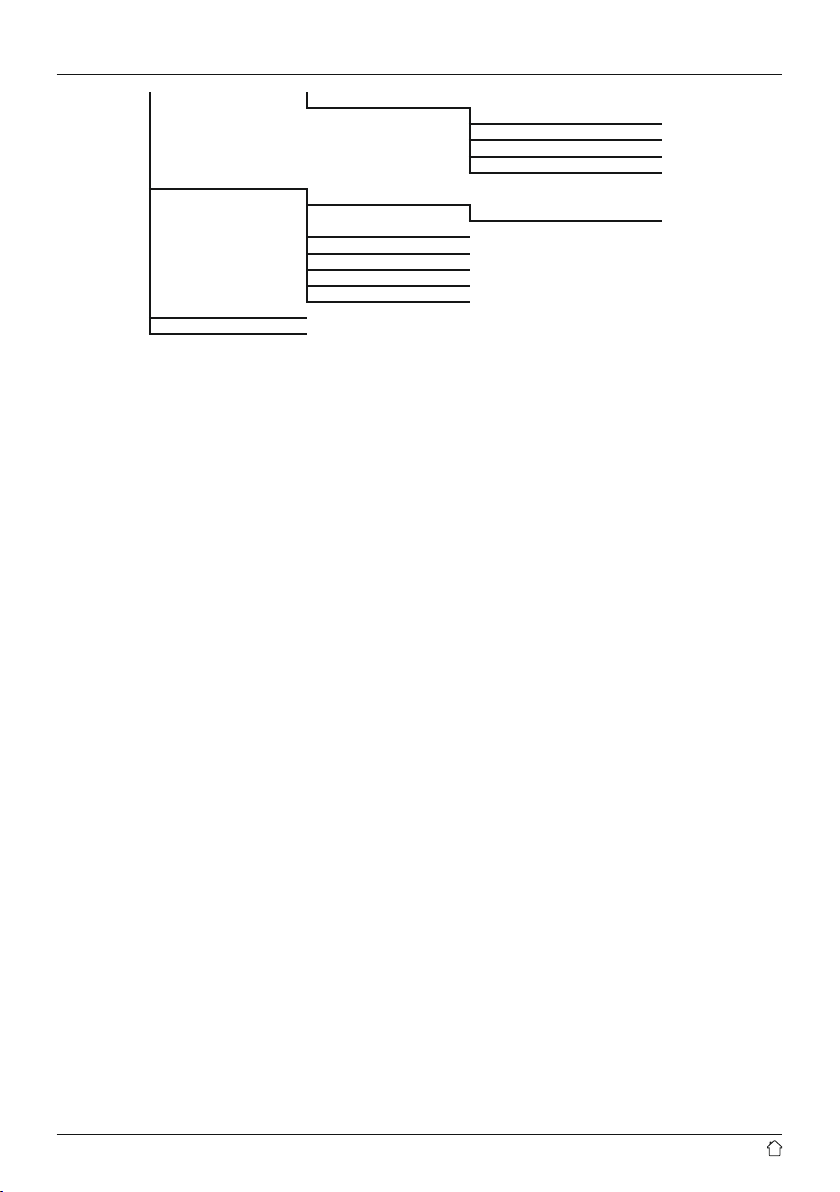
MULTI-ROOM
COLOR THEME
AUTO-STANDBY
Slumber Mode
High
Medium
Low
Off
View details
State:
Create new group
Add to group
List current clients
Leave group
Dissolve group
8
Page 12
Thank you for choosing aHama product.
Take your time and read the following instructions and
information completely.Please keep these instructions in a
safe place for futurereference. If you sellthe device, please
pass these operating instructions on to the new owner.
1. Explanation of Warning Symbols and Notes
Risk of electric shock
This symbol indicates product parts energized with a
dangerous voltage of sucient magnitude to constitute
arisk of electric shock.
Warning
This symbol is used to indicate safety instructions or to
draw your attention to specichazards and risks.
3. Safety Notes
• The product is intended for private, non-commercial use
only.
• Protect the product from dirt, moistureand overheating
and us it in dry rooms only.
• As with all electrical devices, this device should be kept
out of the reach of children.
• Do not drop the product and do not expose it to any
major shocks.
• Do not operate the product outside the power limits
given in the specications.
• Keep the packaging material out of the reach of children
due to the risk of suffocation.
• Dispose of packaging material immediately according to
locally applicable regulations.
• Do not modify the device in any way.Doing so voids the
warranty.
Note
This symbol is used to indicate additional information or
important notes.
2. Package Contents
• Digital radio DIT2100MSBT
• BT antenna
• WiFi antenna
• Telescopic antenna
• RCAcable (for stereo L/R RCAoutput)
• Remote Control
• 2x AAA batteries
• Quick guide/ operation instructions
• Spotify Connect brochure
Risk of electric shock
• Do not open the device or continue to operate it if it
becomes damaged.
• Do not use the product if the AC adapter,adapter
cable or power cable is damaged.
• Do not attempt to service or repair the product
yourself.Leave any and all service work to qualied
experts.
Warning Batteries
• When inserting batteries, note the correct polarity (+
and -markings) and insert the batteries accordingly.
Failuretodosocould result in the batteries leaking
or exploding.
• Do not allow children to change batteries without
supervision.
• Remove the batteries from products that arenot being
used for an extended period.
• Do not short-circuit batteries.
• Do not charge batteries.
• Do not throw batteries in a re.
• Keep batteries out of the reach of children.
• Do not mix old and new batteries or batteries of a
different type or make.
9
Page 13
4. Informations and notes before getting started
Note
Adetailed description of the UNDOK app and
the fullscope of functions can be found in our
UNDOK guide at:
www.hama.com->00054883, 00054890 ->Downloads
4.1 LAN connection (wired network)
• Connect aLAN cable of type RJ45 to afreesocket on
your router,switch or access point.
• Connect the other end of the LAN cable to the RJ45 LAN
socket on the radio.
• Make surethat the router is on and that you have an
Internet or network connection.
• If you have questions about router conguration,
please consult the operating manual of the router for
troubleshooting.
• Adetailed description of how to congurethe LAN
connection is given in the Wired network connection
(LAN) section.
Note –Optimal reception
• This product is equipped with an antenna connection
which allows the use of an active or passive antenna.
The antenna is connected with acoaxial F-connector.
• Awireantenna that enables DAB, DAB+ and FM
reception is included in the delivery.
• Forbest reception, ensurethat the antenna is fully
extended
• Tryvarious different positions if necessary to get the
best reception.
Network connection/
Preparing the internet connection
Youcan integrate this radio into alocal network and
even access home servers or other authorised resources.
To receive internet radio or access non-local media
(streaming, such as Spotify Connect), the network must be
connected to the internet.
Note
The LAN connection is less susceptible to faults than a
WLAN connection. That´s why it´s recommended to use
awired connection between access point (AP) and radio
to ensureanundisturbed reception.
4.2 WLAN connection (wireless network)
• Ensurethat the router is switched on, is functioning
correctly and that thereisaconnection to the internet.
• Activate the WLAN function of your router.
• Follow your router´s operating instructions as regards the
correct functioning of the WLAN connection.
• Adetailed description of how to congurethe
LAN connection is given in the Wireless network
connection (LAN) section.
5. Getting started
5.1 Remote control
• Open the battery compartment cover.Itis located on the
rear of the remote control.
• Pullthe closing tab back (if present) and lift the cover.
With other models of remote control, it suces to simply
push the casing in the direction indicated.
A: Closing tab B: Sliding cover
Insert the batteries provided, paying attention to match the
polarities correctly.The correct polarity is indicated by the
plus and minus symbols in the battery compartment.
10
Page 14

5.2 Radio –Connecting and starting up
Connect the network cable to aproperly installed and
easily accessible network socket.
The power supply unit is suitable for mains voltages
between 100 and 240 V, and is thus operable on almost
any AC power grid. Please note that acountry-specic
adapter may be necessary.
Youcan nd an appropriate selection of Hama products at
www.hama.com.
Note
• Only connect the product to asocket that has been
approved for the device. The electrical socket must
always be easily accessible.
• When using amult-socket power strip, make sure
that the sum power draw of all the connected devices
does not exceed its maximum throughput rating.
• If you will not be usingthe product for along period
of time, disconnect it from mains power.
Once the product has been connected to mains power,
initialisation takes place.
The radio starts up.
To assist you in rst-time setup of the radio, a Setup
Wizard is provided.
5.3. General notes on use
Notes on use
• In the following operating instructions, we willfocus
on operating the device via the front panel. We will
deal with functions separately that areonly available
on the app or the remote control.
• The buttons on the remote control –corresponding
to the control buttons on the device (≙)- you will nd
under Controls and Displays.
• [OK]and the navigation button ► on the remote
control correspond to pressing [navigation].
• The navigation key ◄ on the remote control has the
same function as [back]onthe front of the radio.
• The navigation keys ▲ / ▼ on the remote control
have the same function as turning [navigation]on
the front of the radio to the left and right.
• When aselection among menu items is to be made
(such as YES or NO), the one currently selected has a
light-coloured background ll.
• In menus offering avariety of different options
(such as Equalizer,Update, and so on), the currently
selected option is marked with *.
11
Page 15
Navigation and controls
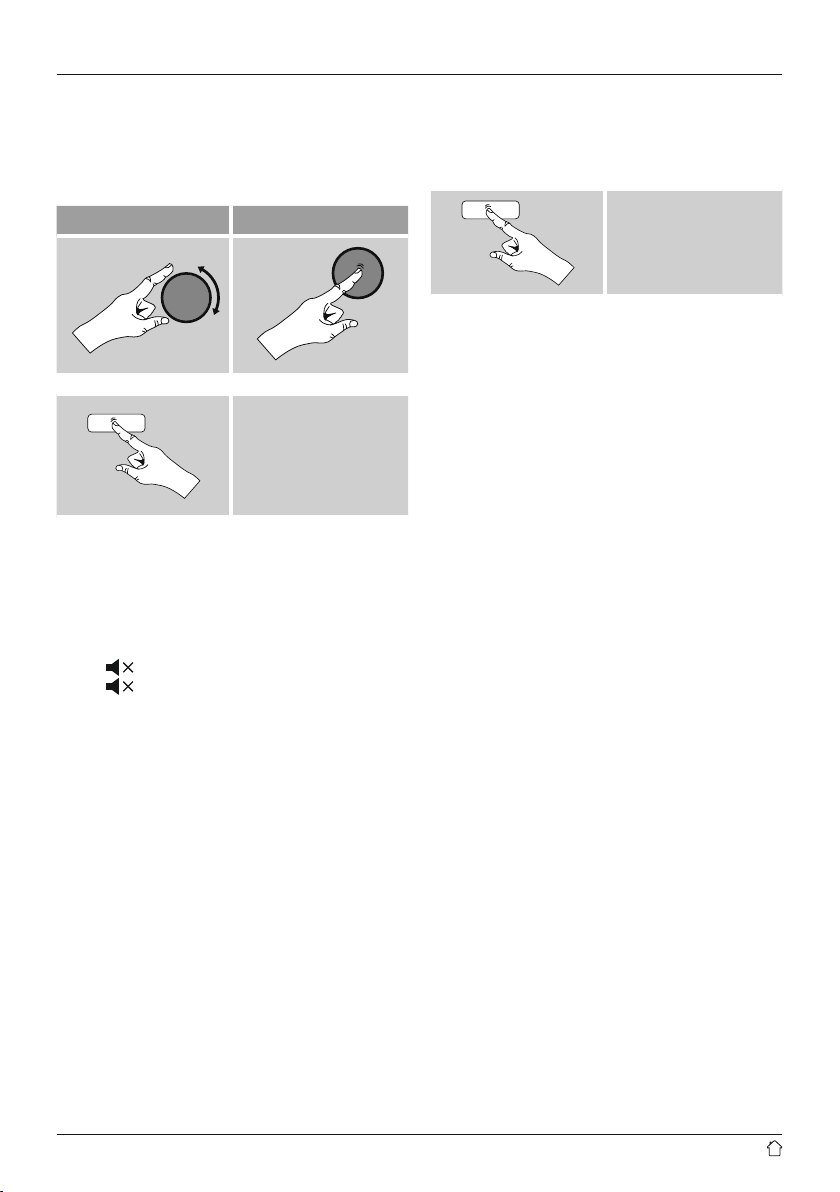
• Select among menu items by turning [navigation].
• Conrm the selection by pressing [navigation].
This procedureisindicated in these operating instructions
by the following symbols:
selection (navigate) conrmation (enter)
Some features can be
accessed by means
of shortcut buttons.
Pressing shortcut buttons
is indicated herebythis
symbol.
After pressing ashortcut button, navigate amongst the
menu items using [navigation].
Volume adjustment /mute
• Youcan turn the volume up (right) or down (left) by
turning [volume]accordingly.
• Press [
• Press [ ], on the remote control again to reset the
volume at the level you set beforemute the radio.
Entering passwords, search terms, and so on
• Select each successive letter and digit by turning
[navigation]and conrm each selection by pressing
[navigation].
• To make corrections, select BKSP and conrm. The last
input made is deleted.
• To cancel input, select CANCEL and conrm.
• Once your input is complete, select OK and conrm to
nish.
• Press [info]tojump directly to the BKSP/ OK/ CANCEL
elds.
]onthe remote control to mute the radio.
Additional information
Press [info]todisplay context-dependent additional
information. The information shown depends on the
operating mode as well as the current selection of radio
station, music le, etc.
[info]
• Description
Indicates the radio station, the current program,
contents, subjects, etc.
• Program genre/country
Indicates the genre(music style) and the country or
region of the station.
• Reliability
• Bit-Rate
The currently received digital bit rate of the received
station is displayed.
• Codec
Species the encoding scheme used to digitise the data
or signal (such as MP3 or WMA).
• Sampling rate
Species the sampling rate, or the frequency with which
the audio signal is polled (Sampling-/ Samplerate), in a
certain period of time.
• Signal strength
The signal strength of the received station is displayed
via abar and its length.
• Today’sdate
• Artist
• Album
• Folder
• Path
Species the directory path at which the le currently
being played back is saved.
Switching on/off /Standby
• Press [on /off] to switch the radio on or off (Standby).
• To completely switch off the device, disconnect it from
the power supply.
12
Page 16
5.4 Initial setup
The Setup Wizardstarts up automatically when the radio
is turned on for the rst time. The default used language
is English. Yo ucan skip the Setup Wizardand start up
anytime in your language.
Set up your desired language as described in 15.4.
Language.
5.4.1 Setup wizard
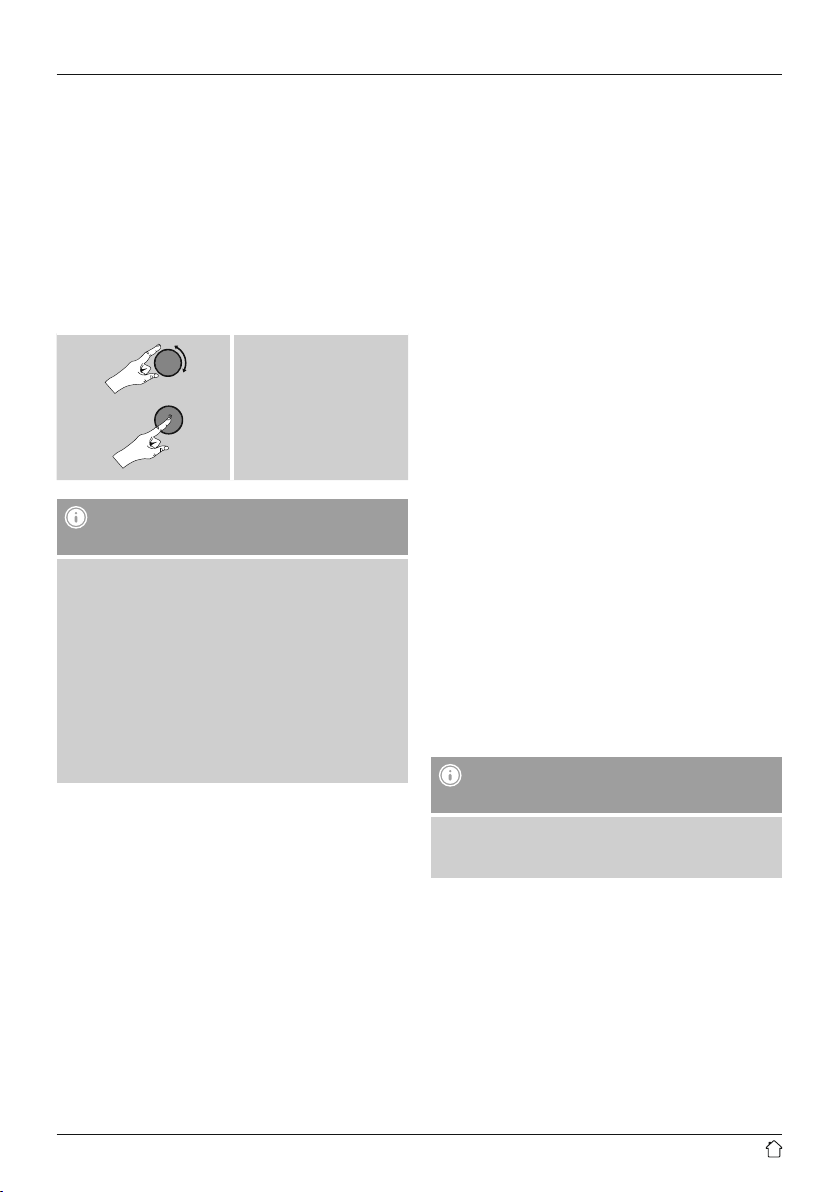
Youcan choose between starting the initial setup via Setup
Wizard(YES)and skipping the Setup Wizard(NO).
YES /NO
Note –Starting up with or without
the setup wizard?
ecommend using the setup wizar
•Wer
quickly and easily congurethe time, date, internet
connection, etc.
• If you wish to skip setup with the setup wizard
anyway,choose NO.All of the settings congured
by the setup wizardcan be congured or changed
individually in the System settings menu. Alternatively,
you may restart the setup wizardatany time.
• Next, choose YES or NO to dene whether the setup
wizardshould start automatically next time the radio
is started up. Youare in the main menu.
d(YES)to
Date/ Time
• 12/24 hours format
• Auto update
• Update from DAB/ FM
If automatic time and date adjustment is
activated, the device receives time and date
information from the station over the FM/DAB/
DAB+ radio network. This is the best way to
ensurethat the clock will run accurately and the
alarm willtrigger at the correct time, even after
power outages.
• Update from Network
Choose this option to set the time and date
automatically from the internet. Set the timezone
of your current location and, if desired, turn (ON)
automatic adjustment between summer time and
winter time.
• No update
The time and date (DD-MM-YYYY)must be set
manually; no automatic calibration takes place.
Keep network connected
This setting is aradio energy-saving function. If this feature
is disabled (NO*), the network module will be switched
off whenever the radio is not actively using the network
connection (such as in standby mode). This means the
radio will not be accessible via the network from your PC,
smartphone or tablet.
Youshould enable (YES *)this menu item if you want
to use streaming or control functions via the app. This
function is disabled by default.
Network wizard–Conguration of network
connection
Note –Reference to adifferent part of these
operating instructions.
• Because this chapter is extensive, please follow the
directions in section 16.2.1. Network wizard–
Conguration of internet connection
13
Page 17
Once the network wizardhas nished, the setup wizard
is nished as well. The display shows amessage to this
effect.
Press [navigation]toenter the main menu.
Select amongst the available operating modes by
repeatedly pressing [mode].
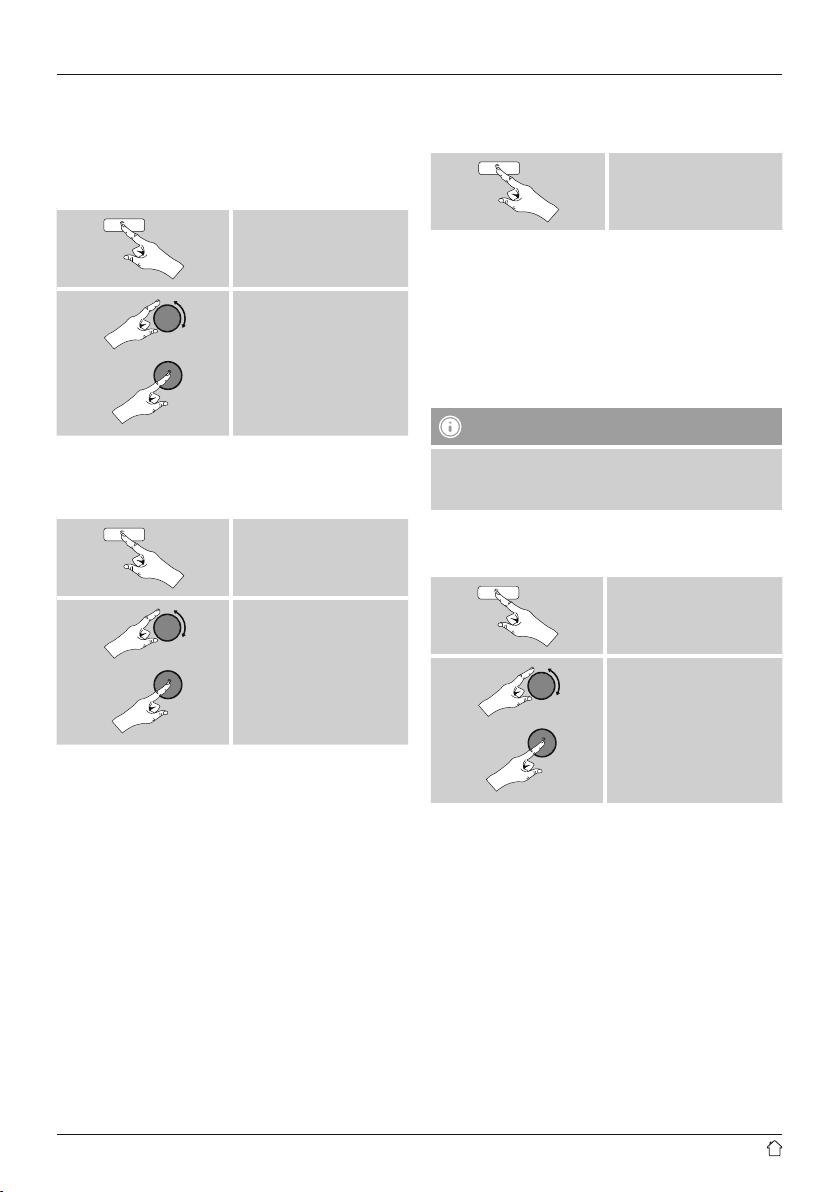
Proceed as follows to choose your desired language:
[menu]
System settings
Language
desired language
6. Main menu /modes
Access the main menu as follows:
[menu]
Main menu
The main menu contains the various operating modes as
well as other options that areexplained separately in the
following chapters.
7. Internet radio
8. Amazon Music
9. Spotify
10. Music player
11. DAB
12. FM
13. Auxiliary Input
14. Bluetooth
®
15. Sleep
16. Alarms
17. System settings
[mode]
7. Internet radio
The radio uses the station list on the vTuner* portal.
Youcan use stations without direct registration on the
following portal: http://www.wiradio-froniter.com.
Youwill nd detailed operating instructions under Section
7.5 Favourites
Note
*Ifnecessary,itispossible to switch providers in order
to make all features and functions of the product
available.
From the main menu or after pressing [mode]repeatedly,
activate Internet radio mode.
[menu]
Main menu
Internet radio
Alternatively,press [IR]onthe remote control to switch
directly to this operating mode.
14
Page 18

7.1 Station search
This radio offers various ways to search for stations.
• Use [navigation]tonavigate through each search
function and its options.
• Once you have found astation you like, conrm by
pressing [navigation]. The radio starts playing the
selected station.
7.1.3 Search by name
If you know the name of the desired station, you can
search for it directly.
[menu]
7.1.1 Search by country or region
To search for astation by continent, country and region,
proceed as follows:
[menu]
Station list
stations
Location
Once you have restricted the results to acertain country or
region, select astation from the complete list or from alist
sorted by genre.
7.1.2 Search by genre
To search for astation of acertain genreorsubject focus,
proceed as follows:
[menu]
Station list
stations
Genre
Station list
stations
Search stations
Enter the complete name, or apart thereof,inthe input
screen and select OK to start the search. Youreceive alist
of all available stations whose names contain the search
key.
7.1.4 Popular stations
Youcan nd aselection of the most popular stations as
follows:
[menu]
Station list
stations
Popular stations
Once you have restricted the results to acertain genre,
select astation from alist of all stations available, or from
apre-selected list, or from alist sorted by country.
15
Page 19
7.1.5 New stations
Stations that have recently been added to the database
can be found as follows:
[menu]
7.2 Podcasts
Podcasts areprograms on various topics and include,
for example, talk shows, news and much more. Podcasts
can be downloaded from the Internet. Thereare normally
approximately 10,000 programs available. Similarly to
radio stations, the radio makes it possible to lter alarge
number of Podcasts, or to search the entiredatabase for a
matching result.
Station list
stations
New stations
7.1.6 Local stations
To search for stations from your own country (the country
in which the radio is currently located), proceed as follows:
[menu]
Station list
Local <Country>
Note
Replace the <Country> placeholder with the country you
arecurrently located in.
Youcan lter this local list by genre, or select astation
from the complete list, or select from apre-selected list.
7.2.1 Search by country or region
To search for apodcast by continent, country and region,
proceed as follows:
[menu]
Station list
Podcasts
Location
Once you have restricted the results to acertain country or
region, select astation from the complete list or from alist
sorted by genre.
7.2.2 Search by format (subjects or categories)
To search for apodcast by continent, country and region,
proceed as follows:
[menu]
Station list
Podcasts
Genre
16
Page 20

7.2.3 Search by name
If you know the name of the desired Podcasts, you can
search for it directly.
7.4.1 Save favourites
• Set the station that you would like to save as afavourite
station preset.
• If the station is received, press and hold [preset]on
front of the radio.
[menu]
Station list
Podcasts
Search podcasts
Enter the complete name, or apart thereof,inthe input
screen and select OK to start the search. Youreceive alist
of all available Podcasts whose names contain the search
key.
7.3 Last listened
The radio saves the last stations and podcasts listened to in
their own list. To access the list, proceed as follows:
[menu]
Last listened
[preset]
An overview window with the station presets should open
after approx. 2seconds.
• Youcan switch between the station presets (1 to 30) by
turning [preset].
• Press [navigation]tosave the station on the desired
station preset.
7.4.2 Access favourites
Press [preset]toopen the overview window with the list
of saved stations.
[preset]
Use [preset]and [navigation]toselect one of your
favourites.
Note
Favourites cannot be deleted.
If all30station memory slots are lled and you wish to
save anew station, choose one of the occupied slots.
The station in this slot will be overwritten with the new
station.
7.4 Favourites (local)
Youcan save up to 30 of your favourite stations for quick
and direct access.
17
Page 21

7.4.3 Management of favourites with the remote control
Favourites 1-10
The remote control enclosed has number keys 1-0
(0≙10). Afavourite can be assigned to each of these
number key.
• To save afavourite, press and hold the corresponding
number key on the remote control (approx. 3seconds).
• The radio conrms that the favourite has been saved by
displaying Preset stored.
• To call up afavourite, brieypress the corresponding
number key on the remote control.
Favourites 1-30 (alternative to number keys)
•Press and hold [FAV ORITES]approx. 3seconds to save
astation on one of the 1-30 favourite station presets.
An overview window with the station presets should
open after approx. 2seconds.
•You can switch between the station presets (1 to 30)
by pressing the favourite keys [+] /[-] (by turning
[preset]).
• Press [OK]([tuning]) to save the station on the desired
station preset.
• To call up afavourite, brieypress [FAVORITES], select
the desired station preset by pressing the favourite keys
[+] /[-] (by turning [preset]) and conrm the selection
by pressing [OK]([tuning]).
7.5 Favourites (vTuner -http://www.wiradio-frontier.com)
In addition to the local station memory slots, you can
create additional lists of favourites using the vTuner
database.
Lists of favourites created using the vTuner database can
be synchronised across multiple radios.
7.5.1 First use –Registering your radio
In order to be able to use this function you have to register
at www.wiradio-frontier.com.You need avalid email
address and an access code which will be generated by
your radio.
Note
• No personal information is collected during the
registration process.
• Registering does not cost you anything extra. The offer
is completely free.
• Following registration you can choose from around
20,000 radio stations and 10,000 podcasts.
Get access code:
[menu]
Station list
Help
Get access code
Note
Please note that each access code can only be used
once. Please contact customer service if you should
experience problems while registering the radio.
18
Page 22

• During registration, the radio’s ID is associated with your
e-mail address and saved in the web interface.
• If multiple radios areregistered toyou and you wish to
delete one of those registrations or just comparethem,
you can nd the radio’s ID as follows.
[menu]
7.5.4 My Added Stations
If astation you desireisnot yet available, you can add it
manually to the portal, or suggest astation be added to
the database (Recommend station).
• Youneed the web address of the stream, which can often
be found on the station’swebsite.
• Youcan access the added radio stations as follows:
System settings
Info
Radio ID
7.5.2 Managing favourites online (vTuner -http://www.wiradio-frontier.com)
After registering on the portal, you can search through
the station archive using various lters, try out stations,
and create your own favourites list from the stations listed
there. The favourites list is then synchronised with your
radio in amatter of seconds.
7.5.3 Opening the favourites list
To open the favourites list you created on the portal using
the radio, proceed as follows:
[menu]
Station list
My Favorites
[menu]
Station list
My Added Stations
The database is constantly expanded and maintained.
Nevertheless, we hope you’llunderstand that sometimes
therecan be delays in integrating new stations and some
stations areeven rejected.
8. Amazon Music
Amazon Music gives you access to millions of songs. You
can listen to them on your radio, on the go using your
smartphone, or at your PC.
Requirements:
• Youhave an Amazon Music Unlimited account (for
information, go to: www.amazon.co.uk/music/unlimited).
• Loginwith your access data or register using the UNDOK
app.
Use:
• Start playback of aplaylist or track, in the usual way,
directly on the device or in the UNDOK app.
• The usual playback information is displayed, such as the
album cover,track, etc.
19
Page 23
After successful initial connection:
Use the main menu or repeatedly press [M]/[MODE]to
activate the ‘A mazon Music’ operating mode on the radio.
• Press [ENTER/NAVIGATE]or[Play]onthe remote
control to begin playback.
• Alternatively,you can control playback (skip to adifferent
track, adjust the volume, etc.) using the remote control,
the UNDOK app or directly on the device.
9. Spotify
Spotify Connect gives you access to millions of songs. You
can listen to them on your radio, on the go using your
smartphone, or at your PC.
Requirements:
• Youmust have the Spotify app installed on your Android
or iOS device.
• It can be downloaded from the Play Storeorthe Apple
App Store. Once the app is installed, start it and log into
your account (or,ifyou do not have an account, register
anew one).
• Youwill requireaSpotify Premium account (see
www.spotify.de for moreinformation).
• The radio must be on the same network as the Android
or iOS device with the Spotify app installed.
Use:
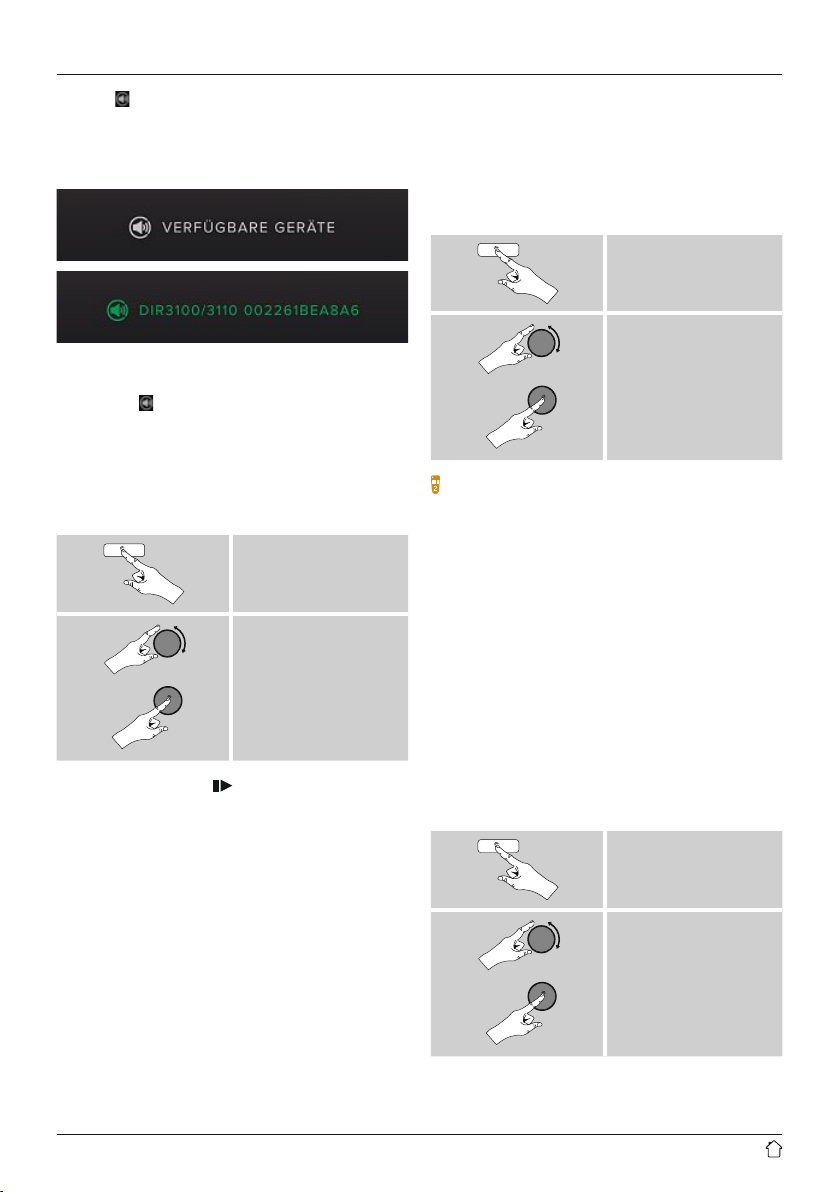
• In the Spotify app, start playback of aplaylist or title as
usual.
• The usual playback information is displayed, such as the
album cover,title, etc.
• At the bottom edge of the screen, the Spotify Connect
is shown next to Available devices.
logo
20
Playback display
Page 24
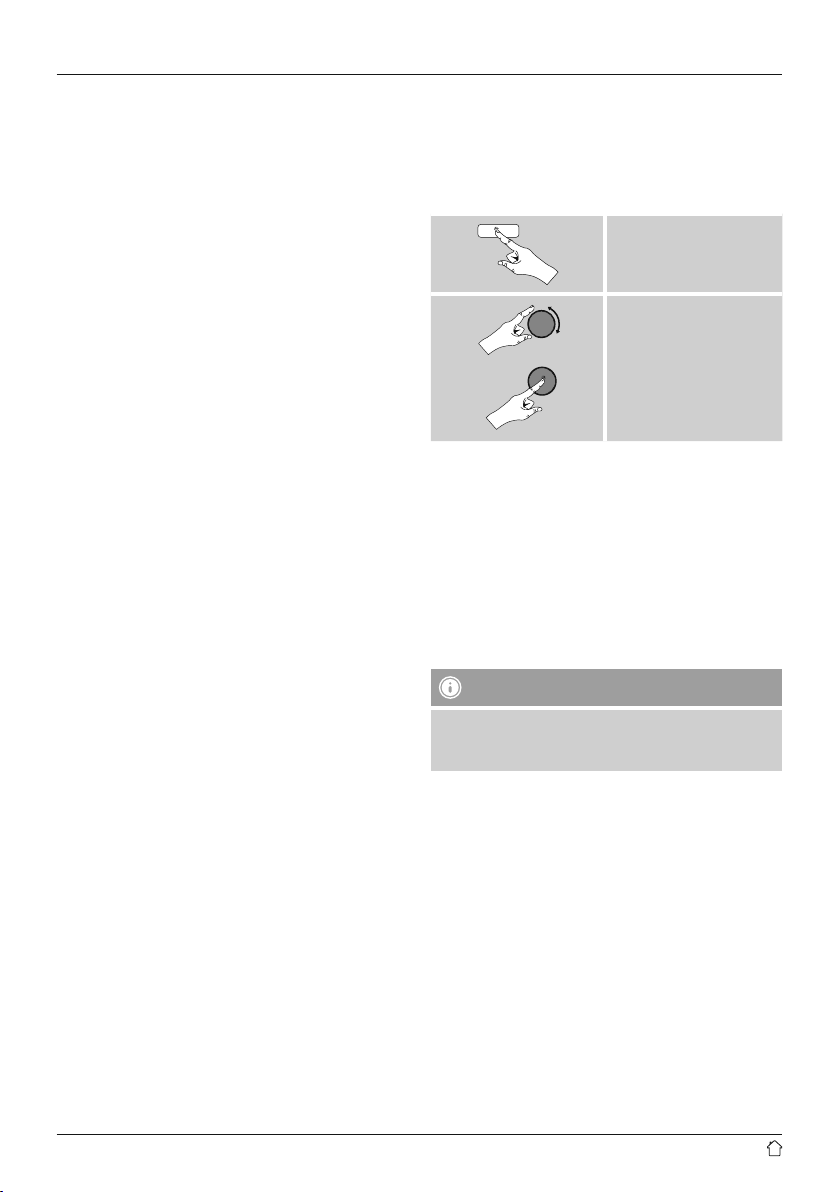
• Choose Available devices to access an overview of
all devices available on the network.
• Select the radio. The audio is now played back on the
radio.
10. Music player (UPNP, USB)
This operating mode enables the playback of MP3, WMA
or FlAC les that aresaved on aPC, data storage medium
or the local network.
From the main menu or after pressing [mode]repeatedly,
activate Music player mode.
[menu]
Once the connection has been established, the Spotify
Connect logo
in green.
After successful initial connection:
From the main menu or after pressing [mode]repeatedly,
activate Spotify (Spotify Connect) mode.
• Press [navigation](or [ ]onthe remote control) to
begin playback.
• Alternatively,you can control the radio (skip to adifferent
title, adjust the volume, etc.) using the remote control,
the Smart Radio app, or the Spotify app.
and the device designation aredisplayed
[menu]
Main menu
Spotify
Main menu
Music player
Alternatively,press [MEDIA]onthe remote control to
switch directly to this operating mode.
10.1 Playback from external storage media (USB)
• Insert astorage device (such as aUSB stick) into the USB
port of the radio.
• The storage medium should be formatted as aFAT16 or
FAT32 volume.
• The radio recognises the storage medium automatically.
• When the radio asks whether to open the connected
storage device, conrm by selecting YES.
• The les and folders saved on the storage medium are
displayed. Use [navigation]tochoose the desired le
and begin playback
Alternatively,ifthe storage medium is already connected,
choose the desired le for playback as follows:
[menu]
21
Music player
USB playback
Page 25
10.2 Playback from acomputer (streaming)
Youcan manage the radio and stream music to it from your
computer.
The following explanation assumes your computer’s
operating system is Windows 8. If you use adifferent
operating system and requireassistance, or if you have
any other questions, please contact our customer support
team.
Requirements:
• The radio and the computer must be on the same
network.
• The radio must be authorised as aplayback device on the
computer.
Proceed as follows:
Control Panel Network and Internet View
network computers and devices
The radio should be shown here.
• Right-click on the icon or designation of the radio and
choose Allow streaming to this device
• Right-click again on the icon or designation of the radio
and choose Show device website to change the
friendly name of the device.
• Anew browser window opens. Yo ucan make the desired
changes here.
Use:
• The radio can now access shared directories on the
computer,and you can stream audio les to the device
for playback.
• The music directory of your music library is enabled as
standard.
• Create and manage shared folders using Explorer or
Windows Media Player.
• Right-click on the desired music le, choose Play To ,
and then select the designation of the radio.
• The radio begins playback of the music le.
10.3 Playback from the network –Accessing files using the radio
To access one of the existing network shared les directly
from the radio, proceed as follows:
From the main menu or after pressing [mode]repeatedly,
activate Music player mode.
[menu]
Main menu
Music player
Shared Media
• Choose the correct device (home server,PC, etc.) and
press [navigation]toopen the list of shared folders on
that device.
Youcan now search for les, open aplaylist, or search
through the entireshared music folders. If you want to
search through the entireselection of music, thereare
other sorting functions available (Album, Artist, Genre,
Folder,etc.) that can help you nd the desired le more
quickly.
Note
These functions areonly available if the ID3 tag and
other le information have been maintained on the
source device.
Prune servers:
To reset the list of servers connected to so far,press
[navigation].
If you conrm by choosing YES,then all Common Media
will be deleted.
22
Page 26
10.4 Playback of playlist
Youcan create alocal playlist on the radio, in which you
save les shared on the network or from connected data
storage devices.
• Under Shared media/ USB playback,choose the le
to be added to the playlist.
• Press and hold [navigation]for approx. 3seconds until
the display shows the message Added to playlist.
Note
Youcan also use playlists that werecreated on your
Windows PC. (WPL =Windows Playlist) Forexample,
Windows Media Player is suited for this purpose.
• To go directly to the playlist, do as follows:
• To delete the entireplaylist, proceed as follows:
[menu]
Main menu
Music player
Clear my playlist
10.5 General playback options
These playback options, which arevalid for all playback
under Music player,can be found here:
[menu]
Main menu
Music player
My playlist
• To remove individual les from the playlist, choose the
le and then press and hold [navigation]for approx. 3
seconds.
• Conrm Delete from My playlist by choosing YES to
delete the le from the playlist.
[menu]
Main menu
Music player
Repeat play /
Shueplay
Repeat play: On /Repeat play: Off :
To turn the function On and Off,press [navigation]
repeatedly.
If this function is activated (Repeat play: On)the current
track is repeated.
Shueplay: On /Shueplay: Off
To turn the function On and Off,press [navigation]
repeatedly.
If this function is activated (Shueplay: On)the radio
plays alltracks in random order.
23
Page 27
11. DAB
The radio receives all established digital radio frequencies
in the range of 174 MHz to 240 MHz (band III, channel
5A to 13F).
• From the main menu or after pressing [mode]
repeatedly,activate operating mode DAB(DABRadio):
11.2 Station list
Youcan access the station list in DABmode at any time via
two methods:
a) If astation is already playing, simply turn
[navigation]. The radio willthen display the station list.
b)
[menu]
Main Menu
DAB
Alternatively,press [DAB]onthe remote control to switch
directly to this operating mode.
11.1 Search/ Automatic search
The automatic DABchannel search scans the DABband
III for available stations. After the station search, all
interference-free stations aresaved in alphabetical order.
In Stations list a ? is displayed in front of the station names
of stations found during aprevious scan but which cannot
currently be received.
The automatic DABstation search starts automatically
when DABmode is started for the rst time; it is indicated
by Scanning…and astatus bar on the display.
If you would like to start the search again, proceed as
follows:
[menu]
[menu]
Station list
11.3 Sort station list
By default the radio sorts stations into alphabetical order.
Youcan also sort by signal strength or ensemble. To
change the sorting order,proceed as follows:
[menu]
Station order
Scan
24
Page 28
11.4 Slideshow/Station information
(Picture with text/full screen)
Many digital radio stations in the DAB+ network provide
additional information, which can be displayed on acolour
screen. This could be pictures from the studio, news,
weather information, or adverts, for example. By default,
the radio displays these “slides” in fullscreen. Alternatively,
amix of pictures and text, such as is the default for
internet radio, can be displayed. To switch between the
display modes, press [navigation]while astation is
playing. The display will switch modes.
Alternatively,you can set the default mode in the DAB
menu. To do so, proceed as follows:
11.6 Favourites
Youcan save up to 30 of your favourite stations for quick
and direct access.
11.6.1 Save favourites
• Set the station that you would like to save as afavourite
station preset.
• If the station is received, press and hold [preset]onthe
front of the radio.
[preset]
[menu]
Slide Show
11.5 Edit station list
To remove stations that arenot currently in the reception
area, from your station list, proceed as follows:
[menu]
Prune invalid
If you answer YES,then all currently unavailable stations
will be removed from the station list.
An overview window with the station presets should open
after approx. 2seconds.
• Youcan switch between the station presets (1 to 30) by
turning [preset].
• Press [navigation]tosave the station on the desired
station preset.
11.6.2 Access favourites
Press [preset]toopen the overview window with the list
of saved stations.
[preset]
Use [preset]and [navigation]toselect one of your
favourites.
Note
Favourites cannot be deleted.
If all30station memory slots are lled and you wish to
save anew station, choose one of the occupied slots.
The station in this slot will be overwritten with the new
station.
25
Page 29
11.6.3 Management of favourites with the remote control
Favourites 1-10
The remote control enclosed has number keys 1-0
(0≙10). Afavourite can be assigned to each of these
number key.
• To save afavourite, press and hold the corresponding
number key on the remote control (approx. 3seconds).
• The radio conrms that the favourite has been saved by
displaying Preset stored.
• To call up afavourite, brieypress the corresponding
number key on the remote control.
Favourites 1-30 (alternative to number keys)
•Press and hold [FAV ORITES]approx. 3seconds to save
astation on one of the 1-30 favourite station presets.
An overview window with the station presets should
open after approx. 2seconds.
•You can switch between the station presets (1 to 30)
by pressing the favourite keys [+] /[-] (by turning
[preset]).
• Press [OK]([navigation]) to save the station on the
desired station preset.
• To call up afavourite, brieypress [FAVORITES], select
the desired station preset by pressing the favourite keys
[+] /[-] (by turning [preset]) and conrm the selection
by pressing [OK]([navigation]).
11.7 DRC (Dynamic Range Control)
Some radio stations in the DABnetwork support an audio
level control that is activated at varying volumes during
playback. If the audio level suddenly rises during playback,
DRC automatically reduces the volume. The same happens
if playback suddenly becomes quieter,with the radio then
increasing the volume.
This radio has three different settings for DRC:
DRC high: total equalisation of different volumes. Strong
compression can audibly reduce the dynamics of amusic
title.
DRC low: partial equalisation of different volumes. More
subtle compression, without too much loss of dynamics.
DRC off: no equalisation.
Proceed as follows to do the settings:
[menu]
DRC
26
Page 30
12. FM
From the main menu or after pressing [mode]repeatedly,
activate operating mode FM (FM Radio):
[menu]
Main menu
FM
Alternatively,press [FM]onthe remote control to switch
directly to this operating mode.
Stations that broadcast additional information regarding
the station and the programme, arehighlighted on the
display with an RDS icon (Radio Data System).
Additional information weredisplayed by pressing [info].
12.1 Scan setting
The search run setting allows you to determine whether
stations with low signal strength areignored during the
automatic search run.
Proceed as follows:
12.2 Automatic station search
• Press and hold [navigation]until the automatic station
search starts.
• The radio stops the search and starts playback when it
nds astation.
• Press [navigation]tocontinue the search until the next
station is found.
12.3 Manual station search
When you make station settings manually,you can dene
the desired frequency yourself and tune into stations that
wereignored during automatic station search because
their signals weretoo weak.
• Turn [navigation](left: –0.05 MHz /right: +0.05 MHz)
until you see the desired frequency.Wait amoment until
playback of the received station signal begins.
12.4 Favourites
Youcan save up to 30 of your favourite stations for quick
and direct access.
12.4.1 Save favourites
• Set the station that you would like to save as afavourite
station preset.
• If the station is received, press and hold [preset]onthe
front of the radio.
[preset]
[menu]
Scan Setting
• To have the search run stop only at stations with high
signal strength, conrm the subsequent query by
selecting YES.Otherwise, the search run will stop at
every station for which asignal is received.
An overview window with the station presets should open
after approx. 2seconds.
• Youcan switch between the station presets (1 to 30) by
turning [preset].
• Press [navigation]tosave the station on the desired
station preset.
27
Page 31
12.4.2 Access favourites
Press [preset]toopen the overview window with the list
of saved stations.
[preset]
Use [preset]and [navigation]toselect one of your
favourites.
Note
Favourites cannot be deleted.
If all 30 station memory slots are lled and you wish to
save anew station, choose one of the occupied slots.
The station in this slot will be overwritten with the new
station.
12.4.3 Management of favourites with the remote control
Favourites 1-10
The remote control enclosed has number keys 1-0
(0≙10). Afavourite can be assigned to each of these
number key.
• To save afavourite, press and hold the corresponding
number key on the remote control (approx. 3seconds).
• The radio conrms that the favourite has been saved by
displaying Preset stored.
• To call up afavourite, brieypress the corresponding
number key on the remote control.
Favourites 1-30 (alternative to number keys)
•Press and hold [FAV ORITES]approx. 3seconds to save
astation on one of the 1-30 favourite station presets.
An overview window with the station presets should
open after approx. 2seconds.
•You can switch between the station presets (1 to 30)
by pressing the favourite keys [+] /[-] (by turning
[preset]).
• Press [OK]([navigation]) to save the station on the
desired station preset.
• To call up afavourite, brieypress [FAVORITES], select
the desired station preset by pressing the favourite keys
[+] /[-] (by turning [preset]) and conrm the selection
by pressing [OK]([navigation]).
•
12.5 Audio setting
Forsome stations with aweak signal, quality can be
slightly improved by playing them in mono quality.You
can enable this function in the menu, and the radio will
automatically switch to mono reception when signal
quality is poor.
To change the audio setting, proceed as follows:
[menu]
Audio
setting
28
Page 32
13. Auxiliary Input
Via the analogue audio input (AUX IN socket) you can
connect mobile devices (for example smartphone, tablet
PC, M3 player etc.) to the radio and play the audio les
using the radio´s speakers.
• From the main menu or after pressing [mode]
repeatedly,activate Auxiliary Input (Aux in)mode.
[menu]
Main menu
Auxiliary Input
14. Bluetooth
®
Youcan pair your terminal device with the radio using
Bluetooth and use it as aplayback device. Youcan control
playback directly on the terminal device. Youcan adjust the
volume on the radio, as well.
Note –Bluetooth
®
• Check whether your mobile device (smartphone, tablet
PC. etc.) is Bluetooth®capable.
• Note that the maximum range for Bluetooth®is 10
metres without obstacles such as walls, people, etc.
• The Bluetooth®connection may be disrupted by other
Bluetooth®devices/ connections in the vicinity.
• It is only possible to connect the radio to one terminal
device.
• Note that compatibility depends on the supported
Bluetooth®proles as wellasthe Bluetooth®versions
being used. (see Technical Data, operating instructions
of the terminal device in use)
Alternatively,press [AUX]onthe remote control to switch
directly to this operating mode.
• Connect your mobile terminal device to the audio in (the
AUX IN socket) of the radio using a3.5-mm TRS stereo
cable.
• Start and control audio playback using the controls of the
connected terminal device.
After pressing [MODE]repeatedly,activate operating
mode Bluetooth
®
:
[MODE]
14.1 BIuetooth®pairing
• Make surethat your Bluetooth capable terminal device is
on and Bluetooth®is activated.
• Enable Bluetooth
®
operating mode on the radio by
repeatedly pressing [MODE]:
[MODE]
• Open the Bluetooth®settings on your terminal device
and wait until DIT2100MSBT appears in the list of
Bluetooth®devices found.
• If necessary,start searching for Bluetooth®devices on
your terminal device.
• Select DIT2100MSBT and wait until the radio is listed
as connected in the Bluetooth
®
settings on your terminal
device.
• Your terminal device is also shown as connected on the
radio display.
• Start and control audio playback using the controls of the
terminal device.
29
Page 33
Note –Bluetooth®password
Some terminal devices requireapasswordinorder to
connect to another Bluetooth device.
• If your terminal device requests apasswordfor
connection to the radio, enter 0000.
14.2 Automatic Bluetooth®connection (after successful pairing)
• Terminal devices already paired with the radio are
automatically saved on the radio.
Note –Connection impaired
After the radio and terminal device have been paired,
aconnection is established automatically.Ifthe
Bluetooth®connection is not established automatically,
check the following:
• Check the Bluetooth®settings of your terminal device
to see whether DIT2100MSBT is connected. If not,
repeat the steps listed under Bluetooth®pairing.
• Check whether your terminal device and the radio are
less than 10 metres apart. If not, move them closer
togehter.
• Check whether obstacles areimpairing the range. If
so, move the devices closer together.
®
14.3 Terminate Bluetooth
connection
15. Sleep
The radio has asleep function, after adened time the
radio switches to standby mode.
• Repeatedly press [SLEEP]onthe remote control to set
the desired time interval (Sleep OFF/15/30/45/60/90/120
minutes).
Alternatively,set the time interval from the main menu
using [navigation]:
[menu]
Main menu
Sleep
• After the dened time the radio switches to standby
mode.
• Press [on/off], to turn the radio back on.
• If atime interval is already activated, you can change or
disable it at any time by again pressing [SLEEP]onthe
remote control.
[ ]
Main menu
Terminate connection
• Then select the YES button by turning [navigation],
and conrm termination of the Bluetooth connection by
pressing [navigation].
Note -Backlight
Thereisaseparate setting for the backlight when the
timer (snooze) is activated. Forexample, it can be set to
be dimmer than in normal operation.
16.9. Backlight
30
Page 34
16. Alarms
The Radio has two individually adjustable alarm times.
16.1 Alarm settings
• Youcan access the alarm settings as follows:
[alarm]
Volume:
Youcan set the volume at which the alarm sound should
be played. This setting makes it irrelevant how loud you
last listened to the radio.
Save:
Conrm this menu item to complete your alarm settings.
Note
• Or:
[menu]
Main menu
Alarms
• Alarm 1and alarm 2are congured identically.Soyou
can save two different alarm times. Select alarm 1or
2and then make the following settings by means of
[navigation]:
Enable:
Choose when the alarm is to activate:
Off –Daily –Once –Weekdays –Weekends
Date and time:
If you selected Once,enter the date and time for the
one-off alarm.
Time:
First choose the hour,then the minute at which the alarm
is to activate.
• When using Internet radio for the alarm sound take
carethat the internet connection will be available at
the time of the alarm.
If no internet connection is available the radio instead
uses the wake-up buzzer (Buzz).
• It is recommended to allow the radio to update the
time automatically.This ensures that the time is
always correct even if thereisaseparation of power
supply –for example apower cut.
16.2 Activating/ deactivating the alarm
• Conrm the menu item Save in alarm settings to activate
the alarm.
• Disable the alarm by setting the Mode:toOff
15.3 Stopping the alarm/ Snooze function
• When the alarm activates, press [on/off]tostop the
alarm.
• Repeatedly press [SNOOZE]onthe remote control to
activate snooze mode.
• The alarm turns off for the selected time interval
(5/10/15/30/60 minutes) beforeactivating once again.
• Repeatedy press [SNOOZE]onthe remote control to
activate ON instead of snooze mode. The radio now
stays switched on.
• If the alarm is not stopped, the radio automatically
switches into standby mode after one hour.
Mode:
Set whether you wish to be woken by an alarm tone
(Buzz), by DAB, FM or by the Internet radio.
Preset:
If you selected Internet radio/ DAB/ FM,choose which
station or podcast you wish to be woken with. Youcan
choose any of the 30 favourite station slots or the Last
listened.
31
Page 35
17. System settings
Youcan modify all settings and access important
information about the radio in the System settings.
17.1 Equaliser
The equaliser allows you to adjust the sound of the radio
to suit your preferences by amplifying or reducing the
amount of bass or treble in the audio .
Youcan choose from precongured proles, adjusted to
suit avariety of music genres, or create your own custom
prole.
17.2 Network
15.6.1 Network wizard –Configuration of internet
connection /Automatic search
The Network wizard supports you to set up a
connection between the radio and internet. Hereby you
can choose between awired LAN connection and a
wireless connection using WLAN/Wi-Fi. Moremethods
of conguration and detailed information areamplied
subsequently.
• Youcan start the Network wizard as follows:
• To set the Equaliser,proceed as follows:
[menu]
System settings
Equaliser
• Use [navigation]tochoose one of the precongured
proles.
• To create your own equaliser prole, choose the option
My EQ prole setup.
• This takes you to the settings for Bass and Treble
• To adjust aparticular value, press [navigation]atthe
corresponding menu item and then change the value by
turning [navigation]. If playback is already started when
you modify these settings, you can hear the changes in
the audio immediately.
• Conrm your settings by pressing [navigation]once
more.
• Complete the conguration process by pressing [back]
on the device and conrm the saving of settings by
pressing [navigation].
• To use the new prole, choose the item My EQ.
[menu]
System settings
Network
Network wizard
• When the wizardisstarted, the radio searches for WLAN
(WiFi) connections and then shows alist of the available
networks.
• Turn [navigation]toswitch amongst the networks
discovered. At the bottom of the list areoptions to
restart the search ([Rescan]), select acable connection
([Wired]) or congurethe connection yourself ([Manual
cong]).
• If your network is not found or the SSID (Service Set
Identication, that is, the name of your network) is not
shown, the network may be hidden or out of range. In
this case, try manual conguration or connecting by LAN
cable.
32
Page 36
17.2.2 Wireless network connection (WLAN)
Depending on the network, thereare anumber of ways to
connect to it.
Networks that support connection via WPS (Wi-Fi Protected
Setup) areidentied in the list as [WPS].
Other connections areeither open networks or connections
protected with aPSK, or Pre-Shared-Key.
Desired Network
WPS-/PSK-/ open network connection
WPS allows simple and nevertheless protected connection
of the radio to the network. Twooptions areavailable
for this purpose: The connection can be set up by means
of PBC, or Push-Button Conguration, or by the PIN
procedure, in which the web interface of your router
prompts you to enter arandomly generated sequence of
numbers.
PBC setup
• Select your desired network. (Indicated by the prex
[WPS])
• In the WPS menu, choose the Push Button option and
conrm your selection by pressing [navigation].
• Press the WPS button on your router or current access
point. This can often be done using the web interface,
as well.
• Consult the operating instructions of your router or
access point for details.
• Once the process has been started on the router or
access point, the radio should be able to nd and
connect to the network.
• Alternatively,PBC setup can be initiated from the internet
settings of the radio:
[menu]
System settings
Network
PBC Wlan setup
PIN setup
• Select your desired network. (Indicated by the prex
[WPS])
• In the WPS menu, choose the Pin option and conrm
your selection by pressing [navigation].
• The radio generates an 8-digit code, which must be
entered into the web or user interface of your router or
access point.
• Consult the corresponding handbook for details on
conguring the router or access point.
Skip WPS /Pre-Shared Key(PSK) setup
• Choose the item Skip WPS to proceed to key entry.
• In networks that do not support WPS, you will go directly
to key entry.
• In the input screen, enter the whole key and then conrm
with OK.
• If the key was entered correctly,the radio connects to
the access point and establishes the internet/network
connection..
Note
• Often the Pre-Shared Keyisprinted on the back or
bottom of the router or access point.
• When entering the key,take notice of capitalisation.
33
Page 37
Open network
Note
• We recommend against establishing unsecured
connections and advise you to always protect your
network against unauthorised access.
• If you plan to use an open network, you just have
to select the network ID from the list of available
networks and conrm.
• The radio then connects immediately to the network.
17.2.3 Wired network connection (LAN)
• Connect the radio to the router using aLAN cable. This
method of direct connection is the most reliable and
least susceptible to interference.
• The cable connection is listed amongst the available
connections as Wired.Simply select it to proceed. If the
DHCP server of the router or access point is active, then
the connection is now established automatically.
• To nd out how to determine whether the DHCP server is
active, please consult the operating instructions of your
router or access point.
17.2.4 Manual configuration of network
connection –wireless (WLAN) and wired (LAN)
• To manually congurethe network connection, proceed
as follows:
Manual conguration wired (LAN) –DHCP enable
• Select the option Wired.
• Select the option DHCP enable.
• The connection is now established. No further setting
adjustments arerequired.
Manual conguration wired (LAN) –DHCP disable
• Select the option Wired.
• Select the option DHCP disable.
• Enter the necessary network information, such as the
IP address, subnet mask, gateway address and DNS
(primary and secondary).
Find this information in the web interface of your router
or access point, or ask your network administrator.Once
all the information has been entered correctly,conrm
to proceed. The radio now attempts to establish the
connection.
Manual conguration wireless (WLAN) –
DHCP enable
• Select the option Wireless.
• Select the option DHCP enable.
• In the input screen, enter the whole SSID (network name)
and then conrm with OK.
• Now choose the security standardused by the network.
This can be found in the conguration options of your
router or access point.
• Depending on the encryption used, you may need
to enter the network key beforethe connection is
established..
[menu]
System settings
Network
Manual settings
Manual conguration wireless (WLAN) –
DHCP disable
The method described hereassumes the DHCP server is
active (manual wireless conguration(WLAN) –DHCP
enable). However,the network information such as IP
address, subnet mask, gateway address, and DNS (primary
and secondary) must still be entered.
Find this information in the web interface of your router
or access point, or ask your network administrator.Once
all the information has been entered correctly,conrm
to proceed. The radio now attempts to establish the
connection.
34
Page 38

17.2.5 View settings
Hereyou can nd all the most important information about
all network connections currently used or congured on
the radio, such as: MACaddress, WLAN region, DHCP
active/disabled, SSID, IP address, subnet mask, gateway
address, DNS (primary and secondary), etc.
17.2.7 Network profile
The radio automatically saves all successfully connected
network proles. This means that re-establishing these
connections (for example, after the radio was disconnected
from the power supply) does not requireyou to re-enter the
network access information.
[menu]
System settings
Network
View settings
17.2.6 NetRemote PIN Setup /Smart Radio-App The radio can be controlled using the application Hama
Smart Radio.
Forthis, you have to have installed the app on your
terminal device (for example smartphone or tablet PC)
and your device has to be in the same network as your
radio. The PIN saved in the radio is to increase security and
prevents other users from connecting with the radio.
If the app is started on your terminal device (for example
smartphone or tablet PC) and it tries to connect with the
radio, awindow will appear on your device requiring you
to enter the PIN.
• Youcan nd and change the PIN as follows:
[menu]
• To remove network proles individually,proceed as
follows:
[menu]
System settings
Network
Network prole
• Select anetwork prole and press [navigation]todelete
it.
• Conrm the prompt querying if you want to delete the
prole with YES.
• Aprole that is currently active, or that is in use, cannot
be deleted.
Note -Data security
• Beforegiving or selling the radio to someone else, we
recommend performing aFactory Reset.
• This will completely and permanently delete all
network information and connections stored on the
device.
System settings
NetRemote PIN Setup
• The radio PIN is set to 1234 by default.
• Use [navigation]tomake changes.
• Conrm your changes by choosing OK.
Network
35
Page 39
17.2.8 Keep network connected
This setting is aradio energy-saving function.
[menu]
System settings
Network
Keep network connected
If this featureisdisabled (NO *), the network module will
be switched off whenever the radio is not actively using
the network connection (such as in standby mode or DAB
reception). This means the radio will not be accessible
via the network from your PC, smartphone or tablet. Yo u
should enable (YES *)this menu item if you want to use
streaming or control functions via the app. This function is
disabled by default.
17.3 Time/ Date
To access the time settings, proceed as follows:
[menu]
Auto update
• Update from Network
Choose this option to set the time and date automatically
from the internet. Set the timezone of your current
location (Set timezone) and, if desired, turn on
automatic adjustment between summer time and winter
time (Daylight savings ON).
• Update from DAB/ FM
If automatic time and date adjustment is activated,
the device receives time and date information from the
station over the FM/DAB/DAB+ radio network. This is
the best way to ensurethat the clock will run accurately
and the alarm will trigger at the correct time, even after
power outages.
No update
The time and date (DD-MM-YYYY)must be set manually;
no automatic calibration takes place.
Set Time/ Date
Set the date (DD-MM-YYYY)and time (hh:mm)manually
using [navigation].
Set format
Choose between 12 and 24 hours format.
17.4 Language
To change the menu language from that selected at rsttime startup, proceed as follows:
System settings
Time/Date
[menu]
System settings
Language
Desired language
16.5 Factory Reset
To reset the radio to the factory default settings, proceed
as follows:
36
Page 40
17.5 Factory Reset
To reset the radio to the factory default settings, proceed
as follows:
[menu]
System settings
Factory Reset
Conrm the following prompt with YES to reset the radio
to the factory default settings.
All settings made previously aredeleted.
Note
• Set Auto-check setting to YES to have the radio
automatically check for new softwareupdates at regular
intervals. (Recommendation)
• Choose Check now to manually start acheck for
softwareupdates.
Warning
• Make surethat the radio has astable power supply
beforeyou start asoftwareupdate.
• Power supply failureduring asoftwareupdate can
cause irreparable damage to the radio.
17.7 Setup wizard
Youcan restart the setup wizard(5.4.1. Setup wizard)at
any time by proceeding as follows:
[menu]
• Resetting to the factory default settings can solve
some problems and malfunctions.
• However,all settings made previously,such as custom
equaliser presets, favorites, and network proles, are
permanently deleted.
17.6 Software update
We areconstantly developing new softwarefeatures
and improvements for our radios to xproblems, add
functionality,etc.
We recommend that you keep your radio’s softwareupto
date.
• Proceed as follows:
[menu]
System settings
Softwareupdate
System settings
Setup wizard
17.8 Info
• To have the radio display current information about
its hardwareand software(version numbers, device
designation, radio ID, etc.), proceed as follows:
[menu]
System settings
Info
• If you have already registered your radio on
the online portal of Frontier Silicon
(http://www.wiradio-frontier.com), then
you can nd out the radio ID there, as well.
37
Page 41
17.9 Backlight Brightness sensor activated
• Move the sliding switch (27) to the ON position.
• The brightness of the display is now automatically
adjusted according to the ambient brightness.
Brightness sensor deactivated
• Move the sliding switch (27) to the OFF position.
The backlight can be congured for each operating
mode (Operation Mode, Standby Mode, Slumber Mode)
separately.
• Proceed as follows:
[menu]
System settings
Backlight
• Forthe operation modes Operation Mode and
Slumber mode,select between various brightness
levels.
• For Standby Mode,you may also choose abrightness
level for the backlight when the radio is in standby
(Standby Level).Alternatively,you can set the backlight
to turn off completely in standby (Standby Level
Off).
• Choose atime interval for Timeout.When the radio is in
standby,press [navigation]toilluminate the display at
the brightness level set for that operating mode for the
selected interval of time.
• Alternatively,you can disable this feature(Timeout
Off).
17.10 Color theme
To change the color scheme of the display (Color of text
and background), proceed as follows:
[menu]
System settings
Color theme
17.11 Auto-Standby
Note
• Forreasons of environmental protection and to save
valuable resources, the radio automatically switches
to standby mode after 15 minutes once playback is at
avery low volume or the radio has been muted.
To activate or deactivate this function, proceed as follows:
[ ]
System settings
Auto-Standby
Alternatively,press [
adjust the backlight setting for the current operating mode.
]onthe remote control to directly
38
Page 42
18. UNDOK –everything in the palm of your hand
The UNDOK app, developed by Frontier Silicon, gives you
full control of radios and speakers from your smartphone.
Whether you aresetting up the device for the rst time,
specifying settings for the equaliser and multi-room, or
managing your favourite stations –the UNDOK app lets
you access all the features from your smartphone or tablet,
thereby offering you greater convenience.
Note
Adetailed description of the UNDOK app and
the fullscope of functions can be found in our
UNDOK guide at:
www.hama.com->00054883, 00054890 ->Downloads
18.1 First-time setup of the device with UNDOK
The rst time you switch on an UNDOK-enabled product
from Hama, or when you have set it to the factory settings,
it creates amicroaccess point –aseparate Wi-Fi network
that you can connect to with your tablet or smartphone.
18.1.1 Procedure for iOS users
• Open the UNDOK app on your iPhone or iPad.
• Tapthe Set up audio system menu item.
• Make surethat the radio or speaker is in SETUP mode.
Set the product to the factory settings, if necessary.
Conrm the query with Next.
• The UNDOK app now prompts you to connect to the
product’sWi-Fi network using the iPhone/iPad settings
–todoso, switch to the system settings on your iPhone
and select the Wi-Fi network (for example, Setup Hama
DIR3120LED). Then return to the UNDOK app and tap
Next.
• Now choose aname for the radio (for example, Oce
DIR3120) and conrm your entry with Next.
• This takes you to the date and time settings –hereyou
set the time format, time source and time zone.
• The various network conguration options arethen
offered to you (whereapplicable, Wi-Fi, WPS and
Ethernet). Tapthe desired method; the UNDOK app
switches to the next window.
• Depending on the selected method, you can now select
and congurethe desired Wi-Fi network, set up aWPS
connection or set up the connection using aLAN cable.
• Finally,the radio connects to the network; by tapping
Start using my audio system,you will be able to use
the device in the UNDOK app.
18.1.2 Procedure for Android users
• Open the UNDOK app on your tablet or smartphone.
• Tapthe Set up audio system menu item.
• Make surethat the radio or speaker is in SETUP mode.
Set the product to the factory settings, if necessary.
Conrm the query with Next.
• On the following page, you will nd alist of all
available Wi-Fi networks as well as the suggested
audio systems; the Hama product (for example, Setup
Hama DIR3120LED) should be listed here. Tapthe
corresponding Wi-Fi network.
• Now choose aname for the radio (for example, Oce
DIR3120) and conrm your entry with Next.
• This takes you to the date and time settings –hereyou
set the time format, time source and time zone.
• The various network conguration options arethen
offered to you (whereapplicable, Wi-Fi, WPS and
Ethernet). Tapthe desired method; the UNDOK app
switches to the next window.
• Depending on the selected method, you can now select
and congurethe desired Wi-Fi network, set up aWPS
connection or set up the connection using aLAN cable.
• Finally,the radio connects to the network; by tapping
Start using my audio system,you will be able to use
the device in the UNDOK app.
39
Page 43
19. Care and Maintenance
• Only clean this product with aslightly damp, lint-free
cloth and do not use aggressive cleaning agents.
• If you do not use the product for along time, turn off the
device and disconnect it from the power supply.Storeit
in aclean, dry place out of direct sunlight.
20. Warranty Disclaimer
Hama GmbH &CoKGassumes no liability and provides no
warranty for damage resulting from improper installation/
mounting, improper use of the product or from failureto
observe the operating instructions and/ or safety notes.
21. Service and Support
Please contact Hama Product Consulting if you have any
questions about this product
Hotline: +49 9091 502-115 (German/English)
Further support information can be found here:
www.hama.com
22. Recycling Information
Note on environmental protection:
After the implementation of the European Directive
2012/19/EU and 2006/66/EU in the national legal
system, the following applies: Electric and
electronic devices as well as batteries must not be
disposed of with household waste. Consumers areobliged
by law to return electrical and electronic devices as well as
batteries at the end of their service lives to the public
collecting points set up for this purpose or point of sale.
Details to this aredened by the national law of the
respective country.This symbol on the product, the
instruction manual or the package indicates that aproduct
is subject to these regulations. By recycling, reusing the
materials or other forms of utilising old devices/Batteries,
you aremaking an important contribution to protecting our
environment.
23. Declaration of Conformity
Hereby,Hama GmbH &CoKGdeclares that the
radio equipment type [00054883, 00054890] is in
compliance with Directive 2014/53/EU.The full
text of the EU declaration of conformity is available at the
following internet address:
www.hama.com->00054883 ->Downloads.
www.hama.com->00054890 ->Downloads.
Bluetooth: 2.402 -2.480GHz
Frequency band(s)
Maximum radio-frequency
power transmitted
Restrictions or Requirements in
Belgium, Bulgaria, Czech Republic, Denmark, Germany,
Estonia, Ireland, Greece, Spain, France, Croatia, Italy,
Cyprus, Latvia, Lithuania, Luxembourg, Hungary,Malta, the
Netherlands, Austria, Poland, Portugal, Romania, Slovenia,
Slovakia, Finland, Sweden, United Kingdom
Note
If channels 36–64 (frequency 5.150–5.350 GHz) are
used in a5-GHz WLAN, the product may only be used
in closed rooms.
WiFi: 2.412 -2.472GHz
WiFi: 5.150 -5.350 GHz
WiFi: 5.470 -5.725 GHz
Bluetooth: 4dBm (EIRP)
WiFi: 2.4GHz /17dBm (EIRP)
WiFi: 5GHz /16.5dBm (EIRP)
40
Page 44

Hama GmbH &CoKG
86652 Monheim/Germany
www.hama.com
The Spotify softwareissubject to thirdparty licenses found here:
www.spotify.com/connect/third-party-licenses
The Bluetooth®wordmark and logos areregistered trademarks owned by Bluetooth SIG, Inc. and
any use of such marks by Hama GmbH &CoKGisunder license. Other trademarks and trade names
arethose of their respective owners.
Alllistedbrands aretrademarksofthe correspondingcompanies.Errorsand omissions excepted,
andsubjecttotechnical changes. Ourgeneral termsofdeliveryand paymentare applied.
00054883_90/06.18
 Loading...