

Page 1

Digital Photo Frame
Digitaler Bilderrahmen
00095230
00095296
00095249
00095276
Operating Instructions
Bedienungsanleitung
Mode d‘emploi
Instrucciones de uso
Istruzioni per l‘uso
Gebruiksaanwijzing
Instrukcja obsługi
Használati útmutató
Návod k použití
Návod na použitie
Manual de instruções
Manual de utilizare
00095294
00118578
00118579
00118596
00118597
GB
D
F
E
I
NL
PL
H
CZ
SK
P
RO
Page 2

GB
A B
95249, 95296, 95230, 118596,
118597
95276, 95294, 118578, 118579
1
2
6
4
7
C
I
◄◄
► II
►►I
MENU
5
3
*nur bei Art.Nr. 95249
8*
9
10
11
12
13
8 9 10 11 12
2 17
7/16
4/8
7/13
15
18
OK
3
12
9/14
5
3
6
Page 3

GB
Design and functionality
A C
A: Digital picture frame –
Control and connection panel
1
2
3
4
5
6
7
8*
9
10
11
12
13
◄◄ /
I
►►I /
MENU MENU
On/off switch
Pr
evious le / cursor up
∧
VOL– / right
/>
Down / last le
∨
Enter / OK, play / pause
►I I
VOL+ / left
<
/
Light sensor (item no. 95249
only)
SD/SDHC/MS/MMC
Audio output (3.5 mm jack)
USB type A
Mini USB
Socket for power supply
adapter
B
B: Digital picture frame –
Control and connection panel
1
2
3
4
5
6
7
8
9
10
11
12
Control button up /
∧
switch to next le
VOL– / left control button
<
VOL+ / right control button
>
Play/Pause / OK/ENTER button
►I I
Control button down /
∨
switch to previous le
ESC / back button
MENU = 2x
ON/OFF button
SD/MMC/SDHC card slot
Audio output (3.5 mm jack)
USB (type A)
Mini USB
Socket for power supply
adapter
C: Remote control
1
2
POWER ON/OFF
3
MENU/
4
5
OK/ ENTER
6
SETUP/
7
VOL +/- Increase/decrease volume
8
9
10
ROTATERotate photo anticlockwise
11
12
13
DOWN
14
15
RETURN/
16
17
MUTE/
18
Switch background music on
BGM
during slide show
Main / function menu
LEFT View previous photo
Conrm button; play/pause
button in playback mode
Return to system settings
Previous photo/track/video
◄◄
I
Next photo/track/video
►►I
ZOOM Image zoom function +/-
Play/pause
►I I
RIGHT View next photo
Return to the previous menu
UP
Mute sound temporarily
Starts the Photo Slideshow
4
Page 4

GB
Contents
1. Explanation of Warning Symbols
and Notes ........................................... 6
2. Package Contents........................... 6
3. Safety Instructions ......................... 6
4. Defective Pixels .............................. 7
5. Getting Started............................... 8
5.1 Setting up..........................................8
5.2 Wall mounting...................................8
5.3 Inserting or changing the battery.......9
5.4 Connecting the power supply.............9
6. Operation...................................... 10
6.1 Using the menu ...............................10
6.2 System settings ................................11
7. Functions ...................................... 14
7.1 Photos .............................................14
7.2 Music...............................................15
7.3 Videos..............................................16
7.4 Calendar..........................................17
7.5 Folder ..............................................18
8. Additional functions..................... 19
8.1 Use as a card reader ........................19
8.2 Automatic image rotation (items no.
95249, 118569, 118570 only)..............19
8.3 Motion sensor
(items no. 118596, 118597 only)..........20
8.4 Brightness/light sensor
(item no. 95249 only)...........................20
8.5 Slide show variations .......................20
8.6 Causes of errors
and error rectication...........................21
9. Care and Maintenance ................. 22
10. Warranty Disclaimer................... 22
11. Service and Support ................... 22
12. Technical specications.............. 23
13. Menu structure ........................... 32
14. Recycling Information ................ 34
5
Page 5

GB
Thank you for choosing a Hama product.
Take your time and read the following instructions and information completely. Please keep
these instructions in a safe place for future reference. If you sell the device, please pass these
operating instructions on to the new owner.
1. Explanation of Warning Symbols and Notes
Warning
This symbol is used to indicate safety instructions or to draw your attention to specic hazards
and risks.
Note
This symbol is used to indicate additional information or important notes.
2. Package Contents
• Digital picture frame
• 230V power supply unit
• Remote control
• 1 CR2025 battery for remote control (already inserted)
• These operating instructions
Note
Check the delivery for completeness and visible damage. Inform your supplier/dealer in the
event of incomplete or damaged deliveries.
3. Safety Instructions
• The product is intended for private, non-commercial use only.
• Protect the product from dirt, moisture and overheating, and only use it in a dry environment.
• Do not drop the product and do not expose it to any major shocks.
• Do not operate the product outside the power limits given in the specications.
• Only connect the product to a socket that has been approved for the device. The socket must
be installed close to the product and easily accessible.
• Disconnect the product from the network using the power button – if this is not available,
unplug the power cord from the socket.
• Lay all cables so that they do not pose a tripping hazard.
• Do not bend or crush the cable.
• Do not modify the product in any way. Doing so voids the warranty.
• Do not attempt to service or repair the product yourself. Leave any and all service work to
qualied experts.
• Keep the packaging material out of the reach of children due to the risk of suffocation.
• Dispose of packaging material immediately according to locally applicable regulations.
6
Page 6

GB
Warning - Batterien
• Immediately remove and dispose of dead batteries from the product.
• Only use batteries (or rechargeable batteries) that match the specied type.
• When inserting batteries, note the correct polarity (+ and - markings) and insert the
batteries accordingly. Failure to do so could result in the batteries leaking or exploding.
• Do not overcharge batteries.
• Keep batteries out of the reach of children.
• Do not short circuit the batteries/rechargeable batteries and keep them away from
uncoated metal objects.
Warning
• Do not open the product. Do not continue to operate the product if it is damaged, which
may be indicated by smoke, odour or loud noises. Immediately contact your dealer or our
service department (see item Service and Support).
• Do not use the product if the adapter, connection cable or power cable is damaged.
4. Defective Pixels
Note
Pixel defects can occur due to the manufacturing process. These manifest themselves as white
or black pixels that permanently light up during playback. Within the context of production
tolerances, a maximum of 0.01% of these pixel defects measured against the total size of the
screen are permitted as a tolerance and are not considered a product defect.
7
Page 7

GB
5. Getting Started
5.1 Setting up
• Screw the foot into the threaded hole on the back of the device.
• Remove the protection foil from the display.
• Set the product on a at, level surface where it will not slip.
• Do not place any other objects on top of the device.
5.2 Wall mounting
Alternatively, you may use the threaded hole on the back of the device to mount it to the wall
using a VESA-compatible wall bracket.
VESA specication in the corresponding technical data.
Note on available accessories
You can nd a selection of compatible Hama products at www.hama.com.
Note
• Before mounting, check that the wall you have chosen is suitable for the weight to be
mounted Also make sure that there are no electric, water, gas or other lines running
through the wall at the mounting site.
• Buy special or suitable installation material from a specialised dealer for wall-mounting.
• Do not mount the product above locations where persons might linger.
8
Page 8

GB
5.3 Inserting or changing the battery
• Open the battery compartment of the remote control
• Insert a type CR2025 button cell battery, observing polarity.
• Remove the contact breaker strip from the battery if present.
• Close the battery compartment. Make sure that the cover closes easily and tightly.
2
1
5.4 Connecting the power supply
Warning
• Only connect the product to a socket that has been approved for the device. The socket
must be installed close to the product and easily accessible.
• Do not continue to operate the device if it becomes visibly damaged. (This is mandatory for
all products with 220 V mains connections.)
Note
• The power supply unit is suitable for mains voltages of 100–240 V and therefore can be
used worldwide. Please note that a country-specic adapter may be necessary.
• You can nd a selection of compatible Hama products at www.hama.com.
• Connect the enclosed power supply unit to a properly installed socket.
• Then connect the lead of the power supply unit to the DC In of the device.
9
Page 9

GB
6. Operation
6.1 Using the menu
The device is equipped with a user-friendly menu. The menu appears on the screen.
The following types of storage media can be read:
• SD/SDHC - cards (up to 32 GB)
• USB storage media
Switch on the device by pressing the ON/OFF switch
You open the main menu using the [MENU] button. In the menu, use the [◄][►] buttons to
move around, and select the desired function.
When you conrm your selection by pressing [OK/ENTER], a corresponding submenu appears.
In this menu, use the [▲] or [▼] buttons to move around, and select the desired line. The
selected line is highlighted in colour.
Conrm your selection using the [OK/ENTER] button. Usually, an additional menu will then
appear, in which you move around using the [◄][►][▲][▼] buttons and select the desired
setting.
Use button [RETURN] to exit the current menu level.
For orientation purposes, the menu structure is also included in the Appendix.
You can control the device using the buttons on the rear or with the included remote control.
10
Page 10

GB
6.2 System settings
To enter the setup menu, press the [SETUP] button on your remote control or use
the [◄][►] buttons on the rear of the device or the remote control to access the
“Settings” menu item
The following menu items are available:
11
Page 11

GB
Photo Setup
Calendar Setup
Display Mode
Music
Display Ratio
Slide Speed
Slideshow Repeat
Slideshow Effect
Slide Mode
Date Function menu for setting the date
Set Time
Format
Clock Time
Alarm Status
Select between two display modes
Function menu for switching the music on/
off during the slideshow
Adjust image to the screen
Select the time interval at which the
images should change (3/5/15/30 sec.;
1/5/15 min.)
Function menu for setting the playback
loop
Function menu for setting the image
transitions
Function for displaying up to four images
simultaneously
Function menu for setting the time
Video Setup
Music Setup
Alarm Time
Alarm
Frequency
Display Mode Select between two display modes
Play Mode
Play Mode
Show Spectrum
Function menu for setting the alarm time
Function menu for setting the playback
loop
Function menu for setting the playback
loop
Function which allows you to display the
sound spectrum in music mode
12
Page 12

GB
System Setup
Lanuage
Brightness
Contrast
Saturation
Hue
Power On
Auto Boot Time
Power Off
Auto Shut Time
Auto-Power-Fre-
quency
Volume
Reset Setting
Version
System
Upgrade
Start-up-Modus
Select the desired language menu/operating language
Set the brightness, contrast, colour saturation, and tint of the device
Set the time at which the device is to
switch on or off.
NOTE: Auto switch-on/switch-off function
must rst be activated!
Function menu for resetting to factory
settings
Function menu for displaying the current
rmware version
Function menu for updating the rmware
Select a start up mode: main menu, photo,
video, music, calendar
Note for 118596 and 118597
Motion sensor / sleep timer:
If this function is enabled, the display turns off after a set time (sleep timer) to save power. The
sensor remains active after the display has turned off. If it detects motion, the display is reactivated.
13
Page 13

GB
7. Functions
7.1 Photos
The device starts a photo slide show automatically when a storage medium is inserted. If
no storage medium has been inserted, the device uses the photos stored on the internal
memory. You can navigate in the photo menu as follows:
• Use the [◄][►][▲][▼] buttons on the device or remote control to select the symbol and
then press [ENTER/OK].
• In the default setting, the device displays the slide show upon start-up.
• Press the [RETURN] button on the remote control or the [MENU] button on the device to
switch to picture preview mode.
• Use the [◄][►][▲][▼] buttons to select a photo and then press [OK] to start playback.
• During picture playback (or slide show), press the [PLAY/PAUSE] button on the remote control
and then hold down [SETUP] for approx. 2 seconds to show options for the currently displayed
picture.
NOTE
You can make additional changes to the settings in the music settings menu.
14
Page 14
GB
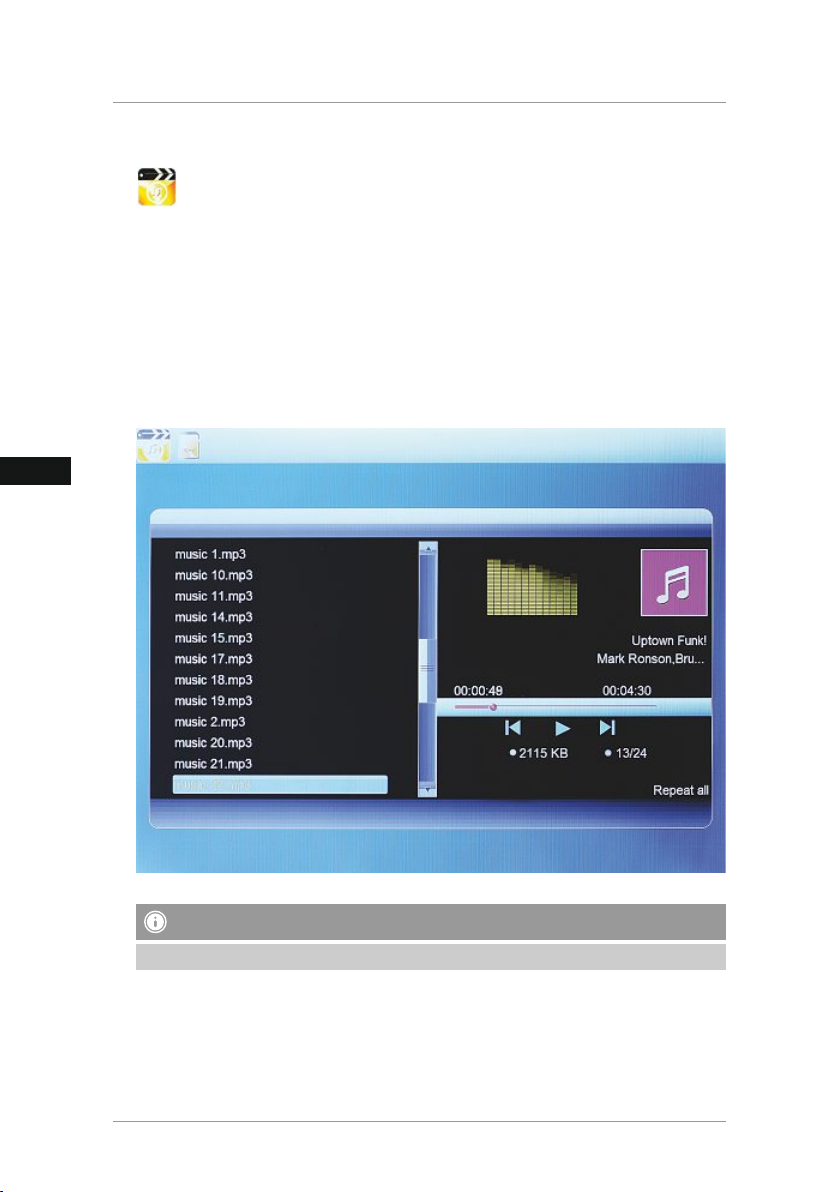
7.2 Music
Use the [◄][►][▲][▼] buttons on the device or remote control to select the symbol
and then press [ENTER/OK].
You can perform the following functions during playback:
• You can fast forward or rewind the current track using the [◄][►] buttons on your remote
control.
• You can switch to the previous track or the next track using the [I◄◄ ][►►I ] or [▲][▼]
buttons.
• You can play/pause the playback by pressing [ENTER/OK] or [►I I ].
• You can set the volume level using the [VOL +/-] buttons.
• During music playback, press the [PLAY/PAUSE] button on the remote control and then hold
down [SETUP] for approx. 2 seconds to show options for the current music le.
NOTE
You can make additional changes to the settings in the music settings menu.
15
Page 15

GB
7.3 Videos
Use the [◄][►][▲][▼] buttons on the device or remote control to select the symbol
and then press [ENTER/OK].
You can perform the following functions during playback:
• You can fast forward or rewind the current video using the [◄][►] buttons on your remote
control.
• You can switch to the previous video or the next video using the [I◄◄ ][►►I ] or [▲][▼]
buttons.
• You can play/pause the playback by pressing [ENTER/OK] or [►I I ].
• You can set the volume level using the [VOL +/-] buttons.
• During video playback, press the [PLAY/PAUSE] button on the remote control and then hold
down [SETUP] for approx. 2 seconds to show options for the current video le.
NOTE
You can make addition changes to the settings in the video settings menu.
16
Page 16

GB
7.4 Calendar
Use the [◄][►][▲][▼] buttons on the device or remote control to select the symbol
and then press [ENTER/OK].
You can perform the following functions:
• You can change the year using the [◄][►] buttons.
• You can change the month using the [▲][▼] buttons.
NOTE
• The alarm icon is displayed when the alarm function is activated .
• You can make additional changes to the settings in the calendar settings menu.
17
Page 17

GB
7.5 Folder
Use the [◄][►][▲][▼] buttons on the device or remote control to select the symbol
and then press [ENTER/OK].
Use the [▲][▼] buttons to select a le and then press the [►] button on the remote control or
3 on your device. A new menu window appears. You can use this window to save all of the les
from the storage medium in the internal memory.
• Select Ja/Yes and then press [ENTER/OK] to transfer the selected le from the storage
medium to the internal memory.
• Press Nein/No to return to the folder level.
NOTE
• By selecting the internal memory, you can delete selected les from the internal memory.
• Please note that the amount of data you can copy is limited to the amount of free storage
space available on the internal storage.
• The more data you wish to store, the longer it will take to copy this data. Please wait until
the system is completely nished copying the data.
18
Page 18

GB
8. Additional functions
8.1 Use as a card reader
This device has a card reader function. You can connect your device to your computer via USB
to access les on the inserted storage medium or the internal memory or exchange/copy/delete
data via the USB interface. Proceed as follows to connect the device to your computer using USB
type A:
• Switch off the device.
• Connect the device with your computer using the included USB cable.
• Switch your device back on. The device now switches automatically to PC mode; this appears
on the display of the device as well.
• If the USB connection to your computer is functioning properly, the device is recognised
automatically and two drive letters are assigned.
• To exit PC mode, switch off the device and remove the USB connection cable.
8.2 Automatic image rotation (items no. 95249, 118569, 118570 only)
The device can rotate images automatically. Turn the device so that it is upright or on its side
and the displayed photo will rotate to the correct orientation automatically.
19
Page 19

GB
8.3 Motion sensor (items no. 118596, 118597 only)
This device is equipped with a sensor that registers nearby motion and activates the display.
8.4 Brightness/light sensor (item no. 95249 only)
This device is equipped with a light sensor that registers changes in the ambient light conditions
and regulates the brightness of the display correspondingly.
8.5 Slide show variations
20
Page 20

GB
8.6 Causes of errors and error rectification
The following table can be used to localise and rectify minor errors with the device:
Error Possible cause Solution
Device is switched off Switch on the device.
Power supply adapter not
Display is blank
General information
Device turns off
General
information
No image appears
No Sound The device is set to “Mute”
DPF
Video/music does not
play
Music does not play Incorrect format
Videos do not play, or
playback is not smooth
connected correctly
No mains power Check your fuse box.
Device is faulty
By static electricity, such as
occur during normal daily use
(carpet, wool sweater), it may
happen that the device will
go into Standby Mode.
No storage medium is
inserted
The storage medium does
not contain data
No storage medium is
inserted
The storage medium does
not contain any les
Incorrect format
Ensure that the power supply
adapter is plugged in and
connected to the device.
Inform our customer service
department.
In case that the device shouldn´t react
on any commands or show a black
screen, reset the device by pressing the
POWER button on the remote control
or on the backpanel of the device.
Insert a storage medium.
Check your storage medium.
Increase the volume of the
device
Insert a storage medium.
Check your storage medium
Convert the music le to mp3
format
Convert the video to a different
format
NOTE
• Contact our customer service department if the problem remains after taking the steps
detailed above.
21
Page 21

GB
9. Care and Maintenance
The display on your device is located behind protective glass.
• Only clean the display with a dry, soft cloth.
• Do not apply pressure to the screen surface when you clean the device.
• To keep from damaging the surface, do not use solvents or alcohol-based cleaners to clean the
device.
Note
For gentle cleaning and care of the display, we recommend that you use a microbre cleaning
cloth.
• Clean the rest of the device with a dry cloth. You can lightly dampen the cloth if the device is
very dirty.
10. Warranty Disclaimer
Hama GmbH & Co. KG assumes no liability and provides no warranty for damage resulting from
improper installation/mounting, improper use of the product or from failure to observe the
operating instructions and/or safety notes.
11. Service and Support
Please contact Hama Product Consulting if you have any questions about this product.
Hotline: +49 9091 502-115 (German/English)
Further support information can be found here:
www.hama.com
22
Page 22

GB
12. Technical specifications
Note
We reserve the right to make technical and design changes without prior notice.
Digital Picture Frame 00095249
Power supply input 100-240V AC / 50/60 Hz / 0,4A Max
Power supply output 5V DC / 2.0 A
Power consumption < 8W
Dimensions 256 x 24 x 208 mm (without the base)
Weight ca. 500g
Recommended ambient
temperature for device
Relative humidity 10 - 80 % (non-condensing)
Display 24,64 cm (9.7“) 4:3 TFT
Resolution 1024 x 768 (RGB)
Brightness 200 cd/m²
Contrast 350 : 1
Button cell battery (CR 2025) 1 x CR2025 (3V)
Kompatible Speichermedien SD/SDHC
External connections USB 2.0 (Host & Device); Audio Out 3.5 mm jack
Supported le formats
Internal storage 2 GB
Wall mount VESA VESA 50 mm x 50 mm
0°C - 40°C (32 - 104 F)
JPEG, JPG
MP3
H.264 (video size ≤ 1920 x 1080)
MJPEG (video size ≤ 1920 x 1080)
DIVX/AVI / MP4 (video size ≤ 1920 x 1080)
23
Page 23

GB
Digital Picture Frame 00095276
Power supply input 100-240V AC / 50/60 Hz / 0,4A Max
Power supply output 5V DC / 2.0 A
Power consumption < 7W
Dimensions
Weight ca. 530g
Recommended ambient
temperature for device
Relative humidity 10 - 80 % (non-condensing)
Display 24,64 cm (9.7“) 4:3 TFT
Resolution 1024 x 768 (RGB)
Brightness 150 cd/m²
Contrast 400 : 1
Button cell battery (CR 2025) 1 x CR2025 (3V)
Kompatible Speichermedien SD/SDHC
External connections USB 2.0 (Host & Device); Audio Out 3.5 mm jack
Supported le formats
220 x 54 x 184 mm (with the base)
220 x 4 x 184 mm (without the base)
0°C - 40°C (32 - 104 F)
JPEG, JPG (up to 16 Megapixel)
MP3
H.264 (video size ≤ 1920 x 1080)
MJPEG (video size ≤ 1920 x 1080)
DIVX/AVI / MP4 (video size ≤ 1920 x 1080)
24
Page 24

GB
Digital Picture Frame 00095230
Power supply input 100-240V AC / 50/60 Hz / 0,4A Max
Power supply output DC 9 V / 1.5 A
Power consumption < 10W
Dimensions 415 x 35 x 280 mm
Weight ca. 1420g
Recommended ambient
temperature for device
Relative humidity 10 - 80 % (non-condensing)
Display 39,6 cm (15.6“) 16:10 TFT
Resolution 1366 x 768 (RGB)
Brightness 200 cd/m²
Contrast 250 : 1
Button cell battery (CR 2025) 1 x CR2025 (3V)
Kompatible Speichermedien SD/SDHC
External connections USB 2.0 (Host & Device); Audio Out 3.5 mm jack
Supported le formats
Internal storage 4 GB
0°C - 40°C (32 - 104 F)
JPEG, JPG (up to 16 Megapixel)
MP3
H.264 (video size ≤ 1920 x 1080)
MJPEG (video size ≤ 1920 x 1080)
MPEG 4 (video size ≤ 1920 x 1080)
25
Page 25

GB
Digital Picture Frame 00095294
Power supply input 100-240V AC / 50/60 Hz / 0,4A Max
Power supply output 5V DC / 2.0 A
Power consumption < 8W
Dimensions
Weight ca. 610g
Recommended ambient
temperature for device
Relative humidity 10 - 80 % (non-condensing)
Display 24,64 cm (9.7“) 4:3 TFT
Resolution 1024 x 768 (RGB)
Brightness 150 cd/m²
Contrast 400 : 1
Button cell battery (CR 2025) 1 x CR2025 (3V)
Kompatible Speichermedien SD / SDHC
External connections USB 2.0 (Host & Device); Audio Out 3.5 mm jack
Supported le formats
Internal storage 4 GB
234 x 56 x 198 mm (with the base)
234 x 8 x 198 mm (without the base)
0°C - 40°C (32 - 104 F)
JPEG, JPG (up to 48 Megapixel)
MP3
H.264 (video size ≤ 1920 x 1080)
MJPEG (video size ≤ 1920 x 1080)
DIVX/AVI / MP4 (video size ≤ 1920 x 1080)
26
Page 26

GB
Digital Picture Frame 00095296
Power supply input 100-240V AC / 50/60 Hz / 0,4A Max
Power supply output 9V DC / 1.5 A
Power consumption < 12W
Dimensions
Weight ca. 1400g
Recommended ambient
temperature for device
Relative humidity 10 - 80 % (non-condensing)
Display 30,73 cm (12.1“) 4:3 TFT
Resolution 800 x 600 (RGB)
Brightness 190 cd/m²
Contrast 400 : 1
Button cell battery (CR 2025) 1 x CR2025 (3V)
Kompatible Speichermedien SD/SDHC
External connections USB 2.0 (Host & Device); Audio Out 3.5 mm jack
Supported le formats
Internal storage 4 GB
Wall mount VESA VESA 75 mm x 75 mm
336 x 35 x 266 mm (with the base)
336 x 20 x 266 mm (without the base)
0°C - 40°C (32 - 104 F)
JPEG, JPG (up to 48 Megapixel)
MP3
H.264
MJPEG (video size ≤ 1920 x 1080)
MPEG 4 (video size ≤ 1920 x 1080)
27
Page 27

GB
Digital Picture Frame 118578
Power supply input 100-240V AC / 50/60 Hz / 0,4A Max
Power supply output 5V DC / 1.5 A
Power consumption < 5,5W
Dimensions 185 x 56 x 158 mm
Weight ca. 400g
Recommended ambient
temperature for device
Relative humidity 10 - 80 % (non-condensing)
Display 20,32 cm (8“) 4:3 TFT-LED
Resolution 1024 x 768 (RGB)
Brightness 300 cd/m²
Contrast 500 : 1
Button cell battery (CR 2025) 1 x CR2025 (3V)
Kompatible Speichermedien SD/SDHC
External connections USB 2.0 (Host & Device); Audio Out 3.5 mm jack
Supported le formats
Internal storage 4 GB
0°C - 40°C (32 - 104 F)
JPEG, JPG (up to 48 Megapixel)
MP3
H.264
MJPEG (video size ≤ 1920 x 1080)
DivX/AVI / MPEG4 (video size ≤ 1920 x 1080)
XviD
28
Page 28

GB
Digital Picture Frame 118579
Power supply input 100-240V AC / 50/60 Hz / 0,4A Max
Power supply output 5V DC / 2.0 A
Power consumption < 8W
Dimensions 222 x 56 x 185 mm
Weight ca. 535g
Recommended ambient
temperature for device
Relative humidity 10 - 80 % (non-condensing)
Display 24,64 cm (9,7“) 4:3 TFT-LED
Resolution 1024 x 768 (RGB)
Brightness 150 cd/m²
Contrast 400 : 1
Button cell battery (CR 2025) 1 x CR2025 (3V)
Kompatible Speichermedien SD/SDHC
External connections USB 2.0 (Host & Device); Audio Out 3.5 mm jack
Supported le formats
Internal storage 4 GB
0°C - 40°C (32 - 104 F)
JPEG, JPG (up to 48 Megapixel)
MP3
H.264 (video size ≤ 1920 x 1080)
MJPEG (video size ≤ 1920 x 1080)
DIVX/AVI / MP4 (video size ≤ 1920 x 1080)
XviD
29
Page 29

GB
Digital Picture Frame 118596
Power supply input 100-240V AC / 50/60 Hz / 0,4A Max
Power supply output 9V DC / 1.5 A
Power consumption < 8.5W
Dimensions 294 x 30 x 232 mm
Weight ca. 1090 g
Recommended ambient
temperature for device
Relative humidity 10 - 80 % (non-condensing)
Display 30,73 cm (12.1“) 4:3 TFT-LED
Resolution 1024 x 768 (RGB)
Brightness 190 cd/m²
Contrast 400 : 1
Button cell battery (CR 2025) 1 x CR2025 (3V)
Kompatible Speichermedien SD/SDHC
External connections USB 2.0 (Host & Device); Audio Out 3.5 mm jack
Supported le formats
Internal storage 4 GB
Wall mount VESA VESA 75 mm x 75 mm
0°C - 40°C (32 - 104 F)
JPEG, JPG (up to 48 Megapixel)
MP3
H.264
MJPEG (video size ≤ 1920 x 1080)
MPEG 4 (video size ≤ 1920 x 1080)
XviD
30
Page 30

GB
Digital Picture Frame 118597
Power supply input 100-240V AC / 50/60 Hz / 0,4A Max
Power supply output 9V DC / 1.5 A
Power consumption < 10.5W
Dimensions 365 x 28 x 290 mm
Weight ca. 1570g
Recommended ambient
temperature for device
Relative humidity 10 - 80 % (non-condensing)
Display 38,10 cm (15“) 4:3 TFT-LED
Resolution 1024 x 768 (RGB)
Brightness 300 cd/m²
Contrast 500 : 1
Button cell battery (CR 2025) 1 x CR2025 (3V)
Kompatible Speichermedien SD/SDHC
External connections USB 2.0 (Host & Device); Audio Out 3.5 mm jack
Supported le formats
Internal storage 4 GB
Wall mount VESA VESA 75 mm x 75 mm
0°C - 40°C (32 - 104 F)
JPEG, JPG (up to 48 Megapixel)
MP3
H.264
MJPEG (video size ≤ 1920 x 1080)
MPEG 4 (video size ≤ 1920 x 1080)
XviD
31
Page 31

GB
13. Menu structure
Photos
Music
Videos
Calendar
Folder
Settings
Photo slide show
Photo slide show with music
Photo Setup
Calendar Setup
Video Setup
Music Setup
Display Mode
Music
Display Ratio
Slide Speed
Slideshow Repeat
Slideshow Effect
Slide Mode
Date
Set Time Format
ime
Clock T
Alarm Status
Alarm Time
Alarm Frequency
Display Mode
Play Mode
Play Mode
Show Spectrum
32
Page 32

GB
Card reader
(if connected to a PC)
System Setup
Lanuage
Brightness
Contrast
Saturation
Hue
Power On
Auto Boot Time
Power Off
Auto Shut Time
Auto-Power-Frequency
Volume
Reset Setting
Version
System Upgrade
Start-up-Modus
33
Page 33

GB
14. Recycling Information
Note on environmental protection:
After the implementation of the European Directive 2012/19/EU and 2006/66/EU in the
national legal system, the following applies: Electric and electronic devices as well as
batteries must not be disposed of with household waste. Consumers are obliged by law
to return electrical and electronic devices as well as batteries at the end of their service
lives to the public collecting points set up for this purpose or point of sale. Details to this are
dened by the national law of the respective country. This symbol on the product, the instruction
manual or the package indicates that a product is subject to these regulations. By recycling,
reusing the materials or other forms of utilising old devices/Batteries, you are making an
important contribution to protecting our environment.
34
Page 34

D
A B
95249, 95296, 95230, 118596,
118597
95276, 95294, 118578, 118579
1
2
6
4
7
C
I
◄◄
► II
►►I
MENU
5
3
*nur bei Art.Nr. 95249
8*
9
10
11
12
13
8 9 10 11 12
2 17
7/16
4/8
7/13
15
18
OK
12
9/14
5
3
6
35
Page 35

D
Bedienungselemente und Anzeigen
A C
A: Digitaler Bilderrahmen –
Bedien- und Anschlussfeld
1
2
3
4
5
6
7
8*
9
10
11
12
13
◄◄ /
I
►►I /
MENU MENU
Power ON/OFF
Aufwärts / Nächste Datei
∧
VOL - / Rechts
/>
Abwärts / Letzte Datei
∨
Enter / OK – Play / Pause
►I I
VOL + / Links
<
/
Lichtsensor (nur Art.Nr. 95249)
SD/SDHC/MS/MMC
Audio Ausgang (3.5mm Klinke)
USB TypA
Mini USB
Anschlußbuchse für
Netzadapter
B
B: Digitaler Bilderrahmen –
Bedien- und Anschlussfeld
1
2
3
4
5
6
7
8
9
10
11
12
Steuerungstaste Aufwärts /
∧
zur nächste Datei wechseln
VOL -/ Links - Steuerungstaste
<
VOL +/ Rechts - Steuerungstaste
>
Play/Pause/OK/ENTER - Taste
►I I
Steuerungstaste Abwärts /
∨
zur letzte Datei wechseln
Exit / Zurück - Taste
MENU = 2x
EIN/AUS - Taste
SD/MMC/SDHC Kartenslot
Audio Ausgang (3.5mm Klinke)
USB (Typ A)
Mini USB
Anschlußbuchse für Netz
adapter
-
C: Fernbedienung
1
2
POWER On/Off
3
MENU /
4
5
OK/ ENTER
6
SETUP/
7
VOL +/- Lautstärke erhöhen / verringern
8
9
10
ROTATE
11
ZOOM Bild Zoom - Funktion
12
13
Abwärts
14
Rechts Nächstes Photo betrachten
15
RETURN/
16
Aufwärts
17
MUTE/
18
Hintergrundmusik bei der
BGM
Slideshow einschalten
Haupt-/Funktionsmenü
Links Vorheriges Photo betrachten
Bestätigungs-Taste; Play/pauseTaste im Abspielmodus
Zurück zur Systemeinstellung
letztes abgespielte Photo /
I
◄◄
Musik / Video
nächstes Photo / Musik / Video
►►I
Photo gegen den Uhrzeigersinn
drehen
Play/pause
►I I
Zurück zum vorhergehenden
Menü
Ton / Sound vorrübergehend
lautlos / stumm schalten
Startet die Photoslideshow
36
Page 36

D
Inhaltsverzeichnis
1. Erklärung von Warnsymbolen
und Hinweisen.................................. 38
2. Packungsinhalt ............................. 38
3. Sicherheitshinweise...................... 38
4. Pixelfehler..................................... 39
5. Inbetriebnahme............................ 40
5.1 Aufstellen ........................................40
5.2 Wandmontage.................................40
5.3 Batterie einlegen, bzw. wechseln .....41
5.4 Anschluss der Stromversorgung .......41
6. Bedienung und Betrieb................. 42
6.1 Die Menüführung.............................42
6.2 Systemeinstellungen ........................43
7. Funktionen.................................... 46
7.1 Photo...............................................46
7.2 Musik...............................................47
7.3 Video...............................................48
7.4 Kalender ..........................................49
7.5 Ordner.............................................50
8. Zusatzfunktionen.......................... 51
8.1 Verwendung als CardReader ............51
9.2 automatische Bildrotation
(nur Art.Nr. 95249, 118569, 118570)...51
8.3 Bewegungssensor
(nur Art.Nr. 118596, 118597)...............52
8.4 Helligkeits-/Lichtsensor
(nur Art.Nr. 95249)...............................52
8.5 Photo-Slideshow-Varianten..............52
8.6 Fehlerursachen und -behebung........53
9. Wartung und Pege ..................... 54
10. Haftungsausschluss.................... 54
11. Service und Support ................... 54
12. Technische Daten........................ 55
13. Menüstruktur.............................. 64
14. Entsorgungshinweise ................. 66
37
Page 37

D
Vielen Dank, dass Sie sich für ein Hama Produkt entschieden haben!
Nehmen Sie sich Zeit und lesen Sie die folgenden Anweisungen und Hinweise zunächst ganz
durch. Bewahren Sie diese Bedienungsanleitung anschließend an einem sicheren Ort auf, um bei
Bedarf darin nachschlagen zu können.
Sollten Sie das Produkt veräußern, geben Sie diese Bedienungsanleitung an den neuen
Eigentümer weiter.
1. Erklärung von Warnsymbolen und Hinweisen
Warnung
Wird verwendet, um Sicherheitshinweise zu kennzeichnen oder um die Aufmerksamkeit auf
besondere Gefahren und Risiken zu lenken.
Hinweis
Wird verwendet, um zusätzliche Informationen oder wichtige Hinweise zu kennzeichnen.
2. Packungsinhalt
• Digitaler Bilderrahmen
• 230V Netzteil
• Fernbedienung
• Standfuß (außer bei 95294, 95276, 118578, 118579)
• Diese Bedienungsanleitung
Hinweis
Prüfen Sie die Lieferung auf Vollständigkeit und auf sichtbare Schäden. Melden Sie eine
unvollständige oder beschädigte Lieferung umgehend Ihrem Lieferanten/Händler.
3. Sicherheitshinweise
• Das Produkt ist für den privaten, nicht-gewerblichen Haushaltsgebrauch vorgesehen.
• Schützen Sie das Produkt vor Schmutz, Feuchtigkeit und Überhitzung und verwenden Sie es
nur in trockenen Räumen.
• Lassen Sie das Produkt nicht fallen und setzen Sie es keinen heftigen Erschütterungen aus.
• Betreiben Sie das Produkt nicht außerhalb seiner in den technischen Daten angegebenen
Leistungsgrenzen.
• Betreiben Sie das Produkt nur an einer dafür zugelassenen Steckdose. Die Steckdose muss in
der Nähe des Produktes angebracht und leicht zugänglich sein.
• Trennen Sie das Produkt mittels des Ein-/Ausschalters vom Netz – wenn dieser nicht vorhanden
ist, ziehen Sie die Netzleitung aus der Steckdose.
• Verlegen Sie alle Kabel so, dass sie keine Stolpergefahr darstellen.
• Knicken und quetschen Sie das Kabel nicht.
38
Page 38

D
• Nehmen Sie keine Veränderungen am Produkt vor. Dadurch verlieren sie jegliche
Gewährleistungsansprüche.
• Versuchen Sie nicht, das Produkt selbst zu warten oder zu reparieren. Überlassen Sie jegliche
Wartungsarbeit dem zuständigen Fachpersonal.
• Halten Sie Kinder unbedingt von dem Verpackungsmaterial fern, es besteht Erstickungsgefahr.
• Entsorgen Sie das Verpackungsmaterial sofort gemäß den örtlich gültigen
Entsorgungsvorschriften.
Warnung - Batterien
• Entfernen und entsorgen Sie verbrauchte Batterien unverzüglich aus dem Produkt.
• Verwenden Sie ausschließlich Akkus (oder Batterien), die dem angegebenen Typ entsprechen.
• Beachten Sie unbedingt die korrekte Polarität (Beschriftung + und -) der Batterien und legen
Sie diese entsprechend ein. Bei Nichtbeachtung besteht die Gefahr des Auslaufens oder einer
Explosion der Batterien.
• Laden Sie Batterien nicht.
• Bewahren Sie Batterien außerhalb der Reichweite von Kindern auf.
• Schließen Sie Akkus/Batterien nicht kurz und halten Sie sie von blanken Metallgegenständen
fern.
Warnung
• Öffnen Sie das Produkt nicht und betreiben Sie es bei Beschädigungen, davon ausgehender
Rauchentwicklung, Geruchsbildung oder lauten Geräusche nicht weiter. Wenden Sie sich
umgehend an Ihren Händler oder unsere Serviceabteilung (siehe Pkt. Service und Support).
• Verwenden Sie das Produkt nicht, wenn der Adapter, das Anschlusskabel oder die Netzleitung
beschädigt sind.
4. Pixelfehler
Hinweis
Bedingt durch den Herstellungsprozess kann es zu sog. Pixelfehlern kommen. Diese äußern
sich im allg. durch weiße oder schwarze Pixel, die während der Wiedergabe permanent
aueuchten. Im Rahmen von Fertigungstoleranzen sind max. 0,01% dieser Pixelfehler
gemessen an der Gesamtgröße des Displays als Toleranz möglich und stellen keinen
Produktfehler dar.
39
Page 39

5. Inbetriebnahme
5.1 Aufstellen
• Schrauben Sie den Standfuß in die dafür vorgesehene Gewindeöffnung auf der Rückseite des
Produktes ein.
• Entfernen Sie die Displayschutzfolie.
• Stellen Sie das Produkt auf eine ebene, waagerechte und rutschfeste Fläche.
• Stellen Sie keine anderen Gegenstände auf das Produkt.
5.2 Wandmontage
Alternativ können Sie die Befestigungsvorbereitung auf der Rückseite des Produktes für eine
Wandmontage verwenden, bzw. können das Produkt an VESA kompatiblen Wandhalterungen
befestigen.
Angabe der VESA in den jeweiligen Technischen Daten.
Hinweis - Zubehörinformation
Eine entsprechende Auswahl an Hama Produkten nden Sie unter www.hama.com.
Hinweis
• Prüfen Sie vor Montage die Eignung der vorgesehenen Wand für das anzubringende Gewicht und
vergewissern Sie sich, dass sich an der Montagestelle in der Wand keine elektrischen Leitungen,
Wasser-, Gas- oder sonstige Leitungen befinden.
• Besorgen Sie sich spezielles bzw. geeignetes Montagematerial im Fachhandel für die Montage an
der vorgesehenen Wand.
• Montieren Sie das Produkt nicht an Orten, unter denen sich Personen aufhalten könnten.
D
40
Page 40

D
5.3 Batterie einlegen, bzw. wechseln
• Öffnen Sie das Batteriefach der Fernbedienung
• Legen Sie die Knopfzelle des Typs CR2025 polrichtig ein.
• Wahlweise entfernen Sie den Kontaktunterbrecherstreifen der Batterie.
• Schließen Sie das Batteriefach wieder. Beachten Sie dabei, dass die Verriegelung sauber
einrastet.
2
1
5.4 Anschluss der Stromversorgung
Warnung
• Betreiben Sie das Produkt nur an einer dafür zugelassenen Steckdose. Die Steckdose muss in der
Nähe des Produktes angebracht und leicht zugänglich sein.
• Betreiben Sie das Produkt nicht weiter, wenn es offensichtlich Beschädigungen aufweist.
Hinweis
• Das Netzgerät ist für eine Netzspannung von 100-240 V geeignet und daher weltweit einsetzbar.
Beachten Sie, dass hierzu ein länderspezifischer Adapter notwendig ist.
• Eine entsprechende Auswahl an Hama Produkten finden Sie unter www.hama.com.
• Verbinden Sie das mitgelieferte Netzteil mit einer ordnungsgemäß installierten und
funktionsfähigen Steckdose.
• Verbinden Sie anschließend das Anschlusskabel des Netzteils mit dem DC-IN Anschluss des
Produktes.
41
Page 41

D
6. Bedienung und Betrieb
6.1 Die Menüführung
Das Gerät ist mit einer benutzerfreundlichen Menüführung ausgestattet. Die Menüführung wird
am Bildschirm eingeblendet.
Folgende Speichermedien können gelesen werden:
• SD/SDHC - Karten (bis 32 GB)
• USB Speichermedien
Schalten Sie das Gerät ein, indem Sie den ON/OFF (Ein/Aus) Schalter betätigen.
Sie rufen das Hauptmenü mit der [MENÜ]-Taste auf. Im Menü bewegen Sie sich mit den
[◄][►]-Tasten und wählen die gewünschte Funktion.
Wenn Sie Ihre Wahl mit der [OK/ENTER]-Taste bestätigen, erscheint ein entsprechendes
Untermenü. Hier bewegen Sie sich mit den [▲] oder [▼]-Tasten und wählen die gewünschte
Zeile. Die gewählte Zeile ist farblich markiert.
Bestätigen Sie Ihre Wahl mit der [OK/ENTER]-Taste. Meist erscheint dann ein weiteres Menü, in
dem Sie sich mit den [◄][►][▲][▼] -Tasten bewegen und die gewünschte Einstellung wählen.
Mit der Taste [RETURN]-Taste verlassen Sie die aktuelle Menüebene.
Zur Orientierung siehe auch die Menüstruktur im Anhang.
Sie können das Gerät mit den Tasten auf der Rückseite oder der im Lieferumfang enthaltenen
Fernbedienung steuern.
42
Page 42

D
6.2 Systemeinstellungen
Um in das Setupmenü zu gelangen, drücken Sie nun die [SETUP]-Taste auf ihrer
Fernbedienung, oder bewegen Sie sich mit den [◄][►]-Tasten auf der Rückseite des
Gerätes oder der Fernbedienung auf den Menüpunkt.
Folgende Menüpunkte stehen zur Verfügung:
43
Page 43

D
Foto -
Einstellungen
Anzeigemodus
Musik
Bild–Anzeige Bild zum Bildschirm ausrichten
Intervall
Wiederholen
Übergänge
Diaschau Modus
Datum Funktionsmenü zum Einstellen des Datums
Hier können Sie zwischen zwei Anzeigemodi wählen
Funktionsmenü zum Einschalten oder
Ausschalten der
Musikwiedergabe während der Slideshow
Wählen Sie die Zeitdauer aus, mit dem die
Bilder
ablaufen sollen (3/5/15/30 Sek.
1/5/15 Min.)
Funktionsmenü zum einstellen der Wiederholschleife
Funktionsmenü zum einstellen der Bildübergänge
Mit dieser Funktion können bis zu vier
Bilder gleichzeitig
angezeigt werden
Kalender -
Einstellungen
Video -
Einstellungen
Musik -
Einstellungen
Zeitformat
Uhrzeit
Alarm Status
Alarm Zeit
Alarm
Wiederholung
Anzeigemodus
Wiedergabe
Wiedergabe
Spektrum
anzeigen
Funktionsmenü zum einstellen der Uhrzeit
Funktionsmenü zum einstellen der
Alarmzeit
Hier können Sie zwischen zwei Anzeigemodi wählen
Funktionsmenü zum einstellen der Wiederholschleife
Funktionsmenü zum einstellen der Wiederholschleife
Mit dieser Funktion können Sie das
Klangspektrum im
Musik – Modus anzeigen lassen
44
Page 44

D
System -
Einstellungen
Sprache
Helligkeit
Kontrast
Sättigung
Farbton
Autom.
Einschalten
Einschaltzeit
Autom.
Ausschalten
Ausschaltzeit
Autom.
Ein/Aus Wdh.
Lautstärke
Reset
Version
System
Upgrade
Start-up-Modus
Wählen Sie die gewünschte Menü/Bediensprache aus
Hier stellen Sie die Helligkeit, Kontrast,
Farbsättigung und Schattierung des
Gerätes ein
Hier kann eingestellt werden, wann das
Gerät Einschalten oder Ausschalten soll.
ACHTUNG: das Einschalten und Ausschalten muß vorher noch extra aktiviert
werden!
Funktionsmenü zum Zurücksetzen auf den
Werkszustand
Funktionsmenü zum anzeigen der aktuellen
Firmware Version
Funktionsmenü zum aktualisieren der
Firmware
Wählen Sie die gewünschte Startfunktion
aus:
Hauptmenü, Photo, Video, Musik ,
Kalender
Hinweis für 118596 und 118597
Bewegungssensor/Sleep Timer:
Ist diese Funktion aktiviert, schaltet sich das Display nach eingestellter Zeit (Sleep Timer) aus um
Energie zu sparen. Der Sensor bleibt auch nach dem Abschalten des Displays aktiv. Stellt er wieder
eine Bewegung fest, wird das Display reaktiviert.
45
Page 45

D
7. Funktionen
7.1 Photo
Das Gerät startet automatisch mit der Photo-Diashow sobald Sie ein Speichermedium
eingelegt haben. Bei nicht eingelegtem Speichermedium, startet das Gerät mit den
abgespeicherten Daten des internen Speichers.
• Wählen Sie mit Hilfe der [◄][►][▲][▼]-Tasten auf Ihrem Gerät oder der Fernbedienung das
Symbol aus und bestätigen Sie die Auswahl mit [OK]
• Das Gerät startet standardmäßig mit der Slideshow.
• Drücken Sie die [RETURN]-Taste auf der Fernbedienung oder die [MENU]-Taste auf dem Gerät,
um in den Bildvorschau Modus zu wechseln.
• Wählen Sie mit Hilfe der [◄][►][▲][▼]-Tasten ein Photo aus und starten Sie mit [OK] die
Wiedergabe.
• Drücken Sie während der Bildwiedergabe (auch Dia-Show) auf der Fernbedienung die
Taste [PLAY/PAUSE] und anschließend für ca. 2 Sek. [SETUP] , um weitere Optionen für das
angezeigte Bild aufzurufen.
Hinweis
Im Photo-Einstellungs-Menü können Sie weitere Einstellungen vornehmen
46
Page 46

D
7.2 Musik
Drücken Sie mit den [◄][►][▲][▼] auf ihrem Gerät oder der Fernbedienung auf das
Symbol und drücken Sie die [ENTER/OK]-Taste.
Folgende Funktionen können Sie während der Wiedergabe ausführen:
• Drücken Sie die [◄][►]-Tasten auf Ihrer Fernbedienung, um innerhalb eines Musiktitels vor-
und zurückzuspulen.
• Drücken Sie die [I◄◄ ][►►I ] oder [▲][▼]-Tasten um zwischen den einzelnen Titeln vor- und
zurückzuspringen.
• Die [ENTER/OK] oder [►I I ]-Taste besitzt hier die Play/Pause-Funktion.
• Stellen Sie die Lautstärke mit den [VOL +/-]-Tasten ein.
• Drücken Sie während der Musikwiedergabe auf der Fernbedienung die Taste [PLAY/PAUSE]
und anschließend für ca. 2 Sek. [SETUP] , um weitere Optionen für die aktuelle Wiedergabe
aufzurufen.
Hinweis
Im Musik-Einstellungs-Menü können Sie weitere Einstellungen vornehmen
47
Page 47

D
7.3 Video
Drücken Sie mit den [◄][►][▲][▼] auf ihrem Gerät oder der Fernbedienung auf das
Symbol und drücken Sie die [ENTER/OK]-Taste.
Folgende Funktionen können Sie während der Wiedergabe ausführen:
• Drücken Sie die [◄][►]-Tasten auf Ihrer Fernbedienung, um innerhalb eines Videos vor- und
zurückzuspulen.
• Drücken Sie die [I◄◄ ][►►I ] oder [▲][▼]-Tasten, um zwischen den einzelnen Videodateien
vor- und zurückzuspringen.
• Die [ENTER/OK] oder [►I I ]-Taste besitzt hier die Play/Pause-Funktion.
• Stellen Sie die Lautstärke mit den [VOL +/-]-Tasten ein.
• Drücken Sie während der Wiedergabe von Videos auf der Fernbedienung die Taste
[PLAY/PAUSE] und anschließend für ca. 2 Sek. [SETUP] , um weitere Optionen für die aktuelle
Wiedergabe aufzurufen.
Hinweis
Im Video-Einstellungs-Menü können Sie weitere Einstellungen vornehmen
48
Page 48

D
7.4 Kalender
Drücken Sie mit den [◄][►][▲][▼] auf ihrem Gerät oder der Fernbedienung auf das
Symbol und drücken Sie die [ENTER/OK]-Taste.
Folgende Funktionen können Sie ausführen:
• Mit Hilfe der [◄][►]-Taste könne Sie das Jahr verändern
• Mit Hilfe der [▲][▼]-Tasten können Sie den Monat wechseln
Hinweis
• Haben Sie die Alarmfunktion aktiviert, wird dies durch das Alarmsymbol angezeigt .
• Im Kalender-Einstellungs-Menü können Sie weitere Einstellungen vornehmen.
49
Page 49

D
7.5 Ordner
Drücken Sie mit den [◄][►][▲][▼] auf ihrem Gerät oder der Fernbedienung auf das
Symbol und drücken Sie die [ENTER/OK]-Taste.
Wählen Sie mit den [▲][▼]-Tasten die gewünschte Datei aus und drücken Sie anschließend die
[►]-Taste auf ihrer Fernbedienung oder Taste 3 auf ihrem Gerät. Es erscheint nun ein neues
Menüfenster mithilfe Sie alle auf dem Speichermedium bendlichen Dateien auf den internen
Speicher speichern können.
• Durch Bestätigung Ja / Yes mit der [ENTER/OK]-Taste wird nun die ausgewählte Datei vom
Speichermedium auf den internen Speicher übertragen.
• Drücken Sie Nein / No kommen Sie zurück auf die Order Ebene.
Hinweis
• Haben Sie den internen Speicher gewählt, können Sie ausgewählte Dateien vom internen
Speicher löschen.
• Bitte achten Sie darauf, dass nur soviel kopiert werden kann, wie freier Speicherplatz im
internen Speicher zur Verfügung steht.
• Je größer die Speichermenge, desto länger dauert der Kopiervorgang. Bitte warten Sie, bis
der komplette Kopiervorgang abgeschlossen ist.
50
Page 50

D
8. Zusatzfunktionen
8.1 Verwendung als CardReader
Dieses Gerät besitzt eine CardReader-Funktion. Sie können somit ihr Gerät per USB mit ihrem
Computer verbinden, um auf Dateien des eingelegten Speichermediums oder des internen
Speichers zuzugreifen, bzw. Daten über die USB Schnittstelle austauschen / kopieren / löschen
zu können. Um das Gerät über USB Typ A an ihrem Computer anzuschließen, gehen Sie wie folgt
vor:
• Schalten Sie das Gerät aus.
• Verbinden Sie das Gerät mit ihrem Computer über das mitgelieferte USB Kabel.
• Schalten Sie nun wieder ihr Gerät ein. Das Gerät wechselt nun automatisch in den
„PC-Modus“, dies wird nun auch im Display des Gerätes angezeigt.
• Funktioniert der USB - Anschluss an ihrem Computer einwandfrei wird das Gerät automatisch
erkannt und zwei Laufwerksbuchstaben werden zugeordnet.
• Um den „PC-Modus“ wieder zu verlassen, schalten Sie das Gerät wieder aus und entfernen Sie
das USB Verbindungskabel.
9.2 automatische Bildrotation (nur Art.Nr. 95249, 118569, 118570)
Das Gerät ist mit einer automatischen Bildrotation ausgestattet. Stellen Sie das Gerät quer
oder hochkant auf, das angezeigte Photo wird sich nun automatisch in die richtige Darstellung
drehen.
51
Page 51

D
8.3 Bewegungssensor (nur Art.Nr. 118596, 118597)
Das Gerät ist mit einem Sensor ausgestattet, der Bewegungen in der Nähe registriert und das
Display aktiviert.
8.4 Helligkeits-/Lichtsensor (nur Art.Nr. 95249)
Das Gerät ist mit einem Lichtsensor ausgestattet, der Veränderungen in der
Umgebungsbeleuchtung registriert und entsprechend die Helligkeit des Displays regelt.
8.5 Photo-Slideshow-Varianten
52
Page 52

D
8.6 Fehlerursachen und -behebung
Die nachfolgende Tabelle hilft bei der Lokalisierung und Behebung kleinerer Störungen:
Fehler Mögliche Ursache Behebung
Gerät ist ausgeschaltet Schalten Sie das Gerät ein.
Stellen Sie sicher, dass der
Netzadapter nicht korrekt
Keine Anzeige auf dem
Display
Allgemein
Gerät schaltet plötzlich
ab
Kein Bild wird
angezeigt
DPF
Kein Ton
Kein Video/
Musik wird abgespielt
Musik spielt nicht ab Falsches Format
Videos werden nicht
abgespielt oder ruckeln
angeschlossen
Steckdose liefert keine
Spannung
Gerät defekt
Durch statische Entladungen,
wie sie im normalen
Alltagsgebrauch vorkommen
(Teppichboden, Wollpullover),
kann es passieren, dass das
Produkt in den Standbymodus
wechselt.
Kein Speichermedium
eingesteckt
Speichermedium enthält
keine Daten
Gerät ist auf „lautlos“
gestellt
Kein Speichermedium
eingesteckt
Speichermedium enthält
keine Datei
Falsches Format
Netzadapter in der Steckdose
steckt und am Gerät
angeschlossen ist.
Überprüfen Sie die
Haussicherungen.
Benachrichtigen Sie den
Kundendienst.
Sollte das Gerät nicht mehr
reagieren oder kein Bild
mehr anzeigen, betätigen
Sie den POWER Knopf an der
Fernbedienung oder an der
Rückseite des Gerätes, um das
Gerät wieder einzuschalten.
Stecken Sie ein Speichermedium
ein.
Überprüfen Sie Ihr
Speichermedium.
Erhöhen Sie die Lautstärke am
Gerät
Stecken Sie ein Speichermedium
ein.
Überprüfen Sie Ihr
Speichermedium
Konvertieren Sie die Musikdatei
in mp3 um
Konvertieren Sie das Video in ein
anderes Format um
Hinweis
• Wenn Sie mit den vorstehend genannten Schritten das Problem nicht lösen können,
wenden Sie sich bitte an den Kundendienst.
53
Page 53

D
9. Wartung und Pflege
Das Display des Gerätes bendet sich hinter einem Schutzglas.
• Reinigen Sie das Display nur mit einem trocken, weichen Tuch.
• Üben Sie beim Reinigen keinen Druck auf die Bildschirmäche aus.
• Verwenden Sie zur Reinigung keine Lösungsmittel- oder alkoholhaltigen Reiniger um die
Oberäche nicht zu beschädigen.
Hinweis
Zur schonenden Reinigung und Pflege des Displays empfehlen wir Ihnen ein MicrofaserReinigungstuch.
• Reinigen Sie den Rest des Gerätes mit einem trocken Tuch. Bei starker Verschmutzung kann
das Tuch ein wenig angefeuchtet werden.
10. Haftungsausschluss
Die Hama GmbH & Co. KG übernimmt keinerlei Haftung oder Gewährleistung für Schäden, die
aus unsachgemäßer Installation, Montage und unsachgemäßem Gebrauch des Produktes oder
einer Nichtbeachtung der Bedienungsanleitung und/oder der Sicherheitshinweise resultieren.
11. Service und Support
Bitte wenden Sie sich bei Fragen zum Produkt gerne an die Hama-Produktberatung.
Hotline: +49 9091 502-115 (Deu/Eng)
Weitere Supportinformationen nden sie hier: www.hama.com
54
Page 54

D
12. Technische Daten
Hinweis
Änderungen von Design und technischen Daten bleiben vorbehalten und bedürfen keiner
Ankündigung.
Digitaler Bilderrahmen 00095249
Stromversorgung Eingang 100-240V AC / 50/60 Hz / 0,4 A Max
Stromversorgung Ausgang 5V DC / 2.0 A
Leistungsaufnahme < 8W
Abmessungen 256 x 24 x 208 mm (ohne Standfuß)
Gewicht ca. 500g
Empfohlene Geräteumgebung 0°C - 40°C (32 - 104 F)
Relative Luftfeuchtigkeit 10 - 80 % (nicht kondensierend)
Display 24,64 cm (9.7“) 4:3 TFT
Auösung 1024 x 768 (RGB)
Helligkeit 200 cd/m²
Kontrast 350 : 1
Batterie Knopfzelle (CR 2025) 1 x CR2025 (3V)
Kompatible Speichermedien SD/SDHC
Externe Anschlüsse USB 2.0 (Host & Device); Audio Out 3.5 mm Klinke
JPEG, JPG
MP3
Unterstützte Dateiformate
Interner Speicher 2 GB
Vorrichtung zur Wandmontage VESA 50 mm x 50 mm
H.264 (Videogröße ≤ 1920 x 1080)
MJPEG (Videogröße ≤ 1920 x 1080)
DIVX/AVI / MP4 (Videogröße ≤ 1920 x 1080)
55
Page 55

D
Digitaler Bilderrahmen 00095276
Stromversorgung Eingang 100-240V AC / 50/60 Hz / 0,4 A Max
Stromversorgung Ausgang 5V DC / 2.0 A
Leistungsaufnahme < 7W
Abmessungen
Gewicht ca. 530g
Empfohlene Geräteumgebung 0°C - 40°C (32 - 104 F)
Relative Luftfeuchtigkeit 10 - 80 % (nicht kondensierend)
Display 24,64 cm (9.7“) 4:3 TFT
Auösung 1024 x 768 (RGB)
Helligkeit 150 cd/m²
Kontrast 400 : 1
Batterie Knopfzelle (CR 2025) 1 x CR2025 (3V)
Kompatible Speichermedien SD/SDHC
Externe Anschlüsse USB 2.0 (Host & Device); Audio Out 3.5 mm Klinke
Unterstützte Dateiformate
220 x 54 x 184 mm (mit Standfuß)
220 x 4 x 184 mm (ohne Standfuß)
JPEG, JPG (up to 16 Megapixel)
MP3
H.264 (Videogröße ≤ 1920 x 1080)
MJPEG (Videogröße ≤ 1920 x 1080)
DIVX/AVI / MP4 (Videogröße ≤ 1920 x 1080)
56
Page 56

D
Digitaler Bilderrahmen 00095230
Stromversorgung Eingang 100-240V AC / 50/60 Hz / 0,4 A Max
Stromversorgung Ausgang DC 9 V / 1.5 A
Leistungsaufnahme < 10W
Abmessungen 415 x 35 x 280 mm
Gewicht ca. 1420g
Empfohlene Geräteumgebung 0°C - 40°C (32 - 104 F)
Relative Luftfeuchtigkeit 10 - 80 % (non-condensing)
Display 39,6 cm (15.6“) 16:10 TFT
Auösung
Helligkeit 200 cd/m²
Kontrast 250 : 1
Batterie Knopfzelle (CR 2025) 1 x CR2025 (3V)
Kompatible Speichermedien SD/SDHC
Externe Anschlüsse USB 2.0 (Host & Device); Audio Out 3.5 mm jack
Unterstützte Dateiformate
Interner Speicher 4 GB
1366 x 768 (RGB)
JPEG, JPG (up to 16 Megapixel)
MP3
H.264 (Videogröße ≤ 1920 x 1080)
MJPEG (Videogröße ≤ 1920 x 1080)
MPEG 4 (Videogröße ≤ 1920 x 1080)
57
Page 57

D
Digitaler Bilderrahmen 00095294
Stromversorgung Eingang 100-240V AC / 50/60 Hz / 0,4 A Max
Stromversorgung Ausgang 5V DC / 2.0 A
Leistungsaufnahme < 8W
Abmessungen
Gewicht ca. 610g
Empfohlene Geräteumgebung 0°C - 40°C (32 - 104 F)
Relative Luftfeuchtigkeit 10 - 80 % (nicht kondensierend)
Display 24,64 cm (9.7“) 4:3 TFT
Auösung 1024 x 768 (RGB)
Helligkeit 150 cd/m²
Kontrast 400 : 1
Batterie Knopfzelle (CR 2025) 1 x CR2025 (3V)
Kompatible Speichermedien SD / SDHC
Externe Anschlüsse USB 2.0 (Host & Device); Audio Out 3.5 mm Klinke
Unterstützte Dateiformate
Interner Speicher 4 GB
234 x 56 x 198 mm (mit Standfuß)
234 x 8 x 198 mm (ohne Standfuß)
JPEG, JPG (up to 48 Megapixel)
MP3
H.264 (Videogröße ≤ 1920 x 1080)
MJPEG (Videogröße ≤ 1920 x 1080)
DIVX/AVI / MP4 (Videogröße ≤ 1920 x 1080)
58
Page 58

D
Digitaler Bilderrahmen 00095296
Stromversorgung Eingang 100-240V AC / 50/60 Hz / 0,4 A Max
Stromversorgung Ausgang 9V DC / 1.5 A
Leistungsaufnahme < 12W
Abmessungen
Gewicht ca. 1400g
Empfohlene Geräteumgebung 0°C - 40°C (32 - 104 F)
Relative Luftfeuchtigkeit 10 - 80 % (nicht kondensierend)
Display 30,73 cm (12.1“) 4:3 TFT
Auösung 800 x 600 (RGB)
Helligkeit 190 cd/m²
Kontrast 400 : 1
Batterie Knopfzelle (CR 2025) 1 x CR2025 (3V)
Kompatible Speichermedien SD/SDHC
Externe Anschlüsse USB 2.0 (Host & Device); Audio Out 3.5 mm Klinke
Unterstützte Dateiformate
Interner Speicher 4 GB
Vorrichtung zur Wandmontage VESA 75 mm x 75 mm
336 x 35 x 266 mm (mit Standfuß)
336 x 20 x 266 mm (ohne Standfuß)
JPEG, JPG (bis zu 48 Megapixel)
MP3
H.264
MJPEG (Videogröße ≤ 1920 x 1080)
MPEG 4 (Videogröße ≤ 1920 x 1080)
59
Page 59

D
Digitaler Bilderrahmen 118578
Stromversorgung Eingang 100-240V AC / 50/60 Hz / 0,4 A Max
Stromversorgung Ausgang 5V DC / 1.5 A
Leistungsaufnahme < 5,5W
Abmessungen 185 x 56 x 158 mm
Gewicht ca. 400g
Empfohlene Geräteumgebung 0°C - 40°C (32 - 104 F)
Relative Luftfeuchtigkeit 10 - 80 % (nicht kondensierend)
Display 20,32 cm (8“) 4:3 TFT-LED
Auösung 1024 x 768 (RGB)
Helligkeit 300 cd/m²
Kontrast 500 : 1
Batterie Knopfzelle (CR 2025) 1 x CR2025 (3V)
Kompatible Speichermedien SD/SDHC
Externe Anschlüsse USB 2.0 (Host & Device); Audio Out 3.5 mm Klinke
JPEG, JPG (bis zu 48 Megapixel)
MP3
Unterstützte Dateiformate
Interner Speicher 4 GB
H.264
MJPEG (Videogröße ≤ 1920 x 1080)
DivX/AVI / MPEG4 (Videogröße ≤ 1920 x 1080)
XviD
60
Page 60

D
Digitaler Bilderrahmen 118579
Stromversorgung Eingang 100-240V AC / 50/60 Hz / 0,4 A Max
Stromversorgung Ausgang 5V DC / 2.0 A
Leistungsaufnahme < 8W
Abmessungen 222 x 56 x 185 mm
Gewicht ca. 535g
Empfohlene Geräteumgebung 0°C - 40°C (32 - 104 F)
Relative Luftfeuchtigkeit 10 - 80 % (nicht kondensierend)
Display 24,64 cm (9,7“) 4:3 TFT-LED
Auösung 1024 x 768 (RGB)
Helligkeit 150 cd/m²
Kontrast 400 : 1
Batterie Knopfzelle (CR 2025) 1 x CR2025 (3V)
Kompatible Speichermedien SD/SDHC
Externe Anschlüsse USB 2.0 (Host & Device); Audio Out 3.5 mm Klinke
JPEG, JPG (bis zu 48 Megapixel)
MP3
Unterstützte Dateiformate
Interner Speicher 4 GB
H.264 (Videogröße ≤ 1920 x 1080)
MJPEG (Videogröße ≤ 1920 x 1080)
DIVX/AVI / MP4 (Videogröße ≤ 1920 x 1080)
XviD
61
Page 61

D
Digitaler Bilderrahmen 118596
Stromversorgung Eingang 100-240V AC / 50/60 Hz / 0,4 A Max
Stromversorgung Ausgang 9V DC / 1.5 A
Leistungsaufnahme < 8.5W
Abmessungen 294 x 30 x 232 mm
Gewicht ca. 1090 g
Empfohlene Geräteumgebung 0°C - 40°C (32 - 104 F)
Relative Luftfeuchtigkeit 10 - 80 % (nicht kondensierend)
Display 30,73 cm (12.1“) 4:3 TFT-LED
Auösung 1024 x 768 (RGB)
Helligkeit 190 cd/m²
Kontrast 400 : 1
Batterie Knopfzelle (CR 2025) 1 x CR2025 (3V)
Kompatible Speichermedien SD/SDHC
Externe Anschlüsse USB 2.0 (Host & Device); Audio Out 3.5 mm Klinke
JPEG, JPG (bis zu 48 Megapixel)
MP3
Unterstützte Dateiformate
Interner Speicher 4 GB
Vorrichtung zur Wandmontage VESA 75 mm x 75 mm
H.264
MJPEG (Videogröße ≤ 1920 x 1080)
MPEG 4 (Videogröße ≤ 1920 x 1080)
XviD
62
Page 62

D
Digitaler Bilderrahmen 118597
Stromversorgung Eingang 100-240V AC / 50/60 Hz / 0,4 A Max
Stromversorgung Ausgang 9V DC / 1.5 A
Leistungsaufnahme < 10.5W
Abmessungen 365 x 28 x 290 mm
Gewicht ca. 1570g
Empfohlene Geräteumgebung 0°C - 40°C (32 - 104 F)
Relative Luftfeuchtigkeit 10 - 80 % (nicht kondensierend)
Display 38,10 cm (15“) 4:3 TFT-LED
Auösung 1024 x 768 (RGB)
Helligkeit 300 cd/m²
Kontrast 500 : 1
Batterie Knopfzelle (CR 2025) 1 x CR2025 (3V)
Kompatible Speichermedien SD/SDHC
Externe Anschlüsse USB 2.0 (Host & Device); Audio Out 3.5 mm Klinke
JPEG, JPG (bis zu 48 Megapixel)
MP3
Unterstützte Dateiformate
Interner Speicher 4 GB
Vorrichtung zur Wandmontage VESA 75 mm x 75 mm
H.264
MJPEG (Videogröße ≤ 1920 x 1080)
MPEG 4 (Videogröße ≤ 1920 x 1080)
XviD
63
Page 63

D
13. Menüstruktur
Photo
Musik
Video
Kalender
Ordner
Einstellungen
Photo Diashow
Photo Diashow mit Musik
Foto Einstellungen
Anzeigemodus
Musik
Bildanzeige
Intervall
Wiederholen
Übergänge
Diaschau Modus
Kalender Einstellungen
Datum
Zeitformat
Uhrzeit
Alarm Status
Alarm Zeit
Alarm Wiederholung
Video Einstellungen
Anzeigemodus
Wiedergabe
Musik Einstellungen
Wiedergabe
Spektrum anzeigen
64
Page 64

D
System Einstellungen
CardReader (möglich, wenn mit PC verbunden)
Sprache
Helligkeit
Kontrast
Sättigung
Farbton
Autom. Einschalten
Einschaltzeit
Autom. Ausschalten
Ausschaltzeit
Autom. Ein/Aus Wdh.
Lautstärke
Reset
Version
System Upgrade
Start-up-Modus
65
Page 65

D
14. Entsorgungshinweise
Hinweis zum Umweltschutz:
Ab dem Zeitpunkt der Umsetzung der europäischen Richtlinien 2012/19/EU und
2006/66/EG in nationales Recht gilt folgendes: Elektrische und elektronische Geräte
sowie Batterien dürfen nicht mit dem Hausmüll entsorgt werden. Der Verbraucher ist
gesetzlich verpichtet, elektrische und elektronische Geräte sowie Batterien am Ende
ihrer Lebensdauer an den dafür eingerichteten, öffentlichen Sammelstellen oder an die
Verkaufsstelle zurückzugeben. Einzelheiten dazu regelt das jeweilige Landesrecht. Das Symbol
auf dem Produkt, der Gebrauchsanleitung oder der Verpackung weist auf diese Bestimmungen
hin. Mit der Wiederverwertung, der stoichen Verwertung oder anderen Formen der Verwertung
von Altgeräten/Batterien leisten Sie einen wichtigen Beitrag zum Schutz unserer Umwelt.
66
Page 66

F
A B
95249, 95296, 95230, 118596,
118597
95276, 95294, 118578, 118579
1
2
6
4
7
C
I
◄◄
► II
►►I
MENU
5
3
*nur bei Art.Nr. 95249
8*
9
10
11
12
13
8 9 10 11 12
2 17
7/16
4/8
7/13
15
18
OK
12
9/14
5
3
6
67
Page 67

F
Éléments de commande et d'affichage
A C
A: Cadre photo numérique – Panneau de
commande et de connexion
1
2
3
4
5
6
7
8*
9
10
11
12
13
I
◄◄ /
►►I /
MENU MENU
Interrupteur marche/arrêt
Fichier précédent / curseur vers
∧
le haut
VOL - / vers la droite
/>
Vers le bas / dernier chier
∨
Entrée / OK - lecture / pause
►I I
VOL + / vers la gauche
<
/
Capteur de luminosité
(uniquement art. n° 95249)
Carte SD/SDHC/MS/MMC
Sortie audio (jack 3,5 mm)
USB type A
Mini USB
Prise de r
accor
adaptateur secteur
dement pour
B
B: Cadre photo numérique – Panneau de
commande et de connexion
1
2
3
4
5
6
7
8
9
10
11
12
Touche de contrôle vers le haut /
∧
Aller vers le chier suivant
Touche Ctrl VOL - / vers la gauche
<
Touche Ctrl VOL + / vers la droite
>
Touche lecture/pause/OK/ENTER
►I I
Touche de contrôle vers le bas /
∨
Aller vers le dernier chier
Quitter / Touche de retour
MENU = 2x
Touche MARCHE/ARRÊT
Emplacement pour carte SD/
MMC/SDHC
Sortie audio (jack 3,5 mm)
Port USB type A
Mini USB
Prise de raccordement pour
adaptateur secteur
C: Télécommande
Activation de la musique
1BGM
d’arrière-fond lors du diaporama
2POWER
3
MENU/
4Links
5OK/ ENTER
6
SETUP/
7VOL +/-
8
9
On/Off
Menu principal / fonction
Visualisation de la photo
précédente
Touche de conrmation ; Play/
pause - touche en mode lecture
Retour à la conguration
système
Augmentation / diminution du
volume
Dernière photo / musique /
◄◄
I
vidéo lue
Prochaine photo / musique /
►►I
vidéo
Rotation de la photo dans le
10 ROTATE
sens contraire des aiguilles
d'une montre
►I I
Fonction zoom
Play/Pause
11 ZOOM
12
13 Abwärts
14 Rechts
15
RETURN/
Visualisation de la photo
suivante
Retour vers le menu précédent
16 Aufwärts
17
MUTE/
18
Son / mise en sourdine temporaire / désactivation du son
Démarrage du diaporama
68
Page 68

F
Sommaire
1. Explication des symboles
d‘avertissement et des remarques... 70
2. Package Contents......................... 70
3. Consignes de sécurité................... 70
4. Erreur de pixels............................. 71
5. Mise en service ............................. 72
5.1. Installation......................................72
5.2 Installation murale...........................72
5.3 Insertion/remplacement de la pile....73
5.4 Connexion de l’alimentation
électrique .............................................73
6. Commande et utilisation.............. 74
6.1 Gestion du menu .............................74
6.2 Paramètres du système ....................75
7. Fonctions ...................................... 78
7.1 Photo...............................................78
7.2 Musique...........................................79
7.3 Vidéo...............................................80
7.4 Calendrier........................................81
7.5 Dossier.............................................82
8. Fonctions supplémentaires .......... 83
8.1 Utilisation comme lecteur de cartes..83
8.2 Rotation automatique de l’image
(uniquement art. n° 95249, 118569,
118570) ...............................................83
8.3 Capteur de mouvement (uniquement
art. n° 118596, 118597) ......................84
8.4 Capteur de clarté/luminosité
(uniquement art. n° 95249)..................84
8.5 Variantes de diaporamas photos......84
8.6 Causes et élimination des pannes ....85
9. Soins et entretien ......................... 86
10. Exclusion de garantie ................. 86
11. Service et assistance .................. 86
12. Caractéristiques techniques....... 87
13. Menu structure ........................... 96
14. Consignes de recyclage .............. 98
69
Page 69

F
Nous vous remercions d’avoir choisi un produit Hama.
Veuillez prendre le temps de lire l‘ensemble des remarques et consignes suivantes. Veuillez
conserver ce mode d‘emploi à portée de main an de pouvoir le consulter en cas de besoin.
Transmettez-le au nouveau propriétaire avec l’appareil le cas échéant.
1. Explication des symboles d‘avertissement et des remarques
Avertissement
Ce symbole est utilisé pour indiquer des consignes de sécurité ou pour attirer votre attention
sur des dangers et risques particuliers.
Remarque
Ce symbole est utilisé pour indiquer des informations supplémentaires ou des remarques
importantes.
2. Package Contents
• Cadre photo numérique
• 230V Adaptateur secteur
• Télécommande
• 1 CR2025
• Mode d‘emploi
Remarque
Vériez que la livraison est complète et que les éléments ne présentent pas de dommages
visibles. Les livraisons incomplètes ou endommagées doivent être immédiatement signalées
au livreur/fournisseur.
3. Consignes de sécurité
• Ce produit est destiné à une installation domestique non commerciale.
• Protégez le produit de toute saleté, humidité, surchauffe et utilisez-le uniquement dans des
locaux secs.
• Protégez le produit des secousses violentes et évitez tout choc ou toute chute.
• N‘utilisez pas le produit en dehors des limites de puissance indiquées dans les caractéristiques
techniques.
• Utilisez l‘appareil exclusivement branché à une prise de courant appropriée. La prise de
courant doit être située à proximité du produit et doit être facilement accessible.
• Coupez le produit du secteur à l‘aide de l‘interrupteur - débranchez la prise de courant en cas
d‘absence d‘interrupteur.
• Posez tous les câbles de telle sorte qu’ils ne présentent aucun risque de chute.
• Faites attention à ne pas plier ni coincer le câble.
• N’apportez aucune modication à l’appareil. Des modications vous feraient perdre vos droits
de garantie.
• Ne tentez pas de réparer l’appareil vous-même ni d’effectuer des travaux d’entretien.
Déléguez tous travaux d‘entretien à des techniciens qualiés.
70
Page 70

F
• Tenez les emballages d‘appareils hors de portée des enfants, risque d‘étouffement.
• Recyclez les matériaux d’emballage conformément aux prescriptions locales en vigueur.
Avertissement - Piles
• Retirez les piles usagées immédiatement du produit pour les recycler.
• Utilisez exclusivement des batteries (ou des piles) du type indiqué.
• Respectez impérativement la polarité de la pile (marquage + et -) lors de l‘insertion dans le
boîtier ; risques d‘écoulement et d‘explosion des piles si tel n‘est pas le cas.
• Ne surchargez pas les piles.
• Conservez les piles hors de portée des enfants.
• Ne court-circuitez pas les batteries/piles et éloignez-les des objets métalliques.
Avertissement
• N‘ouvrez pas l‘appareil et cessez de l’utiliser en cas de détérioration, de dégagement de
fumée, de formation d‘odeurs ou de niveau de bruit élevé. Adressez-vous dans les plus
brefs délais à votre revendeur ou à notre service clientèle (voir point Service et assistance).
• N‘utilisez pas le produit lorsque l‘adaptateur, le câble de connexion ou le câble
d‘alimentation sont endommagés.
4. Erreur de pixels
Remarque
A cause du procédé de fabrication il peut y avoir des erreurs de pixels. Celles-ci sont visibles
généralement par des pixels blancs ou noirs qui s´allument en permanence pendant la
reproduction. Dans le cadre des tolérances de fabrication 0,01% maximum de ces erreurs de
pixels mesurées à la taille totale de l´écran sont possibles et ne représentent pas une erreur de
production.
71
Page 71

F
5. Mise en service
5.1. Installation
• Vissez le pied dans le letage prévu à cet effet à l’arrière de l’appareil conformément.
• Retirez le lm protecteur situé sur l’écran.
• Placez l‘appareil sur une surface plane horizontale antidérapante.
• Ne placez aucun objet sur l‘appareil.
5.2 Installation murale
Vous pouvez également utiliser le dispositif de xation situé sur la face arrière de l’appareil an
de l’installer à une paroi ou utiliser un support mural compatible VESA.
Indication de la VESA dans les caractéristiques techniques respectives.
Remarque concernant les accessoires
L‘entreprise Hama propose une gamme de produits adaptés sur www.hama.com.
Remarque
• Avant l‘installation, vériez que le mur prévu pour l‘installation dispose d‘une force
portante susante et qu‘aucune conduite d‘électricité, d‘eau, de gaz ni aucune autre
conduite ne passe dans cette partie de la cloison.
• Procurez-vous le matériel d‘installation adéquat pour le mur concerné dans un commerce
spécialisé.
• N‘installez pas le produit à un endroit où des personnes sont susceptibles de se tenir.
72
Page 72

F
5.3 Insertion/remplacement de la pile
• Ouvrez le compartiment à pile de la télécommande
• Insérez une pile bouton de type CR 2025 conformément aux indications polarité
• Retirez le lm de protection situé sur la pile.
• Refermez le compartiment à pile. Veuillez contrôler le bon verrouillage du couvercle.
2
1
5.4 Connexion de l’alimentation électrique
Avertissement
• Utilisez l‘appareil exclusivement branché à une prise de courant appropriée. La prise de
courant doit être située à proximité du produit et doit être facilement accessible.
• Cessez d‘utiliser le produit en cas de détérioration visible.
Remarque
• Le chargeur est adapté à une tension secteur de 100-240 V et peut donc être utilisé dans le
monde entier. Veuillez toutefois noter qu‘un adaptateur est éventuellement nécessaire dans
certains pays.
• L‘entreprise Hama propose une gamme de produits adaptés sur www.hama.com.
• Branchez le bloc secteur fourni à une prise de courant.
• Branchez ensuite le cordon de connexion du bloc secteur à la prise DC-IN de l’appareil.
73
Page 73

F
6. Commande et utilisation
6.1 Gestion du menu
L‘appareil est équipé d’une gestion de menu conviviale. La gestion du menu apparaît à l‘écran.
L‘appareil est capable de lire les supports d‘enregistrement suivants:
• Cartes SD/SDHC (jusqu’à 32 Go)
• Supports d‘enregistrement USB
Mettez l‘appareil sous tension en actionnant l‘interrupteur de MARCHE/ARRÊT.
Vous pouvez également y accéder en appuyant sur la touche [MENU]. Dans le menu, utilisez les
touches [◄][►] an de sélectionner une fonction.
Un sous-menu apparaît dès que vous conrmez votre sélection à l‘aide de la touche [OK/
ENTER]. Utilisez la touche [▲] ou [▼] an de sélectionner la ligne souhaitée. Cette dernière
apparaît alors en couleur.
Conrmez votre sélection à l’aide de la touche [OK/ENTER]. Un autre menu, dans lequel vous
pouvez utiliser les touches [◄][►][▲][▼] an de sélectionner des paramètres, apparaît dans
la plupart des cas.
Utilisez la touche [RETURN] an de quitter le niveau du menu. Vous trouverez également la
structure du menu dans l‘annexe.
Vous pouvez commander l‘appareil à l‘aide des touches situées sur sa face arrière ou à l‘aide de
la télécommande fournie.
74
Page 74

F
6.2 Paramètres du système
Appuyez sur la touche [SETUP] de votre télécommande ou utilisez les touches [◄]
[►] situées sur la face arrière de l‘appareil ou sur la télécommande pour sélectionner
l‘option de menu « Paramètres » an d‘ouvrir le menu de conguration
Les options de menu suivantes sont disponibles :
75
Page 75

F
Mode d`achage
Vous pouvez sélectionner ici un des deux
modes d'achage
Conguration
photo
Conguration
calendrier
Musique
Raio d´achage
Vitesse de délement
Répéter
diaporama
Effet du
diaporama
Mode de
délement
Date
Réglage format
heure
Horloge temps
Etat de l`alarme
Temps d`alarme
Fréquence d`alarme
Menu de fonction activer/désactiver la musique d'arrière-fond pendant le diaporama
Positionnement de la photo par rapport à
l'écran
Sélection de la fréquence de délement des
photos (3/5/15/30 sec; 1/5/15 minutes)
Menu de fonctions pour paramétrer la
répétition audio
Menu de fonctions pour le réglage de la
transition entre les photos
Cette fonction vous permet d'acher
simultanément jusqu'à quatre photos à
l'écran
Menu de fonctions pour le réglage de la
date
Menu de fonctions pour le réglage de
l'heure
Menu de fonctions pour le réglage de
l‘alarme
Vous pouvez sélectionner ici un des deux
modes d'achage
Menu de fonctions pour paramétrer la
répétition audio
Menu de fonctions pour paramétrer la
répétition audio
Cette fonction vous permet d'acher le
spectre sonore en mode musique
76
Conguration
vidéo
Conguration
musique
Mode d`achage
Mode de
Lecture
Mode de
Lecture
Voir Spectrum
Page 76

F
Langue
Luminosité
Sélectionnez la langue de menu/
d'utilisation souhaitée
Conguration
du systéme
Contraste
Saturation
Hue
Allumer
Auto Boot Time
Éteindre
Délai auto off
Auto Power Frequency
Volume
Réinitialisation
Réglege
Version
System
Upgrade
Mode de
démarrage
Réglage de la luminosité, du contraste, de
la saturation et de l'ombrage l'appareil
Vous pouvez ici régler l‘heure de mise sous
/ hors tension de l‘appareil
ATTENTION : vous devez avoir activé la
mise sous/hors tension de l‘appareil au
préalable
Menu de fonctions pour réinitialiser l'état
d'usine
Menu de fonctions pour l'achage du
micrologiciel actuellement installé
Menu de fonctions pour mettre le microprogramme à jour
Sélectionnez la fonction de démarrage
désirée : menu principal, photo, vidéo,
musique, calendrier
Remarque pour 118596 et 118597
Capteur de mouvement / Sleep Timer :
Si cette fonction est activée, l’écran s’éteint après un temps déni (Sleep Timer) an d’économiser
de l’énergie. Le capteur reste actif après la mise hors tension de l’écran. S’il détecte à nouveau un
mouvement, l’écran est réactivé.
77
Page 77

F
7. Fonctions
7.1 Photo
L‘appareil ouvre automatiquement le diaporama dès que vous insérez un support
d‘enregistrement. L‘appareil ouvre les données sauvegardées sur la mémoire interne si
aucun support d‘enregistrement externe n‘a été inséré. Vous pouvez également naviguer
dans le menu photo comme suit :
• Appuyez sur le symbole à l‘aide des touches [◄][►][▲][▼] de l‘appareil ou de la
télécommande, puis appuyez sur la touche [ENTER/OK].
• L‘appareil démarre par défaut par le diaporama.
• Appuyez sur la touche [RETURN] de la télécommande ou la touche [MENU] de l’appareil pour
passer au mode de prévisualisation des images.
• À l’aide des touches [◄][►][▲][▼], sélectionnez une photo et lancez la lecture en appuyant
sur [OK].
• Pendant la lecture des images (diaporama), appuyez sur la touche [PLAY/PAUSE] de la
télécommande, puis maintenez la touche [SETUP] enfoncée pendant env. 2 sec. pour ouvrir
d’autres options pour l’image achée.
REMARQUE
Le menu de configuration photos vous permet d’effectuer d‘autres paramétrages.
78
Page 78

F
7.2 Musique
Appuyez sur le symbole à l‘aide des touches [◄][►][▲][▼] de l‘appareil ou de la
télécommande, puis appuyez sur la touche [ENTER].
Vous pouvez utiliser les fonctions suivantes pendant la lecture :
• Utilisez les touches échées [◄][►] de la télécommande pour effectuer une avance/un retour
rapide dans le morceau musical en lecture.
• Utilisez les touches échées [I◄◄ ][►►I ] ou [▲][▼] pour sélectionner le titre musical
précédent/suivant.
• La touche [ENTER/OK] ou la touche [►I I ] peuvent être utilisées comme touches de lecture/
pause.
• Vous pouvez régler le volume à l‘aide des touches [VOL +/-].
• Pendant la lecture de la musique, appuyez sur la touche [PLAY/PAUSE] de la télécommande,
puis maintenez la touche [SETUP] enfoncée pendant env. 2 sec. pour ouvrir d’autres options
pour la lecture en cours.
REMARQUE
Le menu de configuration musique vous permet d’effectuer d‘autres paramétrages.
79
Page 79

F
7.3 Vidéo
Appuyez sur le symbole à l‘aide des touches [◄][►][▲][▼] de l‘appareil ou de
la télécommande, puis appuyez sur la touche [ENTER/OK]. Vous pouvez utiliser les
fonctions suivantes pendant la lecture :
• Utilisez les touches échées [◄][►] de la télécommande pour effectuer une avance/un retour
rapide dans la vidéo en lecture.
• Utilisez les touches échées [I◄◄ ][►►I ] ou [▲][▼] pour sélectionner la vidéo précédente/
suivante.
• La touche [ENTER/OK] ou la touche [►I I ] peuvent être utilisées comme touches de lecture/
pause.
• Vous pouvez régler le volume à l‘aide des touches [VOL +/-].
• Pendant la lecture de vidéos, appuyez sur la touche [PLAY/PAUSE] de la télécommande, puis
maintenez la touche [SETUP] enfoncée pendant env. 2 sec. pour ouvrir d’autres options pour
la lecture en cours.
REMARQUE
Le menu de configuration vidéo vous permet d’effectuer d‘autres paramétrages.
80
Page 80

F
7.4 Calendrier
Appuyez sur le symbole à l‘aide des touches [◄][►][▲][▼] de l‘appareil ou de la
télécommande, puis appuyez sur la touche [ENTER/OK].
Vous pouvez sélectionner les fonctions suivantes :
• Vous pouvez changer l‘année à l‘aide de la touche [◄][►].
• Vous pouvez changer le mois à l‘aide des touches [▲][▼].
REMARQUE
• Un symbole d‘alarme apparaît à l‘écran lorsque l‘alarme est activée .
• Le menu de conguration calendrier vous permet d’effectuer d‘autres paramétrages.
81
Page 81

F
7.5 Dossier
Appuyez sur le symbole à l‘aide des touches [◄][►][▲][▼] de l‘appareil ou de la
télécommande, puis appuyez sur la touche [ENTER/OK].
Sélectionnez un chier à l‘aide des touches [▲][▼], puis appuyez sur la touche [►] de la
télécommande ou sur la touche 3 de l‘appareil. Une nouvelle fenêtre de menu, à l‘aide de
laquelle vous pouvez enregistrer toutes les données du support d‘enregistrement sur la mémoire
interne, apparaît.
• Conrmez votre sélection avec Oui / Yes à l‘aide de la touche [ENTER/OK] pour transférer les
données sélectionnées du support d‘enregistrement sur la mémoire interne.
• Appuyez sur la touche Non / No an de retourner au niveau Dossier.
REMARQUE
• Vous pouvez effacer les données sélectionnées de la mémoire interne après avoir
sélectionné la mémoire interne.
• Veuillez noter que vous pourrez copier uniquement la quantité de données pouvant être
stockées sur l‘espace libre de la mémoire interne.
• Le temps d‘enregistrement dure en fonction de la quantité de données. Veuillez patienter
jusqu‘à la n de la procédure d‘enregistrement.
82
Page 82

F
8. Fonctions supplémentaires
8.1 Utilisation comme lecteur de cartes
Cet appareil possède une fonction de lecteur de cartes. Ainsi, vous pouvez relier votre appareil
à votre ordinateur via USB an d´accéder aux chiers du support d´information inséré ou de la
mémoire interne, ou de pouvoir échanger/ copier/effacer les données via l´interface USB. An de
raccorder l´appareil à votre ordinateur via USB type A, procédez comme suit
• Mettez l’appareil hors tension.
• Raccordez l‘appareil à votre ordinateur à l‘aide du câble USB fourni.
• Mettez votre appareil à nouveau sous tension. L‘appareil commute automatiquement en Mode
PC, ce qui est également aché sur l‘écran de l‘appareil.
• Si la connexion USB fonctionne correctement sur votre ordinateur, l‘appareil est
automatiquement détecté et deux lettres de lecteur sont attribuées.
• Mettez l‘appareil à nouveau hors tension an de quitter le Mode PC et retirez le cordon de
connexion USB.
8.2 Rotation automatique de l’image
(uniquement art. n° 95249, 118569, 118570)
L‘appareil est équipé d’une fonction automatique de rotation de photos. Installez l‘appareil en
hauteur ou en largeur, la photo achée pivotera automatiquement dans le bon sens.
83
Page 83

F
8.3 Capteur de mouvement (uniquement art. n° 118596, 118597)
L’appareil est équipé d’un capteur détectant les mouvements aux alentours et activant l’écran.
8.4 Capteur de clarté/luminosité (uniquement art. n° 95249)
L’appareil est équipé d’un capteur de luminosité détectant les changements dans l’éclairage
ambiant et régulant la clarté de l’écran en conséquence.
8.5 Variantes de diaporamas photos
84
Page 84

F
8.6 Causes et élimination des pannes
Le tableau suivant vous aide à localiser et à éliminer les petits dysfonctionnements :
Problème Cause possible Dépannage
L´appareil est éteint Allumez l´appareil.
Vériez que l´adaptateur
Pas d´achage à
l´écran
Généralités
L’appareil se met
soudainement hors
tension
Généralités
Aucune image n´est
achée
Aucun son
La lecture de la vidéo/
musique ne démarre
pas
La lecture de la
musique ne
DPF (cadre photo numérique)
démarre pas
Les vidéos ne foncti-
onnent pas ou sautent
L´adaptateur secteur n´est
pas branché correctement
La prise de courant ne
fournit pas de tension
Appareil défectueux Informez le service client.
Il est possible que des
décharges statiques, telles
qu‘on en rencontre dans
un environnement normal
(moquettes, pull en laine,
etc.), provoquent la mise en
veille de l‘appareil.
Aucun son
Le support d´information ne
contient aucune donnée
L´appareil est mis sur
„silencieux“
Aucun support
d´information n´est inséré
Le support d´information ne
contient aucun chier
Format incorrect
Format incorrect
secteur est bien enché dans
la prise de courant et qu´il est
bien relié à l´appareil.
Contrôlez les fusibles
Appuyez sur la touche POWER
de la télécommande ou sur la
face arrière de l‘appareil an
de le remettre sous tension
si l‘appareil ne réagit pas ou
si aucune image n‘apparaît à
l‘écran
Insérez un support
d´information
Vériez votre support
d´information.
Augmentez le volume de
l´appareil
Insérez un support
d´information
Vériez votre support
d´information
Convertissez le chier musical
en mp3.
Convertissez la vidéo dans un
autre chier
REMARQUE
• Veuillez contacter le service après-vente dans le cas où les mesures mentionnées ci-dessus
ne vous permettent pas de résoudre le problème.
85
Page 85

F
9. Soins et entretien
L´écran de l´appareil est protégé par un verre.
• Nettoyez l´écran uniquement avec un chiffon sec et doux.
• Lors du nettoyage, n´exercez aucune pression sur la surface de l´écran.
• Pour le nettoyage, n´utilisez aucun produit de nettoyage contenant de l´alcool ou de détergent
an de ne pas abimer la surface du dessus.
Remarque
Pour le nettoyage et l´entretien en douceur de l´écran nous vous recommandons un chiffon de
nettoyage en microbres.
• Nettoyez le reste de l´appareil avec un chiffon sec. Si la saleté est tenace, vous pouvez
humidier un peu le chiffon.
10. Exclusion de garantie
La société Hama GmbH & Co. KG décline toute responsabilité en cas de dommages provoqués
par une installation, un montage ou une utilisation non conformes du produit ou encore
provoqués par un non respect des consignes du mode d‘emploi et/ou des consignes de sécurité.
11. Service et assistance
En cas de question concernant le produit, veuillez vous adresser au service de conseil produits
de Hama.
Ligne téléphonique directe : +49 9091 502-115 (allemand/anglais)
Vous trouverez ici de plus amples informations concernant l‘assistance : www.hama.com
86
Page 86

F
12. Caractéristiques techniques
Remarque
Sous réserve de modications techniques et de modications du design sans préavis.
Remarques générales 00095249
Alimentation en électricité,
entrée
Alimentation en électricité,
sortie
Puissance absorbée < 8 W
Dimensions 256 x 24 x 208 mm (sans pied)
Poids ca. 500g
Température recommandée
pour l‘appareil
Humidité relative de l’air 10 - 80 % (sans condensation)
Ecran 24,64 cm (9.7“) 4:3 TFT
Résolution 1024 x 768 (RGB)
Luminosité 200 cd/m²
Contraste 350 : 1
Pile bouton (CR 2025) 1 x CR2025 (3V)
Supports d‘enregistrement
compatibles
Branchements externes USB 2.0 (Host & Device); Audio Out 3.5 mm jack
Formats de chiers pris en
charge
Mémoire interne 2 GB
Dispositif adapté à un
montage mural
100-240V AC / 50/60 Hz / 0,4 A Max
5V DC / 2.0 A
0°C - 40°C (32 - 104 F)
SD/SDHC
JPEG, JPG
MP3
H.264 (taille des vidéos ≤ 1920 x 1080)
MJPEG (taille des vidéos ≤ 1920 x 1080)
DIVX/AVI / MP4 (taille des vidéos ≤ 1920 x 1080)
VESA 50 mm x 50 mm
87
Page 87

F
Remarques générales 00095276
Alimentation en électricité,
entrée
Alimentation en électricité,
sortie
Puissance absorbée < 7 W
Dimensions
Poids ca. 530g
Température recommandée
pour l‘appareil
Humidité relative de l’air 10 - 80 % (non-condensing)
Ecran 24,64 cm (9.7“) 4:3 TFT
Résolution 1024 x 768 (RGB)
Luminosité 150 cd/m²
Contraste 400 : 1
Pile bouton (CR 2025) 1 x CR2025 (3V)
Supports d‘enregistrement
compatibles
Branchements externes USB 2.0 (Host & Device); Audio Out 3.5 mm jack
Formats de chiers pris en
charge
100-240V AC / 50/60 Hz / 0,4 A Max
5V DC / 2.0 A
220 x 54 x 184 mm (with the base)
220 x 4 x 184 mm (without the base)
0°C - 40°C (32 - 104 F)
SD/SDHC
JPEG, JPG (up to 16 Megapixel)
MP3
H.264 (taille des vidéos ≤ 1920 x 1080)
MJPEG (taille des vidéos ≤ 1920 x 1080)
DIVX/AVI / MP4 (taille des vidéos ≤ 1920 x 1080)
88
Page 88

F
Remarques générales 00095230
Alimentation en électricité,
entrée
Alimentation en électricité,
sortie
Puissance absorbée < 10 W
Dimensions 415 x 35 x 280 mm
Poids ca. 1420g
Température recommandée
pour l‘appareil
Humidité relative de l’air 10 - 80 % (non-condensing)
Ecran 39,6 cm (15.6“) 16:10 TFT
Résolution 1366 x 768 (RGB)
Luminosité 200 cd/m²
Contraste 250 : 1
Pile bouton (CR 2025) 1 x CR2025 (3V)
Supports d‘enregistrement
compatibles
Branchements externes USB 2.0 (Host & Device); Audio Out 3.5 mm jack
Formats de chiers pris en
charge
Mémoire interne 4 GB
100-240V AC / 50/60 Hz / 0,4 A Max
DC 9 V / 1.5 A
0°C - 40°C (32 - 104 F)
SD/SDHC
JPEG, JPG (up to 16 Megapixel)
MP3
H.264 (taille des vidéos ≤ 1920 x 1080)
MJPEG (taille des vidéos ≤ 1920 x 1080)
MPEG 4 (taille des vidéos ≤ 1920 x 1080)
89
Page 89

F
Remarques générales 00095294
Alimentation en électricité,
entrée
Alimentation en électricité,
sortie
Puissance absorbée < 8 W
Dimensions
Poids ca. 610g
Température recommandée
pour l‘appareil
Humidité relative de l’air 10 - 80 % (non-condensing)
Ecran 24,64 cm (9.7“) 4:3 TFT
Résolution 1024 x 768 (RGB)
Luminosité 150 cd/m²
Contraste 400 : 1
Pile bouton (CR 2025) 1 x CR2025 (3V)
Supports d‘enregistrement
compatibles
Branchements externes USB 2.0 (Host & Device); Audio Out 3.5 mm jack
Formats de chiers pris en
charge
Mémoire interne 4 GB
100-240V AC / 50/60 Hz / 0,4 A Max
5V DC / 2.0 A
234 x 56 x 198 mm (with the base)
234 x 8 x 198 mm (without the base)
0°C - 40°C (32 - 104 F)
SD / SDHC
JPEG, JPG (up to 48 Megapixel)
MP3
H.264 (taille des vidéos ≤ 1920 x 1080)
MJPEG (taille des vidéos ≤ 1920 x 1080)
DIVX/AVI / MP4 (taille des vidéos ≤ 1920 x 1080)
90
Page 90

F
Remarques générales 00095296
Alimentation en électricité,
entrée
Alimentation en électricité,
sortie
Puissance absorbée < 12 W
Dimensions
Poids ca. 1400g
Température recommandée
pour l‘appareil
Humidité relative de l’air 10 - 80 % (non-condensing)
Ecran 30,73 cm (12.1“) 4:3 TFT
Résolution 800 x 600 (RGB)
Luminosité 190 cd/m²
Contraste 400 : 1
Pile bouton (CR 2025) 1 x CR2025 (3V)
Supports d‘enregistrement
compatibles
Branchements externes USB 2.0 (Host & Device); Audio Out 3.5 mm jack
Formats de chiers pris en
charge
Mémoire interne 4 GB
Dispositif adapté à un
montage mural
100-240V AC / 50/60 Hz / 0,4 A Max
9V DC / 1.5 A
336 x 35 x 266 mm (with the base)
336 x 20 x 266 mm (without the base)
0°C - 40°C (32 - 104 F)
SD/SDHC
JPEG, JPG (up to 48 Megapixel)
MP3
H.264
MJPEG (taille des vidéos ≤ 1920 x 1080)
MPEG 4 (taille des vidéos ≤ 1920 x 1080)
VESA 75 mm x 75 mm
91
Page 91

F
Remarques générales 118578
Alimentation en électricité,
entrée
Alimentation en électricité,
sortie
Puissance absorbée < 5,5 W
Dimensions 185 x 56 x 158 mm
Poids ca. 400g
Température recommandée
pour l‘appareil
Humidité relative de l’air 10 - 80 % (non-condensing)
Ecran 20,32 cm (8“) 4:3 TFT-LED
Résolution 1024 x 768 (RGB)
Luminosité 300 cd/m²
Contraste 500 : 1
Pile bouton (CR 2025) 1 x CR2025 (3V)
Supports d‘enregistrement
compatibles
Branchements externes USB 2.0 (Host & Device); Audio Out 3.5 mm jack
Formats de chiers pris en
charge
Mémoire interne 4 GB
100-240V AC / 50/60 Hz / 0,4 A Max
5V DC / 1.5 A
0°C - 40°C (32 - 104 F)
SD/SDHC
JPEG, JPG (up to 48 Megapixel)
MP3
H.264
MJPEG (taille des vidéos ≤ 1920 x 1080)
DivX/AVI / MPEG4 (taille des vidéos ≤ 1920 x 1080)
XviD
92
Page 92

F
Remarques générales 118579
Alimentation en électricité,
entrée
Alimentation en électricité,
sortie
Puissance absorbée < 8 W
Dimensions 222 x 56 x 185 mm
Poids ca. 535g
Température recommandée
pour l‘appareil
Humidité relative de l’air 10 - 80 % (non-condensing)
Ecran 24,64 cm (9,7“) 4:3 TFT-LED
Résolution 1024 x 768 (RGB)
Luminosité 150 cd/m²
Contraste 400 : 1
Pile bouton (CR 2025) 1 x CR2025 (3V)
Supports d‘enregistrement
compatibles
Branchements externes USB 2.0 (Host & Device); Audio Out 3.5 mm jack
Formats de chiers pris en
charge
Mémoire interne 4 GB
100-240V AC / 50/60 Hz / 0,4 A Max
5V DC / 2.0 A
0°C - 40°C (32 - 104 F)
SD/SDHC
JPEG, JPG (up to 48 Megapixel)
MP3
H.264 (taille des vidéos ≤ 1920 x 1080)
MJPEG (taille des vidéos ≤ 1920 x 1080)
DIVX/AVI / MP4 (taille des vidéos ≤ 1920 x 1080)
XviD
93
Page 93

F
Remarques générales 118596
Alimentation en électricité,
entrée
Alimentation en électricité,
sortie
Puissance absorbée < 8.5 W
Dimensions 294 x 30 x 232 mm
Poids ca. 1090 g
Température recommandée
pour l‘appareil
Humidité relative de l’air 10 - 80 % (non-condensing)
Ecran 30,73 cm (12.1“) 4:3 TFT-LED
Résolution 1024 x 768 (RGB)
Luminosité 190 cd/m²
Contraste 400 : 1
Pile bouton (CR 2025) 1 x CR2025 (3V)
Supports d‘enregistrement
compatibles
Branchements externes USB 2.0 (Host & Device); Audio Out 3.5 mm jack
Formats de chiers pris en
charge
Mémoire interne 4 GB
Dispositif adapté à un
montage mural
100-240V AC / 50/60 Hz / 0,4 A Max
9V DC / 1.5 A
0°C - 40°C (32 - 104 F)
SD/SDHC
JPEG, JPG (up to 48 Megapixel)
MP3
H.264
MJPEG (taille des vidéos ≤ 1920 x 1080)
MPEG 4 (taille des vidéos ≤ 1920 x 1080)
XviD
VESA 75 mm x 75 mm
94
Page 94

F
Remarques générales 118597
Alimentation en électricité,
entrée
Alimentation en électricité,
sortie
Puissance absorbée < 10.5 W
Dimensions 365 x 28 x 290 mm
Poids ca. 1570g
Température recommandée
pour l‘appareil
Humidité relative de l’air 10 - 80 % (non-condensing)
Ecran 38,10 cm (15“) 4:3 TFT-LED
Résolution 1024 x 768 (RGB)
Luminosité 300 cd/m²
Contraste 500 : 1
Pile bouton (CR 2025) 1 x CR2025 (3V)
Supports d‘enregistrement
compatibles
Branchements externes USB 2.0 (Host & Device); Audio Out 3.5 mm jack
Formats de chiers pris en
charge
Mémoire interne 4 GB
Dispositif adapté à un
montage mural
100-240V AC / 50/60 Hz / 0,4 A Max
9V DC / 1.5 A
0°C - 40°C (32 - 104 F)
SD/SDHC
JPEG, JPG (up to 48 Megapixel)
MP3
H.264
MJPEG (taille des vidéos ≤ 1920 x 1080)
MPEG 4 (taille des vidéos ≤ 1920 x 1080)
XviD
VESA 75 mm x 75 mm
95
Page 95

F
13. Menu structure
Photos
Music
Videos
Calendar
Folder
Settings
Photo slide show
Photo slide show with music
Photo Setup
Calendar Setup
Video Setup
Music Setup
Display Mode
Music
Display Ratio
Slide Speed
Slideshow Repeat
Slideshow Effect
Slide Mode
Date
Set Time Format
ime
Clock T
Alarm Status
Alarm Time
Alarm Frequency
Display Mode
Play Mode
Play Mode
Show Spectrum
96
Page 96

F
System Setup
Card reader (if connected to a PC)
Lanuage
Brightness
Contrast
Saturation
Hue
Power On
Auto Boot Time
Power Off
Auto Shut Time
Auto-Power-Frequency
Volume
Reset Setting
Version
System Upgrade
Start-up-Modus
97
Page 97

F
14. Consignes de recyclage
Remarques concernant la protection de l’environnement:
Conformément à la directive européenne 2012/19/EU et 2006/66/CE, et an d‘atteindre
un certain nombre d‘objectifs en matière de protection de l‘environnement, les règles
suivantes doivent être appliquées: Les appareils électriques et électroniques ainsi que les
batteries ne doivent pas être éliminés avec les déchets ménagers. Le pictogramme
“picto” présent sur le produit, son manuel d‘utilisation ou son emballage indique que le produit
est soumis à cette réglementation. Le consommateur doit retourner le produit/la batterie usager
aux points de collecte prévus à cet effet. Il peut aussi le remettre à un revendeur. En permettant
enn le recyclage des produits ainsi que les batteries, le consommateur contribuera à la
protection de notre environnement. C‘est un acte écologique.
98
Page 98

E
A B
95249, 95296, 95230, 118596,
118597
95276, 95294, 118578, 118579
1
2
6
4
7
C
I
◄◄
► II
►►I
MENU
5
3
*nur bei Art.Nr. 95249
8*
9
10
11
12
13
8 9 10 11 12
2 17
7/16
4/8
7/13
15
18
OK
12
9/14
5
3
6
99
Page 99

E
Elementos de manejo e indicadores
A C
A: Marco digital –
Panel de manejo y conexiones
1
2
3
4
5
6
7
8*
9
10
11
12
13
I
◄◄ /
►►I /
MENU MENÚ
Interruptor on/off
Archivo anterior/Cursor hacia
∧
arriba
VOL -/A la derecha
/>
Hacia abajo/Último archivo
∨
Intro/OK - Reproducción/Pausa
►I I
VOL +/A la izquierda
<
/
Sensor de luz (solo art. nº.
95249)
SD/SDHC/MS/MMC
Salida de audio (jack estéreo
3,5 mm)
USB Tipo A
Mini USB
Hembrilla de conexión para
adaptador de red
B
B: Marco digital –
Panel de manejo y conexiones
1
2
3
4
5
6
7
8
9
10
11
12
Tecla de control Hacia arriba/
∧
Cambiar al siguiente archivo
Tecla de control VOL -/A la izquierda
<
Tecla de control VOL +/A la derecha
>
Tecla Reproducir/Pausa/OK/INTRO
►I I
Tecla de control Hacia abajo/
∨
Cambiar al último archivo
Tecla Salir/Volver
MENU = 2x
Tecla ON/OFF
Ranura para tarjetas SD/MMC/
SDHC
Salida de audio (jack estéreo 3,5
mm)
USB (Tipo A)
Mini USB
Hembrilla de conexión para
adaptador de red
C: Mando a distancia
1BGM
Encender la música de fondo
de la sesión de diapositivas
2POWER Encendido/apagado
3
4
MENÚ/
izquierda
Menú principal / función
A la
Visualizar la fotografía anterior
Tecla de conrmación; tecla
5OK/ ENTER
de reproducción/pausa en el
modo de reproducción
6
SETUP/
Volver a los ajustes del sistema
7VOL +/- Aumentar / reducir el volumen
8
9
10 ROTATE
Última foto / música / vídeo
◄◄
I
reproducida(o)
Foto / música / vídeo siguiente.
►►I
Girar la fotografía en sentido
no horario
11 ZOOM Función de zoom de imagen
12
13
14
15
16
17
18
derecha
RETURN/
MUTE/
Play/pause
►I I
Hacia
abajo
A la
Visualizar la foto siguiente
Volver al menú anterior
Hacia
arriba
Cancelar temporalmente el
sonido
Iniciar la sesión de
diapositivas
100
Page 100

E
Índice
1. Explicación de los símbolos
de aviso y de las indicaciones ........ 102
2. Package Contents....................... 102
3. Instrucciones de seguridad ........ 102
4. Fallo de píxel .............................. 103
5. Puesta en funcionamiento ......... 104
5.1. Instalación....................................104
5.2 Montaje en la pared.......................104
5.3 Colocación o cambio de la pila ......105
5.4 Conexión de la alimentación
de corriente........................................105
6. Manejo y funcionamiento .......... 106
6.1 La guía de menús...........................106
6.2 Ajustes del sistema ........................107
7. Funciones.................................... 110
7.1 Foto...............................................110
7.2 Música...........................................111
7.3 Vídeo.............................................112
7.4 Calendario .....................................113
7.5 Carpeta..........................................114
8. Funciones adicionales ................ 115
8.1 Uso como lector de tarjetas............115
8.2 Rotación de imagen automática
(solo art. nº. 95249, 118569, 118570)115
8.3 Sensor de movimiento
(solo art. nº. 118596, 118597) ...........116
8.4 Sensor de brillo/luz
(solo art. nº. 95249) ...........................116
8.5 Variantes de la sesión
de diapositivas ...................................116
8.6 Causas y solución de fallos.............117
9. Mantenimiento y cuidado .......... 118
10. Exclusión de responsabilidad... 118
11. Servicio y soporte ..................... 118
12. Datos técnicos .......................... 119
13. Estructura de menú del DPF..... 128
14. Instrucciones para desecho
y reciclaje........................................ 130
101
 Loading...