


Owner’s Manual
Universal Touch Screen Remote
UTSR1
Docking Station
Rev 1.1
820-6110-0008
Table of Contents |
3 |
Universal Touch Screen Remote .................. |
3-21 |
Key Features.............................................................. |
3 |
Optional Features ...................................................... |
3 |
Specifications ............................................................. |
5 |
Battery Installation and Charging............................... |
7 |
Operating the Remote ...................................... |
. 8 |
Panel Calibration ........................................................ |
8 |
Hot Keys..................................................................... |
9 |
Hard Keys................................................................... |
9 |
Key Tone .................................................................... |
9 |
Backlight .................................................................... |
10 |
IR Codes Library........................................................ |
10 |
Configuration/Setting Up the Unit ........................... |
10 |
Advanced Set-Up ............................................. |
13 |
Edit ............................................................................. |
13 |
Preference................................................................. |
15 |
Remote Setting......................................................... |
15 |
Smart ......................................................................... |
18 |
Clone......................................................................... |
20 |
PC Link....................................................................... |
21 |
Interactive Help Screen ............................................ |
21 |
Docking Station.......................................... |
22-25 |
Key Features............................................................ |
22 |
Specifications ........................................................... |
22 |
Quick Charger Function .......................................... |
24 |
Remote Advanced Editing via Computer.............. |
24 |
Maintenance ............................................................ |
25 |
Troubleshooting......................................... |
26-27 |
UTSR1........................................................................ |
26 |
Docking Station........................................................ |
27 |
Device Code List........................................ |
28-39 |
Preamp..................................................................... |
28 |
Surround Sound Processor .................................... |
28 |
TV .............................................................................. |
28 |
SAT/CBL ................................................................... |
34 |
CD ............................................................................. |
37 |
DVD ........................................................................... |
38 |
Service & Warranty .................................... |
40-42 |
Service Information.................................................. |
40 |
Warranty Information................................................ |
41 |
Warranty Registration Form.................................... |
42 |
Your Halcro Logic UTSR1 integrates your homes Infrared remote controls, to deliver instant audiovisual action.
Key Features
•Pre-Programmed with learning capability
•9-in-1 remote (replace HALCRO dm 8/10, HALCRO SSP, CD, TV, SAT TV, CBL TV, DVD, AUX 1 & AUX2)
•Learn up to 240 commands
•EL backlit touch screen panel with intelligent light sensor for power saving
•5 useful hard keys for direct access (  , CH+, CH-,
VOL+, VOL-)
•3 touch screen shortcuts (  ,
, ,
, )
)
•Set up by code entering, device brand name search and library code search
•10 programmable smarts, each with 32 steps in maximum
•Device name and function keys editing, moving, deleting and restoring
•Custom page for personal set up and frequently used commands
•Remote-to-remote copy function
•Volume ‘punch through’ control for TV, HALCRO Pre-amplifier and HALCRO SSP
•nteractive help screen
•Security password lock
•Real time clock
•Battery level indicator
• uto power off
• C/DC power charger
Optional Features
•Docking Station for quick battery charging
•Computer link (PC link) for special key layout and function via USB connection to PC
•Perform PC software upload and download
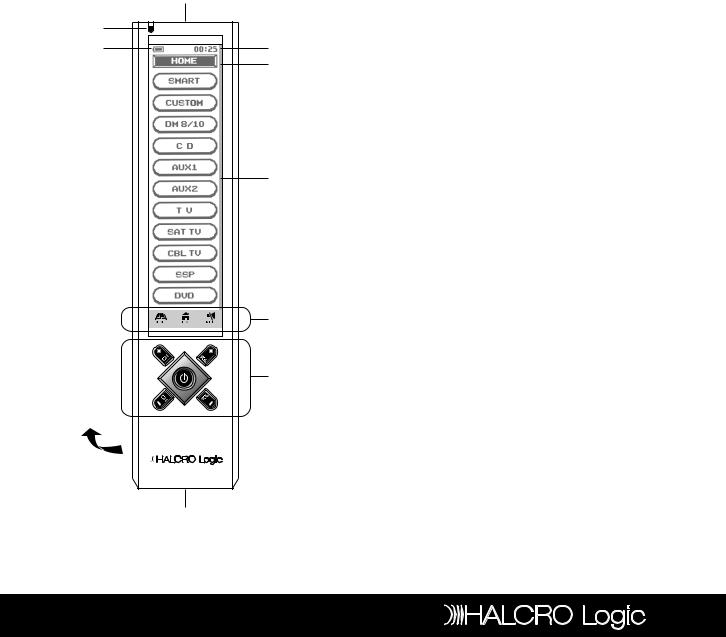
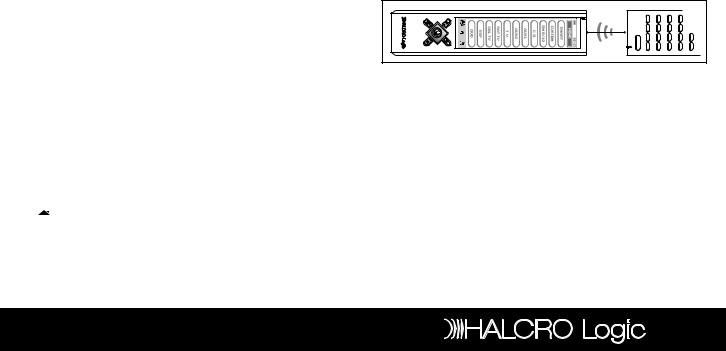
Remote Control |
5 |
1. |
Infra-red Lens |
6. |
Touch Screen Panel |
Specifications |
|
||
2. |
Green LED Indicator |
7. |
Short Cut Keys |
• |
Operation System: |
Integrated preprogrammed |
|
3. |
Battery Level Meter |
8. |
Hard Keys |
||||
|
|
and learning infra-red |
|||||
4. Current Time |
9. Connection Jack |
|
|
||||
|
|
remote control system |
|||||
5. Current Mode |
10. Battery Compartment |
• |
|
||||
Compatibility: |
Preprogrammed with code |
||||||
|
|
|
|
||||
|
|
1 |
|
|
|
library of HALCRO dm 8/10 |
|
|
|
|
|
|
|
(Preamplifier), HALCRO |
|
|
2 |
|
|
|
|
SSP, Compact Disc Players |
|
|
|
|
|
|
(CDs), Televisions (TVs), |
||
|
3 |
|
4 |
|
|
Satellite/Digital Satellite |
|
|
|
|
5 |
|
|
Receivers (SAT TVs), Cable |
|
|
|
|
|
|
Converters (CBL TVs) and |
||
|
|
|
|
|
|
||
|
|
|
|
|
|
Digital Video Disc Players |
|
|
|
|
|
• |
|
(DVDs) |
|
|
|
|
|
Memory Capacity: |
240 learning commands |
||
|
|
|
|
• |
Memory retention after battery disconnection: |
||
|
|
|
|
|
|
Non-volatile and permanent |
|
|
|
|
|
• |
|
memory |
|
|
|
|
6 |
Display Panel: |
Monochrome touch screen |
||
|
|
|
|
|
LCD |
||
|
|
|
|
• |
|
||
|
|
|
|
Resolution: |
320 x 80 pixels |
||
|
|
|
|
• |
EL Backlighting: |
Blue-Green EL backlighting |
|
|
|
|
|
• |
|
with light sensor |
|
|
|
|
|
Operating Distance: |
8 Meters (25 feet) |
||
|
|
|
|
• |
Power Requirement: |
4 x AAA size NiMH |
|
|
|
|
|
• |
|
rechargeable batteries |
|
|
|
|
|
Charging Time: |
Approximately 17 hours |
||
|
|
|
|
• |
Dimensions: |
220 x 51 x 25 mm |
|
|
|
|
7 |
• |
Weight: |
165g (without batteries), |
|
|
|
|
|
• |
|
215g (with batteries) |
|
|
|
|
|
Included Accessories: AC/DC power adaptor |
|||
|
|
|
8 |
|
|
(DC9V, 400mA, 3.6VA) x 1, |
|
|
|
|
|
|
Connector x 1 (for charging |
||
|
|
|
|
|
|
purpose), 4 x AAA size |
|
|
10 |
|
|
|
|
NiMH rechargeable |
|
|
|
|
• |
|
batteries |
||
|
|
|
|
Optional Accessories: Halcro Logic Docking |
|||
|
|
|
|
|
|
Station – Quick charger, PC |
|
|
|
|
|
|
|
Link software for MS |
|
|
|
|
|
|
|
Windows 98SE, Windows |
|
|
|
|
|
|
|
2000, Windows NT, |
|
|
|
|
|
|
|
Windows XP and USB Cable |
|
|
|
9 |
|
|
|
|
|
Remote Control |
7 |
Note: Both the Halcro Logic UTSR1 and Docking Station comply with limits for a Class B digital device, pursuant to Part 15 of the FCC Rules. These limits are designed to provide reasonable protection against harmful interference in a residential installation. This equipment generates, uses and can radiate radio frequency energy and, if not installed and used in accordance with the instruction, may cause harmful interference to radio communications. However, this is no guarantee that interference will not occur in a particular installation.
If this equipment does cause harmful interference to radio or television reception, which can be determined by turning the equipment off and on, the user is encouraged to try to correct the interference by one or more of the following measures:
•Reorient or relocate the receiving antenna
•Increase the separation between the equipment and receiver
•Connect the equipment into an outlet on a circuit different from that to which the receiver is connected
•Consult the dealer or an experienced radio/TV technician for help
“Modifications not authorized by the manufacturer may void users authority to operate this device”
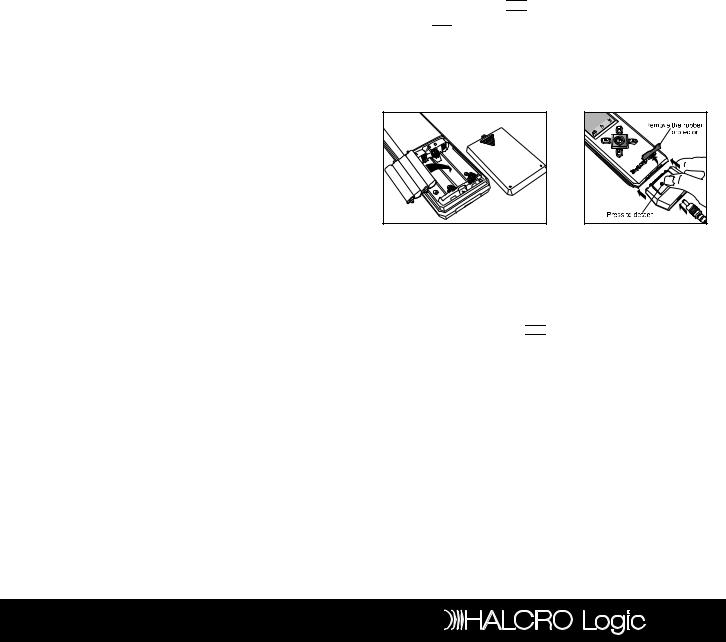
Battery Installation and Charging
Your Halcro Logic UTSR1 is supplied with 4 x AAA NiMH rechargeable batteries, a connector and a charging adaptor. We recommend you charge your batteries over night (10 hours) before 1st time use.
The battery meter 


 (top-left corner of LCD) will empty

 to indicate when the batteries require recharging.
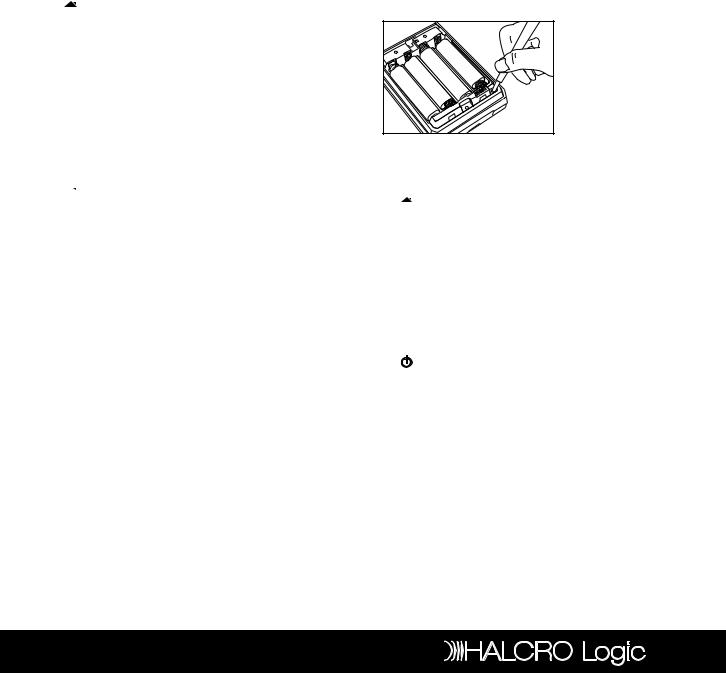
To install the batteries, open the battery cover; follow the polarity symbol shown in battery compartment, place the batteries inside and then replace the cover.
To recharge batteries, put the power adaptor into AC wall outlet, insert the DC jack to the connector, then connect to the socket at the bottom of the remote. It takes approximately 14 to 16 hours to fully charge the batteries.
Note: The Battery icon 


 is not shown when in Menu mode.
The unit is designed for optimum operation with original batteries.
Do NOT connect charging adaptor and connector when using the non-original batteries.
To avoid data loss, Do NOT attempt remote setup when batteries are weak.
Remote Control |
9 |
Operating the Remote
After inserting the batteries, you will be prompted by the main page, which shows all the devices and functions for selection.
•Tap  HOME at any time to jump to this page. If remote is inactive for approximately 60 seconds, it will go to sleep mode and shut down the display. Simply touch the screen panel to activate the unit. (Note: When in sleep mode, the hard key section is still available for command)
•Tap any device icon on screen to enter corresponding device mode. The LCD shows a remote key platform
•Tap a key directly to send out corresponding infrared command
•Tap  PAGE
PAGE  at bottom of screen to change command pages
•Tap  HOME to return to main page
•There will be no label or symbol for an empty key (Note: these keys are available for learning, please refer to learning section of this manual for details.)
•Tap  MENU to set up the unit
Panel Calibration
Please follow the below instruction for calibration of the Halcro Logic UTSR1. If you experience any incorrect response from the touch screen, please recalibrate the unit.
•Tap  MENU to set up the unit
•Tap REMOTE SETTING
•Tap CALIBRATION
•Follow the described procedure from the screen display
•Tap BACK to go back to the HOME page
Note: If your Halcro Logic UTSR1 does not respond, you can reset the remote by pressing the RESET key inside the battery compartment (see illustration). This product may need to be manually reset under high electrostatic discharge.
Hot Keys
There are 3 Hot keys on the bottom of LCD display,
• HOME Jump to main page
• MENU Access main setup menu for
configuration/setting
•  MUTE Volume mute function
Hard Keys
There are 5 hard keys that transmit IR command corresponding to device selected.
• |
|
Power ON/OFF |
• |
CH+ |
Program up or Channel up |
• |
CH- |
Program down or Channel down |
• |
VOL+ |
Volume up |
• |
VOL- |
Volume down |
Key Tone
When you tap any key, there is a short audible beep. User can enable/disable this function from main menu setting (for details, please refer to Remote Setting section in this manual.)
Remote Control |
11 |
Backlight
There are two separate EL backlights for LCD screen and hard keys, and will be turned ON separately. Backlight will be turned ON for 5 seconds (factory default setting) after a key is pressed, and user can disable this function. (For details, please refer to Remote Setting section in this manual.)
IR Codes Library
To setup a code, tap  MENU once then select a device to setup, choose a setup method. User can setup by learning key command from an original remote control, entering a code number, browsing through brand name list, or searching through the whole library. Refer to separate Code List for IR code number of different device.
Configuration/Setting Up the Unit
Tap  Menu, then choose any one of the following items:
Setup – setup the pre-programmed code or learn key command.
•Tap SETUP from main menu
•Select one of following setup methods
Learning – learn or copy a key command from an original remote control to Halcro Logic UTSR1
•Tap Learning from Setup menu
•Select a device where you would like to carry the command keys (e.g. TV)
•Tap a key to be learnt from the Halcro Logic UTSR1
•Aim an original remote to the front of Halcro Logic UTSR1. Press and hold the key until Halcro Logic UTSR1 responds with a successful message (approx. 5 seconds)
•Edit the keyname or just tap OK to confirm
•Tap another key to continue learning of the rest of the useful commands
•Tap  MENU to return to main menu, or tap
  HOME to return to main page
Dual Signal Learning – If you find that a Learn command only works occasionally for your audiovisual equipment, your original remote control may contain dual signals. Please follow the below steps to reprogram these commands.
•Tap Learning from Setup menu
•Select a device which you would like to carry the command keys (e.g. TV)
•Tap a key to be learnt from the Halcro Logic UTSR1
•Aim the original remote to the front of the Halcro Logic UTSR1. Press and hold the key until Halcro Logic UTSR1 responds with a successful message (approx. 5 seconds)
•Edit the key name or just tap OK to confirm
•Tap the same key on the Halcro Logic UTSR1
•Again aim the original remote to the front of the Halcro Logic UTSR1. Press and hold the same key until Halcro Logic UTSR1 responds with a successful message
•Edit the key name or just tap OK to confirm
Note: The optimum receiving distance is 5 to 8cm for remote learning. If you have any reported problem during the learning process, adjust the distance and try again.
5-8 cm |
Brand Name – setup pre-programmed code by selecting a brand name.
•Turn on your device you wish to install before start this setup procedure. (e.g. TV)
•Tap Brand Name from Setup menu
•Select a device (e.g. TV)
•A brand name list in alphabetical order will be displayed. Tap  or
or  to browse the list, or tap a character to access to a brand name. (e.g. ‘H’ for Halcro)
•Tap a brand name from the list, it will be highlighted (e.g. Halcro)
Remote Control |
13 |
•Tap test keys on LCD screen or any of hard keys to test the selected code
•Tap  to search next code, or
  command will be sent at the same time
•Tap  to skip previous code
•Tap Back to cancel and return to previous menu page for selection of other brand name. (Follow the above steps again)
•Tap OK to confirm and exit the setup
Note: If you have reached the end of code, you will be prompted to continue for Auto-Search or Exit. For details of Auto-Search setup, please refer to AutoSearch Setup section in this manual.
Enter Code – setup pre-programmed code by entering code number. (Halcro Logic UTSR1 is preloaded with numerous control codes for most popular AV equipment; you can refer to the enclosed code list for your devices.)
•Tap Enter Code from Setup menu
•Select a device (e.g. TV)
•Tap numeric digit to enter code number (check your code from the code list, e.g. 0021)
•Tap Delete to delete the last entered digit (if you have mistyped a number)
•Tap Back to cancel and return to previous menu page
•Tap OK to confirm the input
•Tap Test Key on LCD screen or any of hard key to test the corresponding function
•Tap OK to confirm and exit the setup
Auto Search - setup pre-programmed code by searching through the library.
•Turn on your device before starting this setup procedure (e.g. TV)
•Tap Auto Search from Setup menu
•Select a device (e.g. TV)
•Tap  once and then repeat until your device is switched off. Then, press OK to save the code. Or you can tap the TEST key to test the device during setup
•If you have missed the last code, tap  once to skip backward
•Tap Back to cancel and return to previous menu page
•Tap OK to confirm and exit the setup
Note: When a code is set to a device, the learned command and key name of that device will be lost, and restored to pre-programmed command.
Some codes do not have Power command. These codes may not be detected by using Auto-Search. User is advised to use Test key to test other keys.
During auto-searching, user can access any of the hard keys to test the command.
Advanced Set-Up
Edit
This function allows you to rename, move or delete key/device label.
Tap  MENU then tap EDIT and choose any one of the following items:
Key Name - rename key label
•Tap KEY NAME from Edit menu
•Select a device
•Select a key to be edited
• Tap ABC , |
?!À , or |
i for quick access to different |
groups of keys (Character, Symbol or Graphic), |
||
and tap |
or |
to access different pages of each |
group of keys |
|
|
•Tap a character/symbol/graphic from the page
•Tap DELETE to erase last entered character/symbol/graphic
•Tap BACK to ignore and return to previous page
•Tap OK to confirm and exit editing
Note: The number of characters input depends on the corresponding key size
 Loading...