

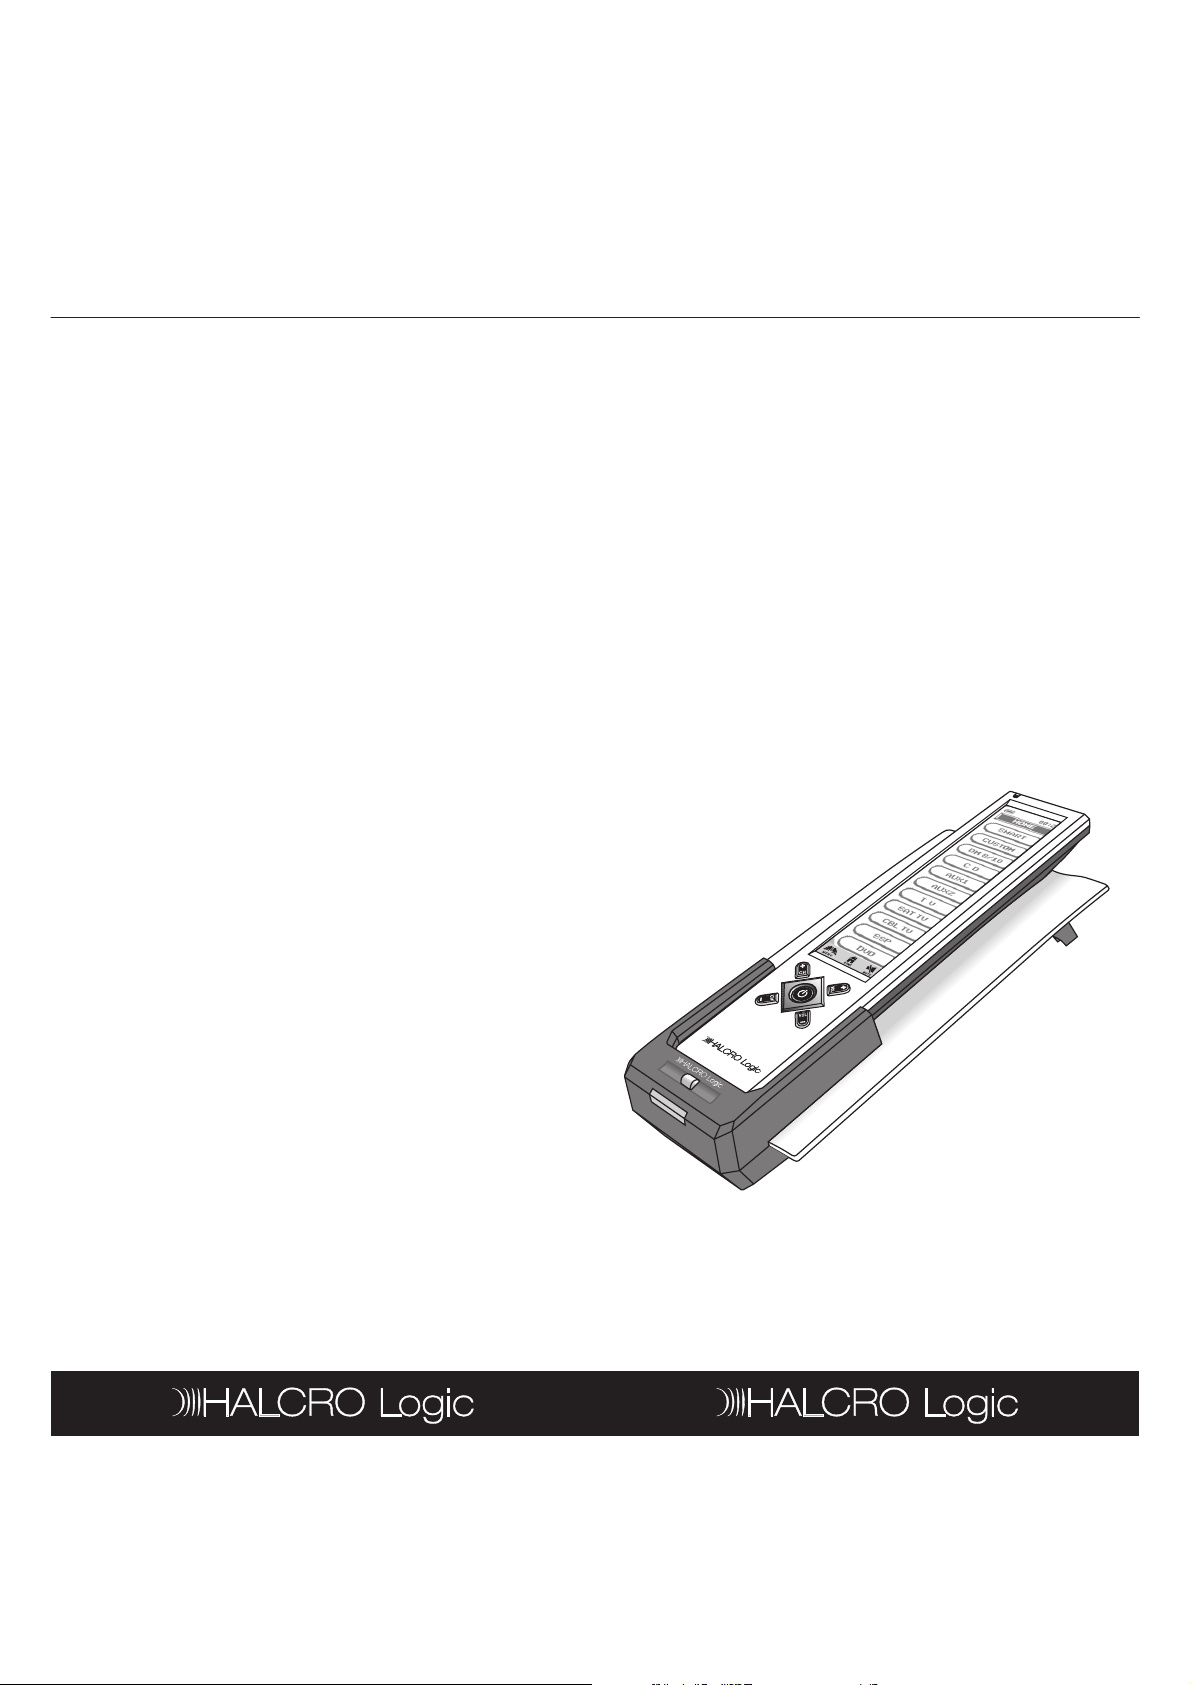
Owner’s Manual
eenRReemmoottee
tatioionn
UUnniivveerrssaallTToouucchhSScrcreen
UTSR1
DDoocckkiinnggSStat
Rev 1.1
820-6110-0008

Table of Contents
UnniivveerrssaallTToouucchhSSccrreeeennRReemmoottee
...................33--2211
...............................
........8.8
...............................
...............1313
...............................
............2222--2525
...............................
...........2626--2277
...............................
..........2828--3939
...............................
......4040--4242
s
l
.
atureess
H+
H-
L+
L-
atureess
3
U
Key Features.............................................................. 3
Optional Features ...................................................... 3
Specifications............................................................. 5
Battery Installation and Charging...............................7
OOppeerraatitinnggtthheeRReemmoottee...............................
Panel Calibration ........................................................ 8
Hot Keys..................................................................... 9
Hard Keys................................................................... 9
Key Tone .................................................................... 9
Backlight ....................................................................10
IR Codes Library........................................................10
Configuration/Setting Up the Unit ...........................10
AAddvvaanncceeddSSeett--UUpp...............................
Edit ............................................................................. 13
Preference.................................................................15
Remote Setting.........................................................15
Smart .........................................................................18
Clone......................................................................... 20
PC Link.......................................................................21
Interactive Help Screen............................................ 21
DDoocckkiinnggSSttaatitioonn...............................
Key Features............................................................ 22
Specifications........................................................... 22
Quick Charger Function .......................................... 24
Remote Advanced Editing via Computer.............. 24
Maintenance ............................................................ 25
TTrroouubblleesshhooootitinngg...............................
UTSR1........................................................................ 26
Docking Station........................................................ 27
.................
.......
.............
..........
.........
YYoouurrHaHallccrrooLLogogiiccUUTTSSRR11inintteeggrraatteessyyoouurrhhoommees
IInfnfrraarreeddrreemmototeeccoonnttrroollss,,totoddeelilivveerrininssttaannttaauuddiioovviissuuaal
acacttiioonn.
KKeeyyFFeeatur
Pre-Programmed with learning capability
•
9-in-1 remote (replace HALCRO dm 8/10, HALCRO
•
SSP, CD, TV, SAT TV , CBL TV, DVD, AUX 1 & AUX2)
Learn up to 240 commands
•
EL backlit touch screen panel with intelligent light
•
sensor for power saving
5 useful hard keys for direct access ( ,
•
VVOOL+
,
VVOOL-
3 touch screen shortcuts ( , , )
•
Set up by code entering, device brand name
•
search and library code search
10 programmable smarts, each with 32 steps in
•
maximum
Device name and function keys editing, moving,
•
deleting and restoring
Custom page for personal set up and frequently
•
used commands
Remote-to-remote copy function
•
Volume ‘punch through’ control for TV, HALCRO
•
Pre-amplifier and HALCRO SSP
nteractive help screen
•
Security password lock
•
Real time clock
•
Battery level indicator
•
uto power off
•
C/DC power charger
•
)
CCH+
,
CCH-
,
DDeevviciceeCCooddeeLLiisstt...............................
Preamp..................................................................... 28
Surround Sound Processor .................................... 28
TV .............................................................................. 28
SAT/CBL................................................................... 34
CD ............................................................................. 37
DVD........................................................................... 38
SSeerrvvicicee&&WWaarrrraannttyy...............................
Service Information.................................................. 40
Warranty Information................................................ 41
Warranty Registration Form.................................... 42
........
....
OOppttiioonanallFFeeatur
Docking Station for quick battery charging
•
Computer link (PC link) for special key layout and
•
function via USB connection to PC
Perform PC software upload and download
•
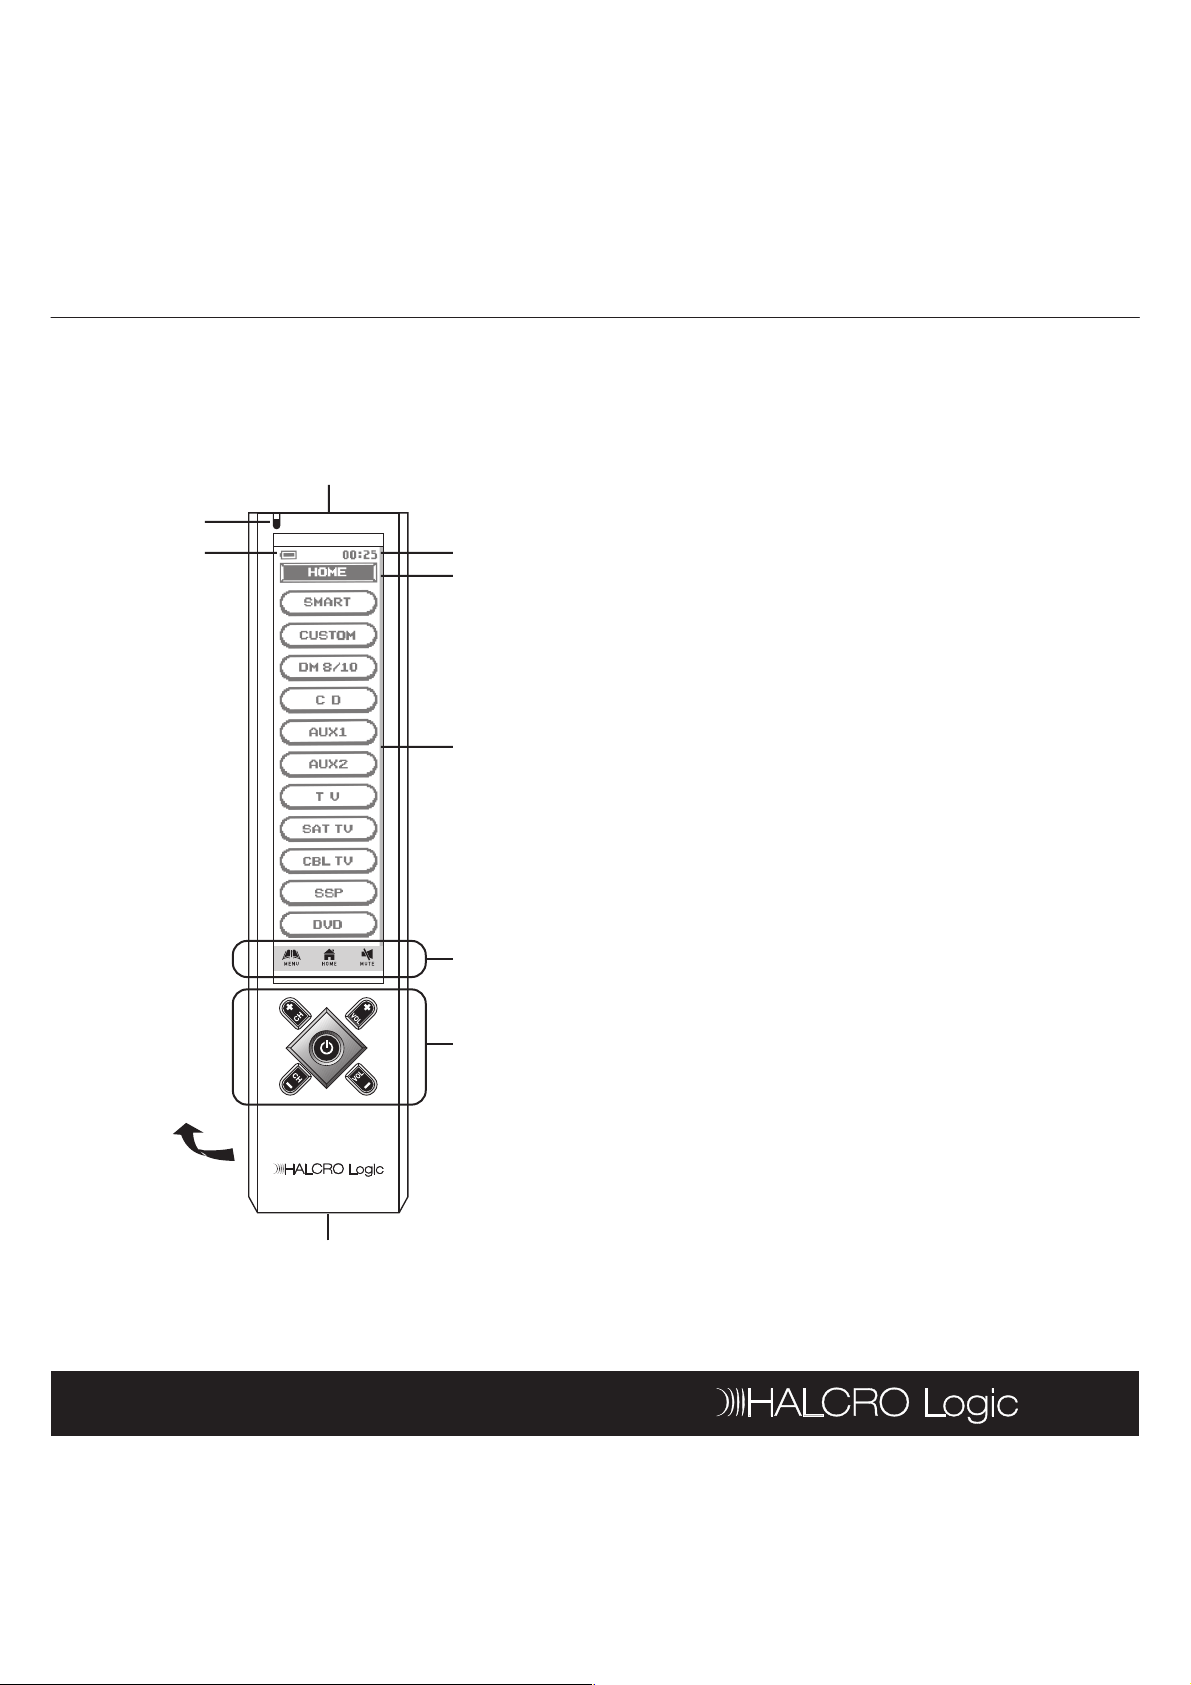
Remote Control
Specciiffii
catiioonnss
5
1. Infra-red Lens 6. Touch Screen Panel
2. Green LED Indicator 7. Short Cut Keys
3. Battery Level Meter 8. Hard Keys
4. Current Time 9. Connection Jack
5. Current Mode 10. Battery Compartment
1
2
3
4
5
6
7
8
10
9
Spe
•
•
•
•
•
•
•
•
•
•
•
•
•
•
cat
Operation System: Integrated preprogrammed
and learning infra-red
remote control system
Compatibility: Preprogrammed with code
library of HALCRO dm 8/10
(Preamplifier), HALCRO
SSP, Compact Disc
(CDs), Televisions
Satellite/Digital
Receivers (SAT
Memory Capacity: 240 learning commands
Memory retention after battery disconnection:
Display Panel: Monochrome touch screen
Resolution: 320 x 80 pixels
EL Backlighting: Blue-Green EL backlighting
Operating Distance: 8 Meters (25 feet)
Power Requirement: 4 x AAA size NiMH
Charging Time: Approximately 17 hours
Dimensions: 220 x 51 x 25 mm
Weight: 165g (without batteries),
I
ncluded Accessories: AC/DC power adaptor
Optional Accessories: Halcro Logic Docking
Converters
Digital Video
(DVDs)
Non-volatile and permanent
memory
LCD
with light sensor
rechargeable batteries
215g (with batteries)
(DC9V, 400mA, 3.6VA) x 1,
Connector x 1 (for charging
purpose), 4 x AAA size
NiMH rechargeable
batteries
Station – Quick charger, PC
Link software for MS
Windows 98SE, Windows
2000, Windows NT,
Windows XP and USB Cable
(CBL TVs) and
Disc Players
Players
(TVs),
Satellite
TVs), Cable

Remote Control
atteerryyIInnsstatallllatatiioonnananddCC
harggiinngg
7
Note: Both the Halcro Logic UTSR1 and Docking
Station comply with limits for a Class B digital device,
pursuant to Part 15 of the FCC Rules. These limits are
designed to provide reasonable protection against
harmful interference in a residential installation. This
equipment generates, uses and can radiate radio
frequency energy and, if not installed and used in
accordance with the instruction, may cause harmful
interference to radio communications. However, this
is no guarantee that interference will not occur in a
particular installation.
If this equipment does cause harmful interference to
radio or television reception, which can be determined
by turning the equipment off and on, the user is
encouraged to try to correct the interference by one
or more of the following measures:
Reorient or relocate the receiving antenna
•
Increase the separation between the equipment
•
and receiver
Connect the equipment into an outlet on a circuit
•
different from that to which the receiver is
connected
Consult the dealer or an experienced radio/TV
•
technician for help
“Modifications not authorized by the manufacturer
may void users authority to operate this device”
BBatt
Your Halcro Logic UTSR1 is supplied with 4 x AAA
NiMH rechargeable batteries, a connector and a
charging adaptor. We recommend you charge your
batteries over night (10 hours) before 1
The battery meter (top-left corner of LCD) will
empty to indicate when the batteries require
recharging.
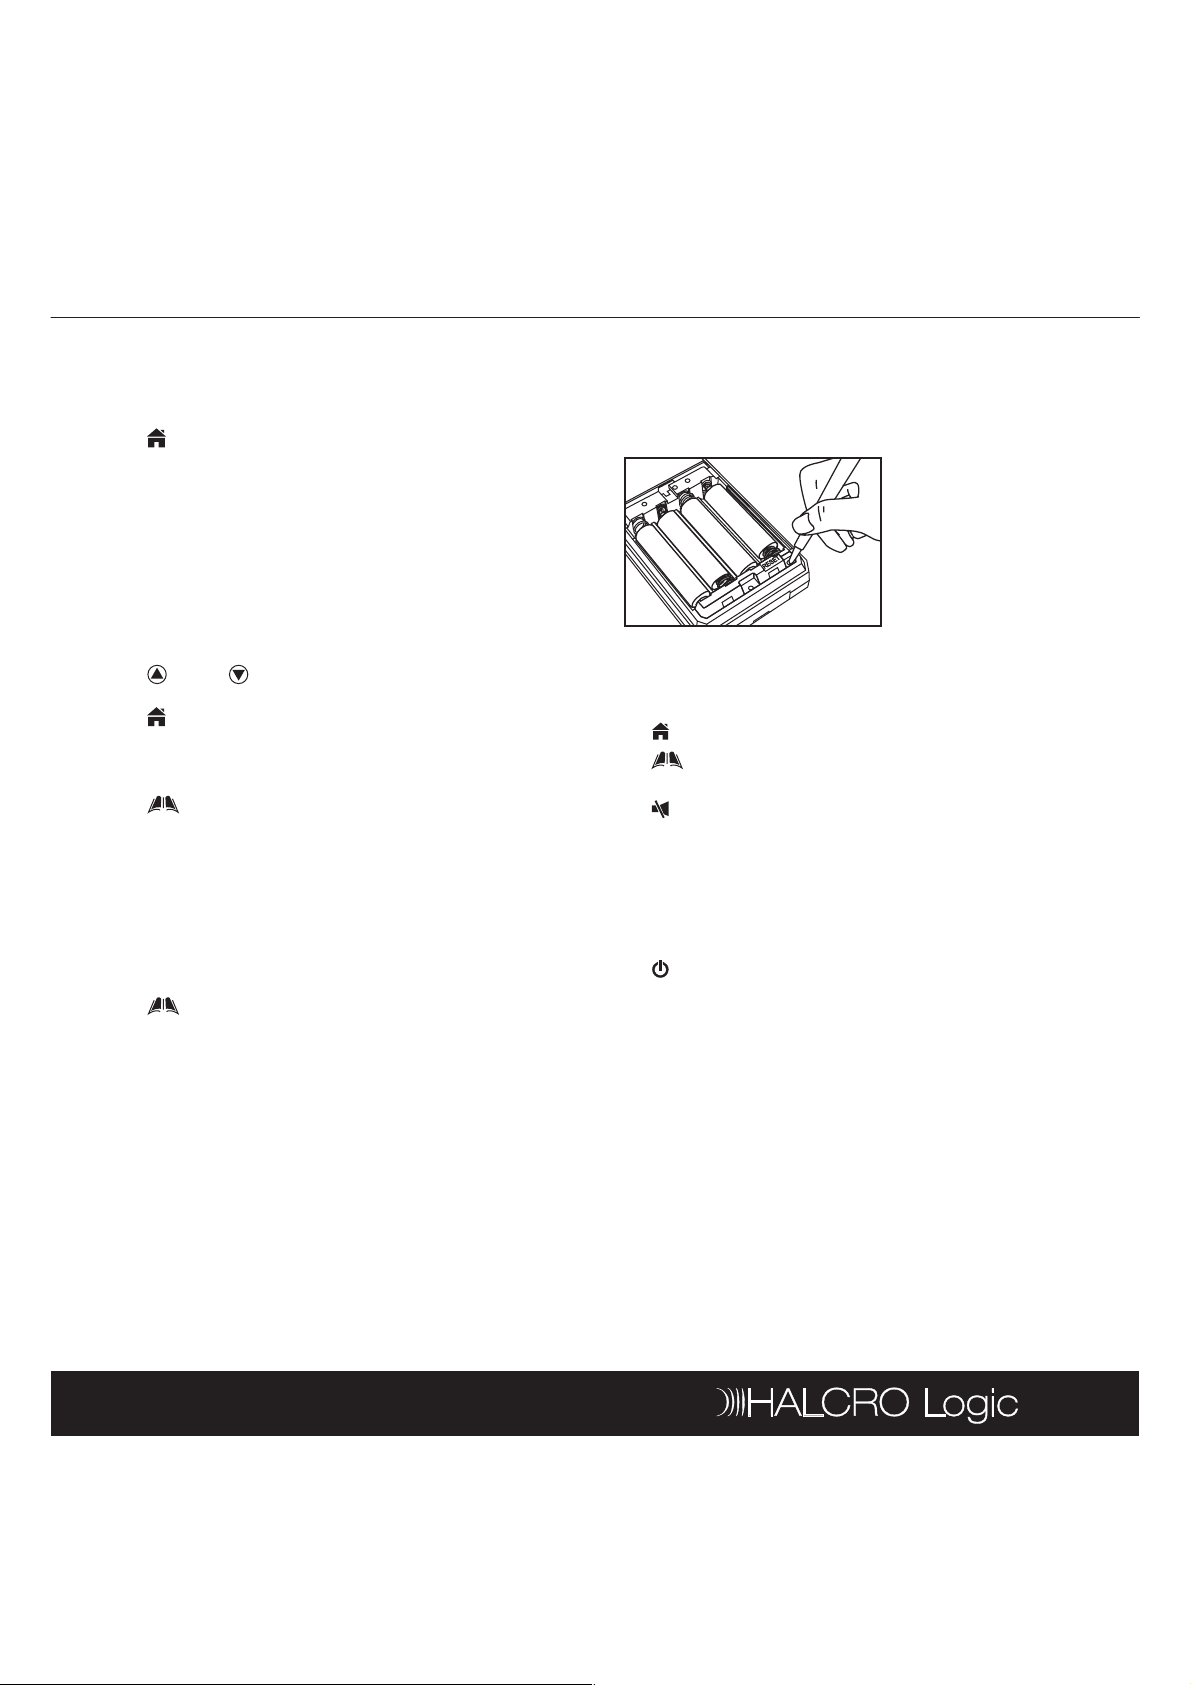
To install the batteries, open the battery cover; follow
the polarity symbol shown in battery compartment,
place the batteries inside and then replace the cover.
To recharge batteries, put the power adaptor into AC
wall outlet, insert the DC jack to the connector, then
connect to the socket at the bottom of the remote. It
takes approximately 14 to 16 hours to fully charge the
batteries.
har
st
time use.
Note: The Battery icon is not shown when in
Menu mode.
The unit is designed for optimum operation with
original batteries.
Do NOT connect charging adaptor and connector
when using the non-original batteries.
To avoid data loss, Do NOT attempt remote setup
when batteries are weak.
Remote Control
e
AGE
NG
ION
ET
ys
ys
H+
H-
L+
L-
e
ReemmototeeSSeetttt
ing
9
OOpeperarattiinnggtthheeRReemmootte
After inserting the batteries, you will be prompted by
the main page, which shows all the devices and
functions for selection.
Tap HHOOMMEEat any time to jump to this page. If
•
remote is inactive for approximately 60 seconds, it
will go to sleep mode and shut down the display.
Simply touch the screen panel to activate the unit.
(Note: When in sleep mode, the hard key section is
still available for command)
Tap any device icon on screen to enter
•
corresponding device mode. The LCD shows a
remote key platform
Tap a key directly to send out corresponding infra-
•
red command
Tap PPAGE
•
command pages
Tap HHOOMMEEto return to main page
•
There will be no label or symbol for an empty key
•
(Note: these keys are available for learning, please
refer to learning section of this manual for details.)
Tap MMEENUNUto set up the unit
•
at bottom of screen to change
Panel Calibration
Please follow the below instruction for calibration of
the Halcro Logic UTSR1. If you experience any
incorrect response from the touch screen, please recalibrate the unit.
Tap MMEENNUUto set up the unit
•
Tap RREEMMOOTTEESSEETTTTIING
•
Tap CCAALLIIBRBRAATTION
•
Follow the described procedure from the screen
•
display
Tap BBAACKCKto go back to the HHOOMEMEpage
•
Note: If your Halcro Logic UTSR1 does not respond,
you can reset the remote by pressing the
inside the battery compartment (see illustration). This
product may need to be manually reset under high
electrostatic discharge.
RREESSET
key
HHoottKKeeys
There are 3 Hot keys on the bottom of LCD display,
HHOOMEMEJump to main page
•
•
•
MMEENUNUAccess main setup menu for
configuration/setting
MMUUTETEVolume mute function
HHararddKKeeys
There are 5 hard keys that transmit IR command
corresponding to device selected.
•
•
•
•
•
CCH+
CCHVVOOL+
VVOOL-
Power ON/OFF
Program up or Channel up
Program down or Channel down
Volume up
Volume down
KKeeyyTToonne
When you tap any key, there is a short audible beep.
User can enable/disable this function from main menu
setting (for details, please refer to R
section in this manual.)
ing
Remote Control
t
ReemmototeeSSeetttt
ing
odessLLiibb
raryy
urattiioonn
/SettttiinnggUUpptthheeUUnniitt
Seettuupp––
ng
ning
H
OME
Dual
Signal
Learning
ning
Brand
Name
N
BBacackkliligghht
There are two separate EL backlights for LCD screen
and hard keys, and will be turned ON separately.
Backlight will be turned ON for 5 seconds (factory
default setting) after a key is pressed, and user can
disable this function. (For details, please refer to
ing
R
IRIRCCode
To setup a code, tap MMEENUNUonce then select a
device to setup, choose a setup method. User can
setup by learning key command from an original
remote control, entering a code number, browsing
through brand name list, or searching through the
whole library. Refer to separate Code List for IR code
number of different device.
CCoonnffiiggura
Tap MMeenunu, then choose any one of the following
items:
S
command.
•
•
setup the pre-programmed code or learn key
Tap SSEETTUPUPfrommainmenu
Select one of following setup methods
section in this manual.)
rar
/Se
Dual
Signal
command only works occasionally for your audiovisual
equipment, your original remote control mayay contain
dual signals. Please follow the below steps to
reprogram these commands.
Tap LLeeaarrning
•
Select a device which you would like to carry the
•
command keys (e.g. TV)
Tap a key to be learnt from the Halcro Logic UTSR1
•
Aim
•
Logic UTSR1. Press and hold the key until Halcro
Logic UTSR1 responds with a successful message
(approx. 5 seconds)
Edit the key name or just tap OKOKto confirm
•
Tap the same key on the Halcro Logic UTSR1
•
Again aim the original remote to the front of the
•
Halcro Logic UTSR1. Press and hold the same key
until Halcro Logic UTSR1 responds with a
successful message
Edit the key name or just tap OKOKto confirm
•
Note: The optimum receiving distance is 5 to 8cm for
remote learning. If you have any reported problem
during the learning process, adjust the distance and
try again.
Learning
from Setup menu
the original remote to the front of the Halcro
– If you find that a Learn
11
LLeeaarrnniing
original remote control to Halcro Logic UTSR1
Tap LLeeaarrning
•
Select a device where you would like to carry the
•
command keys (e.g. TV)
Tap a key to be learnt from the Halcro Logic UTSR1
•
A
•
UTSR1. Press and hold the key until Halcro Logic
UTSR1 responds with a successful message
(approx. 5 seconds)
Edit the keyname or just tap OKOKto confirm
•
Tap another key to continue learning of the rest of
•
the useful commands
Tap MMEENUNUto return to main menu, or tap
•
– learn or copy a key command from an
from Setup menu
im an original remote to the front of Halcro Logic
OME
H
to return to main page
Brand
selecting a brand name.
•
•
•
•
•
Name
N
Turn on your device you wish to install before start
this setup procedure. (e.g. TV)
Tap BBrraannddNaNamemefrom Setup menu
Select a device (e.g. TV)
brand name list in alphabetical order will be
A
displayed. Tap or to browse the list, or tap a
character to access to a brand name. (e.g. ‘H’ for
Halcro)
Tap a brand name from the list, it will be highlighted
(e.g. Halcro)
5-8 cm
– setup pre-programmed code by
Remote Control
Back
ch
ode
ode
Back
ch
OK
TEESTST
Back
st
ancededSeSett--UUpp
t
MEENUNU
me
13
Tap test keys on LCD screen or any of hard keys
•
to test the selected code
Tap to search next code, or command will be
•
sent at the same time
Tap to skip previous code
•
Tap Back
•
page for selection of other brand name. (Follow
the above steps again)
Tap OKOKto confirm and exit the setup
•
Note: If you have reached the end of code, you will be
prompted to continue for
details of Auto-Search setup, please refer to Auto-
Search Setup section in this manual.
EEnntteerrCCode
entering code number. (Halcro Logic UTSR1 is
preloaded with numerous control codes for most
popular AV equipment; you can refer to the enclosed
code list for your devices.)
Tap EEnntteerrCCode
•
Select a device (e.g. TV)
•
Tap numeric digit to enter code number (check
•
your code from the code list, e.g. 0021)
Tap DeDelleeteteto delete the last entered digit (if you
•
have mistyped a number)
Tap Back
•
page
Tap OKOKto confirm the input
•
Tap TTeessttKKeyeyon LCD screen or any of hard key to
•
test the corresponding function
Tap OOKKto confirm and exit the setup
•
AAuuttooSSeeaarrch
searching through the library.
Turn on your device before starting this setup
•
procedure (e.g. TV)
Tap AAuutotoSSeeaarrchchfrom Setup menu
•
Select a device (e.g. TV)
•
Tap once and then repeat until your device is
•
switched off. Then, press OK
you can tap the T
setup
to cancel and return to previous menu
AAuutoto--SSeeaarrch
– setup pre-programmed code by
from Setup menu
to cancel and return to previous menu
- setup pre-programmed code by
to save the code. Or
key to test the device during
or
EExxitit.
For
If you have missed the last code, tap once to
•
skip backward
Tap Back
•
page
Tap OKOKto confirm and exit the setup
•
Note: When a code is set to a device, the learned
command and key name of that device will be lost,
and restored to pre-programmed command.
Some codes do not have Power command. These
codes may not be detected by using Auto-Search.
User is advised to use
During auto-searching, user can access any of the
hard keys to test the command.
to cancel and return to previous menu
TTeest
key to test other keys.
AAddvvanc
EEddiit
This function allows you to rename, move or delete
key/device label.
Tap M
the following items:
KKeeyyNNaame
Tap KKEYEYNNAAMEMEfrom Edit menu
•
Select a device
•
Select a key to be edited
•
•
•
•
•
•
Note: The number of characters input depends on the
corresponding key size
ABC ?!À
Tap , , or for quick access to different
groups of keys (Character, Symbol or Graphic),
and tap or to access different pages of each
group of keys
Tap a character/symbol/graphic from the page
Tap DDEELLEETETEto erase last entered
character/symbol/graphic
Tap BBAACKCKto ignore and return to previous page
Tap OKOKto confirm and exit editing
then tap EEDDITITand choose any one of
- rename key label
i

Remote Control
DeevviciceeNNaameme
ey
ice
ey
YES
e
PununcchhThThrroouugghh
AGE
YES
MEENUNU
E
M
AGE
g
Cloocckk
15
D
Tap DDEVEVIICECENNAAMEMEfrom Edit menu
•
Select a device
•
ABC ?!À
Tap , , or for quick access to different
•
groups of keys (Character, Symbol or Graphic),
and tap or to access different pages of each
group of keys
Tap a character/symbol/graphic from the page
•
Tap DDEELLEETETEto erase last entered
•
character/symbo /graphic
Tap BBAACKCKto ignore and return to previous page
•
Tap OKOKto confirm and exit editing
•
Note: Maximum input of 7 characters
MMoovveeKKey
position)
Tap MMOOVEVEKKEYEYfrom Edit menu
•
Select a device
•
Select a key to be moved, tap OKOKto confirm
•
Select a destination, tap OKOKto confirm. The
•
position of the 2 selected keys will then be
exchanged
Select a key to continue or tap MMEENUNUto exit
•
Move Key mode and return to main menu
--rename device label
i
- move key location (exchange keys
MMoovveeDDeevvice
Tap MMOOVEVEDDEVEVIICECEfrom Edit menu
•
Select a device to move, tap OKOKto confirm
•
Select a destination, tap OKOKto confirm. The
•
position of the 2 selected devices will then be
exchanged
Select a device to continue or tap MMEENUNUto
•
exit Move Device mode and return to main menu
DDeelleetteeKKey
Tap DeDelleetteeKKeyeyfrom Edit menu
•
Select a device
•
Select a key to be deleted, tap YES
•
Select a key to continue or tap MMEENUNUto exit
•
Delete Key mode and return to main menu
– move device location
– delete a key
to confirm
PPrreeffeerreencnce
Tap MMEENNUUthen tap PPRREEFFEERREENNCECEand choose
any one of the following items:
P
Volume Control, Volume + / - and Mute.
Tap PPUUNNCCHHTTHHRROOUUGHGHfrom Preference menu
•
Select a source device (e.g. HALCRO dm 8/10)
•
Select a target device (e.g. DVD)
•
Note: For punch through, Vol +, Vol - and Mute will be
punched through to the selected device.
CuCusstotommPPaaggee––set up a user custom page
•
•
•
•
•
•
Note: Custom Page is a group of keys that allow the
user to copy key commands from different devices,
access custom pages from the
device attribute of a key (tap the header
PPAGE
name) and if a key is deleted or re-named on original
device, it is also changed in Custom Page.
Tap CCUUSSTTOOMMPPAGE
Select your keys from different devices for custom
page
Select a device where a key to be copied to
custom page (e.g. TV)
Select a key command to be copied to custom
page (e.g. )
Tap YES
Tap to select other key to create new command
or tap M
once to toggle display device name and key
– set up device punch through for
from Preference menu
to confirm the selection
to exit and return to main menu
HHOOMME
page, view the
RReemmootteeSeSettttiinng
Tap MMEENNUUthen tap RREEMMOOTTEESSEETTTTIINGNGand
choose any one of the following items:
Cl
•
•
•
•
•
– adjust clock
CuCurrrreennttTTimimee– adjust current time
Tap ClCloockckfrom Remote Setting menu
Tap SSetetto adjust clock
Enter four digits, first two digits represent hour and
second two digits represent minutes (24 hour
format is used.)
Tap OKOKto confirm and exit the setting
CCUUSSTTOOM

Remote Control
eek––
BeeeeppSoSounundd
eepSoSo
und
LCDCD
BackkliligghhttCCoonnttrrolol
Paasssswwoorrdd
AAAAA
lt
ning
es
KeeyyRReennaameme
•
•
•
•
es
•
DevviicceeRReennaameme
es
MoovveeKKeyey
17
DDaayyooffWWeek
•
Tap ClCloockckfrom Remote Setting menu
•
Tap SSetetto adjust date
•
Tap or to select day of week
•
Tap OKOKto confirm and exit the setting
•
B
Tap BBeep
•
Tap EEnnaabbleleto turn on beep sound
•
Tap DDiissaabbleleto turn off beep sound
•
L
– set up LCD related function
LLiigghhttAAuutotoOOffff: select backlight auto turn off at 5
•
Sec, 10 Sec or 15 Sec
Bac
•
control method, By Sensor, Always On or Always
Off.
P
In order to keep your personal setting of the Halcro
Logic UTSR1 secure, you can activate the password
function for remote setting protection.
Enter password, max. 5 characters
•
Re-enter password for confirmation
•
Tap DDEELLEETETEto delete last character
•
To disable password, give a blank input (no
•
characters) to password field
Note: Universal password is
RReesseettDDefefaauult
Warning: Please make sure it is necessary to perform
this function. Your Halcro Logic UTSR1 will be reset to
factory pre-loaded setting and all the learned
signals/custom setting will be erased.
ClCleeaarrLLeeaarrning
restore keys to default command.
One Key – to clear learned command and restore
keys to default command
•
•
•
- create/enable or disable password
Tap to select a device
Tap to select a key
Tap YYesesto confirm or tap NoNoto abort
adjust day of week
– turn beep sound On/Off
und
from Remote Setting menu
select an option of backlight
:
AAAAA
– reset user setting to factory default.
– to clear learned command and
One Device – clear learned command of all keys of
a device.
Tap to select a device
•
Tap YYesesto confirm or tap NoNoto abort
•
All Devices - clear all learned commands of all
devices.
Tap AAllllDeDevviicces
•
Tap YYesesto confirm or tap NoNoto abort
•
K
restore to factory default.
One Key –
single
Tap to select a device
•
Tap to select a key
•
Tap YYesesto confirm or tap NoNoto abort
•
One Device – restore all user renamed key label of
a device.
Tap to select a device
•
Tap YYesesto confirm or tap NoNoto abort
•
All Devices - restore all user renamed key label of
all devices.
Tap AAllllDeDevviicces
•
De
and restore to factory default.
M
movement.
Tap YYesesto confirm or tap NoNoto abort
•
One Device - restore a single user renamed device
label and restore to factory default.
Tap to select a device
•
Tap YYesesto confirm or tap NoNoto abort
•
All Devices - restore all user renamed device label
and restore to factory default.
Tap AAllllDeDevviicces
•
Tap YYesesto confirm or tap NoNoto abort
•
One Device – clear the setting of key movement of
a device and restore to factory default.
Tap to select a device
•
– clear user renamed key label and
restore user renamed key label of a
key.
– clear and restore user setting about key
– clear user renamed device label

Remote Control
es
MoovveeDeDevviicece
es
DelleetteeddKKeyey
es
AllllTTooDeDeffaa
ult
us
Back
ReemmototeeSSeetttt
ing
art
RT
SMMAARTRT
AddddNNeewwSSmmaarrtt
MOOVEVEUPUP
DEELLEETETE
EddiittSSmmaarrtt
MOOVEVEUPUP
DEELLEETETE
DelleetteeSSmmaarrtt
ReennaammeeSSmmaarrtt
DEELLEETETE
l-
-
19
Tap YYesesto confirm or tap NoNoto abort
•
All Devices - clear all settings of key movement of
all devices and restore to factory default.
Tap AAllllDeDevviicces
•
Tap YYesesto confirm or tap NoNoto abort
•
M
and restore to factory default.
•
•
De
One Key – restore a single deleted key
•
•
•
One Device – restore all deleted keys of a device.
•
•
All Devices – restore all deleted keys of all devices.
•
•
A
default.
Tap YYesesto confirm or tap NoNoto abort
•
Note: All user settings will be lost (except clock and
password). Default function do not clear clock setting
and password.
- clear the setting of device movement
Tap MMoovveeDeDevviicces
Tap YYesesto confirm or tap NoNoto abort
– restore deleted keys.
Tap to select a device
Tap to select a key
Tap YYesesto confirm or tap NoNoto abort
Tap to select a device
Tap YYesesto confirm or tap NoNoto abort
Tap AAllllDeDevviicces
Tap YYesesto confirm or tap NoNoto abort
ult
– restore all user settings to factory
Tap MMEENUNU, then tap SSmmaartrtand choose any one
of the following items:
A
Select an empty smart key
•
Tap AADDDDKKEYEYto select a device and a key to add it
•
into smart list
Tap AADDDDDDEELLAAYYto add a delay time between key
•
command (maximum delay is 20 seconds)
Select an item from the command list and tap
•
M
sequence of that item, or tap D
that item from the list
Tap TTEESTSTto test the function of Smart
•
Tap OKOKto confirm
•
E
Select an existing smart
•
Tap AADDDDKKEYEYto select a device and a key to add it
•
into smart list
Tap AADDDDDDEELLAAYYto add a delay time between key
•
command (maximum delay is 20 seconds)
Select an item from the command list and tap
•
M
sequence of that item, or tap D
that item from the list
Tap TTEESSTTto test the function of Smart
•
Tap OKOKto confirm
•
De
Select an existing smart
•
Tap OKOKto confirm
•
Tap BBAACKCKto abort
•
– create a new smart command.
and MMOOVEVEDDOOWNWNto re-order the
– edit an existing smart key
and MMOOVEVEDDOOWNWNto re-order the
– delete a smart key
to remove
to remove
SSttaattus
•
•
– show information of the unit.
Display software version, code number of each
device and other useful information
Tap or for more information or tap Back
return to R
ing
menu
SSmmart
Halcro Logic UTSR1 comes with 10 editable SSMMAART
programs each with a maximum 32 key steps. With
the help of S
commands and time delay to execute in a chain of IR
signals simply by the press of SMART button.
, you can program a group of
R
Select an existing smart
•
Tap a character from the touch screen
to
•
Tap
•
Tap BBAACKCKto ignore and return to previous page
•
Tap OKOKto confirm
•
Note: When a SSmmaartrtis executed, press a hard key
(e.g. ,
transmission. User can set maximum 32 steps
(including delay) for each smart program. The
maximum delay time is 20 seconds.
- to rename label of a smart key
D
CCHH++,,CCHH,,VVooll++,,VVool-
to last entered character
-
) to stop the signal

Remote Control
e
MEENUNU
ne
ve
CopopyyAAllllDeDevviicceess
ve
Cloockck
Paasssswwoordrd
Reecceeiivvee––
k
MEENUNU
PCCLLinink.k.
racttiivveeHHeellppSScrcreeeenn
Reessetet
AAAAA
21
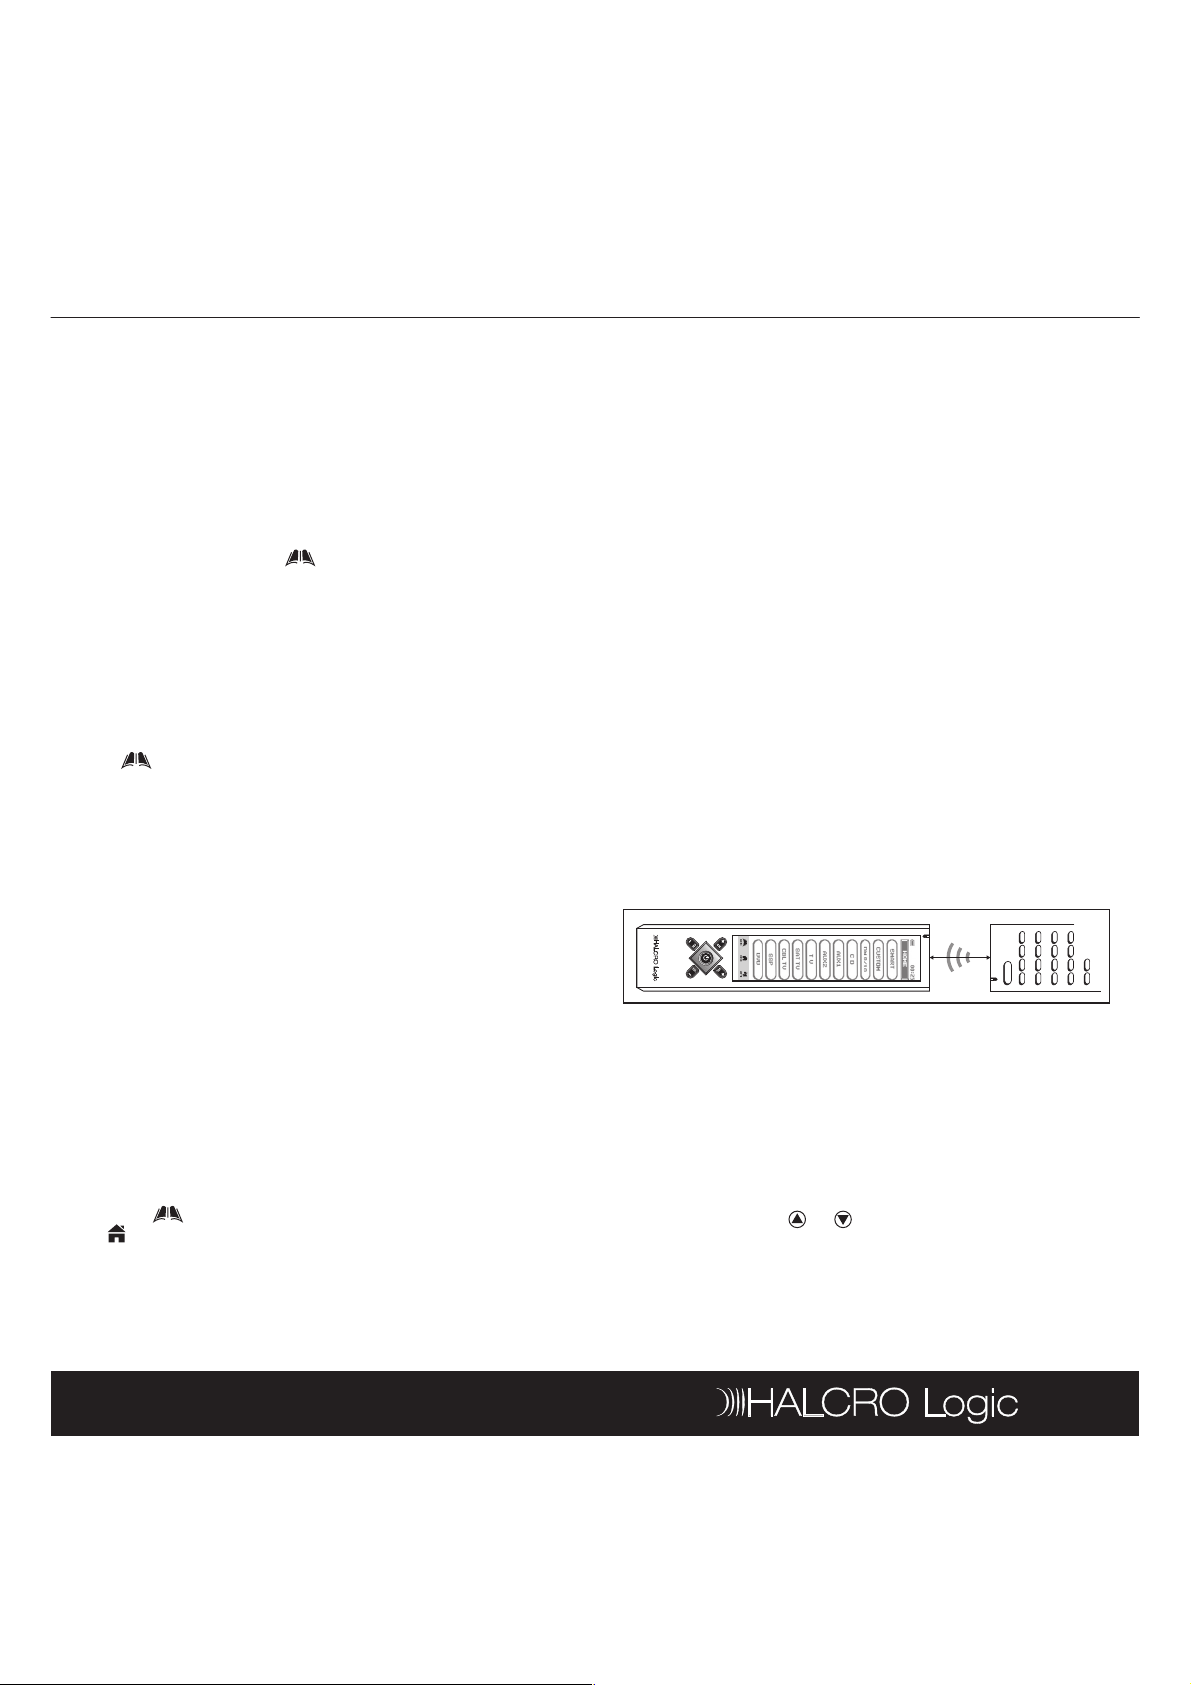
CClloonne
This function is used to copy user setting to another
Halcro Logic UTSR1. Tap M
and choose any one of the following items:
Note: Before you perform this function, please make
sure that you have two (2) Halcro Logic UTSR1s. You
have to identify which unit is the sender and which
one is the receiver. The sender is the unit which
contains data that will be transferred to another
Halcro Logic UTSR1 (receiver unit). The receiver is the
unit which will copy the signals from the sender.
Please keep both sender and receiver units face to
face at a distance of 5 to 8cm during the whole
cloning process.
CCopopyyOOnneeDeDevviiccee– copy all user settings of a single
device from the sender to the receiver unit
On the receiver unit, tap RReecceeiive
•
On the sender unit, tap CCopopyyOOnneeDeDevviicece,thentap
•
to select a device (e.g. TV), all user settings in the
selected device will be sent out via the IR linking
from the sender to the receiver unit
C
from the sender to the receiver unit
On the receiver unit, tap RReecceeiive
•
On the sender unit, tap CCopopyyAAllllDeDevviicceses,alluser
•
settings will be sent out via the IR linking from the
sender to the receiver unit, except Cl
P
– copy all user settings of all devices
will be sent out via IR linking
,thentapClCloone
and
Note: All user settings will be over-written at receiving
end by sending remote. Do NOT interrupt the linking
during sending and receiving data. Be sure to keep
two remotes within 5 to 8cm during the copy process
for better performance.
PPCCLLiinnk
To connect your Halcro Logic UTSR1 with a computer
to download/upload data, Tap M
choose P
Note: To enable PC-to-remote data upload/download
function, you must use the Halcro Docking Station.
, then
IInntteerac
In menu mode, there is a Help icon on the top right
corner of screen. It provides help information for each
sub-level of the menu.
IIMMPPOORRTTAANNTTNNOOTTE:E:Do not drop or apply any shock to
the unit. If the unit does not work properly, press
R
the battery compartment).
If password is set, user needs to enter password for
accessing main menu. Enter AAAAA
password.
key once to restart. (Reset key is located inside
?
if you forget the
R
unit has to select this function in order to start cloning)
Enter into receiving mode, ready for receiving
incoming data.
receive data for Clone function (receiver
5-8 cm

Docking Station
,
.
atureess
Specciiffii
catiioonnss
BBeeffoorreeopopeerraattininggtthheeHaHallccrrooLLogogiiccDDoocckkininggStStaattiioonn,
pplleeaasseerreeaaddtthihissmmaanunuaall.
KKeeyyFFeeatur
Fast charging device for your Halcro Logic UTSR1
•
Connecting your Halcro Logic UTSR1 to home
•
computer system for remote advanced editing
and data back up (PC Link)
LED indicator for charging status display
•
USB Cable included for PC connection
•
Spe
•
•
•
•
•
cat
Power Requirement: DC 9V, 400mA, 3.6VA
Charging Time: 3-4 hours
Dimensions: 225 x 100 x 45mm
Weight: 130g approx.
ncluded Accessory: USB CableI
1. Docking Station 5. LED Indicator
2. Remote Holder 6. ower Connector
3. Connection Pins 7. USB Jack
4. Release Button
1
2
P
23
6
7
3
4
5

Docking Station
hargegerr
Functiioonn
ancededEEddiittiinnggvviiaaCCoommppuutterer
ink
Meenunu
ink
nancee
QQuuiicckkCChar
Make sure that your Halcro Logic UTSR1 is installed
•
with 4xAAA NiMH rechargeable batteries and
remove the rubber protector
Make sure you have the DC power adaptor from
•
the Halcro Logic UTSR1 package
Put the power adaptor into AC wall outlet, insert
•
the DC jack to the power connector of the
Docking Station
Now, slide your Halcro Logic UTSR1 onto the
•
Docking Station until the connection pins are
locked
The Green LED of the Docking Station lights up.
•
It takes approximately 3 to 4 hours to fully charge
•
the remote
When the charging process is completed, the
•
Green LED of the Docking Station will be turned off
Press the RReelleeaasseebutton of the Docking Station to
•
release the Halcro Logic UTSR1
Funct
25
Run the Halcro Editor software from your
•
computer system
Note: For operating the
follow the instruction manual from the software
package.
Halcro Editor
software, please
MMaaiinntteenanc
Do not expose your Docking Station to dust,
•
strong sunlight, humidity, high temperature, or
mechanical shock
Do not use corrosive or abrasive cleansers on your
•
Docking Station
Keep the unit dust free by wiping it with a soft, dry
•
cloth
Do not disassemble your Docking Station
•
RReemmootteeAAddvvanc
Make sure that your computer is loaded with one
•
of the following operating systems: Windows
98SE, Windows 2000, Windows NT or Windows
XP
Download the Halcro Editor software from www.
•
halcro.com. Install the program and reboot
system
Make sure your Halcro Logic UTSR1 is connected
•
with the Docking Station (See Quick Charge
Function, point 4)
Connect the supplied USB cable to the USB jack of
•
the Docking Station and one of the available USB
connectors of your computer system
ctivate the PPCCLLink
A
•
UTSR1 by tapping M
function on the Halcro Logic
and then, select PPCCLLink
your

Troubleshooting
1
s
.
Reessetet
Ihhaavveeininssttaalllleeddaaccododee
ot
y
e.
Auutoto
Leeaarr
ning
Ihhaavveeccopopiieeddmmyyooririggininaall
c
t
y
ccassiioonnaallllyy..
Icacannnnototmmoovveeaakkeeyytoto
.
HoowwcacannIIrreesstotorreemmyy
?
HoowwcacannIIpprreevveenntt
r
?
rd
Ihhaavveeffoorr
gotteennmmyy
.
AAAAA
D
.
By
WhhaattiissCCLLOONNEE??
?
WhhaattiissPPCCLLininkk??
tatiioonn
g
e
e.
HoowwcacannIIccoonnnneeccttmmyy
h
systteemm??
27
UUTTSSRR1
MMyyHaHallccrrooLLogogiiccUUTTSSRR11iis
nnototwwoorrkkiningg.
I
bbuutttthheerreemmototeeiissnnot
wwoorrkkininggoorroonlnlyyppaarrttlly
wwoorrkksswwiitthhmmyyddeevviicce.
I
rreemmototeetotoHaHallccrrooLLogogiic
UUTTSSRR11bbuuttffooununddtthhaat
ssoommeeccoommmmaannddssoonlnly
wwoorrkkoocca
I
aannotothheerrlloocacattiioonn.
H
ffacactotoryrysseettttiningg?
H
ssoommeeoonneeffrroommeeddiittininggoor
cchhaannggininggtthheesseettttininggss?
I
ppaasssswwoorrdd.
ThTheebbacackkliligghhttoofftthheeLLCCD
iissnnototwwoorrkkiningg.
W
gott
WWhhaattiissSSMMAARRTT?
Make sure the provided
rechargeable batteries
are inserted with correct
polarity and are fully
charged.
Try pressing the R
button inside the battery
compartment. (Refer to
page 9 for details)
Try another code
available on the code list
or go through the A
SSeeaarrcchhto locate
another possible code.
OR use the L
function. (Refer to page
10 for details)
Your original remote
may carry dual signal
commands. (Refer to
page 11 for details)
Make sure the selected
key type is identical. You
cannot exchange key
position with different
key type. (Refer to page
14 for details)
(Refer to page 16 for
details)
Activate the PPaasssswwoord
function to lock your
remote. (Refer to page
16 for details)
The factory preloaded
password is AAAAA
Make sure you have
selected either By
SSeennssororor AAllwwaaysysOnOnin
the Remote Setting
menu. (Refer to page 15
for details)
To perform this function,
you must have 2 Halcro
Logic UTSR1s. (Refer to
page 20 for details)
ning
W
DDoocckkiinnggSStat
MMyyHaHallccrrooLLogogiiccDDoocckkining
StStaattiioonndodoeessnnototcchhaarrgge
mmyyrreemmotote.
H
HaHallccrrooLLogogiiccUUTTSSRR11wwiitth
mmyyccoommppuutteerrsys
Note: The Halcro Logic UTSR1 and Docking Station
contain no user serviceable parts. For all service
requirements please contact your dealer.
Using the programmed
SMART button will
execute a series of
commands. (Refer to
page 18 for details)
In order to perform this
function, you must have
a Halcro Logic Docking
Station and the
corresponding
computer software.
(Refer to page 21 for
details)
Make sure that your
Docking Station is
connected properly with
the Halcro Logic UTSR1.
Check whether your
Halcro Logic UTSR1 is
loaded with packaged
NiMH rechargeable
batteries and are
inserted with correct
polarity.
Make sure that you
have connected the DC
power supply with your
Docking Station and an
available AC outlet.
Please refer to page 24
Remote Advanced
Editing via Computer.
Make sure you have
activated the PC Link
function from the Halcro
Logic UTSR1.

Device Code List
p
urrooununddSoSoununddPPrroocceessssoorr
V
29
PPrreeaammp
Model Code
Halcro dm8/dm10 0002
SSurr
Model Code
Halcro SSP100/SSP80 0007
TTV
Model Code
A.R. Systems 1021
Accent 1021
Admiral 1001
Agef 1001
Aiko 1021
Aim 1021
Akai 0331 0841 1021
Akiba 1021
Akito 1021
Akura 1021
Alba 0431 1021 1041
Allstar 1021
Amplivision 1041
Amstrad 0481 1021
Anam 0251 1021
Anam National 1021
Anitech 1021
Ansonic 1021 1031 1041
AOC 0361
Aristona 1021
ASA 1001
Asberg 1021
Atlantic 1021
Audiosonic 0711 1021 1041
Audioton 1041
Autovox 1001
AWA 1021
Bang & Olufsen 0991 1001 1051
Basic Line 1021
Bauer 0441
Baur 0661 1011 1021
Beko 1021 1041
Beon 1021
Best 1041
Bestar 1021 1041
Blaupunkt 0911 0921
Blue Sky 1021
BPL 1021
Brinkmann 1021
Brionvega 1001 1021
Bruns 1001
BSR 0841
Bush 0751 1021
Candle 0351 0361
Carad 1021
Carena 1021
Cascade 1021
Casio 1021
Cathay 1021
CCE 1021
Centurion 0411 1021
Century 1001
CGE 0841 1041
Citizen 0351 0361
Clatronic 0711 1021 1041
Colortyme 0361
Concerto 0351
Condor 1021 1041
Craig 0251
Crosley 0841 1001
Crown 1021 1041
Curtis Mathes 0161 0361
Daewoo 0291 0301 0331 1021
Dansai 1021
Dantax 1041
Dawa 1021
Daytron 1021
Decca 0271 0671 1021
Deitron 1021
Desmet 1021
Diamant 1021
Digiline 1021
Dixi 0331 1021
Drean 1021
Dual 0891 1021
Dual-TEC 0901
Dumont 0841 1001
Dux 1021
Dynatron 1021
Elbe 1021 1031 1041
Elcit 1001
ELG 1021
Elin 1021
Elite 1021
Elta 0331
Emerson 0021 0061 0071 0081 0091
Envisio 0361
Erres 1021
ESC 1021
Etron 0331 0841 1021
Euroman 1021 1041
Europa 1021
Europhon 0671 1021
Exquisit 1021
Family Life 1021
Ferguson 0711
Fidelity 0821 1021
Finlux 0841 1001 1021
First Line 0841 1021
Fisher 0171 0841 1001 1041
Flint 1021
Formenti 0441 0841 1001
Fortress 1001
Fraba 1021 1041
Friac 1021
Frontech 0711 0841
Funai 0711
Galaxi 1021
Galaxis 1021 1041
0101 0111 1001
1021

Device Code List
31
GBC 0841
GE 0131 0161 0201
GEC 0271 0671 1021
Geloso 0841
Gemini 0391
Genexxa 0431 1021
Goldstar 0031 0121 0351 0411 1021
1041
Goodmans 1021
Goodmans/Tashiko 0011 0271
Gorenje 1041
Gradiente 1021
Graetz 1021
Granada 0671 0841 1021
Grandin 1021
Grundig 0671 0871 0951 0961 1021
Hanseatic 1001 1021 1031 1041
Hantarex 0671 1021
Hantor 1021
Harwood 1021
Hauppauge 1021
HCM 1021
Highline 1021
Hinari 0841 0861 1021
Hit 1001
Hitachi 0181 0351 0841 1021
Hornyphone 1021
Hypson 1021
Iberia 1021
ICE 1021
Imperial 1021 1041
Indiana 1021
Inno Hit 0671 0851 0861 1021
Innovation 0951 0961
Interfunk 0841 1001 1011 1021 1041
Internal 1021
Intervision 1021 1041
Irradio 0851 0861 1021
Isukai 1021
ITS 1021
ITT 0751 0841 0931
ITT Nokia 0751 0841 0931
ITV 1021
Jensen 0311
JVC 0001 0261 0281 0751
Kaisui 1021
Karcher 1021 1041
Kendo 1021 1041
Kennedy 0841
Kenwood 0361
Kneissel 1021 1031 1041
Kolster 1021
Konka 1021
Korpel 1021
Korting 1001 1041
Kosmos 1021
Lecson 1021
Lenco 1021
Leyco 1021
Leyeo 0711
LG 1021 1041
Liesenkotter 1021
Lifesat 0951
Lifetec 0951 1011 1021
Loewe 1001 1011 1021 1031 1041
Loewe Opta 0661 0671 0681
Logik 0381
Luma 1021
Lumatron 1021
Lux May 1021
Luxman 0351
Luxor 0841
Lyc o 071 1
Madison 1021
Magnadyne 0671 0841 1001
Magnafon 0671
Magnasonic 0031
Magnavox 0341 0391 0401 0411 0421
Manesth 1021
Manhattan 1021
Marantz 0221 0351 0361 1021
Marelli 1001
Mark 1021
Matsui 0271 0331 1021
Maximal 0841
Mediator 1021
Medion 0951 0961 1021
Melectronic 1011 1021
Memorex 0331 0351 0381 0571
Mercury 1021
Metz 0881 1001
MGA 0361 0561 0571
Micromaxx 0951 1021
Minoka 1021
Mitsubishi 0221 0321 0561 0571 0751
Mivar 0671 1031 1041
Montgomery 0351
Morgan's 1021
MTC 0351 0361 1011 1041
Multitec 1021
Multitech 0671 1021 1041
NAD 0551
Naiko 1021
Nakimura 1021
NEC 0241 0351 0361 1021
Neckermann 0821 0841 1001 1021 1041
NEI 1021
Netsat 1021
Neufunk 1021
New Tech 1021
Nikkai 0271 0431 0861 1021
Nikko 0031
Noblex 1021
Nokia 0751 0841 0931 0941 0971
Nordmende 1021
Novatronic 1021
Oceanic 0841
Okano 1021 1041
Opera 1021
Optimus 0551
Optonica 0541
Orbit 1021
0581
0601 1021
1001 1011 1021

Device Code List
33
Orion 0841 1021
Orline 1021
Osaka 0861
Osaki 0271 0861 1021
Osio 1021
Otto Versand 0751 0841 1011 1021
Palladium 1001 1021 1041
Palsonic 1021
Panama 1021
Panasonic 0191 0251 1021
Panavision 1021
Pathe Cinema 1031
Penny 0161 0351 0361 0521 0531
Perdio 1021
Perfekt 1021
Philco 0361 0581 0591 0601 1001
1021 1041
Philips 0401 0651 0691 0701 0721
1001 1021
Phoenix 1001 1021 1041
Phonola 1001 1021
Pilot 1021
Pioneer 0511 0551 1021 1041
Pionier 1041
Plantron 1021
Prandoni-Prince 0671
Prandoni-Promce 0671
Profex 0841
Profitronic 1021
Proline 1021
Prosonic 1021 1041
Protech 0711 0841 1021
Proton 0351 0501
Provision 1021
Pulser 0351
Pye 1001 1021
Quasar 0251
Quelle 0641 1011 1021
R-Line 1021
Radialva 1021
Radiola 1021
Radiomarelli 1001 1021
RadioShack 0541 1021
Radiotone 1021 1041
RCA 0051 0141 0151 0181 0411
0491 0531
Realistic 0541
Recor 1021
Rectiligne 1021
Rediffusion 0841 0931
Redstar 1021
Reflex 1021
Revox 1021 1041
Rex 0891 0901
RFT 1001 1031 1041
Roadstar 1021
Robotron 1001
Rodex 1021
Royal Lux 1041
Saba 0671 1001
Saisho 0331
Salora 0821 0841
Sambers 0671
Sampo 0361
Samsung 0331 0341 0351 0361 0711
Sansui 1021
Sanyo 0171 0231 0271 0751 1021
Save 1021
SBR 1021
Schneider 0891 0901 1021
Sears 0161 0171 0351 0481 0521
SEG 1021
SEI 0841 1001 1021
Seleco 0891 0901
Sharp 0461 0471 0541 0611 0621
Siam 1021
Siarem 0671 0841 1001
Siemens 0861 0911 0921 1021
Siera 1021
Siesta 1041
Signature 0351 0381
Silva 1021
Silver 0711 1021
Simpson 0581
Singer 1001 1021
Sinudyne 0841 1001 1021
Sky 1021
Solavox 0861
Sonitron 1041
Sonneclair 1021
Sonoko 0711 1021
Sontec 1021 1041
Sony 0371 0451 0631
Soundwave 1021
Squareview 0481
Standard 1021
Starlite 1021
Stern 0891 0901
Strato 1021
Sunkai 1021
Sunstar 1021
Sunwood 1021
SuperTech 1021
Supra 0351
Sylvania 0361 0441 0581 0591 0601
Symphonic 0481
Tandberg 0681 0761 0881
Tandy 0271 0431
Tatung 0271 0671 1021
Tcm 0951
Teac 1011 1021
Tech Line 1021
Techwood 0351
Teknika 0351 0381 0571
Telecor 1021
Telefunken 0691 0731 0741 0771 0781
Telefusion 1021
Telegazi 1021
Telemeister 1021
Telesonic 1021
Telestar 1021
0861 1021 1041
1031 1041
0791 0811 0981
1021

Device Code List
L
35
Teletech 0331 1021
Tempest 1021
Tennessee 1021
Tensai 1021
Tera 0501
Tevion 1021
Thomson 0691 0731 0741 0771 0781
0791 1021
Thorn 1011 1021
Thorn-Ferguson 0711
TMK 0351
Tokai 1021
Toshiba 0351 0521 0751 0801
Trans Continens 1021
Transonic 1011 1021
Triumph 0671 1021
Uher 1021 1041
Ultravox 0841 1001 1021
Unic Line 1021
United 1021
Universum 0711 1011 1021 1041
Univox 1001 1021
Vector Research 0361
Vestel 1021
Vexa 1021
VideoSystem 1021
Vidikron 0211
Vision 1021
Vortec 1021
Voxson 1001 1021
Waltham 1021
Wards 0361 0381 0451 0541 0581
0591 0601
Watson 1021
Watt Radio 0841
Wega 0841 1001 1021
Weltblick 1021
Wharfedale 1021
White Westinghouse 1021
Xrypton 1021
Yamaha 0361
Yamishi 1021
Yokan 1021
Yoko 1021 1041
Zanussi 0891 0901
Zenith 0011 0041 0381
SSAATT//CCBBL
Model Code
ABC 0253 0373
Akiba 0963
Alba 0963
Allsat 0923
Alpha Star 0773
Amstrad 1143
Ansonic 0953
Antronix 0133
Archer 0133 0283
Astra 1053
Autovox 1113
BB 0073
Beko 0963
British Sky Broadcasting (BskyB) 1143
BT 1033
Cabletime 0163
Canal Digital 0943
Canal Satellite 0943 0953
Canal + 0863
Canalt 0943
Carena 0963
Clyde Cablevision 0193
Colour Voice 0303 0343
Comtronics 0213 0273
Conrad 1063
Cyrus 0923
D-Box 1073 1213 1253
DNT 0923
Dual 1113
Eagle Comtronics 0273
Eastern 0063
Echostar 0783 0943
Electricord 0203
Electus 0263
Ferguson 1113
Finlandia 0963 1053
Finlux 0963
Flint 0963
GE 0113 0123
GEC Cable System 0193
General Instrument 0793 0803
Gold Box 0943 0953
Gooding 1023
Goodmans 0403 0963
Granada 1053
Grundig 0973 0983 1023 1143
Hamlin 0633 0643 0653 0663 0673
Hirschmann 1063
Hisawa 0963
Hitachi 0753 0963
HTS 0783
Hughes Network Systems 0813
ITT 1053
ITT Nokia 1163
Jerrold 0253 0433 0593 0603 0613
0803 0823
JOK 1033
JVC 1023
Kathrein 0923
Luxor 1053 1063 1073
Magnavox 0003 0413 0423 0763
Mamm 0293
Manhattan 0963
Marantz 0923
Maspro 0973 1113
Matsui 1023
MediaSat 0943
Memorex 0003 0383 0763
Minerva 1023
Mitsubishi 1053
Mivar 0953
Movie Time 0143 0203
Myryad 0923

Device Code List
D
37
Nokia 0963 1053 1063 1073 1083
1203 1223 1233 1243 1263
1273
Northcoast 0013
NSC 0143
OAK 0103
OAK Sigma 0533 0543
Ondigital 0933 1013 1093
Pace 0903 0963 1093 1103 1113
1123 1133 1143 1153 1223
Palladium 1023
Panasat 1173
Panasonic 0443 0453 0463 0473 1143
Panda 0963
Paragon 0383
Philips 0003 0033 0213 0303 0313
0323 0333 0343 0413 0423
0763
(Philips) 0913 0923 0933 0943 0953
0963 0973 0983 0993 1003
1013
(Philips) 1023 1033 1043 1223
Pioneer 0003 0083 0553 0693 0943
Premiere 0943 0953 1073
Primestar 0803 0823
Pulsar 0383
Promax 0963
Radiola 0923
RCA 0833
RCA Digital Satellite System 0393 0403
Realistic 0133
Regency/Eastern 0683
RFT 0923
Runco 0383
Saba 1033 1113
Sabre 0963
Sagem 0963 1183
Salora 1053
Samsung 0273
Schneider 0983 1113
Scientific Atlanta 0363 0563 0573 0583
Sedea 0863 0873 0883
Signal 0273
Sky 0893
SL Marx 0273
Sony 0843 1143
Spectavision 0233
Standard Components 0183
Starcom V 0253
Stargate 0273
Strong 1173
Sylvania/Texscan 0373 0493
Tandberg 1193
Tantec 0963 1113
Teknika 0173
Teleservice 0053
Teleview 0273
Texscan 0183 0373
TFC 0023
Thomson 0943 0963
Tocom 0223 0353 0503 0513 0523
Toshiba 0383 0853
Tps 0873 1183
Tudi 0043
Universum 1023
Uniden 0763
Unika 0133
Universal 0133 0153 0203 0283
Ventana 0923
Videoway 0093
Viewstar 0213
Wisi 0963
Xsat 0883
Zenith 0243 0383 0483
CCD
Model Code
Acoustic Research 1346
ADC 0076 0116
Adcom 0256 0306 1066
ADS 0316
Aiwa 0346 0996 1086 1106
Akai 0226 0536 0586
Alpine 1266 1356
Audio-Technica 0596
BSR 0296 0706 0826
California Audio Lab 0106
Cambridge Audio 1416
Capetronic 1256
Carrera 0296
Carver 0336 1186
Casio 0396
Crown 0236
Curtis Mathes 0396
Denon 0326 0926 0936
Dual 0556
Dynamic Bass (h) 0606
Emerson 0256 0376 1156
Eroica 1326
Fisher 0146 0606 0976 1056
Garrard 0416
Genexxa 0356 0376 1156
Goldstar 1186 1276 1316 1386
H/K 0156 0226 0516 1046
Hitachi 0246 0256 0556 0866
Inkel 0166 0446
JVC 0366
Kenwood 0096 0146 0456 0636 0776
Kyocera 0076
Luxman 0126 0476 0726 0756 0766
Magnavox 0216 0266 0696 1006
Marantz 0266 0286 0426 0836 1396
Mcintosh 0406 1136
MCS 0956 1366
Memorex 0256 0276 0286 0356 0376
MGA 0186
Mission 0266
Mitsubishi 0186 0496
0786 0796 0806 0946
1036
1156

Device Code List
D
39
MTC 1306
NAD 0086 0666 0736 0746
Nakamichi 0176 0486 0566
NEC 0306 0956 1016
Nikko 0596 1056
Onkyo 0206 0506 0546 0856 1206
Optimus 0276 0296 0606 0646 0896
Panasonic 0106 0876 1146 1176
Penny 0956
Philips 0216 0266
Pioneer 0356 0986 1096
Proton 0266 1236
Quasar 0106
RCA 0256 0966 1166
Realistic 0256 0276 0286 0376 0606
Revox 1226
Rotel 0006 0016 0026 0036 0046
Saba Telecommander (e) 0556
SAE 0266
Samsung 1336
Sansui 0226 0676 1026 1076 1156
Sanyo 0196 0606 0686 0816
Scott 0376 1156
Sears 0396
Sharp 0286 0716 0946 1116 1126
Sherwood 0166 0286 0446 0526
Siements Garrard 1296
Signature 0226
Sontec 1216
Sony 0116 0616 0916 1196
Staron 1286
STS 0076
Sylvania 0266
Symphonic 0386
Tandy 0356
Tangberg 1246
Teac 0286 0386 0436 0576 0846
Technics 0106 0656 1146
Techwood 1376
Telefunken 0556
Thomson 0556
Toshiba 0086 0736
Vector Research 0116 1186
Victor 0366
Wards 0226
Yamaha 0056 0066 0136 0466 0596
0906 0916 0946 0986
0896
0266
0886 1406
0626 1116
Hitachi 0308 0338 0378
JVC 0098 0188 0288
Kenwood 0158
LG 0278
Linn 0358
Loewe 0288 0368
Marantz 0218 0288
Magnavox 0138
Micromedia 0288
Micromega 0288
Mitsubishi 0148
NAD 0328
Onkyo 0078 0138
Optimus 0228
Panasonic 0038
Philips 0108 0138 0218 0288 0368
Pioneer 0118 0128 0198 0228
Proscan 0168
RCA 0168
Rotel 0008
Salora 0278
Samsung 0088 0338
Sharp 0048
Sherwood 0238
Shinco 0258
Sony 0028 0268 0348 0388
Sony-PS2 0298
Teac 0278
Technics 0038
Theta Digital 0228
Thomson 0178
Toshiba 0058 0138
Universum 0278
Xbox 0398
Yamaha 0018 0138 0148 0158 0168
0178 0288
Zenith 0138 0248 0278
3Dlab 0288
DDVVD
Model Code
Akai 0068
Denon 0208
Finlux 0278
Goldstar 0278
Grundig 0288
Hanseatic 0278
Harman/Kardon 0318

Service & Warranty
n
arrantyyIInnffoorrmmatatiioonn
41
SeSerrvviicceeIInnffoorrmmatatiioon
The Halcro Logic Universal Touch Screen Remote
(UTSR1) and Docking Station have been designed for
maximum reliability. If a problem does occur with your
unit, please contact your dealer. Do not open the
cover, or try to modify or repair the products yourself.
Contact your dealer to help you with some trouble
shooting prior to organizing service for your UTSR1
and Docking Station. Your dealer or HALCRO’s
service department will always try to help you correct
any basic problems at your home via email or
telephone.
If service is required, all problems must be described
in as much detail as possible. This will help streamline
the service process.
Return Authorization from HALCRO prior to shipment
must be obtained for any service requirements. To
obtain this authorization, please ask your dealer or
email us at service@halcro.com
HALCRO will not be responsible for any damage
caused to your products during shipping due to
improper packaging.
WWarrant
IMPORTANT - Please read the following details very
carefully.
The Halcro Logic Universal Touch Screen Remote
(UTSR1) and Docking Station are warranted to be free
of defects if used under normal conditions for a period
of ninety (90) days from the date of purchase. To
extend the warranty period to twelve (12) months,
please complete and return the warranty registration
form.
Do not attempt to open the product. Breaking the
seals will void the warranty and all service, repair and
freight costs will be charged to the owner. Willful
damage, tampering, and damage caused by moisture
are not covered by the warranty.
The warranty will only be recognized by HALCRO if a
copy of the original receipt from your dealer showing
all details including the date of purchase,
accompanies the completed warranty registration
form. The warranty period will commence at the date
of purchase, not at the date the warranty registration
form is received by HALCRO.
Return Authorization from HALCRO prior to shipment
must be obtained for any warranty requirements. To
obtain this authorization, please email HALCRO at
service@halcro.com
The warranty registration form is included in this
owner's manual on the following page. Please cut it
out carefully and return it to HALCRO. You will find
HALCRO’s address and facsimile details on the
warranty registration form.

Service & Warranty
arrantyyRRegegiissttrarattiioonnFFoorrmm
WWarrant
Title………..First Name...........................................
Surname.................................................................
Date of Birth:
Day………..Month......................... Year…………...
Address: .................................................................
.................................................................................
.................................................................................
Zip/Postcode:……………… Country: ...................
Phone Numbers:
Home ( )............................................................
Work ( ) ...........................................................
Facsimile Numbers:
Home ( )............................................................
43
Work ( ) ...........................................................
Email Address:.......................................................
Model Number .....................................................
Serial Number........................................................
Date of Purchase:
Day………..Month...................... Year……………..
Purchased From (Dealer Name): ........................
.................................................................................
Please complete all sections of the form and attach a copy
of the original receipt for the warranty to be accepted.
Please refer to the previous page for details of the warranty
period for your model.
Post to: HALCRO, 118 Hayward Ave,
Fax to: +61 8 8238 0852
Torrensville,
South Australia 5031
 Loading...