

Page 1
PREHEATER
Instruction Manual
Thank you for purchasing the HAKKO FR-830 Preheater.
Please read this manual before operating the HAKKO FR-830.
Keep this manual readily accessible for reference.
CAUTION
●Maintain a minimum clearance of 10 mm between a PWB and the hot air outlet.
●Do not cover the hot air outlet while hot air is blowing from the outlet.
●Do not blow heated air directly into the hot air outlet when the upper unit
is used.
●Do not turn off the power until cool down is completed after the heater is
turned off.
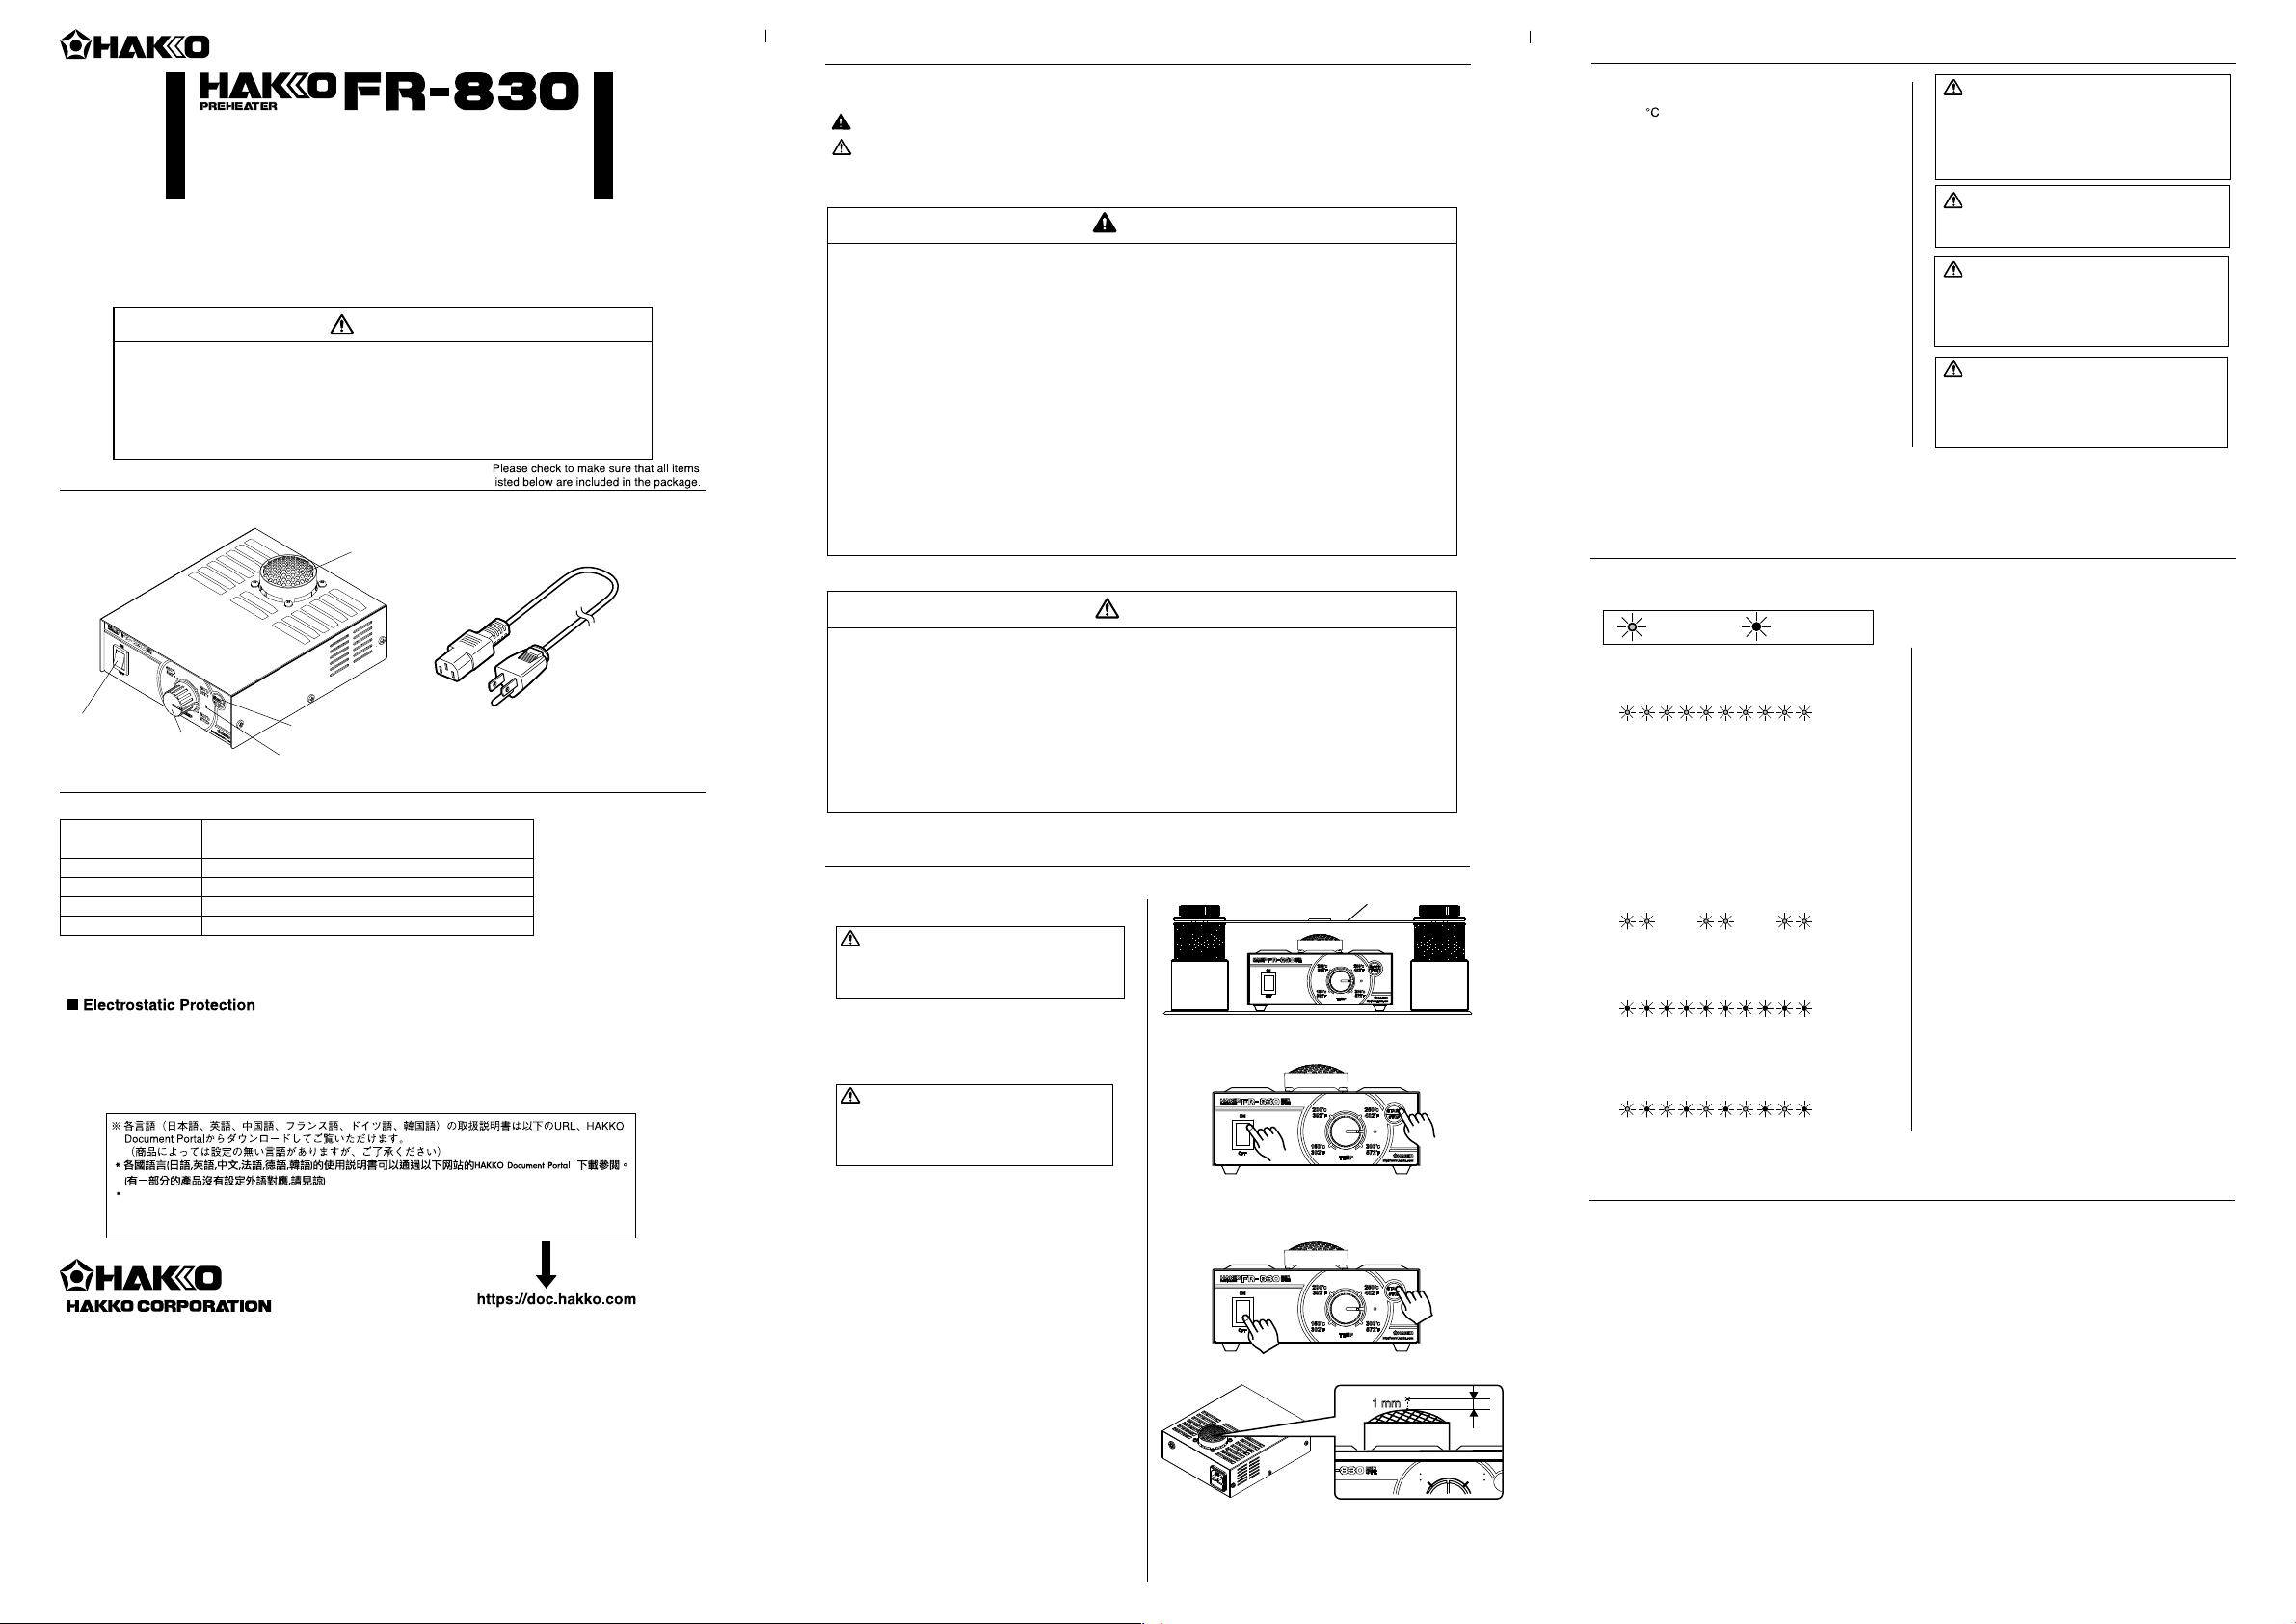
1. PACKING LIST & PART NAMES
HAKKO FR-830 ...................................................1
Power cord..........................................................1
FR-830
Power switch
Temperature
adjusting knob
START/STOP button
Lamp
2. SPECIFICATIONS
●HAKKO FR-830 Preheater
Power Consumption
Control Temperauture
Dimensions
Weight
Air Flow
* Height (H) is the distance from the bottom of the foot to the top of the hot air outlet.
* This product is protected against electrostatic discharge. Be sure to ground the unit during use.
* Specifications and design are subject to change without notice.
This product includes such features as electrically conductive plastic parts and grounding of the unit
as measures to protect the device to be soldered from the effects of static electricity. Be sure to observe
the following instructions:
1. The plastic parts are not insulators, they are conductors. When making repairs or replacing
parts, take sufficient care not to expose live electrical parts or damage insulation materials.
2. Be sure to ground the unit during use.
100 V-210 W, 110 V-240 W, 120 V-470 W
220 V-230 W, 230 V-250 W, 240 V-270 W
150 - 300℃ (302 - 572℉)(above the hot air outlet)
140 (W) × 75*(H) × 185 (D) mm (5.5 × 3.0 × 7.3 in.)
0.75 kg (1.653 lb.)
3
/min (fan capability)
0.15 m
Instruction manual.................................................1
Hot air outlet
Power cord
3. WARNINGS, CAUTIONS, AND NOTES
Warnings, cautions and notes are placed at critical points in this manual to direct the operator’s
attention to significant items. They are defined as follows:
Failure to comply with a WARNING may result in serious injury or death.WARNING:
CAUTION :
NOTE :
Failure to comply with a CAUTION may result in injury to the operator, or damage to the
items involved.
A NOTE indicates a procedure or point that is important to the process being described.
WARNING
When the power is ON, the temperature of the hot air outlet ranges from 150 to 300℃
(302 to 572℉ ). To avoid injury to personnel or damage to items in the workarea,
observe the following:
●Do not directly touch either the hot air outlet or its vicinity.
●Do not use the product near combustible gases or flammable materials.
●Do not spray flammable substances or flux to the hot air outlet or the air inlet.
●Do not put foreign objects into the hot air outlet or the air inlet.
●Do not use the unit in an enclosed area, and with the hot air outlet or the air inlet blocked.
●Inform others in the area that the unit is hot and should not be touched.
●Turn the power off when not in use, or left unattended.
●Turn the power off when changing parts or storing the HAKKO FR-830.
●Do not use the HAKKO FR-830 in the vicinity of anything which can be pulled into the air
inlet and cause a fire (such as dust and dirt).
●This appliance is not intended for use by persons (including children) with reduced physical,
sensory or mental capabilities, or lack of experience and knowledge, unless they have been
given supervision or instruction concerning use of the appliance by a person responsible
for their safety.
●Children should be supervised to ensure that they do not play with the appliance.
This product is approved for use as a PWB preheater. Misuse of this product may result in injury.
CAUTION
●Do not use the HAKKO FR-830 for applications other than preheating.
●Do not blow air into the hot air outlet from above.
●For maximum service life, limit continuous operation to no more than 1 hour.
●Be sure the HAKKO FR-830 is grounded. Always connect power to a grounded receptacle.
●Do not modify the HAKKO FR-830.
●Use only genuine HAKKO replacements parts.
●Do not allow the HAKKO FR-830 to become wet, or use it when hands are wet.
●Remove power cord by holding the plug - not the wires.
●While using the HAKKO FR-830, don't do anything which may cause bodily harm or physical damage.
4. OPERATION
●Preparation
Place the PWB over the HAKKO FR-830.
(See figure to the right for reference)
CAUTION
Please make sure to keep 10 mm or more
gap between the PWB and the hot air
outlet.
●Turn on the power.
1. Insert the power cord into the receptacle.
2. Turn on the power switch.
The lamp comes on in green and room
temperature air is discharged.
CAUTION
Make sure that the hot air outlet and its
vicinity are not blocked before turning
on the power switch.
To start working
●
②
③
P.W.B.
④
4. OPERATION
Temperature Offset Function (continued)
●
1. Turn the temperature adjusting knob to
250 and wait until the measured
temperature is stabilized.
2. After the temperature stabilizes,
press the START/STOP button for
three seconds. The color of
the lamp will change to orange.
3. Turn the knob so that the measured
temperature indicates 250°C. The
temperature offset ranges from –50°C
to +50°C relative to the initial setting.
Once the temperature is offset by +10
°C, the temperature offset range is
from –60°C to +40°C.
4. Press the START/STOP button
again. The lamp returns to red, which
indicates that an automatic control of
the heater begins. Turn the knob to the
desired temperature for preheating.
CAUTION
If you try to make a temperature offset
with the knob being set at 150 ℃ or 300
℃, the temperature cannot be offset in
the negative (-) direction or in the positive
(+) direction respectively.
CAUTION
The temperature offset function does not
work unless the temperature stabilizes.
CAUTION
If you try to make a temperature offset
that exceeds +/-50℃, the lamp will start
flashing. Temperature offset cannot be
made while the lamp is flashing.
CAUTION
The unit automatically switches to the
normal operation mode unless you turn
the knob within 90 seconds after entering
the temperature offset mode.
5. ERROR INDICATION
When a fault is detected, the lamp on the front panel flashes in the following pattern
indicating a fault occurs.
...............
Red
●Heater Error
Lamp flashing pattern:
●Sensor Error
Lamp flashing pattern:
●Overheat Error
Lamp flashing pattern: (fast flashing)
●System Error
Lamp flashing pattern:
...............
Green
There are two causes that the heater error
will occur.
• The heater error occurs when hot air is blown
into the air outlet and the heater protection
is activated.
The heater error due to activation of the
protection system is automatically reset
when turning the power OFF and the unit
is cooled.
• The heater error occurs if the heater is broken
and the temperature is not increased.
Refer to “7. TROUBLESHOOTING”.
The sensor error occurs if the sensor is broken.
The overheat error occurs when the unit
temperature is abnormally high.
When the unit cools, the error will be cleared
automatically and function of the unit will resume.
When a problem has occurred to the control
system, a system error occurs.
Instruction manual in the language of Japanese, English, Chinse, French, German and Korean
can be downloaded from the HAKKO Document Portal.
(Please note that some languages may not be available depending on the product.)
HEAD OFFICE
4-5, Shiokusa 2-chome, Naniwa-ku, Osaka 556-0024 JAPAN
TEL: +81-6-6561-3225 FAX: +81-6-6561-8466
https:// www.hakko.com E-mail: [email protected]
OVERSEAS AFFILIATES
U.S.A.: AMERICAN HAKKO PRODUCTS, INC.
TEL: (661) 294-0090 FAX: (661) 294-0096
Toll Free (800) 88-HAKKO
4 2 5 5 6
https:// www.HakkoUSA.com E-mail: [email protected]
HONG KONG: HAKKO DEVELOPMENT CO., LTD.
TEL: 2811-5588 FAX: 2590-0217
https:// www.hakko.com.cn E-mail: [email protected]
SINGAPORE: HAKKO PRODUCTS PTE., LTD.
TEL: 6748-2277 FAX: 6744-0033
https:// www.hakko.com.sg E-mail: [email protected]
Please access the web address below for other distributors.
https:// www.hakko.com
© 2009-2019 HAKKO Corporation. All Rights Reserved.
MA01822XZ191223
2019.12
3. Set the desired temperature of the air.
4. Press the START/STOP button to start
preheating. The lamp comes on in red.
Hot air is discharged from the hot air outlet.
When the temperature stabilizes, the lamp will
start flashing.
●After finishing the work
1. Press the START/STOP button to stop
preheating. The heater operation stops and
cool down of the unit begins. The lamp flashes
slowly in green. After the cool down is complete,
the lamp comes on in green and
the unit is ready to start again.
2. Make sure that the unit is completely
cooled down before turning off the
power switch.
●Temperature Offset Function
When setting a temperature offset, be sure to
measure the hot air at a point that is
approximately 1mm above the center of
the hot air outlet.
●To finish working
②
1 mm
200 C
392 F
6. MAINTENANCE
Remove any flux or other residue that may stick to the hot air outlet by wiping it off.
①
250 C
482 F
Page 2
7. TROUBLESHOOTING
8. HEATER/SENSOR INSPECTION
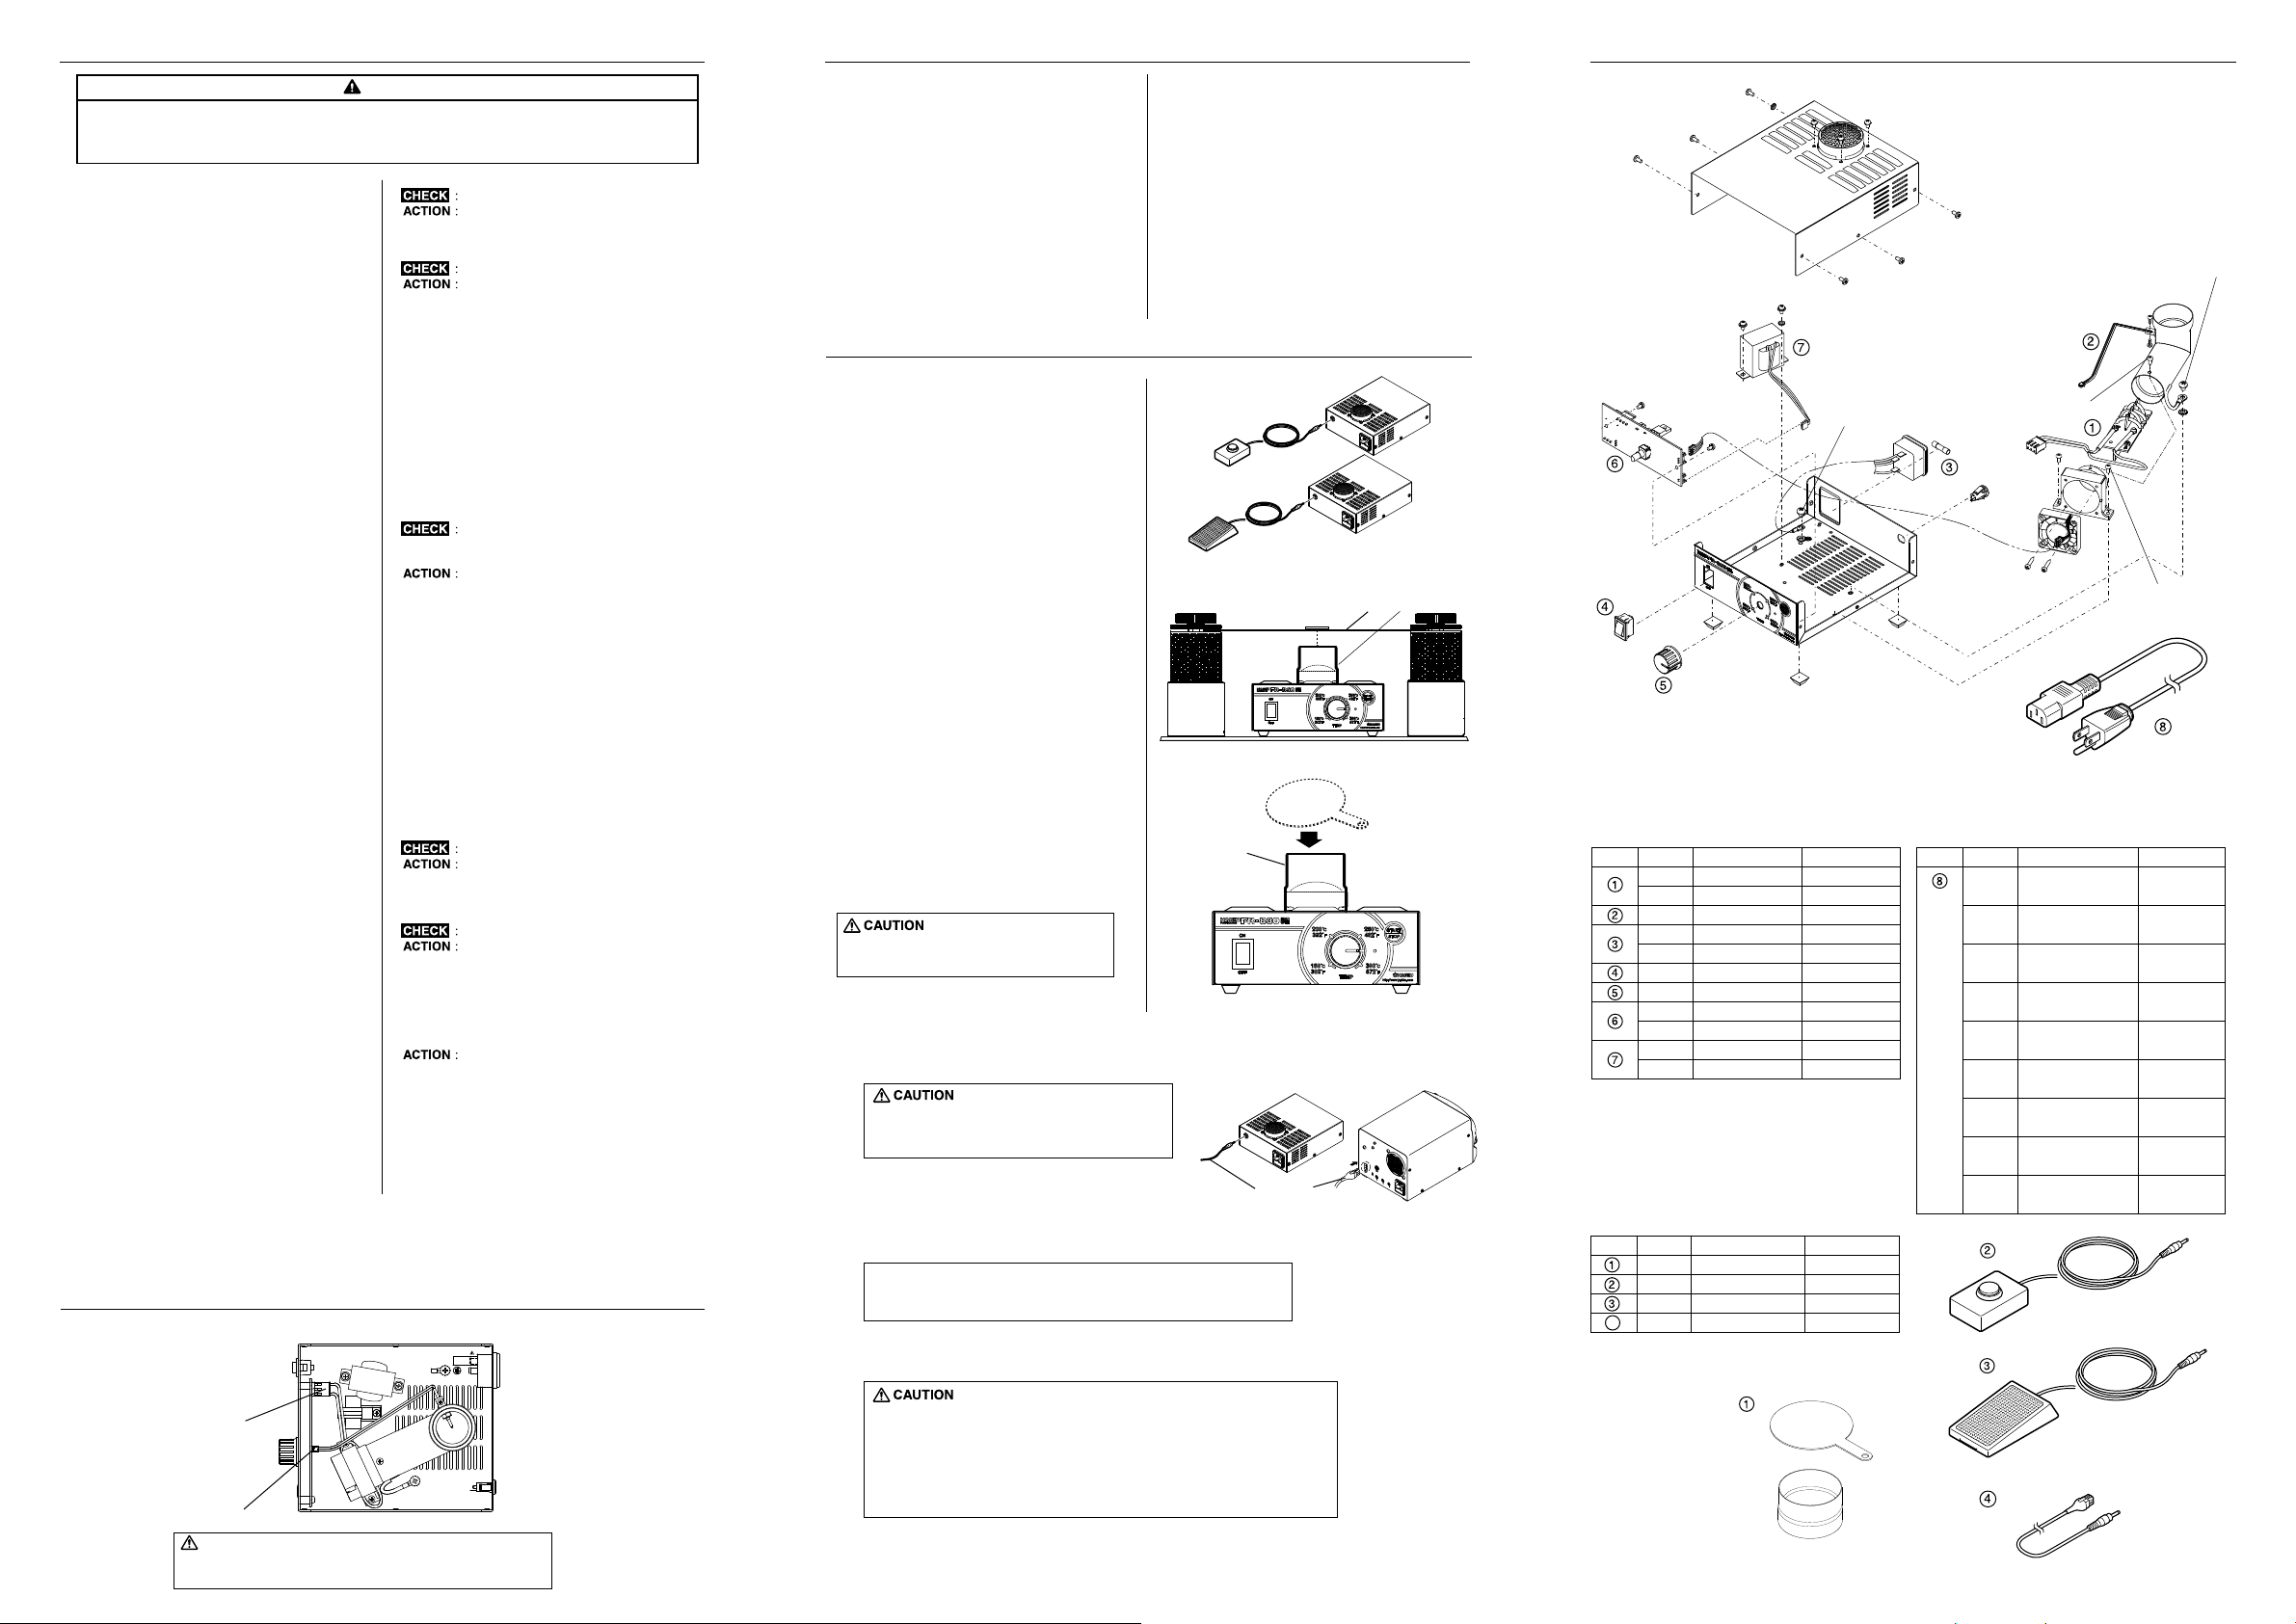
10. PARTS LIST
WARNING
●Before checking the inside of the HAKKO FR-830 or replacing parts, be sure to disconnect
the power plug. Failure to do so may result in electric shock.
●Perform troubleshooting after the unit is completely cooled down.
●
The unit does not operate
when the power switch is turned ON.
Is the fuse blown?
Investigate why the fuse blew and
then replace the fuse.
●The lamp indicates a heater error.
Is the heater broken?
Turn off the power switch.
(The heater error will be reset when
the power switch is turned off.)
Turn on the power switch again,
and then the lamp turns on in
green and room temperature air
(cool air) is discharged. Make sure
that the unit is sufficiently
cooled(with room temperature),
and then press the START/STOP
button. If hot air is not discharged
and the lamp indicates a heater
error again, check the resistance
value of the heating element.
Is air blown into the unit
from outside?
(The protection system is activated.)
Turn off the power switch.
(The heater error will be reset when
the power switch is turned off. )
Turn on the power switch again,
and then the lamp turns on in
green and room temperature air
(cool air) is discharged. Make sure
that the unit is sufficiently cooled
(with room temperature), and then
press the START/STOP button.
When the lamp starts flashing in red
as in the normal operation status
and hot air starts to be discharged,
the protection system is reset,
enabling operation of the unit.
●The lamp indicates a sensor error.
Is the sensor broken?
Measure the resistance value of the
sensor.
●The lamp indicates a overheat error.
Is the unit too hot ?
When the unit cools, the error will
be cleared automatically and
function of the unit will resume.
Use the HAKKO FR-830 in an
environment and method that
does not cause the unit to overheat.
●The lamp indicates a system error.
A problem has occurred to the
control system.
Regardless of the operation status,
even though this unit is operating
or you have just turned on the
power switch, immediately stop
using the unit, disconnect the
power plug, and then contact your
HAKKO representative.
Consult your local distributor for further information about other troubles.
8. HEATER/SENSOR INSPECTION
●Measure the resistance of the heater.
Measure the heater resistance after removing
the connector from the heater.
Heater resistance: 25 to 30 Ω (100 - 120V)
Heater resistance: 100 to 110 Ω (220 - 240V)
If the resistance value is different from the above
figure, replace the heating element.
(For the replacement procedure, see the
instruction manual supplied the replacement part.)
●Measure the resistance of the sensor.
Measure the sensor resistance after removing
the connector from the sensor.
If the resistance value is ∞, replace the sensor
(For the replacement procedure, see the
instruction manual supplied the replacement part.)
9. OPTIONS
●External switch
An optional hand and foot switch are available
which can be connected to the unit to
START/STOP preheating.
●Optional extension pipe
The optional extension pipe can be used to
focus the discharged air.
10 mm or more
●Optional extension lid
If using the HAKKO FR-802 or FR-803B,
use the optional lid and extension pipe to block
hot air from being blown into the air outlet
when the HAKKO FR-830 is not in use.
Failure to do so may damage the unit.
Do not cover the hot air outlet
while hot air is blowing from the outlet.
■Connection with HAKKO FM206
HAKKO FM-206 can be connected to HAKKO FR-830 with connecting cable,
which permits HAKKO FM-206 to be used along with HAKKO FR-830.
Connect the HAKKO FM-206 and FR-830
by the connecting cable
before turning on the power switch.
●START
When pressing the Hot Air button of HAKKO FM-2029
handpiece with HAKKO FM-2029 connected to HAKKO FM-206,
HAKKO FR-830 will work in conjunction with HAKKO FM-206.
HAKKO FR-830 and FM-206 will be operated by the setting
and mode of each unit.
NOTE :
When pressing the START/STOP button of the HAKKO FR-830,
only HAKKO FR-830 will be activated.
●STOP
Press the Hot Air button of the HAKKO FM-2029 handpiece while
HAKKO FM-2029 is connected to HAKKO FM-206.
Extension
pipe
Connecting cable
(not included)
P.W.B
HAKKO FM-206
Extension
pipe
Binding head screw M3x6 (6)
External tooth lock washer
Nominal size 3 (1)
SEMS screw
(with plain, S washer)
M3x6 (2)
External tooth
lock washer
Nominal size 3 (1)
SEMS screw
(with S washer)
M3x5 (2)
●HAKKO FR-830
Item No. Part No.
A1569
A1570
A1571
B2468
B1258
B2852
B1028
B3588
B3589
B3261
B3262
Part Name
Heater
Heater
Sensor
Fuse
Fuse
Power switch
Knob
P.W.B.
P.W.B.
Transformer
Transformer
●Option
Item No. Part No.
B3263
B2763
B1649
4
B3685
Part Name
Extention pipe
Hand switch
Foot switch
Connecting cable
SEMS screw
(with S washer)
M4x5 (1)
External tooth
lock washer
Nominal size 4 (1)
Specifications
100 - 120 V
220 - 240 V
125 V-5 A
250 V-3.15 A
110 - 120 V
220 - 240 V
110 - 120 V
220 - 240 V
Specifications
With lid
For FM-206
SEMS screw
(with S washer)
M3x5 (4)
Nut M3 (4)
Item No. Part No.
Pan head
tapping screw
M3x6 (1)
Pan head
tapping screw
M3x16 (2)
B2419
B2421
B2422
B2424
B2425
B2426
B2436
B3508
B3550
Pan head screw
M2.6x6 (2)
Part Name
Power cord, 3 wired
cord & American plug
Power cord, 3 wired
cord but no plug
Power cord, 3 wired
cord & BS plug
Power cord, 3 wired
cord & European plug
Power cord, 3 wired
cord & BS plug
Power cord, 3 wired
cord & Australian plug
Power cord, 3 wired
cord & Chinese plug
Power cord, 3 wired
cord & American plug
Power cord, 3 wired
cord & SI plug
SEMS screw
(with S washer)
M4x5 (1)
External tooth
lock washer
Nominal size 4 (1)
Pan head screw
M3x6 (2)
Specifications
U.S.A
220 - 240 V
India
220 V KTL,
230 V CE
230 V CE
U.K.
China
Heater connector
Sensor connector
CAUTION
Measure the resistances of the heater and the sensor
when their temperatures are at room temperature.
When the HAKKO FM-206 and HAKKO FR-830 are connected,
be sure they are both in the same operating state (idle or active)
otherwise they units will activate/deactivate opposite of each other.
For example, if the FM-206 is idle, but the HAKKO FR-830 is actively
running, pressing the Hot Air button on the HAKKO FM-2029 will
activate the HAKKO FM-206 and will turn off the HAKKO FR-830.
Please refer to the HAKKO FM-206 or FM-2029 instruction manual for its use.
 Loading...