

SELF FEEDER
●
Thank you for purchasing the HAKKO 373 Self Feeder.
Please read this manual carefully before operating the
HAKKO 373. Store the manual in a saf e, easily accessib le
place for future reference.
●
CAUTION: You must install the Solder Dia. Adjustment Ring before use.
TABLE OF CONTENTS
Precautions .................................................................1
Specifications..............................................................1
Names of Parts ...........................................................2
Setting Up the HAKKO 373 .........................................3
Operation ....................................................................6
Replacement of Parts..................................................8
Options & Replacement Parts .....................................9
Parts List................................................................... 11
Troubleshooting Guide ..............................................13
Precautions
CAUTION
● Setting up should be done while the soldering iron is cool, or you may get burnt.
● Do not force the guide pipe bend or turn as this may result in damage.
● Do not operate with tube bending or holding in sharp angle. It may cause to clogging.
● Input of switching is no-voltage input. Do not apply voltage to the jack for switch.
● Periodically, remov e the guide pipe and clean out clogged flux.
● Do not force the adjustment scre w to adjust the amount of solder return. It may cause to damage.
● If the power cord is damaged, it must be replaced by the manufacturer, its service agent or similarly
qualified person in order to avoid personal injury or damage to the unit.
Specifications
●●
● Usable Solder
●●
Usable solders are as follows. Some of the parts should be changed according to the diameter of
solder desired to use.
Dia. of
solder
Maximum quantity of usable solder is 1 kg (2.2 pounds).
●●
● Usable Soldering Iron
●●
HAKKO 900M (For HAKKO 926, 927, 928)
HAKKO 900L (For HAKKO 926, 927, 928)
HAKKO 902 (For HAKKO 931)
HAKKO 903 (For HAKKO 939)
HAKKO 904 (For HAKKO 929)
HAKKO DASH
HAKKO MACH-I
HAKKO 907 (For HAKKO 936, 937)
HAKKO 908 (For HAKKO 936, 937)
●●
● Specifications
●●
Power Consumption
Motor Rate
Solder Feed Time
Solder Feed Speed
Solder Feed Quantity
Solder Return Quantity
Outer Dimensions
Weight
(mm)
(inch)
0.6, 0.65, 0.8, 1.0, 1.2, 1.6
0.024, 0.025, 0.031, 0.039, 0.047, 0.063
Soldering Iron
6 W
DC 24 V 3.2W
0~7 sec.
4.5~26 mm (0.14~1 in.)/sec.
0~182 mm (0~7.2 in.)
0~5 mm (0~0.2 in.) (Fixed Speed)
107(W) x 110(H) x 215(D)
Approx.1.5 kg/3.3 pounds
Remarks
Operationable only with Foot Switch
1

Names of Parts
① Jack for Switch
② Feed Speed Control Knob
③ Feed Time Control Knob
④ Mode Switch
⑤ Power Switch
⑥ Release Lever
⑦ Securing Screw
⑧ Tension Adjustment Knob
⑨ Tension Gear Guide Shaft
⑩ Adjustment for the amount of solder return
⑪ Feed Gear
⑫ Supply Nozzle
⑬ Solder Bobbin Shaft
⑩⑪ ⑫ ⑬
①② ③ ④ ⑤
⑭ Solder Dia. Adjustment Ring
⑮ Tension Gear
⑧
⑨⑦⑥
⑭⑨⑪
⑮⑧
2
Setting Up the HAKKO 373
● Setting up should be done while the soldering iron is cool, or you may get burnt.
● Do not force the guide pipe bend or turn as this may result in damage.
● Do not operate with tube bending or holding in sharp angle. It may cause to clogging.
1. Install the Solder Dia.
Adjustment Ring
2. Setting the Guide Pipe
Asse’y
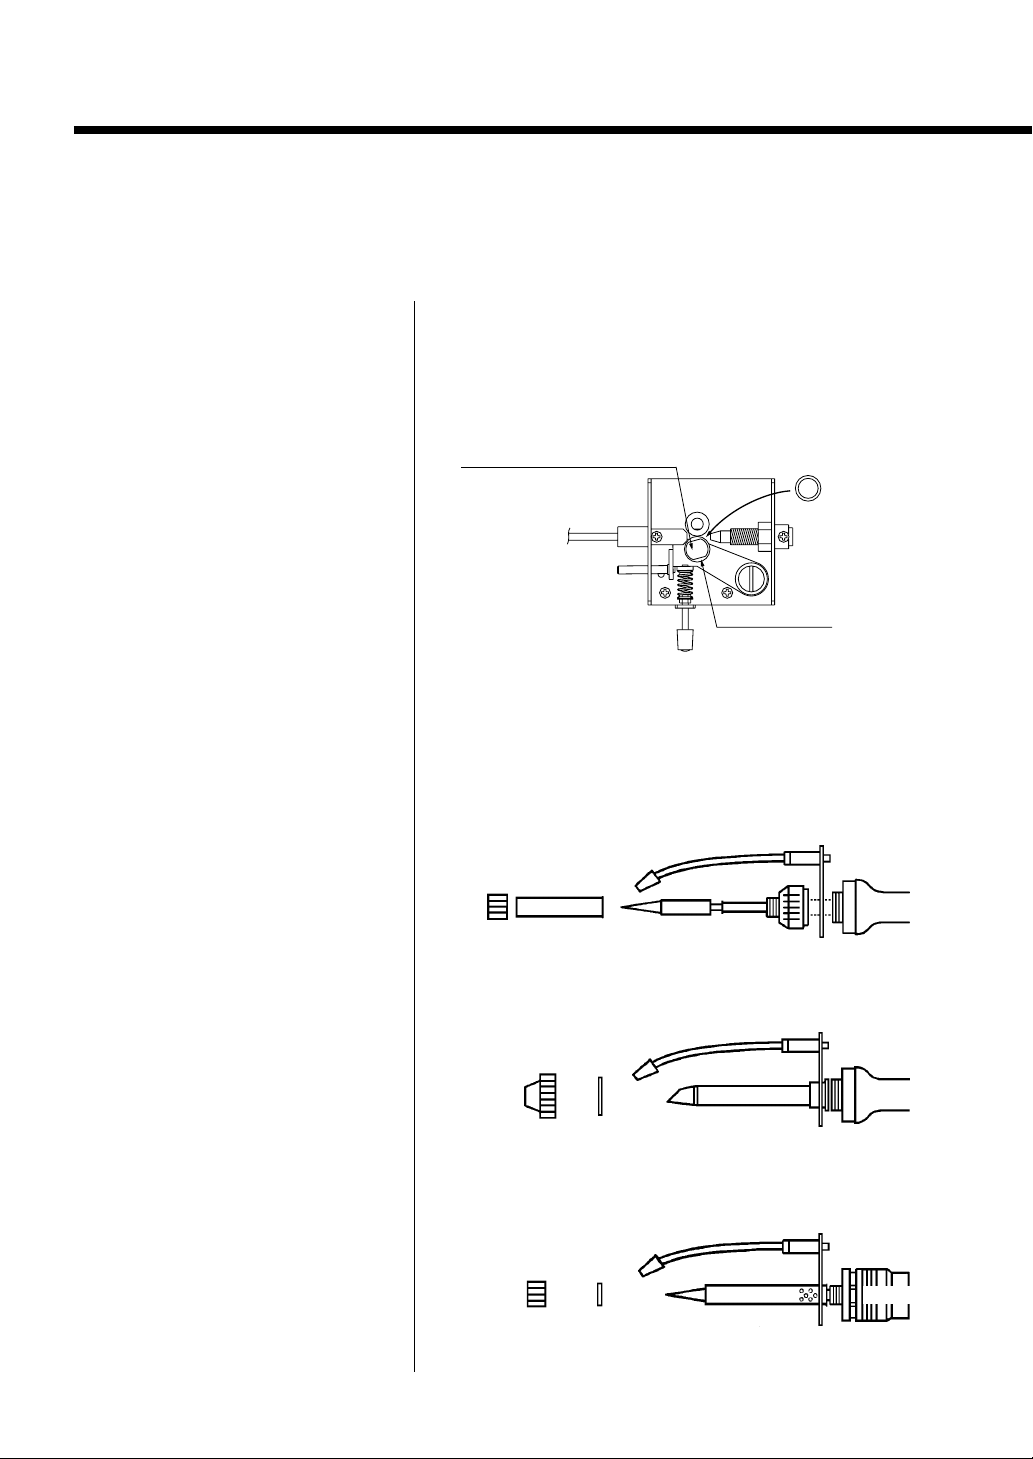
1. Remove the tension gear guide shaft.
2. Attach the solder dia. adjustment ring according to the
diameter of your desired solder and attach the tension
gear guide shaft.
Tension Gear Guide Shaft
Tension Gear
Solder Dia.
Adjustment Ring
Set the guide pipe asse’y between the nipple (or nut) and
handle, and secure it. Washer may need depend on the type
of iron. Please refer to the following figure.
HAKKO 900, HAKKO DASH SERIES & 907, 908
Guide Pipe Asse’y
Nut
HAKKO 902, 903, 904
Nipple Wave W asher (No. B2684)
HAKKO MACH-I SERIES
Stopper
Nut
(for 918 – No. B2685)
(for 920, 921, 922 – No. B2686)
3
Handle
Guide Pipe Asse’y
Handle
Guide Pipe Asse’y
Handle
3. Setting the Tube Unit
Setting Up the HAKKO 373
(a)Attach the T ube to Guide Pipe
Asse’y.
(b)Set the Attachment on the
Handle of Soldering Iron.
The tube is double structure. Insert the inside tube into the
hole of the connection, and the outside black tube should
fully cover the screw part of the connection. Be sure that not
to bend the tube.
NOTE
The Attachment is not necessary if you use HAKKO
MACH-I.
i. Position the attachment on the handle of iron. Decide
which outlet of attachment should use for the tube as the
tube can be pulled out from either way of the attachment.
Find the best position where can connect the tube straight
to the pipe. Be careful not to damage the inner wiring if
replace the tube inside of the attachment.
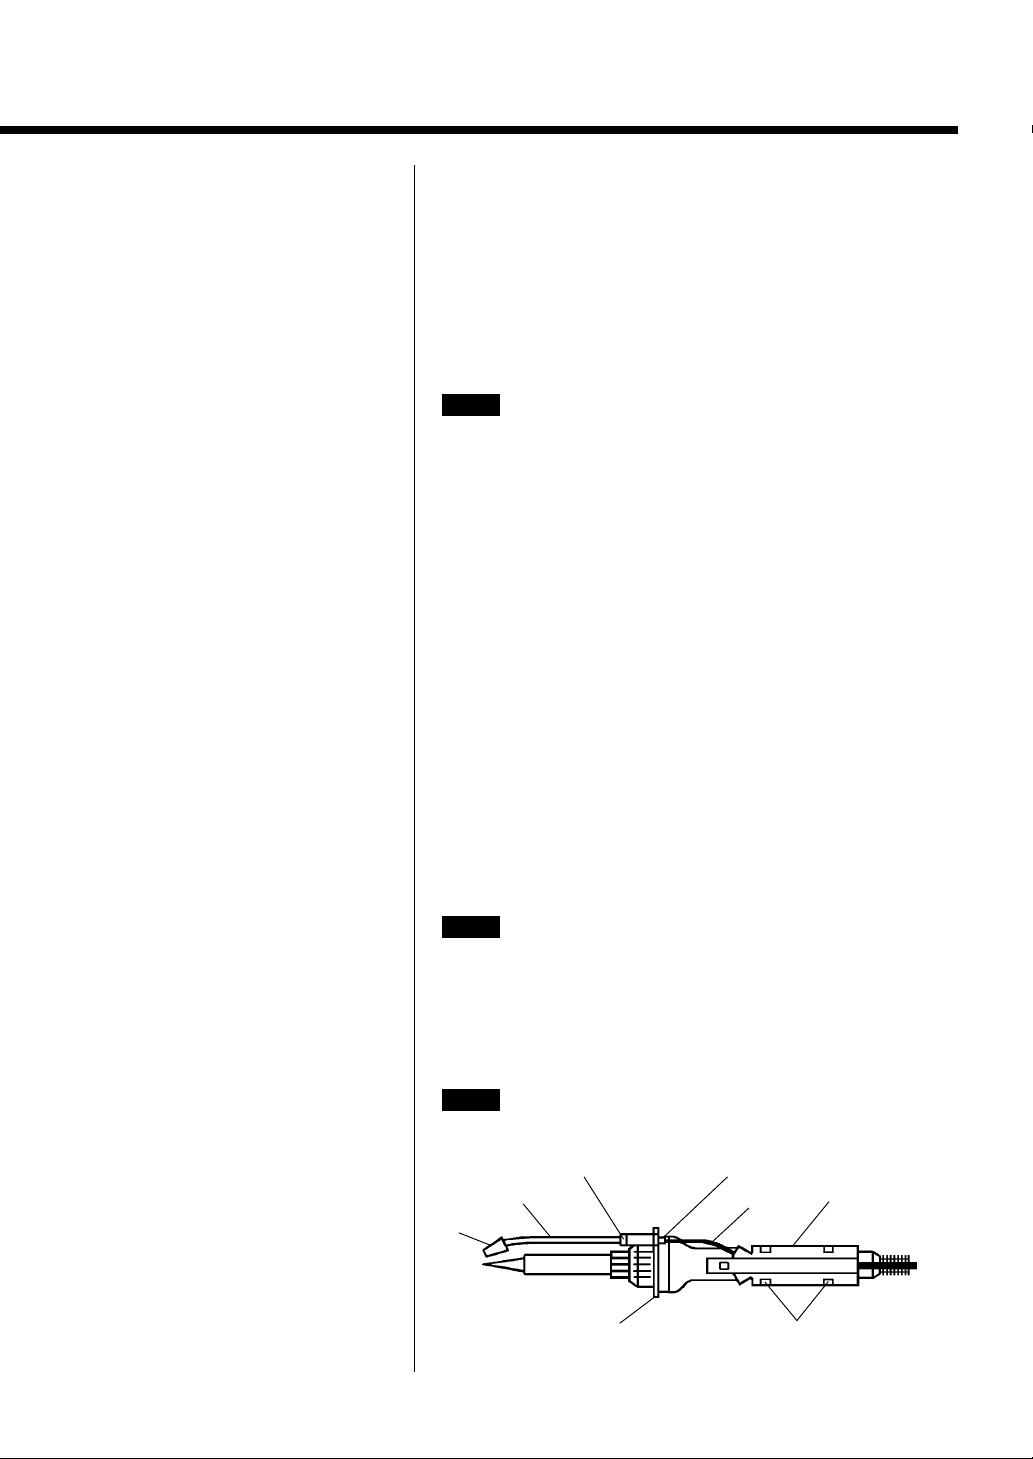
ii. Secure the attachment. Set the attachment on the handle
securely with clips and adhesive tape on backside of the
attachment. Refer to the following figure on the setting
position of the attachment and the guide pipe. P ay attention
on the setting angle of the guide pipe and the attachment.
4. Connect the Feeding
Nozzle
Insert the feeding nozzle into the feeding unit on the top of
the station, and secure it with screw.
NOTE
Securing the screw excessively may break the feeding
nozzle.
5. Connect the Mini-plug Insert the mini-plug branching from the tube unit into the
jack of the station.
NOTE
Nozzle
Connect the mini-plug of foot switch to the station if you
use HAKKO MACH-I.
Securing Nut for Guide Pipe Connection
Guide Pipe
Tube
Attachment
ClipsGuide Pipe Holder
4
 Loading...