

Haier X76 User Manual

1
Thank you for choosing X76 color screen GSM/GPRS digital phone.
This is a GSM/GPRS phone. In addi on to common call func ons, it also provides you with a variety of
prac cal func ons including bluetooth, camera, MP3 player, Video player, U Disk, memory card (T-Flash
card), recorder, calculator, GPRS, MMS (Mul media Message Service), handsfree call. With this manual,
you can acquire a full understanding of the usage of this phone. Our company reserves the right to revise
contents in this manual without any prior no ce.

2
Table of Contents
A en on and Precau ons ....................................................................................................................... 4
1 Safety Precau ons ............................................................................................................................4
2 Precau ons When Using Phone .......................................................................................................4
3 Precau ons When Using Ba eries ...................................................................................................5
4 Precau ons for children ....................................................................................................................5
Descrip on of keypad keys ........................................................................................6
Ge ng Started ..........................................................................................................9
1 Ba ery ............................................................................................................................................9
2 Connec ng to Network ...................................................................................................................11
Basic Func ons .......................................................................................................... 14
1 Making a call ....................................................................................................................................... 14
2 Emergency calls ...............................................................................................................................16
3 Answering a call ..............................................................................................................................16
4 Call records .....................................................................................................................................16
5 Call op ons .....................................................................................................................................16
Usage of func on menu ............................................................................................18
1 Scrolling search and select func on ................................................................................................18
2 Exit menu ........................................................................................................................................18
Instruc ons of Func on menu ...................................................................................18
1 Applica on ........................................................................................................................................18
2 Contact .............................................................................................................................................20

3
3 Relaxa on .........................................................................................................................................21
4 My Files .............................................................................................................................................21
5 Messages ..........................................................................................................................................21
6 Mul media .......................................................................................................................................24
7 Wireless Connec on .........................................................................................................................26
8 Camera ..............................................................................................................................................27
9 Network Services ..............................................................................................................................28
10 Call history ......................................................................................................................................29
11 Se ngs ...........................................................................................................................................29
12 User Profi les ....................................................................................................................................33
Input method ............................................................................................................ 34
Guide to Fast Usage ...................................................................................................35

4
Contents
A en on and Precau ons
Please read these brief rules. Viola on of these rules might cause danger or break laws.
1.Safety Precau ons
1.1 Road safety comes fi rst
When driving, care must be taken for using phone; if driving condi ons are poor, please pull up at road
side to use the phone.
1.2 Sw ch off your phone in hospitals
Please abide by relevant regula ons or rules. Please switch off when close to medical equipment.
1.3 Switch off your phone in aircra s
Wireless phones can cause interference. Using phones in aircra is both dangerous and illegal.
1.4 Sw ch off your phone when refuelling
Do not use the phone at a refuelling sta on or near fuels or chemicals.
1.5 Sw ch off your phone when close to blas ng area
To avoid interfering with blas ng opera ons, turn your phone OFF when in a “blas ng area” or in areas
posted: “turn off twoway radio”. Obey all signs and instruc ons.
2.Precau ons When Using Phone
2.1 Interference
All phones are subject to interference, which will aff ect their performance.
2.2 Use sensibly

5
Use phone only in its normal posi on. Please do not touch antenna area unless necessary.
2.3 Use qualifi ed servicing
Only qualifi ed maintenance staff can assemble or repair the equipment.
2.4 Waterproof
Your phone is not waterproof, please keep it dry.
2.5 Emergency calls
Make sure the phone is sw ched on and in service. Input emergency service number and press Dial key,
give your loca on and do not end the call un l told to do so.
3.Precau ons When Using Ba eries
3.1 Keep the ba eries away from fi re; do not dispose of ba eries in a fi re lest there should
be danger.
3.2 Do not dispose of used ba eries in rubbish, and they should be sent to designated
recycling center.
4.Precau ons for children
Keep the phone out of the reach of children, lest children treat it as toy and cause personal injury.
6
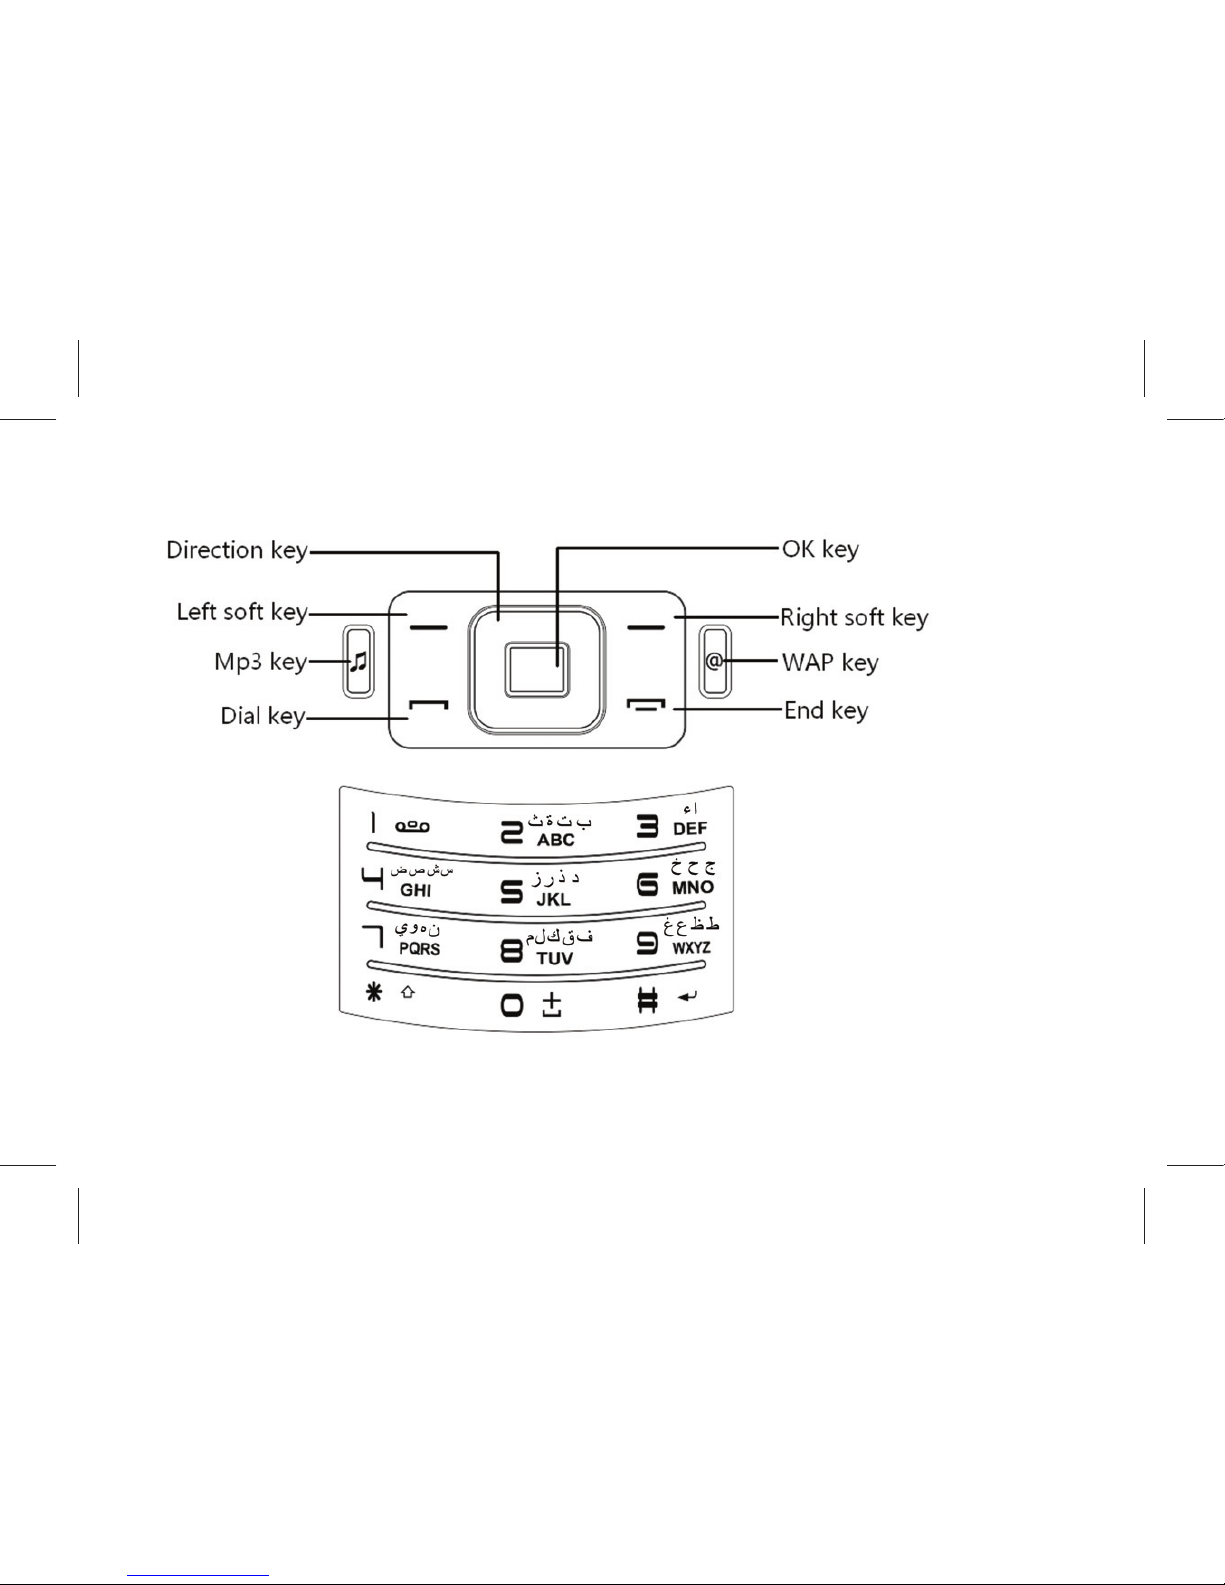
Descrip on of keypad keys
7
Keys Descrip on
[Dial key]
Dial a phone number or answer an incoming call. In standby state, press this key
to show the SIM 1/SIM 2 call history .
[End key]
End a call.
Long press this key to turn on/off your mobile phone.
In other cases, pressing this key will make the phone return to standby state.
[OK Key] Enter the menu that has been selected.
[Le so key]
Performs the func on of the prompt displayed at lower le corner of the
screen.
[Right so key]
Performs the func on of the prompt displayed at right corner of the screen.
In edit mode, tap this bu on to delete the character in front of the cursor. Long
press of this key will delete all the characters in the edi ng window.
In idle screen, press the RSK to access Contact.
8
[Naviga on key]
The key is split into 4 direc onal keys: up, down, le and right. Move the cursor
up, down, le and right in edit mode.
Press the direc onal key in idle interface to enter the corresponding func on
interface.
Up Key: to access Camera.
Down Key: to access Alarm.
Le Key: to access Write Message.
Right Key: to access User profi les.
[Number Keys]
Number keys are used to input numbers, le ers and special characters.
They can also be used as shortcut keys to quickly access the op ons within a
menu.
[WAP key] In idle screen, press this key can access Internet service.
[Mp3 key]
In idle screen, press this key can access audio player.
9
Getting Started
1 Ba ery
The ba ery at its ini al condi on is charged to 50% full, and can be used a er unwrapping. For the fi rst
three mes of charging, do not recharge un l the ba ery is totally exhausted, so that the ba ery can
reach its best usage performance.
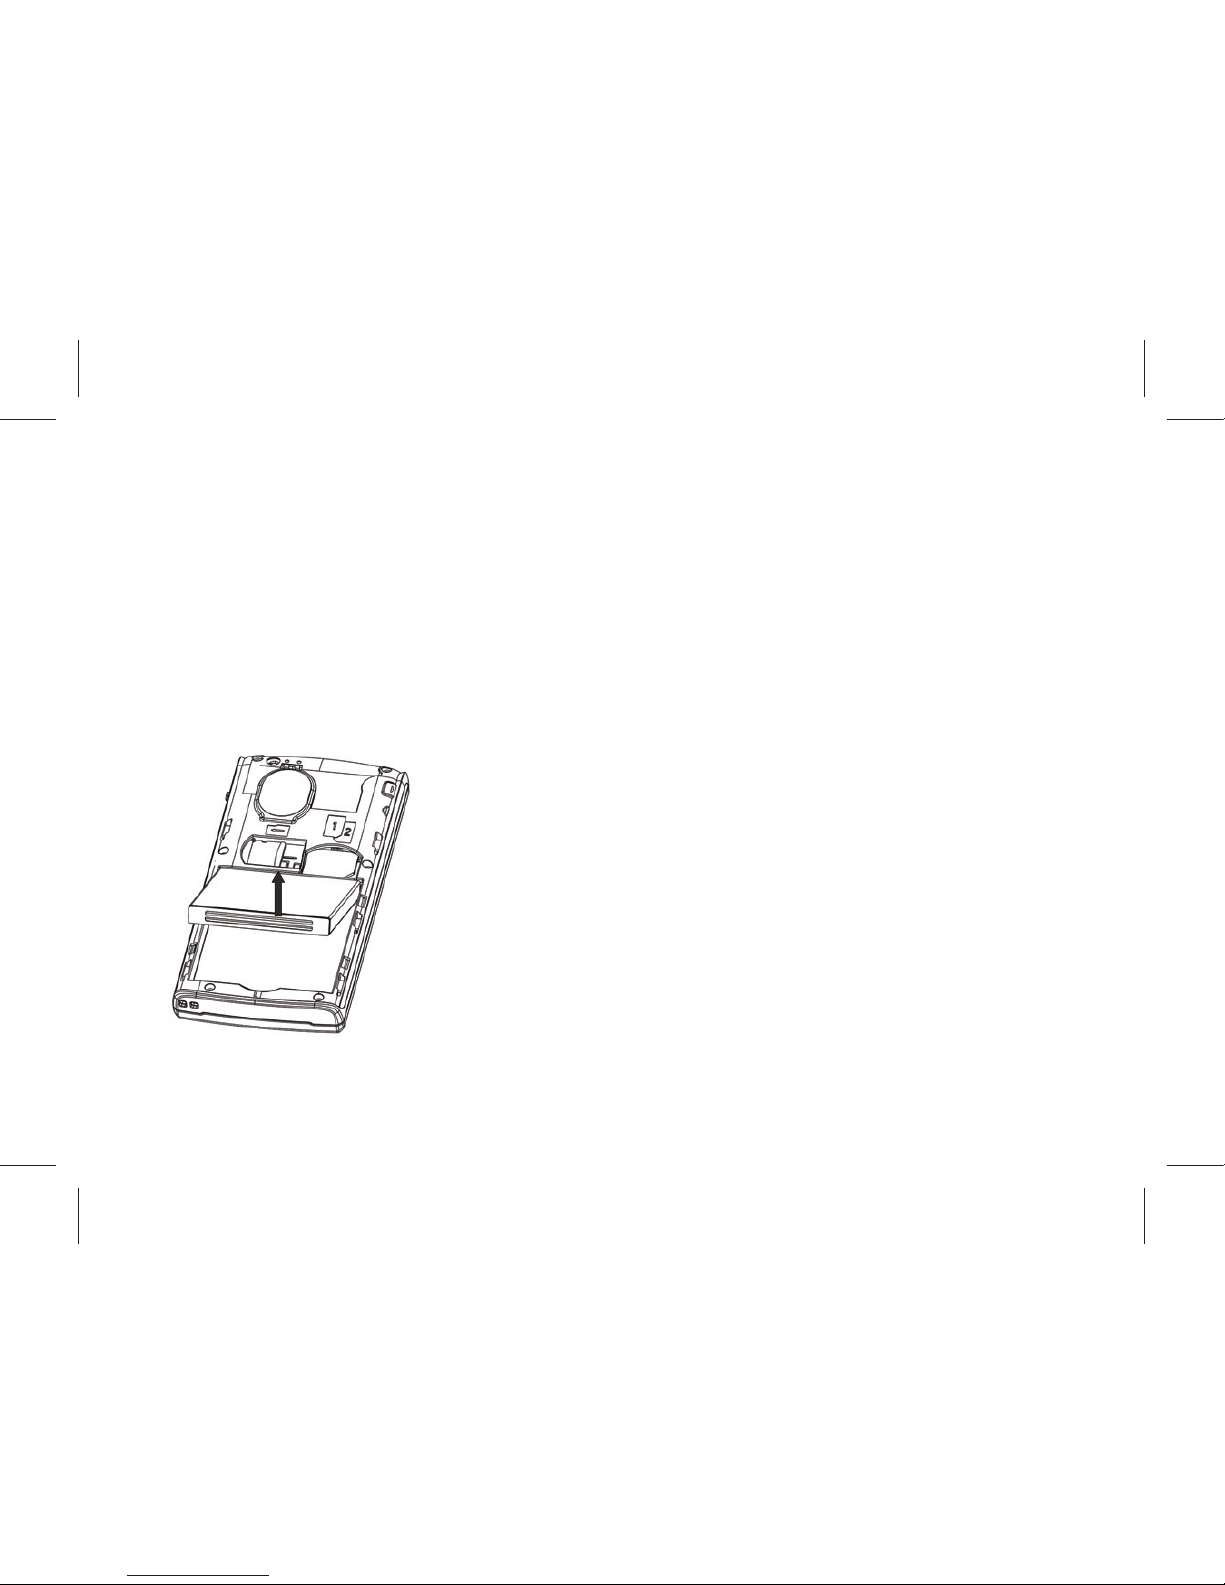
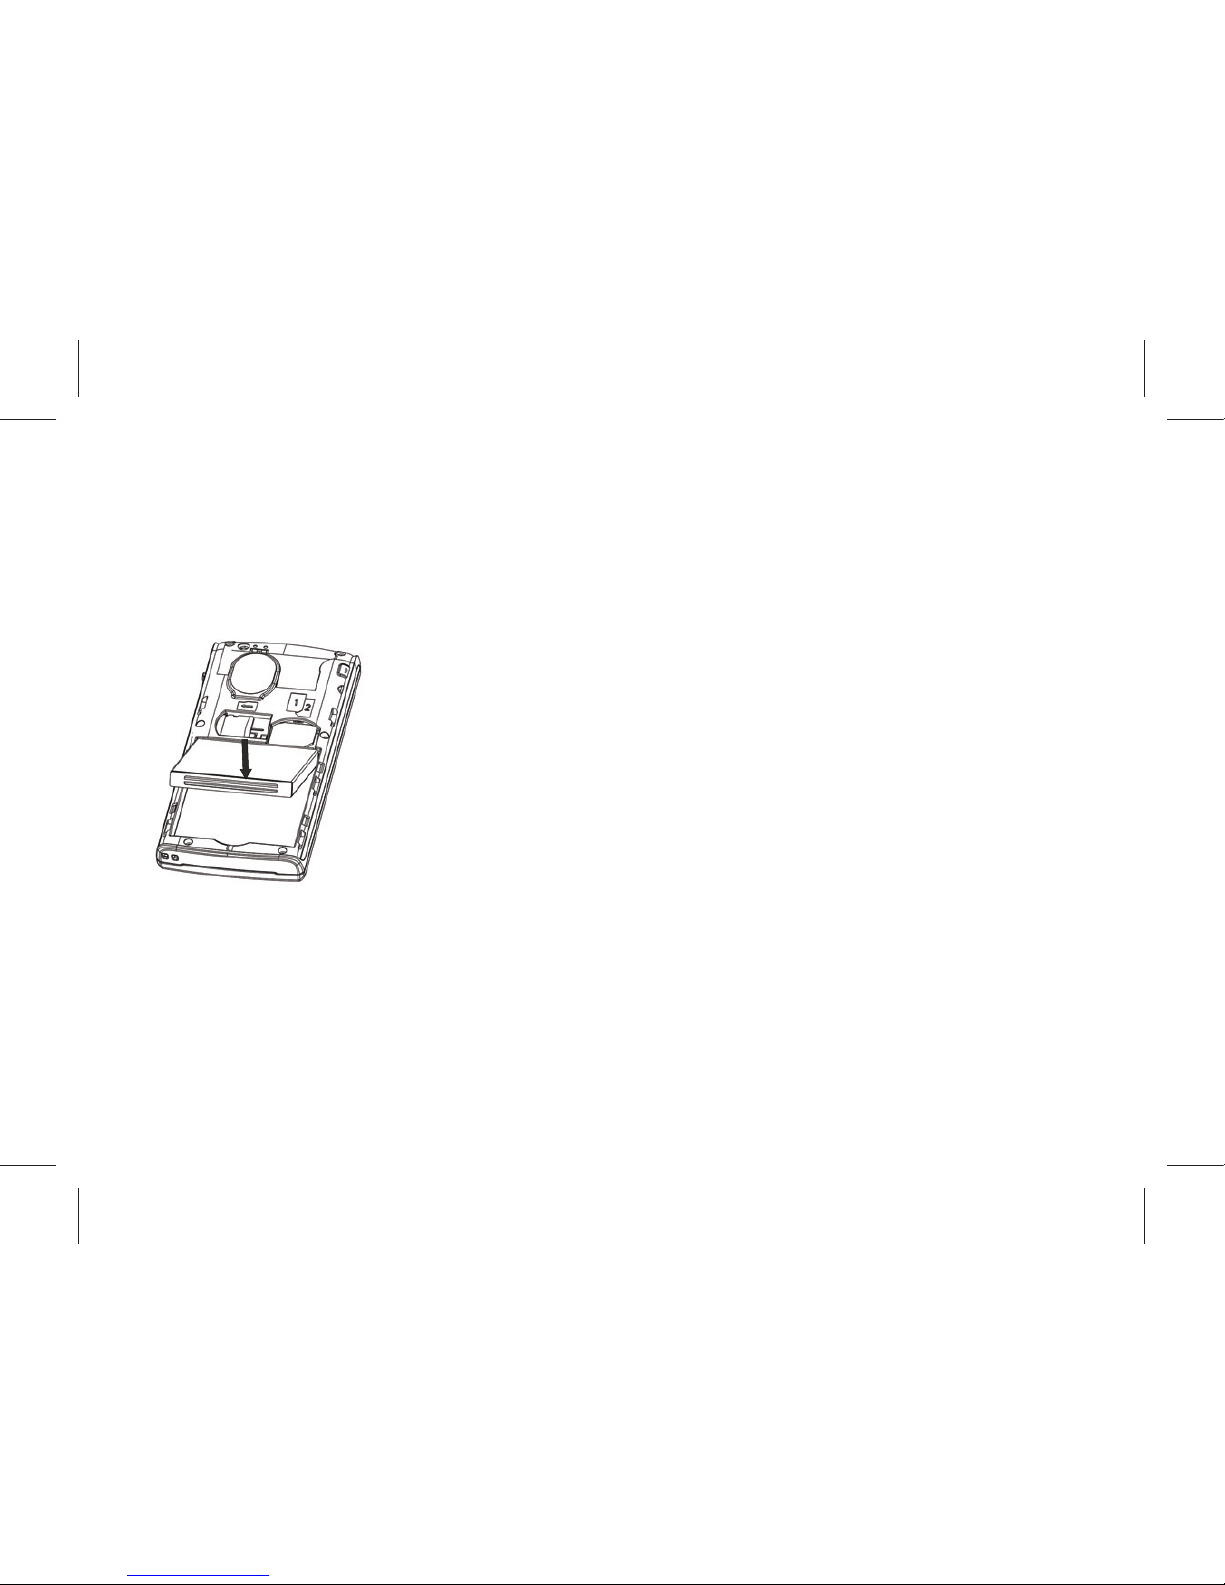
1.1 Removing and installing ba ery
For removing:
A. Push the ba ery back cover in the arrow direc on;
B.Li the ba ery up as indicated by the arrow;
C.Take the ba ery out.
Warning: Make sure to switch off the phone before taking out SIM card, otherwise your SIM card might
be damaged.
10
For installing:
A.Follow the arrow direc on, place the metal contact points of the ba ery upward and fl ush with metal
contact points in the ba ery bay, then insert the bo om of ba ery into ba ery bay;
B.Place the back cover of the ba ery onto the phone squarely, and push in the direc on of the arrow
ll it clicks into place.
1.2 Charging Ba ery
While charging, the power supply indicator at phone’s screen icon zone will fl ash in a rota on manner, if
the phone is off while charging, a charging screen will s ll appear, indica ng that the phone is recharging.
If the phone is s ll being overused while the power supply is insuffi cient, the recharging indicator will
appear on the screen a er the recharging has started for a while.
When the power supply indicator at the screen’s icon zone shows full and stops fl ashing, it means
charging has completed. If it takes place when the phone is off , the screen will display charging-fi nished

11
icon. The process generally takes about 2.5 hours. It is normal that the ba ery, the phone and the charger
will become hot during the charging process.
Charging comple ng, disconnect the phone and the charger from the AC power supply.
Note: Ba ery must be charged in a well ven lated place with surrounding temperature at -10℃ ~+
55℃, and it is impera ve that a charger provided by manufacturer is used. Using unauthorized charger
might cause danger, which also violates warranty terms prescribed by the manufacturer. If the charging
temperature is too high or too low, the phone will automa cally give warning and stop charging, so as to
prevent damages to ba ery or dangers.
2 Connec ng to Network
2.1 SIM card
A valid SIM (Subscriber Iden ty Module) card must be inserted in the phone before using it.
All informa on related to making connec on to the network are recorded in the chips of SIM card,
including the names, phone numbers and short messages you have stored in the SIM card Phone book.
In order to prevent loss or damage of the info in the SIM card, it is necessary to avoid touching metal
contact surface, and keep SIM card far from electricity current and magnet.
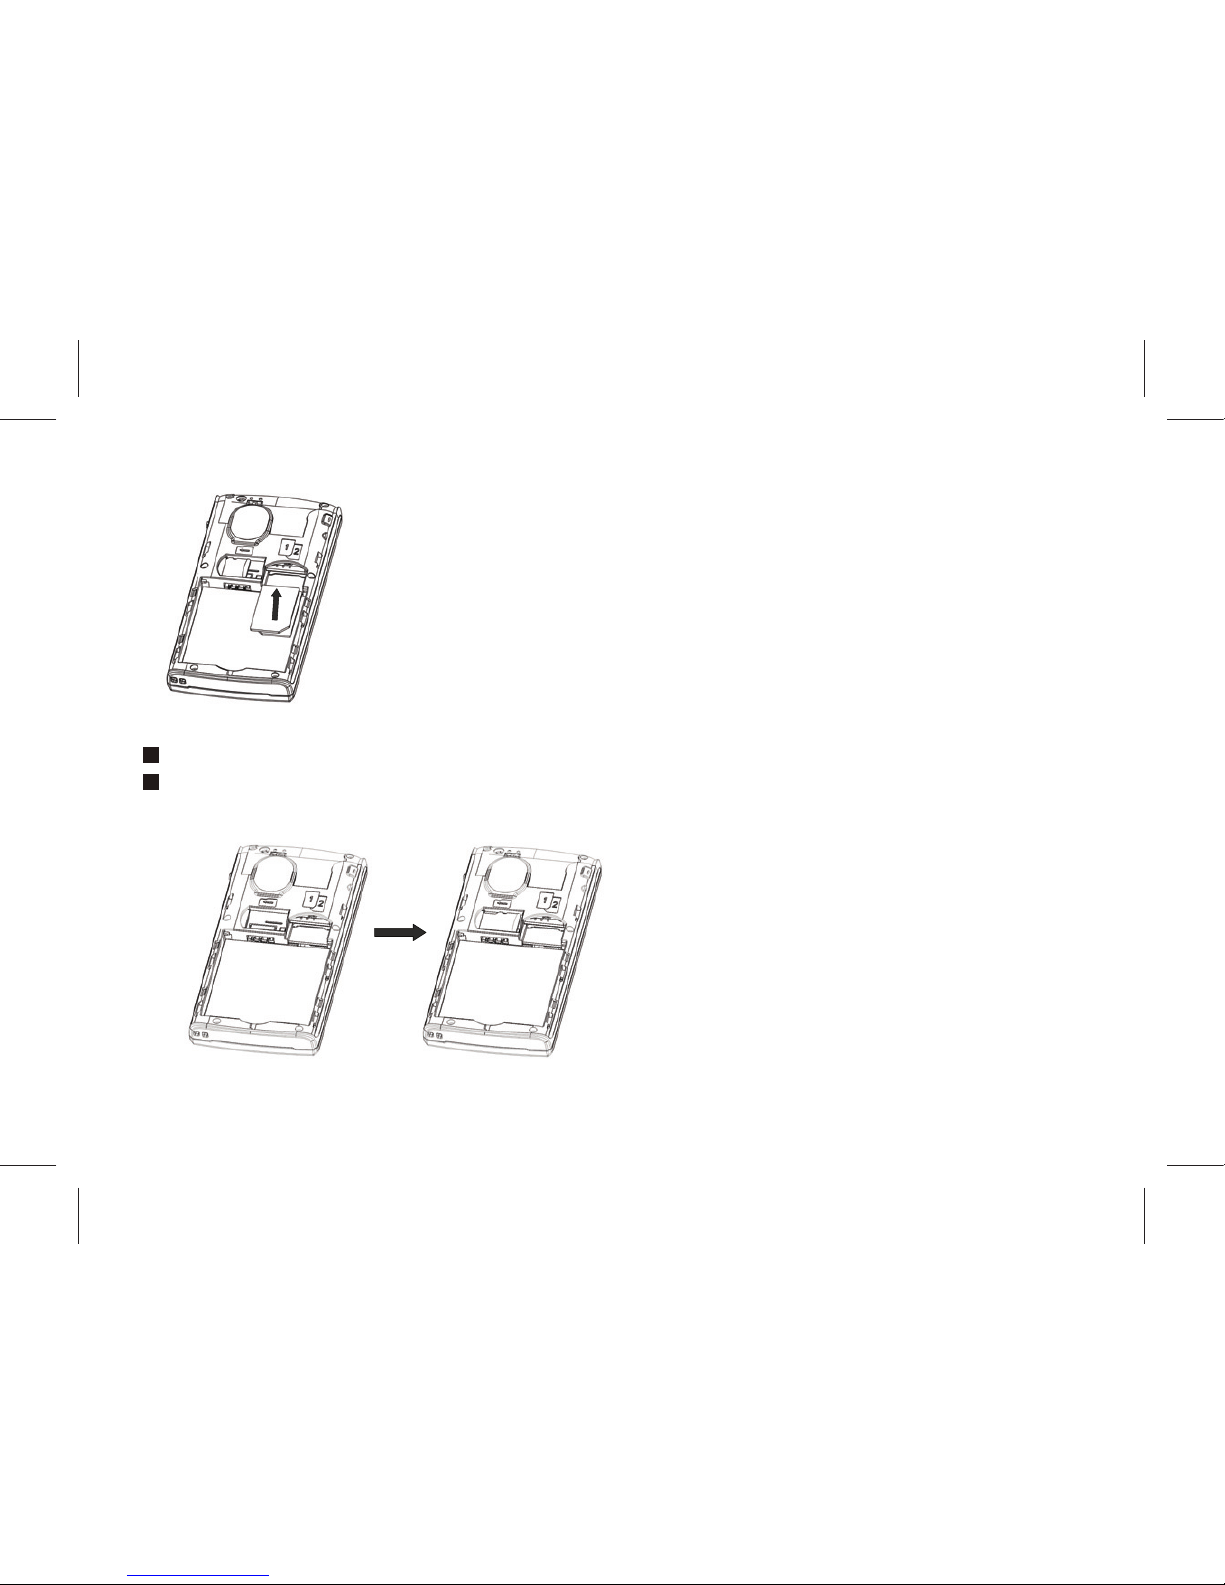
2.2 Inser ng and removing SIM card
Switch off the phone; remove ba ery and other external power connec on, as shown in the image.
Insert SIM card into SIM card socket.
When you need to remove SIM card, please switch off the phone fi rst, remove ba ery, then remove
the card.
12
2.3 Inser ng and removing memory card
Switch off the phone; remove ba ery and other external power connec on.
Insert memory card into card slot as shown in the image.

13
2.4 Switch on/off phone
To switch on or switch off phone, please press and hold the End key. If you have switched on phone
without inser ng SIM card in the fi rst place, the phone will prompt “Insert SIM card”.
Then the screen will display the following prompts in sequen al order:
Enter phone password – if you have set up phone lock password.
Enter PIN – if you have set up SIM card password.
Search – the phone will search ll fi nding appropriate network connec on.
2.5 Unlocking SIM card
To prevent illegal usage, PIN (Personal Iden fi ca on Number) code is adopted to encrypt for protec on
of your SIM card. Selec ng this op on and if having set up PIN code protec on, you have to enter PIN
code each me you start it, unlocking SIM card to use the mobile phone.
Users can erase SIM card password; however, in this case SIM card cannot prevent illegal usage.
Press and hold the End key to switch on the phone;
Enter PIN1 code. For instance, if PIN1 se ng is 1234, then enter the following input: 1 2 3 4 “OK”
If there are three consecu ve input errors, your SIM card will be locked up by the network, the phone
will inquire PUK1 code.
Note: Your service provider will set up a standard PIN (4 to 8 digits) number for your SIM card, you should
change it into your private password as soon as possible.
2.6 Unlocking phone
To prevent phone from being illegally used, you can set up mobile phone lock Password for protec on.
Selec ng this op on, you must input mobile phone lock password to unlocking it and make it normal.
Users can switch off mobile phone lock, but illegal usage cannot be prevented for mobile phone in this
case.

14
Pressing the End key con nuously to start up mobile phone.
Input mobile phone lock Password.
For instance, if mobile phone Password is set up as 0000, then input the following: 0 0 0 0 “OK”.
If you forget mobile phone Password, you have to contact local authorized repair center, so as to unlock
your mobile phone’s Password.
2.7 Connec ng to network
A er SIM card is successfully unlocked, the phone will automa cally search available network (with
searching showing on the screen). Once the connec on is made, the name of the service provider will
be displayed on the top central part of the text and graphic area. At this me your phone has been
connected to the service network.
Note: If the screen prompts “Emergency “, this means you have moved out of the normal network
coverage (service range) or your card has not passed authen ca on, but you can s ll transmit emergency
calls based on signal strength.
Basic Functions
1 Making a call
When the logo of service provider appears on the display screen, you can dial or receive calls. The info
bar at the upper le corner of the display screen shows network signal strength (when there are 5 info
bars the signal is at its strongest).
The call quality is very likely to be aff ected by obstruc ons; therefore movement in a small area can
eff ec vely improve call performance.
1.1 Making domes c calls
Enter phone number, then press Dial Key to make the call. If the user needs to change phone number,

15
press “Clear” back and delete numbers. Dialing anima on will be displayed on the screen during dialing.
Call state info will be shown on the screen a er the called party ends the call
You can enter and dial domes c call following the order:
Area code Phone number Dial
1.2 Dialing extension number of fi xed-line telephone
Some extension numbers of fi xed-line telephone cannot be connected directly, you must dial the
switchboard phone number, then press * key to switch con nually un l the screen displays “P”, then
dial extension number.
You can dial extension numbers of fi xed-line telephone in the following order:
Area code Switchboard number P Extension number Dial Key
1.3 Dialing interna onal calls
To make an interna onal call, you may press * key to switch con nually ll the screen displays the pre-
digit symbol “+” for interna onal long distance call, which will enable you to make a call from any country
without knowing the local interna onal access code (for instance, in China it is 86).
You can enter numbers in the following sequence to make an interna onal call: + country code complete
phone number Dial Key
A er inpu ng prefi x number, input the code and the complete phone number of the wanted country.
The country code follows usual prac ce, such as Germany 49, UK 44, Sweden 46, etc.
Like making an interna onal call, the “0” before city code number should be dropped.
For instance, if making a call to a service hotline from other countries to Shanghai, you should dial: +86
21 114
1.4 Dialing phone numbers in the call records
Every phone number you have dialed or received will be stored in the list of phone call records. The latest

16
dialed, received and missed numbers will be listed, according to their types, in the respec ve menu of
dialed calls, received calls and missed calls. When call record list is full, the old numbers will automa cally
be deleted. To view the list, do the followings:
In standby state press Dial key to view the record for all calls.
All phone numbers in the list can be dialed directly by pressing the Dial key.
When the list is displayed, press “OK” to read the details, then “op ons” to Save or Delete the
number.
2 Emergency calls
As long as in the network service range (which can be confi rmed by checking the signal strength bars on
the top le corner of the screen), you can always call emergency service. If your network supplier does
not provide roaming service in your area, the screen will display “Emergency”, to inform you that only
emergency call is permi ed. If you are within the network service range, you can also make emergency
calls even without the SIM card.
3 Answering a call
Simply press dialing key can answer an incoming call. If an earphone has been connected, use the bu on
on the earphone to answer a call, and if it is not convenient for you to press it, set automa c answer
as on, assuring that the earphone is plugged on, so as to make calls automa cally answered while the
phone rings or vibrates. If Any Key answer func on is chosen, pressing any key, other than End key, can
answer an incoming call.
4 Call records
Your phone can also store call records of the latest missed calls, received calls, dialed calls, the me of last
call as well as total amount of received calls and total dialed calls for you.
5 Call op ons

17
In connected state, pressing “Op ons” can enter call op on, or pressing “H-free” to ac vate speaker,
Under ac vated-handsfree condi on, press “ Normal” to switch off speaker. Opera on methods of call
op ons are the same with that of Func on menu.
This call op ons can only be viewed during call process, moreover, the func ons of call wai ng, call
holding, and conference calls need service support, please contact your service provider for details.
In the call op ons, you can make the following opera ons:
Hold Single call:Make the current call hold.
End Single call:End the current call.
New call:Enter new dialing interface.
Phone book:Enter Phone book menu.
Messages:Enter message menu. Owing to restric on of network engagement, MMS func on is barred
during call process.
Sound Recorder:Record the current call.
Voice changer :Setup voice changer for the current calling.
Mute:Se ng of switches, which disables transmission of local call when Mute func on is on.
DTMF:Opera ons of DTMF switching on and off
Conference*
Enter mul ple party conference call state. By following the prompts, you can have the following func ons:
receive wai ng calls, add them into mul ple party call, maintain the mul ple party call, talk privately with
one party of the conference while maintaining all other callers, connect one party in the call conference
with another party while exi ng the mul ple party call oneself, maintain one party of the mul ple party
call and end current call and all other maintained calls.
Note: The menu marked * items will only appear in special circumstances. For conference func on, it is

18
necessary to apply for service supply to corresponding service operator.
Usage of function menu
1 Scrolling search and select func on
In standby state, press le so key “menu” to enter func on menu, or during the call, press ”Op ons”
to enter call op on menu.
At all main menu or sub-menu interface, it is possible to press up, down, right and le keys of keypad
(under menu of page scrolling, press up or down keys to realize scrolling up or down) to scroll to the
func on you need, then press le so key, or OK key, to enter that func on op on.
2 Exit menu
In func on menu, generally you can exit a menu by right sofe key, or press End key to return to standby
state.
Instructions of Function menu
1.Applica on
1.1 T-Card Backup
Phone book backup
Can Backup or restore the numbers in Phonebook.
SMS backup
Can export the SMS in Inbox, Outbox, Dra s and Archive.
1.2 Calendar

19
A er entering calendar sub-menu, the screen will display the current month’s calendar, with the current
date marked with special color background box. The user may directly use direc on keys to click and
select digits in the calendar, calendar informa on on the screen will also be updated.
1.3 Tasks
It displays all schedules for today and the future days, under the op on menu, it is possible to View, Add,
Edit , Delete, Delete overdue, Delete All, Jump to date, Send vCalendar, Save as fi le..
1.4 Alarm
The mobile phone can set up at most fi ve alarms, and supports shutdown alarm. In the alarm list of the
alarm menu display, select an alarm to edit and set up switching on or off , set me and select ringing
alert type. Wherein repeat can be selected as: once, everyday, custom (for default alarm from Monday to
Friday, the user may also set up certain days in a week based one’s own needs).
1.5 World Clock
Use the direc on keys to browse the current me.
1.6 Calculator
The mobile phone provides you with a calculator with simple func ons, you can use the direc on keys to
make addi on, subtrac on, mul plica on and division, and carry out corresponding memory opera ons
when selec ng M+, M-, MR, MC.
Note: This calculator is limited in accuracy, rounding off errors might occur.
1.7 Ebook reader
The phone supports reading fi les in the *.txt format, which is ideal for reading an e-Book.
Store the *.txt fi les in the Ebook folder, and then you can read them in E-Book reader.

20
2.Contact
You can store info such as names, phone numbers, and mobile phone numbers.
Phone numbers can be stored in your mobile phone or SIM card. The amount of phone numbers that SIM
card can store vary with its capacity.
Add New contact
Add a new number record to SIM card or mobile phone in Phone book.
Mark several
You can mark several contacts one me, then send SMS and delete opera ons. You can also mark all or
unmark all.
Batch Opera ons
You can do the opera on such as copy contacts, move contacts ,delete all contacts.
Phonebook Se ngs
The op ons such as memory status, or preferred storage are available .
Preferred Storage des na on: can choose SIM card/Cell Phone as a preferred storage.
My card:edit my number,or send my number.
Name Card version: Can choose to use version 2.1 or 3.0 version of the card version.
Note: When phone number records are stored in SIM card, only record the info of name and phone
number.
Other numbers: Can set owner number.
Check Memory Status: can inquiry a local or the SIM card for the phone book of records as well as
storage space has been occupied.

21
3.Relaxa on
3.1 Games
The phone provide games for entertainment.
3.2 MSN
3.3 Paradise
3.4 Yahoo!
4.My Files
You can use File Manager to organize your fi les in folders in the Memory Card or Cell Phone.
If a memory card is inserted,the fi les stored on it are organized separately.
Select Memory card and select Op ons to Open, New folder, Rename,Delete ,sort by.
5.Messages
A er entering this menu, the following func on op ons can be viewed: SMS ,MMS, Broadcast
message.
5.1 SMS
5.1.1 Write Message
Create a new short message.
1.Enter text
2.Press the le func on key (Op ons) and select the required items,including Send to, Insert template ,
Insert vcard, Insert Call log, Insert bookmark, Save to Dra s and Input method.
3.Press the le func on key (Op ons) and select Send from SIM1, Send from SIM2,Edit recipient, Remove
recipient, Remove all recipient.

22
Note: Short message center in some ci es and areas do not support long short messages with over 140
English le ers.
5.1.2 Inbox
View received Short message in Inbox sub-menu.
5.1.3 Sent
Enter sent list to view short messages you saved in Outbox (including SIM1 card and SIM 2 card).
5.1.4 Dra s
Dra s stores SMS unprepared for sending for future revision and sending.
5.1.5 Archive
Can save the received SMS to Archive.
5.1.6 Scheduled SMS
With this func on you can write an SMS and schedule for later delivery at a specifi ed me.
5.1.7 SMS Se ngs
Before using Short message func on, you need to make corresponding setup. Enter message se ngs,
and select the following se ngs:
Profi le Se ngs: Please contact your local service provider, so as to receive short message service
center number. Entering this sub-menu will display the current info mode setup list, the number of lists
will vary subject to service provider and SIM card types. A er selec ng mode selec on, press “Edit” to
set up fi le name, short message center number, expira on me of an undelivered message as well as
sending format in sequen al order.
Note: Realiza on of message, valid period, fax, paging, e-mail need service provider support.
Voicemail server: Set voicemail serve.
Common Se ngs: will ac vate/deac vate delivery report and reply path.
 Loading...