

Haier WDQS005, WDQS015, WDQSC145, WDQT015, WDQT005 INSTALLATION
...
Installation
Instructions-
Model #
Water Dispenser
WDQS055
WDQS045
WDQS005
WDQS015
WDQT005
WDQT015
WDQT165
WDQSC145
WDQSC245
Fontaine d'eau
Réfrigérée
Instructions
d’installation-
Modèle #
Dispenser de agua
Instrucciones de
instalación-
Modelo #

SAFETY PRECAUTIONS
Read all of the instructions before using this appliance.
When using this appliance, always exercise basic safety
precautions, including the following:
1. Use this appliance only for its intended purpose as described in this use and
care guide.
2. This water dispenser must be properly installed in accordance with the
installation instructions before it is used. See the grounding instructions in the
installation section.
3. Never unplug your water dispenser by pulling on the power cord. Always
grasp the plug firmly and pull straight out from the outlet.
4. Repair or replace immediately, all electric service cords that have become
frayed or otherwise damaged. Do not use a cord that shows cracks or abrasion
damage along its length, on the plug or at the connector end.
5. Unplug your water dispenser before cleaning and making any repairs.
Note: If for any reason this product requires service, we strongly recommend
that a certified technician perform the ser vice.
6. This water dispenser should not be recessed or built into an enclosed cabinet. It
is designed for freestanding installation only.
7. This appliance is designed for INDOOR USE ONLY and should not be used
outdoors.
8. Do not operate your water dispenser in the presence of explosive fumes.
9. Close supervision is necessar y when any appliance is used by or near children.
10. To protect against electric shock, do not immerse the cord, plug, or any other
part of the water dispenser in water or other liquids.
SAVE THESE INSTRUCTIONS
For Future Use
1
English
Thank you for purchasing our Haier
product. This easy-to-use manual will
guide you in getting the best use of
your water dispenser.
Remember to record the model and
serial number. They are on a label in
back of the unit.
Model number
Serial number
Date of purchase
Staple your receipt to your manual. You will need it to obtain
warranty service.

English
2
Table of Contents
PAGE
SAFETY PRECAUTIONS............................................................................1
UNPACKING ............................................................................................3
PARTS AND FEATURES......................................................................4-12
PROPER LOCATION ..............................................................................13
ASSEMBLY INSTRUCTIONS ............................................................13-14
Installing Your Water Dispenser ..................................................................13
ELECTRICAL CONNECTIONS ................................................................15
Grounding Instructions ................................................................................ 15
Wiring Requirements..................................................................................15
Extension Cords ........................................................................................15
Power Interruptions ....................................................................................15
OPERATING YOUR WATER DISPENSER........................................16-18
Cold/Hot Water Faucets ............................................................................16
Cold/Hot Water Switches ..........................................................................16
Cold/Hot Water Indicator Lights..................................................................16
Using the Refrigerator Compartment............................................................17
Using the Storage Compartment..................................................................17
Replacing the Fuse......................................................................................17
Removable Drip Tray ..................................................................................18
PROPER CARE AND CLEANING ....................................................18-19
General ....................................................................................................18
Cleaning the Condenser Coils ....................................................................19
For Long Vacations or Absences / Moving ..................................................19
TROUBLESHOOTING GUIDE ..........................................................20-21
WARRANTY............................................................................................22

3
English
1. Remove all packing materials. This includes the foam base and all adhesive tape
holding the accessories inside and outside.
2. Inspect and remove any remaining packaging, tape and printed materials before
turning on the water dispenser.
Note: Allow the water dispenser to stand in an upright position for at least
8 hours before turning on the power.
Unpacking

4
English
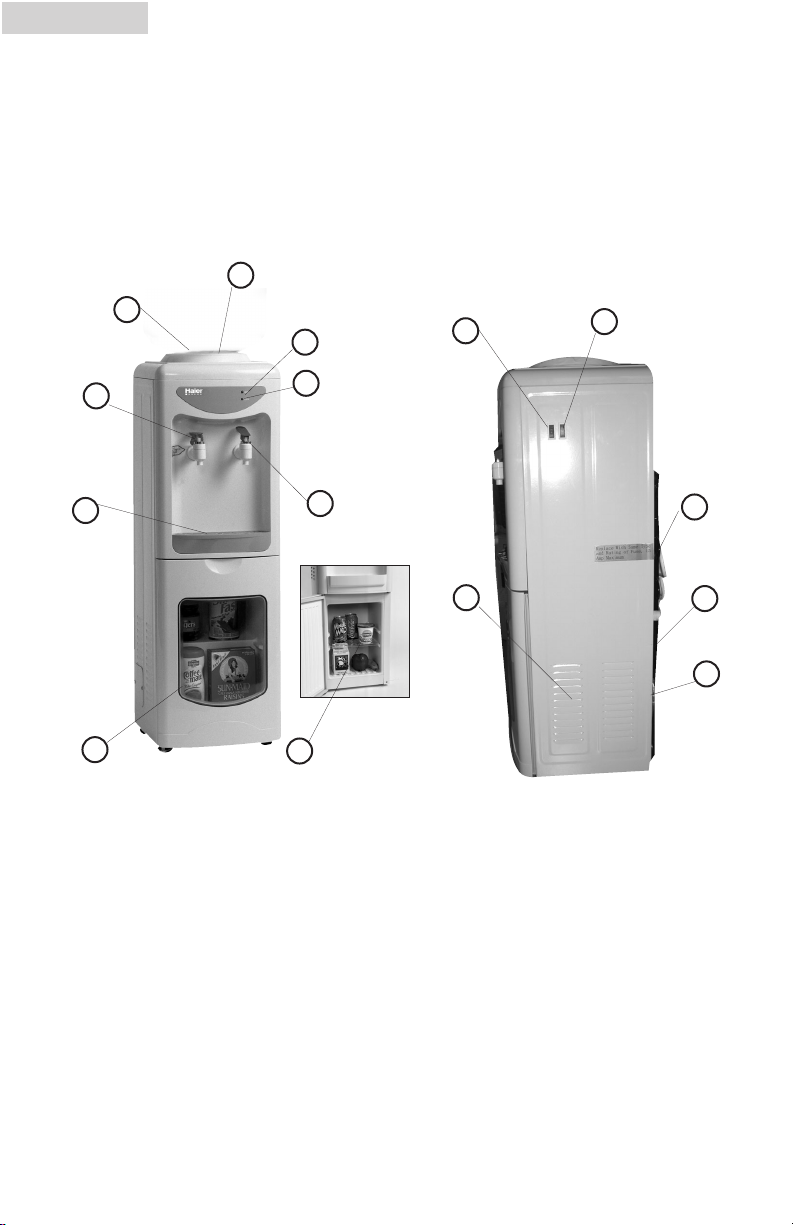
Parts and Features
1. Dust Cover (save for cleaning
purposes)
2. Water Bottle Guard
3. Hot Water Faucet (red)
4. Removable Drip Tray
5. Refrigerator Compartment
6. Removable Adjustable Shelf
7. Water-Collecting Tray
8. Cold Water Faucet (blue)
9. Cold Water Indicator Light (green)
10. Hot Water Indicator Light (red)
11. Vent (right and left sides)
1
2
3
4
5
6
7
8
9
10
Model: WDQS055
Water Dispenser with Refrigerator
Front View Rear View
1. Hot Water On/Off Power Switch
(red)
2. Cold Water On/Off Power Switch
(green)
3. Power Cord (115Volt / 60Hz)
4. Drain
5. Fuse Holder (15Amp)
6. Condenser Coils
1
3
4
5
2
6
11
5
English
Parts and Features
1. Dust Cover (save for cleaning
purposes)
2. Water Bottle Guard
3. Hot Water Faucet (red)
4. Removable Drip Tray
5. Clear Storage Compartment
6. Removable Shelf
7. Cold Water Faucet (blue)
8. Cold Water Indicator Light (green)
9. Hot Water Indicator Light (red)
Model: WDQS015
Water Dispenser with Clear Window Storage
Compartment
Side View
1. Hot Water On/Off Power Switch
(red)
2. Cold Water On/Off Power Switch
(green)
3. Vent (right and left sides)
4. Fuse Holder
5. Condenser Coils
6. Drain (not shown)
1
2
3
4
5
6
7
8
9
Front View
1
2
3
4
5
6
6
English
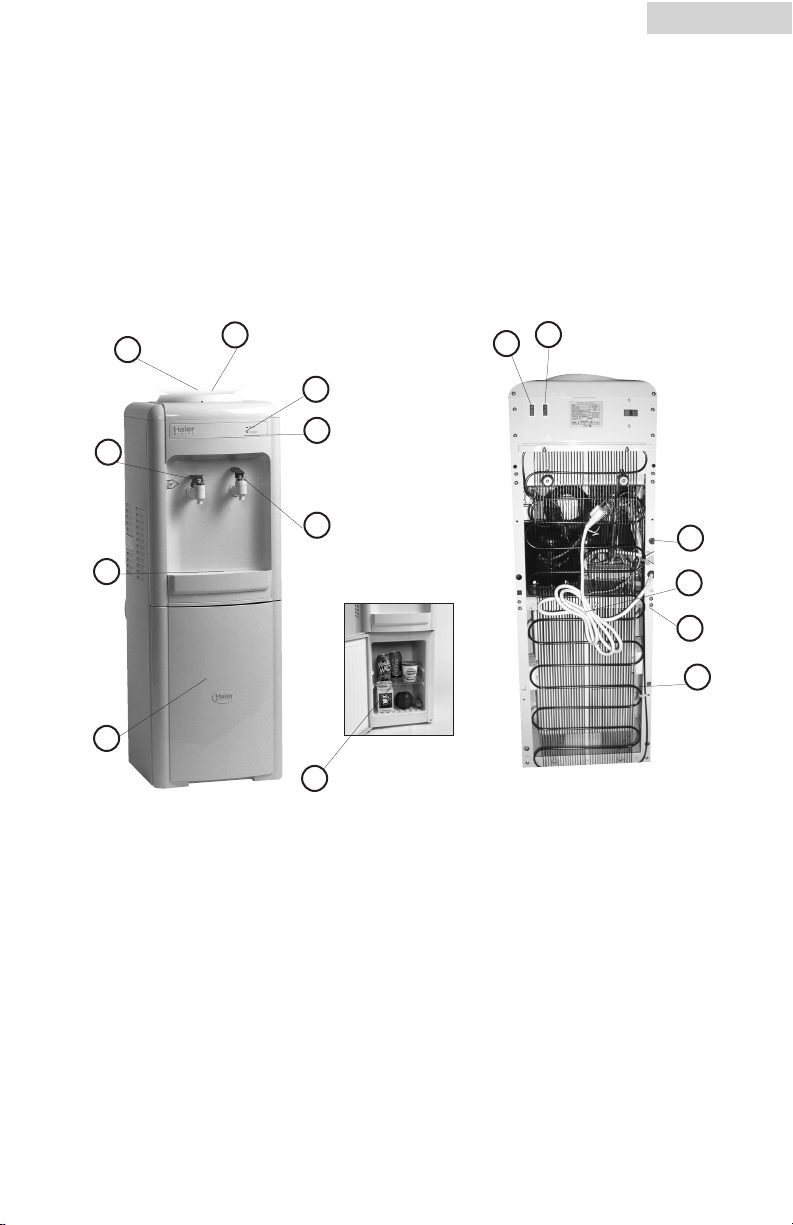
Parts and Features
1. Dust Cover (save for cleaning
purposes)
2. Water Bottle Guard
3. Hot Water Faucet (red)
4. Removable Drip Tray
5. Storage Compartment
6. Removable Shelf
7. Cold Water Faucet (blue)
8. Cold Water Indicator Light (green)
9. Hot Water Indicator Light (red)
Model: WDQS045
Water Dispenser with Storage Compartment (Without Clear Window)
Front View Rear View
1. Hot Water On/Off Power Switch
(red)
2. Cold Water On/Off Power Switch
(green)
3. Drain
4. Fuse Holder (15Amp)
5. Power Cord (115Volt / 60Hz)
6. Condenser Coils
1
2
3
4
5
6
7
8
9
1
2
3
4
5
6
 Loading...