

Page 1
S
P
P
O
O
STAT
US
H
EA
V
Y
C
Y
CL
E
QU
I
CK
W
A
S
H
NO
RM
AL
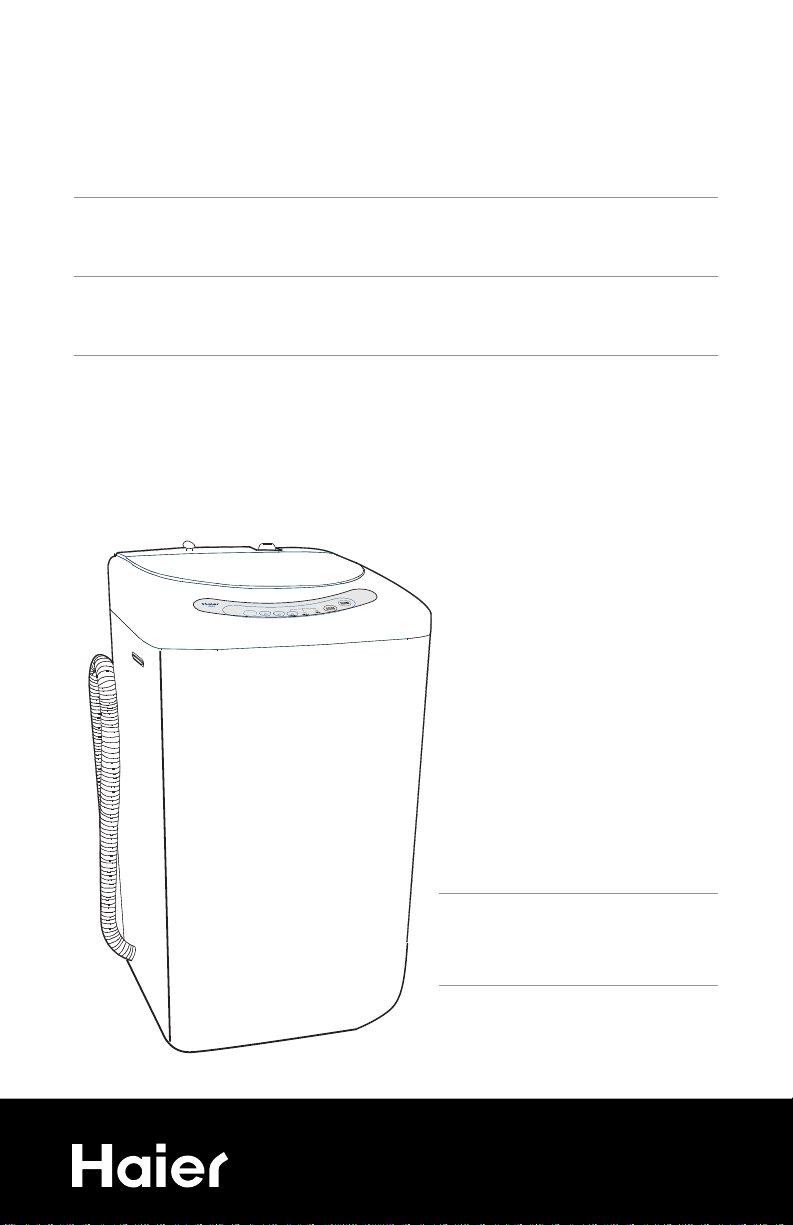
Space Saving 120 Volt
Portable Compact Electronic
Top Load Washer
French
Spanish
Welcome to the world of
Haier Compact Portable Laundry!
• Efficient, Compact and Portable
• Easy Installation and Use
• Uses Convenient Standard120VAC -15 amp Outlets
• You can install them anywhere!
User Manual
HLP021-WM
Guide de l’Utilisateur
HLP021-WM
Manual del Usuario Modelo
HLP021-WM
Quality ß Innovation ß Style
Page 2

English English
unpacking your washing machine
1. Inspect and remove all packing materials. This includes the foam and any
adhesive tape both inside and outside of the unit.
2. Inspect and remove any remains of packing, tape or printed materials before
powering on the Washer.
DANGER
Risk of child entrapment. Before throwing away your old
appliance, remove the door so that children may not easily
become trapped inside.
product registration
Thank you for purchasing our Haier
product. This easy-to-use manual will
guide you in getting the best use of
your washer.
Remember to record the model and
serial number. They are on a label in
back of the washer.
Staple your receipt to your manual.
You will need it to obtain warranty service.
Please register your product online at www.prodregister.com/haier
1
Model number
Serial number
Date of purchase
Page 3

IMPORTANT SAFETY
WARNING
INSTRUCTIONS
Warning – To reduce the risk of fire, electric shock, or injury
to persons when using your appliance, follow basic
precautions, including the following:
Read all instructions before using the appliance.
1.
2. Use this appliance only for its intended purpose as described in this use and
care guide.
3. Use only detergents or softeners as recommended for use in this manual and
keep them out of the reach of children.
4. This appliance must be properly installed in accordance with the installation
instructions before it is used.
5. Never unplug your appliance by pulling on the power cord. Always grasp
the plug firmly and pull straight out from the outlet.
6. Replace immediately any worn power cords, loose plugs and power outlets.
7. Unplug your appliance before cleaning or before making any repairs.
8. If your old appliance is not being used, we recommend that you remove the
door. This will reduce the possibility of danger to children.
9. Do not operate your appliance in the presence of explosive fumes.
10. Do not use this appliance to wash clothes that have been soaked, spotted
or washed in gasoline, dry cleaning solvents or any other explosive or flammable substances that may ignite and explode.
11. Clothes or rags used to clean flammable or explosive materials should not be
washed in this appliance until all traces of this material have been removed.
12. Do not add or mix any flammable or explosive substances to the wash.
13. Do not try to remove clothes while the tub is moving. Allow it to come to a
complete stop before reaching in.
14. The appliance’s loading door must be closed when the tub is spinning.
15. Do not operate your appliance when parts are missing or broken.
16. Do not use this appliance for commercial uses.
17. Do not operate this appliance unless all enclosure panels are properly in
place.
18. Do not tamper with controls.
19. To reduce the risk of injury, do not allow children to play in or on the
appliance. Close supervision of children is necessary when the appliance is
used near children.
2
Page 4

English English
20. This appliance must be connected to a proper electrical outlet with the
correct electrical supply.
21. Proper grounding must be ensured to reduce the risk of shock and fire. DO
NOT CUT OR REMOVE THE GROUNDING PLUG. If you do not have a
three-prong electric receptacle outlet in the wall, have a certified electrician
install the proper receptacle. The wall receptacle MUST be properly
grounded.
22. Hydrogen gas may be produced if the water heater has not been used in
more than 2 weeks. This may be explosive under certain circumstances.
If this is the case turn on all the hot faucets and let the hot water run for a
few minutes before using this appliance. This will let the trapped hydrogen
escape. Avoid accidents during this process by refraining from turning
ON any electrical appliances, smoking, lighting a match/lighter, and using
flames.
23. Do not repair or replace any part of the appliance or attempt any servicing
unless specifically recommended in the user-repair instructions, which you
understand and have the skill to carry out.
If for any reason this product requires service, we strongly
Note:
recommend that a certified technician perform the service.
24. To reduce the risk of electric shock or fire, do not use extension cords or
adapters to connect the unit to an electrical power source.
SAVE THESE INSTRUCTIONS
HOUEHOLD USE ONLY
Tools and Materials Required
You will need to use the following tools when installing your washer:
1 2 3 4 5
1. Phillips Screwdriver - For bottom plate.
2. Open End Plyers - To secure fintake hose.
3. Tape Measure - Check measurement of washer location.
4. Level - To balance washer.
5. Wrench - To attach and lock caster.
3
Page 5

safety instructions
WARNING
Do not, under any
circumstances,
cut, remove,
or bypass the
grounding prong.
WARNINGS:
Electrical Requirements
Grounding Instructions
This appliance must be grounded. It is equipped with a 3-wire cord having
a grounded plug. The plug must be plugged into an outlet which is properly
installed and grounded.
Warning! Improper use of the grounded wire can result in the risk of electric
shock. Consult a qualified electrician if necessary. Do not attempt to defeat this
safety feature by modifying the plug.
Avoid the use of an extension cord because it may overheat and cause a risk of
fire. However, if it is necessary to use an extension cord:
A. Use only 3-wire extension cord with 3-blade grounding plug.
B. The marked rating of the extension cord must be equal to or greater
than the rating of this appliance.
C. It should be positioned such that it does not drape over the counter
or tabletop where it can be pulled on children or tripped over.
Avoid fire hazard or
electric shock. Do not use an extension
cord or an adapter plug. Do not remove
any prong from the power cord.
Attempting any maintenance or cleaning:
To minimize the possibility of electric shock, unplug this appliance from the power
supply or disconnect the dryer at the household distribution panel by removing the
fuse or switching off the circuit breaker before attempting any
maintenance or cleaning (except the removal and cleaning of the lint filter).
Pressing the Power ON/OFF button to an off position or pressing Start /
Note:
Wiring Requirements
• This appliance must be plugged into at least a 15 AMP
110-115 VOLT, 60 HZ GROUNDED OUTLET.
Grounding type
wall receptacle
Power supply
cord with 3-prong
grounding plug
PAUSE button, does NOT disconnect the appliance from the power supply.
4
Page 6

English English
table of contents
PAGE
SAFETY INSTRUCTIONS ............................................................1-2
PARTS AND FEATURES .............................................................4-5
OPERATING YOUR WASHER .................................................6-11
UNPACKING AND ACCESSORIES INVENTORY ........................12
PROPER LOCATION ...................................................................13
INSTALLATION INSTRUCTIONS ........................................... 14-16
UNIT DIMENSIONS .................................................................... 17
ELECTRICAL CONNECTIONS....................................................... 18
PROPER CARE AND CLEANING ................................................19
TROUBLESHOOTING GUIDE ................................................ 20-21
WARRANTY................................................................................ 22
5
Page 7
b
c
d
f
g
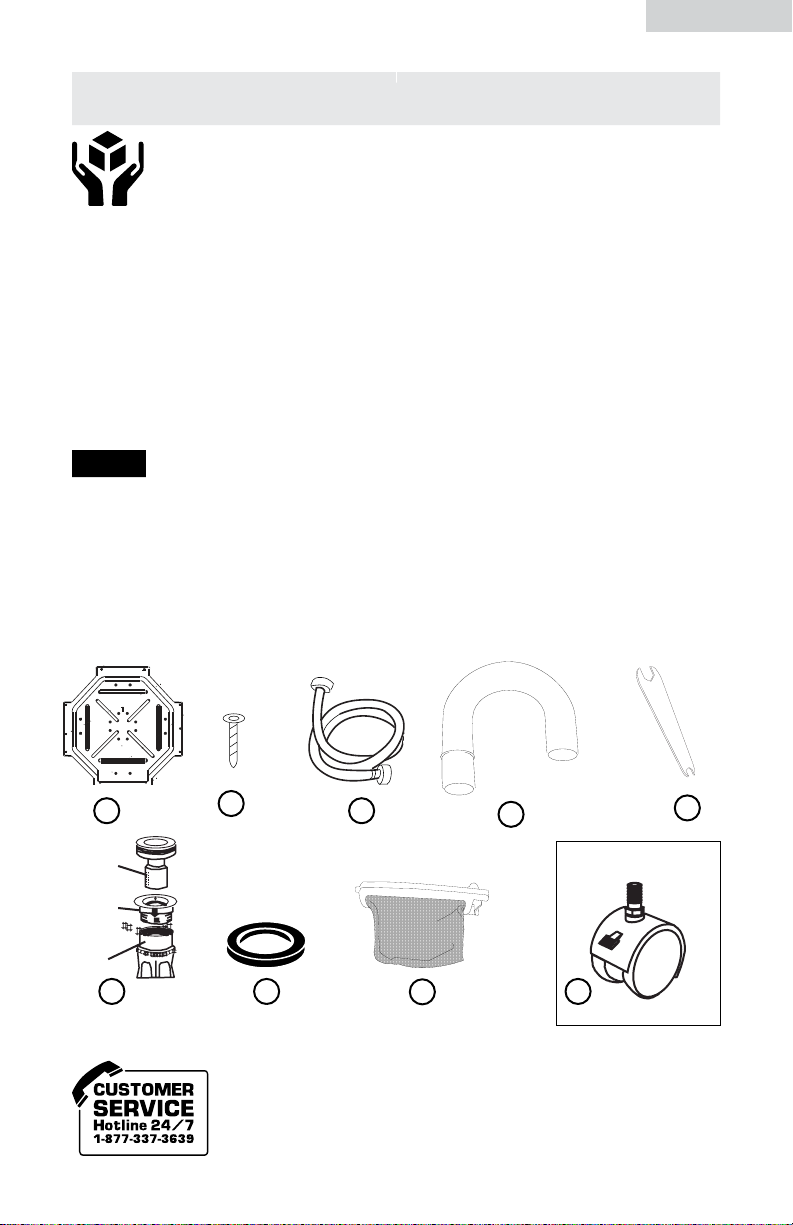
Parts
a) 1 Bottom Panel
b) 6 Screws for the Bottom Plate
c) 1 Water Inlet Hose
d) 1 Drain Hook (Gooseneck)
e)
1 Quick Sink Faucet Adapter
f)
2 Washers
g)
1 Lint Filter
h)
fi
h
e
fi) 4 Caster
1 Wrench
unpacking and checking parts
Unpacking
1. Remove all packing materials. This includes the foam base and all adhesive
tape holding the washer accessories inside and outside. Slide out and remove
the
bottom Styrofoam that is used to protect the washer from shipping damage
due to vibrations and shock.
2. Inspect and remove any remaining packing, tape or printed materials before
using the washer.
Note:
The bottom panel is located between the top foam used for
protection and box.
FRONT
FACE TO FLOOR
a
Sink Faucet
Silver Faucet
Connector
Quick Sink
Faucet
Adapter
HOSE
Check to make sure that the accessories are present and in
good condition. If you find that they are not in good condition
or are missing, please contact our customer service department
for assistance. Our Toll-Free number is
1-877-337-3639.
Optional 4 Pack
6
Page 8
Power Cord (120 Volt / 60 Hz)
10
8
9
7
12
English English
S
P
P
O
O
STAT
US
H
EA
V
Y
C
Y
CL
E
QU
I
CK
W
A
S
H
NO
RM
AL
washer parts and features
Front View
6
5
1. Top Lid
2. Control Panel
3. Washer Cabinet
4. Front Leveling Leg (or for Caster)
Back View
1
2
3
4
5. Cabinet Handle (located on both
sides of the washer)
6. Control panel
7. Water Inlet Fitting
8. Water Absorption Cushion
9. Water Level Selector
10. Power Cord Holder Clip
7
11
11. Drain Hose
12.
Page 9
STATUS
HEAVY
CYCLE
QUICK WASH
NORMAL
Low
Man ual
Wate r L ev el
Med ium
Hig h
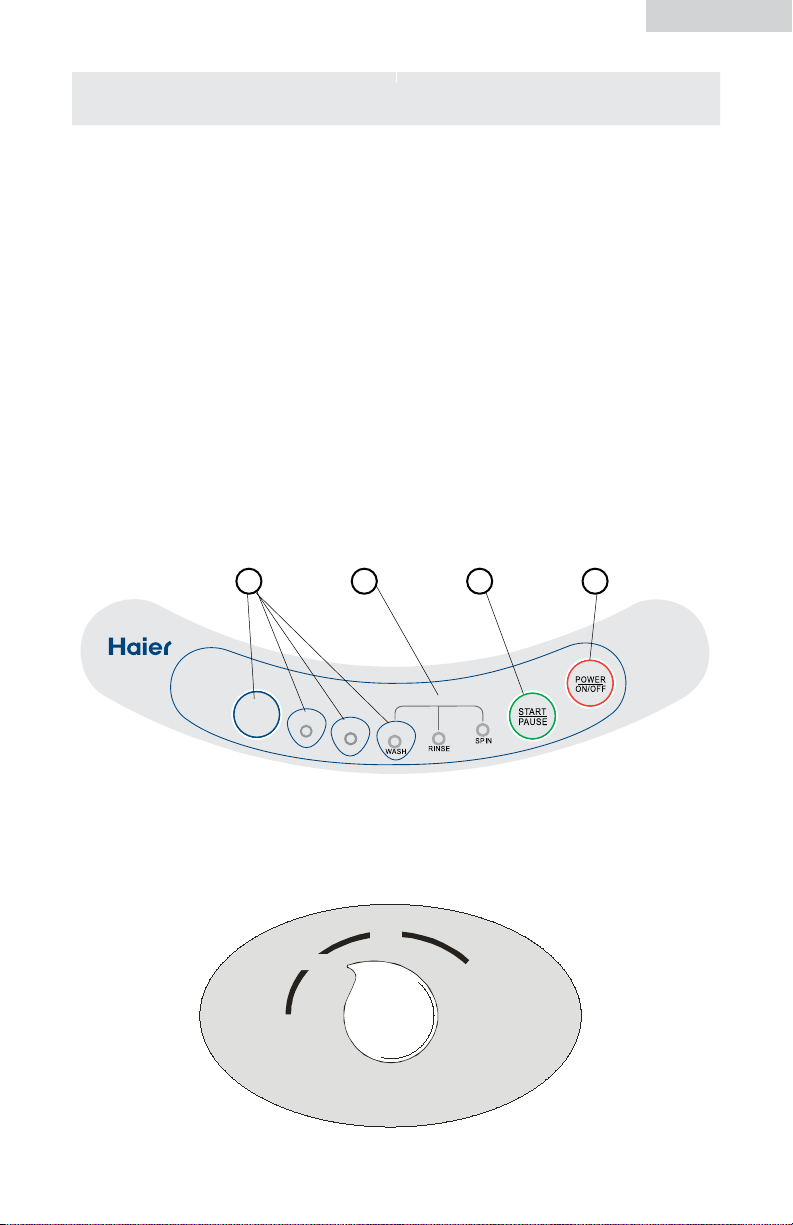
control panel
1. Cycle Button
Choose washing cycle
Normal - Normal Wash
Heavy - Huge and heavy garments
Quick Wash - Small loads that are slightly soiled
2. Status Incicator Lights
Indicates cycle chosen with stages of cycle in operation.
3. Start/Pause Button
With Power "ON" Press the "Start/Pause" button to start washing cycle, pause
operation, or resume operation.
4. Power ON/OFF Button
Press in the "Power On/Off" button to turn on the power of the washer.
1 2 3 4
HLP021-WM
Water Level Selector Knob
Select water height in drum based on laundry being washed.
8
Page 10

CYCLE
English English
Sink Faucet
Quick Sink
Faucet
Adapter
Silver Faucet
Connector
Low
Manual
Water Level
Medium
High
Quick set-up instructions for normal
wash
1. Locate the best place for using your NEW compact portable washer.
Make sure it is near a 120 volt outlet and a water source, like a sink,
with a drain.
2. Screw on the bottom plate with the six (6) screws provided.
3. Connect the water inlet hose, Using the Quick connect fi tting, or directly connect
to faucet.
4. Place drain hose in drain or inside the sink using the Drain Hook.
Drain
Hook
FRONT
FACE TO FLOOR
5. Make sure the lint fi lter is in place, it is installed on the side of the drum.
6. Ensure nothing but clothing is in the washer, then plug power cord into a
15 AMP 110-120 VOLT, 60 HZ GROUNDED OUTLET ONLY.
7. Proceed by pressing the "POWER ON" button.
Power
8. Select water height
9. Select “NORMAL” washing using the “CYCLE” button, then press the
"START" button.
9
NORMAL
S t ar t
Pause
Page 11

29-15/16”
17-1/4”
17-5/8”
38-5/8”
17-1/4”
17-5/8”
proper location
• Select a suitable location for the washer on a hard even surface away from
direct sunlight and heat sources (e.g., radiators, baseboard heaters, cooking
appliances, etc.).
• Verify the compact washer’s measurement with the location you have selected
and make sure the washer will fit.
• Make sure you hav e a grounded 120 volt outlet next to the area of
washers use.
• Any floor unevenness should be corrected with the leveling leg located on the
bottom right corner of the washer.
Cold Environments
• The washer must be placed and used at room temperatures ONLY. You must
not place the washer where the temperature is at or below freezing or outside.
• This appliance must be stored at room temperature. Do not install or operate
this appliance in an area where room temperature is below freezing.
• If you received this appliance when the outside temperature is below freezing,
do not operate until this appliance has warmed to room temperature.
Unit Dimensions
installation instructions
Read carefully and understand all installation instructions before installing this
washing machine. If after completing the process you are still unsure whether
the washer has been properly installed, we recommend that you contact a
qualified installer.
10
Page 12

FRONT
FRONT
English English
Step 1
Installing the Bottom Panel
The bottom panel blocks noises to provide you with the quietest performance
possible during the wash cycle operation.
1. First, lay down the washer on its front side.
2. Place the panel against the bottom of the machine.
Align the holes in the panel with the holes in the
washer.
3. Insert the screws through the holes of the
FRONT
panel into the bottom of the washer and
tighten. (6 screws are supplied)
4. Once all screws have been installed
FACE TO FLOOR
and the panel is in place, return the
washer to its standing position.
Note: During this time, you may reroute the drain hose to the left or right side
for draining. Just remove hose clamp and snake to other side, then re
insert hose to other side
11
Page 13

Leveling the Washer
Leveling leg
Higher Lower
Leveling leg
Locking caster;
Lift tab DOWN to lock and UP to unlock
Your washer has an adjustable leveling leg that is located on the front right
corner. After properly placing your washer in its final location, you must level
the washer.
Warning! An "off-balance" washer will not function properly and can stop.
Using a level is best practice.
• Loosen the adjustable outer and larger ring of the fixed foot. The leveling leg
can be adjusted by turning the center foot counter-clockwise to raise the foot
and clockwise to lower the washer. Once the foot is at the right height, then
lock that position using the outer and larger ring of the fixed foot. This should
be done for all feet of the washer.
Note: If the washer is inclined more than 2˚, the machine will not operate.
Caster Option
This washer can convert from fixed feet to casters for mobility and portability.
The best time to change from fixed feet to casters is when installing the
bottom panel.
Unscrew and remove the fixed feet.
Screw each of the 4 casters to the bottom base by hand first, then use a wrench to
secure the caster's locking bolt to the washer body.
12
Page 14

English English
Sink Faucet
Quick Sink
Faucet
Adapter
Silver Faucet
Connector
B
Large
Inside
thread
A
Outside
Thread
Note:
Incomfing hot water must not exceed 122˚F/50˚C.
Installing Your Washer
Read the installation instructions carefully and ensure washer location before
beginning.
Installing Quick Sink Adapter:
When installing the quick sink faucet adapter to the faucet, follow the steps
below:
1. First, remove the aerator from your faucet nozzle and determine the size/type
of the faucet.
2. Once you determine the size/type of the faucet (Outside
Threaded End or Inside Threaded End), place the proper
sized rubber washer into the silver faucet adapter.
3. Attach the silver faucet connector to the faucet.
4. Attach the faucet connector to the water inlet hose and make sure that the
rubber washer is placed in between.
5. Attach the other end of the water inlet hose to the washer water inlet and make
sure that the rubber washer is placed in between.
Attached hose to water inlet
As a second option, you can install directly to a fixed utility hot and cold water
outlet by using a “Y Hose” (NOT suppliered) .
13
To washer inlet
Page 15

6. The drain hose must be placed into a drainpipe or sink at least 1-1/2 inches
Drain Hook
Drain Hook
Laundry tub:
Just hang hook over side of sink or for a
more permanent use plastic ties.
Plastic Tie
WARNING
in diameter. Use the gooseneck drain hook to hold the hose in place. To avoid
possible water back-up, the drain hose must reach a height of at least 31-1/2
inches minimum and 40 inches maximum.
Final connection of washer to sink should look like this.
7. Make sure the lint filter is installed. The lint filter must be installed before the
washer is used. The lint filter is packaged with the User Manual.
8. Plug in the washer to a regular 115 Volt / 60 Hz, 15 Amps outlet, only after
all water and drain lines are connected .
Carefully inspect for any leaks around the machine and at the back. If
Note:
there is a leak, check if any connections are loose. You may need to
tighten any loose connections. Do not remove the water absorption
cushion. Check before each use to make sure it is not damaged.
CAUTION! If after completing these steps you are still unsure whether unit has
been properly installed, contact a qualified installer. We recommend
that the washer be installed by a certified technician to ensure that it
is properly installed.
Installing the Lint Filter
The lint filter must be installed
before the washer is used.
The lint filter is packaged
with the User Manual.
14
Page 16

CYCLE
English English
STATUS
HEAVY
CYCLE
QUICK WASH
NORMAL
Low
Manual
Water Level
Medium
High
operating your washer
The Control Panel
3 5 2 1
HLP021-WM
4
Power ON/OFF: (1)
• Press the POWER button once to turn ON the power to the washer.
Press it again to turn the power OFF.
Start/Pause: (2)
• Press this button once to start the wash process. Press this button
once again to pause the activity during the wash cycle. Push it
again to resume the wash cycle.
CYCLE Select: (3)
• Select your desired cycle program by pressing the “CYCLE Select”
button. There are 3 main washing cycles, Normal, Heavy and
Quickwash, along with a total of 7 wash operation options.
Press the CYCLE select button for the desired setting.
QUICK WASH
Power
HEAVY
S t ar t
Pause
NORMAL
Water Level Selector: (4)
• Turn the Water Level Selector knob to select the proper water level setting. You
may select from low, medium and high water level settings depending on the
wash load. There is also a MANUAL overide, by holding the knob in the
manual position, until the desired water level is achieved
Function and Status Indicator Lights: (5)
• The function display lights indicate that a selected
NORMAL
feature is ON or what the cycle is about to begin.
• During the wash cycle, a flashing light indicates the current STATUS of
wash/rinse/spin cycle.
Note: Rapid flashing indicates that the washer is not operating properly.
15
STATUS
Page 17

Steps for the Wash Process
1. The lint filter must be cleaned and in place before you start washing
2. Turn the power ON by pressing the “ON” button.
3. Press “Cycle Select” to select the wash program.
4. Select the water level.
5. Add the detergent.
6. Add the wash load.
7. Press the Start / Pause button.
8. After the washing machine starts, you may change the Cylcle or program by
turning OFF the machine and then restarting to make the new selection.
Note:
If the washer is turned ON without any water in the tub, it will start to
spin after a few minutes. The pulsator will not rotate unless the water is
filled to a selected level.
Note: Do not use the “HEAVY Wash” program for woolen clothing.
Note:
Loading the Washer
• Load each item loosely.
• Separate the white from the colored clothing. Separate heavy fabrics from light
fabrics.
• Carefully check all pockets and cuffs for foreign items. They can easily slide
into the tub and cause damage to the tub and/or make disturbing noises during
cycles.
• Always balance the laundry load evenly within the washer tub, so there is no
single heavy areas and all the laundry is evenly distributed.
Lint Filter and Water Filter
• The Lint filter is located inside the washer drum. A small nylon bag collects lint
and residue from clothes during the wash cycle.
Note:
NEVER wash your clothes without the filter in its compartment
inside the tub.
• You must clean the filter after every load for the best results. Push down the tab
in the filter to remove. Clean and slide the filter back in place.
• There is also a filter in the water inlet valve. This prevents foreign particles in
the water from entering the washer. Clean this at least once a month.
16
Page 18

CYCLE
English English
Selecting the Wash Cycle
When you first turn on the POWER, the washer will automactically be set for the
NORMAL wash cycle, for Wash, Rinse & Spin. The LED indicators with be lit,
to show cycle program.
Power ON Wash, Rinse & Spin Normal Wash
STATUS
Power
NORMAL
S t ar t
Pause
Rinse, Spin
Spin
Then press the START button to begin.
• With POWER ON, Press the “CYCLE Select” button for your desired wash
cycle. Choose between 7 various washing cycles options. Each time you press
the CYCLE button, you will move throught the washers cycle menu. When you
finalize your selection, please press the START button.
Program Select Wash Program Application
1. Power ON Normal Wash Cycle Wash, Rinse & Spin
2. Press Once Wash only No Spin or Rinse
3. Press Twice Wash & Rinse only No Spin
4. Press Three Times Rinse & Spin only No Wash
5. Press Four Times Spin only No Wash or Rinse
6. Press Five Times Heavy Wash Cycle Heavy Wash, Wash,
7. Press Six Times Quick Wash Cycle Quick, Wash, Rinse,
17
Page 19

Approximate Wash Times
Wash Program Soak Wash Rinse Spin Total
Times
(approx (approx Minutes (approx (approx
minutes) minutes) / Times minutes) minutes)
NORMAL Wash
Wash, Rinse None 8 – 15 6 / 2 4 35 – 42
& Spin
Heavy Wash
Twice Wash, 25 16 – 30 6 / 2 4 68 – 82
Wash, Rinse
& Spin
Quick Wash
Quick, Wash, None 5 - 9 3 / 1 4 21 – 28
Rinse & Spin
Note:
• The total wash times will vary depending on cycle.
• The total time includes the normal water inlet time and drain time. The total
washing time may be affected by the water inlet pressure and water level.
• The spin time is the time from the intermittent running to the finishing of the cycle.
• In the “Heavy Wash” program, ( heavy soiled laundry) the first soak is
approximately 20 minutes, pre-wash is approximately 8 minutes. Clothes are
soaked again for approximately 5 minutes. The washing, rinsing and spinning will
then be completed. The wash time includes the pre-wash time.
• In the “Quick” program select wash, (fast wash, for delicates) rinse and spin are
set automatically. No procedure can be selected after setting.
Note: When you turn the power OFF, then ON; the machine will reset to the
standard NORMAL wash program with wash/rinse/spin appliactions.
18
Page 20

English English
Low
Manu al
Water L evel
Medi um
High
Selecting the Water Level
• There are 3 pre-set water levels to chose from: Low, Medium and High and 1
manual overide selection using the knob. Your selection may depend on your
wash load.
• Turning the knob to “MANUAL” will add more water to your wash load as long
as it is held in that position. Release knob after setting to the desired water level
by manually adding water.
Recommended Water Levels
Load Size in lbs Water Level Approximate
Water used in
Gallons
3.3 High 8.72
1.76 Medium 5.81
Less than 1.76 Low 3.70
End-of-Cycle Signal
The machine will beep at the end of the cycle, indicating that the washing is
complete. The “Wash/Rinse/Spin” indicator lights will still be ON. The washer
will turn OFF automatically in approximately 10 minutes after the completion of
the cycle.
Closing the Top Lid
For safety purposes, the top lid must always be closed during the wash process.
If you open the top lid while the wash cycle is in progress, you will observe the
following:
• An alarm will sound.
• The tub will not spin while the lid is open.
• If the unit is in wash mode, it will stop running.
Simply close the top lid and press the start/pause button to resume the cycle.
19
Page 21

Loading the Washer
• Load each item loosely.
• Separate the white from the colored clothing. Separate heavy fabrics from light
fabrics.
• Carefully check all pockets and cuffs for foreign items. They can easily slide
into the tub and cause damage to the tub and/or make disturbing noises during
cycles.
• Pre-treat all stains and heavily soiled areas for best results.
• Do not overload your washer.
• Close the door or top lid properly after loading the clothes.
• When loading wet items, keep water level high enough to keep the unit in
balance and to allow clothing to float easily in the water.
Proper Use of Detergent
• Fill water in the tub at the “Low” water level.
• Add the detergent.
• Load the washer.
• Select the water level.
Note: The amount of detergent used depends on the size of the load, the water
type (hard or soft) and whether the clothes are heavily soiled or lightly
soiled. Besides the performance of the washing machine, the quality of
the detergent also affects the wash result. For best results, use low
sudsing detergents only. Refer to the detergent manufacturer’s
recommended amount for usage.
Proper Use of Bleach
Refer to the bleach manufacturer’s chart for the recommended use of liquid
bleach. Dilute the bleach and add it to the water before putting clothes into the
washtub.
Warning! Be careful not to spill undiluted bleach onto the washer cabinet or
onto clothing. It is a strong chemical that may damage your clothes
and the finish of the washer if not properly diluted.
20
Page 22

English English
WARNING
proper care and cleaning
Warning! Always unplug your appliance before cleaning to avoid electric
shock. Ignoring this warning may result in personal injury or death.
Before using cleaning products, always read and follow the cleaning
product manufacturer’s instructions and warnings to avoid personal
injury and product damage.
General Cleaning and Maintenance
Use only a damp or sudsy cloth to clean the control panel.
• To avoid any kind of damage to the cabinet finish, wipe the appliance cabinet
as needed. If liquid/powdered softener, bleach or detergent is spilled onto the
cabinet, wipe the cabinet immediately because it may cause damage to the
finish.
• Do not use any abrasives, harsh chemicals, ammonia, chlorine bleach,
concentrated detergent, solvents or metal scouring pads. Some of these
chemicals and materials may dissolve, damage and/or discolor your
appliance.
• Remove pins and other sharp objects from clothing to prevent scratches
on interior parts.
• The lint filter must be cleaned before each use for optimal efficiency. DO NOT
USE YOUR WASHER WITHOUT THE LINT FILTER IN PLACE.
• The filter screen of the water inlet valve may become blocked by soil
and residue. Please clean it with a brush monthly.
Long Absences / Moving
• Turn OFF the water supply faucets and disconnect the hoses. Drain water from
all hoses. This will prevent damage from water leakage if the hoses are
accidentally ruptured or if they become loose.
• Disconnect the electrical plug.
• Dry the inner washtub. If moving the washer, disconnect the drain hose.
• To prevent mold and mildew, leave the door open so that the moisture inside
the machine can evaporate.
• Reinstall the foam base/Styrofoam at the bottom of the unit to prevent internal
parts from becoming damaged due to vibrations and shock when the washer is
being moved to another location.
21
Page 23

Normal Operating Sounds
The following sounds are normally heard during the operation of the washer:
• Tumbling sounds can be heard as heavy wet clothes in the washer are tossed
around continuously.
• Air rushing noise is the result of the washtub spinning at a very high RPM.
• Clicking sounds are caused by the wash and rinse cycles turning ON and OFF.
22
Page 24

English English
troubleshooting guide
Before calling for service, determine the symptoms and follow the suggested
solutions:
Washer does not operate:
• Check if the unit is plugged in. The plug may have come loose.
• Check if the electrical wall receptacle is of proper voltage.
• Check if the circuit breaker needs to be reset or if the fuse needs to be
replaced.
• Check if the washer is overloaded. Reload and redistribute the clothing to
rebalance the machine.
• Check if the door is open. You may have to close the door properly.
• Check if the program selections are set properly. You may have to adjust the
settings.
• Check the Power “ON/OFF” button to see if it is in the OFF position. You may
need to press the button to set it in the ON position.
• Check if the “Start/Pause” button is on “Pause” mode. Press this button to start
the wash process.
• The wash process is paused. This is normal. The clothing sensor is checking to
verify that there are clothes inside the washtub. Water will be added
approximately 48 seconds later.
• The pulsator pauses during incoming water flow in the wash and rinse cycle.
This is normal. This prevents splashing during water inlet.
• The washer may need to be reloaded and the clothes may need to be
rebalanced.
23
Page 25

Problems with water:
• Not enough water is coming in - The water faucet may need to be fully turned
ON. Water hose may be tangled or bent; straighten the hose. Check the water
level selection. It may need to be readjusted. This may cause the wash program
to pause for a few minutes after water inlet.
• Water leaks - This is due to improper installation of the drain hose or fill hose.
Your home drain may be clogged. You may need to tighten the hose, check the
plumbing or call a plumber. Water may also leak if the machine is
overloaded or if too much detergent is used.
• Water does not drain - This is due to improper installation of the drain hose.
You may need to connect the drain hose properly. Check the position of the
drain hose. The drain hose may be clogged or bent.
• Water flows out of the drain hose during the first use of the machine - This may
be the water left in the tub after the factory inspected the unit to test its
performance in order to ensure the best quality.
Washer makes noises:
• Washer may need to be reinstalled and leveled. Refer to the washer
installation section.
• Wash load may need to be rebalanced, as the load may be uneven.
• Coins, loose change, buttons or other heavy objects may be making the noise.
• A squeaking sound may be due to an overloaded wash tub.
• Vibration noises are due to an improper leveling of the washer or an uneven
distribution of clothing in the tub.
24
Page 26

English English
Problems with clothing:
• Clothes are too wrinkled – Clothes have been improperly sorted or the machine
has been overloaded. Do not mix heavy clothes such as work clothes with light
clothes such as blouses, light shirts and delicate items.
• Clothes have soap residue – The detergent may not be dissolving in the water.
Check the water temperature or add detergent as the washtub is being filled
with water (before you load your clothes) to avoid soap residue on clothes.
Liquid detergent is recommended.
• Clothes are ripped or have holes - Sharp objects such as pins and belt buckles
were left in the washtub. You must remove small, loose, sharp objects. Fasten
belts, zippers, metal snaps etc. Check if you are using undiluted bleach. Never
add undiluted bleach to the wash.
Other:
• The spinning is intermittent when it starts – The laundry needs to be balanced to
avoid slanting. Move the laundry around to equalize tehe load.
• The “Spin” does not work in Program Select – The program is setting the drain
time. Spinning will start in a few minutes.
• During the final spinning, it stops, the “Rinse” indicator lights up and the washer
starts to fill with water – The wash load is slanting on one side. After the water
is filled, the slanting will be removed and the spinning will be reactivated.
Welcome to the world of
Haier Compact Portable Laundry!
• Efficient, Compact and Portable
• Easy Installation and Use
• Uses Convenient Standard120VAC -15 amp Outlets
• You can install them anywhere!
25
Page 27

limited warranty
In Home Service
Full ONE Year Warranty
For 12 months from the date of original
retail purchase, Haier will repair or replace
any part free of charge including labor that
fails due to a defect in materials or
workmanship.
Limited Warranty
After one year from the original retail
purchase date, Haier will provide a part at
no cost, as indicated below, to replace said
part as a result of a defect in materials or
workmanship. Haier is solely responsible
for the cost of the part. All other costs such
as labor, trip charge, etc are the
responsibility of the owner.
Second through Fifth Year
Haier will provide the outer washtub and
related outer tub assembly parts should the
part fail to hold water.
Second through Seventh Year
Haier will provide the inner stainless steel
wash tub if defective in material or
workmanship.
Note: This warranty commences on the
date the item was purchased and the
original purchase receipt must be presented
to the authorized service representative
before warranty repairs are rendered.
Exceptions: Commercial or Rental Use
Warranty
90 days labor from date of original
purchase
90 days parts from date of original
purchase
No other warranty applies
For Warranty Service
Contact your nearest authorized service
center. All service must be performed by
a Haier authorized service center. For the
name and telephone number of the nearest
authorized service center please call
1-877-337-3639.
Before calling please have available
the following information:
Model number and serial number of your
appliance. The name and address of the
dealer you purchased the unit from and the
date of purchase.
A clear description of the problem.
A proof of purchase (sales receipt).
This warranty covers appliances
within the continental United States,
Puerto Rico and Canada. What is
not covered by this warranty:
Replacement or repair of household fuses,
circuit breakers, wiring or plumbing.
A product whose original serial number has
been removed or altered.
Any service charges not specifically
identified as normal such as normal
service area or hours.
Damage to clothing.
Damage incurred in shipping.
Damage caused by improper installation or
maintenance.
Damage from misuse, abuse accident, fire,
flood, or acts of nature.
Damage from service other than an
authorized Haier dealer or service center.
Damage from incorrect electrical current,
voltage or supply.
Damage resulting from any product
modification, alteration or adjustment not
authorized by Haier.
Adjustment of consumer operated controls
as identified in the owner’s manual.
Hoses, knobs, lint trays and all attachments,
accessories and disposable parts.
Labor, service transportation, and shipping
charges for the removal and replacement of
defective parts beyond the initial 12-month
period.
Damage from other than normal household
use.
Any transportation and shipping charges.
THIS LIMITED WARRANTY IS GIVEN
IN LIEU OF ALL OTHER WARRANTIES,
EXPRESSED OR, INCLUDING THE
WARRANTIES OF MERCHANTABILITY
AND FITNESS FOR A PARTICULAR
PURPOSE
The remedy provided in this warranty is
exclusive and is granted in lieu of all other
remedies.
This warranty does not cover incidental or
consequential damages, so the above
limitations may not apply to you. Some
states do not allow limitations on how long
an implied warranty lasts, so the above
limitations may not apply to you.
This warranty gives you specific legal rights,
and you may have other rights, which vary,
from state to state.
Haier America
New York, NY 10018
26
Page 28

IMPORTANT
Do Not Return This Product To The Store
If you have a problem with this product, please contact the
“Haier Customer Satisfaction Center” at 1-877-337-3639.
DATED PROOF OF PURCHASE, MODEL # AND SERIAL # REQUIRED FOR
WARRANTY SERVICE
IMPORTANT
Ne pas renvoyer cet appareil au magasin.
Si vous avez un problème avec cet appareil, veuillez contacter
le service à la clientèle de Haier au 1-877-337-3639.
IL EST OBLIGATOIRE DE FOURNIR UNE PREUVE D’ACHAT DATÉE, LE NUMÉRO DU MODÈLE
ET SON NUMÉRO DE SÉRIE AFIN DE BÉNÉFICIER DE LA COUVERTURE DE LA GARANTIE.
IMPORTANTE
No Devuelva Este Producto al Establecimiento Compra.
Si tiene problemas con este producto, por favor póngase en contacto con el
“Centro Haier de Atención al Cliente” en el 1-877-337-3639.
PARA EL SERVICIO DE GARANTÍA SE REQUIERE PRUEBA DE COMPRA, FECHADA,
No. DE MODELO Y No. DE SERIE
HLP021-WM
100421 1107
120 V, 60 Hz
Made in China
Fabriqué en Chine
Hecho en China
Haier America
New York, NY 10018
Printed in China
Part # WD-9999-14
 Loading...