

Compact
Refrigerator
Réfrigérateur
Compact
Refrigerador
Compacto
User Manual-
Guide de l’Utilisateur-
Manual del Usuario
-
Model #
Modèle #
SMRA-4
Para Modelo de #

English
SAFETY PRECAUTIONS
Read all of the instructions before using this appliance. When using this appliance,
always exercise basic safety precautions, including the following:
1) Use this appliance only for its intended purpose as described in this use
and care guide.
2) This refrigerator must be properly installed in accordance with the
installation instructions before it is used. See grounding instructions in
the installation section.
3) Never unplug your refrigerator by pulling on the power cord. Always
grasp the plug firmly and pull straight out from the outlet.
4) Repair or replace immediately, all electric service cords that have
become frayed or otherwise damaged. Do not use a cord that shows
cracks or abrasion damage along its length, the plug or the connector
end.
5) Unplug your refrigerator before cleaning or before making any repairs.
Note: If for any reason this product requires service, we strongly
recommend that a certified technician performs the service.
6) Do not use any electrical device or any sharp instrument in defrosting
your refrigerator.
7) If your old refrigerator is not being used, we recommend that you
remove the doors and leave the shelves in place. This will reduce the
possibility of danger to children.
After your refrigerator is in operation, do not touch the cold surfaces in
8)
the freezer compartment, particularly when hands are damp or wet.
Skin may adhere to these extremely cold surfaces.
9) Do not refreeze foods, which have been thawed completely. The United
States Department of Agriculture in Home and Garden Bulletin No. 69
reads: "…You may safely refreeze frozen foods that have thawed if they
still contain ice crystals or if they are still cold-below 40˚F".
"…Thawed ground meats, poultry, or fish that have any off-odor or
off-color should not be refrozen and should not be eaten. Thawed ice
cream should be discarded. If the odor or color of any food is poor or
questionable, discard it. The food may be dangerous to eat."
"…Even partial thawing and re-freezing reduce the eating quality of
foods, particularly fruits, vegetables, and prepared foods. The eating
quality of red meats is affected less than that of many other foods. Use
refrozen foods as soon as possible, to save as much of its eating quality
as you can."
1

10) This refrigerator should not be recessed or built-in an enclosed
cabinet. It is designed for freestanding installation only.
11) Do not operate your refrigerator in the presence of explosive fumes.
SAVE THESE INSTRUCTIONS
For Future Reference Please
DANGER
Risk of child entrapment. Before you throw away your old
refrigerator or freezer, take off the doors. Leave the shelves in
place so that children may not easily climb inside.
English
Thank you for using our Snackmate
product. This easy-to-use manual
will guide you in getting the best
use of your refrigerator.
Remember to record the model and
serial number. They are on the
inside right liner of the refrigerator.
Staple your receipt to your manual. You will need it to obtain
warranty service.
Model number
Serial number
Date of purchase
2

English
Table Of Contents
Safety Precautions ..........................................................................1
PAGE
Parts And Features
Installing Your Refrigerator
Unpacking Your Refrigerator ................................................................5
Leveling Your Refrigerator ....................................................................5
Proper Air Circulation ..........................................................................5
Electrical Requirements ........................................................................6
Door Alignment ..................................................................................7
Door Reversal .....................................................................................8
Refrigerator Features And Use ..........................................................10
General Features ..............................................................................10
Refrigerator Interior Shelves ..............................................................10
Dispense-A-Can™ ............................................................................11
Using The Lock..................................................................................11
Defrosting ........................................................................................12
Food Storage Information ..................................................................13
Normal Operating Sounds ................................................................14
Proper Refrigerator Care and Cleaning
Cleaning and Maintenance................................................................15
Power Interruptions............................................................................16
Vacation and Moving Care ................................................................16
..........................................................................4
............................................................5
....................................15
Troubleshooting
Warranty Information
3
............................................................................17
..................................................................19

English
Installing Your Refrigerator
Unpacking Your Refrigerator
1. Remove all packaging material. This includes the foam base and all
adhesive tape holding the refrigerator accessories inside and
outside.
2. Inspect and remove any remains of packing, tape or printed
materials before powering on the refrigerator.
Leveling Your Refrigerator
• Your refrigerator has two leveling legs which are located in the
front corners of your refrigerator. After properly placing your
refrigerator in its final position, you can level your refrigerator.
• Leveling legs can be adjusted by turning them clockwise to raise your
refrigerator or by turning them counterclockwise to lower
your refrigerator. The refrigerator door will close easier when the
leveling legs are extended.
Proper Air Circulation
• To assure your refrigerator works at the maximum efficiency it
was designed for, you should install it in a location where there
is proper air circulation, plumbing and electrical connections.
• The following are recommended clearances around the refrigerator:
Sides……………3/4 "(19mm)
Top....................2" (50mm)
Back..................2" (50mm)
5

Electrical Requirement
• Make sure there is a suitable power Outlet (115 volts, 15 amps out-
let) with proper grounding to power the refrigerator.
• Avoid the use of three plug adapters or cutting off the third grounding
in order to accommodate a two plug outlet. This is a dangerous
practice since it provides no effective grounding for the refrigerator
and may result in shock hazard.
Use of Extension Cords
• Avoid the use of an extension cord because of potential safety
hazards.
Install Limitations
• Do not install your refrigerator in any location not properly insulated
or heated ex. garage etc. Your refrigerator was not designed to operate in temperature settings below 55˚ Fahrenheit.
• Select a suitable location for the refrigerator on a hard even
surface away from direct sunlight or heat source ex. radiators,
baseboard heaters, cooking appliances etc. Any floor unevenness
should be corrected with the leveling legs located on the front bottom
corners of the refrigerator.
English
6
English
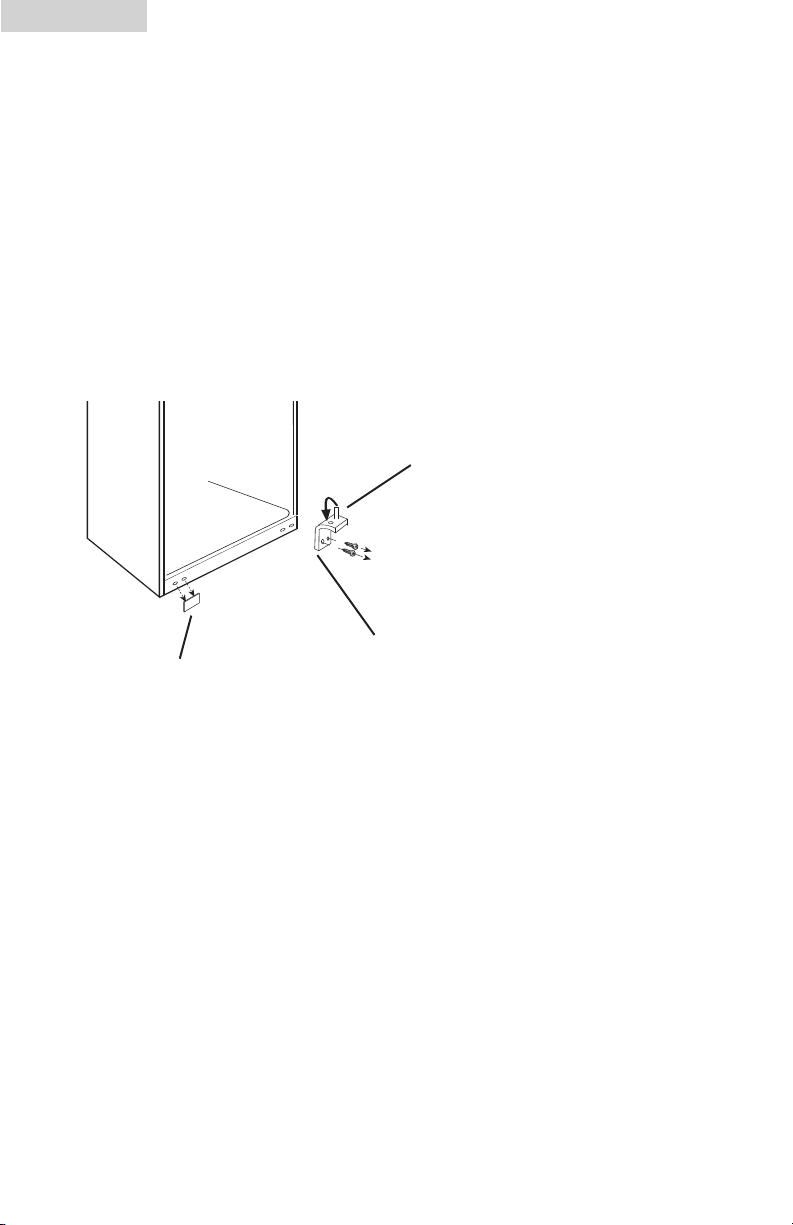
Door Alignment (see fig. # 1)
1. Remove the top hinge cover.
2. Loosen the top hinge screws using a phillips head screwdriver.
3. Adjust the door or put a spacer in between and then tighten the
screws.
4. Replace the top hinge cover.
fig. # 1
7
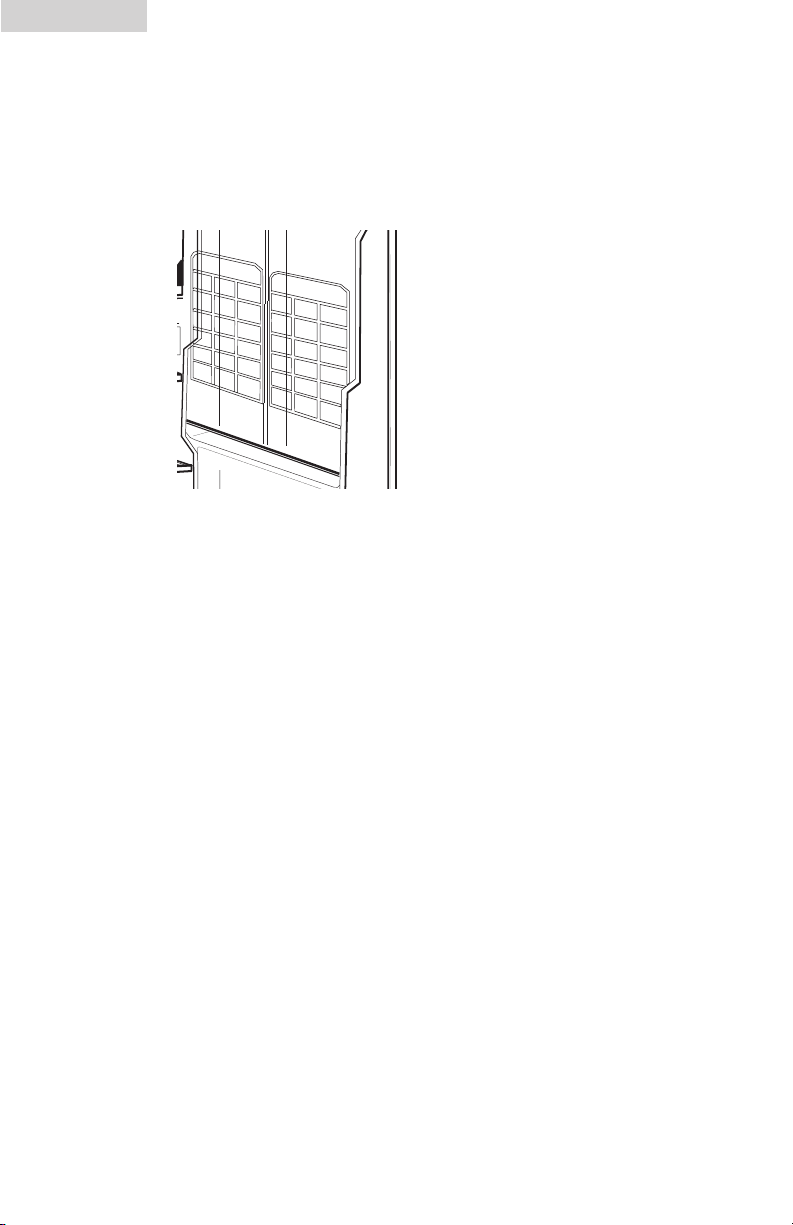
Reversing the Door Hinge
1. Remove the top hinge cover. (see fig. # 1)
2. Using a Phillips Head Screwdriver, loosen and remove the
screws holding the top hinge in place. (see fig. # 1)
3. Remove the top hinge and carefully lift off the door.
4. Remove the screw hole plug from the opposite side and
insert the plug in the screw hole openings of the just
removed screws. (see fig. # 2)
5. Remove the door pin from the bracket of the lower
hinge by turning counter clockwise. Move the pin to the
opposite hole and tighten. (see fig. # 3)
6. Loosen the screws holding the lower hinge bracket
and remove the hinge.(see fig. # 3)
7. Align the holes in the lower hinge bracket to the
corresponding holes in the opposite side of the cabinet.
Insert and tighten the screws.(see fig. # 3)
8. Align the bottom hole on the left side of the door with the
pin of the lower hinge and slide into place.
English
screw hole plugs
fig. # 2
8
English
9. Align the pin of the top hinge with top hole on the left
side of the door and push into place. Replace the screws in the
upper hinge bracket but do not tighten all the way. (see fig. # 2)
10. Make sure the door closes easily but forms a tight seal.
Adjust the door as needed. Once you are satisfied with the door
alignment, completely tighten the upper door hinge screws.
11. Replace the hinge cover. (see fig. # 2)
12. If the door does not close properly, refer to the
section titled “Door Alignment”.
door pin
fig. # 3
screw hole plug
9
lower hinge bracket
NOTE: As the door gets pressed-in during shipping, after reversing the
door the gasket may have to be reset. This is done to prevent
the cool refrigerated air from escaping. If there is a gap
between the door gasket and the cbainet, set the gasket by
gently pulling it out to seal the gap.

Refrigerator Features And Use
General Features
Adjustable
temperature dial:
English
Your refrigerator will automatically
maintain the temperature level you
select. The temperature control dial
has 7 settings plus off. 1 is the
warmest. 7 is the coldest. Turning the
dial to OFF stops cooling in both the
refrigeration and ice compartment. At
first, set the dial to 4 and allow 24
hours to pass before adjusting the
temperature to your needs.
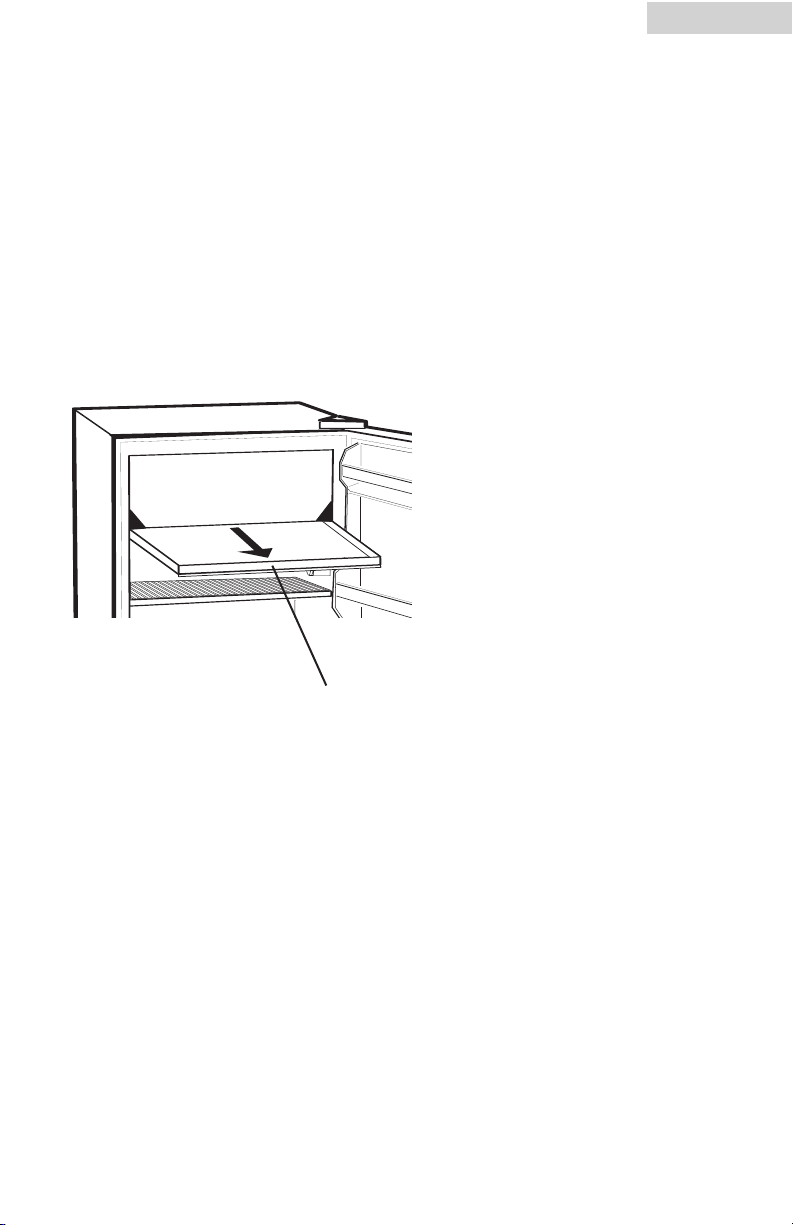
Refrigerator Interior Shelves
To remove or replace a full-width slide-out shelf:
(see fig. # 4)
1. Gently tilt the shelf up and slide forward until the shelf has been
completely removed.
2. To replace the shelf, gently slide the shelf back.
(Note: If the refrigerator has
been placed in a horizontal or
tilted position for any period
of time wait 24 hours before
plugging the unit in.)
fig. # 4
10
English
Using the Dispense-A-Can™
• Your refrigerator is equipped with the convenient
“Dispense-A-Can™” compartment. Each compartment will hold up to
four cans. Simply load the cans from the top. To dispense a can,
simply draw one out from the bottom.
fig. # 5
11
Defrosting Your Refrigerator (see Fig. # 7)
• To set the timer to the defrost cycle, follow the instructions on the
timer which is located on the back of the unit. Make sure the drip tray
is under the freezer section. Defrosting may take a few hours.
• The drip tray on your refrigerator is designed to drain away the
defrosted water to the drip pan on the compressor. Here the water
will evaporate.
English
fig. # 7
drip tray
12

English
Food Storage Information
Fresh Food
• When storing fresh food, which is not prepackaged, be sure to wrap
or store food in airtight and moisture proof material unless otherwise
noted. This will ensure proper shelf life and prevent the transfer of
odors and tastes.
• Wipe containers before storing to avoid needless spills.
• Eggs should be stored in an upright position in their original carton to
maximize shelf life.
• Fruit should be washed and dried then stored in sealed plastic bags
before storing in the refrigerator.
• Vegetables with skins should be stored in plastic bags or containers.
• Leafy vegetables should be washed and drained and then stored in
plastic bags or containers.
• Hot food should be allowed to cool before storing in the refrigeration.
This will prevent unnecessary energy use.
• Fresh seafood should be used the same day as purchased.
13
• When storing meats in the fresh food section, keep in the original
packaging or rewrap as necessary. Follow the suggestions below for
safe storage:
• Chicken 1-2 Days
• Ground Beef 1-2 Days
• Cold Cuts 3-5 Days
• Steaks/Roasts 3-5 Days
• Smoked/Cured Meats 7-10 Days
• All others 1-2 Days

Normal Operating Sounds You May Hear
• Boiling water, gurgling sounds or slight vibrations that are the result
of the refrigerant circulating through the cooling coils.
• The thermostat control will click when it cycles on and off.
English
14

English
Proper Refrigerator Care and Cleaning
Cleaning and Maintenance
Warning: To avoid electric shock always unplug your
refrigerator before cleaning. Ignoring this warning
may result in death or injury.
Caution: Before using cleaning products, always read and
follow manufacturer’s instructions and warnings to
General:
avoid personal injury or product damage.
• Prepare a cleaning solution of 3-4 tablespoons of
baking soda mixed with warm water. Use sponge or
soft cloth, dampened with the cleaning solution, to
wipe down your refrigerator.
• Rinse with clean warm water and dry with a soft
cloth.
• Do not use harsh chemicals, abrasives, ammonia,
chlorine bleach,concentrated detergents, solvents or
metal scouring pads. Some of these chemicals may
dissolve, damage and/or discolor your refrigerator.
Door Gaskets:
15
• Clean door gaskets every three months according to
general instructions. Gaskets must be kept clean and
pliable to assure a proper seal.
• Petroleum jelly applied lightly on the hinge side of
gaskets will keep the gasket pliable and assure a
good seal.

Power Interruptions
• Occasionally there may be power interruptions due to thunderstorms
or other causes. Remove the power cord from AC outlet when a
power outage occurs. When power has been restored, replug power
cord to AC outlet. If outage is for a prolonged period, inspect and
discard spoiled or thawed food in freezer and refrigerator. Clean
refrigerator before reusing.
Vacation and Moving Care
• For long vacations or absences, empty food from refrigerator and
freezer, move the temperature
refrigerator and door gaskets according to "General cleaning" section. Prop doors open, so air can circulate inside.When moving
always move the refrigerator vertically. Do not move with the unit
lying down. Possible damage to the sealed system could occur.
English
dial to the off position and clean the
16

English
TroubleShooting
Refrigerator Does Not Operate
• Check if thermostat control is not in the “OFF” position.
• Check if refrigerator is plugged in.
• Check if there is power at the ac outlet, by checking the circuit breaker.
Food temperature appears too warm
• Frequent door openings.
• Allow time for recently added warm food to reach fresh food or
freezer temperature.
• Check gaskets for proper seal.
• Clean condenser coils.
• Adjust temperature control to colder setting.
Food temperature is too cold
• If temperature control setting is too cold, adjust to a warmer setting
and allow several hours for temperature to adjust.
Refrigerator runs too frequently
• This may be normal to maintain constant temperature during
high temperature and humid days.
• Doors may have been opened frequently or for an extended
period of time.
• Clean condenser coils.
• Check gasket for proper seal.
• Check to see if doors are completely closed.
17

Moisture build up on interior or exterior
of the refrigerator:
• This is normal during high humidity periods.
• Prolonged or frequent door openings.
• Check door gaskets for proper seal.
Refrigerator has an odor:
• Interior needs cleaning.
• Foods improperly wrapped or sealed are giving off odors.
Refrigerator door does not shut properly:
• Level the refrigerator.
• Re-align refrigerator door.
• Check for blockages e.g. food containers, crisper cover,
shelves, bins etc.
English
18
English
19

Français
MESURES DE SECURITE
Lire l’ensemble des instructions avant d’utiliser l’appareil. Lors de l’utilisation de cet
appareil, prendre toutes les mesures de sécurité de base, y compris les suivantes:
1) N’utiliser cet appareil que pour l’usage pour lequel il est prévu, tel qu’il
est indiqué dans le guide d’utilisation et d’entretien.
2) Ce réfrigérateur doit être correctement installé conformément aux
instructions d’installation avant d’être utilisé. Consulter les instructions
de mise à la terre du chapitre Installation.
3) Ne jamais tirer sur le cordon d’alimentation pour débrancher le
réfrigérateur. Toujours saisir fermement la fiche et la retirer
complètement de la prise.
4) Réparer ou remplacer immédiatement tout cordon électrique effiloché
ou endommagé d’une quelconque manière. Ne pas utiliser un cordon
fissuré, abrasé ou dont la prise ou le connecteur est endommagé.
5) Débrancher le réfrigérateur avant de le nettoyer ou d’effectuer des
réparations.
maintenance pour quelque raison que ce soit, il est vivement
recommandé de confier cette tâche à un technicien agréé.
6) Ne pas utiliser d’appareils électriques ou d’objets pointus pour dégivrer
le réfrigérateur.
Remarque: Si ce produit doit faire l’objet d’une
7) Si vous n’avez plus l’usage de votre ancien réfrigérateur, nous vous
conseillons d’en retirer les portes. Ceci permet d’éviter tout danger
potentiel pour les enfants.
Une fois le réfrigérateur en fonctionnement, ne pas toucher les surfaces
8)
froides du compartiment de congélation, en particulier avec des mains
mouillées ou humides. La peau risquerait d’adhérer à ces surfaces
extrêmement froides.
9) Ne pas recongeler les aliments qui ont été complètement décongelés.
Le bulletin Maisons et Jardins du Ministère de l’Agriculture des ÉtatsUnis n° 69 stipule que: « ...Les aliments congelés peuvent être recongelés en toute
sécurité s’ils contiennent toujours des cristaux de glace ou si leur
température reste inférieure à 4,5°C".
« …Les viandes hachées, la volaille et le poisson présentant une odeur
désagréable ou une couleur suspecte ne doivent ni être recongelés, ni
être consommés. L
présentant une odeur ou couleur douteuse doit être jeté. L
d’un aliment de ce type peut s’avérer dangereuse. »
a crème glacée dégelée doit être jetée. T
out aliment
’ingestion
1

Français
« …La décongélation ou la recongélation, même partielle, fait diminuer les qualités gustatives des aliments, en particulier des fruits,
légumes et plats préparés. La qua
affectée à un bien moindre degré que celle de nombreux autres aliments.
Utiliser les aliments recongelés dès que possible, afin de conserver la
majeure partie de leurs
qualités gustatives. »
10) Ce réfrigérateur ne doit être ni encastré, ni enclos dans un placard. Il a été
conçu pour être installé tel qu’il se présente.
11) Ne pas faire marcher le congélateur en présence de fumées pouvant
entraîner une explosion.
lité gustative des viandes rouges est
VEUILLEZ CONSERVER CES
INSTRUCTIONS
2

Français
DANGER
Les enfants pourraient se retrouver coincés dans votre
réfrigérateur ou congélateur usagé avant que vous ne puissiez
vous en débarrasser. Retirer les portes. Laisser les étagères en
place de manière à ce que les enfants ne
puissent pas grimper facilement à l’intérieur".
Nous vous remercions d’avoir
choisi ce produit Liberty
d’utilisation facile d’emploi permet
une utilisation optimum du
réfrigérateur
Ne pas oublier de prendre note du
numéro de modèle et de série. Ils
sont sur le recouvrement droit
intérieur du réfrigérateur
Agrafer le ticket de caisse au guide. Il devra être présenté pour tout
service après-vente sous garantie.
.
. Ce guide
Numéro de modèle
Numéro de série
Date d’achat
3

Français
Sommaire
Mesures de Sécurité ........................................................................1
Pièces et Caractéristiques................................................................5
Installation du Réfrigérateur ..........................................................6
Désemballage du Réfrigérateur ............................................................6
Mise à Niveau du Réfrigérateur ............................................................6
Circulation d’Air Adéquate ....................................................................6
Caractéristiques Electriques ..................................................................7
Alignement de la Porte..........................................................................8
Placer la Charnière de Porte sur le Côté Opposé du Réfrigérateur ..........9
Caractéristiques du réfrigérateur et utilisation
Caractéristiques Générales ..................................................................11
Clayettes Intérieures de Rangement ......................................................11
Distributeur de Boîtes Dispense-A-Can™ ..............................................12
Utilisation du Verrou de Sécurité ..........................................................12
Dégivrage ..........................................................................................13
Informations sur le Rangement des Aliments ........................................14
Bruits de Fonctionnement lors d'une Exploitation Normale ....................15
Entretien et Nettoyage du Réfrigérateur......................................16
Nettoyage et Maintenance....................................................................16
Coupures de Courant ..........................................................................17
Entretien lors des Vacances ou d'un Déménagement ............................17
............................11
PAGE
Guide de Dépannage ....................................................................18
Garantie ..........................................................................................20
4


Français
Installation du Réfrigérateur
Désemballage du Réfrigérateur
1. Retirer l’ensemble du matériel d’emballage. Ceci comprend la base
en mousse ainsi que l’ensemble du matériel adhésif qui maintient les
accessoires du réfrigérateur à l'intérieur tout comme à l’extérieur.
2. Inspecter et enlever tout restant d’emballage, de scotch ou de
matériaux imprimés avant de brancher le réfrigérateur.
Mise á Niveau du Réfrigérateur
• Le réfrigérateur possède deux pieds de mise à niveau qui sont situés
sur les coins avant du réfrigérateur. Après avoir convenablement
installé le réfrigérateur à la place qu’il occupera, procéder à la mise
à niveau.
• Pour régler les pieds de mise à niveau, les tourner dans le sens des
aiguilles d’une montre afin de surélever le réfrigérateur et dans le
sens inverse des aiguilles d’une montre pour l’abaisser. La porte du
réfrigérateur se ferme plus facilement lorsque les pieds de mise à
niveau sont surélevés.
Circulation d’Air Adéquate
• Pour être sûr que le réfrigérateur fonctionne à son maximum d'effi-
cacité, l'installer dans un environnement favorable à une bonne circulation d'air et possédant des connexions de plomberie et d’électricité
saines.
• Les indications suivantes concernent l’espace recommandé autour du
réfrigérateur:
Latéralement...................19mm (3/4")
Partie supérieure.............50mm (2")
Arrière...........................50 mm (2")
6

Caractéristiques Electriques
• Pour l’alimentation du réfrigérateur, veiller à utiliser une prise
de courant convenable (prise de 115 volts,15 amp) raccordée à la
terre
• Eviter d’utiliser des adaptateurs à trois fiches ou de sectionner la
troisième fiche reliée à la terre dans le but d’utiliser un branchement
à deux fiches. Cette pratique pourrait s’avérer dangereuse
dans la mesure où le réfrigérateur n’est pas relié convenablement à
la terre, et risquerait de causer des risques d’électrocution.
Utilisation de Rallonges
• Éviter d’utiliser une rallonge électrique car, dans certains cas, cela
peut entraîner des risques pour la santé.
Limitations relatives à l’Installation
• Ne pas installer le réfrigérateur dans un endroit qui n’est pas
convenablement isolé ou chauffé ; comme par exemple un garage,
etc. Le réfrigérateur n’est pas conçu pour fonctionner à des températures inférieures à 12°C.
• Choisir un endroit convenable et placer le réfrigérateur sur une sur-
face solide et plane, loin de sources de chaleur telles que: les radiateurs, les éléments chauffants à plinthes, les cuisinières, etc. Toute
irrégularité au sol doit être corrigée à l’aide des pieds de mise à
niveau situés sur les coins avant de la partie inférieure du réfrigérateur.
Français
7

Français
Alignement de la porte (voir fig. # 1)
1. Retirer la protection de la charnière du haut.
2. Desserrer les vis de la charnière du haut à l’aide d’un
ournevis cruciforme.
3. Régler la porte ou placer une cale puis serrer les vis.
4. Remettre la couverture de la charnière du haut.
fig. # 1
8

Placer la Charnière de Porte
sur le Côté Opposé du Réfrigérateur
1. Retirez la vis du cache de protection de la charnière. (voir fig. # 1)
2. À l'aide d'un tournevis cruciforme, desserrez puis retirez les vis
retenant la charnière supérieure. (voir fig. # 1)
3. Retirez la charnière supérieure et soulevez doucement la porte.
4. Retirez le bouchon du trou de vis du côté opposé et introduisez le
bouchon dans les ouvertures des vis venant d'être retirées.
(voir fig. # 2)
5. Retirez la broche du support de la charnière inférieure de la porte
en tournant dans le sens contraire à celui des aiguilles d'une montre. Placez la broche dans le trou de l'autre côté et serrez. (voir fig.
# 3)
6. Desserrez les vis retenant le support de la charnière inférieure et
retirez la charnière. (voir fig. # 3)
7. Alignez les trous du support de la charnière inférieure sur les trous
correspondant de l'autre côté.
Introduisez les vis et serrez-les. (voir fig. # 3)
8. Alignez le trou inférieur du côté gauche de la porte sur la
broche de la charnière inférieure et glissez-la en place.
Français
Bouchon pour trou de vis
fig. # 2
9

Français
9. Alignez la broche de la charnière supérieure avec le trou supérieur
du côté gauche de la porte et poussez-la afin de l'installer.
Replacez les vis du support supérieur de la charnière mais sans
serrez complètement. (voir fig. # 2)
10. Vérifiez que la porte ferme facilement et ferme le réfrigérateur de
façon hermétique. Repositionnez la porte si nécessaire. Une fois
satisfait de l'alignement de la porte, serrez complètement les
vis de la charnière supérieure.
11. Replacez le cache de protection de la charnière. (voir fig. # 2)
12. Si la porte ne se ferme pas correctement, reportez-vous à
la section "Alignement de la porte".
Broche de porte
fig. # 3
Bouchon pour trou de vis
REMARQUE: Comme le joint recoit aoouyé-dans pendant l’expédition,
10
Support de charnière inférieure
aprés avoir renversé la porte le joint peut devoir étre
remet á l’état initial. Ceci est fait pour empécher le
refroidit l’air réfrigéré d’échapper. Si lá-bas est un écart
entre la porte et le placard, régle le joint en tirant doucement il hors sceller l’écart.

Caractéristiques du
Réfrigératuer et Utilisati
Français
Caractéristiques Générales
Cadran de température
réglable:
Le réfrigérateur demeurera
automatiquement à la température
que vous avez sélectionnée. La commande de température possède 7
positions de réglage ainsi que la position "Off" (arrêt). La position "1" est la
position la moins froide, "7" est la
position la compartiment de glace.
Réglez la commande sur "OFF" afin
d'arrêter le processus de refroidisse-
Clayettes Intérieures
Pour retirer ou replacer les clayettes amovibles:
(voir fig. # 4)
1. Penchez légèrement la clayette vers le haut et glissez-la vers
l'avant jusqu'à ce que la clayette ait été complètement retirée.
2. Pour replacer la clayette, glissez-la doucement.
ment pour le réfrigérateur et le congélateur. Tout d'abord, réglez la commande sur "4" et patientez 24 heures
avant de régler la commande sur la
température que vous désirez.
(Remarque: Si le réfrigérateur
a été placé à l’horizontale
pendant une période de temps
quelconque, attendre 24 heures
avant de le brancher).
fig. # 4
11

Français
Distributeur de Boîtes Dispense-A-Can™
• Votre réfrigérateur est équipé d'un compartiment
"Dispense-A-CanTM". Chaque compartiment peut accueillir jusqu'à
quatre boîtes de boissons diverses. Il vous suffit de ranger les boîtes à
partir du haut. Pour sortir une boîte, servez-vous à partir du bas.
fig. # 5
12

Dégivrer le Réfrigérateur (see Fig. # 7)
• Pour placer le temporisateur au cycle de dégivrage, suivez les
instructions sur le temporisateur qui est situé sur le dos de
l'unité. Vérifiez que le plateau ramasse-gouttes
se trouve sous le compartiment congélateur. Le dégivrage prends
quelques heures.
• Lors du dégivrage, l'eau risque de s'accumuler dans le plateau
ramasse-gouttes. Ce dernier devra être vidé lors du dégivrage.
Ne pas laisser le plateau ramasse-gouttes sans surveillance.
Français
fig. # 7
plateau ramassegouttes
13

Français
Informations sur le Rangement des Aliments
Aliments frais
• Lorsque vous placez des aliments frais n'ayant pas été pré-emballés,
assurez-vous que ces derniers sont correctement emballés ou placés
dans des contenants hermétiques à l'épreuve de l'humidité et de l'air.
Vous parviendrez ainsi à conserver vos aliments plus longtemps sans
altération de goût ni d'odeur.
• Essuyez les contenants avant de les placer au réfrigérateur afin
d'éviter de les renverser.
• Les oeufs doivent être rangés debout dans leurs carton d'origine
afin d'assurer leur pérennité.
• Les fruits doivent être lavés, séchés puis placés dans des sacs en
plastique avant de les ranger au réfrigérateur.
• Les légumes non pelés doivent être placés dans des sacs en
plastique ou tout autre contenant.
• Les légumes à feuilles doivent être lavés et égouttés avant
d'être placés dans des sacs en plastique ou tout autre contenant.
14
• Laissez les aliments chauds refroidir avant de les placer
au réfrigérateur, vous ferez ainsi des économies d'énergie.
• Le poisson et les fruits de mer doivent être consommés
le jour même de leur achat.
• Lorsque vous conservez de la viande dans le compartiment
destinés aux aliments frais, veillez à conserver cette dernière
dans son emballage d'origine ou emballez-la à nouveau si nécessaire. Suivez les conseils suivants:
• Poulet 1 à 2 jours
• Boeuf haché 1 à 2 jours
• Charcuterie 3 à 5 jours
• Steaks/rôtis 3 à 5 jours
• Viandes fumées/salaisonnées 7 à 10 jours
• Toutes autres viandes 1 à 2 jours

Bruits de Fonctionnement
lors d'une Exploitation Normale
• Les éléments de refroidissement tubulaires (serpentins refroidisseurs)
font des bruits d'ébullition, des gargouillements et provoquent
de légères vibrations.
• La commande du thermostat émettra un déclic lorsque
qu'elle s'allume et s'éteint.
Français
15

Français
Entretien e Nettoyage Adéquats du
Réfrigérateur Nettoyage et Entretien
Nettoyage et Maintenance
Attention:
Précautions:
Généralités:
Joints de porte:
Pour éviter les risques d’électrocution; toujours débrancher
le réfrigérateur avant de le nettoyer. Le non respect de cette
mesure peut entraîner des blessures graves ou mortelles.
Avant d’avoir recours à des produits d’entretien, toujours
consulter et suivre les instructions du fabricant et
recommandations afin d’éviter toute blessure éventuelle et
risque de dégât de matériel.
•Préparer une solution de nettoyage comportant 3 à 4
cuillerées à soupe de bicarbonate de soda mélangé à de
l’eau chaude. A l’aide d’une éponge ou un tissu doux
humectés de solution de nettoyage; essuyer le réfrigérateur.
•Rincer à l’eau chaude et sécher à l’aide d’un tissu doux.
•Ne pas utiliser de détergents chimiques, abrasifs, ou contenant de l’ammoniaque ou du chlore, ni de solvants ou de
tampons à récurer en métal. Certains de ces produits chimiques
peuvent dissoudre, endommager et/ou décolorer
le réfrigérateur.
•Nettoyer les joints de porte tous les trois mois en suivant les
instructions générales fournies. Les joints doivent rester propres et flexibles afin d’assurer une bonne étanchéité.
•Une fine couche de gelée de pétrole appliquée sur le côté
des joints comportant les charnières permet de préserver la
flexibilité de ces derniers et d’assurer une bonne étanchéité.
16

Coupures de Courant
• Des pannes d’alimentation occasionnelles peuvent survenir à cause
d’une tempête ou de causes autres. Retirer le cordon d’alimentation
de la prise CA pendant toute la durée de la coupure d’alimentation.
Lorsque le courant électrique est rétabli, rebrancher le cordon dans la
prise CA. Si la coupure d’alimentation se prolonge, vérifier et jeter les
aliments avariés ou décongelés se trouvant dans le congélateur et le
réfrigérateur. Nettoyer le réfrigérateur avant de le réutiliser.
Vacances et Déménagement
• Pendant les périodes de vacances ou d’absence prolongée, vider le
réfrigérateur et le congélateur, placer le
la position
porte en suivant les procédures du chapitre intitulé ‘Nettoyage
général’. Faire en sorte que la porte reste ouverte de manière à ce
que l’air puisse circuler à l’intérieur. Toujours déplacer le réfrigérateur
en position verticale. Ne pas déplacer l’appareil en position horizontale. Ceci pourrait endommager le système d’étanchéité.
off (arrêt) et nettoyer le réfrigérateur ainsi que les joints de
Français
cadran de température sur
17

Français
Dépannage
Le Réfrigérateur ne fonctionne pas:
• Vérifier que le programmateur du thermostat ne se trouve pas sur la
position ‘OFF’ (arrêt).
• Veiller à ce que le réfrigérateur soit bien branché.
• Veiller à ce que la prise de courant CA fonctionne bien en
vérifiant le disjoncteur.
La température des aliments semble être trop élevée:
• La porte est ouverte trop fréquemment.
• Patienter le temps nécessaire pour que les aliments chauds récemment mis au frais refroidissent ou congèlent.
• Vérifier l’étanchéité des joints.
• Nettoyer les condenseurs
• Régler le programmateur de température sur froid.
La température des aliments est trop basse:
• Si le programmateur de température est placé sur une position trop
froide, le régler sur une position plus chaude et patienter plusieurs
heures, jusqu’à ce que la température se soit ajustée.
18
Le réfrigérateur se met en marche trop fréquemment:
• Il peut s’agir de l’activité normale pour maintenir une
température constante lorsque la température extérieure
ou le taux d’humidité dans l’air sont élevés.
• Les portes ont été ouvertes trop fréquemment ou pendant
une période de temps prolongée.
• Nettoyer les condenseurs.
• Vérifier l’étanchéité des joints.
• Veiller à ce que les portes soient bien fermées.

Accumulation d’humidité à l’intérieur ou à l’extérieur
du refrigérateur:
• Ceci est normal pendant les périodes de grande chaleur humide.
• Ouvertures de la porte prolongée ou trop fréquente.
• Vérifier l’étanchéité des joints.
L’intérieur du réfrigérateur dégage une odeur:
• Nettoyer l’intérieur du réfrigérateur.
• Les aliments ne sont pas convenablement enveloppés ou les
emballages dégagent une odeur.
La porte du réfrigérateur/congélateur ne ferme
pas correctement:
• Mettre le réfrigérateur à niveau.
• Réaligner la porte du réfrigérateur/congélateur.
• Vérifier qu’il n’y ait pas d’obstruction comme par exemple des
containers ou les couvercles des bacs, les étagères, paniers, etc.
Français
19


Español
INSTRUCCIONES PRECAUTORIAS
Lea todas las instrucciones antes de utilizar este aparato. Cuando utilice este aparato,
siempre ejerza las precauciones de seguridad básicas, incluyendo las siguientes:
1) Utilice este aparato exclusivamente para su uso especificado, según se
describe en esta guía de uso y cuidados.
2) Este refrigerador debe ser instalado adecuadamente siguiendo las
instrucciones de instalación antes de utilizarse. Observe las instrucciones para conectarlo a tierra en la sección de instalación.
3) Nunca desconecte su refrigerador tirando del cordón eléctrico. Sujete
siempre la clavija firmemente y retírela del contacto evitando torcerla.
4) Repare o reemplace inmediatamente cualquier cordón eléctrico que
muestre raspaduras o daños. No utilice ningún cordón que muestre
señales de abrasión o grietas en su extensión, clavija o terminal
de conexión.
5) Desconecte su congelador antes de limpiarlo o antes de hacer
cualquier reparación. Nota: Si por alguna razón este producto necesita ser
reparado, recomendamos fuertemente que la reparación se lleve a
cabo por un técnico calificado.
6) No emplee ningún aparato eléctrico o instrumento punzocortante para
descongelar su refrigerador.
7) Si su antiguo refrigerador no está siendo utilizado, recomendamos
quitarle las puertas. Esto reducirá los riesgos de accidentes infantiles.
8) Una vez que su refrigerador se encuentre operando, no toque las
superficies frías en el compartimento del congelador, especialmente
si sus manos se encuentran húmedas o mojadas. Su piel puede
adherirse a estas superficies extremadamente frías.
1

Español
9) No congele alimentos que hayan sido previamente descongelados en
su totalidad. El Departamento de Agricultura de los Estados Unidos, en
su Boletín de Casa y Jardín No. 69 indica que: "…Usted puede volver a
congelar, sin correr ningún riesgo, aquellos alimentos congelados que
hayan sido descongelados y que aún contengan cristales de
hielo o que aún se encuentren fríos con una temperatura por
debajo de los 4,5
"…Carnes molidas, aves, o pescados descongelados que despidan olor
extraño o muestren decoloración no deben volver a congelarse y no
deben consumirse. El helado descongelado debe desecharse. Si el olor
o color de cierto alimento es deficiente o cuestionable, deséchelo. Tal
alimento podría resultar peligroso si lo ingiriese."
"…Incluso el descongelar parcialmente y volver a congelar los alimentos
disminuye su calidad de consumo, especialmente si se trata de frutas,
verduras y alimentos preparados. La calidad de consumo de las carnes
rojas es menormente afectada en comparación a la de muchos otros
alimentos. Utilice los alimentos que hayan vuelto a congelarse lo más
pronto posible para evitar que sufran mayor deterioro en su
calidad de consumo."
°C (40°F)".
10) Este refrigerador no debe de ser empotrado o colocado dentro
de un gabinete de cocina. Ha sido diseñado exclusivamente
para ser instalado por separado.
11) No opere su congelador en la presencia de gases explosivos.
GUARDE ESTAS
INSTRUCCIONES
para referencia futura
2

Español
PELIGRO
Existe el riesgo de que los niños puedan quedar atrapados
dentro. Antes de tirar su refrigerador o congelador, quite las
puertas. Deje los anaqueles en su lugar para que los niños no
puedan entrar fácilmente en el interior."
3

Español
Gracias por utilizar nuestro
producto Liberty. Este sencillo
Número de Modelo
manual le orientará con respecto al
mejor uso que puede darle a
su refrigerador.
Número de Serie
Fecha de Compra
Recuerde tomar nota del modelo y
número de serie. Están en el
trazador de líneas derecho interior
del refrigerador
Agrafer le ticket de caisse au guide. Il devra être présenté pour tout
service après-vente sous garantie.
4

Indice
Español
Instrucciones Precautorias..............................................................1
Piezas y Características ..................................................................5
Instalación de sur Refrigerador ....................................................6
Desempaque del Refrigerador..............................................................6
Nivelación del Refrigerador..................................................................6
Circulación Apropiada del Aire ............................................................6
Requisitos Eléctricos ............................................................................7
Alineación de la Puerta........................................................................8
Colocación de la Puerta en el Lado Opuesto........................................9
Uso y Funciónes ............................................................................11
Funciónes Generales ........................................................................11
Entrepaños Interiores del Refrigerador................................................11
Dispense A-Can™- Servidor de Latas ................................................12
Uso del Cierre ..................................................................................12
Remoción de la Escarcha ..................................................................13
Información sobre el Almacenamiento de Alimentos ..........................14
Ruido Normal de Operación..............................................................15
Limpieza y Cuidado Apropiados del Congelador......................16
Limpieza y Mantenimiento ................................................................16
Interrupciones de la Corriente Eléctrica ..............................................17
Vacaciones y Mudanza ......................................................................17
PAGINA
Verificación de Problemas............................................................18
Información de Garantía ............................................................20
5


Instalación de Su Refrigerador
Desempaque del Refrigerador
1. Retire todo el material de embalaje. Esto incluye la base de
espuma y toda la cinta adhesiva que sostiene los accesorios
del refrigerador en el interior y exterior.
2. Inspeccione y retire cualesquier restos del embalaje, la cinta
adhesiva o los materiales impresos antes de encender el refrigerador.
Nivelación del Refrigerador
• Su refrigerador tiene dos patas niveladoras que están ubicadas en
las esquinas frontales de su refrigerador. Después de haber colocado
su refrigerador en la posición definitiva, puede nivelar su refrigerador.
• Puede ajustar las patas niveladoras girándolas a la derecha para
elevar el refrigerador y girándolas a la izquierda para bajarlo.
La puerta del refrigerador cerrará con más facilidad cuando las
patas niveladoras son elevadas.
Español
Circulación Apropiadado del Aire
• Para asegurar que su refrigerador funcione con la eficiencia
máxima para la que fue diseñado, éste debe ser instalado en
un lugar donde haya una circulación de aire adecuada,
conexiones eléctricas y de tubería.
• Estas son las distancias recomendadas que deben dejarse
alrededor del refrigerador:
Lados..........................19 mm
Parte Superior..............50 mm
Parte Posterior..............50 mm
7

Español
Requisitos Eléctricos
• Asegúrese de que haya un tomacorriente apropiado (115 V, 15
Amp.) con una conexión a tierra apropiada para hacer funcionar
el refrigerador.
• Evite el uso de adaptadores de tres patas o el cortar la tercer
pata de conexión a tierra para poder conectar en un tomacorriente
bifásico. Esto sería una práctica muy peligrosa ya que no
proveería al refrigerador con una conexión a tierra adecuada
y podría resultar un riesgo de descarga eléctrica.
Uso de Alargues
• Evite el uso de alargues para mayor seguridad. Si fuese necesario
utilice solamente un alargue de tres cables que posea un enchuefe
de tres patas.
Limitaciones de Instalación
• No instale su refrigerador en ningún lugar que no tenga el ais-
lamiento o la calefacción apropiada, por ejemplo una cochera, etc.
Su refrigerador no fue diseñado para funcionar en temperaturas
abajo de los 12° Centígrados (55°F).
• Seleccione un lugar adecuado para el refrigerador sobre una
superficie sólida y nivelada alejado de los rayos directos del
sol o de una fuente de calor como la de los radiadores, rejillas de
calefacción, estufas, etc. Cualquier desnivelación del piso debe ser
corregido con las patas niveladoras ubicadas en las esquinas
inferiores frontales del refrigerador.
8

Alineación de la Puerta (Vea Fig. # 1)
1. Quite el tornillo de la cubierta de la bisagra.
2. Afloje los tornillos de la bisagra superior usando un destornillador
de punta de cruz.
3. Ajuste la puerta o coloque un espaciador entremedio y luego vuelva
a apretar los tornillos.
4. Vuelva a colocar la cubierta de la bisagra superior.
Español
fig. # 1
9

Español
Colocación del Gozne de
la Puerta en el Lado Opuesto
1. Quite el tornillo de la cubierta de la bisagra. (Vea fig. # 1)
2. Con un destornillador de cabeza Phillips, afloje y remueva los tornillos que sujetan en su lugar el gozne superior. (Vea fig. # 1)
3. Remueva ahora el gozne superior y cuidadosamente
levante y saque la puerta.
4. Remueva el tapón de agujero de tornillo del lado
opuesto e inserte el tapón en los agujeros de los tornillos
que acaba de sacar. (Vea fig. # 2)
5. Remueva el perno de la puerta del soporte del gozne inferior,
girándolo en la dirección opuesta a las manecillas del reloj.
Coloque luego el perno en el agujero opuesto y apriételo.
(Vea fig. # 3)
6. Remueva los tornillos que sostienen el soporte del
gozne inferior y quite el soporte. (Vea fig. # 3)
7. Alinee los agujeros del soporte del gozne inferior con los
agujeros correspondientes en el costado opuesto del gabinete,
para luego insertar y apretar sus tornillos. (Vea fig. # 3)
8. Alinee el agujero inferior del lado izquierdo de la
puerta con el perno del gozne inferior y colóquelo en su lugar.
tapones para los agujeros de los tornillos
10
fig. # 2

9. Alinee el perno del gozne superior con el agujero de arriba
en el lado izquierdo de la puerta y presiónelo hasta que quede en
su lugar. Vuelva a colocar los tornillos del soporte del gozne superior pero no los apriete completamente, todavía. (Vea fig. # 2)
10. Verifique que la puerta cierra fácilmente y que sella herméticamente el refrigerador. Ajuste la puerta según sea necesario. Una
vez que la puerta quede alineada a su satisfacción, apriete en
forma definitiva los tornillos del gozne superior de la puerta.
11. Vuelva a colocar la cubierta del gozne. (Vea Fig. # 2)
12. Si la puerta no cierra apropiadamente,
consulte la sección titulada "Alineamiento de la Puerta".
perno de la puerta
fig. # 3
Español
soporte del gozne inferior
tapones para los agujeros de los tornillos
NOTA: Cuando la junta de culata de puerta obtiene apretado en
durante el envío, después que invertir la puerta que la junta de
culata tendrá que ser repone. Esto se hace para prevenir el
refresca aire refrigerado de escapar. Si hay un espacio entre la
junta de culata de puerta y el gabinete, puso la junta de culata
suavemente estirarlo fuera sellar el espacio.
11

Español
Uso y Funciónes del Refrigerador
Funciones Generales
Dial de Temperatura
Ajustable
Su refrigerador mantendrá
automáticamente el nivel de
temperatura que seleccione. El dial de
control de temperatura tiene 7 ajustes
además del ajuste "off" (apagado). El
1 es el más tibio. El 7 es el más frío. El
girar el dial hasta "OFF" (apagado),
detiene el enfriamiento en ambas
secciones del refrigerador y congelador. Primero, ajuste el dial a 4 y per-
mita que pasen 24 horas antes de
ajustar la temperatura a sus necesidades.
(Nota: Si el refrigerador ha sido
colocado en una posición
horizontal o inclinada durante
algún periodo de tiempo, espere
24 horas antes
de enchufar la unidad.)
12

Entrepaños Interiores del Refrigerador
Quitar o substituir un de ancho total
resbala -hacia fuera el estante: (Vea fig. # 4)
1. Levante ligeramente el entrepaño y deslícelo hacia el frente
hasta sacarlo completamente.
2. Para volver a colocar el entrepaño, seleccione la ubicación
deseada y deslice cuidadosamente el entrepaño hasta que
quede enganchado.
Español
fig. # 4
13

Español
Uso del "Dispense A-CanMR"
Servidor de Latas
• El refrigerador puede venir equipado con un dispositivo muy
conveniente para guardar envases de hojalata o latas,
"Dispense A-Can
unas 4 latas. Simplemente coloque las latas por la parte de arriba
del compartimiento. Para sacar una lata, sólo es necesario remover
la que está en el fondo del compartimiento.
MR
" Los compartimientos tienen capacidad para
fig. # 5
14

Remoción de la Escarcha del Refrigerador (vea Fig. # 7)
• Para fijar el temporizador al ciclo de la descongelación, siga las
instrucciones en el temporizador que está situado en la parte
posteriora de la unidad. Verifique que la bandeja de goteo está
debajo de la sección del congelador. La licuefacción de la escarcha
puede tomar algunas horas.
• Cuando se está licuando la escarcha el agua se acumulará en la
bandeja de goteo. Puede ser necesario vaciar la bandeja de
goteo durante el proceso de licuefacción de la escarcha.
Mientras el proceso se realiza, obsérvelo periódicamente
para ver que se está desarrollando normalmente.
fig. # 7
Español
bandeja de goteo
15

Español
Información sobre el
Almacenamiento de Alimentos
Alimentos Frescos
• Cuando almacene alimentos frescos que no estén preempacados,
asegúrese de envolver o almacenar los alimentos en un material
hermético y a prueba de humedad a menos que se indique de otra
manera. Esto asegurará la vida útil de los entrepaños y prevendrá la
contaminación de olores y sabores.
• Limpie los contenedores antes de almacenarlos para evitar
derrames innecesarios.
• Los huevos deben ser almacenados en su caja original para
aumentar la vida útil del entrepaño.
• Las frutas deben ser lavadas y secadas y luego almacenadas en el
cajón para frutas y verduras en el ajuste de baja humedad para
mantener su frescura. Si no tiene cajones con control de humedad,
coloque las frutas en bolsas plásticas selladas antes de
almacenarlas en el cajón.
16

• Los vegetales con piel deben ser almacenadas en bolsas o contenedores de
plástico y luego ser almacenadas en el cajón para frutas y verduras con un
ajuste de baja humedad.
• Los vegetales frondosos deben ser lavados y escurridos y luego
almacenados en bolsas o contenedores de plástico en el cajón
para frutas y verduras con un ajuste de alta humedad.
• Debe esperar a que los alimentos calientes se enfríen antes de
almacenarlos en el refrigerador. Esto prevendrá el uso
innecesario de energía.
• Los mariscos frescos deben ser usados el mismo día que se compren.
• Cuando almacene carnes en la sección de alimentos frescos,
manténgala en el paquete original o vuélvala a empacar
conforme sea necesario. Siga las sugerencias de abajo para un
almacenamiento seguro:
• Pollo 1-2 Días
• Carne Molida de Res 1-2 Días
• Carnes Frías 3-5 Días
• Bistecs/Asados 3-5 Días
• Carnes Ahumadas/Curadas 7-10 Días
• Todas las demás 1-2 Días
Español
17

Español
Ruidos de Operación Normales
que Pueda Escuchar
• Agua hirviendo, ruidos gorgoteantes o ligeras vibraciones que son el
resultado del gas refrigerante circulando a través del serpentín
de enfriamiento.
•La commande de thermostat cliquettera quand elle fait un
cycle en marche et en arrêt
18

Cuidados y Limpieza Asecuada
del Refrigerador
Limpieza y Mantenimiento
Español
Advertencia:
Precaución:
En general:
Empaques de la puerta:
Para evitar una descarga eléctrica siempre
desenchufe su refrigerador antes de limpiarlo.
El ignorar esta advertencia puede causar
esiones o la muerte.
Antes de usar productos de limpieza, siempre lea
y siga las instrucciones y advertencias del fabricante para evitar lesiones personales o daños al
producto.
• Prepare una solución de limpieza de 3-4
cucharadas de bicarbonato de sodio mezclado
con agua tibia. Use una esponja o un trapo
suave, humedecidos con la solución de limpieza,
para limpiar su refrigerador.
• Enjuague con agua limpia tibia y seque con un
trapo suave.
• No use químicos fuertes, abrasivos, amoniaco,
cloro, detergentes concentrados, disolventes o
estropajos metálicos. Algunos de estos
químicos pueden disolver, dañar y/o
decolorar su refrigerador.
• Limpie los empaques de la puerta cada tres
meses de acuerdo a las instrucciones generales.
Los empaques deben mantenerse limpios y flexibles para asegurar un sellado apropiado.
• El aplicar un poco de vaselina en el lado
articulado de los empaques mantendrá el
empaque flexible y asegurará un
sellado apropiado.
19

Español
Interrupciones de Energía
• Pueden ocurrir ocasionalmente interrupciones de energía debido a
tormentas eléctricas u otras causas. Desenchufe el cable eléctrico
del tomacorriente de corriente alterna cuando ocurra una interrupción en el sistema eléctrico. Cuando la electricidad haya regresado, vuelva a conectar el cable eléctrico a un tomacorriente de corriente alterna. Si ocurre una interrupción en el sistema eléctrico
durante un periodo prolongado, inspeccione y deseche los alimentos descongelados o echados a perder en el refrigerador o congelador. Limpie el refrigerador antes de volver a usarlo.
Vacaciones y Mudanza
• Durante ausencias largas o vacaciones, vacíe la comida del
refrigerador y congelador, coloque el
posición de off (apagado) y limpie el refrigerador y los empaques
de la puerta de acuerdo a la sección de "Limpieza general".
Mantenga las puertas abiertas para que el aire pueda circular en
el interior. Al mudarse, siempre traslade el refrigerador verticalmente. No lo traslade con la unidad colocada horizontalmente.
Pudiera ocurrir un posible daño el sistema sellado.
dial de temperatura a la
20

Verificación de Problemas
El Refrigerador no Funciona:
• Revise que el control del termostato no esté en la posición de "OFF"
(apagado).
• Revise que el refrigerador esté conectado.
• Revise que haya corriente eléctrica en el tomacorriente de
corriente alterna, revisando el interruptor de circuito.
La temperatura de los alimentos parece estar demasiado tibia:
• Apertura constante de la puerta.
• Dele tiempo a los alimentos tibios para que puedan alcanzar una
temperatura fresca o de congelación.
• Revise que los empaques estén bien sellados.
• Limpie el serpentín del condensador
• Ajuste el control de temperatura al ajuste más frío.
La temperatura de los alimentos es demasiado fría:
• Si el ajuste del control de temperatura es muy frío, ajústelo a una
temperatura más cálida y permita que pasen varias horas hasta
que la temperatura se ajuste.
Español
El refrigerador se enciende frecuentemente:
• Esto puede ser normal para mantener una temperatura constante
durante temperaturas altas y días húmedos.
• Las puertas pudieron haberse abierto frecuentemente o durante un
largo periodo de tiempo.
• Limpie el serpentín del condensador.
• Revise que el empaque esté bien sellado.
• Revise que las puertas estén completamente cerradas.
21

Español
Acumulación de humedad en el interior o exterior
del refrigerador:
• Esto es normal durante periodos de alta humedad.
• Apertura constante o prolongada de la puerta.
• Revise que los empaques de la puerta estén bien sellados.
El refrigerador despide un olor:
• Necesita limpiar el interior.
• Los alimentos envueltos o sellados inadecuadamente están
despidiendo los olores.
La luz del refrigerador no funciona:
• Nivele el refrigerador.
• Vuelva a alinear la puerta del refrigerador/congelador.
• Revise que no haya obstrucciones como contenedores de alimentos,
la cubierta del cajón para frutas y verduras, entrepaños, recipientes,
etc.
22


IMPORTANT
Do Not Return This Product To The Store
If you have a problem with this product, please contact the
"Customer Satisfaction Center" at
DATED PROOF OF PURCHASE REQUIRED FOR WARRANTY SERVICE
IMPORTANT
Ne pas Réexpédier ce Produit au Magasin
our tout problème concernant ce produit, veuillez contacter le service des
P
consommateurs ‘Customer Satisfaction Center’
UNE PREUVE D’ACHAT DATEE EST REQUISE POUR BENEFICIER DE LA GARANTIE.
au
IMPORTANTE
No regrese este producto a la tienda
Si tiene algún problema con este producto, por favor contacte el "Centro de Servicio al
NECESITA UNA PRUEBA DE COMPRA FECHADA PARA EL SERVICIO DE LA GARANTIA
Consumidor" al
Issued: May 06
115V, 60 Hz
Made in China
Fabriqué en Chine
Hecho en China
Printed in China
 Loading...